
This tutorial will teach you, how to create and embed form on your website. It also includes a procedure to implement sliding forms.
Watch the video tutorial given below
Step 1# Register in FormGet : Create Your Account
Here are the few simple steps.
- Go to www.formget.com.
- There you will see an option for Sign Up in the top right corner.
- Just click on it and fill out the required form fields.
- Then click on create account button.
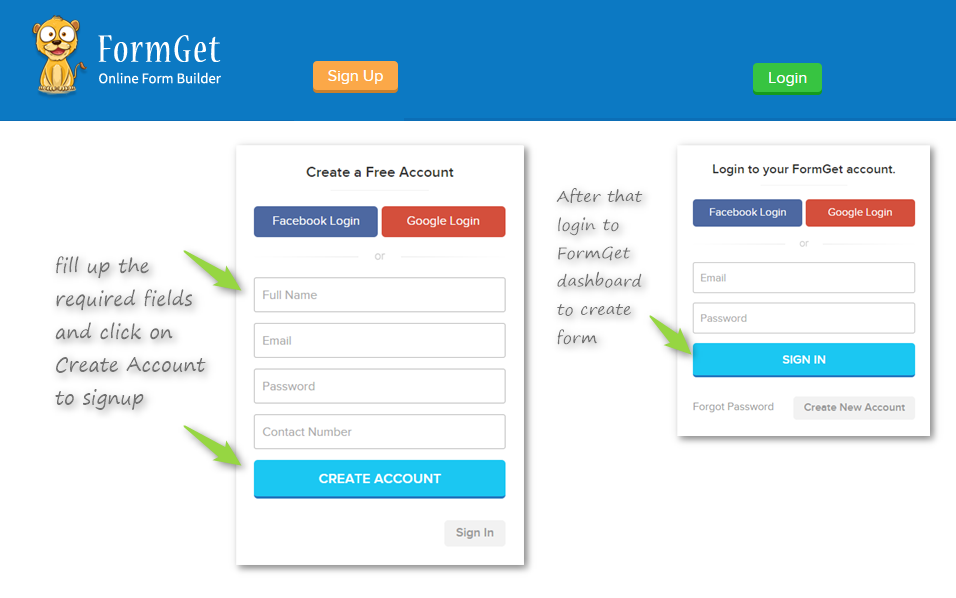
You have now successfully registered. Now the time is for creating a web form. Here we go…
2. Create Form : Start Creating Your First Form
- Login to your FormGet dashboard with the login credentials you have signed up.
- There you will see an option Create New Form, click on it to start building form.

- Now you will see FormGet App page, where you have to create form.
- On that page, you will see Commonly Used form fields on the left side of the window.
- Click on to the fields that you wish to add in your form.
- Here you have a special drag and drop feature with which you can arrange your form fields and place them in a sequential manner in which that you wish.

3. Edit Form : Change Title, Description in Form fields.
This Web Form Builder will help you in building the web forms as per your choice.
- Click on to the title to edit it, an editor will open up in the right side, do the required changes in title and subtitle there.
- You will see an option Apply Conditional Logic. Using that you can apply conditional logics in form fields.
- Again follow the same process for the form fields too.
- In that editor for the fields, you can change the text and can also set up other provided options.
- Other provided options are like, if you wish to keep the field required while filling out the form, then check(tick) the option provided.
- You can also limit the field values, using Max Length option provided.

Now as you complete building your form, then click on Next Step to save the form, and to move on to design section of the form. In the design section, you can change the form header image, background image, form color, field color and many more things.
Here is the form design page

After giving proper designing to the form click on Save Changes. Now you will redirect to the FormGet dashboard. There you will find an option Embed Form, click on that.

You will redirect to the form embed codes page. Now here you will find four different code options for embedding and sharing form, the first two are described below. Here are they:
1. Embed Sliding Form.
In this option, you will find the sub-options as sliding position, slide text, background color and font color. Set them according to you and copy the code.

Now you can use this code in differents ways to embed the form in your website. Here are the ways described as follows:
-
To embed the form in Non-WordPress site.
To make sliding a form view in your website, just paste the code in between the head tags as shown below.

Save the file and view the page. You will get to see the contact form as shown:

As you can see in the picture above, there is a small Contact Us CTA on the homepage. When a visitor clicks on it, the form will open up.
Importance of Sliding Forms
It is another smart and easy FormGet Method to display form.
1# Increase conversion rate:
It’s true. As you can see above, the form is displaying on the home page. So, there is a 5 times more probability of good quality leads. It will automatically increase the conversion rate.
2# Looks Smart and Occupies less space:
As you can see in the above image, the FormGet’s Tabbed form is present in the form of small but beautiful CTA, it smartly occupies less space. Additionally, it is very easy to implement on your website.
-
To embed the sliding contact form in WordPress site.
In your WordPress site you again have two ways to embed the form, either, you paste the code in header.php file or you can use the FormGet Plugin directly.
1. How to use the code if the plugin is not installed.
- Go to your site’s dashboard and open up the Appearance-> Editor. There you will see a file naming header.php.
- Open it and paste the code between head tags.
- Update the file and view your website now.

2. How to embed the form using FormGet Plugin.
- Install the FormGet Contact Form plugin in your WordPress dashboard.
- After successful installation. Click on Contact Form option provided in the left sidebar.
- There you will see the option as Embed Code, click on it and paste the code in the space provided.
- Select the pages in which you wish to show the form.
- Click on Save.

2. Embed Full Form.
In this option, you will find two sub-options Embed Form 1 (with design including header & footer) and Embed Form 2 Plain Form (without header & footer). As per wish copy the code for anyone of the embed type and paste it where you wish to view the form.

- Embed Form 1(With design including header and footer).
If you wish to view the form with complete designing that includes header and footer, then copy the code for Embed Form 1. Before copying the code you can adjust the form height and preview it. Now use the code as described below:
1. In Non-WordPress sites.
Paste the iframe code in the website code, in the place where do you wish to make form view. Save the file and preview the page.

2. In WordPress sites.
You have to follow the same step for WordPress site too. Just place the code in your posts/pages under text mode and update it.

The form output will show up like this

- Embed Form 2 Plain Form(Without header and footer).
Adjust the width of the form and preview it. Now copy the code and use it in the same way as illustrated above for Complete form view. You will see the form output as:


You will receive the output as shown in the below figure.

Now there are other two options provided under Embed Form page. The third one is for WordPress Shortcode in which, you are provided with the short-code for plain form and sliding form. You have to just place these codes(Web Form Generator) in your pages/posts and you will see the form start appearing there. That the fourth one is for a form direct link.
3. Embed form using WordPress shortcode.
Now in this option you have two shortcodes, one for Sliding form and another for a Plain contact form.

Just place the code in the page/post as shown below.
- For sliding for you can place the code anywhere in that page/post, but it is better to put it at the bottom.

- For plain form, place the code where you wish the form to appear. Or you can place this code in widgets. Install the FormGet plugin and add a FormGet widget in any of your widget areas and place the shortcode as explained above.
4. Share the form direct link.
You can use form unique link if you don’t have any website. Just share the link and get your form live with the complete form view.

You will see the form output with the complete design that you have done in edit design section.


Final Words
I hope this tutorial proves to be very helpful for you. If you find it any difficulty, you can contact here on the given link.

11 Replies to “How To Create and Embed Form On Your Website?”
Please help. I don’t know code and I am trying to add a contact form with no side widget or anything else, just my designed for, It’s showing up like this on my page.
http://www.leahmarieblog.com/lets-chat/?preview=true&preview_id=11&preview_nonce=ce21b94fdf
Hi Leah,
To get form codes Go to Embed section on your FormGet dashboard. There you will see form embed codes in multiple options. Choose one of the embed code and paste it on your page text area.
Best regards.
Hi Preeti
I’m working on making a website and I have put in the contact-thingy
on the right side of my page but there is still a lot of text in english that I
would like to translate into danish.
I can’t find it in the Header-coding.
Can you tell me where I can replace english text with danish?
Thank You in advance
/Annika
Hi Annika,
If you want to use Danish text, just translate the text in Google Translator first and then paste the text on your form header.
Thanks. 🙂
Hii,
It’s so nice to here you like the software, you can make your account on our website and start using the application or you can use the WordPress plugin for it.
Create your FormGet account here: https://www.formget.com/app/login/
WordPress contact Form Plugin: https://wordpress.org/plugins/formget-contact-form/
Thanks a lot, this has made my day…..
Thankyou for your kind words. Keep reading our blogs. 🙂
where do the responses go when people fill out the form. I did a test and the test is not showing up.
I’ve created a form and have pasted the Embed code on my site between opening and closing tag. However, the form is not appearing as it should be. I’ve used a FormGet form before, with success, so I’m a bit puzzled.
Do you have any advice or suggestions? Thank you.
hi, good job!
do you have any suggestions how can I embed your nice contact-form into my joomla 2.5 site?
(just a sort youtube video would be fine. i dont have any special technical background ).
thank you in advanced,
stathis
Please follow this process. In this link we have explain step by step to use contact form in joomla.
https://www.formget.com/formget-joomla-contact-form-plugin/