
Looking for a way to make Google Forms alignment from right to left?
Generally, while creating surveys or polls, we want the text of our forms to be aligned differently for a global audience. It has come in light that various people react to diverse kinds of forms. The center-aligned grabs more attention in general. In the exceptional case, if your respondent prefers to answer the survey in Hebrew or Arabic then, it is important to make form right aligned. This is just to keep the spark among users alive.
Google Forms is our first preference when comes to creating forms for free. Unfortunately, the free tool doesn’t offer such advance features. Considering its limitation, you can surely give Pabbly Form Builder a try.
Here, in this piece of writing, we will explain how one can align its created form from right to left.
Are There Any Suitable Alternatives Available That Displays Form From Right To Left?
Definite yes! There are several form builders available in the market but as suggested above named Pabbly Form Builder is best of all. The online tool allows users to display their form on the left side. Not just this, it doesn’t restrict users on features by offering unlimited submission, storage, receive payment and much more.
Some of its perks which makes it different from all:
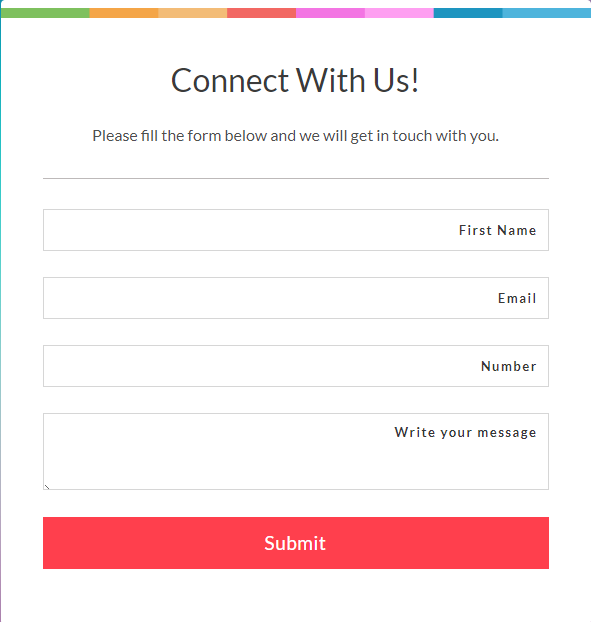
- By default, all the field labels of the form are top-aligned to reduce the time of completion.
- Not only you can change the alignment of the created form but also change the background of the form.
- Further, the generated right-aligned form will require a minimum vertical screen space.
- The software allows you to spread form globally via a link or social media.
- Not just embedding it offers three different kinds of website embedding which are Pop-up, Sliding & Full Form.
- People all across the globe can fill the form without any sign-in trouble.
- Autoresponder feature smoothes the process of communicating with the respondent.
- Again, using the “Form Scheduling” feature, one can put activation and expiration date on forms.
Now, below we are going to show how one can create a right to left aligned forms.
Step-By-Step Guide To Create A Form That Change Text Alignment:
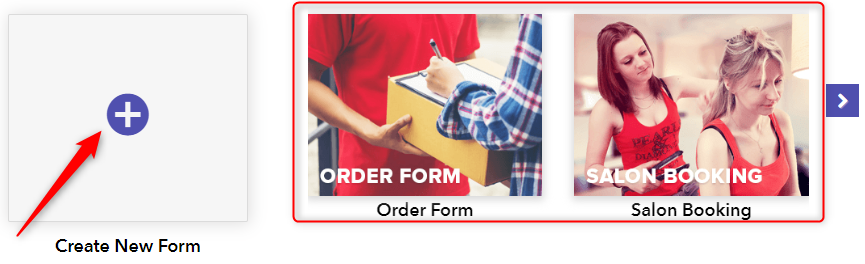
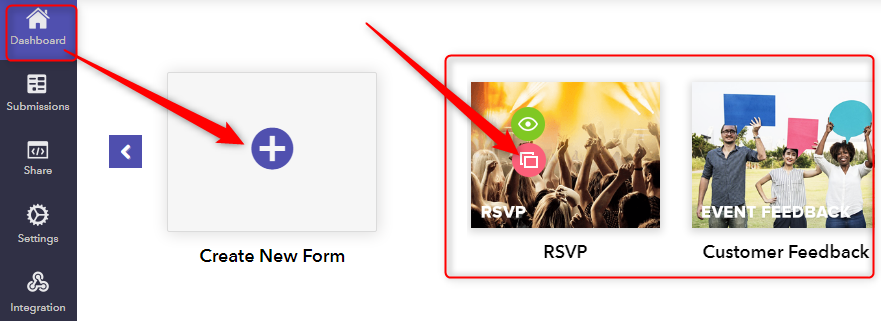
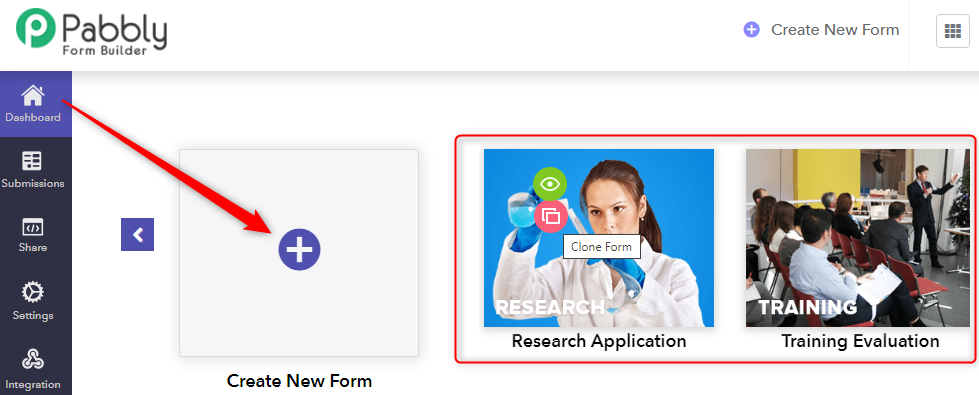
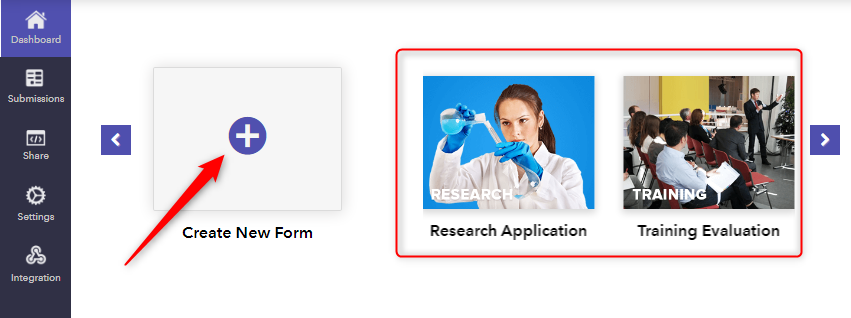
Step 1: Create A Form
The very first thing you need to do is open the dashboard of Pabbly Form Builder. Further, to create a form click on the “+” icon or you can use its pre-designed templates too.

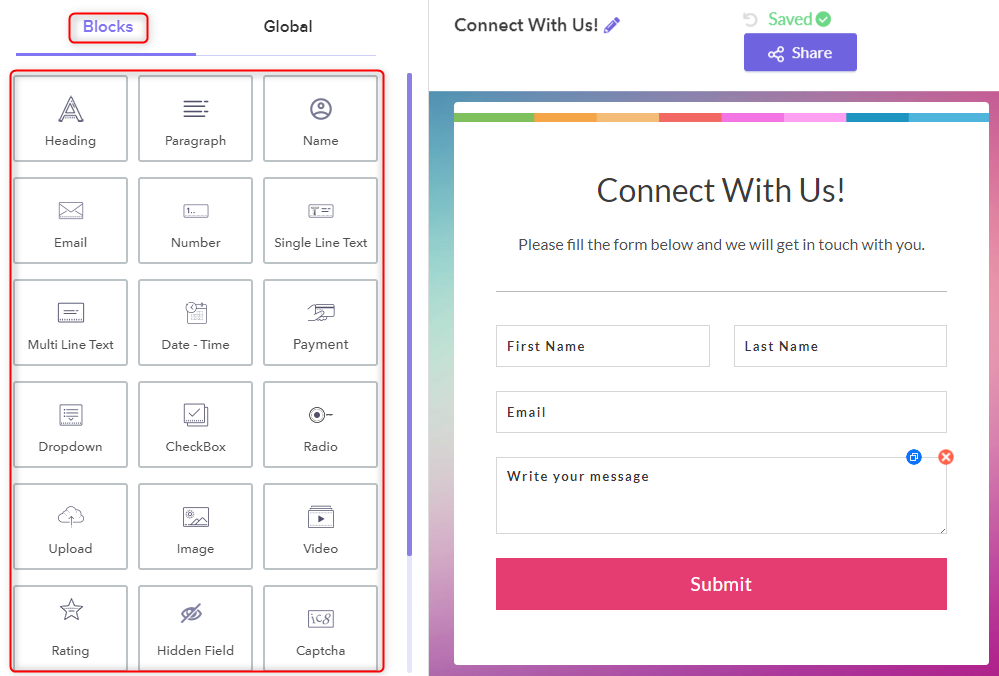
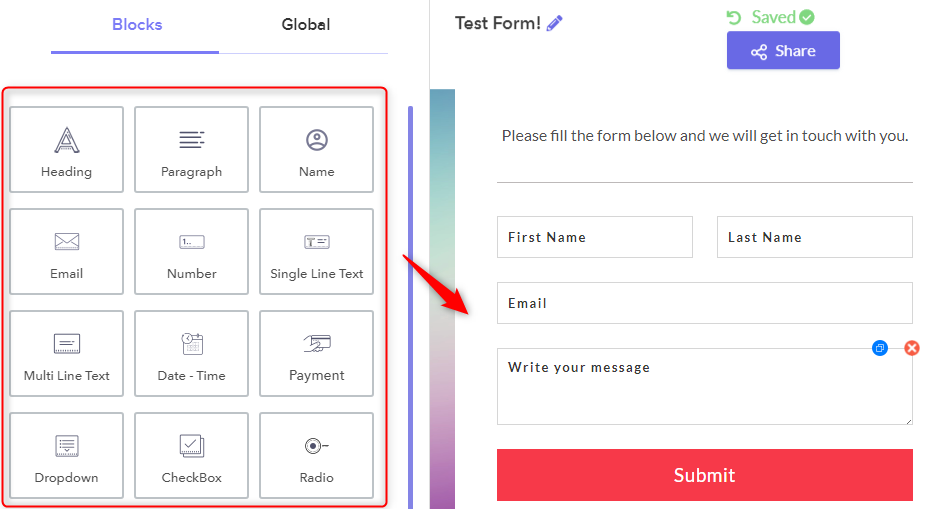
Step 2: Add Form Elements
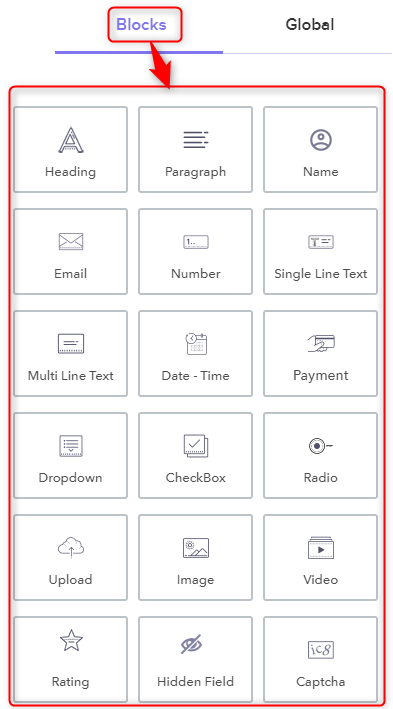
Subsequently, assign a name to your forms then add elements like name, email, contact, multiple-choice and much more using its drag and drop editor.
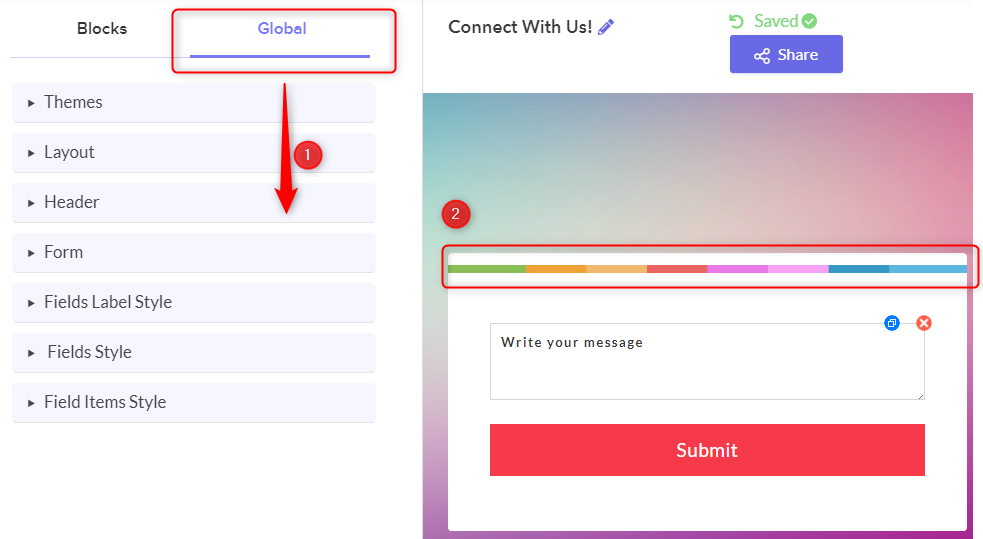
Step 3: Customize Form Using Global Section
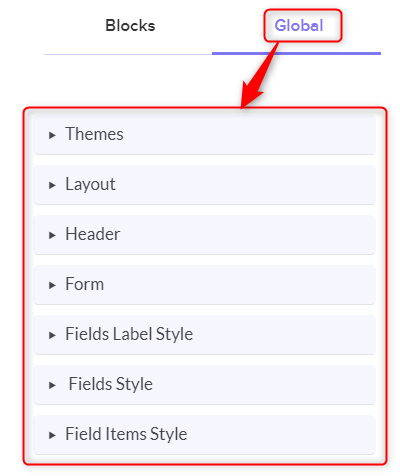
Further, to bind respondent attention, the form should be eye-catching which can be easily done using the “Global” option. Here, it has a bunch of options like the theme, layout, header, etc to customize your whole form.
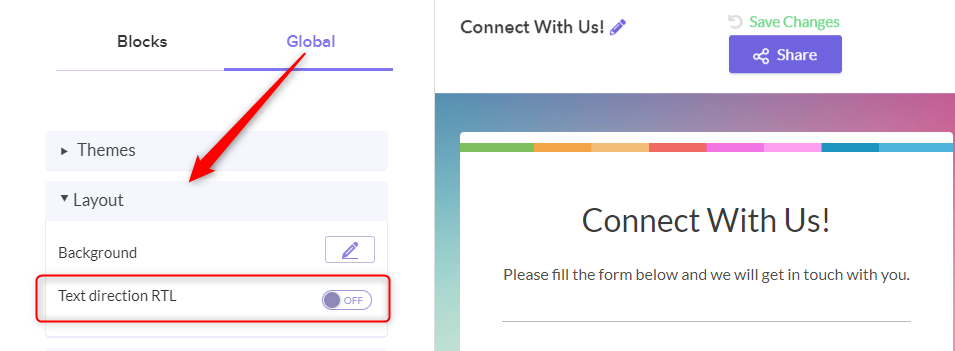
Step 4: Enable Text Direction RTL
Next, in the “layout” section, you will see the “Text Direction RTL” toggle to enable the text alignment. By simply enabling it, the user can shift all the field elements.
Step 5: Preview
Lastly, to view the preview of your created form, click on the eye-shaped icon appearing on the left-hand side of the screen.
Conclusion:
Voila! Now you all know how to create a form that displays text from right to left. No doubt, Google Forms is preferable but it binds global audience hands especially those who want their form in Hebrew, Arabic, and Persian. As there is no such option to make Google Forms right to left. Considering this, one can definitely give Pabbly Form Builder a try. The software offers a free trial to its users to explore the platform.
How To Upload Full Image As A Header In Google Forms?


They say “The first impression is the last impression”. When your respondent views your form, what is the first thing that grabs his/her attention? Definitely, the header image isn’t it? Also, you can convey the full potential of your brand through the header image of the form. Therefore, you can’t compromise on its quality or size. But, unfortunately, if you are using Google Forms, you can’t upload the full image as a header.
Google Forms is a free awesome tool but it requires you to prune the header image. Therefore, I would like to suggest Pabbly Form Builder which allows users to upload full image as a header without any restriction.
This is because the Google Forms puts a ceiling on the header image at 559×140 pixels. Any picture beyond this window has to be cropped. Another irritant is, these undersized header images of Google Forms looks blurry when viewed on a large device like desktops.
Add Full Header Image Without Cropping. What Are My Options?
Let’s say that you want to upload 1600×1600 pixels photo as a header. But, we both know that it is a sizeable photo, so only a few form builders can do this job. Here, I am highlighting one such marvelous form creator i.e. Pabbly Form Builder that lets you upload such gigantic banner as a header image with ease.
- The size of the image doesn’t matter as without cropping you can upload the image into the header.
- In contrast to Google Forms, there are more customization options available in Pabbly Form Builder like changing the background colors, resizing the image dimensions and many more.
- It doesn’t care if the picture resolution is in KB or MB. Besides, you can upload a 4k image into the header comfortably.
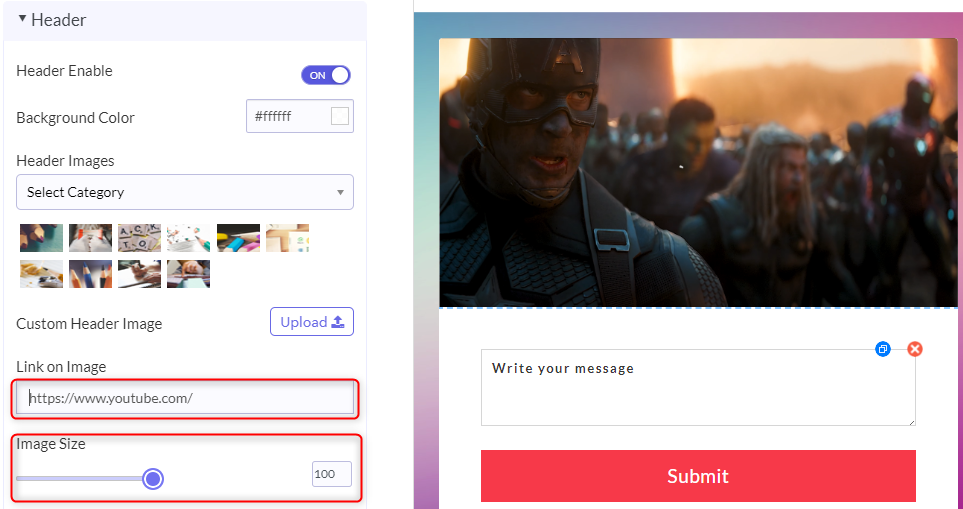
- Furthermore, you can even embed a link into the header image.
- Pabbly Form Builder doesn’t restrict you on any feature like unlimited storage, uploads, and multi integrations through Webhooks.
Now, that Pabbly Form Builder has grabbed your attention with these mesmerizing features, you may be interested in learning how to add a full-size image as a header in it.
Steps To Add Full-Size Image As A Header In Pabbly Form Builder:
Step 1: Create New Form
Log in to your Pabbly Form Builder account. In its dashboard, you will find a plethora of beautiful inbuilt form templates, click on one of them to build a ready-made form. Or create a new form by clicking on the (+) sign.
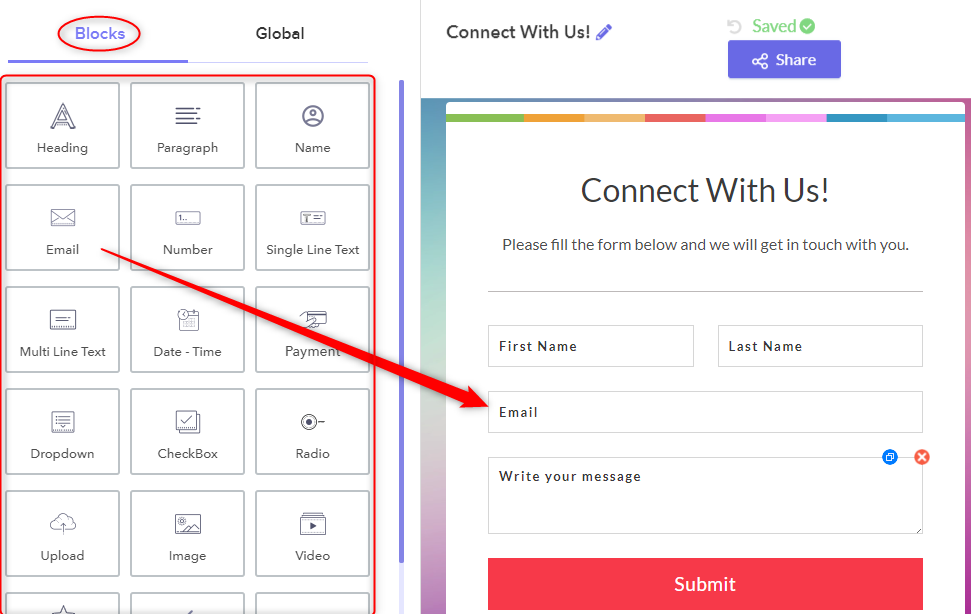
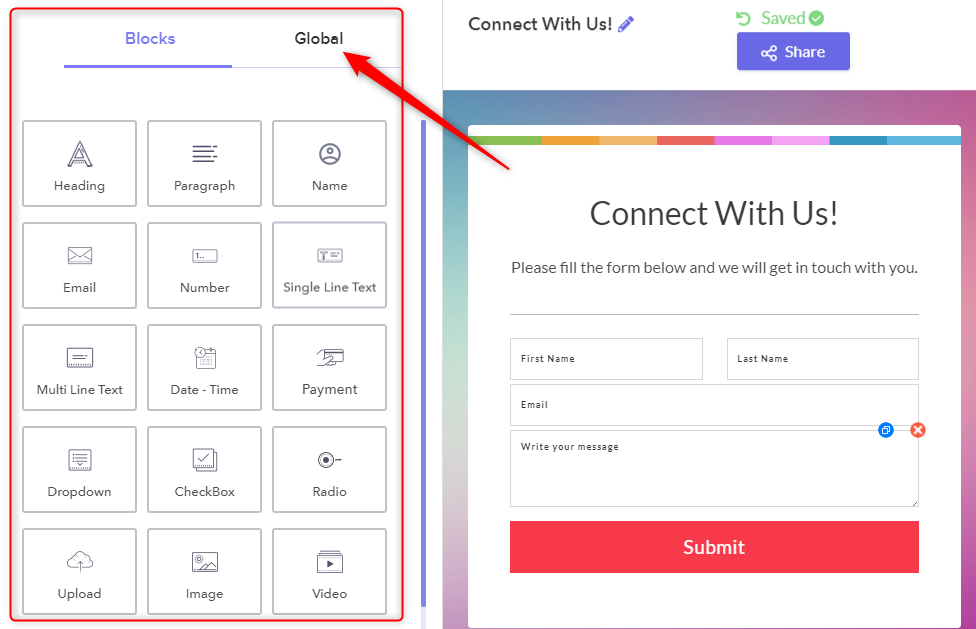
Step 2: Adding Fields Into Form
In the “Blocks” tabs, there are many fields. Click on, one of the fields to insert it to the form. In my case, I am adding the “Paragraph” field into the form. Moreover, you can add as many fields into the form according to your discretion.

Step 3: Opening The Header
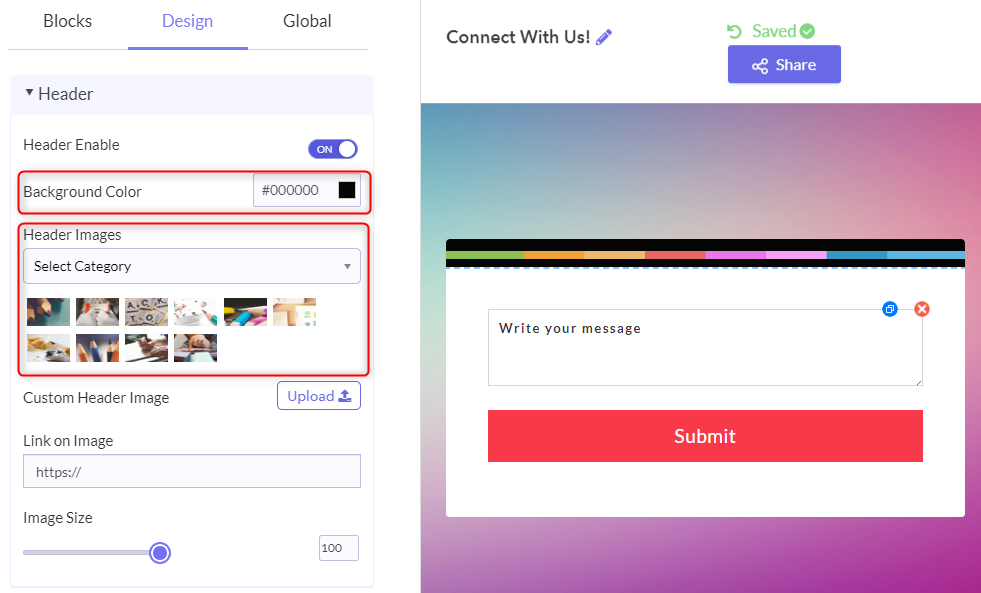
There are two ways to open the header area. First, go to the “Global” tab located adjacent to the “Blocks” tab. Here you will find “Header “, click on it. Or you can just click on the header part on the form.
Step 4: Inbuilt Header Images
Don’t worry, if you have trouble constructing your own header image. Pabbly Form Builder provides plenty of free pictures in different categories to suit your needs. Also, you can set the background color of the image from the palate provided. For example, I have changed the background color to black.
Step 5: Upload Custom Image
Upload a full image into the header of Pabbly Form Builder with the upload button at “Custom Header Image”. I threw myself a challenge and easily uploaded a 4k image into the form.
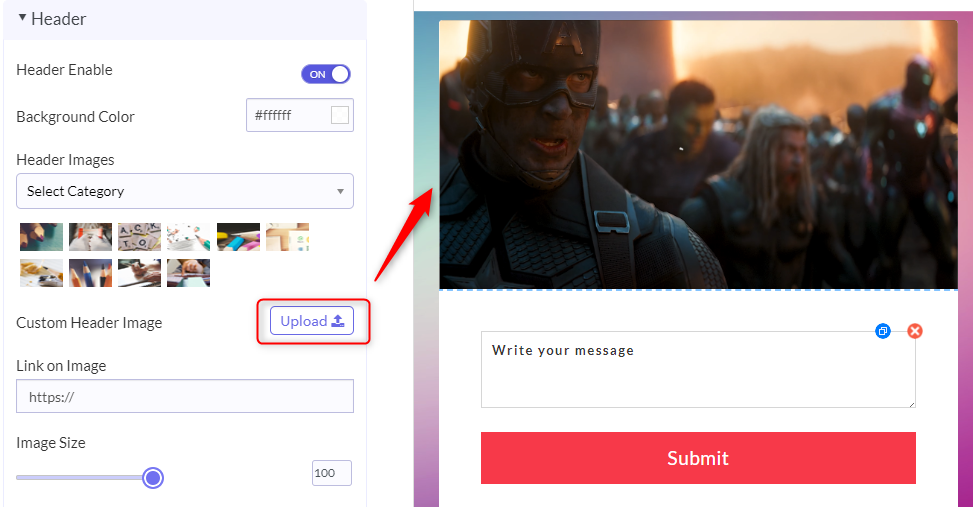
Step 6: Embedding Link Into Header
Now, you may want to direct your customer to a particular website through the header. You can do this by simply copying and pasting the website’s URL into the URL box. For example, I have inserted YouTube’s link into the URL box, so whenever a user clicks on the header it will straightway direct him to YouTube.
Step 7: Preview
Finally, to view the preview of your created form, click on the eye-shaped icon appearing on the top left corner of the screen.

That’s it!! See how easy it was to upload and customize a header image in Pabbly Form Builder.
Conclusion:
Do remember that a picture speaks 1000 words. But, unfortunately, this message hasn’t reached Google Forms yet. To upload a full-size image in the header of Google Forms is not possible. This can be very disruptive for your growing business in the long haul.
However, to mollify your troubles, we have suggested you, Pabbly Form Builder which can upload any kind of images into its header. There is a trial version available. Common, give it a shot.
How To Adjust Line Spacing In Google Forms?
Wondering about how you can adjust the line spacing in Google Forms?
Normally, while creating a form, the most important thing that allows you to make your form presentable is customization. Therefore, to keep you out of creating a mess, it is important to make sure that its lines and columns are arranged in a specific order. That is the reason why features like line spacing, letter spacing plays a major role in form creation.
Unfortunately, Google Forms doesn’t let users to adjust line spacing and letter spacing. Keeping the same in mind, I would like to recommend Google Forms alternative i.e, Pabbly Form Builder.
It allows you to modify the line-height and letter spacing along with several customization features.
Reasons Why Pabbly Form Builder Is A Perfect Google Forms Alternative Available In The Market
At present, form creation plays a vital role. Due to which the most preferred tool in the market is Pabbly Form Builder. As it allows you several customizing features at one place such as font style, line spacing, form width and many more.
So, let’s have a look at those features one by one
- Apart from its line and letter spacing feature, it also allows you to set the width of the form so that it occupies enough space of the screen.
- You can even set the margin of the form in order to adjust the gape among the columns.
- It enables you to increase or decrease the border of your form along with the radius and color.
- You can also modify the background color of the form, font style, background image, header image, etc.
- Pabbly Form Builder gives you access to change the header image which can also be resized as per your requirements.
- A bunch of inbuilt themes is also provided by this software to choose from.
- The most amazing thing about this software is that it enables you to use all of its features such as subscriptions, payments, storage, webhooks and many more without any restrictions and gives you unlimited access to it.
So here, let me take you through the steps to adjust the line spacing with the help of Pabbly Form Builder
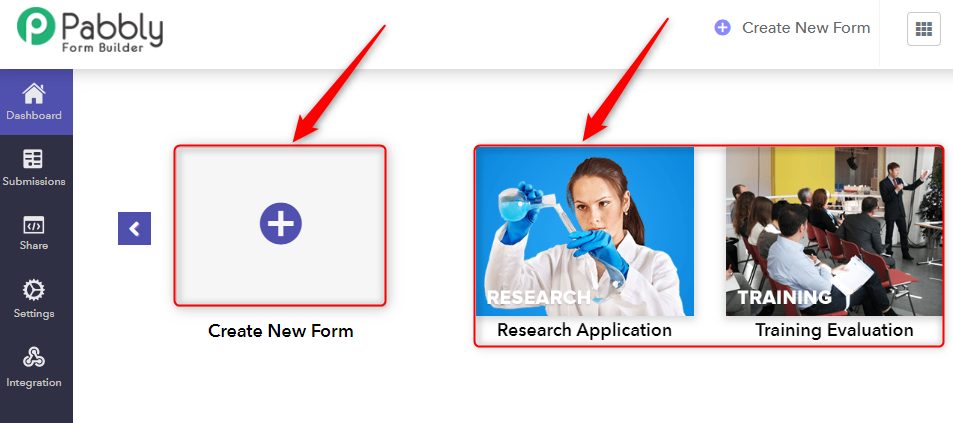
Step 1: Create Form
First and the foremost step after signing up is to create your form. You can choose your form either from the pre-built templates or else you can make it through the “Create New Form” option.
Step 2: Select “Global”
While creating the form, you will head towards its customization page. In which you will see two options “Blocks” and “Global”. From which you need to select the “Global” option.
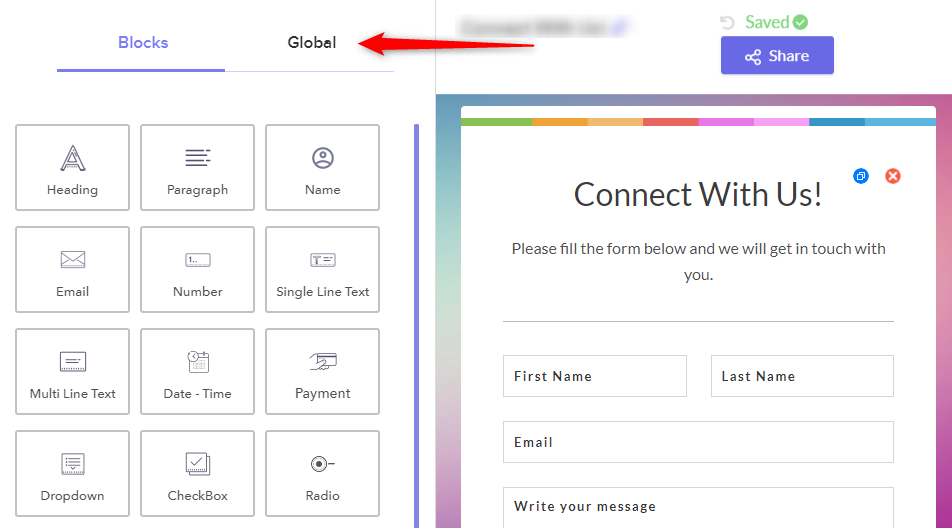
Step 3: Click On “Field Style”
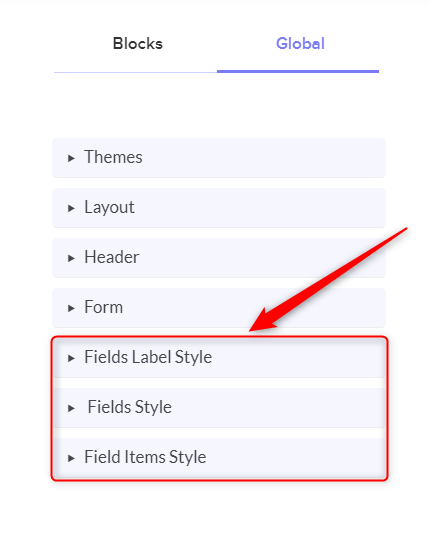
After moving on to the “Global” section, you will find several options to choose from. Basically, the last three option which are fields label style, fields style, and fields item style allows you the same “Typography” feature.
“Field Style” lets you customize the whole form, whereas the “Field Label Style” enables you to change the label of the options and “Field Item Style” allows you to modify the options categories styling in your form.
For instance, here I am selecting the “Field Style” option.
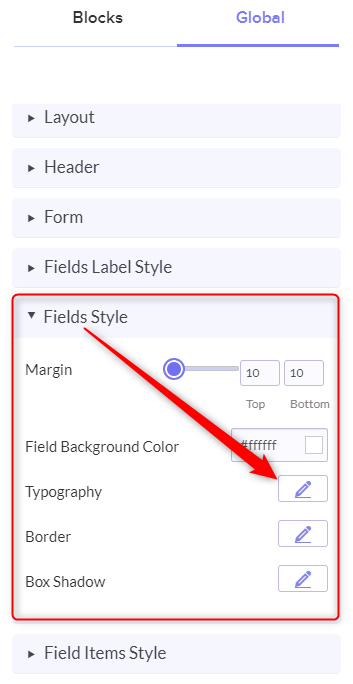
Step 4: Select “Typography”
Once you select the “Field Style” option, a list of features will emerge through the drop-down such as margin, field background color, border and many more. From which you need to click on the term entitled “Typography”.
Step 5: Adjust The “Line-Height”
In the “Typography” option, you will find numerous features to edit your form such as font-weight, font size, line height, letter spacing, etc. From which you need to select the “Line-Height” feature, through which you can easily adjust the line-spacing using the slider.
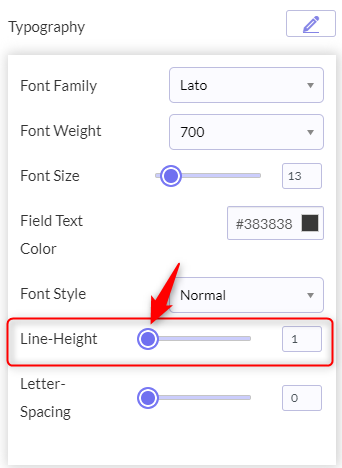
With the help of the above-mentioned steps, you can easily adjust the line height in your form.
Wrapping Up:
Nowadays, several form builders are present in the market and each of them is categorized by their different features. Here, I would like to suggest the best alternative for Google Forms i.e, Pabbly Form Builder, which offers you several features to customize such as modifying borders, background-image, font size along with adjusting the line-height as well as letter spacing.
So, what are you waiting for? Give Pabbly Form Builder a try as it also provides you a free trial with all the best features in one place. And let you use its features without any limits and restrictions.
What Is The Best Way To Create Surveys With Google Forms?

When comes to planning surveys, organizing online competition or collecting feedback forms through respondent, the first thought which crosses our mind is Google Forms. The reason for the same, it is the only free tool that lets us create online beautiful forms without any trouble.
Whether it is a questionnaire or poll, Google Forms is mostly preferred. Not only it allows us to spread form with a larger audience but also we can collect respondent email addresses using it.
Besides, its free of cost tag, Google Forms limits the survey form creator in spreading brand awareness by not allowing to insert its brand logo in the form itself. Again, keeping track of forms is important part of survey where Google Forms disappoint us.
While on the other hand, one of the best Google Forms alternatives named Pabbly form Builder. It is the only software that lets users attach a brand logo to enhance their reach. Further, packed with analytic feature so users can easily keep track of onhold, partially and filled forms.
To Help You Choose Better, We Compared Both The Softwares
| Google Forms V/S Pabbly Form Builder |
|||||
| Services | Google Forms | Pabbly Form Builder | |||
| Storage | Up To 1 Tb | Unlimited | |||
| File Upload | Up To 10 Files | Unlimited Files | |||
| Customization | Basic Customization | Advanced Customization | |||
| Custom Branding | No | Yes | |||
| Integrations | Only With Google Apps | Unlimited Webhooks & Direct Integrations | |||
| Email Autoresponder | No | Yes | |||
| Analysis & Reporting | Pie Chart, Graph | Pie, Graph, Bar Chart With Download Option | |||
| Templates | 16 Templates | 250+ Responsive Templates | |||
| Payment Configuration | No | Yes | |||
| Form Scheduling | No | Yes | |||
Here, in this help guide, we will explain the process of creating a survey form.
Steps To Create A Survey Form Using Google Forms
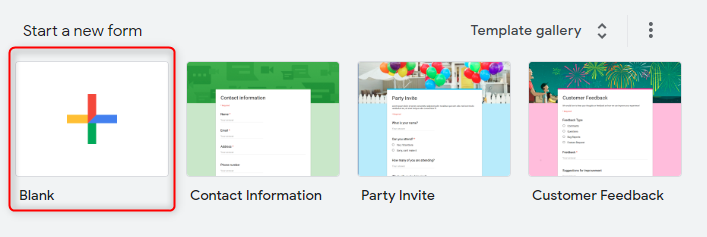
Step 1: Create Form
Open Google Forms and to create survey form click on the “Blank” option or you can use its pre-designed templates too.
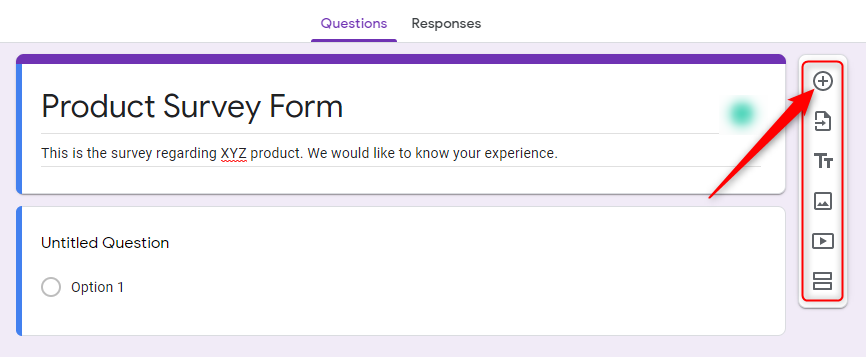
Step 2: Add Fields
Further, assign a name to your survey and add a description if you want to. Then, click on the “+” icon to add a question in the form. It also offers various options like import question, add title and description, image, etc.
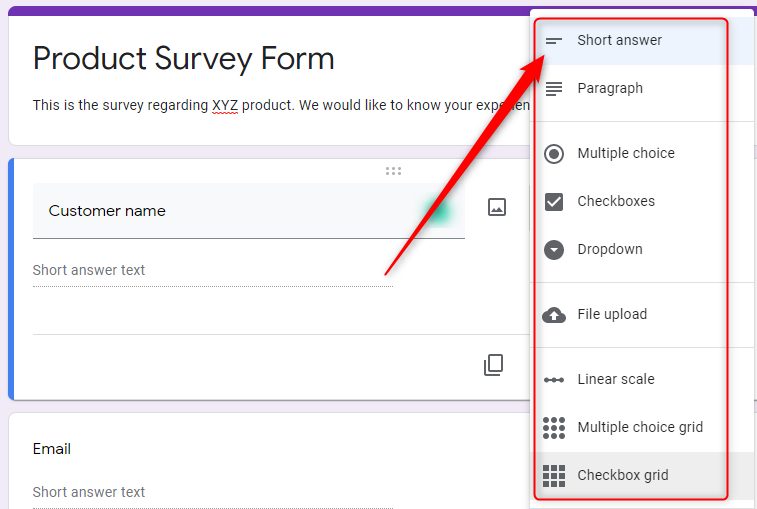
Step 3: Question Field
Next, entitle your question according to your survey needs. For respondents to answer, it wisely chooses convenient options from its various choices like short answer, paragraph, drop-down, etc.
Step 4: Preview
Subsequently, to view the “Preview” of the created survey form, click on the eye-shaped icon appearing on the top right corner of the screen.

That’s how one can create a survey form using Google Forms.
Restrictions Of Google Forms
Apart from its numerous advantages, such as its free of cost tag, easy to use and much more, Google Forms somehow fails the need of a vast audience. Some of its limitations involve:
- The form created using software is so basic and general, unable to bind respondent attention.
- Generally, survey forms are long and there is no feature available in the software to fill the form later.
- In the name of “Conditional Logics”, it only allows section jump.
- Every survey form demands a large audience and it somehow puts halts on it by making require sign-in mandatory.
- The online tool tied its user’s hands by offering only one kind of embedding.
- No option to add the logo of your brand in the form itself.
- Keeping track of respondent activity is not possible through Google Forms.
- Using Google Forms one can’t send personalized confirmation or thank-you messages to their respondent.
Switch To Better Google Forms Alternative
Keeping all the limitations of Google Forms in mind, one can surely give Pabbly Form Builder a try. It is the only software available in the market that doesn’t restrict users on any features by offering unlimited submission, storage, payment and much more.
Lets cast some lights on its features:
- The software is packed up with customization options like a theme, layout, header, etc to create eye-catching forms within a couple of minutes.
- With its in-built analytic feature, users can keep track of partially, filled or on-hold forms within the software.
- One can create any kind of dynamic forms using its And/Or logic. Moreover, users can set multiple logics in the single form itself.
- The best part of the tool is, it lets anybody fill the survey form without any sign-in which increases the reach of the survey form.
- Using Pabbly Form Builder, one can easily insert the logo of a brand in the form to make it more convincing.
- Not just embedding, the software offers three kinds of form embedding which are Full, Sliding and Pop-Up form.
- “Allow save and resume” functionality of the software offers users to fill long survey forms according to their convenience.
- Above all, the software helps to build a healthy relationship with the respondent by allowing users to send a personalized confirmation receipt.
Now, let’s see how one create a survey form via Pabbly Form Builder
Steps To Create A Survey Form Using Pabbly Form Builder
Step 1: Create Form
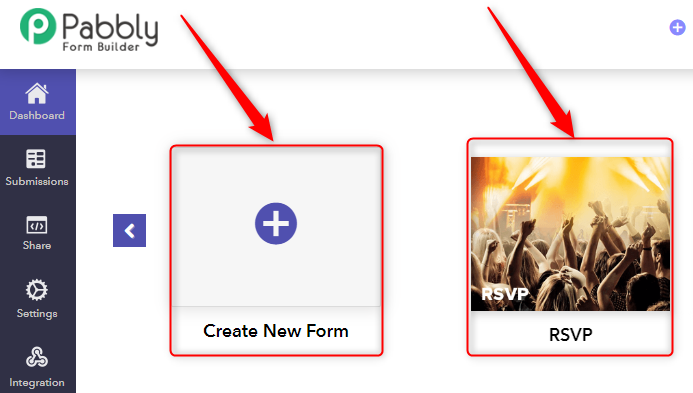
Open the dashboard of the software and click on the option “Create New Form” or you can use its pre-designed templates too.

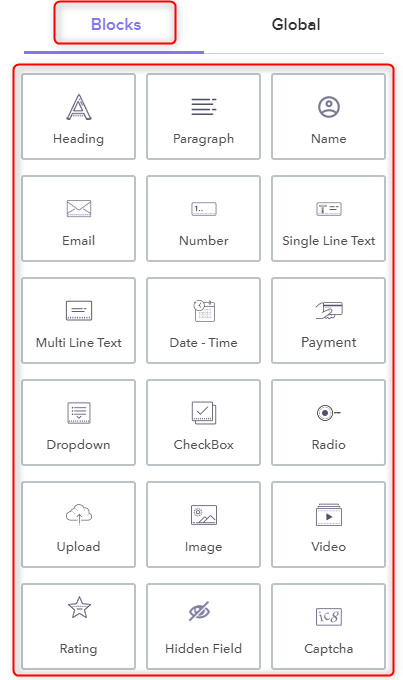
Step 2: Add Form Elements
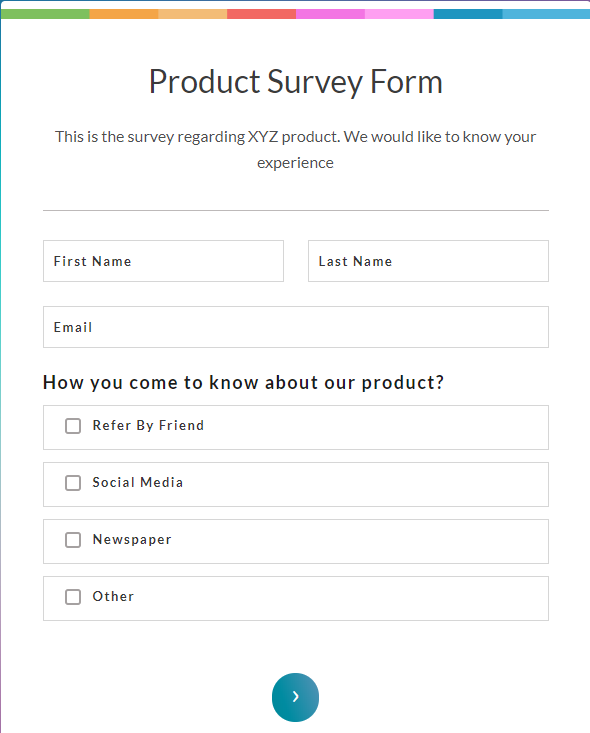
In the “Blocks” section, you will observe a variety of options like heading, paragraph, name, email, etc. Add elements according to your survey or poll requirement.

Step 3: Global Section
Further, to customize your whole survey form, you can use the “Global” section where you will notice a variety of options like themes, layout, header and much more, enough to make form attractive.

Step 4: Logic Field
Now, to make your form dynamic, you can use the “If/Then” and “And/Or” logic to show/hide the particular field using the “Logic” option. You can add multiple logics in a single form.
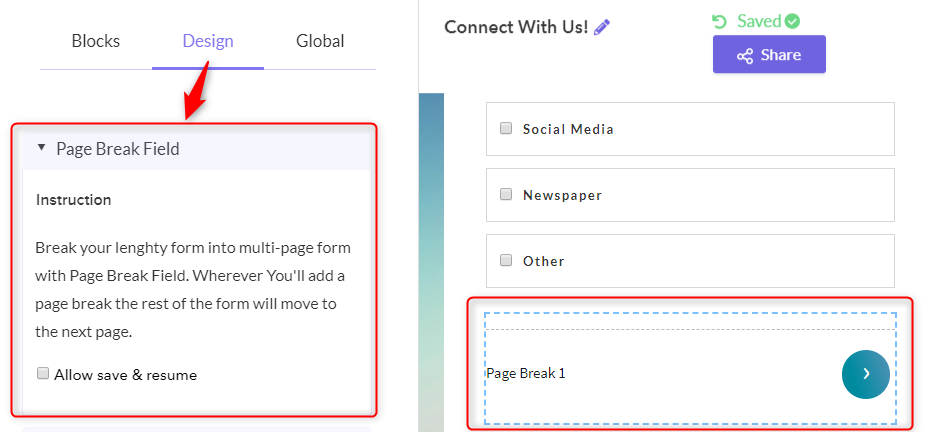
Step 5: Page Break Option
Next, you can add a “Page Break” option which offers a “Save And Resume” functionality as survey forms are long and tiring. So that users can fill it according to their availability.
Step 6: Preview
Lastly, to view the preview of the survey form, you can click on the eye-shaped icon appearing on the top left corner of the screen.
That’s how your created survey form will look like. Further, you can share it using different options like social media, email, and via a link. The software also allows embedding of your form on the website. Not just embedding, it offers three different kinds of embedding which are Full, Sliding and Pop-Up form.
Conclusion:
Surveys are a great way to interact with your audience and to build a strong relationship for the long haul. So that’s why our created forms should be much more than just being mere forms. In such cases, Google Forms surveys doesn’t fulfill all our needs. Considering all this, you can definitely explore Pabbly Form Builder for free.
So, what’s halting you? Go and try it. Let us know all about it in the comments section.
How To Make Google Forms Occupy The Width Of Screen?

Finding a way out to occupy the screen width in Google Forms?
Consequently, in this technological era, filling a form with limited space can be a mess. A form with a smaller size might look more blurry and miserable on a wider screen. Therefore, it is important to make your form wider enough so that you can provide a great experience to your users.
However, it is a known fact that Google Forms is an advanced tool. And it enables you to create forms along with templates for free. But if you wish to occupy the width of the screen in Google Forms. Then, in that case, I would like to inform you that this feature is not supported by Google Forms yet.
Wondering About Google Forms Alternatives To Occupy The Width Of Screen?
Certainly, there are several Google Forms alternatives available in the market for adjusting the form width as per your requirements. So, here let me suggest you the most worthier adversary for Google Forms, i.e, Pabbly Form Builder.
As, it not only provides you a responsive screen feature but you can also customize and embed your form.
Let’s have a look over some of its perks that Pabbly Form Builder provides
- Apart from changing the form width, you can also adjust the border of your form along with its radius and color which is another drawback faced by the Google Forms.
- Pabbly Form Builder also allows you to customize the margin of your form to adjust the spacing between the columns.
- You can even adjust the letter spacing as well as line height in your form.
- It even lets you change the background color, image, font style and many more to make your form more presentable.
- You can also attach hyperlinks in your form to redirect your users to specific links such as links to your website, payments, etc.
- Pabbly Form Builder not only provides you several customizing features that Google Forms lack, but it also offers you unlimited access to subscriptions, payments, Webhooks, third party integrations and many more with no restrictions.
So, Let’s Dive In And Learn How To Increase The Form Width Through Pabbly Form Builder:
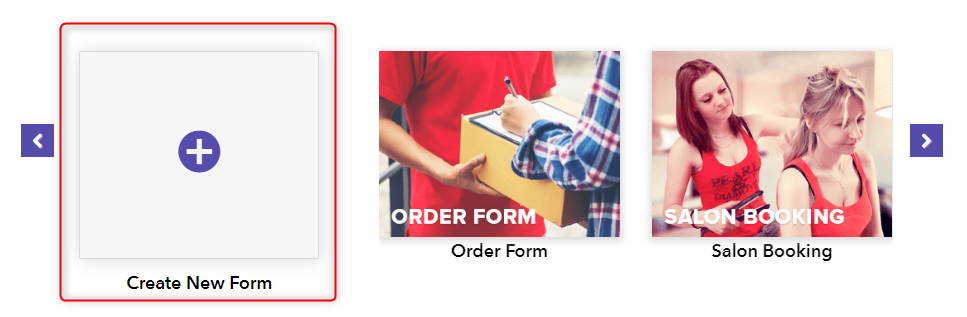
Step 1: Create Form
After signing in, your first step is to create a form. For which you will see two options available on its dashboard. From which either you can start from scratch and make your form by choosing “Create Your Form” or else you can choose from the given templates.
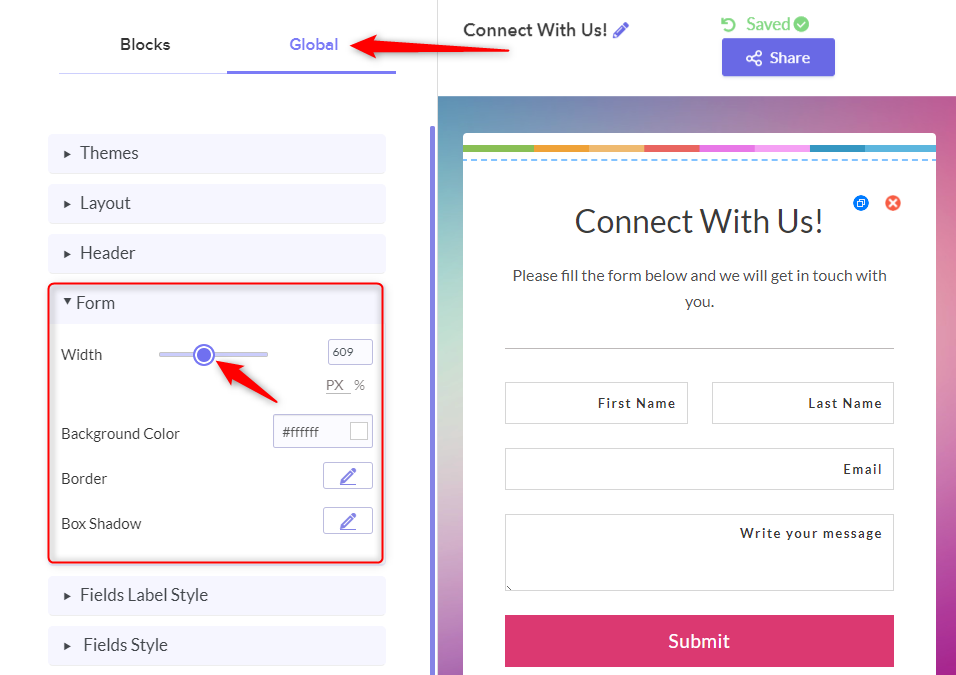
Step 2: Set The Width
When you tap on the form while creating it, you will see the “Design” option pop up between the “Blocks” and the “Global” option. Under that option, you will see the “Width” customizing feature that enables you to adjust the form width by moving the cursor left to right.
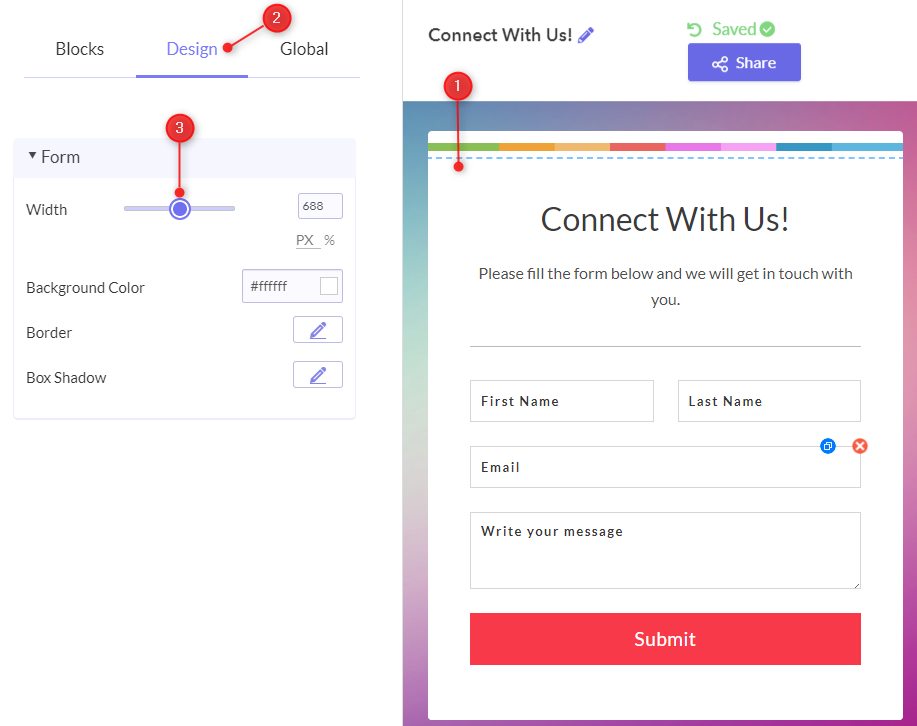
Besides that, you can also select the “Global” option in which you will see various customizing features such as themes, layouts, header and many more. Under this tab, you will find the “Form” option which also provides you the same “Width” customizing feature.
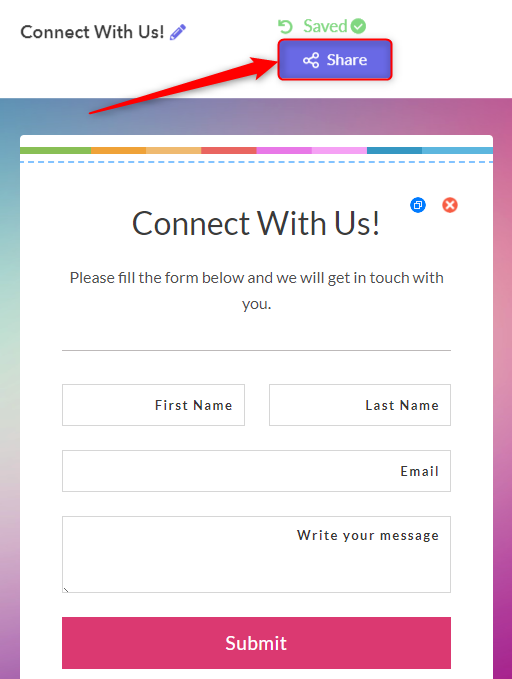
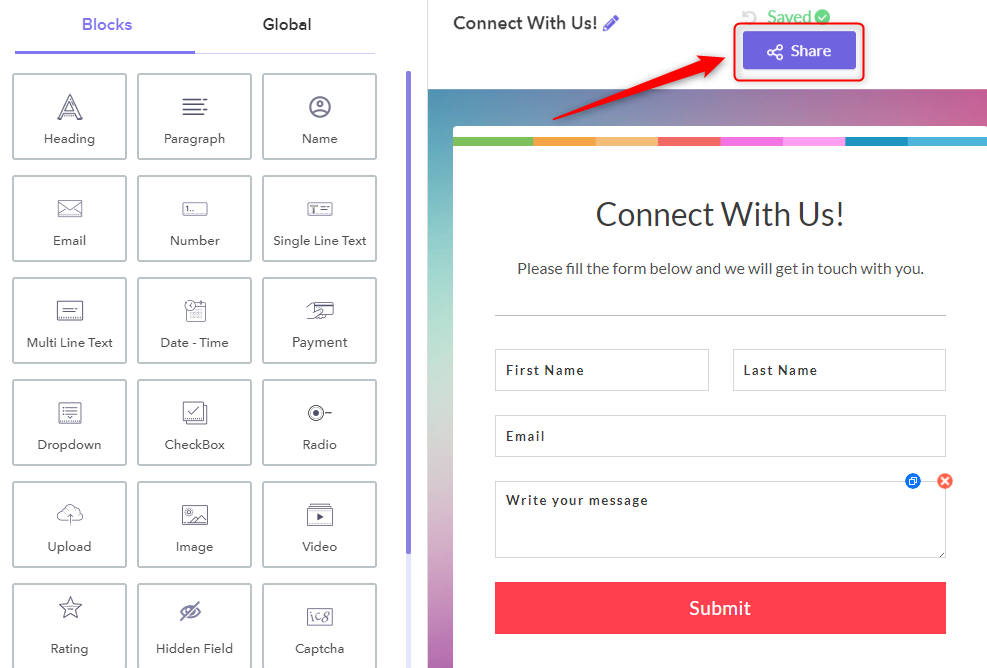
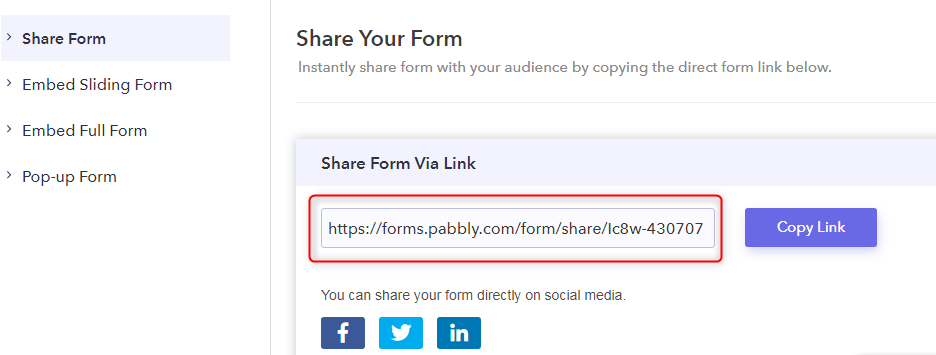
Step 3: Click On “Share”
Once you complete making the form, your next step is to share it. All you have to do is to click on the button named “Share”.
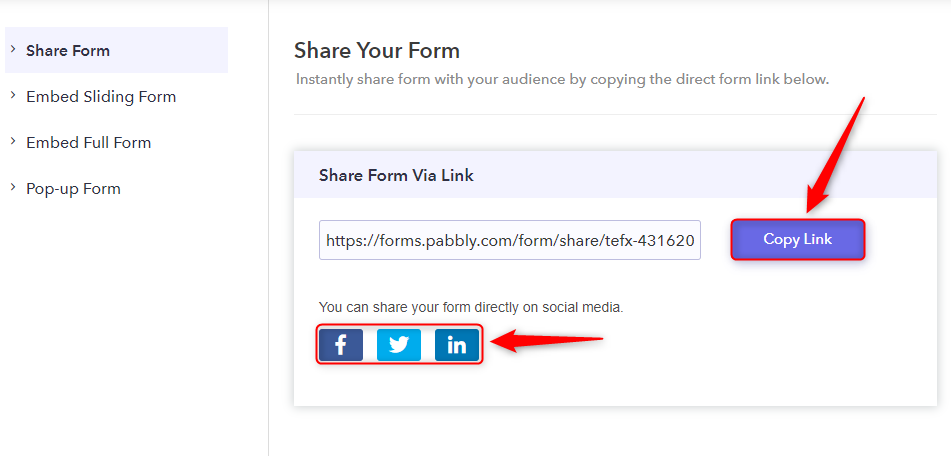
Step 4: Copy The “Link” And “Share”
After clicking on the button “Share” you will be redirected to the link for sharing the form. You can simply copy the link and share it, or else you can directly share it on social media or on any specific platform you want.
Through the above-mentioned steps, one can easily increase or decrease the form width.
Steps To Change The Form Width Through Embedding:
Pabbly Form Builder allows you to embed the full form through its embedding link. However, you can also adjust the width of the form as per your requirements. So without going any further, let me take you through those steps too.
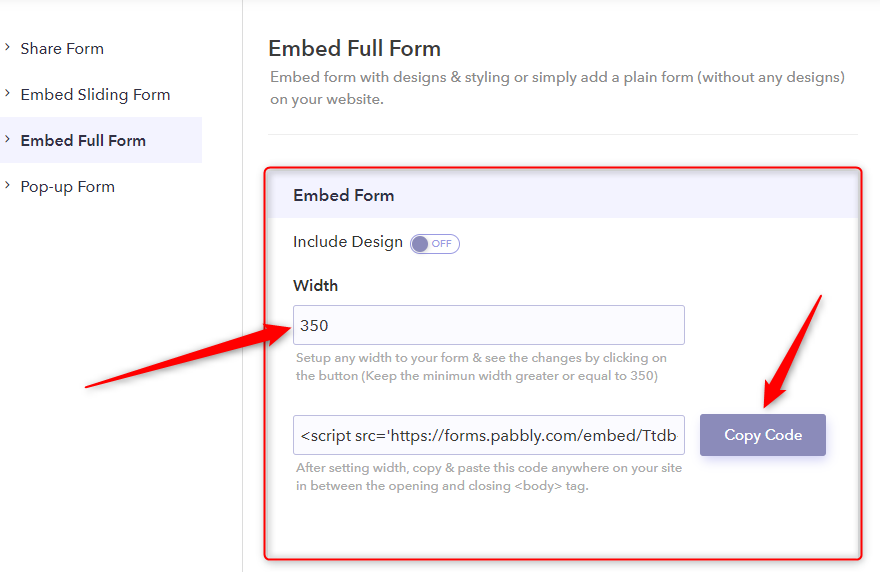
Step 1: Select “Embed Full Form”
On the share page, you will see some other option below the “Share Form”. From which you need to select the option of “Embed Full Form”.
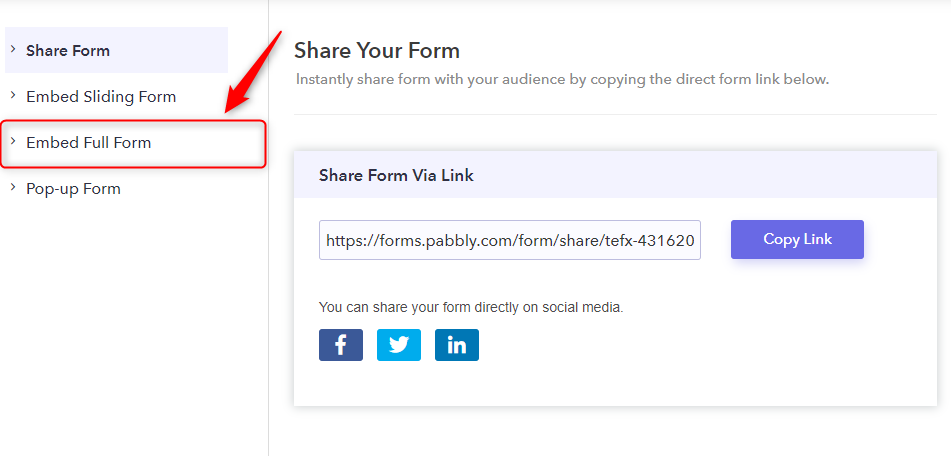
Step 2: Change The “Width”
After moving on to the embed full form, all you have to do is to set the width as per your requirement. And then, you can simply copy the code in order to embed the form on your website.
With the help of a few simple steps above, you can easily embed full form and provide a great experience to your users.
Conclusion:
We hope this article has helped you to answer your query on “How to make Google Forms occupy the width of the screen?”. Even though it does not support such advanced features, yet you can always go with the best Google Forms alternative which fulfills all your requirements. And with the best of our interest, Pabbly Form Builder is the best one to choose from. It not only helps to change the form width but also enables you to embed full form on your website more easily.
So, give Pabbly Form Builder a try, as it provides you a free trial and limitless access to payments, subscription, etc. with no restrictions.
How To Add A Line Break In Google Forms’ Question?

Adding a line break in Google Forms’ question helps users to maintain readability. There is no doubt that long paragraphs are tiresome and it is beyond possible to grabs user’s attention through it.
Generally, while conducting surveys or any online competition we usually prefer to set some guidelines. And, if those guidelines will be in points and bullet it will capture more attention rather than in paragraph. For instance, if you want to ask your respondent a question and need to specify certain detail related to it in a question itself, then using a line break one can easily do it. This way, users won’t lose their interest while filling out the form.
Keeping all the requirements in mind, Google Forms is basically everybody’s first choice because of its free tag. But sadly, you can’t add a line break in it.
Are There Any Other Google Forms Alternatives That Allow Us To Add Line Break In Question?
Yes! There are a plethora of form builders available in the market but, I would like to recommend an amazing software named Pabbly Form Builder. The robust tool allows you to add a line break in form. Further, the only tool that doesn’t restrict you on features by offering unlimited submission, storage, payment, and much more.
Not only you can create beautiful forms but also you can engage respondent attention by allowing line break in a question itself.
Let’s Cast Some Light On Its Features:
- The software offers a bunch of options like a theme, layout, header, field style, etc to customize your whole form.
- One can easily do line spacing and letter spacing with the help of software.
- “Page Break” feature of the software gives the respondent flexibility to fill the form later.
- Using “Separator” users can add a horizontal line between the form elements.
- Further, the user can add their business logo in the form.
- Keeping track of a respondent activity like the status of partially filled, on hold, filled forms can be done easily through the software.
- The only tool that allows to insert a link in the form.
- Further, it allows the “Form Scheduling” feature which is necessary to set start and end date on a form.
- “Autoresponder” makes reverting to form respondent a cakewalk. Using it, one can send a personalized message to the respondent.
Besides, if you want to know how to add a line break in form, then below are steps to help you out.
Steps To Create A Form With Line Break Using Pabbly Form Builder
Step 1: Create A Form
To create a form, open the dashboard of Pabbly Form Builder, then click on the “Create New Form” option or you can use its pre-designed templates too.
Step 2: Add Form Fields
Further, according to your requirements, add elements like name, email, number, etc in the form using the “Blocks” section.
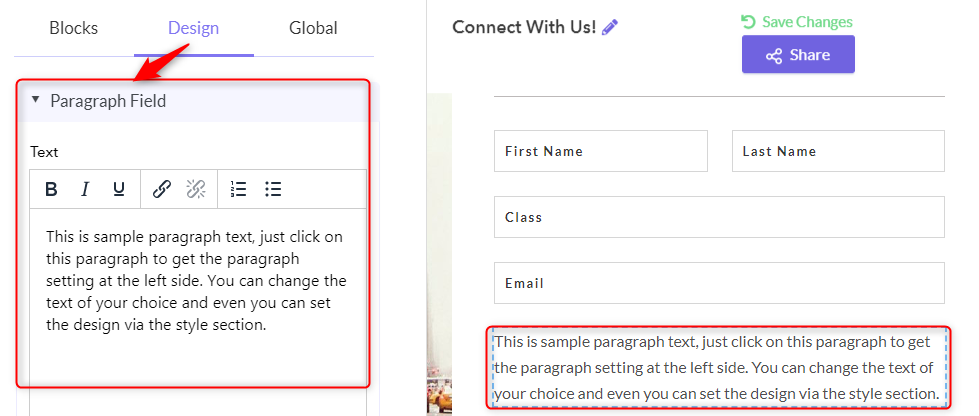
Step 3: Add Paragraph Field
Next, to add a question with certain requisites or guidelines in a form, you can use the “Paragraph” field of the software.

Step 4: Design Element
Subsequently, you can type your required text here in the “Paragraph” field under the “Design” tab. To add a line break in lengthy questions, just hit enter. It will also offer the option of changing text to bold, italic or underline. Further, you can embed a link into a text too. It also gives the flexibility to add your text into a number or bullets.
Step 5: Style Options
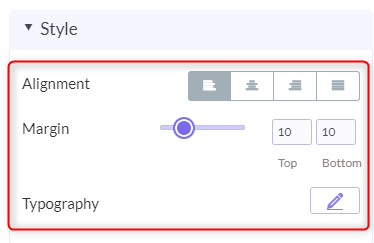
Using the “Style” options, you can change the alignment, margin, and typography of the text.
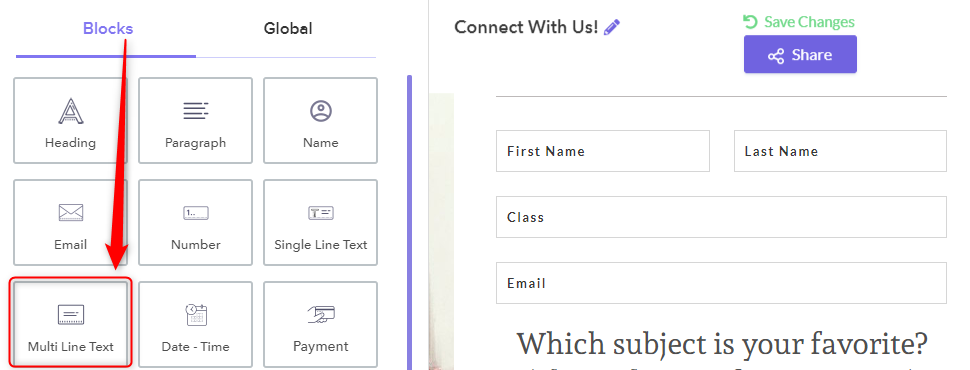
Step 6: Add Multi-Line Text Field
Further, add the “Multi-Line Text” field in the form for the respondent to answer the asked question.
Step 7: Multi Text Option
In the ‘design” tab, you will see the “Multi Text” option, from where users can change field label names, also set certain stipulations using field instruction options. Moreover, you can also put restrictions on word limit, using the max length field. Lastly, by checking on the required box, you can make that particular field mandatory.

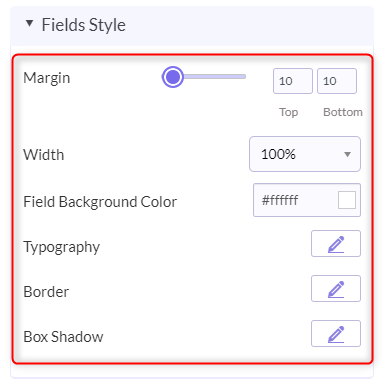
Step 8: Fields Style Option
Next, you can change the margin, width, field background color and much more using the “Field Style” option.
Step 9: Preview
Finally, you can see the preview of form with a line break, just by clicking on the eye-shaped icon appearing on the top-left corner of the screen.
That’s it! This is how one can create a form with a line break in the question itself.
Conclusion
Hopefully, now you know how adding a line break in forms can make it alluring and eye-catching. Unfortunately, Google Forms doesn’t offer that feature in it. So, if you are looking for such kind of functionality in your forms then, you can definitely give Pabbly Form Builder a shot. The software allows users to explore the platform by offering a free trial.
So, what are you waiting for? Go and try your hands on it.
How To Customize Font In Google Forms’ Confirmation Message?

The confirmation messages sent by Google Forms looks kinda unemotional as if, it is sent by a robot. You need a warm communication flow between you and your clients. Now, one of the best ways to make confirmation emails amicable is by altering the font/font size to a more friendly tone. Unfortunately, Google Forms don’t allow you to customize the font type, size, formatting, style, and alignment of a confirmation message.
It also fails to insert emojis, images, and videos. Besides, you can’t trigger confirmation messages based on conditions. It simply restricts you to just compose a simple confirmation mail and send it to your respondents.
So, Can Any Google Forms Alternative Customize Confirmation Messages?
Yes, there are some form builders that can tailor your confirmation emails according to your preferences.
Here, I am bringing the spotlight on one such incredible form creator i.e. Pabbly Form Builder that comes with an in-built confirmation message editor, which allows you to easily set the desired font type, style, and size. Moreover, it supports a bundle of diverse font styles and other features.
- Also, you can set the color of the text as well as the background according to your discretions.
- You can add emoticons, images, and videos into the confirmation emails to make it more exciting.
- In contrast to Google Forms, you have the flexibility to easily change the name, subject line, and email address in the thankyou email.
- Furthermore, you can send conditional emails that will be sent only in some particular situations. This helps you to achieve the dynamic confirmation message functionality in your form.
- Pabbly Form Builder also doesn’t restrict you on any feature like unlimited submissions, storage, and multi integration through Webhooks.
At this point, you know how much versatility Pabbly Form Builder offers when it comes to customizing the confirmation message. Now, you might be eager to learn to do so.
Steps To Change The Font/Font Size In A Confirmation Message In Pabbly Form Builder:
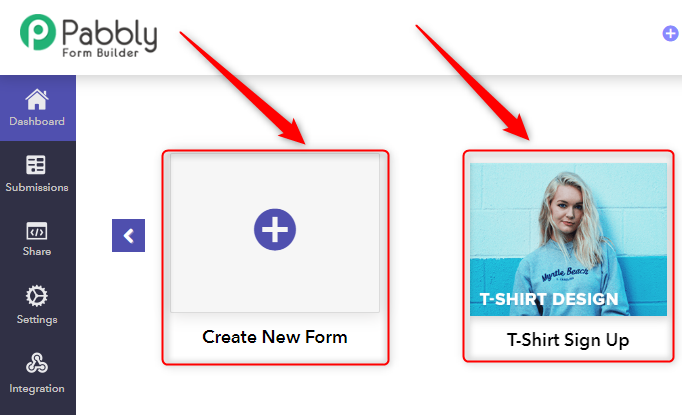
Step 1: Create A New Form
Sign in to your Pabbly Form Builder account. From its dashboard, you can build a form by choosing one of the beautiful inbuilt form templates. Or you can just create a new form by clicking on the (+) sign.
Step 2: Add Fields Into The Form
Next, to add any desired field types into your form, go to the “Blocks” tab & select that particular field. In my case, I have inserted “Name”, “Email” and “Paragraph” fields to the form.
Step 3: Go To Settings
Now, that you have completed building your form, you need to select the “Thank You Page” tab in the “Setting” option.
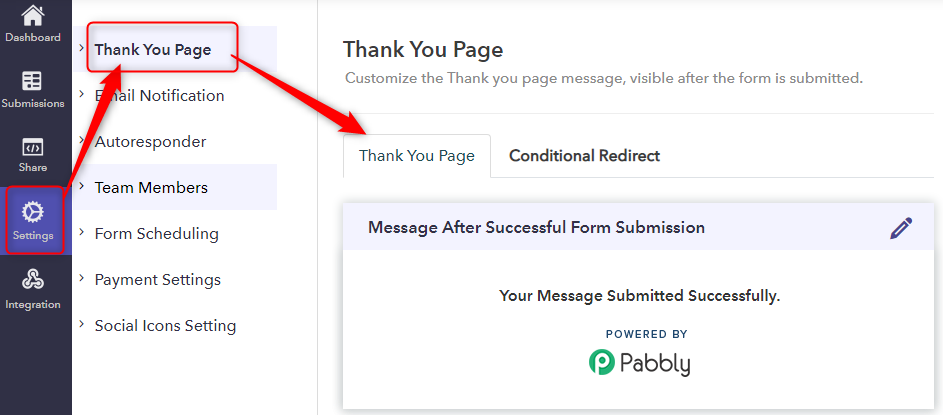
Step 4: Click The Edit Option
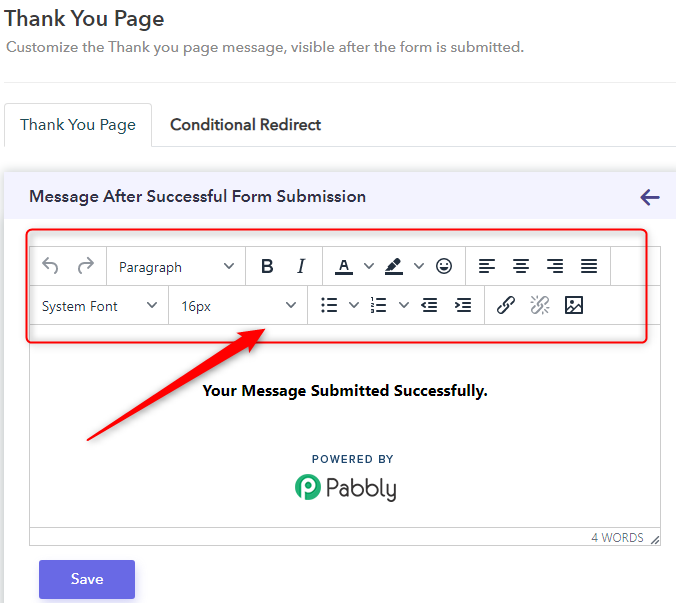
You can either use the default message as a confirmation email or you can compose some desired message too. For this, just select the “Edit” option for customizing the “Thank You” page.
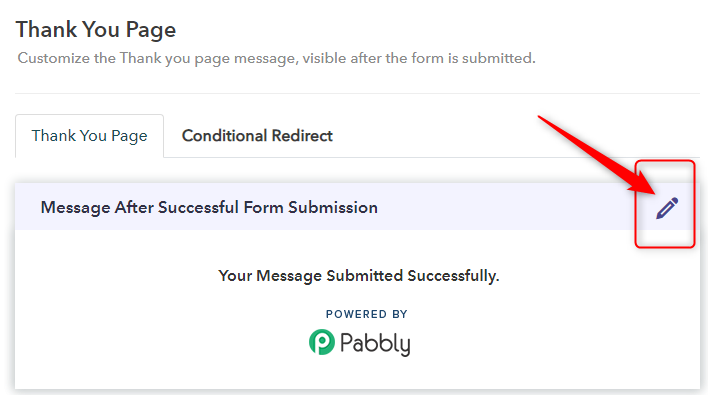
Step 5: Edit Font/Font Size
Clicking on the edit button will summon an advanced message builder to custom-make your email. Here, you can also change the typography, color, font style, size, and many more attributes. If you desire, you can add emojis and images.
Furthermore, you can even insert videos simply by copying and pasting the videos’ URL in the URL box.
Alright, we now learned how to customize the confirmation messages. But Pabbly Form Builder doesn’t let you away with a simple “Thank You” mail. You can set confirmation emails based on conditions and trigger autoresponders emails. Furthermore, you can even customize these emails. And here is how you do it.
Steps To Customize Confirmation Message Based On Conditional Redirect And Autoresponders In Pabbly Form Builder
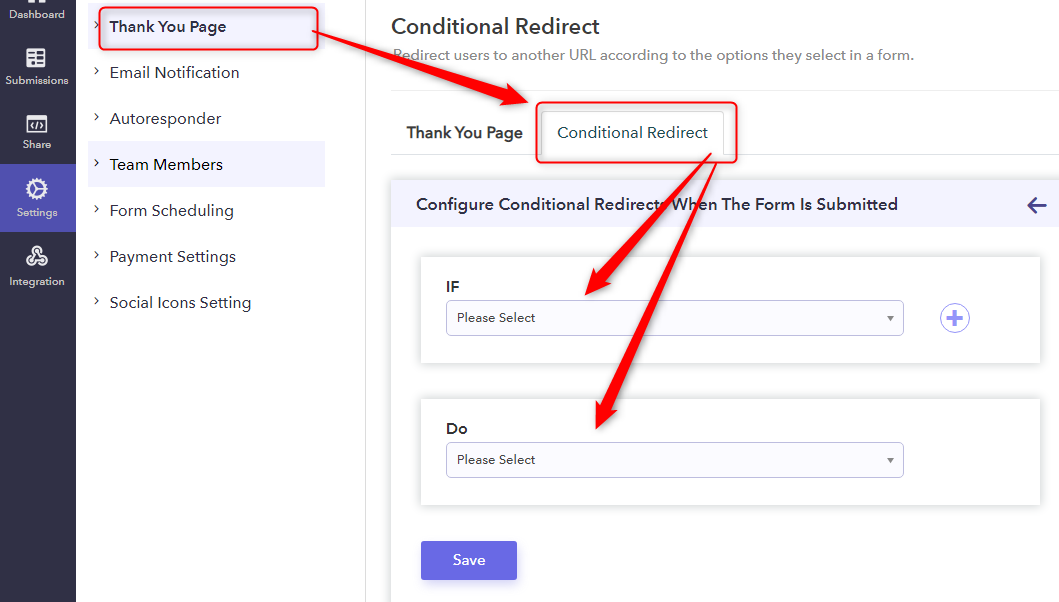
Step 1: Set Conditional Redirect And Customize It
You can set confirmation mail based on conditions. This is done by clicking on the “Conditional Redirect ” tab which is located adjacent to “Thank You Page”.
Here, set the conditions in “IF” and place the results in “Do”. Once the result is placed, an email editor will open, here you can customize the message accordingly.
Step 2: Go To Autoresponder Tab
Further, you can also construct autoresponder emails, that you want to send automatically when some particular actions are triggered like when the user has made a payment. For this, Pabbly Form Builder comes with 5 sets of the autoresponder emails.
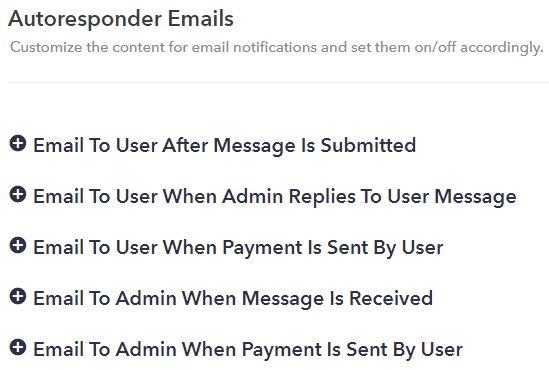
Step 3: Customize Autoresponder Email
So, when you select an autoresponder email from the set, it automatically opens an editor. Here, you can dabble with fonts size, paragraph, styles, alignments and pretty much everything you could customize in thank you messages.

That’s it! This is how you can easily change the font/font size in all kinds of confirmation messages in Pabbly Form Builder.
Conclusion
At present, to customize fonts in Google Form’s confirmation messages is not possible. Due to this limitation, your messages will look dull. Hence, to ease your work, we provided the best solution for this problem i.e. Pabbly Form Builder. With this, you can not only change the font & its style but also send conditional messages and dabble with autoresponders.
Now, keeping things in mind, we are expecting that this post helped you a lot to change the look & feel of your form the way you want.
How To Extend The Margins In Google Forms?

Are you looking for a way on how to extend the margins in Google Forms?
Basically, when you create a form, the first thing that strikes in your mind is to make your form more presentable. Hence, to create an attractive form, a lot of customization is required. Whether it is just a font customization or logo customizing feature, every single feature plays an important role while creating a form.
Whereas, to give your form a subtle look, specific space is required in the form to keep you out from creating a mess. And to help you with that, margin comes across as an essential element to make certain spaces in the forms.
So, if you want to know how one can adjust the margins in Google Forms? Then, you have come to the right place.
Assuredly, Google Forms has provided you numerous templates and unlimited access to create the form for free. But, it does lack a lot of features when it comes to customizing the Google Forms. Thus, one of the drawbacks is that it does not have any feature to extend the margins in its forms yet.
Are There Any Other Form Builders Available To Extend The Margins In Forms?
Yes, there are several alternatives available in the market to extend the margins in your forms.
Here, I would like to recommend you one of the most versatile form builder at an affordable price, i.e, Pabbly Form Builder. It lets you customize the margin in your forms very easily to keep the formatting neat and clean. Apart from that it also provides several customizing features such as:
- Not only you can customize the margins, but you can also customize the letter spacing, font size, line height, background color and many more through its typographic feature.
- In its form feature, you can increase or decrease the size of the form along with its background color, border, and border shadow.
- Through its layout features, you can choose the background image or else can upload the image you want.
- You can also shift text from left to right via its “Text Direction RTL” button.
- With the help of its header option, you can choose the header image and can also attach the link to it.
- It also provides you an option to customize the size of the header image.
- Pabbly Form Builder offers you several built-in themes to choose from.
- Apart from several customizing features, Pabbly Form Builder allows you unlimited access to submissions, payments, storage and many more without any restrictions.
Thus, Here Are The Steps To Extend The Margin Through Pabbly Form Builder:
Step 1: Create Your Form
Once you complete your signup, the first thing you need to do is to generate a form. You can either pick a form directly from the given templates or else you can make your own by clicking on “Create New Form”.
Step 2: Click On Global
While creating the form, you will see the customization page right next to your form. Where you find several elements in ” Blocks” such as email, payment, dropdown, etc. to customize your form. Merely, click on the “Global” option parallel to the ” Blocks” option.
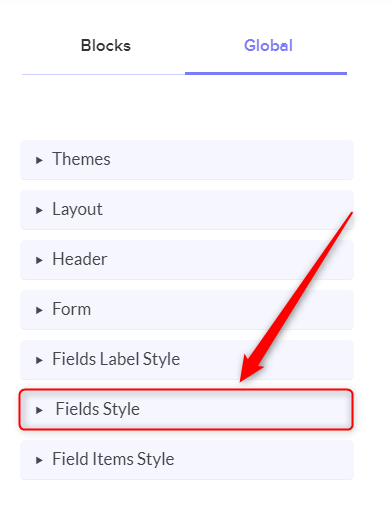
Step 3: Select “ Fields Style”
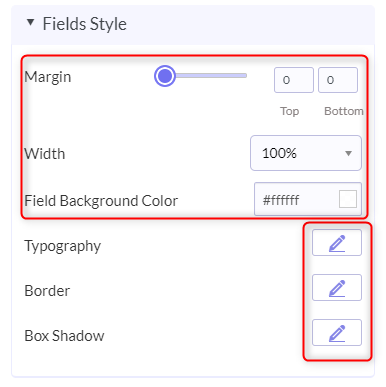
In the ” Global ” section, you will find numerous features to customize your form. From which you need to select the “Fields Style” option in order to extend the margins in your form.
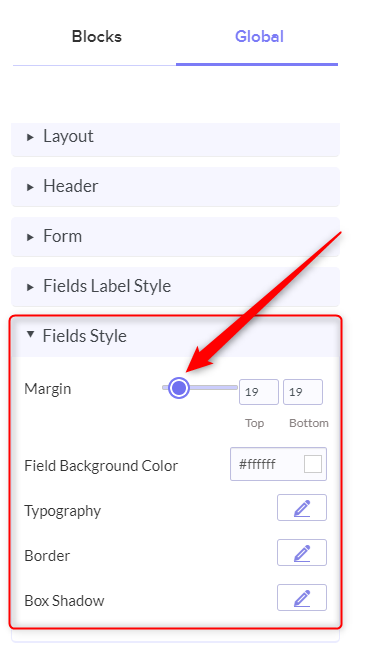
Step 4: Set The “Margin”
After selecting the “Fields Style”, you can easily adjust the margin through sliding the button left and right.
Hence, with the help of the above-mentioned steps, one can easily extend the margin in their forms.
Conclusion:
I hope this blog has helped you to get a solution for your query on extending the margin in Google Forms. At present, Google Forms does not allow several customizing features which might be a stumbling block you don’t want to face. Hence, to adjust margin in your form, a good form builder is required to save you from creating a mess. Therefore, depending upon your needs, Pabbly Form Builder allows you to customize your forms.
So, give Pabbly Form Builder a try, as it does not restrict you from using its any feature and allows you unlimited payment, submission and many more.
Where To Upload Photos In Google Forms?

Let’s say you want to create a certain type of survey that demand photo IDs (face or fingerprints) of your respondents for completing the authentication process. The very first tool, that comes into your mind to construct such surveys is Google Forms. This is because Google Forms is a free form builder that allows you to add fields in which your users can upload their photos.
Uploads per user in Google Forms is capped at 10GB, beyond this limit it stops taking files. Also, annonymous uploads are restricted by Google Forms. Simply put, without signing in their Google Accounts, your respondents won’t be able to upload their files.
However, form creators like Pabbly Form Builder allow users to upload an unlimited number of files directly from their phone/computer drives without worrying about storage.
Not just photos, Google Forms can upload your respondent’s data in different file formats like spreadsheets, presentations, audios, and videos. Furthermore, the state of the art Google security will also keep safe all of your users’ data.
This Is Where You Can Ask Your Respondents To Upload Photos On Google Forms
Here is a preview of your typical Google Form. For instance, I have created two fields where your respondents can upload files. You can create many more.
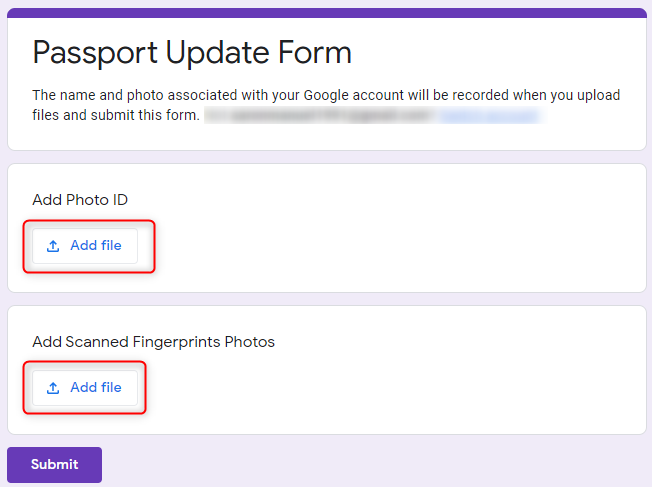
It is actually pretty easy to create these fields. But, if you are a rookie in the form building world and don’t know how to construct fields for file uploads, then here are the steps.
This Is How You Can Create Fields For Photo Uploads On Your Google Forms:
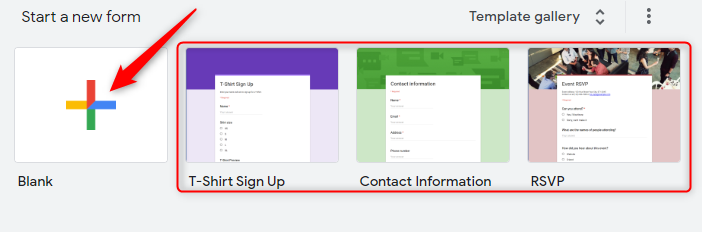
Step 1: Create New Form
You can create a new form by clicking on a “Blank” option or build it with one of the many pre-built form templates that Google Forms provides.
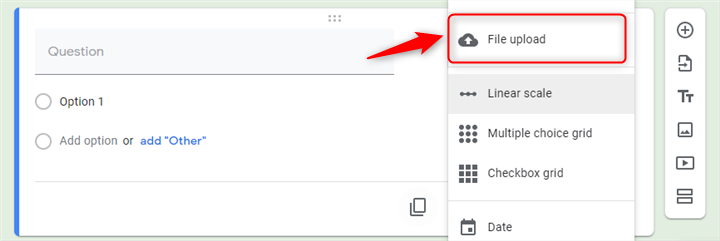
Step 2: Change Question Type To “File Upload”
To change the type of question, click on the drop-down menu on the new question tab that you just created. By default, in Google Forms the question type is set as “Multiple choice”. Thereafter, choose the “File upload” option to create a field where your users will eventually upload their photos.
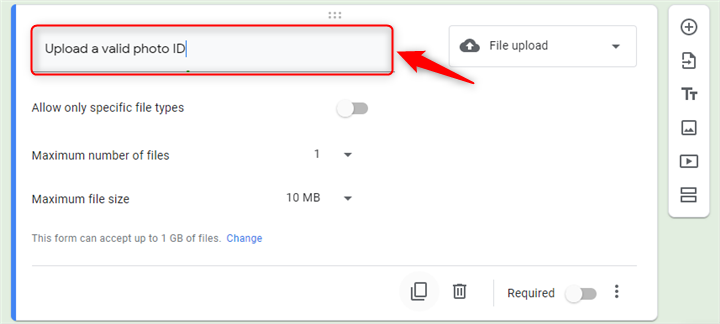
Step 3: Customize Question
Now, it is time to customize the question according to your needs. For instance, if you need your users to upload their photo ID, you can type that in the “Question” text field.
Step 4: Select File Types
Sometimes, you may want to receive only selected file types. In this case, use the “Allow only specific file types” option. Switch it on, from the toggle below the text field. After that, tick on the checkboxes for the type of file your respondents will upload. In our case, we are going to click on the “Image” checkbox.

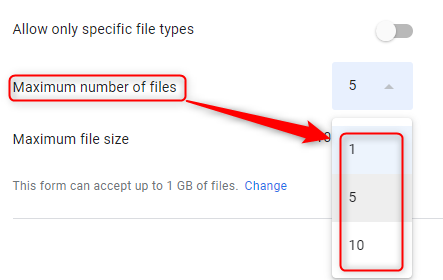
Step 5: Modify File Number Limit
By default, Google Forms restricts the number of file uploads from each user to just 1 file. Furthermore, to modify this, click on the respective drop-down menu to increase the limit as per your requirement.
Step 6: Modify File Size Limit
Also, Google Forms’s default upload size is just 1 MB per user. You can use the drop-down menu to increase the file size according to your discretion.
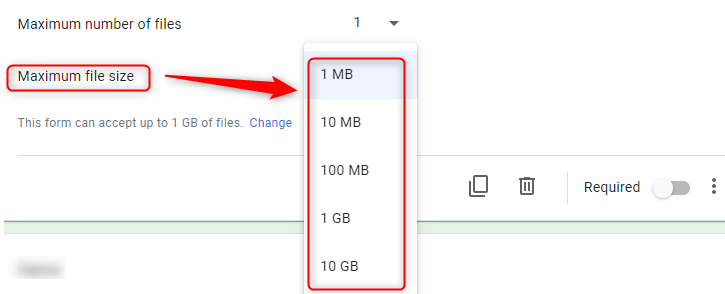
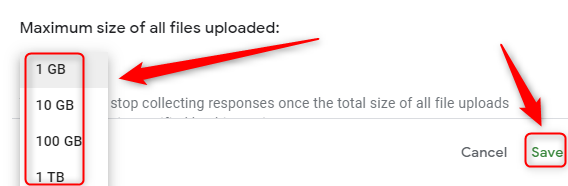
Step 7: Change The Storage Limit
The Google Forms default settings can accept up to 1 GB of files. Furthermore, if you wish to increase this, click on the change button which summons a window. Here at the bottom of this window, you will find a drop-down menu that can increase the maximum size of all file uploads to 1 TB.
Lastly, click “Save” when you’re done.
That’s it! These were the essential steps you need to know if you wish to use the file upload option on Google Forms.
Limitations Of Google Forms’ File Upload Feature
- You always have to change the default limits of the file size. Moreover, the maximum file size available for all uploaded files is 1TB, beyond this limit, Google Forms stops taking any responses.
- The number of uploads per user is restricted to just 10.
- Also, as mentioned earlier a user can’t upload data more than 10GB.
- Users have to sign in to their Google accounts. Otherwise, they wouldn’t be able to upload any files. This is because Google Forms access data only from Google Drive. This is bad for your users as they can’t upload files directly from their computer hard drives.
- Moreover, there are no customizations available for the upload field. All you can do is type in the question and configure the settings like file size and type.
Solutions To The Limitations
There are plenty of other form makers available online that can help you tackle the limitations of Google Forms. One such form maker is Pabbly Form Builder.
Pabbly Form Builder is an online resource that can be used to produce customized forms. In terms of uploading files or photos, it allows you to do the following:
- Receive responses from users without needing them to log into their Google or any other accounts. Your users can upload files directly from their computer storage or phone galleries.
- Furthermore, you can customize the file upload tab. You can configure typography, border, and margin among other settings.
- With Pabbly Form Builder, your users can upload an unlimited number of files. There is simply no limit.
- Moreover, it doesn’t matter if your survey wants a simple pdf or a huge blue ray movie, your respondents can upload files without worrying about conventional issues like storage. You have unlimited storage.
- Also, it doesn’t restrict you on any feature like unlimited submissions, unlimited views, and multi integrations through Webhooks.
Steps To Allow Users To Upload Unlimited Files In Pabbly Form Builder
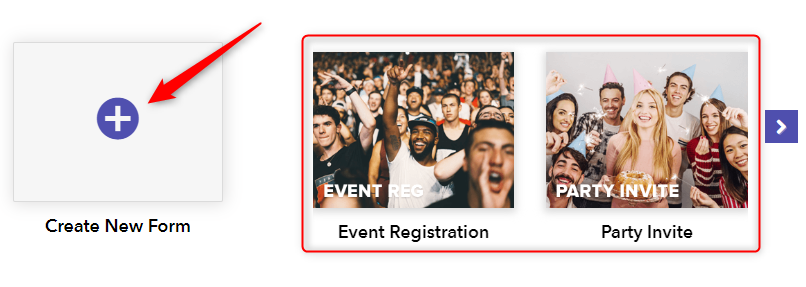
Step 1: Create New Form
Sign in to your Pabbly Form Builder account and in its dashboard, you will find a plethora of inbuilt form templates to build your form or you can simply create a new form by clicking on the (+) sign.
Step 2: Insert The Upload Field
In the left corner, scroll through the “Blocks” section to screen and click on the “Upload” field. You can create an unlimited number of upload fields in the Pabbly Form Builder. In all these fields, your users can upload files without worrying about file size, file numbers, and file types.

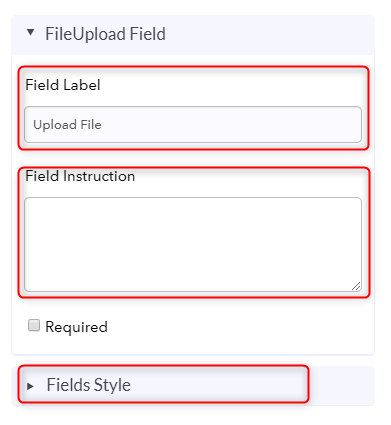
Step 3: Customize Upload Field
Now, you should see an upload field on the form. To customize the upload field, click on it. A design field emerges in the left corner, here in the “FileUpload Field” menu you can customize field label, field instruction and whether it is a required field according to your discretion.
Step 4: Tailoring Field Style
If you wish to customize it further, click on the “Fields Style” located at the bottom of the design block, to open a drop-down menu. This would contain settings like margin, typography, border, and box-shadow. Use slide bar, drop-down menus, and pencil icons to configure these settings. Furthermore, all changes are automatically saved in the Pabbly Form Builder.
At last, you may want to preview your form and share it with your users.
See, how easy it is to construct and customize your upload field in Pabbly Form Builder. Moreover, from the respondent’s perspective too, he/she can upload any files with ease.
Conclusion:
Google Forms do allow us to upload pictures. But the bland upload option of Google Forms, which lacks any customization and also has storage restrictions, will slowly make your survey boring or ineffective. Meanwhile, affordable form creators like Pabbly Form Builder grants users unlimited uploads and brings diversity to its forms with its customization. Come on, give Pabbly Form Builder a try. It will definitely give your lead capturing a necessary headstart.
How To Enable Save And Resume Option In Google Forms?

The “Save and Resume” option in any form can save a lot of trouble when it comes to lengthy forms.
There is no denial in the fact that long forms are tiring and consume most of our time. And that’s the reason why people generally preferred to avoid it.
On the contrary, if forms have “Save and Edit Later” options, it will definitely increase the value of your form. The reason for the same is users can fill the form according to their convenience. With “Save & Resume” functionality, your participants will be able to save answers they have already entered and finish their responses at a later time.
But, unfortunately, you won’t be able to enable this setting in Google Forms as it doesn’t support such feature currently.
However, to help you out with this, I have prepared a complete guide. Give it a read….
Better Option That Offers Save & Edit Later Option
Keeping your need in mind, I would suggest you to try out this Google Forms alternative called Pabbly Form Builder.
The software is built with the idea of fulfilling all the needs of a form creator and respondents whether it is basic or professional. It offers the flexibility of adding “Save & Edit Later” functionality to a form. With the help of this feature, the respondent can fill the form according to your convenience.
Let’s Have A Look At Its Features:
- You can track the progress of submission like status of partially filled, on hold, filled form, etc in the dashboard itself.
- It does not require any sign-in to fill the form. This way, you will be able to target a larger audience.
- You can customize the “Save & Resume” option according to your requirements as it gives you different options like color, border-radius, etc.
- Furthermore, this form provides various customization options like layout, themes, color and more for designing an engaging form.
- The tool offers several options for sharing and embedding like social media platforms, emails, etc. which means one can share their form on a large scale.
- Above all, it does not restrict you on any feature by offering unlimited submissions, uploads, fields, payment accounts and a lot more.
Here’s How One Can Build A “Save & Resume Forms” Using Pabbly Form Builder
Step 1: Create A Form
Firstly, you need to create a form by simply clicking on the “Plus” icon or you can use its pre-designed templates too and customize it as per your needs.

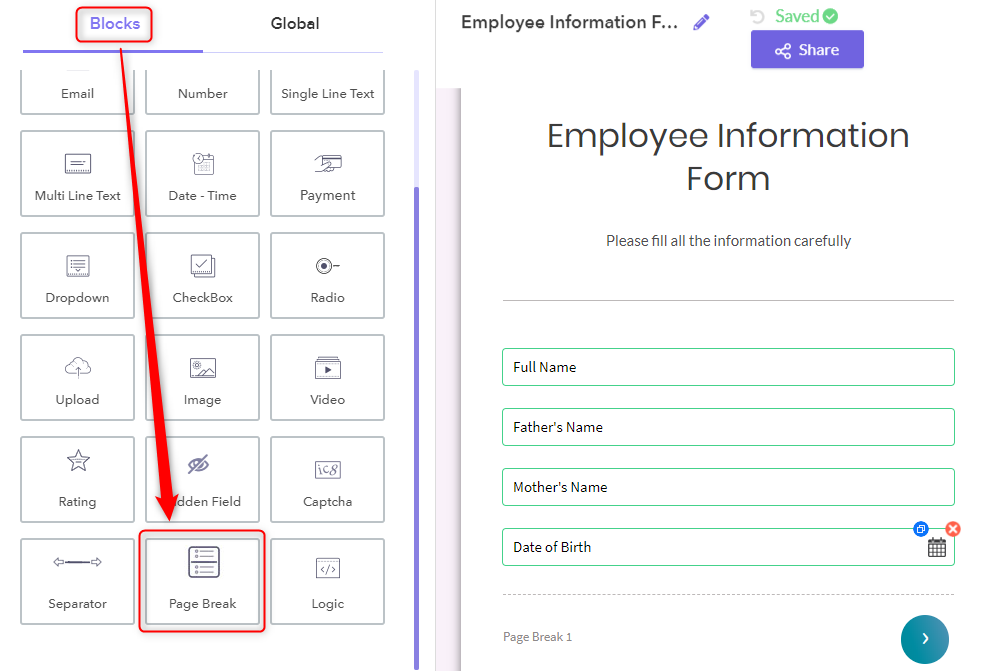
Step 2: Add “Page Break” Functionality
Next, you need to add a “Page Break” element to the form using its drag & drop builder. Using it, one can save and edit their responses at a later time.
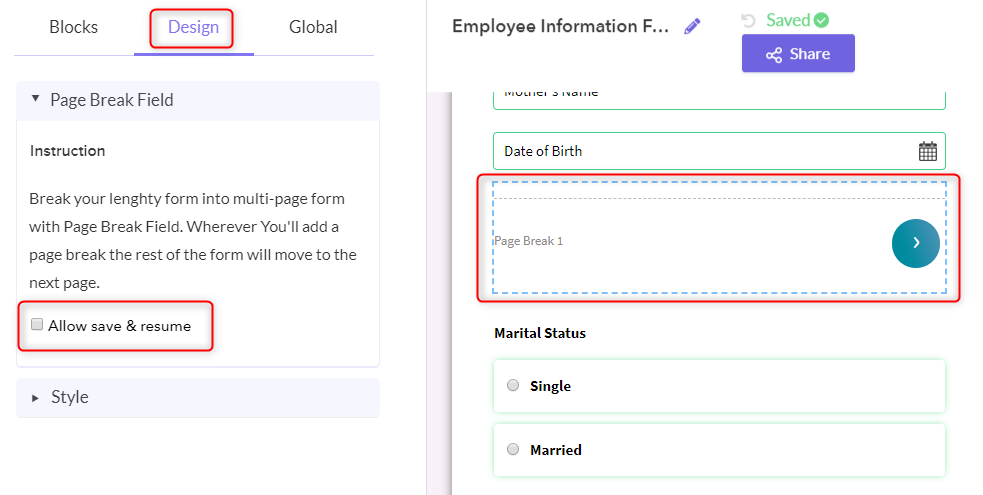
Step 3: Enable The Settings
Once you added the “Page Break” field to the form, you need to check the box beside “Allow Save & Resume” option in the “Design” tab.
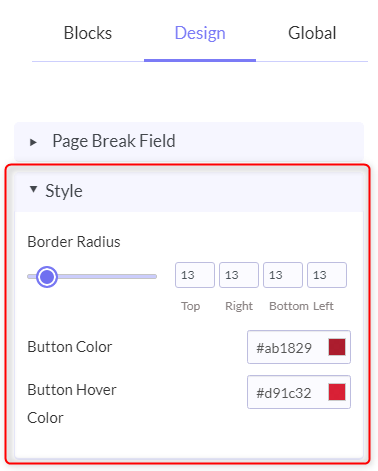
Step 4: Style Options
Besides, in this all-rounder form builder, you can find different style options like border-radius, button color, and much more for customizing the button in the “Style” tab.
Step 5: Preview
Once you’re done with form creation, you can view its preview by clicking on the eye-shaped icon appearing on the top left corner. This is how your form will look after adding the “Save & Resume” functionality.

Step 6: Fill Later Functionality
Further, when the respondent will click on the “Fill Later” option, it will send the partially filled form link to your email address which you can continue any time. That’s how it looks.
That’s it. By following all the above-mentioned steps, one can easily create a form with the “Save & Edit” field.
Wrapping Up:
We hope that this guide has helped you in setting up the form with the “Save & Edit Later” option. The “Save and Resume” feature is a great way to ensure your users have the option of saving their crucial work and picking it up again at a later time. Besides, this feature can cut down on form abandonment and leads to higher completion rates.
Hereby, I would like to suggest you to give Pabbly Form Builder a try which allows the respondent to fill their long forms according to their suitability.
If you like this article, then do share your feedback or suggestion in the comment section below.
5+ Best Zapier Alternatives 2022 (Free & Paid)

In the industry, there are a range of tools to automate the task of copying and pasting information from one app to another. But, Zapier is one of the most popular among them because it focuses on automation and connects all productivity and business apps. Zapier is an iPaaS software that seeks to connect two or more apps and services into workflows. It maintains data consistent across multiple applications without coding or relying on developers to build the integration.
The main purpose of Zapier is to save users time and provide easy integration of apps. But unfortunately, no tool is perfect for all, as each of us have different agendas and requirements. Plus, the pricing of Zapier is bit high, so it is not affordable for everyone.
However, Zapier isn’t the only automation services in town. There are many other Zapier alternatives that connect the business tools and offer an incredible range of features at affordable prices.
A Quick Comparision Of Best Zapier Alternatives
| Services | Pricing | Number Of Tasks | Premium App Integrations |
| Pabbly Connect | $29/m | Unlimited | Unlimited |
| LeadBridge | $29/m | 6,000 | Lesser Integration |
| Integromat | $9/m | 1,000 | Unlimited |
| Automate.io | $49/m | 10,000 | Lesser Integration |
| Microsoft Flow | $40 | Unlimited | Lesser Integration |
In this article, you are going to explore the 5 best Zapier alternatives and find out about the features they offer.
1. Pabbly Connect
“Pabbly Connect is the only platform that automates all your workflows without any restrictions on calls and premium app integration.”
It is a data integration software that automates all your workflows. It enables users to create automation workflows between multiple apps and services without any manual efforts. Moreover, its intuitive low-code flow designer takes you from installation to secure application and partner integration in less than 5 minutes.
Features:
- Supports all the popular apps that provide webhooks integration for CRM, automated marketing, eCommerce, helpdesk, payments, web forms, etc.
- Create one to one integration and multi-app workflows in less time for faster and smarter automation.
- Control the execution of your scenario by customizing the run schedule and the interval on a specified date, day, or time.
- Pabbly Connect’s formatter tool helps you to convert the numbers, dates, text, currency and more into your format.
- Create complex and specific workflows that include conditional triggers, in-sequence processing, etc. without adding a single line of code.
- Set a specific if/then or branching logic condition to your workflow by using the filter option. This will move users to the next step in a workflow depending on their performed actions.
Pricing:
You can make unlimited calls whether it is single or multiple steps, integrate unlimited premium apps, and much more. Besides this, it offers 4 pricing plans that are based on the number of workflows that includes:
- Free: For 3 workflows ($0 per month)
- Rookie: Pay $25 per month for 5 workflows and get all the features of Pabbly Connect.
- Pro: It allows you to create 10 workflows at the cost of $49 per month.
- Advanced: Buy this plan at $99 per month and create 25 workflows.
2. LeadBridge
LeadsBridge is an iPaaS solution that enables companies to enhance their omnichannel strategy orchestrating their business data.
LeadsBridge fulfils your integration needs, focusing on bridging gaps between advertising platforms and sales funnels, and delivering tailor-made integrations made upon your business needs.
The LeadsBridge platform is suited for companies that want to streamline their advertising activities by integrating the marketing technology stack with Facebook & Instagram Ads, Google Ads, and LinkedIn Ads.
With more than +370 out-of-the-box integrations available at the moment, you can easily connect your chosen software with your advertising platform, seamlessly synchronizing data for your marketing workflows.

Features
- Lead Sync:With LeadsBridge, you can automatically synchronize leads from Facebook Lead Ads, Google Lead Form Ads, LinkedIn Lead Gen forms with your favorite CRM, and Email Marketing software.
- Audience Targeting: Thanks to Audience Targeting, you will able to automatically create the best audiences by syncing the CRM segments, email marketing contacts, or customer lists with Facebook, LinkedIn, and Google Ads, always being compliant with GDPR and other privacy laws.
- Online-to-Offline Tracking:This tool allows you to track your offline transactions and understand the performance of online campaigns. LeadsBridge offers this service on Facebook through Facebook Conversion API and on Google by using Google Offline Conversions.
- Platform to PlatformWith LeadsBridge Platform to Platform technology, you can connect the company’s platforms through LeadsBridge to make teams more effective and get rid of data silo issues.
- eCommerce Synchronization:LeadsBridge allows eCommerce companies to sync contacts and orders between your eCommerce tool and the most used advertising platforms including Facebook and Instagram.
- Tailor-Made integration:LeadsBridge provides tailored integrations for complex workflows. This is suitable for companies with unique needs that are not available on the integration list. LeadsBridge helps to integrate custom or internal CRM for such companies.
Pricing
LeadsBridge offers a free 7-day trial with four paid plans billed monthly or annually, starting at $29 for the self-service platform with real-time LeadSync and 1.5k leads/mo, up to Enterprise accounts starting at $699 per month with Custom Volumes. Plans vary in the maximum amount of integrations and synchronized units (leads, audiences, and conversions). All plans offer the GDPR (also for audiences) and CCPA Compliant to keep all customer data safe.
3. Integromat
Integromat is the most advanced online automation platform and it is known as the glue of the internet. It will automate the workflow that you currently handle manually. Integromat is an extremely user-friendly product that not only capable of connecting apps but can also transfer and transform data. Besides, it has direct support for numbers of apps and services like Dropbox, Emails, Facebook, Google Drive, MySQL, Webhooks, etc. Besides this, it provides 1500 templates that provide ready-to-use scenarios to help with set up.
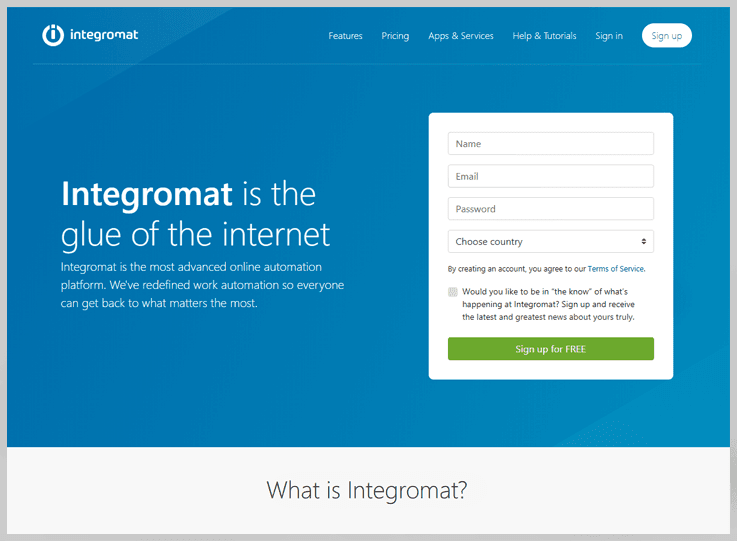
Features
- Connect hundreds of apps and services with Integromat without any coding requirements as it has HTTP/SOAP and JSON modules.
- It provides detailed information about all operations and helps you to see what data is being processed and when.
- Track real-time scenario execution and how your data flow between different apps and services.
- It comes with the most commonly used simpler & familiar functions for working with text, dates, sum values, find out aggregate and percentage, etc.
- Integromat allows you to choose the starting point whether you want to retrieve data from the past or from after activation.
- Easily duplicate the data and process it into multiple routes by dividing your scenario with built-in routers.
- Additionally, it has various features like error handlers, aggregators & iterators, execution history, scheduling, templates and many more.
Pricing
Integromat allows you to perform 1,000 operations with the free trial. After the free plan, you can opt for four paid plans ranging from $9 per month with 10,000 operations to $299 per month for 800,000 operations.
4. Automate.io
Automate.io is another impressive Zapier alternatives in the list that helps you integrate your cloud-based apps. Using this tool, you can automate your marketing sales, eCommerce, and business processes. Automate.io offers multi-app, multistep integrations between many apps in just a few minutes. Also, you can create your own complex workflows by adding delay, conditional logic, format data, etc.

Features
- Automate.io has an intuitive and user-friendly drag-and-drop interface that helps in data mapping.
- Also, you can use its Webhooks/Rest API for connecting all leading cloud and SaaS applications.
- It has various powerful tools for setting up cross-functional internal workflows, format data, or time delay for the enhancement of increasing more and more sales.
- Save your time and efforts with its automated data sync, configurable actions, and much more.
- User-defined cause events, automation of business processes, multiple data tools, automatic form completion etc.
- Integrate several popular apps like Facebook lead ads, Salesforce, Zendesk, WooCommerce, Shopify, etc.
Pricing
Automate.io offers different plans for small and basic needs. Also, it offers a free trial with 250 actions per month
- Startup: Get 10,000 actions and 50 bots at $49 per month.
- Growth: This plan is for small scale businesses with moderate requirements. Pay $99 per month for 30,000 actions and 100 bots.
- Business: Buy this plan at $199 per month with 100,000 actions and 200 bots.
- Enterprise: This plan is best suited for an organization with advanced requirements. It is available at the cost of $499 per month with 500,000 actions and unlimited bots.
5. Jitterbit
Another in this collection of free Zapier alternatives is Jitterbit. It is a dedicated platform to hastening the customer’s workflow by combining the power of APIs, integration and artificial intelligence. You can quickly integrate the SaaS, on-premise and cloud applications using the Jitterbit API and infuse artificial intelligence into any business process.
Jitterbit is especially focusing on ease of use and speed. Furthermore, the pricing of this software is higher than other software in its category, but it offers real-time data connections, as opposed to those that sync in intervals.

Features
- It has an intuitive graphical interface for creating any integration via drag-n-drop configuration.
- You swiftly infuse any application with artificial intelligence such as real-time language translation, speech recognition, and product upsell recommendations.
- Automate your business processes and workflow by integrating thousands of applications with pre-built templates.
- Set your integrations to run on a schedule, triggered, or real-time and control it from anywhere, anytime
- You can map similar fields between your apps and add business logic with over 300 included formulas
Pricing
Jitterbit iPaaS offers custom pricing based on business requirements. You need to contact the Jitterbit team for APAC & EMEA pricing details.
6. Microsoft Flow
Microsoft Flow is an extremely well designed and feature-rich service that consistently outshines Zapier. With Microsoft Flow, you can create automated workflows between your favorite apps and services as it supports more than a hundred of applications. You can immediately start your automation work like files syncing, data collection, etc with its numerous inbuilt templates.
Moreover, It helps you to automate time-consuming tasks whatever your industry, business or career.
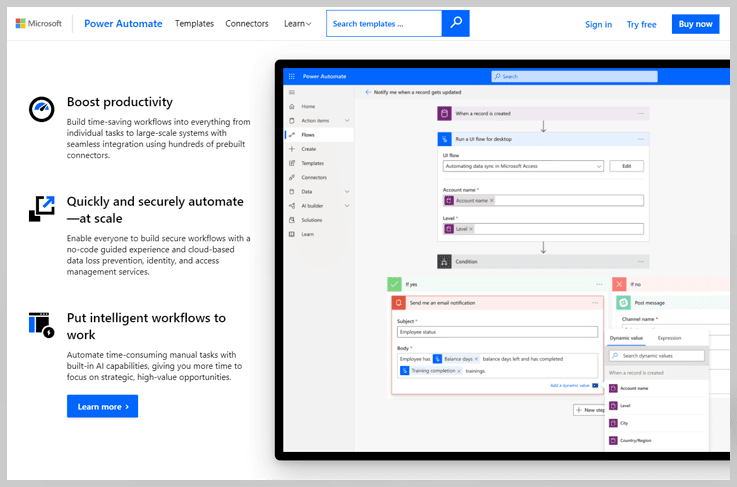
Features
- Connect Microsoft Flow with several popular Microsoft services like OneDrive, Office Outlook, Share Point, Dropbox, etc.
- Furthermore, it has an app for both Android and iOS platforms so you have to work less and do more than you want with Microsoft Flow.
- Besides, it allows you to create automated workflows between the app that you like the most and get notified even for a small change.
- Receive notifications of actions as they occur even for a small change.
- Secure your data with cloud-based data loss prevention, identity, and access management services.
Pricing
Microsoft Flow offers a free plan and two paid plans, according to the individual users and implementation flows. Its pricing starts from $15 to $500 per month per user.
7. IFTTT
IFTTT ensures that all your devices and apps are connected and communicating with each other. It stands for “IF This Then That” i.e it creates powerful connections with one simple statement. Moreover, it works with over 600 apps including Twitter, Telegram, Google Drive, Twitch, Weather Underground, and devices like Google Home, Amazon Alexa, Nest, Philips Hue, etc.
Features
- IFTTT helps your apps and devices talking to each other for faster and smarter automation.
- You can easily download any application from the App Store or Google Play to access IFTTT on the go.
- Works great with social media apps so that you can post, tweet and stream them from everywhere & anywhere.
- Apart from this, it enables you to connect services and make them work together via applets. You can also integrate music apps like Saavn, Spotify, SoundCloud, Songkick, etc.
- Get a notification for weather, reminders, news update, music, Instagram post and many more.
Pricing
For developers and others, IFTTT pricing is $199. Enterprise and business team pricing is custom so they need to contact IFTTT sales.
Final Thoughts
Finally, we can conclude that there are a wide assortment of Zapier alternatives, but each tool varies with its work style and functionality.
In this article, we’ve redefined each tool on the basis of features and pricing. So, go on the above list and choose the best tool to power up workflow with automation.
How To Track IP Addresses Of Respondents In Google Forms?

Wondering about tracking the IP addresses of the respondent in Google Forms?
Primarily, Google Forms is a free tool, best suitable for creating simple forms with basic properties.
But, if you are looking for a way to track advance information like IP address, geolocation, browser details, country, etc.
Then, it will disappoint you as there is no such feature available in Google Forms.
Is There Any Alternative To Google Forms That Will Help Us Out?
A huge yes! If you really want to trace the IP address of your form respondents, then you can try some other alternatives like Pabbly Form Builder that comes with the default feature of IP tracking.
Try Pabbly Form Builder for Free
Further, it not only provides the IP address of form respondents but also tracks the details like their country, the browser, OS, & much more. And the most amazing thing about it is that, you don’t need to do any external setting for tracking.
Some Of Its Features Which Make It Stand Alone In The Crowd Are:
- It comes with the integration of Google Analytics. Using which you can monitor the performance of your form in a blink of an eye.
- On contrary to Google Forms, you can also use the built-in form “Analytics & Reporting Feature” of Pabbly Form Builder that will provide the complete stats about your form in the software itself.
- The software comes up with the “Point Of Contact” feature which helps to discover from which specific page/source the user has referred to your forms.
- Pabbly Form Builder is the only software that doesn’t restrict you on features & utilities as it offers unlimited submissions, storage, uploads, and much more.
- Last but not least, the tool with these many features comes at a very affordable price.
A Step By Step Guide For Tracing The IP Address Of Respondents In Pabbly Form Builder:
At this point, let us discuss the few simple steps for tracking the details like IP address, country, OS, browser, etc, of form respondents.
Step 1: Create A Form
The very first thing you need to do is, open the dashboard & click on the “Create New Form” option or you can also use its beautiful pre-built templates.
Step 2: Add Form Fields
Afterward, you need to add the desired elements in your form. For this, go to the “Blocks” section & add the desired fields. You can also customize the whole form by changing the theme, header, layout and much more.
Step 3: Share The Form
Once done with the process of form creation, the next thing you have to do is share the form for collecting & tracking the details of form respondents such as IP address, country, etc. Simply click on the “Share” tab which will offer options like copy the link, embed the link, etc. Choose according to your needs.
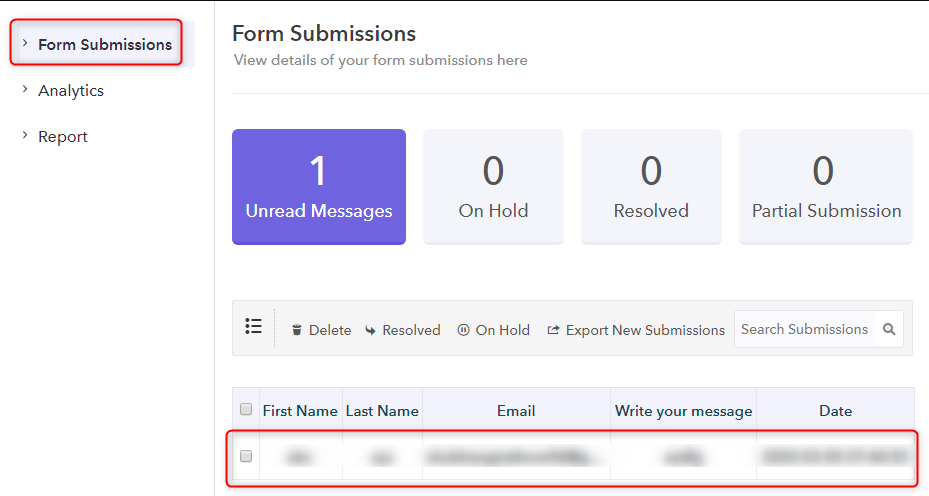
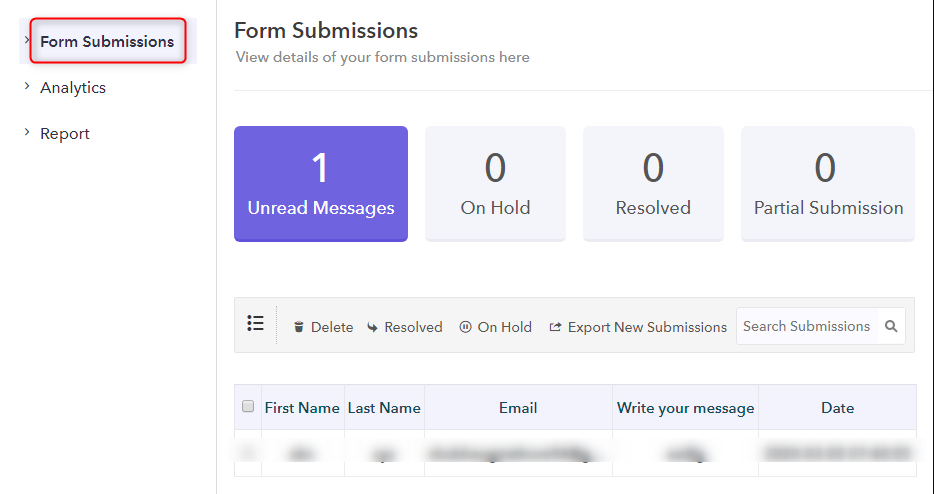
Step 4: Check The Submissions
Now, at this point, go to the “Submission” tab & check how many submissions you have received on your survey.
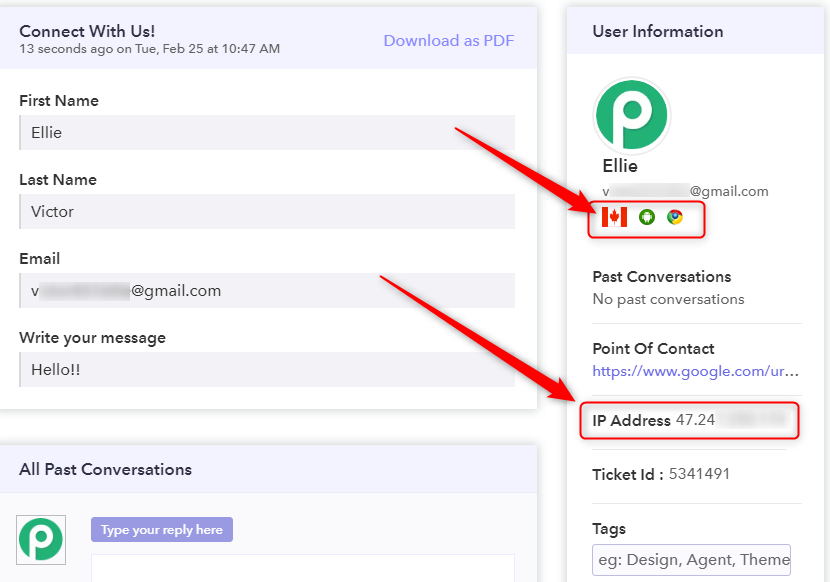
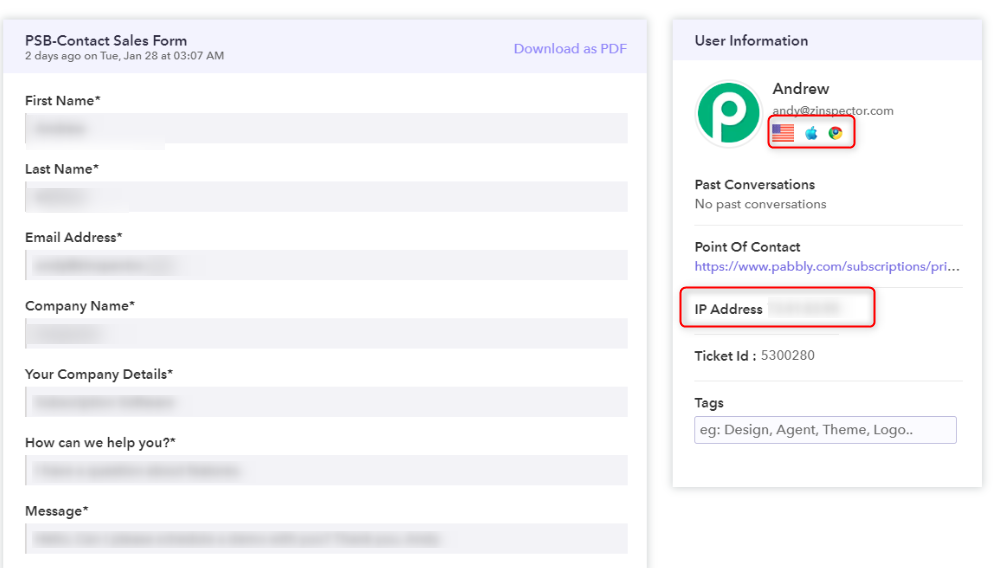
Step 5: Open The Submission
Next, open the response receipt of any user which will open the pop-up window with all the required details like IP address, country, browser, OS, etc., in it.
That’s all!!! There you have it.
This is all about the process of IP address tracking in Pabbly Form Builder.
Final Words!
Tracing the details like IP address, geolocation, browsers, etc, of form respondents, can help you in eliminating the abusive responses that can ruin your important surveys.
But, as you know Google Forms does not allow you to track the IP addresses of the respondent.
Hence, to help you out, here in this post, I have recommended you to give Pabbly Form Builder a try.
Check it out right now & safeguard your survey results instantly.
How To Find Country Of Respondents To Google Forms Survey?

Wondering about how to find a country of the respondent with Google Forms submissions?
Basically, if your form targets a global audience, then it is very important to view and manage the form responses according to the location.
Because knowing where a specific form was filled out can help you cater to your visitor’s needs and turn more leads into paying customers.
But, if you are looking for such type of features in Google Forms then it will disappoint you, as it doesn’t have such advance features available in it.
Alternative To Google Forms For Finding Country Of Respondent
There are many form creators available online that can track the location of form respondents. Here, I am sharing one of the best form creators named Pabbly Form Builder which fulfills all the requirements of a creator as well as the user.
With Pabbly Form builder, one can easily track the user location, country, etc which will help them to enhance the business or sales of their organization. Further, the software doesn’t restrict you on features by offering unlimited submissions, uploads, payment and a lot more.
Just Take A Look At Its Other Highlighted Features:
- Not only the country, but you can also track the respondent IP address, web browser, and devices.
- Besides, it offers the inbuilt analytics feature that can provide you the complete insight about a form.
- The tool gives you various options for tracking the form activity such as Unread Messages, On Hold, Partial Submission and Received Messages.
- Further, you can export responses in a CSV format using its “Export New Submissions”.
- It provides you the “Save & Resume” feature that gives the flexibility to fill the form later.
- Offers different third-party integrations like PayPal, Stripe, Google Analytics & many more to automate your workflow.
- The form builder provides various options for sharing & embedding a form like full form, sliding, etc to target a larger audience.
- Pabbly Form Builder offers the “Autoresponder” feature which makes reverting the responses a lot easier.
- Using its “Form Scheduling” feature, you can set a start and end date on a form.
- With its “Point Of Contact” functionality, you can determine from which specific page/source the user has referred to your forms.
Now, Let’s Discuss The Procedure Of Tracking The Location In Pabbly Form Builder
Step 1: Create A New Form
Firstly, you can either design a new form from scratch by clicking on the “Plus” icon or choose your desired template from its pre-built template library.
Step 2: Design Your Form
Next, you can build a responsive form as per your needs, using its easy to use drag and drop editor.
Step 3: Share The Form
After designing a form, you need to make it public to get responses. And for that, you can simply copy the link and share it using different communication mediums such as Facebook, Twitter, etc. Further, you can also embed it on your website.
Step 4: Form Submissions
Next, under the “Form Submissions” option, you can view all the submissions which you have received from users. Just click on their submission in order to find details.
Step 5: Track The Location
To track the details of users, you need to click on the details of the respondent, which will open a popup window with all the information such as country, browser, Ip, etc.
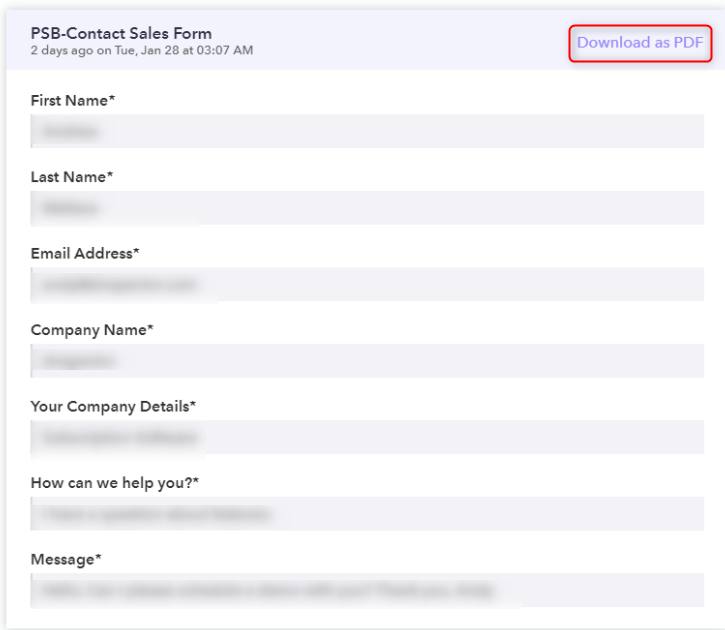
Step 6: Download As PDF
Besides, if you want to download the receipt of the response, simply hit the “Download as PDF” button.
This is how one can find the country and other related details of their form respondents in Pabbly Form Builder.
Conclusion:
By tracking the respondent details like country, browser, etc you can easily optimize your marketing and lead capturing strategy in a better way. And Pabbly Form Builder is the perfect option for you to fulfill these needs by providing accurate details about your users whereas in Google Forms you can only view submitted responses, nothing else. Hence, we would recommend you to give it a try.
We hope that this article has helped you and gives the solution to your problem.
How To Make Google Forms Accessible To Everyone?

Making Google Forms accessible to everyone is a great way to collect feedback.
Basically, gathering feedback from users is one of the most efficient and straight-forward tactics to improve your product, service or business. No doubt, the form is the best way to get that honest and insightful feedback.
Now, for collecting more responses/feedback, obviously, you want your form to be filled out by a larger audience. So, for doing that you need to make your form accessible to everyone that doesn’t restrict any user from filling it. But, before moving forward, you need to create a form using an online tool. Certainly, Google Forms is the first choice of every business or individual for designing a form, because of its “free of cost” tag.
Surely, you can make your Google Forms accessible to everyone, but it has some limitations that won’t be enough to create an engaging & converting form because of its basic customization options. Along with this, it cannot help you in grabbing the attention of more visitors towards your form as it is not compatible with all the devices.
Hence, to avoid these shortcomings, you can try its alternatives like Pabbly Form Builder packed with customization tools that empowers you to design professional looking responsive forms. Using which, you can make your form available to everyone whether they are using your form on desktop, mobile, tablet, etc.
In this article, we will walk you through the process of making your form public.
Let’s Discuss Step By Step, How You Can Make Google Forms Accessible To Everyone
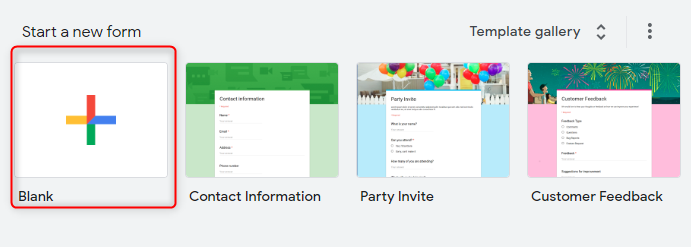
Step 1: Create Your Form
Open the dashboard of Google Forms and then, click on the “Blank” button to create a new form. Besides, you can also use its pre-designed templates according to your needs.
Step 2: Add The Form Fields
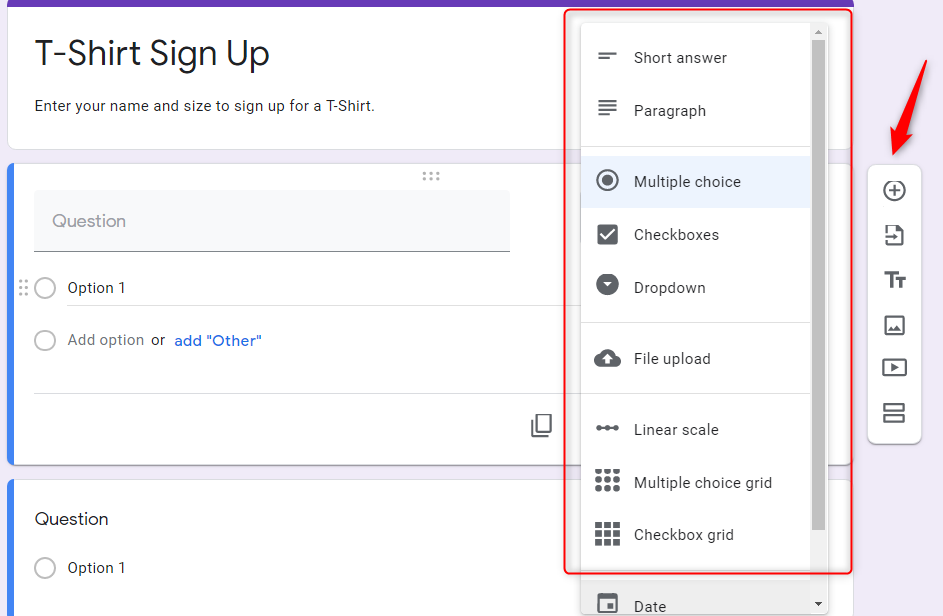
Now, click on the “Plus” icon to add a question of your choice. Here, you can use the dropdown box to choose the field type, such as short answers, paragraph, multiple-choice and so on.
Step 3: Gear Icon
Go to the settings by clicking on the “Gear” icon appears on the top right corner of the screen.
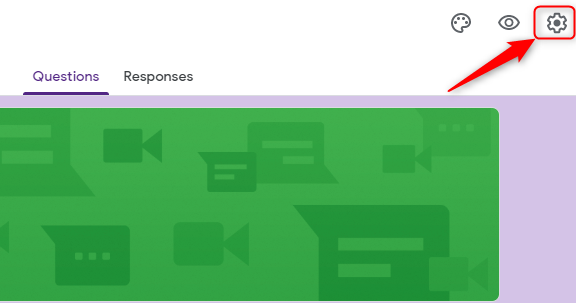
Step 4: Settings
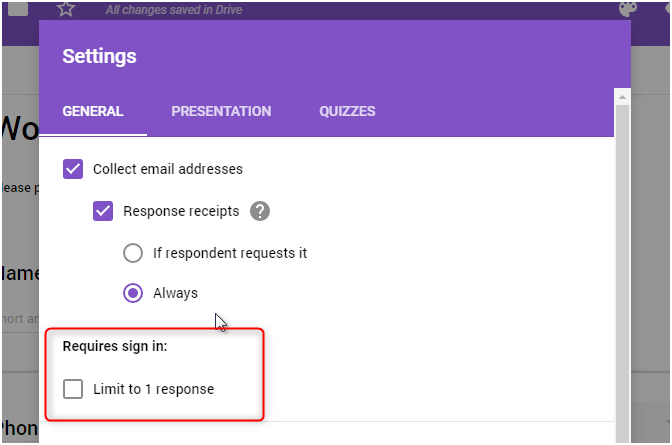
Further, it will open a popup window where you will find various options like collect email addresses, response receipts, require sign-in, etc.
Now, to provide access to everyone make sure that the “Require Sign-in” option is unchecked.
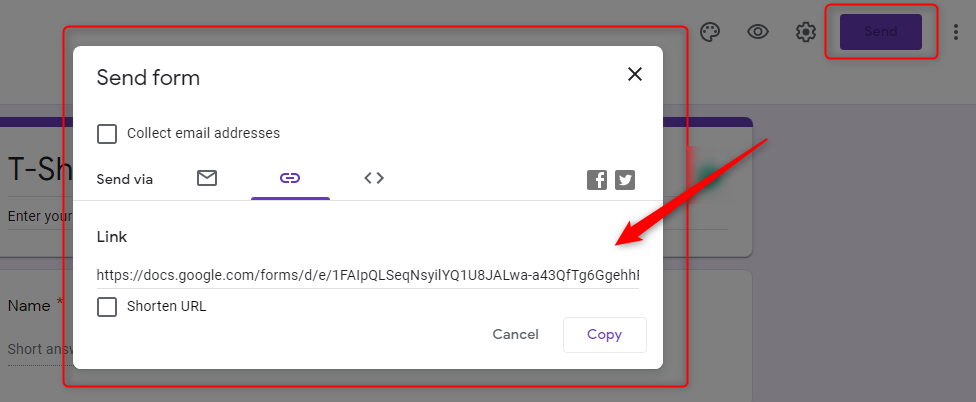
Step 5: Send The Form
Next, to make the form accessible to everyone, simply click on the “Send” button where you will find other options like email, embed, etc. From here, you have to copy the link of the form.
Step 6: Test The Form
To test the form, paste the link in different browsers and see whether it is working or not.
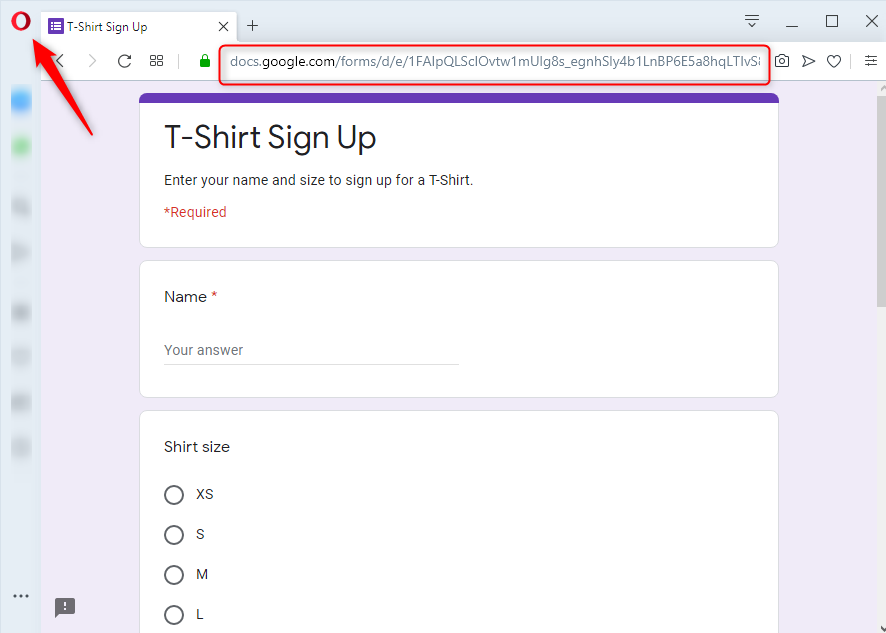
As you can see, here it is working fine without any sign-in.
Limitations Of Google Forms
One of the main purposes of having a form is to expand business growth but Google Forms disappoint us here. Some of its limitations regarding accessibility are shown below:
- To make the form accessible to everyone, you have to manually set the setting.
- If your form requires a file upload, then the user needs to sign-in to their Google account to fill the form.
- No doubt, the form will be available among a larger audience but there is no such option of keeping track of respondent activity.
- The free tool offers a limited customization option.
- No payment collection option in a form which can be a problem to the user who thinks so highly of Google Forms.
Boost The Audience Engagement With Other Alternatives
You might be looking for some other options that can fulfill all your requirements without any headache. As I have already mentioned above, one such form builder i,e. Pabbly Form Builder that doesn’t restrict you on features which means you will get unlimited options like submissions, uploads, storage, etc.
Below we have listed some of its benefits:
- With Pabbly Form Builder, you can easily make your form reachable to a wider audience and collect unlimited submissions from them.
- Using its analytics feature, you can keep an eye on respondent activity.
- And the interesting thing is that you don’t need to make any changes to the settings like you do in Google Forms for making the form public.
- Besides, all the forms created with this form creator would automatically be responsive across all the devices (not just mobile).
- Also, your created forms would not look generic anymore, you would be able to customize every little detail of it and make them truly represent your brand.
- The software gives you the flexibility to collect payment from the form itself.
Let’s See How One Can Make A Form Accessible To Everyone Via Pabbly Form Builder
Step 1: Create A Form
To create your form from scratch, click on the “Create New Form” button into the dashboard. Besides, you can also use its beautiful pre-designed templates too.

Step 2: Customize Your Form
Pabbly Form Builder offers a wide range of customization options like themes, layout, header, colors, fonts and a lot more for designing a form of your desire. 
Step 3: Hit The Share Button
Once you are done with the designing of a form, just press the “Share” button present at the top right side of the screen for sharing it with the larger audience.
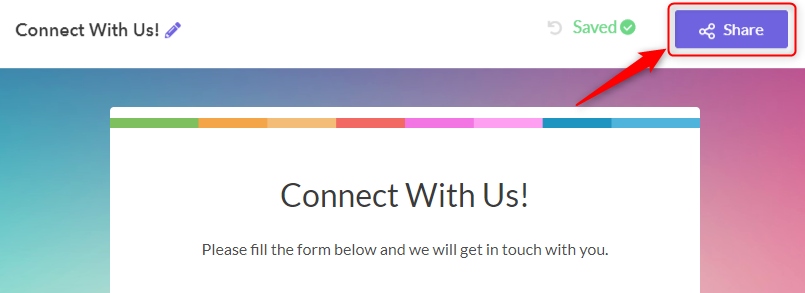
Step 4: Share Your Designed Form
After clicking on the “Share” button, a new window will get open, where you see a shareable link that you can distribute on different mediums for collecting a huge amount of submissions.
Besides this, you can directly share your forms on Facebook, Twitter, LinkedIn, etc. by simply clicking on their icons.

This way, you can easily make your form accessible to everyone that doesn’t require any account login for submitting a form.
Conclusion:
An engaging or accessible form is a need for every business in order to grow. Hence to make it available to the maximum number of users is one of the most important tasks. Using this guide, you will get an idea of how to make your Google Forms accessible to everyone and can capture more & more leads for your business or organization.
How To Change The Sender Name In Google Forms?
Looking for a way to change the sender name in Google Forms?
Basically, people replying to your email is a positive engagement, whereas sending from a “no-reply” address creates a negative impression. That is the reason, why people mostly prefer to customize the sender’s name in their forms. It not only allows you and your clients to connect but, it also helps your recipients to identify you and your organization.
However, it is a known fact that Google Forms provides you limitless access to create and send forms for free. But, the option of changing the sender’s name is not available in its software yet. Therefore, an alternative is required in order to overcome the drawbacks of this tool.
So, Is It Possible To Get Any Alternative Better Than Google Forms?
Yes, there are better alternatives available other than Google Forms to change the sender’s name. Hence, I would like to suggest the best alternative for Google Forms is Pabbly Form Builder. The software doesn’t restrict you on features by offering unlimited submissions, storage, payments and much more.
Further, it not only enables you to send emails to your recipients through your own email address, but you can also choose from multiple SMTP servers which it provides.
Reasons Why You Should Choose Pabbly Form Builder:
Let me tell you some of its features that why you should consider Pabbly Form Builder as a Google Forms alternative.
- With the help of this software, you can not only change the sender’s name but can also change the email address from which you can get a reply from your subscribers.
- It also enables you to add a logo in the email address in order to brand your company or organization.
- This software also provides you different SMTP servers like Gmail, Hotmail, MailGun and many more to connect from.
- You can even customize your email with several options provided in the customization box. For example, you could change the font, color, style and many more.
- Along with customizing the emails, they also provide an option to modify the content of the email as per your requirement.
- This tool also provides you a “Reply-To” feature, through which you can enter your email in which you want to get replies from the subscribers.
- It comes with a built-in form analytic feature, through which you can track form views, submissions and overall performance of your form in the software itself.
- It also allows you to collect payment through your website.
Here Are The Steps To Change The Sender Name Through Pabbly Form Builder:
Step 1: Create Form
Firstly, sign in to Pabbly Form Builder. Then, after completing your signup, you will be directed to its dashboard. Where you can create forms through its “Create New Form” feature or else you can choose from the given form templates.
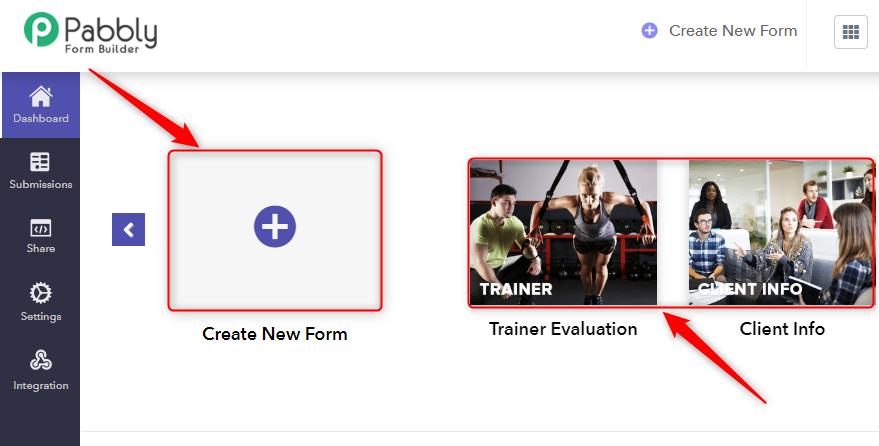
Step 2: Select Settings
After creating the form, your next step is to move towards settings, which you can find on the left side panel.
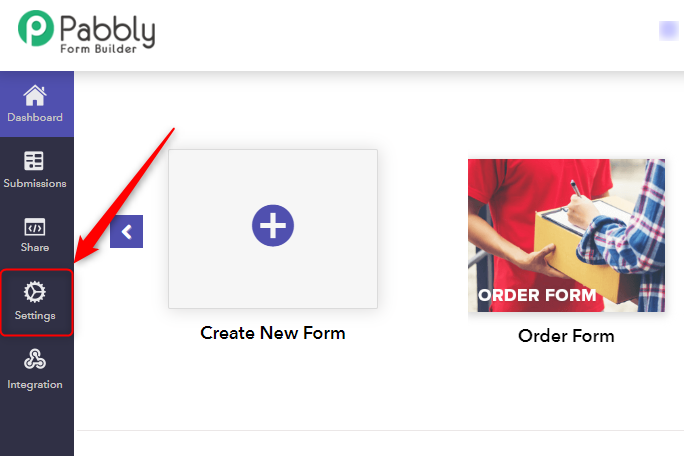
Step 3: Select Autoresponder
After clicking on “Settings” you will find several options on the settings page. From which you need to select the option “Autoresponder”. With the help of this setting, you can easily change the sender’s name in your form.
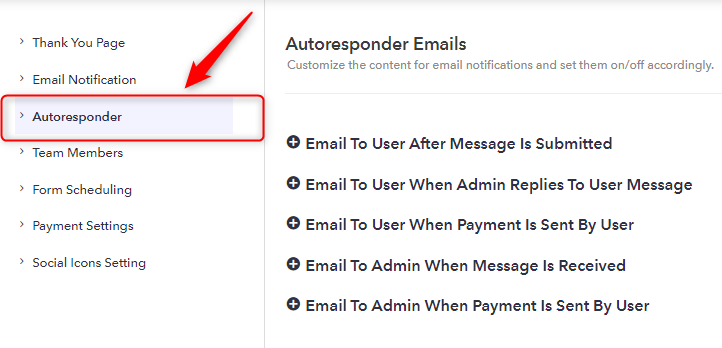
Step 4: Choose From “Autoresponder Emails”
You will find several options when you move to the “Autoresponder”. It provides different autoresponder emails to choose from. Here, let me give you an example by selecting the first option which says ” Email To User After Message Is Submitted”.
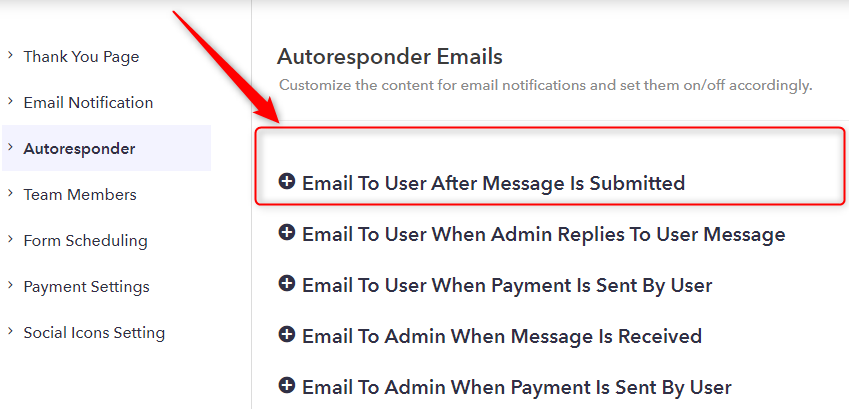
Step 5: Change The Sender Name
Once you click on the first option of the autoresponder, there you will find several options. You can change the sender’s name through the “From Name” option. All you need to do is type your name or company name in the given box.
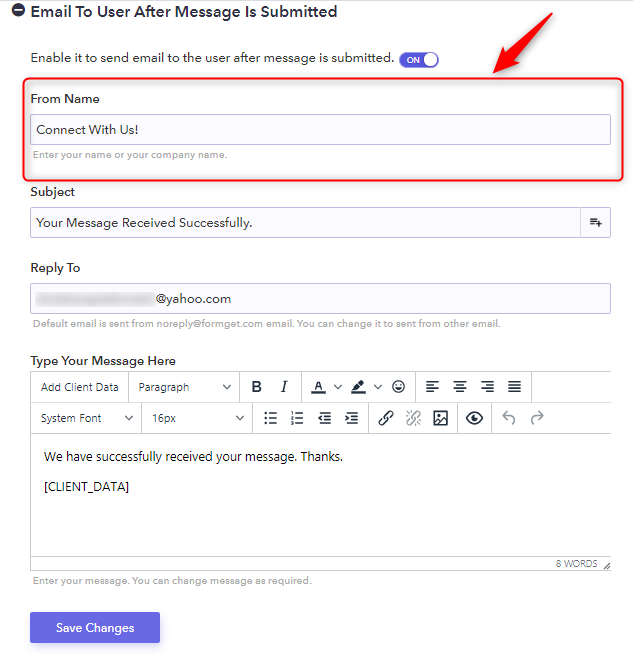
Step 6: Tap On “Save Changes”
After changing the sender’s name, fill all the details you want to provide to your receiver. You can also enable the autoresponder switch by turning it “On” if you want to send the email automatically after someone fills your form.
After that, you need to change the subject, add your email address and type your message with all the modifications you want to do. Then, hit the button “Save Changes” after completing all the customizations.
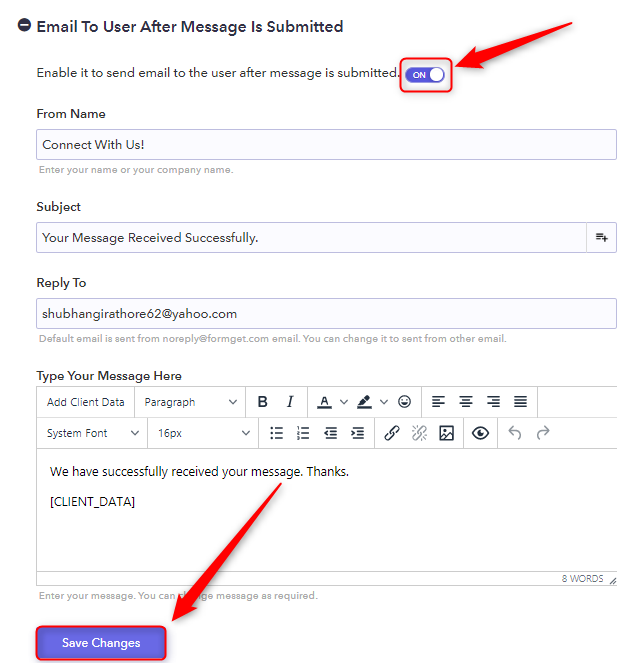
Just by following the above simple steps, you can customize the sender’s name of your form. Similarly, you can also customize the other email options provided in the autoresponder feature.
Here Are The Steps To Change The Email Address By Default Through Pabbly Form Builder:
Step 1: Click On Email Notification
After opening the settings, you need to select the option of the email notification that will redirect you to its settings.
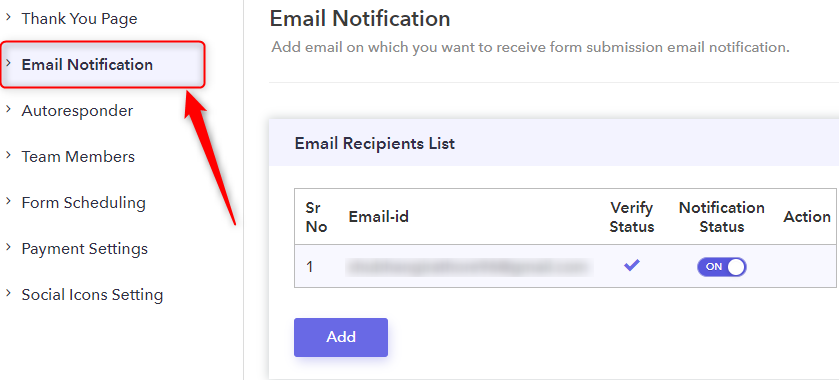
Step 2: Tick The Checkbox Of The SMTP Server
Once you will get directed to the email notification page, you need to scroll down the page. Where you will see two checkboxes, from which you need to click on the checkbox with the SMTP server option. After you tick the checkbox, it will lead you to SMTP settings.
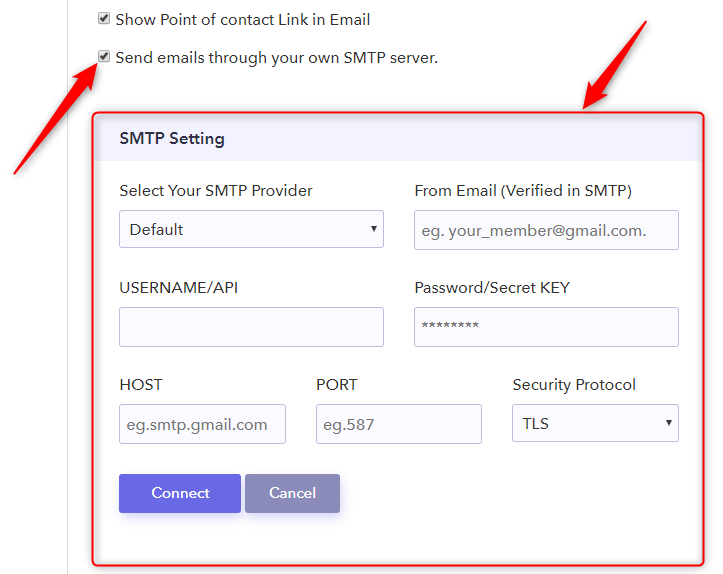
Step 3: Select Your SMTP Server
Pabbly Form Builder allows you to connect with several SMTP providers such as SendGrid, Mailjet, Sparkpost and many more. You can select your SMTP server from the servers provided in the drop-down section.
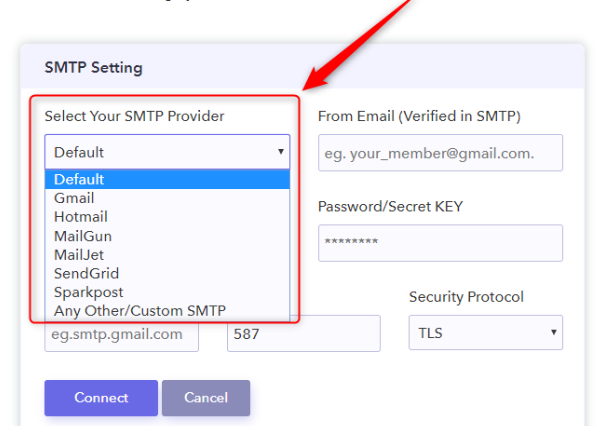
Step 4: Click On The Button “Connect”
Once you select the SMTP provider through which you want to connect. Fill the email address verified by your SMTP provider. Then, enter the username/API through which you want to send the emails.
Enter your password, host, port and select the security protocol. After you finish filling the details, click on the “Connect” button.
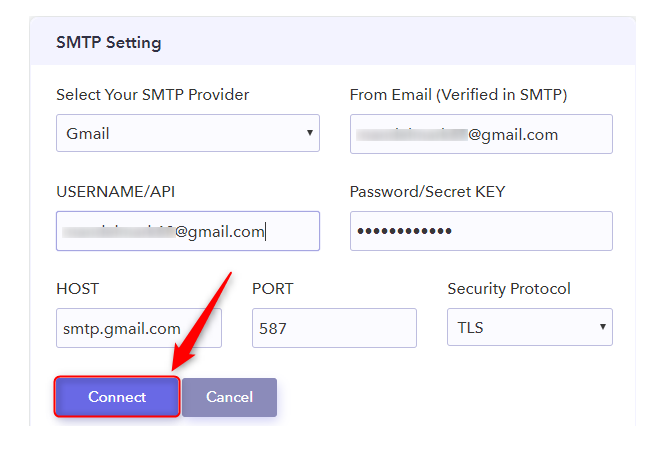
After hitting the “Connect” button, your SMTP server will get connected. Now, whenever someone will fill your form, he/she will get the confirmation email with your customized sender name as well as email in it. That’s how you can change the sender’s name in your respective forms with the help of Pabbly Form Builder.
Wrapping Up:
I hope this post was helpful in answering your query about Google Forms, as it has elaborated on how to change the sender’s name in your forms.
Even though this feature is not available in their Google Forms software, you can easily customize it with the help of the Pabbly Form Builder. By following the above-mentioned steps, one can easily personalize the sender’s name along with the email.
So, give Pabbly Form Builder a try as you can also get a free trial to use its features, I am sure you won’t get any disappointment once you switched to Pabbly Form Builder.
5 Best CSV To Database APIs 2022

Looking for CSV To Database APIs to convert your CSV file into some other formats like XLS, PDF, etc? Then, your search ends here. Here, we have something to help you out.
Data importing and exporting is an essential part of all business and there is no denial in the fact that we all look for a convenient way to convert our data into the required format. One of the most required formats is CSV( Comma Separated Value) which is used to store the data into a tabular format such as a spreadsheet, and database.
Now, you might be thinking of using some software that can help you to convert your data to or from CSV format to various other formats like Microsoft Excel, Open document format, PDF, TSV, JPG, etc. But, at this point, we’ll suggest you try some CSV converter API for this instead of wasting a huge time & money on software. APIs are easy to handle which smooth the whole process, save lots of time and provides accuracy in the work.
Further, you can easily import, export, and convert files into the required format. Keeping the same in mind, here, in this post, we have listed the Best CSV To Database APIs available in the market. Have a look at them & choose the best one according to your requirements.
Csv To Database API

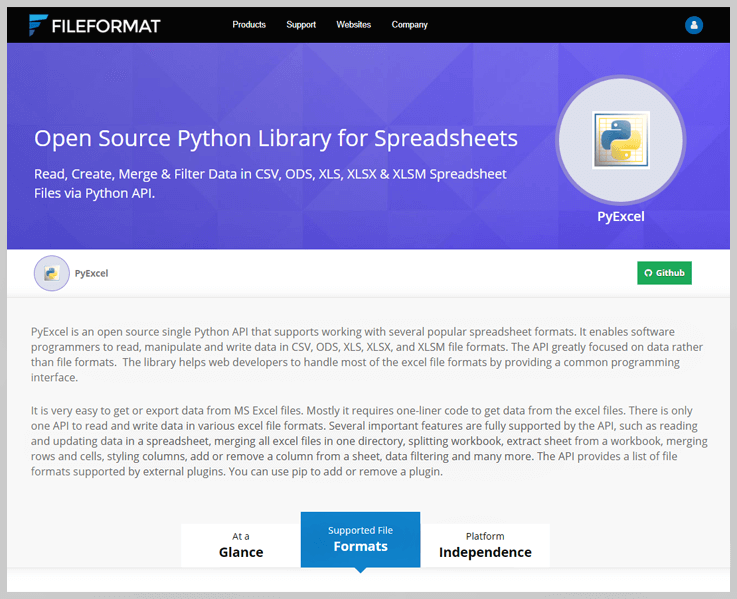
Final Words on CSV To Database APIs-
Here, we have listed 5 Best CSV To Database APIs 2022. Using these conversion APIs, you can easily convert your data into the required format like XML, PDF, TXT, JPG, Excel, etc from CSV or vice versa. It will definitely smooth work at your end. So, just integrate it into your website or application in the desired programming language like PHP, Python, GO, etc, and you’re good to go.
For any more queries, get in touch with us. We’ll be happy to hear from you.
5 Best Gmail Import Contacts CSV APIs 2022

Looking for Gmail Import Contacts CSV APIs to convert your CSV file into some other formats like XLS, PDF, etc? Then, your search ends here. Here, we have something to help you out.
Data importing and exporting is an essential part of all business and there is no denial in the fact that we all look for a convenient way to convert our data into the required format. One of the most required formats is CSV( Comma Separated Value) which is used to store the data into a tabular format such as a spreadsheet, and database.
Now, you might be thinking of using some software that can help you to convert your data to or from CSV format to various other formats like Microsoft Excel, Open document format, PDF, TSV, JPG, etc. But, at this point, we’ll suggest you try some CSV converter API for this instead of wasting a huge time & money on software. APIs are easy to handle which smooth the whole process, save lots of time and provides accuracy in the work.
Further, you can easily import, export, and convert files into the required format. Keeping the same in mind, here, in this post, we have listed the Best Gmail Import Contacts CSV APIs available in the market. Have a look at them & choose the best one according to your requirements.
Gmail Import Contacts Csv API
Final Words On Gmail Import Contacts CSV APIs-
Here, we have listed 5 Best Gmail Import Contacts CSV APIs 2022. Using these conversion APIs, you can easily convert your data into the required format like XML, PDF, TXT, JPG, Excel, etc from CSV or vice versa. It will definitely smooth work at your end. So, just integrate it into your website or application in the desired programming language like PHP, Python, GO, etc, and you’re good to go.
For any more queries, get in touch with us. We’ll be happy to hear from you.
5 Best CSV To Array APIs 2022

Looking for CSV To Array APIs to convert your CSV file into some other formats like XLS, PDF, etc? Then, your search ends here. Here, we have something to help you out.
Data importing and exporting is an essential part of all business and there is no denial in the fact that we all look for a convenient way to convert our data into the required format. One of the most required formats is CSV( Comma Separated Value) which is used to store the data into a tabular format such as a spreadsheet, and database.
Now, you might be thinking of using some software that can help you to convert your data to or from CSV format to various other formats like Microsoft Excel, Open document format, PDF, TSV, JPG, etc. But, at this point, we’ll suggest you try some CSV converter API for this instead of wasting a huge time & money on software. APIs are easy to handle which smooth the whole process, save lots of time and provides accuracy in the work.
Further, you can easily import, export, and convert files into the required format. Keeping the same in mind, here, in this post, we have listed the Best CSV To Array APIs available in the market. Have a look at them & choose the best one according to your requirements.
Csv To Array API
Final Words On CSV To Array APIs-
Here, we have listed 5 Best CSV To Array APIs 2022. Using these conversion APIs, you can easily convert your data into the required format like XML, PDF, TXT, JPG, Excel, etc from CSV or vice versa. It will definitely smooth work at your end. So, just integrate it into your website or application in the desired programming language like PHP, Python, GO, etc, and you’re good to go.
For any more queries, get in touch with us. We’ll be happy to hear from you.