
In this tutorial, we are going to learn about AngularJS Controller. For better understanding, we have divided this tutorial into two parts i.e, theoretical part as well as Implementation part.
Let’s have a look on what we are going to learn in this tutorial: –
Theoretical Part: –
– We will understand the concept of AngularJS Controller and will learn about how to define it in our application.
Implementation Part: –
– We will create a controller which will process a JSON array and will display its data in the view. The JSON array contains the name, designation and department details of each member of the company.
Watch the live demo or download code from the link given below.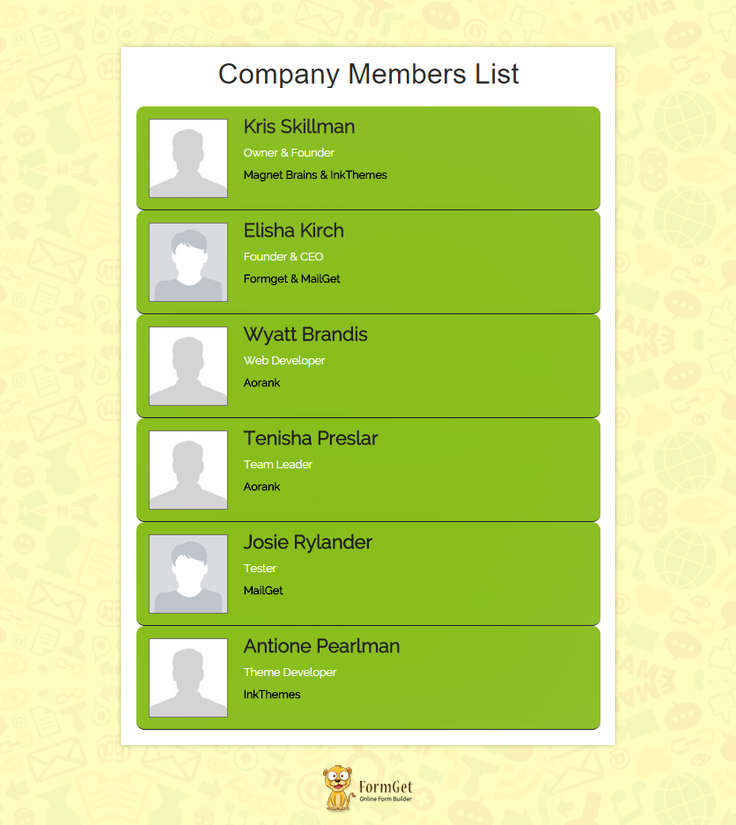
AngularJS Controller:
AngularJS controller is a constructor function which is used for adding and controlling the behaviour of an angular data by defining different functions and values.
It plays an important role in the application and handles the interaction between data and the view.
A controller can be defined as:-
// Application module
var empController = angular.module('EmpController',[]);

// Controller of the application
empController.controller('EmpListController', ['$scope', function($scope) {
$scope.emp = [
{
"name":"Kris Skillman",
"img_link" : "Kris_Skillman",
"designation" : "Owner & Founder",
"department" : "Magnet Brains & InkThemes"
},
{
...
...
},
{
"name":"Tenisha Preslar",
"img_link" : "Tenisha_Preslar",
"designation" : "Team Leader",
"department" : "Aorank"
}
];
}]);
Here, EmpController is the name of application module in which controller constructor function is added by .controller() method.
Like Module, a controller also contains controller name and dependencies. In the above-mentioned controller, EmpListController is the name of the controller and this controller uses $scope as a dependency.
Note: To learn about Modules, read our article AngularJS Module.
In view, a controller is used by ng-controller directive.
<div class="row" ng-controller="EmpListController">

...
...

</div>
Here, EmpListController is the name of the controller.
Controller helps to make to code clean and easy to use.
Scope Inheritance/Child Scope:
We can define more than one controller for an application and use them in the view wherever needed.
An angular application can have only one root scope, but we can create many child scopes for it. This child can inherit the property of its parent scope and override the parents values with its own values.
For Example:
Here, we have three controllers with name controller1, controller3 and controller3.
– Controller1 contains the parent (root) scope and adding two property, company and name, to the scope.
– Controller2 and three contain the child scope and adding name property to it.
Controller:
// Application module
var myApp = angular.module('myApp', []);

// Controller 1
myApp.controller('Controller1', ['$scope', function($scope){
$scope.company ='Magnet Brains';
$scope.name = 'Jasper Sandrock';
}]);

// Controller 2
myApp.controller('Controller2', ['$scope', function($scope){
$scope.name = 'Madelene Lucy';
}]);

// Controller 3
myApp.controller('Controller3', ['$scope', function($scope){
$scope.name = 'Josie Rylander';
}]);
HTML:
In view, we called Controller1 using ng-controller directive. Inside Controller1 div, we used controller2 and inside Controller2, we used Controller3.
<div ng-controller="Controller1">
<ul>
<li>Company Name : {{company}}</li>
<li>Employee Name : {{name}}</li>
</ul>
<div ng-controller="Controller2">
<ul>
<li>Company Name : {{company}}</li>
<li>Employee Name : {{name}}</li>
</ul>
<div ng-controller="Controller3">
<ul>
<li>Company Name : {{company}}</li>
<li>Employee Name : {{name}}</li>
</ul>
</div>
</div>
</div>
Output:

Controller1 will access the value of root scope, i.e company and name, and will show the value available in the root scope. Controller2 will inherit the values of root scope and will access the same value for company but will override the value of name ( child scope override the parent scope ). Same thing happens in the case of Controller3.
Here ends the theoretical part.
Now it’s time to implement controller in the application.
Controller Implementation in the Application:
First follow the directory structure image given below and create the same structure for your application. Now, follow these steps:
Step1: Inside index.php, write the following code.
index.php
It act as the view part of the application. The controller is used in it using ng-directive. It accessed the function and values added to $scope by the controller and show the list of the company members.
<!DOCTYPE htm>
<html ng-app="EmpController">
<head>
<title>Angular Js Tutorial First Demo</title>
<!-- Include Bootstrap CSS library -->
<link rel="stylesheet" type="text/css" href="css/bootstrap.min.css">
<!-- Include CSS -->
<link rel="stylesheet" type="text/css" href="css/style.css">
<!-- Include AngularJS library -->
<script src="lib/angular/angular.min.js"></script>
<!-- Include jQuery library -->
<script src="js/jQuery/jquery.min.js"></script>
<!-- Include Bootstrap Javascript -->
<script src="js/bootstrap.min.js"></script>
<script type="text/javascript" src="js/myController.js"></script>
</head>
<body>
<div class="container main">
<div class="row" ng-controller="EmpListController">
<center>
<h1 class="h1">Company Members
List</h1></center>
<ul class="search-output col-lg-6 col-lg-offset-3 col-md-6 col-md-offset-3 col-xs-12" >
<li class="emp-details col-lg-12 col-md-12 col-xs-12" ng-repeat = "list in emp">
<img ng-src="img/{{list.img_link}}.jpg" alt="{{list.name}}"/>
<div class="emp-info">
<h3>{{list.name}}</h3>
<p>{{list.designation}}</p>
<h5>{{list.department}}</h5>
</div>
</li>
</ul>
</div>
</div>
</body>
</html>
Step2: In myController.php, write the following code.
myController.js
It is the main controller of the application. It added a JSON array to the $scope, which contains the information related to each members of the company.
// Application module
var empController = angular.module('EmpController',[]);

// Controller of the application
empController.controller('EmpListController', ['$scope', function($scope) {
// Adding JSON array in the emp variable
$scope.emp = [
{
"name":"Kris Skillman",
"img_link" : "Kris_Skillman",
"designation" : "Owner & Founder",
"department" : "Magnet Brains & InkThemes"
},
{
"name":"Elisha Kirch",
"img_link" : "Elisha_Kirch",
"designation" : "Founder & CEO",
"department" : "Formget & MailGet"
},
{
"name":"Wyatt Brandis",
"img_link" : "Wyatt_Brandis",
"designation" : "Web Developer",
"department" : "Aorank"
},
{
"name":"Tenisha Preslar",
"img_link" : "Tenisha_Preslar",
"designation" : "Team Leader",
"department" : "Aorank"
},
{
"name":"Josie Rylander",
"img_link" : "Josie_Rylander",
"designation" : "Tester",
"department" : "MailGet"
},
{
"name":"Madelene Lucy",
"img_link" : "Madelene_Lucy",
"designation" : "Team Leader",
"department" : "Sales & Marketing, InkThemes"
},
{
"name":"Jasper Sandrock",
"img_link" : "Jasper_Sandrock",
"designation" : "Plugin Developer",
"department" : "InkThemes"
},
{
"name":"Russ Vandenberg",
"img_link" : "Russ_Vandenberg",
"designation" : "Software Developer",
"department" : "MailGet"
},
{
"name":"Tory Negus",
"img_link" : "Tory_Negus",
"designation" : "Support Team Lead",
"department" : "InkThemes"
},
{
"name":"Antione Pearlman",
"img_link" : "Antione_Pearlman",
"designation" : "Theme Developer",
"department" : "InkThemes"
}
];
}]);
Step 3: Write the code given below in style.css.
style.css
It contains the styling CSS of the view.
@import url(http://fonts.googleapis.com/css?family=Raleway);

h1.h1 {
margin-top: 40px;
margin-bottom: 40px;
}
ul li{
direction: inline-block;
}
ul.search-output {
padding: 0;
min-width: 345px;
}
li.emp-details {
background: #90BF2F;
border-bottom: 2px solid;
border-radius: 10px;
padding: 15px;
font-family:raleway;
}
li.emp-details:hover {
background: #A2DC15;
}
.emp-details img {
width: 100px;
height: 100px;
float: left;
margin-right: 20px;
border: 1px solid #7D7D7D;
}
.emp-info {
font-family:raleway;
}
.emp-info h3 {
margin-top: -3px;
font-weight: bold;
color: #333131;
}
.emp-info p {
color: white;
font-weight: 500;
}
.emp-info h5 {
color: black;
font-weight: bold;
}
Conclusion:
Hope this blog will help you in understanding the concept and proper use of Controller in Angular application. Keep in touch with us and share your feedback regarding this blog with us from the space given below.