
Stunning.! sending Emails in just a few steps.
Amazing to see.!
How to configure Mailgun API in your web application and send Email through it.
Mailgun: – Mailgun is an Email automation service. It has a very powerful sets of inbuilt functions for sending, tracking or receiving emails. Developers can process their email with the help of Mailgun API.
As sending Email is a very time-consuming process. So, using MailGun API, for sending Email, can save user’s time.
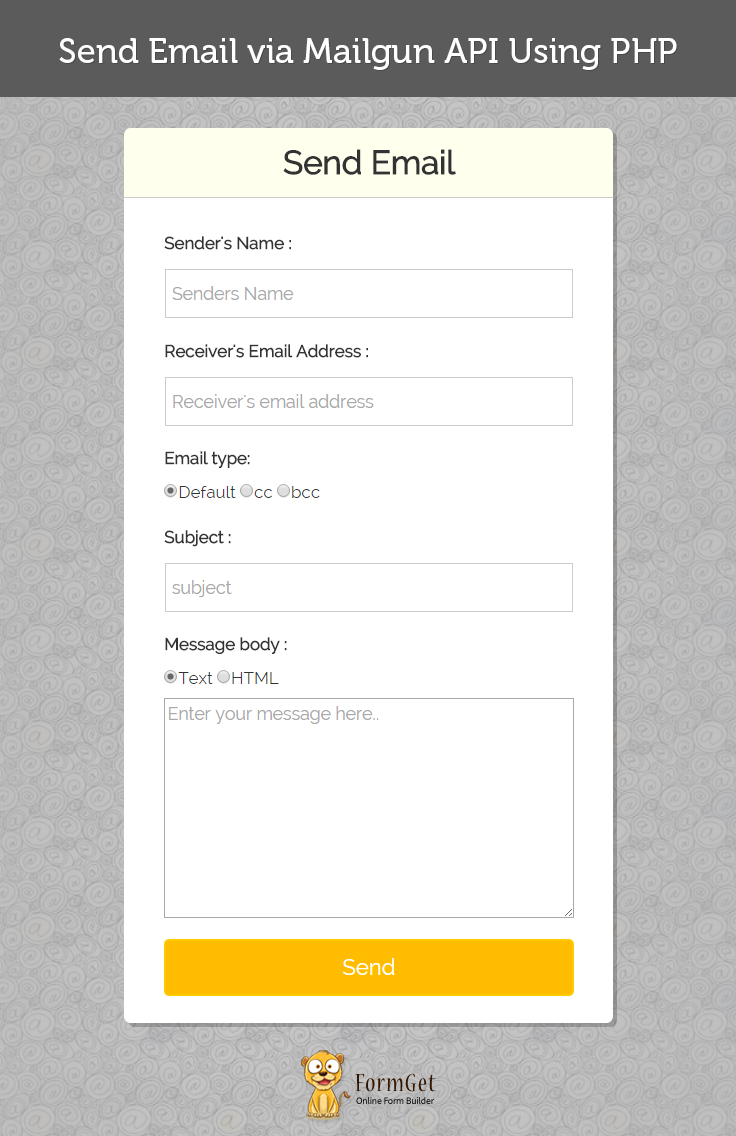
Watch the live demo or download code from the link given below
MailGet is an online Email Marketing Sevice which allow you integrate various API/SMTP servers to send emails in bulk.
To use Mailgun API, you need to embed it in your project. Follow the steps given below:
- Download Composer and install from this link –> click here.
- Open cmd prompt as administrator.
- Through cd command goto your project folder.
 C:> cd  C:xampphtdocsyour-project-folder

e.g C:xampphtdocsyour-project-folder>- Run the command below :
c:xampphtdocsyour-project-folder> composer require mailgun/mailgun-php:~1.7.2 Now, Your application is ready to use Mailgun API.
Steps to send email: –
- At the top of your script main file include mailgun.php, as shown below
 require 'vendor/autoload.php';
use MailgunMailgun; - Create an object of Mailgun through API key.
$mgClient = new Mailgun('<-- API KEY -->'); - In the domain information page, you will get “default SMTP login”. Copy string after @ symbol and initialize your domain variable with this string.
- Finally, send Email by calling sendMessage() method of Mailgun object with parameters such as, domain, sender, receiver, subject, text, HTML etc.
Tutorial Scripts in detail
The code used in the script with proper explanation are listed below .
index.php
This is the main program file. We have configured Mailgun API in this file and accessed its features, like creating object of Mailgun, to sent mail with the help of sendMessage() method.
<?php
//composer require mailgun/mailgun-php:~1.7.2
# Include the Autoloader (see "Libraries" for install instructions)
require 'vendor/autoload.php';
use MailgunMailgun;
?>
<html>
<head>
<title>
Send Email via Mailgun API Using PHP
</title>
<meta name="viewport" content="width=device-width, initial-scale=1.0">
<script src="js/jquery-1.11.3.min.js" type="text/javascript"></script>
<script src="js/bootstrap.js" type="text/javascript"></script>
<link href="css/bootstrap.css" rel="stylesheet" type="text/css"/>
<link href="css/style.css" rel="stylesheet" type="text/css"/>
</head>
<body>
<div class="container">
<div class="row">
<div class="col-md-12">
<div id="main">
<h1>Send Email via Mailgun API Using PHP</h1>
</div>
</div>
<div class="col-md-12">
<div class="matter">
<div id="login">
<h2>Send Email</h2>
<form action="index.php" method="post">
<label class="lab">Sender's Name :</label>
<input type="text" name="sname" id="to" placeholder="Senders Name"/>
<label class="lab">Receiver's Email Address :</label>
<input type="email" name="to" id="to" placeholder="Receiver's email address" />
<label class="lab">Email type:</label><div class="clr"></div>
<div class="lab">
<input type="radio" value="def" name="etype" checked>Default
<input type="radio" value="cc" name="etype" >cc
<input type="radio" value="bcc" name="etype" >bcc </div>
<div class="clr"></div>
<label class="lab">Subject :</label>
<input type="text" name="subject" id="subject" placeholder="subject" required />
<label class="lab">Message body :</label><div class="clr"></div>
<div class="lab">
<input type="radio" value="text" name="msgtype" checked>Text
<input type="radio" value="html" name="msgtype" >HTML</div>
<textarea type="text" name="msg" id="msg" placeholder="Enter your message here.." required ></textarea>
<input type="submit" value=" Send " name="submit"/>
</form>
</div>
</div>
</div>
</div>
<!-- Right side div -->
</div>
</body>
</html>
<?php
if (isset($_POST['sname'])) {
$sname=$_POST['sname'];
$to = $_POST['to'];
$subject = $_POST['subject'];
$msg = $_POST['msg'];
$msgtype = $_POST['msgtype'];
if($msgtype=='text'){
$html='';
}
else{
$msg = htmlentities($msg);
$html=$msg;
$msg='';
}
$mgClient = new Mailgun('<-- API KEY -->');
// Enter domain which you find in Default Password
$domain = "<-- DEFAULT SMTP LOGIN DOMAIN -->";

# Make the call to the client.
$result = $mgClient->sendMessage($domain, array(
"from" => "$sname <mailgun@<--DEFAULT SMTP LOGIN DOMAIN-->>",
"to" => "Baz <$to>",
"subject" => "$subject",
"text" => "$msg!",
'html' => "$html"
));
echo "<script>alert('Email Sent Successfully.. !!');</script>";
}
?>
Style.css
Includes all basic styling of HTML elements.
@import url(http://fonts.googleapis.com/css?family=Raleway);

#main{
margin:50px auto;
font-family:raleway;
}
h2{
font-weight: 600;
background-color: #FEFFED;
text-align:center;
border-radius: 10px 10px 0 0;
margin: -10px -40px;
padding: 15px;
}
#login{
width:40%;;
margin:0 auto;
display:inline-block;border-radius: 10px;
font-family:raleway;
border: 2px solid #ccc;
padding: 10px 40px 25px;
}
textarea{
margin-top: 8px;
font-size: 16px;
font-family:raleway;
}
input[type=radio]{
margin-top: 8px;
}
input[type=text],[type=email],input[type=password]{
width:99.5%;
padding: 10px;
margin-top: 8px;
border: 1px solid #ccc;
padding-left: 5px;
font-size: 16px;
font-family:raleway;
}
input[type=submit]{
width: 100%;
background-color:#FFBC00;
color: white;
border: 2px solid #FFCB00;
padding: 10px;
font-size:20px;
cursor:pointer;
border-radius: 5px;
margin-bottom: 15px;
}
a{
text-decoration:none;
color: cornflowerblue;
}
i{
color: cornflowerblue;
}
h1{
font-weight: 600;
text-align: center;
display:inlne;
alignment-adjust: center;
margin:0 auto;
width:100%;
}
textarea[type=text]{
width:100%;
height:200px;
}
.matter{
alignment-adjust: central;
margin:0 auto;
text-align: center;
}
.clr{
clear:left;
}
.lab{
font-size: 110%;
float:left;
}
@media screen and (max-width: 800px) {
#login{
width:330px;
}
}
Conclusion :
Hope this tutorial will help you to integrate MailGun API in your application and send email. Must try the script and send us your feedback from the space given below.
2 Replies to “Send Email Via Mailgun API Using PHP”
Thanks mate , it’s really useful things
thanx for good explanation 🙂