
Push Notification are –
- Simple messages that one receives from the apps installed in the device.
- Very popular among mobile devices, iPads and what not..!!
For example,
Whatsapp and Facebook message notifications in the notification bar of the home screen or lock screen.
It is a way to –
- notify user,
- update user about new updates,
- send offers,
- notifications related to the app.
Components we’re going to use to implement PhoneGap Push Notification:
- PhoneGap Plugin Push (A 3rd Party Plugin)
– A 3rd Party Plugin to implement push notification in a PhoneGap app.
- Google Cloud Messaging (GCM) Service
– Google Cloud Messaging to send push notifications.
- Web Server for running PHP Files
– Web Server to run PHP Files which are storing registration ID in the database returned by GCM.
Push Notification Providers
Every platform has their own Push Notification provider. Let’s take a look at each of them.
- Android – Google Cloud Messaging Services (GCM)
https://developers.google.com/cloud-messaging/
- iOS Devices – Apple Push Notification Service (APNS)
https://developer.apple.com/notifications/
- Microsoft – Microsoft Push Notification Services (MPNS)
https://msdn.microsoft.com/en-us/library/windows/apps/ff402558(v=vs.105).aspx
There are several other 3rd party providers available such as Parse, Push Bots and more. But I’ll recommend you to use standard providers.
How PhoneGap Push Notification Works?
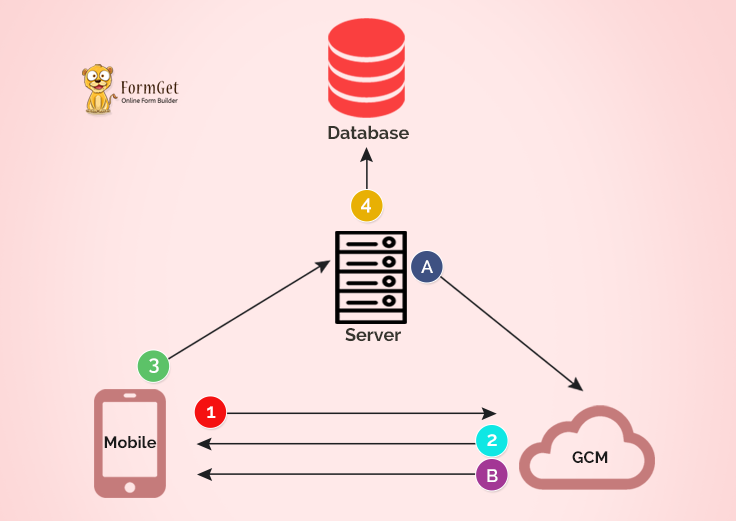
Working of push notification is divided into two steps:
- Registration
- Sending Push Notification
Registration Process
-
-
Step 1Register the mobile device with GCM / APNS / MPNS.
-
-
-
Step 2On successful registration, GCM / APNS / MPNS will return a 256 char encrypted registration ID. This registration ID is unique for every device and every application.
Registration ID - e2I1DO3qcgg:APA91bEqBYx_B_uaVDz_neKna1j2vePk-fAg01JKObli6sC3H1b4ZtR4BCBGyT2a5CUPHL0RNQ66wsQtiwN7jxugxeFqoxB3B3siF6UYgIO53Cg1X0Hnkav1bEeUBLo7TSgO4XtlNeVP
-
-
-
Step 3After obtaining RegistrationID, We will send this ID to our own server.
-
-
-
Step 4Now, we’ll Store this registrationID in our database along with user’s name and email ID
-
Sending Push Notification
-
-
Step ASend Push Message along with registration ID to GCM / APNS / MPNS.
-
-
-
Step BPush message will be automatically sent by GCM / APNS / MPNS when the user comes online.
-
Creating A Project On Google Developer Console
As we’re building the app for android, we will use Google Cloud Messaging (GCM).
For that, we need to create a project on Google’s developer console.
Step – 1
- You need to login to Google Developer Console with your google account.
https://console.developers.google.com/

Step – 2
- Create a new project on the dashboard.
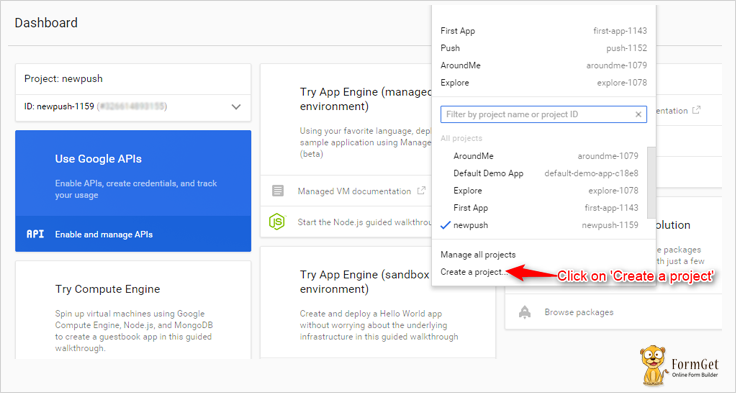
Step – 3
- Name your project.

Step – 4
- Copy the Project number which is also known as Sender’s ID.
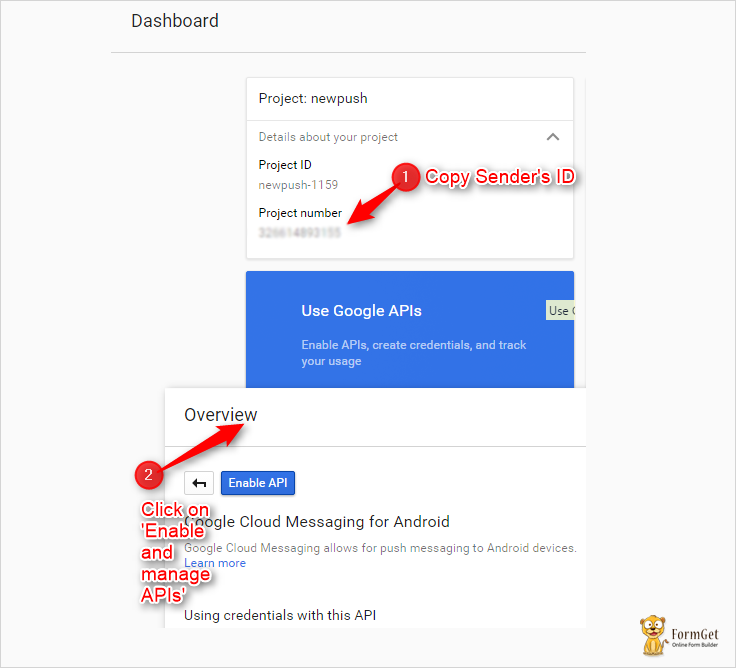
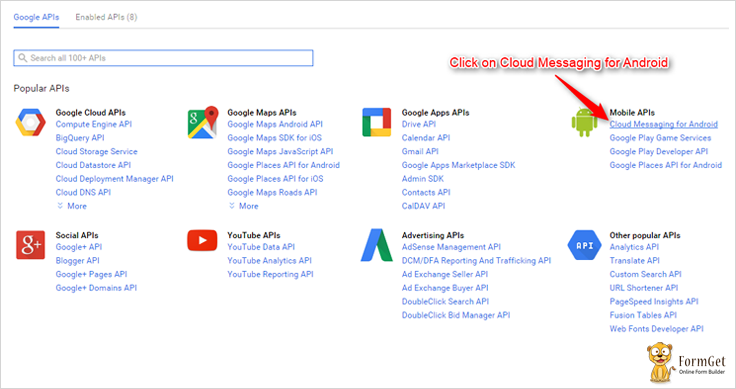
Step – 5
- Now you need to enable the Google Cloud Messaging API.
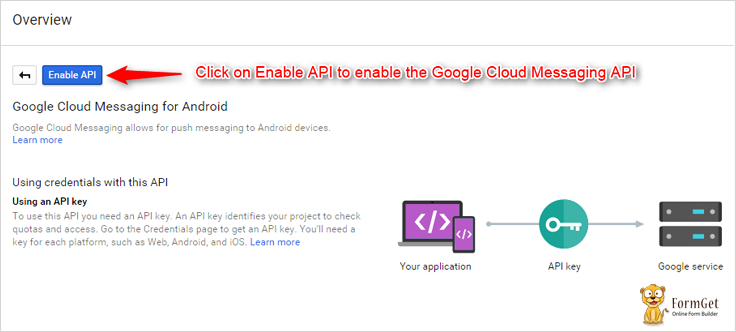
Step – 6
- Enable The API by clicking ‘Enable API’ button.
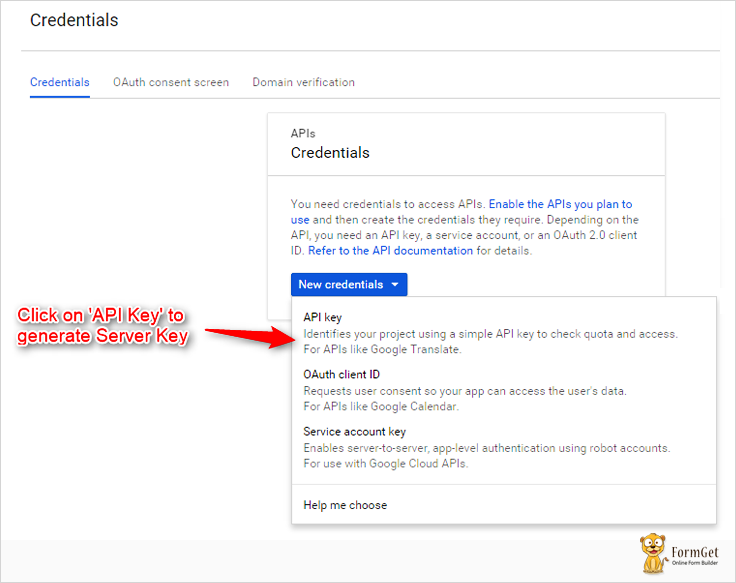
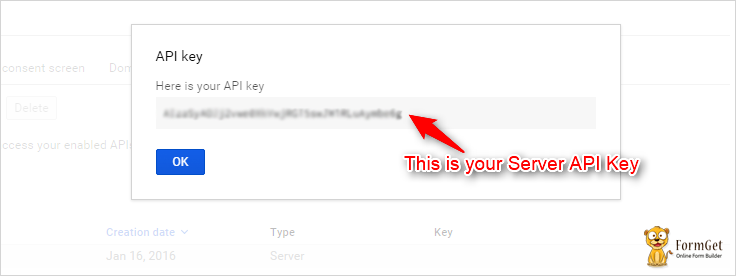
Step – 7
- Now you need to generate a Server Key.
You need to click on ‘Go to credentials‘

Now you need to click on ‘API Key‘ to generate Key.
Now Click on ‘Server Key‘
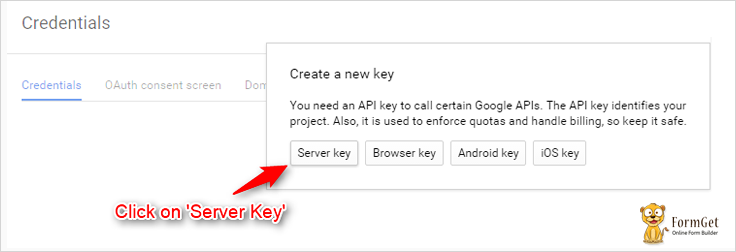
Click on ‘Create‘
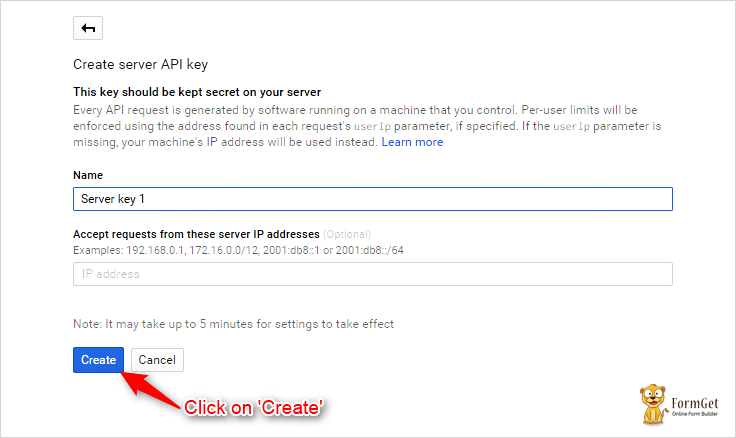
Now, this is your Server Key
Important Points Before Creating A Project
Now, before creating a PhoneGap project, you need to double check the following points:
- Make sure you’ve Android SDK Installed and configured.
- Make sure you have installed the following packages. These packages are different for every platform and every platform has its own API Level.
- Android Support Repository
- Android Support Library
- Google Play Services
- Google Repository
- Intel x86 Emulator Accelerator (HAXM installer)
- Make sure you have a virtual device (x86 System Image with Google API) with the API Level 22 in the emulator.
Creating A PhoneGap Project
-
-
Create a new ProjectCreating a project “PushExample” with id=”org.push.sample”
phonegap create PushExample --id "org.push.sample" --name "PushExample"
-
-
-
Add Android PlatformWe want to create the app for android
phonegap platform add android
-
-
-
Add Push Notification PluginWe need to add the push plugin
phonegap plugin add phonegap-plugin-push
-
-
-
Add Cordova.js and Push.jsAdd cordova.js and push.js in the head section of index.html
<script type="text/javascript" src="cordova.js"></script> <script type="text/javascript" charset="utf-8" src="push.js"></script>
-
-
-
Copy Cordova.jsCopy cordova.js from
Project/platforms/android/assets/wwwto
Project/www
-
-
-
Copy Push.jsCopy push.js from
Project/plugins/phonegap-plugin-push/wwwto
Project/www
-
Changes That Needs To Be Done In The Files
Changes in My.js File:
You need to change “senderID”: “123456789876” with your sender ID in the following code which is a part of my.js file.
var push = PushNotification.init({ "android": {"senderID": "123456789876"},
"ios": {"alert": "true", "badge": "true", "sound": "true"}, "windows": {} } );
push.on('registration', function(data) {
// data.registrationId
});
push.on('notification', function(data) {
});
push.on('error', function(e) {
// e.message
});
Changes in AndroidManifest.xml:
In the last 2 lines of AndroidManifest.xml file, you need to replace application id with your application id which you’ve entered while creating the project.
In my case, it is “org.push.sample”
Location of AndroidManifest.xml : Project-Folder/platforms/android/
<permission android:name="${applicationId}.permission.C2D_MESSAGE" android:protectionLevel="signature" />
<uses-permission android:name="${applicationId}.permission.C2D_MESSAGE"/>
Changes in sendnotification.php:
- You need to enter your own API Key you’ve generated in the Google Developer Console.
define( 'API_ACCESS_KEY', 'ENTER YOUR OWN API KEY' ); - You need to enter your own registration ID here.
I’m fetching it through the database, but you can directly paste it here.
$to="YOUR OWN REGISTRATION ID";Building The Project
- You need to open your Node.js command prompt and follow the following steps:
-
-
Prepare
cordova prepare android
-
-
-
Compile
cordova compile android
-
-
-
Build
cordova build android
-
-
-
Emulate
cordova emulate android
-
Files:
Application Files
HTML File : Index.html
This is the main file of the application.
<!DOCTYPE html>
<html>
<head>
<meta name="format-detection" content="telephone=no">
<meta name="msapplication-tap-highlight" content="no">
<meta name="viewport" content="user-scalable=no, initial-scale=1, maximum-scale=1, minimum-scale=1, width=device-width">
<title>Hello World</title>

<!--Stylesheet Files : jQuery Mobile CSS File, Customized CSS File-->
<link rel="stylesheet" href="css/jquery.mobile-1.4.5.css">
<link rel="stylesheet" href="css/my.css">

<!--AJAX Library, jQuery File : Library, Mobile Library,Cordova JS, Push Notification JS and Customized JS File -->
<script src="https://ajax.googleapis.com/ajax/libs/jquery/1.11.3/jquery.min.js"></script>
<script type="text/javascript" src="js/jquery-1.11.3.min.js"></script>
<script type="text/javascript" src="js/jquery.mobile-1.4.5.js"></script>
<script type="text/javascript" src="cordova.js"></script>
<script type="text/javascript" src="push.js"></script>
<script type="text/javascript" src="js/my.js"></script>
</head>

<!--Beginning of the Body-->
<body>
<div data-role="page">
<div data-role="header" data-position="fixed" class="ui-header ui-bar-a ui-header-fixed slidedown" role="banner">
<h1>Push Me</h1>
</div>
<div data-role="main" class="ui-content" id="main">

<!--Form containing fields registration ID, name, email ID and a submit button -->
<form>
<ul data-role="listview" data-inset="true">
<li class="ui-field-contain">
<label for="name2">Your Registration ID is:</label>
<input type="text" id="regid" value="" data-clear-btn="true" disabled>
</li>
<li class="ui-field-contain">
<label for="name2">Enter Your Name:</label>
<input type="text" id="name" value="" data-clear-btn="true">
</li>
<li class="ui-field-contain">
<label for="name2">Enter Your Email ID:</label>
<input type="text" id="email" value="" data-clear-btn="true">
</li>
<li class="ui-body ui-body-b">
<center><a href="#" id="submit" class="ui-shadow ui-btn ui-corner-all">Submit</a></center>
</li>
</ul>
</form>
</div>
</div>
</body>
<!--End of the body-->
</html>
JavaScript File : My.js
This file is registering the user on GCM and sending the registration ID to our own server, i.e, Insertregid.php.
document.addEventListener("deviceready",onDeviceReady,false);

<!--Device Ready Function-->
function onDeviceReady(){
alert("Device Ready");

<!--Initializing Push Notification-->
var push = PushNotification.init({

<!--Setting attributes for Android, IOS and Windows-->
android: {
senderID: "123456789876"
},
ios: {
alert: "true",
badge: "true",
sound: "true"
},
windows: {}
});

<!--This will alert registration ID which is returned by the GCM-->
push.on('registration', function(data) {
alert(data.registrationId);
$("#regid").val(data.registrationId);
});
push.on('notification', function(data) {
});
push.on('error', function(e) {
});
}

<!--Fetching the values of registration ID, name and email from the input boxes-->
$(document).ready(function() {
$("#submit").click(function() {
var regid = $("#regid").val();
var name = $("#name").val();
var email = $("#email").val();
alert(regid);
alert(name);
alert(email);

<!--Passing those values to the insertregid.php file-->
$.ajax({
url: "http://www.aorank.com/tutorial/push/insertregid.php",
type: "POST",
dataType:'text',
data: {regid: regid,name: name,email:email},
success: function(data){
alert(data);
}
});
});
});
CSS File : My.css
.ui-bar-a, .ui-page-theme-a .ui-bar-inherit, html .ui-bar-a .ui-bar-inherit, html .ui-body-a .ui-bar-inherit, html body .ui-group-theme-a .ui-bar-inherit {
border: 1px solid #005994 !important;
background: #0093EA !important;
color: #fff !important;
font-weight: bold !important;
text-shadow: 0 0 #eee !important;
background-image: -webkit-gradient(linear, left top, left bottom, from( #0093EA), to( #007dcd ));
background-image: -webkit-linear-gradient( #0093EA , #007dcd );
background-image: -moz-linear-gradient( #0093EA, #007dcd );
background-image: -ms-linear-gradient( #0093EA , #007dcd );
background-image: -o-linear-gradient( #0093EA , #007dcd );
background-image: linear-gradient( #0093EA , #007dcd );
}
.ui-page-theme-a .ui-btn:hover, html .ui-bar-a .ui-btn:hover, html .ui-body-a .ui-btn:hover, html body .ui-group-theme-a .ui-btn:hover, html head + body .ui-btn.ui-btn-a:hover{
border: 1px solid #007dcd;
background: #333 ;
font-weight: bold;
text-shadow: 0 0 #eee !important;
color: #fff !important;
background-image: -webkit-gradient(linear, left top, left bottom, from( #0093EA ), to( #0093EA ));
background-image: -webkit-linear-gradient( #0093EA , #0093EA );
background-image: -moz-linear-gradient( #0093EA , #0093EA );
background-image: -ms-linear-gradient( #0093EA , #0093EA );
background-image: -o-linear-gradient( #0093EA , #0093EA );
background-image: linear-gradient( #0093EA , #0093EA );
}
.ui-page-theme-a .ui-btn.ui-btn-active, html .ui-bar-a .ui-btn.ui-btn-active, html .ui-body-a .ui-btn.ui-btn-active, html body .ui-group-theme-a .ui-btn.ui-btn-active, html head + body .ui-btn.ui-btn-a.ui-btn-active, .ui-page-theme-a .ui-checkbox-on:after, html .ui-bar-a .ui-checkbox-on:after, html .ui-body-a .ui-checkbox-on:after, html body .ui-group-theme-a .ui-checkbox-on:after, .ui-btn.ui-checkbox-on.ui-btn-a:after, .ui-page-theme-a .ui-flipswitch-active, html .ui-bar-a .ui-flipswitch-active, html .ui-body-a .ui-flipswitch-active, html body .ui-group-theme-a .ui-flipswitch-active, html body .ui-flipswitch.ui-bar-a.ui-flipswitch-active, .ui-page-theme-a .ui-slider-track .ui-btn-active, html .ui-bar-a .ui-slider-track .ui-btn-active, html .ui-body-a .ui-slider-track .ui-btn-active, html body .ui-group-theme-a .ui-slider-track .ui-btn-active, html body div.ui-slider-track.ui-body-a .ui-btn-active {
background-color: #0093EA !important ;
border-color:#0093EA !important;
color: #fff ;
text-shadow: 0 1px 0 #005599 ;
}
img{
padding: 25px;
}
button.ui-btn, .ui-controlgroup-controls button.ui-btn-icon-notext {
border-radius: 5px !important;
}
#main{
margin-top: 12% !important ;
}
.ui-collapsible-inset.ui-collapsible-themed-content .ui-collapsible-content
{
background-color: #ddd;
color: #111;
}
.ui-collapsible-content {
-webkit-transition: all 0.5s;
-moz-transition: all 0.5s;
-ms-transition: all 0.5s;
-o-transition: all 0.5s;
transition: all 0.5s;
overflow: hidden;
}
.ui-collapsible-content-collapsed {
display: block;
height: 0;
padding: 0 16px;
}
Server Files
Database : Tutorial.db
Create Database with the name ‘tutorial’ in Phpmyadmin:
CREATE DATABASE tutorial;Create a table with the name ‘gcm’ in the tutorial Database in Phpmyadmin:
CREATE TABLE `gcm` ( `id` INT(11) NOT NULL AUTO_INCREMENT , `regid`VARCHAR(255) NOT NULL , `name` VARCHAR(255) NOT NULL , `email` VARCHAR(255)NOT NULL , PRIMARY KEY (`id`) ) ENGINE = InnoDB;PHP File : Insertregid.php
This file is inserting the Registration ID, name and email into the database sent by the user from the index file or the main file of the application.
<?php

<!--Setting values for the database-->
$servername = "localhost";
$username = "root";
$password = "";
$dbname = "tutorial";

<!--Connecting the database-->
$conn = mysqli_connect($servername, $username, $password,$dbname);

<!--Recieving the values of registration ID,name and email ID sent by index.html-->
$regid = $_POST['regid'];
$name = $_POST['name'];
$email =$_POST['email'];
echo "Submitted";

<!--Inserting registration ID,name and email ID in the database-->
$sql = "INSERT INTO gcm (regid, name, email) VALUES ("."'".$regid."'".","."'".$name."'".","."'".$email."'".")";

<!--Executing the query and closing the database connection-->
mysqli_query($conn, $sql);
mysqli_close($conn);
?>
PHP File : Sendnotification.php
This file is retrieving the registration ID from the database and sending message as the push notification on the fetched registration ID/IDs.
<?php

<!--Setting values for the database-->
$servername = "localhost";
$username = "root";
$password = "";
$dbname = "tutorial";

<!--Connecting the database-->
$conn = mysqli_connect($servername, $username, $password,$dbname);
$email = $_POST['email'];
$msg = $_POST['msg'];
$noti =$_POST['noti'];
echo "Submitted";

<!--Retrievin Registration ID from the database with the help of email-->
$sql = "SELECT regid FROM gcm where email='\"'.$email.'\"'";

<!--Executing the query-->
$result = mysqli_query($conn, $sql);
if (mysqli_num_rows($result) > 0) {
$regid = mysqli_fetch_assoc($result);
} else {
echo "0 results";
}

<!--closing the database connection-->
mysqli_close($conn);

<!--Setting Server API Key that we generated in the Google Developer Console-->
define( 'API_ACCESS_KEY', 'ENTER YOUR OWN API KEY' );

<!--Storing Fetched Registration ID to the vaiable 'to'. 'to' is an array of registration IDs whom we want to send push notification-->
$to=$regid;

<!--This 'to' is assigned to registrationIds-->
$registrationIds = array($to);

<!--Message Array-->
$msg = array
(

<!--Message that we want to send in the push notification-->
'message' => $msg,

<!--Title that we want to set for the push notification-->
'title' => $noti,

<!--Subtitle, ticker text-->
'subtitle' => 'This is a subtitle. subtitle',
'tickerText' => 'Ticker text here...Ticker text here...Ticker text here',

<!--Sets to true or '1' if we want device to vibrate and make sound when user recieves push notification-->
'vibrate' => 1,
'sound' => 1,
'largeIcon' => 'large_icon',
'smallIcon' => 'small_icon'
);

<!--RegistrationIds and message are assigned to fields-->
$fields = array
(
'registration_ids' => $registrationIds,
'data' => $msg
);
$headers = array
(

<!--Setting headers for API acceess key and content type-->
'Authorization: key=' . API_ACCESS_KEY,
'Content-Type: application/json'
);

<!--Initializing Curl-->
$ch = curl_init();

<!--Posting data to the following URL-->
curl_setopt( $ch,CURLOPT_URL, 'https://android.googleapis.com/gcm/send' );

<!--Post Data = True, Defining Headers and SSL Verifier = false-->
curl_setopt( $ch,CURLOPT_POST, true );
curl_setopt( $ch,CURLOPT_HTTPHEADER, $headers );
curl_setopt( $ch,CURLOPT_RETURNTRANSFER, true );
curl_setopt( $ch,CURLOPT_SSL_VERIFYPEER, false );

<!--Posting fields array in json format-->
curl_setopt( $ch,CURLOPT_POSTFIELDS, json_encode( $fields ) );

<!--Executing Curl-->
$result = curl_exec($ch );

<!--Closing Curl-->
curl_close( $ch );
echo $result;
?>
<!DOCTYPE html>
<html>
<head>
<meta name="format-detection" content="telephone=no">
<meta name="msapplication-tap-highlight" content="no">
<meta name="viewport" content="user-scalable=no, initial-scale=1, maximum-scale=1, minimum-scale=1, width=device-width">
<title>Send Me </title>

<!--Stylesheet Files : jQuery Mobile CSS File, Customized CSS File-->
<link rel="stylesheet" href="css/jquery.mobile-1.4.5.css">
<link rel="stylesheet" href="css/my.css">

<!--AJAX Library, jQuery File : Library,and Mobile Library -->
<script src="https://ajax.googleapis.com/ajax/libs/jquery/1.11.3/jquery.min.js"></script>
<script type="text/javascript" src="js/jquery-1.11.3.min.js"></script>
<script type="text/javascript" src="js/jquery.mobile-1.4.5.js"></script>
</head>

<!--Beginning of the Body-->
<body>
<div data-role="page">
<div data-role="header" data-position="fixed" class="ui-header ui-bar-a ui-header-fixed slidedown" role="banner">
<h1>Send Me</h1>
</div>
<div data-role="main" class="ui-content" id="main">

<!--Form containing fields registered email, message user wants to send, title of the push notification and submit button-->
<form action="http://www.aorank.com/tutorial/push/sendnotification.php" method="post">
<ul data-role="listview" data-inset="true">
<li class="ui-field-contain">
<label for="name2">Enter Your Registered Email:</label>
<input type="text" name="email" id="email" value="" data-clear-btn="true">
</li>
<li class="ui-field-contain">
<label for="name2">Enter Your Message:</label>
<input type="text" name="msg" id="message" value="" data-clear-btn="true">
</li>
<li class="ui-field-contain">
<label for="name2">Enter Notification Title:</label>
<input type="text" name="noti" id="notification" value="" data-clear-btn="true">
</li>
<li class="ui-body ui-body-b">
<center><input type="submit" id="submit" value="Send Notification" class="ui-shadow ui-btn ui-corner-all"/></center>
</li>
</ul>
</form>
<!--End of the form-->

/div>
</div>
</body>
<!--End of the body-->
</html>
Conclusion:
As you can see, PhoneGap Push Notification is one of the key feature of any application.
With this, it is possible to let subscribers/users of the app know about the application updates, offers and other information.
Hope this will help you with implementing PhoneGap Push Notification.
For more related updates check out below-mentioned blogs –
- Phonegap Contacts Plugin : Contact Management App
- PhoneGap Bluetooth
8 Replies to “PhoneGap : How Push Notifications Work?”
Hello! This app needs to be uploading for Google Play to work?
Hello Bruno
If you want to test this app, then you have to build this app with the mentioned process. For that, you don’t have to upload it on Google Play Store. When you want other users to download your app, in that case you need to upload it on Google Play Store.
I hope it will help you.
Thank you Neeraj!
I build this app and its work fine! Now i´m searching for a method to do this using a Java application in the server side, and setup the plugin for wokrs for iOS and Windows Phone! hugs
Are you looking for native IOS & Windows application development?
i setup all the procedure which u mentioned and also build phonegap and run my application.but i cant able to recieve registration ID …js alert showing empty msg and looking on db table …receiving empty field in regid,but other two fields value received.can u please help me out to slove this problem?
Did you use PhoneGap Build to build the application?
yes, using a phonegap build
Having Problem Downloading the files. I have tried twice. Not even in my Spam