
Config.xml is a platform specific configuration file.
With the help of this configuration file, it is possible to modify the default values of PhoneGap application elements like –
- Widget
- Name
- Description
- Plugins
- API
- Icons
- Splash Screens etc.
Important Points About Config.xml
- Make sure it is at the top level of your application.
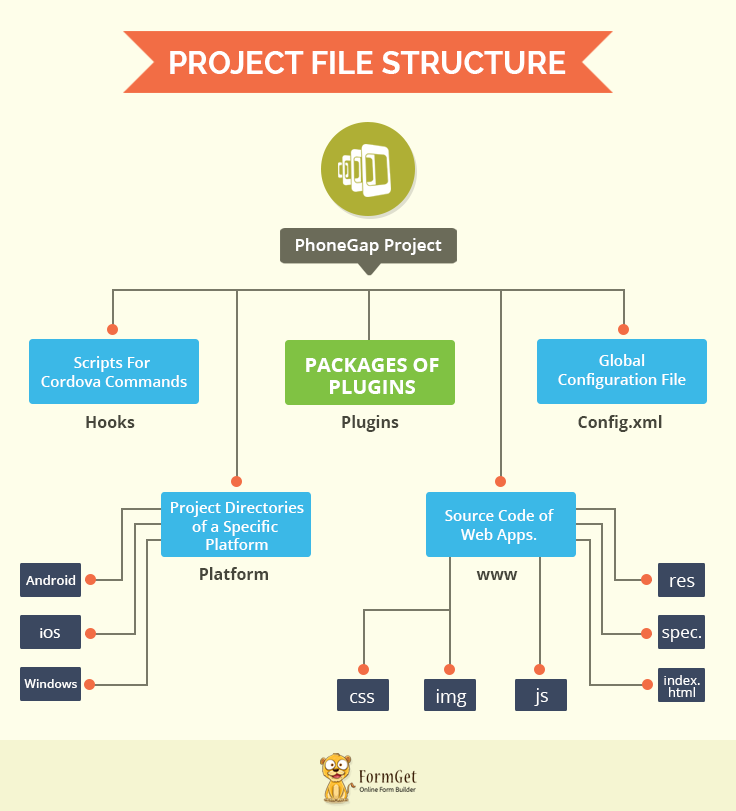
- You can take a look at the file structure of PhoneGap here.
- Its major purpose is to let developers specify the metadata about the application.
Now let’s take a look at the steps through which you can create a configuration file:
Step 1: Including XML Element
The very first step while creating a configuration file is to include XML element with the attributes version and encoding type.
<?xml version = "1.0" encoding = "UTF-8"?>Step 2: Including Widget, Name & Description Element
Following elements are the basic elements of the configuration file. Their inclusion is mandatory.
Necessary Elements
- <widget>: (required) It is the root of the configuration file. It indicates that whether configuration file is following W3C Standards or not.
<widget xmlns = "http://www.w3.org/ns/widgets"
xmlns:gap = "http://phonegap.com/ns/1.0"
id = "com.formget.sample"
versionCode = "1"
version = "1.0.0">
(a) id: It acts like the unique identifier for an application. It is written as reverse domain format. An application supports different platforms because of it.
id = "com.formget.sample"(b) version: Full version number of the application with the three number format : “Major.Minor.Patch”.
version = "1.0.0"(c) versionCode: (optional) Internal version number only set for android.
versionCode = "1"(d) cfBundleVersion: (optional) Internal version number only set for ios.
- <name>: (required) It is the name of the application which is going to be visible on home screen and app store.
<name>FormGet</name> - <description>: (optional) It is the description of the application that what this app is all about and what it does.
<description>An online form building application to create & design any type of HTML web form</description>
Step 3: Including Author Element
(optional) It defines the author of the application with the attributes email and href.
<author email="[email protected]" href="http://formget.com">FormGet Team</author>Step 4: Including Content Element
(optional) It sets the starting page of the application.
<content src="index.html"/>Step 5: Including Platform Element
By default PhoneGap Build builds an application for all platforms. If you want to build an app for a specific platform, you can do it with gap:platform element or platform element.
With ‘gap:platform’ Element:
<gap:platform name="android"/>
<gap:platform name="ios"/>
<gap:platform name="winphone"/>
With ‘platform’ Element:
<platform name="android" />
<platform name="ios" />
<platform name="winphone" />
Step 6: Including Feature (API) Element
Feature Element is used to include the features (API) which are going to used by the application.
Suppose you want to include the network feature.
<feature name="http://api.phonegap.com/1.0/network" />Similarly, you can add multiple features.
<feature name="http://api.phonegap.com/1.0/network" />
<feature name="http://api.phonegap.com/1.0/camera" />
<feature name="http://api.phonegap.com/1.0/notification" />
<feature name="http://api.phonegap.com/1.0/geolocation" />
<feature name="http://api.phonegap.com/1.0/media" />
<feature name="http://api.phonegap.com/1.0/contacts" />
<feature name="http://api.phonegap.com/1.0/file" />
<feature name="http://api.phonegap.com/1.0/battery" />
<feature name="http://api.phonegap.com/1.0/device" />
Step 7: Including Plugin Element
Plugin Element is used to include the plugins.
Plugin
<plugin name="com.phonegap.plugins..barcodescanner" spec="~1" source="npm" />- name: Plugin id with the reverse domain format.
name="com.phonegap.plugins..barcodescanner" - spec: (optional) Plugin version.
spec="~1" - source: (optional) It can be pgb or npm.
source="npm" - params: (optional) Parameters for configuration properties.
Suppose you want to include the barcodescanner plugin.
<plugin name="com.phonegap.plugins..barcodescanner" spec="~1" source="npm" />There are several plugins available for different purposes. You can see them here.
Step 8: Including Preference Element
There are 2 types of preferences you can set in the configuration file of PhoneGap.
- Common Preferences
- Platform Specific Preferences
Common Preferences:
Common Preferences
- Fullscreen Preference: It makes the application full screen. It is used to hide the status bar at the top of the screen.
<preference name="Fullscreen" value="true"/> - DisallowOverscroll Preference: If you don’t want the application to show anything when users scroll past the beginning or end of content, set this to true.
<preference name="DisallowOverscroll" value="true"/> - Orientation Preference: Orientation allows you to set and fix the orientation of the app to avoid automatic rotation.
There are three options for orientation: default, landscape and portrait.<preference name="Orientation" value="landscape"/> - HideKeyboardFromAccessoryBar Preference: Sets to true to hide additional toolbar above the keyboard.
<preference name="HideKeyboardFormAccessoryBar" value="false"/> - BackgroundColor Preference: Sets the background color of the application with a 4 byte format.
Byte 1 : Alpha Channel
Byte 2-4 : RGB(Red Green Blue Colors)<preference name="BackgroundColor" value="0xff0000ff"/>
Platform Specific Preferences:
Platform Specific Preferences:
IOS Specific Preferences
- Target-Device Preference: Targeting the specific device. Its options are : handset, tablet, or universal.
<preference name="target-device" value="universal" /> - Prerendered-icon Preference: Sets to ‘true’ to let ios know that icon is already rendered and don’t add anything to it.
<preference name="prerendered-icon" value="true" /> - Detect-data-types: Checks whether data types (For Example: dates and phone numbers) are automatically converted to links by the system.
<preference name="detect-data-types" value="true" /> - Exit-on-suspend: Application will be closed when suspended.
<preference name="exit-on-suspend" value="true" /> - Deployment-target: It sets the
IPHONEOS_DEPLOYMENT_TARGETin the build process, which is converted to theMinimumOSVersionin the ipa Propertly List.<preference name="deployment-target" value="7.0" />
Android Specific Preferences
- KeepRunning: App will continue to run in the background.
<preference name="KeepRunning" value="false"/> - LoadUrlTimeoutValue: It sets the amount of time to wait during a page load. After that, it will throw a timeout error. It is in milliseconds.
<preference name="LoadUrlTimeoutValue" value="5000"/> - SplashScreen: To set the names of the splash screen images. They must share a common name.
<preference name="SplashScreen" value="FormGetSplash"/> - SplashScreenDelay: The amount to time a splash screen appears. It is in milliseconds.
<preference name="SplashScreenDelay" value="5000"/> - InAppBrowserStorageEnabled: It makes sure that web pages opened in an InAppBrowser and web pages opened in the default browser share the same localStorage.
<preference name="InAppBrowserStorageEnabled" value="true"/> - LoadingDialog: It displays a dialog at the first page of the application with a title, message and a loading image.
<preference name="LoadingDialog" value="My Title,My Message"/> - LoadingPageDialog: It displays a dialog at every page of the application.
<preference name="LoadingPageDialog" value="My Title,My Message"/> - ErrorUrl: Intead of dialog, an error page will be displayed with a title,”Application Error”.
<preference name="ErrorUrl" value="myErrorPage.html"/> - ShowTitle: It displays the title at the top of the screen.
<preference name="ShowTitle" value="true"/> - LogLevel: Its sets the log level to minimum. By doing this, log messages of the app are filtered. Options are :
ERROR, DEBUG, INFO, VERBOSE, and WARN.<preference name="LogLevel" value="VERBOSE"/> - SetFullscreen: It is similar to the FullScreen of global config file.
<preference name="SetFullscreen" value="false"/>
Step 9: Including Icon and Spash Element
Icons and Splashes are also platform specific. Use ‘icon’ element to include ‘icons’ and use ‘splash’ element to include ‘splash screens’.
There are 2 ways to include icons and splashes:
- Use icon and splash element directly
<icon src="formget-icon.png" platform="ios" width="180" height="180"/><splash src="formget-icon.png" platform="ios" width="180" height="180"/> - Put icon element inside the platform element
<platform name="ios">
<icon src="formget-icon.png" width="180" height="180" />
<splash src="formget-icon.png" platform="ios" width="180" height="180"/>
</platform>
Icons:
Icon
<icon src="formget-icon.png" platform="ios" width="180" height="180"/>- src: (required) Source/Location of the icon image file specific to the www folder.
src= "formget-icon.png" - platform: (optional) Platform for which the icon belongs to.
platform="ios" - width: (optional) Width of the icon image.
width="180" - height: (optional) Height of the icon image.
height="180"
Similarly, icons of different sizes can be included for different platforms.
Splashes:
Splash
<splash src="formget-icon.png" platform="ios" width="180" height="180"/>- src: (required) Source/Location of the splash image file specific to the www folder.
src= "formget-icon.png" - platform: (optional) Platform for which the icon belongs to.
platform="ios" - width: (optional) Width of the icon image.
width="180" - height: (optional) Height of the icon image.
height="180"
Similarly, splash screens of different sizes can be included for different platforms.
Conclusion:
So you see, how easy it is to configure PhoneGap using the configuration file. It’s no rocket science to include icons, splash screens, plugins and other elements. I hope this will definitely help you.
You may also like –
- Create, Run And Build A PhoneGap App
- Introduction To PhoneGap