
Now that you’ve completed the Installation of PhoneGap, let’s understand the process of creating, running and building process of an app developed by PhoneGap.
Create An App
There are two ways to create an app:
- GUI
- CLI
Create An App With GUI:
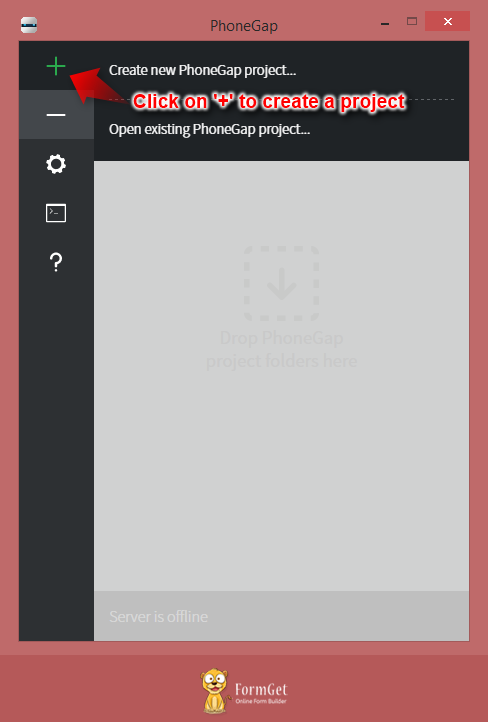
You need to open the PhoneGap Desktop App.
- Click on ‘+’ symbol and then choose ‘Create new PhoneGap project‘.
- Fill the following details:
- Local Path
- Name
- ID (Optional)

- The app has been created. You need to click on the green button to run the app.
The server address at the bottom indicates that your app is running and it is the active project among all.
Only one project can be active at a time.
Create An App With CLI:
Open the command prompt if you’re using Windows or Terminal app if you’re using Mac OS X
- Create a folder named ‘sample‘ in the current location by the following command.
$ phonegap create sampleIt will create the project with the default name as Hello World and default id as ‘com.phonegap.helloworld’.
If you want to create a project with the custom name and custom id, type the following command.$ phonegap create myApp --id "org.myapp.sample" --name "appSample" - Make sure you’re getting the following output.
Creating a new cordova project. - Now when your project has been created in the current location, type cd command to enter into the project directory.
$ cd Sample/ - You need to type dir command in the Command prompt (Windows) and ls command in the Terminal app (Mac Os X).
Command Prompt (Windows)$ dirTerminal App (Mac OS X)
$ lsYou will see the following files and directories.
config.xml hooks platforms plugins www - As index.html stored in www, we’ll change our directory from sample to www.
$ cd www/
Run An App
Again there are 2 ways to run your app:
- GUI
- CLI
Run An App With GUI:
Important Points
- The desktop app of PhoneGap initiates a local web server which hosts the project.
- This local server returns a server address (A private IP Address).
- By entering this server address in PhoneGap’s Mobile app or in any browser installed on the desktop, you can run the app.
- If you’re running the project on the mobile app, make sure your Desktop and Mobile are connected to the same network.
- Run the project by clicking on the green button in the desktop app.
- Grab your device, open PhoneGap’s mobile app, enter the server address written on the bottom of the Desktop App and tap ‘Connect’

- You will see a connection occurred message followed by the success message
- When the app connects, it will load and preview of the app will be displayed.

Run An App With CLI:
- Open the command prompt and change into the project’s directory.
$ cd sample/ - Type ‘$ phonegap serve‘ in the command prompt or terminal app to run the project. This will return a server address.
$ phonegap serve - Now that you’ve server address, you just have to follow the 2nd, 3rd and 4th step mentioned in the above section ‘Running Your App With GUI‘.
Making Updates:
- The preview you saw in the above step was the default look of an app. Now let’s make some changes.
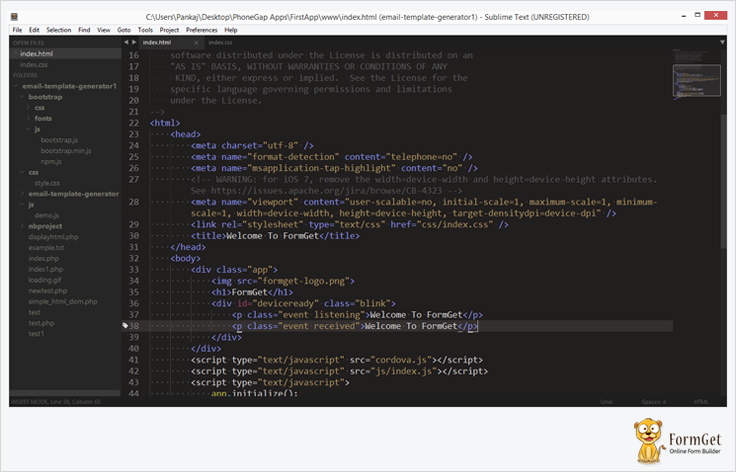
- Open the index.html (located in the project folder: ~/sample/www/index.html) file in any text editor. I am going to use Sublime Text.
- I am going to make following changes to the code:
- Save the changes and run the app by clicking on the green button of the desktop application.
- Now, open the mobile app and see the changes.

- You can make more changes as you like to the HTML, CSS and JavaScipt Code.
Build An App
Building/Compiling an app is an important phase of development. Now that we have created an app, we have to compile and generate an executable file for different platforms. Following are the ways which you can use to build an app.
- Build An App Using PhoneGap Build
- By uploading a zip file
- Using GIT
- Build An App Using CLI
Build An App Using PhoneGap Build:
PhoneGap Build is a cloud service used to build apps online. All you have to do is to upload the project to PhoneGap Build and it will create an executable file of apps for different platforms. It will generate:
- APK for Android
- IPA for IOS
- XAP for Windows
You need to follow the following process:
- Open ‘PhoneGap Build‘ and sign up.

- Log into the PhoneGap Build Account.
- Now you have 2 ways to upload a project:
-
By Using GIT
You can keep your app open source or private. PhoneGap Build has different plans for private apps.
You need to upload your project on GitHub and copy the link of that repository and paste it here.
Now click on ‘Pull from .git repository‘. Your project will be uploaded. -
By Uploading A ZIP File
Click on the ‘private’ tab.
Click on ‘Upload a .zip file’ to upload the project.
4. After uploading the project (Either by GIT or ZIP File), Click on ‘Ready to build‘. You will get the following screen.
5. Now click on ‘PG Build App’.

6. Click on the drop down menu ‘No Key Selected‘ next to android’s icon and select ‘add a key‘.(Optional)
7. Finally, you can download the app for the desired platform.
Build An App Using CLI:
- Open the node.js command prompt on windows or terminal app on Mac OS X.
- Create a new project with the following command.
$phonegap create sample com.phonegap.samplewhere, ‘sample‘ is an application name and ‘com.phonegap.sample‘ is an application ID.
- Make sure you’re getting the following output.
Creating a new cordova project. - Now when your project has been created in the current location, type cd command to enter into the project directory.
$ cd sample/ - Now log into the PhoneGap Build with the credentials you got after registration.
$ cd phonegap remote login -u [email protected] -p ********where, -u is for the username and -p is for the password.
- Make sure you’re getting the following output.
[phonegap]logged in as [email protected] - Now let’s build your project for android platform.
$ phonegap remote build android - Make sure you’re getting the following output.
[phonegap] compressing the app... [phonegap] uploading the app... [phonegap] building the app... [phonegap] Android build complete - Similarly, you can build your project for ios and windows platforms with the following commands.
IOS Platform$ phonegap remote build iosWindows Platform
$ phonegap remote build wp8
Conclusion:
Now you’re ready to create, run and build your own apps. You can do this process with GUI and CLI as you like. Create more useful apps and enjoy 🙂
You may also like –
One Reply to “Create, Run And Build A PhoneGap App”
Excellent Explanation and documentation for phonegap CLI build. Thank you.