
Google’s OAuth 2.0 APIs can be used for open authentication. By this we can access user’s data from server after authorizing user via Google account.
In this tutorial, we are going to explain how you can implement Google open authentication to connect with your website using CodeIgniter.
You can achieve this login mechanism using Google API php client.
To start with this, first Download the Google API php client and save it in your CodeIgniter’s libraries folder, which you will find inside ci_google_oauth > application > libraries. Here ci_google_oauth is the base folder of program file.
You can also refer our live demo or download the Script file. Extract the downloaded files, save it in your local server and run it using path :
http://localhost/ci_google_oauth/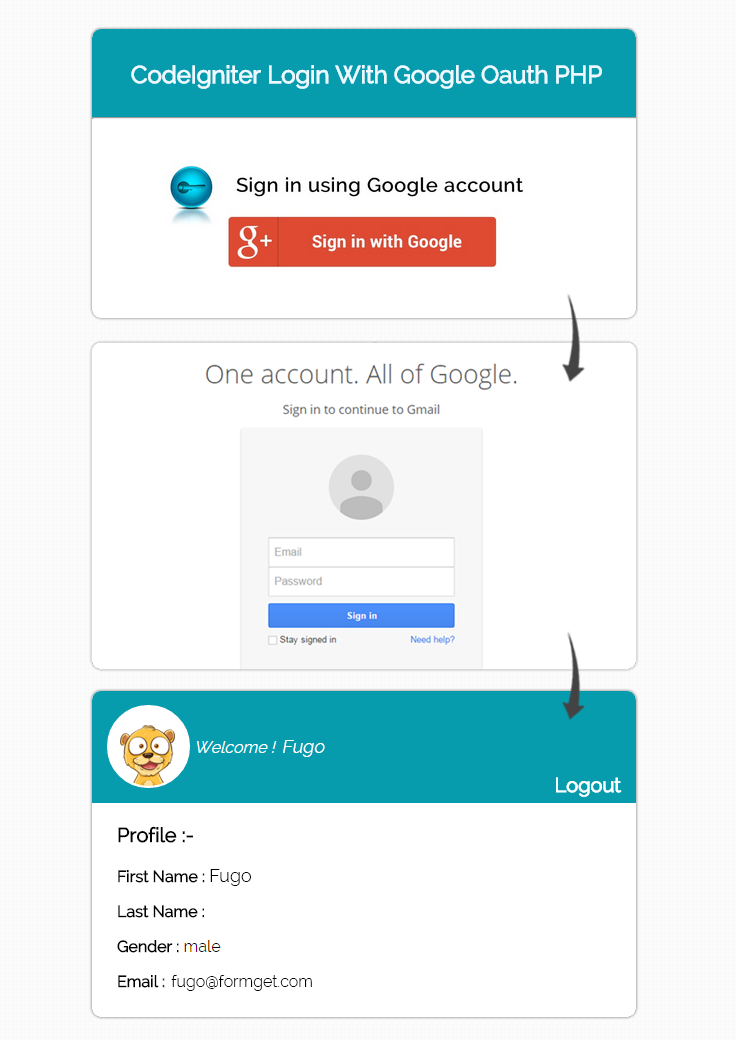
Create Google OAuth Credentials
Before using the Google PHP client library and Oauth 2.0, you must register your application via Google Developers Console.
Google OAuth API required “Client ID” and “Client secret” and “Redirect URIS“ for your application.
If you are looking for inbuilt CodeIgniter facebook and google login. Then you can also try some good scripts. Just plug and play script.
For this follow up the below given steps :
Step 1 : Go to https://developers.google.com/console and sign in by an existing Google account’s username or password.
When you logged in below screen will appear, for creating new project, click on Create Project button .
Now one popup window will appear, here write your project name and click on Create button.

Step 2 : After clicking on Create button below screen will appear. Now go to APIs & auth link.

Step 3 : In this section click on APIs link and find Google+ API by default its off for using this API , make it on by clicking onto OFF button.

Step 4 :After Enabling Google+ API. You will see it under Enabled APIs list..

Step 5 : Now click on Credentials links, here two button will appear Create new Client ID and Create new Key. First click on Create new client ID.

Step 6 : After clicking on Create new app ID one popup window will appear. Here you can select your application type, select Web application and click on Configure consent screen.

Step 7 : Next in Consent screen you can write your product name, homepage URL and product logo which will appear when API access Google data. Then click on Save button

Step 8 : In this window you can mention Authorized Javascript Origins and Redirect URIS.
Redirect URIS used when Google authenticate the user and you want to redirect the user in any URL. Now click on Create Client ID button.

Step 9: After submitting this form, we can get the client Id, secret key and etc as below.for API key click on Create new key button

Step 10:When you click on Create new key one popup window will appear, here you can generate API key for specific platform . We are using web application so click on Server key.

Step 11: In this window just click on Create button

Step 12: Now we finally got CLIENT ID, CLIENT SECRET, REDIRECT URIS and API KEY.

Copy these credentials and put them in your code, which is explained below.
Below is our complete code with short explanation :
Controllers : user_authentication.php
Copy the below code in your controller in that we are using two files , Client.php and Oauth2.php from the library(google-api-php-client-master) that we have saved in libraries folder , other files are interconnected. Now write the Google OAuth Credentials (CLIENT ID, CLIENT SECRET, REDIRECT URIS and API KEY) in the below given space in the code.
<?php
// Start session

session_start();

class User_Authentication extends CI_Controller {

public function __construct() {
parent::__construct();
}

public function index() {

// Include two files from google-php-client library in controller
include_once APPPATH . "libraries/google-api-php-client-master/src/Google/Client.php";
include_once APPPATH . "libraries/google-api-php-client-master/src/Google/Service/Oauth2.php";

// Store values in variables from project created in Google Developer Console
$client_id = '< Generated Client Id >';
$client_secret = '< Generated Client secret Key >';
$redirect_uri = 'http://localhost/ci_google_oauth/';
$simple_api_key = '< Generated Server/API Key >';

// Create Client Request to access Google API
$client = new Google_Client();
$client->setApplicationName("PHP Google OAuth Login Example");
$client->setClientId($client_id);
$client->setClientSecret($client_secret);
$client->setRedirectUri($redirect_uri);
$client->setDeveloperKey($simple_api_key);
$client->addScope("https://www.googleapis.com/auth/userinfo.email");

// Send Client Request
$objOAuthService = new Google_Service_Oauth2($client);

// Add Access Token to Session
if (isset($_GET['code'])) {
$client->authenticate($_GET['code']);
$_SESSION['access_token'] = $client->getAccessToken();
header('Location: ' . filter_var($redirect_uri, FILTER_SANITIZE_URL));
}

// Set Access Token to make Request
if (isset($_SESSION['access_token']) && $_SESSION['access_token']) {
$client->setAccessToken($_SESSION['access_token']);
}

// Get User Data from Google and store them in $data
if ($client->getAccessToken()) {
$userData = $objOAuthService->userinfo->get();
$data['userData'] = $userData;
$_SESSION['access_token'] = $client->getAccessToken();
} else {
$authUrl = $client->createAuthUrl();
$data['authUrl'] = $authUrl;
}
// Load view and send values stored in $data
$this->load->view('google_authentication', $data);
}

// Unset session and logout
public function logout() {
unset($_SESSION['access_token']);
redirect(base_url());
}
}
?>
Views : google_authentication.php
Copy the below code in your view and save as google_authentication.php. This page contain Sign in with Google option. After sign in ,Google will redirect the user data to to google_authentication.php. Now you can see user information and logout option.
<html>
<head>
<link rel="stylesheet" type="text/css" href="<?php echo base_url(); ?>css/style.css">
<link rel="stylesheet" media="screen and (max-width: 1200px) and (min-width: 0px)" type="text/css" href="<?php echo base_url(); ?>css/styleresponsive1.css">
<link rel="stylesheet" media="screen and (max-width: 600px) and (min-width: 0px)" type="text/css" href="<?php echo base_url(); ?>css/styleresponsive2.css">
<link href='http://fonts.googleapis.com/css?family=Source+Sans+Pro|Open+Sans+Condensed:300|Raleway' rel='stylesheet' type='text/css'>
</head>
<body>
<div id="main">
<div id="envelope">
<?php if (isset($authUrl)){ ?>
<header id="sign_in">
<h2>CodeIgniter Login With Google Oauth PHP</h2>
</header>
<hr>
<div id="content">
<center><a href="<?php echo $authUrl; ?>"><img id="google_signin" src="<?php echo base_url(); ?>images/google_login.jpg" width="100%" ></a></center>
</div>
<?php }else{ ?>
<header id="info">
<a target="_blank" class="user_name" href="<?php echo $userData->link; ?>" /><img class="user_img" src="<?php echo $userData->picture; ?>" width="15%" />
<?php echo '<p class="welcome"><i>Welcome ! </i>' . $userData->name . "</p>"; ?></a><a class='logout' href='https://www.google.com/accounts/Logout?continue=https://appengine.google.com/_ah/logout?continue=<?php echo base_url(); ?>index.php/user_authentication/logout'>Logout</a>
</header>
<?php
echo "<p class='profile'>Profile :-</p>";
echo "<p><b> First Name : </b>" . $userData->given_name . "</p>";
echo "<p><b> Last Name : </b>" . $userData->family_name . "</p>";
echo "<p><b> Gender : </b>" . $userData->gender . "</p>";
echo "<p><b>Email : </b>" . $userData->email . "</p>";
?>
<?php }?>
</div>
</div>
</body>
</html>
CSS : style.css
Styling HTML Elements.
body {
margin:0;
padding:0;
font-family:raleway;
background-image: url(../images/repeat-bg.png);
}
#main{
width: 65%;
height: 100%;
margin-left: 17%;
margin-top: 5%;
position: relative;
}
h2{
font-family:raleway;
}
div#envelope{
position: relative;
width: 51%;
border: 1px solid #CFCFD0;
border-radius: 10px;
background-color: #FFFFFF;
}
div#content{
width: 100%;
padding:12px auto;
overflow: hidden;
word-break: break-all;
overflow-wrap: break-word;
border-radius: 0 0 10px 10px;
}
header#sign_in{
font-family:raleway;
background-color: #079BAE;
text-align: center;
padding-top: 12px;
padding-left: 5px;
padding-bottom: 8px;
margin-bottom: -8px;
border-radius: 10px 10px 0 0;
color: white;
}
header#info{
font-family:raleway;
background-color: #079BAE;
margin-top: -11px;
padding-top:15px;
padding-bottom: 42px;
padding-left: 15px;
padding-right: 15px;
font-size: 16px;
border-radius: 10px 10px 0 0;
color: white;

}
header#info a.user_name{
font-family:raleway;
text-decoration: none;
color:white;
}
div.logout{
padding-top: 30px;
float:right;
}
a.logout{
font-family:raleway;
font-size: 20px;
font-weight: 600;
text-decoration: none;
padding-right: 0 auto;
float:right;
color:white;
}
p {
padding: 0 25px;
}
p.profile {
font-weight: bold;
font-size: 20px;
}
img.user_img{
border-radius:50% 50% 50% 50%;
border:3px solid white;
}
p.welcome{
margin-top: -50px;
margin-left: 12%;
}
Conclusion:
This was all about how we can implement Google open authentication with our website using CodeIgniter. Hope you like it, keep reading our other blogs.
37 Replies to “Login With Google CodeIgniter : OAuth API PHP Client”
Hi sir/madam, I am not able to create the “client id”. when iam trying to create the client id, It is repeatedly showing the Popup window when i am clicking on the “create client id” button in the 8th step.
I got it, i have created the Id and Key.
But i am not able to get the data from the google that is first name and last name,etc.
I have copied google-api-php-client-master in library and create files with your code.
I am getting
Fatal error: Class ‘Google_Service’ not found in C:UsersuserDesktopwwwapplicationlibrariesgoogle-api-php-client-mastersrcGoogleServiceOauth2.php on line 32
this error.
Please help
You need to add this line at the begin of the Oauth2.php
include_once APPPATH . “libraries/google-api-php-client-master/src/Google/autoload.php”;
because Oauth2 changed so you need to add the class GoogleService manually.
Fatal error: Class ‘Google_Service’ not found in D:\xampp\htdocs\ci\application\libraries\google-api-php-client-master\src\Google\Service\Oauth2.php on line 32
help me.
require_once APPPATH . “libraries/google-api-php-client-master/src/Google/autoload.php”;
include_once APPPATH . “libraries/google-api-php-client-master/src/Google/Client.php”;
include_once APPPATH . “libraries/google-api-php-client-master/src/Google/Service/Oauth2.php”;
please include this line
require_once APPPATH .’libraries/google-api-php-client-master/src/Google/autoload.php’;
Hi,
To avoid the below issue,
Fatal error: Class ‘Google_Service’ not found in D:\xampp\htdocs\ci\application\libraries\google-api-php-client-master\src\Google\Service\Oauth2.php on line 32
Use
============
require_once APPPATH . “google-api-php-client-master/src/Google/autoload.php”;
require_once APPPATH . “google-api-php-client-master/src/Google/Client.php”;
require_once APPPATH . “google-api-php-client-master/src/Google/Service/Oauth2.php”;
Note: Use any url path. but require_once “autoload.php”
Unable to load the requested file: https://accounts.google.com/o/oauth2/auth
why is this?
Hi Sham,
$redirect_uri = ‘http://localhost/myapps/prod/bq-int-apps/index.php’;
I used below given URL to open google authentication page in browser:
http://localhost/myapps/prod/bq-int-apps/index.php/user_authentication
Result :
Empty page only displayed please help me.
include the ‘url’ in helper of your autoload.php
sir,
i integrate the given code ..but problem is when redirect url (login in google and page redirect to redirect url) then google_authentication view not dispay .. plz help me
just copy in your logout function
public function logout()
{
unset($_SESSION[‘access_token’]);
redirect(‘http://localhost/GoogleIgniter/index.php/user_authentication/’);
}
in user_authentication.php
Hi, i don´t really understand how can i get the information from any view..and how can i filter which google account has permission to enter my app . can you give me a hint please ?
while using this code i got a fatal error like below:
Fatal error: Class ‘Google_Service’ not found in /var/www/oop/CI-google/application/libraries/google-api-php-client-master/src/Google/Service/Oauth2.php on line 32
if anybody getting error like this the solution is
instead of=>
include_once APPPATH . “libraries/google-api-php-client-master/src/Google/Client.php”;
include_once APPPATH . “libraries/google-api-php-client-master/src/Google/Service/Oauth2.php”;
replace both with=>
require_once APPPATH . “libraries/google-api-php-client-master/src/Google/autoload.php”;
And your good to go
😀
Thank, Its really helpfull..
work fine to me
Fatal error: Class ‘Google_Service’ not found in D:\xampp\htdocs\ci_google_oauth\application\libraries\google-api-php-client-master\src\Google\Service\Oauth2.php on line 33
after including your lines
please resolve my problem
I got a perfect code.anyone need,email me.Mail id:[email protected]
I want source code for Login with Google Account and facebook in CodeIgniter
Thank you very much. working well..
its not working it gives a error like..
A PHP Error was encountered
Severity: Error
Message: Class ‘Google_Service’ not found
Filename: Service/Oauth2.php
Line Number: 32
Backtrace:
Any one needs the working code,mail me.ID:[email protected].
Thank you very much…
After Enter Login Details and Click Allow Button, then this error is showing………….
An uncaught Exception was encountered
Type: Google_IO_Exception
Message: HTTP Error: Unable to connect: ‘fopen(https://accounts.google.com/o/oauth2/token) [function.fopen]: failed to open stream: Invalid argument’
Filename: C:\wamp\www\ci_google_oauth\application\libraries\google-api-php-client-master\src\Google\IO\Stream.php
Line Number: 141
Backtrace:
File: C:\wamp\www\ci_google_oauth\application\libraries\google-api-php-client-master\src\Google\IO\Abstract.php
Line: 136
Function: executeRequest
File: C:\wamp\www\ci_google_oauth\application\libraries\google-api-php-client-master\src\Google\Auth\OAuth2.php
Line: 111
Function: makeRequest
File: C:\wamp\www\ci_google_oauth\application\libraries\google-api-php-client-master\src\Google\Client.php
Line: 128
Function: authenticate
File: C:\wamp\www\ci_google_oauth\application\controllers\user_authentication.php
Line: 38
Function: authenticate
File: C:\wamp\www\ci_google_oauth\index.php
Line: 292
Function: require_once
do u need code?
Yes… I Want the code… How to solve the above error?
contact to my mail. [email protected]
$simple_api_key = ”; <—where is this came from ?
thanks
Same Error Class ‘Google_Service’ not found
Added only autoload.php inplace of these below two files:-
Client.php
Oauth2.php
And got This library must be installed via composer or by downloading the full package. See the instructions at https://github.com/google/google-api-php-client#installation.
Has any one got it working right??
Please send me the right code. here is my email [email protected]
Hello there! This post couldn’t be written any better!
Looking through this post reminds me of my previous roommate!
He always kept preaching about this. I will send this article to
him. Fairly certain he will have a very good read. Many thanks for
sharing!
Hi
I have copied google-api-php-client-master in library and create files with your code.
I am getting
Parse error: syntax error, unexpected ‘[‘, expecting ‘)’ in C:\wamp\www\ci_google_oauth\application\libraries\google-api-php-client-master\google-api-php-client-master\src\Google\Client.php on line 94
Anyone pls help me
Your Tutorials Heled me verry well, i learned incradible things to provide in my project in a couple of days !! Thanks !!!
I have a problem a no get code but if a var_dum of
$objOAuthService = new Google_Service_Oauth2($client);
var_dump($objOAuthService);
I can see my info of gmail, somebody tell me whiy?
Fatal error: Uncaught exception ‘Exception’ with message ‘This library must be installed via composer or by downloading the full package. See the instructions at https://github.com/google/google-api-php-client#installation.’ in E:\Ampps\www\astin\application\libraries\google-api-php-client-master\src\Google\autoload.php:14 Stack trace: #0 E:\Ampps\www\astin\application\controllers\user_authentication.php(3): require_once() #1 E:\Ampps\www\astin\system\core\CodeIgniter.php(250): include(‘E:\\Ampps\\www\\as…’) #2 E:\Ampps\www\astin\index.php(202): require_once(‘E:\\Ampps\\www\\as…’) #3 {main} thrown in E:\Ampps\www\astin\application\libraries\google-api-php-client-master\src\Google\autoload.php on line 14
Tremendous issues here. I am very happy to look your article.
Thank you a lot and I’m taking a look ahead to touch you. Will you kindly drop me a
e-mail?
hey there and thank you for your information ?
I’ve certainly picked up anything new from right here.
I did however expertise a few technical points
using this website, since I experienced to reload the website lots of times previous to I could get it to
load correctly. I had been wondering if your web host is OK?
Not that I am complaining, but slow loading instances times will very frequently affect your placement in google and could damage your
high quality score if advertising and marketing with Adwords.
Well I’m adding this RSS to my email and could look
out for much more of your respective fascinating content.
Make sure you update this again very soon.
I am receiving error while integrating google+.
I followed all the instructions given by you.
This is the error i am receiving:-
Type: Google_Auth_Exception
Message: The OAuth 2.0 access token has expired, and a refresh token is not available. Refresh tokens are not returned for responses that were auto-approved.
Thanks.