
Now Why Email Attachments are Important..??? As business grows larger, its need to facilitate the flow of information between workers grows. Colleagues and Supervisors need to access documents and keep the data up-to-date in order to complete collaborative tasks. Email Attachments is one way to accomplish this sharing of data.
We know sending a simple text email using mail() function is not a big deal nowadays. But, it’s a little bit tricky and difficult task to send emails with multiple attachments rather than sending a plain text.
If you’re just a normal user or intermediate programmer and want to implement multiple attachment functionalities for your mail using native mail() function its a bit challenging.. Isn’t it..??
And So,
Today, in this article I am going to explain a simple and easy way to send emails with multiple attachments using famous mail library PHPMailer.
Watch the live demo or download code from the link given below.
Steps To Proceed:-
Step 1- First, Download the latest PHPMailer library file. You can download the latest library file from here.
Step 2- Extract the library folder and copy class.phpmailer.php, class.smtp.php and PHPMailerAutoload.php file available in the extracted folder.
Step 3- Now, Create a lib folder in your project folder and paste the above-mentioned library file in it.
Step 4- Similarly, create js and css folder. Download latest jQuery library file and after renaming it to jquery.js, paste it into the js folder. In the same way, download and paste bootstrap.css file in css folder.
Step 5- Create a uploads folder. I’ve stored all attached file in this folder and will delete these files once I send the emails.
Step 6- Create index.php file in the root folder of your project and paste the code given below in it.
Step 7- Create MulAttachMail.php file in the same folder where we created index.php file and paste the code given in it.
Step 8- Create style.css file in the css folder. Paste the following code in it.
Note: You must be very clear about the directory structure of your project. A simple mistake can ruin your coding part and cause frustration in your mind.
So, be careful and follow each step exactly in the same way as I explained. For better understanding of directory structure, you can also refer to the image given below:

index.php
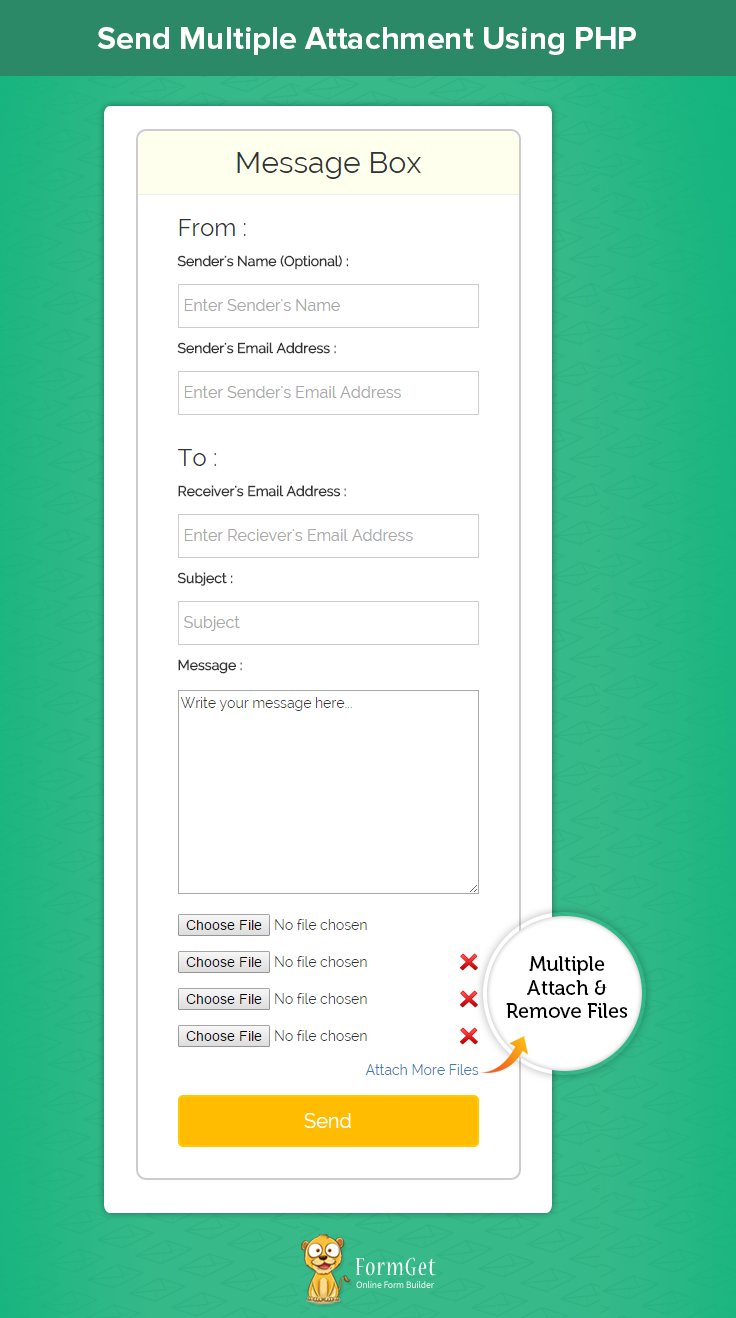
This file lets you create a message box. Users can write their message in the message box and attach their files. User should also enter the sender’s and receiver’s email addresses. When the user will clicks on the send button, all the submitted data will be passed to MulAttachMail.php file.
<html>
<head>
<meta http-equiv="Content-Type" content="text/html; charset=windows-1252">
<title>Send Multiple Attachment Using PHP</title>
<link rel="stylesheet" type="text/css" href="css/style.css"/>
<link rel="stylesheet" type="text/css" href="css/bootstrap.css"/>
<script src="js/jquery.js"></script>
</head>
<body>
<h1>Send Multiple Attachment Using PHP</h1>
<div id="main" class="col-sm-12 col-md-6 col-lg-6">
<div id="login">
<h2>Message Box</h2>
<hr>
<form action="MulAttachMail.php" method="post" enctype="multipart/form-data">
<h3>From : </h3>
<label>Sender's Name (Optional) : </label> <input type="text" name="" class="" placeholder="Enter Sender's Name"/>
<label>Sender's Email Address : </label> <input type="email" name="sen_email" class="sen_email" placeholder="Enter Sender's Email Address"/>
<h3>To : </h3>
<label>Receiver's Email Address : </label> <input type="email" name="rec_email" class="rec_email" placeholder="Enter Reciever's Email Address"/>
<label>Subject : </label>
<input type="text" name="email_sub" class="" placeholder="Subject"/>
<label>Message : </label>
<textarea name="box_msg" rows="10" cols="30">Write your message here...</textarea>
<div class="input_fields_wrap">
<div><input type="file" name="attachment" value="Attach File" id="first_attach" ></div>
</div>
<a class="add_field_button">Attach More Files</a>
<input type="submit" value="Send" id="submit"/>
</form>
</div>
</div>
<script>
jQuery(document).ready(function() {
jQuery("#submit").click(function(e) {
var sen_email = jQuery('.sen_email').val();
var rec_email = jQuery('.rec_email').val();
if (sen_email == "") {
alert('Sender's Email Address cannot be empty.');
e.preventDefault();
}
if (rec_email == "") {
alert('Receiver's Email Address cannot be empty.');
e.preventDefault();
}
var attach = jQuery('#first_attach').val();
if (attach == "") {
alert('Atleast one attachment is required!!!');
e.preventDefault();
}

});
// Code for creating more attachment file
// Maximum attachment allowed
var max_fields = 10;
//Fields wrapper
var wrapper = $(".input_fields_wrap");
// Add button ID
var add_button = $(".add_field_button");
// Initlal attachment field count
var x = 1;
// Add attachment field on per click
$(add_button).click(function(e) {
e.preventDefault();
// Max attachment allowed
if (x < max_fields) {
// Attachment increment
x++;
$(wrapper).append('<div><input type="file" name="attachment' + x + '"/><a href="#" class="remove_field"><img src="img/del-attach.png"/></a></div>'); //add attachment
if (x == max_fields) {
// Hide add more attachment link
$(".add_field_button").hide();
}
}

});
// Remove attachment on per click
$(wrapper).on("click", ".remove_field", function(e) { //user click on to remove attachment
e.preventDefault();
$(this).parent('div').remove();
x--;

if (x < max_fields) {
// Show add more attachment link when field < max_fields
$(".add_field_button").show();
}
})
});
</script>
</body>
</html>
MulAttachMail.php
All submitted values from index.php will be processed here. This file checks for the supported file, upload attached files, send emails. It then deletes the uploaded files from the project folder finally.
<?php
// Include PHPMailerAutoload.php library file
include ("lib/PHPMailerAutoload.php");

$sen_name = "";
$sen_email = "";
$rec_email = "";
$email_sub = "";
$box_msg = "";
// Retrieving & storing user's submitted information
if (isset($_POST['sen_name'])) {
$sen_name = $_POST['sen_name'];
}
if (isset($_POST['sen_email'])) {
$sen_email = $_POST['sen_email'];
}
if (isset($_POST['rec_email'])) {
$rec_email = $_POST['rec_email'];
}
if (isset($_POST['email_sub'])) {
$email_sub = $_POST['email_sub'];
}
if (isset($_POST['box_msg'])) {
$box_msg = $_POST['box_msg'];
}

if (isset($_FILES) && (bool) $_FILES) {
$files = array();
$ext_error = "";
// Define allowed extensions
$allowedExtentsoins = array('pdf', 'doc', 'docx', 'gif', 'jpeg', 'jpg', 'png', 'rtf', 'txt','zip');
foreach ($_FILES as $name => $file) {
if (!$file['name'] == "") {
$file_name = $file['name'];
$temp_name = $file['tmp_name'];
$path_part = pathinfo($file_name);
$ext = $path_part['extension'];

// Checking for extension of attached files
if (!in_array($ext, $allowedExtentsoins)) {
echo "<script>alert('Sorry!!! ." . $ext ."Extension is not allowed!!! Try Again.')</script>";
$ext_error = FALSE;
}else{
$ext_error = True;
}

// Store attached files in uploads folder
$server_file = dirname(__FILE__) . "/uploads/" . $path_part['basename'];
move_uploaded_file($temp_name, $server_file);
array_push($files, $server_file);
}
}
if($ext_error != FALSE){
$mail = new PHPMailer();
$mail->IsSMTP();
$mail->Mailer = "smtp";
$mail->Host = "smtp.gmail.com";
$mail->Port = 465;

// Enable SMTP authentication
$mail->SMTPAuth = true;

// SMTP username (e.g [email protected])
$mail->Username = '<-- SMTP Username -->';

// SMTP password
$mail->Password = '<-- SMTP password -->';

// Enable encryption, 'tls' also accepted
$mail->SMTPSecure = 'ssl';

// Sender Email address
$mail->From = $sen_email;

// Sender name
$mail->FromName = $sen_name;

// Receiver Email address
$mail->addAddress($rec_email);

// Attaching files in the mail
foreach ($files as $file) {
$mail->addAttachment($file);
}
$mail->Subject = $email_sub;
$mail->Body = $box_msg;
$mail->WordWrap = 50;

// Sending message and checking status
if (!$mail->send()) {
echo "<script>alert('Sorry!!! Message was not sent. Mailer error: " . $mail->ErrorInfo . ")</script>";
exit;
} else {
echo "<script>alert('Congratulations!!! Your Email has been sent successfully!!!')</script>";
}
// Deleting files from the uploads folder
foreach ($files as $file) {
unlink($file);
}
echo "<script>window.location='index.php';</script>";
}else{
foreach ($files as $file) {
unlink($file);
}
echo "<script>window.location='index.php';</script>";
}
}
?>
<script src="js/jquery.js"></script>
style.css
Includes basic styling of HTML elements.
@import url(http://fonts.googleapis.com/css?family=Raleway);
body{
padding: 0;
}
#main{
float: none;
margin: 0 auto;
font-family:raleway;
}
h2{
background-color: #FEFFED;
text-align:center;
border-radius: 10px 10px 0 0;
margin: -10px -40px -20px !important;
padding: 15px;
}
hr{
border:0;
border-bottom:1px solid #ccc;
margin: 10px -40px;
margin-bottom: 30px;
}
#login{
width:50%;
min-width: 320px;
border-radius: 10px;
font-family:raleway;
border: 2px solid #ccc;
padding: 10px 40px 25px;
margin: 70px auto 0 auto;
}
input[type=text],input[type=email]{
width:100%;
padding: 10px;
margin-top: 8px;
border: 1px solid #ccc;
padding-left: 5px;
font-size: 16px;
font-family:raleway;
margin-bottom: 10px;
}
input[type=submit]{
width: 100%;
background-color:#FFBC00;
color: white;
border: 2px solid #FFCB00;
padding: 10px;
font-size:20px;
cursor:pointer;
border-radius: 5px;
margin-bottom: 15px;
}
textarea{
width: 100%;
margin-top: 10px !important;
margin-bottom: 15px !important;
}
input[type="file"] {
float: left;
width: 90%;
}
a.remove_field img{
width: 20px;
height: 20px;
float: right;
margin-top: 6px;
}
.input_fields_wrap div input {
margin-top: 5px;
margin-bottom: 10px;
}
a.add_field_button {
float: right;
margin-bottom: 15px;
}
h1 {
text-align: center;
}
@media only screen and (max-width:480px){
div#login{
width: 300px;
}
}
Conclusion:
Hope you liked the tutorial. Do give a try to the script and share your experience with us in the space given below. Keep reading our other blog posts. 🙂
For more related information check out following blogs –