
Ugh! Need to send the same Email for multiple contacts but don’t have enough time. OR Feel irritate in typing the same message and contacts each & every time.
It’s very easy to send an email for few person say 2-5 manually, but it becomes a tough job when it comes for sending to the bulk of contacts.
Though it is well said that ‘Time is Money’ so every person is trying to save his/her time.
In today’s busy human lives, it’s really has been a hectic job to write & send the same email message each time. Worrying about escape emails, misplace emails, fail emails.
Cheer up All……No need to worry now onwards.
We came up with a very optimized & simple solution named as Personalized Email.
Keep your all email contacts in CSV file with a specific format explained below in the blog. Upload this CSV file and write your message and just click the send button. It will be delivered to all the contacts which are listed in CSV file.
Today, we are going to explain you a simple way to send personalized messages to a large number client by just uploading a CSV file.The CSV file will only contain the name of the client and their email address. The format of information inside CSV file should be of the following pattern,
Client-name1, [email protected]
Client-name2, [email protected]
...
...
so on.
After uploading a valid CSV file, you will get a message box where you can write subject and messages.
Since, this is a personalized message so you will have to mention users name inside the subject and message.
For this, use keyword “{user}”, where you want to insert client name in the subject or message. The keyword {user} will be automatically replaced with the username during the process of sending messages.
For example: If, in the message you want to write
Hi, Client-name1Then you can write the message in the following way.
Hi, {user}Similarly, write {user} to all place in the message where you want client names.
Watch the live demo or download code from the link given below.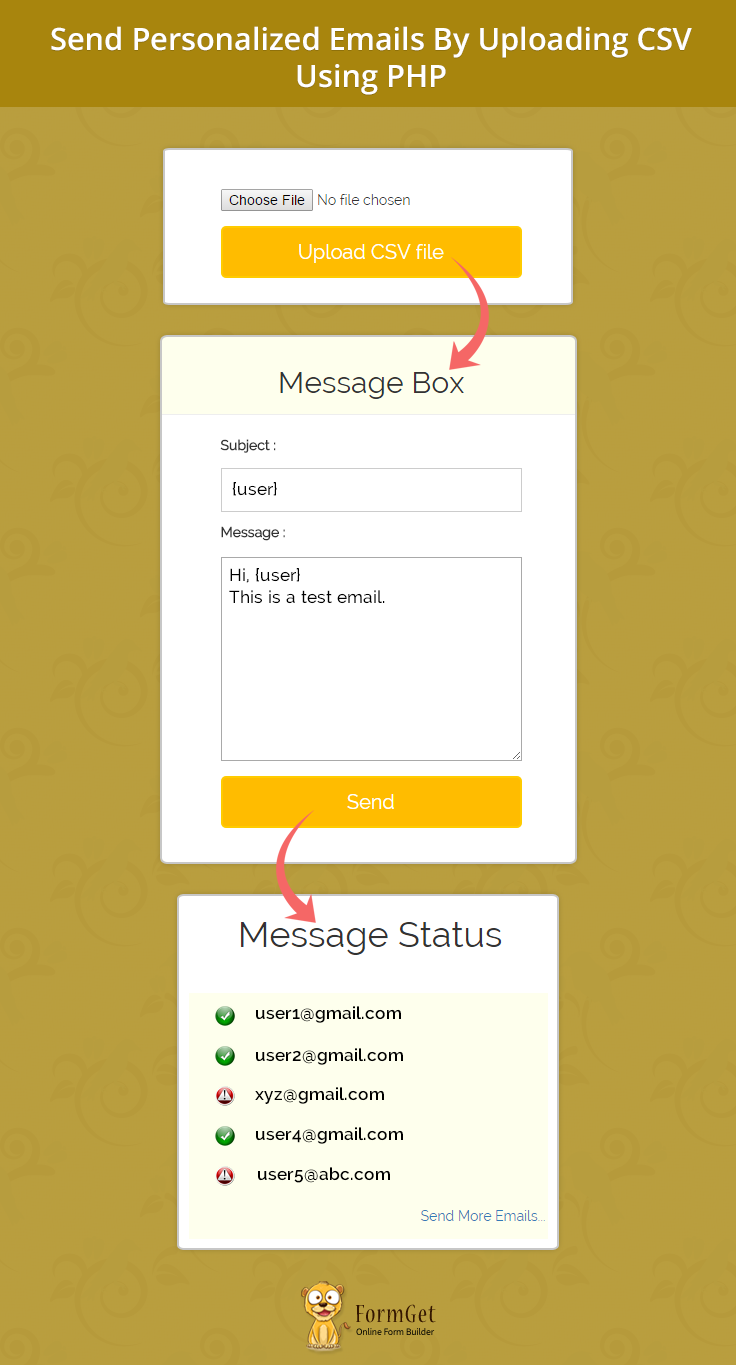
We have introduced an online service for personalized email marketing, name MailGet – Email Marketing Platform. It allow you to send personalized message to mulitple recipients at the same time. It also contains several userful features.
Follow the steps:
Step 1: Download latest version of PHPMailer library from here.
Step 2: Extract download library file and copy class.phpmailer.php, class.smtp.php and PHPMailerAutoload.php.
Step 3: Create a lib folder in your application folder and paste these library files in it.
Step 4: Now, create css and js folder. Download and paste bootstrap.css file in css folder. Similarly, download latest jQuery library file. Rename it to jquery.js and paste it into the js folder.
Step 5: Create uploads folder to store uploaded CSV file. The uploaded file will be deleted once the email is sent.
Step 6: Create index.php, Mail.php files in the root folder of your application and write the code provided below.
Step 7: Now, create style.css in css folder and paste the code as mentioned below.
Note: Be careful about the directory structure of your application. Follow the image given below for a clear understanding.

index.php
First, it shows a form containing CSV file uploading option. Once a valid CSV file is uploaded, it will again display a form which will allow users to write personalized subject and message.
When user will submit the form, all information will be passed to Mail.php file for further process.
<html>
<head>
<meta http-equiv="Content-Type" content="text/html; charset=windows-1252">
<title>Send Personalized Emails By Uploading CSV Using PHP</title>
<link rel="stylesheet" type="text/css" href="css/style.css"/>
<link rel="stylesheet" type="text/css" href="css/bootstrap.css"/>
<script src="js/jquery.js"></script>
</head>
<body>
<h1>Send Personalized Emails By Uploading CSV Using PHP</h1>
<div id="main" class="col-sm-12 col-md-6 col-lg-6">
<div id="csv_sec">
<form action="" method="POST" enctype="multipart/form-data">
<input type="file" name="csv_data" class="csv_upload"/>
<input type="submit" id="csv_upload" value="Upload CSV file" />
</form>
</div>

<?php
$ext_error = "";
$data = "";
$csv_data = array();
if (isset($_FILES) && (bool) $_FILES) {

// Define allowed extensions
$allowedExtentsoins = "csv";
$file_name = $_FILES['csv_data']['name'];
$temp_name = $_FILES['csv_data']['tmp_name'];
$path_part = pathinfo($file_name);
$ext = $path_part['extension'];

// Checking for extension of attached files
if ($ext != $allowedExtentsoins) {
echo "<script>alert('Sorry!!! ." . $ext . " file is not allowed!!! Try Again.')</script>";
$ext_error = TRUE;
} else {
$ext_error = FALSE;
}
if ($ext_error == FALSE) {
echo "<script>alert('File successfully uploaded!!! Continue...')</script>";

// Store attached files in uploads folder
$file_path = dirname(__FILE__) . "/uploads/" . $path_part['basename'];
move_uploaded_file($temp_name, $file_path);

// Retrieve data from the CSV file and storing in $csv_data
$file = new SplFileObject($file_path);
$file->setFlags(SplFileObject::READ_CSV);
foreach ($file as $row) {
// Remove empty row and empty values from the uploaded csv data
$csv_data[] = array_filter($row);
}
$csv_data = array_filter($csv_data);
$data = htmlspecialchars(json_encode($csv_data));
?>
<div id="login">
<h2>Message Box</h2>
<hr>
<form action="Mail.php" method="post">
<label>Subject : </label>
<input type="hidden" name="uploaded_file_path" value="<?php echo $file_path; ?>" />
<input type="hidden" name="user_list" value="<?php echo $data; ?>" />
<input type="text" name="email_sub" class="email_sub" />
<label>Message : </label>
<textarea name="box_msg" rows="10" cols="30" class="box_msg">Message...</textarea>
<input type="submit" value="Send" id="submit"/>
</form>
</div>
<?php
}
}
?>
</div>
<script>
jQuery("#csv_upload").click(function(e) {
var upload = jQuery('.csv_upload').val();
if (upload == "") {
alert('Please Upload a CSV file!!!');
e.preventDefault();
}
});
jQuery("#submit").click(function(e) {
var email_sub = jQuery('.email_sub').val();
var box_msg = jQuery('.box_msg').val();
if (email_sub == "") {
alert('Subject is required!!!');
e.preventDefault();
}
if (box_msg == "") {
alert('Message is required!!!');
e.preventDefault();
}
});
</script>
</body>
</html>
Mail.php
Retrieve and store all the data sent by index.php file. Then, it will pass all the information to the PHPMailerAutoload.php library file to send personalized email to each user( mentioned in the uploaded CSV file ) one by one.
Then, based upon the respose from the server, it will display status of each email and also will delete the uploaded CSV file form the uploads folder.
<html>
<head>
<meta http-equiv="Content-Type" content="text/html; charset=windows-1252">
<title>Send Personalized Email By Uploading CSV</title>
<link rel="stylesheet" type="text/css" href="css/style.css"/>
<link rel="stylesheet" type="text/css" href="css/bootstrap.css"/>
<script src="js/jquery.js"></script>
</head>
<body>
<?php
// Include PHPMailerAutoload.php library file
include("lib/PHPMailerAutoload.php");
$email_sub = "";
$msg = "";
$user_list = array();
$status = array();
$file_path = "";

// Retrieving & storing user's submitted information
if (isset($_POST['user_list'])) {
$user_list = json_decode($_POST['user_list']);
}
if (isset($_POST['email_sub'])) {
$email_sub = $_POST['email_sub'];
}
if (isset($_POST['box_msg'])) {
$msg = $_POST['box_msg'];
}
if (isset($_POST['uploaded_file_path'])) {
$file_path = $_POST['uploaded_file_path'];
}

// Sending personalized email
foreach ($user_list as $list) {
$receiver_name = "";
$receiver_add = "";
$per_msg = "";
$per_email_sub = "";
$receiver_name = $list[0];
$receiver_add = $list[1];

// Replacing {user} with client name from subject and message
$per_msg = str_replace("{user}", $receiver_name, $msg);
$per_email_sub = str_replace("{user}", $receiver_name, $email_sub);

$mail = new PHPMailer();
$mail->IsSMTP();
$mail->Mailer = "smtp";
$mail->Host = "smtp.gmail.com";
$mail->Port = 465;

// Enable SMTP authentication
$mail->SMTPAuth = true;

// SMTP username
$mail->Username = '<-- SMTP Username -->';

// SMTP password
$mail->Password = '<-- SMTP Password -->';

// Enable encryption, 'tls' also accepted
$mail->SMTPSecure = 'ssl';

// Sender Email address
$mail->From = '<-- Sender Email Address -->';

// Sender name
$mail->FromName = "<-- Sender Name -->";

// Receiver Email address
$mail->addAddress($receiver_add);

$mail->Subject = $per_email_sub;
$mail->Body = $per_msg;
$mail->WordWrap = 50;

// Sending message and storing status
if (!$mail->send()) {
$status[$receiver_add] = False;
} else {
$status[$receiver_add] = TRUE;
}
}
?>
<div id="main" class="col-sm-12 col-md-6 col-lg-6">
<h1>Message Status</h1>
<div id="status">
<ul>
<?php
foreach ($status as $user => $sent_status) {
if ($sent_status == True) {
$img = "img/errorFree.png";
} else {
$img = "img/error.png";
}
echo "<li> <img src='$img'/>" . $user;
}
// Deleting iuploaded CSV file from the uploads folder
unlink($file_path);
?>
</ul>
<a href="index.php" id="more">Send More Emails...</a>
</div>
</div>
</body>
</html>
style.css
Contain CSS coding used for this project. You can change it according to your requirement.
@import url(http://fonts.googleapis.com/css?family=Raleway);
body{
padding: 0;
}
#main{
float: none;
margin: 0 auto;
font-family:raleway;
}
h2{
background-color: #FEFFED;
text-align:center;
border-radius: 10px 10px 0 0;
margin: -10px -40px -20px !important;
padding: 15px;
}
hr{
border:0;
border-bottom:1px solid #ccc;
margin: 10px -40px;
margin-bottom: 30px;
}
#login, #csv_sec, #status{
width:50%;
min-width: 320px;
border-radius: 10px;
font-family:raleway;
border: 2px solid #ccc;
padding: 10px 40px 25px;
margin: 70px auto 0 auto;
}
#status{
padding: 10px 0 45px;
margin-top:30px;
background: #FEFFED;
}
input[type=text],input[type=email]{
width:100%;
padding: 10px;
margin-top: 8px;
border: 1px solid #ccc;
padding-left: 5px;
font-size: 16px;
font-family:raleway;
margin-bottom: 10px;
}
input[type=submit]{
width: 100%;
background-color:#FFBC00;
color: white;
border: 2px solid #FFCB00;
padding: 10px;
font-size:20px;
cursor:pointer;
border-radius: 5px;
}
textarea{
width: 100%;
margin-top: 10px !important;
margin-bottom: 15px !important;
}
input[type="file"] {
float: left;
width: 100%;
margin: 15px auto;
}
a#more {
float: right;
margin-right: 15px;
}
h1 {
text-align: center;
}
ul {
list-style: none;
}
div#status ul {
padding-left: 0;
}
div#status ul li {
width: 100%;
padding: 5px 10px;
font-weight: bold;
font-size: 16px;
}

div#status ul li img {
width: 50px;
margin: 5px 10px;
padding: 0 15px;
}
@media only screen and (max-width:480px){
div#login{
width: 300px;
}
}
Run the script & Enjoy!!!
Conclusion:
Hope this tutorial will be beneficial to you. Try the script and share your experience from the space given below. Keep reading our blogs for more easy tricks and concepts 🙂
2 Replies to “Email Personalization: Just Upload A CSV File And Send Email To Multiple Recipients”
Very nice tutorial, even though I haven’t tested I guess that with some “code cooking” someone can get a handy, simple but working mailing solution..
Thanks for your contribution 🙂 !!!
I am using your personalized email script. It’s great!!
I noticed it is plain text only. How to make html? This is the script I am talking about: https://www.formget.com/send-personalized-email-to-multiple-recipients/
Thank you!!