
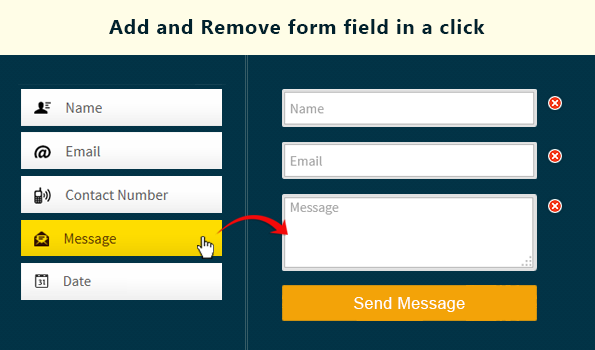
In the last Blog, we have shown you how to dynamically add form fields to create form. This blog post tells about how to add and remove fields dynamically with the help of JavaScript codes. So while creating your form, you can easily add fields in a click and if you don’t want it, you can easily delete it in a click.

Here are the following code snippets for it.
HTML File – getform.html
Here, you can view HTML coding for the blog. It will display form buttons. When you click on those buttons, it’s respective field will appear.
<!DOCTYPE html>
<html>
<head>
<title>Create Dynamic form Using JavaScript</title>
<script src="js/form.js" type="text/javascript"></script>
<link href="form.css" rel="stylesheet" type="text/css">
</head>
<body>
<div class="main_content">
<!--
========================================================================================
Header Div.
========================================================================================
-->
<div class="first">
<p><a href="https://www.formget.com/app/"><img id="logo" src="logo.png">
</a> Online form builder.</p>
</div>
<!--
======================================================================================
This Div is for the Buttons. When user click on buttons, respective field will appear.
=======================================================================================
-->
<div class="two">
<h4>Frequently Used Form Fields</h4><button onclick="nameFunction()">Name</button>
<button onclick="emailFunction()">Email</button>
<button onclick="contactFunction()">Contact</button>
<button onclick="textareaFunction()">Message</button>
<button onclick="resetElements()">Reset</button>
</div>
<!--
========================================================================================
This Div is meant to display final form.
========================================================================================
-->
<div class="three">
<h2>Your Dynamic Form!</h2>
<form action="#" id="mainform" method="get" name="mainform">
<span id="myForm"></span>
<p></p><input type="submit" value="Submit">
</form>
</div>
<!--
========================================================================================
Footer Div.
========================================================================================
-->
<div class="four">
<p>2014 <a href="https://www.formget.com/app/"><img src="logo.png">
</a> All rights reserved.</p>
</div>
</div>
</body>
</html>
JavaScript File – form.js
var i = 0; /* Set Global Variable i */
function increment(){
i += 1; /* Function for automatic increment of field's "Name" attribute. */
}
/*
---------------------------------------------

Function to Remove Form Elements Dynamically
---------------------------------------------

*/
function removeElement(parentDiv, childDiv){
if (childDiv == parentDiv){
alert("The parent div cannot be removed.");
}
else if (document.getElementById(childDiv)){
var child = document.getElementById(childDiv);
var parent = document.getElementById(parentDiv);
parent.removeChild(child);
}
else{
alert("Child div has already been removed or does not exist.");
return false;
}
}
/*
----------------------------------------------------------------------------

Functions that will be called upon, when user click on the Name text field.

----------------------------------------------------------------------------
*/
function nameFunction(){
var r = document.createElement('span');
var y = document.createElement("INPUT");
y.setAttribute("type", "text");
y.setAttribute("placeholder", "Name");
var g = document.createElement("IMG");
g.setAttribute("src", "delete.png");
increment();
y.setAttribute("Name", "textelement_" + i);
r.appendChild(y);
g.setAttribute("onclick", "removeElement('myForm','id_" + i + "')");
r.appendChild(g);
r.setAttribute("id", "id_" + i);
document.getElementById("myForm").appendChild(r);
}
/*
-----------------------------------------------------------------------------

Functions that will be called upon, when user click on the E-mail text field.

------------------------------------------------------------------------------
*/
function emailFunction(){
var r = document.createElement('span');
var y = document.createElement("INPUT");
y.setAttribute("type", "text");
y.setAttribute("placeholder", "Email");
var g = document.createElement("IMG");
g.setAttribute("src", "delete.png");
increment();
y.setAttribute("Name", "textelement_" + i);
r.appendChild(y);
g.setAttribute("onclick", "removeElement('myForm','id_" + i + "')");
r.appendChild(g);
r.setAttribute("id", "id_" + i);
document.getElementById("myForm").appendChild(r);
}
/*
-----------------------------------------------------------------------------

Functions that will be called upon, when user click on the Contact text field.

------------------------------------------------------------------------------
*/
function contactFunction(){
var r = document.createElement('span');
var y = document.createElement("INPUT");
y.setAttribute("type", "text");
y.setAttribute("placeholder", "Contact");
var g = document.createElement("IMG");
g.setAttribute("src", "delete.png");
increment();
y.setAttribute("Name", "textelement_" + i);
r.appendChild(y);
g.setAttribute("onclick", "removeElement('myForm','id_" + i + "')");
r.appendChild(g);
r.setAttribute("id", "id_" + i);
document.getElementById("myForm").appendChild(r);
}
/*
-----------------------------------------------------------------------------

Functions that will be called upon, when user click on the Message textarea field.

------------------------------------------------------------------------------
*/
function textareaFunction(){
var r = document.createElement('span');
var y = document.createElement("TEXTAREA");
var g = document.createElement("IMG");
y.setAttribute("cols", "17");
y.setAttribute("placeholder", "message..");
g.setAttribute("src", "delete.png");
increment();
y.setAttribute("Name", "textelement_" + i);
r.appendChild(y);
g.setAttribute("onclick", "removeElement('myForm','id_" + i + "')");
r.appendChild(g);
r.setAttribute("id", "id_" + i);
document.getElementById("myForm").appendChild(r);
}
/*
-----------------------------------------------------------------------------

Functions that will be called upon, when user click on the Reset Button.

------------------------------------------------------------------------------
*/
function resetElements(){
document.getElementById('myForm').innerHTML = '';
}
CSS File – form.css
This contains css codes to give basic styling in the form
body{
width:960px;
margin:45px auto;
background-color:#f9ebe8
}
form{
width:330px;
border-top:1px dotted #D9D9D9;
margin:10px 180px
}
button{
width:246px;
height:40px;
color:#4C4C4C;
margin-bottom:20px;
margin-left:20px
}
input{
width:280px;
height:40px;
padding:5px;
margin:20px 0 10px;
border-radius:5px;
border:4px solid #acbfa5
}
input[type = submit]{
width:100px;
background-color:#35c8ef;
border-radius:5px;
border:2px solid blue;
color:#fff
}
textarea{
width:280px;
height:70px;
padding:5px;
margin:20px 0 10px;
border-radius:5px;
border:4px solid #acbfa5
}
.four p{
text-align:center;
color:#fff;
padding:15px 0
}
.first p{
padding:15px;
color:#fff
}
.two{
background-color:#fff;
width:290px;
float:left;
height:600px
}
.main_content{
width:960px;
height:auto;
background-color:#fff
}
.two h4{
color:#4C4C4C;
text-align:center
}
.three{
text-align:center;
width:660px;
border-left:1px solid #D0D0D0;
float:left;
background-color:#fff
}
.four,.first{
width:960px;
clear:both;
background-color:#41A2CD;
height:55px
}
Conclusion:
This is a basic concept of creating dynamic form. You can use these codes to create your own form. But if you want to add more functions, you need to customize your code accordingly.
7 Replies to “How To Dynamically Add and Remove Form Fields Using JavaScript”
this is great. thank you very much.
Great form. I’m trying to learn Javascript and have been attempting to customise the code so that when you click the submit button it simply displays the input made to each of the form boxes somewhere on the screen (either as a block of text or popup)
Unforfunately I can’t seem to work out how to target the form content and do this!
Any help would be much appreciated..
Your tutorial on How To Dynamically Add and Remove Form Fields Using JavaScript is very close to what i am looking for, but it is 20 to 25 percent from the mark. In all honesty, I don’t know if what I am looking to accomplish is possible, but hopefully someone here will know.
I would like to create a text field that:
1. allows a user to add a new “clothing type” to a drop down menu on the same form when they type text into the text field (e.g. sweater, t-shirt, pants, etc.) and click a button
2. When the button is clicked, a new database value equaling the typed text is created under “clothing type”
Any help is appreciated, and thanks in advance.
I think this is a sample code which is similar to your thought..
The program which i am giving below is after selecting the state name the city names will be displayed..
Check it out
…
..
Get Cities From State Names
function myfun(){
var x=document.forms[“mytry”][“state”].value;
if(x==”Tamil Nadu”){
var y=document.forms[“mytry”][“city”];
y.options.length=0;
y.options[0]=new Option(“Chennai”, “chennai”, false, false);
y.options[1]=new Option(“Madurai”, “madurai”, false, false);
y.options[2]=new Option(“Trichy”, “trichy”, false, false);
y.options[3]=new Option(“Kanyakumari”, “kanyakumari”, false, false);
y.options[4]=new Option(“Rameshwaram”, “Rameshwaram”, false, false);
}
else if(x==”Andhra Pradesh”){
var y=document.forms[“mytry”][“city”];
y.options.length=0;
y.options[0]=new Option(“Hyderabad”, “Hyderabad”, false, false);
y.options[1]=new Option(“Kukatpally”, “Kukatpally”, false, false);
y.options[2]=new Option(“Vijayawada”, “vijaywada”, false, false);
y.options[3]=new Option(“Lingampally”, “Lingampally”, false, false);
y.options[4]=new Option(“Miyapur”, “Miyapur”, false, false);
}
}
Tamil Nadu
Andhra Pradesh
Very good
How do you add the delete.png image i.e i am having a folder named resources that contains the images. So how to fetch the images from that folder and add it to src
Hi Lawrence,
In “form.js” replace “delete.png” from “g.setAttribute(“src”, “delete.png”);” available in each function with your image path ( e.g resources/xyz.png).