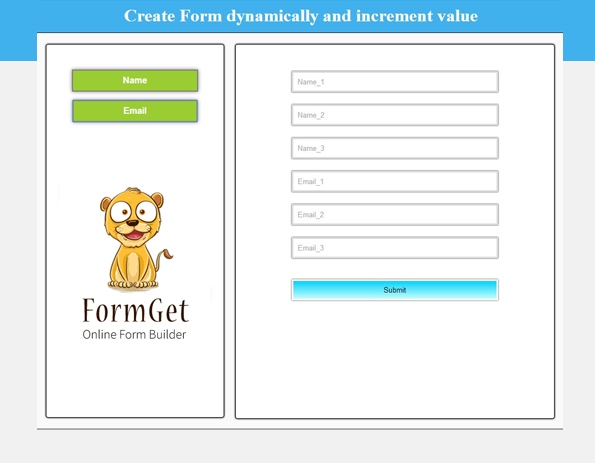
In this tutorial you will learn-how to make dynamic form with JavaScript codes. The fields are dynamically added in the form. With it, “Name” and “Email” fields get incremented on click of respective buttons.
You can take a view on screenshots that shows dynamically addition of form elements.
As we click on the fields, they will appear on the right side. In this way, you can dynamically add fields and create form.

And, “Name” attribute of the fields will increment automatically:
Now, have a look on the codes to implement this function.
HTML File – getform.html
In html file we have made a html button for the form fields. When you click on those fields, it will instantly appear on form.
<!DOCTYPE html>
<html>
<head>
<title>Create Form Dynamically And Increment Value</title>
<script src="js/form.js" type="text/javascript"></script>
<link href="css/form.css" rel="stylesheet" type="text/css">
</head>
<body>
<div class="main">
<div class="header">
<h1>Create Form Dynamically And Increment Value</h1>
</div>
<!--
=================
First Div for the buttons. Click on the button to add field in the form.
=================
-->
<div class="two">
<button class="name" onclick="textBoxCreate()">Name</button>
<button class="email" onclick="emailBoxCreate()">Email</button>
</div>
<!--
=================
Form fields get added in the third div. Click on the button to add field in the form.
=================
-->
<div class="third">
<form action="" id="mainform" method="get" name="mainform">
<p id="myForm"></p><input type="submit" value="Submit">
</form>
</div>
</div>
</body>
</html>
JavaScript File – form.js
In this file, we have included JavaScript codes to add form fields dynamically.
// FormGet Online Form Builder JS Code
// Creating and Adding Dynamic Form Elements.
var i = 1; // Global Variable for Name
var j = 1; // Global Variable for E-mail
/*
=================
Creating Text Box for name field in the Form.
=================
*/
function textBoxCreate(){
var y = document.createElement("INPUT");
y.setAttribute("type", "text");
y.setAttribute("Placeholder", "Name_" + i);
y.setAttribute("Name", "Name_" + i);
document.getElementById("myForm").appendChild(y);
i++;
}
/*
=================
Creating Text Box for email field in the Form.
=================
*/
function emailBoxCreate(){
var y = document.createElement("INPUT");
var t = document.createTextNode("Email");
y.appendChild(t);
y.setAttribute("Placeholder", "Email_" + j);
y.setAttribute("Name", "Email_" + j);
document.getElementById("myForm").appendChild(y);
j++;
}
Css File – form.css
In this file we have designed form a little bit. It’s just a sample to enhance styling view.
.main{
border:1px solid #000;
background:#FAFAFA;
width:960px;
height:775px;
margin:10px auto;
overflow:auto
}
.header{
background-color:#40B1ED;
height:70px;
margin-top:-21px;
padding-top:10px;
color:#fff;
text-align:center;
border-bottom:1px solid #000
}
.name,.email{
padding:8px 90px;
font-size:16px;
font-weight:700;
background-color:#9acd32;
border:2px solid gray;
color:#fff;
box-shadow:0 0 10px gray;
margin-bottom:10px;
margin-top:5px;
cursor:pointer
}
input{
padding:8px;
width:65%;
border:3px solid #ddd;
box-shadow:0 0 2px;
margin-bottom:20px
}
input[type=submit]{
border:3px solid #fff;
background:linear-gradient(#c4fcfc,#02d2fa)
}
input[type=submit]:hover{
background:linear-gradient(#02d2fa,#c4fcfc)
}
img{
margin-top:100px
}
a{
text-decoration:none
}
.two{
text-align:center;
background-color:#fff;
width:290px;
height:593px;
padding:40px 15px;
border:1px solid #000;
border-radius:4px;
box-shadow:0 0 5px #000;
float:left;
margin:20px
}
.third{
background-color:#fff;
width:575px;
height:645px;
padding-top:30px;
border:1px solid #000;
border-radius:4px;
overflow:auto;
box-shadow:0 0 5px #000;
float:left;
margin-top:20px;
text-align:center
}
Conclusion:
To create dynamic form via code snippet is quiet difficult. Now it’s easy for your to download the codes and use it on your project.
For more related information just go through following blogs –
- Show And Hide Registration/Login Form Using jQuery
- Create Dynamic Form Fields Using jQuery


5 Replies to “How To Dynamically Add Form Fields And Increment “Name” Attribute Of The Field”
very nice, great job, thanks
i need code for inserting data from dynamically carted fields
Hello eyob,
Pleased with your response.
Here is the link where you will find of tutorials for cart in PHP with PayPal:
https://www.formget.com/paypal-express-checkout-api/
https://www.formget.com/paypal-shopping-cart/
Hope I have helped you.
Regards,
FormGet Team.
Hi,
I also want remove button to remove field,kindly provide some hint or source
Hi,
Check out this link https://www.formget.com/how-to-dynamically-add-and-remove-form-fields-using-javascript/ for the solution.