
FormGet is the tool which simplifies the teamwork of your organization by:
- Distributing the queries from the FormGet dashboard.
- Enabling team members to reply to the queries instantly.
- Auto-filtration of New entries and Resolved entries.
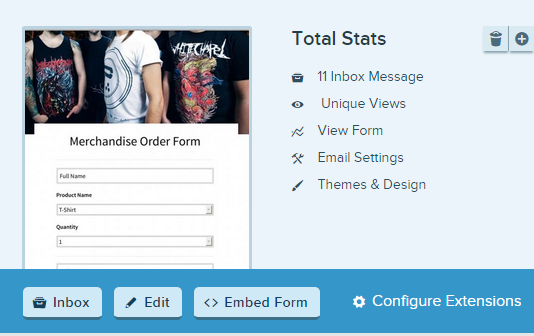
These three different factors makes the FormGet unique and advance from other Help Desk software like Zendesk, Formstack. To give a clear view on the above points, let me show you a simple example of this. Suppose you have a contact us form in your website as shown below.

Focus on the Query Type field, there are three categories in it i.e. General Query, Technical Query, Presales. The customer will choose any of the categories, type the message and submit the form. In the real world we get thousands of queries every day, it is difficult to manage them from a single window. With FormGet, you will be able to manage those queries from a single dashboard. Let’s see how easy it is to manage huge volume of queries from FormGet dashboard. The process just requires a simple steps to get accomplished.
Step 1: Login to your FormGet account and activate the Team Management Extension
- Login to your FormGet account.
- Go to Extensions section present on the top bar.
- In that, you will find Team Management category listed in the left-hand side. Click on it.
- Then click on See Details button.

- Now you may see the description about the extension bundle.
- Choose the relevant pricing package and click on Purchase Now.
- In this extension, you will get some more add-in features like HelpDesk, Canned Response, Notes about which I will discuss later at the end of this tutorial.

- After final checkout, you will find the extension added under Active Extension section in FormGet dashboard.
Step 2 : Adding Team members and distributing task to them
- Now go to Active Extension section and click on Team Management category listed in the left sidebar.
- Then you will find the Team Members extension there, click on to Setup Now button to add team member and to assign form to them.

Now in that window you have to:
- Place the person’s email id that you wish to add as a team member in Email field.
- Choose the form that you want to assign him/her and the form entries category (General Query, Technical Query, Presales).
- Click on Add Team Member.

- Then you will see the added team member at the bottom of the page as.

- The added member will get the welcome mail with the login credentials.

This is all about the adding team member to your form that will be going to handle the queries that have assigned to him/her.
You have seen a panel where you can assign different categories of queries to different team members.
This is how the queries can be distributed on FormGet.
Now let me tell you the complete process from submitting the form to the conversation between customer and agent.
Step 1: User submits a query and received by concern team member
- Now, suppose a user sends a query onto your site’s form.
- The agent can log in to its FormGet account directly from its mail account and sort out queries.

- The notification for this new query is dropped into agent’s mail account. When you add an agent in your team its email gets saved for email notifications that you can see in Email Notification section. Follow path FormGet Dashboard > Active Extension > Email notification > Setup Now.

- When the agent login to its email account and click to the above notification, he/she can see the query as shown below in the image.

- As the agent click on the Login to your account here button, he will be redirected to the FormGet Login page. The agent can login to its FormGet account using the login credentials provided to him/her.

- After login to FormGet account, click on Inbox button to view the form entries.

- Now agent can reply to the query from here.
And from here, there starts a 2-way communication between agent and customer. Let’s see how it happens.
Step 2 : Communication between agent-customer on FormGet
- When agent click on the query, he can see a conversation window from where he can reply to the customer.

- As the agent clicks on the Send Reply button, the answer will go to the customer’s email account.
- When a customer opens her/his mail account, she/he will see the query notification as shown in the image.

- As a user clicks on the entry it will see the notification as shown below.

- Finally clicking on the above button, a user can see the reply for the conversation.
- As user replies back, its query will again be treated as a new query on agent’s account.
- So, an agent can reply back following the same procedure.
- The coolest thing is, the whole conversation between the agent and the client can be seen from a single thread.
Step 3: Auto Filtration Of Entries and some added features
This is another advanced feature of FormGet, made for agent’s ease. As there is another new entry on your site’s form, the New Entries query counter will increase. As the agent replied to a particular query, New Entries counter will decrease by one and Replied Entries counter will increase by one. What is it showing? This event is showing that whenever the query is resolved by an agent, it is automatically transferable to the Replied section.
Before Reply:

After Reply :

The queries which are pending or need some time to resolve can be put in On Hold.
For that, you have to select the Send and set as Hold option from the given dropdown as shown below.

Attach File and Canned Replies feature:
Both of these features will give you a dynamic and fast help desk experience, how? Let me tell you.
Suppose you wish to send some attached files to the user while replying to their question then using Attach File feature you will be able to do that. Which will provide a good user experience because you will be able to answer the customer’s question in a descriptive manner.
And for the quick response to the user question you have the Canned Replies option using which you can fasten your answering habit.
What benefits, auto-filtration feature is going to give?
I have the simple answer.
- Queries will be properly arranged and well-distinguished at a glance.
- As a result, an agent cannot miss any query, not even by mistake.
- Agent can pre-plan her/his work.
- Team leader, as well as the team member, can analyze the daily workflow of their team.
- Support is simple and clutter-free.
Other than this you have a record of each and every customer as well as that of the conversation going in between them. So there is no possibility that any of your customers will be out of your reach.
Conclusion
InkThemes has simplified the whole support process after using FormGet on its website. FormGet is said to be a form building tool, it’s one side of the coin. What’s its other side says is that what i have mentioned above in the post. That is, easy and smart execution of customer support and managing leads. If you are curious to try this awesome application then you can start creating your form now
For more information check out below-mentioned blogs –
3 Replies to “How To Use FormGet as Help Desk”
Hi Preeti Singhal, thnk u 4 sending this additional information. You would be very helpful if you could tell me how to implement the e-mail autoresponder feature. I already have installed FormGet Pro. Thank you in advance. Kind Regards, Admin Liborclaim
Thanks a lot. You will love the application.Keep reading our blogs. 🙂
Your most Welcome.Keep reading our blogs.