
Android is an operating system based on Linux, specifically developed for mobile devices such as cell-phones and tablets. It includes all the frameworks and that let you create and deploy your own custom applications.
The Operating system uses touch inputs that correspond to real-world input actions, Ex: swiping, tapping, pinching, and reverse pinching, and a Virtual keyboard, which is also being used in games, digital cameras, regular personal computers and other electronics .
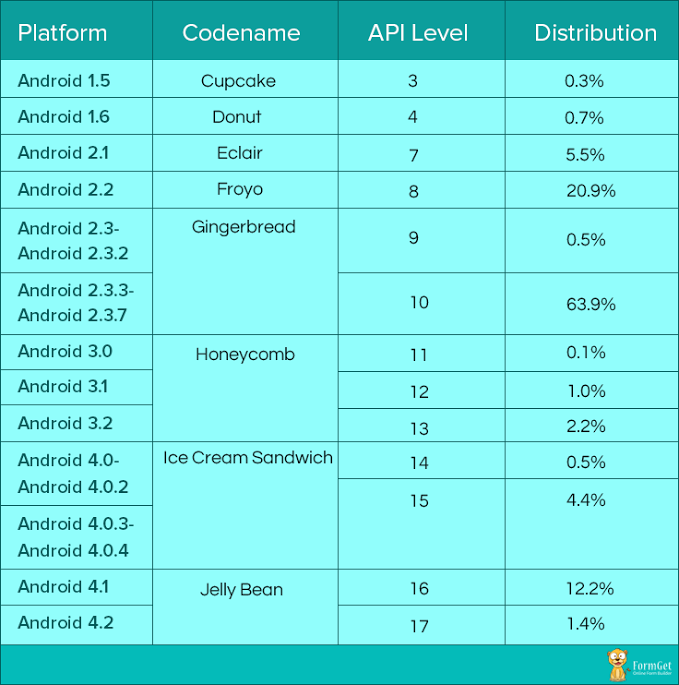
Different versions of android
Android has different versions began with the release of the Android beta in November 2007. The first commercial version, Android 1.0, was released in Sep 2008. Android is under ongoing development combinedly by Google and the Open Handset Alliance, and has gone under a number of updates to the base operating system since its initial release.
Below is the table that is depicting the details of different versions of Android.
“Here in this tutorial we will just going to see, what are the tools and softwares required to built an Android Application. So now, we will be moving on to know what are the configurations and the installation steps required for building the initial Android Application“.
Required Android Configuration
Operating system
- For Windows – Windows XP or above
- For Mac – Version 10.4.8 or above
- For Linux – Any version
Development tools
- JDK – Java Development KIT version 5 or above
- SDK – Software Development KIT
- IDE – Integrated development environment (ex:-Eclipse, ADT, Android studio)
About Development Tools
JDK
Java is used to run Integrated Development Environment in android application programming. The JDK forms an extended subset of a software development kit (SDK). It includes “tools for developing, debugging, and monitoring Java applications”.
Any version of java can be used which is greater than version 5.
SDK
A software development kit enables developers to create applications for the Android platform. It includes sample projects with source code, development tools, an emulator, and required libraries to build Android applications.
Software Development kit contains all the:
- System Tools
- System Images
- Source Codes
- All Documentations
Eclipse (IDE)
Eclipse is an editor for android applications. It contains various features which are different from other editors , so it is used widely all over the world .
It can be used for developing in other programming languages like C, C++,java script, COBOL, FORTRAN and other languages too. Other editors can be used as well like ADT , Android studio etc.
Installation Steps
1. Download the JDK from the link given above. Then install it.
2. Download the SDK from the link given above. Create a separate folder (say : Android Development) and then save the downloaded files in that folder.
3. Download the Eclipse (IDE) from the link given above and save it in the same folder that have SDK in it.
4. Launch the Eclipse by double clicking the eclipse.exe file provided in the eclipse folder.
5. Now it will ask for a location where to save the projects, provide a suitable name according to you, say, Android Project.
Note : When you will first launch eclipse for android development then it will ask SDK location, which you have to do it manually.
The flowchart for the same is given :

The steps given above are the initial steps that a beginner need to follow to get start creating an Android Application.
You can follow our next blog to learn, how to create a hello world program.
Conclusion :
This was our first post regarding introduction to Android. Hope you have understood it properly. So, keep visiting us to learn more about it and you may also provide your feedback in the space provided below to get in touch with us 🙂
2 Replies to “Introduction To Android and Its Installation”
we are waiting for the next lesson of android plz upload next lesson as soon as possible …thanks
regards : sonu khan
Hello Sonu,
Thanks for reading the post. Hope you have benefited with it.
Keep visiting our website for the upcoming posts. 🙂
Thanks & Regards,
Swapnil Gupta,
FormGet.com