
In our previous blog post we have seen what are the tools and software required to start creating a basic android program. Continuing with it, in this post we will be creating our first android program to see that how it actually works.
It will be a simple program in which we will see how to output a sample text, say, Hello World in an android virtual device.
We hope that you have followed our previous blog which was based on tools required for Android basic program, like SDK, JDK and Eclipse (IDE).
Also, we have illustrated how to launch Eclipse, set project folder and select SDK path.
After you successfully launch the eclipse, the steps that we have to follow are as under:
1. Select Android Application Project
- Go to File and then click on New.
- In New, Click on Android Application Project.

2. Creating new Android Application Project :
There is a series of steps for setting up an Android Application Project. A dialog box will appear, fill in all the details :

Where :
- Application name – Refers to the name of the application you want to give .
- Project name – Refers to the Project name you want to give to your application .
- Package name – Should be in a A.B format for ex: myapp.magnetbrains.co
- Min. req. SDK – From which version you want to have access with. ex: Android 2.2 or above
- Targeted SDK – Which particular version you are targeting. ex: Android 4.4 or above
- Compile with – From which SDK you want to compile with
- Theme – Any theme of your choice.
Then click on NEXT.
3. Configure Application launcher icon :
Choose your desired icon and configure as per your requirements. You can select the Image size and can give different colors as per your choice.
![]()
This icon will be representing your application later when we use it. Then click on NEXT.
4. Creating Activity:
Select any activity for ex : Blank activity. Blank activity refers to window that we will see when the application will be launched.

Then you need to specify about your blank activity and then click on Finish.

5. Project file structure :
After you have done all the required steps, android project will be created with some default files in it. It will be containing main activity Java codes and in layout XML codes, which will be containing all the required libraries which are used in any android application project.

Note : Above are the steps that you need to follow before writing any android program. Now we will be moving forward to the write our first program.
We can write the android program in XML, Java or can use drag and drop feature for it. But here we will be doing it with XML only.
6. “Hello World” using XML codes :
<LinearLayout xmlns:android="http://schemas.android.com/apk/res/android"
android:layout_width="fill_parent"
android:layout_height="fill_parent"
android:orientation="vertical" >

<TextView
android:id="@+id/textView1"
android:layout_width="wrap_content"
android:layout_height="wrap_content"
android:text="Hello World" />
</LinearLayout>
Below is the explanation for the above given XML code.
1. At first, any Layout is selected :
- An Android Layout is a class that handles arranging the way its child element appears on the screen. Any layout can be selected (We will be discussing about the layouts in our next tutorials).
2. Text view is used to display text on the screen.
- ‘@+id/textview’ is the id that is given to the text view, it can be changed and it is used for nesting purposes when you have to insert different layouts and views in your user interface.
- ‘Width’ and ‘Height’ instruction is to define how much a text would take the space on the application screen.
- ‘Text’ Syntax is used to enter the desired text and which will be displayed on the application screen.
7. Creating AVD(Android Virtual Device) :
Select Window from the title bar and then select ‘Android Virtual Device Manager ‘. Configure AVD according to you.

- AVD name – Name that you want to keep for your device
- Device name – Model number you want to work on
- Target – Which API version you are targeting for your app
- Memory options – Select Ram you are targeting
- Storage – Memory how much you want
- SD card – If you want SD card options
Then click on OK.
8. Launch Android Virtual Device

Select your device, click on start and then click on Launch. It will launch the AVD.

After the device is booted up virtual screen will appear. It will be containing all the Preloaded Applications. If you are launching for the first time it can take some time to launch the AVD.

9. Running of application:
Right click on the project and from the menu that appears, select Run as option and then choose as Android Application.

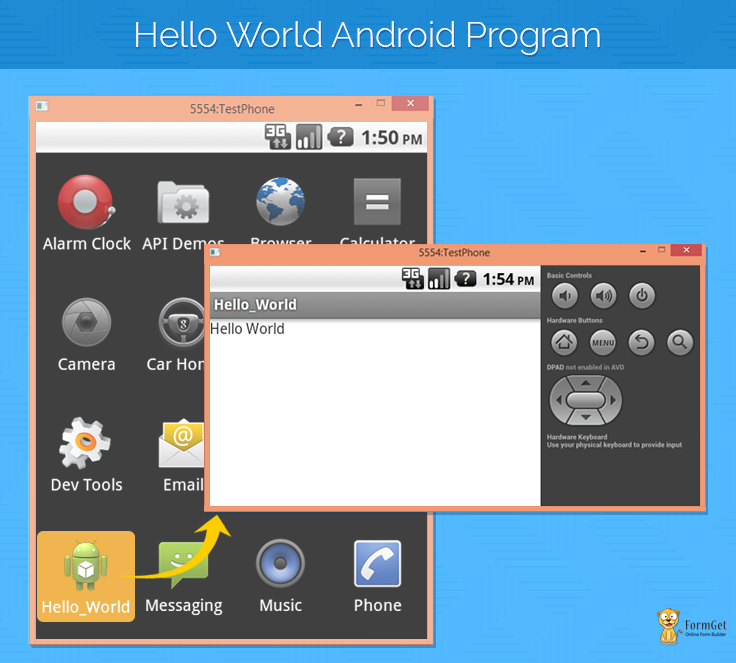
In the virtual device an application will be created that will be according to your application name.

Click on your application and then “Hello World” will be displayed on the application screen .

Conclusion
This is how the first Hello World program will work. Keep visiting us to learn more about Android and other coding concepts. Fill out the below given form to provide your feedback. We love to hear from you 🙂
One Reply to “Android Hello World Program Example Using Eclipse”
I downloaded eveything you told us to download but in the eclipse file, under new project, I saw java but the path to android development project is not there