
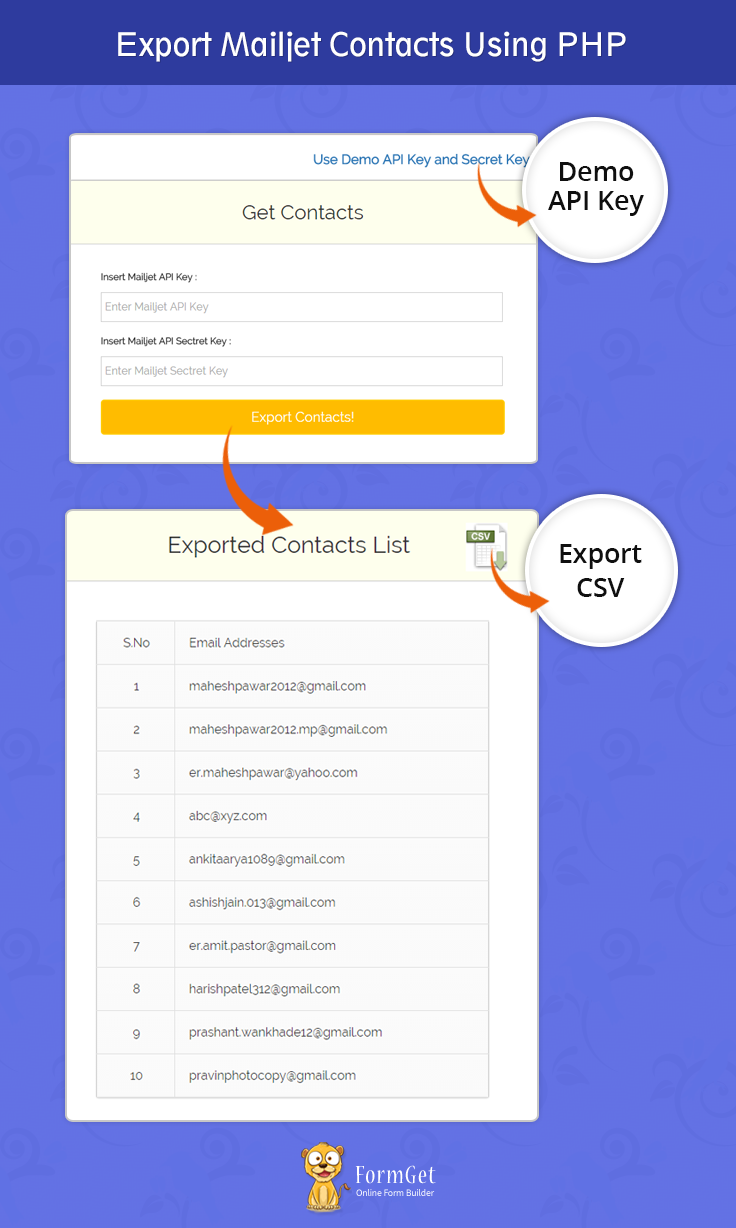
This tutorial demonstrate you how to do a proper email list management by exporting your Mailjet contacts.
After inserting your Mailjet API key and Secret key, all the contacts from different contact list will be displayed. Here we have used dummy Mailjet API key and Secret key for exporting contacts from Mailjet account.
If you want to export your contacts from Mailjet account then you must have your own API key and Secret key. You can then download this list in the form of excel sheet through the download link.
For this, we are going to use MailJet API.
Watch the live demo or download code from the link given below
MailGet – Email Service Provider povides a perfect and well managed list management services for Sending Emails. Just connect and send with MailJet API or SMTP services.
Steps to Export Contacts From MailJet : –
Step 1:– Download the latest MailJet API library .zip folder
Step 2:- Extract the downloaded .zip folder.
Step 3:- Create a lib folder in the root folder, copy & paste all the files available in the src folder of extracted zip folder.
Step 4:- Create index.php into your root folder and copy the code present under index.php section.
Tutorial Scripts in detail
Below are the details of the code used in this tutorial with proper explanation.
index.php
It provides an interface for user to fill the Mailjet account details like Mailjet API Key and Mailjet Secret Key which will go to Mailjet Api for further processing which will export all the contacts present in the all the contact list.
<html>
<head>
<title>Export Mailjet Contacts Using PHP</title>
<meta name="robots" content="noindex, nofollow">
<link href="css/style.css" rel="stylesheet" type="text/css"/>
<link href="css/table.css" rel="stylesheet" type="text/css"/>
<link href="css/bootstrap.css" rel="stylesheet" type="text/css"/>
<script src="js/bootstrap.js" type="text/javascript"></script>
<script src="js/jquery.min.js" type="text/javascript"></script>
<meta name="robots" content="noindex, nofollow">
<script type="text/javascript">
var _gaq = _gaq || [];
_gaq.push(['_setAccount', 'UA-43981329-1']);
_gaq.push(['_trackPageview']);
(function() {
var ga = document.createElement('script');
ga.type = 'text/javascript';
ga.async = true;
ga.src = ('https:' == document.location.protocol ? 'https://ssl' : 'http://www') + '.google-analytics.com/ga.js';
var s = document.getElementsByTagName('script')[0];
s.parentNode.insertBefore(ga, s);
})();
</script>
<script type = "text/javascript" >
$(document).ready(function() {
$('#demo_keys').click(function() {
$('#api_key').val('xxxxxxxxxxx');
$('#secret_key').val('ssssssssss');
});
});
</script>

</script>
</head>
<body>
<div class="container">
<div class='wrap'>
<div class='row'>
<div id="main" class="col-xs-12 col-sm-6 col-md-4 ">
<h1 id='h1'>Export Mailjet Contacts Using PHP</h1>
<a href="#" id="demo_keys" style="float:right; margin:35px 0px -14px 0px;font-weight: bold;font-size: 20px;">Use Demo API Key and Secret Key</a>
</div>
</div>

<div class='row' >
<div id="login" class="col-xs-12 col-sm-6 col-md-4 ">
<div style='margin-top:-30px;'>
<h2>Get Contacts</h2>
<div style="margin: 20px 10px;">
<form action="" method="post" name='myForm' onsubmit="return validate();">
<label>Insert Mailjet API Key : </label>
<input type='text' name='api_key' id='api_key' placeholder="Enter Mailjet API Key "/>
<label>Insert Mailjet API Sectret Key : </label>
<input type='text' name='secret_key' id='secret_key' placeholder='Enter Mailjet Sectret Key '/>
<br/><br/>
<input type='submit' name='submit' value='Export Contacts!' /><br/>
</form>
</div>
</div>

</div>
</div>

</div>
</div>
<?php
if (isset($_POST['submit'])) {
include("src/Mailjet/php-mailjet-v3-simple.class.php");

function listContacts() {
error_reporting(0);
if ($_POST['api_key'] == 'xxxxxxxxxxx') {
//Enter Your Mailjet API Key Here
$apiKey = "Enter Your Mailjet API Key Here";
} else {
$apiKey = $_POST['api_key'];
}
if ($_POST['secret_key'] == 'ssssssssss') {
//Enter Your Mailjet Secter Key Here
$secretKey = "Enter Your Mailjet Secter Key Here";
} else {
$secretKey = $_POST['secret_key'];
}

$mj = new Mailjet($apiKey, $secretKey);
$result = $mj->contact();
foreach ($result as $data) {

for ($i = 0; $i < count($data);) {
$index = $i + 1;
if ($data[$i]->Email) {
$contact[$i]['email'] = $data[$i]->Email;
} $i++;
}
}
if ($mj->_response_code == 200) {
print '<script type="text/javascript">';
print "alert('success - listed contacts!')";
print '</script>';
} else {
print '<script type="text/javascript">';
print "alert('Enter Valid API and Secret Key...')";
print '</script>';
}
if ($mj->_response_code == 200) {
echo "<div class='container'>
<div class='wrap'>
<div class='row' >
<div id='login' class='col-xs-12 col-sm-6 col-md-4 '>
<div style='margin-top:-30px;'>
<h2>Exported Contacts List</h2>";
?>
<a href="csvdownload.php?<?php
echo http_build_query($contact);
?>"><img src="image/excelimg1.gif" alt="" style="float:right; margin: -86px 0px 0px 0px;" /></a>
<?php
echo "<div style='margin: 20px 10px;'>
<form method='get' name='myForm' ><table cellspacing='0'>
<thead>
<td id='name'>S.No</td>
<td>Email Addresses</td>
</thead>";
$index = 1;
foreach ($contact as $data) {
echo "<tr><td>" . $index . "</td><td>" . $data['email'] . "</td></tr>";
$index++;
}
}
return $contact;
}

listContacts();
}
?>

</table>
</form>
</div>
</div>
</div>
</div>
</div>
</div>

</body>
</html>
Step 5:- Create csvdownload.php into your root folder and copy the code present under the csvdownload.php section.
csvdownload.php
This code will download the Mailjet account contacts in excel sheet which we are getting in the form of array.
<?php

if (isset($_GET)) {
$contact = $_GET;
header("Content-type: text/csv");
header("Content-Disposition: attachment; filename=Contacts.csv");
header("Pragma: no-cache");
header("Expires: 0");
$file = fopen('php://output', 'w');
fputcsv($file, array('Email'));
foreach ($contact as $email) {
fputcsv($file, $email);
}
exit();
}
?>
Step 6:- Create style.css into your css folder created within the root folder. Once you finished this task just copy css code and paste it into style.css.
style.css
This make front page attractive and look good.
/*----------------------------------------------
css settings for HTML div exactCenter
------------------------------------------------*/
@import url(http://fonts.googleapis.com/css?family=Raleway);
.wrap{
margin:0;
padding: 0;
}

#main{
width:60%;
margin:auto;
font-family:raleway;
//border:1px solid green;
margin-left: 20%;
}

span{
color:red;
}

#h1{
text-align:center;
font-size:35px !important;
margin-top: 60px;

}
#a{
font-size:15px !important;
}
h2{
background-color: #FEFFED;
text-align:center;
border-radius: 10px 10px 0 0;
padding:30px;
margin: 0px -40px -40px -40px ;
border-bottom: 1px solid #ccc;
}

#login{
width:60%;
//float: left;
border-radius: 10px;
font-family:raleway;
border: 2px solid #ccc;
padding: 10px 40px 25px;
margin-top: 30px;
margin-left: 20%;
}

input[type=text],input[type=textarea]{
width:99.5%;
padding: 10px;
margin-top: 8px;
border: 1px solid #ccc;
padding-left: 5px;
font-size: 16px;
font-family:raleway;

}
input[type=radio]{
vertical-align: middle;
margin: -4px 0 0 2px !important;

}
input[type=submit]{
width: 100%;
background-color:#FFBC00;
color: white;
border: 2px solid #FFCB00;
padding: 10px;
font-size:20px;
cursor:pointer;
border-radius: 5px;
margin-bottom: 15px;
}
#profile{
padding:50px;
border:1px dashed grey;
font-size:20px;
background-color:#DCE6F7;
}

#logout{
float:right;
padding:5px;
border:dashed 1px gray;
}

a{
text-decoration:none;
color: cornflowerblue;
}

i{
color: cornflowerblue;
}
#note {
word-wrap: break-word;
margin: 10px 24%;
width: 62%;
padding: 10px 50px;
font-size: 16px;
}

label {
display: inline-block;
max-width: 100%;
margin-bottom: 5px;
font-weight: bold;
margin-top: 18px;
}
/*-----------------------------------------------------------------
css settings for right side advertisement
------------------------------------------------------------------*/
#formget{
float:right;
}
Step 7:- Create table.css into your css folder created within the root folder. Once you finished this task just copy css code and paste it into table.css.
table.css
It will provide style to content of table awesome and in well format.
table a:link {
color: #666;
font-weight: bold;
text-decoration:none;
}
table a:visited {
color: #999999;
font-weight:bold;
text-decoration:none;
}
table a:active,
table a:hover {
color: #bd5a35;
text-decoration:underline;
}
table {
font-family: 'Raleway', sans-serif;
//color:#666;
font-size:12px;
text-shadow: 1px 1px 0px #fff;
background:#eaebec;
//margin:20px;
border:#ccc 1px solid;
font-size: 16px;
-moz-border-radius:3px;
-webkit-border-radius:3px;
border-radius:3px;

-moz-box-shadow: 0 1px 2px #d1d1d1;
-webkit-box-shadow: 0 1px 2px #d1d1d1;
box-shadow: 0 1px 2px #d1d1d1;
margin: 50px 50px;
width: 85%;

}
table th {
padding:21px 25px 22px 25px;
border-top:1px solid #fafafa;
border-bottom:1px solid #e0e0e0;

background: #ededed;
background: -webkit-gradient(linear, left top, left bottom, from(#ededed), to(#ebebeb));
background: -moz-linear-gradient(top, #ededed, #ebebeb);
}
table th:first-child {
text-indent: center;
padding-left:20px;
}
table tr:first-child th:first-child {
-moz-border-radius-topleft:3px;
-webkit-border-top-left-radius:3px;
border-top-left-radius:3px;
}
table tr:first-child th:last-child {
-moz-border-radius-topright:3px;
-webkit-border-top-right-radius:3px;
border-top-right-radius:3px;
}
table tr {
text-indent: center;
padding-left:20px;
}
table td:first-child {
text-align: center;
padding-left:20px;
border-left: 0;
}
table td {
padding:18px;
border-top: 1px solid #ffffff;
border-bottom:1px solid #e0e0e0;
border-left: 1px solid #e0e0e0;

background: #fafafa;
background: -webkit-gradient(linear, left top, left bottom, from(#fbfbfb), to(#fafafa));
background: -moz-linear-gradient(top, #fbfbfb, #fafafa);
}
table tr.even td {
background: #f6f6f6;
background: -webkit-gradient(linear, left top, left bottom, from(#f8f8f8), to(#f6f6f6));
background: -moz-linear-gradient(top, #f8f8f8, #f6f6f6);
}
table tr:last-child td {
//border-bottom:0;
}
table tr:last-child td:first-child {
-moz-border-radius-bottomleft:3px;
-webkit-border-bottom-left-radius:3px;
border-bottom-left-radius:3px;
}
table tr:last-child td:last-child {
-moz-border-radius-bottomright:3px;
-webkit-border-bottom-right-radius:3px;
border-bottom-right-radius:3px;
}
table tr:hover td {
background: #f2f2f2;
background: -webkit-gradient(linear, left top, left bottom, from(#f2f2f2), to(#f0f0f0));
background: -moz-linear-gradient(top, #f2f2f2, #f0f0f0);
}
thead {
border-top: 2px solid #E8E8E8;
}
Conclusion :
Thus using MailJet API you can export the contacts and download it. Hope you like it, keep reading our other blogs and share your experience in the space given below 🙂
Recommended blogs –