
One should not miss any chance to leverage the capability of forms. No matter, how small is the feature of the form. It should be utilized properly to make out the best benefits of the features.
Just think of a scenario, your user has filled the form, submit it, but it doesn’t end here. They should know whether their query is successfully submitted or not.
With the help of Auto responder function, your users will automatically get the confirmation email soon after the form submission.
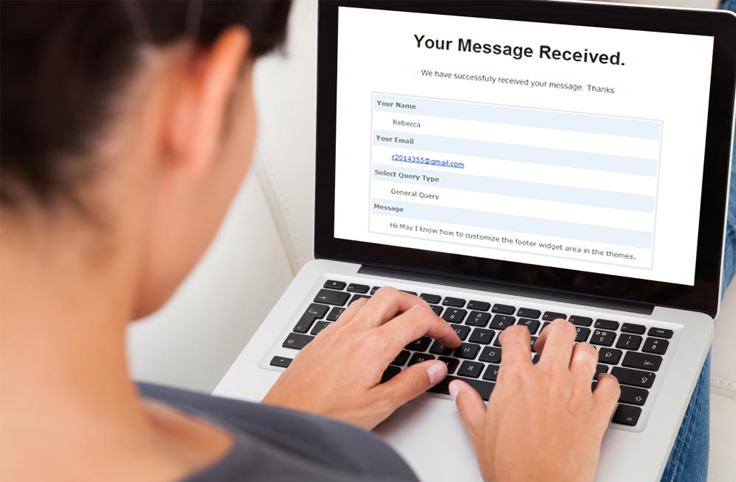
The interesting thing inside the notification is, users can look out their message inside the notification which they have submitted via forms.
So, what does Auto responder mean to you?
Gives The Essence of Branding and Personalization
Auto responder does two sub-tasks.
- Automatic confirmation email about successful form submission right away in user’s mail account.
- Form message view at a glance inside the notification.
Users can look out the complete message in the email notification which they have sent, just in one view.
Auto responder is extremely simple to organize and use.
Now, just look into the easy steps that will guide you to use this interesting feature in FormGet.
Note : Remember your form must contain an email field so that user can put their email (where autoresponder will be send).
1. Activate Email Customizer Autoresponder Extension in your account.
To experience this feature first you need to activate this extension in your FormGet account for that follow up this few steps :
- Login to your FormGet account.
- Then click on Extensions option present at the top bar.
- In that you have to select the Notifications section from the left sidebar.
- You will now be able to see Email Customizer Autoresponder Extension , click on See Details.

- The extension details and its pricing plans will be listed there, choose the relevant one from them and click on to the Purchase Now button to checkout.

- Now the extension will get activated and will get added inside Active Extension section of your FormGet dashboard.
2. Steps to Set Up Autoresponders.
- Login to your FormGet dashboard. Go to the particular form in which you want to set the autoresponder.
- Then, click on Configure Extensions option.

- Now go to Notifications section present at the left sidebar.
- Click on Setup Now button of the Email Customizer Autoresponder Extension.
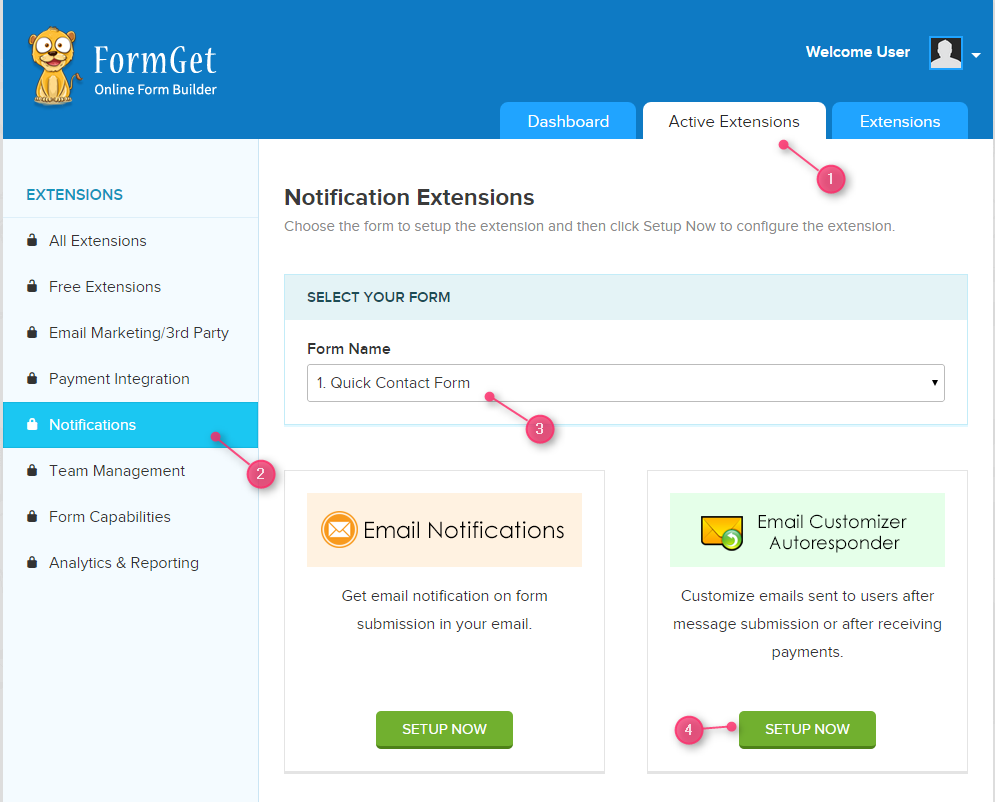
- Now you will find different email options listed there.
- Which you can set on/off according to your wish using the On/Off switch.
- Also you can change the email credentials like From , Subject and Message Content.
- The first one is the option for Autoresponder mail that user receives after they submits the form.
- In this option under Message Content you are provided two shortcodes [REPLY_EMAIL] and [CLIENT_DATA]. Lets see what they are meant for :
1. [REPLY_EMAIL][email protected][REPLY_EMAIL] : Whenever user submit the form they will get an autoresponder email on the behalf of [email protected], so if you wish to add your email id then place your email id in between [REPLY_EMAIL]your email id[REPLY_EMAIL].
2. [CLIENT_DATA] : If you wish that user should also get the form entries they just submitted then you have to add this shortcode in your message content.
Note : You can also use html codes to design your message content to attract your customer.

Note: See the shortcode [CLIENT DATA] in Message Content field option. This shortcode is very important. Actually, the shortcode will sent the replica of user’s message into their mail account.
This is not an end. Here is more to enhance the autoresponder feature.
Set text for subject and greeting message. It’s about telling your user, “We are listening you”. Personalized message reflects interactivity and liveliness from your organization’s side.
The brand is yours organization’s identity. You can’t miss it anywhere. In fact, you should show your brand wherever it is possible. This approach is very well valid for autoresponder too.
With the help of header and footer settings, you can very clearly display your company’s name, contact details on your autoresponder notification emails.
That was all about the autoresponder customization settings. But it will give the output as shown below.
Step 1 : Form filled by user.

Step 2 : Notification in user’s mail account.

Step 3: On clicking the mail, the user will get the outcome of autoresponder. See the image below:

Conclusion
One question might come in your mind that what is the use of the Autoresponder feature. Why this feature is so important? So here is the answer.
Sometimes it happens that, sudden errors can happen while filling the form. And the worst thing is, the user will not come to know about it until and unless something is going to come to tell him about the mistake.
With the help of advanced features like autoresponders, your user will get the replica of sent messages in their email account. So that, if they find that by mistaken, they do some error, they can again go for their query submission.
And last but not the least when they get a positive response like “Your Message Received Successfully”, they feel quite confident and thinks that they are not at wrong place.
You may also like –
- Schedule Forms: Call Up Your Form At Specific Time