
In this tutorial I’ve given brief explanation about Andriod View Class. View Class are the basic building block for user interface components. A View occupies a 2-dimensional area (say: rectangle) on the screen, which is responsible for framing and handling different type of events.
In our previous blog posts, we have learned Android installation steps and made first program called Hello world (built in XML code). The program was created to show text output in the AVD.
Views are used to create input and output fields in the an Android App. It can be input text field, radio field, image field etc. They are same as, input text field, image tag to show images, radio field in HTML.
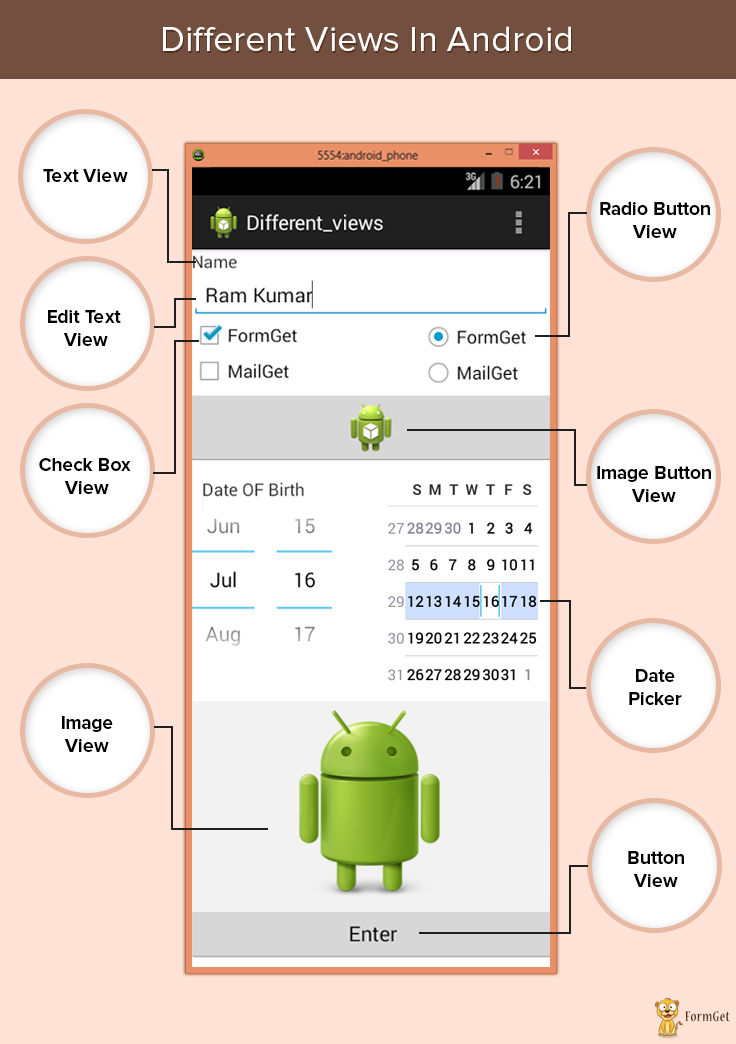
Most Commonly Used Android View classes:
These views can be used to create a useful input and output fields.
- Text View
- EditText
- Button
- ImageView
- ImageButton
- CheckBox
- Radio button
- RadioGroup
- ListView
- Spinner
- AutoCompleteTextView
View Group Class
The View-Group is the base class for layouts, which holds other Views and define their properties. Actually an application comprises combination and nesting of Views-Group and Views Classes.

Text View:
This class is used to display text on the android application screen. It also allows user to optionally edit it. Although it contains text editing operations, the basic class does not allow editing, So Edit Text class is included to do so.

Syntax For Text View In XML Coding Is:
XML coding of text view:
<LinearLayout xmlns:android="http://schemas.android.com/apk/res/android"
android:layout_width="fill_parent"
android:layout_height="fill_parent"
android:orientation="vertical" >

<TextView
android:id="@+id/myTextview"
android:layout_width="fill_parent"
android:layout_height="wrap_content"
android:text="Mangnet Brains"
android:textSize="25dp"
android:textColor="@android:color/black"
android:typeface="serif"
android:gravity="center"
android:padding="10dp"
android:layout_margin="20dp" />
</LinearLayout>
Edit Text:
This class makes text to be editable in Android application. It helps in building the data interface taken from any user, also contains certain features through which we can hide the data which are confidential.

Syntax For Edit Text In XML Coding Is:
XML coding of edit text:
<LinearLayout xmlns:android="http://schemas.android.com/apk/res/android"
android:layout_width="fill_parent"
android:layout_height="fill_parent"
android:orientation="vertical" >

<EditText
android:id="@+id/myEdittext"
android:layout_width="fill_parent"
android:layout_height="wrap_content"
android:textSize="20dp"
android:textStyle="bold"
android:typeface="serif"
android:gravity="center"
android:padding="10dp"
android:layout_margin="20dp"
android:hint="Enter a Number"
android:singleLine="true"
android:inputType="textPassword" />

</LinearLayout>
Image view:
Image view helps to display images in an android application. Any image can be selected, we just have to paste our image in a drawable folder from where we can access it. For example: In below Code “@drawable/ic_laucher” has been taken.

Syntax For Image View In XML Coding Is:
XML coding of Image view:
<LinearLayout
xmlns:android="http://schemas.android.com/apk/res/android"
android:layout_width="fill_parent"
android:layout_height="fill_parent"
android:orientation="vertical"
android:gravity="center_horizontal" >

<ImageView
android:id="@+id/myimageview"
android:layout_width="100dp"
android:layout_height="100dp"
android:layout_margin="20dp"
android:gravity="center"
android:padding="10dp"
android:src="@drawable/ic_launcher" />
Check Box:
Checkbox is used in that applications where we have to select one option from multiple provided. Checkbox is mainly used when 2 or more options are present.

Syntax For CheckBox In XML Coding Is:
XML coding of checkbox:
<LinearLayout

xmlns:android="http://schemas.android.com/apk/res/android"
android:layout_width="fill_parent"
android:layout_height="fill_parent" >

<CheckBox
android:id="@+id/checkBox1"
android:layout_width="100dp"
android:layout_height="wrap_content"
android:layout_margin="20dp"
android:text="Formget."
android:checked="true" />
<CheckBox
android:id="@+id/checkBox2"
android:layout_width="100dp"
android:layout_height="wrap_content"
android:layout_margin="20dp"
android:text="Mailget." />

</LinearLayout>
Radio Button:
Radio button is like checkbox, but there is slight difference between them. Radio button is a two-states button that can be either checked or unchecked.

Syntax For Radio Button In XML Coding Is:
XML coding of Radio Button:
<LinearLayout xmlns:android="http://schemas.android.com/apk/res/android"
android:layout_width="fill_parent"
android:layout_height="fill_parent"
android:orientation="vertical"
android:gravity="center_horizontal" >

<RadioButton
android:id="@+id/radioButton1"
android:layout_width="100dp"
android:layout_height="wrap_content"
android:layout_margin="20dp"
android:text="Formget"
android:checked="true" />
<RadioButton
android:id="@+id/radioButton1"
android:layout_width="100dp"
android:layout_height="wrap_content"
android:layout_margin="20dp"
android:text="Mailget" />
</LinearLayout>
Button View:
This class is used to create a button on an application screen. Buttons are very helpful in getting into a content. Android button represents a clickable push-button widget.

Syntax For Button In XML Coding Is:
XML coding of button:
<LinearLayout xmlns:android="http://schemas.android.com/apk/res/android"
android:layout_width="fill_parent"
android:layout_height="fill_parent" >

<Button
android:id="@+id/button1"
android:layout_width="match_parent"
android:layout_height="wrap_content"
android:text="Click Here !" />

</LinearLayout>
Image Button View:
Image button is a button but it carries an image on it. We can put an image or a certain text on it and when we click it provides the operations assigned to it.

Syntax For Image Button In XML Coding Is:
XML coding of Image button:
<LinearLayout xmlns:android="http://schemas.android.com/apk/res/android"
android:layout_width="fill_parent"
android:layout_height="fill_parent"
android:orientation="vertical" >

<ImageButton
android:id="@+id/imageButton1"
android:layout_width="match_parent"
android:layout_height="wrap_content"
android:layout_gravity="center"
android:src="@drawable/ic_launcher" />

</LinearLayout>
Conclusion :
From this tutorial you know different types of view classes in Android and their functionality . They can be nested to do multiple functions at a higher level of coding, that we will be learning in our next blogs. Basically, these functions are used to create any applications. Hope you like it keep visiting for more posts from android. 🙂
One Reply to “Android View Classes”
please make subsriber/newsletter option, then we continues updated languages and technologies
Thankyou