
AngularJS Routing is one of the amazing feature provided by Angular. Routing helps in expanding the scope of view and allow us to use multiple templates within a single page application.
In this tutorial, we are going to demonstrate you how to configure and use routing in your single page application.
First we will explain how to configure and use routing in an application. Then we will give you information about some important services, such as $routeParams, $routeProvider etc. used for routing.
And finally, we will create an application using these services which will first show the list of members of a company.
When a user will select and click on See full bio link of a member’s list, the user will be redirected to another template which will contain the biography of that member.
In Biography template, the user will be able to switch to another members biography using the next and previous button. The user will also be able to go to members list page using Back to List link.
Watch the live demo or download code from the link given below.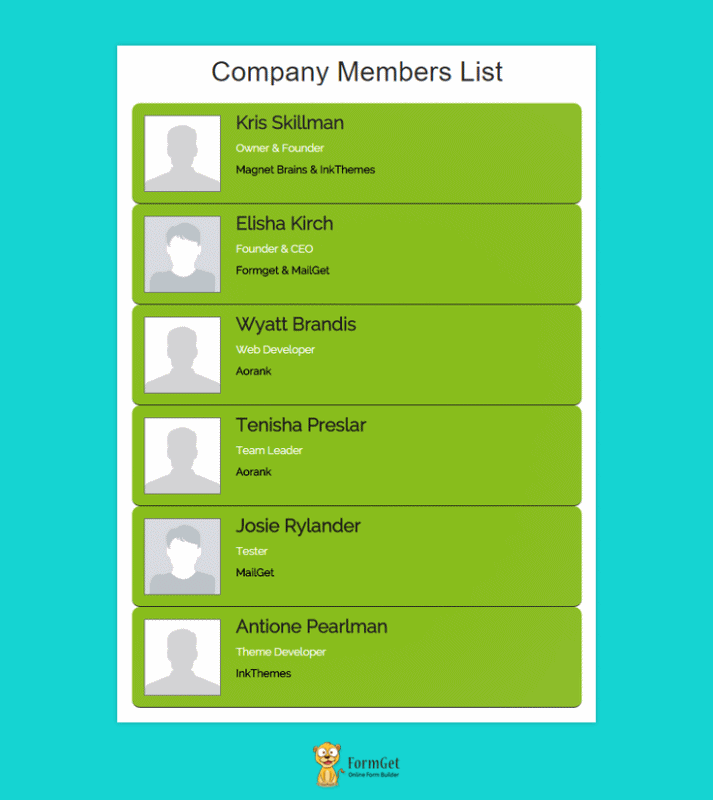
ngRoute:
To use routing in the application, first we will have to include and configure ngRoute module in our application.
ngRoute requires an additional library angular-route.min.js which you can download from AngularJS official site.
When you will click on Download button, you will get Browse Additional Modules under Extra as shown in the image given below.

Click on the link and you will get a list of different modules.
Find the module with name angular-route.min.js. Download and include it in your application.
Now, we are ready to use ngRoute module.
Configure Application to use ngRoute:
Include ngRoute as a dependency in application module.
For example:
// Applicatio module
var myApp = angular.module('myApp', [
'ngRoute',
]);
Now, we will have to configure routes using $routeProvider in the application. For this, use .config() method of angular module.
myApp.config(['$routeProvider', function($routeProvider){
$routeProvider.
when('/', {
templateUrl:'templates/emp_list.php',
controller : 'EmpListController'
}).
when('/emp_list',{
templateUrl : 'templates/emp_list.php',
controller : 'EmpListController'
}).
when('/emp_details/:itemId',{
templateUrl : 'templates/emp_details.php',
controller : 'EmpDetailsController'
});
}]);
$routeProvider :
$routeProvider is a way of handling different templates and connect them with the view. It used .when() method to set controller and template for a particular route.
For example:
In the above-mentioned code, when a user will enter the URL for root document( e.g application) of the application, the user will be redirected to them another template page (e.g application/#/templates/emp_lists.php).
Note:- Whenever you will write the URL of application, /#/ will always appear after root document path. It reason behind is that, AngaularJS is a client side framework and applicable for single page application only. It works on front-end rather than backend so, will always contain a # symbol after root document URL.
when() method also allow you to use a controller in the template by just adding the name of the controller in controller property.
$routeParams :
$routeParams is a service which allow you to retrieve and use different parameters of routes.
To store route parameters in $routeParams use “ : “after the slash ” / ” followed by parameter name. The character or value up to next slash “/” will be stored in the name.
For example:
In the above-mentioned configuration code, we have written,
$routeProvider.
when('/emp_details/:itemId',{
templateUrl : 'templates/emp_details.php',
controller : 'EmpDetailsController'
});
Suppose an URL, /emp_details/5/.
Here, 5 will be stored in the $routeParams as { “itemId”:”5″} because we have added :itemId after /emp_details/.
Note: Mulitple parameter can be retieved by adding “:” along with parameter name. Each name will contain the string or value upto next slash “/”.
Same concept is used for the EmpDetailsController controller, which stores each employee ID in $routeParams and use it for linking to other employees.
myApp.controller('EmpDetailsController', ['$scope', '$http', '$routeParams', function($scope, $http , $routeParams) {
$http.get('js/data.json').success(function(data) {
$scope.emp = data;
$scope.whichItem = $routeParams.itemId;

if($routeParams.itemId > 0){
$scope.prevItem = Number($routeParams.itemId)-1;
}else{
$scope.prevItem = $scope.emp.length-1;
}

if($routeParams.itemId < $scope.emp.length-1){
$scope.nextItem = Number($routeParams.itemId)+1;
}else{
$scope.nextItem = 0;
}
});
}]);
Here, EmpDetailsController used $routeParams to store the id of employee in whichItem property of $scope service that is available in the emp_details template.
This id is further used by the controller to switch another employee’s details through next and previous buttons.
Now, let’s implement the above-mentioned services and create an application.
First, follow the directory structure image given below and create the directory for the application. Now, follow the steps given below.
Step 1: In index.php, write the following code.
index.php
It contains ng-view directive which will load different templates containing employee lists and employee biography.
<!DOCTYPE htm>
<html ng-app="myApp">
<head>
<title>AngularJs Route Demo</title>
<!-- Including Bootstrap CSS library -->
<link rel="stylesheet" href="css/bootstrap.min.css">
<!-- Including custom CSS file -->
<link rel="stylesheet" href="css/style.css">
<!-- Including AngularJS library file -->
<script src="lib/angular/angular.min.js"></script>
<!-- Including jQuery library -->
<script src="js/jQuery/jquery.min.js"></script>
<!-- Including Bootstrap JS file -->
<script src="js/bootstrap.min.js"></script>
<!-- Include Angular Route library -->
<script src="lib/angular/angular-route.min.js"></script>
</head>
<body>
<!-- Main div showing different templates loaded by ng-view directive -->
<div class="container main" ng-view>
</div>
<!-- Including Application main controller -->
<script type="text/javascript" src="js/AngularController.js"></script>
</body>
</html>
Step 2: Write the code given below in emp_list.php and emp_details.php.
emp_list.php
It contains the company members list which show a complete list of employees working in the company.
<div class="row">
<h1 class="text-center">Comapany Members List</h1>
<ul class="details col-lg-6 col-lg-offset-3 col-md-6 col-md-offset-3 col-xs-12" >
<li class="emp-details col-lg-12 col-md-12 col-xs-12" ng-repeat = "item in emp">
<img ng-src="img/{{item.img_link}}.jpg" alt="{{item.name}}"/>
<div class="emp-info">
<h3>{{item.name}}</h3>
<p class="designation">{{item.designation}}</p>
<h4>{{item.department}}</h4>
</div>
<a class="more" href="#/emp_details/{{emp.indexOf(item)}}"> See Full Bio...</a>
</li>
</ul>
</div>
emp_details.php
This template contains the biography of each employee.
<div class="row">
<h1 class="text-center">Member's Biography</h1>
<div class="emp-detail-wrapper col-lg-6 col-lg-offset-3 col-md-6 col-md-offset-3 col-xs-12" >
<div class="nav-info">
<a href="#/emp_details/{{prevItem}}" class="btn btn-left"><</a>
<a href="#/emp_details/{{nextItem}}" class="btn btn-right">></a>
</div>
<div class="clearfix"></div>
<div class="emp-bio-details col-lg-12 col-md-12 col-xs-12" ng-model="emp">
<div class="emp-info">
<h4>{{emp[whichItem].name}}</h4>
<p class="designation-info">{{emp[whichItem].designation}}, {{emp[whichItem].department}}</p>
</div>
<div class="clearfix"></div>
<img ng-src="img/{{emp[whichItem].img_link}}.jpg" alt="{{emp[whichItem].name}}"/>
<p class="bio">{{emp[whichItem].bio}}</p>
<a class="back" href="#/emp_list"> « Back to List</a>
</div>
</div>
</div>Step 3: Create a data.json file and write the following array in it.
data.json
It contains json array containing employee’s data and biography information.
[
{
"name":"Kris Skillman",
"img_link" : "Kris_Skillman",
"designation" : "Owner & Founder",
"department" : "Magnet Brains & InkThemes",
"bio": "Magnis scelerisque fermentum blandit. Sapien tempor montes elementum tempus litora torquent aliquam cursus cum ad adipiscing semper felis. Pede, eros convallis est, mi lorem conubia est habitant scelerisque. Enim morbi vestibulum venenatis nullam mauris suscipit."
},
{
"name":"Elisha Kirch",
"img_link" : "Elisha_Kirch",
"designation" : "Founder & CEO",
"department" : "Formget & MailGet",
"bio": "Magnis scelerisque fermentum blandit. Sapien tempor montes elementum tempus litora torquent aliquam cursus cum ad adipiscing semper felis. Pede, eros convallis est, mi lorem conubia est habitant scelerisque. Enim morbi vestibulum venenatis nullam mauris suscipit."
},
{
"name":"Wyatt Brandis",
"img_link" : "Wyatt_Brandis",
"designation" : "Web Developer",
"department" : "Aorank",
"bio": "Magnis scelerisque fermentum blandit. Sapien tempor montes elementum tempus litora torquent aliquam cursus cum ad adipiscing semper felis. Pede, eros convallis est, mi lorem conubia est habitant scelerisque. Enim morbi vestibulum venenatis nullam mauris suscipit."
},
{
"name":"Tenisha Preslar",
"img_link" : "Tenisha_Preslar",
"designation" : "Team Leader",
"department" : "Aorank",
"bio": "Magnis scelerisque fermentum blandit. Sapien tempor montes elementum tempus litora torquent aliquam cursus cum ad adipiscing semper felis. Pede, eros convallis est, mi lorem conubia est habitant scelerisque. Enim morbi vestibulum venenatis nullam mauris suscipit."
},
{
"name":"Josie Rylander",
"img_link" : "Josie_Rylander",
"designation" : "Tester",
"department" : "MailGet",
"bio": "Magnis scelerisque fermentum blandit. Sapien tempor montes elementum tempus litora torquent aliquam cursus cum ad adipiscing semper felis. Pede, eros convallis est, mi lorem conubia est habitant scelerisque. Enim morbi vestibulum venenatis nullam mauris suscipit."
},
{
"name":"Madelene Lucy",
"img_link" : "Madelene_Lucy",
"designation" : "Team Leader",
"department" : "Sales & Marketing, InkThemes",
"bio": "Magnis scelerisque fermentum blandit. Sapien tempor montes elementum tempus litora torquent aliquam cursus cum ad adipiscing semper felis. Pede, eros convallis est, mi lorem conubia est habitant scelerisque. Enim morbi vestibulum venenatis nullam mauris suscipit."
},
{
"name":"Jasper Sandrock",
"img_link" : "Jasper_Sandrock",
"designation" : "Plugin Developer",
"department" : "InkThemes",
"bio": "Magnis scelerisque fermentum blandit. Sapien tempor montes elementum tempus litora torquent aliquam cursus cum ad adipiscing semper felis. Pede, eros convallis est, mi lorem conubia est habitant scelerisque. Enim morbi vestibulum venenatis nullam mauris suscipit."
},
{
"name":"Russ Vandenberg",
"img_link" : "Russ_Vandenberg",
"designation" : "Software Developer",
"department" : "MailGet",
"bio": "Magnis scelerisque fermentum blandit. Sapien tempor montes elementum tempus litora torquent aliquam cursus cum ad adipiscing semper felis. Pede, eros convallis est, mi lorem conubia est habitant scelerisque. Enim morbi vestibulum venenatis nullam mauris suscipit."
},
{
"name":"Tory Negus",
"img_link" : "Tory_Negus",
"designation" : "Support Team Lead",
"department" : "InkThemes",
"bio": "Magnis scelerisque fermentum blandit. Sapien tempor montes elementum tempus litora torquent aliquam cursus cum ad adipiscing semper felis. Pede, eros convallis est, mi lorem conubia est habitant scelerisque. Enim morbi vestibulum venenatis nullam mauris suscipit."
},
{
"name":"Antione Pearlman",
"img_link" : "Antione_Pearlman",
"designation" : "Theme Developer",
"department" : "InkThemes",
"bio": "Magnis scelerisque fermentum blandit. Sapien tempor montes elementum tempus litora torquent aliquam cursus cum ad adipiscing semper felis. Pede, eros convallis est, mi lorem conubia est habitant scelerisque. Enim morbi vestibulum venenatis nullam mauris suscipit."
}
]
Step 4: In AngularContoller.js, write the following angular code.
AngularController.js
It is the main controller for the application containing different modules and controllers used in the application.
// Applicatio module
var myApp = angular.module('myApp', [
'ngRoute',
]);

myApp.config(['$routeProvider', function($routeProvider){
$routeProvider.
when('/', {
templateUrl:'templates/emp_list.php',
controller : 'EmpListController'
}).
when('/emp_list',{
templateUrl : 'templates/emp_list.php',
controller : 'EmpListController'
}).
when('/emp_details/:itemId',{
templateUrl : 'templates/emp_details.php',
controller : 'EmpDetailsController'
});
}]);

// Controller for employee lists template
myApp.controller('EmpListController', ['$scope', '$http', function($scope, $http) {
$http.get('js/data.json').success(function(data) {
$scope.emp = data;
});
}]);

// Controller for employee details template
myApp.controller('EmpDetailsController', ['$scope', '$http', '$routeParams', function($scope, $http , $routeParams) {
$http.get('js/data.json').success(function(data) {
$scope.emp = data;
$scope.whichItem = $routeParams.itemId;

if($routeParams.itemId > 0){
$scope.prevItem = Number($routeParams.itemId)-1;
}else{
$scope.prevItem = $scope.emp.length-1;
}

if($routeParams.itemId < $scope.emp.length-1){
$scope.nextItem = Number($routeParams.itemId)+1;
}else{
$scope.nextItem = 0;
}
});
}]);
Step 5: In style.css, write the following css code.
style.css
It contains all CSS code for the different templates used in the application.
@import url(http://fonts.googleapis.com/css?family=Raleway);
ul.details {
padding: 0;
margin-top: 15px;
min-width: 424px;
}
li.emp-details {
background: #90BF2F;
border-bottom: 2px solid;
border-radius: 10px;
padding: 15px;
font-family:raleway;
}
li.emp-details:hover {
background: #A2DC15;
}
.emp-details img {
width: 100px;
height: 100px;
float: left;
margin-right: 20px;
border: 1px solid #7D7D7D;
}
.emp-info {
font-family:raleway;
}
.emp-info h3 {
margin-top: -3px;
}
p.designation{
color: #FFF;
}
a.more {
position: absolute;
bottom: 12px;
right: 30px;
color:#FFF;
font-family:raleway;
}
.emp-detail-wrapper {
min-width: 424px;
background: #90BF2F;
padding: 10px;
border-radius: 5px;
margin-top: 20px;
}
.emp-info h4{
color:#000000;
font-weight: bold;
}
a.btn{
background: red;
color: white;
}
a.btn:hover{
background: white;
color: red;
}
p.bio{
color:#333029;
}
p.designation-info {
color: white;
margin-top: -10px;
font-size: 12px;
margin-bottom: 0;
}
.emp-bio-details img {
width: 100px;
height: 100px;
float: left;
margin: 7px 10px 0 0;
border: 1px solid #7D7D7D;
}
a.back{
color: white;
}
.nav-info {
margin: 0 15px;
}
Run the application and enjoy!!!
Conclusion:
Hope you will understand concept and importance of routing in angular. Run the script at your end and provide us your feedback from the space given below 🙂