
As we have previously learnt about sending data using GET and POST in php. Both methods are used for sending data from one page to another, but using POST that can be done in hidden manner and in GET the data is traveled in the url, that is quite insecure if we sends a important information.
Here, we will be going to learn about fsockopen function in php, which will make POST method a highly secure method to send the information from one page to another that can’t even hacked by using JavaScript too.
$socket = fsockopen($host, 80, $errno, $errstr, 15);
Watch the live demo or download code from the below given links
Note : The installation documentation is given in the download file.
About fsockopen() :
fsockopen() function opens a server on the exact port we specify, here it is port 80 and the host is www.formget.com, then waits for us to specify what to do with it.
It checks whether http is enabled in the server or not, if it is not enabled then sends an error message and we can ends up the script there itself.
if (!$socket) {
//If connection gets fail then it will display the error number & message and will stops the script from continue working
echo ' error: ' . $errno . ' ' . $errstr;
die;
}
But if it finds the connection properly, then we can move further. Here we are sending the header information with the form data to the second.php file using fwrite() function.
 //Sends header data to the web server
fwrite($socket, $http);
It then returns some information which is stored in an array format to be displayed in the front end.
while (!feof($socket)) {
$contents[] = fgets($socket, 4096);
}
The returned value will contain some header information and the data sent. This time the data which we will get, will be in the processed form (performed at the another page). That data will be in the 8th index of the returned array.
if (isset($contents[8])) {
echo $contents[8] == '' ? '' : $contents[8];
}
It will then be displayed in the front end.
Below are the files used in the tutorial with the explanation :
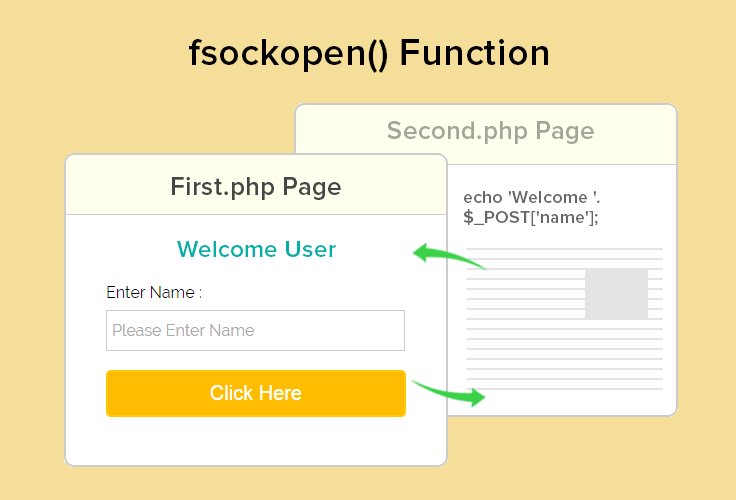
First.php :
Here in this page, when the value will be entered in the textbox will be initially posted to the first.php page, then using fsockopen() value will be posted to second.php where some operations will be performed.
<html>
<head>
<title>POST data using fsockopen() Function</title>
<meta content="noindex, nofollow" name="robots">
<link rel="stylesheet" type="text/css" href="style.css">
</head>
<body>
<?php
if (isset($_POST['submit'])) {
$data = $_POST['emp_name'];
$host = "www.formget.com";
$path = "/tutorial/fsockopen/second.php";
$post_data = 'name=' . $data;
$socket = fsockopen($host, 80, $errno, $errstr, 15);
//Checks if the connection was fine
if (!$socket) {
//If connection gets fail then it will display the error number & message and will stops the script from continue working
echo ' error: ' . $errno . ' ' . $errstr;
die;
}
else
{
//This tells the web server what version of HTTP protocol we are using and the file to which we are sending request
$http = "POST $path HTTP/1.1rn";

//This is the url or IP of which the request is coming from
$http .= "Host: $hostrn";

//The user agent being used to send the request
$http .= "User-Agent: " . $_SERVER['HTTP_USER_AGENT'] . "rn";

//The content type, this is important and much look like the following if sending POST data.
//If this is not provided the server may not process the POST data
$http .= "Content-Type: application/x-www-form-urlencodedrn";

//Lets the web server know the total length/size of are posted content
//It is not always required but some servers will refuse requests if not provided
$http .= "Content-length: " . strlen($post_data) . "rn";

//Tells the server whether header request is completed and the rest if content / POST data
$http .= "Connection: closernrn";

//Add data to be sent
$http .= $post_data . "rnrn";

//Sends header data to the web server
fwrite($socket, $http);

//Waits for the web server to send the full response. On every line returned we append it onto the $contents
//variable which will store the whole returned request once completed.
while (!feof($socket)) {
$contents[] = fgets($socket, 4096);
}
//Close are request or the connection will stay open until script has completed.
fclose($socket);
}
}
?>
<div id="main">
<h1>POST data using fsockopen() Function</h1>
<div id="login">
<h2> fsockopen() Function </h2>
<hr/>
<form action="first.php" method="POST">
<center><span style="color: green;"><?php
if (isset($contents[8])) {
echo $contents[8] == '' ? '' : $contents[8];
}
?></span></center>
<br/>
<br/>
<label>Enter Name :</label>
<input type="text" name="emp_name" required="required" placeholder="Please Enter Name"/><br /><br />
<input type="submit" value="Click Here" name="submit"/><br />
</form>
<br/>
</div>
</div>
</body>
</html>
Second.php :
Now second.php page will return a value to first.php which will be displayed there.
<?php
//$_POST['name'] is Post with the help of fsockopen().
if (isset($_POST['name'])) {
echo 'Welcome '.$_POST['name'];
}?>
Style.css
This is the CSS file used for giving proper look to the tutorial pages.
/*----------------------------------------------
css settings for HTML div exactCenter
------------------------------------------------*/
@import url(http://fonts.googleapis.com/css?family=Raleway);
#main{
width:960px;
margin:50px auto;
font-family: 'Raleway', sans-serif;
}
h2{
background-color: #FEFFED;
text-align:center;
border-radius: 10px 10px 0 0;
margin: -10px -40px;
padding: 15px;
}
hr{
border:0;
border-bottom:1px solid #ccc;
margin: 10px -40px;
margin-bottom: 30px;
}
#login{
width:300px;
float: left;
border-radius: 10px;
font-family:raleway;
border: 2px solid #ccc;
padding: 10px 40px 25px;
margin-top: 70px;
}
input[type=text],input[type=email]{
width:99.5%;
padding: 10px;
margin-top: 8px;
border: 1px solid #ccc;
padding-left: 5px;
font-size: 16px;
font-family:raleway;
}
input[type=submit]{
width: 100%;
background-color:#FFBC00;
color: white;
border: 2px solid #FFCB00;
padding: 10px;
font-size:20px;
cursor:pointer;
border-radius: 5px;
margin-bottom: -12px;
}
span {
color: red;
}
#note{
float: right;
margin-top: 28px;
width: 43%;
margin-right: 298px;
text-align: justify;
}
Conclusion :
After reading the above post, I am sure you will give a try to the script provided and implement it in your own projects as well. Feel free to visit our website again in the future to get in touch with new coding tricks. You can let us know about your feedback in the space provided below 🙂
You may also like –
- PayPal Adaptive Payments for Marketplace in PHP
- PHP Multi Page Form
One Reply to “POST data using fsockopen() Function”
Nice site and nice article thanks team formget