
In this tutorial, I am going to create a simple comment box via ‘Bootstrap’.
There will be 4 fields (i.e. Name, email, website, and message) and a submit button in that comment box.
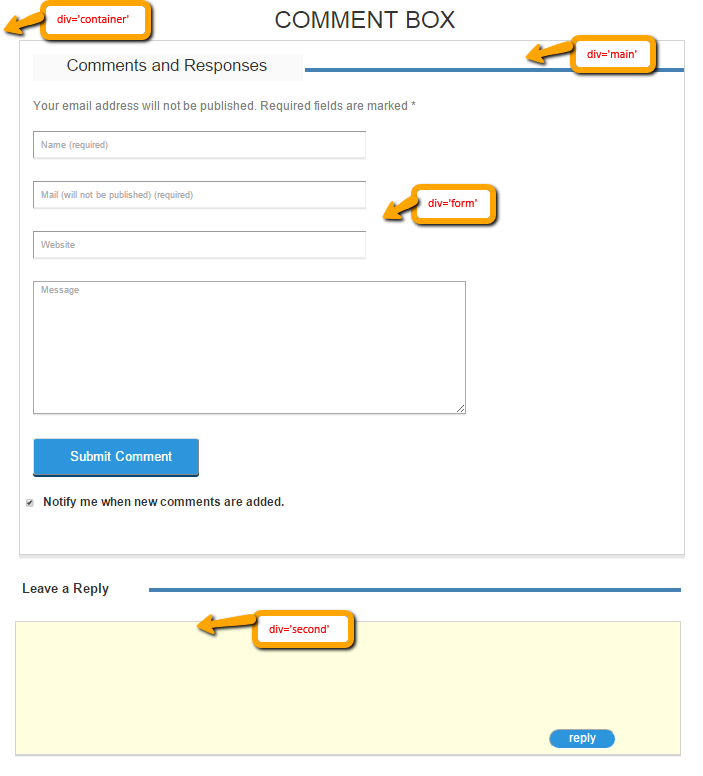
- When a user will submit that form then,
..his/her comment will get displayed in Leave A Reply section as indicated in the diagram given below.
In bootstrap,
We have to deal with ‘rows’ and ‘columns’ to make our web page responsive and mobile friendly.
For a quick solution, you can take a look at our bootstrap templates.
Here’s the layout of our comment box:-
Steps to create comment box:
Let’s have a look on the coding given below :-
1. Firstly we have to download bootstrap library and add ‘bootstrap.css’ in our ‘head’ section.
Head section of HTML file will appear as:-
<head>
<meta charset = "utf-8">
<meta name = "viewport" content = "width=device-width, initial-scale=1">
<link href = "css/bootstrap.css" rel = "stylesheet" type = "text/css"/>
<link href="css.css" rel="stylesheet" type="text/css"/>
<link rel = "stylesheet" href = "http://maxcdn.bootstrapcdn.com/bootstrap/3.3.4/css/bootstrap.min.css">
<link href='http://fonts.googleapis.com/css?family=Roboto' rel='stylesheet' type='text/css'>
<title>Comment Box</title>
</head>
2. Start coding with the ‘HTML’ section
In this file, we will maintain our HTML part to give a basic layout of the form.
Create a html file i.e. ‘index.html’ :
<html>
<head>
<meta charset = "utf-8">
<meta name = "viewport" content = "width=device-width, initial-scale=1">
<link href = "css/bootstrap.css" rel = "stylesheet" type = "text/css"/>
<link href="css.css" rel="stylesheet" type="text/css"/>
<link rel = "stylesheet" href = "http://maxcdn.bootstrapcdn.com/bootstrap/3.3.4/css/bootstrap.min.css">
<link href='http://fonts.googleapis.com/css?family=Roboto' rel='stylesheet' type='text/css'>
<title>Comment Box</title>
</head>
<body>
<!------------container------->

<div class="container">

<h1>COMMENT BOX</h1>
<!-------Wrap------------>
<div id="wrap">
<div id="main">
<div class="row">
<div class="col-md-5">
<h3 class="heading">Comments and Responses</h3>
</div>
<div class="col-md-7">
<div id="upper_blank"></div>
</div>
</div>
</div>

<p>Your email address will not be published. Required fields are marked *</p>

<!------------Form Start---------->

<div id='form'>
<div class="row">
<div class="col-md-12">

<form action="" method="POST" id="commentform">

<div id="comment-name" class="form-row">
<input type = "text" placeholder = "Name (required)" name = "dname"  id = "name" >
</div>
<div id="comment-email" class="form-row">
<input type = "text" placeholder = "Mail (will not be published) (required)" name = "demail"  id = "email">
</div>
<div id="comment-url" class="form-row">
<input type = "text" placeholder = "Website" name = "url"  id = "url" >
</div>
<div id="comment-message" class="form-row">
<textarea name = "comment" placeholder = "Message" id = "comment" ></textarea>
</div>
<a href="#"><input type="submit" name="dsubmit" id="commentSubmit" value="Submit Comment"></a>
<input style="width: 30px" type="checkbox" value="1" name="subscribe" id="subscribe" checked="checked">
<p1><b>Notify me when new comments are added.</b></p1>
</form>

</div>
</div>
</div>
</div>

<!-------------------Reply Section------->
<div id="second">
<div class="row">
<div class="col-md-2">
<h3 class="second_heading"><b>Leave a Reply</b></h3>
</div>
<div class="col-md-10">
<div class="blank"></div>
</div>
</div>
</div>
<div id="middle">
<form>
<a href="#"><input type = "text" value = "reply" name = "dreply" id = "inner_reply"></a>
</form>
</div>

</div>
</body>
</html>
3. Coding for CSS
In this file, we will maintain the coding for the CSS part to give a good ‘look and feel’ to our layout and link this file to the head section of ‘HTML’.
create a ‘CSS’ file i.e. style.css
#wrap{
border: 1px solid lightgray;
alignment-adjust: central;
width: 1000px;
margin-left: 50px;
margin-top: 10px;
box-shadow: 0 5px 0 #e6e6e6;
padding-bottom: 50px;

}
h1{
color: blue-violet;
text-align: center;
}

h3.heading{
margin-left: 20px;
background-color: #fafafa;
font-size: 25px;
float: left;
padding-left: 40px;
position: relative;
width: 405px;
height: 40px;
padding-top: 5px;

}
#upper_blank{
border-bottom: 7px solid steelblue;
margin-top: 40px;
margin-right: 485px;
width: 570px;
padding-right: 480px;
}
p{
margin-left: 5px;
padding: 8px;
padding-left: 20px;
}
#name{
margin-left: 20px;
box-shadow: 0 2px 0 #e6e6e6;
height: 40px;
padding-left: 10px;
width: 500px;
}
#email{
margin-left: 20px;
box-shadow: 0 2px 0 #e6e6e6;
height: 40px;
padding-left: 10px;
width: 500px;
}
#url{
margin-left: 20px;
box-shadow: 0 2px 0 #e6e6e6;
height: 40px;
padding-left: 10px;
width: 500px;
}
#comment{
margin-left: 20px;
box-shadow: 0 2px 0 #e6e6e6;
height: 40px;
padding-left: 10px;
width: 650px;
height: 200px;
}
#commentSubmit{
margin-left: 20px;
width: 250px;
height: 55px;
color: white;
font-size: 20px;
background-color: #2c95dc;
box-shadow: 0 3px 0 #09466f;
margin-bottom: 30px;
padding-left: 20px;
border-radius: 5px;
}
#commentSubmit:hover {
background-color: #09466f;

}

p{
font-size: 18px;
color: gray;
padding-bottom: 15px;
padding-top: 15px;
}
p1{
font-size: 18px;
padding-top: 20px;
}

h3.second_heading{
margin-left: 0;
margin-top: 30px;
font-size: 20px;
width: 250px;
height: 50px;
padding-top: 10px;
padding-left: 55px;

}
#middle{
border: 1px solid lightgray;
width: 1000px;
height: 200px;
background-color: lightyellow;
margin-left: 45px;
text-align: left;
margin-top: 10px;
box-shadow: 0 2px 0 lightgray;
}
.blank{
border-bottom: 7px solid steelblue;
margin-top: 50px;
margin-left: 50px;
margin-right: 100px;
width: 800px;
}

#inner_reply{

margin-left: 800px;
margin-top: 160px;
width: 100px;
height: 30px;
background-color: #2c95dc;
text-align: center;
font-size: 18px;
color: white;
border-radius: 18px;
}
Conclusion: –
In this tutorial, we have learned about, how to create a comment box via bootstrap. Hope you will like this way to create a good comment box.
17 Replies to “Bootstrap Comment Box”
Looks nice, but I can’t figure out where the comments are supposed to appear on my page and how they get posted there. (Obviously, I’m new to bootstrap.)
very nice
salut
thats nice
this is nice. it helps us. 🙂
Looks great!
Nice one!
very good method to solve this
wow
i love your website
Thanks Mr. Neeraj,
Really Very helpful.
Thanks for the post. Bootstrap rocks.
I need to use this comment and reply option in my html
sadasdsad
My brother recommended I would possibly like this website.
He was totally right. This post actually made my day. You cann’t believe
simply how a lot time I had spent for this info!
Thank you!
Thank You 🙂
What i do not understood is in truth how you are now not really a lot more well-preferred than you might be now.
You are so intelligent. You understand thus considerably when it comes to this topic,
producerd me personally believe it ffrom so many varied angles.
Its like women annd men don’t seem to be fascinated until it’s one thing to accomplish with Girl
gaga! Your personal stuffs nice. At all times take care of
it up!
My webpge … Games revealed