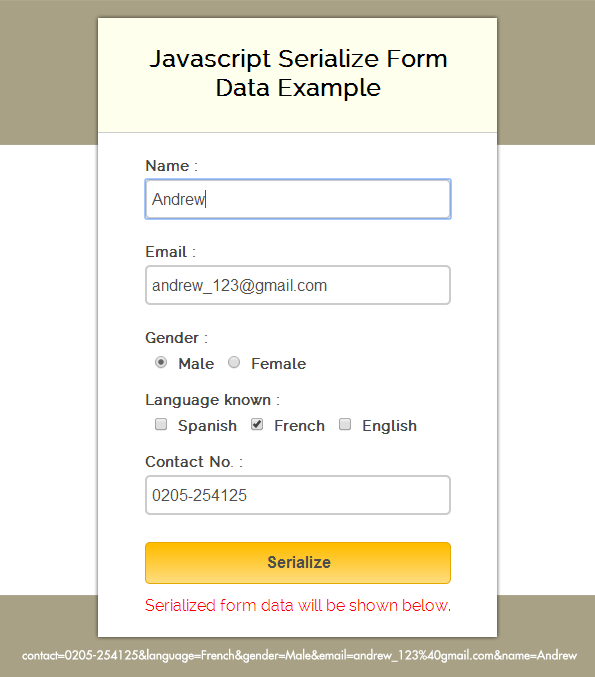
Serializing form data means to get all values of form fields in a text string (in URL query string format).
For example:
contact=598864552&language=French&gender=Male&email=john_12%40hotmail.com&name=John
jQuery has a method “serialize()” to serialize form data. However, JavaScript serialize form do not support this method directly. To allow form data serialize in JavaScript, we must import a library from google.
<!-- For Serialization Function -->
<script type="text/javascript" src="http://form-serialize.googlecode.com/svn/trunk/serialize-0.2.min.js"></script>
Form data can be serialized by both jQuery and JavaScript but, the major difference between them is that, jQuery’s serialize() method returns form field values in top down sequence whereas, serialize JavaScript returns it in bottom up sequence.
Here in this example you will see that contact number field’s value will be shown up first in the query string which is the last field of the form.
contact=598864552&language=French&gender=Male&email=john_12%40hotmail.com&name=JohnJavascript serialize method:
document.getElementById("wrapper").innerHTML = serialize(document.forms[0]); //Serialize Form Data
jQuery serialize method:
$("div").text($("form").serialize()); //Serialize Form Data
In our example, we have created an HTML form with some common form fields like “text”, “checkbox” and “radio” and to get their values, we used JavaScript serialize method which returns a string.
Watch out the live demo or download the code to use it.

Complete HTML and JavaScript codes are given below.
HTML file: serialize.html
Given below our complete HTML form.
<!DOCTYPE html>
<html>
<head>
<title>JavaScript Serialize Form Data Example</title>
<link href="css/style.css" rel="stylesheet"> <!-- Include CSS File Here-->
<script src="http://form-serialize.googlecode.com/svn/trunk/serialize-0.2.min.js" type="text/javascript"></script> <!-- For Serialization Function -->
<script src="js/serialize.js"></script> <!-- Include JavaScript File Here-->
</head>
<body>
<div class="container">
<div class="main">
<form action="" id="form" method="post" name="form">
<h2>JavaScript Serialize Form Data Example</h2>
<label>Name :</label>
<input id="name" name="name" placeholder="Name" type="text">
<label>Email :</label>
<input id="email" name="email" placeholder="Valid Email" type="text">
<label>Gender :</label>
<input name="gender" type="radio" value="Male">
<label>Male</label>
<input name="gender" type="radio" value="Female">
<label>Female</label>
<label>Language known :</label>
<input name="language" type="checkbox" value="Spanish">
<label>Spanish</label> <input name="language" type="checkbox" value="French">
<label>French</label>
<input name="language" type="checkbox" value="English">
<label>English</label>
<label>Contact No. :</label>
<input id="contact" name="contact" placeholder="Contact No." type="text">
<input onclick="myfunction()" type="button" value="Serialize">
<span>Serialized form data will be shown below.</span>
</form>
</div>
<!--Below Paragraph Tag Displays Serialized Form Data-->
<p id="wrapper"></p>
</div>
</body>
</html>
JavaScript file: serialize.js
In the below script, we validate all fields and then serialize form data.
function myfunction() {
if (validation()) // Calling Validation Function
{
// Serializing Form Data And Displaying It In <p id="wrapper"></p>
document.getElementById("wrapper").innerHTML = serialize(document.forms[0]); // Serialize Form Data
document.getElementById("form").reset(); // Reset Form Fields
}
}

// Name And Email Validation Function
function validation() {
var name = document.getElementById("name").value;
var email = document.getElementById("email").value;
var contact = document.getElementById("contact").value;
var emailReg = /^([w-.]+@([w-]+.)+[w-]{2,4})?$/;
if (name === '' || email === '' || contact === '') {
alert("Please fill all fields...!!!!!!");
return false;
} else if (!(email).match(emailReg)) {
alert("Invalid Email...!!!!!!");
return false;
} else {
return true;
}
}
CSS File: style.css
Styling HTML elements.
@import "http://fonts.googleapis.com/css?family=Raleway";
/* Above line is used for online google font */
h2 {
background-color:#FEFFED;
padding:30px 35px;
margin:-10px -50px;
text-align:center;
border-radius:10px 10px 0 0
}
span {
display:block;
margin-top:10px;
color:red
}
p {
color:green;
font-weight:700;
clear:both;
padding:15px
}
hr {
margin:10px -50px;
border:0;
border-top:1px solid #ccc;
margin-bottom:25px
}
div.container {
width:900px;
height:610px;
margin:35px auto;
font-family:'Raleway',sans-serif
}
div.main {
width:306px;
padding:10px 50px;
border:2px solid gray;
border-radius:10px;
font-family:raleway;
float:left
}
input[type=text] {
width:100%;
height:40px;
padding:5px;
margin-bottom:25px;
margin-top:5px;
border:2px solid #ccc;
color:#4f4f4f;
font-size:16px;
border-radius:5px
}
input[type=radio],input[type=checkbox] {
margin:10px 10px 0
}
label {
color:#464646;
text-shadow:0 1px 0 #fff;
font-size:14px;
font-weight:700
}
input[type=button] {
font-size:16px;
background:linear-gradient(#ffbc00 5%,#ffdd7f 100%);
border:1px solid #e5a900;
color:#4E4D4B;
font-weight:700;
cursor:pointer;
width:100%;
border-radius:5px;
padding:10px 0;
outline:none
}
input[type=button]:hover {
background:linear-gradient(#ffdd7f 5%,#ffbc00 100%)
}
Conclusion:
So, this was all about form data serialization using JavaScript. Hope you like it, keep reading our other blogs post and do provide us your valuable feedback.
Check out our latest blogs here –
- Chrome Extension Tutorial: to Display RSS Blog Feeds
- Reset Form Fields Using JavaScript

One Reply to “JavaScript Serialize Form Data”
nice one for learning thank you