
Undoubtedly, most people believe that Google Forms is the best form builder for creating wonderful forms that suit your business requirements.
But, the most tragic thing about Google Forms is that it does not even offer any feature that will allow you to instantly redirect your visitors at any other web page after each submission.
Now, you might be wondering what you can do for enabling such options. Right?
Then don’t panic! Here, in this post, we break down this problem for you by providing a few solutions that you can follow to resolve this problem.
Assuredly, Google Forms is the most trusted form builder that has a very simple interface. But, contrary to this, it is quite rigid with the option of redirecting the visitor to a custom URL after submission.
Now what?
Don’t worry, you can use some other form builders like Pabbly Form Builder for this. It offers advance features like custom URL after submission, logical redirections, dynamic redirection logics and much more for enabling this.
So, try it now!
Redirect To Custom URL After Submissions with Pabbly Form Builder
If you want to redirect the visitor to a custom URL via Google Form, then you need to add a link to the page on the confirmation section as this is the only way to land your visitor.
Setup Google Forms’ Confirmation Message To Add A Redirection Link:
By setting up Google Forms’ confirmation message, you can navigate the form respondents to the desired web page. But, this will not instantly redirect the visitors to that page. Why?
Because once the respondents submit the form, they will find a confirmation message page with the link of that page where you wanted to send them.
Now, by clicking on that link, they will get navigated towards that particular web page.
Let’s see how you can do this:
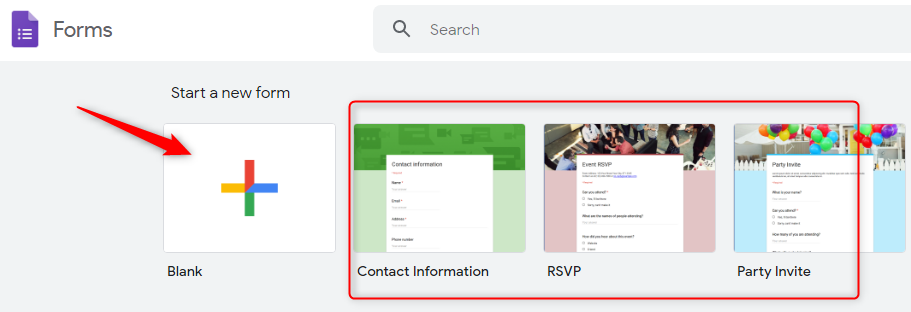
Step 1: Create A New Form
Firstly, you have to create a new form by clicking the “Blank” button into the dashboard. Also, you can use its beautiful pre-built templates too.
Step 2: Add Personalized Questions In The Form
Now, you can add customized questions into the form by just clicking the “Plus” icon. Besides that, you can also add a few more elements like file upload section, images, videos, etc into your forms from here.

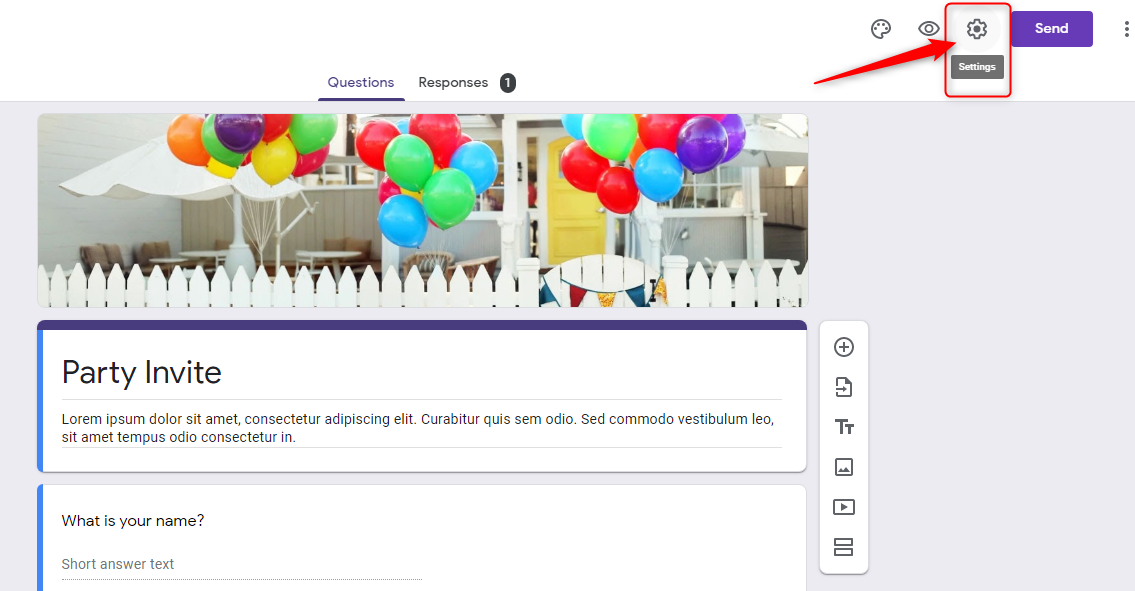
Step 3: Hit The “Setting” Icon
Once you are done with adding required elements into your form, you have to select the “Setting” option which is available at the top right corner of the dashboard.
Step 4: Go To The “Presentation” Section
Now, in the “Settings” section, you will find a window entitled “Presentation”. From here, you can customize the confirmation message as per your requirements.
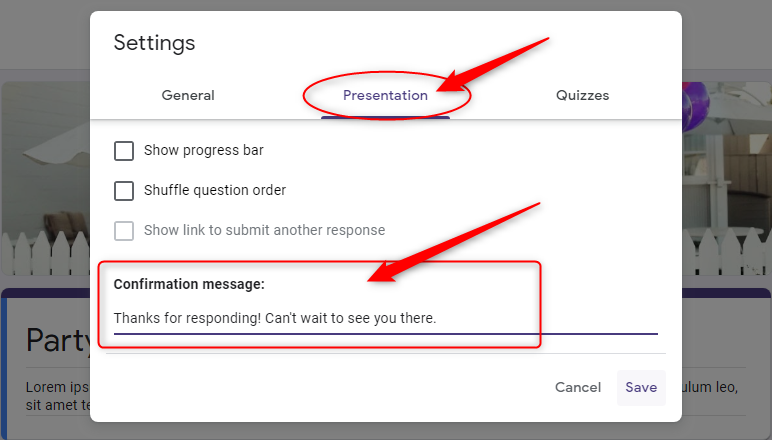
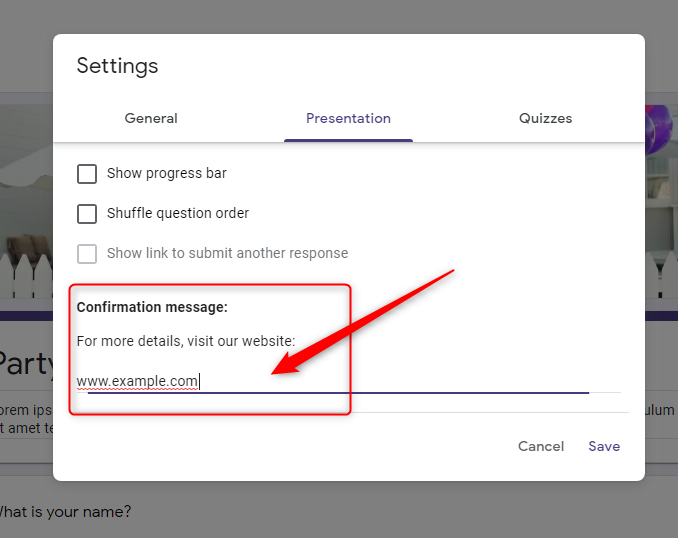
Step 5: Add Link In The Confirmation Message
Here, you can add the link of that page where you wanted to send your visitors after form submission.
Step 6: Save Setting & Preview It
Now, all you need to do is just save these settings & preview your form.
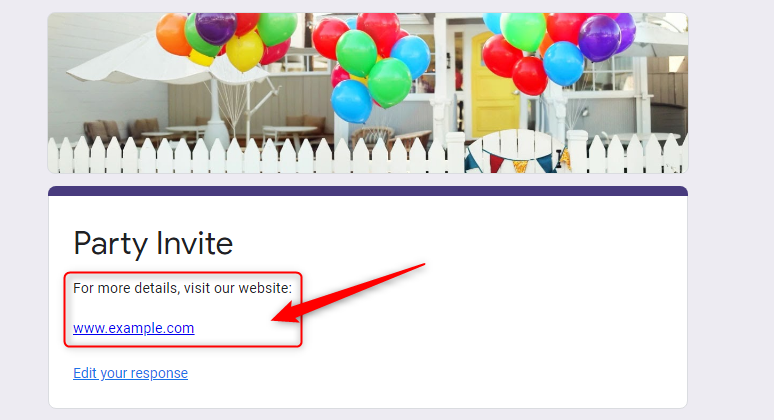
Below, I have mentioned how that link will look to the respondents. So, they can click that link & navigate to that page on which you wanted them to go.
Now, you are all set to avail of the option “redirect on submission” into your Google Forms. Enjoy!
Limitations Of Google Forms:
As mentioned above that Google Forms does not support any direct feature of ‘Redirection On Submission”. This means, using the above method, you can only show a link of that page on which you want to send your respondents but it does not automatically redirect them on to that page.
Hence, it’s totally up to the users whether they want to jump on that page or not.
And, if they didn’t click the link then there is no point in adding that link.
Further, Google Forms does not offer any feature of “Conditional Redirection”. Nowadays, such types of redirection are highly demanded by the business as it helps them to customize things according to the data submitted by the users.
Now at this point, you must have realized that if you stick to Google Forms, then it will be a very loss deal for you.
Therefore, we will recommend you to use Pabbly Form Builder to overcomes all the stated shortcomings of Google Forms.
How “Redirect On Completion” Works In Pabbly Form Builder?
The main advantage of using Pabbly Form Builder is that it can navigate the respondents on to another webpage automatically after form submission. Here, the user doesn’t have to click on any link or button separately.
Apart from this, it allows you to configure different conditional redirections into form to see what happens after the form is submitted. With it, you can dynamically redirect a user to a specific URL based on their form input.
Let’s see how you can do all this.
Setting Up Pabbly Form Builder For Enabling “Dynamic Redirects After Form Submission” Option:
In Pabbly Form Builder, you can either show a default “Thank You” page to the user after submission or you can directly navigate them on to some special page depending on the input data submitted by them. We broke down this complex process in a few simple steps.
Step 1: Create A New Form
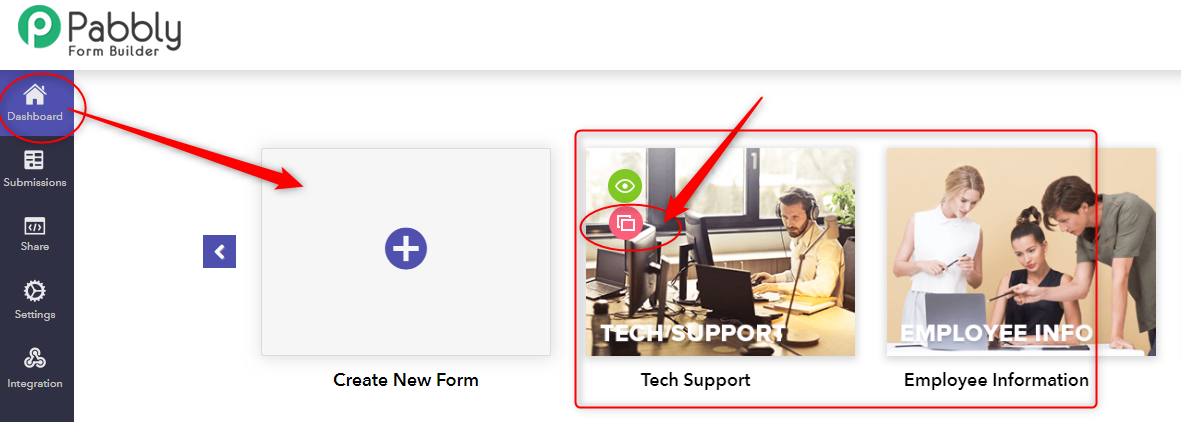
The very first thing you have to do is open the dashboard of Pabbly Form Builder & select the “Create New Form” icon for creating a fresh form from scratch.
Further, you can also “Clone” any of its pre-built templates & customize them according to your requirements.
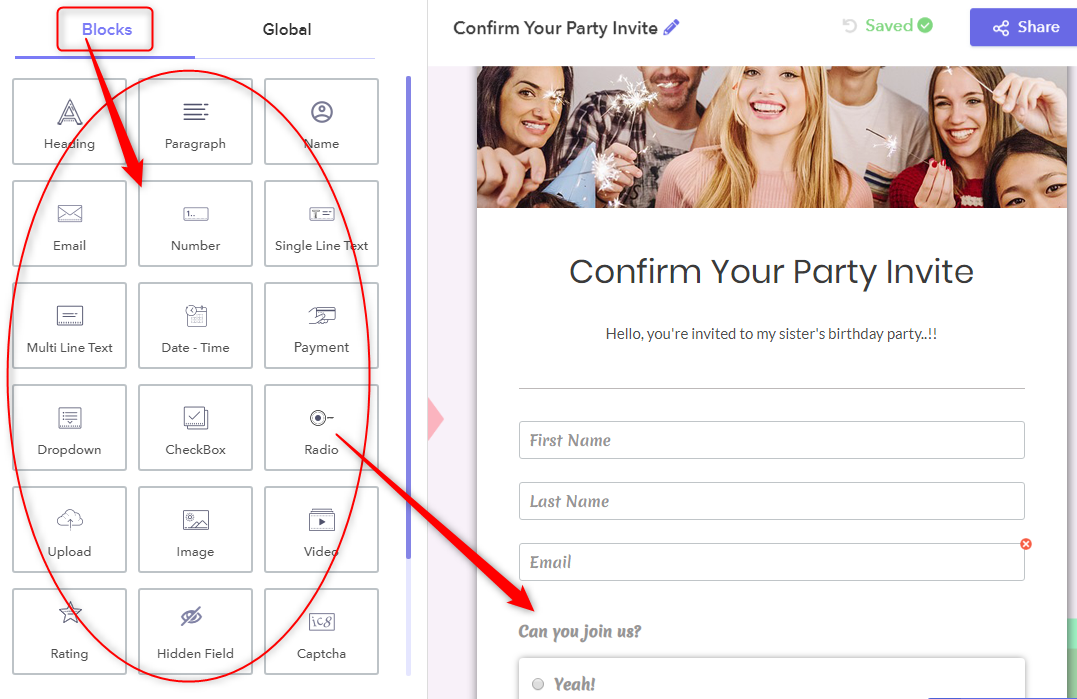
Step 2: Add Required Fields In The Form
Next, you can add different types of form fields like upload, rating, payment option, separator, Captcha, etc, into your form by choosing all these from the “Block” section of the dashboard.
Besides, you can also arrange the order of these fields the way you want.
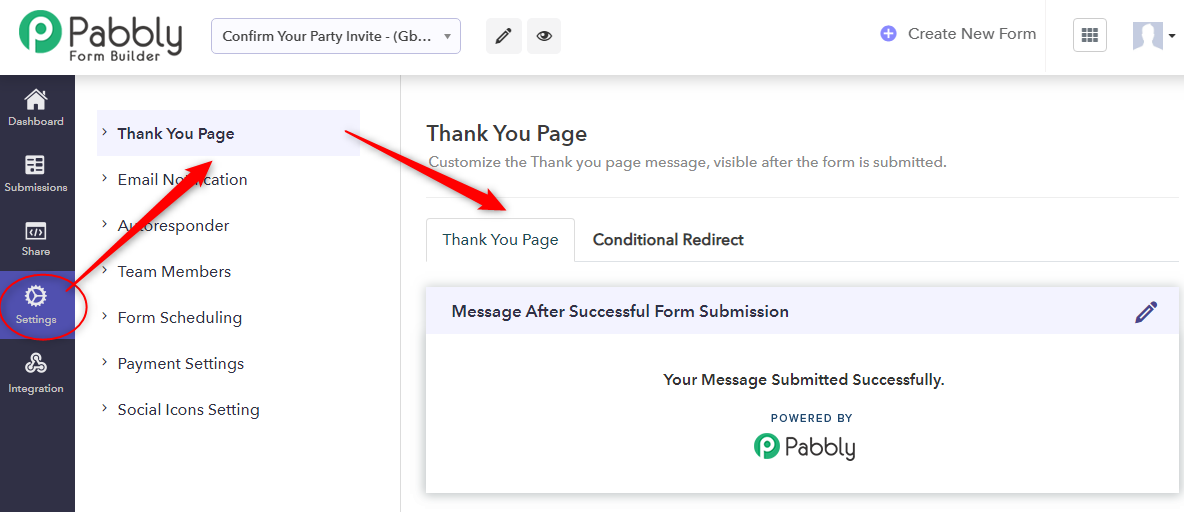
Step 3: Go To Setting Button & Customize “Thank You Page”
Once you are done with editing the form fields, then after that, go to the “Setting” option which is available at the left side column of the dashboard. Here, you will find many tabs for configuring advanced settings into the form. Click on the first tab called “Thank You Page”. If you didn’t make any external settings from here then by default the below-mentioned thankyou message will be visible to the respondents after submission.
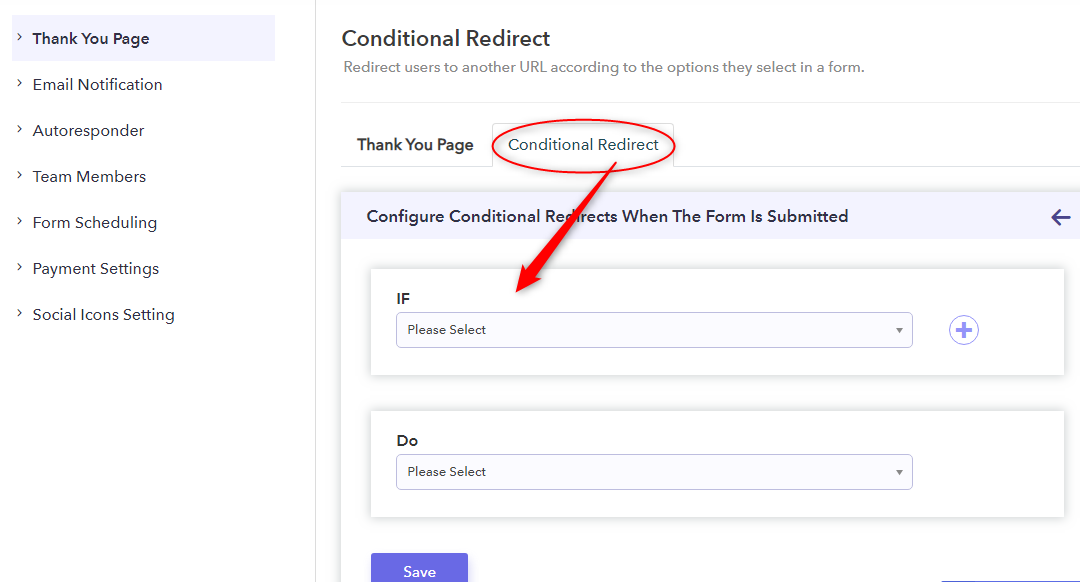
Step 4: Conditional Redirection
Now, this is a crucial stage from where you will be going to set up things for redirecting respondents on some other page after submission. For this, go to the “Conditional Redirect” tab in the “Thank You Page” option.
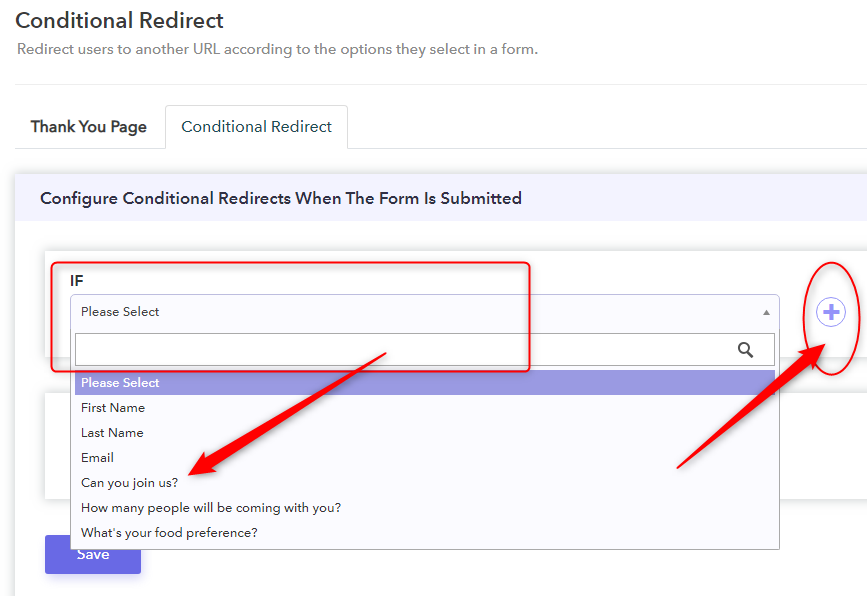
Step 5: Add Specified Conditions
Later, you have to choose the desired “IF” condition for the drop-down list. If you want to add more than one conditional logics into your form for redirections then you can do that by clicking the “Plus” (+) icon available at the right side of the “If” block.
Step 6: Set The “State” Logics
Momentarily, you have to choose the desired “State” from the drop-down list for the “IF” condition you have chosen.
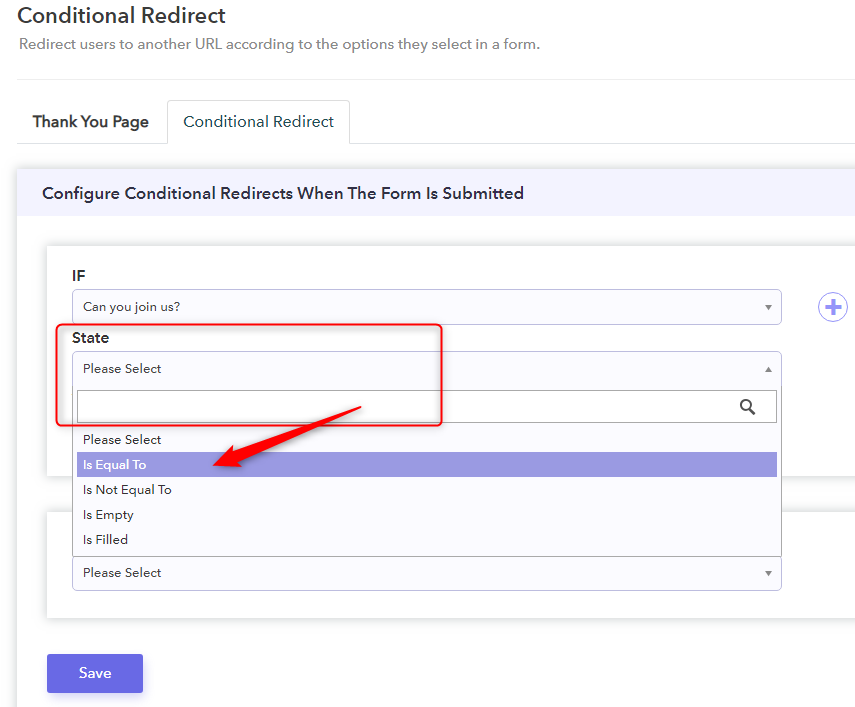
Step 7: Select the “Value” Logics
Further, for completing the condition on which you want to send your visitors to some other page, you have to lastly set up the “Value” parameter from the drop-down list.

Step 8: Setup “Do” Logic
As you have completely set up the “If” condition successfully. Now at this instance, you have to set up the “Do” logics. For this, Pabbly Form Builder offers three variants of redirection after submission. Below, we mentioned how you can set up any one step out of these three.
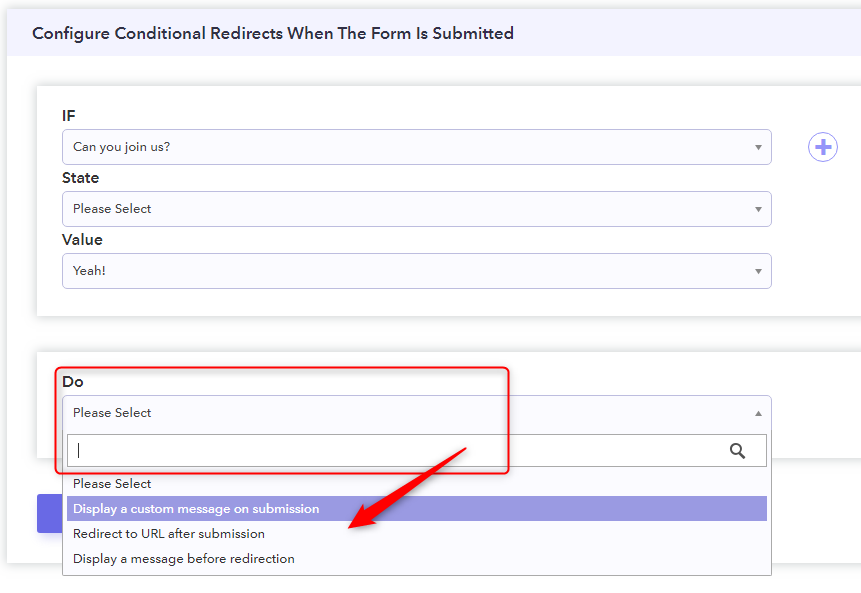
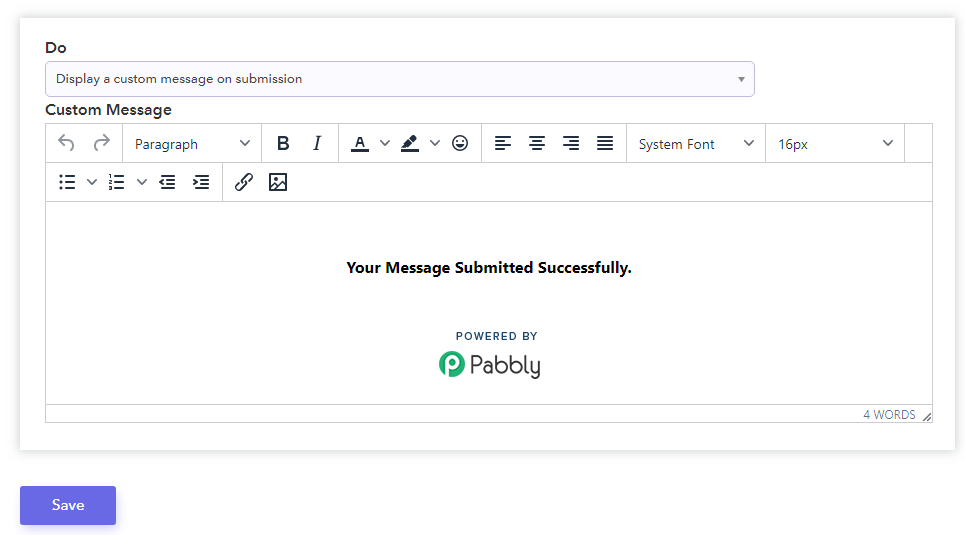
Step 8a) “Display A Custom Message On Submission” – Do Condition
The first method is “Display A Custom Message On Submission”. With this option, instead of redirecting visitors on any particular page, a customized message will be visible to them just like Google Forms.
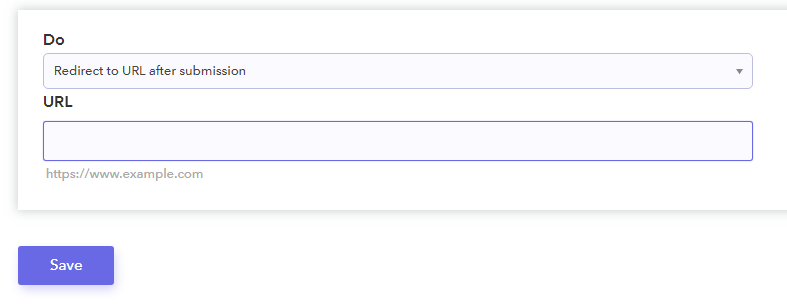
Step 8b) “Redirect To URL After Submission” – Do Logic
Now, if you want to avail of the “Redirection After Submission” option then you can do this from here. For this, you have to set the “Do” condition as “Redirect To URL After Submission” & then enter the URL of the page where you want them to send.
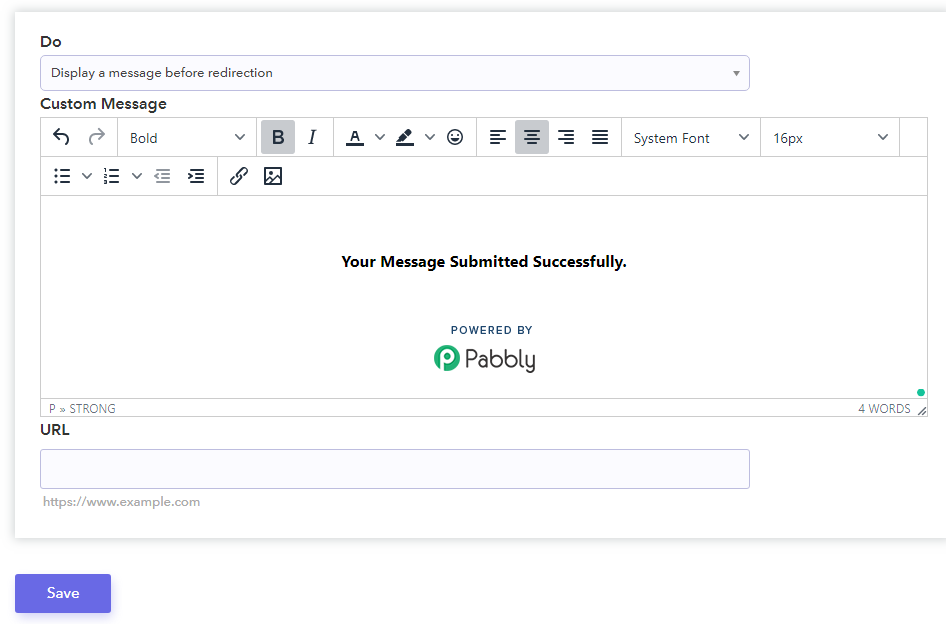
Step 8c) “Display A Message Before Redirection” – Do Logic
The most amazing thing about Pabbly Form Builder is it gives you the freedom of displaying a customized message before redirecting users on a different page after submissions. For this, you have to set the “Do” parameter as “Display A Message Before Redirection”. Then, set up a customized message which you want to display. Finally, you have to enter the URL of that page where you want to send your visitors.
Congratulations you have successfully configure the “Redirection After Completion” logics into Pabbly Form Builder.
Final Words!
Nowadays, in order to utilize your forms for marketing automation, many websites follow the “Redirection After Completion” logics in their forms. As you are using Google Forms and looking for ways of how you can do this. Hence, to help you out, we have discussed various methods using which you can avail of the same feature in your form.
Momentarily, taking everything into account, we are expecting that the above-mentioned information helped you to understand how one can redirect the respondents on a custom URL after form submission.
You May Also Like: