
Want to set an end date on Google Forms responses?
Forms are an easy and affordable way to gather information. Putting an end date on forms is a necessity when it comes to collecting a limited number of responses according to your requirements. By doing so, you will save your survey from being spammed by unnecessary entries.
Google Forms are basically everybody’s first choice for creating forms without paying a dime. Yet, most people hesitates as it doesn’t have any feature to set the closing date on forms. However, one such alternative available in the market, named Pabbly Form Builder that lets us set both activation and expiration date on forms.
Below, we are going to explore how one can put expiration dates on forms.
Alternatives Of Google Forms That Allow Us to Set Expiration Date On Forms
Yes! There are many form builders available in the market that let users set an expiration date on the form. As discussed before, Pabbly Form Builder is best among all. The reason which makes it stand alone in a crowd is, it doesn’t restrict users on features by offering unlimited storage, webhooks, form analytics and much more.
The feature that makes it remarkable involves:
- “Form Scheduling” feature allows you to put an activation and expiration date on the form when the required amount of submission is reached.
- Using it, users can set a submission limit on the form
- With the help of software, you can keep track of every response using its in-built analytic feature
- Moreover, it has an “Autoresponder” feature, through which one can send confirmation messages to their respondent.
- Not just this, the software lets you collect unlimited responses on a single form.
- The only tool that lets respondents fill the form from all across the globe without any sign-in trouble.
- It offers three kinds of “Form Embedding” on the website which are pop-up, sliding and full forms.
Let’s cast light on this “Form Scheduling” of software by creating a form.
Steps To Create A Form With Form Scheduling Feature Using Pabbly Form Builder:
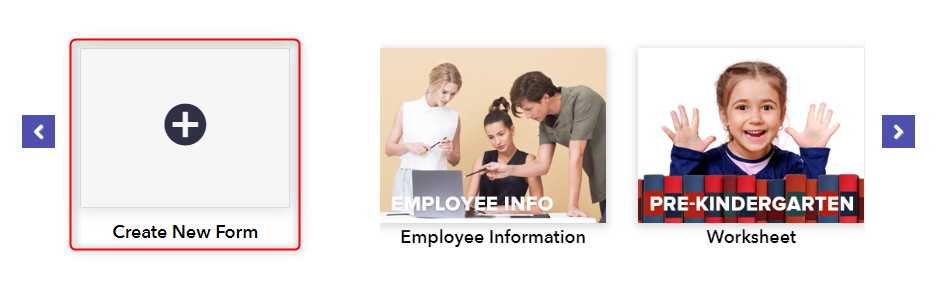
Step 1: Create A Form
To create a form, open the dashboard of Pabbly Form Builder, then click on the”+” icon or you can use its pre-built templates too.
Step 2: Drag Form Elements
Next, after entitling your form, drag form elements like name, email, contact, etc from the “Blocks” section using its drag & drop editor.

Step 3: Open Setting Tab
After making the form, go to the “Setting” option and then click on the “Form Scheduling” feature on the dashboard of Pabbly Form Builder.

Step 4: Enable The Activation Date On Form
Further, to set an activation date, enable the toggle, then assign a start date and time to the created form. Users can also set a custom message. After doing all the changes, save the settings.
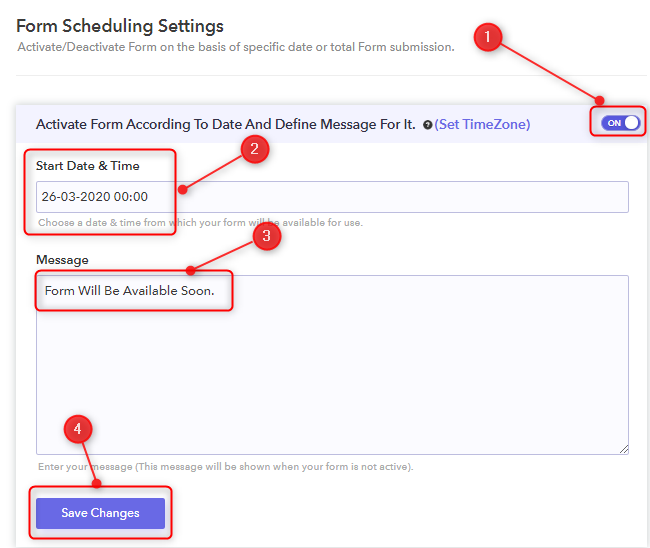
Step 5: Enable The Expiration Date On Form
Subsequently, to set an expiration date, enable the toggle, further assign end date and time to form. After making certain changes, hit the save button.

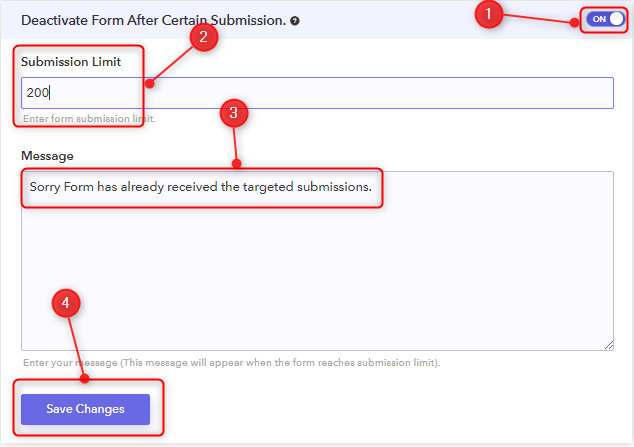
Step 6: Set Submission Limit On Form
Finally, to set the submission limit on form enter the value in the field. Set custom message if any and then save the setting.
That’s it! This is how one can set activation, expiration and submission limit on form.
Conclusion:
Hopefully, now you know that how important is to set limitations on a form responses to only collect genuine responses. Google Forms let us create forms but restricts to put an end date which is why you should try Pabbly Form Builder. The software allows its users to explore the platform using its free trial.
Enjoy this amazing software at your fingertips.