
Let’s say you want to create a certain type of survey that demand photo IDs (face or fingerprints) of your respondents for completing the authentication process. The very first tool, that comes into your mind to construct such surveys is Google Forms. This is because Google Forms is a free form builder that allows you to add fields in which your users can upload their photos.
Uploads per user in Google Forms is capped at 10GB, beyond this limit it stops taking files. Also, annonymous uploads are restricted by Google Forms. Simply put, without signing in their Google Accounts, your respondents won’t be able to upload their files.
However, form creators like Pabbly Form Builder allow users to upload an unlimited number of files directly from their phone/computer drives without worrying about storage.
Not just photos, Google Forms can upload your respondent’s data in different file formats like spreadsheets, presentations, audios, and videos. Furthermore, the state of the art Google security will also keep safe all of your users’ data.
This Is Where You Can Ask Your Respondents To Upload Photos On Google Forms
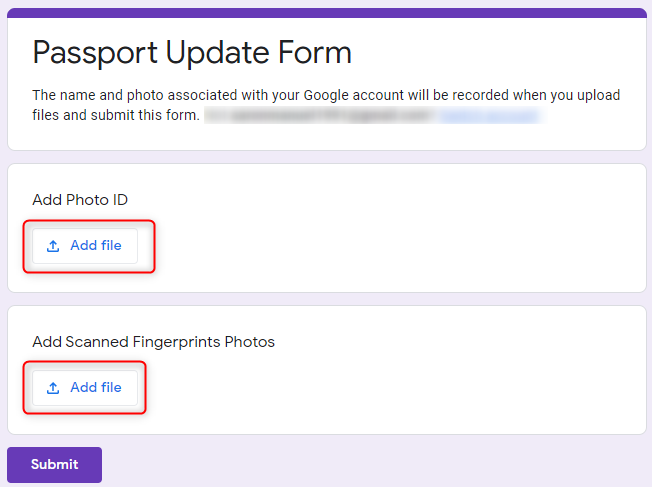
Here is a preview of your typical Google Form. For instance, I have created two fields where your respondents can upload files. You can create many more.
It is actually pretty easy to create these fields. But, if you are a rookie in the form building world and don’t know how to construct fields for file uploads, then here are the steps.
This Is How You Can Create Fields For Photo Uploads On Your Google Forms:
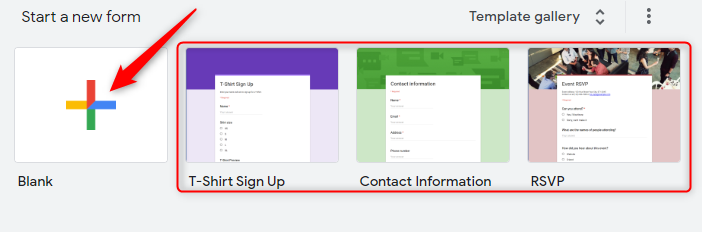
Step 1: Create New Form
You can create a new form by clicking on a “Blank” option or build it with one of the many pre-built form templates that Google Forms provides.
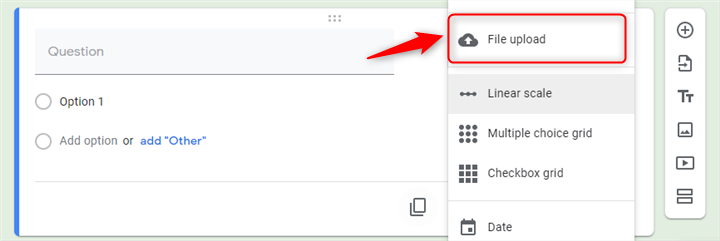
Step 2: Change Question Type To “File Upload”
To change the type of question, click on the drop-down menu on the new question tab that you just created. By default, in Google Forms the question type is set as “Multiple choice”. Thereafter, choose the “File upload” option to create a field where your users will eventually upload their photos.
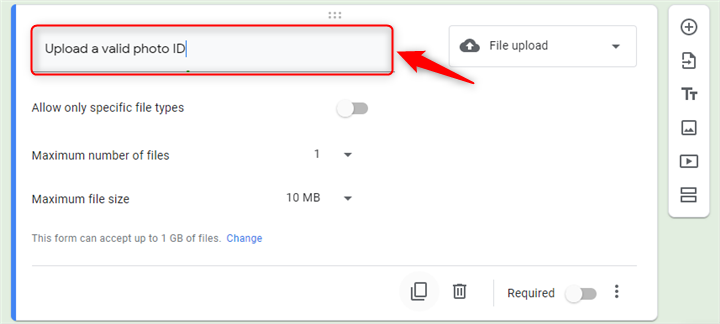
Step 3: Customize Question
Now, it is time to customize the question according to your needs. For instance, if you need your users to upload their photo ID, you can type that in the “Question” text field.
Step 4: Select File Types
Sometimes, you may want to receive only selected file types. In this case, use the “Allow only specific file types” option. Switch it on, from the toggle below the text field. After that, tick on the checkboxes for the type of file your respondents will upload. In our case, we are going to click on the “Image” checkbox.

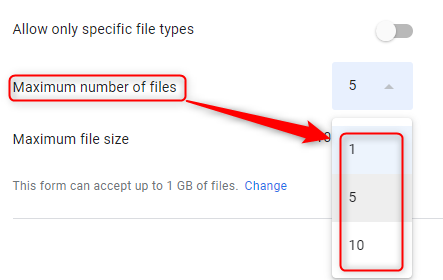
Step 5: Modify File Number Limit
By default, Google Forms restricts the number of file uploads from each user to just 1 file. Furthermore, to modify this, click on the respective drop-down menu to increase the limit as per your requirement.
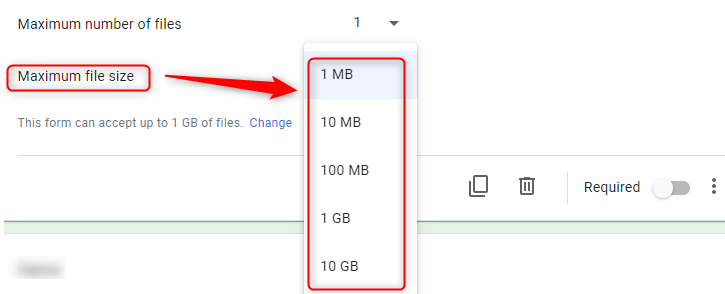
Step 6: Modify File Size Limit
Also, Google Forms’s default upload size is just 1 MB per user. You can use the drop-down menu to increase the file size according to your discretion.
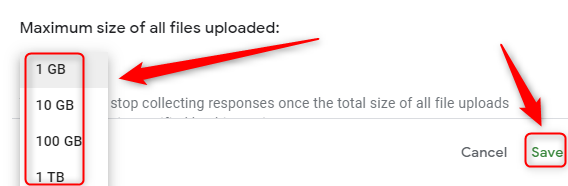
Step 7: Change The Storage Limit
The Google Forms default settings can accept up to 1 GB of files. Furthermore, if you wish to increase this, click on the change button which summons a window. Here at the bottom of this window, you will find a drop-down menu that can increase the maximum size of all file uploads to 1 TB.
Lastly, click “Save” when you’re done.
That’s it! These were the essential steps you need to know if you wish to use the file upload option on Google Forms.
Limitations Of Google Forms’ File Upload Feature
- You always have to change the default limits of the file size. Moreover, the maximum file size available for all uploaded files is 1TB, beyond this limit, Google Forms stops taking any responses.
- The number of uploads per user is restricted to just 10.
- Also, as mentioned earlier a user can’t upload data more than 10GB.
- Users have to sign in to their Google accounts. Otherwise, they wouldn’t be able to upload any files. This is because Google Forms access data only from Google Drive. This is bad for your users as they can’t upload files directly from their computer hard drives.
- Moreover, there are no customizations available for the upload field. All you can do is type in the question and configure the settings like file size and type.
Solutions To The Limitations
There are plenty of other form makers available online that can help you tackle the limitations of Google Forms. One such form maker is Pabbly Form Builder.
Pabbly Form Builder is an online resource that can be used to produce customized forms. In terms of uploading files or photos, it allows you to do the following:
- Receive responses from users without needing them to log into their Google or any other accounts. Your users can upload files directly from their computer storage or phone galleries.
- Furthermore, you can customize the file upload tab. You can configure typography, border, and margin among other settings.
- With Pabbly Form Builder, your users can upload an unlimited number of files. There is simply no limit.
- Moreover, it doesn’t matter if your survey wants a simple pdf or a huge blue ray movie, your respondents can upload files without worrying about conventional issues like storage. You have unlimited storage.
- Also, it doesn’t restrict you on any feature like unlimited submissions, unlimited views, and multi integrations through Webhooks.
Steps To Allow Users To Upload Unlimited Files In Pabbly Form Builder
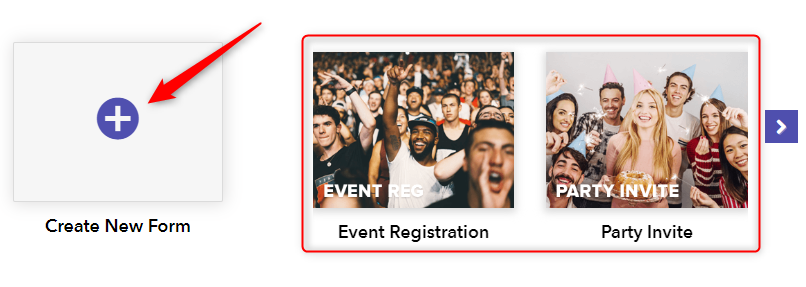
Step 1: Create New Form
Sign in to your Pabbly Form Builder account and in its dashboard, you will find a plethora of inbuilt form templates to build your form or you can simply create a new form by clicking on the (+) sign.
Step 2: Insert The Upload Field
In the left corner, scroll through the “Blocks” section to screen and click on the “Upload” field. You can create an unlimited number of upload fields in the Pabbly Form Builder. In all these fields, your users can upload files without worrying about file size, file numbers, and file types.

Step 3: Customize Upload Field
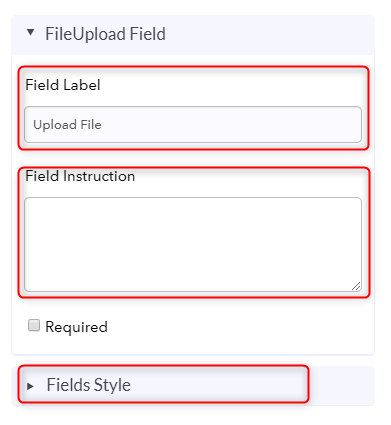
Now, you should see an upload field on the form. To customize the upload field, click on it. A design field emerges in the left corner, here in the “FileUpload Field” menu you can customize field label, field instruction and whether it is a required field according to your discretion.
Step 4: Tailoring Field Style
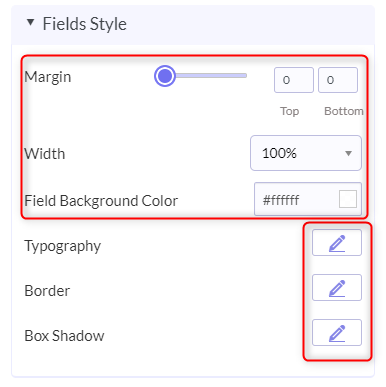
If you wish to customize it further, click on the “Fields Style” located at the bottom of the design block, to open a drop-down menu. This would contain settings like margin, typography, border, and box-shadow. Use slide bar, drop-down menus, and pencil icons to configure these settings. Furthermore, all changes are automatically saved in the Pabbly Form Builder.
At last, you may want to preview your form and share it with your users.
See, how easy it is to construct and customize your upload field in Pabbly Form Builder. Moreover, from the respondent’s perspective too, he/she can upload any files with ease.
Conclusion:
Google Forms do allow us to upload pictures. But the bland upload option of Google Forms, which lacks any customization and also has storage restrictions, will slowly make your survey boring or ineffective. Meanwhile, affordable form creators like Pabbly Form Builder grants users unlimited uploads and brings diversity to its forms with its customization. Come on, give Pabbly Form Builder a try. It will definitely give your lead capturing a necessary headstart.