
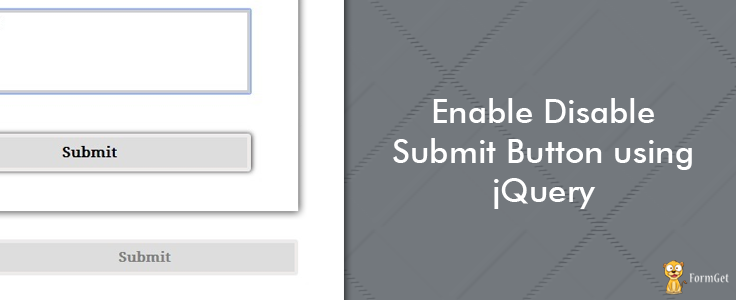
Form data is submitted to server by clicking on Submit button, sometimes user clicks it more than once, which results in multiple form submission to server. To avoid such anomaly, one of the best solution is to disable the submit button through jQuery.
We are covering below two conditions in this tutorial to disable submit button:
- On page load, Let submit button be disabled by default, when user fills out form completely, it becomes enable.
// To Disable Submit Button By Default
$("input[type=submit]").attr('disabled','disabled');
// When User Fills Out Form Completely
$("form").keyup(function(){
$("input[type=submit]").removeAttr('disabled');
});
- Also, disable submit button on its first click.
$("input[type=submit]").click(function(){
$("input[type=submit]").attr('disabled','disabled');
});
Watch our live demo or download our codes to use it.

HTML File: submit_disable.html
Given below our complete HTML code.
<!DOCTYPE html>
<html>
<head>
<title>Enable Disable Submit Button Using jQuery</title>
<link href="submit_disable.css" rel="stylesheet">
<script src="http://ajax.googleapis.com/ajax/libs/jquery/1.11.1/jquery.min.js"></script>
<script src="submit_disable.js" type="text/javascript"></script>
</head>
<body>
<div class="container">
<div class="main">
<h2>Enable Disable Submit Button Using jQuery</h2>
<form action="" method="get">
<label>Name :</label>
<input id="name" name="name" placeholder="Ex: Albert" type="text" value="">
<label>Email :</label>
<input id="email" name="email" placeholder="Ex: [email protected]" type="text" value="">
<label>Message :</label>
<textarea id="message" placeholder="Ex: Hi! Wassup"></textarea>
<input id="submit" type="submit" value="Submit">
</form>
</div>
<p><b>Note:</b> By default we have Disabled Submit Button,<br>
Please fill complete form with approprite values to enable it.</p>
</div>
</body>
</html>
jQuery File: submit_disable.js
Given below our complete jQuery code.
$(document).ready(function() {
$("#submit").attr('disabled', 'disabled');
$("form").keyup(function() {
// To Disable Submit Button
$("#submit").attr('disabled', 'disabled');
// Validating Fields
var name = $("#name").val();
var email = $("#email").val();
var message = $("#message").val();
var filter = /^[w-.+]+@[a-zA-Z0-9.-]+.[a-zA-z0-9]{2,4}$/;
if (!(name == "" || email == "" || message == "")) {
if (filter.test(email)) {
// To Enable Submit Button
$("#submit").removeAttr('disabled');
$("#submit").css({
"cursor": "pointer",
"box-shadow": "1px 0px 6px #333"
});
}
}
});
// On Click Of Submit Button
$("#submit").click(function() {
$("#submit").css({
"cursor": "default",
"box-shadow": "none"
});
alert("Form Submitted Successfully..!!");
});
});
CSS File: submit_disable.css
Styling HTML elements.
@import "http://fonts.googleapis.com/css?family=Droid+Serif";
/* Above line is used for online google font */
div.container {
width:960px;
height:600px;
margin:50px auto;
font-family:'Droid Serif',serif
}
div.main {
width:360px;
float:left;
padding:30px 40px;
box-shadow:0 0 10px;
border-radius:2px;
margin-top:7px;
color:#333
}
h2 {
text-align:center;
font-size:20px;
margin-bottom:40px
}
label {
font-weight:700
}
input[type=submit] {
font-size:15px;
border:4px solid #efebeb;
padding:5px;
font-weight:700;
width:95%;
border-radius:3px;
margin-left:6px;
font-family:'Droid Serif',serif;
height:40px
}
input[type=text] {
padding:3px;
border-radius:3px;
margin-left:6px;
border:4px solid #d0cdd1;
width:95%;
height:40px;
margin-bottom:20px;
margin-top:10px
}
form {
font-size:15px;
margin-top:30px
}
textarea {
border:4px solid #d0cdd1;
padding:3px;
width:95%;
border-radius:3px;
resize:none;
height:90px;
margin-left:6px;
margin-top:10px;
margin-bottom:20px
}
p {
clear:both;
padding-top:20px
}
Conclusion:
Above tutorial shows the importance of disabling submit button. Hope you like it, keep reading our other blogs.
jQuery Get Value Of Input, Textarea and Radio Button

HTML Forms contains various elements like input fields, options, textarea etc. and for further processing, we need to get value of each field using jQuery.
This tutorial, Explains about, how to get input values of different HTML form elements using jQuery as follows:
we have taken three form elements in our example – input field, radio button and a textarea.
- To get value of input field.
$("input").val();- To get value of Checked Radio Button.
$("form input[type='radio']:checked").val();- Get value of Radio button with onChange.
$('input:radio').change(function(){
var value = $("form input[type='radio']:checked").val();
alert("Value of Changed Radio is : " +value);
});- To get value of Textarea field.
$("textarea").val();To learn more, just watch our live demo and go through our complete HTML and jQuery codes given below.

HTML file: form_value.html
Given below our complete HTML code.
<!DOCTYPE html>
<html>
<head>
<title>Get Values Of Form Elements Using jQuery</title>
<!-- Include CSS File Here -->
<link rel="stylesheet" href="form_value.css"/>
<!-- Include JS File Here -->
<script src="http://ajax.googleapis.com/ajax/libs/jquery/1.11.1/jquery.min.js"></script>
<script type="text/javascript" src="form_value.js"></script>
</head>
<body>
<div class="container">
<div class="main">
<h2>Get Values Of Form Elements Using jQuery</h2>
<form action="">
<!-- Text -->
<label>Input :</label>
<input type="text" id="text" name="name" value="" />
<input type="button" id="text_value" value="Get Value"/>
<input type="button" id="text_reset" value=" Reset "/>
<!-- Radio Button -->
<label>Radio Button :</label>
<input type="radio" name="radio" value="Radio 1">Radio 1
<input type="radio" name="radio" value="Radio 2">Radio 2
<input type="radio" name="radio" value="Radio 3">Radio 3
<input type="radio" name="radio" value="Radio 4">Radio 4
<input type="button" id="radio_value" value="Get Value"/>
<input type="button" id="radio_reset" value=" Reset "/>
<p id="result"></p>
<!-- Textarea -->
<label>Textarea :</label>
<textarea id="textarea" ></textarea>
<input type="button" id="textarea_value" value="Get Value"/>
<input type="button" id="textarea_reset" value=" Reset "/>
</form>
</div>
</div>
</body>
</html>
jQuery File: form_value.js
Given below our complete jQuery code.
$(document).ready(function() {
// Function to get input value.
$('#text_value').click(function() {
var text_value = $("#text").val();
if(text_value=='') {
alert("Enter Some Text In Input Field");
}else{
alert(text_value);
}
});
$('#text_reset').click(function() {
$("#text").val('');
});

// Funtion to get checked radio's value.
$('#radio_value').click(function() {
$('#result').empty();
var value = $("form input[type='radio']:checked").val();
if($("form input[type='radio']").is(':checked')) {
$('#result').append("Checked Radio Button Value is :<span> "+ value +" </span>");
}else{
alert(" Please Select any Option ");
}
});
// Get value Onchange radio function.
$('input:radio').change(function(){
var value = $("form input[type='radio']:checked").val();
alert("Value of Changed Radio is : " +value);
});
// Funtion to reset or clear selection.
$('#radio_reset').click(function() {
$('#result').empty();
$("input:radio").attr("checked", false);
});
// To get value of textarea.
$('#textarea_value').click(function() {
var textarea_value = $("#textarea").val();
if(textarea_value=='') {
alert("Enter Some Text In Textarea");
}else{
alert(textarea_value);
}
});
$('#textarea_reset').click(function() {
$("textarea").val('');
});
});
CSS File: form_value.css
Styling HTML elements.
/* Below line is used for online Google font */
@import url(http://fonts.googleapis.com/css?family=Droid+Serif);
div.container{
width: 960px;
height: 600px;
margin:50px auto;
font-family: 'Droid Serif', serif;
}
div.main{
width:425px;
float:left;
padding: 30px 40px;
box-shadow: 0 0 10px;
border-radius: 2px;
margin-top:7px;
}
h2{
text-align:center;
font-size:18px;
}
p{
font-size:15px;
color:#084CA1;
}
label{
color: #464646;
font-size: 16px;
font-weight: bold;
}
input[type=button]{
font-size: 15px;
border: 1px solid gray;
padding: 5px;
background-color: #084CA1;
font-weight:bold;
cursor: pointer;
width:48%;
color:white;
border-radius:3px;
margin-left:6px;
font-family: 'Droid Serif', serif;
}
input[type=radio]{
width:15px;
height:15px;
}
input[type=text]{
padding: 5px;
border-radius:3px;
margin-left:6px;
border: 2px solid rgb(165, 165, 165);
width: 95%;
height: 20px;
}
form{
font-size:15px;
}
span{
color:red;
}
textarea{
border: 2px solid rgb(165, 165, 165);
padding: 5px;
width: 95%;
border-radius: 3px;
resize: none;
height: 40px;
margin-left:6px;
}
Conclusion:
This was all about to get values of different HTML Form elements. hope you like it, keep reading our other blogs.
jQuery Dialog Box Form Example

jQuery has a collection of various user interface interactions, effects and animation in its library. Dialog Box is one of them to interact with user.
It consists of a button, some contents or message for user. It may be a draggable window which appears on screen when any event is triggered. It may or may not allow user to take immediate action over it where as popup boxes needs an immediate response from user.

By watching our live demo and reading below codes, you will learn to create dialog form with name and email field and a submit button using jQuery dialog UI.
We used following jQuery dialog UI link in our HTML :
<!-- Including  jQuery Dialog UI Here-->
<link href="http://ajax.googleapis.com/ajax/libs/jqueryui/1.9.2/themes/ui-darkness/jquery-ui.css" rel="stylesheet">
<script src="http://ajax.googleapis.com/ajax/libs/jquery/1.10.2/jquery.min.js"></script>
<script src="http://ajax.googleapis.com/ajax/libs/jqueryui/1.9.2/jquery-ui.min.js"></script>
<script type="text/javascript" src="js/dialog.js"></script>
-:See Also:-

HTML file: dialog.html
Below is our complete HTML form linked with jQuery dialog UI.
<!DOCTYPE html>
<html>
<head>
<title>jQuery Dialog Form Example</title>
<link href="css/dialog.css" rel="stylesheet"> <!-- Including CSS File Here-->
<!-- Including CSS & jQuery Dialog UI Here-->
<link href="http://ajax.googleapis.com/ajax/libs/jqueryui/1.9.2/themes/ui-darkness/jquery-ui.css" rel="stylesheet">
<script src="http://ajax.googleapis.com/ajax/libs/jquery/1.10.2/jquery.min.js"></script>
<script src="http://ajax.googleapis.com/ajax/libs/jqueryui/1.9.2/jquery-ui.min.js"></script>
<script src="js/dialog.js" type="text/javascript"></script>
</head>
<body>
<div class="container">
<div class="main">
<div id="dialog" title="Dialog Form">
<form action="" method="post">
<label>Name:</label>
<input id="name" name="name" type="text">
<label>Email:</label>
<input id="email" name="email" type="text">
<input id="submit" type="submit" value="Submit">
</form>
</div>
<h2>jQuery Dialog Form Example</h2>
<p>Click below button to see jQuery dialog form.</p>
<input id="button" type="button" value="Open Dialog Form">
</div>
</div>
</body>
</html>
jQuery File: dialog.js
Below jQuery code executes and validates dialog form.
$(document).ready(function() {
$(function() {
$("#dialog").dialog({
autoOpen: false
});
$("#button").on("click", function() {
$("#dialog").dialog("open");
});
});
// Validating Form Fields.....
$("#submit").click(function(e) {
var email = $("#email").val();
var name = $("#name").val();
var emailReg = /^([w-.]+@([w-]+.)+[w-]{2,4})?$/;
if (email === '' || name === '') {
alert("Please fill all fields...!!!!!!");
e.preventDefault();
} else if (!(email).match(emailReg)) {
alert("Invalid Email...!!!!!!");
e.preventDefault();
} else {
alert("Form Submitted Successfully......");
}
});
});
CSS File: dialog.css
Styling HTML elements.
@import "http://fonts.googleapis.com/css?family=Droid+Serif";
/* Above line is used for online google font */
h2 {
text-align:center;
font-size:24px
}
hr {
margin-bottom:30px
}
p {
color:#000;
font-size:16px;
font-weight:700
}
#button {
border:1px solid #0c799e;
width:250px;
padding:10px;
font-size:16px;
font-weight:700;
color:#fff;
border-radius:3px;
background:linear-gradient(to bottom,#59d0f8 5%,#49c0e8 100%);
cursor:pointer
}
#button:hover {
background:linear-gradient(to bottom,#49c0e8 5%,#59d0f8 100%)
}
input[type=text] {
margin-top:5px;
margin-bottom:20px;
width:96%;
border-radius:5px;
border:0;
padding:5px 0
}
#name,#email {
padding-left:10px
}
input[type=submit] {
width:30%;
border:1px solid #59b4d4;
background:#0078a3;
color:#eee;
padding:3px 0;
border-radius:5px;
margin-left:33%;
cursor:pointer
}
input[type=submit]:hover {
border:1px solid #666;
background:#555;
color:#fff
}
.ui-dialog .ui-dialog-content {
padding:2em
}
div.container {
width:960px;
height:610px;
margin:50px auto;
font-family:'Droid Serif',serif;
position:relative
}
div.main {
width:320px;
margin-top:35px;
float:left;
padding:10px 55px 25px;
background-color:rgba(204,204,191,0.51);
border:15px solid #fff;
box-shadow:0 0 10px;
border-radius:2px;
font-size:13px;
text-align:center
}
Conclusion:
Above example explains how to use jQuery dialog UI in HTML. Hope you like it, keep reading our other blogs.
jQuery Popup Login and Contact Form
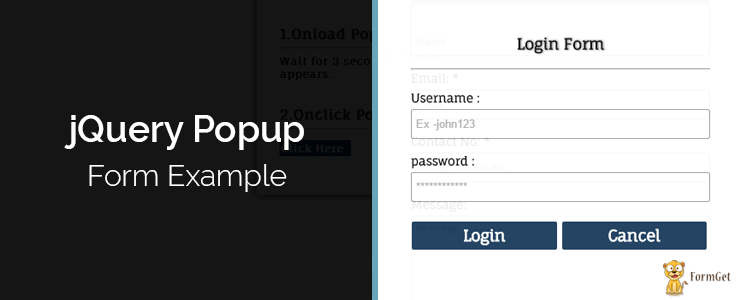
Pop up forms are the smart way to present your site. These forms are similar to other forms except, these forms appears abruptly on exact center of screen and requests user to take immediate action over them.
Here, In this example, we explained how to create popup form like Login and Contact form to fulfill below requirements:
- Login Popup form should appears at the center of screen after specific time interval by jQuery on load event .
- Contact form may appear on click event of a button or any link.
Here, we have covered above requirements in this example as given below:
- To popup login form after specific time interval on page load, we used following jQuery code.
setTimeout(popup, 3000); // Setting time 3s to popup login form
function popup() {
$("#logindiv").css("display", "block");
}- To popup login form on click event of a button, we used following jQuery code.
$("#onclick").click(function() {
$("#contactdiv").css("display", "block");
});
Just watch our live demo or download zip file to use it.


To learn more about it, go through our complete jQuery and HTML codes given below.
HTML File – jquery_popup.html
Given below our complete HTML code to create Login and Contact form.
<html>
<head>
<title>jQuery Popup Login and Contact Form</title>
<script src="js/jquery.min.js"></script>
<link rel="stylesheet" href="css/jquery_popup.css" />
<script src="js/jquery_popup.js"></script>
</head>
<body>
<div id="mainform">

<h2>jQuery Popup Form Example</h2>
<!-- Required div starts here -->
<div class="form" id="popup">
<b>1.Onload Popup Login Form</b><br/><hr/>
<span>Wait for 3 second.Login Popup form Will appears.</span><br/><br/><br/>

<b>2.Onclick Popup Contact Form</b><hr/>
<p id="onclick">Popup</p>
<br/>
</div>

<!-- Right side div -->
<div id="formget"><a href=https://www.formget.com/app><img src="images/formget.jpg" alt="Online Form Builder"/></a>
</div>
</div>

<!--Contact Form -->
<div id="contactdiv">
<form class="form" action="#" id="contact">
<img src="images/button_cancel.png" class="img" id="cancel"/>
<h3>Contact Form</h3>
<hr/><br/>
<label>Name: <span>*</span></label>
<br/>
<input type="text" id="name" placeholder="Name"/><br/>
<br/>
<label>Email: <span>*</span></label>
<br/>
<input type="text" id="email" placeholder="Email"/><br/>
<br/>
<label>Contact No: <span>*</span></label>
<br/>
<input type="text" id="contactno" placeholder="10 digit Mobile no."/><br/>
<br/>
<label>Message:</label>
<br/>
<textarea id="message" placeholder="Message......."></textarea><br/>
<br/>
<input type="button" id="send" value="Send"/>
<input type="button" id="cancel" value="Cancel"/>
<br/>
</form>
</div>

<!--Login Form -->
<div id="logindiv">
<form class="form" action="#" id="login">
<img src="images/button_cancel.png" class="img" id="cancel"/>
<h3>Login Form</h3>
<hr/><br/>
<label>Username : </label>
<br/>
<input type="text" id="username" placeholder="Ex -john123"/><br/>
<br/>
<label>password : </label>
<br/>
<input type="text" id="password" placeholder="************"/><br/>
<br/>
<input type="button" id="loginbtn" value="Login"/>
<input type="button" id="cancel" value="Cancel"/>
<br/>

</form>

</div>
</body>
</html>
JavaScript File – jquery_popup.js
- Wait for 3 seconds and jQuery on load event of page allows Login form to popup on exact center of screen.
- To popup Conact Formuser have to click on “Popup” button.
$(document).ready(function() {
setTimeout(popup, 3000);
function popup() {
$("#logindiv").css("display", "block");
}
$("#login #cancel").click(function() {
$(this).parent().parent().hide();
});
$("#onclick").click(function() {
$("#contactdiv").css("display", "block");
});
$("#contact #cancel").click(function() {
$(this).parent().parent().hide();
});
// Contact form popup send-button click event.
$("#send").click(function() {
var name = $("#name").val();
var email = $("#email").val();
var contact = $("#contactno").val();
var message = $("#message").val();
if (name == "" || email == "" || contactno == "" || message == ""){
alert("Please Fill All Fields");
}else{
if (validateEmail(email)) {
$("#contactdiv").css("display", "none");
}else {
alert('Invalid Email Address');
}
function validateEmail(email) {
var filter = /^[w-.+]+@[a-zA-Z0-9.-]+.[a-zA-z0-9]{2,4}$/;
if (filter.test(email)) {
return true;
}else {
return false;
}
}
}
});
// Login form popup login-button click event.
$("#loginbtn").click(function() {
var name = $("#username").val();
var password = $("#password").val();
if (username == "" || password == ""){
alert("Username or Password was Wrong");
}else{
$("#logindiv").css("display", "none");
}
});
});
CSS File – jquery_popup.css
- Design login and contact forms.
- Sets popup form to appear at exact center of screen.
@import url(http://fonts.googleapis.com/css?family=Fauna+One|Muli);
#mainform{
width:960px;
margin:20px auto;
padding-top:20px;
font-family: 'Fauna One', serif;
display:block;
}
h2{
margin-left: 65px;
text-shadow:1px 0px 3px gray;
}
h3{
font-size:18px;
text-align:center;
text-shadow:1px 0px 3px gray;
}
#onclick{
padding:3px;
color:green;
cursor:pointer;
padding:5px 5px 5px 15px;
width:70px;
color:white;
background-color:#123456;
box-shadow:1px 1px 5px grey;
border-radius:3px;
}
b{
font-size:18px;
text-shadow:1px 0px 3px gray;
}
#popup{
padding-top:80px;
}
.form{
border-radius:2px;
padding:20px 30px;
box-shadow:0 0 15px;
font-size:14px;
font-weight:bold;
width:350px;
margin:20px 250px 0 35px;
float:left;
}
input{
width:100%;
height:35px;
margin-top:5px;
border:1px solid #999;
border-radius:3px;
padding:5px;
}
input[type=button]{
background-color:#123456;
border:1px solid white;
font-family: 'Fauna One', serif;
font-Weight:bold;
font-size:18px;
color:white;
width:49%;
}
textarea{
width:100%;
height:80px;
margin-top:5px;
border-radius:3px;
padding:5px;
resize:none;
}
#contactdiv{
opacity:0.92;
position: absolute;
top: 0px;
left: 0px;
height: 100%;
width: 100%;
background: #000;
display: none;
}
#logindiv{
opacity:0.92;
position: absolute;
top: 0px;
left: 0px;
height: 100%;
width: 100%;
background: #000;
display: none;
}

#login,#contact{
width:350px;
margin:0px;
background-color:white;
font-family: 'Fauna One', serif;
position: relative;
border: 5px solid rgb(90, 158, 181);
}
.img{
float: right;
margin-top: -35px;
margin-right: -37px;
}
#contact{
left: 50%;
top: 50%;
margin-left:-210px;
margin-top:-255px;
}
#login{
left: 50%;
top: 50%;
margin-left:-210px;
margin-top:-158px;
}
Conclusion:
Popup forms are event triggered forms. here, we used jQuery’s onload and click events to popup login and contact forms respectively, it will appear on the screen. Keep following our other blogs.
Create Login Form Using jQuery

This tutorial concerns about creating a login form and validating it using jQuery. The prestored username, password are verified from database whether both exist’s or not in our database, this is done using PHP script .
Here we have created a simple HTML form with two fields- Email and Password. jQuery validation is used for email and password to ensure that they are valid or not .

You can download the zip file or simply follow our code and edit it to use.
-:See Also:-

HTML File: login.html
Given below our complete HTML code , copy to use it.
<!DOCTYPE html>
<html>
<head>
<title>Login Form Using jQuery - Demo Preview</title>
<meta name="robots" content="noindex, nofollow">
<!-- Include CSS File Here -->
<link rel="stylesheet" href="css/style.css"/>
<!-- Include CSS File Here -->
<script src="http://ajax.googleapis.com/ajax/libs/jquery/1.11.1/jquery.min.js"></script>
<script type="text/javascript" src="js/login.js"></script>
</head>
<body>
<div class="container">
<div class="main">
<form class="form" method="post" action="#">
<h2>Create Login Form Using jQuery</h2>
<label>Email :</label>
<input type="text" name="demail" id="email">
<label>Password :</label>
<input type="password" name="password" id="password">
<input type="button" name="login" id="login" value="Login">
</form>
</div>
</div>
</body>
</html>
jQuery File: login.js
Given below our complete jQuery code.
$(document).ready(function(){
$("#login").click(function(){
var email = $("#email").val();
var password = $("#password").val();
// Checking for blank fields.
if( email =='' || password ==''){
$('input[type="text"],input[type="password"]').css("border","2px solid red");
$('input[type="text"],input[type="password"]').css("box-shadow","0 0 3px red");
alert("Please fill all fields...!!!!!!");
}else {
$.post("login.php",{ email1: email, password1:password},
function(data) {
if(data=='Invalid Email.......') {
$('input[type="text"]').css({"border":"2px solid red","box-shadow":"0 0 3px red"});
$('input[type="password"]').css({"border":"2px solid #00F5FF","box-shadow":"0 0 5px #00F5FF"});
alert(data);
}else if(data=='Email or Password is wrong...!!!!'){
$('input[type="text"],input[type="password"]').css({"border":"2px solid red","box-shadow":"0 0 3px red"});
alert(data);
} else if(data=='Successfully Logged in...'){
$("form")[0].reset();
$('input[type="text"],input[type="password"]').css({"border":"2px solid #00F5FF","box-shadow":"0 0 5px #00F5FF"});
alert(data);
} else{
alert(data);
}
});
}
});
});
PHP Script: login.php
Below script executes for matching email and password in database.
<?php
$connection = mysql_connect("localhost", "root", ""); // Establishing connection with server..
$db = mysql_select_db("college", $connection); // Selecting Database.
$email=$_POST['email1']; // Fetching Values from URL.
$password= sha1($_POST['password1']); // Password Encryption, If you like you can also leave sha1.
// check if e-mail address syntax is valid or not
$email = filter_var($email, FILTER_SANITIZE_EMAIL); // sanitizing email(Remove unexpected symbol like <,>,?,#,!, etc.)
if (!filter_var($email, FILTER_VALIDATE_EMAIL)){
echo "Invalid Email.......";
}else{
// Matching user input email and password with stored email and password in database.
$result = mysql_query("SELECT * FROM registration WHERE email='$email' AND password='$password'");
$data = mysql_num_rows($result);
if($data==1){
echo "Successfully Logged in...";
}else{
echo "Email or Password is wrong...!!!!";
}
}
mysql_close ($connection); // Connection Closed.
?>
CSS File: style.css
Styling HTML Elements.
/* Below line is used for online Google font */
@import url(http://fonts.googleapis.com/css?family=Droid+Serif);
h2{
text-align: center;
font-size: 24px;
}
hr{
margin-bottom: 30px;
}
div.container{
width: 960px;
height: 610px;
margin:50px auto;
font-family: 'Droid Serif', serif;
position:relative;
}
div.main{
width: 320px;
margin-top: 80px;
float:left;
padding: 10px 55px 40px;
background-color: rgba(187, 255, 184, 0.65);
border: 15px solid white;
box-shadow: 0 0 10px;
border-radius: 2px;
font-size: 13px;
}
input[type=text],[type=password] {
width: 97.7%;
height: 34px;
padding-left: 5px;
margin-bottom: 20px;
margin-top: 8px;
box-shadow: 0 0 5px #00F5FF;
border: 2px solid #00F5FF;
color: #4f4f4f;
font-size: 16px;
}
label{
color: #464646;
text-shadow: 0 1px 0 #fff;
font-size: 14px;
font-weight: bold;
}
#login {
width: 100%;
background: linear-gradient(#22abe9 5%, #36caf0 100%);
border: 1px solid #0F799E;
font-size: 20px;
margin-top: 15px;
padding: 8px;
font-weight: bold;
cursor: pointer;
color: white;
text-shadow: 0px 1px 0px #13506D;
}
#login:hover{
background: linear-gradient(#36caf0 5%, #22abe9 100%);
}
Conclusion:
This was all about creating simple login form with validation and database connectivity. Hope you have liked it, keep reading our other blogs for getting attached with more coding tricks.
Create Simple Registration Form Using jQuery
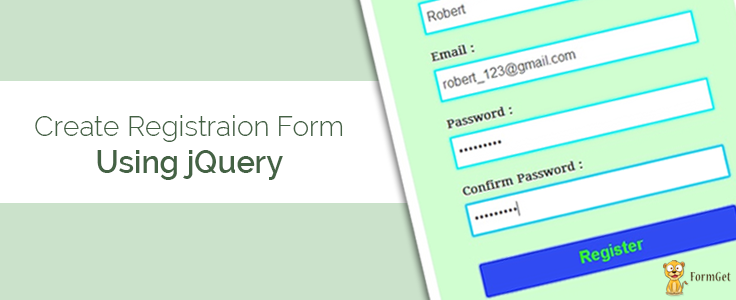
Here in this tutorial, we make you learn how to create simple registration form with proper validation using jQuery and database connectivity using PHP.
We have created a simple HTML form with four fields- Name, Email, Password., and Confirm Password. There is a jQuery function for complete validation and user data get inserted through PHP script.
Before inserting into database, sanitization and validation on email is done using PHP. Also, user input email get checked into database for it’s existence, if it exist then, user must enter another email.
You can download our zip file or simply follow our code and edit it to use.
-:See Also:-

HTML File: registration.html
Given below our complete HTML code , copy to use it.
<!DOCTYPE html>
<html>
<head>
<title>Registration Form Using jQuery - Demo Preview</title>
<meta name="robots" content="noindex, nofollow">
<!-- Include CSS File Here -->
<link rel="stylesheet" href="css/style.css"/>
<!-- Include JS File Here -->
<script src="http://ajax.googleapis.com/ajax/libs/jquery/1.11.1/jquery.min.js"></script>
<script type="text/javascript" src="js/registration.js"></script>
</head>
<body>
<div class="container">
<div class="main">
<form class="form" method="post" action="#">
<h2>Create Registration Form Using jQuery</h2>
<label>Name :</label>
<input type="text" name="dname" id="name">
<label>Email :</label>
<input type="text" name="demail" id="email">
<label>Password :</label>
<input type="password" name="password" id="password">
<label>Confirm Password :</label>
<input type="password" name="cpassword" id="cpassword">
<input type="button" name="register" id="register" value="Register">
</form>
</div>
</body>
</html>
jQuery File: registration.js
Given below our complete jQuery code.
$(document).ready(function() {
$("#register").click(function() {
var name = $("#name").val();
var email = $("#email").val();
var password = $("#password").val();
var cpassword = $("#cpassword").val();
if (name == '' || email == '' || password == '' || cpassword == '') {
alert("Please fill all fields...!!!!!!");
} else if ((password.length) < 8) {
alert("Password should atleast 8 character in length...!!!!!!");
} else if (!(password).match(cpassword)) {
alert("Your passwords don't match. Try again?");
} else {
$.post("register.php", {
name1: name,
email1: email,
password1: password
}, function(data) {
if (data == 'You have Successfully Registered.....') {
$("form")[0].reset();
}
alert(data);
});
}
});
});
PHP Script: register.php
Below script executes for inserting data into database.
<?php
$connection = mysql_connect("localhost", "root", ""); // Establishing connection with server..
$db = mysql_select_db("college", $connection); // Selecting Database.
$name=$_POST['name1']; // Fetching Values from URL.
$email=$_POST['email1'];
$password= sha1($_POST['password1']); // Password Encryption, If you like you can also leave sha1.
// Check if e-mail address syntax is valid or not
$email = filter_var($email, FILTER_SANITIZE_EMAIL); // Sanitizing email(Remove unexpected symbol like <,>,?,#,!, etc.)
if (!filter_var($email, FILTER_VALIDATE_EMAIL)){
echo "Invalid Email.......";
}else{
$result = mysql_query("SELECT * FROM registration WHERE email='$email'");
$data = mysql_num_rows($result);
if(($data)==0){
$query = mysql_query("insert into registration(name, email, password) values ('$name', '$email', '$password')"); // Insert query
if($query){
echo "You have Successfully Registered.....";
}else
{
echo "Error....!!";
}
}else{
echo "This email is already registered, Please try another email...";
}
}
mysql_close ($connection);
?>
My SQL Code Segment:
To create database and table, execute following codes in your My SQL .
CREATE DATABASE college;
CREATE TABLE registration(
id int(10) NOT NULL AUTO_INCREMENT,
name varchar(255) NOT NULL,
email varchar(255) NOT NULL,
password varchar(255) NOT NULL,
PRIMARY KEY (id)
)
CSS File: style.css
Styling HTML Elements.
/* Below line is used for online Google font */
@import url(http://fonts.googleapis.com/css?family=Droid+Serif);
h2{
text-align: center;
font-size: 24px;
}
hr{
margin-bottom: 30px;
}
div.container{
width: 960px;
height: 610px;
margin:50px auto;
font-family: 'Droid Serif', serif;
position:relative;
}
div.main{
width: 320px;
float:left;
padding: 10px 55px 40px;
background-color: rgba(187, 255, 184, 0.65);
border: 15px solid white;
box-shadow: 0 0 10px;
border-radius: 2px;
font-size: 13px;
}
input[type=text],[type=password] {
width: 97.7%;
height: 34px;
padding-left: 5px;
margin-bottom: 20px;
margin-top: 8px;
box-shadow: 0 0 5px #00F5FF;
border: 2px solid #00F5FF;
color: #4f4f4f;
font-size: 16px;
}
label{
color: #464646;
text-shadow: 0 1px 0 #fff;
font-size: 14px;
font-weight: bold;
}
#register {
font-size: 20px;
margin-top: 15px;
background: linear-gradient(#22abe9 5%, #36caf0 100%);
border: 1px solid #0F799E;
padding: 7px 35px;
color: white;
text-shadow: 0px 1px 0px #13506D;
font-weight: bold;
border-radius: 2px;
cursor: pointer;
width: 100%;
}
#register:hover{
background: linear-gradient(#36caf0 5%, #22abe9 100%);
}
Conclusion:
This was all about to create simple registration form with validation and database connectitvity. Hope you like it, Keep reading our other blogs.
You may also like –
Simple jQuery Contact Form with Validation
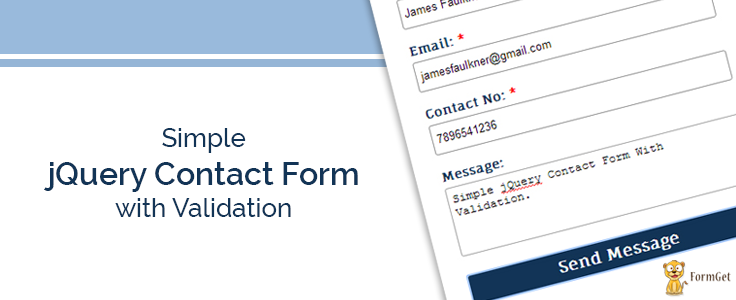
Contact form comes on first priority for any organisation as this may led to establish one to one communication with their customers.
Here in this tutorial, we make you learn how to create simple contact form and applying validation over it using jQuery and PHP.
We have created a simple HTML form with four fields- Name, Email, Contact No., and Message.
we used following PHP mail() function with four parameters to send email as follows:
mail("$to", $subject, $message, $headers);- Here, $to variable is to store reciever’s email id.
- $subject is a variable to store mail subject.
- $message is a variable to store user’s message.
- $headers contains other email parameters like BCc, Cc etc.
You can download our zip file or simply follow our code and edit it to use.
-:See Also:-

HTML File: contact_form.html
Given below our complete HTML code , copy to use it.
<html>
<head>
<title>Simple jQuery Contact Form With Validation</title>
<script src="http://ajax.googleapis.com/ajax/libs/jquery/1.11.0/jquery.min.js"></script>
<link rel="stylesheet" href="css/contact_form.css" />
<script src="contact_form.js"></script>
</head>
<body>
<div id="mainform">
<h2>Simple jQuery Contact Form With Validation</h2>
<!-- Required Div Starts Here -->
<form id="form">
<h3>Contact Form</h3>
<p id="returnmessage"></p>
<label>Name: <span>*</span></label>
<input type="text" id="name" placeholder="Name"/>
<label>Email: <span>*</span></label>
<input type="text" id="email" placeholder="Email"/>
<label>Contact No: <span>*</span></label>
<input type="text" id="contact" placeholder="10 digit Mobile no."/>
<label>Message:</label>
<textarea id="message" placeholder="Message......."></textarea>
<input type="button" id="submit" value="Send Message"/>
</form>
</div>
</body>
</html>
jQuery File: contact_form.js
Given below our complete jQuery code.
$(document).ready(function() {
$("#submit").click(function() {
var name = $("#name").val();
var email = $("#email").val();
var message = $("#message").val();
var contact = $("#contact").val();
$("#returnmessage").empty(); // To empty previous error/success message.
// Checking for blank fields.
if (name == '' || email == '' || contact == '') {
alert("Please Fill Required Fields");
} else {
// Returns successful data submission message when the entered information is stored in database.
$.post("contact_form.php", {
name1: name,
email1: email,
message1: message,
contact1: contact
}, function(data) {
$("#returnmessage").append(data); // Append returned message to message paragraph.
if (data == "Your Query has been received, We will contact you soon.") {
$("#form")[0].reset(); // To reset form fields on success.
}
});
}
});
});
PHP Script: contact_form.php
Below script executes for Validating and to send Email.
<?php
// Fetching Values from URL.
$name = $_POST['name1'];
$email = $_POST['email1'];
$message = $_POST['message1'];
$contact = $_POST['contact1'];
$email = filter_var($email, FILTER_SANITIZE_EMAIL); // Sanitizing E-mail.
// After sanitization Validation is performed
if (filter_var($email, FILTER_VALIDATE_EMAIL)) {
if (!preg_match("/^[0-9]{10}$/", $contact)) {
echo "<span>* Please Fill Valid Contact No. *</span>";
} else {
$subject = $name;
// To send HTML mail, the Content-type header must be set.
$headers = 'MIME-Version: 1.0' . "rn";
$headers .= 'Content-type: text/html; charset=iso-8859-1' . "rn";
$headers .= 'From:' . $email. "rn"; // Sender's Email
$headers .= 'Cc:' . $email. "rn"; // Carbon copy to Sender
$template = '<div style="padding:50px; color:white;">Hello ' . $name . ',<br/>'
. '<br/>Thank you...! For Contacting Us.<br/><br/>'
. 'Name:' . $name . '<br/>'
. 'Email:' . $email . '<br/>'
. 'Contact No:' . $contact . '<br/>'
. 'Message:' . $message . '<br/><br/>'
. 'This is a Contact Confirmation mail.'
. '<br/>'
. 'We Will contact You as soon as possible .</div>';
$sendmessage = "<div style="background-color:#7E7E7E; color:white;">" . $template . "</div>";
// Message lines should not exceed 70 characters (PHP rule), so wrap it.
$sendmessage = wordwrap($sendmessage, 70);
// Send mail by PHP Mail Function.
mail("[email protected]", $subject, $sendmessage, $headers);
echo "Your Query has been received, We will contact you soon.";
}
} else {
echo "<span>* invalid email *</span>";
}
?>
CSS File: contact_form.css
Styling HTML Elements.
@import url(http://fonts.googleapis.com/css?family=Fauna+One|Muli);
#mainform{
width:960px;
margin:20px auto;
padding-top:20px;
font-family: 'Fauna One', serif;
}
#form{
border-radius:2px;
padding:20px 30px;
box-shadow:0 0 15px;
font-size:14px;
font-weight:bold;
width:350px;
margin:20px 250px 0 35px;
float:left;

}
h3{
text-align:center;
font-size:20px;
}
input{
width:100%;
height:35px;
margin-top:5px;
border:1px solid #999;
border-radius:3px;
padding:5px;
}
input[type=button]{
background-color:#123456;
border:1px solid white;
font-family: 'Fauna One', serif;
font-Weight:bold;
font-size:18px;
color:white;
}
textarea{
width:100%;
height:80px;
margin-top:5px;
border-radius:3px;
padding:5px;
resize:none;
}
span{
color:red
}
#note{
color:black;
font-Weight:400;
}
#returnmessage{
font-size:14px;
color:green;
text-align:center;
}
Conclusion:
This was all about to create simple contact form with validation. Hope you like it, Keep reading our other blogs.
jQuery Select Change Event, Get Selected Option

If you have two select fields and want to load options in second one, based on selected option from first one then, below example will help you lot to understand how it can be done.
Here in this example, when a user selects country in first select field, jQuery on change event is called upon to list out it’s relevant cities in second select field simultaneously.
Given below jQuery select change function’s syntax:
$("select").change(function(){
// Do something here.
}
we used arrays to store city names for different countries and created a function city(arr) which populates options (city names relevant to selected country) for second select tag as shown below:
//Function To List out Cities in Second Select tags
function city(arr){
$("#city").empty();//To reset cities
$("#city").append("<option>--Select--</option>");
$(arr).each(function(i){//to list cities
$("#city").append("<option value=""+arr[i].value+"">"+arr[i].display+"</option>")
});
}
Watch our live demo or download code to use it.

To learn more, our Complete HTML and jQuery Code is given below:
HTML File: select_jquery.html
Given below our complete HTML code , copy to use it.
<!DOCTYPE html>
<html>
<head>
<title>jQuery Select Change Event For Dependent Select Option Field - Demo Preview</title>
<meta name="robots" content="noindex, nofollow">
<!-- Include CSS File Here -->
<link rel="stylesheet" href="select_jquery.css"/>
<!-- Include JS File Here -->
<script src="http://ajax.googleapis.com/ajax/libs/jquery/1.11.1/jquery.min.js"></script>
<script type="text/javascript" src="select_jquery.js"></script>
</head>
<body>
<div class="container">
<div class="main">
<h2>Dependent Select Option Field Example</h2>
<label>Select Country:</label>
<div id="prm">
<select id="country">
<option>--Select--</option>
<option>USA</option>
<option>AUSTRALIA</option>
<option>FRANCE</option>
</select>
<label>Select City:</label>
<select id="city">
<!-- Dependent Select option field -->
</select>
</div>
</div>
</div>
</body>
</html>
jQuery File: select_jquery.js
Given below our complete jQuery code for initializing second select tag options.
$(document).ready(function() {
// Initializing arrays with city names.
var USA = [{
display: "Washington, D.C.",value: "WashingtonDC"},
{display: "Alaska", value: "Alaska"},
{display: "New York",value: "New-York"},
{display: "Florida",value: "Florida"},
{display: "Hawaii",value: "Hawaii"},
{display: "California",value: "California"}];
var AUSTRALIA = [{
display: "Canberra",value: "Canberra"},
{display: "Sydney",value: "Sydney"},
{display: "Melbourne",value: "Melbourne"},
{display: "Perth",value: "Perth"},
{display: "Gold Coast ",value: "Gold-Coast"}];
var FRANCE = [{
display: "Paris",value: "Paris"},
{display: "Avignon",value: "Avignon"},
{ display: "Strasbourg",value: "Strasbourg"},
{display: "Nice", value: "Nice"}];
// Function executes on change of first select option field.
$("#country").change(function() {
var select = $("#country option:selected").val();
switch (select) {
case "USA":
city(USA);
break;
case "AUSTRALIA":
city(AUSTRALIA);
break;
case "FRANCE":
city(FRANCE);
break;
default:
$("#city").empty();
$("#city").append("<option>--Select--</option>");
break;
}
});
// Function To List out Cities in Second Select tags
function city(arr) {
$("#city").empty(); //To reset cities
$("#city").append("<option>--Select--</option>");
$(arr).each(function(i) { //to list cities
$("#city").append("<option value="" + arr[i].value + "">" + arr[i].display + "</option>")
});
}
});
CSS File: select_jquery.css
Styling HTML Elements.
/* Below line is used for online Google font */
@import url(http://fonts.googleapis.com/css?family=Droid+Serif);
h2{
text-align: center;
}
div.container{
width: 960px;
height: 610px;
margin:50px auto;
font-family: 'Droid Serif', serif;
position:relative;
}
div.main{
width: 320px;
float:left;
padding: 10px 60px 40px;
box-shadow: 0 0 10px;
border-radius: 2px;
font-size: 13px;
margin-top: 70px;
}
label{
color: #464646;
text-shadow: 0 1px 0 #fff;
font-size: 14px;
font-weight: bold;
}
select#country,#city{
width:100%;
height:30px;
font-size:16px;
font-family:cursive;
}
select#USA,
select#AUSTRALIA,
select#FRANCE{
display:none;
width:100%;
height:30px;
font-size:16px;
font-family:cursive;
}
Conclusion:
This was all about to use select change event for populating list in second select tag. Hope you like it, Keep reading our other blogs.
jQuery : Select option Tag Common Operations
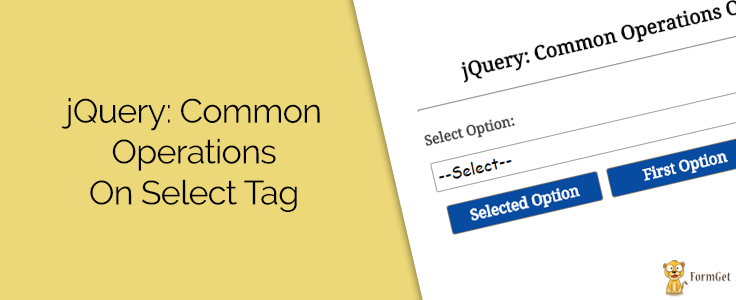
HTML select option field is a drop down list of options, user may be allowed to choose one or more option(s) from this list.
To get selected option value , we can implement some jQuery codes on select option field. We will also see various operations that can be performed over it with the below given examples.
- To get value of first option.
// Function to get first option.
$('#first_value').click(function() {
$("select").prop('selectedIndex', 1);
});
- To get value of selected option.
// Function to get selected value
$('#selected_value').click(function() {
var value = $("#select_option option:selected").val();
//To display the selected value we used <p id="result"> tag in HTML file
$('#result').append(value);
});
- To reset/clear selection of the field.
// Function to reset or clear selection
$('#reset').click(function() {
$('#select_option').val($("#select_option option[selected]").val());
});
});
In our example, we have created an HTML select option field and applied jQuery functions over it by clicking on three buttons.
Just watch our live demo or go through our codes and download it to use.

For more understanding, our complete HTML and jQuery code is given below:
HTML File: select_operation.html
Given below our complete HTML code , copy to use it.
<!DOCTYPE html>
<html>
<head>
<title>jQuery: Common Operations On Select Tag - Demo Preview</title>
<meta name="robots" content="noindex, nofollow">
<!-- Include CSS File Here-->
<link rel="stylesheet" href="select_operation.css"/>
<!-- Include JS File Here-->
<script src="http://ajax.googleapis.com/ajax/libs/jquery/1.11.1/jquery.min.js"></script>
<script type="text/javascript" src="select_operation.js"></script>
</head>
<body>
<div class="container">
<div class="main">
<h2>jQuery: Common Operations On Select Tag</h2>
<form action="">
<label>Select Option:</label>
<select id="select_option">
<option value="None" selected="selected">--Select--</option>
<option value="PHP">PHP</option>
<option value="jQuery">jQuery</option>
<option value="Javascript">Javascript</option>
<option value="HTML">HTML</option>
<option value="CSS">CSS</option>
</select>
<input type="button" id="selected_value" value="Selected Option"/>
<input type="button" id="first_value" value="First Option"/>
<input type="button" id="reset" value="Clear Selection"/>
</form>
<p id="result"></p>
</div>
</div>
</body>
</html>
jQuery File: select_operation.js
Given below our complete jQuery code for performing common operations.
$(document).ready(function() {
// Function to get selected value.
$('#selected_value').click(function() {
$('#result').empty();
var value = $("#select_option option:selected").val();
$('#result').append(value);
});
// Function to get first option.
$('#first_value').click(function() {
$('#result').empty();
$("select").prop('selectedIndex', 1);
});
// Function to reset or clear selection.
$('#reset').click(function() {
$('#result').empty();
$('#select_option').val($("#select_option option[selected]").val());
});
});
CSS File: select_operation.css
Styling HTML Elements.
/* Below line is used for online Google font */
@import url(http://fonts.googleapis.com/css?family=Droid+Serif);
div.container{
width: 960px;
height: 610px;
margin:50px auto;
font-family: 'Droid Serif', serif;
}
div.main{
width: 500px;
float:left;
padding: 30px 40px;
box-shadow: 0 0 10px;
border-radius: 2px;
font-size: 13px;
text-shadow: 0 1px 0 #fff;
margin-top:100px;
}
h2{
text-align:center;
}
input[type=text]{
width: 97.7%;
height: 25px;
padding-left: 5px;
margin-bottom: 10px;
margin-top: 5px;
box-shadow: 0 0 5px;
border: 1px solid #b7b7b7;
color: #4f4f4f;
font-size: 16px;
}
p{
font-size:16px;
color:#084CA1;
}
label{
color: #464646;
font-size: 14px;
font-weight: bold;
}
input[type=button]{
font-size: 15px;
border: 1px solid gray;
padding: 5px;
background-color: #084CA1;
font-weight:bold;
border-radius: 2px;
cursor: pointer;
width:31%;
color:white;
border-radius:3px;
margin-left:6px;
font-family: 'Droid Serif', serif;
}
select{
width:100%;
height:30px;
font-size:16px;
font-family:cursive;
}
Conclusion:
This was all about some basic operations performed on select tag using jQuery. Hope you might have liked it, keep reading our other blog posts for catching up more coding tricks.
For more information have a look on below-mentioned blogs –
jQuery Datepicker Example

While creating form , we mostly require date field and if it is dynamic it gets more easy to select date. By using jQuery date format in forms, we will be able to change the format of the date by selecting any one from the given formats.
This blog posts will show you how to add date picker along with multiple formats. All this can be possible just by including jQuery UI to your HTML form as follows:
<!------------ Including  jQuery Date UI with CSS -------------->
<script src="http://code.jquery.com/jquery-1.10.2.js"></script>
<script src="http://code.jquery.com/ui/1.11.0/jquery-ui.js">
</script>
In our example, when user focus on input field by clicking on it or using tab key, below jQuery code popups calender for choosing date, another field in our form allows user to select desired date format.
$(function(){
$( "#datepicker" ).datepicker();
//Pass the user selected date format
$( "#format" ).change(function() {
$( "#datepicker" ).datepicker( "option", "dateFormat", $(this).val() );
});
});
Just watch our live demo or go through our codes and download it to use to make it work.

For more learning, our complete HTML and jQuery code is given below:
HTML File: cal.html
Given below our HTML codes to create simple form with Date input and select format fields.
<!doctype html>
<html>
<head>
<title>jQuery Datepicker UI Example - Demo Preview</title>
<meta name="robots" content="noindex, nofollow"/>
<!------------ Including jQuery Date UI with CSS -------------->
<script src="http://code.jquery.com/jquery-1.10.2.js"></script>
<script src="http://code.jquery.com/ui/1.11.0/jquery-ui.js"></script>
<link rel="stylesheet" href="http://code.jquery.com/ui/1.11.0/themes/smoothness/jquery-ui.css">
<!-- jQuery Code executes on Date Format option ----->
<script src="js/script.js"></script>
<link rel="stylesheet" href="css/style.css">
</head>
<body>
<div class="container">
<h2>jQuery Datepicker UI Example Form</h2>
<div class="main">
<form action="" method="post">
<label>Name :</label>
<input type="text" name="sname" id="Name"/>
<label>Date Of Birth :</label>
<input type="text" name="selected_date" id="datepicker"/>
<label>Select Date Format :</label>
<select id="format">
<option value="mm/dd/yy">Default - mm/dd/yyyy</option>
<option value="dd/mm/yy">dd/mm/yyyy</option>
<option value="yy-mm-dd">ISO 8601 - yyyy-mm-dd</option>
<option value="d M, y">Short - d M, y</option>
<option value="d MM, y">Medium - d MM, y</option>
<option value="DD, d MM, yy">Full - DD, d MM, yyyy</option>
<option value="'day' d 'of' MM 'in the year' yy">With text - 'day' d 'of' MM 'in the year' yyyy</option>
</select>
<input type="submit" id="submit" value="Submit">
</form>
</div>
</div>
</body>
</html>jQuery File: script.js
This file contains jQuery functions to popup calender on focus of date input field.
$(document).ready(function() {
// Datepicker Popups calender to Choose date.
$(function() {
$("#datepicker").datepicker();
// Pass the user selected date format.
$("#format").change(function() {
$("#datepicker").datepicker("option", "dateFormat", $(this).val());
});
});
});
CSS file: style.css
Styling HTML elements.
/* Below line is used for online Google font */
@import url(http://fonts.googleapis.com/css?family=Droid+Serif);
select{
width::80%;
border:3px solid rgb(200, 200, 207);
height:42px;
padding:5px;
border-radius:3px;
margin:5px 10px 20px 35px;
}
input[type=text]{
width:76%;
border:3px solid rgb(200, 200, 207);
height:23px;
padding:5px;
border-radius:3px;
margin:5px 10px 20px 35px;
}
input[type=submit]{
width:80%;
border:3px solid rgb(200, 200, 207);
height:42px;
padding:5px;
border-radius:3px;
margin:10px 10px 20px 35px;
border:1px solid green;
}
label{
margin-left:35px;
font-family: 'Droid Serif', serif;
}
.container{
width:960px;
margin:50px auto;
}
.main{
float:left;
width:355px;
height:350px;
box-shadow:1px 1px 12px gray;
padding-top:30px;
}
h2{
width:370px;
text-align:center;
font-family: 'Droid Serif', serif;
}
Conclusion: Through above example it becomes easy to add date input in forms. Hope you like it, Keep reading our other blogs.
Enable/Disable Radio Button Using jQuery
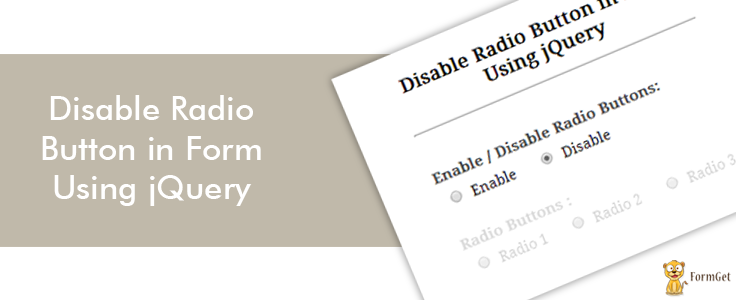
While creating a form many times we require an option to enable or disable some information based on user point of view, whether it is through checkbox or radio button.
Here, in this example, we have created simple HTML form with some radio buttons and by using jQuery on change() event , we will show, how enable and disable function works . Also, in place of “input[type=radio]” we used “.second” (Class of a group of radio buttons) to enable/disable a group of radio buttons.
To Disable a radio option :
$("input[type=radio]").attr('disabled', true);
To Enable a radio option :
$("input[type=radio]").attr('disabled', false);
Watch our live demo, follow our codes or download it to use.

HTML File: disable_radio.html
Given below our HTML codes to create simple form with radio buttons.
<!DOCTYPE html>
<html>
<head>
<title>Disable Radio Button in Form Using jQuery</title>
<!-- Include CSS File Here -->
<link rel="stylesheet" href="css/style.css"/>
<!-- Include JS File Here -->
<script src="http://ajax.googleapis.com/ajax/libs/jquery/1.11.1/jquery.min.js"></script>
<script type="text/javascript" src="js/disable_radio.js"></script>
</head>
<body>
<div class="container">
<div class="main">
<h2>Disable Radio Button in Form Using jQuery</h2>
<form action="#" method="post" id="form">
<label>Enable / Disable Radio Buttons: </label>
<input type="radio" name="first" value="Enable" id="enable">
<span>Enable</span>
<input type="radio" name="first" value="Disable" id="disable" checked>
<span>Disable</span>
<label>Radio Buttons :</label>
<input type="radio" name="second" class="second" value="Radio 1">
<span class="wrap">Radio 1</span>
<input type="radio" name="second" class="second" value="Radio 2">
<span class="wrap">Radio 2</span>
<input type="radio" name="second" class="second" value="Radio 3">
<span class="wrap">Radio 3</span>
</form>
</div>
</div>
</body>
</html>
jQuery File: disable_radio.js
This file contains jQuery functions to Enable/Disable radio buttons.
$(document).ready(function() {
// By Default Disable radio button
$(".second").attr('disabled', true);
$(".wrap").css('opacity', '.2'); // This line is used to lightly hide label for disable radio buttons.
// Disable radio buttons function on Check Disable radio button.
$("form input:radio").change(function() {
if ($(this).val() == "Disable") {
$(".second").attr('checked', false);
$(".second").attr('disabled', true);
$(".wrap").css('opacity', '.2');
}
// Else Enable radio buttons.
else {
$(".second").attr('disabled', false);
$(".wrap").css('opacity', '1');
}
});
});
CSS file: style.css
Styling HTML elements.
/* Below line is used for online Google font */
@import url(http://fonts.googleapis.com/css?family=Droid+Serif);
h2{
text-align: center;
}
hr{
margin-bottom: 25px;
}
div.container{
width: 643px;
margin:50px auto;
font-family: 'Droid Serif', serif;
position:relative;
}
div.main{
width: 320px;
padding: 10px 60px 15px;
box-shadow: 0 0 10px;
border-radius: 2px;
font-size: 13px;
margin: 0 auto 50px;
}
span{
margin-right: 17px;
font-size: 15px;
}
input[type=radio]{
margin:10px 10px 0 10px;
}
label{
color: #464646;
font-size: 15px;
font-weight: bold;
}
Conclusion:
We explained about enabling and disabling feature with radio button using jQuery. Hope you like it, Keep reading our other blogs.
jQuery Add Option to Select Tag in Form
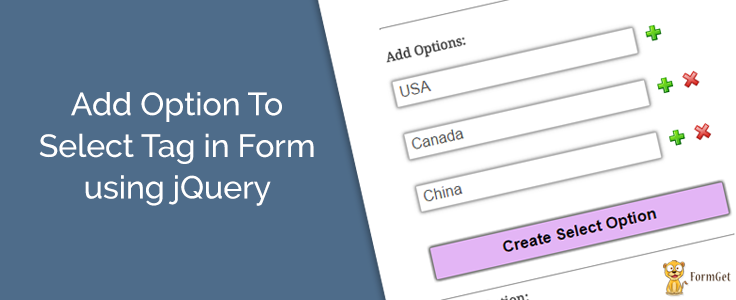
This blog post demonstrates you to create and manipulate dynamically select option field in form using jQuery.
In our tutorial we have created simple HTML form to add user inputs in select option field by clicking on create select option button.
moreover, user can add or remove more options into select field.
Watch our live demo and Just follow our codes or download it to use.

HTML file: select_jquery.html
Given below our HTML codes to create simple form.
<!DOCTYPE html>
<html>
<head>
<title>Add Option To Select Tag in Form using jQuery - Demo Preview</title>
<meta name="robots" content="noindex, nofollow">
<!-- Include CSS File Here -->
<link rel="stylesheet" href="select_jquery.css"/>
<!-- Include JS File Here -->
<script src="http://ajax.googleapis.com/ajax/libs/jquery/1.11.1/jquery.min.js"></script>
<script type="text/javascript" src="select_jquery.js"></script>
</head>
<body>
<div class="container">
<div class="main">
<h2>Add Option To Select Tag in Form using jQuery</h2>
<form action="">
<div class="hide">
<label>Add Options:</label>
<p><input type="text" id="option1" placeholder="option1"/><img class="add" src="images/add.png"/></p>
<div class="more"></div>
<input type="button" id="button" value="Create Select Option"/>
</div>
<label>Select Option:</label>
<div id="prm">
<!-- Here Select Option Field will be Created -->
</div>
</form>
</div>
</div>
</body>
</html>
jQuery File: select_jquery.js
This file contains jQuery code to meet above requirements.
$(document).ready(function() {
// Function To Add or Remove New Option Field in Form.
var i = 2;
$(".add").on("click", function add_new() {
$(".more").append($("<p/>").append("<input type='text' id='option" + i + "' placeholder='option" + i + "'/>", $("<img/>", {
class: 'add',
src: 'images/add.png'
}).click(function() {
add_new();
}), $("<img/>", {
class: 'del',
src: 'images/del.png'
}).click(function() {
$(this).parent().remove();
})))
i = i + 1;
});
// Below function executes on click of create select button.
$("#button").on("click", function() {
// To Clear Previous Select Option Field if Exists in Div.
$("#prm").empty();
// Creating Select Option in Div.
$("#prm").append("<select></select>");
// Creating Options and Adding it To Above Select Tag.
$("input[type=text]").each(function() {
if ($(this).val() == "") {
alert($(this).attr('id') + " is Empty !");
} else {
$("select").append('<option>' + $(this).val() + '</option>');
}
});
});
});
CSS file: select_jquery.css
Styling HTML elements.
/* Below line is used for online Google font */
@import url(http://fonts.googleapis.com/css?family=Droid+Serif);
h2{
text-align: center;
}
div.container{
width: 960px;
height: 610px;
margin:50px auto;
font-family: 'Droid Serif', serif;
position:relative;
}
div.main{
width: 320px;
float:left;
padding: 10px 60px 40px;
box-shadow: 0 0 10px;
border-radius: 2px;
font-size: 13px;
margin-top: 70px;
}
input[type=text]{
width: 80%;
height: 25px;
padding-left: 5px;
margin-bottom: 10px;
margin-top: 5px;
box-shadow: 0 0 5px;
border: 1px solid #b7b7b7;
color: #4f4f4f;
font-size: 16px;
}
span{
color:red;
}
label{
color: #464646;
text-shadow: 0 1px 0 #fff;
font-size: 14px;
font-weight: bold;
}
#button {
font-size: 17px;
border: 1px solid gray;
padding: 7px 35px;
background-color: #E3B5F5;
font-weight:bold;
box-shadow: 0 0 5px;
border-radius: 2px;
cursor: pointer;
width:100%;
}
select{
width:100%;
height:30px;
font-size:16px;
font-family:cursive;
}
.add, .del{
margin-left: 12px;
}
Conclusion:
In above example we have explained how to create and manipulate select option field in form using jQuery. Hope you like it, Keep reading our blogs.
Check out some more related blogs here –
- Email Validation Using jQuery Codes
jQuery Reset Form Fields

A quick reset of the form fields is possible with this jQuery reset function.
$(selector)[0].reset();In our previous blog, we explained you how to reset form fields using javascript. Now in this blog, we will explain you to do the same using single line jQuery Code.
Sometimes it becomes very important to reset your form fields, here we have explained how it can be done in simple way. We have to catch form by it’s Id and apply a jQuery reset() function on it.
Just click on live demo to see how form functionality works, follow the codes given below or download it to use.

HTML file: resetjquery.html
Given below our HTML codes to create simple form.
<!DOCTYPE html>
<html>
<head>
<title>Reset Form Using jQuery - Demo Preview</title>
<meta name="robots" content="noindex, nofollow">
<!-- Include CSS File Here -->
<link rel="stylesheet" href="css/style.css"/>
<!-- Include JavaScript File Here -->
<script src="http://ajax.googleapis.com/ajax/libs/jquery/1.11.1/jquery.min.js"></script>
<script type="text/javascript" src="js/reset.js"></script>
</head>
<body>
<div class="container">
<div class="main">
<h1>Reset Form Using jQuery</h1>
<form action="#" method="post" id="form">
<label>Name :</label>
<input type="text" name="name" />
<label>Email :</label>
<input type="text" name="email" />
<label>Gender :</label>
<input type="radio" name="sex" value="male">Male
<input type="radio" name="sex" value="female">Female
<label>Message :</label>
<textarea name="textarea" ></textarea>
<label>Language Known :</label>
<input type="checkbox" name="vehicle" value="Bike">English
<input type="checkbox" name="vehicle" value="Car">French
<input type="button" id="btn" value="Reset" />
</form>
</div>
</div>
</body>
</html>
jQuery File: reset.js
This file contains jQuery one line function to reset form fields.
$(document).ready(function(){
$("#btn").click(function(){
/* Single line Reset function executes on click of Reset Button */
$("#form")[0].reset();
});});
CSS file: style.css
Styling HTML elements.
/* Below line is used for online Google font */
@import url(http://fonts.googleapis.com/css?family=Droid+Serif);
h1{
text-align: center;
font-size: 25px;
}
div.container{
width: 960px;
height: 610px;
margin:50px auto;
font-family: 'Droid Serif', serif;
position:relative;
}
div.main{
width: 320px;
float:left;
padding: 10px 60px 40px;
background: ghostwhite;
border: 1px dotted #ccc;
box-shadow: 0 0 10px;
border-radius: 2px;
font-size: 13px;
}
input[type=text],textarea {
width: 97.7%;
height: 34px;
padding-left: 5px;
margin-bottom: 20px;
margin-top: 8px;
box-shadow: 0 0 5px;
border: 1px solid #b7b7b7;
color: #4f4f4f;
font-size: 16px;
}
textarea{
height: 60px;
resize: none;
}
input[type=radio],[type=checkbox]{
margin:10px 10px 0 10px;
}
label{
color: #464646;
text-shadow: 0 1px 0 #fff;
font-size: 14px;
font-weight: bold;
}
#btn{
font-size: 17px;
border: 1px solid gray;
padding: 7px 35px;
background-color: #E3B5F5;
font-weight:bold;
box-shadow: 0 0 5px;
border-radius: 2px;
cursor: pointer;
width:100%;
}
Conclusion:
Here you have seen one of the basic method of jQuery to reset form fields. Keep reading our blogs and also provide us your valuable feedback and suggestions in the below provided space.
CodeIgniter Form Submission Using jQuery

From our previous blogs, you have learnt much more about working with CodeIgniter framework.
Now, with this tutorial you can learn how to include external jQuery file in your codeIgniter framework for form submission.
First, jQuery file must be kept in a folder at CodeIgniter’s root directory.
Second, to link External jQuery file “submit.js” placed in above folder named “js” with form:
<!------- Including  jQuery library from Google------>
<script src="http://ajax.googleapis.com/ajax/libs/jquery/1.11.1/jquery.min.js"></script>
<!-------Including jQuery file in form------>
<script src="<?php echo base_url(). "js/submit.js" ?>"></script>
above jQuery file contains following code to submit form:
$("#form").submit();Watch our live demo or follow, our complete codes to learn more about this.
or
download the submit_ci_jquery.zip file from below link, extract files and include them in view, controller and model directory of your codeigniter framework as shown in the Read Me.txt file.

VIEW FILE: submit_view.php
copy the below code in your view.
<html>
<head>
<title>Submit CodeIgniter Form Using jQuery</title>
<link href='http://fonts.googleapis.com/css?family=Marcellus' rel='stylesheet' type='text/css'/>
<link rel="stylesheet" type="text/css" href="<?php echo base_url(). "css/submit.css" ?>">
<script src="http://ajax.googleapis.com/ajax/libs/jquery/1.11.1/jquery.min.js"></script>
<script src="<?php echo base_url(). "js/submit.js" ?>"></script>
</head>
<body>
<div id="container">
<?php echo form_open('submit_ctrl',array('id'=>'form')); ?>
<h1>Submit CodeIgniter Form Using jQuery</h1>
<?php echo form_label('Name :'); ?> <?php echo form_error('dname'); ?>
<?php echo form_input(array('id' => 'dname', 'name' => 'dname')); ?>
<?php echo form_label('Email :'); ?> <?php echo form_error('demail'); ?>
<?php echo form_input(array('id' => 'demail', 'name' => 'demail')); ?>
<?php echo form_label('Mobile No. :'); ?> <?php echo form_error('dmobile'); ?>
<?php echo form_input(array('id' => 'dmobile', 'name' => 'dmobile')); ?>
<?php echo form_label('Address :'); ?> <?php echo form_error('daddress'); ?>
<?php echo form_input(array('id' => 'daddress', 'name' => 'daddress')); ?>
<?php echo ('<p id="submit">Submit</p>'); ?>
<?php echo form_close(); ?>
</div>
</body>
</html>
CONTROLLER FILE: submit_ctrl.php
copy the below code in your controller.
<?php
class submit_ctrl extends CI_Controller {
function __construct() {
parent::__construct();
$this->load->model('submit_model');
}
function index(){
$this->load->library('form_validation'); // Including Validation Library.
$this->form_validation->set_error_delimiters('<div class="error">', '</div>'); // Displaying Errors in Div
$this->form_validation->set_rules('dname', 'Username', 'required|min_length[5]|max_length[15]'); // Validation for Name Field
$this->form_validation->set_rules('demail', 'Email', 'required|valid_email'); // Validation for E-mail field.
$this->form_validation->set_rules('dmobile', 'Contact No.', 'required|regex_match[/^[0-9]{10}$/]'); // Validation for Contact Field.
$this->form_validation->set_rules('daddress', 'Address', 'required|min_length[10]|max_length[50]'); // Validation for Address Field.
if ($this->form_validation->run() == FALSE) {
$this->load->view('submit_view');
}else {
// Initializing database table columns.
$data = array(
'Student_Name' => $this->input->post('dname'),
'Student_Email' => $this->input->post('demail'),
'Student_Mobile' => $this->input->post('dmobile'),
'Student_Address' => $this->input->post('daddress')
);
$this->submit_model->form_insert($data); // Calling Insert Model and its function.
echo "<script>alert('Form Submitted Successfully....!!!! ');</script>";
$this->load->view('submit_view'); // Reloading after submit.
}
}
}
?>
MODEL FILE: submit_model.php
Create new class in your model as shown below.
<?php
class submit_model extends CI_Model{
function __construct() {
parent::__construct();
}
function form_insert($data){
$this->db->insert('employee', $data);
}
}
?>
My SQL Code Segment:
To create database and table, execute following codes in your My SQL .
CREATE DATABASE company;
CREATE TABLE employee(
employee_id int(10) NOT NULL AUTO_INCREMENT,
employee_name varchar(255) NOT NULL,
employee_email varchar(255) NOT NULL,
employee_contact varchar(255) NOT NULL,
employee_address varchar(255) NOT NULL,
PRIMARY KEY (employee_id)
)
jQuery Script: submit.js
On click of submit button following jQuery code executes.
$(document).ready(function(){
$("#submit").click(function(){
$("#form").submit();  // jQuey's submit function applied on form.
});
});
CSS FILE: submit.css
Styling HTML Elements.
#container{
width:960px;
height:610px;
margin: 50px auto;
}
.error{
color: red;
font-size: 13px;
margin-bottom: -15px;
}
form{
width: 345px;
padding: 0px 50px 20px;
background-color: whitesmoke;
border: 1px solid #ccc;
box-shadow: 0 0 5px;
font-family: 'Marcellus', serif;
float:left;
margin-top: 15px;
}
h1{
text-align: center;
font-size: 28px;
}
hr{
border: 0;
border-bottom: 1.5px solid #ccc;
margin-top: -10px;
margin-bottom: 30px;
}
label{
font-size: 17px;
}
input{
width: 100%;
padding: 10px;
margin: 6px 0 20px;
border: none;
box-shadow: 0 0 5px;
}
#submit{
padding: 10px;
text-align: center;
box-shadow: 0 0 5px;
font-size: 18px;
background: linear-gradient(#22abe9 5%, #36caf0 100%);
border: 1px solid #0F799E;
color: #ffffff;
font-weight: bold;
cursor: pointer;
text-shadow: 0px 1px 0px #13506D;
}
#submit:hover{
background: linear-gradient(#36caf0 5%, #22abe9 100%);
}
Conclusion:
So, this was all about submitting codeigniter form through jQuery . keep following us to learn more.
Displaying Progress Bar On Form Submission Using jQuery

This tutorial demonstrate you to add progress bar functionality on form submission i.e. when you click the submit button it will show a loading image and until the post information won’t get submitted into database.
Here, we have created an HTML form with four fields and a submit button. User fills the form and as he/she clicks on submit button a progress bar will display for a moment.
In our example we send our form data to a PHP page where, we fetched values from url and insert them into a My-SQL database. Untill this PHP page returns some value back to HTML page, Progress bar is shown to user using jQuery.
Just follow our codes or download it to use.

HTML File: progress.html
Given below an html code to create simple form.
<!DOCTYPE html>
<html>
<head>
<title>Displaying Progress Bar on Form Submission</title>
<!-- Include Google font here -->
<link href='http://fonts.googleapis.com/css?family=Marcellus' rel='stylesheet' type='text/css'>
<!-- Include CSS file here -->
<link rel="stylesheet" type="text/css" href="css/processing.css">
<!-- Include jQuery file here -->
<script src="http://ajax.googleapis.com/ajax/libs/jquery/1.11.1/jquery.min.js"></script>
<script type="text/javascript" src="js/processing.js"></script>
</head>
<body>
<div id="container">
<form id="form" action="" method="post">
<h1>Displaying Progress Bar on Form Submission</h1>
<label>Student Name :</label>
<input type="text" name="dname" id="name"/>
<label>Student Email :</label>
<input type="text" name="demail" id="email"/>
<label>Student Mobile No. :</label>
<input type="text" name="dmobile" id="mobile"/>
<label>Student Address :</label><br />
<input type="text" name="daddress" id="address"/>
<img id="loading" src="images/3.gif" /> <!-- Loading Image -->
<input type="button" id="submit" name="submit" value="Submit" />
</form>
</div>
</body>
</html>
jQuery File: processing.js
This jquery code executes to transfer Form data to PHP page without page refreshing.
$(document).ready(function() {
$("#submit").click(function() {
// To Display progress bar
$("#loading").show();
var name = $("#name").val();
var email = $("#email").val();
var mobile = $("#mobile").val();
var address = $("#address").val();
// Transfering form information to different page without page refresh
$.post("processing.php", {
name: name,
email: email,
mobile: mobile,
address: address
}, function(status) {
$("#loading").hide(); // To Hide progress bar
alert(status);
});
});
});
PHP Script: processing.php
Below script executes on html form submission.
<?php
//Initializing connection variable with server_name, user_name, password.
$con = mysql_connect("localhost", "username", "password");
//Selecting Database
$db = mysql_select_db("database_name", $con);
//Fetching values from url and storing it in PHP variables.
$name=$_POST['name'];
$email=$_POST['email'];
$mobile=$_POST['mobile'];
$address=$_POST['address'];
if(($_POST['name']=='')
||($_POST['email']=='')
||($_POST['mobile']=='')
||($_POST['address']==''))
{
echo "Please fill all fields....." ;
} else{
// My-SQL query for inerting PHP variable values in table of selected database.
$query=mysql_query("insert into table_name (column1, column2, column3, column4) values ('$name','$email','$mobile','$address')");
if($query){
echo "Form Submitted Successfully....";
}else{
echo "Error...!!" ;
}
}
mysql_close($con); // Closing Connecion with server
?>
CSS File: processing.css
Styling, HTML elements.
#container{
width:960px;
height:610px;
margin:50px auto
}
#fugo{
float:right
}
form{
width:345px;
padding:0 50px 20px;
background:linear-gradient(#FFF,#CEBA53);
border:1px solid #ccc;
box-shadow:0 0 5px;
font-family:'Marcellus',serif;
float:left;
margin-top:10px
}
h1{
text-align:center;
text-shadow:1px 5px 22px gray
}
hr{
border:0;
border-bottom:1.5px solid #ccc;
margin-top:-10px;
margin-bottom:30px
}
label{
font-size:17px
}
#loading{
display:none;
margin-left:145px
}
input{
width:94%;
padding:10px;
margin:6px 0 20px;
border:none;
box-shadow:0 0 5px
}
input#submit{
width:100%;
margin-top:20px;
font-size:18px;
background:linear-gradient(#22abe9 5%,#36caf0 100%);
border:1px solid #0F799E;
color:#fff;
font-weight:700;
cursor:pointer;
text-shadow:0 1px 0 #13506D
}
input#submit:hover{
background:linear-gradient(#36caf0 5%,#22abe9 100%)
}
Conclusion:
Thus, In this way you can add different .gif images as a progress bar or wheel in your form. To learn more, keep reading our blogs.
Check out these below given blogs for more details –
- jQuery Form Submit by Id, Class, Name and Tag
- jQuery Dialog Form
Upload Multiple Images Using PHP and jQuery

In our previous blog we taught you about how to upload images using jQuery and PHP but it works for single image. Now, In this blog post we focused on Multiple Image uploading functionality using PHP and jQuery in forms. Just click on live demo or follow our codes to use it.
Here, we have created an html form, set it’s attribute enctype=”multipart/form-data”. This form contains input tag , type=” file” when a user clicks on this input tag a window will opens for image file selection, after image selection an image preview is shown to user (using jquery).
Also, there is an Add More Files button which allows user to dynamically create above input tag, type=” file” and with it he/she can perform the same functionality as explained above.
As user clicks on another input tag of type submit on which a PHP script will executes in which we wrote our codes in following steps:-
- We defined an array of allowed extensions .
$validextensions = array("jpeg", "jpg", "png");- Defined a variable to store the selected file extension.
$ext = explode('.', basename($_FILES['file']['name'][$i]));//Explode file name from dot(.)
$file_extension = end($ext); //Store extensions in the variable- Matching selected file size and it’s extension with allowed file size and allowed file extensions.
if (($_FILES["file"]["size"][$i] < 100000) // Approx. 100kb files can be uploaded.
&& in_array($file_extension, $validextensions)) {
//PHP Image Uploading Code
}- If it is invalid file then,
echo "<span>***Invalid file Type or file Size Exceeded***<span>";
- Else the following code will execute:
if (move_uploaded_file($_FILES['file']['tmp_name'][$i], $target_path)) {      //  If File Moved To Uploads Folder
echo $j. ').<span id="noerror">Image uploaded successfully!.</span><br/>';
} else {    //  If File Was Not Moved.
echo $j. ').<span id="error">please try again!.</span><br/><br/> ';
}
} else {    //  If File Size And File Type Was Incorrect.
echo $j. ').<span id="error">***Invalid file Size or Type***</span><br/><br/>';
}

HTML Form : multiupload.php
We have explained line by line process in the above section , Here we have Created a form with html syntax.
<!DOCTYPE html>
<html>
<head>
<title>Upload Multiple Images Using jquery and PHP</title>
<!-------Including jQuery from Google ------>
<script src="http://ajax.googleapis.com/ajax/libs/jquery/1.11.1/jquery.min.js"></script>
<script src="script.js"></script>
<!------- Including CSS File ------>
<link rel="stylesheet" type="text/css" href="style.css">
<body>
<div id="maindiv">
<div id="formdiv">
<h2>Multiple Image Upload Form</h2>
<form enctype="multipart/form-data" action="" method="post">
First Field is Compulsory. Only JPEG,PNG,JPG Type Image Uploaded. Image Size Should Be Less Than 100KB.
<div id="filediv"><input name="file[]" type="file" id="file"/></div>
<input type="button" id="add_more" class="upload" value="Add More Files"/>
<input type="submit" value="Upload File" name="submit" id="upload" class="upload"/>
</form>
<!------- Including PHP Script here ------>
<?php include "upload.php"; ?>
</div>
</div>
</body>
</html>
PHP Image Uploading Script : upload.php
Here, We have given complete Multiple Image Uploading Script.
<?php
if (isset($_POST['submit'])) {
$j = 0;     // Variable for indexing uploaded image.
$target_path = "uploads/";     // Declaring Path for uploaded images.
for ($i = 0; $i < count($_FILES['file']['name']); $i++) {
// Loop to get individual element from the array
$validextensions = array("jpeg", "jpg", "png");      // Extensions which are allowed.
$ext = explode('.', basename($_FILES['file']['name'][$i]));   // Explode file name from dot(.)
$file_extension = end($ext); // Store extensions in the variable.
$target_path = $target_path . md5(uniqid()) . "." . $ext[count($ext) - 1];     // Set the target path with a new name of image.
$j = $j + 1;      // Increment the number of uploaded images according to the files in array.
if (($_FILES["file"]["size"][$i] < 100000)     // Approx. 100kb files can be uploaded.
&& in_array($file_extension, $validextensions)) {
if (move_uploaded_file($_FILES['file']['tmp_name'][$i], $target_path)) {
// If file moved to uploads folder.
echo $j. ').<span id="noerror">Image uploaded successfully!.</span><br/><br/>';
} else {     //  If File Was Not Moved.
echo $j. ').<span id="error">please try again!.</span><br/><br/>';
}
} else {     //   If File Size And File Type Was Incorrect.
echo $j. ').<span id="error">***Invalid file Size or Type***</span><br/><br/>';
}
}
}
?>
jQuery Code: script.js
This, jquery code is to provide image preview facility in form, before Uploading it.
var abc = 0;      // Declaring and defining global increment variable.
$(document).ready(function() {
//  To add new input file field dynamically, on click of "Add More Files" button below function will be executed.
$('#add_more').click(function() {
$(this).before($("<div/>", {
id: 'filediv'
}).fadeIn('slow').append($("<input/>", {
name: 'file[]',
type: 'file',
id: 'file'
}), $("<br/><br/>")));
});
// Following function will executes on change event of file input to select different file.
$('body').on('change', '#file', function() {
if (this.files && this.files[0]) {
abc += 1; // Incrementing global variable by 1.
var z = abc - 1;
var x = $(this).parent().find('#previewimg' + z).remove();
$(this).before("<div id='abcd" + abc + "' class='abcd'><img id='previewimg" + abc + "' src=''/></div>");
var reader = new FileReader();
reader.onload = imageIsLoaded;
reader.readAsDataURL(this.files[0]);
$(this).hide();
$("#abcd" + abc).append($("<img/>", {
id: 'img',
src: 'x.png',
alt: 'delete'
}).click(function() {
$(this).parent().parent().remove();
}));
}
});
// To Preview Image
function imageIsLoaded(e) {
$('#previewimg' + abc).attr('src', e.target.result);
};
$('#upload').click(function(e) {
var name = $(":file").val();
if (!name) {
alert("First Image Must Be Selected");
e.preventDefault();
}
});
});
CSS File: style.css
Styling HTML Elements.
@import "http://fonts.googleapis.com/css?family=Droid+Sans";
form{
background-color:#fff
}
#maindiv{
width:960px;
margin:10px auto;
padding:10px;
font-family:'Droid Sans',sans-serif
}
#formdiv{
width:500px;
float:left;
text-align:center
}
form{
padding:40px 20px;
box-shadow:0 0 10px;
border-radius:2px
}
h2{
margin-left:30px
}
.upload{
background-color:red;
border:1px solid red;
color:#fff;
border-radius:5px;
padding:10px;
text-shadow:1px 1px 0 green;
box-shadow:2px 2px 15px rgba(0,0,0,.75)
}
.upload:hover{
cursor:pointer;
background:#c20b0b;
border:1px solid #c20b0b;
box-shadow:0 0 5px rgba(0,0,0,.75)
}
#file{
color:green;
padding:5px;
border:1px dashed #123456;
background-color:#f9ffe5
}
#upload{
margin-left:45px
}
#noerror{
color:green;
text-align:left
}
#error{
color:red;
text-align:left
}
#img{
width:17px;
border:none;
height:17px;
margin-left:-20px;
margin-bottom:91px
}
.abcd{
text-align:center
}
.abcd img{
height:100px;
width:100px;
padding:5px;
border:1px solid #e8debd
}
b{
color:red
}
Conclusion:
This was all about multiple image uploading using PHP and jQuery. Similarily, you can define other file extensions to upload them, just copy or download our codes to use it, keep following us for upcoming blogs.
Dynamically Change Form Action Based on Selection Using jQuery
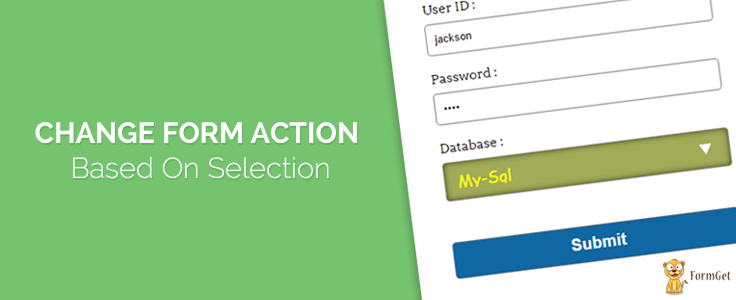
This blog post concern’s about dynamically changing form action and submit the form data on required action (web page).
Some times there is a need to submit form data to different pages, for this, we must dynamically change form action=” “ .
In our example we have created a simple html form containing Select options field. We applied jQuery’s on change event on it to fulfill above requirement.
As user selects an option, form action gets dynamically set to respective page. Just follow our codes or you can download it to use.

HTML File: select_action.html
Here, we have created a simple html form with select option field, as user selects an option, script alert is shown.
<!DOCTYPE html>
<html>
<head>
<title>Change Form Action Based on selection - Demo Preview</title>
<meta content="noindex, nofollow" name="robots">
<!-- Include jQuery library and file here -->
<script src="http://ajax.googleapis.com/ajax/libs/jquery/1.11.1/jquery.min.js"></script>
<script src="js/script.js" type="text/javascript"></script>
<!-- Include CSS file here -->
<link href="css/drop_down.css" rel="stylesheet">
</head>
<body>
<div id="main">
<div id="first">
<h1>Change Form Action Based On Selection</h1>
<form id="myform" method="post" name="myform">
<label>User ID :</label>
<input class="name" type="text">
<label>Password :</label>
<input class="email" type="password">
<label>Database :</label>
<select id="db">
<option>--- Choose Database Here ---</option>
<option>My-Sql</option>
<option>Oracle</option>
<option>MS-Access</option>
</select>
<input class="submit" id="submit" type="submit" value="Submit">
</form>
</div>
</div>
</body>
</html>
jQuery File: script.js
We used following jquery code executes on change section. Just copy it to use.
$(document).ready(function() {
// Function to change form action.
$("#db").change(function() {
var selected = $(this).children(":selected").text();
switch (selected) {
case "My-Sql":
$("#myform").attr('action', 'mysql.html');
alert("Form Action is Changed to 'mysql.html'n Press Submit to Confirm");
break;
case "Oracle":
$("#myform").attr('action', 'oracle.html');
alert("Form Action is Changed to 'oracle.html'n Press Submit to Confirm");
break;
case "MS-Access":
$("#myform").attr('action', 'msaccess.html');
alert("Form Action is Changed to 'msaccess.html'n Press Submit to Confirm");
break;
default:
$("#myform").attr('action', '#');
}
});
// Function For Back Button
$(".back").click(function() {
parent.history.back();
return false;
});
});
CSS File: drop_down.css
Styling of HTML elements is done by below css.
/* Below line is used for online Google font */
@import "http://fonts.googleapis.com/css?family=Arvo";
h1{
text-align:center
}
h2{
text-align:center;
font-family:'Arvo',serif
}
hr{
border:0;
border-top:1px solid #ccc;
margin-bottom:-10px
}
div#main{
width:868px;
height:654px;
margin:20px auto;
font-family:'Arvo',serif
}
div#first{
width:350px;
height:515px;
padding:0 45px 20px;
box-shadow:0 0 10px;
float:left;
margin-top:55px
}
input{
width:340px;
height:35px;
border:1px solid gray;
padding-left:10px;
margin-top:8px;
border-radius:5px
}
select{
background-image:url(../images/arrow.png);
background-repeat:no-repeat;
background-position:300px;
width:353px;
padding:12px;
margin-top:8px;
font-family:Cursive;
line-height:1;
border-radius:5px;
background-color:#A2AB58;
color:#ff0;
font-size:20px;
-webkit-appearance:none;
box-shadow:inset 0 0 10px 0 rgba(0,0,0,0.6);
outline:none
}
select:hover{
color:#00ff7f
}
.submit{
width:353px;
height:45px;
color:#fff;
margin-top:50px;
background-color:#1067a2;
font-size:20px;
font-weight:700
}
button{
width:353px;
height:45px;
color:#fff;
margin-top:120px;
background-color:#1067a2;
font-size:20px;
font-weight:700;
border-radius:5px
}
.page{
width:720px;
height:260px;
padding:70px 0;
margin:140px auto;
border:3px dashed gray;
text-align:center
}
Conclusion:
Thus, we can change form action in this way, keep reading our other blogs.
For more related stuff, just go through following blogs –
- jQuery Get Value Of Input, Textarea and Radio Button
- jQuery Datepicker
How To Create And Validate Select Option Field (using for each loop) in CodeIgniter

In our previous tutorials we have explained you , how to create and validate forms in codeigniter. In this blog, we will demonstrate you to create and validate a form containing a select option box field using CodeIgniter PHP framework.
In our example, we have created a select option field in form with fetched values from database using for each loop and set validation rules for fields.
<select name="city">
<option value="none" selected="selected">------------Select City------------</option>
<!-----Displaying fetched cities in options using foreach loop ---->
<?php foreach($students as $student):?>
<option value="<?php echo $student->student_id?>"><?php echo $student->city?></option>
<?php endforeach;?>
</select>
watch our live demo or copy paste our codes as per directed in read me file.
download the selectoptionfield_ci.zip file from below link, extract files and include them in view, controller and model directory of your codeigniter framework as shown in the Read Me.txt file.
-: See Also :-
Form Validation using CodeIgniter

VIEW FILE: select_view.php
In this, we fetched all the adresses from data base and showed them in select option field.
<html>
<head>
<title> Create And Validate Select Option Field (using for each loop) In CodeIgniter</title>
<link href='http://fonts.googleapis.com/css?family=Marcellus' rel='stylesheet' type='text/css'>
<link rel="stylesheet" type="text/css" href="<?php echo base_url(). "css/select.css" ?>">
</head>
<body>
<div id="container">
<?php echo form_open('select_ctrl/error'); ?>
<h3>Create And Validate Select Option Field (using for each loop) In CodeIgniter</h3>
<?php echo form_label('Student Name :'); ?> <?php echo form_error('dname'); ?>
<?php echo form_input(array('id' => 'dname', 'name' => 'dname')); ?>
<?php echo form_label('Student Email :'); ?> <?php echo form_error('demail'); ?>
<?php echo form_input(array('id' => 'demail', 'name' => 'demail')); ?>
<?php echo form_label('Student City :'); ?><?php echo form_error('city'); ?>
<select name="city">
<option value="none" selected="selected">------------Select City------------</option>
<!----- Displaying fetched cities in options using foreach loop ---->
<?php foreach($students as $student):?>
<option value="<?php echo $student->student_id?>"><?php echo $student->city?></option>
<?php endforeach;?>
</select>
<?php echo form_submit(array('id' => 'submit', 'value' => 'Submit')); ?>
<?php echo form_close(); ?>
</div>
</body>
</html>
CONTROLLER FILE: select_ctrl.php
copy the below file in your controller directory.
<?php
class select_ctrl extends CI_Controller{
function __construct(){
parent::__construct();
$this->load->model('select_model');
}
function index(){
// Loading model to fetch all records from database
$data['students'] = $this->select_model->show_students();
$this->load->view('select_view', $data);
}
// Validation Function
function error(){
$this->load->library('form_validation');
$abcd = $this->input->post('city');
$this->form_validation->set_error_delimiters('<div class="error">', '</div>');
$this->form_validation->set_rules('dname', 'Username', 'required|min_length[5]|max_length[15]');// Validating Name field.
$this->form_validation->set_rules('demail', 'Email', 'required|valid_email'); // Validating Email field.
$this->form_validation->set_rules('city', 'city', 'required|callback_select_validate'); // Validating select option field.
if ($this->form_validation->run() == FALSE) {
$this->index();
} else{
echo "<script>alert('Form Submitted Successfully....!!!! ');</script>";
$this->index();
}
}
// Below function is called for validating select option field.
function select_validate($abcd)
{
// 'none' is the first option that is default "-------Choose City-------"
if($abcd=="none"){
$this->form_validation->set_message('select_validate', 'Please Select Your City.');
return false;
} else{
// User picked something.
return true;
}
}
}
?>
MODEL FILE: select_model.php
Create new class in your model as shown below.
<?php
class select_model extends CI_Model{
//function to run select all query from students table
function show_students(){
$query = $this->db->get('students');
$query_result = $query->result();
return $query_result;
}
}
?>
My SQL Code Segment:
To create database and table, execute following codes in your My SQL .
CREATE DATABASE college;
CREATE TABLE students(
student_id int(10) NOT NULL AUTO_INCREMENT,
student_name varchar(255) NOT NULL,
student_email varchar(255) NOT NULL,
student_contact varchar(255) NOT NULL,
student_address varchar(255) NOT NULL,
student_city varchar(255) NOT NULL,
PRIMARY KEY (employee_id)
)
CSS FILE: select.css
Styling HTML Elements.
#container{
width:960px;
height:610px;
margin:50px auto
}
.error{
color:red;
font-size:13px;
margin-bottom:-15px
}
form{
width:345px;
padding:0 50px 20px;
background:linear-gradient(#A5FFFF,#FFF);
border:1px solid #ccc;
box-shadow:0 0 5px;
font-family:'Marcellus',serif;
float:left;
margin-top:10px
}
h3{
text-align:center
}
hr{
border:0;
border-bottom:1.5px solid #ccc;
margin-top:-10px;
margin-bottom:30px
}
label{
font-size:17px
}
input,select{
width:100%;
padding:10px;
margin:6px 0 20px;
border:none;
box-shadow:0 0 5px
}
input#submit{
margin-top:20px;
font-size:18px;
background:linear-gradient(#22abe9 5%,#36caf0 100%);
border:1px solid #0F799E;
color:#fff;
font-weight:700;
cursor:pointer;
text-shadow:0 1px 0 #13506D
}
input#submit:hover{
background:linear-gradient(#36caf0 5%,#22abe9 100%)
}
Conclusion:
Now, you can create and validate your own select option field using codeigniter framework. keep following us to learn more.
Recommended blogs:-