

AJAX (Asynchronous JavaScript and XML) is the art of exchanging data with a server, and updating parts of a web page – without reloading the whole page.
Our earlier blog post already explained about form submission without page refresh, but it was done by using ajax, PHP and jQuery.
Now you will learn same functionality using ajax, PHP and Javascript through this blog post . Just follow our post or download it to use.

For this you must have a database in MY-SQL . Here, we have database named “mydba” which consists of table named “form_element” with 5 fields.
next we create a php page named “ajaxsubmit.php” where following steps were performed:
- We first establish connection with server .
- Selects database.
- Executes query.
- Closing connection with server.

HTML File: ajaxjs.html
Here, we create our form
<!DOCTYPE html>
<html>
<head>
<title>Submit Form Using AJAX PHP and javascript</title>
<script src="http://ajax.googleapis.com/ajax/libs/jquery/1.11.0/jquery.min.js"></script>
<link href="css/style.css" rel="stylesheet">
<script src="script.js"></script>
</head>
<body>
<div id="mainform">
<div class="innerdiv">
<h2>Submit Form Using AJAX,PHP and javascript</h2>
<!-- Required Div Starts Here -->
<form id="form" name="form">
<h3>Fill Your Information!</h3>
<div>
<label>Name :</label>
<input id="name" type="text">
<label>Email :</label>
<input id="email" type="text">
<label>Password :</label>
<input id="password" type="password">
<label>Contact No :</label>
<input id="contact" type="text">
<input id="submit" onclick="myFunction()" type="button" value="Submit">
</div>
</form>
<div id="clear"></div>
</div>
<div id="clear"></div>
</div>
</body>
</html>
PHP File: ajaxjs.php
<?php
// Fetching Values From URL
$name2 = $_POST['name1'];
$email2 = $_POST['email1'];
$password2 = $_POST['password1'];
$contact2 = $_POST['contact1'];
$connection = mysql_connect("localhost", "root", ""); // Establishing Connection with Server..
$db = mysql_select_db("mydba", $connection); // Selecting Database
if (isset($_POST['name1'])) {
$query = mysql_query("insert into form_element(name, email, password, contact) values ('$name2', '$email2', '$password2','$contact2')"); //Insert Query
echo "Form Submitted succesfully";
}
mysql_close($connection); // Connection Closed
?>
JAVASCRIPT File: script.js
javascript file consist of ajax functionality.
function myFunction() {
var name = document.getElementById("name").value;
var email = document.getElementById("email").value;
var password = document.getElementById("password").value;
var contact = document.getElementById("contact").value;
// Returns successful data submission message when the entered information is stored in database.
var dataString = 'name1=' + name + '&email1=' + email + '&password1=' + password + '&contact1=' + contact;
if (name == '' || email == '' || password == '' || contact == '') {
alert("Please Fill All Fields");
} else {
// AJAX code to submit form.
$.ajax({
type: "POST",
url: "ajaxjs.php",
data: dataString,
cache: false,
success: function(html) {
alert(html);
}
});
}
return false;
}
MY-SQL Code Segment:
Here is the My-SQL code for creating database and table.
CREATE DATABASE mydba;
CREATE TABLE form_element(
student_id int(10) NOT NULL AUTO_INCREMENT,
student_name varchar(255) NOT NULL,
student_email varchar(255) NOT NULL,
student_contact varchar(255) NOT NULL,
student_address varchar(255) NOT NULL,
PRIMARY KEY (student_id)
);
CSS File: style.css
@import url(http://fonts.googleapis.com/css?family=Fauna+One|Muli);
/*//to load google fonts in our page.*/
#form{
background-color:white;
color:#123456;
box-shadow:0px 1px 1px 1px gray;
font-Weight:400;
width:350px;
margin:50px 250px 0 50px;
float:left;
height:500px;
}
#form div{
padding:10px 0 0 30px;
}
h3{
margin-top:0px;
color:white;
background-color:forestgreen;
text-align:center;
width:100%;
height:50px;
padding-top:30px;
}
#mainform{
width:960px;
margin:20px auto;
padding-top:20px;
font-family: 'Fauna One', serif;
}
#mainform h2{
width:100%; float:left;
}
input{
width:90%;
height:30px;
margin-top:10px;
border-radius:3px;
padding:2px;
box-shadow:0px 1px 1px 0px darkgray;
}
.innerdiv{
width:65%; float:left;
}
input[type=button]{
background-color:forestgreen;
border:1px solid white;
font-family: 'Fauna One', serif;
font-Weight:bold;
font-size:18px;
color:white;
}
#clear{clear:both;
}
/*CSS for right side advertizement*/
#formget{
float:right;
width:30%;
margin-top:30px;
}
Conclusion:
We showed you Ajax implementation with PHP and javascript, Keep following us to learn more.
You may also like to read:
Form Styling with HTML/CSS3
In this blog post we provide you 5 different form styles, created in HTML/CSS3.
just follow our codes or download it to use in your form styles.
Form Style 1:- if you want to put icons in input fields of your form then following style is for you.


HTML File: form1.html
<!DOCTYPE html>
<html>
<head>
<title>Icon inside Input Field - Demo Preview</title>
<meta content="noindex, nofollow" name="robots">
<!-- Include CSS File Here -->
<link href="css/form1.css" rel="stylesheet">
</head>
<body>
<div id="first">
<img id="logo" src="images/logo.png">
<label>Full Name :</label>
<input id="fname" placeholder="Full Name" type="text">
<label>Email :</label>
<input id="email" placeholder="Email" type="text">
<label>Contact Number :</label>
<input id="contact" placeholder="Contact Number" type="text">
<label>Address :</label>
<input id="address" placeholder="Address" type="text">
<input id="submit" type="submit" value="Submit">
</div>
</body>
</html>
CSS File: form1.css
@import "http://fonts.googleapis.com/css?family=Raleway";
body{
font-family:'Raleway',sans-serif
}
img#logo{
margin-left:90px
}
div#first{
width:350px;
height:auto;
margin:50px auto 0;
padding:50px;
background-color:#EEE;
color:#333;
border:2px solid #C2D6FF;
border-radius:40px 0 40px 0
}
label{
font-size:15px;
font-weight:700
}
input#fname{
background-image:url(../images/icon_name.png);
background-repeat:no-repeat;
background-position:6px;
border:1px solid #DADADA;
margin-top:10px;
margin-bottom:10px;
padding-left:35px;
width:310px;
height:30px;
font-size:14px;
box-shadow:0 0 10px;
-webkit-box-shadow:0 0 10px;
/* For I.E */
-moz-box-shadow:0 0 10px;
/* For Mozilla Web Browser */
border-radius:5px;
-webkit-border-radius:5px;
/* For I.E */
-moz-border-radius:5px
/* For Mozilla Web Browser */
}
input#email{
background-image:url(../images/email.png);
background-repeat:no-repeat;
background-position:6px;
border:1px solid #DADADA;
margin-top:10px;
margin-bottom:10px;
padding-left:35px;
width:310px;
height:30px;
font-size:14px;
box-shadow:0 0 10px;
-webkit-box-shadow:0 0 10px;
/* For I.E */
-moz-box-shadow:0 0 10px;
/* For Mozilla Web Browser */
border-radius:5px;
-webkit-border-radius:5px;
/* For I.E */
-moz-border-radius:5px
/* For Mozilla Web Browser */
}
input#contact{
background-image:url(../images/mobile.png);
background-repeat:no-repeat;
background-position:6px;
border:1px solid #DADADA;
margin-top:10px;
margin-bottom:10px;
padding-left:35px;
width:310px;
height:30px;
font-size:14px;
box-shadow:0 0 10px;
-webkit-box-shadow:0 0 10px;
/* For I.E */
-moz-box-shadow:0 0 10px;
/* For Mozilla Web Browser */
border-radius:5px;
-webkit-border-radius:5px;
/* For I.E */
-moz-border-radius:5px
/* For Mozilla Web Browser */
}
input#address{
background-image:url(../images/home.png);
background-repeat:no-repeat;
background-position:6px;
border:1px solid #DADADA;
margin-top:10px;
margin-bottom:10px;
padding-left:35px;
width:310px;
height:30px;
font-size:14px;
box-shadow:0 0 10px;
-webkit-box-shadow:0 0 10px;
/* For I.E */
-moz-box-shadow:0 0 10px;
/* For Mozilla Web Browser */
border-radius:5px;
-webkit-border-radius:5px;
/* For I.E */
-moz-border-radius:5px
/* For Mozilla Web Browser */
}
input#submit {
background-color:#cc7a66;
border-radius:5px;
border:none;
padding:10px 25px;
color:#FFF;
text-shadow:1px 1px 1px #949494;
margin-left:120px
}
input#submit:hover{
background-color:#FF9980
}
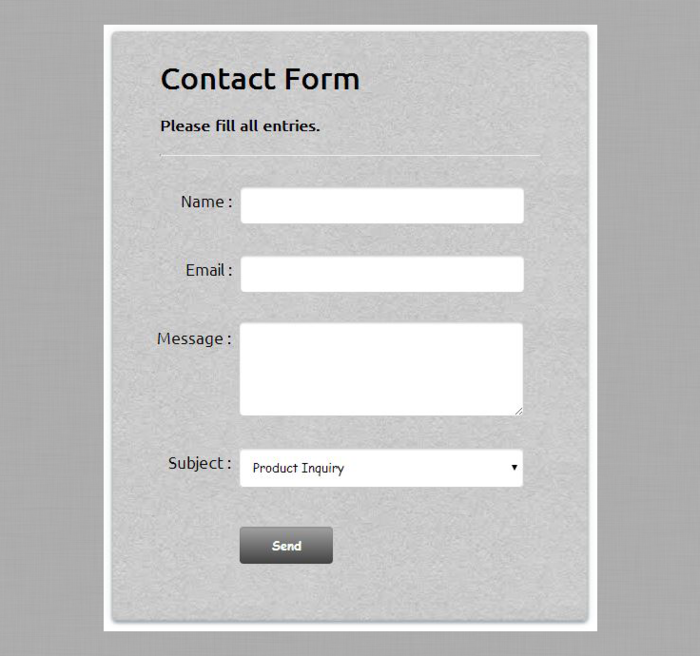
Form Style 2:- if you want to put some texture in background of your form then following style is for you.
HTML File: form2.html
<!DOCTYPE html>
<html>
<head>
<title>Forms - Demo Preview</title>
<meta content="noindex, nofollow" name="robots">
<!-- Include CSS File Here -->
<link href="css/form2.css" rel="stylesheet">
</head>
<body>
<div id="first">
<form action="" method="post">
<h1>Contact Form</h1>
<h4>Please fill all entries.</h4>
<label class="one">
<span>Name :</span>
<input class="name" name="dname" type="text">
</label>
<label class="two">
<span>Email :</span>
<input class="email" name="demail" type="email">
</label>
<label class="three">
<span>Message :</span>
<textarea class="msg" name="msg">
</textarea>
</label>
<label class="four">
<span>Subject :</span>
<select>
<option value="Product Inquiry">Product Inquiry</option>
<option value="Feedback">Feedback</option>
<option value="Complaint">Complaint</option>
</select>
</label>
<input class="submit" name="dsubmit" type="submit" value="Send">
</form>
</div>
</body>
</html>
CSS File: form2.css
/* Below line is used for online Google Font */
@import "http://fonts.googleapis.com/css?family=Ubuntu";
body{
margin:0;
padding:0;
font-family:'Ubuntu',sans-serif
}
#first{
width:400px;
height:610px;
box-shadow:0 0 15px rgba(14,41,57,0.12),0 2px 5px rgba(14,41,57,0.44),inset 0 -1px 2px rgba(14,41,57,0.15);
float:left;
padding:10px 50px 0;
background-image:url(../images/1.jpg);
margin:2% 30%;
border-radius:5px
}
hr{
border-top:1px solid #ccc;
margin-bottom:30px
}
span{
float:left;
margin-top:8px;
font-size:17px
}
.one{
display:block;
margin-left:22px;
margin-top:10px
}
.two{
display:block;
margin-left:27px;
margin-top:10px
}
.three{
display:block;
margin-left:-3px;
margin-top:10px
}
.four{
display:block;
margin-left:9px;
margin-top:10px
}
input,select{
width:300px;
padding:10px;
border-radius:5px;
border:1px solid #cbcbcb;
box-shadow:inset 0 1px 2px rgba(0,0,0,0.18);
font-family:Cursive
}
textarea{
width:300px;
padding:7px;
height:100px;
border-radius:5px;
border:1px solid #cbcbcb;
box-shadow:inset 0 1px 2px rgba(0,0,0,0.18)
}
.submit{
width:100px;
margin-left:83px;
padding:10px;
margin-top:20px;
background:linear-gradient(#A4A4A4,#424242);
color:#fff;
font-weight:700
}
.submit:hover{
background:linear-gradient(#424242,#A4A4A4)
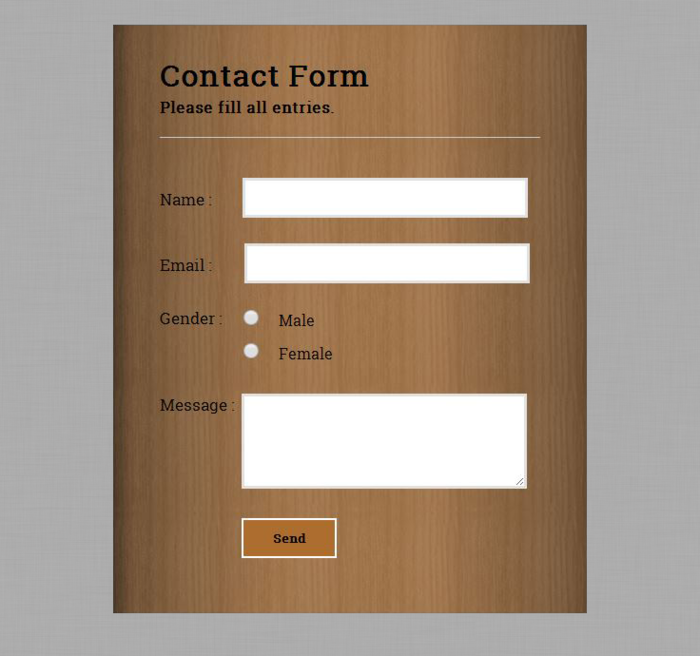
}Form Style 3:- if you want to put some image in background of your form then following style is for you.
HTML File:form3.html
<!DOCTYPE html>
<html>
<head>
<title>Forms - Demo Preview</title>
<meta content="noindex, nofollow" name="robots">
<!-- Include CSS File Here-->
<link href="css/form3.css" rel="stylesheet">
</head>
<body>
<div id="first">
<form action="" method="post">
<h1>Contact Form</h1>
<h4>Please fill all entries.</h4>
<span class="spn1">Name :</span>
<input class="name" name="dname" type="text">
<span class="spn1">Email :</span>
<input class="email" name="demail" type="email">
<span>Gender :</span>
<input class="male" name="gender" type="radio" value="male">Male
<input class="female" name="gender" type="radio" value="female">Female
<span>Message :</span>
<textarea class="msg" name="msg">
</textarea>
<input class="submit" name="dsubmit" type="submit" value="Send">
</form>
</div>
</body>
</html>
CSS File: form3.css
/* Below line is used for online Google font */
@import "http://fonts.googleapis.com/css?family=Roboto+Slab";
body{
margin:0;
padding:0;
font-family:'Roboto Slab',serif
}
#first{
width:400px;
height:610px;
box-shadow:0 0 0 1px rgba(14,41,57,0.12),0 2px 5px rgba(14,41,57,0.44),inset 0 -1px 2px rgba(14,41,57,0.15);
float:left;
padding:10px 50px 0;
margin:2% 30%;
background-image:url(../images/i.jpg)
}
hr{
border:none;
border-bottom:1px solid #ccc;
margin-bottom:40px
}
h4{
margin-top:-20px
}
span{
float:left;
font-size:17px
}
span.spn1{
margin-top:13px
}
input{
width:300px;
padding:10px;
border:3px solid #e1e1e1;
margin-bottom:25px
}
textarea{
width:300px;
padding:10px;
border:3px solid #e1e1e1;
height:100px;
margin-bottom:25px
}
input.name{
margin-left:25px
}
input.email{
margin-left:27px
}
input.male{
width:50px;
margin-left:7px;
margin-bottom:15px;
height:17px
}
input.female{
width:50px;
margin-left:72px;
margin-bottom:15px;
height:17px
}
input.submit{
width:100px;
font-weight:700;
margin-left:86px;
cursor:pointer;
background-color:#ad6d2f;
font-family:'Roboto Slab',serif;
border:2px solid #fff
}
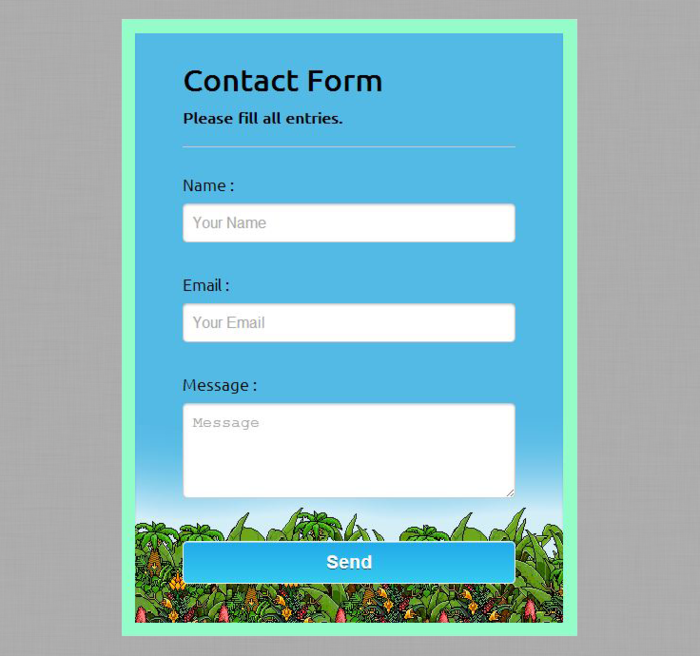
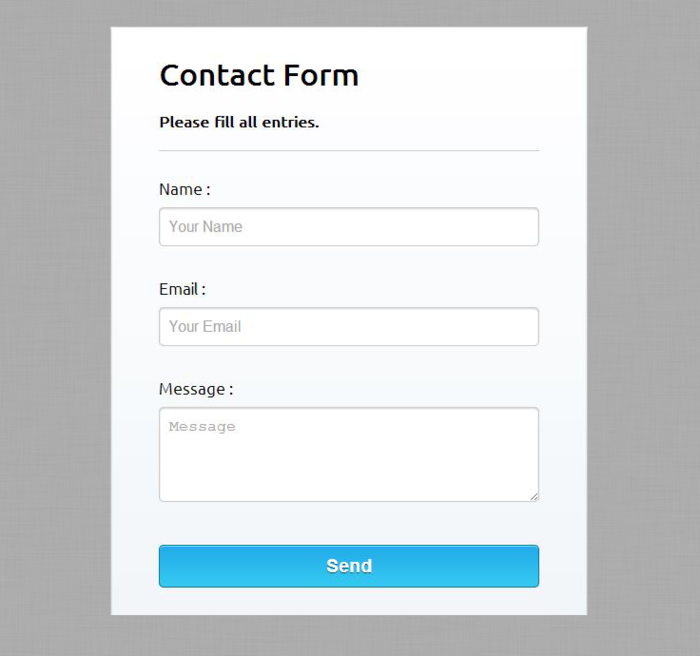
Form Style 4:- if you want to put some image in background of your form then following style is for you.
HTML File: form4.html
<!DOCTYPE html>
<html>
<head>
<title>Forms - Demo Preview</title>
<meta content="noindex, nofollow" name="robots">
<!-- Include CSS File Here-->
<link href="css/form4.css" rel="stylesheet">
</head>
<body>
<div id="first">
<form action="" method="post">
<h1>Contact Form</h1>
<h4>Please fill all entries.</h4>
<label>Name :</label>
<input name="dname" placeholder="Your Name" type="text">
<label>Email :</label>
<input name="demail" placeholder="Your Email" type="text">
<label>Message :</label>
<textarea name="dmsg" placeholder="Message">
</textarea>
<input name="dsubmit" type="submit" value="Send">
</form>
</div>
</body>
</html>
CSS File: form4.css
/* Below line is used for online Google font */
@import "http://fonts.googleapis.com/css?family=Ubuntu";
body{
margin:0;
padding:0;
font-family:'Ubuntu',sans-serif
}
#first{
width:350px;
height:610px;
box-shadow:0 0 25px rgba(14,41,57,0.12),0 2px 5px rgba(14,41,57,0.44),inset 0 -1px 2px rgba(14,41,57,0.15);
float:left;
padding:10px 50px 0;
border:15px solid #93FCC9;
margin:2% 30%;
background-image:url(../images/tt.png)
}
hr{
border:0;
border-top:1px solid #ccc;
margin-bottom:30px
}
h1{
margin-bottom:-10px
}
label{
font-size:17px
}
input{
width:350px;
padding:10px;
margin-top:10px;
margin-bottom:35px;
border-radius:5px;
border:1px solid #cbcbcb;
box-shadow:inset 0 1px 2px rgba(0,0,0,0.18);
font-size:16px
}
textarea{
width:350px;
height:100px;
padding:10px;
margin-top:10px;
margin-bottom:35px;
border-radius:5px;
border:1px solid #cbcbcb;
box-shadow:inset 0 1px 2px rgba(0,0,0,0.18);
font-size:16px
}
input[type=submit]{
background:linear-gradient(to bottom,#22abe9 5%,#36caf0 100%);
box-shadow:inset 0 1px 0 0 #7bdcf4;
border:1px solid #fff;
color:#fff;
font-size:19px;
font-weight:700;
cursor:pointer;
text-shadow:0 1px 0 #13506D
}
input[type=submit]:hover{
background:linear-gradient(to bottom,#36caf0 5%,#22abe9 100%)
}
Form Style 5:- if you want a normal form then following style is for you.
HTML File: form5.html
<!DOCTYPE html>
<html>
<head>
<title>Forms - Demo Preview</title>
<meta content="noindex, nofollow" name="robots">
<!-- Include CSS File Here-->
<link href="css/form5.css" rel="stylesheet">
</head>
<body>
<div id="main">
<div id="first">
<form action="" method="post">
<h1>Contact Form</h1>
<h4>Please fill all entries.</h4>
<label>Name :</label>
<input name="dname" placeholder="Your Name" type="text">
<label>Email :</label>
<input name="demail" placeholder="Your Email" type="text">
<label>Message :</label>
<textarea name="dmsg" placeholder="Message">
</textarea>
<input name="dsubmit" type="submit" value="Send">
</form>
</div>
</div>
</body>
</html>
CSS File: form5.css
/* Below line is used for online Google font */
@import "http://fonts.googleapis.com/css?family=Ubuntu";
body{
margin:0;
padding:0;
font-family:'Ubuntu',sans-serif
}
#main{
width:910px;
height:620px;
margin:30px auto
}
#first{
width:400px;
height:610px;
box-shadow:0 0 0 1px rgba(14,41,57,0.12),0 2px 5px rgba(14,41,57,0.44),inset 0 -1px 2px rgba(14,41,57,0.15);
float:left;
padding:10px 50px 0;
background:linear-gradient(#fff,#f2f6f9)
}
hr{
border:0;
border-top:1px solid #ccc;
margin-bottom:30px
}
label{
font-size:17px
}
input{
width:400px;
padding:10px;
margin-top:10px;
margin-bottom:35px;
border-radius:5px;
border:1px solid #cbcbcb;
box-shadow:inset 0 1px 2px rgba(0,0,0,0.18);
font-size:16px
}
textarea{
width:400px;
height:100px;
padding:10px;
margin-top:10px;
margin-bottom:35px;
border-radius:5px;
border:1px solid #cbcbcb;
box-shadow:inset 0 1px 2px rgba(0,0,0,0.18);
font-size:16px
}
input[type=submit]{
background:linear-gradient(to bottom,#22abe9 5%,#36caf0 100%);
box-shadow:inset 0 1px 0 0 #7bdcf4;
border:1px solid #0F799E;
color:#fff;
font-size:19px;
font-weight:700;
cursor:pointer;
text-shadow:0 1px 0 #13506D
}
input[type=submit]:hover{
background:linear-gradient(to bottom,#36caf0 5%,#22abe9 100%)
}
For more related updates check out the following blogs –
- CSS Gradient
- CSS Submit Button Designs
Submit Form Using Ajax, PHP and jQuery

AJAX (Asynchronous JavaScript and XML) is the art of exchanging data with a server, and updating parts of a web page – without reloading the whole page.
We have already post a blog which explains about submitting form without page refresh, but it was done by using PHP and jQuery only. Now we will show how you can do the same with ajax, PHP and jQuery.
For this you must have a database in MY-SQL . Here, we have database named “mydba” which consists of table named “form_element” with 5 fields viz. “id”, “name”, “email”, “password” and “contact”.
next we create a php page named “ajaxsubmit.php” where following steps were performed:
- We first establish connection with server .
- Selects database.
- Executes query.
- Closing connection with server.

HTML File: ajaxsubmit.html
Here, we create our form
<!DOCTYPE html>
<html>
<head>
<title>Submit Form Using AJAX and jQuery</title>
<script src="http://ajax.googleapis.com/ajax/libs/jquery/1.11.0/jquery.min.js"></script>
<link href="css/refreshform.css" rel="stylesheet">
<script src="script.js"></script>
</head>
<body>
<div id="mainform">
<h2>Submit Form Using AJAX and jQuery</h2> <!-- Required div Starts Here -->
<div id="form">
<h3>Fill Your Information !</h3>
<div>
<label>Name :</label>
<input id="name" type="text">
<label>Email :</label>
<input id="email" type="text">
<label>Password :</label>
<input id="password" type="password">
<label>Contact No :</label>
<input id="contact" type="text">
<input id="submit" type="button" value="Submit">
</div>
</div>
</div>
</body>
</html>
PHP File: ajaxsubmit.php
<?php
$connection = mysql_connect("localhost", "root", ""); // Establishing Connection with Server..
$db = mysql_select_db("mydba", $connection); // Selecting Database
//Fetching Values from URL
$name2=$_POST['name1'];
$email2=$_POST['email1'];
$password2=$_POST['password1'];
$contact2=$_POST['contact1'];
//Insert query
$query = mysql_query("insert into form_element(name, email, password, contact) values ('$name2', '$email2', '$password2','$contact2')");
echo "Form Submitted Succesfully";
mysql_close($connection); // Connection Closed
?>
jQuery File: script.js
jQuery file consist of ajax functionality.
$(document).ready(function(){
$("#submit").click(function(){
var name = $("#name").val();
var email = $("#email").val();
var password = $("#password").val();
var contact = $("#contact").val();
// Returns successful data submission message when the entered information is stored in database.
var dataString = 'name1='+ name + '&email1='+ email + '&password1='+ password + '&contact1='+ contact;
if(name==''||email==''||password==''||contact=='')
{
alert("Please Fill All Fields");
}
else
{
// AJAX Code To Submit Form.
$.ajax({
type: "POST",
url: "ajaxsubmit.php",
data: dataString,
cache: false,
success: function(result){
alert(result);
}
});
}
return false;
});
});
MY-SQL Code Segment:
Here is the My-SQL code for creating database and table.
CREATE DATABASE mydba;
CREATE TABLE form_element(
id int(10) NOT NULL AUTO_INCREMENT,
name varchar(255) NOT NULL,
email varchar(255) NOT NULL,
password varchar(255) NOT NULL,
contact varchar(255) NOT NULL,
PRIMARY KEY (id)
)
CSS File: style.css
@import "http://fonts.googleapis.com/css?family=Fauna+One|Muli";
#form {
background-color:#fff;
color:#123456;
box-shadow:0 1px 1px 1px #123456;
font-weight:400;
width:350px;
margin:50px 250px 0 35px;
float:left;
height:500px
}
#form div {
padding:10px 0 0 30px
}
h3 {
margin-top:0;
color:#fff;
background-color:#3C599B;
text-align:center;
width:100%;
height:50px;
padding-top:30px
}
#mainform {
width:960px;
margin:50px auto;
padding-top:20px;
font-family:'Fauna One',serif
}
input {
width:90%;
height:30px;
margin-top:10px;
border-radius:3px;
padding:2px;
box-shadow:0 1px 1px 0 #123456
}
input[type=button] {
background-color:#3C599B;
border:1px solid #fff;
font-family:'Fauna One',serif;
font-weight:700;
font-size:18px;
color:#fff
}
Conclusion:
We showed you Ajax implementation with PHP, just follow our codes or download zip file to use.
You may also like to read:
Create Multi Step Form Using jQuery and CSS3

Now a days multi-step form become more popular than regular forms, as it is more convenient and provides step by step procedure to follow by user. therefore, this blog post brings creation of multi step form using jquery and CSS3 .
Very first you have to create a form with fieldset tag in HTML, number of fieldset depends upon the steps you want to put.
here, we have created a registration form with 3 fieldsets and a progress bar in HTML, i.e. our form includes three steps for registrstion.
- Step 1- Account Creation.
- Step 2- Related to Educational Profile of individual .
- Step 3- Personal Information of individual.
In last step, as user clicks submit button various details given by user get submitted.

HTML File: multi_step_form.html
<!DOCTYPE html>
<html>
<head>
<title>Multistep Registration Form- Demo Preview</title>
<meta content="noindex, nofollow" name="robots">
<script src="http://ajax.googleapis.com/ajax/libs/jquery/1.11.1/jquery.min.js"></script>
<link href="style.css" rel="stylesheet" type="text/css">
<script src="multi_step_form.js"></script>
</head>
<body>
<div class="content">
<!-- Multistep Form -->
<div class="main">
<form action="" class="regform" method="get">
<!-- Progress Bar -->
<ul id="progressbar">
<li class="active">Create Account</li>
<li>Educational Profiles</li>
<li>Personal Details</li>
</ul>
<!-- Fieldsets -->
<fieldset id="first">
<h2 class="title">Create your account</h2>
<p class="subtitle">Step 1</p>
<input class="text_field" name="email" placeholder="Email" type="text">
<input class="text_field" name="pass" placeholder="Password" type="password">
<input class="text_field" name="cpass" placeholder="Confirm Password" type="password">
<input class="next_btn" name="next" type="button" value="Next">
</fieldset>
<fieldset>
<h2 class="title">Educational Profiles</h2>
<p class="subtitle">Step 2</p>
<select class="options">
<option>--Select Education--</option>
<option>Post Graduate</option>
<option>Graduate</option>
<option>HSC</option>
<option>SSC</option>
</select>
<input class="text_field" name="marks" placeholder="Marks Obtained" type="text">
<input class="text_field" name="pyear" placeholder="Passing Year" type="text">
<input class="text_field" name="univ" placeholder="University" type="text">
<input class="pre_btn" name="previous" type="button" value="Previous">
<input class="next_btn" name="next" type="button" value="Next">
</fieldset>
<fieldset>
<h2 class="title">Personal Details</h2>
<p class="subtitle">Step 3</p>
<input class="text_field" name="fname" placeholder="First Name" type="text">
<input class="text_field" name="lname" placeholder="Last Name" type="text">
<input class="text_field" name="cont" placeholder="Contact" type="text">
<label>Gender</label>
<input class="rad" name="gender" type="radio">Male
<input class="rad" name="gender" type="radio">Female
<textarea name="address" placeholder="Address"></textarea>
<input class="pre_btn" type="button" value="Previous">
<input class="submit_btn" type="submit" value="Submit">
</fieldset>
</form>
</div>
</div>
</body>
</html>
jQuery File: multi_step_form.js
$(document).ready(function() {
var count = 0; // To Count Blank Fields
/*------------ Validation Function-----------------*/
$(".submit_btn").click(function(event) {
var radio_check = $('.rad'); // Fetching Radio Button By Class Name
var input_field = $('.text_field'); // Fetching All Inputs With Same Class Name text_field & An HTML Tag textarea
var text_area = $('textarea');
// Validating Radio Button
if (radio_check[0].checked == false && radio_check[1].checked == false) {
var y = 0;
} else {
var y = 1;
}
// For Loop To Count Blank Inputs
for (var i = input_field.length; i > count; i--) {
if (input_field[i - 1].value == '' || text_area.value == '') {
count = count + 1;
} else {
count = 0;
}
}
// Notifying Validation
if (count != 0 || y == 0) {
alert("*All Fields are mandatory*");
event.preventDefault();
} else {
return true;
}
});
/*---------------------------------------------------------*/
$(".next_btn").click(function() { // Function Runs On NEXT Button Click
$(this).parent().next().fadeIn('slow');
$(this).parent().css({
'display': 'none'
});
// Adding Class Active To Show Steps Forward;
$('.active').next().addClass('active');
});
$(".pre_btn").click(function() { // Function Runs On PREVIOUS Button Click
$(this).parent().prev().fadeIn('slow');
$(this).parent().css({
'display': 'none'
});
// Removing Class Active To Show Steps Backward;
$('.active:last').removeClass('active');
});
// Validating All Input And Textarea Fields
$(".submit_btn").click(function(e) {
if ($('input').val() == "" || $('textarea').val() == "") {
alert("*All Fields are mandatory*");
return false;
} else {
return true;
}
});
});
CSS File: style.css
@import url(http://fonts.googleapis.com/css?family=Droid+Serif);
/* Above line is to import google font style */
.content{
width:960px;
margin:20px auto;
}
.main{
float:left;
width: 650px;
margin-top:80px;
}
#progressbar{
margin:0;
padding:0;
font-size:18px;
}
.active{
color:red;
}
fieldset{
display:none;
width: 350px;
padding:20px;
margin-top:50px;
margin-left: 85px;
border-radius:5px;
box-shadow: 3px 3px 25px 1px gray;
}
#first{
display:block;
width: 350px;
padding:20px;
margin-top:50px;
border-radius:5px;
margin-left: 85px;
box-shadow: 3px 3px 25px 1px gray;
}
input[type=text],
input[type=password],
select{
width:100%;
margin:10px 0;
height:40px;
padding:5px;
border: 3px solid rgb(236, 176, 220);
border-radius: 4px;
}
textarea{
width:100%;
margin:10px 0;
height:70px;
padding:5px;
border: 3px solid rgb(236, 176, 220);
border-radius: 4px;
}
input[type=submit],
input[type=button]{
width: 120px;
margin:15px 25px;
padding: 5px;
height: 40px;
background-color: sienna;
border: none;
border-radius: 4px;
color: white;
font-family: 'Droid Serif', serif;
}
h2,p{
text-align:center;
font-family: 'Droid Serif', serif;
}
li{
margin-right:52px;
display:inline;
color:#c1c5cc;
font-family: 'Droid Serif', serif;
}
Conclusion:
So, this way you can create your own multistep form and can give more style to your form in a simple way, for more blogs keep following us.
Just go through with some more additional information here –
- jQuery Select Change Event, Get Selected Option
- jQuery Form Validation
Delete Data From MySql Database Using PHP

In this blog post we will illustrate you how to delete data from database using PHP. For this you must have a database in MYSQL where your record are present.
In MySQL the command used is :
DELETE FROM table_name
WHERE column_name=some_value;
and in php query used is :
$query1 = mysql_query("delete from employee where employee_id=$del", $connection);Here, we have database named “company” which consists of table named “employee” with 5 fields viz.
“employee_id”, “employee_name”, “employee_email”, “employee_contact” and “employee_address”.
Next we created a php page named “updatephp.php” where following steps were performed:
-
- We first establish connection with server .
- Selects database.
- Executes SQL query.
- Closing connection with server.
Below is our complete code with download and live demo option

PHP File: deletephp.php
<!DOCTYPE html>
<html>
<head>
<title>Delete Data Using PHP- Demo Preview</title>
<meta content="noindex, nofollow" name="robot">
<link href="style.css" rel="stylesheet" type="text/css">
</head>
<body>
<div class="maindiv">
<div class="divA">
<div class="title">
<h2>Delete Data Using PHP</h2>
</div>
<div class="divB">
<div class="divD">
<p>Click On Menu</p>
<?php
$connection = mysql_connect("localhost", "root", ""); // Eastablishing Connection With Server.
$db = mysql_select_db("company", $connection); // Selecting Database From Server.
if (isset($_GET['del'])) {
$del = $_GET['del'];
//SQL query for deletion.
$query1 = mysql_query("delete from employee where employee_id=$del", $connection);
}
$query = mysql_query("select * from employee", $connection); // SQL query to fetch data to display in menu.
while ($row = mysql_fetch_array($query)) {
echo "<b><a href="deletephp.php?id={$row['employee_id']}">{$row['employee_name']}</a></b>";
echo "<br />";
}
?>
</div><?php
if (isset($_GET['id'])) {
$id = $_GET['id'];
// SQL query to Display Details.
$query1 = mysql_query("select * from employee where employee_id=$id", $connection);
while ($row1 = mysql_fetch_array($query1)) {
?>
<form class="form">
<h2>---Details---</h2>
<span>Name:</span> <?php echo $row1['employee_name']; ?>
<span>E-mail:</span> <?php echo $row1['employee_email']; ?>
<span>Contact No:</span> <?php echo $row1['employee_contact']; ?>
<span>Address:</span> <?php echo $row1['employee_address']; ?><
<?php echo "<b><a href="deletephp.php?del={$row1['employee_id']}"><input type="button" class="submit" value="Delete"/></a></b>"; ?>
</form><?php
}
}
// Closing Connection with Server.
mysql_close($connection);
?>
<div class="clear"></div>
</div>
<div class="clear"></div>
</div>
</body>
</html>
MY-SQL Code Segment:
Here is the My-SQL code for creating database and table.
CREATE DATABASE company;
CREATE TABLE employee(
employee_id int(10) NOT NULL AUTO_INCREMENT,
employee_name varchar(255) NOT NULL,
employee_email varchar(255) NOT NULL,
employee_contact varchar(255) NOT NULL,
employee_address varchar(255) NOT NULL,
PRIMARY KEY (employee_id)
)
CSS File: style.css
@import "http://fonts.googleapis.com/css?family=Droid+Serif";
/* Above line is to import Google font style */
.maindiv{
margin:0 auto;
width:980px;
height:500px;
background:#fff;
padding-top:20px;
font-size:14px;
font-family:'Droid Serif',serif
}
.title{
width:100%;
height:70px;
text-shadow:2px 2px 2px #cfcfcf;
font-size:16px;
text-align:center;
font-family:'Droid Serif',serif
}
.divA{
width:70%;
float:left;
margin-top:30px
}
.form{
width:400px;
float:left;
background-color:#fff;
font-family:'Droid Serif',serif;
padding-left:30px
}
.divB{
width:100%;
height:100%;
background-color:#fff;
border:dashed 1px #999
}
.divD{
width:200px;
height:480px;
padding:0 20px;
float:left;
background-color:#f0f8ff;
border-right:dashed 1px #999
}
p{
text-align:center;
font-weight:700;
color:#5678C0;
font-size:18px;
text-shadow:2px 2px 2px #cfcfcf
}
.submit{
color:#fff;
border-radius:3px;
background:#1F8DD6;
padding:4px;
margin-top:40px;
border:none;
width:100px;
height:30px;
box-shadow:0 0 1px 1px #123456;
font-size:16px;
cursor:pointer
}
.form h2{
text-align:center;
text-shadow:2px 2px 2px #cfcfcf
}
a{
text-decoration:none;
font-size:16px;
margin:2px 0 0 30px;
padding:3px;
color:#1F8DD6
}
a:hover{
text-shadow:2px 2px 2px #cfcfcf;
font-size:18px
}
.clear{
clear:both
}
span{
font-weight:700
}
Conclusion:
We have shown you how Delete command of sql is executed with PHP for removing data from database , for more MYSQL commands with php you can refer to our blog posts.
For more related information go through following blogs –
Retrieve or Fetch Data From Database in PHP

As we know Database is a collection of tables that stores data in it.
To retrieve or fetch data from MySQL database it is simple to do it using MySQL ” Select ” query in PHP .
Here in this blog post we will be going to see how to fetch data and to display it in front end.
MySQL Select Query:
SELECT column_name(s)
FROM table_name
PHP:
$query = mysql_query("select * from tablename", $connection);For this you must have a database in MySQL . Here, we have a database named “company” which consists of a table named “employee” with 5 fields in it.
Next we have created a PHP page named “updatephp.php” where following steps will be going to perform:
- We first establish connection with server .
$connection = mysql_connect("localhost", "root", "");- Selects database.
$db = mysql_select_db("company", $connection);- Executes MySQL select query.
$query = mysql_query("select * from employee", $connection);- Display fetched data
<span>Name:</span> <?php echo $row1['employee_name']; ?>
<span>E-mail:</span> <?php echo $row1['employee_email']; ?>
<span>Contact No:</span> <?php echo $row1['employee_contact']; ?>
<span>Address:</span> <?php echo $row1['employee_address']; ?>- Closing connection with server.
mysql_close($connection);
Below is our complete code with download and live demo option

PHP File: readphp.php
<!DOCTYPE html>
<html>
<head>
<title>Read Data From Database Using PHP - Demo Preview</title>
<meta content="noindex, nofollow" name="robots">
<link href="style.css" rel="stylesheet" type="text/css">
</head>
<body>
<div class="maindiv">
<div class="divA">
<div class="title">
<h2>Read Data Using PHP</h2>
</div>
<div class="divB">
<div class="divD">
<p>Click On Menu</p>
<?php
$connection = mysql_connect("localhost", "root", ""); // Establishing Connection with Server
$db = mysql_select_db("company", $connection); // Selecting Database
//MySQL Query to read data
$query = mysql_query("select * from employee", $connection);
while ($row = mysql_fetch_array($query)) {
echo "<b><a href="readphp.php?id={$row['employee_id']}">{$row['employee_name']}</a></b>";
echo "<br />";
}
?>
</div>
<?php
if (isset($_GET['id'])) {
$id = $_GET['id'];
$query1 = mysql_query("select * from employee where employee_id=$id", $connection);
while ($row1 = mysql_fetch_array($query1)) {
?>
<div class="form">
<h2>---Details---</h2>
<!-- Displaying Data Read From Database -->
<span>Name:</span> <?php echo $row1['employee_name']; ?>
<span>E-mail:</span> <?php echo $row1['employee_email']; ?>
<span>Contact No:</span> <?php echo $row1['employee_contact']; ?>
<span>Address:</span> <?php echo $row1['employee_address']; ?>
</div>
<?php
}
}
?>
<div class="clear"></div>
</div>
<div class="clear"></div>
</div>
</div>
<?php
mysql_close($connection); // Closing Connection with Server
?>
</body>
</html>
MySQL Code Segment: Here is the MySQL code for creating database and table.
CREATE DATABASE company;
CREATE TABLE employee(
employee_id int(10) NOT NULL AUTO_INCREMENT,
employee_name varchar(255) NOT NULL,
employee_email varchar(255) NOT NULL,
employee_contact varchar(255) NOT NULL,
employee_address varchar(255) NOT NULL,
PRIMARY KEY (employee_id)
)
CSS File: style.css
@import "http://fonts.googleapis.com/css?family=Droid+Serif";
/* Above line is to import google font style */
.maindiv {
margin:0 auto;
width:980px;
height:500px;
background:#fff;
padding-top:20px;
font-size:14px;
font-family:'Droid Serif',serif
}
.title {
width:100%;
height:70px;
text-shadow:2px 2px 2px #cfcfcf;
font-size:16px;
text-align:center;
font-family:'Droid Serif',serif
}
.divA {
width:70%;
float:left;
margin-top:30px
}
.form {
width:400px;
float:left;
background-color:#fff;
font-family:'Droid Serif',serif;
padding-left:30px
}
.divB {
width:100%;
height:100%;
background-color:#fff;
border:dashed 1px #999
}
.divD {
width:200px;
height:480px;
padding:0 20px;
float:left;
background-color:#f0f8ff;
border-right:dashed 1px #999
}
p {
text-align:center;
font-weight:700;
color:#5678C0;
font-size:18px;
text-shadow:2px 2px 2px #cfcfcf
}
.form h2 {
text-align:center;
text-shadow:2px 2px 2px #cfcfcf
}
a {
text-decoration:none;
font-size:16px;
margin:2px 0 0 30px;
padding:3px;
color:#1F8DD6
}
a:hover {
text-shadow:2px 2px 2px #cfcfcf;
font-size:18px
}
.clear {
clear:both
}
span {
font-weight:700
}
Conclusion:
We have shown you how SELECT command of SQL is executed with PHP, for fetching data from database. For more MySQL commands with PHP, follow our other blog posts .
Update Data in Database Using PHP

Data storing in to database enables us to keep the information safe and secure, but what if we wish to update it. Here we are with the proper solution i.e. Update data in database using PHP. In this blog post we will show you how to update previously stored information in database using PHP.
For this you must have a database in MySQL with the information stored in it. Here, we have a database named “company” which consists of table named “employee” with 5 fields viz.
“employee_id”, “employee_name”, “employee_email”, “employee_contact” and “employee_address”.
next we create a php page named “updatephp.php” where following steps will be performed:
- Establish connection with server .
- Selecting database.
- Executing query.
- Closing connection with server.
Below is our complete code with download and live demo option

PHP File: updatephp.php
<!DOCTYPE html>
<html>
<head>
<title></title>
<link href="style.css" rel="stylesheet" type="text/css">
</head>
<body>
<div class="maindiv">
<div class="divA">
<div class="title">
<h2>Update Data Using PHP</h2>
</div>
<div class="divB">
<div class="divD">
<p>Click On Menu</p>
<?php
$connection = mysql_connect("localhost", "root", "");
$db = mysql_select_db("company", $connection);
if (isset($_GET['submit'])) {
$id = $_GET['did'];
$name = $_GET['dname'];
$email = $_GET['demail'];
$mobile = $_GET['dmobile'];
$address = $_GET['daddress'];
$query = mysql_query("update employee set
employee_name='$name', employee_email='$email', employee_contact='$mobile',
employee_address='$address' where employee_id='$id'", $connection);
}
$query = mysql_query("select * from employee", $connection);
while ($row = mysql_fetch_array($query)) {
echo "<b><a href='updatephp.php?update={$row['employee_id']}'>{$row['employee_name']}</a></b>";
echo "<br />";
}
?>
</div><?php
if (isset($_GET['update'])) {
$update = $_GET['update'];
$query1 = mysql_query("select * from employee where employee_id=$update", $connection);
while ($row1 = mysql_fetch_array($query1)) {
echo "<form class='form' method='get'>";
echo "<h2>Update Form</h2>";
echo "<hr/>";
echo"<input class='input' type='hidden' name='did' value='{$row1['employee_id']}' />";
echo "<br />";
echo "<label>" . "Name:" . "</label>" . "<br />";
echo"<input class='input' type='text' name='dname' value='{$row1['employee_name']}' />";
echo "<br />";
echo "<label>" . "Email:" . "</label>" . "<br />";
echo"<input class='input' type='text' name='demail' value='{$row1['employee_email']}' />";
echo "<br />";
echo "<label>" . "Mobile:" . "</label>" . "<br />";
echo"<input class='input' type='text' name='dmobile' value='{$row1['employee_contact']}' />";
echo "<br />";
echo "<label>" . "Address:" . "</label>" . "<br />";
echo "<textarea rows='15' cols='15' name='daddress'>{$row1['employee_address']}";
echo "</textarea>";
echo "<br />";
echo "<input class='submit' type='submit' name='submit' value='update' />";
echo "</form>";
}
}
if (isset($_GET['submit'])) {
echo '<div class="form" id="form3"><br><br><br><br><br><br>
<Span>Data Updated Successfuly......!!</span></div>';
}
?>
<div class="clear"></div>
</div>
<div class="clear"></div>
</div>
</div><?php
mysql_close($connection);
?>
</body>
</html>
MySQL Code Segment:
Here is the MySQL code for creating database and table.
CREATE DATABASE company;
CREATE TABLE employee(
employee_id int(10) NOT NULL AUTO_INCREMENT,
employee_name varchar(255) NOT NULL,
employee_email varchar(255) NOT NULL,
employee_contact varchar(255) NOT NULL,
employee_address varchar(255) NOT NULL,
PRIMARY KEY (employee_id)
)
CSS File: style.css
@import "http://fonts.googleapis.com/css?family=Droid+Serif";
/* Above line is used to import Google font style */
.maindiv{
margin:0 auto;
width:980px;
height:500px;
background:#fff;
padding-top:20px;
font-size:14px;
font-family:'Droid Serif',serif
}
.title{
width:100%;
height:70px;
text-shadow:2px 2px 2px #cfcfcf;
font-size:16px;
text-align:center;
font-family:'Droid Serif',serif
}
.divA{
width:70%;
float:left;
margin-top:30px
}
.form{
width:400px;
float:left;
background-color:#f0f8ff;
font-family:'Droid Serif',serif;
padding-left:30px
}
.divB{
width:100%;
height:100%;
background-color:#f0f8ff;
border:dashed 1px #999
}
.divD{
width:200px;
height:480px;
float:left;
background-color:#f0f8ff;
border-right:dashed 1px #999
}
#form3{
color:green;
font-weight:700
}
p{
font-weight:700;
text-align:center;
color:#5678C0;
font-size:18px;
text-shadow:2px 2px 2px #cfcfcf
}
form h2{
text-align:center;
text-shadow:2px 2px 2px #cfcfcf
}
textarea{
width:250px;
height:60px;
border-radius:1px;
box-shadow:0 0 1px 2px #123456;
margin-top:10px;
padding:5px 0;
border:none
}
.input{
width:250px;
height:15px;
border-radius:1px;
box-shadow:0 0 1px 2px #123456;
margin-top:10px;
padding:5px 0;
border:none;
margin-bottom:20px
}
.submit{
color:#fff;
border-radius:3px;
background:#1F8DD6;
padding:5px;
margin-top:40px;
border:none;
width:100px;
height:30px;
box-shadow:0 0 1px 2px #123456;
font-size:16px
}
a{
text-decoration:none;
font-size:16px;
margin:2px 0 0 30px;
padding:3px;
color:#1F8DD6
}
a:hover{
text-shadow:2px 2px 2px #cfcfcf;
font-size:18px
}
.clear{
clear:both
}
Conclusion:
We showed you how Update command of MySQL is executed with PHP, soon we will be going to post DELETE command with PHP. Keep following us to catch more updates.
Get more realated information through these blogs –
How to implement CSS design in Select Option
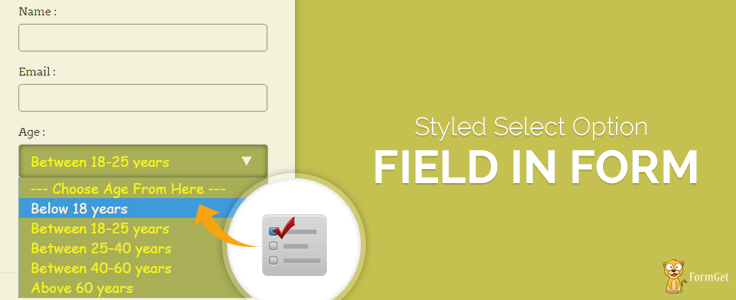
In this blog post , we will tell you to style your HTML drop down field.
We have created simple form with id=”myform” and add drop down field into it.
Now, with the help of CSS we have styled our form fields, just follow our codes or download it to use.

HTML File: drop_down.html
<!DOCTYPE html>
<html>
<head>
<title>Styled Drop-Down Field in Form - Demo Preview</title>
<meta content="noindex, nofollow" name="robots">
<link href="css/drop_down.css" rel="stylesheet"> <!-- Include CSS File Here-->
</head>
<body>
<div id="main">
<div id="first">
<h1>Styled Drop-Down Field in Form</h1>
<form id="myform" name="myform">
<label>Name :</label>
<input class="name" type="text">
<label>Email :</label>
<input class="email" type="text">
<label>Age :</label>
<select>
<option>--- Choose Age From Here ---</option>
<option>Below 18 years</option>
<option>Between 18-25 years</option>
<option>Between 25-40 years</option>
<option>Between 40-60 years</option>
<option>Above 60 years</option>
</select>
<input class="submit" type="submit" value="Submit">
</form>
</div>
</div>
</body>
</html>
CSS File: drop_down.css
@import "http://fonts.googleapis.com/css?family=Arvo";
/* Above line is used for online google font */
h1 {
text-align:center
}
hr {
border:0;
border-top:1px solid #ccc;
margin-bottom:-10px
}
div#main {
width:868px;
height:654px;
margin:20px auto;
font-family:'Arvo',serif
}
div#first {
width:350px;
height:615px;
padding:0 45px 20px;
border:1px dotted #ccc;
float:left
}
input {
width:340px;
height:35px;
border:1px solid gray;
padding-left:10px;
margin-top:8px;
border-radius:5px
}
select {
background-image:url(../images/arrow.png);
background-repeat:no-repeat;
background-position:300px;
width:353px;
padding:12px;
margin-top:8px;
font-family:Cursive;
line-height:1;
border-radius:5px;
background-color:#A2AB58;
color:#ff0;
font-size:20px;
-webkit-appearance:none;
box-shadow:inset 0 0 10px 0 rgba(0,0,0,0.6);
outline:none
}
select:hover {
color:#00ff7f
}
.submit {
width:353px;
height:45px;
color:#fff;
margin-top:170px;
background-color:#1067a2;
font-size:20px;
font-weight:700
}
Conclusion:
So, this way you can style your drop down field in more elegant fashion.
You may also like –
- CSS Background
- CSS Form Field Elements Having Icon
Disable Autocomplete in Form Fields With jQuery
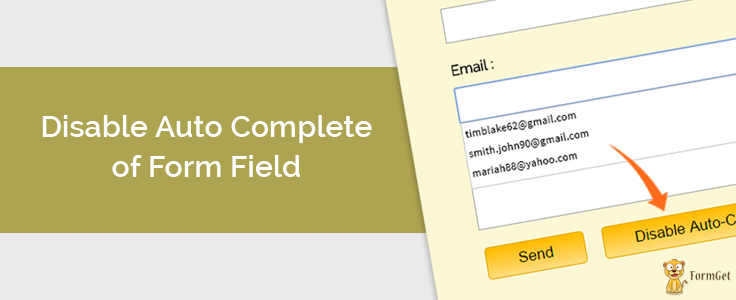
Autocomplete attribute of HTML is use to fetch previous input values in input fields.
Almost all browsers supports autocomplete attribute, by default this attribute is “on” in html.
If you want to disable this attribute ,you can set autocomplete=”off” in html input tag.
<input class="text" name="name" type="text" autocomplete="off">
Here, we will show you how you can do this with jQuery.
$("form").attr('autocomplete', 'off');
Below is our complete code with download and live demo option

HTML file: Disable_autocomplete.html
<!DOCTYPE html>
<html>
<head>
<title>Disable auto-complete in Form - Demo Preview</title>
<meta content="noindex, nofollow" name="robots">
<!-- Include CSS File Here-->
<link href="css/style.css" rel="stylesheet"
><!-- Include JS File Here-->
<script src="http://ajax.googleapis.com/ajax/libs/jquery/1.11.1/jquery.min.js"></script>
<script src="js/disable_autocomplete.js"></script>
</head>
<body>
<div class="main">
<div class="first">
<h1>Disable auto-complete in Form</h1>
<form>
<label>Name :</label>
<input class="text" name="name" type="text">
<label>Email :</label>
<input class="text" name="email" type="text">
<label>Message :</label>
<textarea class="text" rows="8">
</textarea>
<input class="send" type="submit" value="Send">
<button id="btn">Disable Auto-Complete</button>
<button id="btn1">Enable Auto-Complete</button>
</form>
</div>
</div>
</body>
</html>
JS file: disable_autocomplete.js
$(document).ready(function() {
$("#btn").click(function(e) {
e.preventDefault(); // To Prevent Form Submission Through This Button
$("form").attr('autocomplete', 'off'); // Switching form autocomplete attribute to off
$("#btn").hide();
$("#btn1").show();
});
$("#btn1").click(function(e) {
e.preventDefault(); // To Prevent Form Submission Through This Button.
$("form").attr('autocomplete', 'on'); // Switching form autocomplete attribute to on
$("#btn1").hide();
$("#btn").show();
});
});
CSS File: style.css
@import "http://fonts.googleapis.com/css?family=Droid+Serif";
/* Above line is used for online Google font */
h1{
text-align:center
}
div.main{
width:970px;
height:655px;
margin:50px auto;
font-family:'Droid Serif',serif
}
div.first{
width:424px;
height:623px;
float:left;
padding:15px 60px;
background:#f8f8ff;
border:1px dotted #ccc
}
.text{
width:404px;
padding:10px;
margin-top:10px
}
.send{
font-size:17px;
border:1px solid gray;
padding:7px 35px;
background-color:#E7E7E7;
margin-left:35px;
margin-top:15px;
cursor:pointer
}
button#btn{
font-size:17px;
border:1px solid gray;
padding:7px 35px;
background-color:#E7E7E7;
margin-left:16px;
cursor:pointer
}
button#btn1{
font-size:17px;
border:1px solid gray;
padding:7px 35px;
background-color:#E7E7E7;
margin-left:16px;
cursor:pointer;
display:none
}
Conclusion:
The above mentioned method is of the one way to disable autocomplete of form fields , there are some other ways to do it, however we will publish them later. Keep following us for getting more coding tricks.
Get more informative stuff here –
- Displaying Progress Bar On Form Submission Using jQuery
- jQuery Checkboxes – Uncheck/Check All
jQuery Form Validation

jQuery provides a validation plugin or library to validate your form, all you have to do is just import it in your script and use it in a simple way.
But, here we will show you a simple programming approach to validate your form using jQuery without importing jQuery validation library or plugin.
Below example contains an HTML form with some fields, we used following Regular Expressions (RegEx) in our jQuery codes to set validation rules :
RegEx for Name field:
/^[a-zA-Z]+$/;
RegEx for Email field:
/^[w-.+]+@[a-zA-Z0-9.-]+.[a-zA-z0-9]{2,4}$/;
RegEx for Address field:
/^[0-9a-zA-Z]+$/;
RegEx for Postal Zip field:
/^[0-9]+$/;
About Regular Expression
It pre-defines characters in the particular form field. So, when user entered data into the fields, regular expression matches the data.
The field will accept that character which the regular expression allow it to do.
If the character does not match, then alert will be display that notifies about wrong input to user. You can check out below, what these characters means:
. : Matches any single charcter except a new line

+ : Matches the preceding character or repeated character.

$ : Matches character at the end of the line.

.: Matches only period.

^ : Matches the beginning of a line or string.

: Escapes a special character.

- : Range indicator. [a-z, A-Z]

-: Escapes a special character.(e.g. escaping - by -)

[0-9] : It matches digital number from 0-9.

[a-z] : It matches characters from lowercase ‘a’ to lowercase ‘z’.

[A-Z] : It matches characters from uppercase ‘A’ to lowercase ‘Z’.

w: Matches a word character and underscore. (a-z, A-Z, 0-9, _).

W: Matches a non word character (%, #, @, !).

{M, N} : Donates minimum M and maximum N value.
In our example, jQuery code get executes for each form field, which matches the user input value with above defined RegEx. If, it got perfect match then function returns true otherwise, false

To learn more, we have our complete HTML, jQuery and Regular Expression references given below.
HTML file: formvalid.html
<!DOCTYPE html>
<html>
<head>
<title>Form Validation jQuery:Demo Preview</title>
<meta content="noindex, nofollow" name="robots">
<script src="http://ajax.googleapis.com/ajax/libs/jquery/1.11.1/jquery.min.js"></script>
<link href="formvalid.css" rel="stylesheet">
<script src="formvalid.js"></script>
</head>
<body>
<div class="main">
<h1>Form Validation Using jQuery</h1>
<div id="form">
<p id="head"></p> <!-- This Segment Displays The Validation Rule -->
<h2>Java script form validation</h2>
<form action="" method="post"> <!-- Form Starts From Here -->
<label>Full Name:</label>
<input id='firstname' type='text'>
<p id="p1"></p> <!--This Segment Displays The Validation Rule For Name-->
<label>Username(6-8 characters):</label>
<input id='username' type='text'>
<p id="p2"></p> <!-- This Segment Displays The Validation Rule For User Name -->
<label>Email:</label>
<input id='email' type='text'>
<p id="p3"></p> <!-- This Segment Displays The Validation Rule For Email -->
<label>State:</label>
<select id='state'>
<option>Please Choose</option>
<option>America</option>
<option>Australia</option>
<option>Sweden</option>
<option>Africa</option>
</select>
<p id="p4"></p> <!-- This Segment Displays The Validation Rule For Selection -->
<label>Address:</label>
<input id='addr' type='text'>
<p id="p5"></p> <!-- This Segment Displays The Validation Rule For Address -->
<label>Zip Code:</label>
<input id='zip' type='text'>
<p id="p6"></p> <!-- This Segment Displays The Validation Rule For Zip -->
<button id="submit">Check Form</button>
</form>
</div>
</div>
</body>
</html>
jQuery File: formvalid.js
$(document).ready(function() {
$('#submit').click(function(e) {
// Initializing Variables With Form Element Values
var firstname = $('#firstname').val();
var addr = $('#addr').val();
var zip = $('#zip').val();
var state = $('#state').val();
var username = $('#username').val();
var email = $('#email').val();
// Initializing Variables With Regular Expressions
var name_regex = /^[a-zA-Z]+$/;
var email_regex = /^[w-.+]+@[a-zA-Z0-9.-]+.[a-zA-z0-9]{2,4}$/;
var add_regex = /^[0-9a-zA-Z]+$/;
var zip_regex = /^[0-9]+$/;
// To Check Empty Form Fields.
if (firstname.length == 0) {
$('#head').text("* All fields are mandatory *"); // This Segment Displays The Validation Rule For All Fields
$("#firstname").focus();
return false;
}
// Validating Name Field.
else if (!firstname.match(name_regex) || firstname.length == 0) {
$('#p1').text("* For your name please use alphabets only *"); // This Segment Displays The Validation Rule For Name
$("#firstname").focus();
return false;
}
// Validating Username Field.
else if (!(username.length >= 6 && username.length <= 8) || username.length == 0) {
$('#p2').text("* Please enter between 6 and 8 characters *"); // This Segment Displays The Validation Rule For Username
$("#username").focus();
return false;
}
// Validating Email Field.
else if (!email.match(email_regex) || email.length == 0) {
$('#p3').text("* Please enter a valid email address *"); // This Segment Displays The Validation Rule For Email
$("#email").focus();
return false;
}
// Validating Select Field.
else if (state == "Please Choose") {
$('#p4').text("* Please Choose any one option"); // This Segment Displays The Validation Rule For Selection
$("#state").focus();
return false;
}
// Validating Address Field.
else if (!addr.match(add_regex) || addr.length == 0) {
$('#p5').text("* For Address please use numbers and letters *"); // This Segment Displays The Validation Rule For Address
$("#addr").focus();
return false;
}
// Validating Zip Field.
else if (!zip.match(zip_regex) || zip.length == 0) {
$('#p6').text("* Please enter a valid zip code *"); // This Segment Displays The Validation Rule For Zip
$("#zip").focus();
return false;
} else {
alert("Form Submitted Successfuly!");
return true;
}
});
});
CSS File: formvalid.css
@import "http://fonts.googleapis.com/css?family=Droid+Sans";
@import "http://fonts.googleapis.com/css?family=Roboto+Slab";
body {
font-family:'Droid Sans',sans-serif;
font-size:14px
}
.main {
width:960px;
margin:10px auto
}
div#form {
margin-top:80px;
margin-left:10px;
padding:20px 0 20px 20px;
width:500px;
border:1px dashed #000;
float:left
}
h2 {
text-align:center;
font-family:'Roboto Slab',serif
}
p {
font-size:12px;
color:red;
margin-left:185px
}
h1 {
margin-top:50px;
margin-left:60px
}
input {
width:250px;
height:27px;
padding:10,0,0,10px;
margin-top:10px;
border:1px solid #e3e3e3
}
#firstname {
margin-left:110px
}
#username {
margin-left:10px
}
#email {
margin-left:140px
}
#state {
margin-left:145px;
margin-top:10px
}
#addr {
margin-left:122px
}
#zip {
margin-left:119px
}
#submit {
width:100px;
height:35px;
margin-top:20px;
border:1px solid #000
}
Conclusion:
Thus, using above mentioned regular expressions and jQuery codes, you can define your own validation rules for your forms. Keep reading our other blogs.
You may also like –
Form Validation Using PHP

We have already explain about form validation using javascript and jQuery, but this time we will show you how to validate your form using PHP.
Very first we have to create a form in html setting action “#” and method “POST” with some fields, when a user clicks on submit button all the data starts travel in URL but it will be hidden, as we set method = “POST”.
Now, on page refresh, PHP code runs, all values fetches from URL into PHP variables and aplying “preg_match ( )“ function on them.

PHP Code segment from validation.php
<?php
// Initialize variables to null.
$nameError ="";
$emailError ="";
$genderError ="";
$websiteError ="";
// On submitting form below function will execute.
if(isset($_POST['submit'])){
if (empty($_POST["name"])) {
$nameError = "Name is required";
} else {
$name = test_input($_POST["name"]);
// check name only contains letters and whitespace
if (!preg_match("/^[a-zA-Z ]*$/",$name)) {
$nameError = "Only letters and white space allowed";
}
}
if (empty($_POST["email"])) {
$emailError = "Email is required";
} else {
$email = test_input($_POST["email"]);
// check if e-mail address syntax is valid or not
if (!preg_match("/([w-]+@[w-]+.[w-]+)/",$email)) {
$emailError = "Invalid email format";
}
}
if (empty($_POST["website"])) {
$website = "";
} else {
$website = test_input($_POST["website"]);
// check address syntax is valid or not(this regular expression also allows dashes in the URL)
if (!preg_match("/b(?:(?:https?|ftp)://|www.)[-a-z0-9+&@#/%?=~_|!:,.;]*[-a-z0-9+&@#/%=~_|]/i",$website)) {
$websiteError = "Invalid URL";
}
}
if (empty($_POST["comment"])) {
$comment = "";
} else {
$comment = test_input($_POST["comment"]);
}
if (empty($_POST["gender"])) {
$genderError = "Gender is required";
} else {
$gender = test_input($_POST["gender"]);
}
}
function test_input($data) {
$data = trim($data);
$data = stripslashes($data);
$data = htmlspecialchars($data);
return $data;
}
//php code ends here
?>
HTML Code segment from “validation.php”
<!DOCTYPE html>
<html>
<head>
<title>Form Validation with PHP - Demo Preview</title>
<meta content="noindex, nofollow" name="robots">
<link href="style.css" rel="stylesheet">
</head>
<body>
<div class="maindiv">
<div class="form_div">
<div class="title">
<h2>Form Validation with PHP.</h2>
</div>
<form action="validation.php" method="post">
<h2>Form</h2>
<span class="error">* required field.</span>
Name:
<input class="input" name="name" type="text" value="">
<span class="error">* <?php echo $nameError;?></span>
E-mail:
<input class="input" name="email" type="text" value="">
<span class="error">* <?php echo $emailError;?></span>
Gender:
<input class="radio" name="gender" type="radio" value="female">Female
<input class="radio" name="gender" type="radio" value="male">Male
<span class="error">*<?php echo $genderError;?></span>
Website:
<input class="input" name="website" type="text" value="">
<span class="error"><?php echo $websiteError;?></span>
Comment:
<textarea cols="40" name="comment" rows="5">
</textarea>
<input class="submit" name="submit" type="submit" value="Submit">
</form>
</div>
</body>
</html>
CSS File : style.css
@import "http://fonts.googleapis.com/css?family=Droid+Serif";
/* Above line is to import Google font style */
.maindiv{
margin:0 auto;
width:980px;
height:500px;
background:#fff;
padding-top:20px;
font-size:14px
}
.title{
width:500px;
height:70px;
text-shadow:2px 2px 2px #cfcfcf;
font-size:16px;
text-align:center;
font-family:'Droid Serif',serif
}
.form_div{
width:70%;
float:left
}
form{
width:440px;
border:1px dashed #ccc;
padding:10px 30px 40px;
background-color:#f0f8ff;
font-family:'Droid Serif',serif
}
form h2{
text-align:center;
text-shadow:2px 2px 2px #cfcfcf
}
textarea{
width:250px;
height:60px;
border-radius:1px;
box-shadow:0 0 1px 2px #123456;
margin-top:10px;
padding:5px;
border:none
}
.input{
width:250px;
height:15px;
border-radius:1px;
box-shadow:0 0 1px 2px #123456;
margin-top:10px;
padding:5px;
border:none;
margin-bottom:20px
}
.submit{
color:#fff;
border-radius:3px;
background:#1F8DD6;
padding:5px;
margin-top:40px;
border:none;
width:100px;
height:30px;
box-shadow:0 0 1px 2px #123456;
font-size:16px
}
.error{
color:red
}
.radio{
width:15px;
height:15px;
border-radius:1px;
margin-top:10px;
padding:5px;
border:none;
margin-bottom:20px
}
.formget{
float:right;
margin-top:85px
}
Conclusion:
Validation is very important aspect in data submission, hence we told you all the three methods to validate your form. keep learning our next posts.
Stylish Designs For Submit Button
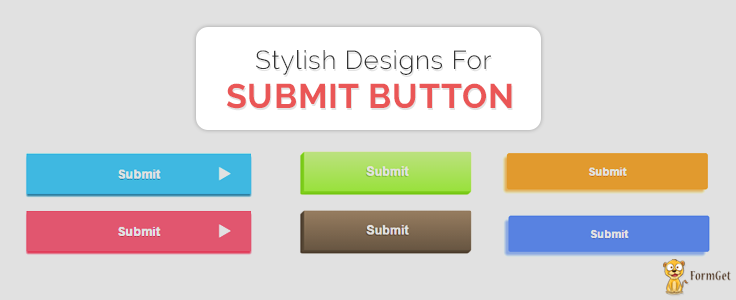
Cascading Style Sheets level 3 allow us to design various HTML elements in elegant fashion, submit button is one of them.
This blog post helps you to design stylish button using CSS-3.
Here are the HTML and CSS codes given below just follow the codes or download it and apply them to your button and give elegant style to it.

HTML file: design_submit_button.html
<!DOCTYPE html>
<html>
<head>
<title>Design Submit Button - Demo Preview</title>
<meta content="noindex, nofollow" name="robots">
<!-- Include CSS File Here-->
<link href="css/design_submit_button.css" rel="stylesheet">
</head>
<body>
<div id="main">
<div id="first">
<h1>Stylish Designs for Submit Button</h1>
<form id="myform" name="myform">
<h3>Type 1</h3>
<div class="btn">
<input class="button1" type="button" value="Submit">
</div>
<div class="btn">
<input class="button2" type="button" value="Submit">
</div>
<h3>Type 2</h3>
<div class="btn1">
<input class="button3" type="button" value="Submit">
</div>
<div class="btn1">
<input class="button4" type="button" value="Submit">
</div>
<h3>Type 3</h3>
<div class="btn">
<input class="button5" type="button" value="Submit">
</div>
<div class="btn">
<input class="button6" type="button" value="Submit">
</div>
</form>
</div>
</div>
</body>
</html>
CSS File: design_submit_button .css
@import "http://fonts.googleapis.com/css?family=Arvo";
/* Above line is used for online Google font */
hr{
border:0;
border-top:1px solid #ccc;
margin-bottom:-10px
}
div#main{
width:828px;
height:764px;
margin:0 auto;
font-family:'Arvo',serif
}
div#first{
width:350px;
height:740px;
padding:0 25px 20px;
float:left;
text-align:center
}
.btn{
width:260px;
height:50px;
margin-left:45px
}
.btn1{
width:260px;
height:85px;
margin-left:42px
}
.button1{
width:250px;
height:45px;
border:none;
outline:none;
box-shadow:0 3px 2px 0 #2c80a2;
color:#fff;
font-size:14px;
text-shadow:0 1px rgba(0,0,0,0.4);
background-color:#3fb8e8;
font-weight:700;
background-image:url(../images/1.png);
background-repeat:no-repeat;
background-position:200px
}
.button1:hover{
background-color:#1baae3;
cursor:pointer
}
.button1:active{
padding-top:2px;
box-shadow:none
}
.button2{
width:250px;
height:45px;
border:none;
outline:none;
color:#fff;
margin-top:20px;
font-size:14px;
background-color:#ff6a80;
text-shadow:0 1px rgba(0,0,0,0.4);
box-shadow:0 3px 2px 0 #ff3755;
font-weight:700;
background-image:url(../images/1.png);
background-repeat:no-repeat;
background-position:200px
}
.button2:hover{
background-color:#ff566f;
cursor:pointer
}
.button2:active{
padding-top:2px;
box-shadow:none
}
.button3{
color:#fff;
padding:20px 100px;
border:none;
outline:none;
font-size:20px;
text-shadow:-2px 2px 0 rgba(0,0,0,0.2);
font-weight:700;
transition:all .1s linear;
background:linear-gradient(to bottom,#bced7f,#99e43c);
box-shadow:-1px 0 1px #80d01d,0 1px 1px #80d01d,-2px 1px 1px #80d01d,-1px 2px 1px #80d01d,-3px 2px 1px #80d01d,-2px 3px 1px #80d01d,-4px 3px 1px #80d01d,-3px 4px 1px #80d01d,-5px 4px 1px #80d01d,-4px 5px 1px #72ba1a,-6px 5px 1px #72ba1a
}
.button3:active{
box-shadow:none;
-moz-transform:translate3d(-6px,6px,0);
-ms-transform:translate3d(-6px,6px,0);
-webkit-transform:translate3d(-6px,6px,0);
transform:translate3d(-6px,6px,0)
}
.button4{
color:#fff;
padding:20px 100px;
border:none;
outline:none;
font-size:20px;
text-shadow:-2px 2px 0 rgba(0,0,0,0.2);
font-weight:700;
transition:all .1s linear;
background:linear-gradient(to bottom,#977d60,#685642);
box-shadow:-1px 0 1px #584938,0 1px 1px #584938,-2px 1px 1px #584938,-1px 2px 1px #584938,-3px 2px 1px #584938,-2px 3px 1px #584938,-4px 3px 1px #584938,-3px 4px 1px #493c2e,-5px 4px 1px #493c2e,-4px 5px 1px #493c2e,-6px 5px 1px #493c2e
}
.button4:active{
box-shadow:none;
-moz-transform:translate3d(-6px,6px,0);
-ms-transform:translate3d(-6px,6px,0);
-webkit-transform:translate3d(-6px,6px,0);
transform:translate3d(-6px,6px,0)
}
.button5{
width:250px;
height:45px;
border:none;
outline:none;
box-shadow:-4px 4px 5px 0 #feb361;
color:#fff;
font-size:14px;
text-shadow:0 1px rgba(0,0,0,0.4);
background-color:#FE9A2E;
border-radius:3px;
font-weight:700
}
.button5:hover{
background-color:#FF8000;
cursor:pointer
}
.button5:active{
margin-left:-4px;
margin-bottom:-4px;
padding-top:2px;
box-shadow:none
}
.button6{
width:250px;
height:45px;
border:none;
outline:none;
box-shadow:-5px 5px 5px 0 #8aa7fb;
margin-top:20px;
color:#fff;
font-size:14px;
text-shadow:0 1px rgba(0,0,0,0.4);
background-color:#5882FA;
border-radius:3px;
font-weight:700
}
.button6:hover{
background-color:#2E64FE;
cursor:pointer
}
.button6:active{
margin-left:-5px;
margin-bottom:-5px;
padding-top:2px;
box-shadow:none
}
Conclusion:
Thus, giving style to button becomes more easy when you use CSS-3. learn more in next blog post.
Recommended blogs –
- CSS Float Property
- 12 Inspiring Form Designs You Will Love To See
Insert Data in Database Using PHP

Php is a server side scripting language it allows to store data into database at server level. In this post I will illustrate you how insert data with Sql insert query in PHP.
insert into tablename(column1,column2,...) values(value1,'value2',...);
Note : Value1 is written without single quotes, because it is an integer value and value2 is a string.
For example : value1 = 1 and value2 = Albert.
First of all, I have created HTML form, in which method is set to post ,to hide values in URL which flows on form submission.
Next, I wrote PHP code where the main functionality of insertion of values into database is performed.
At MySql database I have created a database named “colleges” and table named “students” which consists of five fields viz. “student_id”, “student_name”, “student_email”, “student_contact”, “student_address”.
Here in the download code provided below there is file naming db.sql in which sql queries are written for creating database, creating table and different columns in it.
You just need to import it in your phpmyadmin it will create the required tables.
MY-SQL Code
CREATE DATABASE IF NOT EXISTS colleges;
CREATE TABLE students(
student_name varchar(255) NOT NULL,
student_email varchar(255) NOT NULL,
student_contact varchar(255) NOT NULL,
student_address varchar(255) NOT NULL
)
After that use relevant path to run the program, like for example :
localhost/insert.php
Now fill the form fields and submit it, data will be saved to MySql database and a notification will be delivered “Data Submitted successfully”.
Watch out the live demo or download the code to use it

HTML File – insert.php
- Consists of form div “form”.
<!DOCTYPE html>
<html>
<head>
<title>PHP insertion</title>
<link href="css/insert.css" rel="stylesheet">
</head>
<body>
<div class="maindiv">
<!--HTML Form -->
<div class="form_div">
<div class="title">
<h2>Insert Data In Database Using PHP.</h2>
</div>
<form action="insert.php" method="post">
<!-- Method can be set as POST for hiding values in URL-->
<h2>Form</h2>
<label>Name:</label>
<input class="input" name="name" type="text" value="">
<label>Email:</label>
<input class="input" name="email" type="text" value="">
<label>Contact:</label>
<input class="input" name="contact" type="text" value="">
<label>Address:</label>
<textarea cols="25" name="address" rows="5"></textarea><br>
<input class="submit" name="submit" type="submit" value="Insert">
</form>
</div>
</div>
</body>
</html>
PHP Code segment
- Insert form information into database.
<?php
$connection = mysql_connect("localhost", "root", ""); // Establishing Connection with Server
$db = mysql_select_db("colleges", $connection); // Selecting Database from Server
if(isset($_POST['submit'])){ // Fetching variables of the form which travels in URL
$name = $_POST['name'];
$email = $_POST['email'];
$contact = $_POST['contact'];
$address = $_POST['address'];
if($name !=''||$email !=''){
//Insert Query of SQL
$query = mysql_query("insert into students(student_name, student_email, student_contact, student_address) values ('$name', '$email', '$contact', '$address')");
echo "<br/><br/><span>Data Inserted successfully...!!</span>";
}
else{
echo "<p>Insertion Failed <br/> Some Fields are Blank....!!</p>";
}
}
mysql_close($connection); // Closing Connection with Server
?>
Css File – insert.css
- Includes basic styling of HTML elements.
@import "http://fonts.googleapis.com/css?family=Droid+Serif";
/* The Above Line Is To Import Google Font Style */
.maindiv {
margin:30px auto;
width:980px;
height:500px;
background:#fff;
padding-top:20px;
font-family:'Droid Serif',serif;
font-size:14px
}
.title {
width:500px;
height:70px;
text-shadow:2px 2px 2px #cfcfcf;
font-size:16px;
text-align:center
}
.form_div {
width:70%;
float:left
}
form {
width:300px;
border:1px dashed #aaa;
padding:10px 30px 40px;
margin-left:70px;
background-color:#f0f8ff
}
form h2 {
text-align:center;
text-shadow:2px 2px 2px #cfcfcf
}
textarea {
width:100%;
height:60px;
border-radius:1px;
box-shadow:0 0 1px 2px #123456;
margin-top:10px;
padding:7px;
border:none
}
.input {
width:100%;
height:30px;
border-radius:2px;
box-shadow:0 0 1px 2px #123456;
margin-top:10px;
padding:7px;
border:none;
margin-bottom:20px
}
.submit {
color:#fff;
border-radius:3px;
background:#1F8DD6;
padding:5px;
margin-top:40px;
border:none;
width:100%;
height:30px;
box-shadow:0 0 1px 2px #123456;
font-size:18px
}
p {
color:red;
text-align:center
}
span {
text-align:center;
color:green
}
Conclusion:
I hope this tutorial helped you to insert data into database. If you want to share your feedback, you can easily do it via space provided below.
jQuery Enter Key Form Submit

Without submit button, it is possible to submit a form on pressing enter key, this tutorial demonstrates you to do the same using jQuery.
In our example, we have created a simple HTML form with some fields and applied following jQuery code in keydown() event on form.
$('#my_form').keydown(function() {
var key = e.which;
if (key == 13) {
// As ASCII code for ENTER key is "13"
$('#my_form').submit(); // Submit form code
}
});
Moreover, we used some validation on form fields. Just click on live demo to see its functionality, follow the codes given below or download it to use.

To learn more, our complete HTML and jQuery codes are given below:
HTML file: form.html
<!DOCTYPE html>
<html>
<head>
<title>Submit Form On Enter Key - Demo Preview</title>
<meta content="noindex, nofollow" name="robots">
<script src="http://ajax.googleapis.com/ajax/libs/jquery/1.11.1/jquery.min.js"></script>
<link href="style.css" rel="stylesheet" type="text/css">
<script src="script.js"></script>
</head>
<body>
<div class="maindiv">
<div class="first">
<div class="title">
<h2>Submit Form On Enter Key</h2>
</div><!-- Form Starts Here -->
<form action="#" id="my_form" method="post" name="my_form">
<h3>Form Title</h3>
<label>Full Name:</label><br>
<input class="text" id="name" type="name"><br><br>
<label>Email Id:</label><br>
<input class="text" id="email" type="email"><br><br>
<label>Message:</label><br>
<textarea class="text" id="message">
</textarea>
</form>
<!-- Form Ends Here -->
<p class="notification"><br><br>
Note: Fill complete form and hit the enter button. As soon as you<br>
hit enter key your form data will be submitted.<br>
</p>
</div>
</div>
</body>
</html>
jQuery File: script.js
$(document).ready(function() {
$('#my_form').keydown(function() {
var name = $("#name").val();
var email = $("#email").val();
var message = $("#message").val();
var key = e.which;
if (key == 13) {
if (name == "") {
alert("Name is Missing");
} else if (email == "") {
alert("Email Id is missing");
} else if (message == "") {
alert("Message is missing");
} else {
$('#my_form').submit();
alert("Form Submitted ...!!");
}
return false;
}
});
});
CSS File: style.css
@import "http://fonts.googleapis.com/css?family=Droid+Serif";
/* Above Line is to import Google font style */
.maindiv{
margin:30px auto;
width:980px;
height:500px;
background:#fff;
padding-top:20px;
font-family:'Droid Serif',serif;
font-size:14px
}
textarea{
width:420px;
height:60px;
border-radius:4px;
box-shadow:0 0 1px 2px #123456;
margin-top:10px;
padding:2px 7px
}
input{
width:420px;
height:20px;
border-radius:4px;
box-shadow:0 0 1px 2px #123456;
margin-top:10px;
padding:2px 7px
}
.first{
width:70%;
float:left
}
.title{
width:500px;
height:70px;
text-shadow:2px 2px 2px #cfcfcf;
margin-top:40px;
font-size:16px;
text-align:center
}
form{
border:1px dashed #777;
padding:0 20px 20px;
width:450px
}
h3{
padding-bottom:15px;
text-align:center;
color:#333;
font-size:20px;
text-shadow:2px 2px 2px #cfcfcf
}
.notification{
color:#777
}
Conclusion:
So, with pressing enter key it is possible to submit your form. Now use our simple code in your form.
You may also like –
- jQuery Add Option to Select Tag in Form
- jQuery Multi Step Form
Textarea Enter Key Submit Data using jQuery

In this blog post we have illustrated about text submission from textarea on pressing enter key using jQuery, which you can also implement in other form fields too.
To submit text from the message box first of all we have applied validations in it
if (message == "")
{
alert("Enter Some Text In Textarea");
 }
and as soon as enter key is pressed, text from textarea will be submitted.
$('#my_form').submit();
 alert("Successfully submitted:- " + message);
Watch our Live Demo given below or download it to implement in your forms.

HTML file: index.html
<!DOCTYPE html>
<html>
<head>
<title>Submit Data On Enter Key - Demo Preview</title>
<script src="http://ajax.googleapis.com/ajax/libs/jquery/1.11.1/jquery.min.js"></script>
<link href="style.css" rel="stylesheet" type="text/css">
<script src="script.js"></script>
</head>
<body>
<div id="maindiv">
<div id="first">
<div id="title">
<h2>Submit Data Of Textarea On Enter Key</h2>
</div>
<!-- Form Starts Here -->
<form action="#" id="my_form" method="post" name="my_form">
<label>Type Message:</label><br>
<textarea id="text" placeholder="Your Message...">
</textarea>
</form>
<!-- Form Ends Here -->
<p class="notification"><br><br>
Note: Write some text on textarea and hit the enter button. As soon as<br>
you hit enter key your data will be submitted.<br></p>
</div>
</div>
</body>
</html>
jQuery File: script.js
$(document).ready(function() {
$('#text').keydown(function() {
var message = $("textarea").val();
if (event.keyCode == 13) {
if (message == "") {
alert("Enter Some Text In Textarea");
} else {
$('#my_form').submit();
alert("Succesfully submitted:- " + message);
}
$("textarea").val('');
return false;
}
});
});
CSS File: style.css
@import "http://fonts.googleapis.com/css?family=Droid+Serif";
/* Above line is to import Google Font Style */
div#maindiv{
margin:30px auto;
width:980px;
height:500px;
background:#Fff;
padding-top:20px;
font-family:'Droid Serif',serif;
font-size:14px
}
#text{
width:420px;
height:60px;
border-radius:4px;
box-shadow:0 0 2px 2px #123456;
margin-top:10px;
clear:both
}
#first{
width:65%;
float:left
}
#title{
width:500px;
height:70px;
text-shadow:2px 2px 2px #cfcfcf;
margin-top:40px;
font-size:16px
}
.notification{
color:#777
}
Conclusion:
So, pressing enter key it is possible to submit your form data with applied validations in it , to check whether field is not left blank before submitting. Now you can use our simple code in your form to experience it & keep reading our blogs for getting more coding tricks.
Get more related stuff here –
Reset Form Fields Using JavaScript
If you want to do JavaScript reset on your form fields go with this one line JavaScript code.
document.getElementById(selector).reset();Some times it becomes very important to reset your form fields, here we explain how it can be done in simple way. We have to catch form by it’s ID and apply a javascript reset() function on it.
Just click on live demo to see RESET fields functionality, follow the codes given below or download it to use.

HTML file: reset_form.html
<!DOCTYPE html>
<html>
<head>
<title>Reset form fields value using JavaScript - Demo Preview</title>
<meta content="noindex, nofollow" name="robots">
<!-- Include CSS File Here -->
<link href="css/reset_form.css" rel="stylesheet">
<!-- Include JS File Here -->
<script src="js/reset_form.js"></script>
</head>
<body>
<div id="main">
<!--=================================================================
First Div For Form
===================================================================-->
<div id="first">
<h1>Please fill this form and check reset button.</h1>
<form id="myform" name="myform">
<label>First name :</label><br>
<input id="fname" name="fname" placeholder="First Name" type="text"><br><br>
<label>Last name :</label><br>
<input id="lname" name="lname" placeholder="Last Name" type="text"><br><br>
<label>Email :</label><br>
<input id="email" name="email" placeholder="Email" type="text"><br><br>
<label>Contact No. :</label><br>
<input id="contact" name="contact" placeholder="Contact No." type="text"><br><br>
<input align="middle" id="button" onclick="resetform()" type="button" value="Reset Form">
</form>
</div>
</div>
</body>
</html>
JS File: reset_form.js
This file contains javascript one line function to reset form fields.
function resetform() {
document.getElementById("myform").reset();
}
CSS file: reset_form.css
@import "http://fonts.googleapis.com/css?family=Rokkitt";
/*-------------------------------------------------------------
CSS for Required Elements .
------------------------------------------------------------*/
h1,p{
clear:both;
margin-bottom:15px;
text-align:center
}
hr{
margin-bottom:20px
}
div#main{
width:900px;
height:500px;
margin:20px auto;
font-family:'Rokkitt',serif
}
div#first{
width:400px;
padding:0 40px 20px;
float:left;
background-color:#dcdcdc;
margin:10px
}
label{
font-size:20px
}
input{
width:390px;
height:30px;
font-size:14px;
box-shadow:0 0 5px;
-webkit-box-shadow:0 0 5px;
/* For Chrome & Safari Browser */
-moz-box-shadow:0 0 5px;
/* For Mozilla Web Browser */
border-style:none;
margin-top:5px;
padding-left:10px
}
#button{
display:block;
margin:0 auto;
width:100px;
font-family:'Rokkitt',serif;
box-shadow:0 0 5px;
text-shadow:1px 1px 1px #949494;
background-color:silver;
font-size:18px
}
Conclusion:
We explained about JavaScript reset() to reset your form fields. Now it becomes easy to use it.
jQuery Form Shake Effect on Invalid Entry
This segment defines, how you can put shake effect on a form for invalid entry without refreshing page.
Here we have done this with jQuery using .effect() method.
$(selector).effect("shake");
We have set “[email protected]” and “fugo” as user ID and password respectively for our login form. When a user try to enter different user ID or Password , form will shake and an alert message will be shown in form.
Shake effect in jQuery can only be used by including a js library
<script src="http://code.jquery.com/ui/1.10.4/jquery-ui.js"></script>as shown in below code .
Just follow the code or download it to use .

HTML File: login.html
<!DOCTYPE html>
<html>
<head>
<title>Login form - Demo Preview</title>
<meta content="noindex, nofollow" name="robots">
<script src="http://code.jquery.com/jquery-1.10.2.js"></script>
<script src="script.js"></script>
<link href="style.css" rel="stylesheet">
<!-- Including below JS library is mandatory to use shake effect -->
<script src="http://code.jquery.com/ui/1.10.4/jquery-ui.js"></script>
</head>
<body>
<div id="maindiv">
<!--=========================================================================================
Shake Effect Login Form HTML Starts Here
===========================================================================================-->
<div id="first">
<div id="title">
<h2>Shake Form on Invalid Login</h2>
</div>
<form id="login" name="login">
<h3>Login Form</h3>
<input class="textbox" id="email" name="email" placeholder="Email" type="email">
<input class="textbox" id="password" name="password" placeholder="Password" type="password">
<input id="login_button" type="button" value=" Login ">
<div id="message"></div>
</form>
<div id="last">
Example:<br>
Email : <span>[email protected]</span><br>
Password : <span>fugo</span>
</div>
</div>
</div>
</body>
</html>
jQuery File: script.js
$(document).ready(function() {
// Start when document will be ready.
$("#login_button").click(function() {
var email = $("#email").val(); // Store E-mail input value in the variable email.
var password = $("#password").val(); // Store Password input value in the variable password.
/* Check if [email protected] and password=fugo then,Show the message Account Validated!!! in the Div having id message.*/
if (email == "[email protected]" && password == "fugo") {
$("#message").html("Account Validated!!!");
}
/* If E-mail and Password do not match then shake Div having id maindiv and show the message "***Invalid email or password***" in the div having id message.*/
else {
$("#login").effect("shake");
$("#message").html('***Invalid email or password***');
}
});
});
CSS File: style.css
Styling various form elements .
@import url(http://fonts.googleapis.com/css?family=Droid+Serif);
/*-------------------------------------------------------
CSS for required elements.
---------------------------------------------------------*/
div#maindiv {
margin:30px auto;
width: 980px;
height: 500px;
background: #Ffffff;
padding-top:20px;
font-family: 'Droid Serif', serif;
font-size:14px;
}
.textbox {
border: 1px solid #c4c4c4;
height: 30px;
width: 250px;
padding:4px;
border-radius:4px;
-webkit-border-radius:4px;
-moz-border-radius:4px;
box-shadow:0px 0px 8px #d9d9d9;
-moz-box-shadow:0px 0px 8px #d9d9d9;
-webkit-box-shadow:0px 0px 8px #d9d9d9;
}
.textbox:focus {
border: 1px solid #7bc1f7;
}
div#message{
color:red;
width:100%;
margin-top:20px;
}
input#login_button {
background-color:#33bdef;
border-radius:4px;
-webkit-border-radius:4px;
-moz-border-radius:4px;
border:1px solid #057fd0;
color:#ffffff;
padding:4px;
margin-top:10px;
}
span {
color:green;
}
#login {
clear:both;
width:400px;
float:left;
border-radius:5px;
box-shadow:0px 0px 8px #123456;
height:280px;
}
#first {
width:60%;
float:left;
text-align:center;
margin-left:100px;
}
#title {
width:400px;
height:70px;
text-shadow:2px 2px 2px #cfcfcf;
margin-top:30px;
font-size:16px;
}
#last {
clear:both;
padding-top:30px;
width:400px;
}
Conclusion:
Hence, to provide shake effect we must include js library as shown in html code and need to use .effect(‘shake’) method of jQuery in our code. That will add up an alert effect in form when someone tries to enter invalid log in details.
Keep reading our other blog posts for getting more coding tricks and knowledge.
Recommended blogs –
- Upload Multiple Images Using PHP and jQuery
- jQuery Login Form
Form Field Elements having Icon Inside it
This code segment emphasize on creating input form elements that consists of Icons. There is Email field, Name Field, Contact Name and Address fields so we have to put icon inside the form fields.
To put icon inside the form field, we have to fetch form field using id and then use CSS to set background inside the form fields using it’s background properties :
background-image:url(.....);
background-repeat:no-repeat;
background-position:6px;
So, just view its Live Demo , download the code and attach it to your website to make it attractive.
![]()
HTML File: formicon.html
We are creating a contact form using HTML. Form is defined in Div name “first”.
<!DOCTYPE html>
<html>
<head>
<title>Icon inside Input Field - Demo Preview</title>
<meta content="noindex, nofollow" name="robots">
<link href="css/formicon.css" rel="stylesheet">
</head>
<!-- Include CSS File Here -->
<body>
<div id="first">
<img id="logo" src="images/logo.png">
<label>Full Name :</label>
<input id="fname" placeholder="Full Name" type="text">
<label>Email :</label>
<input id="email" placeholder="Email" type="text">
<label>Contact Number :</label>
<input id="contact" placeholder="Contact Number" type="text">
<label>Address :</label>
<input id="address" placeholder="Address" type="text">
<input id="submit" type="submit" value="Submit">
</div>
</body>
</html>
CSS File: formicon.css
Styling form fields elements and placing icons inside it .
/* Below line is used to import font-family: Raleway from Google Fonts (optional)*/
@import "http://fonts.googleapis.com/css?family=Raleway";
body{
font-family:'Raleway',sans-serif
}
img#logo{
margin-left:90px
}
div#first{
width:350px;
height:auto;
margin:50px auto 0;
padding:20px 25px;
background-color:#EEE;
color:#333;
border:2px solid #C2D6FF;
border-radius:5px;
border-radius:40px 0 40px 0
}
label{
font-size:15px;
font-weight:700
}
input#fname{
background-image:url(../images/icon_name.png);
background-repeat:no-repeat;
background-position:6px;
border:1px solid #DADADA;
margin-top:10px;
padding-left:35px;
width:310px;
height:30px;
font-size:14px;
box-shadow:0 0 10px;
-webkit-box-shadow:0 0 10px;
/* For I.E */
-moz-box-shadow:0 0 10px;
/* For Mozilla Web Browser*/
border-radius:5px;
-webkit-border-radius:5px;
/* For I.E */
-moz-border-radius:5px
/* For Mozilla Web Browser*/
}
input#email{
background-image:url(../images/email.png);
background-repeat:no-repeat;
background-position:6px;
border:1px solid #DADADA;
margin-top:10px;
padding-left:35px;
width:310px;
height:30px;
font-size:14px;
box-shadow:0 0 10px;
-webkit-box-shadow:0 0 10px;
/* For I.E */
-moz-box-shadow:0 0 10px;
/* For Mozilla Web Browser*/
border-radius:5px;
-webkit-border-radius:5px;
/* For I.E */
-moz-border-radius:5px
/* For Mozilla Web Browser*/
}
input#contact{
background-image:url(../images/mobile.png);
background-repeat:no-repeat;
background-position:6px;
border:1px solid #DADADA;
margin-top:10px;
padding-left:35px;
width:310px;
height:30px;
font-size:14px;
box-shadow:0 0 10px;
-webkit-box-shadow:0 0 10px;
/* For I.E */
-moz-box-shadow:0 0 10px;
/* For Mozilla Web Browser*/
border-radius:5px;
-webkit-border-radius:5px;
/* For I.E */
-moz-border-radius:5px
/* For Mozilla Web Browser*/
}
input#address{
background-image:url(../images/home.png);
background-repeat:no-repeat;
background-position:6px;
border:1px solid #DADADA;
margin-top:10px;
padding-left:35px;
width:310px;
height:30px;
font-size:14px;
box-shadow:0 0 10px;
-webkit-box-shadow:0 0 10px;
/* For I.E */
-moz-box-shadow:0 0 10px;
/* For Mozilla Web Browser*/
border-radius:5px;
-webkit-border-radius:5px;
/* For I.E */
-moz-border-radius:5px
/* For Mozilla Web Browser*/
}
input#submit{
background-color:#FF9980;
border-radius:5px;
border:none;
padding:10px 25px;
color:#FFF;
text-shadow:1px 1px 1px #949494;
margin-left:120px
}
input#submit:hover{
background-color:#80A24A
}
Conclusion:
So, in this blog post we have learned to place icons inside the form fields elements. Hope you find it easy if have any issues do reply in the comments.
Have a look on some more related stuffs –
- CSS Background
- 12 Inspiring Form Designs You Will Love To See