

CodeIgniter comes with various pre-defined settings in it’s config.php file, but for form processing developer needs to manually configure some parameters.
This tutorial will demonstrate how to configure manually your CodeIgniter framework for form processing.
Configuration:
- Unzip the codeigniter package and upload its files and folders to your server.
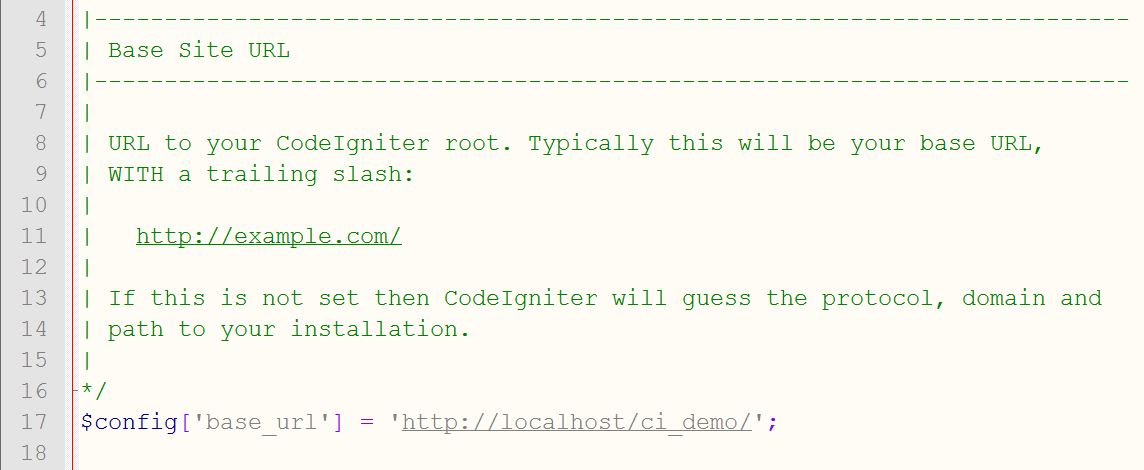
- Open application/config/config.php file with any text editor and set your base_url(), also set an encryption key (if there is a requirment of session in your CodeIgniter application) as shown below.

- If your form accesses MySql database then, Open application/config/database.php file with any text editor set your default hostname, default username, default password and default database (if required) as shown below.

- For forms you have to load helpers in your CodeIgniter as : open application/config/autoload.php and set helper as shown below.

- If you want to auto load some libraries like database, session you can set it in application/config/autoload.php as shown below.

- For Form Validation you can directly load CodeIgniter’s Validation library in your controller function as shown below.
$this->load->library('form_validation');Click here, to learn more about Form Validation in CodeIgniter.
Click here, to learn about Form Creation in CodeIgniter.

Conclusion:
This was all about configuring CodeIgniter for form processing. Read our other Blogs to learn CodeIgniter form with database processing.
Send an Email on Form Submission Using PHP

Sending Mail to specific email becomes a global issue for website development. Online communication for any organization with customers or users is done either by emailing them or through comments. These organizations or companies uses feedback or contact form to communicate with users.

Through these forms, the user is able to send his/her suggestion or feedback via email to respective organization.
Here, In this blog, we will show you, how to use mail() function of PHP to send information like suggestions/messages to the specific email address on form submission.
we used following PHP mail() function with four parameters to send email as follows:
mail("$to", $subject, $message, $headers);
- Here, $to variable is to store reciever’s email id.
- $subject is a variable to store mail subject.
- $message is a variable to store user’s message.
- $headers contains other email parameters like BCc, Cc etc.
You can download our zip file or simply follow our code and edit it to use.
-:See Also:-

Note : Mail function works only on a web server that supports mail sending functionality. It’s not working on localhost.
Most of the new host company has stopped PHP (mail) functioning, because using this spammer can send a thousand of emails. If your host not enabled with PHP mail function you can send using PHP Mailer Class.
HTML file: secure_email_form.php
Here, we have created a simple html Feedback Form as shown below.
<!DOCTYPE html>
<html>
<head>
<title>FeedBack Form With Email Functionality</title>
<link href="css/elements.css" rel="stylesheet">
</head>
<!-- Body Starts Here -->
<body>
<div class="container">
<!-- Feedback Form Starts Here -->
<div id="feedback">
<!-- Heading Of The Form -->
<div class="head">
<h3>FeedBack Form</h3>
<p>This is feedback form. Send us your feedback !</p>
</div>
<!-- Feedback Form -->
<form action="#" id="form" method="post" name="form">
<input name="vname" placeholder="Your Name" type="text" value="">
<input name="vemail" placeholder="Your Email" type="text" value="">
<input name="sub" placeholder="Subject" type="text" value="">
<label>Your Suggestion/Feedback</label>
<textarea name="msg" placeholder="Type your text here..."></textarea>
<input id="send" name="submit" type="submit" value="Send Feedback">
</form>
<h3><?php include "secure_email_code.php"?></h3>
</div>
<!-- Feedback Form Ends Here -->
</div>
</body>
<!-- Body Ends Here -->
</html>
PHP File: secure_email_code.php
As User fills the above Html form and clicks on send button, following php code will executes.
<?php
if(isset($_POST["submit"])){
// Checking For Blank Fields..
if($_POST["vname"]==""||$_POST["vemail"]==""||$_POST["sub"]==""||$_POST["msg"]==""){
echo "Fill All Fields..";
}else{
// Check if the "Sender's Email" input field is filled out
$email=$_POST['vemail'];
// Sanitize E-mail Address
$email =filter_var($email, FILTER_SANITIZE_EMAIL);
// Validate E-mail Address
$email= filter_var($email, FILTER_VALIDATE_EMAIL);
if (!$email){
echo "Invalid Sender's Email";
}
else{
$subject = $_POST['sub'];
$message = $_POST['msg'];
$headers = 'From:'. $email2 . "rn"; // Sender's Email
$headers .= 'Cc:'. $email2 . "rn"; // Carbon copy to Sender
// Message lines should not exceed 70 characters (PHP rule), so wrap it
$message = wordwrap($message, 70);
// Send Mail By PHP Mail Function
mail("[email protected]", $subject, $message, $headers);
echo "Your mail has been sent successfuly ! Thank you for your feedback";
}
}
}
?>
CSS File: elements.css
Styling HTML form is done here.
@import "http://fonts.googleapis.com/css?family=Raleway";
/*----------------------------------------------
CSS Settings For HTML Div ExactCenter
------------------------------------------------*/
h3,p,label {
text-align:center;
font-family:'Raleway',sans-serif;
color:#006400
}
h2 {
font-family:'Raleway',sans-serif
}
input {
width:100%;
margin-bottom:20px;
padding:5px;
height:30px;
box-shadow:1px 1px 12px gray;
border-radius:3px;
border:none
}
textarea {
width:100%;
height:80px;
margin-top:10px;
padding:5px;
box-shadow:1px 1px 12px gray;
border-radius:3px
}
#send {
width:103%;
height:45px;
margin-top:40px;
border-radius:3px;
background-color:#cd853f;
border:1px solid #fff;
color:#fff;
font-family:'Raleway',sans-serif;
font-size:18px
}
div#feedback {
text-align:center;
height:520px;
width:330px;
padding:20px 25px 20px 15px;
background-color:#f3f3f3;
border-radius:3px;
border:1px solid #cd853f;
font-family:'Raleway',sans-serif;
float:left
}
.container {
width:960px;
margin:40px auto
}
Conclusion:
So, you have learnt how to send an email on form submission. Further, you can even notify your users the details regarding their form submission using several email marketing services with higher profficiency. To know more about these services, you can go through the following blog-
CodeIgniter Update Data In Database

In our previous codeIgniter tutorials, we explained you, how to perform insertion and deletion operation on database using CodeIgniter. Now, this tutorial demonstrates you, how to perform Updation operation on database using CodeIgniter framework. Watch our live demo or download the update_ci.zip file from below link, extract files and include them in view, controller and model directory of your codeigniter framework as shown in the Read Me.txt file.
-: See Also :-

VIEW FILE: update_view.php
In this, we fetched all the names from data base and showed them in links. As user clicks on a particular name, its details appears in form on the right side with update button. User can click on Update button to Update his/her record in table.
<html>
<head>
<title>Update Data In Database Using CodeIgniter</title>
<link href='http://fonts.googleapis.com/css?family=Marcellus' rel='stylesheet' type='text/css'>
<link rel="stylesheet" type="text/css" href="<?php echo base_url(). "css/update.css" ?>">
</head>
<body>
<div id="container">
<div id="wrapper">
<h1>Update Data In Database Using CodeIgniter </h1><hr/>
<div id="menu">
<p>Click On Menu</p>
<!-- Fetching Names Of All Students From Database -->
<ol>
<?php foreach ($students as $student): ?>
<li><a href="<?php echo base_url() . "index.php/update_ctrl/show_student_id/" . $student->student_id; ?>"><?php echo $student->student_name; ?></a></li>
<?php endforeach; ?>
</ol>
</div>
<div id="detail">
<!-- Fetching All Details of Selected Student From Database And Showing In a Form -->
<?php foreach ($single_student as $student): ?>
<p>Edit Detail & Click Update Button</p>
<form method="post" action="<?php echo base_url() . "index.php/update_ctrl/update_student_id1"?>">
<label id="hide">Id :</label>
<input type="text" id="hide" name="did" value="<?php echo $student->student_id; ?>">
<label>Name :</label>
<input type="text" name="dname" value="<?php echo $student->student_name; ?>">
<label>Email :</label>
<input type="text" name="demail" value="<?php echo $student->student_email; ?>">
<label>Mobile :</label>
<input type="text" name="dmobile" value="<?php echo $student->student_mobile; ?>">
<label>Address :</label>
<input type="text" name="daddress" value="<?php echo $student->student_address; ?>">
<input type="submit" id="submit" name="dsubmit" value="Update">
</form>
<?php endforeach; ?>
</div>
</div>
</div>
</body>
</html>
CONTROLLER FILE: update_ctrl.php
Copy the below file in your controller directory.
<?php
class update_ctrl extends CI_Controller{
function __construct(){
parent::__construct();
$this->load->model('update_model');
}
function show_student_id() {
$id = $this->uri->segment(3);
$data['students'] = $this->update_model->show_students();
$data['single_student'] = $this->update_model->show_student_id($id);
$this->load->view('update_view', $data);
}
function update_student_id1() {
$id= $this->input->post('did');
$data = array(
'Student_Name' => $this->input->post('dname'),
'Student_Email' => $this->input->post('demail'),
'Student_Mobile' => $this->input->post('dmobile'),
'Student_Address' => $this->input->post('daddress')
);
$this->update_model->update_student_id1($id,$data);
$this->show_student_id();
}
}
?>
MODEL FILE: update_model.php
Create new class in your model as shown below.
<?php
class update_model extends CI_Model{
// Function To Fetch All Students Record
function show_students(){
$query = $this->db->get('students');
$query_result = $query->result();
return $query_result;
}
// Function To Fetch Selected Student Record
function show_student_id($data){
$this->db->select('*');
$this->db->from('students');
$this->db->where('student_id', $data);
$query = $this->db->get();
$result = $query->result();
return $result;
}
// Update Query For Selected Student
function update_student_id1($id,$data){
$this->db->where('student_id', $id);
$this->db->update('students', $data);
}
}
?>
My SQL Code Segment:
To create database and table, execute following codes in your My SQL .
CREATE DATABASE college;
CREATE TABLE students(
student_id int(10) NOT NULL AUTO_INCREMENT,
student_name varchar(255) NOT NULL,
student_email varchar(255) NOT NULL,
student_contact varchar(255) NOT NULL,
student_address varchar(255) NOT NULL,
PRIMARY KEY (student_id)
)
CSS FILE: update.css
Styling HTML Elements.
#container {
width:622px;
height:610px;
margin:50px auto
}
#wrapper {
width:520px;
padding:0 50px 20px;
background:linear-gradient(#fff,#AFEBD8);
border:1px solid #ccc;
box-shadow:0 0 5px;
font-family:'Marcellus',serif;
float:left;
margin-top:10px
}
#menu {
float:left;
width:200px;
margin-top:-30px
}
#detail {
float:left;
width:320px;
margin-top:-27px
}
a {
text-decoration:none;
color:blue
}
a:hover {
color:red
}
li {
padding:4px 0
}
h1 {
text-align:center;
font-size:28px
}
hr {
border:0;
border-bottom:1.5px solid #ccc;
margin-top:-10px;
margin-bottom:30px
}
#hide {
display:none
}
form {
margin-top:-40px
}
label {
font-size:17px
}
input {
width:100%;
padding:8px;
margin:5px 0 15px;
border:none;
box-shadow:0 0 5px
}
input#submit {
margin-top:10px;
font-size:18px;
background:linear-gradient(#22abe9 5%,#36caf0 100%);
border:1px solid #0F799E;
color:#fff;
font-weight:700;
cursor:pointer;
text-shadow:0 1px 0 #13506D
}
input#submit:hover {
background:linear-gradient(#36caf0 5%,#22abe9 100%)
}
p {
font-size:18px;
font-weight:700;
color:#18af0b
}
Conclusion: So, this was all about updating data in database using codeigniter framework. Keep following us to learn more.
How to Setup Google Captcha PHP

Google captcha is used in forms to avoid spam users in websites. It also provide security to your contact form.
But, the thing is how to use it?
We do a lot of search in Google to understand how to add Google captcha in our from.
In Our previous blog post Captcha using PHP and jQuery, we have explained you how to create and implement your own captcha using PHP, jQuery and AJAX in your forms.
Now this blog post guide you to setup that captcha for your forms. Now to set it up, you need to use captcha library offered by Google.
That captcha library contains captcha.php file , which we will include in our PHP file i.e form.php to produce captcha image.

HTML Form File: form.php
We have created a simple HTML form here and included google captcha image generated from captcha.php .
<!DOCTYPE html>
<html>
<head>
<title>Google Captcha Protection in form- Demo Preview</title>
<meta content="noindex, nofollow" name="robots">
<link href="style.css" rel="stylesheet" type="text/css">
<script src="http://ajax.googleapis.com/ajax/libs/jquery/1.11.1/jquery.min.js"></script>
<script src="scripts.js"></script>
</head>
<body>
<div id="mainform">
<div class="innerdiv">
<!-- Required Div Starts Here -->
<h2>Captcha creation using Google Library</h2>
<form id="myForm" method="post" name="myForm">
<h3>Fill Your Information!</h3>
<table>
<tr>
<!-- Including Google Captcha image from captcha.php -->
<td>
<img id="captcha_img" src="captcha.php">
<span id="reload">Can't read? try another one</span>
</td>
</tr>
<tr>
<td>Enter Text:</td>
<td><input id="captcha1" name="captcha" type="text"></td>
</tr>
<tr>
<td>
<input id="button" type='submit' value='Submit'>
</td>
</tr>
</table>
<?php include 'verify.php';?>
</form>
</div>
</div>
</body>
</html>
jQuery Code : scripts.js
Here, we can change captcha by clicking change captcha link.
$(document).ready(function() {
$("#reload").click(function() {
$("#captcha_img").attr("src", "captcha.php");
});
});
VERIFYING CAPTCHA : verify.php
Verifying user input CAPTCHA text with google generated CAPTCHA .
<?php
if (isset($_POST["captcha"])) {
session_start();
// Verifying user input captcha text with Google generated captcha.
if ($_SESSION["captcha"] == $_POST["captcha"]) {
echo "<b class="correct">Correct Code Entered..!!</b>";
}else {
echo "<b class="wrong">Wrong Code Entered..!!</b>";
}
unset($_SESSION['captcha']);
}
?>
CSS File: style.css
Styling HTML elements.
@import "http://fonts.googleapis.com/css?family=Fauna+One|Muli";
#mainform{
width:960px;
margin:20px auto;
padding-top:20px;
font-family:'Fauna One',serif
}
#mainform h2{
width:100%;
float:left;
text-align:center;
margin-top:35px
}
.innerdiv{
width:65%;
float:left
}
form{
background-color:#fff;
color:#123456;
box-shadow:1px 1px 22px #c2c2c2;
width:500px;
margin:50px 250px 0 50px;
float:left;
height:430px;
text-align:center
}
h3{
margin-top:0;
margin-bottom:10px;
color:#fff;
background-color:#ff8c00;
text-align:center;
width:100%;
height:50px;
padding-top:30px
}
input{
width:250px;
height:30px;
border-radius:3px;
padding:2px;
box-shadow:0 0 10px #a9a9a9;
margin:10px
}
input[type=submit]{
background-color:#ff8c00;
border:1px solid #fff;
font-family:'Fauna One',serif;
font-weight:700;
font-size:18px;
color:#fff;
margin-top:15px
}
span{
color:green;
font-size:14px
}
#myForm div{
color:red;
font-size:14px
}
table{
margin-left:40px
}
#captcha_img{
margin-left:60px
}
#reload{
margin-left:40px;
cursor:pointer
}
.correct{
color:green
}
.wrong{
color:red
}
Conclusion:
So, in this way you can use google forms captcha in your forms. Keep following us to learn more.
CodeIgniter Delete Data From Database

Through our previous post, you have learnt to insert data in database using CodeIgniter framework.
In this tutorial we explain you how to delete data from database using CodeIgniter framework.
Just Watch our live demo or download the delete_codeigniter.zip file from below link, extract files and include them in view, controller and model directory of your codeigniter framework as shown in the Read Me.txt file.
-: See Also :-
Update Data in Database using CodeIgniter

VIEW FILE: delete_view.php
In this, we fetched all the names from data base and showed them in links. As user clicks on a particular name, its details appears on the right side with delete button.
user can click on Delete button to delete his/her record from table.
<!DOCTYPE html>
<html>
<head>
<title>Delete Data From Database Using CodeIgniter</title>
<!--=========== Importing Google fonts ===========-->
<link href='http://fonts.googleapis.com/css?family=Marcellus' rel='stylesheet' type='text/css'>
<link href="<?php echo base_url()?>./css/delete.css" rel="stylesheet" type="text/css">
</head>
<body>
<div id="container">
<div id="wrapper">
<h1>Delete Data From Database Using CodeIgniter</h1>
<div id="menu">
<p>Click On Menu</p>
<!--====== Displaying Fetched Names from Database in Links ========-->
<ol>
<?php foreach ($students as $student): ?>
<li><a href="<?php echo base_url() . "index.php/delete_ctrl/show_student_id/" . $student->student_id; ?>"><?php echo $student->student_name; ?></a>
</li><?php endforeach; ?>
</ol>
</div>
<div id="detail">
<!--====== Displaying Fetched Details from Database ========-->
<?php foreach ($single_student as $student): ?>
<p>Student Detail</p>
<?php echo $student->student_name; ?>
<?php echo $student->student_email; ?>
<?php echo $student->student_mobile; ?>
<?php echo $student->student_address; ?>
<!--====== Delete Button ========-->
<a href="<?php echo base_url() . "index.php/delete_ctrl/delete_student_id/" . $student->student_id; ?>">
<button>Delete</button></a>
<?php endforeach; ?>
</div>
</div>
</div>
</body>
</html>
CONTROLLER FILE: delete_ctrl.php
copy the below file in your controller directory.
<?php
class delete_ctrl extends CI_Controller{
function __construct(){
parent::__construct();
$this->load->model('delete_model');
}
// Function to Fetch selected record from database.
function show_student_id() {
$id = $this->uri->segment(3);
$data['students'] = $this->delete_model->show_students();
$data['single_student'] = $this->delete_model->show_student_id($id);
$this->load->view('delete_view', $data);
}
// Function to Delete selected record from database.
function delete_student_id() {
$id = $this->uri->segment(3);
$this->delete_model->delete_student_id($id);
$this->show_student_id();
}
}
?>
MODEL FILE: delete_model.php
Create new class in your model as shown below.
<?php
class delete_model extends CI_Model{
// Function to select all from table name students.
function show_students(){
$query = $this->db->get('students');
$query_result = $query->result();
return $query_result;
}
// Function to select particular record from table name students.
function show_student_id($data){
$this->db->select('*');
$this->db->from('students');
$this->db->where('student_id', $data);
$query = $this->db->get();
$result = $query->result();
return $result;
}
// Function to Delete selected record from table name students.
function delete_student_id($id){
$this->db->where('student_id', $id);
$this->db->delete('students');
}
}
?>
My SQL Code Segment:
To create database and table, execute following codes in your My SQL .
CREATE DATABASE company;
CREATE TABLE employee(
employee_id int(10) NOT NULL AUTO_INCREMENT,
employee_name varchar(255) NOT NULL,
employee_email varchar(255) NOT NULL,
employee_contact varchar(255) NOT NULL,
employee_address varchar(255) NOT NULL,
PRIMARY KEY (employee_id)
)
CSS FILE: delete.css
Styling HTML Elements.
#container{
width:960px;
height:610px;
margin:50px auto
}
#wrapper{
width:460px;
padding:0 50px 20px;
background:linear-gradient(#fff,#ABDBFF);
border:1px solid #ccc;
box-shadow:0 0 5px;
font-family:'Marcellus',serif;
float:left;
margin-top:10px
}
#menu{
float:left;
width:200px;
margin-top:-30px
}
#detail{
float:left;
width:220px;
padding:10px;
margin-top:-40px
}
a{
text-decoration:none;
color:blue
}
a:hover{
color:red
}
h1{
text-align:center;
font-size:28px
}
hr{
border:0;
border-bottom:1.5px solid #ccc;
margin-top:-10px;
margin-bottom:30px
}
button{
padding:6px 30px;
margin-top:10px;
font-size:14px;
background:linear-gradient(#fff,#828FEC);
border:2px solid #828FEC;
font-weight:700;
color:#8b008b
}
button:hover{
background:linear-gradient(#828FEC,#fff)
}
p{
font-size:18px;
font-weight:700;
color:#18af0b
}
Conclusion:
So, this was all about deleting data from database using codeigniter framework. keep following us to learn more.
CodeIgniter Insert Data into Database

After creating form in CodeIgniter framework one must learn to insert data into a database. Following steps explains you, how this operation can be done in easy way:-
- First, you must create a PHP page in View directory of CodeIgniter, in which a form is created using CodeIgniter’s syntax.
- Second, you have to create class in Controller directory, in which the above PHP page(view) is loaded, applying validation over form fields and respective model is loaded.
- Third, for database connectivity in your application, a class is created in Model directory with database insert function.
You can also refer our live demo or download the Script file. Extract the downloaded files, save it in your local server and run it using path :
http://localhost/CodeIgniter-insert-: See Also :-
Update Data in Database using CodeIgniter

Note : You can also refer the PHPProjectInstall.pdf file given in the download code folder.
VIEW FILE: insert_view.php
copy the below code in your view.
<html>
<head>
<title>Insert Data Into Database Using CodeIgniter Form</title>
<link href='http://fonts.googleapis.com/css?family=Marcellus' rel='stylesheet' type='text/css'/>
<link rel="stylesheet" type="text/css" href="<?php echo base_url(); ?>css/style.css" />
</head>
<body>

<div id="container">
<?php echo form_open('insert_ctrl'); ?>
<h1>Insert Data Into Database Using CodeIgniter</h1><hr/>
<?php if (isset($message)) { ?>
<CENTER><h3 style="color:green;">Data inserted successfully</h3></CENTER><br>
<?php } ?>
<?php echo form_label('Student Name :'); ?> <?php echo form_error('dname'); ?><br />
<?php echo form_input(array('id' => 'dname', 'name' => 'dname')); ?><br />

<?php echo form_label('Student Email :'); ?> <?php echo form_error('demail'); ?><br />
<?php echo form_input(array('id' => 'demail', 'name' => 'demail')); ?><br />

<?php echo form_label('Student Mobile No. :'); ?> <?php echo form_error('dmobile'); ?><br />
<?php echo form_input(array('id' => 'dmobile', 'name' => 'dmobile', 'placeholder' => '10 Digit Mobile No.')); ?><br />

<?php echo form_label('Student Address :'); ?> <?php echo form_error('daddress'); ?><br />
<?php echo form_input(array('id' => 'daddress', 'name' => 'daddress')); ?><br />

<?php echo form_submit(array('id' => 'submit', 'value' => 'Submit')); ?>
<?php echo form_close(); ?><br/>
<div id="fugo">

</div>
</div>
</body>
</html>
CONTROLLER FILE: insert_ctrl.php
copy the below code in your controller.
<?php

class insert_ctrl extends CI_Controller {

function __construct() {
parent::__construct();
$this->load->model('insert_model');
}
function index() {
//Including validation library
$this->load->library('form_validation');

$this->form_validation->set_error_delimiters('<div class="error">', '</div>');

//Validating Name Field
$this->form_validation->set_rules('dname', 'Username', 'required|min_length[5]|max_length[15]');

//Validating Email Field
$this->form_validation->set_rules('demail', 'Email', 'required|valid_email');

//Validating Mobile no. Field
$this->form_validation->set_rules('dmobile', 'Mobile No.', 'required|regex_match[/^[0-9]{10}$/]');

//Validating Address Field
$this->form_validation->set_rules('daddress', 'Address', 'required|min_length[10]|max_length[50]');

if ($this->form_validation->run() == FALSE) {
$this->load->view('insert_view');
} else {
//Setting values for tabel columns
$data = array(
'Student_Name' => $this->input->post('dname'),
'Student_Email' => $this->input->post('demail'),
'Student_Mobile' => $this->input->post('dmobile'),
'Student_Address' => $this->input->post('daddress')
);
//Transfering data to Model
$this->insert_model->form_insert($data);
$data['message'] = 'Data Inserted Successfully';
//Loading View
$this->load->view('insert_view', $data);
}
}

}

?>
MODEL FILE: insert_model.php
Create new class in your model as shown below.
<?php
class insert_model extends CI_Model{
function __construct() {
parent::__construct();
}
function form_insert($data){
// Inserting in Table(students) of Database(college)
$this->db->insert('students', $data);
}
}
?>
My SQL Code Segment:
To create database and table, execute following codes in your My SQL .
CREATE DATABASE college;
CREATE TABLE students(
Student_id int(10) NOT NULL AUTO_INCREMENT,
Student_Name varchar(255) NOT NULL,
Student_Email varchar(255) NOT NULL,
Student_Mobile varchar(255) NOT NULL,
Student_Address varchar(255) NOT NULL,
PRIMARY KEY (Student_id)
)
Note : .sql file included in project downloaded root folder you can also import them in mysql database.
CSS FILE: styles.css
Styling HTML Elements.
#container {
width:960px;
height:610px;
margin:50px auto
}
.error {
color:red;
font-size:13px;
margin-bottom:-15px
}
form {
width:345px;
padding:0 50px 20px;
background:linear-gradient(#fff,#FF94BB);
border:1px solid #ccc;
box-shadow:0 0 5px;
font-family:'Marcellus',serif;
float:left;
margin-top:10px
}
h1 {
text-align:center;
font-size:28px
}
hr {
border:0;
border-bottom:1.5px solid #ccc;
margin-top:-10px;
margin-bottom:30px
}
label {
font-size:17px
}
input {
width:100%;
padding:10px;
margin:6px 0 20px;
border:none;
box-shadow:0 0 5px
}
input#submit {
margin-top:20px;
font-size:18px;
background:linear-gradient(#22abe9 5%,#36caf0 100%);
border:1px solid #0F799E;
color:#fff;
font-weight:700;
cursor:pointer;
text-shadow:0 1px 0 #13506D
}
input#submit:hover {
background:linear-gradient(#36caf0 5%,#22abe9 100%)
}
Conclusion:
So, this was all about Inserting data in database using codeigniter framework. keep following us to learn more.
CodeIgniter Form Validation

In our previous, tutorial we explained how to create form using codeIgniter framework. Now, we will explain you to validate various form fields using codeIgniter framework.
In Controller file we have create a class named “validate_ctrl” where index() function initializes “form_validation” library :
function index()
{
//including validation library
$this->load->library('form_validation');
}
Also, using above library we set some validation rules for each fields.
To set validation rules we will use the set_rules() function :
$this->form_validation->set_rules();which takes three parameters :
1. Actual field name (e.g. uname).
2. Name of the field used to identify it (e.g. Username).
3. Validation rules for the form field.
$this->form_validation->set_rules('uname', 'Username', 'required');The third parameter can be set for multiple rules like this :
$this->form_validation->set_rules('uname', 'Username', 'required|min_length[4]|max_length[10]);Here are some listing of the rules with their specification :
required // Returns FALSE if the form field is empty.

matches // Returns FALSE if the form field does not match the defined value of parameter.

is_unique // Returns FALSE if the form field is not unique to the table and field name in the parameter.

min_length // Returns FALSE if the form field is shorter than the parameter value.

max_length // Returns FALSE if the form field is longer than the parameter value.

exact_length // Returns FALSE if the form field is not exactly the parameter value.

greater_than // Returns FALSE if the form field is less than the parameter value or not numeric.

less_than // Returns FALSE if the form field is greater than the parameter value or not numeric.

alpha // Returns FALSE if the form field contains anything other than alphabetical characters.

alpha_numeric // Returns FALSE if the form field contains anything other than alpha-numeric characters.

alpha_dash // Returns FALSE if the field contains anything other than alpha-numeric characters, underscores or dashes.

numeric // Returns FALSE if the form field contains anything other than numeric characters.

integer // Returns FALSE if the form field contains anything other than an integer.

decimal // Returns FALSE if the form field contains anything other than a decimal number.

is_natural // Returns FALSE if the form field contains anything other than a natural number.

is_natural_no_zero // Returns FALSE if the form field contains anything other than a natural number, but not zero.

valid_email // Returns FALSE if the form field does not contain a valid email address.

valid_emails // Returns FALSE if any value provided in a comma separated list is not a valid email.

valid_ip // Returns FALSE if the supplied IP is not valid.

valid_base64 // Returns FALSE if the supplied string contains anything other than valid Base64 characters.
To learn more, go through our complete PHP code
or
download the validate_codeigniter_form.zip file from below link, extract files and include them in view and controller directory of your codeigniter framework as shown in the Read Me.txt file.

VIEW FILE: valform.php
copy the below code in your view.
<!DOCTYPE html>
<html>
<head>
<title>Validating Form Fields Using CodeIgniter</title>
<link href='http://fonts.googleapis.com/css?family=Marcellus' rel='stylesheet' type='text/css'>
<link href="http://localhost/CodeIgniter/css/styles.css" rel="stylesheet" type="text/css">
</head>
<body>
<div id="container">
<?php echo form_open('validate_ctrl'); ?>
<h1>Validating form fields using CodeIgniter</h1>
<?php echo form_label('Student Name :'); ?><?php echo form_error('dname'); ?>
<?php echo form_input(array('id' => 'dname', 'name' => 'dname')); ?>
<?php echo form_label('Student Email :'); ?> <?php echo form_error('demail'); ?>
<?php echo form_input(array('id' => 'demail', 'name' => 'demail')); ?>
<?php echo form_label('Student Mobile No. :'); ?> <?php echo form_error('dmobile'); ?>
<?php echo form_input(array('id' => 'dmobile', 'name' => 'dmobile','placeholder'=>'10 Digit Mobile No.')); ?>
<?php echo form_label('Student Address :'); ?> <?php echo form_error('daddress'); ?>
<?php echo form_input(array('id' => 'daddress', 'name' => 'daddress')); ?>
<?php echo form_submit(array('id' => 'submit', 'value' => 'Submit')); ?> <?php echo form_close(); ?>
</div>
</body>
</html>
CONTROLLER FILE: validate_ctrl.php
copy the below code in your controller.
<?php
class validate_ctrl extends CI_Controller {
function __construct() {
parent::__construct();
$this->load->model('form_model');
}
function index()
{
// Including Validation Library
$this->load->library('form_validation');
// Displaying Errors In Div
$this->form_validation->set_error_delimiters('<div class="error">', '</div>');
// Validation For Name Field
$this->form_validation->set_rules('dname', 'Username', 'required|min_length[5]|max_length[15]');
// Validation For Email Field
$this->form_validation->set_rules('demail', 'Email', 'required|valid_email');
// Validation For Contact Field
$this->form_validation->set_rules('dmobile', 'Contact No.', 'required|regex_match[/^[0-9]{10}$/]');
// Validation For Address Field
$this->form_validation->set_rules('daddress', 'Address', 'required|min_length[10]|max_length[50]');
if ($this->form_validation->run() == FALSE)
{
$this->load->view('valform');
}
else
{
$this->load->view('formsubmit');
}
}
}
?>
CSS FILE: styles.css
Styling HTML Elements.
#container {
width:960px;
height:610px;
margin:50px auto
}
.error {
color:red;
font-size:13px;
margin-bottom:-15px
}
form {
width:320px;
padding:0 50px 20px;
background:linear-gradient(#fff,#CBCE80);
border:1px solid #ccc;
box-shadow:0 0 5px;
font-family:'Marcellus',serif;
float:left;
margin-top:10px
}
h1 {
text-align:center;
font-size:28px
}
hr {
border:0;
border-bottom:1.5px solid #ccc;
margin-top:-10px;
margin-bottom:30px
}
label {
font-size:17px
}
input {
width:100%;
padding:10px;
margin:6px 0 20px;
border:none;
box-shadow:0 0 5px
}
input#submit {
margin-top:20px;
font-size:18px;
background:linear-gradient(#22abe9 5%,#36caf0 100%);
border:1px solid #0F799E;
color:#fff;
font-weight:700;
cursor:pointer;
text-shadow:0 1px 0 #13506D
}
input#submit:hover {
background:linear-gradient(#36caf0 5%,#22abe9 100%)
}
Conclusion:
So, this was all about creating and validating a simple form using codeigniter framework. keep following us to learn more.
Captcha Code in PHP and jQuery
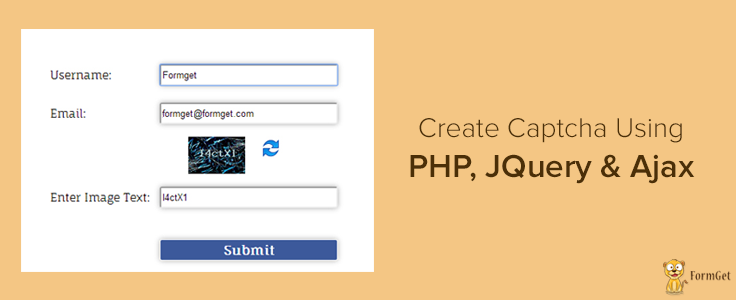
This blog post demonstrate you, how to implement your own simple captcha using PHP, jQuery and AJAX in form.
Description : Captcha is basically a random generate captcha string and which can be stored in session variable for further use.
After that, the generated string is bunched with an image to pretend as a single image in such a way that only human being is able read it.
- Here we used an alphanumeric string and stored it in a PHP variable.
- This variable is then passed in str_shuffle() function.
- After shuffling, we took sub-string of defined length and stored it in a session (global variable).
- Then, we convert the string into image and used it in our form.

HTML File: index.html
We have created a simple HTML form.
<!DOCTYPE html>
<html>
<head>
<title>Create Captcha using PHP,jQuery and AJAX</title>
<link href="style.css" rel="stylesheet" type="text/css">
<script src="http://ajax.googleapis.com/ajax/libs/jquery/1.11.1/jquery.min.js"></script>
<script src="script.js"></script>
</head>
<body>
<div id="mainform">
<div class="innerdiv">
<!-- Required Div Starts Here -->
<h2>Create Captcha using PHP,jQuery and AJAX</h2>
<form id="myForm" method="post" name="myForm">
<h3>Fill Your Information!</h3>
<table>
<tr>
<td>Username:</td>
<td>
<input id='username1' name='username' type='text'>
</td>
</tr>
<tr>
<td>Email:</td>
<td>
<input id='email1' name='email' type='text'>
</td>
</tr>
<tr>
<td>
</td>
<td id="imgparent">
<div id="imgdiv">
<img id="img" src="captcha.php">
</div>
<img id="reload" src="reload.png">
</td>
</tr>
<tr>
<td>Enter Image Text:</td>
<td>
<input id="captcha1" name="captcha" type="text">
</td>
</tr>
<tr>
<td><input id="button" type='button' value='Submit'></td>
</tr>
</table>
</form>
</div>
</div>
</body>
</html>
CAPTCHA Generating code: captcha.php
Here, we generate our CAPTCHA code in PHP as mentioned above.
<?php
session_start(); // Staring Session
$captchanumber = 'ABCDEFGHIJKLMNOPQRSTUVWXYZ1234567890abcdefghijklmnopqrstuvwxyz'; // Initializing PHP variable with string
$captchanumber = substr(str_shuffle($captchanumber), 0, 6); // Getting first 6 word after shuffle.
$_SESSION["code"] = $captchanumber; // Initializing session variable with above generated sub-string
$image = imagecreatefromjpeg("bj.jpg"); // Generating CAPTCHA
$foreground = imagecolorallocate($image, 175, 199, 200); // Font Color
imagestring($image, 5, 45, 8, $captchanumber, $foreground);
header('Content-type: image/png');
imagepng($image);
?>
jQuery and Ajax Code : script.js
here, we performed validation of other fields and sending user input CAPTCHA text via Ajax to verfy.php file.
$(document).ready(function() {
//change CAPTCHA on each click or on refreshing page
$("#reload").click(function() {

$("img#img").remove();
var id = Math.random();
$('<img id="img" src="captcha.php?id='+id+'"/>').appendTo("#imgdiv");
id ='';
});

//validation function
$('#button').click(function() {
var name = $("#username1").val();
var email = $("#email1").val();
var captcha = $("#captcha1").val();

if (name == '' || email == '' || captcha == '')
{
alert("Fill All Fields");
}

else
{ //validating CAPTCHA with user input text
var dataString = 'captcha=' + captcha;
$.ajax({
type: "POST",
url: "verify.php",
data: dataString,
success: function(html) {
alert(html);
}
});
}
});
});
VERIFYING CAPTCHA : verify.php
verifying user input CAPTCHA text with generated CAPTCHA string, stored in session variable.
<?php
//CAPTCHA Matching code
session_start();
if ($_SESSION["code"] == $_POST["captcha"]) {
echo "Form Submitted successfully....!";
} else {
die("Wrong TEXT Entered");
}
?>
CSS File: style.css
Styling HTML elements.
@import "http://fonts.googleapis.com/css?family=Fauna+One|Muli";
#mainform{
width:960px;
margin:20px auto;
padding-top:20px;
font-family:'Fauna One',serif
}
#mainform h2{
width:100%;
float:left;
text-align:center;
margin-top:35px
}
.innerdiv{
width:65%;
float:left
}
form{
background-color:#fff;
color:#123456;
box-shadow:0 1px 1px 1px gray;
width:500px;
margin:50px 250px 0 50px;
float:left;
height:430px
}
h3{
margin-top:0;
margin-bottom:10px;
color:#fff;
background-color:#3C599B;
text-align:center;
width:100%;
height:50px;
padding-top:30px
}
input{
width:250px;
height:30px;
border-radius:3px;
padding:2px;
box-shadow:0 0 10px #a9a9a9;
margin:10px
}
input[type=button]{
background-color:#3C599B;
border:1px solid #fff;
font-family:'Fauna One',serif;
font-weight:700;
font-size:18px;
color:#fff;
margin-top:15px
}
span{
color:green
}
#myForm div{
color:red;
font-size:14px
}
table{
margin-left:40px
}
#imgdiv{
width:160px;
float:left;
margin-left:20px
}
#reload{
float:right;
margin-right:40px
}
Conclusion:
So, in this way you can create your own php captcha, keep following to learn more.
How to Create a Contact Form In CodeIgniter

CodeIgniter is a framework based on MVC (Model, View & Controller) architecture. It includes step by step process to construct PHP applications.
In this tutorial, we will show, how to create a simple contact form using CodeIgniter framework as follows:
- In first step, you must create a php page in View directory of codeigniter, in which a form need to be created using codeigniter’s syntax.
<?php echo form_open('main_controller'); ?>
<?php echo form_label('Student Name :'); ?>
.............
<?php echo form_close(); ?>
- Secondly, you have to create class in Controller directory, to load above php page(view) and to call other functions.
<?php
class main_controller extends CI_Controller {
..............
$this->load->view('form');
........
?>
- And then if there is a need of database connectivity in your application then, a class needs to be created in Model directory with database functions. Here, we do not require this class, as we are simply creating a form.
We have given below our codes you can copy that to your view and controller files to use it.
or
Download the create_codeigniter_form.zip file from below link, extract files and include them in view and controller directory of your codeigniter framework as illustrated in the Read Me.txt file.
See Also Form Validation Using CodeIgniter

VIEW FILE: form.php
Copy the below code in your view file.
<!DOCTYPE html>
<html>
<head>
<title>Create Contact Form Using CodeIgniter</title>
<link href='http://fonts.googleapis.com/css?family=Marcellus' rel='stylesheet' type='text/css'>
<link href="http://localhost/CodeIgniter/css/styles.css" rel="stylesheet" type="text/css">
</head>
<body>
<div id="container">
<?php echo form_open('main_controller'); ?>
<h1>Create Contact Form Using CodeIgniter</h1>
<?php echo form_label('Student Name :'); ?>
<?php echo form_input(array('id' => 'dname', 'name' => 'dname')); ?>
<?php echo form_label('Student Email :'); ?>
<?php echo form_input(array('id' => 'demail', 'name' => 'demail')); ?>
<?php echo form_label('Student Mobile No. :'); ?>
<?php echo form_input(array('id' => 'dmobile', 'name' => 'dmobile')); ?>
<?php echo form_label('Student Address :'); ?>
<?php echo form_input(array('id' => 'daddress', 'name' => 'daddress')); ?>
<?php echo form_submit(array('id' => 'submit', 'value' => 'Submit')); ?>
<?php echo form_close(); ?>
</div>
</body>
</html>
CONTROLLER FILE: main_controller.php
Copy the below code in your controller file.
<?php
class main_controller extends CI_Controller {
function __construct() {
parent::__construct();
$this->load->model('form_model');
}
function index() {
$this->load->view('form');
}
}
?>
CSS FILE: styles.css
Styling HTML Elements.
#container{
width:960px;
height:610px;
margin:50px auto
}
#fugo{
float:right
}
form{
width:320px;
padding:0 50px 20px;
background:linear-gradient(#fff,#ABDBFF);
border:1px solid #ccc;
box-shadow:0 0 5px;
font-family:'Marcellus',serif;
float:left;
margin-top:10px
}
h1{
text-align:center;
font-size:28px
}
hr{
border:0;
border-bottom:1.5px solid #ccc;
margin-top:-10px;
margin-bottom:30px
}
label{
font-size:17px
}
input{
width:100%;
padding:10px;
margin:6px 0 20px;
border:none;
box-shadow:0 0 5px
}
input#submit{
margin-top:20px;
font-size:18px;
background:linear-gradient(#22abe9 5%,#36caf0 100%);
border:1px solid #0F799E;
color:#fff;
font-weight:700;
cursor:pointer;
text-shadow:0 1px 0 #13506D
}
input#submit:hover{
background:linear-gradient(#36caf0 5%,#22abe9 100%)
}
Conclusion:
So, this was all about creating simple contact form using codeigniter framework. Keep following us to learn more.
PHP Sanitize and Validate Input Fields via Filters
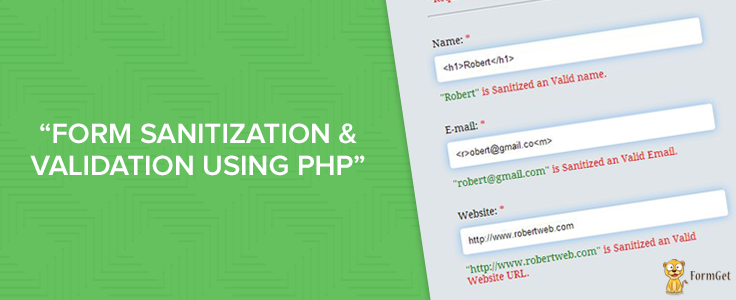
In this tutorial, I’ll explain you to sanitize and validate form fields using PHP filter function filter_var(). This function requires a variable value to filter and name of the filter to use as an argument. It returns filtered data on success and FALSE on failure.
Why exactly do we need to sanitize and validate form fields..?? As you build a site using PHP, gaining unauthorized access to your site’s data can cause it to be hacked. Invalid submitted data not only lead to security problems, but it can also break your webpage. Whenever data or information flows over internet, it becomes one of the important aspects of information security.
Lets take a look on how to remove illegal characters and validate data. You can start doing this in PHP with validating and sanitizing data on your site. Why sanitize and not just validate? It’s possible that the user accidentally typed in a wrong character or maybe it was a bad copy and paste. By sanitizing the data, any illegal character from the data is removed. Just because the data is sanitized doesn’t ensure that it is properly formatted. And so validation is done which determines if the data is in proper form.
Watch the live demo or download code from the link given below

PHP File: sanitization.php
In this php script filter_var() filter function is used for sanitization and validation. Here we have an HTML form with three input fields namely: name, email and website. As user fills all information and clicks on submit button all input fields will be sanitized and validated using filters.
<?php
// Initializing Error Variables To Null.
$nameError ="";
$emailError ="";
$websiteError ="";
// This code block will execute when form is submitted
if(isset($_POST['submit'])){
/*--------------------------------------------------------------
Fetch name value from URL and Sanitize it
--------------------------------------------------------------*/
if($_POST['name'] != ""){
// Sanitizing name value of type string
$_POST['name'] = filter_var($_POST['name'], FILTER_SANITIZE_STRING);
$nameError = "<span class="valid">"".$_POST['name']."" </span>is Sanitized an Valid name.";
if ($_POST['name'] == ""){
$nameError = "<span class="invalid">Please enter a valid name.</span>";
}
}
else {
$nameError = "<span class="invalid">Please enter your name.</span>";
}
/*------------------------------------------------------------------
Fetch email value from URL, Sanitize and Validate it
--------------------------------------------------------------------*/
if($_POST['email'] != ""){
//sanitizing email
$_POST['email'] = filter_var($_POST['email'], FILTER_SANITIZE_EMAIL);
//After sanitization Validation is performed
$_POST['email'] = filter_var($_POST['email'], FILTER_VALIDATE_EMAIL);
$emailError = "<span class="valid">"".$_POST['email']."" </span>is Sanitized an Valid Email.";
if($_POST['email'] == ""){
$emailError = "<span class="invalid">Please enter a valid email.</span>";
}
}
else {
$emailError = "<span class="invalid">Please enter your email.</span>";
}
/*---------------------------------------------------------------------------
Fetch website value from URL, Sanitize and Validate it
----------------------------------------------------------------------------*/
if($_POST['website'] != ""){
//sanitizing URL
$_POST['website'] = filter_var($_POST['website'], FILTER_SANITIZE_URL);
//After sanitization Validation is performed
$_POST['website'] = filter_var($_POST['website'], FILTER_VALIDATE_URL);
$websiteError = "<span class="valid">"".$_POST['website']."" </span>is Sanitized an Valid Website URL.";
if ($_POST['website'] == ""){
$websiteError = "<span class="invalid">Please enter a valid website start with http:// </span>";
}
}
else {
$websiteError = "<span class="invalid">Please enter your website URL.</span>";
}
}
?>

<!DOCTYPE html>
<html>
<head>
<title>Form Sanitization and Validation Using PHP - Demo Preview</title>
<meta content="noindex, nofollow" name="robots">
<link href="style.css" rel="stylesheet">
</head>
<body>
<div class="maindiv">
<div class="form_div">
<div class="title">
<h2>Form Sanitization and Validation Using PHP</h2>
</div>
<form action="sanitization.php" method="post">
<h2>Form</h2>
<p>* Required Fields</p>
Name: <span class="invalid">*</span>
<input class="input" name="name" type="text" value="">
<p><?php echo $nameError;?></p>
E-mail: <span class="invalid">*</span>
<input class="input" name="email" type="text" value="">
<p><?php echo $emailError;?></p>
Website: <span class="invalid">*</span>
<input class="input" name="website" type="text" value="">
<p><?php echo $websiteError;?></p><input class="submit" name="submit" type="submit" value="Submit">
</form>
</div>
</div> <!-- HTML Ends Here -->
</body>
</html>
CSS File: style.css
For Styling HTML Elements.
@import "http://fonts.googleapis.com/css?family=Droid+Serif";
/* Above line is to import google font style */
.maindiv {
margin:0 auto;
width:980px;
height:500px;
background:#fff;
padding-top:20px;
font-size:14px
}
.title {
width:500px;
height:70px;
text-shadow:2px 2px 2px #cfcfcf;
font-size:16px;
text-align:center;
font-family:'Droid Serif',serif
}
.form_div {
width:70%;
float:left
}
p {
color:red
}
hr {
margin-top:15px;
margin-bottom:30px
}
form {
margin-top:50px;
width:380px;
border-radius:5px;
box-shadow:0 0 20px gray;
padding:10px 60px 40px;
background-color:#e0e5e9;
font-family:'Droid Serif',serif
}
form h2 {
text-align:center;
text-shadow:2px 2px 2px #cfcfcf
}
.input {
width:97%;
border-radius:4px;
box-shadow:0 0 16px 1px #8FC2F5;
margin-top:10px;
height:35px;
padding-left:10px;
border:none
}
.submit {
color:#fff;
border-radius:3px;
background:#1F8DD6;
margin-top:35px;
border:none;
width:100%;
height:40px;
box-shadow:0 0 1px 2px #123456;
font-size:16px
}
.radio {
width:15px;
height:15px;
border-radius:1px;
margin-top:10px;
padding:5px;
border:none;
margin-bottom:20px
}
.valid {
color:green
}
.invalid {
color:red
}
Conclusion:
I’ve showed you sanitization and validation of form fields using PHP as it has became one of the important aspect of security. Hope you like it. Keep following us to learn more and do provide us your feedback in the below given space. 🙂
You may also like –
- PHP MySQL Insert Data Into Database
Form Validation Using Ajax

AJAX (Asynchronous JavaScript and XML) is the art of exchanging data with a server, and updating parts of a web page – without reloading the whole page. Therefore, Ajax makes web page quick responsive.
We have already explained about form validation using different technologies. Now, the same can be done by using Ajax, In this blog post we will tell you how it can be done.
We have created an HTML form with four input fields and validation of each field is done by using combine logic of Ajax, PHP and Javascript.
We have used The onreadystatechange Event of Ajax in our javascript file. All you have to do is just follow our codes or download it to use.

HTML File: index.html
Here, we create our form
<!DOCTYPE html>
<html>
<head>
<link href="style.css" rel="stylesheet" type="text/css">
<script src="script.js"></script>
</head>
<body>
<div id="mainform">
<div class="innerdiv">
<!-- Required Div Starts Here -->
<h2>Form Validation Using AJAX</h2>
<form action='#' id="myForm" method='post' name="myForm">
<h3>Fill Your Information!</h3>
<table>
<tr>
<td>Username</td>
<td><input id='username1' name='username' onblur="validate('username', this.value)" type='text'></td>
<td>
<div id='username'></div>
</td>
</tr>
<tr>
<td>Password</td>
<td><input id='password1' name='password' onblur="validate('password', this.value)" type='password'></td>
<td>
<div id='password'></div>
</td>
</tr>
<tr>
<td>Email</td>
<td><input id='email1' name='email' onblur="validate('email', this.value)" type='text'></td>
<td>
<div id='email'></div>
</td>
</tr>
<tr>
<td>website</td>
<td><input id='website1' name='website' onblur="validate('website', this.value)" type='text'></td>
<td>
<div id='website'></div>
</td>
</tr>
</table>
<input onclick="checkForm()" type='button' value='Submit'>
</form>
</div>
</body>
</html>
PHP File: validation.php
In this php script Regular Expression is used for validation.
<?php
$value = $_GET['query'];
$formfield = $_GET['field'];
// Check Valid or Invalid user name when user enters user name in username input field.
if ($formfield == "username") {
if (strlen($value) < 4) {
echo "Must be 3+ letters";
} else {
echo "<span>Valid</span>";
}
}
// Check Valid or Invalid password when user enters password in password input field.
if ($formfield == "password") {
if (strlen($value) < 6) {
echo "Password too short";
} else {
echo "<span>Strong</span>";
}
}
// Check Valid or Invalid email when user enters email in email input field.
if ($formfield == "email") {
if (!preg_match("/([w-]+@[w-]+.[w-]+)/", $value)) {
echo "Invalid email";
} else {
echo "<span>Valid</span>";
}
}
// Check Valid or Invalid website address when user enters website address in website input field.
if ($formfield == "website") {
if (!preg_match("/b(?:(?:https?|ftp)://|www.)[-a-z0-9+&@#/%?=~_|!:,.;]*[-a-z0-9+&@#/%=~_|]/i", $value)) {
echo "Invalid website";
} else {
echo "<span>Valid</span>";
}
}
?>
JAVASCRIPT File: script.js
javascript file consist of ajax functionality.
function checkForm() {
// Fetching values from all input fields and storing them in variables.
var name = document.getElementById("username1").value;
var password = document.getElementById("password1").value;
var email = document.getElementById("email1").value;
var website = document.getElementById("website1").value;
//Check input Fields Should not be blanks.
if (name == '' || password == '' || email == '' || website == '') {
alert("Fill All Fields");
} else {
//Notifying error fields
var username1 = document.getElementById("username");
var password1 = document.getElementById("password");
var email1 = document.getElementById("email");
var website1 = document.getElementById("website");
//Check All Values/Informations Filled by User are Valid Or Not.If All Fields Are invalid Then Generate alert.
if (username1.innerHTML == 'Must be 3+ letters' || password1.innerHTML == 'Password too short' || email1.innerHTML == 'Invalid email' || website1.innerHTML == 'Invalid website') {
alert("Fill Valid Information");
} else {
//Submit Form When All values are valid.
document.getElementById("myForm").submit();
}
}
}
// AJAX code to check input field values when onblur event triggerd.
function validate(field, query) {
var xmlhttp;
if (window.XMLHttpRequest) { // for IE7+, Firefox, Chrome, Opera, Safari
xmlhttp = new XMLHttpRequest();
} else { // for IE6, IE5
xmlhttp = new ActiveXObject("Microsoft.XMLHTTP");
}
xmlhttp.onreadystatechange = function() {
if (xmlhttp.readyState != 4 && xmlhttp.status == 200) {
document.getElementById(field).innerHTML = "Validating..";
} else if (xmlhttp.readyState == 4 && xmlhttp.status == 200) {
document.getElementById(field).innerHTML = xmlhttp.responseText;
} else {
document.getElementById(field).innerHTML = "Error Occurred. <a href='index.php'>Reload Or Try Again</a> the page.";
}
}
xmlhttp.open("GET", "validation.php?field=" + field + "&query=" + query, false);
xmlhttp.send();
}
CSS File: style.css
Styling HTML Elements.
@import "http://fonts.googleapis.com/css?family=Fauna+One|Muli";
#mainform{
width:960px;
margin:20px auto;
padding-top:20px;
font-family:'Fauna One',serif
}
#mainform h2{
width:100%;
float:left;
text-align:center;
margin-top:35px
}
.innerdiv{
width:65%;
float:left
}
form{
background-color:#fff;
color:#123456;
box-shadow:0 1px 1px 1px gray;
width:500px;
margin:50px 250px 0 50px;
float:left;
height:400px;
padding:10px
}
h3{
margin-top:0;
color:#fff;
background-color:#0B87AA;
text-align:center;
width:100%;
height:50px;
padding-top:30px
}
input{
width:250px;
height:30px;
margin-top:10px;
border-radius:3px;
padding:2px;
box-shadow:0 1px 1px 0 #a9a9a9;
margin:10px
}
input[type=button]{
background-color:#0B87AA;
border:1px solid #fff;
font-family:'Fauna One',serif;
font-weight:700;
font-size:18px;
color:#fff;
width:50%;
margin-left:105px;
margin-top:30px
}
span{
color:green
}
#myForm div{
color:red;
font-size:14px
}
Conclusion:
We showed you form validation by using Ajax, PHP and javascript, Keep following us to learn more.
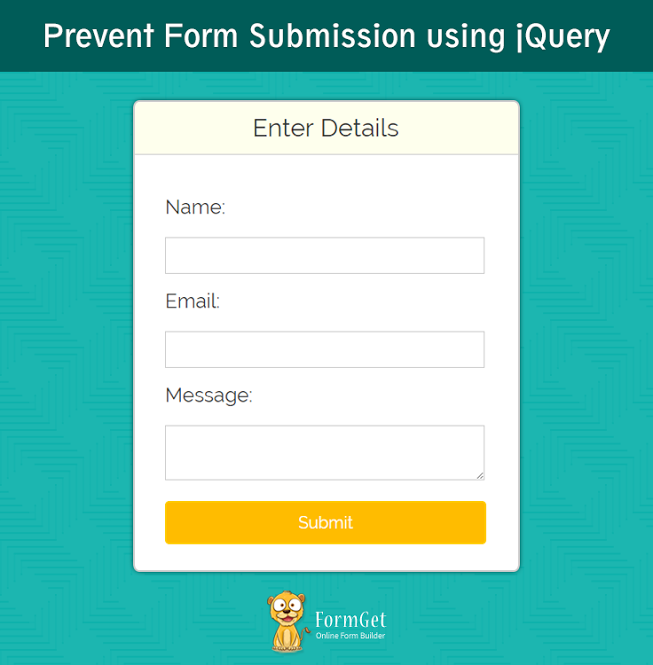
Prevent Form Submission Using jQuery

In this tutorial I am going to show, how you can prevent form submission using jQuery. Now from Form Submission we know, that the user information flow from client level to server level as soon as we click submit button after which the information is further processed. Now sometimes situation arises when user wants to perform certain activities before form submission.
From this tutorial you will learn how to prevent a submit button from submitting a form using jQuery. In my example I’ve stopped form submission functionality through jQuery preventDefault() method.
Watch the live demo or download code from the link given below
HTML File: preventbutton.html
This page describes 3 input text fields and a submit button.
<!DOCTYPE html>
<html>
<head>
<title>Prevent Form Submission Using jQuery</title>
<meta charset="UTF-8">
<meta name="viewport" content="width=device-width, initial-scale=1.0">
<link href="css/bootstrap.css" rel="stylesheet" type="text/css"/>
<link href="css/style.css" rel="stylesheet">
<script src="http://ajax.googleapis.com/ajax/libs/jquery/1.11.1/jquery.min.js"></script>
<script src="js/prevent.js"></script>
</head>
<body>
<div class="container">
<div class="row">
</div>
<div class="row">
<div class="col-md-12">
<div class="main">
<h1>Prevent Form Submission using jQuery</h1>
</div>
</div>
<div class="col-md-12">
<div id="content">
<div class="login">
<h2>Enter Details</h2><hr/>
<form action="#" method="post">
<label><h3>Name:</h3></label>
<input class="text" id="name" name="name" type="text">
<label><h3>Email:</h3></label>
<input class="text" id="email" name="email" type="email">
<label><h3>Message:</h3></label>
<textarea class="msg" id="msg"></textarea><br/><br/>
<input id="send" type="submit" value="Submit">
<span id="submitdata"></span>
</form>
</div>
<p id="note"><b>Note:</b> Here I've stopped form submission by using <b><i>event.preventDefault()</i></b> method that prevents form to submit.</p>
</div>
</div>
</div>
</div>
</body>
</html>
jQuery File: prevent.js
Here is our jQuery code for for preventing form submission. preventDefault() method used here stops the default action of submit button from submitting the form.
$(document).ready(function() {
$("#send").click(function(e) {
e.preventDefault();
var name = $("#name").val();
var email = $("#email").val();
var msg = $("#msg").val();
if (!(name == '' || email == '' || msg == '')) {
$("#submitdata").empty();
$("#submitdata").append("Name: " + name + "<br/>Email: " + email + "<br/>Message: " + msg);
} else {
alert("Please Fill All Fields.");
}
});
});
CSS File: style.css
For Styling HTML elements.
@import url(http://fonts.googleapis.com/css?family=Raleway);

h3 {
text-align:left;
}

div.main{
margin:50px auto;
font-family:raleway;
}
div.main h1{
text-align:center;
align:center;
word-spacing:5px;
}
div.login{
width:50%;
margin:0 auto;
border-radius: 10px;
font-family:raleway;
border: 2px solid #ccc;
padding: 10px 40px 25px;
}
hr{
border:0;
border-bottom:1px solid #ccc;
margin: 10px -40px;
margin-bottom: 30px;
}
h2{
background-color: #FEFFED;
text-align:center;
border-radius: 10px 10px 0 0;
margin: -10px -40px;
padding: 15px;
}
a{
text-decoration:none;
color: cornflowerblue;
}

i{
color: cornflowerblue;
}
#content{
alignment-adjust: central;
margin:0 auto;
text-align: left;
}
#note{
clear: left;
padding-top: 20px;
margin-left: 8px;
font-size: 18px;
text-align: center;
width:100%;
}
input[type=text],input[type=password],input[type=email]{
width:99.5%;
padding: 10px;
margin-top: 8px;
border: 1px solid #ccc;
padding-left: 5px;
font-size: 16px;
font-family:raleway;
}
input[type=submit]{
width: 100%;
background-color:#FFBC00;
color: white;
border: 2px solid #FFCB00;
padding: 10px;
font-size:20px;
cursor:pointer;
border-radius: 5px;
margin-bottom: 15px;
}
.msg{
width:99.5%;
padding: 10px;
margin-top: 8px;
border: 1px solid #ccc;
padding-left: 5px;
font-size: 16px;
font-family:raleway;
}
p {
text-align:justify;
clear:both;
width:432px
}
span {
color:red
}
Conclusion:
So now you know how form submission can be prevented using jQuery. Hope you like the tutorial, Keep reading our other blog posts. 🙂
You may also have a look on below mentioned blogs –
- jQuery Popup Login and Contact Form
- jQuery Disable Radio Button=
Create Multi Step Form Using Javascript and CSS3
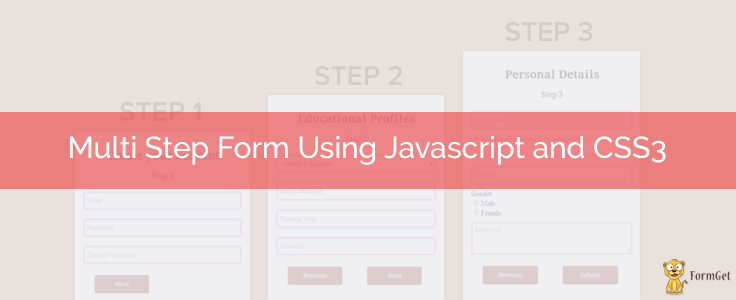
In our previous blog, we gave a multi-step form example using jQuery with some attractive effects.
Given below, is the same example but generated by Javscript have a look over live demo and follow our codes to use it.

HTML File: multi_step_form.html
Below we provide HTML code for creating form, which consists of three fieldsets. You can copy it and use directly.
<!DOCTYPE html>
<html>
<head>
<title>Multistep Registration Form- Demo Preview</title>
<meta content="noindex, nofollow" name="robots">
<!-- Including CSS File Here -->
<link href="css/style.css" rel="stylesheet" type="text/css">
<!-- Including JS File Here -->
<script src="js/multi_step_form.js" type="text/javascript"></script>
</head>
<body>
<div class="content">
<!-- Multistep Form -->
<div class="main">
<form action="#" class="regform" method="get">
<!-- Progressbar -->
<ul id="progressbar">
<li id="active1">Create Account</li>
<li id="active2">Educational Profiles</li>
<li id="active3">Personal Details</li>
</ul>
<!-- Fieldsets -->
<fieldset id="first">
<h2 class="title">Create your account</h2>
<p class="subtitle">Step 1</p><input class="text_field" name="email" placeholder="Email" type="text" value="">
<input class="text_field" name="pass" placeholder="Password" type="password" value="">
<input class="text_field" name="cpass" placeholder="Confirm Password" type="password" value="">
<input id="next_btn1" onclick="next_step1()" type="button" value="Next">
</fieldset>
<fieldset id="second">
<h2 class="title">Educational Profiles</h2>
<p class="subtitle">Step 2</p>
<select class="options">
<option>--Select Education--</option>
<option>Post Graduate</option>
<option>Graduate</option>
<option>HSC</option>
<option>SSC</option>
</select>
<input class="text_field" name="marks" placeholder="Marks Obtained" type="text" value="">
<input class="text_field" name="pyear" placeholder="Passing Year" type="text" value="">
<input class="text_field" name="univ" placeholder="University" type="text">
<input id="pre_btn1" onclick="prev_step1()" type="button" value="Previous">
<input id="next_btn2" name="next" onclick="next_step2()" type="button" value="Next">
</fieldset>
<fieldset id="third">
<h2 class="title">Personal Details</h2>
<p class="subtitle">Step 3</p>
<input class="text_field" name="fname" placeholder="First Name" type="text">
<input class="text_field" name="lname" placeholder="Last Name" type="text">
<input class="text_field" name="cont" placeholder="Contact" type="text">
<label>Gender</label>
<input name="gender" type="radio" value="Male">Male
<input name="gender" type="radio" value="Female">Female
<textarea name="address" placeholder="Address">
</textarea>
<input id="pre_btn2" onclick="prev_step2()" type="button" value="Previous">
<input class="submit_btn" onclick="validation(event)" type="submit" value="Submit">
</fieldset>
</form>
</div>
</div>
</body>
</html>
Javascript File: multi_step_form.js
Javascript code is given below you can copy it and use directly.
/*------------Validation Function-----------------*/
var count = 0; // To count blank fields.
function validation(event) {
var radio_check = document.getElementsByName('gender'); // Fetching radio button by name.
var input_field = document.getElementsByClassName('text_field'); // Fetching all inputs with same class name text_field and an html tag textarea.
var text_area = document.getElementsByTagName('textarea');
// Validating radio button.
if (radio_check[0].checked == false && radio_check[1].checked == false) {
var y = 0;
} else {
var y = 1;
}
// For loop to count blank inputs.
for (var i = input_field.length; i > count; i--) {
if (input_field[i - 1].value == '' || text_area.value == '') {
count = count + 1;
} else {
count = 0;
}
}
if (count != 0 || y == 0) {
alert("*All Fields are mandatory*"); // Notifying validation
event.preventDefault();
} else {
return true;
}
}
/*---------------------------------------------------------*/
// Function that executes on click of first next button.
function next_step1() {
document.getElementById("first").style.display = "none";
document.getElementById("second").style.display = "block";
document.getElementById("active2").style.color = "red";
}
// Function that executes on click of first previous button.
function prev_step1() {
document.getElementById("first").style.display = "block";
document.getElementById("second").style.display = "none";
document.getElementById("active1").style.color = "red";
document.getElementById("active2").style.color = "gray";
}
// Function that executes on click of second next button.
function next_step2() {
document.getElementById("second").style.display = "none";
document.getElementById("third").style.display = "block";
document.getElementById("active3").style.color = "red";
}
// Function that executes on click of second previous button.
function prev_step2() {
document.getElementById("third").style.display = "none";
document.getElementById("second").style.display = "block";
document.getElementById("active2").style.color = "red";
document.getElementById("active3").style.color = "gray";
}
CSS File: style.css
@import "http://fonts.googleapis.com/css?family=Droid+Serif";  /* This Line is to import Google font style */
.content{
width:960px;
margin:20px auto
}
.main{
float:left;
width:650px;
margin-top:80px
}
#progressbar{
margin:0;
padding:0;
font-size:18px
}
#active1{
color:red
}
fieldset{
display:none;
width:350px;
padding:20px;
margin-top:50px;
margin-left:85px;
border-radius:5px;
box-shadow:3px 3px 25px 1px gray
}
#first{
display:block;
width:350px;
padding:20px;
margin-top:50px;
border-radius:5px;
margin-left:85px;
box-shadow:3px 3px 25px 1px gray
}
input[type=text],input[type=password],select{
width:100%;
margin:10px 0;
height:40px;
padding:5px;
border:3px solid #ecb0dc;
border-radius:4px
}
textarea{
width:100%;
margin:10px 0;
height:70px;
padding:5px;
border:3px solid #ecb0dc;
border-radius:4px
}
input[type=submit],input[type=button]{
width:120px;
margin:15px 25px;
padding:5px;
height:40px;
background-color:#a0522d;
border:none;
border-radius:4px;
color:#fff;
font-family:'Droid Serif',serif
}
h2,p{
text-align:center;
font-family:'Droid Serif',serif
}
li{
margin-right:52px;
display:inline;
color:#c1c5cc;
font-family:'Droid Serif',serif
}
Conclusion:
So, this way you can create your own multistep form and can give more style to your form in a simple way, for more blogs keep following us.
Recommended blogs –
PHP: Redirect To URL After Form Submission
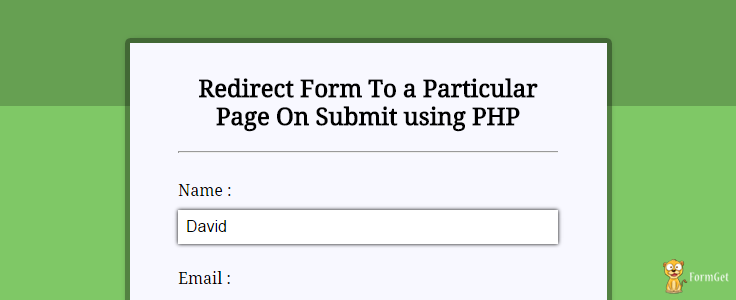
In this tutorial I’ll show you how to redirect a url after form submission using php. What can be achieved by doing so..?? As it is one of the basic requirements of website. Through redirection you can actually divert your user after submitting form to land to particular page of your choice in order to perform certain actions. Redirection benefits you in many ways.
Now in PHP, redirection is done by using header() function as it is considered to be the fastest method to redirect traffic from one web page to another. The main advantage of this method is that it can navigate from one location to another without the user having to click on a link or button.
Watch the live demo or download code from the link given below

PHP File: redirect_form.php
This file consists of html form with four fields and a submit button.
<!DOCTYPE html>
<html>
<head>
<title>Redirect Form To a Particular Page On Submit - Demo Preview</title>
<meta content="noindex, nofollow" name="robots">
<link href='css/redirect_form.css' rel='stylesheet' type='text/css'> <!--== Include CSS File Here ==-->
</head>
<body>
<div class="main">
<div class="first">
<h2>Redirect Form To a Particular Page On Submit using PHP</h2>
<form action="redirect_form.php" id="#form" method="post" name="#form">
<label>Name :</label>
<input id="name" name="name" placeholder='Your Name' type='text'>
<label>Email :</label>
<input id="email" name="email" placeholder='Valid Email Address' type='text'>
<label>Contact :</label>
<input id="contact" name="contact" placeholder='Contact' type='text'>
<label>Address:</label>
<input id="address" name="address" placeholder='Address' type='text' value="">
<input id='btn' name="submit" type='submit' value='Submit'>
<!---- Including PHP File Here ---->
<?php
include "include/redirect.php";
?>
</form>
</div>
</div>
</body>
</html>
PHP Script: redirect.php
When user fills all fields and clicks on submit button in redirect_form.php, this PHP code will executes and redirects to url mentioned in the code.
<?php
if(isset($_POST['submit'])){
// Fetching variables of the form which travels in URL
$name = $_POST['name'];
$email = $_POST['email'];
$contact = $_POST['contact'];
$address = $_POST['address'];
if($name !=''&& $email !=''&& $contact !=''&& $address !='')
{
//  To redirect form on a particular page
header("Location:https://www.formget.com/app/");
}
else{
?><span><?php echo "Please fill all fields.....!!!!!!!!!!!!";?></span> <?php
}
}
?>
CSS File: redirect_form.css
For Styling HTML Elements.
@import "http://fonts.googleapis.com/css?family=Droid+Serif";
/* Above line is used for online google font */
h2 {
text-align:center
}
hr {
margin-bottom:-10px
}
span {
color:red;
margin-left:65px
}
div.main {
width:960px;
height:655px;
margin:50px auto;
font-family:'Droid Serif',serif
}
div.first {
width:380px;
height:570px;
float:left;
padding:15px 50px;
background:#f8f8ff;
box-shadow:0 0 10px gray;
margin-top:20px
}
input {
width:100%;
padding:8px;
margin-top:10px;
font-size:16px;
margin-bottom:25px;
box-shadow:0 0 5px;
border:none
}
#btn {
width:100%;
padding:8px;
margin-top:10px;
background-color:#474242;
cursor:pointer;
color:#fff;
border:2px solid #adadad;
font-size:18px;
font-weight:700;
font-family:'Droid Serif',serif;
margin-bottom:15px
}
#btn:hover {
background-color:#adadad;
border:2px solid #474242
}
Conclusion:
This was all about php redirecting using header() function. Hope you liked it. Keep reading our other blog posts. 🙂
Upload Images Using PHP and jQuery via form

This blog Post concerns about Image uploading functionality using PHP and jQuery in forms. Just click on live demo or follow our codes to use it.
Here we have created an html form, set it’s attribute enctype=”multipart/form-data”. This form contains input tag , type=” file” when a user clicks on this input tag a window will opens for image file selection, after image selection an image preview is shown to user (using jquery). As user clicks on another input tag of type submit on which a PHP script will executes in which we wrote our codes in following steps:-
- We defined an array of allowed extensions .
$validextensions = array("jpeg", "jpg", "png");
- Defined a variable to store the selected file extension.
$temporary = explode(".", $_FILES["file"]["name"]);
$file_extension = end($temporary);
- Matching selected file size and it’s extension with allowed file size and allowed file extensions.
if ((($_FILES["file"]["type"] == "image/png")
|| ($_FILES["file"]["type"] == "image/jpg")
|| ($_FILES["file"]["type"] == "image/jpeg"))
&& ($_FILES["file"]["size"] < 100000)//approx. 100kb files can be uploaded
&& in_array($file_extension, $validextentions)){
//PHP Image Uploading Code
}- If it is invalid file then,
echo "<span>***Invalid file Type or file Size Exceeded***<span>";
- Else the following code will execute:
echo "<span>Your File Uploaded Succesfully...!!</span><br/>";
echo "<br/><b>File Name:</b> " . $_FILES["file"]["name"] . "<br>";
echo "<b>Type:</b> " . $_FILES["file"]["type"] . "<br>";
echo "<b>Size:</b> " . ($_FILES["file"]["size"] / 1024) . " kB<br>";
echo "<b>Temp file:</b> " . $_FILES["file"]["tmp_name"] . "<br>";

if (file_exists("upload/" . $_FILES["file"]["name"])) {
echo $_FILES["file"]["name"] . " <b>already exists.</b> ";
}
else {
move_uploaded_file($_FILES["file"]["tmp_name"],
"upload/" . $_FILES["file"]["name"]);
echo "<b>Stored in:</b> " . "upload/" . $_FILES["file"]["name"];
}
-: See Also :-
Upload Multiple Images Using PHP and jQuery

HTML Form : upload.php
We have explained line by line process in the above section , Here we have Created a form with html syntax.
<!DOCTYPE html>
<html>
<head>
<title>Upload Image using form</title>
<link href="style.css" rel="stylesheet">
<script src="http://ajax.googleapis.com/ajax/libs/jquery/1.11.1/jquery.min.js"></script>
<script src="script.js"></script>
</head>
<body>
<div id="mainform">
<div id="innerdiv">
<h2>Upload Image using form</h2>
<!-- Required Div Starts Here -->
<div id="formdiv">
<h3>Upload Form</h3>
<form action="" enctype="multipart/form-data" id="form" method="post" name="form">
<div id="upload">
<input id="file" name="file" type="file">
</div>
<input id="submit" name="submit" type="submit" value="Upload">
</form>
<div id="detail">
<b>Note:</b>
<ul>
<li>To Choose file Click on folder.</li>
<li>You can upload- <b>images(jpeg,jpg,png).</b></li>
<li>Image should be less than 100kb in size.</li>
</ul>
</div>
</div>
<div id="clear"></div>
<div id="preview">
<img id="previewimg" src=""><img id="deleteimg" src="delete.png">
<span class="pre">IMAGE PREVIEW</span>
</div>
<div id="message">
<?php include 'uploadphp.php';?>
</div>
</div>
</div>
</body>
</html>
PHP Image Uploading Script : uploadphp.php
Here, We have given complete Image Uploading Script.
<?php

if (isset($_POST['submit'])) {

$validextensions = array("jpeg", "jpg", "png");
$temporary = explode(".", $_FILES["file"]["name"]);
$file_extension = end($temporary);

if ((($_FILES["file"]["type"] == "image/png") || ($_FILES["file"]["type"] == "image/jpg") || ($_FILES["file"]["type"] == "image/jpeg")
) && ($_FILES["file"]["size"] < 100000)//Approx. 100kb files can be uploaded.
&& in_array($file_extension, $validextensions)) {

if ($_FILES["file"]["error"] > 0) {
echo "Return Code: " . $_FILES["file"]["error"] . "<br/><br/>";
} else {

echo "<span>Your File Uploaded Succesfully...!!</span><br/>";
echo "<br/><b>File Name:</b> " . $_FILES["file"]["name"] . "<br>";
echo "<b>Type:</b> " . $_FILES["file"]["type"] . "<br>";
echo "<b>Size:</b> " . ($_FILES["file"]["size"] / 1024) . " kB<br>";
echo "<b>Temp file:</b> " . $_FILES["file"]["tmp_name"] . "<br>";
if (file_exists("upload/" . $_FILES["file"]["name"])) {
echo $_FILES["file"]["name"] . " <b>already exists.</b> ";
} else {
move_uploaded_file($_FILES["file"]["tmp_name"], "upload/" . $_FILES["file"]["name"]);
$imgFullpath = "http://".$_SERVER['SERVER_NAME'].dirname($_SERVER["REQUEST_URI"].'?').'/'. "upload/" . $_FILES["file"]["name"];
echo "<b>Stored in:</b><a href = '$imgFullpath' target='_blank'> " .$imgFullpath.'<a>';

}

}
} else {
echo "<span>***Invalid file Size or Type***<span>";
}
}
?>
jQuery Code: script.js
This, jquery code is to provide image preview facility in form, before Uploading it.
$(document).ready(function() {
// Function for Preview Image.
$(function() {
$(":file").change(function() {
if (this.files && this.files[0]) {
var reader = new FileReader();
reader.onload = imageIsLoaded;
reader.readAsDataURL(this.files[0]);
}
});
});
function imageIsLoaded(e) {
$('#message').css("display", "none");
$('#preview').css("display", "block");
$('#previewimg').attr('src', e.target.result);
};
// Function for Deleting Preview Image.
$("#deleteimg").click(function() {
$('#preview').css("display", "none");
$('#file').val("");
});
// Function for Displaying Details of Uploaded Image.
$("#submit").click(function() {
$('#preview').css("display", "none");
$('#message').css("display", "block");
});
});
CSS File: style.css
Styling HTML Elements.
@import "http://fonts.googleapis.com/css?family=Droid+Sans";
/* Above is to load Google Fonts in our page.*/
#mainform{
width:960px;
margin:30px auto;
padding-top:20px;
font-family:'Droid Sans',sans-serif
}
#mainform h2{
margin-left:95px
}
#innerdiv{
float:left;
width:60%;
height:575px;
padding:10px 30px 30px
}
#formdiv{
background-color:#fff;
color:#123456;
box-shadow:0 1px 1px 1px gray;
width:480px;
margin:50px 0 0;
height:300px
}
h3{
margin-top:0;
color:#fff;
background-color:#1CC32B;
text-align:center;
width:100%;
height:50px;
padding-top:30px
}
input[type=submit]{
background-color:#1CC32B;
border:1px solid #fff;
font-weight:700;
font-size:18px;
color:#fff;
width:150px;
height:30px;
border-radius:3px;
padding:2px;
box-shadow:0 1px 1px 0 #a9a9a9;
margin-left:20px
}
#form{
width:43%;
float:left
}
#preview{
height:180px;
width:180px;
text-align:center;
margin:20px;
display:none
}
.pre{
margin-right:20px;
font-size:13px
}
#previewimg{
height:140px;
width:140px;
float:left;
padding:8px;
border:1px solid #e4d3c3;
margin-bottom:5px
}
#file{
opacity:0;
width:115px;
height:115px
}
#upload{
width:115px;
height:115px;
background-image:url(abc.png);
background-repeat:no-repeat;
margin-left:35px;
box-shadow:0 0 10px grey;
background-position:5px
}
#message{
width:100%;
font-size:14px;
color:#123456;
margin-top:-90px;
float:left;
margin:15px
}
#message span{
color:red;
font-size:15px
}
#detail{
line-height:20px;
float:left;
width:270px;
font-size:14px
}
ul{
margin-left:-25px
}
#textmessage{
float:right;
width:50%;
margin:15px 85px 0 0
}
div#img{
width:200px;
height:200px
}
#imageupload{
width:150px;
height:150px
}
#deleteimg{
cursor:pointer;
float:right;
margin-top:-175px;
margin-right:10px
}
Conclusion:
This was all about image uploading using PHP . Similarily, you can define other file extensions to upload them, just copy or download our codes to use it, keep following us for upcoming blogs.
Email Verification in PHP for Registered User

To verify an authorized user registration and to avoid duplicacy in accounts of users for an organization, it becomes very important to verify his/her identity. For this, a common way of email id verification is used for registered user, which was pre-stored in organisation’s database when he/she was registered for the first time.
This blog post concerns about “Email Verification” and explains you how it is done using PHP.
We have used PHP script to verify particular email, in which following steps were performed:
- Establish connection with server.
- Selecting Database.
- SQL Query to fetch records from table.
- Matches input values with query returned values.
- Connection Close.
We have created our database and stored an email “[email protected]” with name “fugo” when above PHP script executes values from input field matches with pre-stored email id and name in database, if match found then it will notify as “verification successful”.
Below is our complete code with download and live demo option

PHP File: checkemail.php
In this file you will find combination of HTML and PHP, main functionality of the code has written in PHP segment.
<!DOCTYPE html>
<html>
<head>
<title>PHP Email Verification Script</title>
<link href="css/style.css" rel="stylesheet">
</head>
<body>
<div id="mainform">
<div id="innerdiv">
<!-- Required Div Starts Here -->
<h2>PHP Email Verification</h2>
<form action="" id="form" method="get" name="form">
<h3>Email Verification Form</h3>
<label>Name :</label>
<input id="name" name="name" placeholder="Name" type="text">
<label>Email :</label>
<input id="email" name="email" placeholder="Email" type="text">
<input id="submit" name="submit" type="submit" value="Verify">
<div id="alert">
<?php
if (isset($_GET['submit'])) {
if (empty($_GET['name']) || empty($_GET['email'])) {
echo '<span id="one">***Fill All Fields***</span>';
} else {
$name2 = $_GET['name'];
$email2 = $_GET['email'];
$connection = mysql_connect("localhost", "root", ""); // Establishing Connection with Server
$db = mysql_select_db("company", $connection); // Selecting Database
$query = mysql_query("select * from member where emp_email='$email2'", $connection); // My-SQL Query to fetch particular matching row.
$rows = mysql_num_rows($query);
if ($rows == 1) {
echo '<span id="two">***Email Verification Success***</span>';
} else {
echo '<span id="three">***Email Verification Failed***</span>';
}
mysql_close($connection); // Closing Connection with Server
}
}
?>
</div>
</form>
</div>
</div>
</body>
</html>
CSS FIle: style.css
Style of HTML elements is defined here.
/*----- Below line is to import Google fonts in our page. -------------*/
@import "http://fonts.googleapis.com/css?family=Fauna+One|Muli";
/*---------- CSS For the required HTML elements---------*/
#mainform{
width:960px;
margin:30px auto;
padding-top:20px;
font-family:'Fauna One',serif;
text-align:center
}
#mainform h2{
width:480px
}
#form{
background-color:#fff;
color:#123456;
box-shadow:0 1px 1px 1px gray;
font-weight:400;
width:480px;
margin:70px 0 0;
height:300px
}
h3{
margin-top:0;
color:#fff;
background-color:#1CC32B;
text-align:center;
width:100%;
height:50px;
padding-top:30px
}
input{
width:300px;
height:30px;
margin-top:10px;
border-radius:3px;
padding:2px;
box-shadow:0 1px 1px 0 #a9a9a9
}
input[type=submit]{
background-color:#1CC32B;
border:1px solid #fff;
font-family:'Fauna One',serif;
font-weight:700;
font-size:18px;
color:#fff;
margin-left:60px
}
#message{
width:100%px;
margin-top:50px;
font-size:14px
}
#alert{
margin-top:10px
}
#one{
padding:5px;
color:red
}
#two{
padding:5px;
color:green
}
#three{
padding:5px;
color:red
}
#innerdiv{
float:left;
width:50%;
height:500px;
padding:50px 30px 30px;
margin-top:30px
}
Conclusion:
So, in this way we have verified the user email using php that can be used in a login form too. For more technical assistance visit our other blogs and keep following us for more excitements.
For more information check out the following mentioned blogs –
- Retrieve or Fetch Data From Database in PHP
jQuery Uncheck/Check All Checkboxes

Checkbox Plays a key role in forms. Sometimes there is a need to select or Check/Uncheck all options (ex. email inbox) then, how it happens and what technique is used to do this?
This blog post answers the above question.
We used jQuery to accomplish this, moreover we have explained two ways to do the same, one is by using button to check/uncheck all options, and other one is by using a single checkbox to check/uncheck all options. All you have to do is just follow or download our code as per your requirement and implement it in your forms.

HTML File: all_check.html
In this file all the basic html code has written. To place various html elements.
<!DOCTYPE html>
<html>
<head>
<title>Check & Uncheck All Check Boxes</title>
<!-- Include CSS File Here -->
<link href="css/all_check.css" rel="stylesheet">
<!-- Include JS File Here -->
<script src="http://ajax.googleapis.com/ajax/libs/jquery/1.11.1/jquery.min.js"></script>
<script src="js/all_check.js"></script>
</head>
<body>
<div id="main">
<div id="first">
<h1>Check & Uncheck All Options</h1>
<p>Check & Uncheck All Options by Button</p>
<input id="checkAll" type="button" value="Check/Uncheck All ">
<div class="button">
<input class="first" id="Item 1" name="option1" type="checkbox">
<label class="label1" for="Item 1">Item 1</label>
<input class="first" id="Item 2" name="option1" type="checkbox">
<label class="label1" for="Item 2">Item 2</label>
<input class="first" id="Item 3" name="option1" type="checkbox">
<label class="label1" for="Item 3">Item 3</label>
<input class="first" id="Item 4" name="option1" type="checkbox">
<label class="label1" for="Item 4">Item 4</label>
</div>
<p>Check & Uncheck All Options by Check Box</p>
<input class="second" id="selectall" name="check" type="checkbox">
<label class="label2" for="selectall">Check/Uncheck All</label>
<div class="check">
<input class="second" id="Item A" name="option2" type="checkbox">
<label class="label2" for="Item A">Item A</label>
<input class="second" id="Item B" name="option2" type="checkbox">
<label class="label2" for="Item B">Item B</label>
<input class="second" id="Item C" name="option2" type="checkbox">
<label class="label2" for="Item C">Item C</label>
<input class="second" id="Item D" name="option2" type="checkbox">
<label class="label2" for="Item D">Item D</label>
</div>
</div>
</body>
</html>
JQUERY File: all_check.js
Main functionality of the code has written in this file.
$(document).ready(function() {
// Below code is used to remove all check property if,
// User select/unselect options with class first options.
$(".first").click(function() {
$("#checkAll").attr("data-type", "uncheck");
});
// Below code is used to remove all check property if,
// User select/unselect options with name=option2 options.
$("input[name=option2]").click(function() {
$("#selectall").prop("checked", false);
});
/////////////////////////////////////////////////////////////
// JS for Check/Uncheck all CheckBoxes by Button //
/////////////////////////////////////////////////////////////
$("#checkAll").attr("data-type", "check");
$("#checkAll").click(function() {
if ($("#checkAll").attr("data-type") === "check") {
$(".first").prop("checked", true);
$("#checkAll").attr("data-type", "uncheck");
} else {
$(".first").prop("checked", false);
$("#checkAll").attr("data-type", "check");
}
})
/////////////////////////////////////////////////////////////
// JS for Check/Uncheck all CheckBoxes by Checkbox //
/////////////////////////////////////////////////////////////
$("#selectall").click(function() {
$(".second").prop("checked", $("#selectall").prop("checked"))
})
});
CSS FIle: all_check.css
Styling of html elements is done here.
@import "http://fonts.googleapis.com/css?family=Arvo";
/* Above line is used for online Google font */
hr{
margin-top:-13px;
margin-bottom:25px
}
h1{
font-size:30px
}
p{
padding-left:35px;
font-weight:700
}
div#main{
width:960px;
height:825px;
margin:50px auto;
font-family:'Arvo',sans-serif
}
div#first{
width:460px;
height:500px;
padding:10px 25px 30px;
float:left;
border:12px solid #F99;
margin-top:25px;
box-shadow:0 0 25px
}
input#checkAll{
background:linear-gradient(to bottom,#59d0f8 5%,#49c0e8 100%);
border:1px solid #0c799e;
padding:7px 25px;
font-size:15px;
color:#fff;
margin-left:40px;
margin-top:-10px;
border-radius:5px;
cursor:pointer
}
input#checkAll:hover{
background:linear-gradient(to bottom,#49c0e8 5%,#59d0f8 100%)
}
.button{
margin-top:15px;
margin-bottom:35px;
border-bottom:1px solid #ccc
}
.check{
margin-top:15px;
border-top:1px dashed #ccc;
padding-top:15px
}
/* -------------------------------------
CSS for Checkbox (Check/Uncheck) with Button
---------------------------------------- */
input[type=checkbox].first{
display:none
}
/*--------------------------------------------------------------------------------
Creating Checkbox and label as a single unit(for Cross browser compatibility)
----------------------------------------------------------------------------------*/
input[type=checkbox].first + label.label1{
padding-left:35px;
display:inline-block;
line-height:30px;
background-repeat:no-repeat;
cursor:pointer;
margin-left:40px;
margin-right:90px
}
input[type=checkbox].first:checked + label.label1{
background-position:0 -30px
}
label.label1{
background-image:url(../images/check1.png)
}
/* -------------------------------------
CSS for Checkbox (Check/Uncheck) with Checkbox
---------------------------------------- */
input[type=checkbox].second{
display:none
}
/*--------------------------------------------------------------------------------
Creating Checkbox and label as a single unit(for Cross browser compatibility)
----------------------------------------------------------------------------------*/
input[type=checkbox].second + label.label2{
padding-left:44px;
display:inline-block;
line-height:34px;
background-repeat:no-repeat;
cursor:pointer;
margin-left:40px;
margin-right:90px
}
input[type=checkbox].second:checked + label.label2{
background-position:0 -34px
}
label.label2{
background-image:url(../images/check2.png)
}
Conclusion:
So, This was all about how to check/uncheck all available checkboxes using jquery, visit our other blogs and keep following us.
Also have a look on some more informative blogs –
- Simple jQuery Contact Form with Validation
- Captcha Code in PHP
Customized Checkbox and Radio Button with CSS3

This blog post explains and provide you different CSS Styles for checkbox and radio button .
Here, are the following types, you just copy our code or download it to implement in your forms.
In our CSS style we put label along with radio button and checkbox to treated them as a single unit and defined CSS for it.

HTML File:
<!DOCTYPE html>
<html>
<head>
<title>Designed Checkbox and Radio Button</title>
<!-- include css file here-->
<link rel="stylesheet" href="css/design_checkbox.css"/>
</head>
<body>
<div id="main">
<div id="first">
<h1>Stylish Designs for Radio & Check Box</h1>
<div id="radio">
<h3> Radio Button Type-1 </h3>
<input type="radio" name="option" id="radio1" checked="checked"/>
<label for="radio1" >Fresher</label>
<input type="radio" name="option" id="radio2" />
<label for="radio2" >Experienced</label>
<h3 class="h3"> Radio Button Type-2 </h3>
<input type="radio" name="study" id="radio11" class="education" checked="checked" />
<label for="radio11" class="degree" >Master Degree</label>
<input type="radio" name="study" id="radio12" class="education" />
<label for="radio12" class="degree">Bachelor Degree</label>
</div>
<div id="check">
<h3> Check Box Type-1 </h3>
<input type="checkbox" name="option1" id="checkbox1" class="check1" />
<label for="checkbox1" class="label1">Option 1</label>
<input type="checkbox" name="option1" id="checkbox2" class="check1" checked="checked"/>
<label for="checkbox2" class="label1">Option 2</label>
<h3> Check Box Type-2 </h3>
<input type="checkbox" name="option2" id="checkbox11" class="check2" />
<label for="checkbox11" class="label2">Cricket</label>
<input type="checkbox" name="option2" id="checkbox12" class="check2" checked="checked"/>
<label for="checkbox12" class="label2">Football</label>
</div>
</div>
</div>
</body>
</html>
CSS For html part:
/* below line is used for online google font */
@import url(http://fonts.googleapis.com/css?family=Arvo);
@import url(http://fonts.googleapis.com/css?family=Roboto);
hr {
border: 0;
border-top: 1px solid #ccc;
margin-bottom: -10px;
}
div#main{
width: 960px;
height: 825px;
margin: 0px auto;
font-family: 'Roboto', sans-serif;
}
div#first {
width: 460px;
height:500px;
padding: 10px 25px 20px 25px;
float:left;
border: 12px solid #ccc;
margin-top:60px;
box-shadow: 0 0 25px;
}
div#radio{
width:210px;
float:left;
padding-left:20px;
}
div#check{
width:190px;
padding-left:40px;
float:left;
}
.h3{
margin-top: 32px;
}
h1{
font-family: 'Arvo', serif;
text-align:center;
}
CSS For Radio button Type1:
/* -------------------------------------
CSS for Radio Button Type-1
---------------------------------------- */
input[type=radio] {
display:none;
}
/*--------------------------------------------------------------------------------
Creating radio button and label as a Single unit(for Cross browser compatibility)
----------------------------------------------------------------------------------*/
input[type=radio] + label{
padding-left:31px;
display:inline-block;
line-height:24px;
background-repeat:no-repeat;
cursor:pointer;
}
input[type=radio]:checked + label {
background-position: 0 -24px;
}
label{
background-image:url('../images/radio2.png');
}
CSS For Radio button Type2:
/* -------------------------------------
CSS for Radio Button Type-2
---------------------------------------- */
input[type=radio].bachelor {
display:none;
}
/*--------------------------------------------------------------------------------
Creating radio button and label as a Single unit(for Cross browser compatibility)
----------------------------------------------------------------------------------*/
input[type=radio].bachelor + label.degree{
padding-left:31px;
display:inline-block;
line-height:24px;
background-repeat:no-repeat;
cursor:pointer;
}
input[type=radio].bachelor:checked + label.degree {
background-position: 0 -24px;
}
label.degree{
background-image:url('../images/radio1.png');
}
CSS For Check-Box Type1:
/* -------------------------------------
CSS for Checkbox Type-1
---------------------------------------- */
input[type=checkbox].check1 {
display:none;
}
/*--------------------------------------------------------------------------------
Creating Checkbox and label as a Single unit(for Cross browser compatibility)
----------------------------------------------------------------------------------*/
input[type=checkbox].check1 + label.label1{
padding-left:35px;
display:inline-block;
line-height:30px;
background-repeat:no-repeat;
cursor:pointer;
}
input[type=checkbox].check1:checked + label.label1 {
background-position: 0 -30px;
}
label.label1{
background-image:url('../images/check1.png');
}
CSS For Check-Box Type2:
/* -------------------------------------
CSS for Checkbox Type-2
---------------------------------------- */
input[type=checkbox].check2 {
display:none;
}
/*--------------------------------------------------------------------------------
Creating Checkbox and label as a Single unit(for Cross browser compatibility)
----------------------------------------------------------------------------------*/
input[type=checkbox].check2 + label.label2 {
padding-left:44px;
display:inline-block;
line-height:34px;
background-repeat:no-repeat;
cursor:pointer;
}
input[type=checkbox].check2:checked + label.label2 {
background-position: 0 -34px;
}
label.label2{
background-image:url('../images/check2.png');
}
Check some more informative blogs here –
- CSS Progress Bar
- CSS Submit Button Designs