

Amazon Simple Email Sending (Amazon SES) service is a reliable, easy to use, robust, cost-effective and highly scalable email sending service that allows businesses and firms to send transactional and marketing messages in bulk and one has to only pay for what he or she uses.
With Amazon SES, businesses can now access a high-quality, scalable email infrastructure to efficiently and inexpensively communicate to their customers without having a long-term commitment or a minimum chargeable cost.
And when it comes to costing, it’s hard to beat Amazon SES. At $0.10 per thousand emails, Amazon SES proves to be a deal worth grabbing.
To connect to the Amazon SES SMTP interface, you need to generate your IAM credentials. And for this, you need to first setup Amazon SES account first. After generating IAM credentials you can use these keys to shoot emails.
We too have recently launched a new email service provider MailGet which also works on the same technology. It connects to Amazon SES SMTP interface and allows you send emails with just few clicks. It is an amazingly simple email builder, which works great with Amazon SES.
Features and Benefits of Amazon SES :
Amazon SES is full of features and benefits that make it the best Email Sending Service among other existing services. Here are in brief, the features it is loaded with and the benefits that it may give you.
Reliability
Amazon SES has a world class email infrastructure which Amazon.com has built to serve its own customer base and so it proves to be a very reliable service.
It can integrate with different applications through SMTP interface. It has monitoring services, statistics, and also a built-in feedback loop that facilitates bounce, complaint, and delivery notifications.
Cost
As far as cost of using this service is concerned, Amazon SES appears to be the leader here. This service charges a whopping $ 0.10 per thousand emails which is the lowest among all other email sending services.
Below follows a cost comparison between Amazon SES and some other email sending services.

SMTP and Account Security
Amazon SES provides a unique Access Key ID and Secret Access Key to its users which they can safely use at SMTP end to send emails. Also, when you want to generate a New Access Key you can revoke the access to send emails using SMTP.
The SMTP credentials should be kept secret as they only allow access to send emails.
Deliverability
As an email sender, one always wants that the maximum number of mails he sends, reach recipients’ inboxes. Amazon SES is equipped with content filtering technologies where it scans the outgoing email and ensures that the content meets ISP standards, and then either queues it for sending or routes back to the sender for correction.
Amazon SES also detects and blocks messages containing viruses or malware before they can be sent. Additionally, it helps you know which of your emails were marked as spam by recipients by maintaining a feedback loop with major ISPs, and thus helps guide your sending strategy.
Sending Statistics
When you send emails, Amazon SES automatically collects statistics regarding successful deliveries, rejected messages, bounces and complaints. You can see these statistics on a real-time basis on SES console thereby diagnosing problems and fixing them right away.

Quota
The default quota for sending emails via Amazon SES is 10000 emails per day after you are granted production access. For new accounts in the sandbox, the quota is restricted to 200 emails per day, therefore one should request production access as soon as he/she creates an account.
Now if you send high-quality content and shoot nearly 10000 emails everyday, Amazon SES detects your utilization and increases your current limit by itself. You don’t have to send any new request or something, your quota is modified by Amazon SES as per your requirements automatically.
Notifications
Amazon SES is enabled to send you notifications automatically. As far as notifications regarding bounces and complaints are concerned, Amazon SES can send them to you by either an email or through Amazon Simple Notification Service (Amazon SNS).
Whereas, notifications triggered when an email is delivered successfully are send to you only through Amazon SNS.
Scalability
As mentioned before, Amazon SES is highly scalable. It is readable & clickable no matter which size environment it is being read in.
Amazon SES uses the same cloud-based technology that Amazon websites use to send innumerable messages every year.
The Final Word…
For businesses that require bulk email sending for marketing or any other purpose, Amazon SES service is of great use. It is simple, scalable, very economic in terms of pricing and provides high deliverability. It is based on proven technologies of Amazon.com and so is very reliable.
Especially with email builders like MailGet, It emerges as a great deal and can surely make businesses’ growth graphs go steeper.
Login With Google CodeIgniter : OAuth API PHP Client

Google’s OAuth 2.0 APIs can be used for open authentication. By this we can access user’s data from server after authorizing user via Google account.
In this tutorial, we are going to explain how you can implement Google open authentication to connect with your website using CodeIgniter.
You can achieve this login mechanism using Google API php client.
To start with this, first Download the Google API php client and save it in your CodeIgniter’s libraries folder, which you will find inside ci_google_oauth > application > libraries. Here ci_google_oauth is the base folder of program file.
You can also refer our live demo or download the Script file. Extract the downloaded files, save it in your local server and run it using path :
http://localhost/ci_google_oauth/
Create Google OAuth Credentials
Before using the Google PHP client library and Oauth 2.0, you must register your application via Google Developers Console.
Google OAuth API required “Client ID” and “Client secret” and “Redirect URIS“ for your application.
If you are looking for inbuilt CodeIgniter facebook and google login. Then you can also try some good scripts. Just plug and play script.
For this follow up the below given steps :
Step 1 : Go to https://developers.google.com/console and sign in by an existing Google account’s username or password.
When you logged in below screen will appear, for creating new project, click on Create Project button .
Now one popup window will appear, here write your project name and click on Create button.

Step 2 : After clicking on Create button below screen will appear. Now go to APIs & auth link.

Step 3 : In this section click on APIs link and find Google+ API by default its off for using this API , make it on by clicking onto OFF button.

Step 4 :After Enabling Google+ API. You will see it under Enabled APIs list..

Step 5 : Now click on Credentials links, here two button will appear Create new Client ID and Create new Key. First click on Create new client ID.

Step 6 : After clicking on Create new app ID one popup window will appear. Here you can select your application type, select Web application and click on Configure consent screen.

Step 7 : Next in Consent screen you can write your product name, homepage URL and product logo which will appear when API access Google data. Then click on Save button

Step 8 : In this window you can mention Authorized Javascript Origins and Redirect URIS.
Redirect URIS used when Google authenticate the user and you want to redirect the user in any URL. Now click on Create Client ID button.

Step 9: After submitting this form, we can get the client Id, secret key and etc as below.for API key click on Create new key button

Step 10:When you click on Create new key one popup window will appear, here you can generate API key for specific platform . We are using web application so click on Server key.

Step 11: In this window just click on Create button

Step 12: Now we finally got CLIENT ID, CLIENT SECRET, REDIRECT URIS and API KEY.

Copy these credentials and put them in your code, which is explained below.
Below is our complete code with short explanation :
Controllers : user_authentication.php
Copy the below code in your controller in that we are using two files , Client.php and Oauth2.php from the library(google-api-php-client-master) that we have saved in libraries folder , other files are interconnected. Now write the Google OAuth Credentials (CLIENT ID, CLIENT SECRET, REDIRECT URIS and API KEY) in the below given space in the code.
<?php
// Start session

session_start();

class User_Authentication extends CI_Controller {

public function __construct() {
parent::__construct();
}

public function index() {

// Include two files from google-php-client library in controller
include_once APPPATH . "libraries/google-api-php-client-master/src/Google/Client.php";
include_once APPPATH . "libraries/google-api-php-client-master/src/Google/Service/Oauth2.php";

// Store values in variables from project created in Google Developer Console
$client_id = '< Generated Client Id >';
$client_secret = '< Generated Client secret Key >';
$redirect_uri = 'http://localhost/ci_google_oauth/';
$simple_api_key = '< Generated Server/API Key >';

// Create Client Request to access Google API
$client = new Google_Client();
$client->setApplicationName("PHP Google OAuth Login Example");
$client->setClientId($client_id);
$client->setClientSecret($client_secret);
$client->setRedirectUri($redirect_uri);
$client->setDeveloperKey($simple_api_key);
$client->addScope("https://www.googleapis.com/auth/userinfo.email");

// Send Client Request
$objOAuthService = new Google_Service_Oauth2($client);

// Add Access Token to Session
if (isset($_GET['code'])) {
$client->authenticate($_GET['code']);
$_SESSION['access_token'] = $client->getAccessToken();
header('Location: ' . filter_var($redirect_uri, FILTER_SANITIZE_URL));
}

// Set Access Token to make Request
if (isset($_SESSION['access_token']) && $_SESSION['access_token']) {
$client->setAccessToken($_SESSION['access_token']);
}

// Get User Data from Google and store them in $data
if ($client->getAccessToken()) {
$userData = $objOAuthService->userinfo->get();
$data['userData'] = $userData;
$_SESSION['access_token'] = $client->getAccessToken();
} else {
$authUrl = $client->createAuthUrl();
$data['authUrl'] = $authUrl;
}
// Load view and send values stored in $data
$this->load->view('google_authentication', $data);
}

// Unset session and logout
public function logout() {
unset($_SESSION['access_token']);
redirect(base_url());
}
}
?>
Views : google_authentication.php
Copy the below code in your view and save as google_authentication.php. This page contain Sign in with Google option. After sign in ,Google will redirect the user data to to google_authentication.php. Now you can see user information and logout option.
<html>
<head>
<link rel="stylesheet" type="text/css" href="<?php echo base_url(); ?>css/style.css">
<link rel="stylesheet" media="screen and (max-width: 1200px) and (min-width: 0px)" type="text/css" href="<?php echo base_url(); ?>css/styleresponsive1.css">
<link rel="stylesheet" media="screen and (max-width: 600px) and (min-width: 0px)" type="text/css" href="<?php echo base_url(); ?>css/styleresponsive2.css">
<link href='http://fonts.googleapis.com/css?family=Source+Sans+Pro|Open+Sans+Condensed:300|Raleway' rel='stylesheet' type='text/css'>
</head>
<body>
<div id="main">
<div id="envelope">
<?php if (isset($authUrl)){ ?>
<header id="sign_in">
<h2>CodeIgniter Login With Google Oauth PHP</h2>
</header>
<hr>
<div id="content">
<center><a href="<?php echo $authUrl; ?>"><img id="google_signin" src="<?php echo base_url(); ?>images/google_login.jpg" width="100%" ></a></center>
</div>
<?php }else{ ?>
<header id="info">
<a target="_blank" class="user_name" href="<?php echo $userData->link; ?>" /><img class="user_img" src="<?php echo $userData->picture; ?>" width="15%" />
<?php echo '<p class="welcome"><i>Welcome ! </i>' . $userData->name . "</p>"; ?></a><a class='logout' href='https://www.google.com/accounts/Logout?continue=https://appengine.google.com/_ah/logout?continue=<?php echo base_url(); ?>index.php/user_authentication/logout'>Logout</a>
</header>
<?php
echo "<p class='profile'>Profile :-</p>";
echo "<p><b> First Name : </b>" . $userData->given_name . "</p>";
echo "<p><b> Last Name : </b>" . $userData->family_name . "</p>";
echo "<p><b> Gender : </b>" . $userData->gender . "</p>";
echo "<p><b>Email : </b>" . $userData->email . "</p>";
?>
<?php }?>
</div>
</div>
</body>
</html>
CSS : style.css
Styling HTML Elements.
body {
margin:0;
padding:0;
font-family:raleway;
background-image: url(../images/repeat-bg.png);
}
#main{
width: 65%;
height: 100%;
margin-left: 17%;
margin-top: 5%;
position: relative;
}
h2{
font-family:raleway;
}
div#envelope{
position: relative;
width: 51%;
border: 1px solid #CFCFD0;
border-radius: 10px;
background-color: #FFFFFF;
}
div#content{
width: 100%;
padding:12px auto;
overflow: hidden;
word-break: break-all;
overflow-wrap: break-word;
border-radius: 0 0 10px 10px;
}
header#sign_in{
font-family:raleway;
background-color: #079BAE;
text-align: center;
padding-top: 12px;
padding-left: 5px;
padding-bottom: 8px;
margin-bottom: -8px;
border-radius: 10px 10px 0 0;
color: white;
}
header#info{
font-family:raleway;
background-color: #079BAE;
margin-top: -11px;
padding-top:15px;
padding-bottom: 42px;
padding-left: 15px;
padding-right: 15px;
font-size: 16px;
border-radius: 10px 10px 0 0;
color: white;

}
header#info a.user_name{
font-family:raleway;
text-decoration: none;
color:white;
}
div.logout{
padding-top: 30px;
float:right;
}
a.logout{
font-family:raleway;
font-size: 20px;
font-weight: 600;
text-decoration: none;
padding-right: 0 auto;
float:right;
color:white;
}
p {
padding: 0 25px;
}
p.profile {
font-weight: bold;
font-size: 20px;
}
img.user_img{
border-radius:50% 50% 50% 50%;
border:3px solid white;
}
p.welcome{
margin-top: -50px;
margin-left: 12%;
}
Conclusion:
This was all about how we can implement Google open authentication with our website using CodeIgniter. Hope you like it, keep reading our other blogs.
Responsive Email Template Builder: Build The Perfect Email!

How about if your sent emails get automatically optimized according to recipients viewing environment.?
From the above statement I just want to acknowledge you that –
- It is possible to design perfect responsive emails..
..automatically resized according to the viewing device like smartphones, tablets, etc.
And So, MailGet provides responsive email builder through which you can create beautiful and stunning emails.
It just requires a few clicks, and your email is ready..!!
Let Us Dig Into Each Email Editor –
Drag and Drop Email Editor
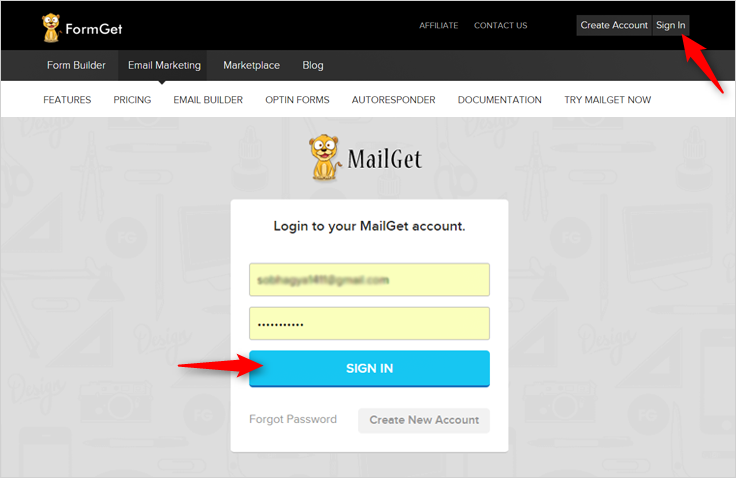
STEP 1 –
- Login to your MailGet Account..
..you will be redirected to MailGet dashboard.
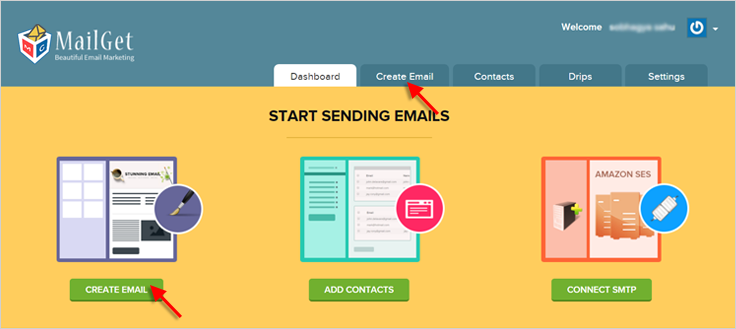
STEP 2 –
- As soon as you enter into the MailGet dashboard..
..click on CREATE EMAIL button i.e. the first step of creating an email.
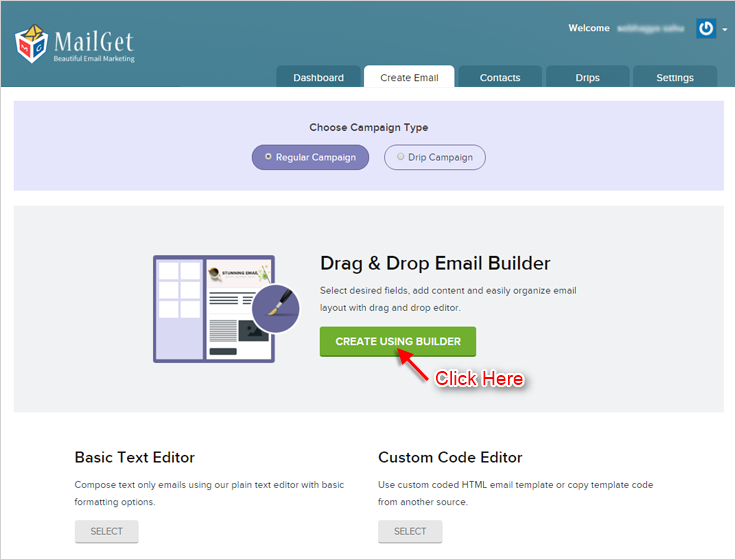
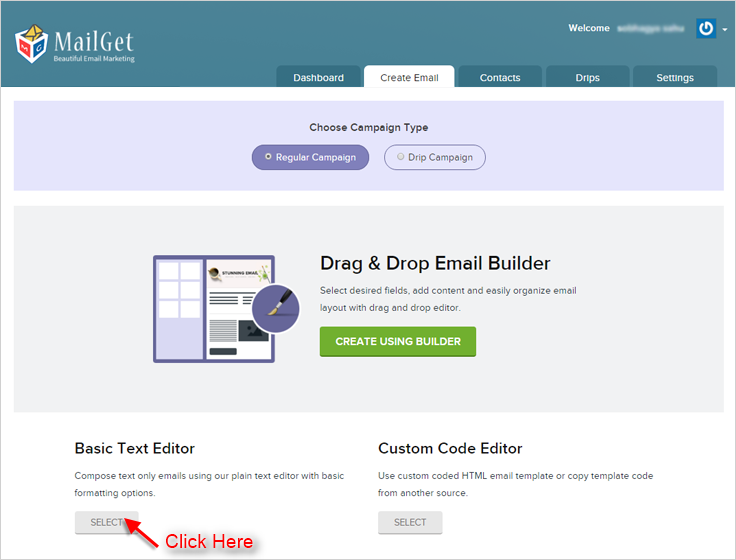
STEP 3 –
- After clicking on CREATE EMAIL button..
..you will find various email editors for creating emails.
- Select Drag and Drop Email Editor and you will move on to email builder panel.
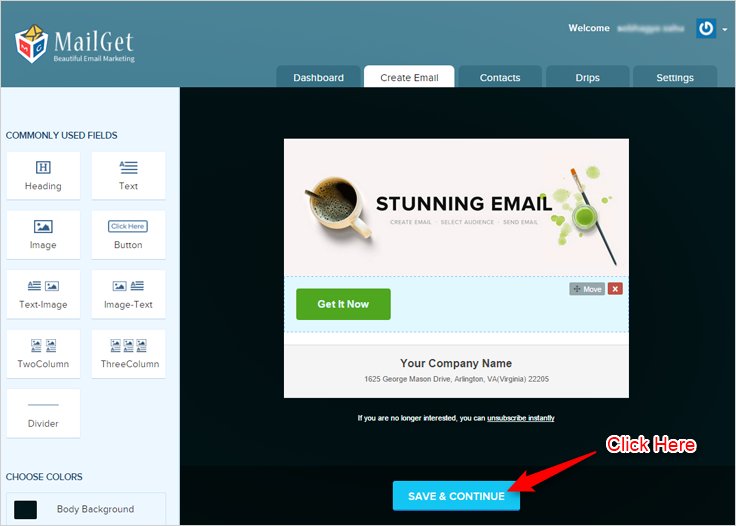
STEP 4 –
Click on sections to Add/Remove or to Drag & Drop field elements as per your requirement.
STEP 5 –
If you want to Add More Fields to your email, you have options on the left side.
STEP 6 –
- Choose and insert what you want and where you want.
- Once you are done, click on Save & Continue button..
..proceed to send email tab.
Basic Text Editor
STEP 1 –
- Follow previous steps from 1 to 3..
..reach onto email editor section.
STEP 2 –
Check for Basic Text Editor from all the email editors and click on it.
Then you will proceed towards the editor panel.
STEP 3 –
This is the most Fundamental Editor one where you can create email within seconds.
You just need to write your content in the space provided.
With all that, you will find some great Editing Options at the top of this email editor.
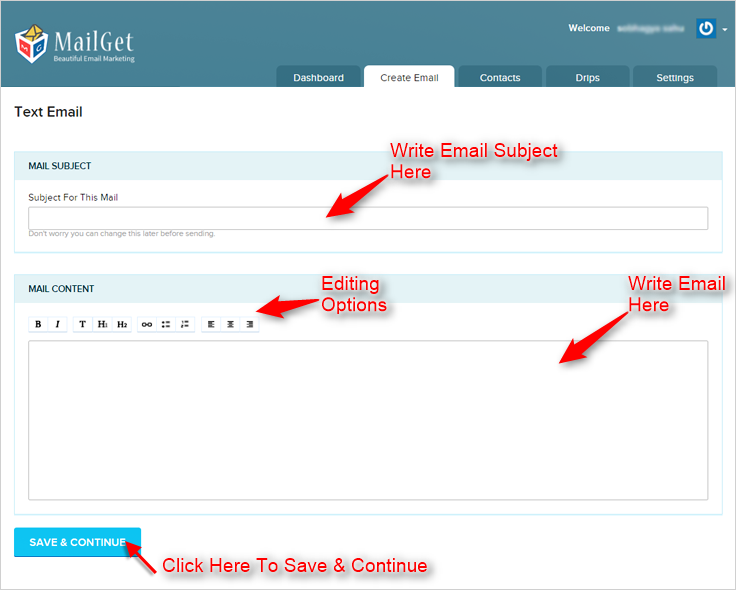
STEP 4 –
Finally, click on SAVE & CONTINUE button and move on to email sending section.
Custom Code Editor
- Other than providing two good email creator..
..MailGet also comprises of Custom Code Editor keeping in mind of HTML lovers.
- Through this email editor, you can directly go for creating your custom coded emails.
You just need to write HTML Code in the editor.
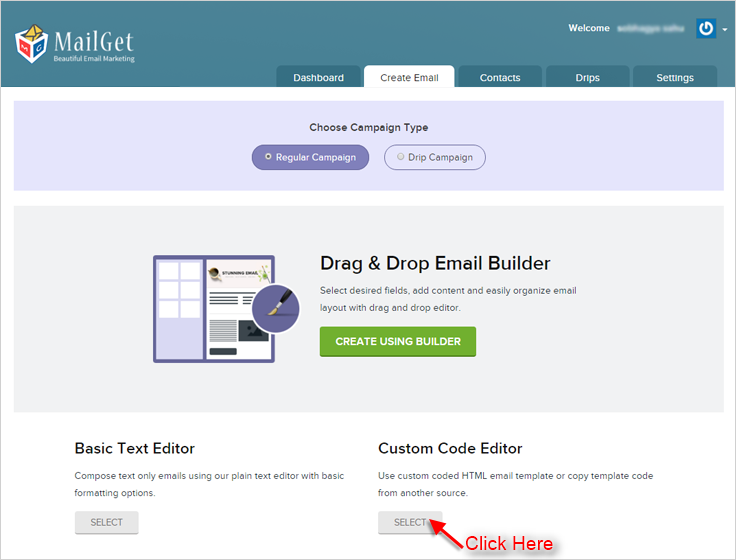
You can also check how your email looks by using Email Inbox Preview feature, just by clicking on Preview Button present on the top right corner. Along with this, you can also use Premailer HTML email template builder in MailGet.
Other than providing responsive email template builders, MailGet is equipped with all the necessary and relevant features for successful email marketing and thus promises to achieve higher ROI for you than with any other service.
MailGet – email service provider… Only here you can have the real joy of Email Sending. It is Fresh, it is Easy, and it is Awesome..!!
CodeIgniter Shopping Cart Sample

A shopping cart is a software package and Ecommerce application that acts as an online store’s catalog and ordering process.
When a user is browsing your site at that time Cart Class allows the items to be added to a session that stays active . These items can be retrieved and displayed in a standard “shopping cart” format
In this tutorial, we are going to explain how we can use “Cart class in CodeIgniter”. This cart class allows us to add and remove products to a shopping cart and to update them.
The Cart Class only provides the core “cart” functionality. It does not provide shipping, credit card authorization, or other processing components.
To start with first you need to initialize the class by loading cart library.
Syntax
Load cart library in your controller’s constructor
$this->load->library('cart');This function allows you to add items to the shopping cart, insert() method will return the unique $rowid if you successfully insert a single item
$insert_data = array( 'id' => $this->input->post('id'),
 'name' => $this->input->post('name'),
 'price' => $this->input->post('price'),
'qty' => 1 );

 // This function add items into cart.
$this->cart->insert($insert_data);
This function allows you to update items to the shopping cart.
 $data = array( 'rowid' => $cart['rowid'];,
 'price' => $cart['price'];,
'amount' => $price * $cart['qty'];,
'qty' =>$cart['qty'];
);

// This function update item into cart.
$this->cart->update($data);
This function returns an array of the items added in the cart.
$this->cart->contents();This function allows you to destroy the cart, which stores the session of the cart.
$this->cart->destroy();Below is our complete code with download and live demo option
Click on Add to Cart option to add the items in to the list from where you can update their quantity and can remove them too.
Steps to run Downloaded file:
- Download the shopping cart project by given url and extract them.
- Copy it on to your local server base folder.
- Create database “shopping” in mysql.
- Go to database and import “shopping.sql” file which you will find in downloaded project’s folder.
- After importing it run the program using below url.
http://localhost/codeigniter_cart/index.php/shoppingNote : Here we are displaying the products and their information in front end which is fetched from database table naming Products. If you wish to add more items to display then you have to manually update it from database. Whereas when user clicks on Place Order button then all the cart information get stored in database table naming customers, orders , order_detail.
Controller File: shopping.php
<?php if (!defined('BASEPATH')) exit('No direct script access allowed');

class Shopping extends CI_Controller {

public function __construct()
{
parent::__construct();
//Load Library and model.
$this->load->library('cart');
$this->load->model('billing_model');
}

public function index()
{
//Get all data from database
$data['products'] = $this->billing_model->get_all();
//send all product data to "shopping_view", which fetch from database.
$this->load->view('shopping_view', $data);
}

function add()
{
// Set array for send data.
$insert_data = array(
'id' => $this->input->post('id'),
'name' => $this->input->post('name'),
'price' => $this->input->post('price'),
'qty' => 1
);

// This function add items into cart.
$this->cart->insert($insert_data);

// This will show insert data in cart.
redirect('shopping');
}

function remove($rowid) {
// Check rowid value.
if ($rowid==="all"){
// Destroy data which store in session.
$this->cart->destroy();
}else{
// Destroy selected rowid in session.
$data = array(
'rowid' => $rowid,
'qty' => 0
);
// Update cart data, after cancel.
$this->cart->update($data);
}

// This will show cancel data in cart.
redirect('shopping');
}

function update_cart(){

// Recieve post values,calcute them and update
$cart_info = $_POST['cart'] ;
foreach( $cart_info as $id => $cart)
{
$rowid = $cart['rowid'];
$price = $cart['price'];
$amount = $price * $cart['qty'];
$qty = $cart['qty'];

$data = array(
'rowid' => $rowid,
'price' => $price,
'amount' => $amount,
'qty' => $qty
);

$this->cart->update($data);
}
redirect('shopping');
}

function billing_view(){
// Load "billing_view".
$this->load->view('billing_view');
}

public function save_order()
{
// This will store all values which inserted from user.
$customer = array(
'name' => $this->input->post('name'),
'email' => $this->input->post('email'),
'address' => $this->input->post('address'),
'phone' => $this->input->post('phone')
);
// And store user information in database.
$cust_id = $this->billing_model->insert_customer($customer);

$order = array(
'date' => date('Y-m-d'),
'customerid' => $cust_id
);

$ord_id = $this->billing_model->insert_order($order);

if ($cart = $this->cart->contents()):
foreach ($cart as $item):
$order_detail = array(
'orderid' => $ord_id,
'productid' => $item['id'],
'quantity' => $item['qty'],
'price' => $item['price']
);

// Insert product imformation with order detail, store in cart also store in database.

$cust_id = $this->billing_model->insert_order_detail($order_detail);
endforeach;
endif;

// After storing all imformation in database load "billing_success".
$this->load->view('billing_success');
}
}
?>
View File : shopping_view.php
<html>
<head>
<title>Codeigniter cart class</title>
<link href='http://fonts.googleapis.com/css?family=Raleway:500,600,700' rel='stylesheet' type='text/css'>
<link rel="stylesheet" type="text/css" href="<?php echo base_url(); ?>css/style.css">
<script type="text/javascript">
// To conform clear all data in cart.
function clear_cart() {
var result = confirm('Are you sure want to clear all bookings?');
if (result) {
window.location = "<?php echo base_url(); ?>index.php/shopping/remove/all";
} else {
return false; // cancel button
}
}
</script>
</head>
<body>
<div id='content'>
<div id='tag'>
<!-- Formget Fugo logo image -->
<img src="<?php echo base_url(); ?>images/head_cart.jpg"/>
</div>
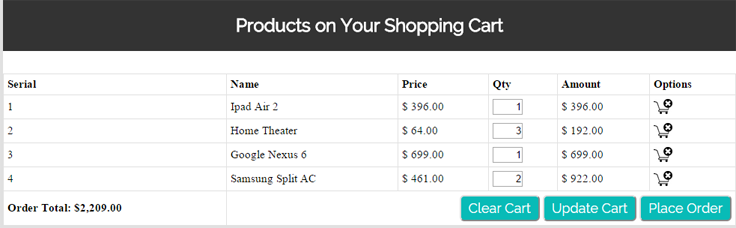
<div id="cart" >
<div id = "heading">
<h2 align="center">Products on Your Shopping Cart</h2>
</div>
<div id="text">
<?php $cart_check = $this->cart->contents();
// If cart is empty, this will show below message.
if(empty($cart_check)) {
echo 'To add products to your shopping cart click on "Add to Cart" Button';
} ?> </div>
<table id="table" border="0" cellpadding="5px" cellspacing="1px">
<?php
// All values of cart store in "$cart".
if ($cart = $this->cart->contents()): ?>
<tr id= "main_heading">
<td>Serial</td>
<td>Name</td>
<td>Price</td>
<td>Qty</td>
<td>Amount</td>
<td>Cancel Product</td>
</tr>
<?php
// Create form and send all values in "shopping/update_cart" function.
echo form_open('shopping/update_cart');
$grand_total = 0;
$i = 1;
foreach ($cart as $item):
// echo form_hidden('cart[' . $item['id'] . '][id]', $item['id']);
// Will produce the following output.
// <input type="hidden" name="cart[1][id]" value="1" />
echo form_hidden('cart[' . $item['id'] . '][id]', $item['id']);
echo form_hidden('cart[' . $item['id'] . '][rowid]', $item['rowid']);
echo form_hidden('cart[' . $item['id'] . '][name]', $item['name']);
echo form_hidden('cart[' . $item['id'] . '][price]', $item['price']);
echo form_hidden('cart[' . $item['id'] . '][qty]', $item['qty']);
?>
<tr>
<td>
<?php echo $i++; ?>
</td>
<td>
<?php echo $item['name']; ?>
</td>
<td>
$ <?php echo number_format($item['price'], 2); ?>
</td>
<td>
<?php echo form_input('cart[' . $item['id'] . '][qty]', $item['qty'], 'maxlength="3" size="1" style="text-align: right"'); ?>
</td>
<?php $grand_total = $grand_total + $item['subtotal']; ?>
<td>
$ <?php echo number_format($item['subtotal'], 2) ?>
</td>
<td>
<?php
// cancle image.
$path = "<img src='http://localhost/codeigniter_cart/images/cart_cross.jpg' width='25px' height='20px'>";
echo anchor('shopping/remove/' . $item['rowid'], $path); ?>
</td>
<?php endforeach; ?>
</tr>
<tr>
<td><b>Order Total: $<?php
//Grand Total.
echo number_format($grand_total, 2); ?></b></td>
<?php // "clear cart" button call javascript confirmation message ?>
<td colspan="5" align="right"><input class ='fg-button teal' type="button" value="Clear Cart" onclick="clear_cart()">
<?php //submit button. ?>
<input class ='fg-button teal' type="submit" value="Update Cart">
<?php echo form_close(); ?>
<!-- "Place order button" on click send "billing" controller -->
<input class ='fg-button teal' type="button" value="Place Order" onclick="window.location = 'shopping/billing_view'"></td>
</tr>
<?php endif; ?>
</table>
</div>
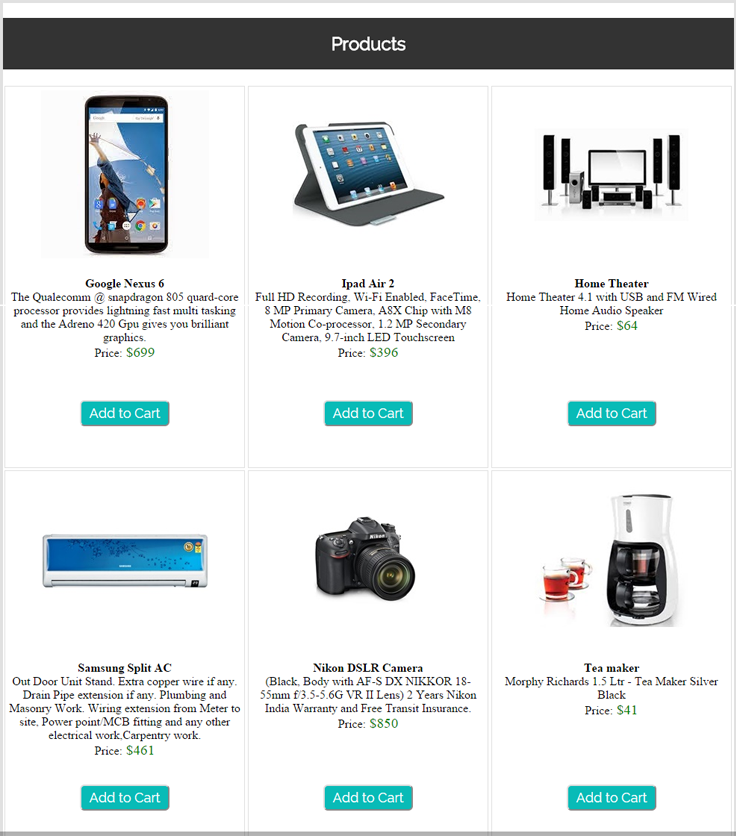
<div id="products_e" align="center">
<h2 id="head" align="center">Products</h2>
<?php
// "$products" send from "shopping" controller,its stores all product which available in database.
foreach ($products as $product) {
$id = $product['serial'];
$name = $product['name'];
$description = $product['description'];
$price = $product['price'];
?>
<div id='product_div'>
<div id='image_div'>
<img src="<?php echo base_url() . $product['picture'] ?>"/>
</div>
<div id='info_product'>
<div id='name'><?php echo $name; ?></div>
<div id='desc'> <?php echo $description; ?></div>
<div id='rs'><b>Price</b>:<big>
$<?php echo $price; ?></big></div>
<?php
// Create form and send values in 'shopping/add' function.
echo form_open('shopping/add');
echo form_hidden('id', $id);
echo form_hidden('name', $name);
echo form_hidden('price', $price);
?> </div>
<div id='add_button'>
<?php
$btn = array(
'class' => 'fg-button teal',
'value' => 'Add to Cart',
'name' => 'action'
);
// Submit Button.
echo form_submit($btn);
echo form_close();
?>
</div>
</div>
<?php } ?>
</div>
</div>
</body>
</html>View File : billing_view.php
<?php
$grand_total = 0;
// Calculate grand total.
if ($cart = $this->cart->contents()):
foreach ($cart as $item):
$grand_total = $grand_total + $item['subtotal'];
endforeach;
endif;
?>
<html>
<head>
<title>Codeigniter cart class</title>
<link href='http://fonts.googleapis.com/css?family=Raleway:500,600,700' rel='stylesheet' type='text/css'>
<link rel="stylesheet" type="text/css" href="<?php echo base_url(); ?>css/style.css"/>
</head>
<body>
<div id="bill_info">

<?php // Create form for enter user imformation and send values 'shopping/save_order' function?>
<form name="billing" method="post" action="<?php echo base_url() . 'index.php/shopping/save_order' ?>" >
<input type="hidden" name="command" />
<div align="center">
<h1 align="center">Billing Info</h1>
<table border="0" cellpadding="2px">
<tr><td>Order Total:</td><td><strong>$<?php echo number_format($grand_total, 2); ?></strong></td></tr>
<tr><td>Your Name:</td><td><input type="text" name="name" required=""/></td></tr>
<tr><td>Address:</td><td><input type="text" name="address" required="" /></td></tr>
<tr><td>Email:</td><td><input type="text" name="email" required="" /></td></tr>
<tr><td>Phone:</td><td><input type="text" name="phone" required="" /></td></tr>
<tr><td><?php
// This button for redirect main page.
echo "<a class ='fg-button teal'  id='back' href=" . base_url() . "index.php/shopping>Back</a>"; ?>
</td><td><input class ='fg-button teal' type="submit" value="Place Order" /></td></tr>

</table>
</div>
</form>
</div>
</body>
</html>
View File : billing_success.php
<html>
<head>
<title>Codeigniter cart class</title>
<link href='http://fonts.googleapis.com/css?family=Raleway:500,600,700' rel='stylesheet' type='text/css'>
<link rel="stylesheet" type="text/css" href="<?php echo base_url(); ?>css/style.css">
</head>
<body>
<div id='result_div'>
<?php
// this will show you thank you message.
echo "<h1 align='center'>Thank You! your order has been placed!</h1>";
echo "<span id='go_back'><a class='fg-button teal' href=" . base_url() . "index.php/shopping>Go back</a></span>";
?>
</div>
</body>
</html>
Model File : billing_model.php
<?php if (!defined('BASEPATH')) exit('No direct script access allowed');

class Billing_model extends CI_Model {

// Get all details ehich store in "products" table in database.
public function get_all()
{
$query = $this->db->get('products');
return $query->result_array();
}

// Insert customer details in "customer" table in database.
public function insert_customer($data)
{
$this->db->insert('customers', $data);
$id = $this->db->insert_id();
return (isset($id)) ? $id : FALSE;
}

// Insert order date with customer id in "orders" table in database.
public function insert_order($data)
{
$this->db->insert('orders', $data);
$id = $this->db->insert_id();
return (isset($id)) ? $id : FALSE;
}

// Insert ordered product detail in "order_detail" table in database.
public function insert_order_detail($data)
{
$this->db->insert('order_detail', $data);
}
}
?>
CSS File: style.css
body{
background-color:#E0E0E0;
margin:0 auto;
font-family: 'Raleway', sans-serif;
}
#content{

width:979px;
margin:0 auto;
}
#result_div {
background-color: #FFF;
width: 640px;
height: 175px;
margin: 0 auto;
margin-bottom: 10px;
margin-left: 445px;
margin-top: 300px;
}
h1{
padding:20px;
background-color:#333333;
width: 600px;
color:#FFF;
}
#products_e{
background-color: #FFFFFF;
width: 979px;
position: absolute;
margin-top: 10px;
}
#cart{
width:979px;
height:auto;
margin-top: -20px;
position:relative;
background-color:#FFFFFF;
}
h2{
font-family: 'Raleway', sans-serif;
padding:20px;
background-color:#333333;
color:#FFF;
}
#product_div{
width: 310px;
height:500px;
background: #fff;
position: relative;
float: left;
padding: 5px;
margin: 2px;
border: 1px solid #E0E0E0;
}
div#image_div {
width: 300px;
height: 250px;
}
div#info_product {
height: 165px;
}
tr {
background: white;
}
#bill_info{
background-color:#FFF;
width:640px;
margin:0 auto;
margin-bottom:10px;
}
h1{
padding:20px;
background-color:#333333;
color:#FFF;
}
div#text {
color: #08BBB7;
margin-left: 255px;
margin-top: -19px;
margin-bottom: 10;
font-family: 'Raleway', sans-serif;
}
#heading{
padding-bottom:10px
}
#table{
font-size:15px;
background-color:#E1E1E1;
width:100%;
}
tr{
bgcolor:#FFFFFF;
}
#main_heading{
font-weight:bold;
bgcolor:#FFFFFF;
}
div#name {
font-weight: 700;
font-size: 17px;
margin-bottom: 10px;
}
div#desc {
font-size: 15px;
margin-bottom: 11px;
min-height: 105px;
line-height: 1.4;
}
div#add_button {
margin-top: 23px;
}
span#go_back {
margin-left: 245px;
}

.fg-button{
position: relative;
top: 0;
border-radius: 4;
font-size: 18px;
padding: 8px 28px;
text-decoration: none;
border: 0px solid;
cursor: pointer;
border-bottom-width: 3px;
outline: none;
-webkit-transition: 0.3s background;
-moz-transition: 0.3s background;
transition: 0.3s background;
}
.fg-button:active{
top: 2px;
}
.fg-button.teal{
color: #fff;
border-color: #04A5A1;
background-color:#08BBB7;
}
.fg-button.teal:hover{
background: #0ACFCB;
}
.fg-button.teal:active{
background: #09cbc7;
top: 2px;
border-bottom-width: 1px;
}
Conclusion:
This was all about how we can implement core shopping cart using CodeIgniter cart class. Hope you like it, keep reading our other blogs
Setup Amazon SES Account – Send Cheaper Emails
MailGet is basically an application through which you can send bulk emails by connecting with any SMTP. In this documentation, we’re going to see the steps that are needed to create an Amazon SES account.
Once you have created Amazon SES account, you will get Amazon SES credentials namely “Access Key ID” and “Secret Access Key”, which you will be going to place in your MailGet account.
Along with this, you will have to verify the email address also through which you’re willing to send emails.
Below is the step by step procedure to setup Amazon SES account and verifying the email address.
Steps To Setup Amazon SES Account
Step 1. Go to Amazon SES website
Open Amazon SES website (https://aws.amazon.com/ses/) and then click on “Get started with Amazon SES” button.
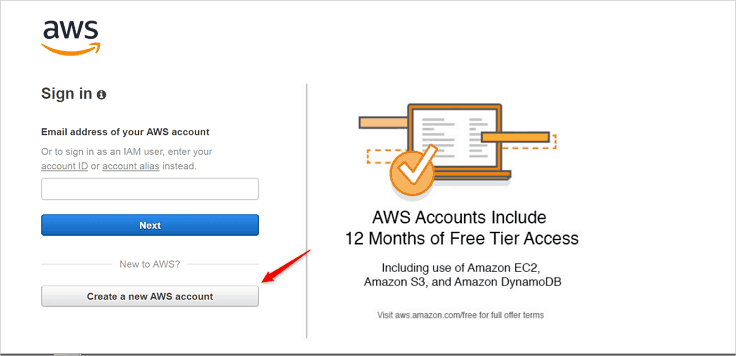
Step 2. Create an Account
On the page appeared, you will have two options either to sign in or to create an account. If you already hold an Amazon SES account, then you can simply login to your account
If you are a new user, then click on the “Create a new AWS account” option.
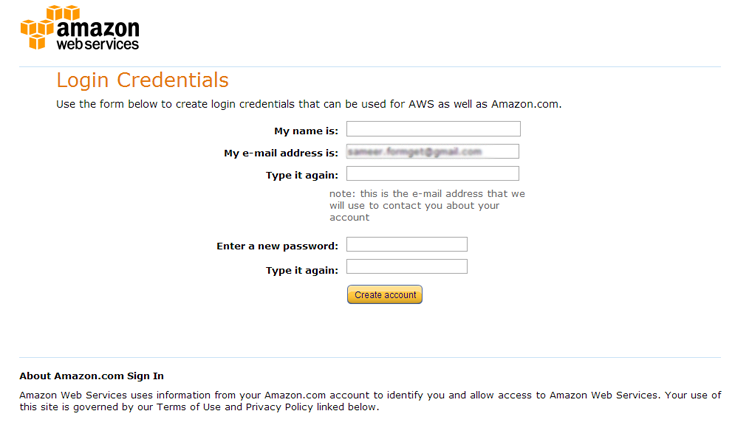
Step 3. Enter Login Credentials :
Now on this Login credentials page enter your name, re-type your email ID and a password. Now click on “Create account” button. You have now successfully registered an AWS account and only a simple 5 step process of filling contact information, payment information, verification, selection of support plan and confirmation is left.
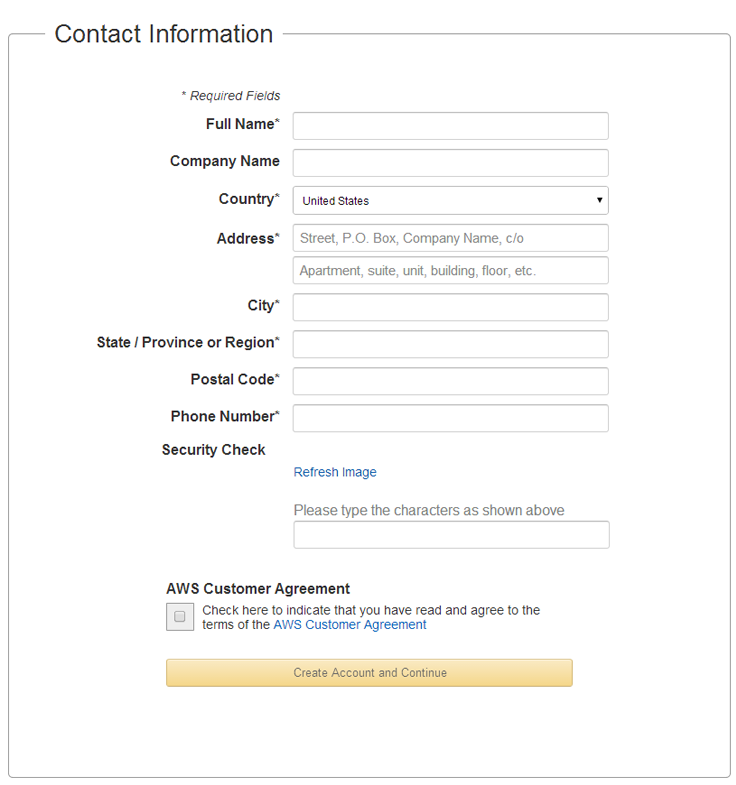
Step 4. Enter Contact Information :
When you click on “Create account” button you will be redirected to a page asking for contact information.
There you need to fill your basic information like your name, your company’s name, your country, your address, your city, state, postal code, and your phone number.
This will be followed by a security check where you will have to enter the captcha. Now put a tick on the AWS customer agreement (after reading it properly) an click on “Create account and continue” button.
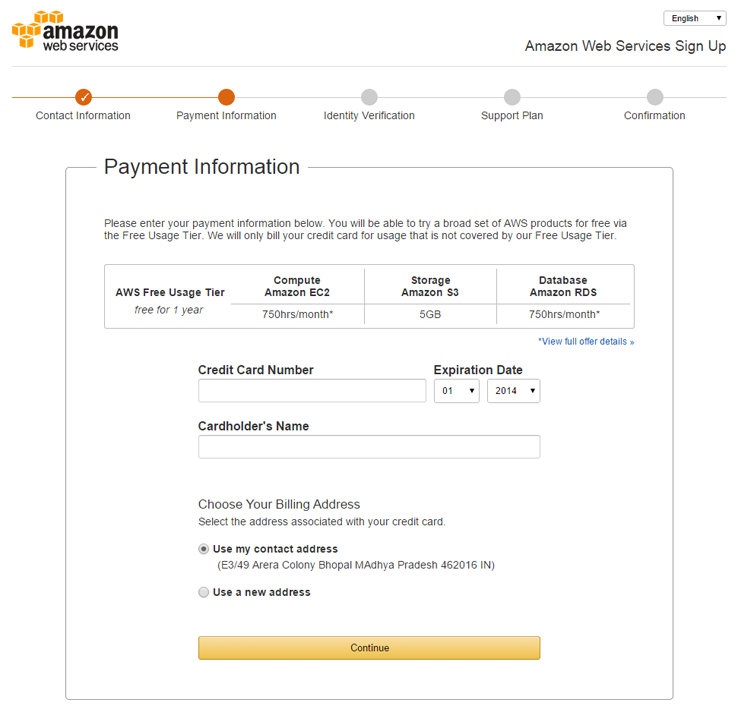
Step 5. Enter Payment Information :
Now on the payment information page enter your credit card number and expiration date followed by card holder’s name. Here you also have a choice of selecting your billing address; choose your billing address and click on “Continue” button. As shown below:-
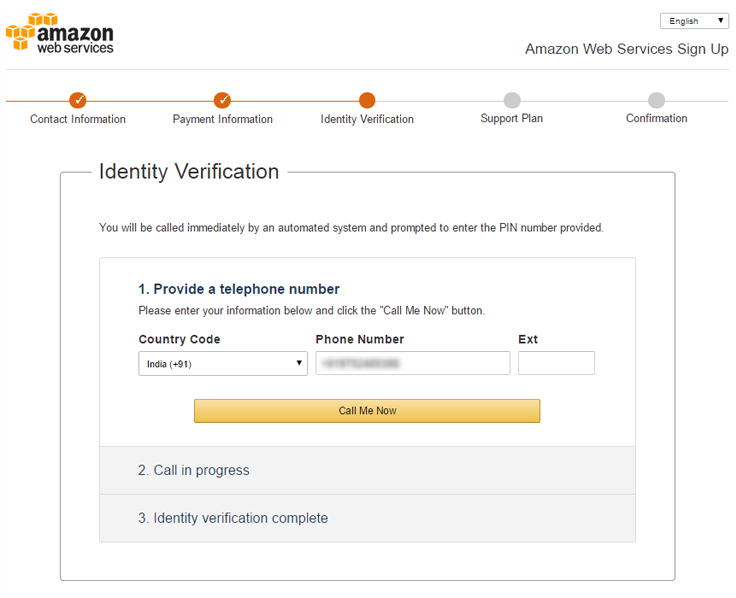
Step 6. Identity Verification :
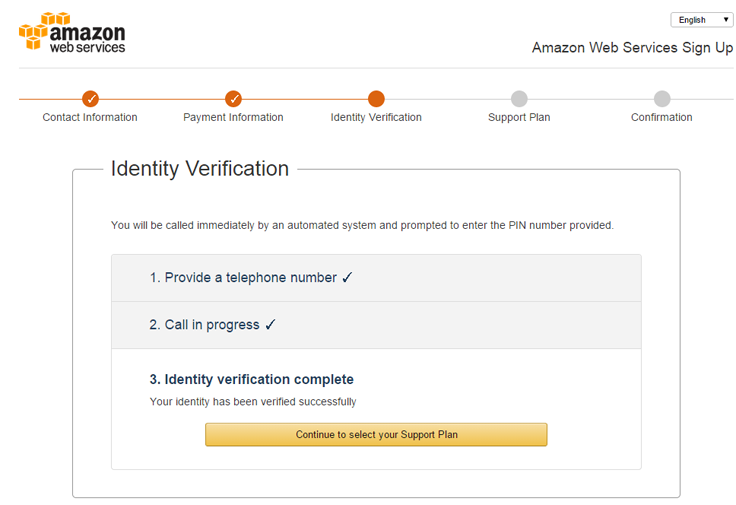
The next step will be identity verification where you have to provide your phone number and then click on “Call me now” button. You will get a 4 digit verification code and will receive an automated call simultaneously. Enter this code through your phone.
Then you will see a window confirming your verification. In that window click on “Continue to select your Support plan” button.
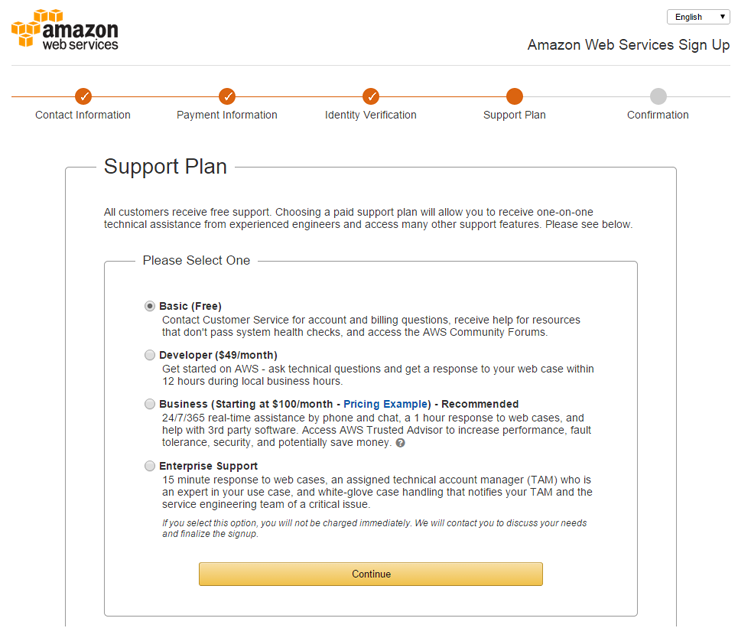
Step 7. Select Your Plan :
Now on this page select your plan according to your utility and click on “Continue” button.
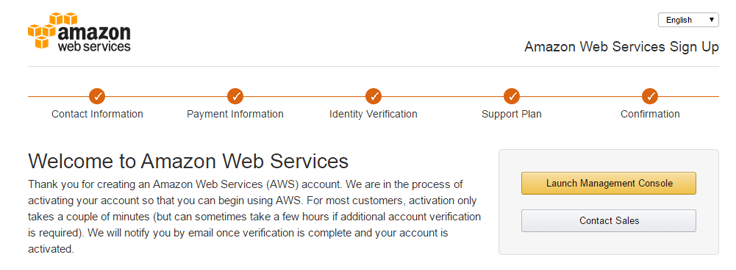
Step 8. Confirmation Page :
Now a confirmation window will appear where you will see a “Launch management console ” button. Click on “Launch management console” button.
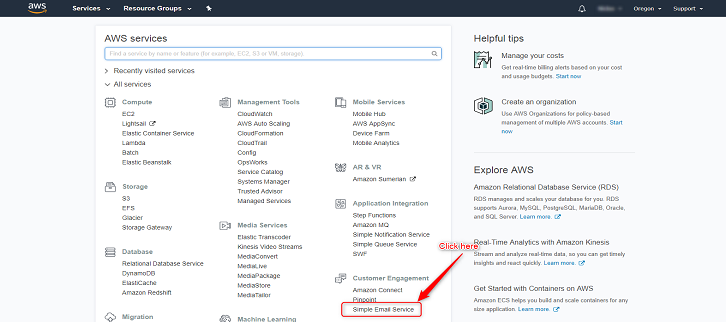
Step 9. Click on SES (Simple Email Service) icon :
Click on the SES icon as mentioned in below image to start with email services.
This may take some time, you need to be patient. You will receive an email once 

Now your verification status will be pending untill your email address is verfied.
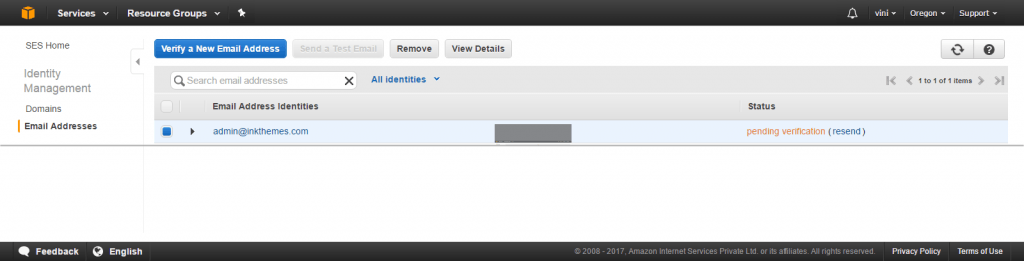
Click on the verification link sent to your email ID and verify the email address.
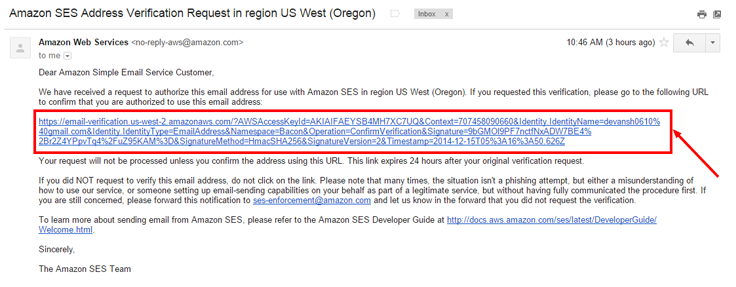 When you click on the above link your verification status will change from Pending to Verified.

The setup of your Amazon SES account to your MailGet account is now complete, you can use it to send emails through MailGet.
Send 100x Cheaper Emails Using MailGet :
MailGet is an excellent Email builder that sends emails 100x cheaper.It charges merely $30 for sending 10,000 emails. Also it also provides you a complete record of delivery, bounces and spam.
It has a stunning email creator in which you can design magnificent emails very easily just with a few clicks. With Amazon SES, It gives high deliverability and trackability of emails along with amazing features affordable prices.
Enjoy awesome email sending experience with MailGet – email service provider .
Login With Facebook PHP CodeIgniter : OAuth Login
OAuth is simply an open authentication that is used for providing access to the server data after authorizing a user via third party services.
In this tutorial, we are going to explain how you can implement Facebook login via open authentication to connect with your website using CodeIgniter.
You can achieve this login mechanism using Facebook PHP SDK.
To start with, first Download the Facebook PHP SDK and save it in your CodeIgniter’s libraries folder.
Before running script, generate your Facebook app id and Facebook app secret key, for this follow up the below given steps:
You can also refer our live demo or download the Script file. Extract the downloaded files and run it on your Local server.

Steps for Getting Facebook App ID and Facebook App secret key :
If you are looking for Codeigniter login script with facebook and google built in ready script, then you can try this.
In Facebook open authentication, App Id and the App secret key are required for authenticating a valid Facebook account.
For getting this you have to do the following steps :
Step 1 : Go to https://developers.facebook.com and sign in by an existing Facebook username or password.

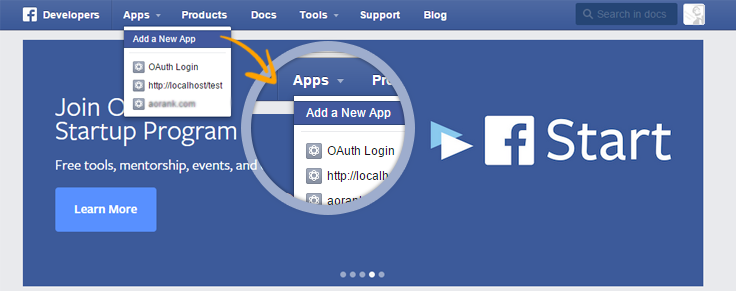
Step 2 : After login click on to Apps tab.

Step 3 : When you will click on to Apps button one drop down list will appear that will contain your previous added Apps. Now click on Add a New App.
Step 4 : After clicking on it one popup window will appear here you have to select a platform for which type of app you are creating, platform may be ios, android, any Facebook app or for any website, here we are creating apps for website.

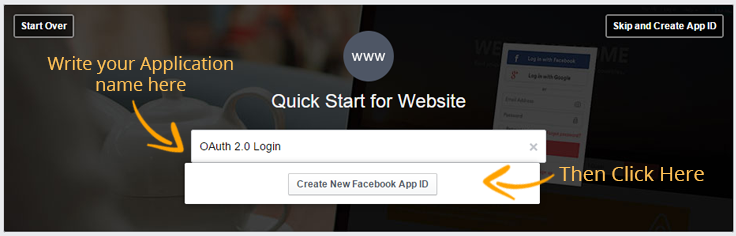
Step 5 : Here you have to write your application name based upon your choice and click on Create New Facebook App Id.
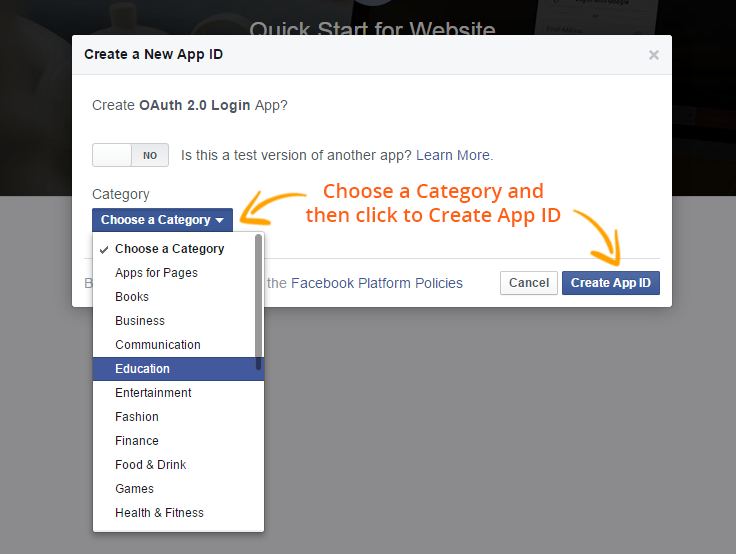
Step 6 : In this window, choose a category and then click on Create App ID button. Here, you will have two steps, in first steps you can create a test version of another app and in second step you have to choose a category for which type of apps you are creating.
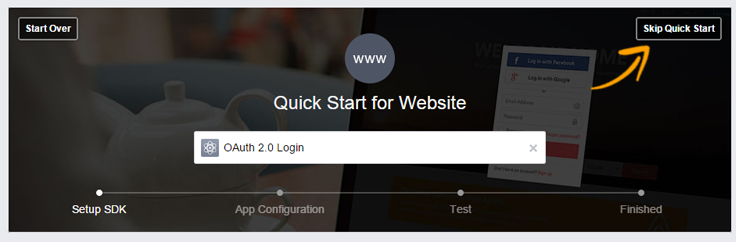
Step 7 : For going to dashboard, click on Skip Quick start.
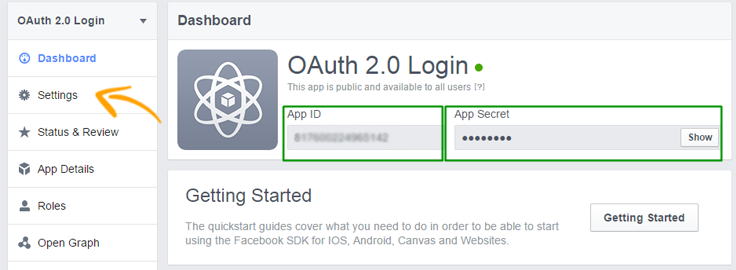
Step 8 : In Dashboard you will see your App ID and App Secret.Where App ID is visible and App Secret key is hidden, to see this click on show button, now that App ID and App Secret Key you have to add into your application code as shown below:
// Load facebook library and pass associative array which contains appId and secret key
$this->load->library('facebook', array('appId' => '<Your Facebook appId>', 'secret' => '<Generated Secret Key>'));
This App ID and App Secret is only accessible by your own Facebook account, by default it is available for private, but for making public, click on settings link and follow step 9 & 10.
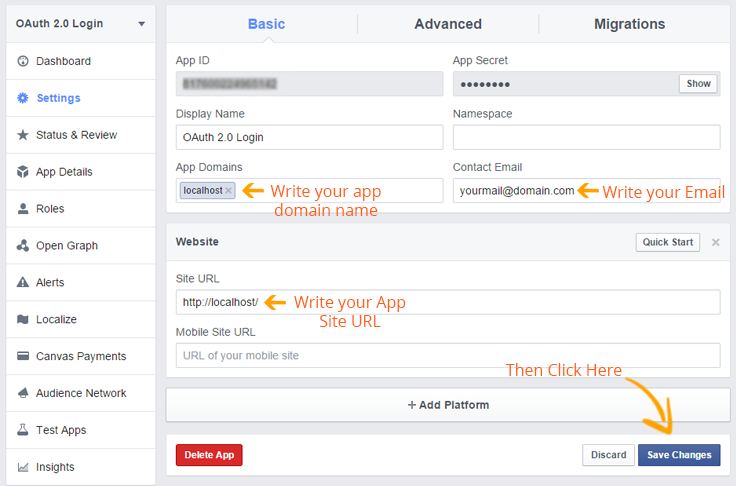
Step 9 : In setting ,write your app domain name, your email id and then click on + Add Platform > Website to add Site URL. This will be used by the FB server on authentication to hand back control to your application.
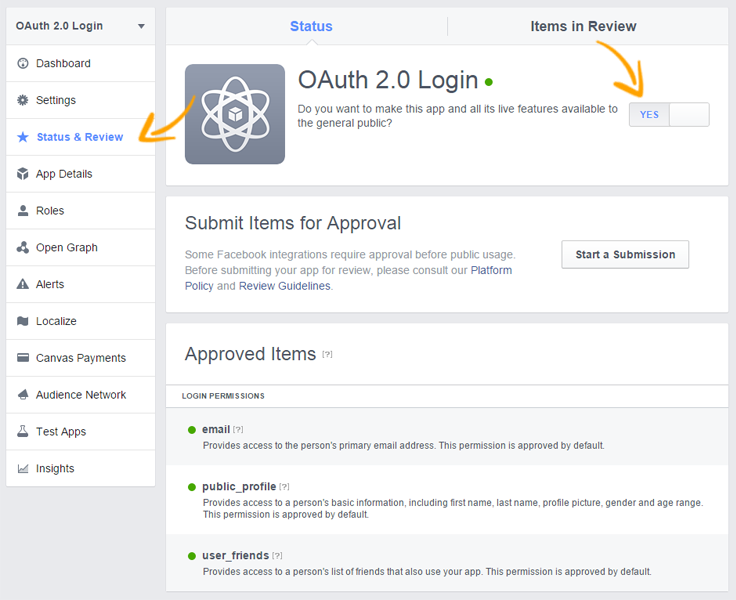
Step 10 : Now go to Status & Review, set YES for your app features available to public.
As now since you have generated your app Id and app secret key, now you are ready to integrate and connect to your Facebook login account.
CodeIgniter Facebook OAuth login Flow:
- On accessing a website page the Facebook login button is shown. The user will click the FB button to login into the codeIgniter application.
- After clicking on that button a Facebook URL will be invoked that will contain App Id and App Secret Key.
- Now Facebook will validate the application ID and then will redirect to its login page.
- User will enter the FB login credentials and submit the form.
- In Facebook when validation will be success it will respond back with access_token that will contain the user’s detail.
- Redirect URL page will forward to a page showing user data in the client browser.
We have created a CodeIgniter login example in that we have explain how you can connect your Facebook account via OAuth. You can create similar files as mentioned below and can copy the code. If you like you can even download the files.
Below is our complete code with short explanation :
Controllers : oauth_login.php
Copy the below code in your controller. When you load Facebook library in your controller’s constructor writes your Facebook App Id and Facebook Secret Key.
<?php

class Oauth_Login extends CI_Controller {

public $user = "";

public function __construct() {
parent::__construct();

// Load facebook library and pass associative array which contains appId and secret key
$this->load->library('facebook', array('appId' => '<Your Facebook appId>', 'secret' => '<Generated Secret Key>'));

// Get user's login information
$this->user = $this->facebook->getUser();
}

// Store user information and send to profile page
public function index() {
if ($this->user) {
$data['user_profile'] = $this->facebook->api('/me/');

// Get logout url of facebook
$data['logout_url'] = $this->facebook->getLogoutUrl(array('next' => base_url() . 'index.php/oauth_login/logout'));

// Send data to profile page
$this->load->view('profile', $data);
} else {

// Store users facebook login url
$data['login_url'] = $this->facebook->getLoginUrl();
$this->load->view('login', $data);
}
}

// Logout from facebook
public function logout() {

// Destroy session
session_destroy();

// Redirect to baseurl
redirect(base_url());
}

}
?>
Views : login.php
Copy the below code in your view and save as login.php. This will be the first page to be shown which will contain Sign in with facebook option.
<html>
<head>
<title>CodeIgniter : Login Facebook via Oauth 2.0</title>
<link rel="stylesheet" type="text/css" href="<?php echo base_url(); ?>css/style.css">
<link href='http://fonts.googleapis.com/css?family=Source+Sans+Pro|Open+Sans+Condensed:300|Raleway' rel='stylesheet' type='text/css'>
</head>
<body>
<div id="main">
<div id="login">
<h2>CodeIgniter : Login Facebook via Oauth 2.0</h2>
<?php echo "<a href='$login_url'><img class='fb' src=".base_url()."images/fb.png"."></a>"; ?>
</div>
</div>
</body>
</html>
Views : profile.php
Copy the below code in your view and save as profile.php. As anyone will login with the facebook he/she will see this page that will contain logged in user details.
<html>
<head>
<title>CodeIgniter : Login Facebook via Oauth 2.0</title>
<link rel="stylesheet" type="text/css" href="<?php echo base_url(); ?>css/style.css">
<link href='http://fonts.googleapis.com/css?family=Source+Sans+Pro|Open+Sans+Condensed:300|Raleway' rel='stylesheet' type='text/css'>
</head>
<body>
<div id="main">
<div id="login">
<h2> <?php echo "<a href=".$user_profile['link']." target='_blank' ><img class='fb_profile' src="."https://graph.facebook.com/".$user_profile['id']."/picture".">"."</a>"."<p class='profile_name'>Welcome ! <em>".$user_profile['name']."</em></p>";
echo "<a class='logout' href='$logout_url'>Logout</a>";
?></h2>
<hr/>
<h3><u>Profile</u></h3>
<?php
echo "<p>First Name : ".$user_profile['first_name']."</p>";
echo "<p>Last Name : ".$user_profile['last_name']."</p>";
echo "<p>Gender : ".$user_profile['gender']."</p>";
echo "<p>Facebook URL : "."<a href=".$user_profile['link']." target='_blank'"."> https://www.facebook.com/".$user_profile['id']."</a></p>";
?>
</div>
</div>
</body>
</html>
CSS : style.css
Styling HTML Elements.
#main{
width:960px;
margin:50px auto;
font-family:raleway;
}
h2{
position: relative;
background-color: #26c489;
text-align:center;
border-radius: 10px 10px 0 0;
margin: -10px -40px;
padding: 30px;
color:white;
}
hr{
border:0;
border-bottom:1px solid #ccc;
margin: 10px -40px;
margin-bottom: 30px;
}
#login{
width:462px;
float: left;
border-radius: 10px;
font-family:raleway;
border: 2px solid #ccc;
padding: 10px 40px 34px;
margin-top: 0;
margin-left: -70px;;
background-color: #DBF6ED;
}
img.fb{
height: 50px;
padding-left: 90px;
}
img.fb_profile{
height: 50px;
padding-right: 20px;
margin-left: -410px;
}
p.profile_name{
font-size: 16px;
margin-top: -19px;
margin-left: -148px;
}
a.logout{
position: absolute;
font-size: 18px;
text-decoration: none;
top: 46px;
right: 45px;
}
Conclusion:
This was all about how we can implement Facebook open authentication with our website using CodeIgniter. Hope you like it, keep reading our other blogs
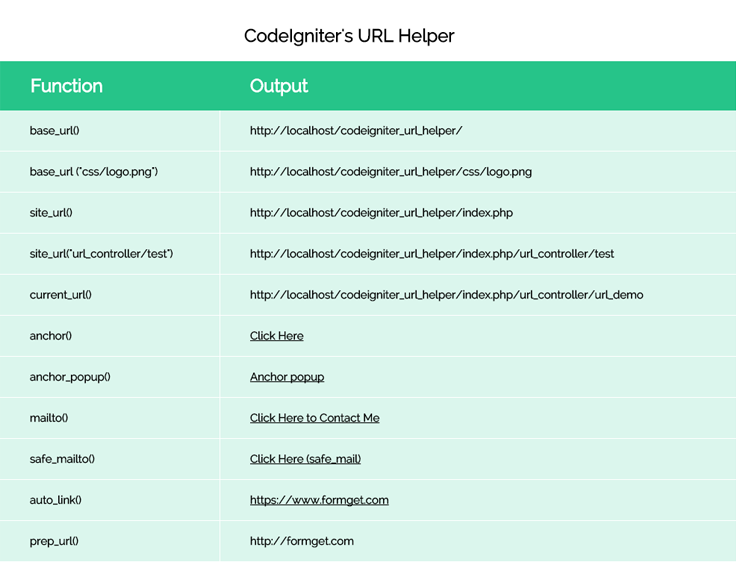
CodeIgniter : URL Helper Functions

CodeIgniter’s URL helpers are groups of utility functions which will help you to call ,create and maintain url.
It mainly have more than 20 helpers some of them you might be familiar with are URL, email, form etc. These are some common helper functions that generaly used in web based application for email, files, URLs.
You will feel the need of these CodeIgniter helper functions when you have to repeat lots of code like calling base URL, formatting dates, sending emails.
In this tutorial we will give you brief description about how to use “URL Helper” in CodeIgniter which will help you in making ,calling and creating url.
Loading Helper
Load URL helper in your controller’s constructor, write following code:
$this->load->helper('url');Here we are demonstrating an example to use the codeigniter url function.
You can also refer our live demo or download the Script file. Extract the downloaded files and run it on your Local server.
The URL Helper file contains functions that assist in working with URLs, The functions are define below.
base_url()
This function will returns your base URL.
echo base_url();This would give you codeigniter root folder path.
http://localhost/codeigniter_url_helper/If you want to call image or file in another folder, You have paas the parameter or array inside the function as given.
base_url (“css/logo.png″);// Or you can pass array, this would also append the path in base_url().
$segments = array('index.php', 'url_controller', 'test');
base_url (“$segments ″);output
http://localhost/codeigniter_url_helper/css/logo.png

http://localhost/codeigniter_url_helper/index.php/url_controller/test
site_url()
It return site url.
echo site_url();This would give you codeigniter root folder path with “index.php”.
http://localhost/codeigniter_url_helper/index.php This function not work for call another folder which is presence in root folder , when you want the “url” following “index.php” then you may use site_url().
site_url("url_controller/test");

//you can pass array, this would also append the path in site_url().
$segments = array( 'url_controller', 'test');
echo site_url ($segments);
output
http://localhost/codeigniter_url_helper/index.php/url_controller/testcurrent_url()
This function would return the full path of the page being currently viewed.
echo current_url();http://localhost/codeigniter_url_helper/index.php/url_controller/testanchor()
This tag has three parameters uri segments, text and attributes.
// Syntax for anchor.
anchor(uri segments, text, attributes);
echo anchor(http://localhost/codeigniter_url_helper/index.php/url_controller/anchor, 'Click Here', 'title="This is anchor"');
echo anchor('http://localhost/codeigniter_url_helper/index.php/url_controller/anchor', 'Click Here', array('title' => 'This is anchor!'));Above function creates a standard HTML anchor link based on your local site URL
<a href="http://localhost/codeigniter_url_helper/index.php/url_controller/anchor" title="This is anchor"> Click Here</a>anchor_popup()
This function will create a popup in new window. if you want to set property for new window, you can paas an array in third parameter.
anchor_popup(uri segments, text, attributes);
$attributes = array(
'width' => '500',
'height' => '500',
'scrollbars' => 'yes',
'status' => 'yes',
'resizable' => 'yes',
'screenx' => '0',
'screeny' => '0'
);

echo anchor_popup(http://localhost/codeigniter_url_helper/index.php/url_controller, 'Anchor popup', $attributes );
mailto()
The mailto () function allows you to send emails directly from a script and visible in view source.
echo mailto('[email protected]', 'Click Here to Contact Me');This function would produce the standard HTML tag output.
<a href="mailto:[email protected]">Click Here to Contact Me</a>safe_mailto()
The safe_mailto () function allows you to send emails directly from a script .
This function are encoded the link address from being harvested by spam bots.
echo safe_mailto('[email protected]', 'Click Here to Contact Me');This function would produce the encoded script in view source.
<script type="text/javascript">

//<![CDATA[
var l=new Array();
l[0]='>';l[1]='a';l[2]='/';l[3]='<';l[4]='|41';l[5]='|108';l[6]='|105';l[7]='|97';l[8]='|109';l[9]='|95';l[10]='|101';l[11]='|102';l[12]='|97';l[13]='|115';l[14]='|40';l[15]='|32';l[16]='|101';l[17]='|114';l[18]='|101';l[19]='|72';l[20]='|32';l[21]='|107';l[22]='|99';l[23]='|105';l[24]='|108';l[25]='|67';l[26]='>';l[27]='"';l[28]='|109';l[29]='|111';l[30]='|99';l[31]='|46';l[32]='|101';l[33]='|116';l[34]='|105';l[35]='|115';l[36]='|45';l[37]='|121';l[38]='|109';l[39]='|64';l[40]='|101';l[41]='|109';l[42]=':';l[43]='o';l[44]='t';l[45]='l';l[46]='i';l[47]='a';l[48]='m';l[49]='"';l[50]='=';l[51]='f';l[52]='e';l[53]='r';l[54]='h';l[55]=' ';l[56]='a';l[57]='<';
for (var i = l.length-1; i >= 0; i=i-1){
if (l[i].substring(0, 1) == '|') document.write("&#"+unescape(l[i].substring(1))+";");
else document.write(unescape(l[i]));}
//]]>
</script>
auto_link()
Automaticaly, given URLs and EMAIL as string, turns into a link.
$string = auto_link($string);

echo auto_link("https://www.formget.com");
The second parameter determines that both URLs and Email are converted into link or one or the other, Email links are encoded the link address from being harvested by spam bots.
Converts only URLs:
$string = auto_link($string, 'url');Converts only Email addresses:
$string = auto_link($string, 'email');The third parameter determines whether links are shown in a new window. The value can be TRUE or FALSE (boolean):
$string = auto_link($string, 'both', TRUE);prep_url()
This function will add http://
$url = "formget.com";
echo prep_url($url);
This would produse the output
http://formget.comredirect()
This function first parameter is “uri segment”, you would give the link which you want to refresh or redirect, second is “location”, and third is “http responce code” .
 // Refresh the page.

redirect('/login/form/', 'refresh');

// Redirect the page with 301 response code.

redirect('/article/13', 'location', 301);
Here you can also refer complete code.
Controller File : url_controller.php
Copy the below code in your controller.just load url class in constructor.
<?php if (!defined('BASEPATH')) exit('No direct script access allowed');

class Url_Controller extends CI_Controller {

// Load Library.
function __construct() {
parent::__construct();
$this->load->helper('url');
}

// View "url_view" Page.
public function url_demo() {
$this->load->view('url_view');
}

public function index() {
echo "Hello";
}
}
?>
View File : url_view.php
Copy the below code in your view.Here we are calling url class’s functions
<html>
<head>
<title>CodeIgnigter url Helper</title>
<link rel="stylesheet" type="text/css" href="<?php echo base_url(); ?>css/style.css">
<link href='http://fonts.googleapis.com/css?family=Source+Sans+Pro|Open+Sans+Condensed:300|Raleway' rel='stylesheet' type='text/css'>

</head>
<body>
<div class="main">
<h2>CodeIgniter's URL Helper</h2>
<div id="content">
<div id = "table_data">
<table >
<tr>
<td>
Function
</td>
<td >
Output
</td>

</tr>
<tr>
<td >
base_url()
</td>
<td>
<?php echo base_url(); ?>
</td>

</tr>
<tr>
<td >
base_url ("css/logo.png")
</td>
<td>

<?php echo base_url ("css/logo.png"); ?>

</td>

</tr>
<tr>
<td >
site_url()
</td>
<td>
<?php echo site_url(); ?>
</td>

</tr>
<tr>
<td >
site_url("url_controller/test")
</td>
<td>
<?php echo site_url("url_controller/test"); ?>
</td>

</tr>
<tr>
<td >
current_url()
</td>
<td>
<?php echo current_url(); ?>
</td>

</tr>
<tr>
<td >
anchor()
</td>
<td>
<?php echo anchor(base_url("index.php/url_controller/index"), 'Click Here', array('title'=>'This is anchor','target'=> '_blank' )); ?>
</td>

</tr>
<tr>
<td >
anchor_popup()
</td>
<td>
<?php $attributes = array(
'width' => '500',
'height' => '500',
'scrollbars' => 'yes',
'status' => 'yes',
'resizable' => 'yes',
'screenx' => '0',
'screeny' => '0'
);
echo anchor_popup(base_url("index.php/url_controller"), 'Anchor popup', $attributes); ?>
</td>
</tr>
<tr>
<td >
mailto()
</td>
<td>
<?php echo mailto('[email protected]', 'Click Here to Contact Me'); ?>
</td>
</tr>
<tr>
<td >
safe_mailto()
</td>
<td>
<?php echo safe_mailto('[email protected]', 'Click Here (safe_mail)'); ?>
</td>
</tr>
<tr>
<td >
auto_link()
</td>
<td>
<?php echo auto_link("https://www.formget.com"); ?>
</td>
</tr>
<tr>
<td >
prep_url()
</td>
<td>
<?php $url = "formget.com";
echo prep_url($url); ?>
</td>
</tr>

</table>
</div>
</div>
</div>
</body>
</html>
CSS File : style.css
Styling HTML Elements.
body {
font-family: 'Open Sans', sans-serif;
}
.main
{
width: 1015px;
height: 900px;
position: absolute;
top: 10%;
left: 20%;
}

#content {
position: absolute;
width: 850px;
height: auto;
}
#table_data{
border-collapse: collapse;
border-spacing: 0;

}
#table_data {
margin:0px;padding:0px;
width:116%;
border:1px solid white;

}
#table_data table{
border-collapse: collapse;
border-spacing: 0;
width:100%;
height:50%;
margin:0px;padding:0px;
}
#table_data td{
vertical-align:middle;
border:1px solid white;
border-width:0px 1px 1px 0px;
text-align:left;
padding:18px;
font-size:20px;
background-color: #DBF6ED;
color: #4f4f4f;
}
#table_data tr:first-child td{
background-color:#26C489;
border:0px solid #26C489;
border-width:0px 0px 1px 1px;
font-size:24px;
font-weight:bold;
color:#ffffff;
}
#table_data td{
padding-left:40px;
font-weight:bold;
font-size:15px;
}
a {

color: #4f4f4f;
}
h2{
padding-left:328px;
}
Conclusion
Thanks for reading the complete post. Hope you have got the concept. You can share your views in the space provided below and get in touch with us.
Amazon SES Email Client: Send Emails 100X Cheaper with MailGet


We used to spend huge amount of money on email marketing. Till last month, we used to pay nearly $395 every month for email marketing services.
We thought this should change and thats when we decided to build MailGet.
MailGet – Email Service Provider is an Amazon SES email client that use Amazon SES for email sending. MailGet is beautiful, simple and over 100x cheaper than any other email marketing tool available in the market.
Read our personal story below.
What motivated us to build MailGet ?
We are an Internet Company with 2 software products.
- InkThemes (We sell WordPress Themes here.)
- FormGet (We sell a form building solution here.)
Both our software products have combined 80,000 subscribers. We send weekly email newsletter to all our subscribers to keep them up-to date on latest offers and happenings with our products.
Overall we send near about 80K emails every week. For sending emails, we opted for a well known email marketing service.
Problems with existing email marketing services
1. Email Marketing Services are pretty expensive.
Email marketing in its existing form is pretty expensive. This expenses increase with growing subscriber base.
Lets, Checkout the pricing of a well known email marketing solution and you will get the idea.
- Upto 10000 Subscribers: $75/mo
- Upto 25000 Emails: $150/mo
- Upto 50000 Emails: $240/mo
- Upto 100000 Emails: $475/mo
2. They charge you big monthly fee based on the number of subscriber you have.
- If you have 25000 subscribers: You pay $150/month
If you do not send emails too frequently and just every once in a while. You end up paying a big monthly fee without seeing much value at your end.
If you try to compensate for the monthly fee and send too frequent emails you lose subscribers interest.
Basically you do not have much freedom in email marketing. There is this huge monthly fee dangle hanging around your neck based on the number of email subscribers.
3. Upper limit of number of emails you can send to your subscribers plan.
Very few people know that these email solutions also place an upper limit on the number of emails you can send to your subscribers.
If you are on 75000 subscribers plan, most of them do not allow you to send more than 6 campaigns every month.
If you wish to send more than 6 campaigns, you have to pay extra out of your pocket.
So, Lets do some basic high school maths.
Lets say, You have 80000 subscribers and you send weekly emails to your subscribers.
- Total Subscribers: 80000
- Total Email Sent in One Campaign: 80000
- Weekly Email Campaign(Avg 4.3 weeks/month): 80000 X 4.3 = 344000 Emails Sent
- Average Charges of existing email marketing companies (Upto 80000 subscribers): $400/month
- Yearly Expenses: $400 X 12 = $4800
This is what we have been paying since last year and we wanted to make this email sending affordable for ourselves without compromising on the quality of emails that we sent.
Since, the pricing is pretty expensive. We decided to build a World Class email marketing solution ourselves.
We studied these existing email marketing solutions and figured something interesting.
Every decent email marketing tool has 5 key elements
- Email Builder (A drag drop email building tool)
- Subscribers Management (Managing Email Lists, Importing Contacts, Blocking etc.)
- Tracking (Sent Emails, Opens, Clicks, Spam)
- Powerful Server to pass on lots of email data to the “Email SMTP server” to finally send emails.
- SMTP based Email Server to send emails.
Since, we had an amazing design and developer team. We decided to build an affordable email marketing tool ourselves.
Based on the Amazon Cloud Web Services reputation and affordability, we settled for Amazon SES for sending emails via its SMTP based Email Server. SES does its due diligence at its end and makes sure that your emails lands in inbox and not as spams.
We decided to keep MailGet super affordable. We wanted to be around 85% less expensive than the existing email marketing solutions.
Here is the breakdown of costs of using MailGet
- Upto 10000 Subscribers: $29/month (Send Unlimited Emails)
- From 10,001-50,000 Subscribers: $49/month (Send Unlimited Emails)
- From 50,001-1,00,000 Subscribers: $79/month (Send Unlimited Emails)
Amazon SES charges $1 per 10000 Emails.
So If you send weekly email campaigns. Your overall cost including Amazon SES Expenses will be just $33 for 10000 subscribers.
- Upto 10,000 Subscribers: $33
- Upto 25,000 Subscribers: $59
- Upto 50,000 Subscribers: $69
- Upto 1,00,000 Subscribers: $119
Your Existing Email Marketing Solution costs much much higher.
- Upto 10,000 Emails: $75/mo
- Upto 25,000 Emails: $150/mo
- Upto 50,000 Emails: $245/mo
- Upto 1,00,000 Emails: $475/mo
MailGet simply gives you the saving of over 65% than your existing email marketing solution without compromising your email send quality. Since the final emails are delivered through Amazon’s Infrastructure you can expect maximum email inbox deliverability too.
You do not have to worry about self hosting the email sending server. We manage everything at our end and you get all the features of your typical email marketing solutions packed without any hassle.
All you need is to connect your Amazon SES account with MailGet and you are good to go.
CodeIgniter : Sending Email via Gmail Using SMTP Protocol
Email is nothing but an Electronic mail. It is a method in which an author can exchange digital messages from one or more recipients.
Here in this post by the use of CodeIgniter’s inbuilt email class you will learn how one can use this CI email library to send emails via multiple protocols (mail, Sendmail, and SMTP).
CodeIgniter email library supports multiple features like CC and BCCs, HTML or plain text email Multiple recipients etc.
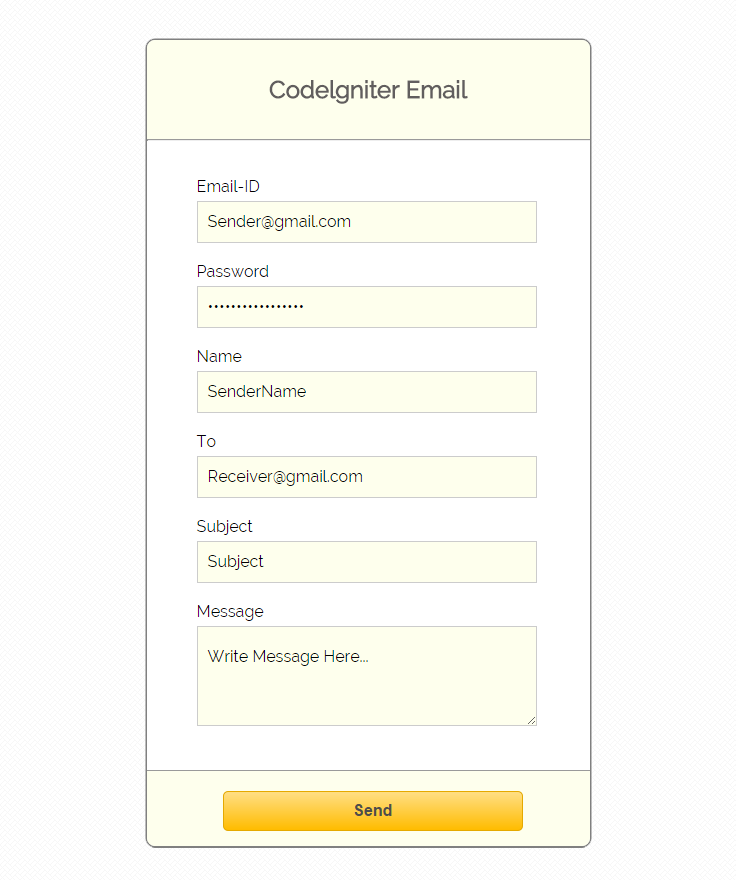
In this tutorial we are going to explain it with an example which will demonstrate you “How to use Email class library in CodeIgniter”.
For this, we have designed an interface where you can sign in via your existing mail account and send emails to other accounts.
Here we are using Gmail as a mail provider.
Before running the code, it is required to configure some setting in your local server as well in your email account.
Settings Required :
On your local server find php.ini file and enable OpenSSL by removing “;” semi-colon. As shown below:-
 // Find the line.
;extension=php_openssl.dll

// Remove  ";" from this line to enable
extension=php_openssl.dll

// Save and restart all services
// ssl service  is enable
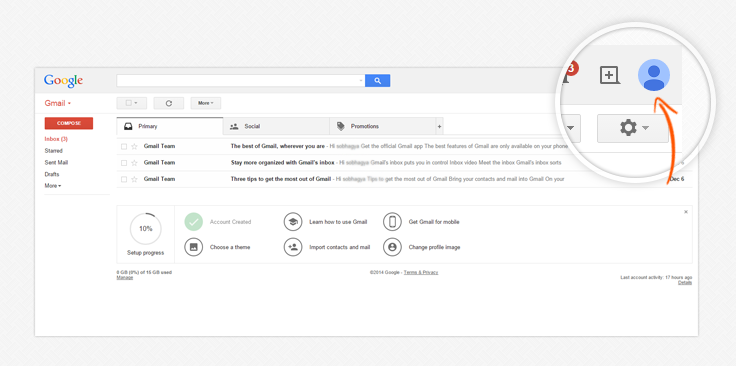
Now in your Gmail account disabled 2-Step Verification and enable Access for less secure apps. You can do this by using the following 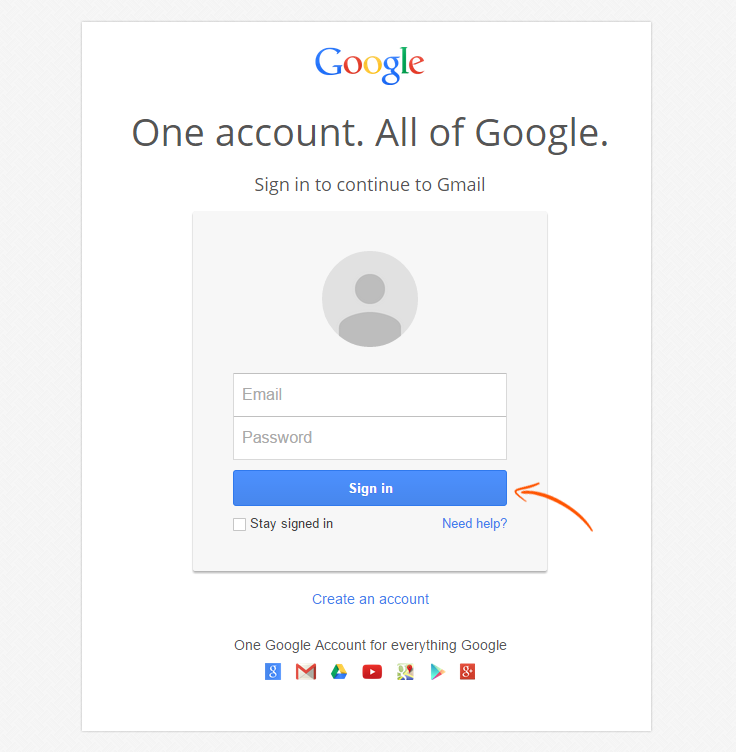
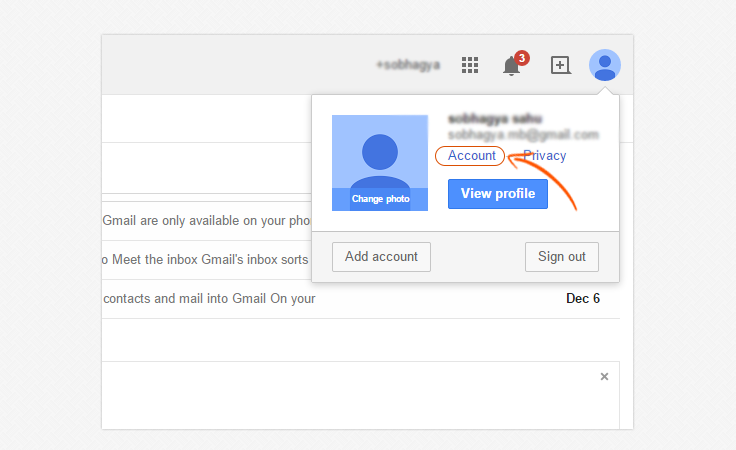
Step 2: Then click on profile icon.
Step 3: Now click on account link.
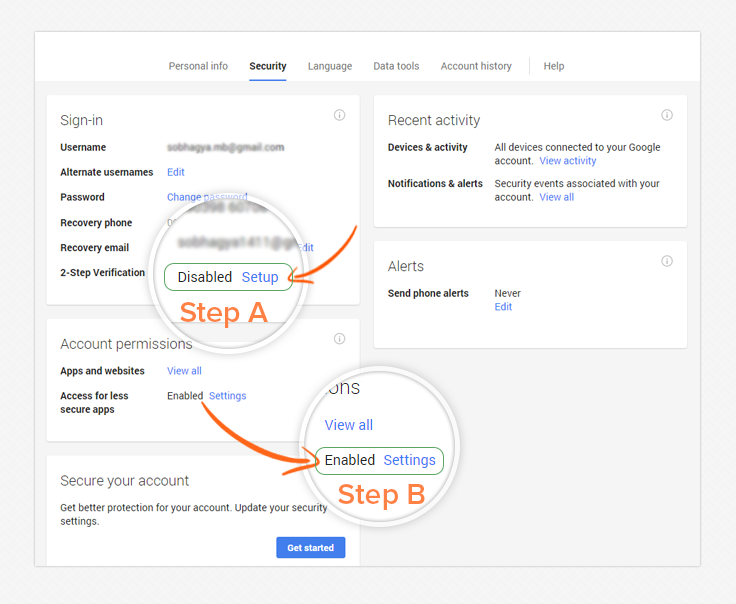
Step 4: Click on security tab.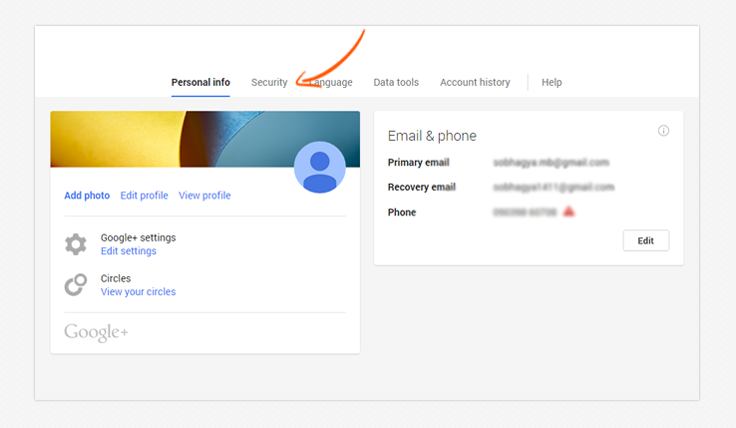
Step 5: In security tab we should edit two section:-
- A: At security tab sign-in section is there, find 2-step verification and disable it.
- B: In Account permissions section, find Access for less secure apps and enable it.
Now you are ready to access Gmail account via CodeIgniter email class.
Setting Email Preferences In CodeIgniter:-
Setting up the email preferences is required. You can set the preferences manually or if you want to auto-load it then you can set it in $config file.
To initialize the values according to mail, and pass array of preference values in library.
Syntax:
// The mail sending protocol.
$config['protocol'] = 'smtp';
// SMTP Server Address for Gmail.
$config['smtp_host'] = ssl://smtp.googlemail.com
// SMTP Port - the port that you is required
$config['smtp_port'] = 465;
// SMTP Username like. ([email protected])
$config['smtp_user'] = $sender_email;
// SMTP Password like (abc***##)
$config['smtp_pass'] = $user_password;
// Load email library and passing configured values to email library
$this->load->library('email', $config);
// Sender email address
$this->email->from($sender_email, $username);
// Receiver email address.for single email
$this->email->to($receiver_email);
//send multiple email
$this->email->to([email protected],[email protected],[email protected]);
// Subject of email
$this->email->subject($subject);
// Message in email
$this->email->message($message);
// It returns boolean TRUE or FALSE based on success or failure
$this->email->send();
Different kinds of smtp_host:
In this tutorial we are using Gmail’s SMTP host as mail provider you can also use different kinds of SMTP host like Hotmail, Yahoo, Google Gmail, Lycos Mail , AOL, Netscape , etc.. For that you need to do slight changes in $config file as shown below:
Hotmail Settings
$config['smtp_host']=smtp.live.com

Yahoo!
$config['smtp_host']=smtp.mail.yahoo.com

Google Gmail
$config['smtp_host']=smtp.gmail.com

Lycos Mail
$config['smtp_host']=smtp.mail.lycos.com

AOL Mail
$config['smtp_host']=smtp.mail.lycos.com

Netscape
$config['smtp_host']=smtp.isp.netscape.com
Tutorial Codes In details:
Below are the codes used in this tutorial with proper explanation.
Controllers : ci_email_tutorial.php
Here the complete code with validation and its values stored form of array and pass to “view” file.
<?php

if (!defined('BASEPATH'))exit('No direct script access allowed');

class CI_Email_Tutorial extends CI_Controller {

public function __construct() {
parent::__construct();
$this->load->helper('form');
$this->load->library('form_validation');
$this->load->library('encrypt');
}
// Show email page
public function index() {
$this->load->view('view_form');
}

// Send Gmail to another user
public function Send_Mail() {

// Check for validation
$this->form_validation->set_rules('user_email', 'User Email', 'trim|required|xss_clean');
$this->form_validation->set_rules('user_password', 'User Password', 'trim|required|xss_clean');
$this->form_validation->set_rules('to_email', 'To', 'trim|required|xss_clean');
$this->form_validation->set_rules('subject', 'Subject', 'trim|required|xss_clean');
$this->form_validation->set_rules('message', 'Message', 'trim|required|xss_clean');
if ($this->form_validation->run() == FALSE) {
$this->load->view('view_form');
} else {

// Storing submitted values
$sender_email = $this->input->post('user_email');
$user_password = $this->input->post('user_password');
$receiver_email = $this->input->post('to_email');
$username = $this->input->post('name');
$subject = $this->input->post('subject');
$message = $this->input->post('message');

// Configure email library
$config['protocol'] = 'smtp';
$config['smtp_host'] = 'ssl://smtp.googlemail.com';
$config['smtp_port'] = 465;
$config['smtp_user'] = $sender_email;
$config['smtp_pass'] = $user_password;

// Load email library and passing configured values to email library
$this->load->library('email', $config);
$this->email->set_newline("rn");

// Sender email address
$this->email->from($sender_email, $username);
// Receiver email address
$this->email->to($receiver_email);
// Subject of email
$this->email->subject($subject);
// Message in email
$this->email->message($message);

if ($this->email->send()) {
$data['message_display'] = 'Email Successfully Send !';
} else {
$data['message_display'] =  '<p class="error_msg">Invalid Gmail Account or Password !</p>';
}
$this->load->view('view_form', $data);
}
}
}
?>
Views : view_form.php
Here the complete code of view file with values.
<html>
<head>
<title>Codeigniter Email</title>
<link rel="stylesheet" type="text/css" href="<?php echo base_url(); ?>css/style.css">
<link href='http://fonts.googleapis.com/css?family=Source+Sans+Pro|Open+Sans+Condensed:300|Raleway' rel='stylesheet' type='text/css'>
</head>
<body>
<div class="main">
<div id="content">
<h2 id="form_head">Codelgniter Email</h2>
<div id="form_input">
<div class="msg">
<?php
if (isset($message_display)) {
echo $message_display;
}
?>
</div>
<?php
echo '<div class="error_msg">';
echo validation_errors();
echo "</div>";
echo form_open('ci_email_tutorial/send_mail');
echo form_label('Email-ID');
echo "<div class='all_input'>";
$data_email = array(
'type' => 'email',
'name' => 'user_email',
'id' => 'e_email_id',
'class' => 'input_box',
'placeholder' => 'Please Enter Email'
);
echo form_input($data_email);
echo "</div>";
echo form_label('Password');
echo "<div class='all_input'>";
$data_password = array(
'name' => 'user_password',
'id' => 'password_id',
'class' => 'input_box',
'placeholder' => 'Please Enter Password'
);
echo form_password($data_password);
echo "</div>";
echo form_label('Name');
echo "<div class='all_input'>";
$data_email = array(
'name' => 'name',
'class' => 'input_box',
'placeholder' => 'Please Enter Name'
);
echo form_input($data_email);
echo "</div>";
echo form_label('To');
echo "<div class='all_input'>";
$data_email = array(
'type' => 'email',
'name' => 'to_email',
'class' => 'input_box',
'placeholder' => 'Please Enter Email'
);
echo form_input($data_email);
echo "</div>";
echo form_label('Subject');
echo "<div class='all_input'>";
$data_subject = array(
'name' => 'subject',
'class' => 'input_box',
);
echo form_input($data_subject);
echo "</div>";
echo form_label('Message');
echo "<div class='all_input'>";
$data_message = array(
'name' => 'message',
'rows' => 5,
'cols' => 32
);
echo form_textarea($data_message);
echo "</div>";
?>
</div>
<div id="form_button">
<?php echo form_submit('submit', 'Send', "class='submit'"); ?>
</div>
<?php echo form_close(); ?>
</div>
</div>
</body>
</html>
CSS : style.css
HTML Styling.
body {
font-family: 'Roboto Condensed', sans-serif;
}
.main{
width: 1015px;
position: absolute;
top: 10%;
left: 20%;
font-family:raleway;
}
#form_head{
text-align: center;
background-color: #FEFFED;
height: 66px;
margin: 0 0 -29px 0;
padding-top: 35px;
border-radius: 8px 8px 0 0;
color: rgb(97, 94, 94);
}
#content {
position: relative;
width: 443px;
border: 2px solid gray;
border-radius: 10px;
margin-top: 5px;;
margin-left: -60px;
padding-bottom: 85px;
font-family:raleway;
}
#form_input{
margin-left: 50px;
margin-top: 36px;
}
label{
margin-right: 6px;
font-family:raleway;
}
#form_button{
padding: 0 21px 15px 15px;
position: absolute;
bottom: 0px;
width: 407px;
background-color: #FEFFED;
border-radius: 0px 0px 8px 8px;
border-top: 1px solid #9A9A9A;
}
.submit{
font-size: 16px;
background: linear-gradient(#ffbc00 5%, #ffdd7f 100%);
border: 1px solid #e5a900;
color: #4E4D4B;
font-weight: bold;
cursor: pointer;
width: 300px;
border-radius: 5px;
padding: 10px 0;
outline: none;
margin-top: 20px;
margin-left: 15%;
}
.submit:hover{
background: linear-gradient(#ffdd7f 5%, #ffbc00 100%);
}
.input_box, textarea{
height:40px;
width:340px;
padding:20px 20px 20px 10px;
margin-top: 5px;
border: 1px solid #ccc;
font-size: 16px;
font-family:raleway;
background-color:#FEFFED;
}
textarea{
height:100px;
padding-bottom: 30px;
}
.msg{
color : blue;
}
.error_msg{
color: red;
}
Conclusion
Thanks for reading the complete post. Hope you have got the concept. You can share your views in the space provided below and get in touch with us.
CodeIgniter JavaScript Class Example

JavaScript is a dynamic language. It is mainly used for client-side scripting i.e. user requests an HTML page with JavaScript in it, the script is sent to the browser and then browser perform some task like effects, events etc.
Here you will learn how one can use CodeIgniter’s JavaScript class after loading the provided JavaScript library.
Before moving further, first we need to set and configure the path as shown below:
Syntax
Set this line in “application/config/config.php”.
// Here is the location, where "jquery.min.js" stored.
$config['javascript_location'] = 'http://localhost/codeigniter_javascript/js/jquery.min.js';
To initialize the Javascript class manually in your controller constructor.
$this->load->library('javascript'); // to load JavaScript library
$this->load->library('javascript/jquery');
One can set different events by using syntax:
$this->jquery->event('element_path', code_to_run()); //Here "event" is like focus, blur, click etc. The below block of code is from example that we have created in which “$data” is an array whose each index stores different function call of jQuery library.
// This function return the js file location, so we have to echo this line in <head> tag.
$data['library_src'] = $this->jquery->script();

// $this->jquery->event('element_path', code_to_run());
// Following jQuery code set according to syntax.

$data['click'] = $this->jquery->_click('#click', "alert('Hello! You Click the button');");
$data['dbl_click'] = $this->jquery->_dblclick('#double_click', "alert('Hello! You Double Click the button');");

// $this->jquery->effect(target, optional speed, optional extra information);
// Following jQuery code set according to syntax, Here first parameter is the "target", in which you want to apply jquery effect.
// Second is "optional speed",which set effect motion in "miliseconds",its optional.
// Third parameter " optional extra information" is like "callback" function, its also optional.

$data['hide'] = $this->jquery->_hide('#content', 800);
$data['show'] = $this->jquery->_show('#content', 800);
$data['fade_in'] = $this->jquery->_fadeIn('#content', 800);
$data['fade_out'] = $this->jquery->_fadeOut('#content', 800);
$data['toggle'] = $this->jquery->_toggle('#content');
$data['slide_up'] = $this->jquery->_slideUp('#content',800);
$data['slide_down'] = $this->jquery->_slideDown('#content',800);
$data['slide_toggle'] = $this->jquery->_slideToggle('#content',800);

// Pass the variable "$data" in view page, which holds multiple tasks of js using CodeIgniter library.
$this->load->view('js_class_view', $data);
Now you can create these below mentioned files and put them in their respective folder or you can download from the link given.
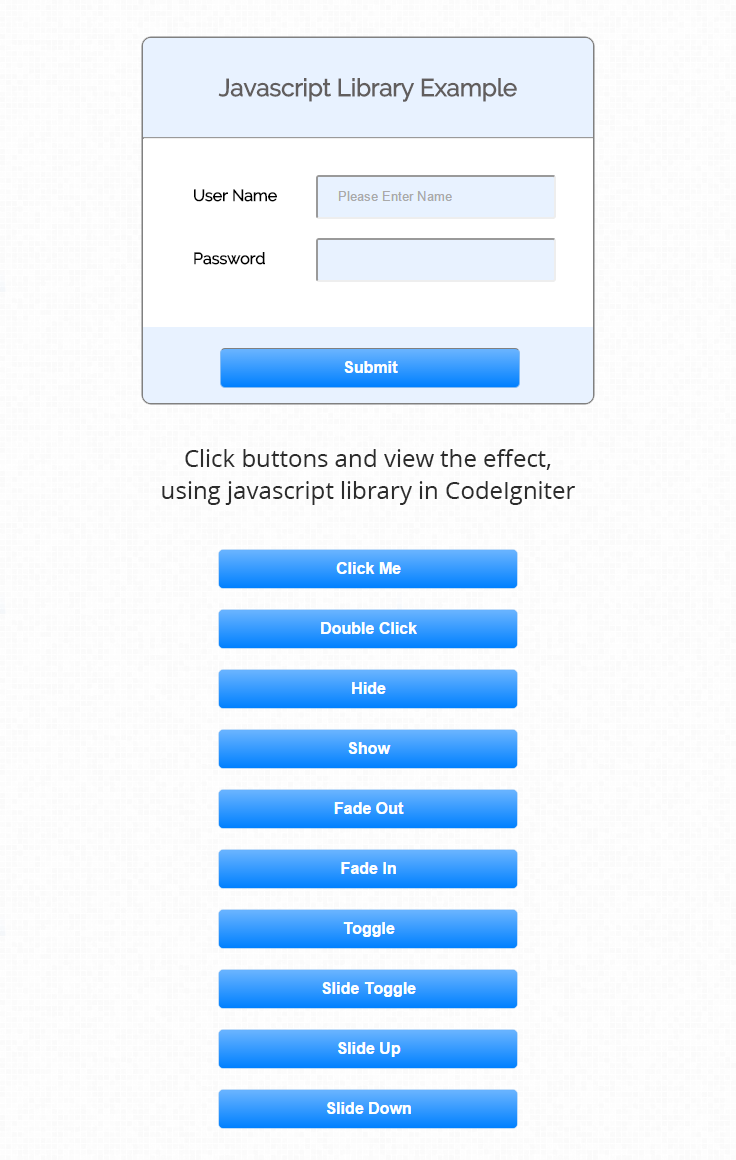
Tutorial Codes In details:
Below are the codes used in this tutorial with proper explanation.
Controller File : js_class.php
This file will help you to initialize, set the configuration and pass it to “view” page.
<?php if (!defined('BASEPATH')) exit('No direct script access allowed');

class Js_Class extends CI_Controller {

// Load Library.
function __construct() {
parent::__construct();
$this->load->library('javascript');
$this->load->library('javascript/jquery');
}

// View "js_class_view" Page.
public function index() {
// its hold the "jquery.min.js" path with <script> tag, and store in variable.
$data['library_src'] = $this->jquery->script();

$data['click'] = $this->jquery->_click('#click', "alert('Hello! You Click the button');");
$data['dbl_click'] = $this->jquery->_dblclick('#double_click', "alert('Hello! You Double Click the button');");
$data['hide'] = $this->jquery->_click('#hide_div', $this->jquery->_hide('#content', 800));
$data['show'] = $this->jquery->_click('#show_div', $this->jquery->_show('#content', 800));
$data['fade_in'] = $this->jquery->_click('#fadein_fun', $this->jquery->_fadeIn('#content', 800));
$data['fade_out'] = $this->jquery->_click('#fadeout_fun', $this->jquery->_fadeOut('#content', 800));
$data['toggle'] = $this->jquery->_click('#toggle', $this->jquery->_toggle('#content'));
$data['slide_up'] = $this->jquery->_click('#slideup', $this->jquery->_slideUp('#content',800));
$data['slide_down'] = $this->jquery->_click('#slidedown', $this->jquery->_slideDown('#content',800));
$data['slide_toggle'] = $this->jquery->_click('#slidetoggle', $this->jquery->_slideToggle('#content',800));

// Pass the variable "$data" in view page, which holds multiple task of js using codeigniter library.
$this->load->view('js_class_view', $data);
}
}
?>
View File : js_class_view.php
This file will help you, that where to print variables, which recieve from “controller”.
<html>
<head>
<title>Codeigniter javascript and jquery class</title>
<link href='http://fonts.googleapis.com/css?family=Source+Sans+Pro|Open+Sans+Condensed:300|Raleway' rel='stylesheet' type='text/css'>
<link rel="stylesheet" type="text/css" href="<?php echo base_url(); ?>css/style.css">

<!--Here is Jquery file "jquery.min.js", which send from controller as variable-->
<?php echo $library_src; ?>
</head>
<body>
<div class="main">
<div id="content">
<h2 id="form_head">Javascript Library Example</h2><br/>
<hr>
<div id="form_input">
<?php
echo form_open();
// Name Fied
echo form_label('User Name');
$data_name = array(
'name' => 'name',
'class' => 'input_box',
'placeholder' => 'Please Enter Name',
'id' => 'name'
);
echo form_input($data_name);
echo "<br>";
echo "<br>";
// Password Field
echo form_label('Password');
$data_name = array(
'type' => 'password',
'name' => 'pwd',
'class' => 'input_box',
'placeholder' => '',
'id' => 'pwd'
);
echo form_input($data_name);
?>
</div>
<div id="form_button">
<?php echo form_submit('submit', 'Submit', "class='submit'"); ?>
</div>
<?php
// Form Close
echo form_close();
?>
</div>
</div>

<!-- Buttons, which perform jquery task -->
<div id="js_button">
<h3 id="button_heading">Click Buttons and view the effect, using javascript library in codeIgniter</h2>

<button type="button" class="button_type" id="click">Click Me</button>
<br>
<button type="button" class="button_type" id="double_click">Double Click</button>
<br>
<button type="button" class="button_type" id="hide_div">Hide</button>
<br>
<button type="button" class="button_type" id="show_div">Show</button>
<br>
<button type="button" class="button_type" id="fadeout_fun">Fade Out</button>
<br>
<button type="button" class="button_type" id="fadein_fun">Fade In</button>
<br>
<button type="button" class="button_type" id="toggle">Toggle</button>
<br>
<button type="button" class="button_type" id="slidetoggle">Slide Toggle</button>
<br>
<button type="button" class="button_type" id="slideup">Slide Up</button>
<br>
<button type="button" class="button_type" id="slidedown">Slide Down</button>
</div>

<!-- script tag recieve variables with js event,which send from controller. -->
<script type="text/javascript">
<?php echo $click; ?>
<?php echo $dbl_click; ?>
<?php echo $hide; ?>
<?php echo $show; ?>
<?php echo $fade_in; ?>
<?php echo $fade_out; ?>
<?php echo $toggle; ?>
<?php echo $slide_toggle; ?>
<?php echo $slide_down; ?>
<?php echo $slide_up; ?>
</script>
</body>
</html>
CSS File : style.css
Styling HTML Elements.
body {
font-family: 'Raleway', sans-serif;
}
.main
{
width: 1015px;
position: absolute;
top: 10%;
left: 20%;
}
#form_head
{
text-align: center;
background-color: #E8F2FF;
height: 66px;
margin: 0 0 -29px 0;
padding-top: 35px;
border-radius: 8px 8px 0 0;
color: rgb(97, 94, 94);
}
#content {
position: absolute;
width: 450px;
height: 365px;
border: 2px solid grey;
border-radius: 10px;
margin-top: 125px;
}
#form_input
{
margin-left: 50px;
margin-top: 36px;
}
label
{
margin-right: 6px;
font-weight: bold;
}
#form_button{
padding: 0 21px 15px 15px;
position: absolute;
bottom: 0px;
width: 414px;
background-color: #E8F2FF;
border-radius: 0px 0px 8px 8px;
border-top: 1px solid #E8F2FF;
margin-top: 30px;
margin-left: 0;
}
.submit{
font-size: 16px;
background: linear-gradient( #66B2FF 5%, #0080FF 100%);
border: 1px solid #84BBF3;
color: white;
font-weight: bold;
cursor: pointer;
border-top: 1px solid grey;
width: 300px;
border-radius: 5px;
padding: 10px 0;
outline: none;
margin-top: 20px;
margin-left: 15%;
}
.submit:hover{
background: linear-gradient(#0080FF 5%, #004C99 100%);
}
.input_box{
height:40px;
width:240px;
padding:20px;
border-radius:3px;
background-color:#E8F2FF;
margin-left:45px;
}
.button_type{
font-size: 16px;
background: linear-gradient( #66B2FF 5%, #0080FF 100%);
border: 1px solid #84BBF3;
color: white;
font-weight: bold;
cursor: pointer;
width: 300px;
border-radius: 5px;
padding: 10px 0;
outline: none;
margin-top: 20px;
margin-left: 15%;
}
.button_type:hover{
background: linear-gradient(#0080FF 5%, #004C99 100%);
}
div#js_button {
position: absolute;
margin-left: 800px;
margin-top: 55px;
}
input#name {
margin-left: 33px;
}
#button_heading
{
text-align: center;
color: rgb(97, 94, 94);
}
Conclusion
Thanks for reading the complete post. Hope you have got the concept. You can share your views in the space provided below and get in touch with us.
CodeIgniter – Getting Started With MVC

CodeIgniter is a simple web application development framework for PHP . By its modular approach we can use its inbuilt libraries and helpers.
It has a three-tier architecture i.e. Model-View-Controller (MVC) which is easy to use by which the functional process logic, data access, data storage and user interface can be developed.
You can also refer our previous tutorial For CodeIgniter installation and configuration.
What is MVC..?
MVC stands for Model, View, Controller. It is a programing pattern used in developing Web applications. This pattern separates the user interface and backend.
Using MVC, developers can implement or modify their interface or back-end without affecting the other files. MVC also increases the flexibility of an app by being able to reuse models or views over again.
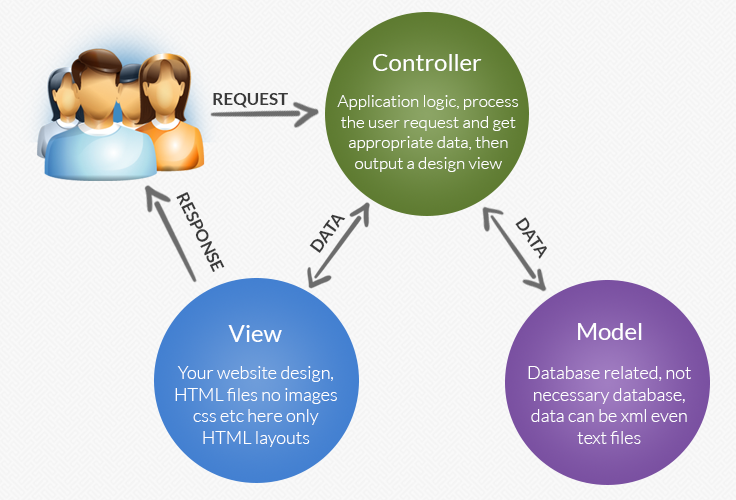
Below is a description of MVC.
Model:
The model deals with the raw data and database interaction and will contain functions
like inserting records to a database or selecting specific database records.
View:
The view deals with displaying the data and interface controls to the user with.
Controller:
The controller acts as mediator to interact with view and model. It act as a single point of control from where you can manage both model and view.
Now you will learn how to run a sample program. Before we start with a sample program we assume that you have already install CodeIgniter on your system if not than you have to download and install it first.
Steps to create CodeIgniter’s first sample program:-
Step:1
First, in controller, create a file name “ci_sample_controller.php” within path: C:wampwwwCodeIgniterapplicationcontrollers. Write following code:
<?php
class ci_sample_controller extends CI_Controller {

public function __construct() {
parent::__construct();
}

//This is Default function of controller
public function index() {
//Loading view file ci_sample_view.php
$this->load->view('ci_sample_view');
}

public function Hello() {
//Loading view file ci_sample_view.php
$this->load->view('ci_sample_view');
}

}
?>
Step:2 Next step, in view. Create “ci_sample_view.php” within C:wampwwwCodeIgniterapplicationviews. Write just simple line code like:
<?php

echo "Hello World";

?>
To run a file:
http://localhost/codeigniter/index.php/ci_sample_controller/helloYou can also refer: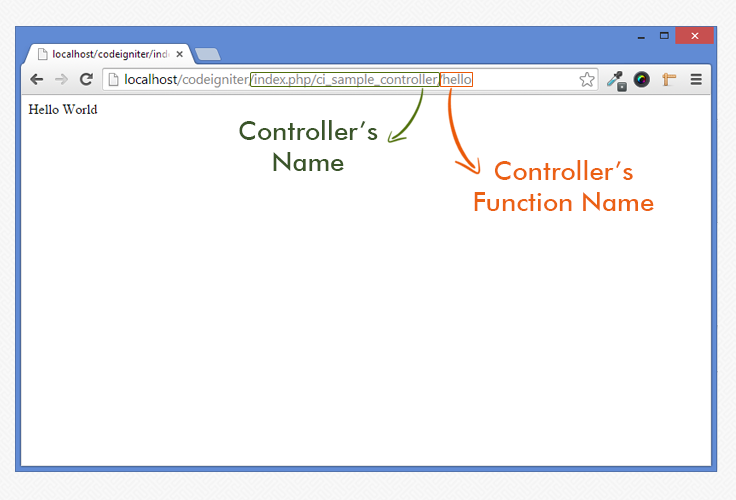
Note: By default controller calls the index function and if you want to call your defined function then you have to specify it while calling.
You can also download the Script file. Extract the downloaded files and run it on your Local server.
Conclusion:
Thanks for reading the complete post. Hope you have got the concept. You can share your views in the space provided below and get in touch with us.
CodeIgniter Installation and Configuration

CodeIgniter is a simple web application development framework for PHP. By its modular approach we can use its inbuilt libraries and helpers in our application.
We can separate logic from presentation by using a Model-View-Controller (MVC) pattern.
In this tutorial we are going to explain you, how to install and configure the CodeIgniter framework. Below mentioned are the step by step process and installation instructions that you can follow to get CodeIgniter installed on your local computer.
Step 1 : Downloading CodeIgniter Framework
Go to http://www.codeigniter.com and download current version of CodeIgniter framework. In this tutorial we are using CodeIgniter 2.2.
Step 2 : Installing and Exploring CodeIgniter
After downloading CodeIgniter you will receive files in a zip format. So, first you need to unzip it, and rename the “CodeIgniter-2.2-stable” folder to your application name.
In this tutorial we are renaming “CodeIgniter-2.2-stable” folder to CodeIgniter.
Now copy it to your PHP and MySQL enabled server. In this tutorial we are using WAMP(Windows, Apache, Mysql, PHP). So copy it on C:wampwww
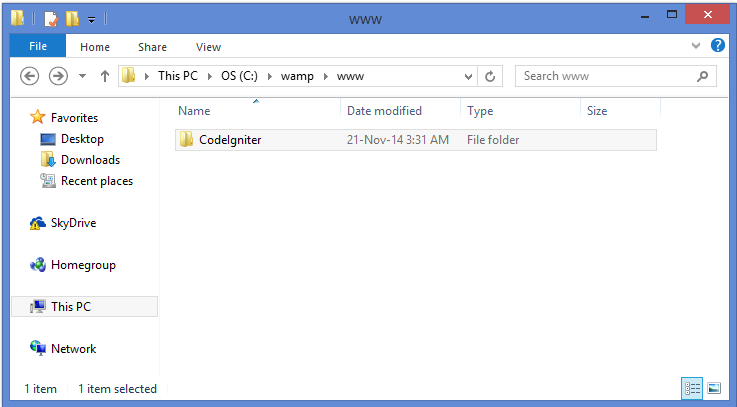
Step 3 : Configuring CodeIgniter
For running CodeIgniter application you need to setup the right base URL of the app. To do this, open up C:/wamp/www/CodeIgniter/application/config/config.php and edit the base_url array item to point to your server and CodeIgniter folder.
Syntax:
//you can find this at line number 17
$config['base_url'] = "http://localhost/CodeIgniter/";
Step 4 : Testing CodeIgniter
Here we do quick test to see CodeIgniter application running properly or not. Go to
http://localhost/codeigniter/and you should see the following. Means its working proper
Step 5 : Database configuration :
To connect with database CodeIgniter provides a configuration file in config folder with name database.php. Below is the mentioned path:-
C:/wamp/www/CodeIgniter/application/config/database.phpTo setup connectivity with your database you need to do the changes as mentioned in below code:
$db['default']['hostname'] = "localhost";
$db['default']['username'] = "root"; // Your username if required.
$db['default']['password'] = ""; // Your password if any.
$db['default']['database'] = "database_name"; // Your database name.
$db['default']['dbdriver'] = "mysql";
$db['default']['dbprefix'] = "";
$db['default']['pconnect'] = TRUE;
$db['default']['db_debug'] = FALSE;
$db['default']['cache_on'] = FALSE;
$db['default']['cachedir'] = "";
$db['default']['char_set'] = "utf8";
$db['default']['dbcollat'] = "utf8_general_ci";
$db['default']['swap_pre'] = "";
$db['default']['autoinit'] = TRUE;
$db['default']['stricton'] = FALSE;
Also you can even set CodeIgniter’s form helper that will help you to generate HTML tags automatically.
After performing these setting you are ready to perform database activities like insert, update, delete.
If you want to test the connectivity then you can create a database and can perform CRUD activity.
Conclusion:
Thanks for reading the complete post. Hope you have got the concept. You can share your views in the space provided below and get in touch with us.
CodeIgniter Image Library For Image Manipulation

While developing any web application there is a need to manipulate image dynamically such as while uploading an image.
In this tutorial we are going to explain an example, which shows how to use CodeIgniter’s image library for Image Manipulation.
You can find Image_Lib.php class inside your CodeIgniter project’s system/libraries folder.
First load image_lib library in your Controller.
Syntax:
$this->load->library('image_lib');
//Once library is loaded, the image library object will be available using: $this->image_lib
Using CodeIgniter Image Manipulation class we can perform following Functionality:-
Image Resizing
With the help of the resize function, one can easily able to resize the original image. To all the function one can use the below syntax:
$this->image_lib->resize();Image Cropping
Cropping function of the image manipulation class is nearly identically to the resizing function but the only thing that it requires is to specify X and Y axis (in pixels) to crop the image. To call the function use below syntax:
$this->image_lib->crop();Image Rotating
This function helps to rotate the image. To rotate the image you need to specify the angle of rotation like 90 degree, 180 degree and so on.
$this->image_lib->rotate();Image Watermarking
Image watermarking generally used for branding, for copyright text and so on. Watermarking feature requires the GD/GD2 library.
In CodeIgniter there are two types of watermarking that you can use:
Text: In this the watermark message will get displayed using text. You can even specify True Type font or can use native text output that the GD library supports.
Overlay: By using this overlay your watermark message will be generated by overlaying an image(usually a transparent PNG or GIF). In this your watermark contains over the source image.
$this->image_lib->watermark();You can also refer our live demo or download the Script file. Extract the downloaded files and run it on your Local server.
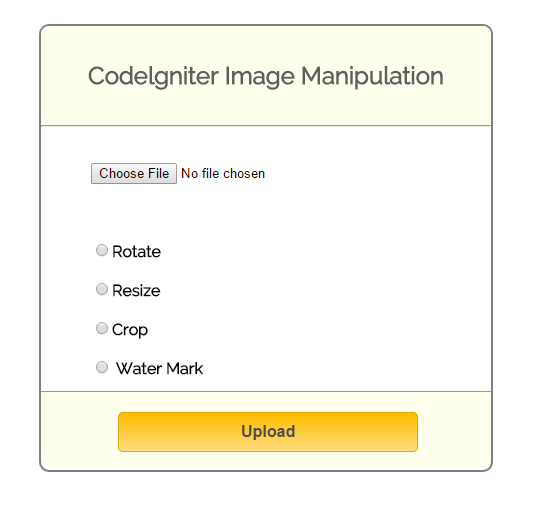
How to run file:
http://localhost/codeigniter_image_manipulation/index.php/manipulation_controller
Tutorial Codes In details:
Below are the codes used in this tutorial with proper explanation.
Controllers : ci_email_tutorial.php
Controller File : manipulation_controller.php
Copy the below code in your controller.
<?php

if (!defined('BASEPATH'))
exit('No direct script access allowed');

class Manipulation_Controller extends CI_Controller {

// Load Library.
function __construct() {
parent::__construct();
$this->load->library('image_lib');
}

// View "manipulation_view" Page.
public function index() {
$this->load->view('manipulation_view');
}

// Perform manipuation on image ("crop","resize","rotate","watermark".)
public function value() {
if ($this->input->post("submit")) {
// Use "upload" library to select image, and image will store in root directory "uploads" folder.
$config = array(
'upload_path' => "uploads/",
'upload_url' => base_url() . "uploads/",
'allowed_types' => "gif|jpg|png|jpeg|pdf"
);
$this->load->library('upload', $config);
if ($this->upload->do_upload()) {
//If image upload in folder, set also this value in "$image_data".
$image_data = $this->upload->data();
}

switch ($this->input->post("mode")) {
case "crop":
//"$image_data" contains information about upload image, so this array pass in function for manipulation.
$data = $this->crop($image_data);
$this->load->view('manipulation_view', $data);
break;
case "resize":
//"$image_data" contains information about upload image, so this array pass in function for manipulation.
$data = $this->resize($image_data);
$this->load->view('manipulation_view', $data);
break;
case "rotate":
//"$image_data" contains information about upload image, so this array pass in function for manipulation.
$data = $this->rotate($image_data);
$this->load->view('manipulation_view', $data);
break;
case "watermark":
//"$image_data" contains information about upload image, so this array pass in function for manipulation.
$data = $this->water_marking($image_data);
$this->load->view('manipulation_view', $data);
break;
default:
// If select no option in above given, then this will alert you message.
echo "<script type='text/javascript'> alert('Please Select any option which you want to operate'); </script>";
$this->load->view('manipulation_view');
break;
}
}
}

// Resize Manipulation.
public function resize($image_data) {
$img = substr($image_data['full_path'], 51);
$config['image_library'] = 'gd2';
$config['source_image'] = $image_data['full_path'];
$config['new_image'] = './uploads/new_' . $img;
$config['width'] = $this->input->post('width');
$config['height'] = $this->input->post('height');

//send config array to image_lib's  initialize function
$this->image_lib->initialize($config);
$src = $config['new_image'];
$data['new_image'] = substr($src, 2);
$data['img_src'] = base_url() . $data['new_image'];
// Call resize function in image library.
$this->image_lib->resize();
// Return new image contains above properties and also store in "upload" folder.
return $data;
}

// Rotate Manipulation.
public function rotate($image_data) {
$img = substr($image_data['full_path'], 51);
$config['image_library'] = 'gd2';
$config['source_image'] = $image_data['full_path'];
$config['rotation_angle'] = $this->input->post('degree');
$config['quality'] = "90%";
$config['new_image'] = './uploads/rot_' . $img;

//send config array to image_lib's  initialize function
$this->image_lib->initialize($config);
$src = $config['new_image'];
$data['rot_image'] = substr($src, 2);
$data['rot_image'] = base_url() . $data['rot_image'];
// Call rotate function in image library.
$this->image_lib->rotate();
// Return new image contains above properties and also store in "upload" folder.
return $data;
}

// Water Mark Manipulation.
public function water_marking($image_data) {
$img = substr($image_data['full_path'], 51);
$config['image_library'] = 'gd2';
$config['source_image'] = $image_data['full_path'];
$config['wm_text'] = $this->input->post('text');
$config['wm_type'] = 'text';
$config['wm_font_path'] = './system/fonts/texb.ttf';
$config['wm_font_size'] = '50';
$config['wm_font_color'] = '#707A7C';
$config['wm_hor_alignment'] = 'center';
$config['new_image'] = './uploads/watermark_' . $img;

//send config array to image_lib's  initialize function
$this->image_lib->initialize($config);
$src = $config['new_image'];
$data['watermark_image'] = substr($src, 2);
$data['watermark_image'] = base_url() . $data['watermark_image'];
// Call watermark function in image library.
$this->image_lib->watermark();
// Return new image contains above properties and also store in "upload" folder.
return $data;
}

// Crop Manipulation.
public function crop($image_data) {
$img = substr($image_data['full_path'], 51);
$config['image_library'] = 'gd2';
$config['source_image'] = $image_data['full_path'];
$config['x_axis'] = $this->input->post('x1');
$config['y_axis'] = $this->input->post('y1');
$config['maintain_ratio'] = TRUE;
$config['width'] = $this->input->post('width_cor');
$config['height'] = $this->input->post('height_cor');
$config['new_image'] = './uploads/crop_' . $img;

//send config array to image_lib's  initialize function
$this->image_lib->initialize($config);
$src = $config['new_image'];
$data['crop_image'] = substr($src, 2);
$data['crop_image'] = base_url() . $data['crop_image'];
// Call crop function in image library.
$this->image_lib->crop();
// Return new image contains above properties and also store in "upload" folder.
return $data;
}
}
?>
View File : manipulation_view.php
Copy the below code in your view.
<html>
<head>
<title>Image manipulation using codeigniter</title>
<link rel="stylesheet" type="text/css" href="<?php echo base_url(); ?>css/style.css">
<link href='http://fonts.googleapis.com/css?family=Source+Sans+Pro|Open+Sans+Condensed:300|Raleway' rel='stylesheet' type='text/css'>
<script src="http://ajax.googleapis.com/ajax/libs/jquery/1/jquery.min.js"></script>
<script src="http://ajax.googleapis.com/ajax/libs/jqueryui/1.8.0/jquery-ui.min.js"></script>
<script>
// Show select image using file input.
function readURL(input) {
$('#default_img').show();
if (input.files && input.files[0]) {
var reader = new FileReader();
reader.onload = function(e) {
$('#select')
.attr('src', e.target.result)
.width(300)
.height(200);
};
reader.readAsDataURL(input.files[0]);
}
}
</script>
</head>
<body>
<div class="main">
<div class="data">
<div class="page">
<div id="content">
<h2 id="form_head">Codelgniter Image Manipulation</h2><br/>
<hr>
<div id="form_input">
<?php
$data = array(
'enctype' => 'multipart/form-data'
);
// Form open
echo form_open('manipulation_controller/value', $data);
// File input field.
$file = array(
'type' => 'file',
'name' => 'userfile',
'required' => '',
'onchange' => 'readURL(this);'
);
echo form_input($file);
echo "<br>";
echo "<br>";
?>
<?php // show image which we choose in file input ?>
<div id='default_img'>
<img id="select" src="#" alt="your image" />
</div>
<br>
<br>
<?php
// Radio Button "rotate" field.
$radio = array(
'type' => 'radio',
'name' => 'mode',
'value' => 'rotate',
'id' => 'rotate_button'
);
echo form_input($radio);
echo form_label('Rotate');
echo "<br>";
echo "<br>";
// Radio Button "resize" field.
$radio = array(
'type' => 'radio',
'name' => 'mode',
'value' => 'resize',
'id' => 'resize_button'
);
echo form_input($radio);
echo form_label('Resize');
echo "<br>";
echo "<br>";
// Radio Button "crop" field.
$radio = array(
'type' => 'radio',
'name' => 'mode',
'value' => 'crop',
'id' => 'crop_button'
);
echo form_input($radio);
echo form_label('Crop');
echo "<br>";
echo "<br>";
// Radio Button "watermark" field.
$radio = array(
'type' => 'radio',
'name' => 'mode',
'value' => 'watermark',
'id' => 'watermark_button'
);
echo form_input($radio);
echo form_label(' Water Mark');
?>
<div id="form_button">
<?php
// Submit Button.
echo form_submit('submit', 'Upload', "class='submit'");
?>
</div>
</div>
<?php // Input fields for resize option. ?>
<div id='resize' style='display: none'>
<div id='content_result'>
<?php
echo "<h3 id='result_id'>Enter width & height for resize image</h3><br/><hr>";
echo "<div id='result_show'>";
echo "<label class='label_output'>Width :</label>";
$data_width = array(
'name' => 'width',
'class' => 'input_box',
'value' => '200',
'id' => 'width'
);
echo form_input($data_width);
echo "<br>";
echo "<br>";
echo "<label class='label_output'>Height:</label>";
$data_height = array(
'name' => 'height',
'class' => 'input_box',
'value' => '200',
'id' => 'height'
);
echo form_input($data_height);
?>
</div>
</div>
</div>
<?php // Result image will show on here. ?>
<div id='img_resize'>
<?php
if (isset($img_src)) {
echo "<p>Success..</p>";
echo "<img src='" . $img_src . "'/>";
}
?>
<?php
if (isset($rot_image)) {
echo "<p>Success..</p>";
echo "<img src='" . $rot_image . "'/>";
}
?>
<?php
if (isset($watermark_image)) {
echo "<p>Success..</p>";
echo "<img src='" . $watermark_image . "'/>";
}
?>
<?php
if (isset($crop_image)) {
echo "<p>Success..</p>";
echo "<img src='" . $crop_image . "'/>";
}
?>
</div>
<?php // Input fields for watermark option. ?>
<div id='water_mark' style='display: none'>
<div id='water_result'>
<?php
echo "<h3 id='result_id'>Enter text for watermark image</h3><br/><hr>";
echo "<div id='result_show'>";
echo "<label class='label_output'>Text :</label>";
$data_text = array(
'name' => 'text',
'class' => 'input_box',
'value' => 'Formget.com',
'id' => 'watermark_text'
);
echo form_input($data_text);
?>
</div>
</div>
</div>
<?php // Input fields for crop option. ?>
<div id='crop' style='display: none'>
<div id='crop_result'>
<?php
echo "<h3 id='result_id'>Enter Cordinates</h3><br/><hr>";
echo "<div id='result_show'>";
echo "<label class='label_output'>X-axis (left) </label>";
$data = array(
'name' => 'x1',
'class' => 'input_box',
'value' => '100 ',
'id' => 'x1'
);
echo form_input($data);
echo "<br>";
echo "<br>";
echo "<label class='label_output'>Y-axis (top) </label>";
$data = array(
'name' => 'y1',
'class' => 'input_box',
'value' => '100',
'id' => 'y1'
);
echo form_input($data);
echo "<br>";
echo "<br>";
echo "<label class='label_output'>Width (right) </label>";
$data = array(
'name' => 'width_cor',
'class' => 'input_box',
'value' => '400',
'id' => 'width_cor'
);
echo form_input($data);
echo "<br>";
echo "<br>";
echo "<label class='label_output'>Height (bottom)</label>";
$data = array(
'name' => 'height_cor',
'class' => 'input_box',
'value' => '350',
'id' => 'height_cor'
);
echo form_input($data);
?>
</div>
</div>
</div>
<?php // Input fields for rotate option. ?>
<div id='rotate' style='display: none' >
<div id='rotate_result'>
<?php
echo "<h3 id='result_id'>Enter Angle For Rotate Image</h3><br/><hr>";
echo "<div id='result_show'>";
$radio = array(
'type' => 'radio',
'name' => 'degree',
'value' => '90',
'id' => 'degree_90',
'checked' => 'checked'
);
echo form_input($radio);
echo form_label('90°');
echo "<br>";
echo "<br>";
$radio = array(
'type' => 'radio',
'name' => 'degree',
'value' => '180',
'id' => 'degree_180'
);
echo form_input($radio);
echo form_label('180°');
echo "<br>";
echo "<br>";
$radio = array(
'type' => 'radio',
'name' => 'degree',
'value' => '270',
'id' => 'degree_270'
);
echo form_input($radio);
echo form_label('270°');
echo "<br>";
echo "<br>";
$radio = array(
'type' => 'radio',
'name' => 'degree',
'value' => '360',
'id' => 'degree_360'
);
echo form_input($radio);
echo form_label('360°');
?>
</div>
</div>
<?php echo form_close(); ?>
</div>
<script>
$("#resize_button").click(function() {
$('div#img_resize').hide();
$('div#crop').hide();
$('div#water_mark').hide();
$('div#rotate').hide();
$('div#resize').show();
});
$("#watermark_button").click(function() {
$('div#img_resize').hide();
$('div#resize').hide();
$('div#crop').hide();
$('div#rotate').hide();
$('div#water_mark').show();
});
$("#crop_button").click(function() {
$('div#img_resize').hide();
$('div#resize').hide();
$('div#water_mark').hide();
$('div#rotate').hide();
$('div#crop').show();
});
$("#rotate_button").click(function() {
$('div#img_resize').hide();
$('div#resize').hide();
$('div#water_mark').hide();
$('div#crop').hide();
$('div#rotate').show();
});
</script>
</body>
</html>CSS : style.css
Styling HTML Elements.
body {
font-family: 'Raleway', sans-serif;
}
.main
{
width: 1015px;
position: absolute;
top: 10%;
left: 20%;
}
#form_head
{
text-align: center;
background-color: #FEFFED;
height: 66px;
margin: 0 0 -29px 0;
padding-top: 35px;
border-radius: 8px 8px 0 0;
color: rgb(97, 94, 94);
}
#content {
position: absolute;
width: 450px;
height: auto;
border: 2px solid gray;
border-radius: 10px;
}
#content_result{
position: absolute;
width: 450px;
height: 240px;
border: 2px solid gray;
border-radius: 10px;
margin-left: 559px;
margin-top: -465px;
}

#crop_result{
position: absolute;
width: 450px;
height: 362px;
border: 2px solid gray;
border-radius: 10px;
margin-left: 559px;
margin-top: -465px;
}
#water_result{
position: absolute;
width: 450px;
height: 175px;
border: 2px solid gray;
border-radius: 10px;
margin-left: 559px;
margin-top: -465px;
}
#rotate_result{
position: absolute;
width: 450px;
height: 240px;
border: 2px solid gray;
border-radius: 10px;
margin-left: 559px;
margin-top: -465px;
}
#form_input
{
margin-left: 50px;
margin-top: 36px;
}
label
{
margin-right: 6px;
font-weight: bold;
}

#form_button{
padding: 0 21px 15px 15px;
position: absolute;
bottom: -13px;
width: 414px;
background-color: #FEFFED;
border-radius: 0px 0px 8px 8px;
border-top: 1px solid #9A9A9A;
position: relative;
margin-left: -50;
}
.submit{
font-size: 16px;
background: linear-gradient(#ffbc00 5%, #ffdd7f 100%);
border: 1px solid #e5a900;
color: #4E4D4B;
font-weight: bold;
cursor: pointer;
width: 300px;
border-radius: 5px;
padding: 10px 0;
outline: none;
margin-top: 20px;
margin-left: 15%;
}
.submit:hover{
background: linear-gradient(#ffdd7f 5%, #ffbc00 100%);
}
.label_output
{
color:#4A85AB;
margin-left: 10px;
}
#result_id
{
text-align: center;
background-color: #FCD6F4;
height: 47px;
margin: 0 0 -29px 0;
padding-top: 12px;
border-radius: 8px 8px 0 0;
color: rgb(97, 94, 94);
}
#result_show
{
margin-top: 35px;
margin-left: 45px;
}
.input_box{
height:40px;
width:240px;
padding:20px;
border-radius:3px;
background-color:#FEFFED;
margin-left:30px;
}
img {
margin-left: 97px;
}
input#name {
margin-left: 45px;
}
input#email {
margin-left: 50px;
}
img#ref_symbol {
margin-left: 275px;
margin-top: -36px;
}
div#default_img {
display: none;
}
#img_resize{
position: absolute;
margin-left: 520px;
margin-top: -450px;
}
div#water_mark {
position: absolute;
}
div#rotate {
position: absolute;
}
input#height_cor{
margin-left: -2px;
}
input#width_cor {
margin-left: 20px;
}
p {
margin-left: 100;
color: green;
}
Conclusion:
In this way, we can use CodeIgniter’s image library for Image Manipulation to do Image Resizing,Image Cropping, Image Rotating, Image Watermarking Functionality. Hope that helped you a lot, keep reading our other blogs posts for more coding tricks.
CodeIgniter Calendar Class For Creating Dynamic Calendar

In this tutorial we are going to explain an example, which shows how to use CodeIgniter’s Calendar class which enables you to create dynamic calendars.
By using calendar template you can format the calendars in your own way as it gives 100% control over every aspect of its design. To load calendar library use:
Syntax:
$this->load->library('calendar');You can find Calendar.php class inside your CodeIgniter project’s system/libraries folder
Once loaded, the Calendar object will be available using: $this->calendar
To display a calendar use the below mentioned code in your controller file.
//Like most other library in CodeIgniter, the calendar library is loaded in your controller
$this->load->library('calendar');

//Below code will help you to  generate calendar in view
echo $this->calendar->generate();
We have used the below calendar template in our example, you can use it or can even modify as per your requirement:
$prefs['template'] = '
{table_open}<table cellpadding="1" cellspacing="2">{/table_open}
{heading_row_start}<tr>{/heading_row_start}
{heading_previous_cell}<th class="prev_sign"><a href="{previous_url}"><<</a></th>{/heading_previous_cell}
{heading_title_cell}<th colspan="{colspan}">{heading}</th>{/heading_title_cell}
{heading_next_cell}<th class="next_sign"><a href="{next_url}">>></a></th>{/heading_next_cell}
{heading_row_end}</tr>{/heading_row_end}
//Deciding where to week row start
{week_row_start}<tr class="week_name" >{/week_row_start}
//Deciding week day cell and week days
{week_day_cell}<td >{week_day}</td>{/week_day_cell}
//week row end
{week_row_end}</tr>{/week_row_end}
{cal_row_start}<tr>{/cal_row_start}
{cal_cell_start}<td>{/cal_cell_start}
{cal_cell_content}<a href="{content}">{day}</a>{/cal_cell_content}
{cal_cell_content_today}<div class="highlight"><a href="{content}">{day}</a></div>{/cal_cell_content_today}
{cal_cell_no_content}{day}{/cal_cell_no_content}
{cal_cell_no_content_today}<div class="highlight">{day}</div>{/cal_cell_no_content_today}
{cal_cell_blank} {/cal_cell_blank}
{cal_cell_end}</td>{/cal_cell_end}
{cal_row_end}</tr>{/cal_row_end}
{table_close}</table>{/table_close}
';
Refer our live demo or download the Script file. Extract the downloaded files and run it on your Local server.

How to run file:
http://localhost/codeigniter_calendar/index.php/ci_calendar_tutorial
Tutorial Codes In details:
Below are the codes used in this tutorial with proper explanation.
Controllers : ci_calendar_tutorial.php
Copy the below code in your controller.
<?php
class CI_Calendar_Tutorial extends CI_Controller {
public function __construct() {
parent::__construct();
}
public function index() {
$data = array(
'year' => $this->uri->segment(3),
'month' => $this->uri->segment(4)
);
// Creating template for table
$prefs['template'] = '
{table_open}<table cellpadding="1" cellspacing="2">{/table_open}
{heading_row_start}<tr>{/heading_row_start}
{heading_previous_cell}<th class="prev_sign"><a href="{previous_url}"><<</a></th>{/heading_previous_cell}
{heading_title_cell}<th colspan="{colspan}">{heading}</th>{/heading_title_cell}
{heading_next_cell}<th class="next_sign"><a href="{next_url}">>></a></th>{/heading_next_cell}
{heading_row_end}</tr>{/heading_row_end}
//Deciding where to week row start
{week_row_start}<tr class="week_name" >{/week_row_start}
//Deciding week day cell and week days
{week_day_cell}<td >{week_day}</td>{/week_day_cell}
//week row end
{week_row_end}</tr>{/week_row_end}
{cal_row_start}<tr>{/cal_row_start}
{cal_cell_start}<td>{/cal_cell_start}
{cal_cell_content}<a href="{content}">{day}</a>{/cal_cell_content}
{cal_cell_content_today}<div class="highlight"><a href="{content}">{day}</a></div>{/cal_cell_content_today}
{cal_cell_no_content}{day}{/cal_cell_no_content}
{cal_cell_no_content_today}<div class="highlight">{day}</div>{/cal_cell_no_content_today}
{cal_cell_blank} {/cal_cell_blank}
{cal_cell_end}</td>{/cal_cell_end}
{cal_row_end}</tr>{/cal_row_end}
{table_close}</table>{/table_close}
';
$prefs['day_type'] = 'short';
$prefs['show_next_prev'] = true;
$prefs['next_prev_url'] = 'http://localhost/codeigniter_calendar/index.php/ci_calendar_tutorial/index';
// Loading calendar library and configuring table template
$this->load->library('calendar', $prefs);
// Load view page
$this->load->view('calendar_show', $data);
}
}
?>
Views : calendar_show.php
Copy the below code in your view.
<html>
<head>
<title>CodeIgniter Calendar</title>
<link rel="stylesheet" type="text/css" href="<?php echo base_url(); ?>css/style.css" />
<link href='http://fonts.googleapis.com/css?family=Source+Sans+Pro|Open+Sans+Condensed:300|Raleway' rel='stylesheet' type='text/css'>
</head>
<body>
<?php
// Generate calendar
echo $this->calendar->generate($year, $month);
?>
</body>
</html>
CSS : style.css
Styling HTML Elements.
table{
border: 15px solid #25BAE4;
border-collapse:collapse;
margin-top: 50px;
margin-left: 250px;
}
td{
width: 50px;
height: 50px;
text-align: center;
border: 1px solid #e2e0e0;
font-size: 18px;
font-weight: bold;
}
th{
height: 50px;
padding-bottom: 8px;
background:#25BAE4;
font-size: 20px;
}
.prev_sign a, .next_sign a{
color:white;
text-decoration: none;
}
tr.week_name{
font-size: 16px;
font-weight:400;
color:red;
width: 10px;
background-color: #efe8e8;
}
.highlight{
background-color:#25BAE4;
color:white;
height: 27px;
padding-top: 13px;
padding-bottom: 7px;
}
Conclusion:
Thanks for reading the complete post. Hope you have got the concept. You can share your views in the space provided below and get in touch with us.
Encryption and Decryption In CodeIgniter

Data encryption and decryption is nothing but just converting a plain text into something that appears to be random and meaningless and vice verse.
Generally this encryption is opted by the developers to make the data secured like for password, URL, credit card numbers and so on.
If you are using CodeIgniter than to encrypt the data becomes much more easier as compared to native PHP code.
As C.I. provides its own encryption class which you can use to encrypt or decrypt the data.
To initialize the encryption class one must have to load the library as shown below:
$this->load->library('encrypt');As soon as it gets loaded, then Encrypt library object will be available using: $this->encrypt
But before doing all these process one must require to set up the encryption key. This Key is nothing but an information that controls the cryptographic process and allow encrypted string to get decrypted.
This key should be any random string but not a simple plain text and should be 32 characters in length (128 bits).
For setting up your key, go to application/config/config.php, open the file and set:
$config['encryption_key'] = "YOUR KEY"; Below we have created an example to show, how to encode and decode the data.
To encode the code we have used below syntax:
$this->encrypt->encode() // Performs the data encryption and returns it as a stringTo decode the code use:
$this->encrypt->decode() // Decrypts an encoded string.If you wish you can copy the codes and can try at your end locally or can even download the files
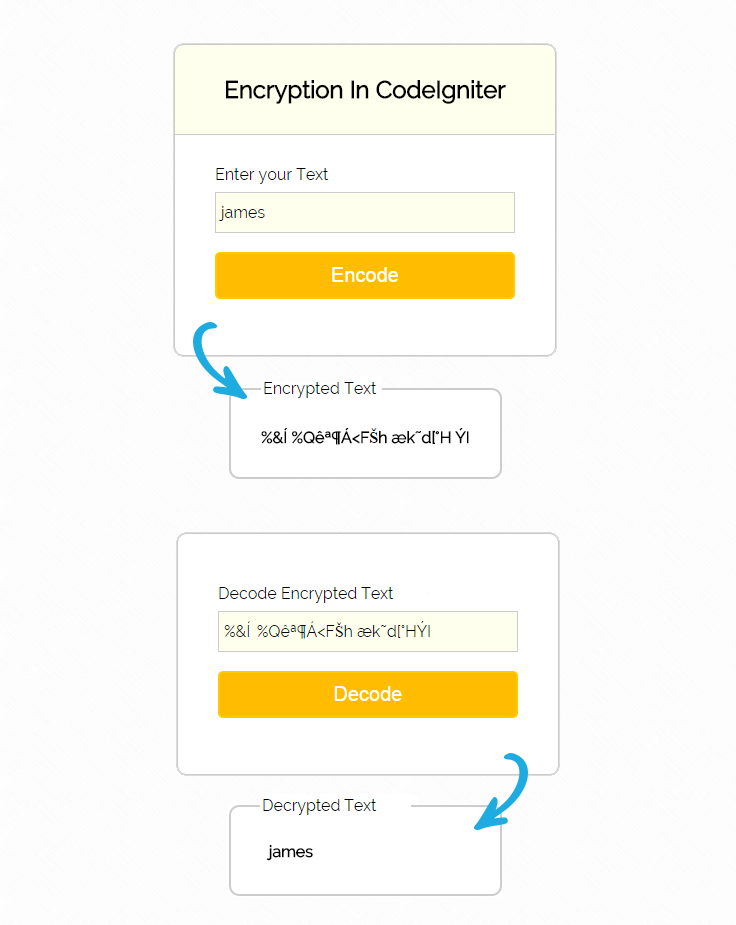
Tutorial Scripts in detail
Below are the details of the code used in this tutorial with proper explanation.
Controllers : encryption_tutorial.php
copy the below code in your controller.
<?php

class Encryption_Tutorial extends CI_Controller {

public function __construct() {
parent:: __construct();
// Load form helper
$this->load->helper('form');
// Load encryption library
$this->load->library('encrypt');
// Load form validation library
$this->load->library('form_validation');
}

// Show form
public function index() {
$this->load->view('show_form');
}

// Encode message
public function key_encoder() {

// Check for validation
$this->form_validation->set_rules('key', 'Message', 'trim|required|xss_clean');
if ($this->form_validation->run() == FALSE) {
$this->load->view('show_form');
} else {
$key = $this->input->post('key');
// Encoding message
$data['encrypt_value'] = $this->encrypt->encode($key);
$this->load->view('show_form', $data);
}
}

// Decode encrypted message
public function key_decoder() {

$encrypt_key = $this->input->post('encrypt_key');
// Decode message
$data['decrypt_value'] = $this->encrypt->decode($encrypt_key);
$this->load->view('show_form', $data);
}

}

?>
Views : show_form.php
Copy the below code in your view.
<html>
<head>
<title>Encryption In CodeIgniter</title>
<link rel="stylesheet" type="text/css" href="<?php echo base_url(); ?>css/style.css">
<link href='http://fonts.googleapis.com/css?family=Source+Sans+Pro|Open+Sans+Condensed:300|Raleway' rel='stylesheet' type='text/css'>
</head>
<body>
<div id="main">
<div id="show_form">
<h2>Encryption In CodeIgniter</h2>
<?php
echo form_open('encryption_tutorial/key_encoder');
echo "<div class='error_msg'>";
echo validation_errors();
echo "</div>";
echo form_label('Enter your Message');
$data = array(
'name' => 'key',
'placeholder' => 'Please Enter a Message'
);
echo form_input($data);
echo form_submit('submit', 'Encode');
echo form_close();
if (isset($decrypt_value) && $decrypt_value != NULL) {
echo form_fieldset('Decrypted Message', "class='result_decode'");
echo "<b>" . $decrypt_value . "</b>";
echo form_fieldset_close();
}
?>
</div>
</div>
<?php
if (isset($encrypt_value) && $encrypt_value != NULL) {
echo form_fieldset('Encrypted Message', "class='result_encode'");
echo "<b>" . $encrypt_value . "</b>";
echo form_fieldset_close();
echo "<div class='decode_form'>";
echo form_open('encryption_tutorial/key_decoder');
echo form_label('Decode Encrypted Message');
$data = array(
'name' => 'encrypt_key',
'value' => $encrypt_value
);
echo form_input($data);
echo form_submit('submit', 'Decode');
echo form_close();
echo "</div>";
}
?>
CSS : style.css
Styling HTML Elements.
#main{
width:960px;
margin:50px auto;
font-family:raleway;
}
h2{
background-color: #FEFFED;
text-align:center;
border-radius: 10px 10px 0 0;
margin: -10px -40px;
padding: 30px;
}
hr{
border:0;
border-bottom:1px solid #ccc;
margin: 10px -40px;
margin-bottom: 30px;
}
#show_form{
width:300px;
float: left;
border-radius: 10px;
font-family:raleway;
border: 2px solid #ccc;
padding: 10px 40px 25px;
margin-top: 10px;
}
.result_encode{
position: absolute;
width: auto;
border-radius: 10px;
font-family: raleway;
border: 2px solid #ccc;
top: 400px;
padding: 30px;
word-wrap:break-word;
}
.result_decode{
position: absolute;
width: 500px;
border-radius: 10px;
font-family: raleway;
border: 2px solid #ccc;
top: 400px;
left: 302px;
padding: 30px;
word-wrap:break-word;
}
.decode_form{
position: absolute;
width: 300px;
float: right;
border-radius: 10px;
font-family: raleway;
border: 2px solid #ccc;
top: 540px;
left: 325px;
padding: 50px 40px 25px;
}
input[type=text]{
width:100%;
padding: 10px;
margin-top: 8px;
border: 1px solid #ccc;
padding-left: 5px;
font-size: 16px;
font-family:raleway;
background-color: #FEFFED;
}

input[type=submit]{
width: 100%;
background-color:#FFBC00;
color: white;
border: 2px solid #FFCB00;
padding: 10px;
font-size:20px;
cursor:pointer;
border-radius: 5px;
margin-bottom: 15px;
}
.error_msg{
color:red;
font-size: 16px;
}
Conclusion:
This was all about how Encryption work In CodeIgniter. Hope you like it, keep reading our other blogs
CodeIgniter Captcha Helper Example

Mostly in web applications there is a need to protect your website from getting spammed. So we need to create a Captcha spam protection to stop the spamming activities.
This blog post demonstrate you, how to implement simple captcha using CodeIgniter captcha helper file.
Captcha is basically a random generated captcha string and which can be stored in session variable for further use. After that, the generated string is bunched with an image to pretend as a single image in such a way that only human being is able to read it.
If a “word” is not supplied, the function will generate a random ASCII string.
Watch our live demo or download the Script file from below link, extract files and run on your Local server.
-: See Also :-
Captcha Code in PHP and jQuery
How to Setup Google Captcha
Syntax:
 $values = array(
'word' => '',   //Generate alternate word by default. You can also set your word.
'word_length' => 8,  // To set length of captcha word.
'img_path' => './images/',   // Create  folder "images" in root directory, and give path.
'img_url' => base_url() .'images/',  // To store captcha images in "images" folder.

// Font path is used font library, which will stored  in system/fonts/texb.ttf.
'font_path' => base_url() . 'system/fonts/texb.ttf',
'img_width' => '150',   //Set image width.
'img_height' => 50,   // Set image height.
'expiration' => 3600   // This will automatically expire images in given time.
);
// "create_captcha" is function of "captcha helper", this will set array in helper library.
$data = create_captcha($values);

How to run file:
Tutorial Scripts in detail
Below are the details of the code used in this tutorial with proper explanation.
Controller File: captcha_controller.php
Copy the below code in your controller.
<?php
if (!defined('BASEPATH')) exit('No direct script access allowed');

class Captcha_Controller extends CI_Controller {

// Load Helper in and Start session.
function __construct() {
parent::__construct();
$this->load->helper('captcha');
session_start();
}
// This function show values in view page and check captcha value.
public function form() {
if(empty($_POST)){
$this->captcha_setting();
}
else{
// Case comparing values.
if (strcasecmp($_SESSION['captchaWord'], $_POST['captcha']) == 0) {
echo "<script type='text/javascript'> alert('Your form successfully submitted'); </script>";
$this->captcha_setting();
} else {
echo "<script type='text/javascript'> alert('Try Again'); </script>";
$this->captcha_setting();
}
}
}
// This function generates CAPTCHA image and store in "image folder".
public function captcha_setting(){
$values = array(
'word' => '',
'word_length' => 8,
'img_path' => './images/',
'img_url' => base_url() .'images/',
'font_path' => base_url() . 'system/fonts/texb.ttf',
'img_width' => '150',
'img_height' => 50,
'expiration' => 3600
);
$data = create_captcha($values);
$_SESSION['captchaWord'] = $data['word'];

// image will store in "$data['image']" index and its send on view page
$this->load->view('captcha_view', $data);
}
// For new image on click refresh button.
public function captcha_refresh(){
$values = array(
'word' => '',
'word_length' => 8,
'img_path' => './images/',
'img_url' => base_url() .'images/',
'font_path' => base_url() . 'system/fonts/texb.ttf',
'img_width' => '150',
'img_height' => 50,
'expiration' => 3600
);
$data = create_captcha($values);
$_SESSION['captchaWord'] = $data['word'];
echo $data['image'];

}
}
?>
View File : captcha_view.php
Copy the below code in your view.
<html>
<head>
<title>Add captcha using CodeIgniter</title>
<link rel="stylesheet" type="text/css" href="<?php echo base_url(); ?>css/style.css">
<link href='http://fonts.googleapis.com/css?family=Source+Sans+Pro|Open+Sans+Condensed:300|Raleway' rel='stylesheet' type='text/css'>
<script src="http://ajax.googleapis.com/ajax/libs/jquery/1.11.1/jquery.min.js"></script>
<script type="text/javascript">

// Ajax post for refresh captcha image.
$(document).ready(function() {
$("a.refresh").click(function() {
jQuery.ajax({
type: "POST",
url: "<?php echo base_url(); ?>" + "index.php/captcha_controller/captcha_refresh",
success: function(res) {
if (res)
{
jQuery("div.image").html(res);
}
}
});
});
});
</script>
</head>
<body>
<div class="main">
<div id="content">
<h2 id="form_head">Captcha Using Codelgniter</h2><br/>
<hr>
<div id="form_input">
<?php

// Form Open
echo form_open();

// Name Field
echo form_label('Name');
$data_name = array(
'name' => 'name',
'class' => 'input_box',
'placeholder' => 'Please Enter Name',
'id' => 'name',
'required' => ''
);
echo form_input($data_name);
echo "<br>";
echo "<br>";

// Email Field
echo form_label('Email');
$data_email = array(
'name' => 'email',
'class' => 'input_box',
'placeholder' => 'Please Enter Email',
'id' => 'email',
'required' => ''
);
echo form_input($data_email);
echo "<br>";
echo "<br>";

echo "<div class='image'>";

// $image is the index of $data array. which will send by controller.
echo $image;
echo "</div>";

// Calling for refresh captcha image.
echo "<a href='#' class ='refresh'><img id = 'ref_symbol' src =".base_url()."img/refresh.png></a>";
echo "<br>";
echo "<br>";

// Captcha word field.
echo form_label('Captcha');
$data_captcha = array(
'name' => 'captcha',
'class' => 'input_box',
'color' => 'white',
'placeholder' => '',
'id' => 'captcha'
);
echo form_input($data_captcha);
?>
</div>
<div id="form_button">
<?php echo form_submit('submit', 'Submit', "class='submit'"); ?>
</div>
<?php
// Form Close
echo form_close(); ?>
</div>
</div>
</body>
</html>
CSS File : style.css
Styling HTML Elements.
body {
font-family: 'Raleway', sans-serif;
}
.main
{
width: 1015px;
position: absolute;
top: 10%;
left: 20%;
}
#form_head
{
text-align: center;
background-color: #FEFFED;
height: 66px;
margin: 0 0 -29px 0;
padding-top: 35px;
border-radius: 8px 8px 0 0;
color: rgb(97, 94, 94);
}
#content {
position: absolute;
width: 450px;
height: 490px;
border: 2px solid gray;
border-radius: 10px;
}
#content_result{
position: absolute;
width: 450px;
height: 192px;
border: 2px solid gray;
border-radius: 10px;
margin-left: 559px;
margin-top: -262px;
}
#form_input
{
margin-left: 50px;
margin-top: 36px;
}
label
{
margin-right: 6px;
font-weight: bold;
}

#form_button{
padding: 0 21px 15px 15px;
position: absolute;
bottom: 0px;
width: 414px;
background-color: #FEFFED;
border-radius: 0px 0px 8px 8px;
border-top: 1px solid #9A9A9A;
}
.submit{
font-size: 16px;
background: linear-gradient(#ffbc00 5%, #ffdd7f 100%);
border: 1px solid #e5a900;
color: #4E4D4B;
font-weight: bold;
cursor: pointer;
width: 300px;
border-radius: 5px;
padding: 10px 0;
outline: none;
margin-top: 20px;
margin-left: 15%;
}
.submit:hover{
background: linear-gradient(#ffdd7f 5%, #ffbc00 100%);
}
.label_output
{
color:#4A85AB;
margin-left: 10px;
}
#result_id
{
text-align: center;
background-color: #FCD6F4;
height: 47px;
margin: 0 0 -29px 0;
padding-top: 12px;
border-radius: 8px 8px 0 0;
color: rgb(97, 94, 94);
}
#result_show
{
margin-top: 35px;
margin-left: 45px;
}
.input_box{
height:40px;
width:240px;
padding:20px;
border-radius:3px;
background-color:#FEFFED;
margin-left:30px;
}
img {
margin-left: 97px;
}
input#name {
margin-left: 45px;
}
input#email {
margin-left: 50px;
}
img#ref_symbol {
margin-left: 275px;
margin-top: -36px;
}
Conclusion:
This was all about how CodeIgniter captcha helper class work. hope you like it, keep reading our other blogs.
CodeIgniter HTML Table Library

We are going to explain you how we can use CodeIgniter Table Library efficiently to create HTML table. The functions in Table Class enable you to auto-generate HTML tables from arrays or database result sets.
The Table class also allow you to set a table template that helps to specify the design of your layout. Here is the template prototype:
$tmpl = array (
'table_open'          => '<table border="0" cellpadding="4" cellspacing="0">',

'heading_row_start'   => '<tr>',
'heading_row_end'     => '</tr>',
'heading_cell_start'  => '<th>',
'heading_cell_end'    => '</th>',

'row_start'           => '<tr>',
'row_end'             => '</tr>',
'cell_start'          => '<td>',
'cell_end'            => '</td>',

'row_alt_start'       => '<tr>',
'row_alt_end'         => '</tr>',
'cell_alt_start'      => '<td>',
'cell_alt_end'        => '</td>',

'table_close'         => '</table>'
);

$this->table->set_template($tmpl);
In this demo we will show you how one can pass array to table and can managed table to create row span and coll-span functionality.
Download the Script file from below link, extract files and run on your Local server

How to run file:
http://localhost/codeigniter_table/index.php
Tutorial Scripts in detail
Below are the details of the code used in this tutorial with proper explanation.
Controllers : table_tutorial.php
Now make a file name table_tutorial.php in ‘application/controller’ folder of CodeIgniter and write the codes given below
<?php

if (!defined('BASEPATH'))exit('No direct script access allowed');

class Table_Tutorial extends CI_Controller {

public function __construct() {
parent::__construct();
// Load form helper
$this->load->helper('form');
// Load table library
$this->load->library('table');
}

// Show table page
public function index() {
$this->load->view('table_view');
}

}
Views : table_view.php
Now, go to ‘aplication/views’ folder and create a file name ‘table_view.php’ and write the code given below
<html>
<head>
<title>CodeIgniter Table Demo</title>
<link rel="stylesheet" type="text/css" href="<?php echo base_url(); ?>css/style.css">
<link href='http://fonts.googleapis.com/css?family=Source+Sans+Pro|Open+Sans+Condensed:300|Raleway' rel='stylesheet' type='text/css'>
</head>
<body>
<center>
<div id="show_table">
<?php
// Create cation for table
$this->table->set_caption('Time Table');

// Set a table template to specify the design of table layout
$table_property = array('table_open' => '<table cellpadding="2" cellspacing="1" class="table_show">');
$this->table->set_template($table_property);

// Create a row with colspan
$row1_col1 = array('data' => 'Seminar', 'colspan' => 6, 'class' => 'row1_col1');
$this->table->add_row($row1_col1);

// Create a row with rowspan and colspan
$row2_col1 = array('data' => 'Day', 'rowspan' => 2, 'class' => 'row2_col1');
$row2_col2 = array('data' => 'Schedule', 'colspan' => 2, 'class' => 'row2_col2');
$row2_col3 = array('data' => 'Topic', 'colspan' => 2, 'rowspan' => 2, 'class' => 'row2_col3');
$this->table->add_row($row2_col1, $row2_col2, $row2_col3);

$row3_col1 = array('data' => 'Begin', 'class' => 'row3_col1',);
$row3_col2 = array('data' => 'End', 'class' => 'row3_col2');
$this->table->add_row($row3_col1, $row3_col2);

$row4_col1 = array('data' => 'Monday', 'rowspan' => 2, 'class' => 'row4_col1');
$row4_col2 = array('data' => '8:00 AM', 'rowspan' => 2, 'class' => 'row4_col2');
$row4_col3 = array('data' => '5:00 PM', 'rowspan' => 2, 'class' => 'row4_col3');
$row4_col4 = array('data' => 'HTML', 'colspan' => 3, 'class' => 'row4_col4');
$this->table->add_row($row4_col1, $row4_col2, $row4_col3, $row4_col4);

$row5_col1 = array('data' => 'CSS', 'colspan' => 3, 'class' => 'row5_col1');
$this->table->add_row($row5_col1);

$row6_col1 = array('data' => 'Tuesday', 'rowspan' => 3, 'class' => 'row6_col1');
$row6_col2 = array('data' => '8:00 AM', 'class' => 'row6_col2');
$row6_col3 = array('data' => '11:00 AM', 'class' => 'row6_col3');
$row6_col4 = array('data' => 'Javascript', 'colspan' => 3, 'class' => 'row6_col4');
$this->table->add_row($row6_col1, $row6_col2, $row6_col3, $row6_col4);

$row7_col1 = array('data' => '11:00 AM', 'class' => 'row7_col1');
$row7_col2 = array('data' => '2:00 PM', 'class' => 'row7_col2');
$row7_col3 = array('data' => 'PHP & jQuery', 'rowspan' => 2, 'colspan' => 3, 'class' => 'row7_col3');
$this->table->add_row($row7_col1, $row7_col2, $row7_col3);

$row8_col1 = array('data' => '2:00 PM', 'class' => 'row8_col1');
$row8_col2 = array('data' => '5:00 PM', 'class' => 'row8_col2');
$this->table->add_row($row8_col1, $row8_col2);

$row9_col1 = array('data' => 'Wednesday', 'class' => 'row9_col1');
$row9_col2 = array('data' => '8:00 AM', 'class' => 'row9_col2');
$row9_col3 = array('data' => '12:00 PM', 'class' => 'row9_col3');
$row9_col4 = array('data' => 'CodeIgniter', 'colspan' => 3, 'class' => 'row9_col4');
$this->table->add_row($row9_col1, $row9_col2, $row9_col3, $row9_col4);
// Generate table
echo $this->table->generate();
?>
</div>
</center>
</body>
</html>
CSS : style.css
Styling HTML Elements.
#show_table{
alignment-adjust: center;
}
table{
align: center;
height:500px;
width:700px;
}
table td{
padding:10px;
text-align: center;
}
caption{
font-size: 24px;
font-weight: bold;
}
.row1_col1{
background-color: #26C489;
font-weight:bold;
color:white;
font-size:28px;
}
.row1_col2{
background-color: #DBF6ED;
font-weight:bold;
}
.row2_col1{
background-color: #DBF6ED;
font-weight:bold;
}
.row2_col2{
background-color: #DBF6ED;
font-weight:bold;
}
.row2_col3{
background-color: #DBF6ED;
font-weight:bold;
}
.row3_col1{
background-color: #DBF6ED;
font-weight:bold;
}
.row3_col2{
background-color: #DBF6ED;
font-weight:bold;
}
.row4_col2, .row6_col3, .row7_col1, .row8_col2, .row9_col2 {
background-color: #DBF6ED;
}
.row4_col3, .row6_col2, .row7_col2, .row8_col1, .row9_col3 {
background-color: #DBF6ED;
}
.row5_col1, .row7_col3{
background-color: #DBF6ED;
}
.row4_col4, .row6_col4, .row9_col4{
background-color: #DBF6ED;
}
.row4_col1{
background-color: #DBF6ED;
}
.row6_col1{
background-color: #DBF6ED;
}
.row9_col1{
background-color: #DBF6ED;
}
Conclusion:
Thanks for reading the complete post. Hope you have got the concept. You can share your views in the space provided below and get in touch with us.
CodeIgniter Select By ID and Date Range

In this tutorial we are going to explain you how to perform CodeIgniter select query to fetch data from database using date range and ID.
In this demo we are using input box and date selector. In input box you can enter an ID which you want to search and using date selector you can search data for a particular date or for a date range.
Now one can easy find a records between the two given date ranges.
Watch our live demo or download the Script file from below link, extract files and run on your Local server.
-: See Also :-
CodeIgniter Insert Data into Database
CodeIgniter Update Data In Database
CodeIgniter Delete Data From Database
Watch the live demo or download code from the link given below

How to run file:
http://localhost/select_demo/index.php/select_tutorial
Tutorial Scripts in detail
Below are the details of the code used in this tutorial with proper explanation.
My SQL Code Segment:
To create database and table, execute following codes in your My SQL.
//First create database
CREATE DATABASE `select_database`;
//Then create table
CREATE TABLE  `employee_info` (
`emp_id` int(11) NOT NULL AUTO_INCREMENT,
`emp_name` varchar(255) NOT NULL,
`emp_date_of_join` date NOT NULL,
`emp_address` varchar(255) NOT NULL,
`emp_mobile` varchar(255) NOT NULL,
PRIMARY KEY (`emp_id`)
)
Controllers : select_tutorial.php
copy the below code in your controller.
<?php

if (!defined('BASEPATH'))
exit('No direct script access allowed');

class Select_Tutorial extends CI_Controller {

public function __construct() {
parent::__construct();
$this->load->model('employee_database');
}

public function index() {
$data['show_table'] = $this->view_table();
$this->load->view('select_form', $data);
}
public function view_table(){
$result = $this->employee_database->show_all_data();
if ($result != false) {
return $result;
} else {
return 'Database is empty !';
}
}

public function select_by_id() {
$id = $this->input->post('id');
if ($id != "") {
$result = $this->employee_database->show_data_by_id($id);
if ($result != false) {
$data['result_display'] = $result;
} else {
$data['result_display'] = "No record found !";
}
} else {
$data = array(
'id_error_message' => "Id field is required"
);
}
$data['show_table'] = $this->view_table();
$this->load->view('select_form', $data);
}

public function select_by_date() {
$date = $this->input->post('date');
if ($date != "") {
$result = $this->employee_database->show_data_by_date($date);

if ($result != false) {
$data['result_display'] = $result;
} else {
$data['result_display'] = "No record found !";
}
} else {
$data['date_error_message'] = "Date field is required";
}
$data['show_table'] = $this->view_table();
$this->load->view('select_form', $data);
}

public function select_by_date_range() {
$date1 = $this->input->post('date_from');
$date2 = $this->input->post('date_to');
$data = array(
'date1' => $date1,
'date2' => $date2
);
if ($date1 == "" || $date2 == "") {
$data['date_range_error_message'] = "Both date fields are required";
} else {
$result = $this->employee_database->show_data_by_date_range($data);
if ($result != false) {
$data['result_display'] = $result;
} else {
$data['result_display'] = "No record found !";
}
}
$data['show_table'] = $this->view_table();
$this->load->view('select_form', $data);
}

}
Views : select_form.php
Copy the below code in your view.
<html>
<head>
<title>CodeIgniter Select Demo</title>
<link rel="stylesheet" type="text/css" href="<?php echo base_url(); ?>css/style.css">
<link href='http://fonts.googleapis.com/css?family=Source+Sans+Pro|Open+Sans+Condensed:300|Raleway' rel='stylesheet' type='text/css'>
</head>

<body>
<div id="main">
<div id="note"><span><b>Note : </b></span> In this DEMO we have used a default table for record. </div>
<div class="message">
<?php
if (isset($read_set_value)) {
echo $read_set_value;
}
if (isset($message_display)) {
echo $message_display;
}
?>
</div>

<div id="show_form">
<h2>CodeIgniter Select By ID And Date</h2>
<?php
echo form_open('select_tutorial/select_by_id');
echo form_label('Select By ID : ');
$data = array(
'name' => 'id',
'placeholder' => 'Please Enter ID'
);
echo form_input($data);
echo "<div class='error_msg'>";
if (isset($id_error_message)) {
echo $id_error_message;
}

echo "</div>";
echo form_submit('submit', 'Show Record');
echo form_close();
echo form_open('select_tutorial/select_by_date');
echo form_label('Select By Date : ');
$data = array(
'type' => 'date',
'name' => 'date',
'placeholder' => 'yyyy-mm-dd'
);
echo form_input($data);
echo "<div class='error_msg'>";
if (isset($date_error_message)) {
echo $date_error_message;
}
echo "</div>";
echo form_submit('submit', 'Show Record');
echo form_close();
echo form_open('select_tutorial/select_by_date_range');
echo form_label('Select By Range Of Dates : ');
echo "From : ";

$data = array(
'type' => 'date',
'name' => 'date_from',
'placeholder' => 'yyyy-mm-dd'
);
echo form_input($data);
echo " To : ";

$data = array(
'type' => 'date',
'name' => 'date_to',
'placeholder' => 'yyyy-mm-dd'
);
echo form_input($data);
echo "<div class='error_msg'>";
if (isset($date_range_error_message)) {
echo $date_range_error_message;
}
echo form_submit('submit', 'Show Record');
echo form_close();
?>
<div class="message">
<?php
if (isset($result_display)) {
echo "<p><u>Result</u></p>";
if ($result_display == 'No record found !') {
echo $result_display;
} else {
echo "<table class='result_table'>";
echo '<tr><th>Employee ID</th><th>Employee Name</th><th>Joining Date</th><th>Address</th><th>Mobile</th><tr/>';
foreach ($result_display as $value) {
echo '<tr>' . '<td class="e_id">' . $value->emp_id . '</td>' . '<td>' . $value->emp_name . '</td>' . '<td class="j_date">' . $value->emp_date_of_join . '</td>' . '<td>' . $value->emp_address . '</td>' . '<td class="mob">' . $value->emp_mobile . '</td>' . '<tr/>';
}
echo '</table>';
}
}
?>

</div>
</div>
<?php
if (isset($show_table)) {
echo "<div class='emp_table'>";
if ($show_table == 'Database is empty !') {
echo $show_table;
} else {
echo '<caption>Employee Table</caption>';
echo "<table width='500px'>";
echo '<tr><th class="e_id">Employee ID</th><th>Employee Name</th><th>Joining Date</th><tr/>';
foreach ($show_table as $value) {
echo "<tr>" . "<td class='e_id'>" . $value->emp_id . "</td>" . "<td>" . $value->emp_name . "</td>" . "<td>" . $value->emp_date_of_join . "</td>" . "<tr/>";
}
echo '</table>';
}
echo "</div>";
}
?>
</div>
</body>
</html>
Models : employee_database.php
Create new class in your model as shown below.
<?php

if (!defined('BASEPATH'))exit('No direct script access allowed');

class Employee_Database extends CI_Controller {

public function show_all_data() {
$this->db->select('*');
$this->db->from('employee_info');
$query = $this->db->get();
if ($query->num_rows() > 0) {
return $query->result();
} else {
return false;
}
}

public function show_data_by_id($id) {
$condition = "emp_id =" . "'" . $id . "'";
$this->db->select('*');
$this->db->from('employee_info');
$this->db->where($condition);
$this->db->limit(1);
$query = $this->db->get();

if ($query->num_rows() == 1) {
return $query->result();
} else {
return false;
}
}

public function show_data_by_date($date) {
$condition = "emp_date_of_join =" . "'" . $date . "'";
$this->db->select('*');
$this->db->from('employee_info');
$this->db->where($condition);
$query = $this->db->get();
if ($query->num_rows() > 0) {
return $query->result();
} else {
return false;
}
}

public function show_data_by_date_range($data) {
$condition = "emp_date_of_join BETWEEN " . "'" . $data['date1'] . "'" . " AND " . "'" . $data['date2'] . "'";
$this->db->select('*');
$this->db->from('employee_info');
$this->db->where($condition);
$query = $this->db->get();
if ($query->num_rows() > 0) {
return $query->result();
} else {
return false;
}
}

}
CSS : style.css
Styling HTML Elements.
#main{
width:960px;
margin:50px auto;
font-family:raleway;
}
span{
color:red;
}
#note{
position: absolute;
left: 291px;
top: 28px;
}
h2{
background-color: #FEFFED;
text-align:center;
border-radius: 10px 10px 0 0;
margin: -10px -40px;
padding: 30px;
}
p{
color : blue;
}
p.no_found{
color : red;
}
hr{
border:0;
border-bottom:1px solid #ccc;
margin: 10px -40px;
margin-bottom: 30px;
}
#show_form{
width:300px;
float: left;
border-radius: 10px;
font-family:raleway;
border: 2px solid #ccc;
padding: 10px 40px 25px;
margin-top: 20px;
}
input[type=text],[type=date]{
width:100%;
padding: 10px;
margin-top: 8px;
border: 1px solid #ccc;
padding-left: 5px;
font-size: 16px;
font-family:raleway;
background-color: #FEFFED;
}
input[type=submit]{
width: 100%;
background-color:#FFBC00;
color: white;
border: 2px solid #FFCB00;
padding: 10px;
font-size:20px;
cursor:pointer;
border-radius: 5px;
margin-bottom: 15px;
}
.message{
position: absolute;
font-weight: bold;
font-size: 28px;
top:300px;
left: 862px;
width: 500px;
text-align: center;
}
.error_msg{
color:red;
font-size: 16px;
}
.emp_table{
position: absolute;
font-weight: bold;
font-size: 28px;
top:30px;
left: 862px;
width: 516px;
text-align: center;
}
table tr td {
border: 1px solid #CCCCCC;
padding : 5px 10px;
}
td.e_id{
padding-left:0;
text-align: center;
}
td.j_date{
width : 100px;
}
caption{
margin-left: 500px;
}
table {
border-collapse: collapse;
}
.result_table{
width : 750px;
margin-left: -120px;
}
th{
border: 1px solid #CCCCCC;
background-color: #FFBC00;
color: white;
padding : 10px 0;
}
.mob{
width:130px;
}
Conclusion:
So, this was all about selecting data from database by id or date using CodeIgniter framework. keep following us to learn more.