Are you looking for Best API Services For Converting User Agent to Browser that can help you to identify different devices requesting online content or webpages?
Then you are in the right place. Here, in this post, we have come up with a set of some most advanced & comprehensive APIs. Using one out of this, you can easily detect all the different attributes related to browser & device. These attributes can be anything like OS, device name, browser details, etc.
Further, you know the web is meant to be accessible to everyone, regardless of which browser or the device they’re using. Hence, using this information you can find some ways to develop your site to progressively enhance itself based on the availability of features rather than by targeting specific browsers only. Right?
So, what are you waiting for? Explore the following APIs & choose the best one that fixes your business requirements.
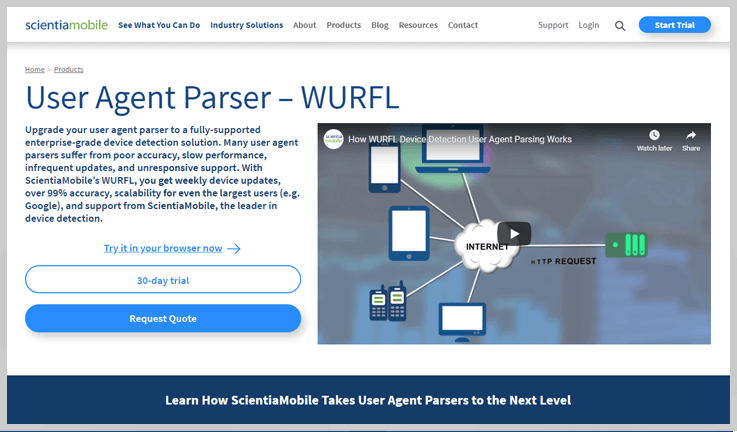
User Agent To Browser

5 Best API Services To Parse User Agent 2022

Are you looking for Best API Services To Parse User Agent that can help you to identify different devices requesting online content or webpages?
Then you are in the right place. Here, in this post, we have come up with a set of some most advanced & comprehensive APIs. Using one out of this, you can easily detect all the different attributes related to browser & device. These attributes can be anything like OS, device name, browser details, etc.
Further, you know the web is meant to be accessible to everyone, regardless of which browser or the device they’re using. Hence, using this information you can find some ways to develop your site to progressively enhance itself based on the availability of features rather than by targeting specific browsers only. Right?
So, what are you waiting for? Explore the following APIs & choose the best one that fixes your business requirements.
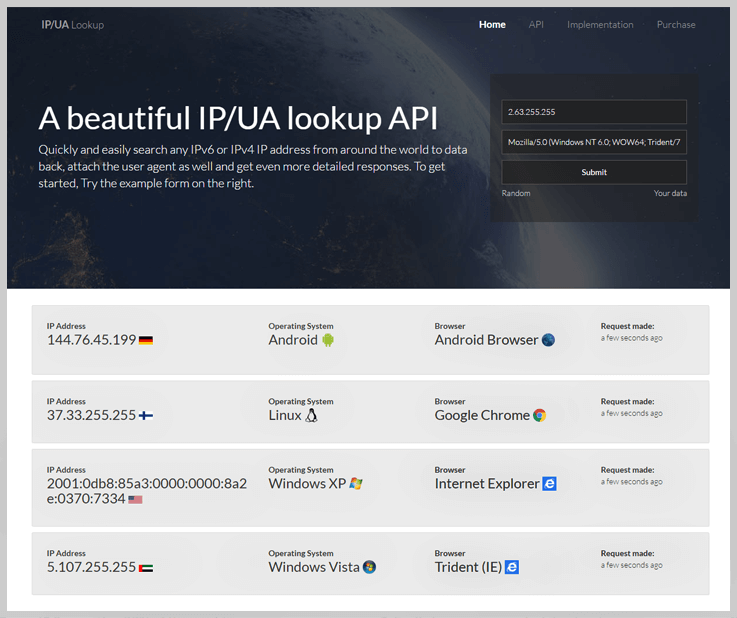
Parse User Agent
5 Best Browser User Agent Lookup API Services 2022

Are you looking for Best Browser User Agent Lookup API Services that can help you to identify different devices requesting online content or webpages?
Then you are in the right place. Here, in this post, we have come up with a set of some most advanced & comprehensive APIs. Using one out of this, you can easily detect all the different attributes related to browser & device. These attributes can be anything like OS, device name, browser details, etc.
Further, you know the web is meant to be accessible to everyone, regardless of which browser or the device they’re using. Hence, using this information you can find some ways to develop your site to progressively enhance itself based on the availability of features rather than by targeting specific browsers only. Right?
So, what are you waiting for? Explore the following APIs & choose the best one that fixes your business requirements.
Browser User Agent Lookup

5 Best API Services To Detect Operating System From User Agent 2022

Are you looking for Best API Services To Detect Operating System From User Agent that can help you to identify different devices requesting online content or webpages?
Then you are in the right place. Here, in this post, we have come up with a set of some most advanced & comprehensive APIs. Using one out of this, you can easily detect all the different attributes related to browser & device. These attributes can be anything like OS, device name, browser details, etc.
Further, you know the web is meant to be accessible to everyone, regardless of which browser or the device they’re using. Hence, using this information you can find some ways to develop your site to progressively enhance itself based on the availability of features rather than by targeting specific browsers only. Right?
So, what are you waiting for? Explore the following APIs & choose the best one that fixes your business requirements.
Detect Operating System From User Agent
5 Best API Services To Find Chrome OS from User Agent 2022

Are you looking for Best API Services To Find Chrome OS from User Agent that can help you to identify different devices requesting online content or webpages?
Then you are in the right place. Here, in this post, we have come up with a set of some most advanced & comprehensive APIs. Using one out of this, you can easily detect all the different attributes related to browser & device. These attributes can be anything like OS, device name, browser details, etc.
Further, you know the web is meant to be accessible to everyone, regardless of which browser or the device they’re using. Hence, using this information you can find some ways to develop your site to progressively enhance itself based on the availability of features rather than by targeting specific browsers only. Right?
So, what are you waiting for? Explore the following APIs & choose the best one that fixes your business requirements.
Chrome Os User Agent

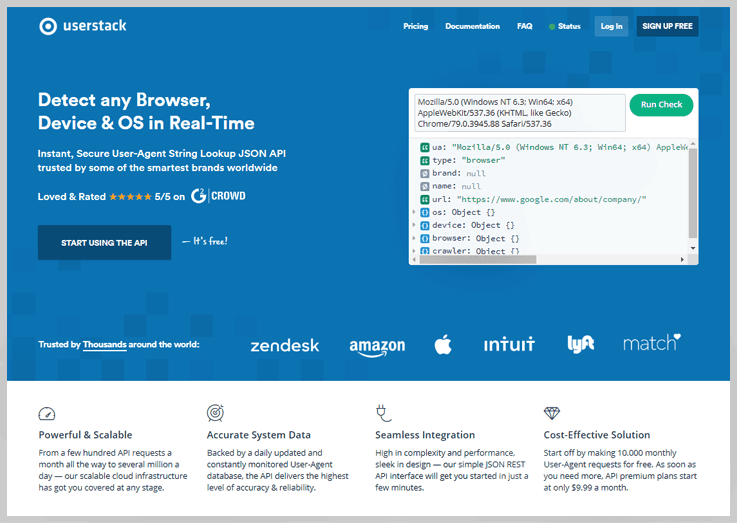
Heroku's User Agent Identifier is an add-on to simplify User Agent Identification with its continuously updated user agent parsing library.
5 Best User Agent Browser Detection API Services 2022

Are you looking for Best User Agent Browser Detection API Services that can help you to identify different devices requesting online content or webpages?
Then you are in the right place. Here, in this post, we have come up with a set of some most advanced & comprehensive APIs. Using one out of this, you can easily detect all the different attributes related to browser & device. These attributes can be anything like OS, device name, browser details, etc.
Further, you know the web is meant to be accessible to everyone, regardless of which browser or the device they’re using. Hence, using this information you can find some ways to develop your site to progressively enhance itself based on the availability of features rather than by targeting specific browsers only. Right?
So, what are you waiting for? Explore the following APIs & choose the best one that fixes your business requirements.
User Agent Browser Detection

5 Best API Services To Find Mobile Device from User Agent 2022

Are you looking for Best API Services To Find Mobile Device from User Agent that can help you to identify different devices requesting online content or webpages?
Then you are in the right place. Here, in this post, we have come up with a set of some most advanced & comprehensive APIs. Using one out of this, you can easily detect all the different attributes related to browser & device. These attributes can be anything like OS, device name, browser details, etc.
Further, you know the web is meant to be accessible to everyone, regardless of which browser or the device they’re using. Hence, using this information you can find some ways to develop your site to progressively enhance itself based on the availability of features rather than by targeting specific browsers only. Right?
So, what are you waiting for? Explore the following APIs & choose the best one that fixes your business requirements.
Mobile Device User Agent
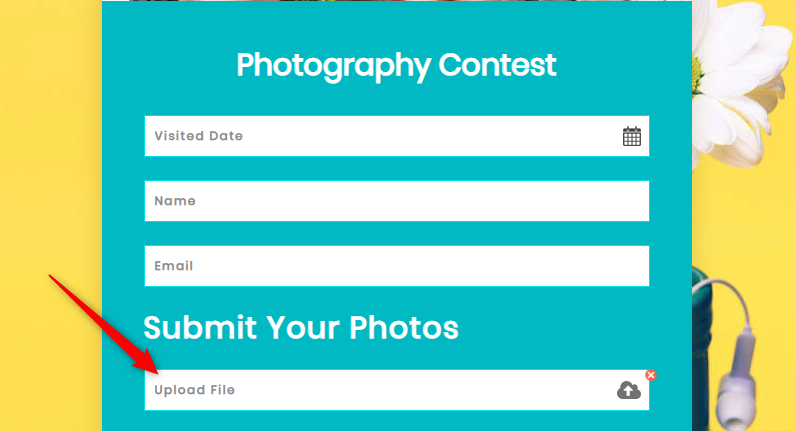
How To Use Google Forms To Collect Images?

Forms are a great way to organize an online contest to engage your users or to promote your services. Whether its photography contest or creative writing test, you want to ensure that the survey does justice with your respondent time. The next thing you make sure that the form should be precise and ask for the least cost. Hence, depending on requirements the definite question rise in your brain is can I use Google Forms for data collection?
Yes! Keeping in mind the needs of every individual out there Google Forms offered a feature of file upload. Basically, it let users attach any kind of file like a document, spreadsheets, images, videos, pdf, etc.in the form.
Surely, Google Forms are packed up with all general features but it does restrict you when came to the storage of the file. It automatically stops taking response when exceeds the allowed limit. Whereas in Pabbly Form Builder, there is no such boundation as it offers unlimited file storage.
Moreover, this amazing software doesn’t restrict you by offering unlimited file upload with customization option to change the border, width, and color of Upload field.
Undeniably, Google Forms is a free tool that lets you conduct online quizzes, competitions, and much more. With minimum efforts, you can customize your form and then you can embed it on your websites too.
Let’s see in steps how one can create a form for uploading images using Google Forms.
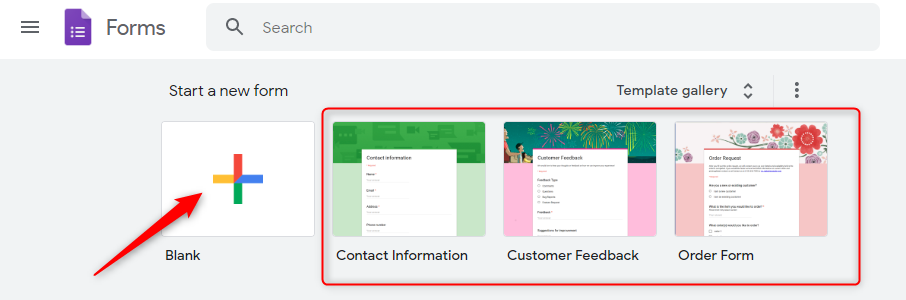
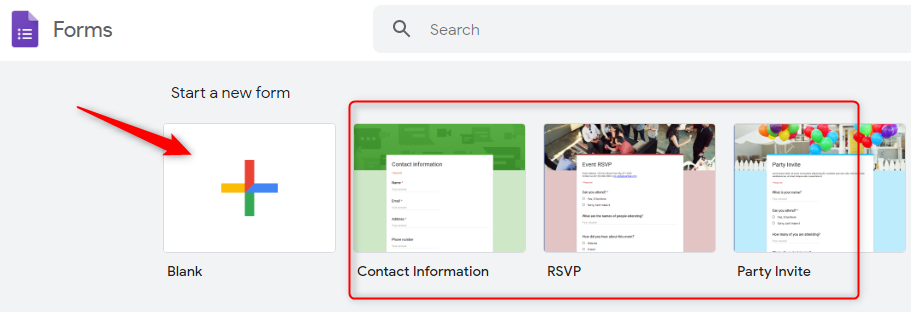
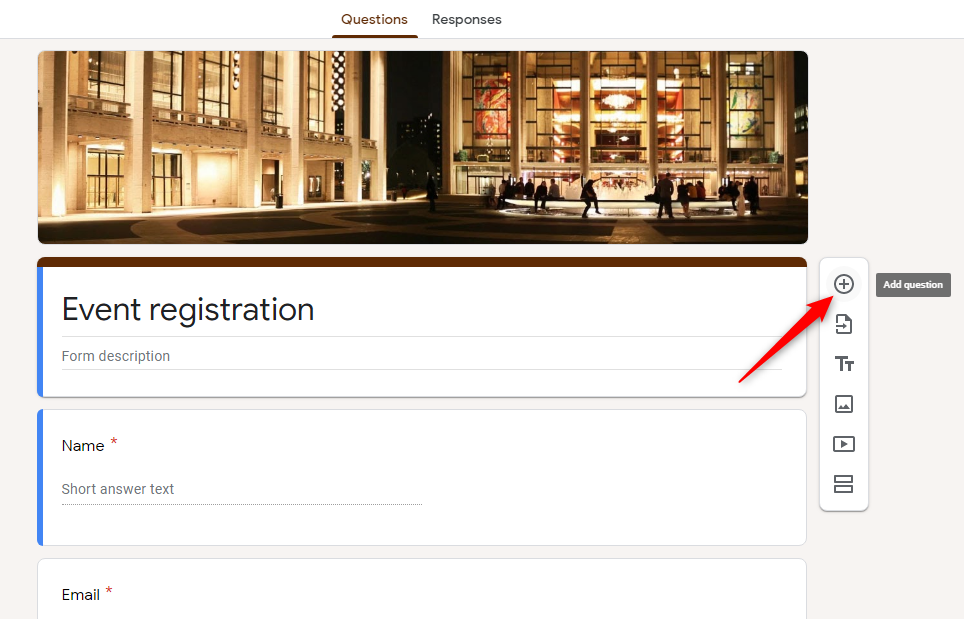
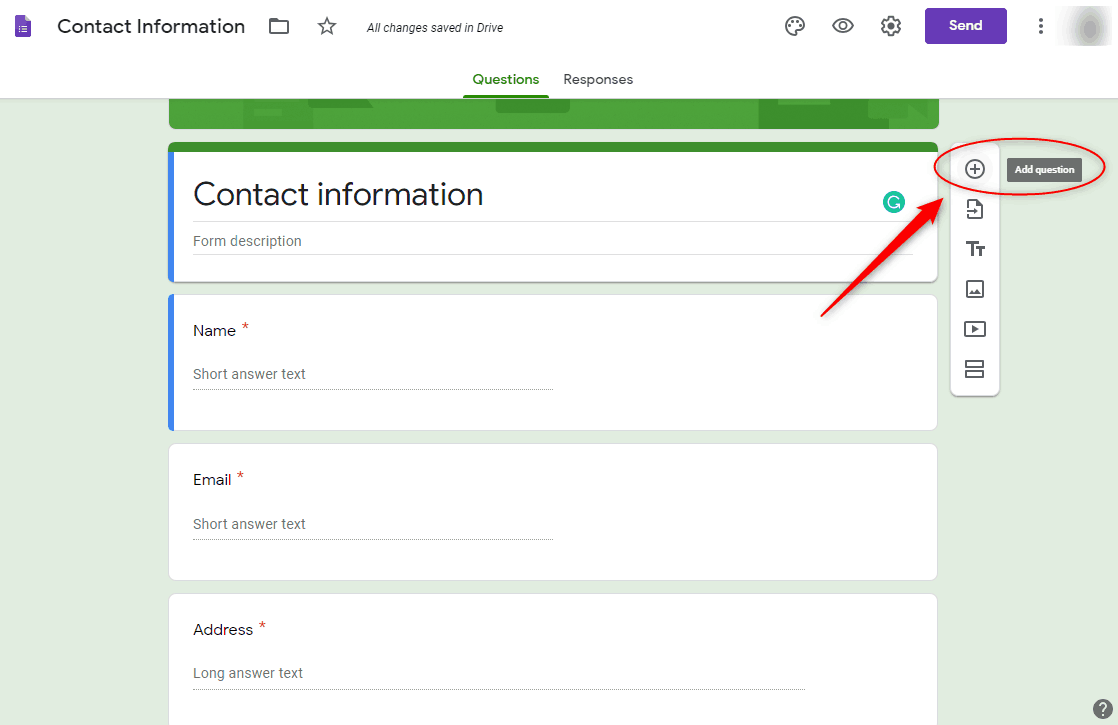
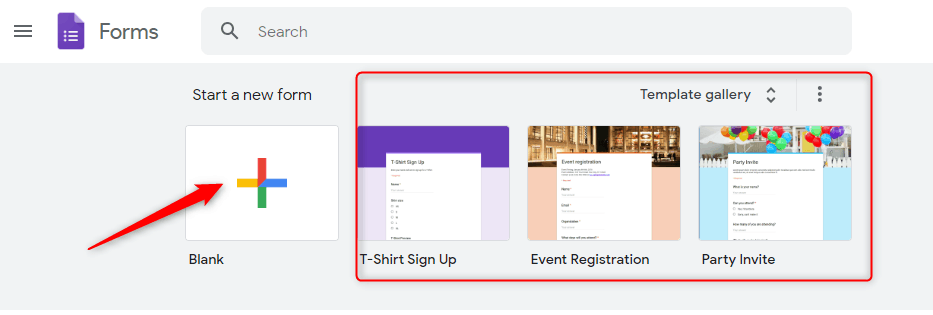
Step 1: Create Form
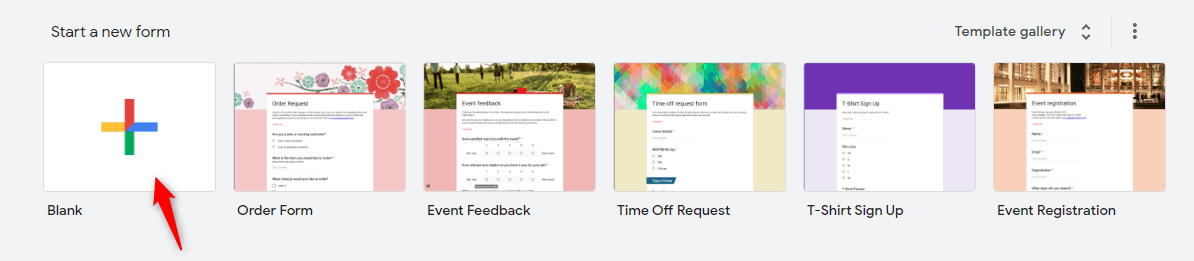
To create a form click on the ‘Blank’ option or you can use pre-designed templates too. Further, entitle your form by naming the necessary details accordingly.
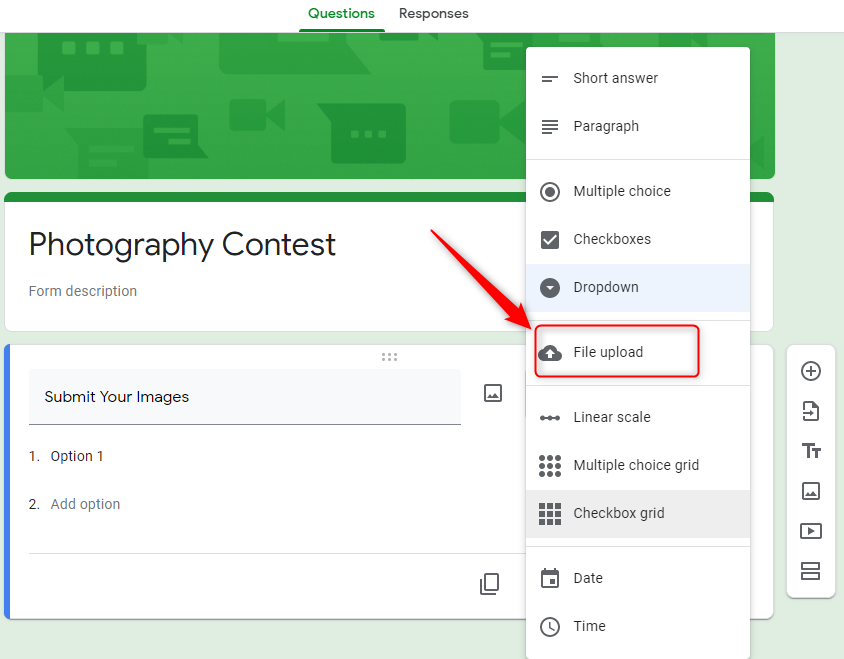
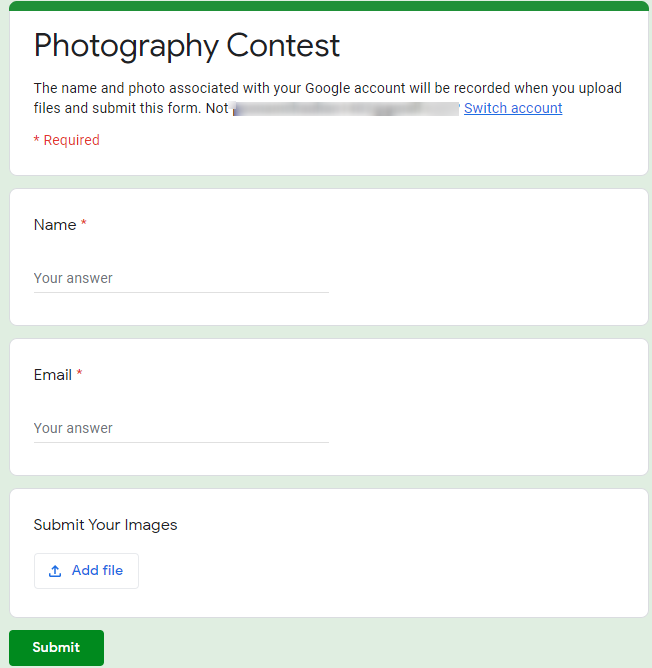
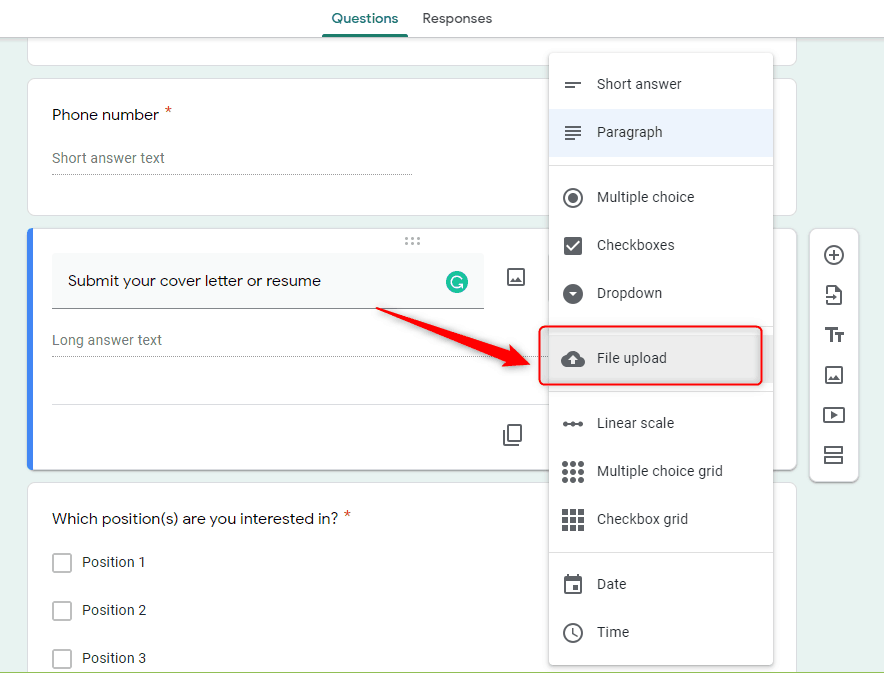
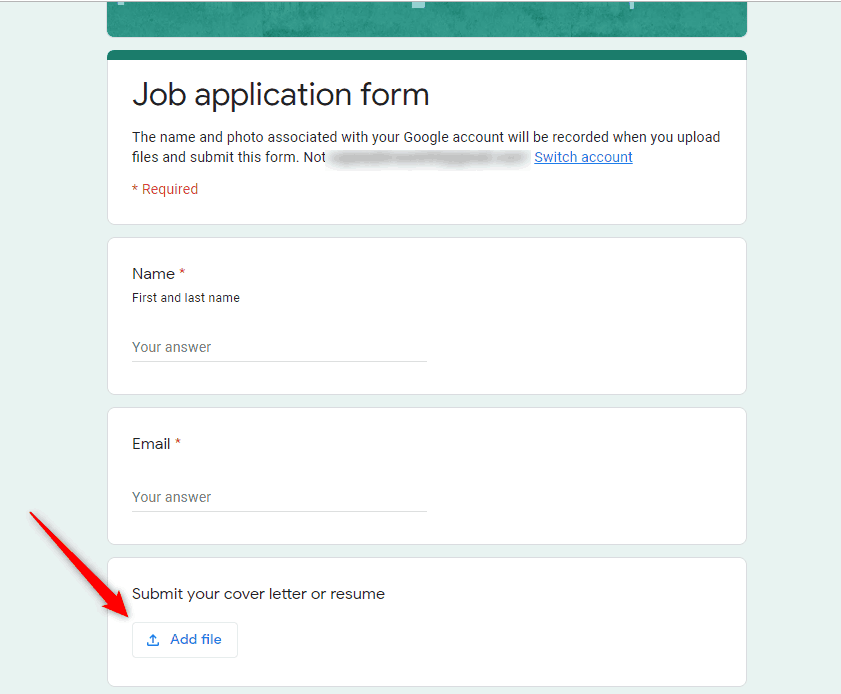
Step 2: File Upload
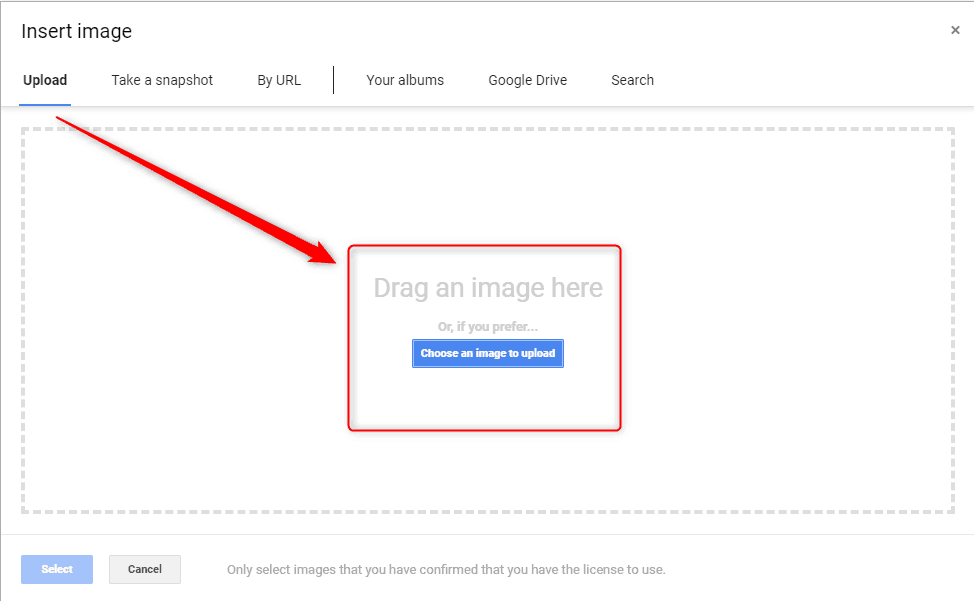
After assigning the name to your field, click on the option ‘File Upload’ to add it in forms. However, the warning sign will appear saying that the respondent needs to sign in to Google account to fill the form. All the uploaded files will go to the creator’s drive.
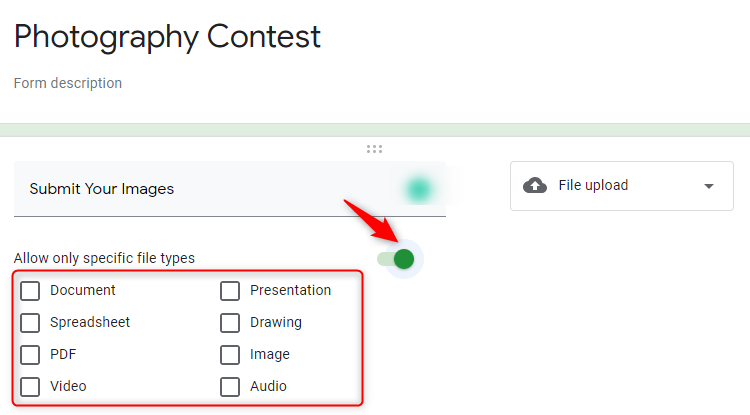
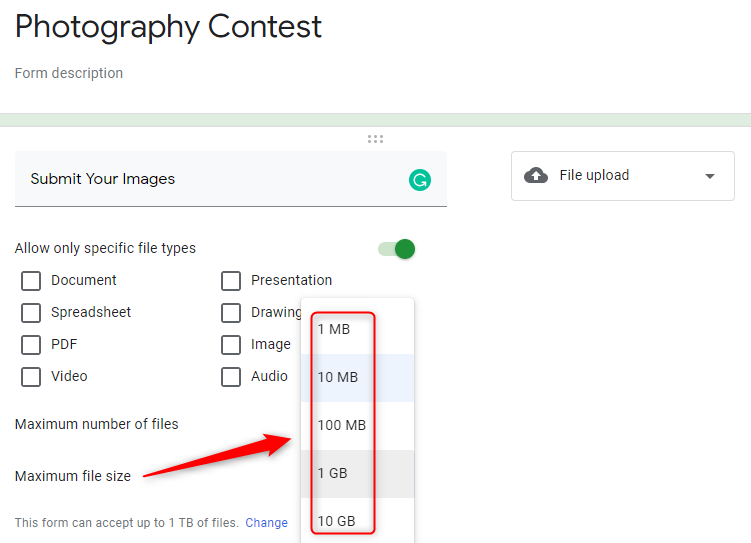
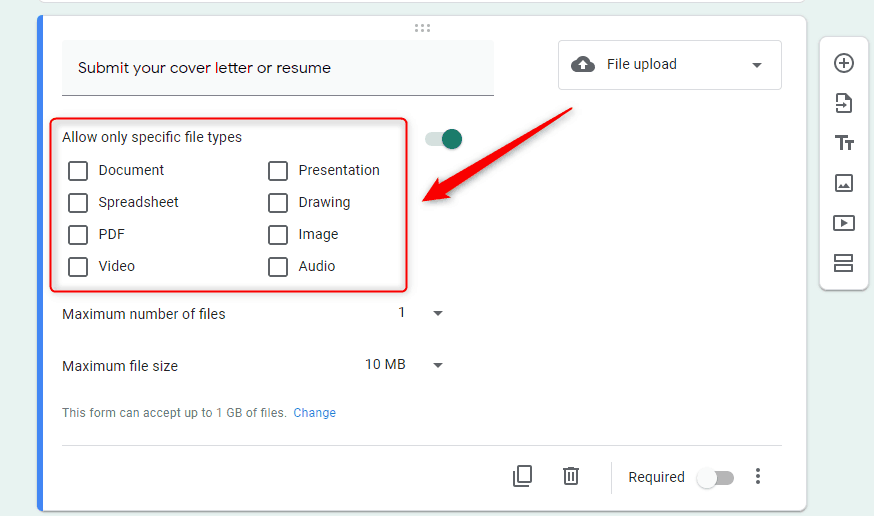
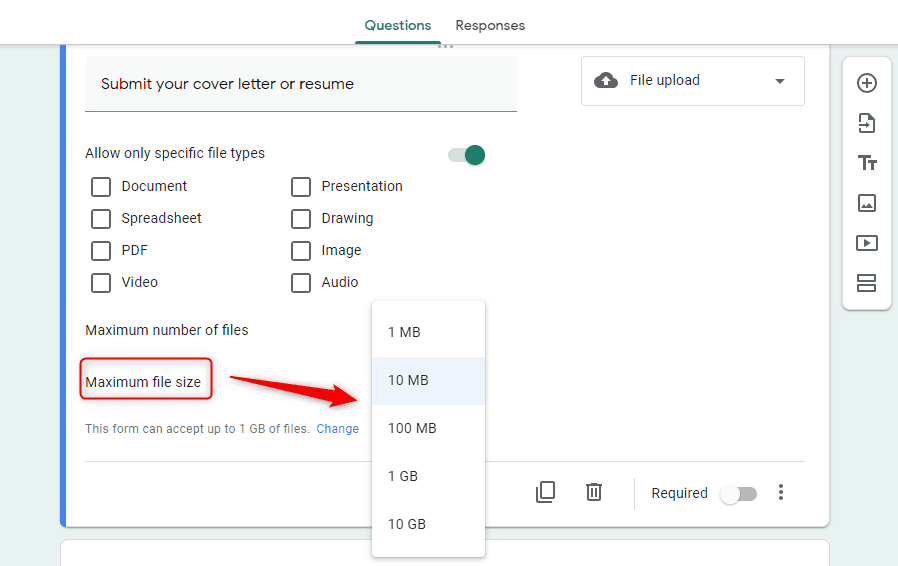
Step 3: Allow Only Specific File Types
By enabling it you will see multiple options, choose according to your form needs.
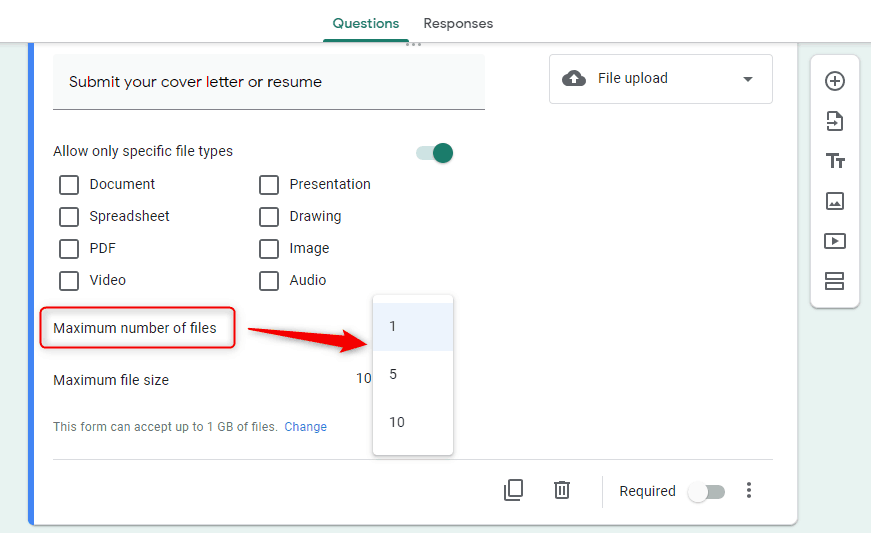
Step 4: Maximum Number Of Files
Further, using this option you can specify the number of files, the respondent can upload at a time. However, it has a limit of up to 10.
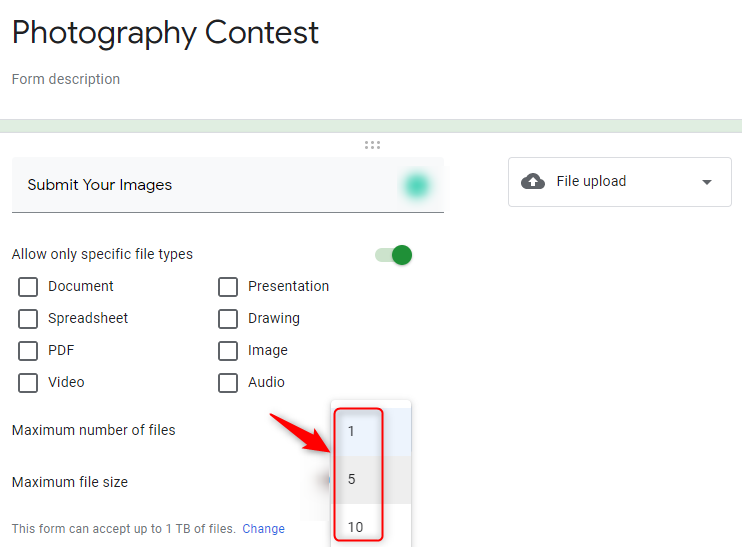
Step 5: Maximum File Size
Hereby, clicking on this option you can easily specify the size of attachment which can go up to 10Gb. Further, you can exceed the total form submission limit up to 1Tb.
Step 6: Preview
To view the preview of your created form, you have to click on the eye icon appearing on the top right corner.
Limitations in Google Forms
Without a second thought, Google Forms amused all of us with its free of cost tag but it fails to deliver the customer with vast needs. One of the prime reasons for its turn off is users need to have a Google account to fill the form.
Secondly, it has a storage of 1Tb only. If the form tops the mentioned limit, it will automatically cease the response.
Lastly, you don’t see any customization option in the File Upload feature.
How To Overcome The Limitations Of Google Forms?
You must be looking for an alternative that fulfills all the above-mentioned limitations. Fortunately here we have one suitable in mind named Pabbly Form Builder.
The best Form creating software that lets you build online forms without any restriction. One of the best reason for choosing it is anybody can access the form, it doesn’t demand any sign in.
Moreover, there is no such limitation on storage. You can collect unlimited responses on your single form without worrying about the storage.
Additionally, it offers the customization option for the ‘Upload’ field from where users can change the margin, width, background color and much more.
As interesting it sounds, it is way much easier in doing.
Let’s see how one can create a form for uploading images using Pabbly Form Builder.
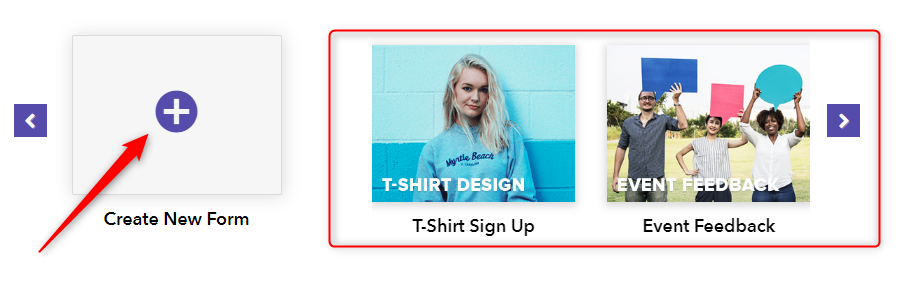
Step 1: Create Form
To create the form click on ‘Create New Form’ options or you can use pre-designed templates too.
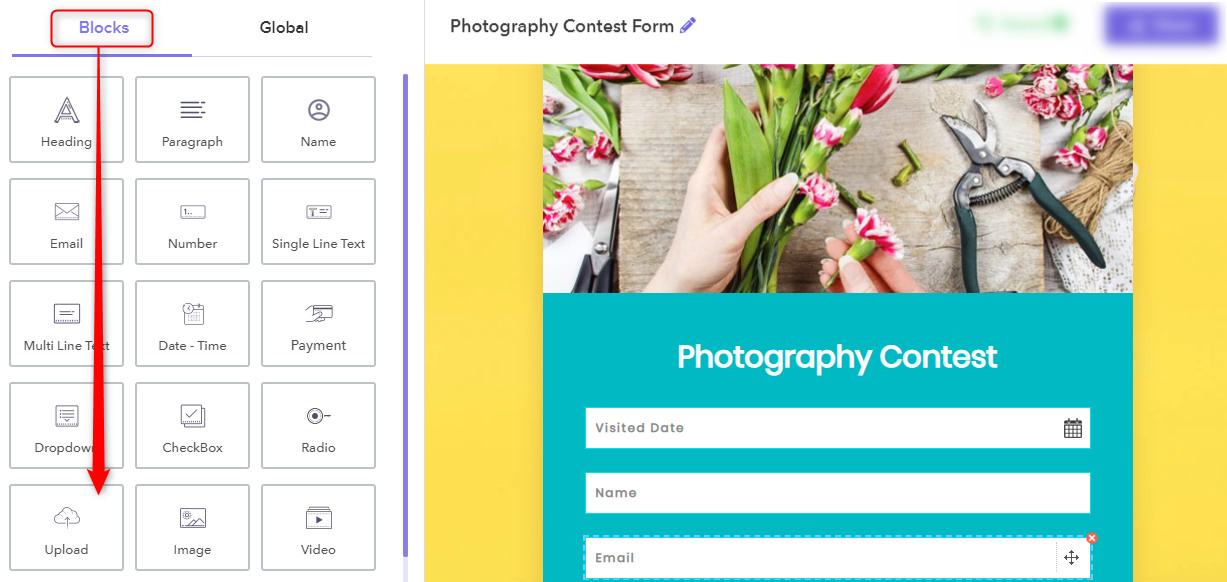
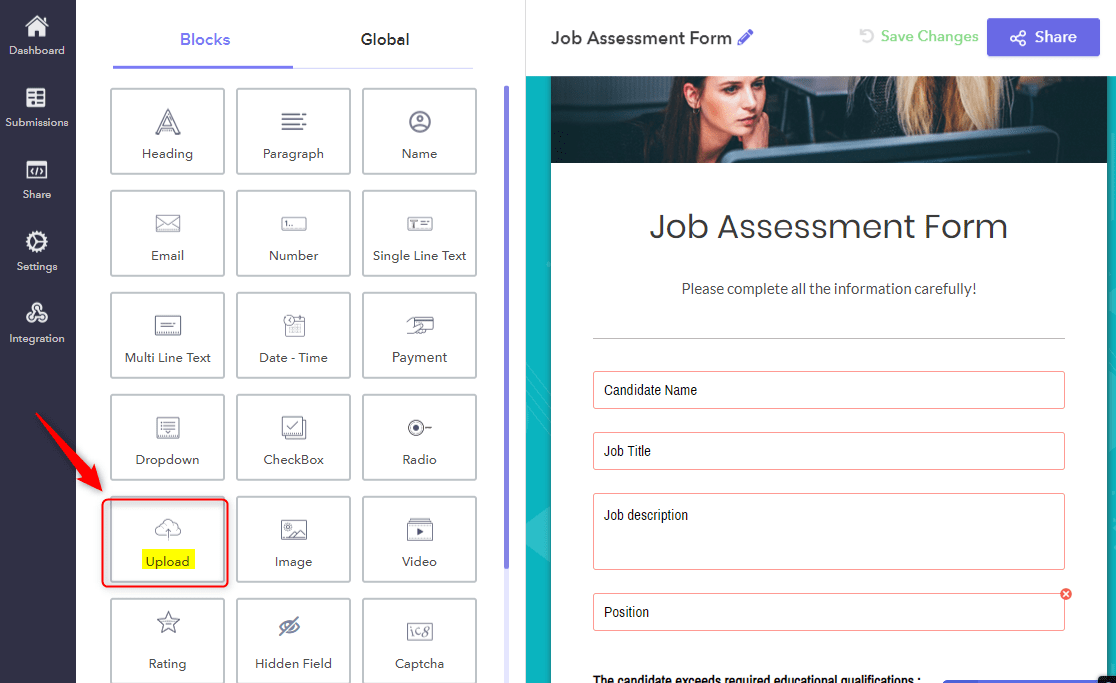
Step 2: Blocks Field Elements
Entitle your form and add respective fields according to your needs. Further, click on the ‘Upload’ option in the ‘Blocks’ field to add it in forms.
Step 3: Upload Field Option
Using the ‘Upload’ feature respondent can attach any kind of file without mentioning the file type manually.
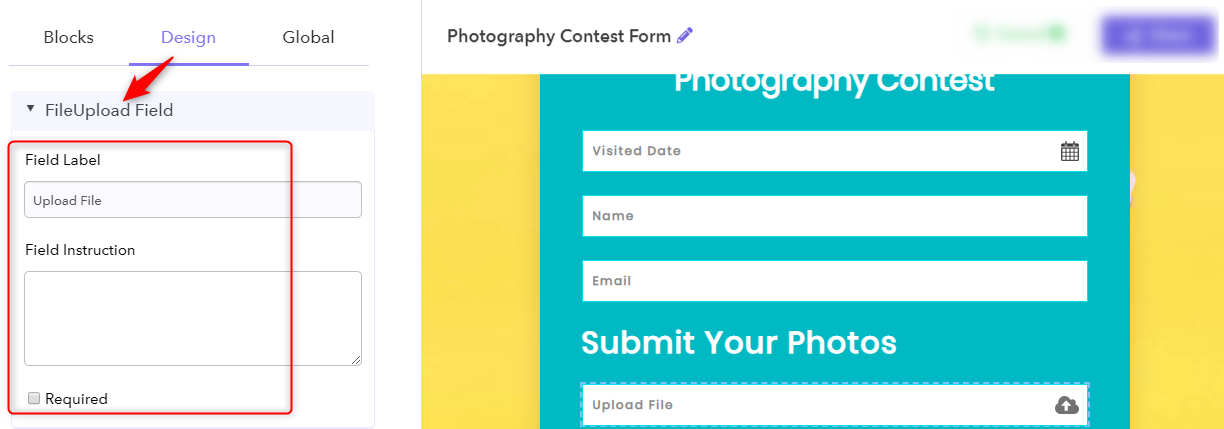
Step 4: Design Fields
Under the ‘FileUpload Field’ option, you will see an option of the ‘Field label’ from where you can assign the name of your choice. Using the ‘Field Instruction’ option, you can give particular instruction of your choice to the respondent. Further, you can also make it mandatory by enabling the required option.
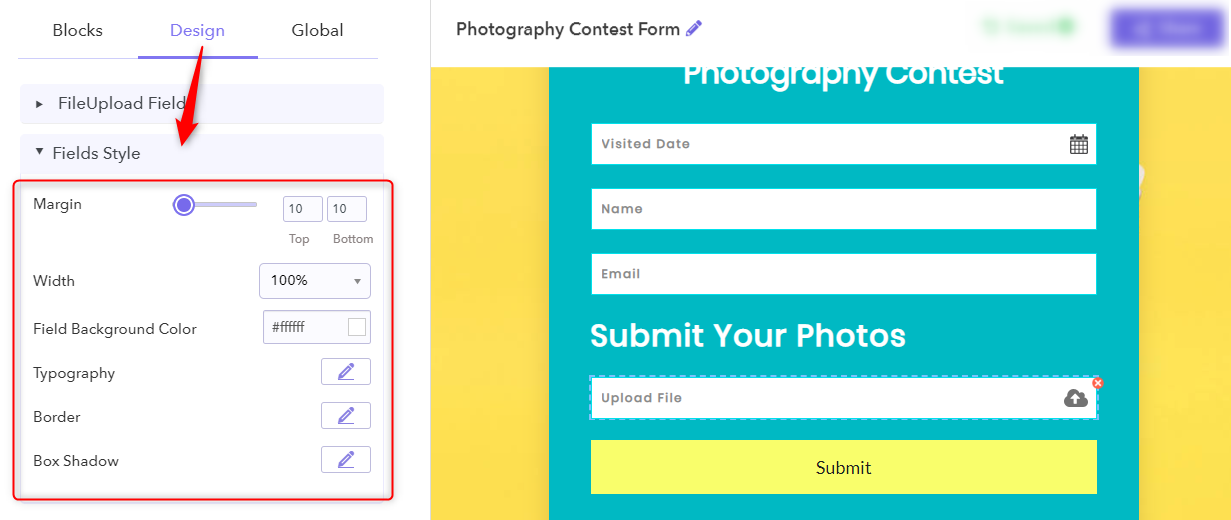
Step 5: Fields Style
Under this, you will see various options to change the margin, width, field background color and much more.
Step 6: Preview
To view the preview of your created form, you have to click on the eye icon appearing on the top.

Conclusion
Voila! There you have it. Follow the above-mentioned steps and you can easily use the Google Forms for data collection within minutes. All the steps are simple and one can do comfortably without any expert help.
Give it a try and let us know how’s your experience in a comment section.
You May Also Like To Read:
Is It Possible To Collect Payment With Google Forms?

We all know payments are the first concern in every business and it is the most critical part too. Right!
Also, whenever there is money involved, everyone demands maximum security.
If you have been using Google Forms for a long time & trusted it too much then you are finding some provision to receive payments in it.
So, let me tell you that Google Forms don’t allow you to do so.
Yes, you heard it right!
With Google Forms, you can definitely add a payment button in your forms but it will not allow you to collect online payments directly from it. There are many reasons behind this which are described below in this article.
Do you know Google Forms are not PCI compliant?
Yes, it does not support any security standards that ensure the acceptance or transmission of credit card information, maintains a secure environment for payment collection. Hence, it would be a very unsafe way for your users to submit their payment details in Google Forms.
Don’t worry! You can try some other alternative like Pabbly Form Builder.
Certainly, it provides a fully secure platform for collecting payments right from your forms.
Let us discuss everything one by one,
As you know, mostly Google Forms are used to create any kind of checkout form. But for this, you have to include a link to PayPal, Stripe, or some other third-party payment services into the form. This will help you to redirect your user from Google Forms to the 3rd-party website for payment. However, this reduces the purpose of using Google Forms. Anyway, if you are wondering how you can do that, let’s discuss that first.
Settings For Redirecting The Respondents Towards Third-Party Payment Gateways:
Google Forms allows you to create a custom confirmation text which you can easily use to insert a link of the third-party payment website. This would redirect the users to the webpage where they can complete their payment.
Let’s see what are the steps you have to follow for this,
Step 1: Create A Form
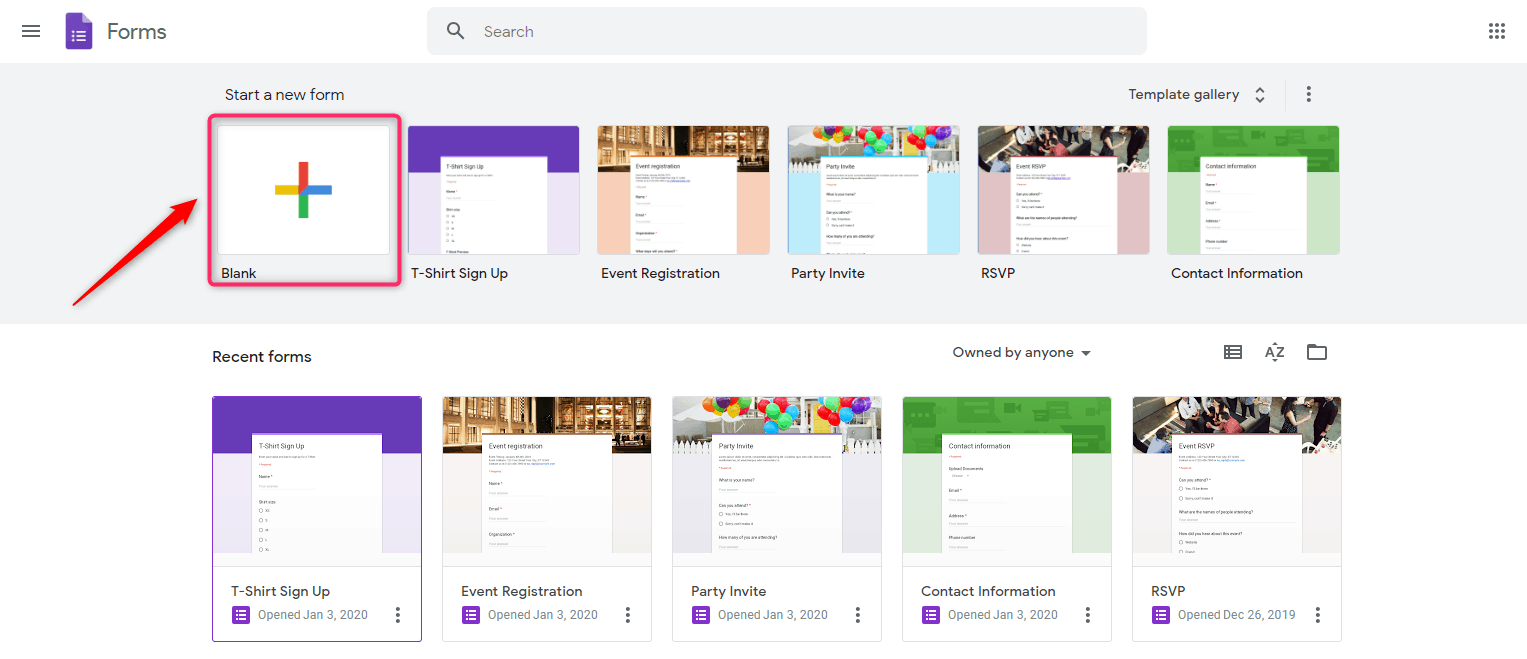
First, you have to create a form for collecting payments. For this, you can either create a new form from scratch or you can choose one from its amazing pre-built templates. In Google Forms Dashboard, hit the “Blank” button for creating a new form.
Step 2: Add Customized Questions/Media Into The Form
With Google Forms, you can add customized questions into your forms very easily. For this, you just need to hit the “Plus” icon. Further, you can add options like file upload section, images, videos, etc into your forms from here.
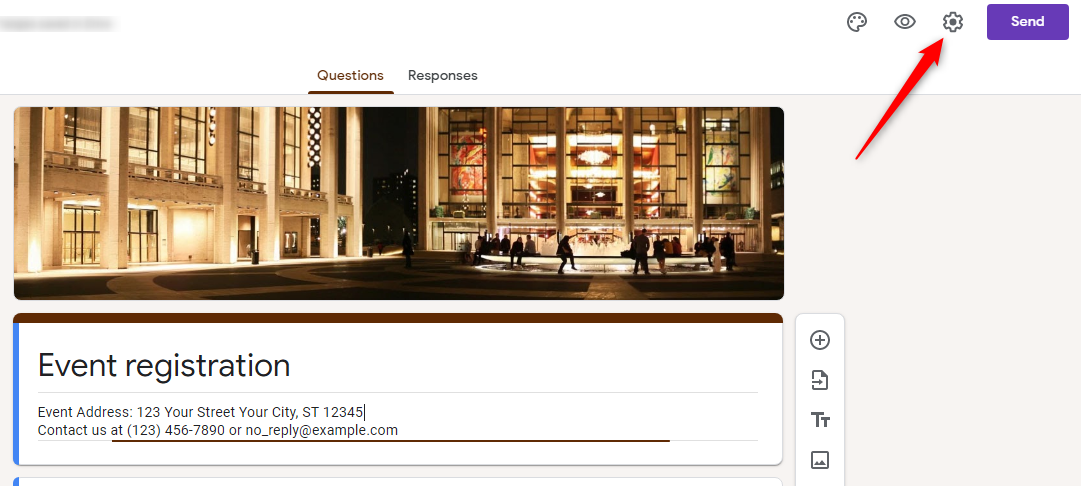
Step 3: Hit The Setting Button
Once you complete the procedure of form creation, then go to the “Setting” button which is available at the top right section of the dashboard for customizing the confirmation message.
Step 4: Go To The “Presentation” Section
When you hit the “Setting” button, a pop-up window will appear. Here, you will find the “Presentation” section.
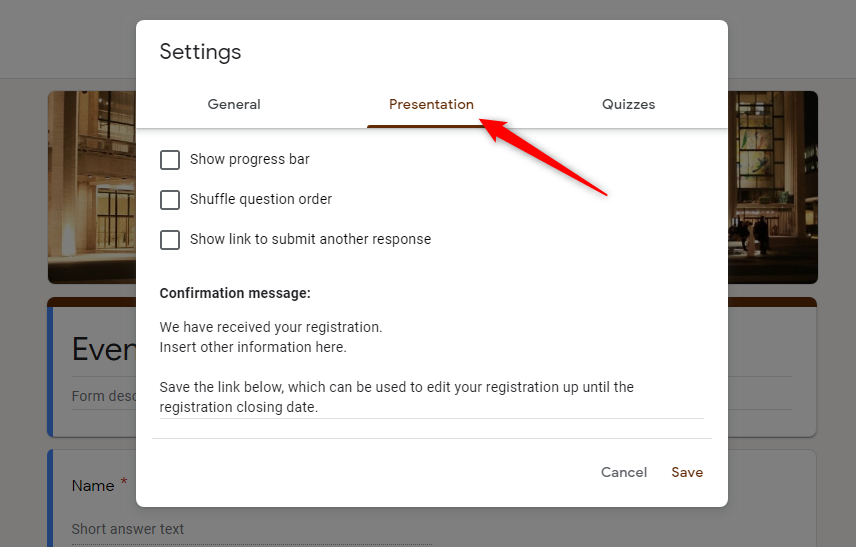
Step 5: Setup The Confirmation Message
Here, you can add a customized message and the link of third-party payment gateway like PayPal, Stripe, etc, for collecting the payments.
Save the personal confirmation message after editing it. There you go to collect payments very easily directly from your forms.

That’s it! Yes, this is how you can enable the payment collection functionality into the Google Forms.
While this may sound simple and effective, it leaves you with another task that you will need to complete on your end. Let’s see what are they,
Shortcoming Of Google Forms:
As stated earlier, Google Forms allows you to set a custom confirmation text where you can add a link that will request users to make payment. But, this link will be shown once someone submits your form. So, there can be chances that few customers may skip that & don’t jump out from that page. This can become a serious problem for you as the purpose of adding that link failed.
Secondly, you will have to manually check and record the status of payments that you have received by the checkouts made by customers. This may not be achievable without asking for a payment reference number from each customer. But, it looks quite unprofessional & insecure too.
Now, you must have realized how hectic receiving payments can become if you stick to Google Forms.
Hence, for professional purposes, you should use some other comprehensive alternative of Google Forms that can provide you a fully secure platform for managing funds.
The Best Alternative To Google Forms For Managing Payments:
I recommend you try Pabbly Form Builder for managing payments & checkouts. Why?
Pabbly Form Builder is the ultimate form builder that not only allows you to create unlimited beautiful forms but also helps you to collect & manage payments very easily. It is veritably the best software for creating SaaS-based payment collection forms.
Further, it provides you with efficient features like more than 260 pre-built templates to choose from, custom branding, file uploads & much more.
Plus, it allows you to collect the payment via connecting you to different payment gateways like PayPal & Stripe. Last but not least, Pabbly Form Builder helps you to collect recurring as well as one-time payment from customers. Interesting Isn’t it?
Yes, you can do all these using this form builder that too at a very reasonable cost.
How You Can Collect Payment With Pabbly Form Builder?
Now, you have agreed with me that the Pabbly Form Builder is the best choice for all the payment collection needs. You surely want to know what procedure you have to follow for enabling options for payment collection.
Let’s discuss it now:
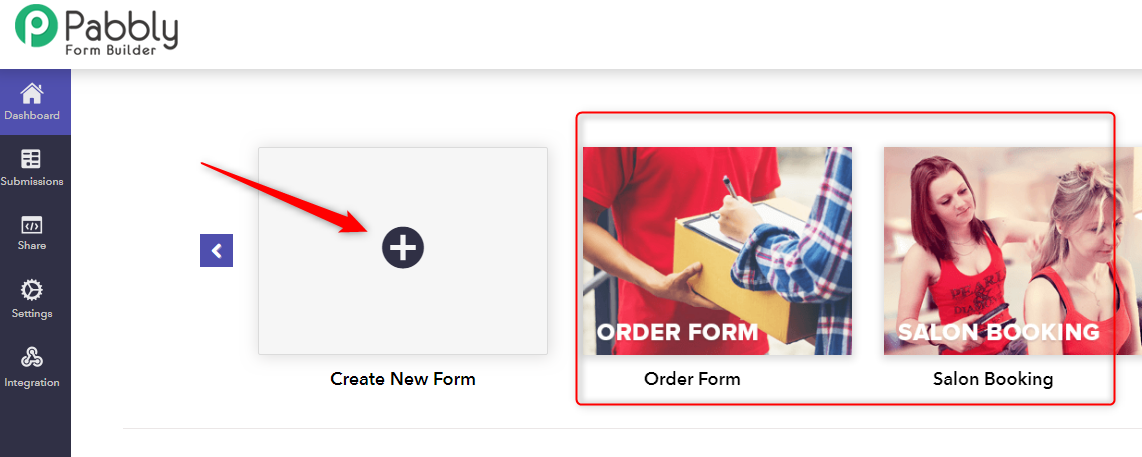
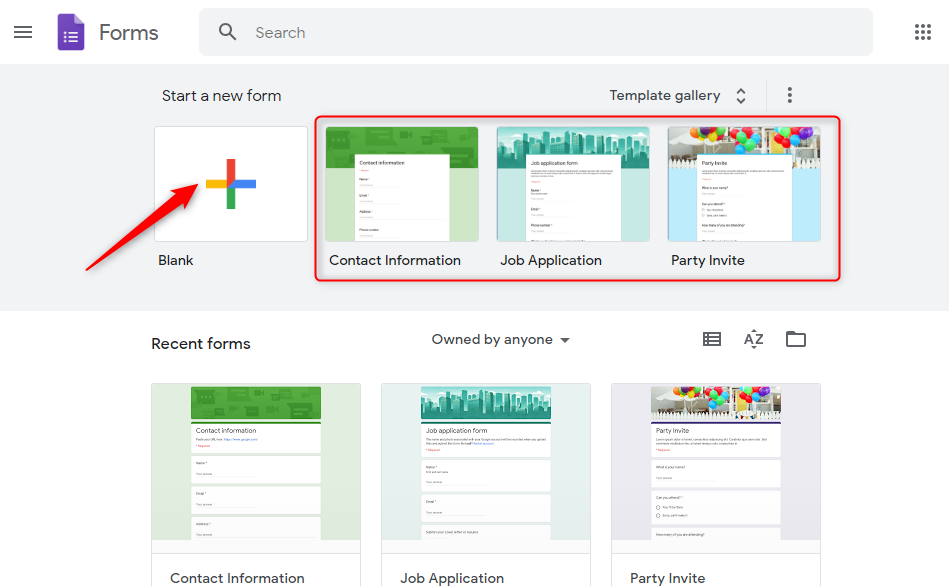
Step 1: Create A Payment Collection Form
The first thing all you have to do is to open the dashboard of Pabbly Form Builder. After that, hit the “Create New Form” icon for creating a new form from scratch. If you don’t want to do this, then you can also use one from the set of its pre-built templates & customize that according to your requirements.
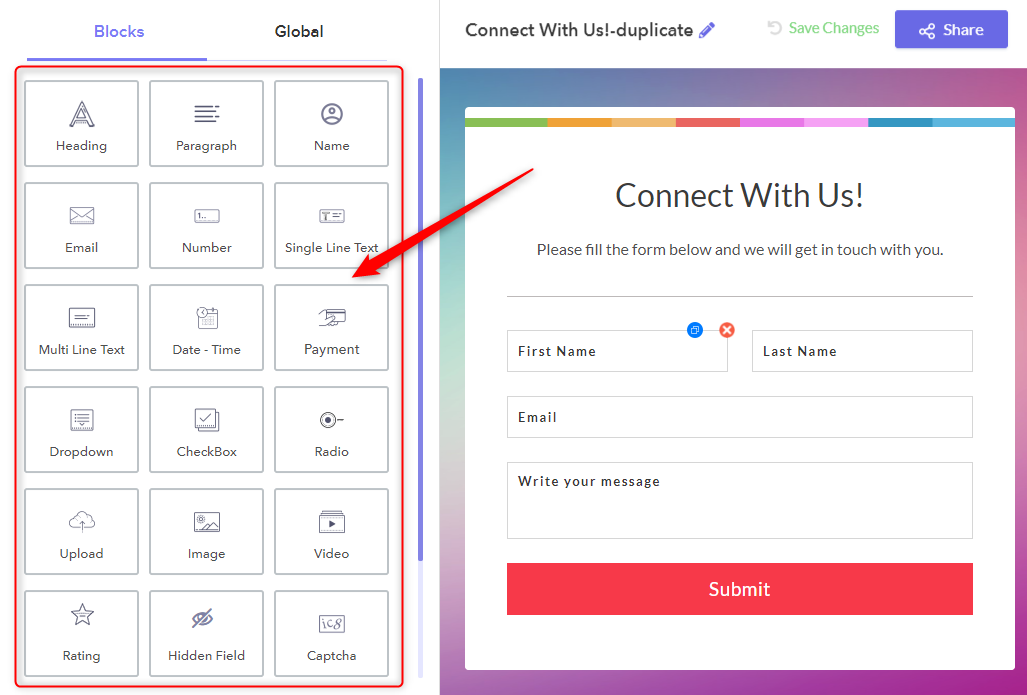
Step 2: Customize The Form As You Want
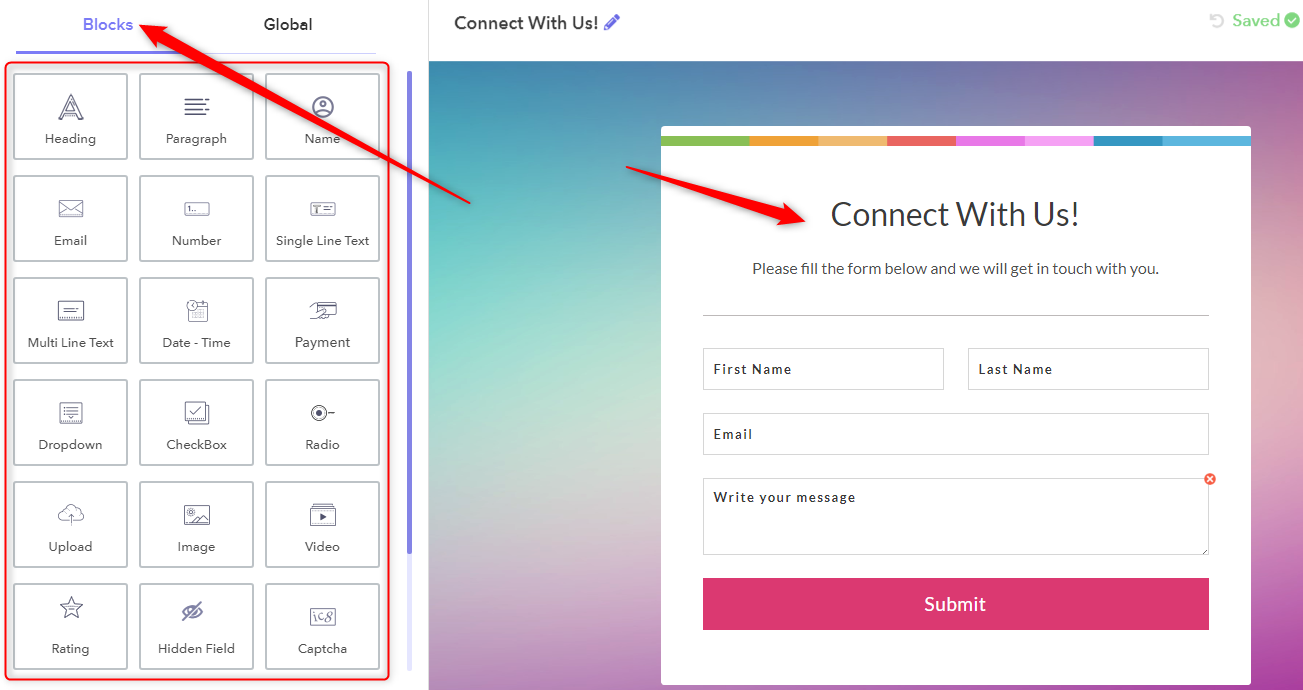
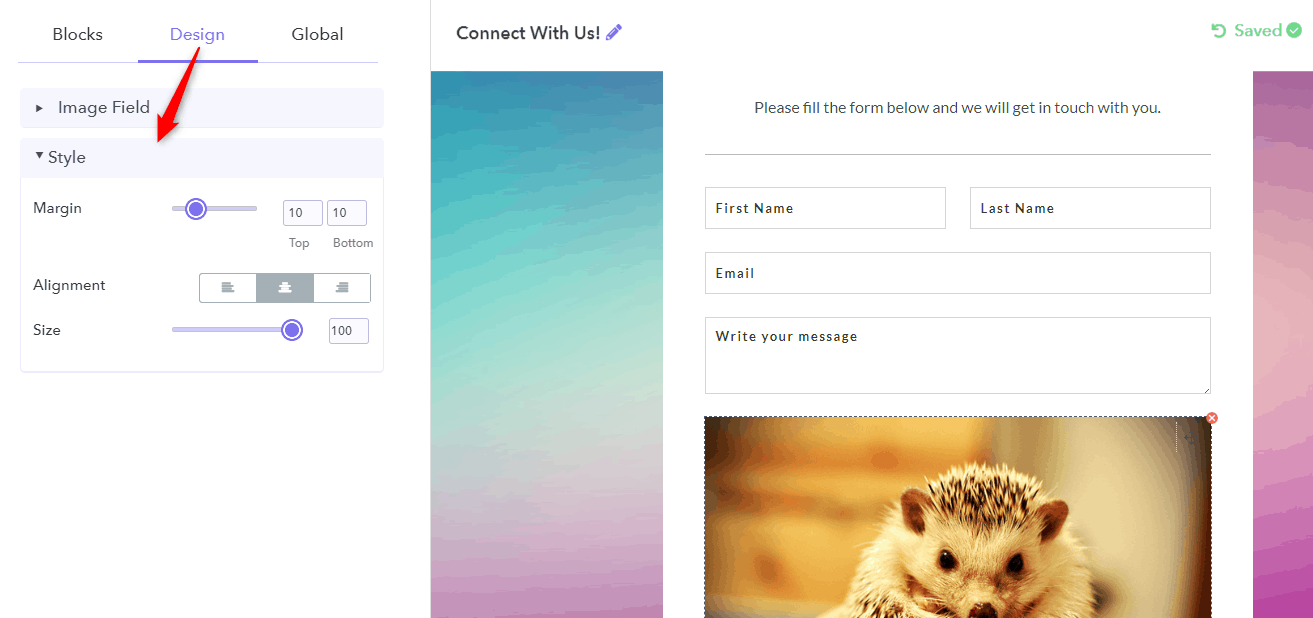
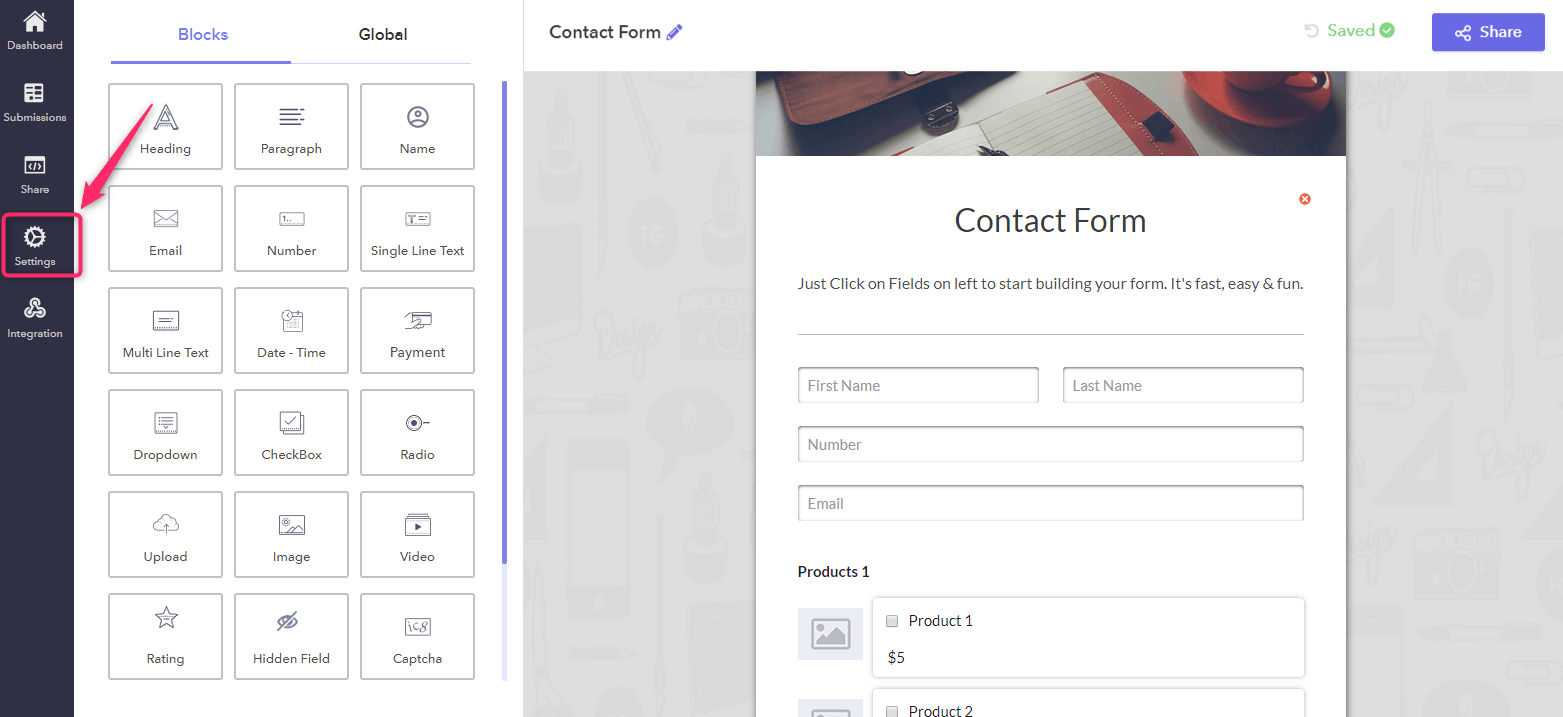
After this, you will find that a default “Connect With Us” form will appear on the screen, that you can edit as per your requirements. For this, Pabbly Form Builder provides you a lot of form elements & designing options in its “Block” tab. From here, you can add multiple fields like heading, images, captch, upload, rating, payment, etc.
Steps 3: Add Payment Field
Now, once you add all the required elements into your form. Next, you can add the payment field into your form,
For this, just drag the “Payment” field from the block and place it at the desired area of your form. The application would automatically show a default product list, details and the total price of the purchase.
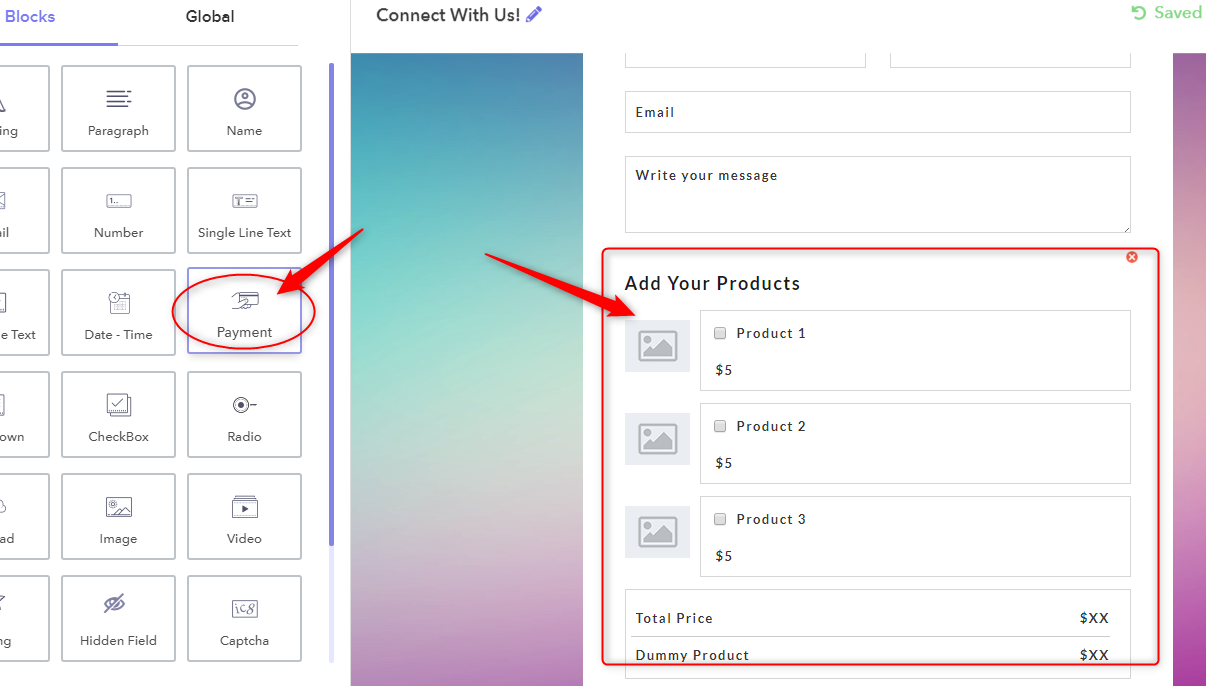
Step 4: Setup Product Details
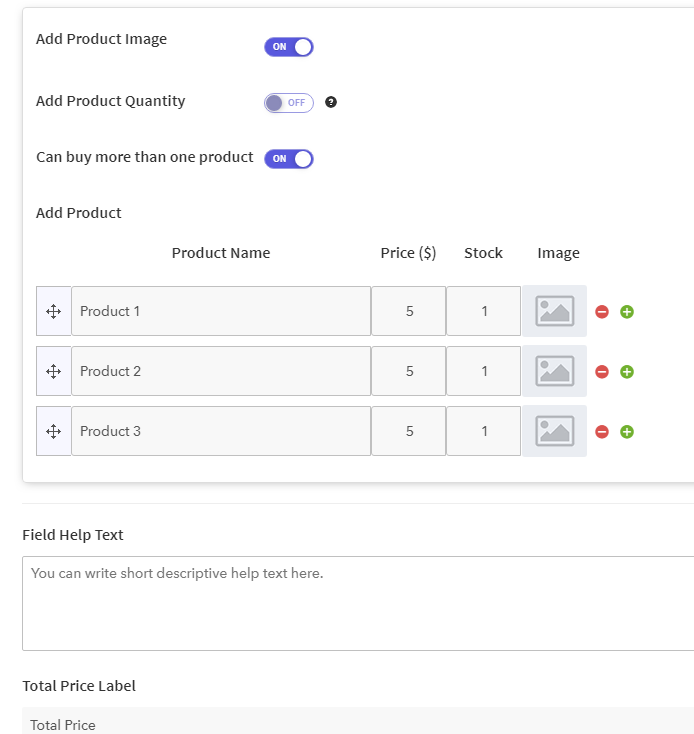
Subsequently, you need to edit the details of your products like its name, image, price, total stock, etc, just by clicking on it. These products can be anything like commodities, tickets, etc for which you wish to receive payment from your customers.
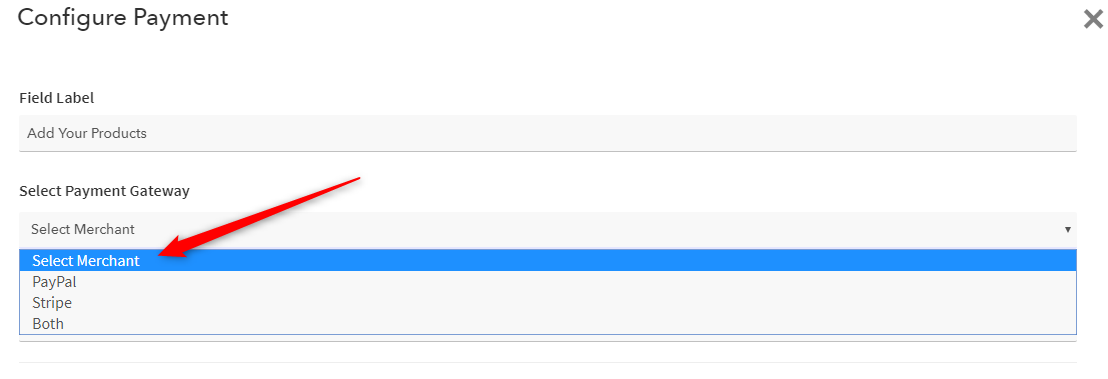
Step 5: Select Payment Gateway
After this, you have to select a payment gateway from which you want to receive payments from your customers. Here, you will find options like PayPal, Stripe or both.
To this, you will need to integrate your PayPal and Stripe accounts into the form. In order to learn how you can do this, visit the PayPal integration guide and Stripe integration guide.
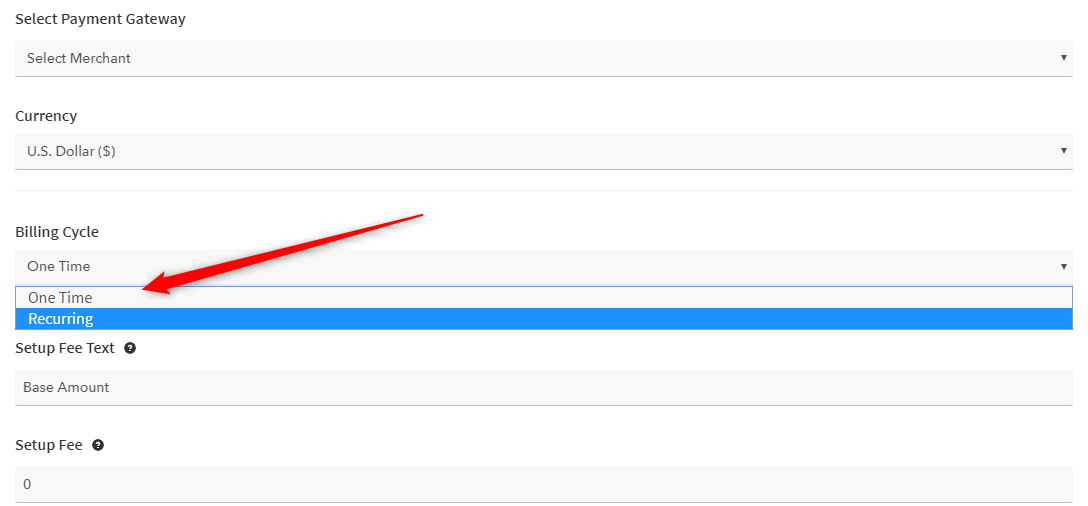
Step 6: Setup Billing Cycle
Once you add payment gateways, you have to specify the type of billing cycle you want to follow. That means Pabbly Form Builder allows you to receive both recurring & one time payments.
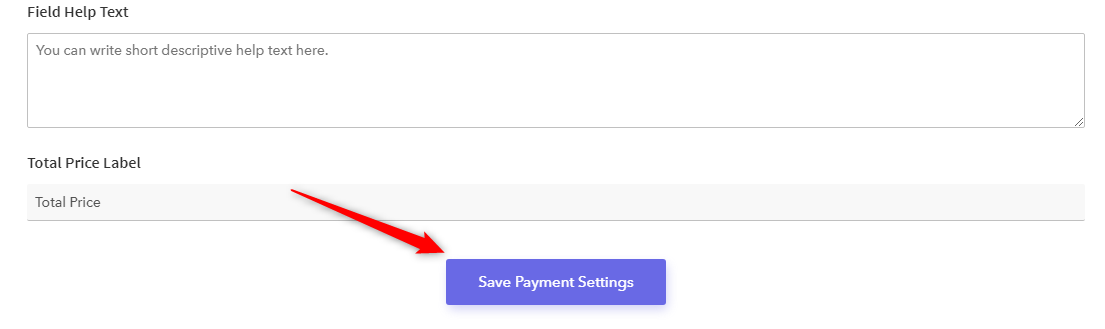
Step 7: Save The Payment Setting
Now, your payment form is ready. Hence, to complete the payment setup, click on the “Save Payment Settings” button at the bottom.
Step 8: Save, Share, Enjoy!
Hurray! You have successfully designed & configure your payment form!
Momentarily, you just need to save the form and share it wherever you want. Now, you don’t need to worry about the payment collection requirements. Everything will be managed automatically by Pabbly Form Builder.
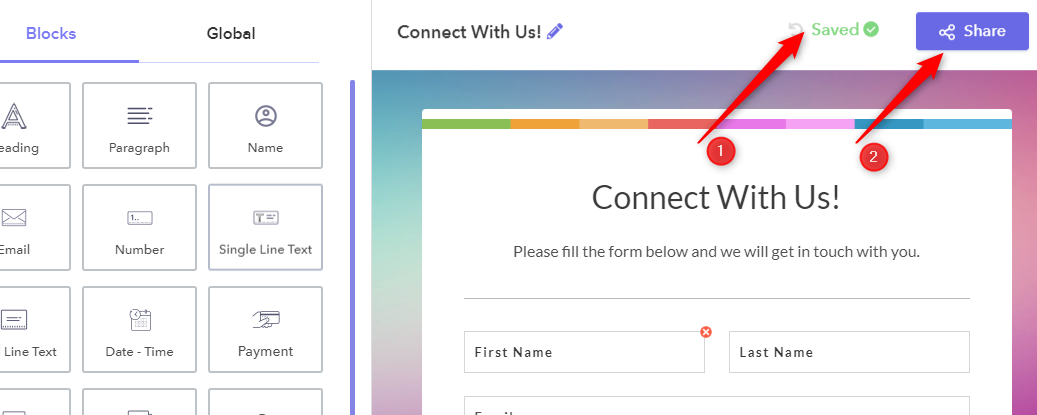
That’s it! Everything on your end is done. Now, you can sit back and receive payments directly through your forms.
Wrapping Up:
Now, taking everything into account, I am expecting that the above-mentioned information helped you to understand how one can enable options for payment collection direct from Google Forms.
Though Google Forms does not support such options. Then also, here, I shared a few other ways that can help you in collecting payments.
So, don’t waste any more time and start collecting payments and generate revenue for your business through forms without any hassle.
You May Also Like To Read:
How Can I Embed A Link In Google Forms?

Sometimes while creating a form, you need to share some additional information such as Terms & Conditions, Privacy Policy, etc., with your customers which is mentioned on another page. In these instances, you will require to add hyperlink in the form using some relevant anchor text which is linking out to supplementary information.
Furthermore, it will help your form respondents to easily and quickly redirect them after form submits between different documents and web pages.
Likewise, you can also embed a link in Google Forms that gives your viewers with one-click convenience.
Undoubtedly, Google Forms is one of the best free tools for creating beautiful forms. But, it restricts you from embedding a link on anchor text. So, to fulfill this, you should try some of its alternatives. Here, I’ll suggest you try Pabbly Form Builder as it enables you to insert a link on any text.
If you are looking for a way to embed a link into your form via Google Forms, then this article is for you.
Let’s discuss further and learn how to embed a link in Google Forms.
Step 1: Google Forms Dashboard
First, you need to open the Google Forms then select the ‘Blank’ option for creating a form. You can also use its pre-designed templates according to your requirements.
Step 2: Create Your Form
You can simply create your form by adding multiple descriptions & questions according to your business requirements.
Step 3: Embed A Link
After creating the form you can insert a link in the description field that you want to display on your form.

Note: In Google Forms, you are allowed to paste the raw URL only in the description field. From there Google will automatically recognize it and publish it as a live link. Also, this form builder doesn’t give the flexibility to place a link anywhere in the form. So, if someone wants to add links at the footer or somewhere else in the form then they will not get this opportunity in Google Forms.
Besides, you can’t add a link on an anchor text which is one of its major drawbacks.
Looking For Some Other Options For Inserting Links?
As you all already know that there are plenty of form creators available in the market that offers several features that are required for creating a high converting form. One of which is Pabbly Form Builder.
It is a worthy alternative to Google Forms that lets you build any kind of form without requiring any technical knowledge. Also, the Pabbly Form builder has a wide range of pre-designed different templates using which one can create a form in less than a minute. Besides, it will help you to design a professional-looking form by enabling you to put a link on a meaningful text that is redirected to your desired page.
Other than this, Pabbly Form Builder offers you the flexibility to insert a link wherever you want.
Here is how you can use Pabbly Form Builder for inserting a link into your form with ease:
Step 1: Form Creation
Click on the “Create New Form” button to start the designing of your form.

Step 2: Form Customization
You can edit the form as per your requirements. This amazing form creator provides you with a plethora of designing tools that one can use to customize the form easily with just a few clicks.
In addition, you can easily insert headings, dropdown, video, image, captcha, radio, and a lot more elements by using its drag & drop feature.
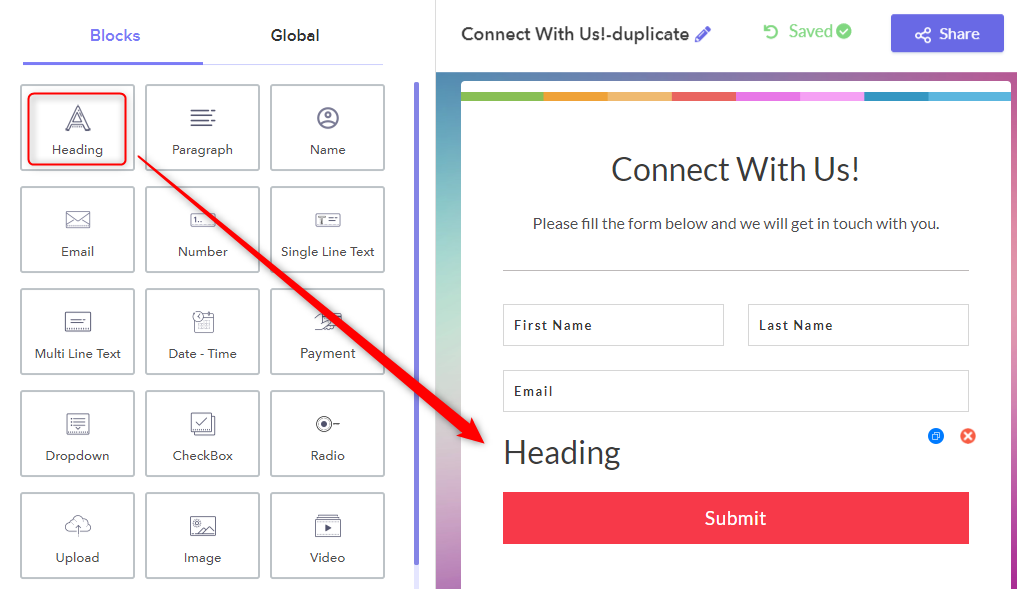
Step 3: Hyperlink Text
Now for adding hyperlinks to your form, you will need to either insert the Heading or Paragraph by dragging them from the blocks section.
Step 4: Options For Inserting Links
Then, click on the button “Design” which is present next to the Blocks. Here, you will find an option for inserting a link. Just hit that icon.
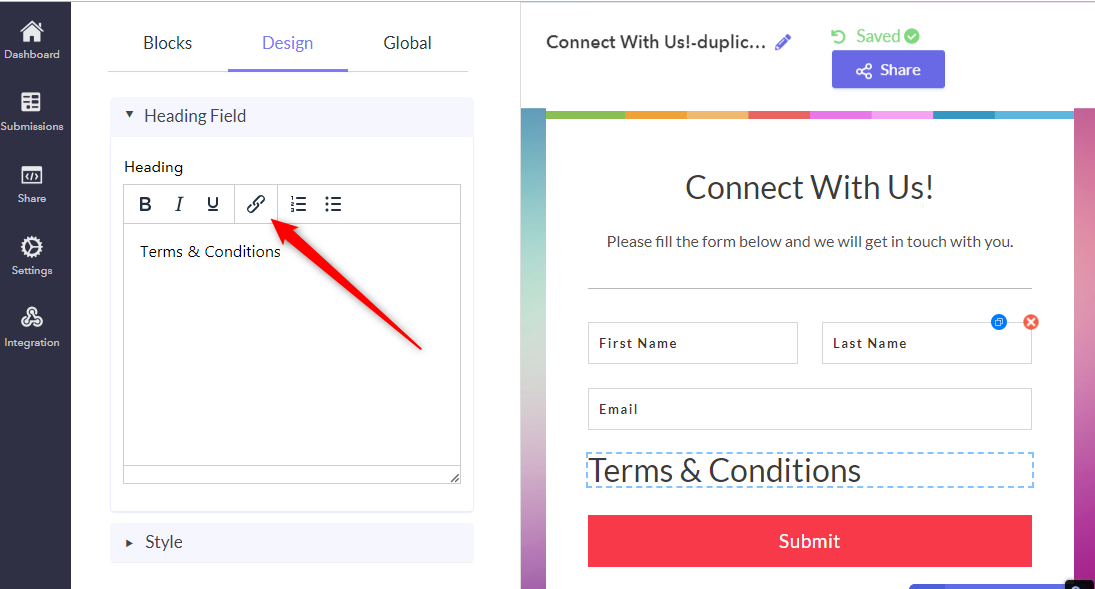
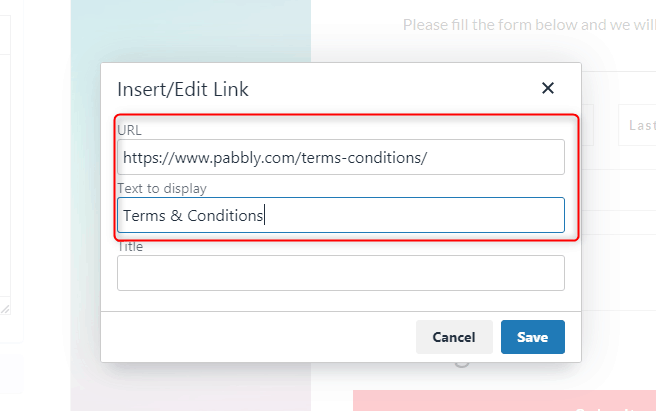
Step 5: Insert/Edit Links
Once you have clicked on the link icon, a popup window will get appear where you can place the URL along with its anchor text.
And that’s how anyone can quickly create a hyperlink into their form and divert the traffic to their desired page or websites.
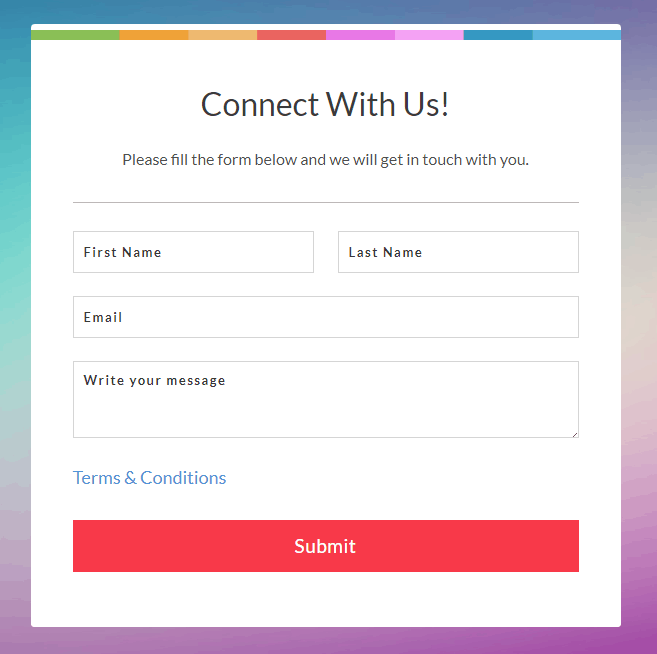
Besides, you can preview your form to see how it will look at runtime.
Wrapping Up
That’s all… We hope that this article has helped you in learning how to integrate hyperlinks into your forms easily. Hence, if you just want to place a raw URL you can go for Google Forms but if you want to make your form more professional by providing a link on an anchor text you can blindly select Pabbly Form Builder. Besides, it offers a free trial so that one can explore and test all its features before purchasing it.
You May Also Like To Read:
Is there a way to split Google Forms into 2 stages?

Google Forms are great ways to carry out surveys, conduct quiz and much more using their online forms. But suppose your surveys are way too long then you definitely want to split it into sections to not withdraw interest of your potential users. There is no denial in the fact that most people don’t prefer long forms because it consumes time.
Keeping this in mind, form creator divides forms into sections to make it likable. So the definite question here is ‘Can I split my Google Form into 2 stages?’
Indeed you can.
No doubt Google Forms are way too convenient but it fails surveyor need when it comes to allowing save and resume option. You have to fill the form in one sitting whereas Pabbly Form Builder offers you this flexibility.
Undeniably Google Forms are a one-stop destination for all your needs. It offers a bunch of beautiful templates and lets you build multi-page online forms like feedback, order, surveys and much more.
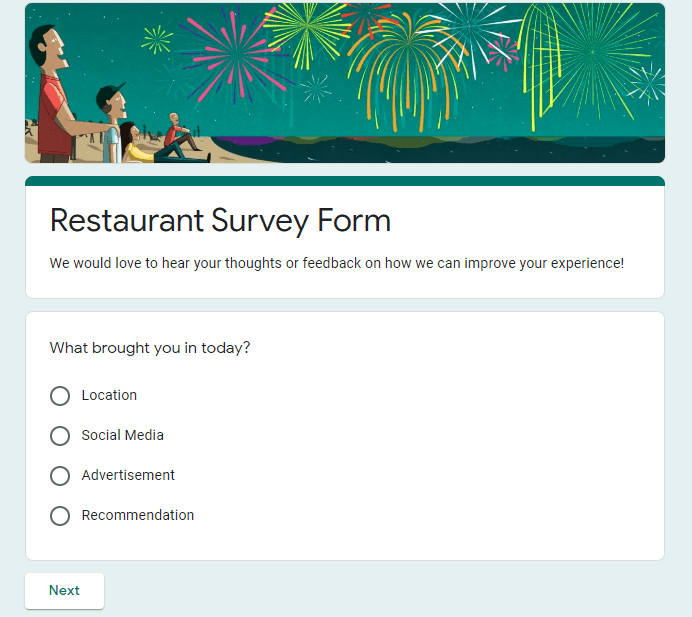
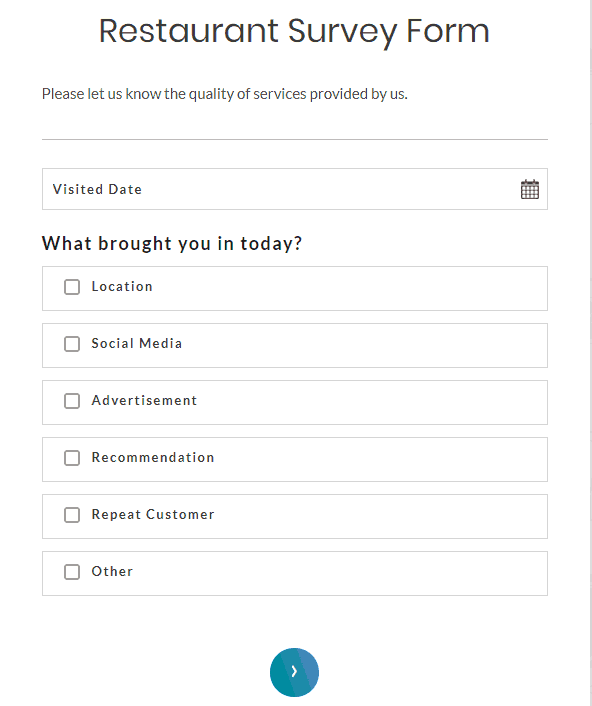
As we said earlier long forms are time-consuming yet it is the only source of gathering additional information. The page break in business forms helps in improving conversion rates. Moreover, it allows you to redirect the users to a different section based on his/her response.
To make it more understandable let me walk you through the process of creating sections in a survey form.
Steps for creating a survey form in Google Forms.
Step 1: Create Your Form
To create your form click on the ‘Blank’ option or you can use pre-designed templates too. Further, entitle and customize your form according to your needs.

Step 2: Add Section
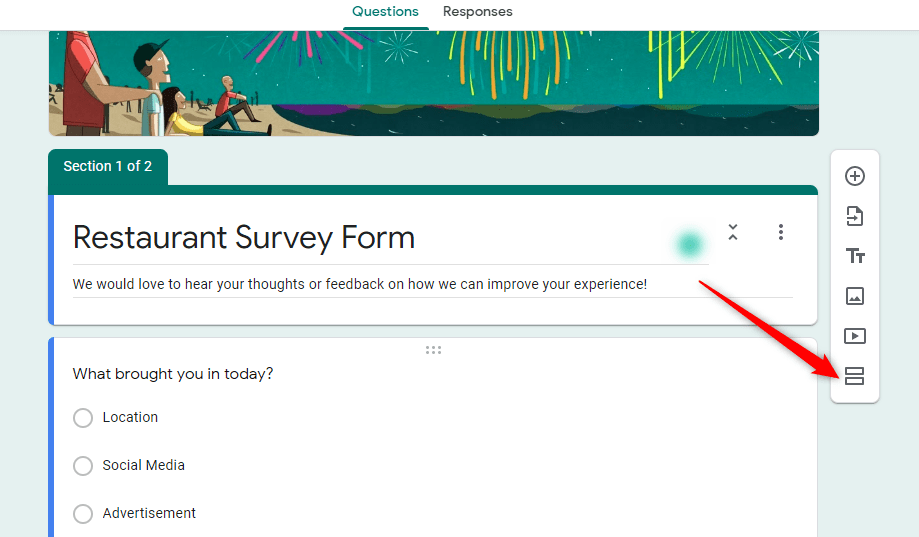
To add a section in your form you have to click on two horizontal bars appearing on the right side of your form.
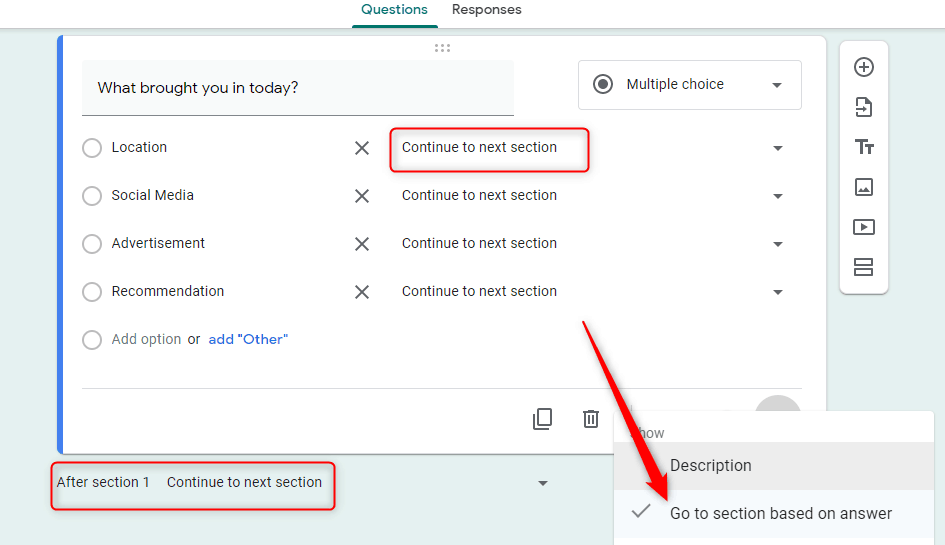
Step 3: Go to Section Based on Answer
You can easily apply it by clicking on three vertical dots, thereby choosing the mentioned option. Further according to respondent answer you can redirect on a particular section. Moreover, it also lets you skip in between sections based on the answer.
Step 4: Preview
To check the preview of your multiple sections form you can simply click on eye icon appearing on the top right corner.
Limitations Of Google Forms
Certainly, Google Forms are the best to access but again it tied your hands by offering limited features. Like there are no such options to customize your sections, you have to make peace with the inbuilt next/back button it offers you.
Other than this, Google Forms restrict you by offering only 75 sections. As discussed earlier it doesn’t offer any save and resume option.
Above all, you can only use simple jump logics using Google Forms.
Is there any way to overcome Google Forms Limitations?
Definitely! A Big Yes
By exploring all the difficulties users faced we came across the best flexible online form generating tool named Pabbly Form Builder. The software allows you to create unlimited sections. Moreover, it lets you customize your split section by allowing you to change the size, color, and hover color of the button.
Additionally, it offers the flexibility to fill the form later by providing the option ‘allow save and resume’.
Using Pabby Form Builder one can easily apply multiple Conditional logics like And/Or for your forms.
No wonder, you might want to see all these features working. Let’s help you understand the process of creating a page break in a survey form step by step.
Steps for creating a survey form in Pabbly Form Builder.
Step 1: Create Your Form
To start, click on the option ‘Create New Form’ or you can also use a pre-designed template. Further, customize the survey form accordingly.

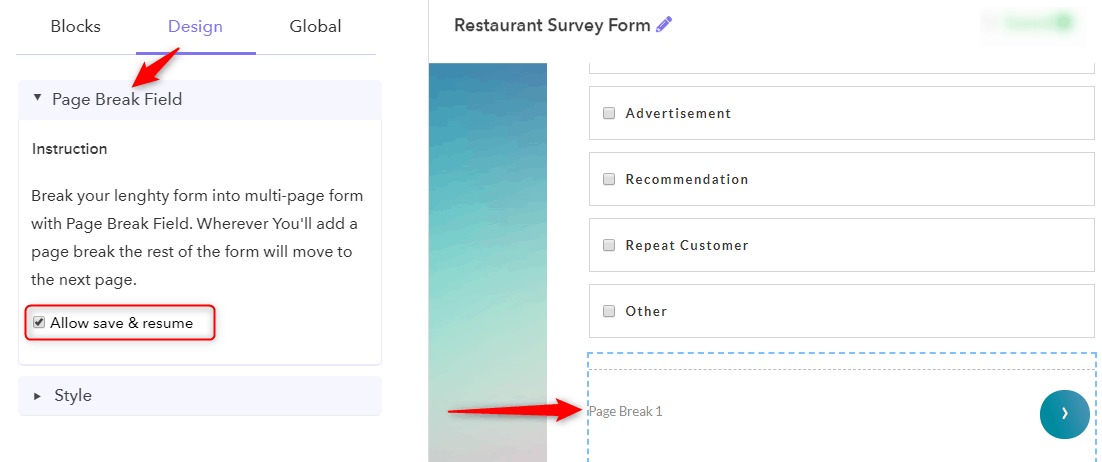
Step 2: Page Break Option
To split the form into multiple pages you have to click on the option ‘Page Break’. Further, you can place it wherever you want to apply the partition.

Step 3: Design Fields
Under ‘Page Break Field’ the option of ‘Allow save & resume’ will appear, you can easily check/uncheck it.
Step 4: Style Option
Under the ‘Style’ option, it allows you to change button color, button hover color, and radius.

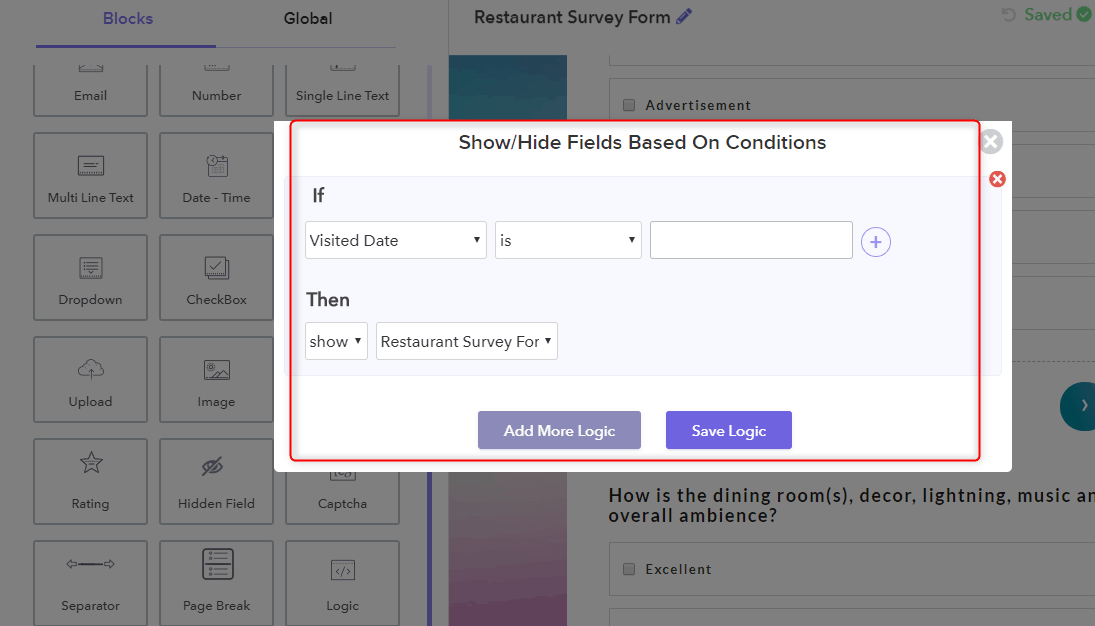
Step 5: Logic Field
Further, you can apply multiple And/Or logics using ‘Logic Field’.
Step 6: Preview
Save all the changes and your created form will appear on the dashboard. Further, you can view the ‘Preview’ by simply clicking on it.
Besides this, you can add conditional logic in multiple options too.
Conclusion
That’s it! We are hoping that this tutorial did justice with your time. All the mentioned steps are simple and easy to follow.
If you’re looking for the best suitable alternative of Google Forms then you can check out our article on 10 Best Online Form Builders 2020.
Give it a try and let us know your reaction in the comment section.
You May Also Like To Read:
How to add an upload button to a Google Forms?

Are you looking for a form that allows you to collect uploaded files?
Then don’t go anywhere,
Google Forms gives users the ability to add files and media to the forms. With its file upload option, form owners will be able to collect various types of information like job applications, videos, pictures, students’ assignments, etc., from the respondent. Further, it helps them to verify the identity of the individuals on the basis of their information.
Assuredly, Google Forms simplifies the process of form creation but it restricts you to upload unlimited files. Also, it does not allow you to upload files if you are not logged into a Google account. In that case, you can switch to one of its alternative i.e. Pabbly Form Builder
It empowers you to upload unlimited files without login to Google account. Other than this, the form builder gives you a lot of reasons why people will come to your form. Read it out in the below section.
Google Forms empowers you to effortlessly configure uploaded files and set restrictions on the size & type of files you accept.
Let’s take a brief look at how you can add upload button to Google Forms
Step1: Create Your Form
At first, you need to open Google Forms for creating a new contact form. You can create a new form by selecting the ‘Blank’ or by choosing pre-designed templates.
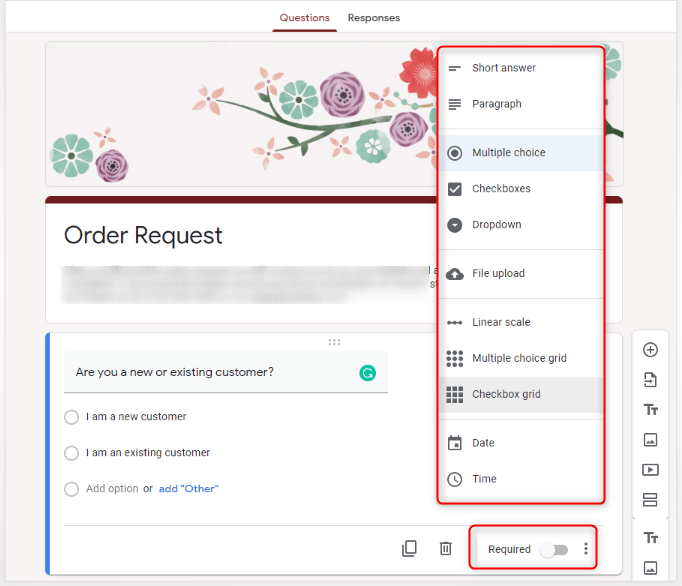
Step 2: Select Answer Type
After that, all you need to do is enter the necessary details/question according to your survey. Then, you have to select the ‘File upload’ option as an answer from the dropdown list menu.
Step 3: Specify File Types
After adding the file upload field in the form you can specify the file type that you want to accept from the users such as document, presentation, spreadsheet, image, video, audio, etc.
Step 4: Maximum Number of Files
Here, you get an option to set the maximum number of files – this can only be 1, 5 or 10 at the moment. You can choose any of the options and allows users to upload the file.
Step 5: Maximum File Size
Inside the file upload attachment question, you’ll find other options to specify the max file size (from 1 MB to 10 GB).
Step 5: Preview Your Form
Once the form is completed, you can view your form by clicking on the eye-shaped preview icon in the upper-right corner. Thus, your respondents will be able to upload the file to the form submission.
Why Pabbly Form Builder is the best Google Forms alternative?
Google Forms is definitely delighted you at first because it is a free tool but it has a very limited feature-set.
Whereas, Pabbly Form Builder is the only software that does not restrict you on features. With this, you can create amazing forms in a snap and handle unlimited file uploads, submissions, storage, webhooks, etc. It makes your complications of file uploading, form submission easier.
Moreover, you can completely customize the file upload form with its advanced designing options. Pabbly Form Builder offers numerous 3rd party integrations with many kinds of business tools, including Google Analytics. Therefore you can automatically add your file uploads to the storage option that you use in your daily workflow.
Let’s take a look at how to add a file upload field to your forms in few minutes via Pabbly Form Builder.
Step 1: Create Your Form
You can choose the predefined templates or create your own new form by clicking on the “Create New Form” option.
Step 2: File Upload Option
After creating the form you can add an upload field in your form by simply dragging the “upload” option.
Step 3: Customization Options
Now when you click on the upload field, multiple customization options will get appear on the screen. Using this, you can easily design the form fields, layout, header, etc.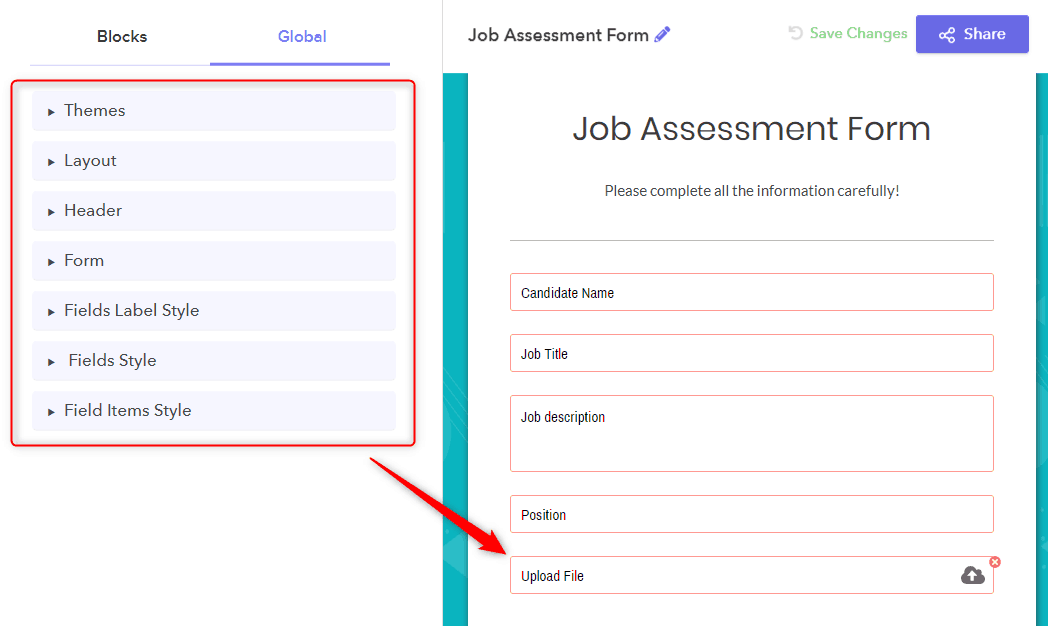
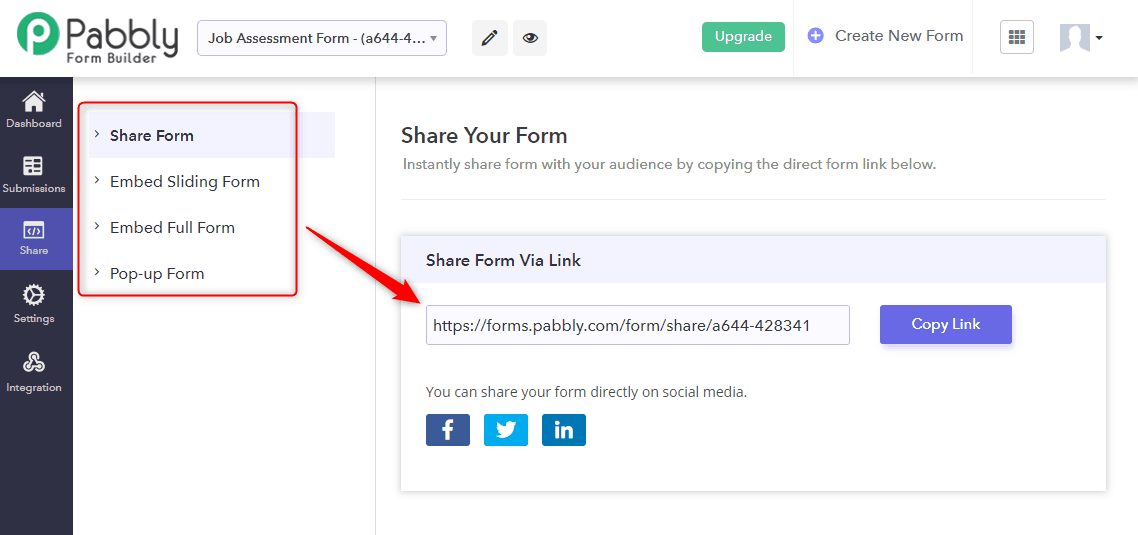
Step 4: Share The Form
After creating the form you can instantly share it with your audience by just copying the link. You can easily embed the form on your website in 3 ways like – full form, popup form or sliding form.
That’s it! Now, you can easily accept the files through forms as per your requirements.
Conclusion
Adding forms with file upload fields to your site can help you get the necessary information from customers faster. By following the above implementation you can easily streamline the processes that were once complex such as accepting job applications, guest post submissions, etc.
You May Also Like To Read:
How to use Google Forms for Business?

Forms are an easy and simple way to quickly gather customer information like their name, email address, preferences, comments, etc. Also, it is a powerful means to actually initiate communication with visitors and possibly convert them into customers. That’s the reason why a business owner relies on forms. However, they seek resources to grow its services that are free and require less effort. The very first thought which strikes in mind is Can I use Google Forms For commercial purposes?
Well, in some ways, you can!
Undoubtedly, Google Forms is the right access for all the startup and business owners who want to boost their sales with minimum cost. Basically, it is the only free tool that lets you create online forms like feedback forms, order forms, event registration forms and much more.
Furthermore, with fewer efforts, you can easily get statistical data of responses from your clients in a spreadsheet. The platform is fully automated, you don’t have to trouble yourself for every other response.
Though it offers numerous features yet Google Forms doesn’t let you collect payment through your commercial form which is exactly why one should give Pabbly Form Builder a try. We’ll recommend you to give this robust Google Forms alternative a shot.
As a business owner, at some point of time, you would want to sell out your product or services via the form. So let’s understand the process of creating an order form in Google Forms from scratch.
Steps for creating an order form in Google Forms
Step 1: Create Your Form
You can easily create the Google Forms by selecting the ‘Blank’ option or you can also use its pre-designed templates. After that, entitle your form using the customization options accordingly. All the changes suggested will save automatically. Also, you can make a particular field mandatory by enabling the ‘Required’ toggle.
Step 2: Share Your Form
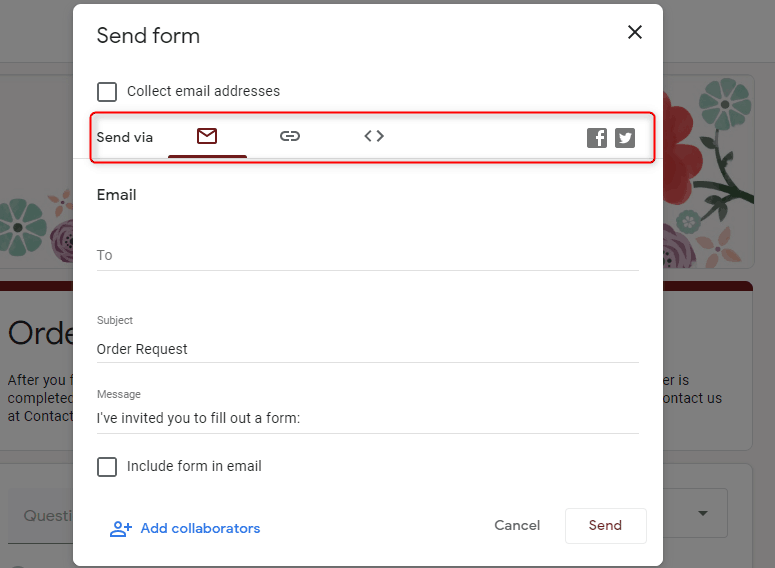
By clicking on the ‘Send’ button appearing on the top right corner, a pop-up will appear with options like you can share your form via email, URL, on your social media platform and also you can embed the code on your website. It also lets you add collaborators.
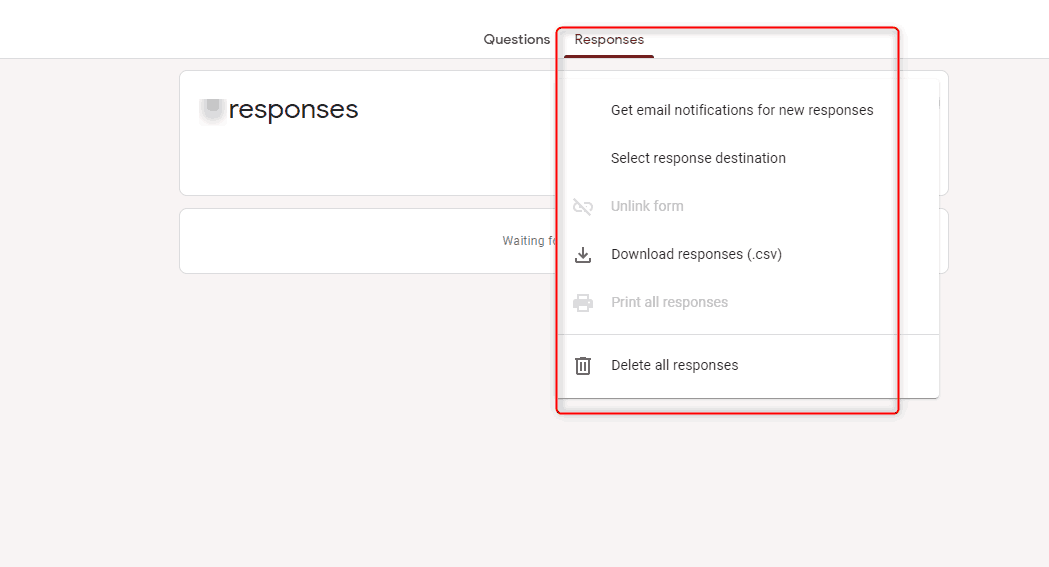
Step 3: Response Section
In the response section, you will see the results of your form. It lets you create a spreadsheet. Additionally, by clicking on three vertical dots you get an option to enable the email notification, download the spreadsheet, select the response destination and delete all responses simultaneously.
Limitations Of Google Forms in Business purpose.
As discussed earlier one of the major drawbacks of Google Forms is it doesn’t let you collect payment through your forms. There are no such options of payment gateway available in Google Forms. Using it, you can only gather customer information regarding the product.
Other than this there is no such inbuilt feature available in Google Forms to keep track of user response and activity.
Every business owner wants their platform to be hassle-free by offering less work on the customer end. If users have to switch on different options for payments then it’s quite a task.
That’s the reason why Google Forms are a huge turn off for business owners.
How one can overcome the Google Forms Limitations?
Keeping this problem in mind we came across the best suitable alternative of Google Forms which is Pabbly Form Builder. One of the cheapest and most effective online form creating tool that lets you collect payment through the form itself. It provides two payment gateways which are Paypal and Stripe.
Moreover, it lets you add more than one product in a single form.
Other than this, the software is packed with all advanced features like unlimited form submission, receive unlimited payments and much more.
You must be wondering how it works? Let’s walk you through the whole process step by step.
Steps for creating an order form in Pabbly Form Builder
Step 1: Create Your Form
To create a form, you can either click on the option ‘Create New Form’ or select a pre-designed template. Using the ‘Block’ field you can easily customize a form by drag and drop option. Next, when you click on the ‘Payment’ option, the product field will appear in the form.
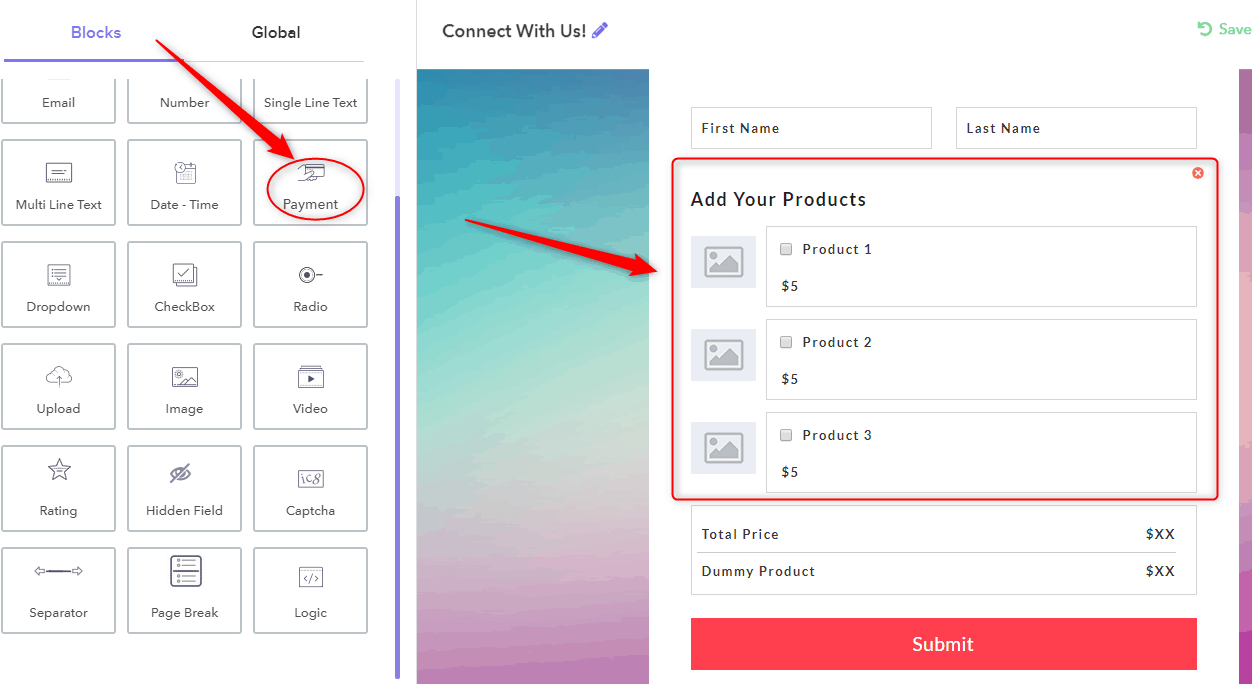
Step 2: Configure Payment
By clicking on the product, the ‘Configure Payment’ page will appear where you have to mention your product details like product name, currency, billing cycle and set up fees if any.
Additionally, by clicking on ‘Select Payment Gateway’ PayPal and Stripe will appear, you can easily integrate your payment option by providing the required details. Further, it offers ‘single and multiple product’ field, choose accordingly. Finalize everything by clicking on the button ‘Save Payment Setting’

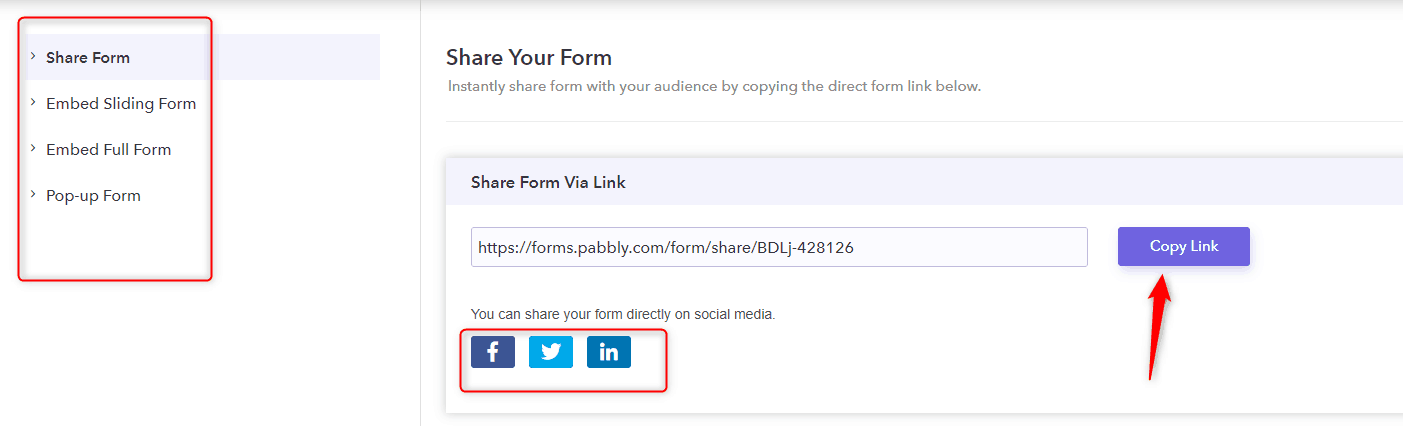
Step 3: Share Your Form
After customizing your form as per your need, you can share by clicking on the ‘Share’ button appearing on the top right corner. Further, it allows you to share your form via URL, on your social media directly and you can also embed your form on your website.
Step 4: Response Section
You can keep track of every response by clicking on the ‘Submission’ option appearing on the left side. There you will see options like form submission, analytics, and reports. Other than this it lets you export all the submission or specified month submission in CSV file format
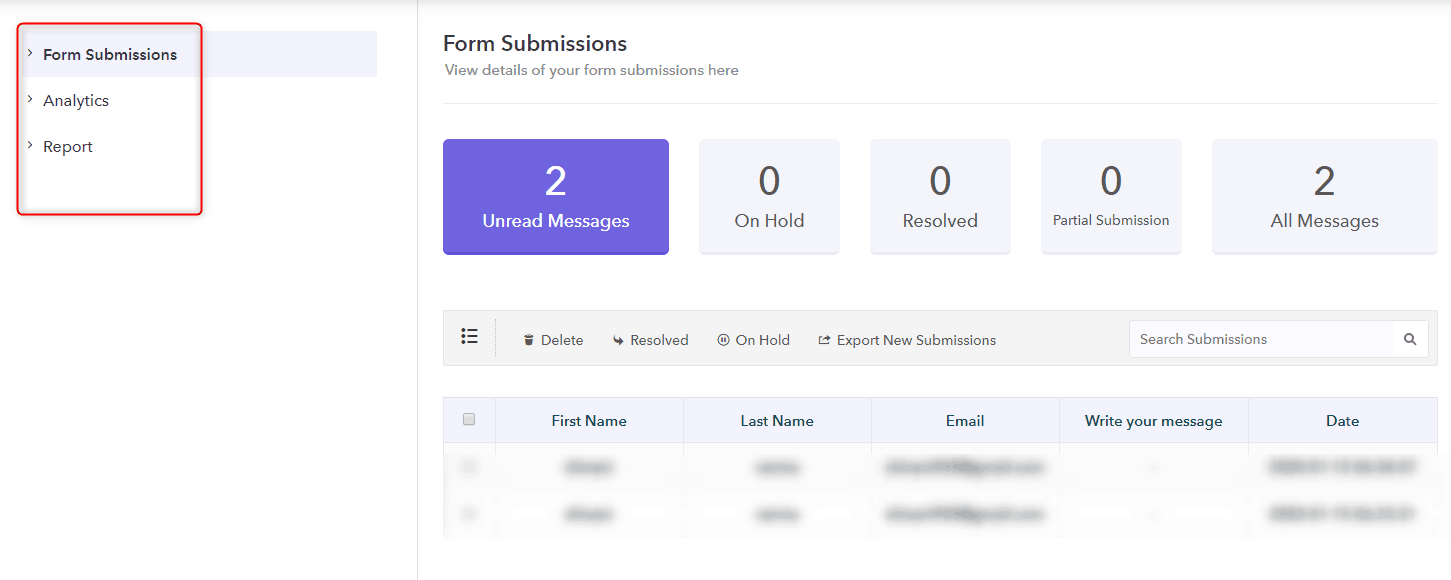
Besides this, you will see a surplus number of features in Pabbly Form Builder like for every new response you will get an email notification, autoresponder and much more in setting option. You can keep an eye on each response using the single software.
Conclusion
That’s all following the above procedure and you are good to go. All those who were wondering about Google Forms commercial use, we hope this article helped you clear your doubt about the same.
Let us know your reaction in the comment section.
For more information, give it a read:
Is Google Forms Better Than SurveyMonkey?
If you’re in the market for a survey maker, you might hear that Google Forms and SurveyMonkey are the two most popular online survey tools. Both let you design basic surveys at little to no cost. For business, personal, and educational questionnaires, they each have their offerings.
Now, you might be having trouble choosing between the two, this deep-dive Google Forms vs SurveyMonkey comparison should answer your questions. Also, this will make it easier to determine which tool is better than another one.
In case, if neither tool fulfills your needs, here I also provide you one more alternative to these two services i.e. Pabbly Form Builder. It is the only form builder that does not restrict you on features like form submissions, file uploads, payments, etc. In the below section, we will explain why you should try this tool.
Let’s begin:
Google Forms vs SurveyMonkey
Here in this blog, we covered both Google Forms & SurveyMonkey for providing you a closer look at both the software to see which one’s a better fit for you. Let’s compare both software using the following criteria to judge each solution:
Round 1: Pricing
Are you only in the market for a free tool or are you willing to pay for some extra features?
Google Forms is absolutely free regardless of your design, number of questions or amount of responses. With it, you can create as many surveys as you like, save them all, and turn them into templates to use again. If you want a tool that costs nothing, then Google Forms is a splendid choice.
Well, you can’t really beat software that comes at no cost. But, SurveyMonkey has both free and paid plans. With it, you can create unlimited surveys. The paid plans that SurveyMonkey offers are subscription-based and it provides few more options like accept payments, analyze filter data, and export results.

How to decide: If you really want all the bells and whistles, then SurveyMonkey is the one to check out. But, if you want to stick with a free tool for basic surveys then you can go for Google Forms.
Round 2: Features
Google Forms has some excellent features, but the advanced ones really need some scripting experience to set up.
Whereas, SurveyMonkey is clearer and more intuitive, as well as containing some extra features that are not available in Google Forms like it offers question bank, themes, print style, etc. Save your time and create more effective surveys by choosing from over 1,600 predefined questions. Further, it lets you find survey respondents in specific demographics.
How to decide: Both the software are simple to use and intuitive for the most part. But it’s clear to see that SurveyMonkey gives many useful features that Google Forms does not. In particular, the Question Bank provides help with wording questions & the logic options offer you the flexibility to control how your survey is completed.
Round 3: Integrations
You can access the Google Forms API yourself for custom development. But you can only integrate it with other Google Apps or with other programs through Zapier.
Whereas, SurveyMonkey integrates with several email marketing and customer relationship platforms such as Slack, Microsoft Excel, Trello, WordPress, Mailchimp, Salesforce Sales Cloud, and many more.
How to decide: SurveyMonkey is the clear winner of this round as it offers more integration options than Google Forms. Also, you can go for some other form services like Pabbly Form Builder to get the support of more number of integrations like ConvertKit, Google Analytics, etc.
| Comparison Of all 3 Form Builders |
|||||
| Services | Google Forms | SurveyMonkey | Pabbly Form Builder | ||
| Pricing | Free | Free Trial, 3 Premium plans starts from $21/M | Free Trial, One Premium plan of $10/M, No additional fee/tax | ||
| Features | Restrict features | Some advanced features | Unlimited access to all features | ||
| Integrations | Only with Google Apps | With 1500 apps on Zapier | Unlimited Webhooks & direct integrations | ||
| Language Support | No | 15+ Languages | Multilingual | ||
| Analysis & Reporting | Pie Chart, Graph | Pie Chart, Graph, Bar chart | Pie, Graph, Bar chart with download option | ||
| Templates | 16 templates | 200 templates | 250+ responsive templates | ||
| Payment Configuration | Not possible | Not possible | Possible (via PayPal & Stripe) | ||
| Scheduling | Not supported | Not supported | Supported | ||
Round 4: Language Support
Google Forms currently does not support more than one language being displayed in your forms, though there are third-party apps that can be added as a workaround.
SurveyMonkey has translations for all standard elements of the form like buttons and fields in 55 languages. Further, you can include more than one language in the same form for bilingual responders. While questions and answers are not translated automatically but there is a multilingual library of common questions available.
How to decide: Here, you also know SuveryMonkey is better than Google Forms as it supports more languages.
Round 5: Analysis And Reporting
In Google Forms, your survey data is available in simple bar graphs, pie charts, and text displays. The users can’t filter results by questions & answers, but exported the data into a Google Spreadsheet.
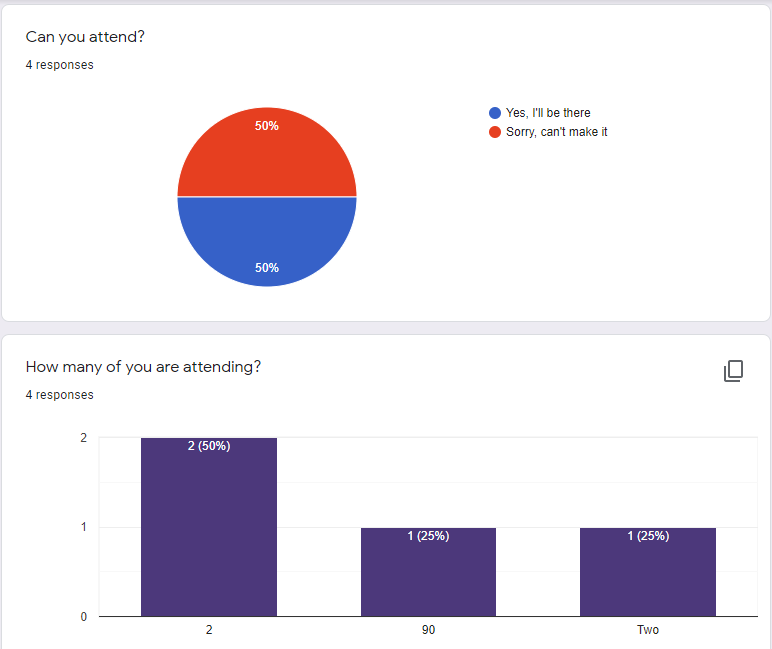
SurveyMonkey gives a number of graphs, charts and filtering tools to analyze your data. Some versions of SurveyMonkey lets you export data to your computer to analyze the data in SPSS or another predictive analytics program.
How to decide: Here both the software show reports in bar graphs, pie charts and text form. But SurveyMonkey offers more advanced options for analysis & reporting. With it, you can convert your data into any custom format like charts and reports to show off your results.
So, you can choose any of the software according to your business requirements.
What is missing in Google Forms?
If you go with Google Forms then you cannot schedule and automate surveys, segment users, or email surveys to a mass audience.
Google Forms does have some limited branching logic like section jumps. In fact, their branching logic only works on specific question types only. So, this might be frustrating if you are a Google power user.
- It does not support any options for collecting payments.
- The overall survey is a little bit too simple – some have believed it unprofessional.
- You need to purchase the add-ons for creating the advance form and It can be a bit pricey. And, the prices can range from 10 cents to $3.50 depending on how tricky you get with it.
- While it does have cool-looking graphs and analytics, you’ll have to pay for them too.
What are the limits of SurveyMonkey?
- SurveyMonkey’s collaborative features are only available with a paid, premium membership.
- No payment collection options available.
- If you’d like to remove the branding then you need to pay $75/month for the premier plan.
- SurveyMonkey offers a very limited free tier. So, you have to pay extra to unlock the extra responses.
- Sometimes, it creates difficulty to set up two or three-part questions into the form.
- Further, creating conditional questions can be a little bit tricky with SurveyMonkey.
Here at this point, you know Google Forms is a simple tool that can be good for creating simple forms. On contrary to that SurveyMonkey is a more advanced tool but it’s not free like Google Forms. Also, a few features like limitless submissions, integrations, security, customization, branding, etc, are only available in its Enterprise plan which costs a lot. So, it might be quite difficult for you to pick any one from these two options.
What’s The Top Alternative Of Google Forms & SurveyMonkey?
Try Pabbly Form Builder! Why?
Because this software incorporates all those features due to which you refused to use both Google Forms & SurveyMonkey.
With it, you can create and distribute a survey at a very reasonable cost with all the premium & necessary features. This is the reason why I am saying that the Pabbly Form Builder is the best choice over both the tools
It is the only software that does not restricts you on features. That means, it offers unlimited submissions, file uploads, Webhooks, views, and much more. And, the interesting thing about this is it does not charge much for all this.
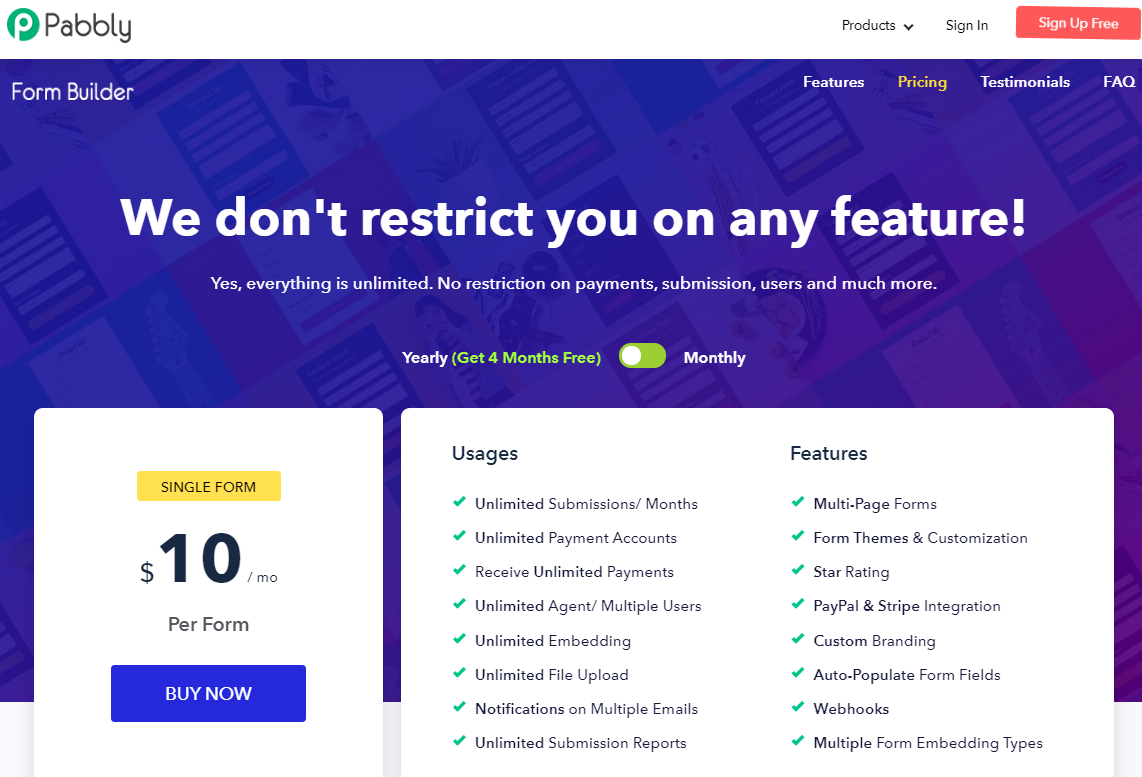
Yes, you can get access to all its features for creating amazing surveys just at the cost of $10 per month. Unlike SurveyMonkey, it comes at a very affordable price. Also, it supports a bundle of features that both the tools don’t.
Finally, check the following at-a-glance feature comparison of all the 3 software to compare everything more clearly.
On the basis of the above comparison, it’s very clear which tool is the best for you.
Then, what are you waiting for?
Get Pabbly Form Builder now and create amazing surveys very easily that too at a very reasonable price.
Wrap Up!
In the end, it all comes down to what you prioritize the most.
As for the battle between these two major tech brands, it’s quite difficult to say which one is best. So to come up with some results, here we compared both the tools in an unbiased way. As a result, we found that SurveyMonkey keeps the title of being the King of Surveys in between these two.
But, it also has some limitations that I mentioned above.
Therefore, to help you pick the best, I also recommend the best alternative to these two tools i.e. “Pabbly Form Builder”. With it, you can create amazing surveys at a very reasonable cost.
I recommend you to try this tool once. Then, you will know why I call it the best.
You May Also Like To Read:
How To Insert A Logo Into Google Forms?
Want to add a logo in your Google Forms?
Logos are an effortless and unique way to portray your brand or services in the market.
Generally, to enhance the business or to maintain customer relationships, companies/firms organize surveys. To make their surveys more honest and eye-catching they started using logos in their forms too. It spreads security and reassurance of your brand which makes your organization good for the long haul.
Why use Google Forms over other form builders?
One of the biggest reasons is that Google Forms is a free tool that empowers you to create beautiful online forms like survey forms, feedback forms, and much more. Furthermore, it offers you pre-designed templates where you will find an option for adding a logo or image in the header or in the form itself.
In spite of numerous advantages, Google Forms might not be the most suitable one for your use due to some of its limitations.
Restriction of Google Forms with Logo Image
- The insertion of a header image demands certain requirements to fit in forms.
- Other than this, the customization options are limited like you can’t change the background color of the header.
- Also, it doesn’t provide any option to insert the URL in the logo image.
Other things that upset most of the creative users that Google Forms is so ordinary and offers very basic functionalities. For business owners who wants to allure their customer using the same, the interface is quite unprofessional.
So if you are looking for a simple and effective alternative of Google Forms, we have one for you named Pabbly Form Builder. It fulfills all the limitations of Google Forms that are mentioned above. Along with this, it offers advanced features like unlimited file upload, payment options, submissions and much more.
If you are looking for a way to add a logo in your forms then give it a read.
Process of inserting a logo in Google Forms.
There are two ways to insert the logo in Google Forms.
1. How to insert a logo in the header of your Google Forms?
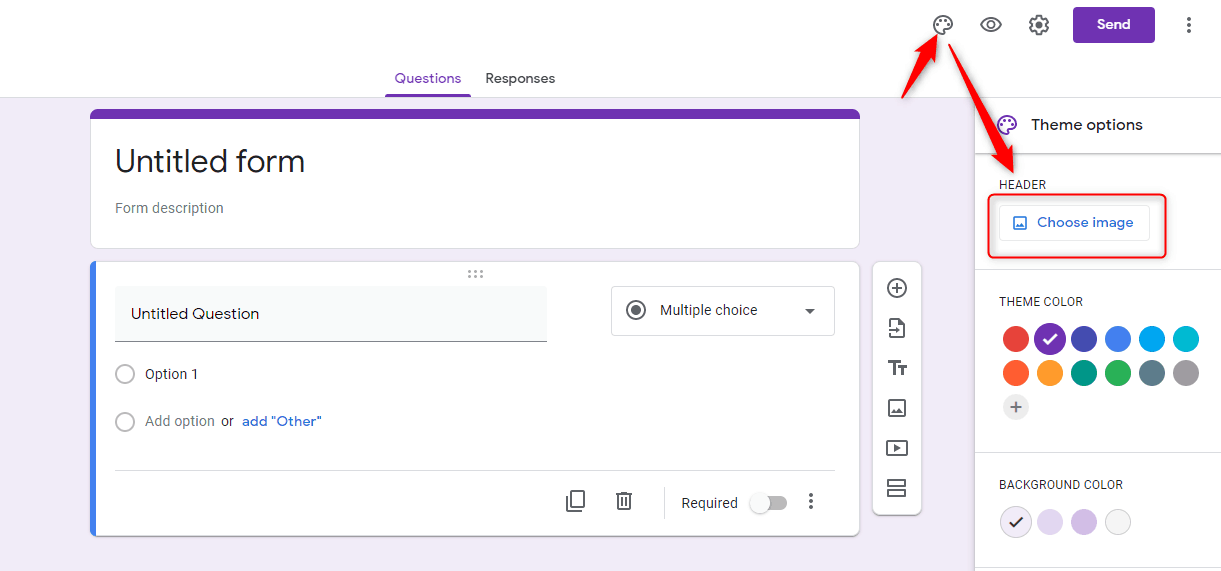
Step 1: The first thing all you have to do is to open Google Forms. Select the ‘Blank’ form or you can also use pre-designed templates.
Step 2: After doing that, you have to click on a color palette button appear on the top right corner and thereby clicking on the ‘Choose image’ option.
Step 3: Further, click on the ‘Upload photos’ which will offer you the option of ‘Drag a photo here’ or ‘Select a photo from your computer’.
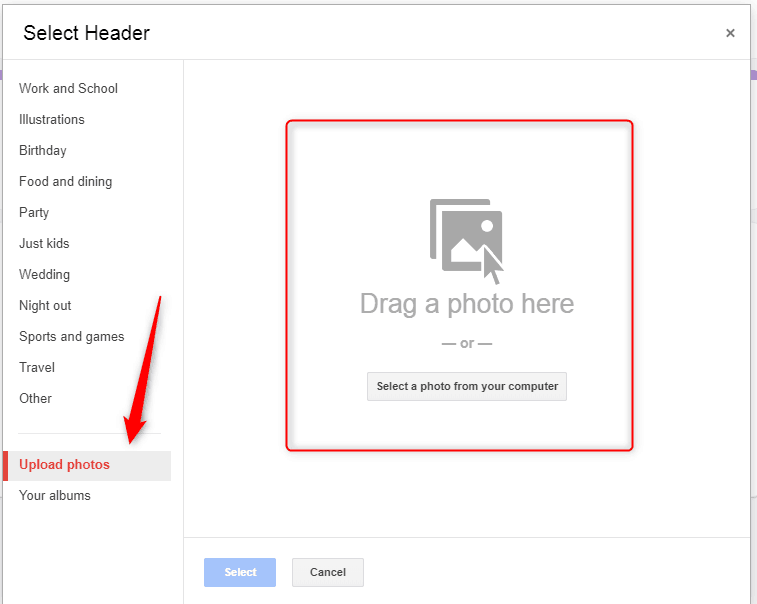
However, the size of the image must follow the criterion which is at least 200 pixels tall and 800 pixels wide.
2. How to insert a logo into the Google Forms itself?
Step 1: To insert a logo into the forms you have to click on the image icon showing on the right side.
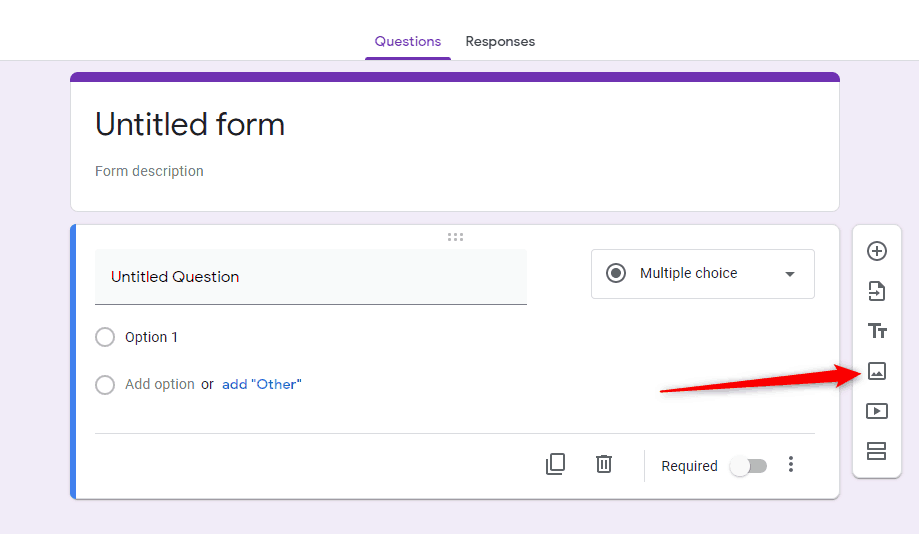
Step 2: Further, insert an image by clicking on the ‘Upload’ option.
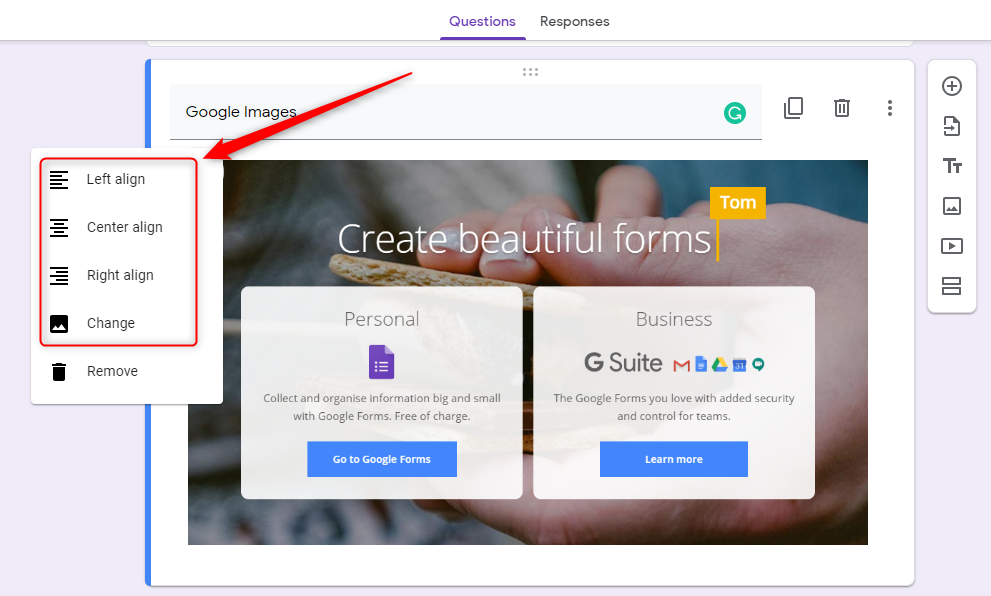
Step 3: Align the image accordingly.
As discussed earlier the best suitable alternative of Google Forms which doesn’t restrict you on features and allow you to create forms without any trouble. Certainly, for those who have vast needs and looking for an easy way out.
Let’s cast some lights on the Question, how one can insert the logo using Pabbly Form Builder?
The software offers two different ways of inserting a logo image in a form.
1. How to insert a logo in the header via Pabbly Form Builder?
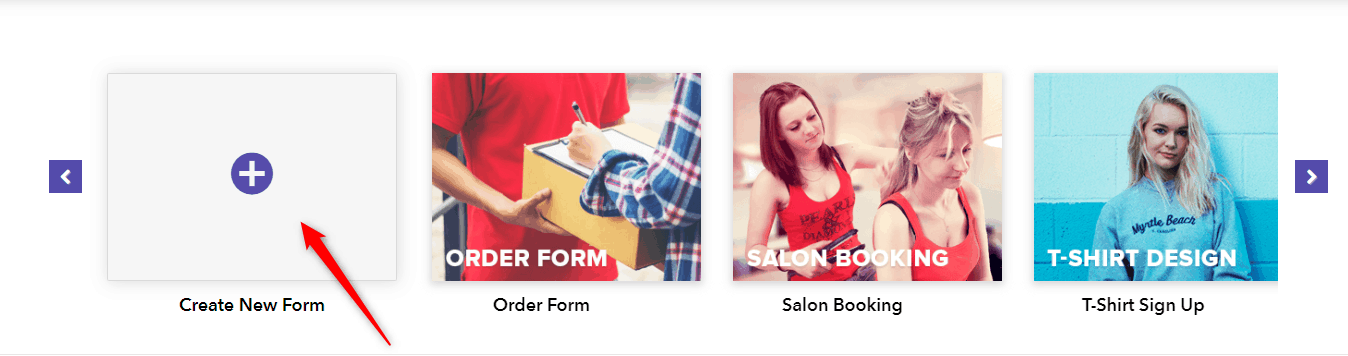
Step 1: Start working on your form by signing in to your Pabbly Form Builder account. Thereby clicking on ‘Create New Form’ or you can use pre-designed templates too.
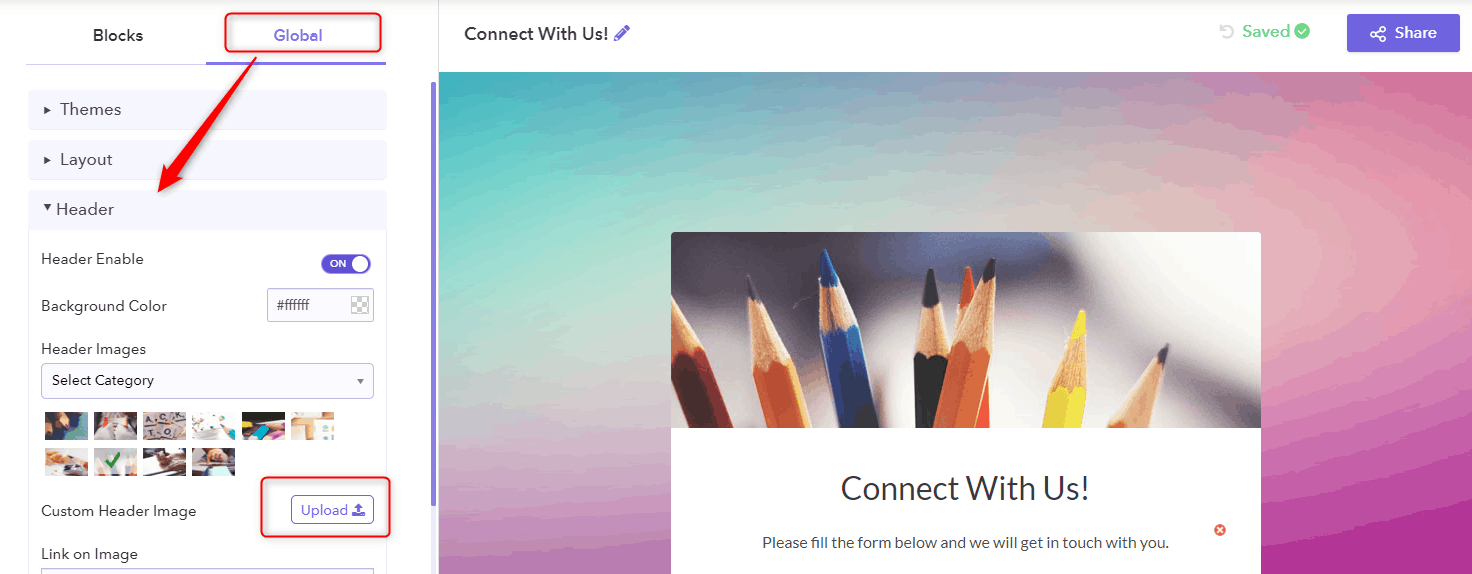
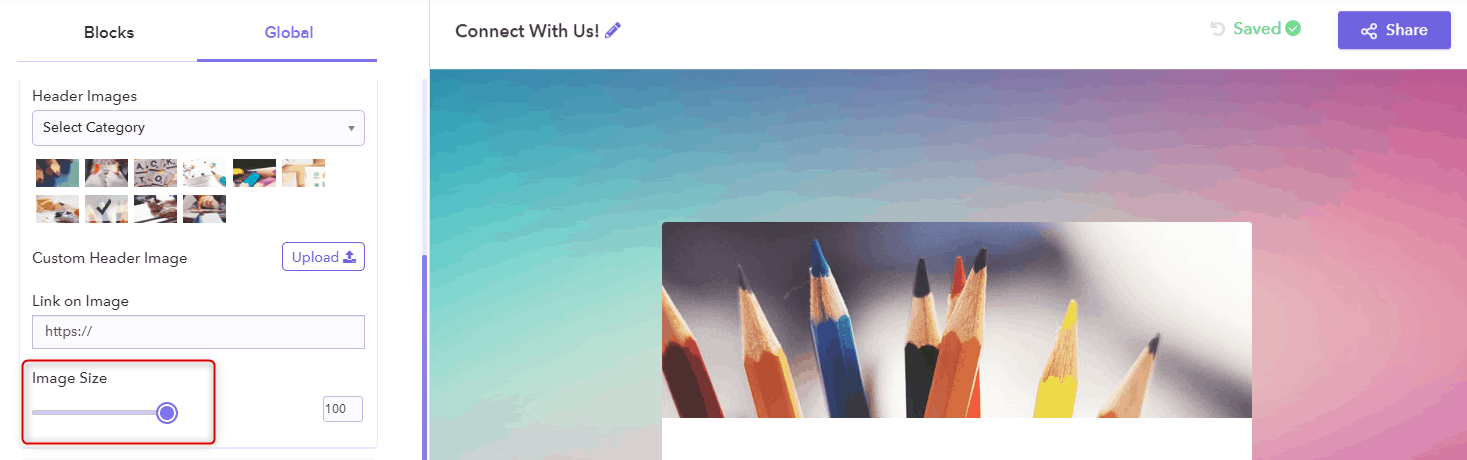
Step 2: Design your template accordingly. To add a logo in the header, you have to click on the ‘Global’ option. Further, click on the ‘Header’. Here you can add your custom image by clicking on option ‘upload’.
Additionally, it also lets you attach the URL to your custom image which Google Forms restricts.
Step 3: Also, you can choose an inbuilt image by clicking on the ‘Select Category’. Here you will find different categories according to your form.
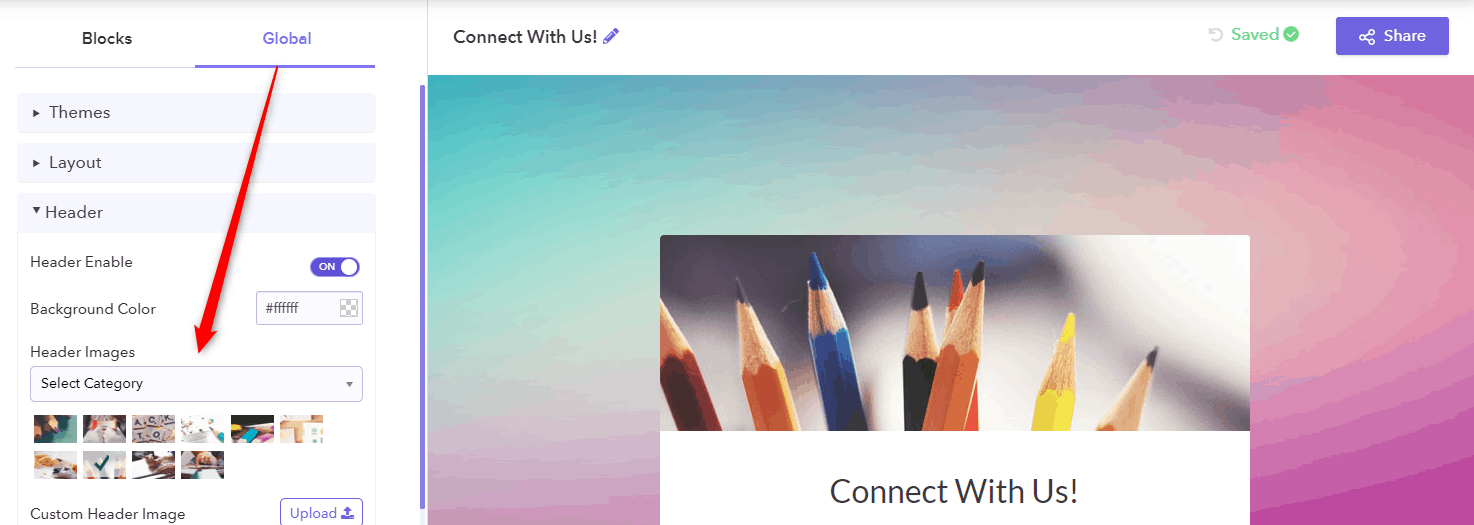
Step 4: Besides, you can resize your image by simply sliding on the ‘Image Size’ option.
2. How to insert a logo in the form itself via Pabbly Form Builder?
Step 1: You can easily insert the logo into your form by clicking on Blocks options.
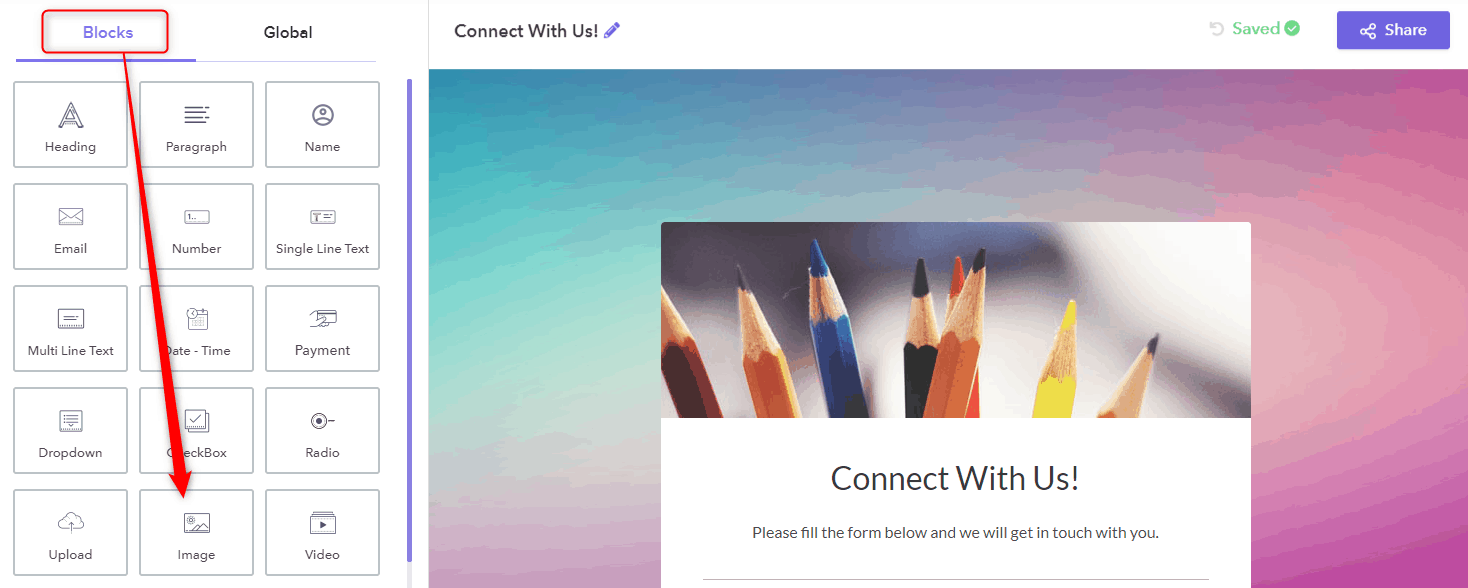
Step 2: Further, clicking on the ‘Image’ icon in the Block field. Here already assigned image will appear which you can change by clicking on the ‘Upload’ option. Also, you can connect the URL in an image too.
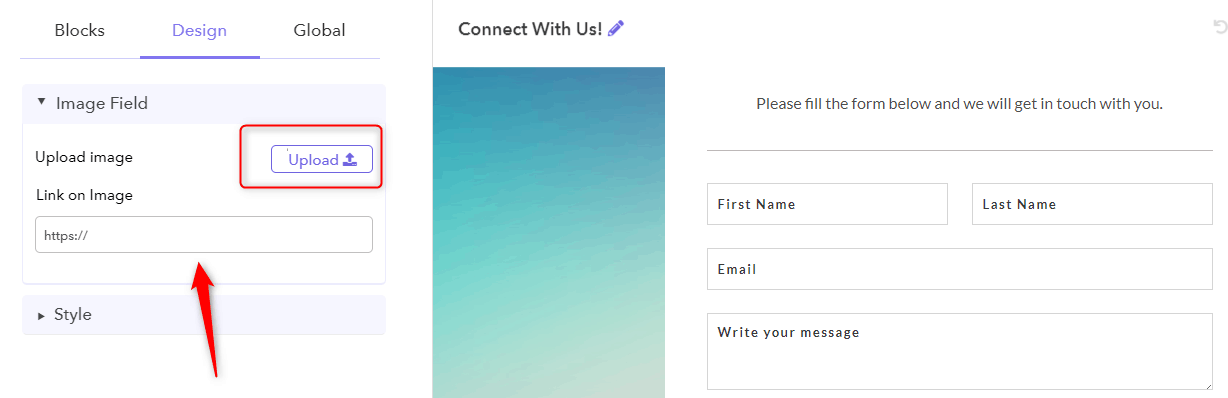
Step 3: Moreover, the ‘Style’ option makes the resizing of the image handier.
Unquestionably, in Pabbly Form Builder, there are a plethora of features and can go with every customer’s needs. All you have to do is drag and drop and voila your form is ready within a couple of minutes.
Conclusion
That’s all, follow the above-mentioned steps and you are more than ready to go. We are hoping that this tutorial will help to clear your confusion about the same.
No doubt Google Forms is free and provides most of the features but there is no denial in a fact that the forms created are so general and outdated.
Whereas Pabbly Form Builder fills that void by being the handiest and creative form building tool in the market.
Other than this, it also allows you to explore the platform by offering a free trial.
So what are you waiting for? Go and try your hands on the software and I know for sure you will be amazed by its features.
Let us know your views in the comment section.
For further information, you may also like to read:
- How to track Google Forms submissions in Google Analytics?
- Can Google Forms be made to be ‘Responsive’?
Can Google Forms be made to be ‘Responsive’?
In today’s mobile-internet era every user loves to surf the net on their mobile phones. Hence, it is important to deliver a user-friendly experience to users on each and every device.
Let’s says if your form is not responsive and the user browses it from his smartphones, that time they need to pinch, zoom and scroll the page. In that case, the form will not look good due to a lack of responsiveness. Hence, users might not like to fill the form.
That’s why it is important to build responsive forms that can compatible with all the devices. So, your customers can easily view and fill the form on whatever device or channel they are using.
Now for creating the responsive forms you can use online form builders and provide a seamless look and feel to your form.
When we talk about the form builders, Google Forms comes first in everyone’s mind because it is an efficient and free tool available in the market. Further, it lets you create different forms like feedback, survey, payment, etc.
Despite various advantages, due to some of its limitations, Google Forms might not be the most suitable one for your use.
Are Google Forms Really Responsive?
Google Forms is not optimized for mobile devices or tablets. It works online in desktop and when you go offline, some of the form fields, images, background designs look distorted due to lack of responsive design. As a result, users might get frustrated while filling out the form.
Making forms responsive isn’t easy, it requires lots of programming knowledge. Thus to reduce this burden, you can switch to any paid online form builders. Here, I am providing you Pabbly Form Builder – one of its best alternatives which lets you create responsive forms without any significant technical efforts.
Every form you build with this software adjusts automatically to the width of your content container and provide a hassle-free experience to your users.
If you want to create a simple form without worrying about the form responsiveness then follow these steps and create your form.
Steps to make Google Forms responsive:
Step 1: Firstly, you’ll need to create the actual Google Form. Start by logging into your Google account and then pick a template or blank form that you want to use.
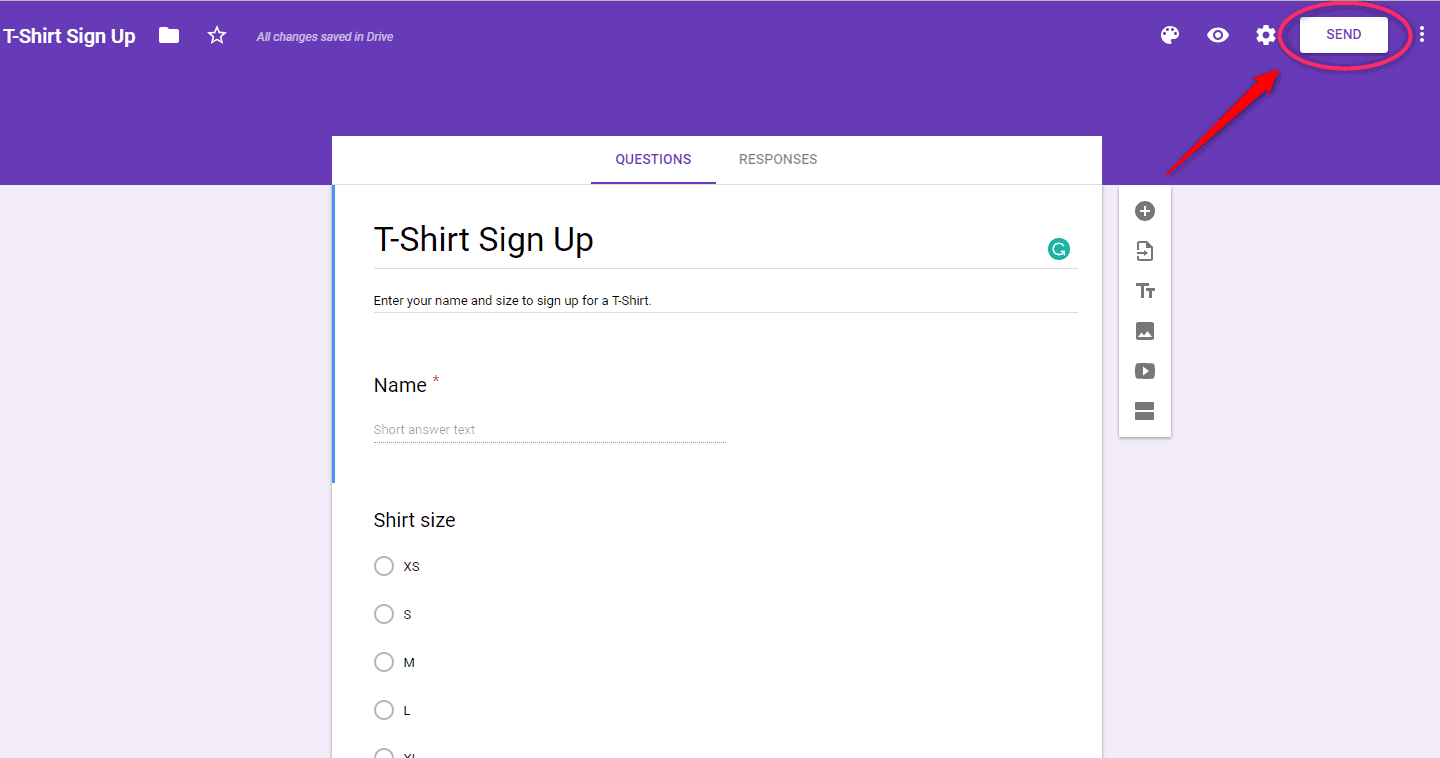
Step 2: After creating the form, click on the “Send” button of your Google Forms and you’ll see a number of options to share your form, including email, link sharing, HTML and more.
Step 3: Select the tab label “<>” to change the height and width of the form.
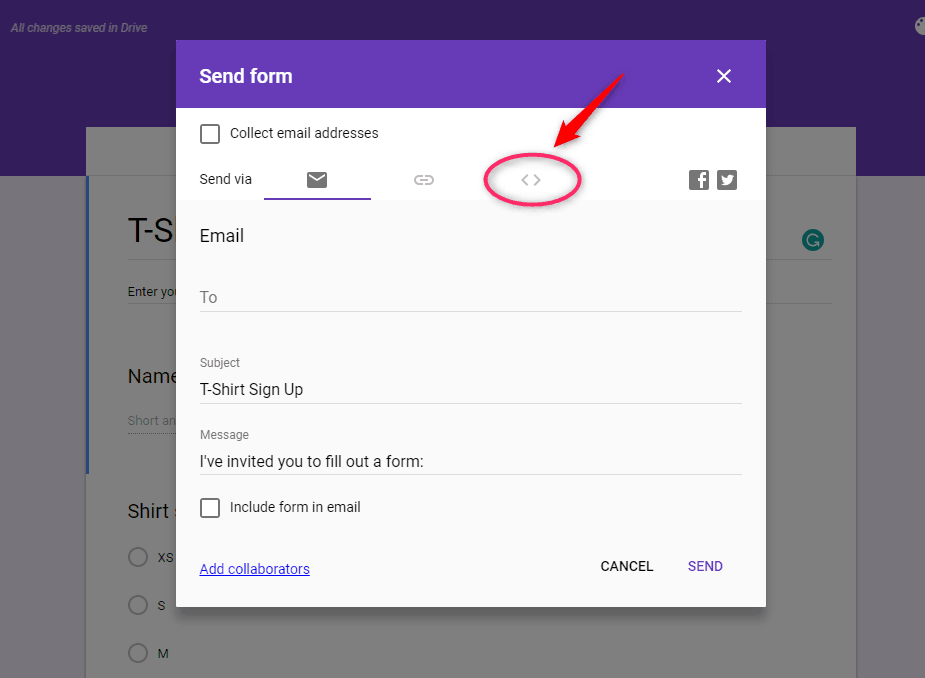
Step 4: In the tab labeled < >, you’ll see a code snippet under Embed HTML where you can adjust the size of your form.
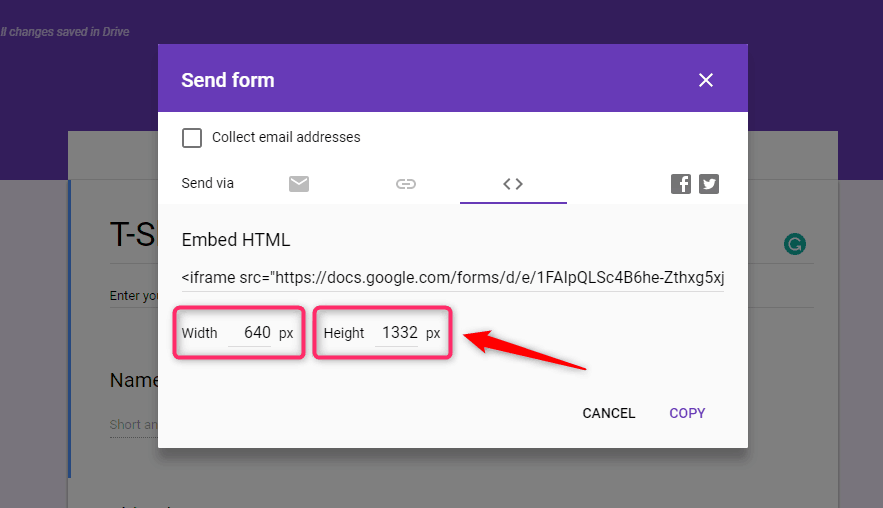
If you see this code the width of the form is “640” by default, if you take this code and paste it as it is on mobile view then your Google Forms will get distorted. In that case, you need to change the width of your form to 100%.
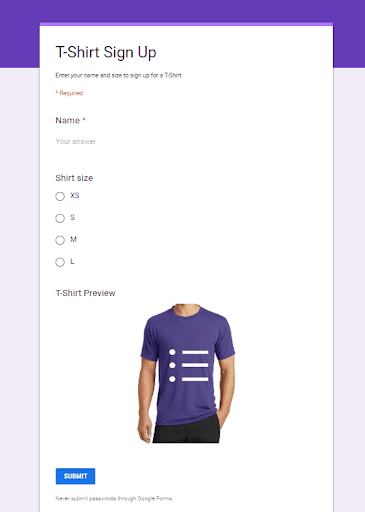
Once you finish tweaking, you should end up with a decent looking mobile form, as pictured here, without the requirement to squeeze-zoom every page continually.
Build Responsive Forms with Pabbly Form Builder (3 Steps)
No matter where your customers are or what device they’re using, they can easily browse your website on different screen sizes without any headache with Pabbly Form Builder. Whether it is Desktop, tablet, and smartphone, all living in happy forms harmony.
Step 1: Create a form with the required fields and then go to the “Share” option. Where you’ll get multiple options like share form, embed full form, and pop up form.
Step 2: When you choose the “Embed Full Form” option the settings will get opened.
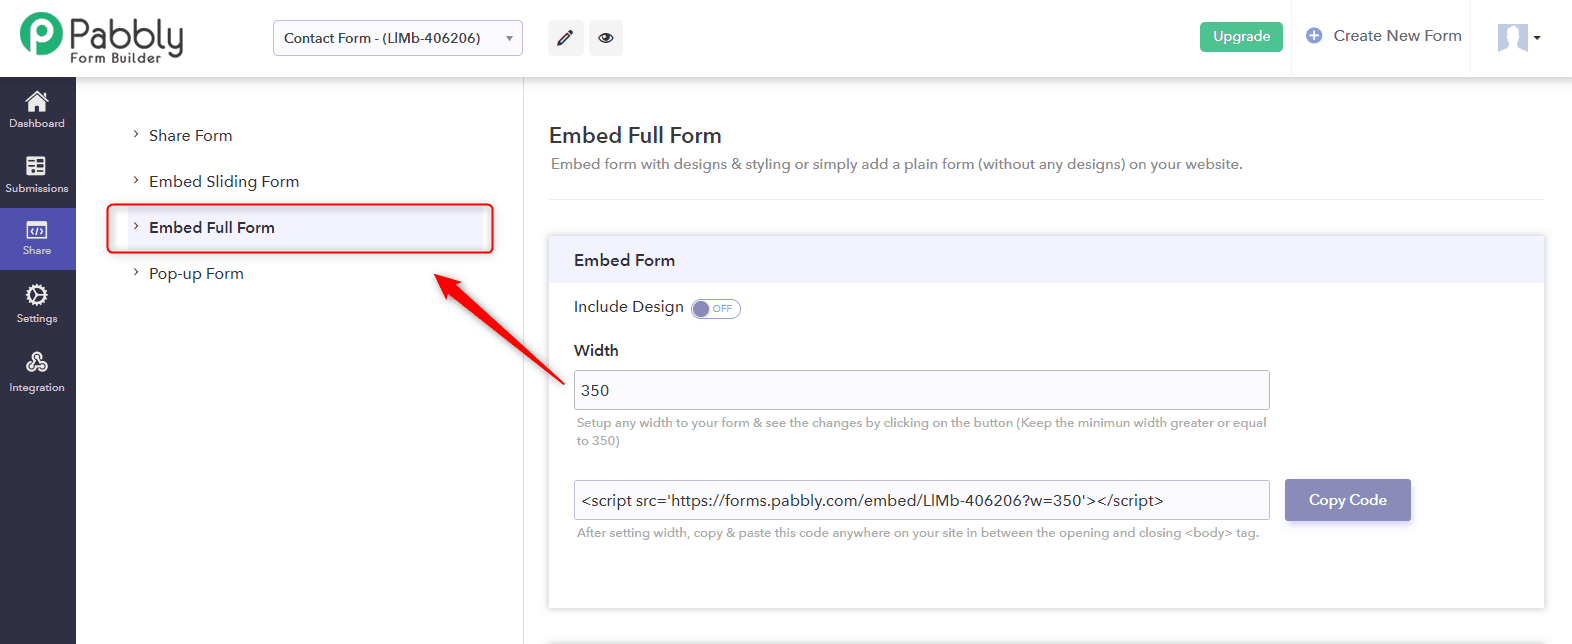
Step 3: You can set up any width to your form & see the changes by clicking on the preview button. The height of the form is automatically adjusted according to the screen sizes.
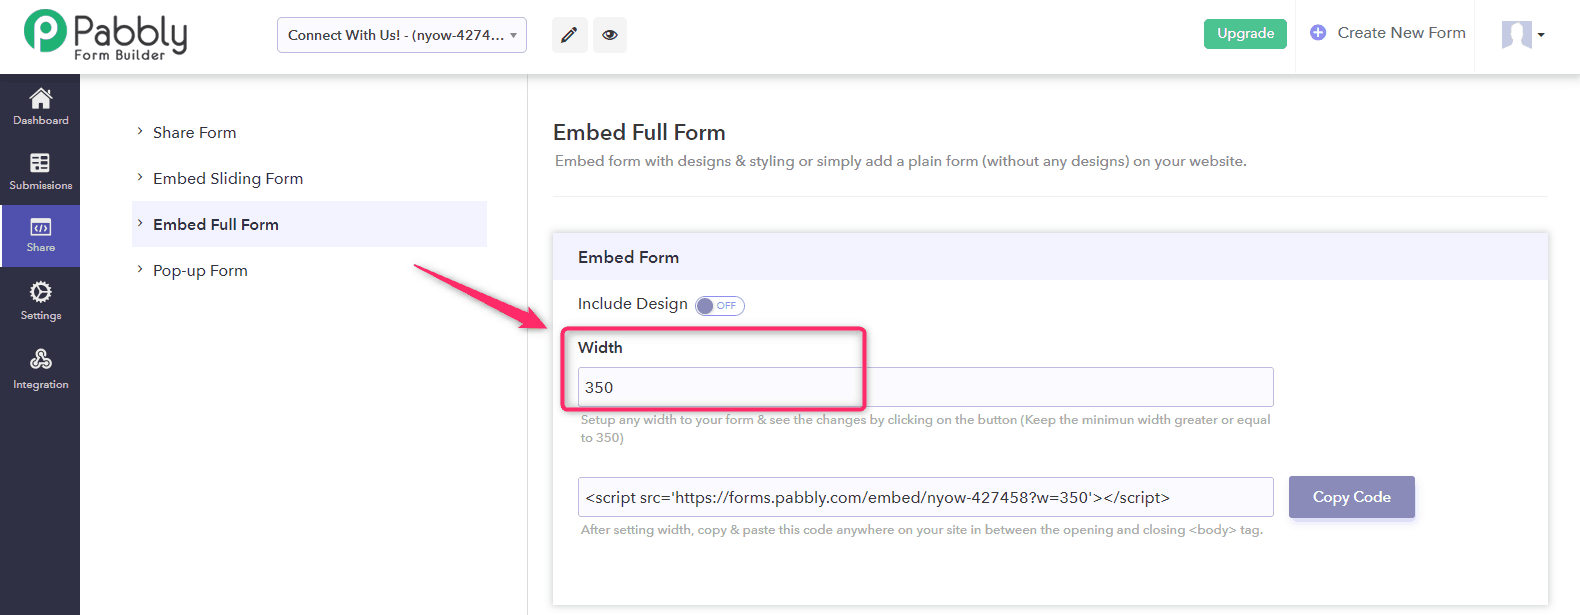
After setting width, just copy & paste the HTML code anywhere on your site in between the opening and closing <body> tag and your responsive form is ready.
Wrapping up
It is good to make dynamic changes in the appearance of forms that are compatible with different size displays on desktops, laptops, tablets, and phones. Forms are an integral part of many websites that helps to gain access to the results and we’re passionate about improving the experience of every customer.
If you want an inbuilt responsive form for the website then you can choose Pabbly Form Builder. It might be the best bid you that doesn’t ruin your user’s experience.
Otherwise, Google Forms is a great online form builder.
You May Also Like To Read:
How to track Google Forms submissions in Google Analytics?

Want to track your Google Forms submissions?
Well, Google Analytics can review your form views and conversions and help you figure out where the users of your form come from. After analyzing web traffic on your site you can make informed business decisions in order to boost your conversions.
In this article, we will show you how to use Google Analytics to track form submissions in Google Forms.
Why do you use Google Analytics to track forms?
With the help of Google Analytics, you can easily analyze the form data that will help you to determine how you might streamline the process of form submission for your users. As a result, you can design the best form that collects the most submissions. Below are some benefits of using Google Analytics:
- Track form views to see which form works better
- Determine which form gets the highest number of submissions
- Optimize the conversion rate of form
Limitations of Google Forms with Google Analytics
By default, there is no such way to track the usage of a form that is created in Google Forms. For that, you need to create a form in Google Forms and integrate it into your website. This way, you will be able to track the activity on your forms such as a number of submissions, views and a lot more.
Now you guys might be thinking that how one can track submissions on their forms if they don’t have any website. Well, don’t worry because there are many form builders available in the market which provides the facility to keep a record of all the form submissions. Here, I am sharing one of the worth mentioning form creators i.e, Pabbly Form Builder which has an inbuilt form analytics feature.
Furthermore, this amazing form builder software lets you view how your forms are converting, the value of leads they’ve collected, and how people are responding to your questions.
Let’s understand step by step how this feature works in Pabbly Form Builder:
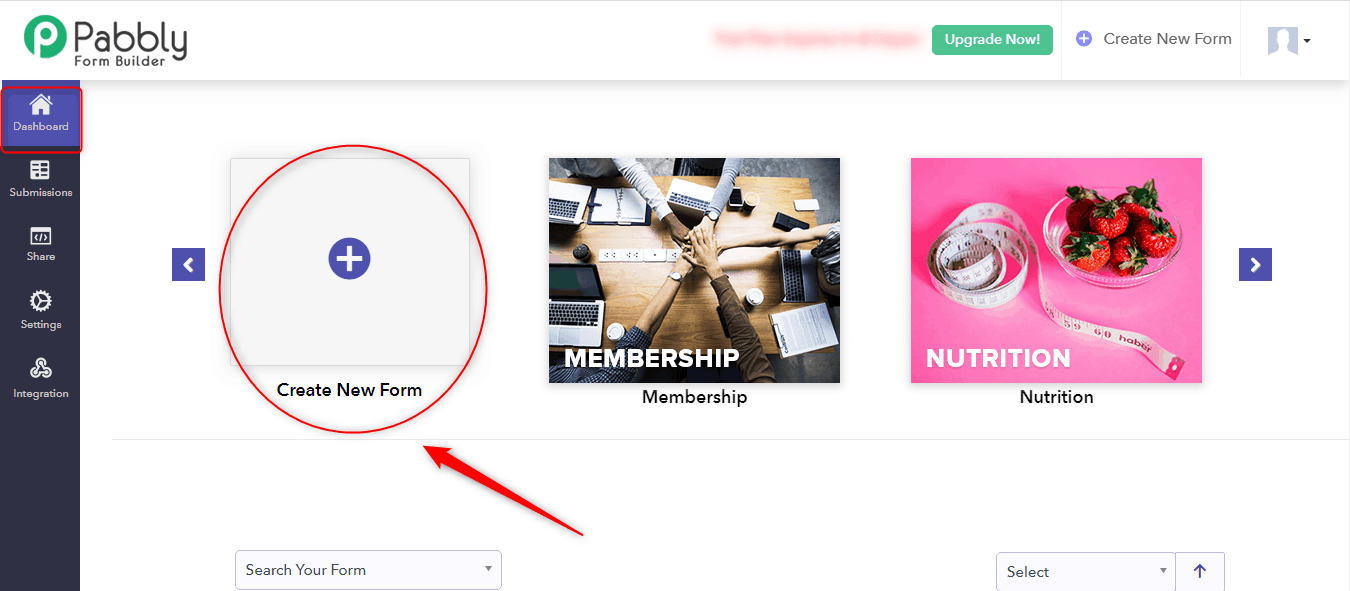
Step 1: Create your form by logging in to the dashboard of Pabbly Form Builder.
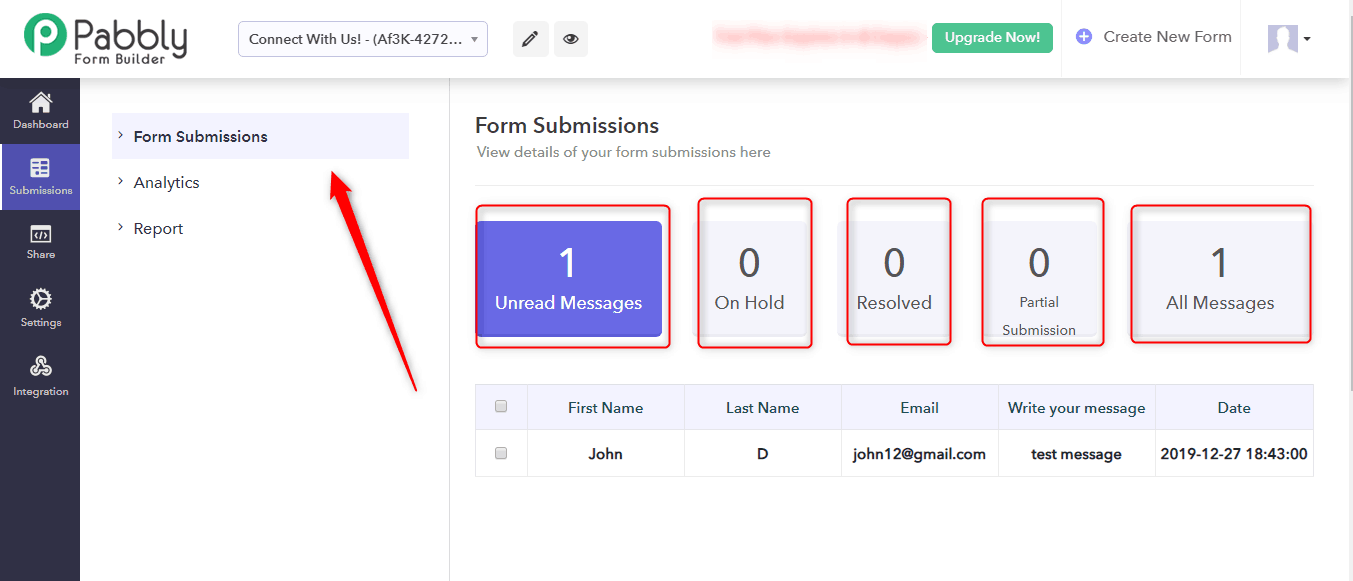
Step 2: Click on the “Submission” button from the menu, where you can find the following options that are Forms submission, Analytics, and Report.
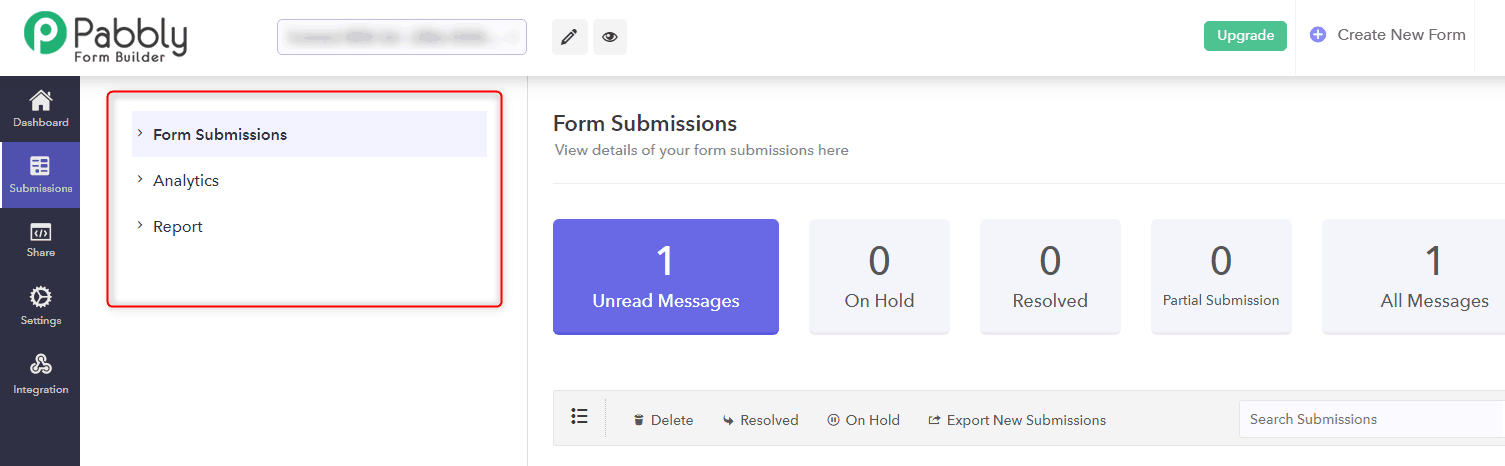
Step 3: You can view the details of all the forms in the Form Submissions section that are submitted by your users such as unread messages, partial submission, etc.
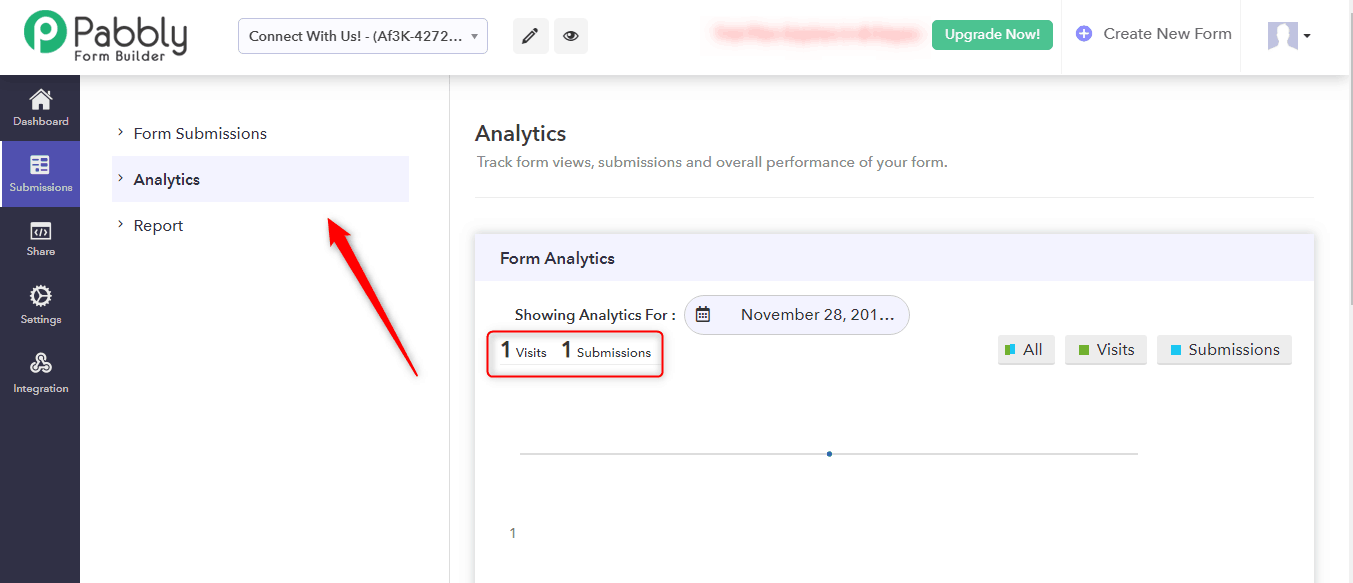
Step 4: With the “Analytics” option, you will get the complete insight into your form. You can easily track the number of forms views, submissions and a lot more.
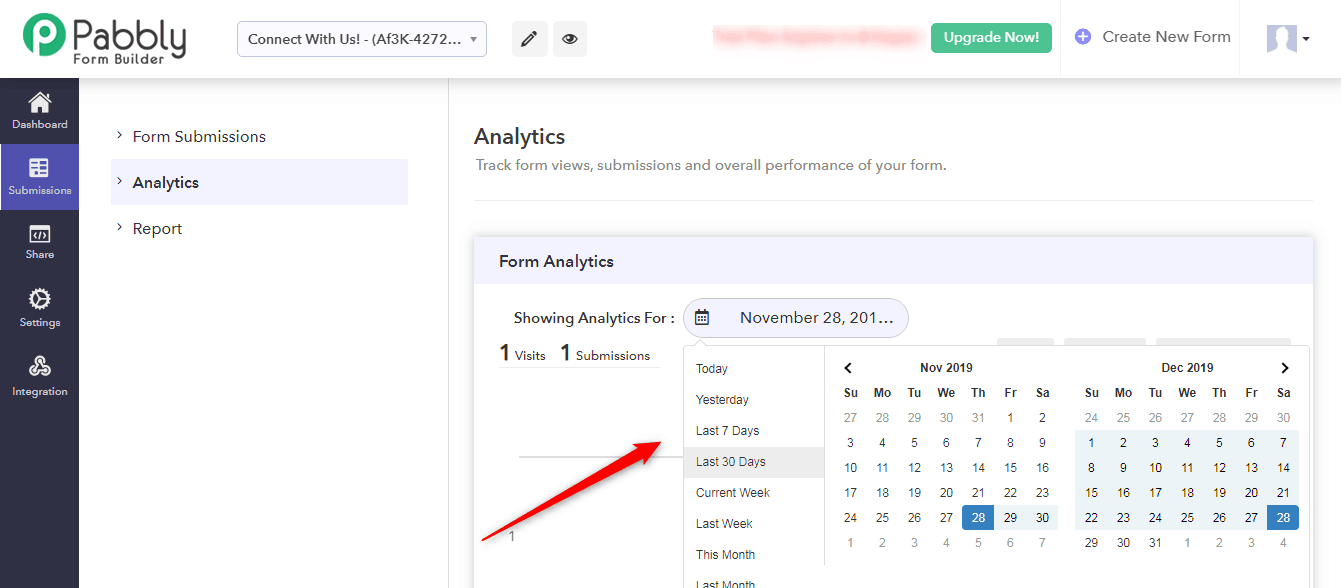
Additionally, you can also use the date filter to display specific records in your form.
Step 5: In the “Report” section, you can see Visual Reports in the form of graphs & charts based on your submission data.
By following the steps outlined above you can easily track submissions on your form with just a few clicks. In addition, it will help you to understand where you might improve your form.
Final Thoughts:
That’s it, you are all set to find out whether your site visitors are completing the form or not. Now, you must be thinking which form creator to pick. Well, if you want to track the form submissions free of cost then you can go with Google Forms but for that, you should have a separate page on your website where you can embed Google Forms.
However, I would recommend you to try Pabbly Form Builder as it provides a built-in form tracking feature that gives you a quick overview of how your form is performing in just less than a minute.
You May Also Like To Read:
- What are the good alternatives of Google Forms with a file upload option?
- How to integrate a payment gateway in Google Forms?
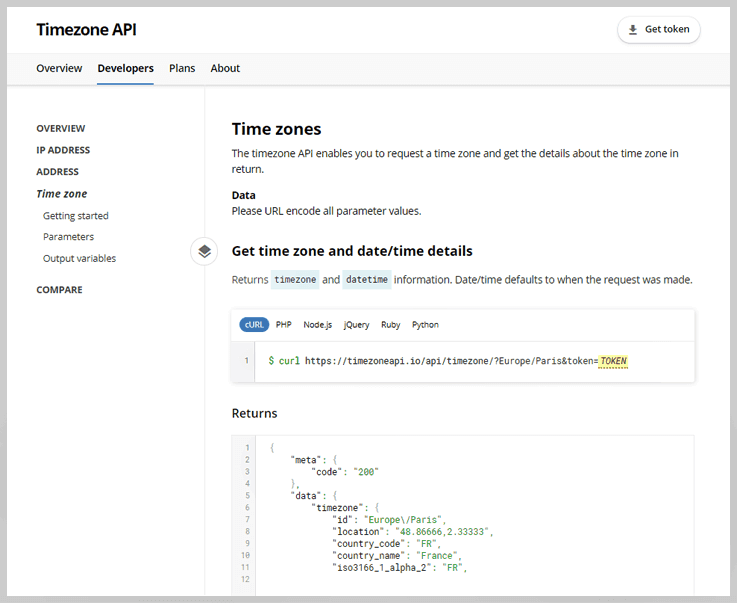
4 Best API Services To Convert Mountain Time To Eastern Time 2022

Nowadays, most applications available in the market tend to have date and time associated data in it. If the application is not used just in a single location, then you likely have to deal with the date & time manipulation functionality in your application to synchronize everything according to the different timezone. But, managing date & time definitely adds some complexity in your system as you always have to remember too much calculation to properly adjust dates. So, these kinds of time zone conversion routines are a bit of a pain to use.
Now, you might be wondering how you can automate this with ease?
Don’t worry, we spent several weeks looking at over dozens of time zone API’s to determine which one makes dealing with multiple time zones easy and simple. On that basis, we created a list of Best API Services To Convert Mountain Time To Eastern Time for you. Have a look at them, & try the best one according to your requirements & budget.
Convert Mountain Time To Eastern Time