

This tutorial will demonstrate how to make “Pagination in CodeIgniter”. In this post we used CodeIgniter pagination class by initializing pagination library.
Pagination is one concept used for web applications. Wherever we have a bulk of data and need to show them, then it allows you to navigate from page to page, at that time we require pagination. It looks like:
As a robust framework, CodeIgniter provides very efficient way to handle it with its integrated support. In this tutorial, we will see through an example, how we can implement CodeIgniter pagination and enhance it further as per our need.
Watch the live demo or download code from the link given below

Syntax:
For initialization codeIgniter pagination library
// Initialize empty array.
$config = array();
// Set base_url for every links
$config["base_url"] = base_url()."index.php/pagination_controller/contact_info";
// Set total rows in the result set you are creating pagination for.
$config["total_rows"] = $total_row;
// Number of items you intend to show per page.
$config["per_page"] = 1;
// Use pagination number for anchor URL.
$config['use_page_numbers'] = TRUE;
//Set that how many number of pages you want to view.
$config['num_links'] = $total_row;
// Open tag for CURRENT link.
$config['cur_tag_open'] = ' <a class="current">';
// Close tag for CURRENT link.
$config['cur_tag_close'] = '</a>';
// By clicking on performing NEXT pagination.
$config['next_link'] = 'Next';
// By clicking on performing PREVIOUS pagination.
$config['prev_link'] = 'Previous';
// To initialize "$config" array and set to pagination library.
$this->pagination->initialize($config);
// Create link.
$this->pagination->create_links();
How to run file:
http://localhost/codeigniter_pagination/index.php/pagination_controller/contact_info
Tutorial Scripts in detail
Below are the details of the code used in this tutorial with proper explanation.
My SQL code segment
To create database and table, execute following codes in your My SQL . or in downloaded model folder info.sql file is there you can also import them
CREATE DATABASE info;
CREATE TABLE contact_info(
id  int(11) NOT NULL AUTO_INCREMENT,
name  varchar(255) NOT NULL,
email  varchar(255) NOT NULL,
mobile_number  int(11) NOT NULL,
country  varchar(255) NOT NULL,
PRIMARY KEY (`id`)
)
Controller File : pagination_controller.php
Copy the below code in your controller.
<?php if (!defined('BASEPATH')) exit('No direct script access allowed');
class Pagination_Controller extends CI_Controller {
// Load libraries in Constructor.
function __construct() {
parent::__construct();
$this->load->model('pagination_model');
$this->load->library('pagination');
}
// Set array for PAGINATION LIBRARY, and show view data according to page.
public function contact_info(){
$config = array();
$config["base_url"] = base_url() . "index.php/pagination_controller/contact_info";
$total_row = $this->pagination_model->record_count();
$config["total_rows"] = $total_row;
$config["per_page"] = 1;
$config['use_page_numbers'] = TRUE;
$config['num_links'] = $total_row;
$config['cur_tag_open'] = ' <a class="current">';
$config['cur_tag_close'] = '</a>';
$config['next_link'] = 'Next';
$config['prev_link'] = 'Previous';
$this->pagination->initialize($config);
if($this->uri->segment(3)){
$page = ($this->uri->segment(3)) ;
}
else{
$page = 1;
}
$data["results"] = $this->pagination_model->fetch_data($config["per_page"], $page);
$str_links = $this->pagination->create_links();
$data["links"] = explode(' ',$str_links );
// View data according to array.
$this->load->view("pagination_view", $data);
}
}
?>
View File: pagination_view.php
Copy the below code in your view.
<html>
<head>
<title>Codelgniter pagination</title>
<link rel="stylesheet" type="text/css" href="<?php echo base_url(); ?>css/style.css">
<link href='http://fonts.googleapis.com/css?family=Source+Sans+Pro|Open+Sans+Condensed:300|Raleway' rel='stylesheet' type='text/css'>
</head>
<body>
<div class="main">
<div id="content">
<h3 id='form_head'>Codelgniter Pagination Example </h3><br/>
<hr>
<div id="form_input">
<?php

// Show data
foreach ($results as $data) {
echo "<label> Id </label>" . "<div class='input_text'>" . $data->id . "</div>"
. "<label> Name</label> " . "<div class='input_name'>" . $data->name . "</div>"
. "<label> Email </label>" . "<div class='input_email'>" . $data->email . "</div>"
. "<label> Mobile No </label>" . "<div class='input_num'>" . $data->mobile_number . "</div>"
. "<label> Country </label> " . "<div class='input_country'>" . $data->country . "</div>";
}
?>
</div>
<div id="pagination">
<ul class="tsc_pagination">

<!-- Show pagination links -->
<?php foreach ($links as $link) {
echo "<li>". $link."</li>";
} ?>
</div>
</div>
</div>
</body>
</html>
Model File : pagination_model.php
Create new class in your model as shown below.
<?php if ( ! defined('BASEPATH')) exit('No direct script access allowed');

class Pagination_Model extends CI_Model {
function __construct() {
parent::__construct();
}
// Count all record of table "contact_info" in database.
public function record_count() {
return $this->db->count_all("contact_info");
}

// Fetch data according to per_page limit.
public function fetch_data($limit, $id) {
$this->db->limit($limit);
$this->db->where('id', $id);
$query = $this->db->get("contact_info");
if ($query->num_rows() > 0) {
foreach ($query->result() as $row) {
$data[] = $row;
}

return $data;
}
return false;
}
}
?>
CSS File : style.css
Styling HTML Elements.
body {
font-family: 'Raleway', sans-serif;
}
.main
{
width: 1015px;
position: absolute;
top: 10%;
left: 20%;
}
#form_head
{
text-align: center;
background-color: #61CAFA;
height: 66px;
margin: 0 0 -29px 0;
padding-top: 35px;
border-radius: 8px 8px 0 0;
color: rgb(255, 255, 255);
}
#content {
position: absolute;
width: 450px;
height: 390px;
border: 2px solid gray;
border-radius: 10px;
}
#form_input
{
margin-left: 110px;
margin-top: 30px;
}
label
{
margin-right: 6px;
font-weight: bold;
}
#pagination{
margin: 40 40 0;
}
.input_text {
display: inline;
margin: 100px;
}
.input_name {
display: inline;
margin: 65px;
}
.input_email {
display: inline;
margin-left: 73px;
}
.input_num {
display: inline;
margin: 36px;
}
.input_country {
display: inline;
margin: 53px;
}
ul.tsc_pagination li a
{
border:solid 1px;
border-radius:3px;
-moz-border-radius:3px;
-webkit-border-radius:3px;
padding:6px 9px 6px 9px;
}
ul.tsc_pagination li
{
padding-bottom:1px;
}
ul.tsc_pagination li a:hover,
ul.tsc_pagination li a.current
{
color:#FFFFFF;
box-shadow:0px 1px #EDEDED;
-moz-box-shadow:0px 1px #EDEDED;
-webkit-box-shadow:0px 1px #EDEDED;
}
ul.tsc_pagination
{
margin:4px 0;
padding:0px;
height:100%;
overflow:hidden;
font:12px 'Tahoma';
list-style-type:none;
}
ul.tsc_pagination li
{
float:left;
margin:0px;
padding:0px;
margin-left:5px;
}
ul.tsc_pagination li a
{
color:black;
display:block;
text-decoration:none;
padding:7px 10px 7px 10px;
}
ul.tsc_pagination li a img
{
border:none;
}
ul.tsc_pagination li a
{
color:#0A7EC5;
border-color:#8DC5E6;
background:#F8FCFF;
}
ul.tsc_pagination li a:hover,
ul.tsc_pagination li a.current
{
text-shadow:0px 1px #388DBE;
border-color:#3390CA;
background:#58B0E7;
background:-moz-linear-gradient(top, #B4F6FF 1px, #63D0FE 1px, #58B0E7);
background:-webkit-gradient(linear, 0 0, 0 100%, color-stop(0.02, #B4F6FF), color-stop(0.02, #63D0FE), color-stop(1, #58B0E7));
}
Conclusion:
Thanks for reading the complete post. Hope you have got the concept. You can share your views in the space provided below and get in touch with us.
CodeIgniter Remove index.php By .htaccess
In this tutorial I am going to show how to remove index.php from URL using .htaccess file in CodeIgniter. htaccess is the shortened used for Hypertext Access, which is a powerful configuration file that controls the directory “.htaccess”. It is used by Apache based web servers to control various server features.
Now The Question Arises Why Exactly do we want to remove index.php..?? As CodeIgniter’s URLs are designed to be search engine friendly and to human too. And so to maintain the standards we need to remove the default index.php which appears in the url of codeigniter applications, so that the url becomes search engine friendly and looks clean.
Download The Script Given Below
The script contains the code with proper documentation to perform the following transformation.

Steps To Remove index.php using .htaccess:-
Step:-1 Open the file config.php located in application/config path. Find and Replace the below code in config.php file.
//  Find the below code

$config['index_page'] = "index.php"

//  Remove index.php

$config['index_page'] = ""
Step:-2 Go to your CodeIgniter folder and create .htaccess file.
Path:
Your_website_folder/
application/
assets/
system/
user_guide/
.htaccess <--------- this file
index.php
license.txt
Step:-3 Write below code in .htaccess file
<IfModule mod_rewrite.c>
RewriteEngine On
RewriteCond %{REQUEST_FILENAME} !-f
RewriteCond %{REQUEST_FILENAME} !-d
RewriteRule ^(.*)$ index.php/$1 [L]
</IfModule>
Step:-4 In some cases the default setting for uri_protocol does not work properly. To solve this issue just open the file config.php located in application/config and then find and replace the code as:
//  Find the below code

$config['uri_protocol'] = "AUTO"

//  Replace it as

$config['uri_protocol'] = "REQUEST_URI"
Conclusion:
Hope these steps helped you to remove index.php in CodeIgniter framework using .htaccess. Keep reading our blogs. 🙂
Session In CodeIgniter
Sessions are one of the most important part for any web applications, as it helps to maintain user’s “state” and to track their activity when they visit your website.
Here we have use CodeIgniter’s session class that will maintain and help to store session information for each user.
To use this class you need to first initialize or load the session library of CodeIgniter in your controller constructors or you can also go for $autoload in config file, so that it can be auto-loaded by the system.
To load session library manually use below code –
Syntax:
$this->load->library('session');Note: The Session class in CodeIgniter does not use native PHP sessions, as It generates its own session data.
Following are some syntax that are mainly used for session data:-
To retrieve session data:
$this->session->userdata('item'); // Where item is the array index like session idTo add custom session data:
$this->session->set_userdata($array); // $array is an associative array of your new dataTo retrieve all session data:
$this->session->all_userdata() // Read all session valuesTo remove all session data:
$this->session->unset_userdata('some_name'); // Removing values from sessionWe have made an example which will let you know how we have used the above mentioned syntax and how they works.
To run this example locally at your end you can create the files and copy the code. If you wish to download the files, you can click using the download link given below.
Watch the live demo or download code from the link given below

How to run file:
http://localhost/session/index.php/session_tutorial/session_demo_page_show
Tutorial Scripts in detail
Below are the details of the code used in this tutorial with proper explanation.
Controller : session_tutorial.php
copy the below code in your controller.
<?php
Class Session_Tutorial extends CI_Controller {

public function __construct() {
parent::__construct();

// Load form helper library
$this->load->helper('form');

// Load session library
$this->load->library('session');

// Load validation library
$this->load->library('form_validation');
}

// Show session demo page
public function session_demo_page_show() {
$this->load->view('session_view');
}

// Set values in session
public function set_session_value() {

// Check input validation
$this->form_validation->set_rules('session_value', 'Session Value', 'trim|required|xss_clean');

if ($this->form_validation->run() == FALSE) {
$this->load->view('session_view');
} else {

// Create session array
$sess_array = array(
'set_value' => $this->input->post('session_value')
);

// Add user value in session
$this->session->set_userdata('session_data', $sess_array);
$data['message_display'] = 'Value Successfully Set in Session';
$this->load->view('session_view', $data);
}
}

// Read session values
public function read_session_value() {

// Read all session values
$set_data = $this->session->all_userdata();

if (isset($set_data['session_data']) && $set_data['session_data']['set_value'] != NULL) {
$data['read_set_value'] = 'Set Value : ' . $set_data['session_data']['set_value'];
} else {
$data['read_set_value'] = 'Please Set Session Value First !';
}
$this->load->view('session_view', $data);
}

// Unset set values from session
public function unset_session_value() {
$sess_array = array(
'set_value' => ''
);

// Removing values from session
$this->session->unset_userdata('session_data', $sess_array);
$data['message_display'] = 'Successfully Unset Session Set Value';
$this->load->view('session_view', $data);
}
}
?>
views : session_view.php
copy the below code in your view.
<html>
<head>
<title>Session View Page</title>
<link rel="stylesheet" type="text/css" href="<?php echo base_url(); ?>css/style.css">
<link href='http://fonts.googleapis.com/css?family=Source+Sans+Pro|Open+Sans+Condensed:300|Raleway' rel='stylesheet' type='text/css'>
</head>
<body>

<div id="main">
<div id="note"><span><b>Note : </b></span> In this DEMO we gives you functionality to set your own session value. </div>
<div class="message">
<?php
if (isset($read_set_value)) {
echo $read_set_value;
}
if (isset($message_display)) {
echo $message_display;
}
?>
</div>

<div id="show_form">
<h2>CodeIgniter Session Demo</h2>
<?php echo form_open('session_tutorial/set_session_value'); ?>
<div class='error_msg'>
<?php echo validation_errors(); ?>
</div>
<?php echo form_label('Enter a session value :');?>
<input type="text" name="session_value" />
<input type="submit" value="Set Session Value" id='set_button'/>
<?php echo form_close(); ?>

<?php echo form_open('session_tutorial/read_session_value'); ?>
<input type="submit" value="Read Session Value" id="read_button" />
<?php echo form_close(); ?>

<?php echo form_open('session_tutorial/unset_session_value'); ?>
<input type="submit" value="Unset Session Value" id="unset_button" />
<?php echo form_close(); ?>
</div>
</div>
</body>
</html>
CSS : style.css
Styling HTML Elements.
#main{
width:960px;
margin:50px auto;
font-family:raleway;
}
span{
color:red;
}
#note{
position:absolute;
left: 246px;
top: 81px;
}
h2{
background-color: #FEFFED;
text-align:center;
border-radius: 10px 10px 0 0;
margin: -10px -40px;
padding: 30px;
}
#show_form{
width:300px;
float: left;
border-radius: 10px;
font-family:raleway;
border: 2px solid #ccc;
padding: 10px 40px 25px;
margin-top: 70px;
}
input[type=text]{
width:100%;
padding: 10px;
margin-top: 8px;
border: 1px solid #ccc;
padding-left: 5px;
font-size: 16px;
font-family:raleway;
background-color: #FEFFED;
}
input[type=submit]{
width: 100%;
background-color:#FFBC00;
color: white;
border: 2px solid #FFCB00;
padding: 10px;
font-size:20px;
cursor:pointer;
border-radius: 5px;
margin-bottom: 15px;
}
.message{
position: absolute;
font-weight: bold;
font-size: 28px;
top:150px;
left: 862px;
width: 500px;
text-align: center;
}
.error_msg{
color:red;
font-size: 16px;
}
Conclusion:
So, this was all about creating and maintaining session using CodeIgniter framework. keep following us to learn more.
CodeIgniter jQuery Ajax Post Data

jQuery’s Ajax methods really made easy to post a data and return that data without refreshing the page. We can apply this jQuery Ajax post in CodeIgniter as well.
Syntax for Ajax:
$.ajax({name:value, name:value, ... })Before proceeding further we consider that you are a bit familiar with CodeIgniter PHP framework.
With the help of an example you will learn how to post data to a controller using the CodeIgniter jQuery Ajax method.
In this post we have created two files ajax_post_view.php in view folder and ajax_post_controller.php in controller folder.
The Ajax code in a view page will look like as shown below:
Syntax
jQuery.ajax({
type: "POST",
url: "<?php echo base_url(); ?>" + "index.php/ajax_post_controller/user_data_submit",
dataType: 'json',
data: {name: user_name, pwd: password},
success: function(res)
In this example first the controller will load the view page. After data submission jQuery Ajax post function send data to controller’s function and after performing some task it will return data to view page without refreshing.
Below given are the codes for the files we have mentioned along with CSS file to design the view page.
You can copy the below code or can also download the files.
Watch the live demo or download code from the link given below

How to run file:
http://localhost/codeigniter_ajax_post/index.php/ajax_post_controller
Tutorial Scripts in detail
Below are the details of the code used in this tutorial with proper explanation.
Controller File : ajax_post_controller.php
In this controller file first index function will load the view file.
<?php if ( ! defined('BASEPATH')) exit('No direct script access allowed');

class Ajax_Post_Controller extends CI_Controller {

// Show view Page
public function index(){
$this->load->view("ajax_post_view");
}

// This function call from AJAX
public function user_data_submit() {
$data = array(
'username' => $this->input->post('name'),
'pwd'=>$this->input->post('pwd')
);

//Either you can print value or you can send value to database
echo json_encode($data);
}
}
View File : ajax_post_view.php
In view file submits data to jQuery function by class name and post data to controller’s function “ajax_post_controller/submit”
<html>
<head>
<title>CodeIgniter ajax post</title>
<link rel="stylesheet" type="text/css" href="<?php echo base_url(); ?>css/style.css">
<link href='http://fonts.googleapis.com/css?family=Source+Sans+Pro|Open+Sans+Condensed:300|Raleway' rel='stylesheet' type='text/css'>
<script src="http://ajax.googleapis.com/ajax/libs/jquery/1.11.1/jquery.min.js"></script>
<script type="text/javascript">

// Ajax post
$(document).ready(function() {
$(".submit").click(function(event) {
event.preventDefault();
var user_name = $("input#name").val();
var password = $("input#pwd").val();
jQuery.ajax({
type: "POST",
url: "<?php echo base_url(); ?>" + "index.php/ajax_post_controller/user_data_submit",
dataType: 'json',
data: {name: user_name, pwd: password},
success: function(res) {
if (res)
{
// Show Entered Value
jQuery("div#result").show();
jQuery("div#value").html(res.username);
jQuery("div#value_pwd").html(res.pwd);
}
}
});
});
});
</script>
</head>
<body>
<div class="main">
<div id="content">
<h2 id="form_head">Codelgniter Ajax Post</h2><br/>
<hr>
<div id="form_input">
<?php

// Form Open
echo form_open();

// Name Field
echo form_label('User Name');
$data_name = array(
'name' => 'name',
'class' => 'input_box',
'placeholder' => 'Please Enter Name',
'id' => 'name'
);
echo form_input($data_name);
echo "<br>";
echo "<br>";

// Password Field
echo form_label('Password');
$data_name = array(
'type' => 'password',
'name' => 'pwd',
'class' => 'input_box',
'placeholder' => '',
'id' => 'pwd'
);
echo form_input($data_name);
?>
</div>
<div id="form_button">
<?php echo form_submit('submit', 'Submit', "class='submit'"); ?>
</div>
<?php
// Form Close
echo form_close(); ?>
<?php

// Display Result Using Ajax
echo "<div id='result' style='display: none'>";
echo "<div id='content_result'>";
echo "<h3 id='result_id'>You have submitted these values</h3><br/><hr>";
echo "<div id='result_show'>";
echo "<label class='label_output'>Entered Name :<div id='value'> </div></label>";
echo "<br>";
echo "<br>";
echo "<label class='label_output'>Entered Password :<div id='value_pwd'> </div></label>";
echo "<div>";
echo "</div>";
echo "</div>";
?>
</div>
</div>
</body>
</html>
CSS File: style.css
Styling HTML elements.
body {
font-family: 'Raleway', sans-serif;
}
.main
{
width: 1015px;
position: absolute;
top: 10%;
left: 20%;
}
#form_head
{
text-align: center;
background-color: #FEFFED;
height: 66px;
margin: 0 0 -29px 0;
padding-top: 35px;
border-radius: 8px 8px 0 0;
color: rgb(97, 94, 94);
}
#content {
position: absolute;
width: 450px;
height: 340px;
border: 2px solid gray;
border-radius: 10px;
}
#content_result{
position: absolute;
width: 450px;
height: 192px;
border: 2px solid gray;
border-radius: 10px;
margin-left: 559px;
margin-top: -262px;
}
#form_input
{
margin-left: 50px;
margin-top: 36px;
}
label
{
margin-right: 6px;
font-weight: bold;
}

#form_button{
padding: 0 21px 15px 15px;
position: absolute;
bottom: 0px;
width: 414px;
background-color: #FEFFED;
border-radius: 0px 0px 8px 8px;
border-top: 1px solid #9A9A9A;
}
.submit{
font-size: 16px;
background: linear-gradient(#ffbc00 5%, #ffdd7f 100%);
border: 1px solid #e5a900;
color: #4E4D4B;
font-weight: bold;
cursor: pointer;
width: 300px;
border-radius: 5px;
padding: 10px 0;
outline: none;
margin-top: 20px;
margin-left: 15%;
}
.submit:hover{
background: linear-gradient(#ffdd7f 5%, #ffbc00 100%);
}
.label_output
{
color:#4A85AB;
margin-left: 10px;
}
#result_id
{
text-align: center;
background-color: #FCD6F4;
height: 47px;
margin: 0 0 -29px 0;
padding-top: 12px;
border-radius: 8px 8px 0 0;
color: rgb(97, 94, 94);
}
#result_show
{
margin-top: 35px;
margin-left: 45px;
}
.input_box{
height:40px;
width:240px;
padding:20px;
border-radius:3px;
background-color:#FEFFED;
margin-left:30px;
}
input#date_id {
margin-left: 10px;
}
input#name_id {
margin-left: 53px;
}
input#validate_dd_id {
margin-left: 65px;
}
div#value {
margin-left: 140;
margin-top: -20;
}
input#pwd {
margin-left: 40px;
}
div#value_pwd {
margin-left: 160;
margin-top: -20;
}
Conclusion:
So in this tutorial we learned about how we can post data by jQuery Ajax in CodeIgniter. Keep reading our blog posts for getting in touch with more coding tricks.
CodeIgniter Simple Login Form With Sessions

In this tutorial, we are going to learn about creating a simple login form in CodeIgniter. In login form, we made registration module, login module and admin panel using sessions.

We also have a paid ready-to-use advance login & registration module built on CodeIgniter that you can check out at CodeIgniter Login Registration Form.
Creating sessions in CodeIgniter is different from simple PHP. I will give you detailed information about all the method as we move further in this tutorial.
Watch the live demo or download code from the link given below

Note : You can also refer the PHPProjectInstall.pdf file given in the download code folder.
Before starting, let’s have a look on what we are going to learn about.
- Create login page, signup page and admin page.
- Setting up validation to all input field.
- Check for existing users in database during signup process.
- Check for username and password in database and show their information stored in database.
- Create session for admin panel, store users input data in session and destroy session(logout).
We are introducing a flow chart which will give you a clear vision about the objectives of this tutorial.

Firstly, set base URL in config.php file of CodeIgniter as given below:-
$config['base_url'] = 'http://localhost/login/';
Tutorial Scripts in detail
Below are the details of the code used in this tutorial with proper explanation.
Database Table: user_login
Now create a database name ‘login‘ with a table ‘user_login‘ using the code given below
create database login;
CREATE TABLE IF NOT EXISTS `user_login` (
`id` int(11) NOT NULL AUTO_INCREMENT,
`user_name` varchar(255) NOT NULL,
`user_email` varchar(255) NOT NULL,
`user_password` varchar(255) NOT NULL,
PRIMARY KEY (`id`)
)
Controller: user_authentication.php
Before start coding, let’s load all the libraries required to make and manage login form.
First we need to load session and validation libraries in controller file.
So, let’s start coding with controller. Create a file name ‘user_authentication.php‘ in ‘application/controllers’ folder of CodeIgniter. Write the code given below in the file.
<?php

session_start(); //we need to start session in order to access it through CI

Class User_Authentication extends CI_Controller {

public function __construct() {
parent::__construct();

// Load form helper library
$this->load->helper('form');

// Load form validation library
$this->load->library('form_validation');

// Load session library
$this->load->library('session');

// Load database
$this->load->model('login_database');
}

// Show login page
public function index() {
$this->load->view('login_form');
}

// Show registration page
public function user_registration_show() {
$this->load->view('registration_form');
}

// Validate and store registration data in database
public function new_user_registration() {

// Check validation for user input in SignUp form
$this->form_validation->set_rules('username', 'Username', 'trim|required|xss_clean');
$this->form_validation->set_rules('email_value', 'Email', 'trim|required|xss_clean');
$this->form_validation->set_rules('password', 'Password', 'trim|required|xss_clean');
if ($this->form_validation->run() == FALSE) {
$this->load->view('registration_form');
} else {
$data = array(
'user_name' => $this->input->post('username'),
'user_email' => $this->input->post('email_value'),
'user_password' => $this->input->post('password')
);
$result = $this->login_database->registration_insert($data);
if ($result == TRUE) {
$data['message_display'] = 'Registration Successfully !';
$this->load->view('login_form', $data);
} else {
$data['message_display'] = 'Username already exist!';
$this->load->view('registration_form', $data);
}
}
}

// Check for user login process
public function user_login_process() {

$this->form_validation->set_rules('username', 'Username', 'trim|required|xss_clean');
$this->form_validation->set_rules('password', 'Password', 'trim|required|xss_clean');

if ($this->form_validation->run() == FALSE) {
if(isset($this->session->userdata['logged_in'])){
$this->load->view('admin_page');
}else{
$this->load->view('login_form');
}
} else {
$data = array(
'username' => $this->input->post('username'),
'password' => $this->input->post('password')
);
$result = $this->login_database->login($data);
if ($result == TRUE) {

$username = $this->input->post('username');
$result = $this->login_database->read_user_information($username);
if ($result != false) {
$session_data = array(
'username' => $result[0]->user_name,
'email' => $result[0]->user_email,
);
// Add user data in session
$this->session->set_userdata('logged_in', $session_data);
$this->load->view('admin_page');
}
} else {
$data = array(
'error_message' => 'Invalid Username or Password'
);
$this->load->view('login_form', $data);
}
}
}

// Logout from admin page
public function logout() {

// Removing session data
$sess_array = array(
'username' => ''
);
$this->session->unset_userdata('logged_in', $sess_array);
$data['message_display'] = 'Successfully Logout';
$this->load->view('login_form', $data);
}

}

?>
Views: login_form.php
This will show login form on the view page.
<html>
<?php
if (isset($this->session->userdata['logged_in'])) {

header("location: http://localhost/login/index.php/user_authentication/user_login_process");
}
?>
<head>
<title>Login Form</title>
<link rel="stylesheet" type="text/css" href="<?php echo base_url(); ?>css/style.css">
<link href='http://fonts.googleapis.com/css?family=Source+Sans+Pro|Open+Sans+Condensed:300|Raleway' rel='stylesheet' type='text/css'>
</head>
<body>
<?php
if (isset($logout_message)) {
echo "<div class='message'>";
echo $logout_message;
echo "</div>";
}
?>
<?php
if (isset($message_display)) {
echo "<div class='message'>";
echo $message_display;
echo "</div>";
}
?>
<div id="main">
<div id="login">
<h2>Login Form</h2>
<hr/>
<?php echo form_open('user_authentication/user_login_process'); ?>
<?php
echo "<div class='error_msg'>";
if (isset($error_message)) {
echo $error_message;
}
echo validation_errors();
echo "</div>";
?>
<label>UserName :</label>
<input type="text" name="username" id="name" placeholder="username"/><br /><br />
<label>Password :</label>
<input type="password" name="password" id="password" placeholder="**********"/><br/><br />
<input type="submit" value=" Login " name="submit"/><br />
<a href="<?php echo base_url() ?>index.php/user_authentication/user_registration_show">To SignUp Click Here</a>
<?php echo form_close(); ?>
</div>
</div>
</body>
</html>
Views: registration_form.php
This file will load to show signup form.
<html>
<?php
if (isset($this->session->userdata['logged_in'])) {
header("location: http://localhost/login/index.php/user_authentication/user_login_process");
}
?>
<head>
<title>Registration Form</title>
<link rel="stylesheet" type="text/css" href="<?php echo base_url(); ?>css/style.css">
<link href='http://fonts.googleapis.com/css?family=Source+Sans+Pro|Open+Sans+Condensed:300|Raleway' rel='stylesheet' type='text/css'>
</head>
<body>
<div id="main">
<div id="login">
<h2>Registration Form</h2>
<hr/>
<?php
echo "<div class='error_msg'>";
echo validation_errors();
echo "</div>";
echo form_open('user_authentication/new_user_registration');

echo form_label('Create Username : ');
echo"<br/>";
echo form_input('username');
echo "<div class='error_msg'>";
if (isset($message_display)) {
echo $message_display;
}
echo "</div>";
echo"<br/>";
echo form_label('Email : ');
echo"<br/>";
$data = array(
'type' => 'email',
'name' => 'email_value'
);
echo form_input($data);
echo"<br/>";
echo"<br/>";
echo form_label('Password : ');
echo"<br/>";
echo form_password('password');
echo"<br/>";
echo"<br/>";
echo form_submit('submit', 'Sign Up');
echo form_close();
?>
<a href="<?php echo base_url() ?> ">For Login Click Here</a>
</div>
</div>
</body>
</html>
Views: admin_page.php
This file load in the admin part, once user is successfully login to admin page.
<html>
<?php
if (isset($this->session->userdata['logged_in'])) {
$username = ($this->session->userdata['logged_in']['username']);
$email = ($this->session->userdata['logged_in']['email']);
} else {
header("location: login");
}
?>
<head>
<title>Admin Page</title>
<link rel="stylesheet" type="text/css" href="<?php echo base_url(); ?>css/style.css">
<link href='http://fonts.googleapis.com/css?family=Source+Sans+Pro|Open+Sans+Condensed:300|Raleway' rel='stylesheet' type='text/css'>
</head>
<body>
<div id="profile">
<?php
echo "Hello <b id='welcome'><i>" . $username . "</i> !</b>";
echo "<br/>";
echo "<br/>";
echo "Welcome to Admin Page";
echo "<br/>";
echo "<br/>";
echo "Your Username is " . $username;
echo "<br/>";
echo "Your Email is " . $email;
echo "<br/>";
?>
<b id="logout"><a href="logout">Logout</a></b>
</div>
<br/>
</body>
</html>
Models : login_database.php
When a new user register.It check for duplicate user registration.
<?php

Class Login_Database extends CI_Model {

// Insert registration data in database
public function registration_insert($data) {

// Query to check whether username already exist or not
$condition = "user_name =" . "'" . $data['user_name'] . "'";
$this->db->select('*');
$this->db->from('user_login');
$this->db->where($condition);
$this->db->limit(1);
$query = $this->db->get();
if ($query->num_rows() == 0) {

// Query to insert data in database
$this->db->insert('user_login', $data);
if ($this->db->affected_rows() > 0) {
return true;
}
} else {
return false;
}
}

// Read data using username and password
public function login($data) {

$condition = "user_name =" . "'" . $data['username'] . "' AND " . "user_password =" . "'" . $data['password'] . "'";
$this->db->select('*');
$this->db->from('user_login');
$this->db->where($condition);
$this->db->limit(1);
$query = $this->db->get();

if ($query->num_rows() == 1) {
return true;
} else {
return false;
}
}

// Read data from database to show data in admin page
public function read_user_information($username) {

$condition = "user_name =" . "'" . $username . "'";
$this->db->select('*');
$this->db->from('user_login');
$this->db->where($condition);
$this->db->limit(1);
$query = $this->db->get();

if ($query->num_rows() == 1) {
return $query->result();
} else {
return false;
}
}

}

?>
CSS : style.css
Design for login, admin and registration page.
#main{
width:960px;
margin:50px auto;
font-family:raleway;
}

span{
color:red;
}

h2{
background-color: #FEFFED;
text-align:center;
border-radius: 10px 10px 0 0;
margin: -10px -40px;
padding: 30px;
}

#login{

width:300px;
float: left;
border-radius: 10px;
font-family:raleway;
border: 2px solid #ccc;
padding: 10px 40px 25px;
margin-top: 70px;
}

input[type=text],input[type=password], input[type=email]{
width:99.5%;
padding: 10px;
margin-top: 8px;
border: 1px solid #ccc;
padding-left: 5px;
font-size: 16px;
font-family:raleway;
}

input[type=submit]{
width: 100%;
background-color:#FFBC00;
color: white;
border: 2px solid #FFCB00;
padding: 10px;
font-size:20px;
cursor:pointer;
border-radius: 5px;
margin-bottom: 15px;
}

#profile{
padding:50px;
border:1px dashed grey;
font-size:20px;
background-color:#DCE6F7;
}

#logout{
float:right;
padding:5px;
border:dashed 1px gray;
margin-top: -168px;
}

a{
text-decoration:none;
color: cornflowerblue;
}

i{
color: cornflowerblue;
}

.error_msg{
color:red;
font-size: 16px;
}

.message{
position: absolute;
font-weight: bold;
font-size: 28px;
color: #6495ED;
left: 262px;
width: 500px;
text-align: center;
}
Process
First of all it is needed to type the given below URL in browser.
http://localhost/login/When browser get the above url it will display a login page. This page contains a login section and a signup link.
The whole process includes :-
- SignUp process and
- SignIn process
So, let’s learn about these processes.
Sign Up Process:
When you click on singup link, it will redirect you to ‘SignUp.php’ and display a signup form.
After filling all input field when you click on submit button, all data travels to new_user_registration() function of controller. This function first check validation for each field.
If your data is empty or invalid then it will generate an error message but, if all input field get proper data then it will connect you to database.
Before inserting data to database, it first check for username in database.
If given username is already available in database, a ‘username already exits ! ‘ message will be displayed but if username is not available in database then it will insert all the information in the database and display a ‘SignUp Successfullly !’ message.
Sign In Process:
After signup, you can login by giving a valid username and password. If invalid username or password will be given then a error message will be displayed.
Now let’s have a look at the whole procedure of SignIn. When you enters username and password, the values are travelled to user_login_process() function in controller where the validation for each field is checked.
When all input given are valid then user_login_process() function matches the given username and password with data stored in database.
If match doesn’t found then you will be redirected to login page and an error message will be displayed. But, if match found in database then session will be created and user data will be inserted into session data.
Now, these data are send to admin page where all information along with logout option will be displayed. When you will click on logout then logout() function will be called and where session data will be destroyed. After this, you will be redirect to login page for a new login.
Conclusion :
Thanks for reading the complete post. Hope you have enjoyed reading this blog post and got the concept. You can share your views in the space provided below and get in touch with us.
CodeIgniter Form Helper

In this tutorial we will give you brief description about how to use “Form Helper” in CodeIgniter which will help you in making a form input tags. The process of making a form in CodeIgniter is quite different as we used in HTML. So, a user must have proper knowledge about it in order to use it properly.
Form Helper files basically contains functions which are needed to create different segments of a form (e.g inputbox , submitbutton , dropdown boxes etc.) in CodeIgniter. To use these functions it is needed to load a form helper library. So, let’s begin this tutorial by learning how to load a form helper library.

The form library can be loaded using two methods :-
- Open application/config/autoload.php and configure it as given below
$autoload['helper'] = array(‘form’); - Use $this->load->helper(‘form’) ; within the Controller.
After loading form helper library we can easily make segment of form using its functions. So, let’s learn about different functions of form helper.
First of all let’s have a look at syntax of all functions we are going to learn.
Syntax:
form_open( );     //create an opening form tag
form_label( );     //create a label
form_input( );     //create input field such as text , email etc.
form_password( );     //create a password input field
form_hidden( );     //create hidden field
form_radio( );     //create radio button
form_dropdown( );     //create select field
form_checkbox( );     //create checkbox
form_textarea( );     //create textarea
form_fieldset( );      //create fieldset
form_upload( );     //to upload files
form_submit( );     //create submit button
form_reset( );     //create reset button
form_close( );     //create form closing tag
set_value( ) ;     //set default value for input tag
set_select( );     //set default value for select field
set_checkbox();     //set default value for checkbox
set_radio();     //set default value for radio button
Watch the live demo or download code from the link given below

Details of all form helper
Below are the details of CodeIgniter Form Helpers
Form Open
form_open( ) function creates an opening form tag which contains a base URL built in the config preferences. It will always add the attribute accept-charset based on the charset value in the config file.
Example of form_open( ) function is given below :-
echo form_open('form/data_submitted');The above code will produce the following HTML tag:-
<form action="http://localhost/form_helper/index.php/form/data_submitted" method="post" accept-charset="utf-8">
Form Label
form_label( ) function helps to generate a simple label.
Example of form_label( ) function is given below :-
echo form_label('Employee Email-ID');The above code will produce the following HTML tag:-
<label>Employee Email-ID</label>
Form Input Text
form_input( ) function allow us to generate a standard text input field. We can pass the array containing indexes and values to create different input fields.
Text input field can be created by just passing a simple associative array to form_input( ). By default form_input( ) create a text input field.
Example of text fields using form_input( ) function is given below:-
 $data_name = array(
'name' => 'emp_name',
'id' => 'emp_name_id',
'placeholder' => 'Please Enter Name'
);
echo form_input($data_name);
The above code will produce the following HTML tag :-
<input type="text" name="emp_name" value="" id="emp_name_id" placeholder="Please Enter Name" />Form Input with Readonly permission :-
An input field can be created with readonly permission by passing ‘readonly’ as a index and value both in the associative array of form_input() function.
Example of input field with readonly permission is given below :-
 $data_name = array(
'name' => 'emp_name',
'id' => 'emp_name_id',
'value' => 'John'
'readonly' => 'readonly'
);
echo form_input($data_name);
The above code will produce the following HTML tag :-
<input type="text" name="emp_name" value="" id="emp_name_id" value="John" readonly="readonly" />
Form Input Email
Email input field can be created by passing ‘type’ as index and ’email’ as value in the array of form_input( ) function.
Example of email field using form_input( ) is given below :-
$data_email = array(
'type' => 'email',
'name' => 'emp_email',
'id' => 'emp_email_id',
'placeholder' => 'Please Enter Email'
);
echo form_input($data_email);
The above code will produce the following HTML tag :-
<input type="email" name="emp_email" value="" id="emp_email_id" placeholder="Please Enter Email" />
Form Password
form_password( ) function can be used to create a password input field.All other functionality of this function is same as the form_input( ) function.
Example of form_password( ) function is given below:-
$data_password = array(
'name' => 'password',
'id' => 'password_id',
'placeholder' => 'Please Enter Password'
);
echo form_password($data_password);
The above code will produce the following HTML tag :-
<input type="password" name="password" value="" id="password_id" placeholder="Please Enter Password" />
Form Input Hidden
form_hidden( ) function is used to create a hidden field.We can create a single and multiple hidden field both using this function.
For a single hidden field, we have to pass two values in which first value contains name and second value contains value for the hidden field.
Example of single hidden field using form_hidden( ) function is given below :-
form_hidden('employee_name', 'John');The above code will produce the following HTML tag :-
<input type="hidden" name="employee_name" value="John" />To create multiple hidden field we have to pass an associative array in which each index will act as name and their related value act as value for the hidden fields.
Example of multiple hidden fields using from_hidden( ) is given below:-
$data_hidden = array(
'employee_name' => 'John',
'employee_id' => '555'
);
echo form_hidden($data);
The above code will produce the following HTML tag :-
<input type="hidden" name="employee_name" value="John" />
<input type="hidden" name="employee_id" value="555" />
Form Radio Button
form_radio( ) function is used to create a radio button in a form in CodeIgniter. As we know that radio button is used for single selection so it’s name attribute must be same.
Example of form_radio( ) function is given below :-
$data_radio1 = array(
'name' => 'emp_marital_status',
'value' => 'Unmarried',
'checked' => TRUE,
);

$data_radio2 = array(
'name' => 'emp_marital_status',
'value' => 'Married',
);
echo form_radio($data_radio1);
echo form_radio($data_radio2);
The above code will produce the following HTML tag :-
<input type="radio" name="emp_marital_status" value="Unmarried" checked="checked"  />
<input type="radio" name="emp_marital_status" value="Married"  />
Form Dropdown
form_dropdown( ) function is used to create standard dropdown field. It basically contains three parameters. First parameter contains the name of the dropdown field, second parameter contains associative arrays of options needed in dropdown and the third parameter contains the value wish to be selected.
Example of form_dropdown( ) function is given below :-
$data_gender = array(
'Male' => 'Male',
'Female' => 'Female'
);
echo form_dropdown('select', $data_gender, 'Male');
The above code will produce the following HTML tag :-
<select name="select">
<option value="Male" selected="selected">Male</option>
<option value="Female">Female</option>
</select>
For detailed information about form_dropdown( ) function in codeigniter read our article CodeIgniter form dropdown.
Form Checkbox
form_checkbox( ) function is used to create a checkbox field in CodeIgniter. As we know that checkbox field is used for multiple values selection so its name must be an array and each checkbox contains array having same name.
Example of form_checkbox( ) function is given below :-
$data_checkbox1 = array(
'name' => 'qualification[]',
'value' => 'Graduation'
);

$data_checkbox2 = array(
'name' => 'qualification[]',
'value' => 'Post Graduation'
);

echo form_checkbox($data_checkbox1);
echo form_checkbox($data_checkbox2);
The above code will produce the following HTML tag :-
<input type="checkbox" name="qualification[]" value="Graduation" />
<input type="checkbox" name="qualification[]" value="Post Graduation" />
Form Textarea
form_textarea( ) function is used to create a textarea field in CodeIgniter. To define the height and width of textarea we have to pass an associative array with index ‘rows’ and ‘cols’ with numeric value.
Example of form_textarea( ) function is given below :-
$data_textarea = array(
'name' => 'textarea',
'rows' => 10,
'cols' => 50
);
echo form_textarea($data_textarea);
The above code will produce the following HTML tag :-
<textarea name="textarea" cols="50" rows="10" ></textarea>
From Fieldset
form_fieldset( ) function is used to create a fieldset in CodeIgniter. Remember to use form_fieldset_close( ) function to close fielset tag.
Example of form_fieldset( ) function is given below :-
$data_fieldset = array(
'id' => 'employee_info',
'class' => 'employee_detail'
);
echo form_fieldset('Personal Detail', $data_fieldset);
echo "<p>Write your details here</p>";
echo form_fieldset_close();
The above code will produce the following HTML tag :-
<fieldset id="employee_info" class="employee_detail">
<legend>Personal Detail</legend>
<p>Write your details here</p>
</fieldset>
File Upload
form_upload( ) function is used to create a upload field. For this we have to only pass an associative array with index ‘type’ and value ‘file’. Other functionality is same as form_input() function.
Example of form_upload( ) function is given below :-
$data_upload = array(
'type' => 'file',
'name' => 'file_upload'
);
echo form_upload($data_upload);
The above code will produce the following HTML tag :-
<input type="file" name="file_upload" value="" />
Form Submit
form_submit( ) function is used to create a submit button in CodeIgniter.
Example of form_submit( ) function is given below :-
<?php echo form_submit('submit', 'Submit'); ?>The above code will produce the following HTML tag :-
<input type="submit" name="submit" value="Submit" />
Form Reset
form_reset( ) function is used to create a reset button in CodeIgniter.
Example of form_reset( ) function is given below :-
<?php echo form_reset('reset', 'Reset'); ?>The above code will produce the following HTML tag :
<input type="reset" name="reset" value="Reset" />
Form Close
form_close( ) function is used to create closing form tag.
Example of form_close( ) function is given below :-
<?php echo form_close( ); ?>The above code will produce the following HTML tag :
</form>Let’s have a look for some other functions which are used to set values in different tags.
- set_value( ) function helps to set default value for a input text field. The first parameter should be name of input field and second parameter will be value you want as default value.
Example :-
<input type="text" name="country" value="<?php echo set_value('country', 'India'); ?>" />- set_select( ) function help you to create a select field and also allowed you to set default value for select field. The first parameter contains name of select field, second parameter contains values for each item and third parameter allow us to set default item.
Example :-
 <select name="experience">
<option value="fresher" <?php echo set_select('experience', 'fresher', TRUE); ?> >fresher</option>
<option value="1-5 years" <?php echo set_select('experience', '1-5 years'); ?> >1-5 years</option>
<option value="above 5 years" <?php echo set_select('experience', 'above 5 years'); ?> >above 5 years</option>
</select>- set_checkbox( ) function help you to create checkbox and also allowed you to set default value. The first parameter contains name of checkbox, second parameter contain its values and third parameter allow us to set default value.
Example :-
<input type="checkbox" name="Graduate" value="Graduate" <?php echo set_checkbox('quralification', 'Graduate', TRUE); ?> />
<input type="checkbox" name="Post_Graduate" value="Post_Graduate" <?php echo set_checkbox('qualification', 'Post_Graduate'); ?> />- set_radio( ) function help you to create radio buttons and also allowed you to set default value. The first parameter contains name of radio button, second parameter contain its values and third parameter allow us to set default value.
Example :-
<input type="radio" name="gender" value="Male" <?php echo set_radio('gender', 'Male', TRUE); ?> />
<input type="radio" name="gender" value="Female" <?php echo set_radio('gender', 'Female'); ?> />
Now, let’s use the above mentioned functions and create a form which will help you to understand the functionality of each function more clearly.
Before we start coding, we have to make following changes in the configuration files of codeIgniter.
- Open ‘application/config/config.php file’ and set base url as given below :-
$config['base_url'] = 'http://localhost/form_helper/'; - Now open ‘application/config/autoload.php’ file and load form helper library as given below
$autoload['helper'] = array('url','file','form');
Now make a file name form.php in ‘application/controller’ folder of CodeIgniter and write the codes given below inside form.php :-
Tutorial Scripts in detail
Below are the details of the code used in this tutorial with proper explanation.
Controller : form.php
<?php
class Form extends CI_Controller {
public function __construct() {
parent::__construct();
}
public function form_show() {

// load view_form.php present in views folder
$this->load->view("view_form");
}
public function data_submitted() {

//Storing all  values travelled through POST method
$checkbox_array = $this->input->post('qualification');
$data = array(
'employee_name' => $this->input->post('emp_name'),
'employee_email' => $this->input->post('emp_email'),
'employee_password' => $this->input->post('password'),
'employee_gender' => $this->input->post('select'),
'employee_marital_status'=> $this->input->post('emp_marital_status'),
'employee_qualification' => serialize($checkbox_array),
'employee_address' => $this->input->post('address'),
'employee_upload_file' => $this->input->post('file_upload')
);

//send stored values to the view_form.php page
$this->load->view("view_form", $data);
}
}
?>
Now, go to ‘application/views’ folder and create a file name ‘view_form.php’ and write the code given below:-
Views : view_form.php
<html>
<head>
<title>Codeigniter Form Helper</title>
<meta name="robots" content="noindex, nofollow">
<link rel="stylesheet" type="text/css" href="<?php echo base_url(); ?>css/style.css">
<link href='http://fonts.googleapis.com/css?family=Source+Sans+Pro|Open+Sans+Condensed:300|Raleway' rel='stylesheet' type='text/css'>
</head>
<body>
<div class="main">
<div id="content">
<h2 id="form_head">Codelgniter Form Helper Demo</h2>
<div id="form_input">
<?php

//create  form open tag
echo form_open('form/data_submitted');

//create label
echo form_label('Employee Name');

//create name input field
$data_name = array(
'name' => 'emp_name',
'id' => 'emp_name_id',
'class' => 'input_box',
'placeholder' => 'Please Enter Name'
);
echo form_input($data_name);
echo form_label('Employee Email-ID');

//create email input field
$data_email = array(
'type' => 'email',
'name' => 'emp_email',
'id' => 'e_email_id',
'class' => 'input_box',
'placeholder' => 'Please Enter Email'
);
echo form_input($data_email);
echo form_label('Password');

//create password field
$data_password = array(
'name' => 'password',
'id' => 'password_id',
'class' => 'input_box',
'placeholder' => 'Please Enter Password'
);
echo form_password($data_password);
echo form_label('Gender');

//create dropdown box
$data_gender = array(
'Male' => 'Male',
'Female' => 'Female'
);
echo form_dropdown('select', $data_gender, 'Male', 'class="dropdown_box"');
echo form_label('Marital status');
echo "<div id = "radio_list">";

//create radio button
$data_radio1 = array(
'name' => 'emp_marital_status',
'value' => 'Unmarried',
'checked' => TRUE,
);
echo form_radio($data_radio1);
echo form_label('Unmarried');
$data_radio2 = array(
'name' => 'emp_marital_status',
'value' => 'Married',
);
echo form_radio($data_radio2);
echo form_label('Married');
echo "</div>";
echo form_label('Qualification');

//create checkbox
$data_checkbox1 = array(
'name' => 'qualification[]',
'value' => 'Graduation'
);
echo "<div id = "checkbox_list">";
echo form_checkbox($data_checkbox1);
echo form_label('Graduation');
$data_checkbox2 = array(
'name' => 'qualification[]',
'value' => 'Post Graduation'
);
echo form_checkbox($data_checkbox2);
echo form_label('Post-Graduation');
echo "</div>";
echo form_label('Address');
echo "<div class='textarea_input'>";

//create textarea
$data_textarea = array(
'name' => 'address',
'rows' => 5,
'cols' => 32
);
echo form_textarea($data_textarea);
echo "</div>";
echo form_label('Upload Image');
echo "<div class='upload'>";

//create upload section
$data_upload = array(
'type' => 'file',
'name' => 'file_upload',
'value' => 'upload resume'
);
echo form_upload($data_upload);
echo "</div>";
?>
</div>
<div id="form_button">

//create reset button
<?php echo form_reset('reset', 'Reset', "class='submit'"); ?>

//create submit button
<?php echo form_submit('submit', 'Submit', "class='submit'"); ?>
</div>

//close form tag
<?php echo form_close(); ?>
<?php

//check whether the value send from data_submitted() function of controller is set or not
if (isset($employee_name)) {
$checkbox_value = unserialize($employee_qualification);
echo "<div id='content_result'>";
echo "<h3 id='result_id'>You have submitted these values</h3>";
echo "<div id='result_show'>";
echo "<label class='label_output'>Entered Employee Name : </label>" . $employee_name;
echo "<label class='label_output'>Entered Employee Email : </label>" . $employee_email;
echo "<label class='label_output'>Entered Password : </label>" . $employee_password;
echo "<label class='label_output'>Entered Gender : </label>" . $employee_gender;
echo "<label class='label_output'>Entered Marital status : </label>" . $employee_marital_status;
echo "<label class='label_output'>Entered Qualification : </label>";
echo "<ul class='qual_output'>";
if (isset($checkbox_value) && $checkbox_value != NULL) {
foreach ($checkbox_value as $value) {
echo "<li>" . $value . "</li>";
}
}
echo "</ul>";
echo "<label class='label_output'>Entered Address : </label><pre class='address_output'>" . $employee_address . "</pre>";
echo "<label class='label_output'>Uploaded Image : </label>" . $employee_upload_file;
echo "<div>";
echo "</div>";
}
?>
</div>
</div>
</body>
</html>
CSS : style.css
body {
font-family: 'Raleway', sans-serif;
}
.main{
width: 1015px;
position: absolute;
top: 10%;
left: 20%;
}
#form_head{
text-align: center;
background-color: #FEFFED;
height: 66px;
margin: 0 0 -29px 0;
padding-top: 35px;
border-radius: 8px 8px 0 0;
color: rgb(97, 94, 94);
}
#content {
position: absolute;
width: 481px;
height: 782px;
border: 2px solid gray;
border-radius: 10px;
margin-top: -40px;
margin-left: -60px;
}
#content_result{
position: relative;
width: 522px;
height: auto;
border: 2px solid gray;
padding-bottom: 40px;
border-radius: 10px;
margin-left: 559px;
margin-top: -645px;
}
#form_input{
margin-left: 50px;
margin-top: 36px;
}
label{
margin-right: 6px;
font-weight: bold;
}

#form_button{
padding: 0 21px 15px 15px;
position: absolute;
bottom: 0px;
width: 445px;
background-color: #FEFFED;
border-radius: 0px 0px 8px 8px;
border-top: 1px solid #9A9A9A;
}
.submit{
font-size: 16px;
background: linear-gradient(#ffbc00 5%, #ffdd7f 100%);
border: 1px solid #e5a900;
color: #4E4D4B;
font-weight: bold;
cursor: pointer;
width: 300px;
border-radius: 5px;
padding: 10px 0;
outline: none;
margin-top: 20px;
margin-left: 15%;
}
.submit:hover{
background: linear-gradient(#ffdd7f 5%, #ffbc00 100%);
}
.label_output{
color:#4A85AB;
margin-left: 10px;
}
.dropdown_box{
height:40px;
width:240px;
border-radius:3px;
background-color:#FEFFED;
}
#result_id{
text-align: center;
background-color: #FCD6F4;
height: 47px;
margin: 0 0 -29px 0;
padding-top: 12px;
border-radius: 8px 8px 0 0;
color: rgb(97, 94, 94);
}
#result_show{
margin-top: 35px;
margin-left: 45px;
}
.input_box{
height:40px;
width:240px;
padding:20px;
border-radius:3px;
background-color:#FEFFED;
}
#checkbox_list{
margin-left: 143px;
margin-top: -36px;
}
ul{
position: absolute;
list-style: none;
}
.qual_output{
margin-left: 176px;
margin-top: -17px;
}
#radio_list{
margin-left: 143px;
margin-top: -18px;
}
.textarea_input{
margin-left: 145px;
margin-top: -16px;
}
.upload{
margin-left: 144px;
margin-top: -19px;
}
textarea{
background-color:#FEFFED;
}
.address_div{
width: 50px;
height:auto;
}
pre.address_output{
font-family: 'Raleway', sans-serif;
margin-top: -19px;
margin-left: 217px;
width:247px;
height:auto;
font-size: 16px;
word-wrap: break-word;
}
Working:
First we have to enter the url in the browser as given below :-
http://localhost/form_helper/index.php/form/form_showWhen you enter url and press enter, form created in view_form.php will display. After filling all field click submit button. After submitting, all values will travel through POST method to data_submitted() function in the controller file “form.php” where these values will be store in $data. Then, $data is send to view page where its value is used to display the output.
For detailed information about the POST method and the whole process of submitting a form you can read our article CodeIgniter form submit – GET And POST method.
Conclusion :
Thanks for reading the complete post. Hope you have enjoyed reading this blog post and got the concept. You can share your views in the space provided below and get in touch with us.
CodeIgniter Date Format Form Validation

This tutorial is very useful if you are looking to validate date format through CodeIgniter form validation library.
Using this CodeIgniter validation library you can set as many rules as you want for a given field.
To set rules for validation use :
Syntax: –
$this->form_validation->set_rules();
With the help of an example we will let you know how it works.
In this example we have created a form containing name and date field. We have used here a text box for date input as some times users also demand for it.
We have used dd/mm/yy date format and set the validation rules according to format using callback function.
Set_ruels for date field using “form validation” library .
Syntax:-
$this->form_validation->set_rules('date','DOB','callback_checkDateFormat'); You can also use your own function in the place of “checkDateFormat” to set format of date.
Callback function:-
function checkDateFormat($date) {
if (preg_match("/[0-31]{2}/[0-12]{2}/[0-9]{4}/", $date)) {
if(checkdate(substr($date, 3, 2), substr($date, 0, 2), substr($date, 6, 4)))
return true;
else
return false;
} else {
return false;
}
}
Setting Up Codeigniter – Configuration Files
First you have to make the following changes in your CodeIgniter file as given below.
- Load “form_validation” library in constructor.
$this->load->library('form_validation'); - Setting up Base url for your file path.
Open “applicationconfigconfig.php” file and set the path as$config['base_url'] = 'http://localhost/form_validation_date/'; - Setup helper function that helps you to load form tags.
Open “applicationconfigautoload.php” and set the ‘form’ in helper array.$autoload['helper'] = array('form','url');
Below is our complete code with download and live demo option

How To Run File
http://localhost/form_validation_date/index.php/date_controller/show
Tutorial Scripts in detail
Below are the details of the code used in this tutorial with proper explanation.
Controller File : date_controller.php
<?php
class Date_controller extends CI_Controller {
public function __construct() {
parent::__construct();
$this->load->library('form_validation');
}

// Show form in view page i.e date_view.php
public function show() {
$this->load->view("date_view");
}
// When user submit data on view page, Then this function set_ruels in "form_validation" according to  "date",and show on again view page.
public function submit(){
$name = $this->input->post('u_name');
$input = $this->input->post('date');
$this->form_validation->set_rules('date','DOB','callback_checkDateFormat');

if ($this->form_validation->run() == FALSE) {
echo "<script type='text/javascript'>
alert('Please Enter correct values in dd/mm/yyyy Format');
</script>";
$this->load->view('date_view');
} else {
$data = array('name'=> $name, 'DOB'=>$input);
$this->load->view('date_view',$data);
}
}

// Check date format, if input date is valid return TRUE else returned FALSE.
function checkDateFormat($date) {
if (preg_match("/[0-31]{2}/[0-12]{2}/[0-9]{4}/", $date)) {
if(checkdate(substr($date, 3, 2), substr($date, 0, 2), substr($date, 6, 4)))
return true;
else
return false;
} else {
return false;
}
}
}
?>
View File : date_view.php
<html>
<head>
<title>Codelgniter form validation date</title>
<link rel="stylesheet" type="text/css" href="<?php echo base_url(); ?>css/style.css">
<link href='http://fonts.googleapis.com/css?family=Source+Sans+Pro|Open+Sans+Condensed:300|Raleway' rel='stylesheet' type='text/css'>
</head>
<body>
<div class="main">
<div id="content">
<h3 id='form_head'>Codelgniter form validation date</h3><br/>
<hr>
<div id="form_input">
<?php

// Open form and set url for submit form
echo form_open('date_controller/submit');

// Show Name Field in View Page
echo form_label('Name :');
$data = array(
'id' => 'name_id',
'name' => 'u_name',
'placeholder' => 'Please Enter User Name',
'class' => 'input_box',
'required' => ''
);
echo form_input($data);
echo "<br/><br/>";

// Show Date Field in View Page
echo form_label('DOB:');
$date = array(
'type' => 'text',
'id' => 'validate_dd_id',
'name' => 'date',
'class' => 'input_box',
'placeholder' => 'dd/mm/yyyy',
'required' => ''
);
echo form_input($date);
?>
</div>

<div id="form_button">
<?php

// Show Update Field in View Page
$data = array(
'type' => 'submit',
'value'=> 'Submit',
'class'=> 'submit'
);
echo form_submit($data); ?>
</div>
<?php echo form_close();?>
<?php

// When user submit CORRECT VALUES.
if(isset($name) && isset($DOB)){
echo "<div id='content_result'>";
echo "<h3 id='result_id'>You have submitted these values</h3><br/><hr>";
echo "<div id='result_show'>";
echo "<label class='label_output'>Entered Name : </label>".$name;
echo"<br/><br/>";
echo "<label class='label_output'>Entered Date: </label>".$DOB;
}
?>
</div>
</div>
</body>
</html>
CSS File : style.css
body {
font-family: 'Raleway', sans-serif;
}
.main
{
width: 1015px;
position: absolute;
top: 10%;
left: 20%;
}
#form_head
{
text-align: center;
background-color: #FEFFED;
height: 66px;
margin: 0 0 -29px 0;
padding-top: 35px;
border-radius: 8px 8px 0 0;
color: rgb(97, 94, 94);
}
#content {
position: absolute;
width: 450px;
height: 350px;
border: 2px solid gray;
border-radius: 10px;
}
#content_result{
position: absolute;
width: 450px;
height: 192px;
border: 2px solid gray;
border-radius: 10px;
margin-left: 559px;
margin-top: -262px;
}
#form_input
{
margin-left: 50px;
margin-top: 36px;
}
label
{
margin-right: 6px;
font-weight: bold;
}

#form_button{
padding: 0 21px 15px 15px;
position: absolute;
bottom: 0px;
width: 414px;
background-color: #FEFFED;
border-radius: 0px 0px 8px 8px;
border-top: 1px solid #9A9A9A;
}
.submit{
font-size: 16px;
background: linear-gradient(#ffbc00 5%, #ffdd7f 100%);
border: 1px solid #e5a900;
color: #4E4D4B;
font-weight: bold;
cursor: pointer;
width: 300px;
border-radius: 5px;
padding: 10px 0;
outline: none;
margin-top: 20px;
margin-left: 15%;
}
.submit:hover{
background: linear-gradient(#ffdd7f 5%, #ffbc00 100%);
}
.label_output
{
color:#4A85AB;
margin-left: 10px;
}
#result_id
{
text-align: center;
background-color: #FCD6F4;
height: 47px;
margin: 0 0 -29px 0;
padding-top: 12px;
border-radius: 8px 8px 0 0;
color: rgb(97, 94, 94);
}
#result_show
{
margin-top: 35px;
margin-left: 45px;
}
.input_box{
height:40px;
width:240px;
padding:20px;
border-radius:3px;
background-color:#FEFFED;
}
input#date_id {
margin-left: 10px;
}
input#name_id {
margin-left: 53px;
}
input#validate_dd_id {
margin-left: 65px;
}
Conclusion
Thanx for reading a complete post,Hope you enjoyed it. Keep reading our blog posts for get in touch with more coding tricks.
CodeIgniter GET And POST Form Input Method

In this tutorial we will give you brief description about CodeIgniter input post, this is most important part of a web application.
It uses an input class of CodeIgniter that provides some helper functions that helps to fetch data and to pre-process it.
Form submit can done with two input methods, GET and POST. In this blog, we use default method POST for submit form.
CodeIgniter doesn’t support GET method as natively. To use GET method, you have to use normal HTML form.
Syntax:
$this->input->post();    // Catch values form url via POST Method
$this->input->get();                 // Catch values form url via GET Method
$this->input->get_post();      // Search data first for POST then for GET.
Setting Up Codeigniter – Configuration Files
- Setting up Base url for your file path.
Open “applicationconfigconfig.php” file and set the path as given below$config['base_url'] = 'http://localhost/form_submit/'; - Setup helper function that helps you to load form tags.
Open “applicationconfigautoload.php” and set the ‘form’ in helper array.$autoload['helper'] = array(‘form’);
Watch the live demo or download code from the link given below

How To Run File
Run the program using basepath as class name and function name, for example :
http://localhost/form_submit/index.php/form/form_show
Tutorial Scripts in detail
Below are the details of the code used in this tutorial with proper explanation.
Form Submission Using Post Method
Now I am going to create a form that use POST method. We know that CodeIgniter contains controller, model and view files. Let’s start with controller.
Controller file : form.php
This file helps you to load forms in view page, data submitted on the view page will be catched and then data again displayed on the view part.
<?php
class Form extends CI_Controller {
public function __construct() {
parent::__construct();
}

// Show form in view page i.e view_page.php
public function form_show() {
$this->load->view("view_form");
}

// When user submit data on view page, Then this function store data in array.
public function data_submitted() {
$data = array(
'user_name' => $this->input->post('u_name'),
'user_email_id' => $this->input->post('u_email')
);

// Show submitted data on view page again.
$this->load->view("view_form", $data);
}
}
?>
View file : view_form.php
<html>
<head>
<title>Codeigniter Form Submit Using Post and Get Method</title>
<link rel="stylesheet" type="text/css" href="<?php echo base_url(); ?>css/style.css">
</head>
<body>
<div class="main">
<div id="content">
<h3 id='form_head'>Codelgniter Form Submit </h3><br/>
<div id="form_input">
<?php

// Open form and set URL for submit form
echo form_open('form/data_submitted');

// Show Name Field in View Page
echo form_label('User Name :', 'u_name');
$data= array(
'name' => 'u_name',
'placeholder' => 'Please Enter User Name',
'class' => 'input_box'
);
echo form_input($data);

// Show Email Field in View Page
echo form_label('User email:', 'u_email');
$data= array(
'type' => 'email',
'name' => 'u_email',
'placeholder' => 'Please Enter Email Address',
'class' => 'input_box'
);
echo form_input($data);
?>
</div>

// Show Update Field in View Page
<div id="form_button">
<?php
$data = array(
'type' => 'submit',
'value'=> 'Submit',
'class'=> 'submit'
);
echo form_submit($data); ?>
</div>

// Close Form
<?php echo form_close();?>

// Display Entered values in View Page

<?php if(isset($user_name) && isset($user_email_id)){
echo "<div id='content_result'>";
echo "<h3 id='result_id'>You have submitted these values</h3><br/><hr>";
echo "<div id='result_show'>";
echo "<label class='label_output'>Entered User Name : </label>".$user_name;
echo "<label class='label_output'>Entered Email: </label>".$user_email_id;
echo "<div>";
echo "</div>";
} ?>
</div>
</div>
</body>
</html>
CSS File: style.css
Here is the CSS file, which is used in form.
body {
font-family: 'Raleway', sans-serif;
}
.main
{
width: 1015px;
position: absolute;
top: 10%;
left: 20%;
}
#form_head
{
text-align: center;
background-color: #FEFFED;
height: 66px;
margin: 0 0 -29px 0;
padding-top: 35px;
border-radius: 8px 8px 0 0;
color: rgb(97, 94, 94);
}
#content {
position: absolute;
width: 450px;
height: 356px;
border: 2px solid gray;
border-radius: 10px;
}
#content_result{
position: absolute;
width: 450px;
height: 192px;
border: 2px solid gray;
border-radius: 10px;
margin-left: 559px;
margin-top: -262px;
}
#form_input
{
margin-left: 50px;
margin-top: 36px;
}
label
{
margin-right: 6px;
font-weight: bold;
}

#form_button{
padding: 0 21px 15px 15px;
position: absolute;
bottom: 0px;
width: 414px;
background-color: #FEFFED;
border-radius: 0px 0px 8px 8px;
border-top: 1px solid #9A9A9A;
}
.submit{
font-size: 16px;
background: linear-gradient(#ffbc00 5%, #ffdd7f 100%);
border: 1px solid #e5a900;
color: #4E4D4B;
font-weight: bold;
cursor: pointer;
width: 300px;
border-radius: 5px;
padding: 10px 0;
outline: none;
margin-top: 20px;
margin-left: 15%;
}
.submit:hover{
background: linear-gradient(#ffdd7f 5%, #ffbc00 100%);
}
.label_output
{
color:#4A85AB;
margin-left: 10px;
}
#result_id
{
text-align: center;
background-color: #FCD6F4;
height: 47px;
margin: 0 0 -29px 0;
padding-top: 12px;
border-radius: 8px 8px 0 0;
color: rgb(97, 94, 94);
}
#result_show
{
margin-top: 35px;
margin-left: 45px;
}
.input_box{
height:40px;
width:240px;
padding:20px;
border-radius:3px;
background-color:#FEFFED;
}
Form Submission Using Get Method
CodeIgniter doesn’t support GET method natively. So we have to use normal HTML form code.
<form action="form/data_submitted" method="get">
User Name :: <input type="text" name="u_name" placeholder="Please Enter User Name" class="input_box">
User email: <input type="text" name="u_email" placeholder="Please Enter Email Address" class="input_box">
<input type="submit" value="Submit" class="submit">
</form>
Values receive as array using GET in Controller.
public function data_submitted()
{ $data = array(
'user_name' => $this->input->get('u_name'),
'user_email_id' => $this->input->get('u_email')
);
Conclusion
Thanks for reading complete post. Hope you enjoyed learning. You can share your views in the space provided below and get in touch with us.
Codeigniter Form Dropdown – Insert and Read using Database

Here in this post we will learn about CodeIgniter dropdown using form helper file. There are various functions in this helper file that assist in working with forms. To load helper within controller use below code.
Syntax:-
$this->load->helper('form');
If you want to load the helper automatically then add the name of the helper to $autoload array config.
Syntax:-
Path: applicationconfigautoload.php

Code: $autoload[‘helper’] = array(‘form’);
To populate form dropdown in CodeIgniter we are going to use one of the form helper function i.e. form_dropdown() from helper file that will create drop-down field.
Also, one can use it to create multi select by passing an array of multiple items.
To insert and read data, we have created a database and table naming dropdown and dropdown_value respectively.
In that we have two columns one for storing single selection dropdown value and another for storing multiple selection dropdown value.
MySql Code : database.sql
CREATE DATABASE dropdown;
CREATE TABLE dropdown_value(
dropdown_single varchar(255) NOT NULL,
dropdown_multi varchar(255) NOT NULL,
)
Now to start with, we have created a view file: reg_form.php , a controller file form.php, a model file db_dropdown.php to connect with database and a CSS file style.css for designing view page.
You can copy and paste the below mention codes in their respective files or can download it through the link given. Run the program using base path:
localhost/ci_dropdown/index.php/form/form_dropdown
Below is our complete code with download and live demo option

Tutorial Scripts in detail
Below are the details of the code used in this tutorial with proper explanation.
As we know that the CodeIgniter contains controller, model and view files. Let’s start with controller.
Controller file : form.php
<?php
class Form extends CI_Controller {
public function __construct() {
parent::__construct();
$this->load->helper('form');
}
public function form_dropdown() {
$this->load->view("reg_form");
}
public function data_submitted() {
//storing the value send by submit using post method in an array
$mul_array = $this->input->post('Technical_skills');
//converting array into a string
$mul_val_string = serialize($mul_array);
$data = array(
'dropdown_single' => $this->input->post('Department'),
'dropdown_multi' => $mul_val_string
);
$this->load->model("db_dropdown");
$this->db_dropdown->insert_in_db($data);
$this->load->model("db_dropdown");
$result = $this->db_dropdown->read_from_db($data);
$data['result'] = $result[0];
$this->load->view("reg_form", $data);
}
}
?>
View file : reg_form.php
<html>
<head>
<title>Codeigniter Form Dropdown</title>
<link rel="stylesheet" type="text/css" href="<?php echo base_url(); ?>css/style.css">
<link href='http://fonts.googleapis.com/css?family=Source+Sans+Pro|Open+Sans+Condensed:300|Raleway' rel='stylesheet' type='text/css'>
<script src="http://ajax.googleapis.com/ajax/libs/jquery/1.11.1/jquery.min.js"></script>
<script src="<?php echo base_url(); ?>acript/script.js"></script>
</head>
<body>
<div class="main">
<div id="content">
<h2>Form Dropdown In Codelgniter</h2><br/>
<div id="message"></div>
<hr>
<?php
echo "<h3>Single Selection Dropdown</h3>";
echo form_open('form/data_submitted');
$options = array(
'Computer Science Engineering' => 'Computer Science Engineering',
'Electronics and Comm. Engineering' => 'Electronics and Comm. Engineering',
'Mechanical Engineering' => 'Mechanical Engineering',
'Civil Engineering' => 'Civil Engineering',
);
echo "<div class='drop_pos'>";
echo form_dropdown('Department', $options, 'Computer Science Engineering', 'class="dropdown_box1"');
if (isset($result)) {
$db_value = array();
foreach ($result as $value) {
$db_value[] = $value;
}
$single_sel = $db_value[0];
//Converting string to array
$mul_selection = unserialize($db_value[1]);
}
if (isset($single_sel)) {
echo "<p><b>You have selected :</b> ";
echo "<ul>";
echo "<li>" . $single_sel . "</li>";
}
echo "</p>";
echo "</ul>";
echo "</div>";
echo "<hr/>";
?>
<?php
echo "<h3>Multiple Selection Dropdown</h3>";
$options = array(
'C' => 'C',
'C++' => 'C++',
'ORACLE' => 'Oracle',
'JAVA' => 'Java',
'DATABASE' => 'Database',
'PHP' => 'Php'
);
$selected = array('C', 'ORACLE');
echo "<div class='drop_pos'>";
echo "<p><font color='red'><b>Note:</b></font> <b>To Select Multiple Options Press<br/> ctrl+left click</b></p>";
echo form_dropdown('Technical_skills[]', $options, $selected, 'class="dropdown_box2"');
if (isset($mul_selection)) {
echo "<p><b>You have selected :</b>";
echo "<ul>";
foreach ($mul_selection as $value) {
echo "<li>" . $value . "</li>";
}
}
echo "</ul>";
echo "</p>";
echo "</div>";
?>
<div id="form_button">
<?php echo form_submit('submit', 'submit', 'class="submit"'); ?>
</div>
<?php echo form_close(); ?>
</div>
</div>
</body>
</html>
Model file : db_dropdown.php
<?php
class Db_Dropdown extends CI_Model {
public function form_dropdown() {
$this->load->view("reg_form");
}
public function insert_in_db($data) {
$this->db->insert('dropdown_value', $data);
if ($this->db->affected_rows() > 1) {
return true;
} else {
return false;
}
}
public function read_from_db($data) {
$condition = "dropdown_single =" . "'" . $data['dropdown_single'] . "' AND " . "dropdown_multi =" . "'" . $data['dropdown_multi'] . "'";
$this->db->select('*');
$this->db->from('dropdown_value');
$this->db->where($condition);
$query = $this->db->get();
$data = $query->result();
return $data;
}
}
?>
CSS file: style.css that we have used for designing the form is given below:
body {
font-family: 'Raleway', sans-serif;
}
.main
{
width: 600px;
height: 650px;
position: absolute;
top: 10%;
left: 30%;
}
h2
{
text-align: center;
background-color: #FEFFED;
height: 66px;
margin: 0 0 -29px 0;
padding-top: 14px;
border-radius: 8px 8px 0 0;
color: rgb(97, 94, 94);
}
h3{
padding-left: 78px;
color: rgb(97, 94, 94);
}
p{
color:#146092;
}
li{
color:#550000;
}
#content {
position: absolute;
width: 450px;
height: auto;
border: 2px solid gray;
border-radius: 10px;
}
#form_button{
padding: 0 21px 15px 15px;
position: absolute;
bottom: 0px;
width: 414px;
background-color: #FEFFED;
border-radius: 0px 0px 8px 8px;
border-top: 1px solid #9A9A9A;
}
.drop_pos{
padding-left:78px;
width:500px;
}
.submit{
font-size: 16px;
background: linear-gradient(#ffbc00 5%, #ffdd7f 100%);
border: 1px solid #e5a900;
color: #4E4D4B;
font-weight: bold;
cursor: pointer;
width: 300px;
border-radius: 5px;
padding: 10px 0;
outline: none;
margin-top: 20px;
margin-left: 15%;
}
.submit:hover{
background: linear-gradient(#ffdd7f 5%, #ffbc00 100%);
}
.dropdown_box1{
width:300px;
height:30px;
margin-top:-5px;
font-size: 16px;
font-family: cursive;
}
.dropdown_box2{
width:300px;
height:88px;
margin-top:-5px;
font-size: 16px;
font-family: cursive;
}
Conclusion:
Thanks for reading the complete post. Hope you have got the concept. You can share your views in the space provided below and get in touch with us.
CodeIgniter : PHP Curl library with SSL Example

In this tutorial, I’ll give you brief description on using PHP cURL library or function in CodeIgniter. Now what is cURL and Why it is being used..?? cURL stands for ‘client URL’. In PHP cURL library let you make HTTP requests. PHP supports libcurl that permits to connect and communicate with different types of servers protocols.
cURL is used to get content from another websites through the applications. It is also used to post data to another website and download files via FTP or HTTP in short helps you manipulate the data. Hence, it allows your application to act like a user accessing a website.
Download The Script Used For Data Retrieval Via Curl

Steps To Start Using cURL:
Step 1: Install the libcurl pakage.
In order to use PHP’s cURL functions you need to install the libcurl package. PHP requires that you use libcurl 7.0.2-beta or higher. Download the file and save that in libraries folder. Which you will find under system folder of your CodeIgniter base file.
Path : ci_demo > system > libraries > curl.phpNote: You can make HTTP requests without cURL too, though it requires allow_url_fopen to be enabled in your php.ini file.
Step 2: Now after saving curl.php file in library. Create a controller file controller_curl.php for calling curl.php and setting parameter to fetch server side information of a website.
Controller File : controller_curl.php
<?php if ( ! defined('BASEPATH')) exit('No direct script access allowed');
class Controller_curl extends CI_Controller {
public function __construct() {
parent::__construct();
}
public function index(){

//  Calling cURL Library
$this->load->library('curl');

//  Setting URL To Fetch Data From
$this->curl->create('https://www.formget.com/');

//  To Temporarily Store Data Received From Server
$this->curl->option('buffersize', 10);

//  To support Different Browsers
$this->curl->option('useragent', 'Mozilla/5.0 (Windows; U; Windows NT 6.1; en-US; rv:1.9.2.8) Gecko/20100722 Firefox/3.6.8 (.NET CLR 3.5.30729)');

//  To Receive Data Returned From Server
$this->curl->option('returntransfer', 1);

//  To follow The URL Provided For Website
$this->curl->option('followlocation', 1);

//  To Retrieve Server Related Data
$this->curl->option('HEADER', true);

//  To Set Time For Process Timeout
$this->curl->option('connecttimeout', 600);

//  To Execute 'option' Array Into cURL Library & Store Returned Data Into $data
$data = $this->curl->execute();

//  To Display Returned Data
echo $data;
}
}
?>
Difference in code for HTTP and HTTPS Websites:
There is a slight change in the code if we need to fetch data from SSL site. Here you need to set 3 SSL security Options.
<?php if ( ! defined('BASEPATH')) exit('No direct script access allowed');
$this->curl->create('https://www.formget.com/');
//  Rest Of The Code As In controller_curl.php
$this->curl->option('connecttimeout', 600);

// For SSL Sites. Check whether the Host Name you are connecting to is valid
$this->curl->option('SSL_VERIFYPEER', false);

//  Ensure that the server is the server you mean to be talking to
$this->curl->option('SSL_VERIFYHOST', false);

// Defines the SSL Version to be Used
$this->curl->option('SSLVERSION', 3);
$data = $this->curl->execute();
echo $data;
}
}
?>
Conclusion:
I hope that you have got an idea on how to use cURL library to fetch any website’s server side information. There are lot more things you can do with cURL, Keep reading our blog posts that will help you to enhance your knowledge and will sharpen your coding tricks. 🙂
CodeIgniter Image and File Upload

This post is about CodeIgniter(C.I.) file upload. By the use of file uploading class, you can easily upload a file or an image.
One can easily validate and restrict file type, its size and can even provide various preferences while uploading a file or image.
Using CodeIgniter Image Upload example, we will teach you how an image or a file gets uploaded to an upload folder or a targeted location.
Below is our complete code with live demo and download code option.
Watch the live demo or download code from the link given below

Note: Download the file and extract it to the root file of your local server.
Firstly, you’ll need to create a destination folder where you want your images to get uploaded.
So, Create a folder named “uploads” at the root of your CodeIgniter(CI) installation.
Now create two “view” files file_view.php and upload_success.php in a views folder of CodeIgniter . First file will display a complete form that contains upload field and the second file is to display the message “successfully uploaded”.
In your controller folder create a file naming: upload_controller.php
where we will going to load a library to initialize an Upload class using the below code:
$this->load->library('upload');Also you have to set preferences for image and file i.e. size, type etc. based on that you can allow uploading. We have set file preferences in a function do_upload() of controller which looks like:
$config['upload_path'] = './uploads/';

$config['allowed_types'] = 'gif|jpg|png';

$config['max_size'] = '100';

$config['max_width'] = '1024';

$config['max_height'] = '768';
Now, you can also try it at your end by using similar URL
localhost/ci_demo/index.php/upload_controller/file_viewand pasting the complete code as shown below in your “views” and “controller” files.
Note: File uploads require a multipart form so we have include a form helper in controller to create the opening form tag as it create proper syntax you can also go for simple HTML form tags.
Syntax for form helper: –
$this->load->helper(array('form', 'url'));
Tutorial Scripts in detail
Below are the details of the code used in this tutorial with proper explanation.
View file for viewing complete form : file_view.php
<html>
<head>
<title>Upload Form</title>
</head>
<body>
<?php echo $error;?> <!-- Error Message will show up here -->
<?php echo form_open_multipart('upload_controller/do_upload');?>
<?php echo "<input type='file' name='userfile' size='20' />"; ?>
<?php echo "<input type='submit' name='submit' value='upload' /> ";?>
<?php echo "</form>"?>
</body>
</html>
Controller file : upload_controller.php
<?php if ( ! defined('BASEPATH')) exit('No direct script access allowed');
class Upload_Controller extends CI_Controller {
public function __construct() {
parent::__construct();
}
public function file_view(){
$this->load->view('file_view', array('error' => ' ' ));
}
public function do_upload(){
$config = array(
'upload_path' => "./uploads/",
'allowed_types' => "gif|jpg|png|jpeg|pdf",
'overwrite' => TRUE,
'max_size' => "2048000", // Can be set to particular file size , here it is 2 MB(2048 Kb)
'max_height' => "768",
'max_width' => "1024"
);
$this->load->library('upload', $config);
if($this->upload->do_upload())
{
$data = array('upload_data' => $this->upload->data());
$this->load->view('upload_success',$data);
}
else
{
$error = array('error' => $this->upload->display_errors());
$this->load->view('file_view', $error);
}
}
}
?>
Note : You can change preferences depending upon the file you wish to upload.
'allowed_types' => "gif|jpg|jpeg|png|iso|dmg|zip|rar|doc|docx|xls|xlsx|ppt|pptx|csv|ods|odt|odp|pdf|rtf|sxc|sxi|txt|exe|avi|mpeg|mp3|mp4|3gp",
View file to display success message : upload_success.php
<html>
<head>
<title>Upload File Specification</title>
</head>
<body>
<h3>Your file was successfully uploaded!</h3>
<!-- Uploaded file specification will show up here -->
<ul>
<?php foreach ($upload_data as $item => $value):?>
<li><?php echo $item;?>: <?php echo $value;?></li>
<?php endforeach; ?>
</ul>
<p><?php echo anchor('upload_controller/file_view', 'Upload Another File!'); ?></p>
</body>
</html>
Conclusion:
So in this tutorial we have focused on one of the topic of codeigniter which might have beneficial for you to understand it’s complete functionality. Keep reading our blog posts for getting in touch with more coding tricks.
Ajax Image Upload using PHP and jQuery

In this blog post we have covered one of the topic of ajax i.e. to upload images using Ajax and php without page refresh.
Short Description :
In this process the image is selected first and previewed before storing it in to any location . Then using jQuery Ajax, it is send to php script on submit button event.
PHP script stores the image in a defined location and returns the message of the success and failure of the process.
Here we have applied some validations on the selected file, to check it whether it is an image file (jpg, jpeg or png ) or any other file type.
Upload File size allowed is 100 Kb.
Following steps are pointed under this process :
1. Include jQuery library.
2. HTML page with upload field.
3. jQuery Ajax code.
3. PHP script to store image.
Ajax Code :
$.ajax({
url: "ajax_php_file.php", // Url to which the request is send
type: "POST",             // Type of request to be send, called as method
data: new FormData(this), // Data sent to server, a set of key/value pairs (i.e. form fields and values)
contentType: false,       // The content type used when sending data to the server.
cache: false,             // To unable request pages to be cached
processData:false,        // To send DOMDocument or non processed data file it is set to false
success: function(data)   // A function to be called if request succeeds
{
$('#loading').hide();
$("#message").html(data);
}
});
PHP code used to store the image :
$sourcePath = $_FILES['file']['tmp_name'];       // Storing source path of the file in a variable
$targetPath = "upload/".$_FILES['file']['name']; // Target path where file is to be stored
move_uploaded_file($sourcePath,$targetPath) ;    // Moving Uploaded file
Below is our complete code with the live demo and download option

HTML page containing file upload field.
HTML file : ajax_upload_image_main.php
<html>
<head>
<title>Ajax Image Upload Using PHP and jQuery</title>
<link rel="stylesheet" href="style.css" />
<link href='http://fonts.googleapis.com/css?family=Roboto+Condensed|Open+Sans+Condensed:300' rel='stylesheet' type='text/css'>
<script src="http://ajax.googleapis.com/ajax/libs/jquery/1.11.1/jquery.min.js"></script>
<script src="script.js"></script>
</head>
<body>
<div class="main">
<h1>Ajax Image Upload</h1><br/>
<hr>
<form id="uploadimage" action="" method="post" enctype="multipart/form-data">
<div id="image_preview"><img id="previewing" src="noimage.png" /></div>
<hr id="line">
<div id="selectImage">
<label>Select Your Image</label><br/>
<input type="file" name="file" id="file" required />
<input type="submit" value="Upload" class="submit" />
</div>
</form>
</div>
<h4 id='loading' >loading..</h4>
<div id="message"></div>
</body>
</html>
Complete jQuery Code : script.js
$(document).ready(function (e) {
$("#uploadimage").on('submit',(function(e) {
e.preventDefault();
$("#message").empty();
$('#loading').show();
$.ajax({
url: "ajax_php_file.php", // Url to which the request is send
type: "POST",             // Type of request to be send, called as method
data: new FormData(this), // Data sent to server, a set of key/value pairs (i.e. form fields and values)
contentType: false,       // The content type used when sending data to the server.
cache: false,             // To unable request pages to be cached
processData:false,        // To send DOMDocument or non processed data file it is set to false
success: function(data)   // A function to be called if request succeeds
{
$('#loading').hide();
$("#message").html(data);
}
});
}));

// Function to preview image after validation
$(function() {
$("#file").change(function() {
$("#message").empty(); // To remove the previous error message
var file = this.files[0];
var imagefile = file.type;
var match= ["image/jpeg","image/png","image/jpg"];
if(!((imagefile==match[0]) || (imagefile==match[1]) || (imagefile==match[2])))
{
$('#previewing').attr('src','noimage.png');
$("#message").html("<p id='error'>Please Select A valid Image File</p>"+"<h4>Note</h4>"+"<span id='error_message'>Only jpeg, jpg and png Images type allowed</span>");
return false;
}
else
{
var reader = new FileReader();
reader.onload = imageIsLoaded;
reader.readAsDataURL(this.files[0]);
}
});
});
function imageIsLoaded(e) {
$("#file").css("color","green");
$('#image_preview').css("display", "block");
$('#previewing').attr('src', e.target.result);
$('#previewing').attr('width', '250px');
$('#previewing').attr('height', '230px');
};
});
PHP Script : ajax_php_file.php
<?php
if(isset($_FILES["file"]["type"]))
{
$validextensions = array("jpeg", "jpg", "png");
$temporary = explode(".", $_FILES["file"]["name"]);
$file_extension = end($temporary);
if ((($_FILES["file"]["type"] == "image/png") || ($_FILES["file"]["type"] == "image/jpg") || ($_FILES["file"]["type"] == "image/jpeg")
) && ($_FILES["file"]["size"] < 100000)//Approx. 100kb files can be uploaded.
&& in_array($file_extension, $validextensions)) {
if ($_FILES["file"]["error"] > 0)
{
echo "Return Code: " . $_FILES["file"]["error"] . "<br/><br/>";
}
else
{
if (file_exists("upload/" . $_FILES["file"]["name"])) {
echo $_FILES["file"]["name"] . " <span id='invalid'><b>already exists.</b></span> ";
}
else
{
$sourcePath = $_FILES['file']['tmp_name']; // Storing source path of the file in a variable
$targetPath = "upload/".$_FILES['file']['name']; // Target path where file is to be stored
move_uploaded_file($sourcePath,$targetPath) ; // Moving Uploaded file
echo "<span id='success'>Image Uploaded Successfully...!!</span><br/>";
echo "<br/><b>File Name:</b> " . $_FILES["file"]["name"] . "<br>";
echo "<b>Type:</b> " . $_FILES["file"]["type"] . "<br>";
echo "<b>Size:</b> " . ($_FILES["file"]["size"] / 1024) . " kB<br>";
echo "<b>Temp file:</b> " . $_FILES["file"]["tmp_name"] . "<br>";
}
}
}
else
{
echo "<span id='invalid'>***Invalid file Size or Type***<span>";
}
}
?>
CSS code : style.css
body {
font-family: 'Roboto Condensed', sans-serif;
}
h1
{
text-align: center;
background-color: #FEFFED;
height: 70px;
color: rgb(95, 89, 89);
margin: 0 0 -29px 0;
padding-top: 14px;
border-radius: 10px 10px 0 0;
font-size: 35px;
}
.main {
position: absolute;
top: 50px;
left: 20%;
width: 450px;
height:530px;
border: 2px solid gray;
border-radius: 10px;
}
.main label{
color: rgba(0, 0, 0, 0.71);
margin-left: 60px;
}
#image_preview{
position: absolute;
font-size: 30px;
top: 100px;
left: 100px;
width: 250px;
height: 230px;
text-align: center;
line-height: 180px;
font-weight: bold;
color: #C0C0C0;
background-color: #FFFFFF;
overflow: auto;
}
#selectImage{
padding: 19px 21px 14px 15px;
position: absolute;
bottom: 0px;
width: 414px;
background-color: #FEFFED;
border-radius: 10px;
}
.submit{
font-size: 16px;
background: linear-gradient(#ffbc00 5%, #ffdd7f 100%);
border: 1px solid #e5a900;
color: #4E4D4B;
font-weight: bold;
cursor: pointer;
width: 300px;
border-radius: 5px;
padding: 10px 0;
outline: none;
margin-top: 20px;
margin-left: 15%;
}
.submit:hover{
background: linear-gradient(#ffdd7f 5%, #ffbc00 100%);
}
#file {
color: red;
padding: 5px;
border: 5px solid #8BF1B0;
background-color: #8BF1B0;
margin-top: 10px;
border-radius: 5px;
box-shadow: 0 0 15px #626F7E;
margin-left: 15%;
width: 72%;
}
#message{
position:absolute;
top:120px;
left:815px;
}
#success
{
color:green;
}
#invalid
{
color:red;
}
#line
{
margin-top: 274px;
}
#error
{
color:red;
}
#error_message
{
color:blue;
}
#loading
{
display:none;
position:absolute;
top:50px;
left:850px;
font-size:25px;
}
Conclusion :
In this blog post we have covered a basic topic of ajax of uploading image using php with applied validations in it. Hope this might have worked for you to understand the ajax property. Keep reading our other blog posts for more coding tricks.
CSS: Background Gradient
In this tutorial I am give you brief explanation about CSS Background Gradient property used for background to display smooth transition between two or more colors which was not possible earlier, as earlier we use to put image or other alternative approach for such effects.
Gradient is nothing but a color that fades into another.

Types Of Gradients:
1. Linear Gradients
You can create a linear gradient by defining an axis. It can go from left-to-right, top-to-bottom or at any angle your choice.
There is one thing you need to keep in mind i.e. define at-least two color stops. Color stops are nothing but the colors in among which you want a smooth transitions.
Syntax:
background: linear-gradient(direction, color-stop1, color-stop2);Using Linear-Gradient In Different Styles:
Linear Gradient (Top to Bottom):
This is the default direction of linear-gradient.
This example shows a transition that starts from a top. We have used two colors yellow and green in it. It starts with yellow and transitioned to green. This is how it will look:
")
CSS File : style.css
#linear_grad
{
height: 100px;
background: linear-gradient(yellow, green);
}
HTML File : linear-top-bottom.html
<!DOCTYPE html>
<html>
<head>
<title>Linear-Gradient CSS Example </title>
<!-- Include CSS file here -->
<link href="css/style.css" rel="stylesheet">
</head>
<body>
<div id="linear_grad"></div>
</body>
</html>
Linear Gradient (Left to Right):
The following example shows a linear gradient that starts from the left. It starts with yellow and transitioned to green.
") CSS File : style.css
CSS File : style.css
#linear_grad
{
height: 100px;
background: linear-gradient(to right, yellow, green);
}
HTML File : linear-left-right.html
<!DOCTYPE html>
<html>
<head>
<title>Linear-Gradient Left to Right CSS Example </title>
<!-- Include CSS file here -->
<link href="css/style.css" rel="stylesheet">
</head>
<body>
<div id="linear_grad"></div>
</body>
</html>
Linear Gradient (Diagonal):
If you wish to create a gradient of diagonal type then you have to specify horizontal and vertical starting positions, as shown in example:
") CSS File : style.css
CSS File : style.css
#grad_diagonal
{
height: 100px;
background: linear-gradient(to bottom right, red ,yellow, green);
}
HTML File : linear-gradient-diagonal.html
<!DOCTYPE html>
<html>
<head>
<title>Linear-Gradient-Diagonal </title>
<!-- Include CSS file here -->
<link href="css/style.css" rel="stylesheet">
</head>
<body>
<div id="grad_diagonal"></div>
</body>
</html>
Linear Gradient (Angle Gradients):
By specifying angle to your gradient you can control over its different direction.
Syntax:
background: linear-gradient(angle, color-stop1, color-stop2);")
CSS File : style.css
#grad_0deg
{
height: 100px;
background: linear-gradient(0deg, orange, green, magenta);
}

#grad_90deg
{
height: 100px;
background: linear-gradient(90deg, orange, green, magenta);
}

#grad_180deg
{
height: 100px;
background: linear-gradient(180deg, orange, green, magenta);
}
HTML File : linear-angle-gradient.html
<!DOCTYPE html>
<html>
<head>
<title>Linear-Gradient Left to Right CSS Example </title>
<!-- Include CSS file here -->
<link href="css/style.css" rel="stylesheet">
</head>
<body>
<div id="grad_0deg" style="color:white;text-align:center;font- size:20px;">0deg</div>
<div id="grad_90deg" style="color:white;text-align:center;font- size:20px;">90deg</div>
<div id="grad_180deg" style="color:white;text-align:center;font- size:20px;">180deg</div>
</body>
</html>
Gradients With Transparency:
For creating fading effects, gradients also support transparency. To create this effect we need to use rgba() function. The last parameter in the rgba() function can be a value from 0 to 1, and it defines the transparency of the color: 0 indicates full transparency, 1 indicates full color (no transparency).
The following example shows a linear gradient that starts from the left. It starts fully transparent, transitioning to full color red:
 CSS File : style.css
#grad_transparency
{
height: 200px;
background: linear-gradient(to left, rgba(100,50,20,0), rgba(100,50,20,1));
}
HTML File : transparent-gradient.html
<!DOCTYPE html>
<html>
<head>
<style>
<link href="css/style.css" rel="stylesheet">
<!-- Include CSS file here -->
</style>
</head>
<body>
<div id="grad_transparency" style="text- align:center;margin:auto;color:#fff;font- size:40px;font- weight:bold">
Transparency
</div>
</body>
</html>
2. Radial Gradients:
By using radial gradient you can give different shapes to your gradients like circle, ecllipse and so on. This gradient is defined by its centre.
Syntax:
background: radial-gradient(shape size at position, start-color, ..., last-color); CSS File : style.css
#grad_radial
{
height: 150px;
width: 200px;
background: radial-gradient(purple, yellow, red);
}
HTML File : radial-gradient.html
<!DOCTYPE html>
<html>
<head>
<link href="css/style.css" rel="stylesheet">
<!-- Include CSS file here -->
</head>
<body>
<div id="grad_radial" style="text-align:center; margin:auto; color:#fff; font-size:20px; font-weight:bold">
Radial Gradient
</div>
</body>
</html>
Using Radial Gradient In Different Styles:
Radial Gradient (Differently Spaced Color Stops):
We can also specify different spaced color stops. The gradient line extends out from the starting position in all directions.
")
CSS File : style.css
#grad_colorstop
{
height: 250px;
width: 300px;
background: radial-gradient(purple 20%, yellow 40%, red 60%);
}
HTML File : different-space-rg.html
<!DOCTYPE html>
<html>
<head>
<!-- Include CSS file here -->
<link href="css/style.css" rel="stylesheet">
</head>
<body>
<div id="grad_colorstop" style="text-align: center;margin: auto; color:#fff; font-size:20px; font-weight:bold">
Radial Gradient with Color Stops.
</div>
</body>
</html>
Set Radial Shapes:
We can also specify the shape parameter in radial gradient in order to set the shape to circle or ecllipse. The default value is ecllipse.
Below is the example to set different shapes:
")
CSS File : style.css
#grad_ellips
{
height: 150px;
width: 200px;
background: radial-gradient(blue, yellow, red);
}

#grad_circle
{
height: 150px;
width: 200px;
background: radial-gradient(circle, blue, yellow, red);
}
HTML File : gradient-shapes.html
<!DOCTYPE html>
<html>
<head>
<link href="css/style.css" rel="stylesheet">
<!-- Include CSS file here -->
</head>
<body>
<h3>Radial Gradient - Shapes</h3>
<p><strong>Ellipse (this is default):</strong></p>
<div id="grad_ellips"></div>
<p><strong>Circle:</strong></p>
<div id="grad_circle"></div>
</body>
</html>
Use Of Different Size Parameters:
The size parameter defines the size of the gradient. The size parameter includes four values:
- closest-side
- farthest-side
- closest-corner
- farthest-corner
CSS File : style.css
#grad1
{
height: 150px;
width: 150px;
background: radial-gradient(closest-side at 60% 55%,orange, yellow,green,yellow, blue);
}

#grad2
{
height: 150px;
width: 150px;
background: radial-gradient(farthest-side at 60% 55%,orange, yellow,green,yellow, blue);
}

#grad3
{
height: 150px;
width: 150px;
background: radial-gradient(closest-corner at 60% 55%,orange, yellow,green,yellow, blue);
}

#grad4 {
height: 150px;
width: 150px;
background: radial-gradient(farthest-corner at 60% 55%,orange, yellow,green,yellow, blue);
}
HTML File : gradient-size.html
<!DOCTYPE html>
<html>
<head>
<link href="css/style.css" rel="stylesheet">
<!-- Include CSS file here -->
</head>
<body>
<p><strong>closest-side:</strong></p>
<div id="grad1"></div>
<p><strong>farthest-side:</strong></p>
<div id="grad2"></div>
<p><strong>closest-corner:</strong></p>
<div id="grad3"></div>
<p><strong>farthest-corner (this is default):</strong></p>
<div id="grad4"></div>
</body>
</html>
Repeating a radial-gradient:
For repeating radial gradients, we can use repeating-radial-gradient function.

CSS File : style.css
#grad1
{
height: 250px;
width: 300px;
background: repeating-radial-gradient(orange, green 10%, red 15%);
}
HTML File : repeat-radial.html
<!DOCTYPE html>
<html>
<head>
<link href="css/style.css" rel="stylesheet">
<!-- Include CSS file here -->
</head>
</head>
<body>
<div id="grad1"></div>
</body>
</html>
Conclusion:
This tutorial showed you to add background gradients to any HTML element along with examples and demos. Hope you liked it. Keep reading our blog posts. 🙂
For more related stuff give a look on following blogs –
CSS: Background-Image & Background-Repeat

In this tutorial I am going to give an overview on: Background-image, a css property that sets one or more background images for an element like div, paragraph etc., which by default gets placed at the top-left corner of that element, and can be repeated vertically and horizontally or both by using Background-repeat property.
Through this tutorial you will know different variations in order to place your background image. You can set one or more images in the background as:
background-image: url("image1.jpg"), url("image2.jpg");Syntax For Background-image:
background-image: url|none|initial|inherit;Where:
url:   Url of the image. To set more than one image, place the urls separated by a comma
none:  This is default property with no background image
initial: Sets the property to default value
inherit: The property is inherited from its parent element
Syntax For Background-repeat:
background-repeat: repeat|repeat-x|repeat-y|no-repeat|initial|inherit;Where:
repeat :The background image will be repeated both vertically and horizontally. This is default

repeat-x: The background image will be repeated only horizontally

repeat-y: The background image will be repeated only vertically

no-repeat: The background-image will not be repeated

initial: Sets the property to default value

inherit: The property is inherited from its parent element.
Background-Image With Default Property
This demo will help you to set a background image in an element. Here you will see that image spreads all over the element’s body. It is because of it’s default property i.e. background-repeat : repeat

CSS Code:
.main{
background-image:url(../images/park.jpg);
width:100%;
height:100%;
position:absolute;
top:0;
bottom:0;
right:0;
left:0;
}
HTML Code:
<!DOCTYPE html>
<html>
<head>
<title>Background Image CSS Example</title>
<!-- Include CSS file here -->
<link href="css/style.css" rel="stylesheet">
</head>
<body>
<div class="main">
<p>This is a example of background-image with default property.</p>
</div>
</body>
</html>Background-Image With No-Repeat Property
In the above demo you have seen that the image gets spread all over the element’s container, so to fix it at a certain position you may use repeat property i.e. background-repeat

CSS Code:
.main{
background-image:url(../images/park.jpg);
background-repeat: no-repeat;
width:500px;
height:500px;
}
HTML Code:
<!DOCTYPE html>
<html>
<head>
<!-- Include CSS file here -->
<link href="CSS/style.css" rel="stylesheet">
</head>
<body>
<div class="main">
<p>This is a example of background-image no-repeat.</p>
</div>
</body>
</html>
Background-Image With Repeat-X Property

CSS Code:
.main{
background-image:url(../images/park.jpg);
background-repeat: repeat-x;
width:100%;
height:100%;
position:absolute;
top:0;
bottom:0;
right:0;
left:0;
}
HTML Code:
<!DOCTYPE html>
<html>
<head>
<!-- Include CSS file here -->
<link href="css/style.css" rel="stylesheet">
</head>
<body>
<div class="main">
<p>This is a example of background-image with repeat in x-axis.</p>
</div>
</body>
</html>
Background-Image With Repeat-Y Property

CSS Code:
.main{
background-image:url(../images/park.jpg);
background-repeat: repeat-y;
width:100%;
height:100%;
position:absolute;
top:0;
bottom:0;
right:0;
left:0;
}
HTML Code :
<!DOCTYPE html>
<html>
<head>
<!-- Include CSS file here -->
<link href="css/style.css" rel="stylesheet">
</head>
<body>
<div class="main">
<p>This is a example of background-image with repeat in y-axis.</p>
</div>
</body>
</html>
Conclusion:
In the above tutorial, we have learnt to set a background image in an element using CSS. You have also seen to fix the image using repeat property. Hope you might have benefited with this post. Give us your feedback so that we can able to know about your reviews.
Also read our popular post:-
Float Property CSS – Left and Right
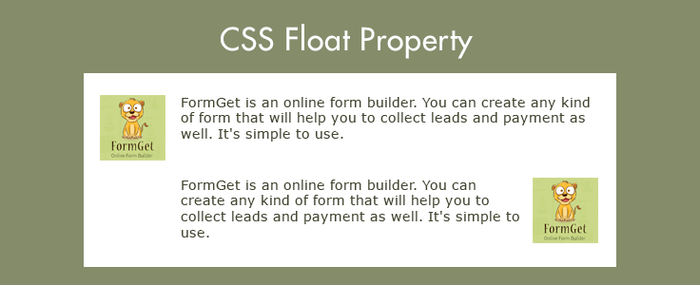
CSS float is a property that forces any element to float (right, left, none, inherit) inside its parent body with the rest of the element to wrap around it. This property can be used to place an image or an element inside its container and other inline elements will wrap around it.
For eg. : Images in newspaper and articles are placed in certain position with rest of the content wrapped around it.
One should keep in mind that this can only be applied to float the element horizontally (i.e. right or left ) not vertically.
Syntax :
float: left | right | none | inherit ;Values :
float : right;    /* Floats the element to right of it's container */
float : left;     /*  Floats the element to left of it's container */
float : none;     /*  It will restrict the element to float */
float : initial;  /*  The element remains to it's default position */
float : inherit;  /*  Enables the element to inherit the property from its parent element */
Example 1 – Floating single element
Here we will be going to see how an element floats inside its container with the help of an example.

CSS File : style.css
Below is the CSS that we have used here. In which property is set to float : left.
img {
float: left;
width: 200px;
height: 150px;
}
HTML File : float_left.html
This is our html page in which few demo paragraphs are created with an image in it to show float effect.
<!DOCTYPE html>
<html>
<head>
<title>CSS float left</title>
<!-- Include CSS file here -->
<link href="css/style.css" rel="stylesheet">
</head>
<body>
<p>The result is that the image will float to the left in the paragraph.</p>
<p><img src="images/cat.jpg">
Lorem Ipsum has been the industry's standard dummy text ever since the 1500s,
when an unknown printer took a galley of type and scrambled it to make a type specimen book.
</p>
</body>
</html>
Example 2 – Floating multiple elements
In the above example we have seen to float a single element, here we will be going to see how multiple element (here it is an image) floats inside it’s container one to another. In this you may also find that as you will minimize the window size they will automatically get shifted to the defined position. It is because they do not get enough space to spread.

CSS File : style.css
Here it is our CSS file which is implied to all the images with the class name as slides.
.slides {
float: left;
width: 150px;
height: 100px;
margin: 5px;
}
HTML File : float_multiple.html
Our HTML page with multiple images to show the float effect in it.
<!DOCTYPE html>
<html>
<head>
<title>CSS float left for multiple elements</title>
<!-- Include CSS file here -->
<link href="css/style.css" rel="stylesheet">
</head>
<body>
<h3>Multiple Image Float CSS</h3>
<p>Resize the browser-window to see the changes. The image will automatically shift to left</p>
<img class="slides" src="images/balls.jpg"/>
<img class="slides" src="images/cloud.jpg"/>
<img class="slides" src="images/flowers.jpg"/>
<img class="slides" src="images/nature.jpg"/>
<img class="slides" src="images/spiral.jpg"/>
<img class="slides" src="images/sunflower.jpg"/>
<img class="slides" src="images/waves.jpg"/>
<img class="slides" src="images/forest.jpg"/>
</body>
</html>
Using Clear to turn off float :
To avoid viewing the wrapped element around the floated element you have to use clear property. Using this the wrapped element will switch to next line.

CSS File : style.css
Simple CSS lines that is being used to clear the element from both sides of the paragraph using property clear : both.
img {
float: left;
}
p.para {
clear: both;
}
HTML File : clear.html
Easy HTML lines with an image and two paragraphs for illustrating clear effect in it.
<!DOCTYPE html>
<html>
<head>
<title>
<!-- Include CSS file here -->
<link href="css/style.css" rel="stylesheet">
</head>
<body>
<img src="images/fogo.jpg" width="95" height="84">
<p>Lorem Ipsum has been the industry's standard dummy text ever since the 1500s,
when an unknown printer took a galley of type and scrambled it to make a type specimen book.
</p>
<p class="para">Lorem Ipsum has been the industry's standard dummy text ever since the 1500s,
when an unknown printer took a galley of type and scrambled it to make a type specimen book.
</p>
</body>
</html>Conclusion:
In the above tutorial we have learned about the CSS float property. Hope you have benefited from it. Keep visiting our websites for more knowledge and information.
Recommended Blogs –
CSS Border Property: Style, Width, Color

The CSS Border property allows you to customize the borders around an HTML elements. It is a shorthand property to set individual border property values in a single place. You can set the thickness or width, color and style of each border.
There are mainly three border properties:
- The border-style :- Specifies whether a border should be solid, dashed line, double line, or one of the other possible values
- The border-color :- Specifies the color of a border
- The border-width :- Specifies the width of a border
Apart from the above three one more property is:
- Border – Shorthand property
Border-style:
This border-style property defines the type of border to display. Below given is the syntax for the type of styles that can be used:
Syntax:
border-style: none /* Defines no border */

border-style: solid

border-style: double

border-style: dotted

border-style: dashed

border-style: groove

border-style: inset

border-style: outset

border-style: ridge

border-style: hidden
Below are the different border styles:

Border Style Example:
Following is the example showing some of the above mentioned border styles. We can set different individual border on the four sides of an element.
CSS File: style.css
p.multiple
{
border-top-style: solid;
border-left-style: dotted;
border-bottom-style: dashed;
border-right-style: double;
padding:5px;
width:350px;
}
HTML File: border-style.html
<!DOCTYPE html>
<html>
<head>
<title>CSS Border Style</title>
<!-- Include css file here -->
<link href="css/style.css" rel="stylesheet">
</head>
<body>
<p class="multiple">
This is the paragraph with multiple border style
</p>
</body>
</html>
Border-width:-
The border-width property helps you to set the width of the border. It comes up with a predefined values thin, medium and thick.
You can also set the custom width of borders but in pixels. While setting the border width one thing should kept in mind that this property will not work if used alone, for that we need to set the border first.
The predefined values are :
border-width: thin

border-width: thick

border-width: medium

Border Width Example:
This example will help you how to set the border width.We can set the different border widths on four side of an element.
Note: The border width is 0 or absolute when the border-style is set to be none or absolute.
CSS File: style.css
p.multiple
{
border-style:solid;
border-left-width:10px;
border-top-width:20px;
border-right-width:30px;
border-bottom-width:40px;
width:400px;
}
HTML File: border-width.html
<!DOCTYPE html>
<html>
<head>
<title>CSS border width</title>
<!-- Include css file here -->
<link href="css/style.css" rel="stylesheet">
</head>
<body>
<p class="multiple">
This is the paragraph with multiple border width
</p>
</body>
</html>
Border-color:-
The border-color property is used to give colors to the border. We can set color on the basis of:
- name – color name, like “red”
- RGB – RGB value, like “rgb(252,217,197)”
- Hex – hex value, like “#98bf21”
If no color is specified the border color properties default to the value of the color for the element.
Syntax:
border-color: "name of color";

p.one {
border-style: solid;
border-color: red;
border-width:10px;
}

p.two {
border-style: solid;
border-color: #98bf21;
border-width:10px;
}

p.three {
border-style: solid;
border-color: rgb(252,217,197);
border-width:10px;
}

Border Color Example:
In this example we have set the border color in different ways as shown:
CSS File: style.css
p {
border-style: solid;
border-width: 20px;
border-top-color: red;
border-right-color: green;
border-bottom-color: blue;
border-left-color: yellow;
padding: 10px; /* Leave a gap between the content and the borders. */
width:100px; /*narrower the box width*/
}
HTML File: border-color.html
<!DOCTYPE html>
<html>
<head>
<title>CSS Border Color</title>
<!-- Include css file here -->
<link href="css/style.css" rel="stylesheet">
</head>
<body>
<p>
This is the paragraph with different border color.
</p>
</body>
</html>
This is how it will look:

Border – Shorthand property:
While dealing with border there are many properties that we have to consider. Some time remembering all and using them becomes a bit lengthy.
To make it short, we can also use border shorthand property. In which all the individual border properties can be specify into one.
One can use it for the following individual properties:
- border-width
- border-style
- border-color
Syntax:-
border: 2px solid red;
Border – Shorthand example:
The given below example will show you how to set this property:
CSS File: style.css
p.one{
border: 2px solid red;
padding:2px;
width:350px;
}
HTML File: border-shorthand.html
<!DOCTYPE html>
<html>
<head>
<title>CSS Border Shorthand Property</title>
<!-- Include css file here -->
<link href='css/style.css' rel='stylesheet' type='text/css'/>
</head>
<body>
<p class="one">
This is the paragraph with border shorthand property
</p>
</body>
</html>
This is how you will see in the live demo.

Conclusion
By using border property you can make your web page and elements more attractive and beautiful.
Get more related information here –
CSS Background-attachment Property
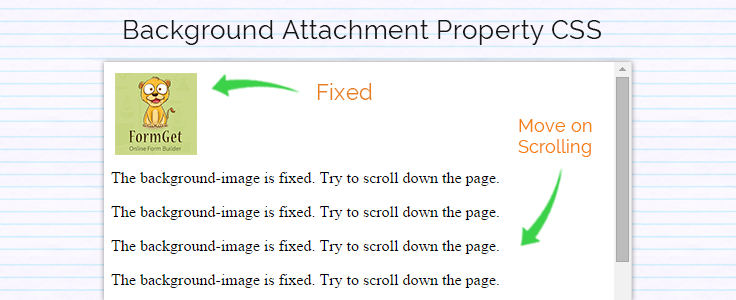
Using CSS background-attachment property one can either fix the background image or can scroll it accordingly with the rest of the content.
For eg: If you have used an image in your background then normally the image will scroll with the page and its content , but if you have set this property to fixed then the image will stay in the same position.
You can also refer the below shown syntax by using which you can set up this property in different ways.
Background-attachment Syntax
background-attachment: scroll;   /* It will scroll along with the element (default )*/

background-attachment: fixed;    /* It will fix the background image  */

background-attachment: local;    /* The background scrolls along with the element's contents  */

background-attachment: initial;  /* Sets this property to its default value  */

background-attachment: inherit;  /* Inherits this property from its parent element  */
Below is our complete code with download and live demo option
CSS File: Style.css
The below given is a CSS file in which we have set the background-attachment property attribute to fixed.
div.demo{
background-image: url('images/mb.png');
background-repeat: no-repeat;
background-attachment: fixed;
}
As you have seen in live demo that the image is fixed in a certain place i.e. at the top-left corner of the screen and the rest of the content is scrollable. Do remember that scroll effect will only cause depending upon the content length.
HTML File: background-attachment.html
Its Plain HTML code where we have include the CSS file shown above.
<html>
<title>background-clip<title>
<head>
<!-- Include CSS file here --!>
<link href="css/style.css" rel="stylesheet">
</head>
<body>
<div class="demo">
<p>Lorem Ipsum has been the industry's standard dummy text ever since the 1500s,
when an unknown printer took a galley of type and scrambled it to make a type specimen book.
</p>
<p>Lorem Ipsum has been the industry's standard dummy text ever since the 1500s,
when an unknown printer took a galley of type and scrambled it to make a type specimen book.
</p>
<p>Lorem Ipsum has been the industry's standard dummy text ever since the 1500s,
when an unknown printer took a galley of type and scrambled it to make a type specimen book.
</p>
</div>
</body>
</html>
Conclusion:
This way you can put images on background that can be made fixed or scroll with respect to content.
For more related stuffs check out the following listing –
Background Image Opacity With CSS
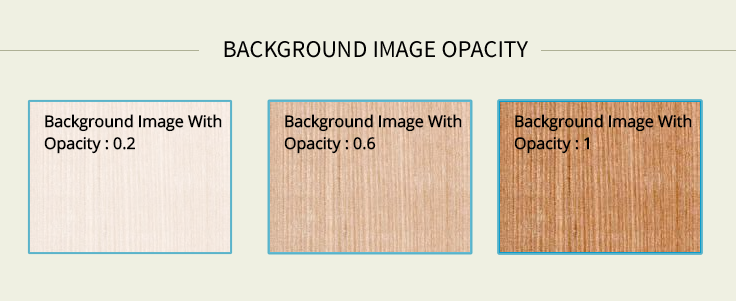
When we opt for Background opacity property of CSS for an HTML element generally what happen is it will not only change the opacity of image in background but also reflects the opacity changes in its child elements. The default initial value for opacity is 1(100% opaque). But this tutorial will guide you how to handle this property effectively.
Watch the live demo or download code from the link given below
You can also refer the below opacity syntax which suits best for your requirements:
Background Opacity Syntax
opacity: 1.0  /* The default opacity where image looks complete solid. */
opacity: 0.6 /* The image will look less solid, more opaque*/
opacity: 0.1 /* The image will become nearly transparent and text gets visible more clearly */
opacity: inherit /* The default opacity of actual image/*
filter: alpha(opacity=100); /* For IE8 and below */
zoom: 1; /* Triggers "has Layout" in IE 7 and below */
CSS File: Style.css
The below CSS code will help you to set up background opacity property.
#main{
position:relative;
}
div#first{
background-image: url('images/wood1.jpg');
opacity:0.2;
width:300px;
height:300px;
}
div#second{
width:300px;
height:300px;
position:absolute;
top: 0;
left:0;
}
HTML File: background_opacity.html
Here is the HTML code.
<!DOCTYPE html>
<html>
<head>
<title>Background CSS Example </title>
<!-- Include CSS file here -->
<link href="css/style.css" rel="stylesheet">
</head>
<body>
<div id="main">
<div id="first">
</div>
<div id="second">
<p id="container">
Lorem Ipsum has been the industry's standard dummy text ever since the 1500s,
when an unknown printer took a galley of type and scrambled it to make a type specimen book.
</p>
</div>
</div>
</body>
</html>
Conclusion:
Generally, when the opacity is added to any div, it automatically adds opacity to all associated elements in the same div. This tutorial specifically adds opacity to just the background and not to any other corresponding element in the same div. Just follow the example and demo to add opacity to your background element.
Check out some latest blog here –
- CSS Progress Bar
- CSS Design In Selection Option