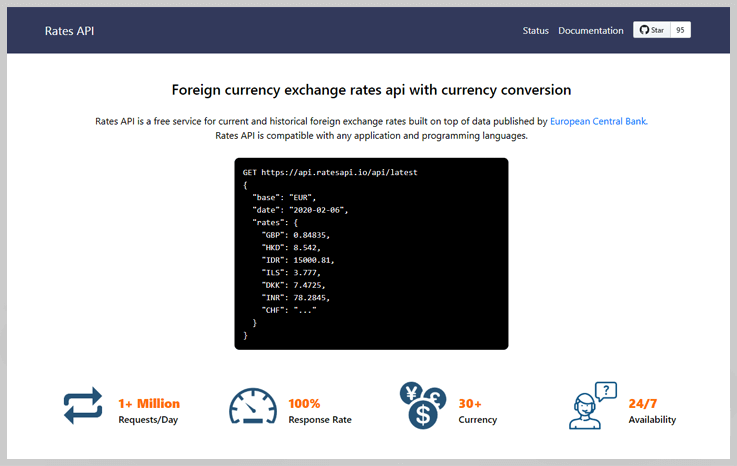
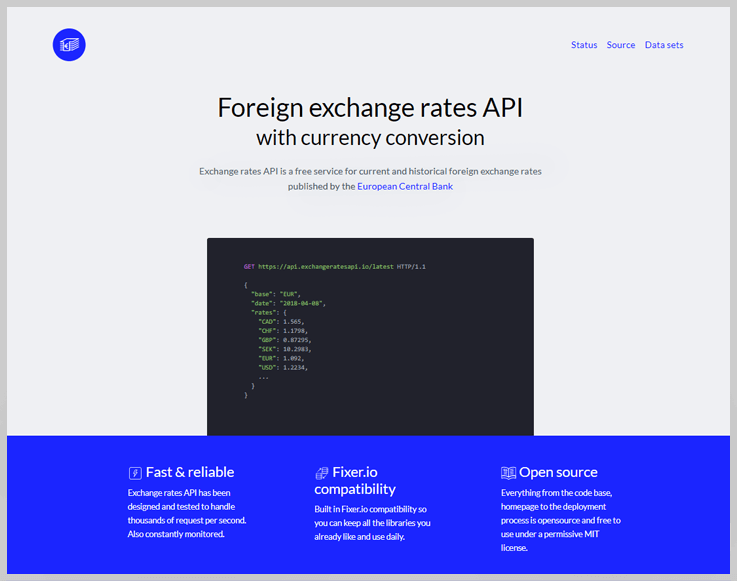
Most of the business owner who deals with financial markets on a daily basis must have been looked for a tool for currency conversion and exchange rates. Keeping the same in mind, many financial services released their APIs in the market. The reason for exposing APIs is, it eases the work, saves time and provides accuracy.
Here in this particular help guide, we’ll reveal some of the Best Foreign Exchange Rates API Services available in the market.
Choose accordingly and then integrate it with your website and you’re good to go.
Foreign Exchange Rates API


11 Best Google Exchange Rates API Services 2022

Most of the business owner who deals with financial markets on a daily basis must have been looked for a tool for currency conversion and exchange rates. Keeping the same in mind, many financial services released their APIs in the market. The reason for exposing APIs is, it eases the work, saves time and provides accuracy.
Here in this particular help guide, we’ll reveal some of the Best Google Exchange Rates API Services available in the market.
Choose accordingly and then integrate it with your website and you’re good to go.
Google Exchange Rates API


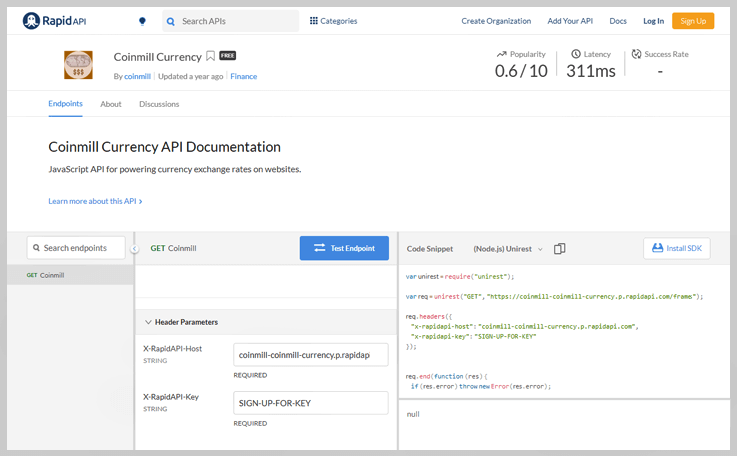
11 Best Real Time Currency Rates API Services 2022

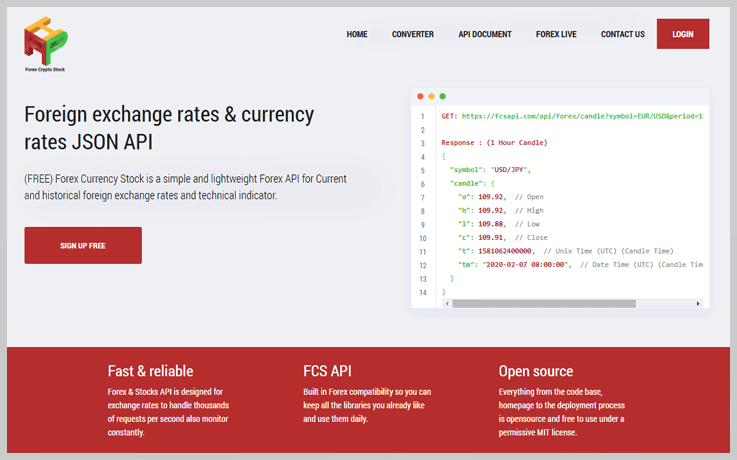
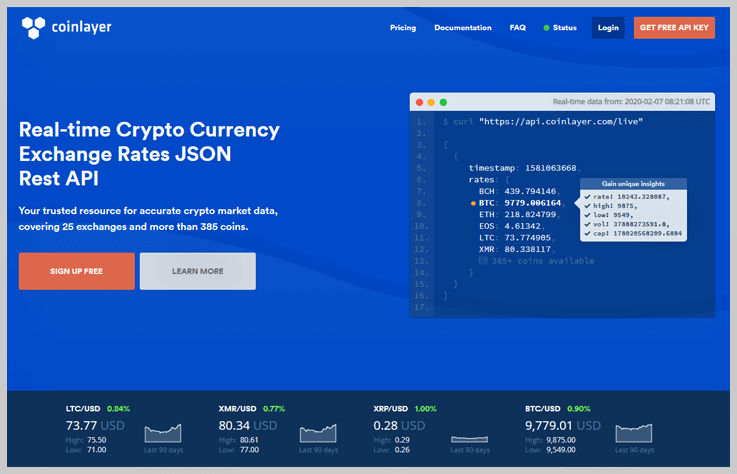
Most of the business owner who deals with financial markets on a daily basis must have been looked for a tool for currency conversion and exchange rates. Keeping the same in mind, many financial services released their APIs in the market. The reason for exposing APIs is, it eases the work, saves time and provides accuracy.
Here in this particular help guide, we’ll reveal some of the Best Real Time Currency Rates API Services available in the market.
Choose accordingly and then integrate it with your website and you’re good to go.
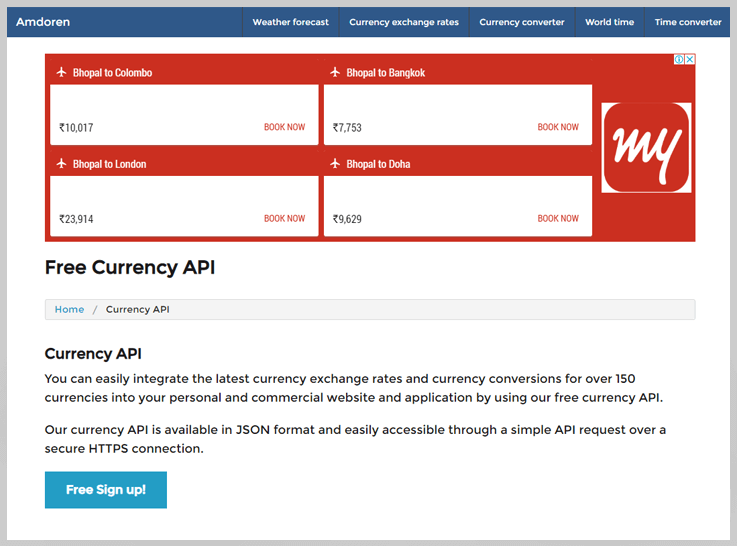
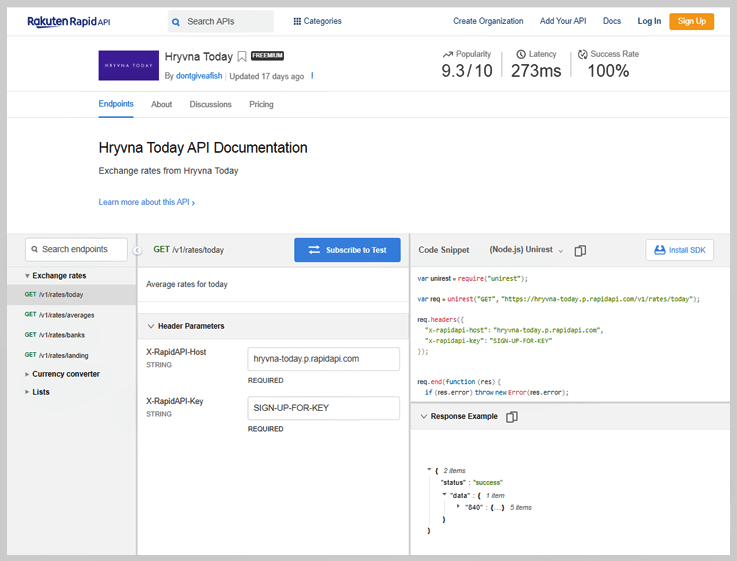
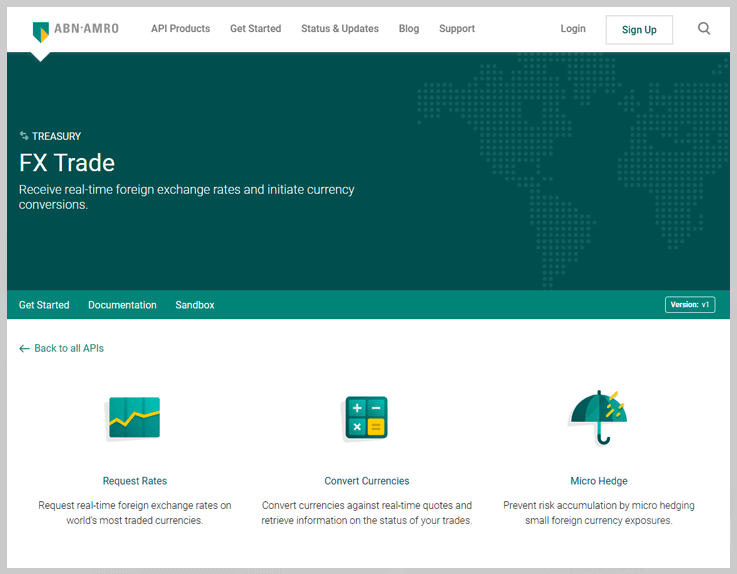
Real Time Currency Rates API
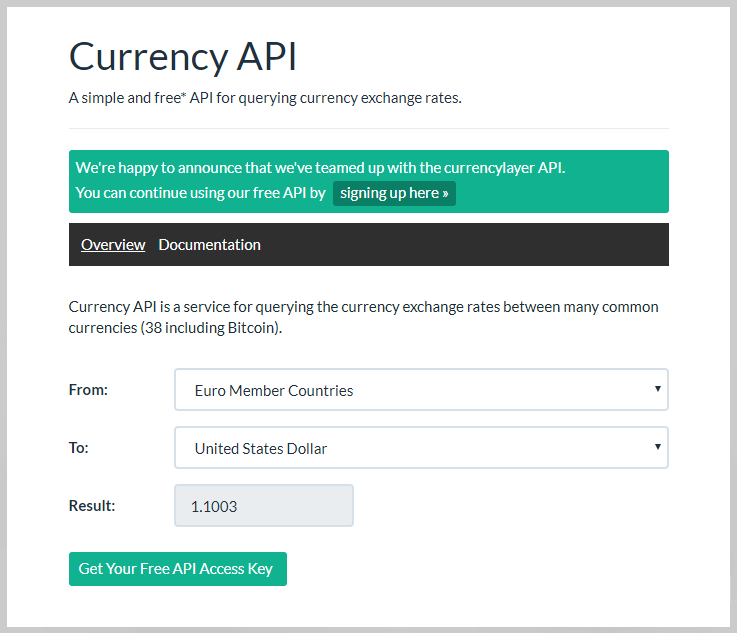

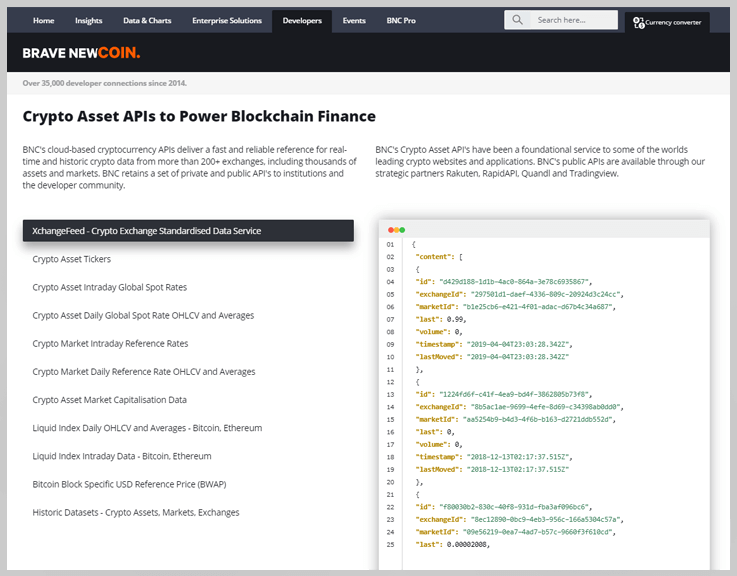

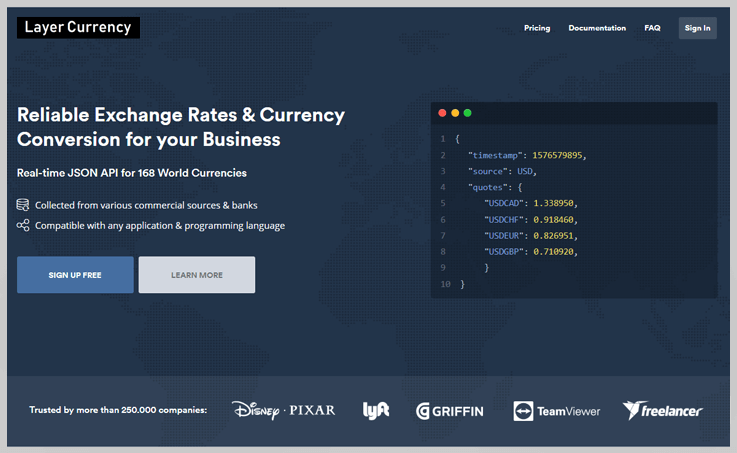
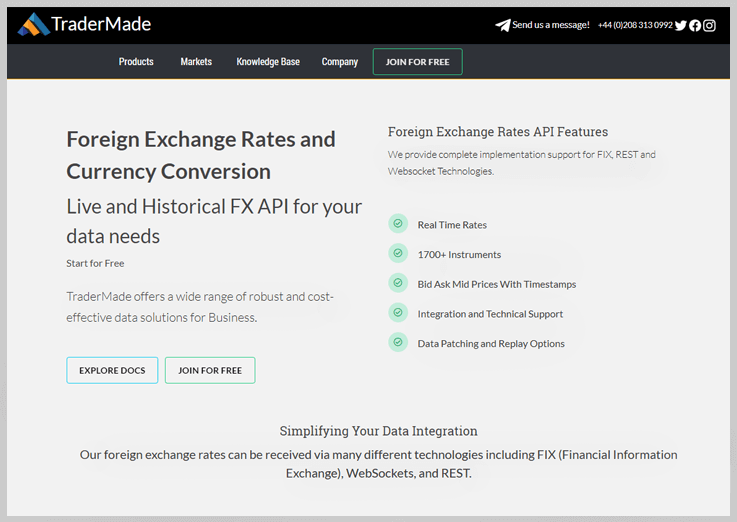
LayerCurrency provides a simple REST API with real-time and historical exchange rates for 168 world currencies, delivering currency pairs in universally usable JSON format - compatible with any of your applications.
Spot exchange rate data is retrieved from several major forex data providers in real-time, validated, processed and delivered hourly, every 10 minutes, or even within the 60-second market window.
How Many Respondents Can You Have In A Google Forms Survey?

Google Forms is a simple to use form builder tool that lets you create beautiful survey forms. It is not only preferred by individuals but also by organizations for conducting surveys.
The thing which makes this software a real delight is, it allows you to receive unlimited responses on surveys from the audience. Moreover, its “free of cost” tag is cherry on top.
Although the form creator provides the mentioned feature, but it has some restrictions which we are going to discuss further.
No doubt, Google Forms let you collect unlimited responses on your survey but it does not provide any option to keep track of the responses which is a huge disappointment for business with greater needs.
Keeping this in mind, we came across the best effective alternative of Google Forms which is Pabbly Form Builder. It lets you view the analytics and report of the submission in the software itself.
Besides, you can easily manage responses at your fingertips. The software is trouble-free and can be accessed by anyone.
Here, in this particular help guide, we will see how one can manage their responses in Google Forms.
1. How To View Google Forms Responses:
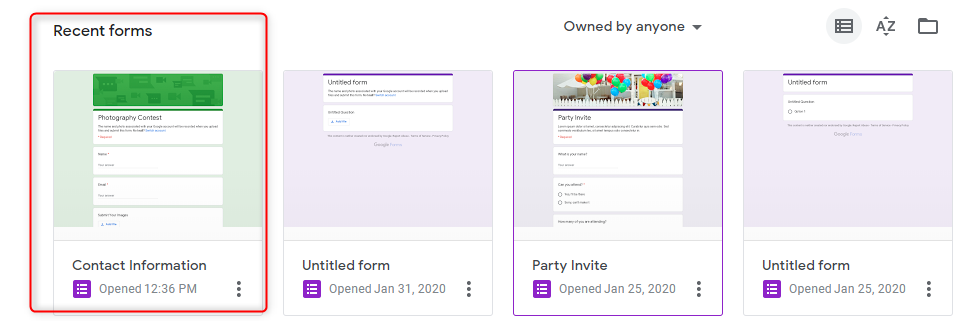
Step 1: Open A Form
To see the responses, open the particular form. Don’t forget to log in to your Google account before that.
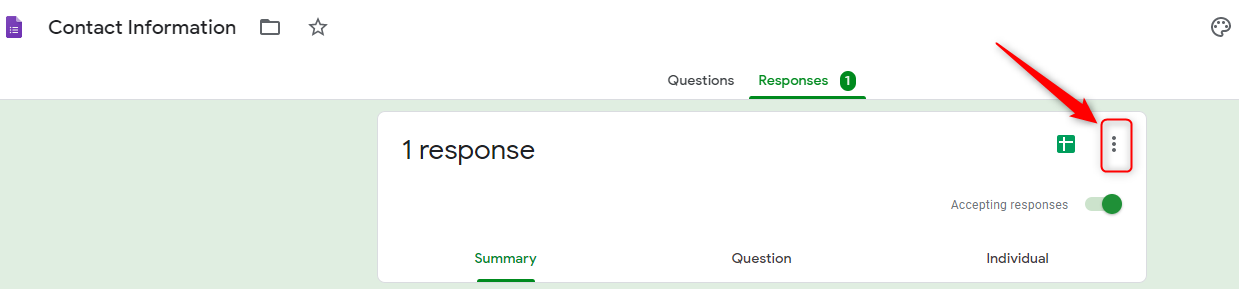
Step 2: Responses Section
Further, click on the “Responses” on the top of the page to view the user responses on your form.

Step 3: Accepting Responses Option
If you want to conclude the survey and don’t want to receive further responses, then disable the “Accepting responses” button.

2. How To Download Responses In CSV Format:
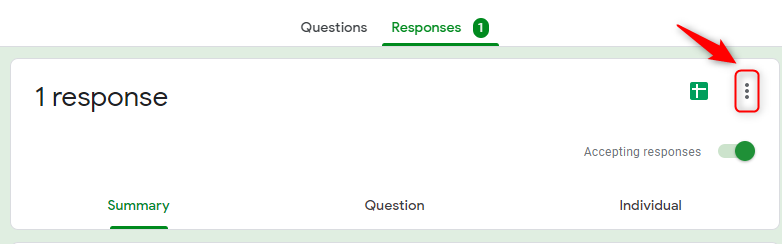
Step 1: Responses Section
In the responses tab, click on the three vertical dots icon to view the drop-down menu.
Step 2: Download Responses
To download the received responses of your form. Select the “Download responses(.csv)” option.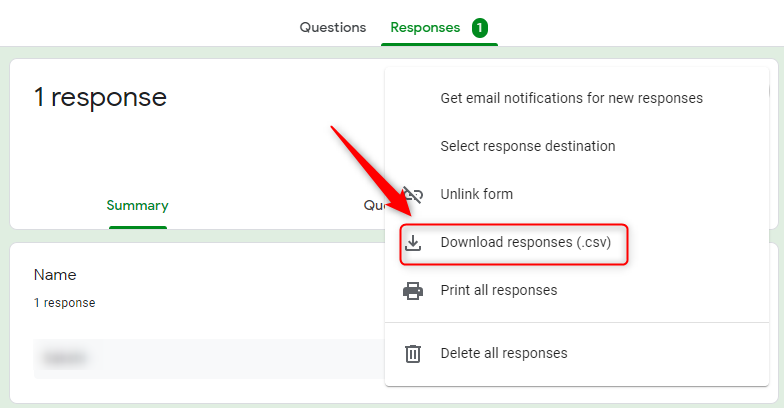
After clicking on that button, a zip file would automatically be downloaded on your system. Thereafter, you would be able to access the responses offline.
3. How To Use Google Sheets Integration:
Step 1: Google Sheet Icon
In the Responses tab, click on the Google Sheets icon beside the three vertical dots.
![]()
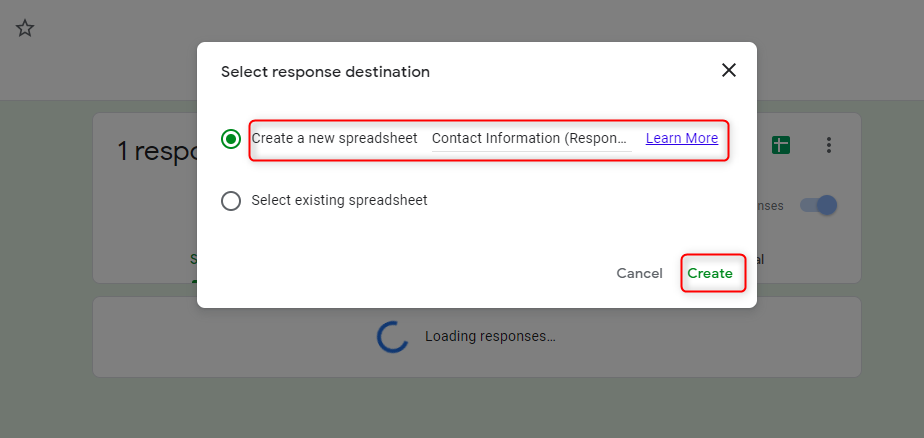
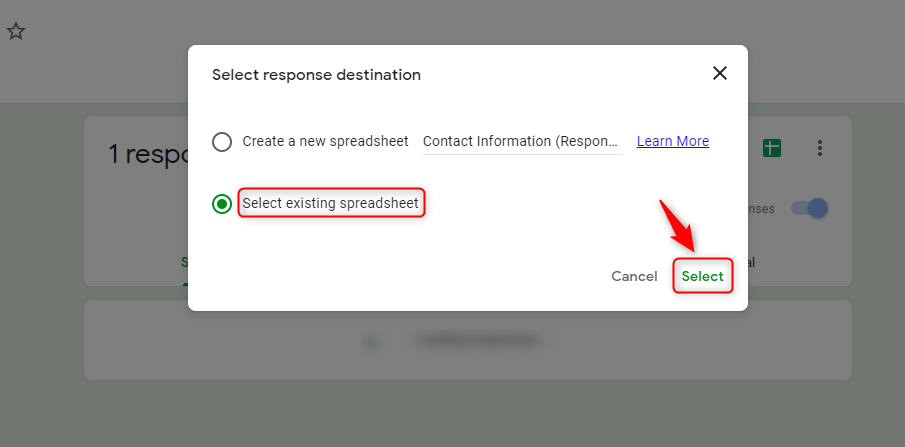
Step 2: Select Response Destination
You will have two options, which are either create a new spreadsheet or link the responses to an existing spreadsheet.
Check the radio button of the option you wish to choose and then click “Create” or “Select”.
Step 3: Choose Spreadsheet
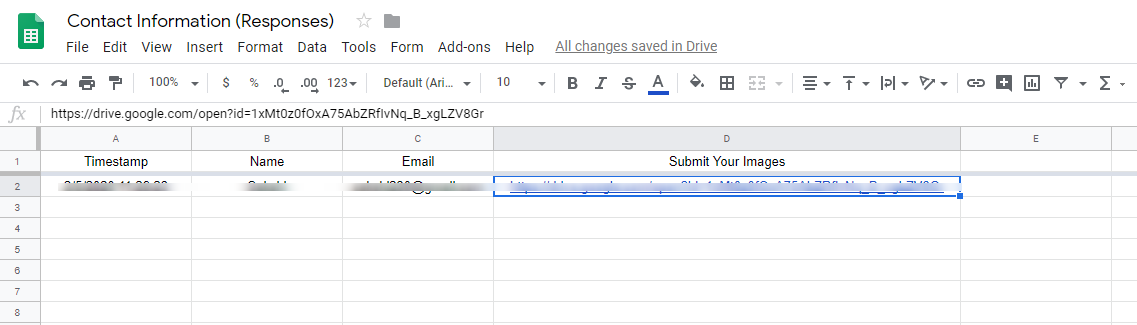
If you choose to create a new spreadsheet, a new tab will open with Google Sheets displaying your responses.
On the other hand, the second option will ask you to select the existing spreadsheet you wish to link your responses with. 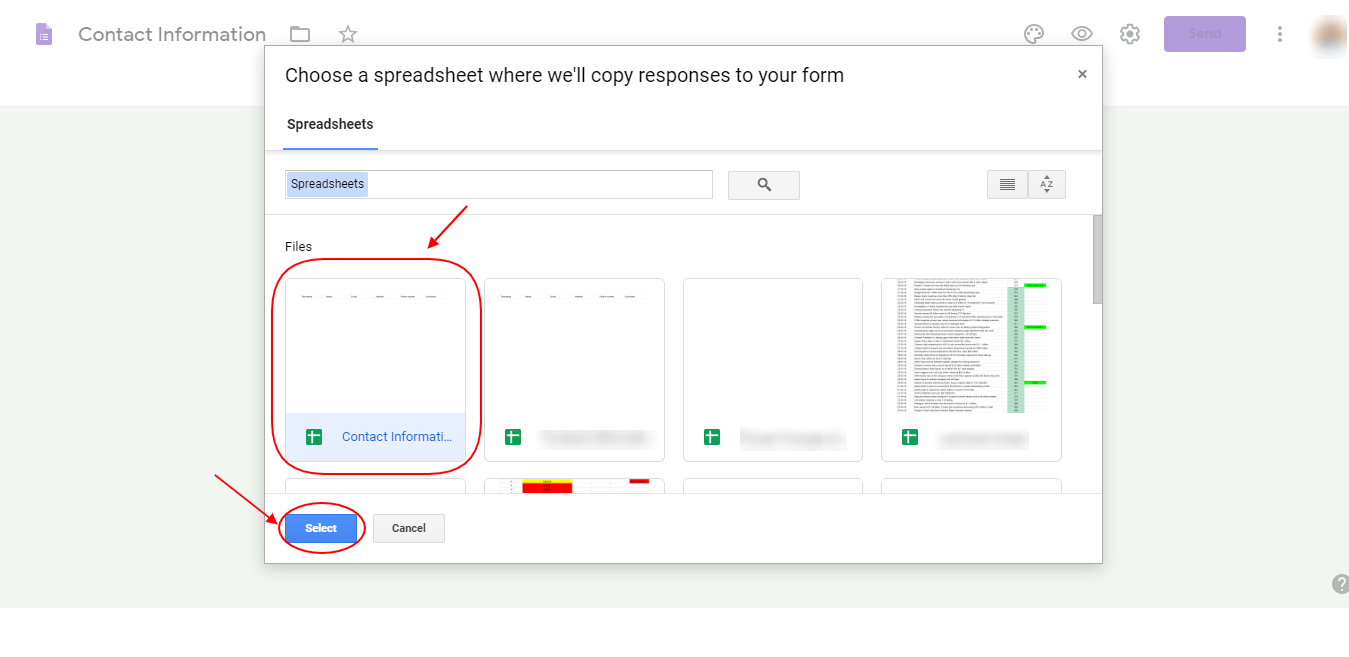
Subsequently, a new tab will open with the Google Sheets, that you just selected, displaying your responses.
4. How To Enable Email Notifications Of Responses:
Step 1: Response Section
Click on the three vertical dots icon in the Responses tab.
Step 2: Select Option
Further, from the drop-down menu, select “Get email notifications for new responses”.
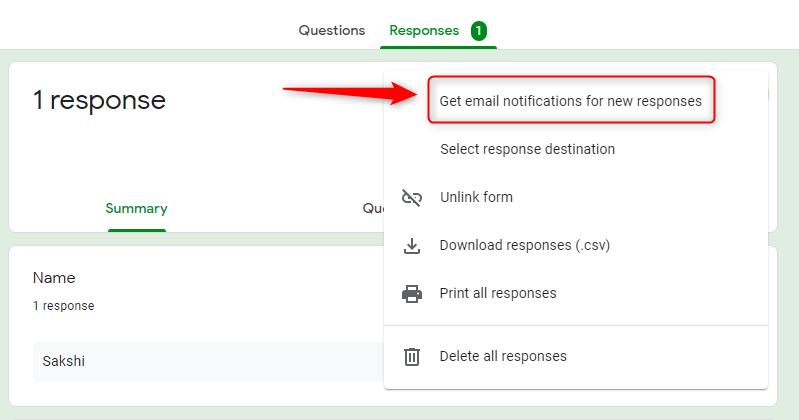
Thereafter, email notifications would be enabled on your Google account. Further, you will receive notifications in your Gmail inbox.
Restrictions of Google Forms in managing responses?
Google Forms has some limitations that you may not realize until you actually use it. Collecting responses is one thing but keeping track of your respondent form activity via Analytics is something Google Forms doesn’t offer. Further, you get to view the data in spreadsheets software but you can’t download specified month responses separately.
Besides that, this survey maker has only one integration – Google Sheets. As you have seen, this is used to export responses. Another thing you might have noticed is that the tool allows you to get email notifications only on one email address – that too, a Gmail account.
These are some pitfalls of using Google Forms, which may cause you to look for other survey makers available online.
Is there any suitable alternative to Google Forms available in the market?
Yes! One of the alternatives is Pabbly Form Builder, which has excellent response management features. It not only covers all the Google Forms limitations, but also offers additional features such as real-time reports and analytics tool in the software itself.
Moreover, it provides email notifications of responses on multiple email addresses. It also offers a convenient way of exporting responses as you can download specific month responses or whole responses submitted using the software itself.
Let’s understand how one can manage responses using Pabbly Form Builder.
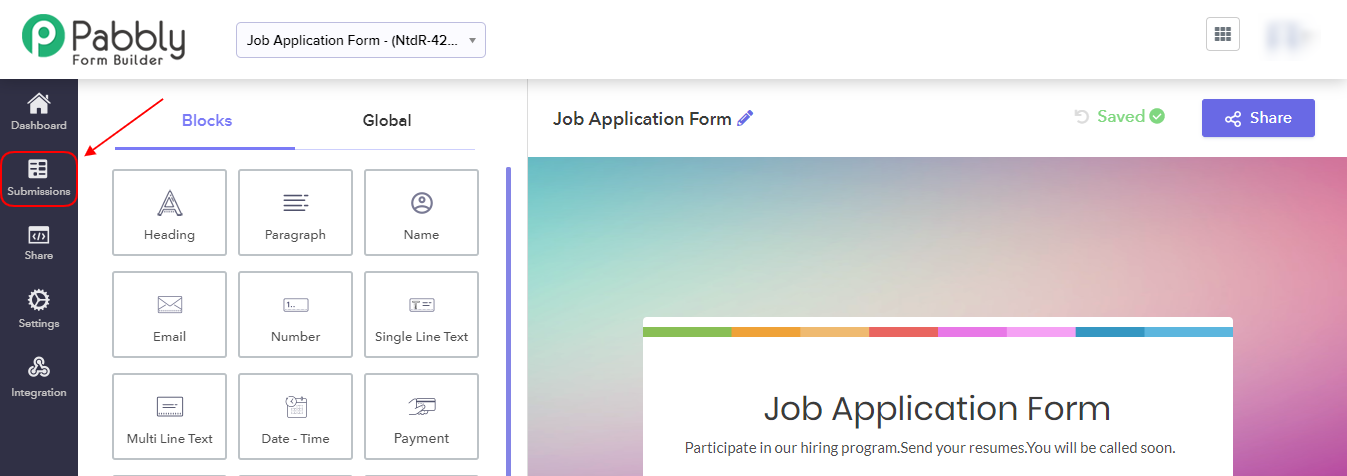
1. How To View Responses:
Step 1: Submission Section
After you create your survey using Pabbly Form Builder, open the “Submissions” tab which you will see on the extreme left column.
Step 2: Form Submission Section
The following page will give you 5 options: ‘Unread Messages’, ‘On Hold’, ‘Resolved’, ‘Partial Submissions’ and ‘All Messages’. Choose accordingly to view responses in the respective categories below.
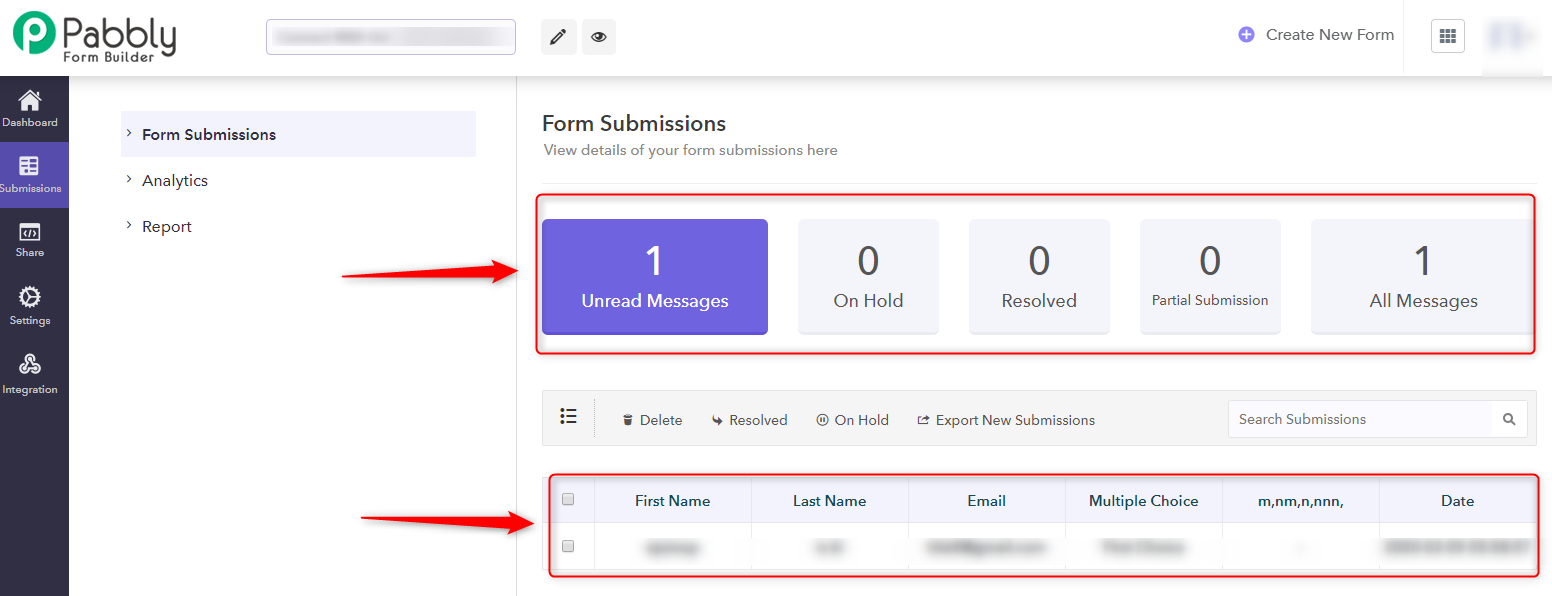
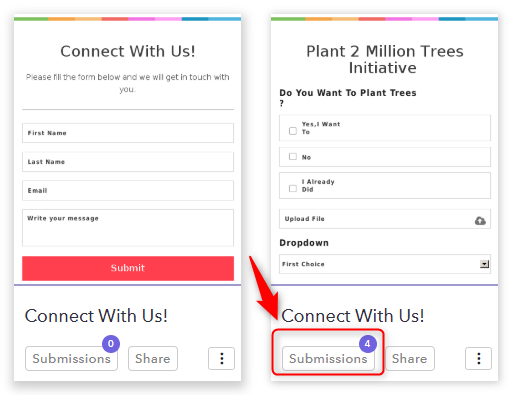
Alternatively, by selecting the “Submissions” button appearing on your form in the dashboard. The button also shows the number of new responses received on the survey.
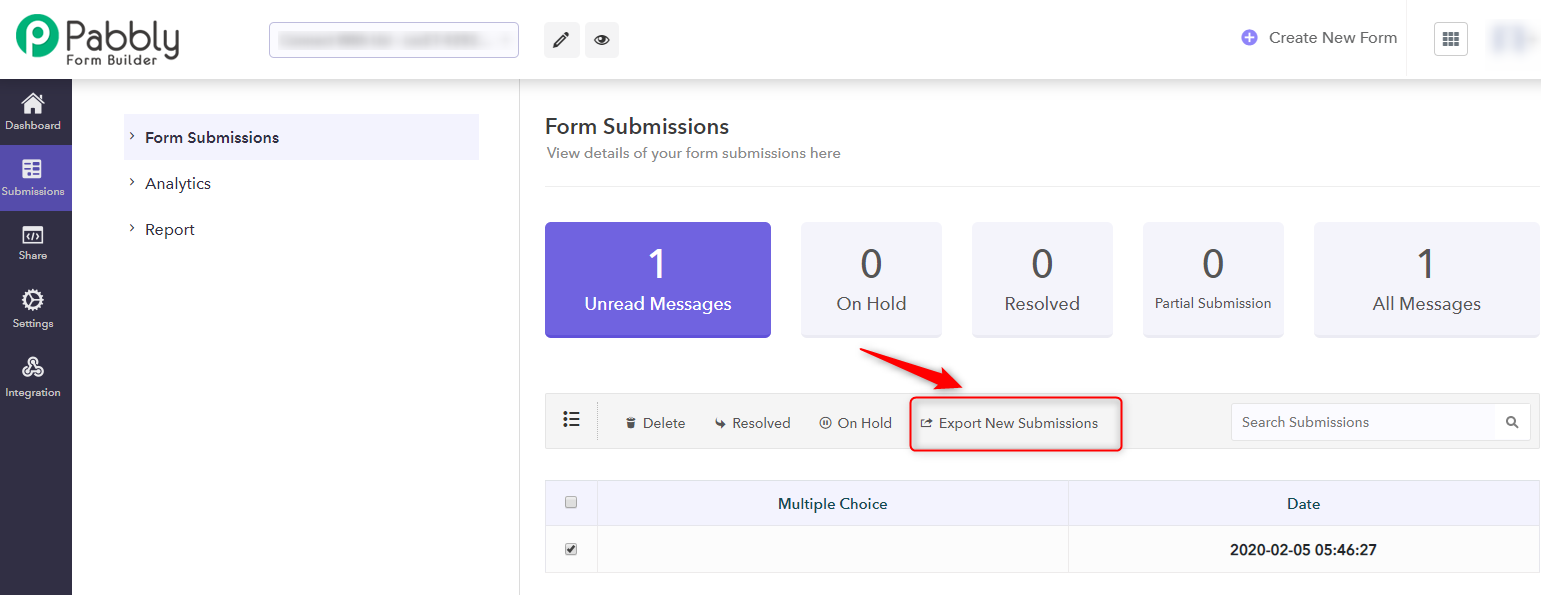
2. How To Download Responses:
Step 1: Select Responses
You first need to select specific responses you want to download. Pabbly Form Builder allows you to download specific responses as well. Check the boxes of the responses you wish to download.
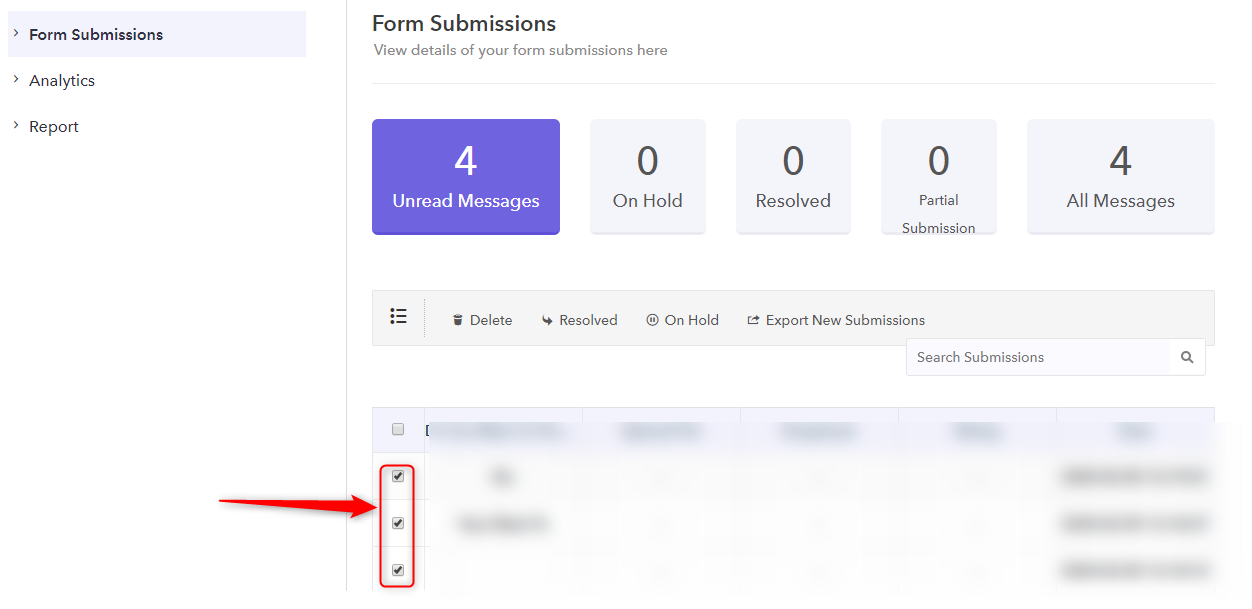
Step 2: Download Responses
Click on the “Export Submissions” button to download the selected responses. The file that would be downloaded on your system will only include the selected responses.
3. How To Enable Email Notifications For Responses:
Step 1: Setting Option
Open “Settings” from the dashboard, the button of which you can find on the extreme left column.
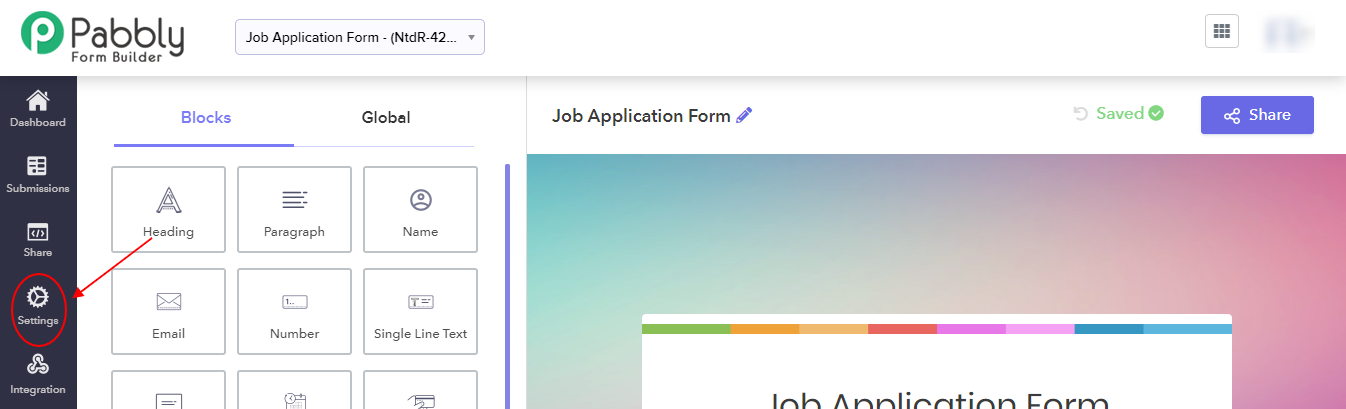
Step 2: Email Notification Section
Click on the “Email Notifications” button on the following page from the list of settings available.
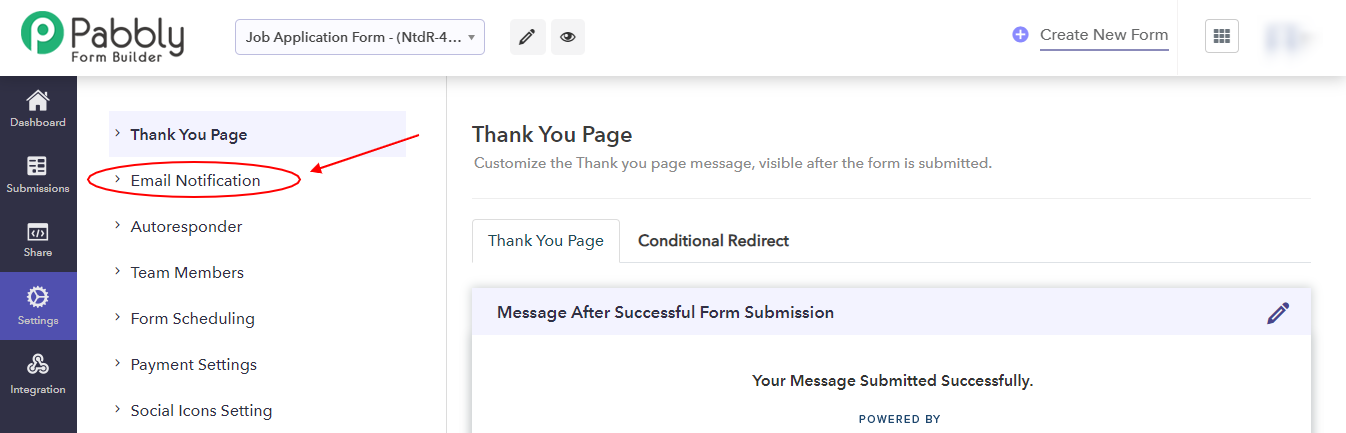
Step 3: Add Multiple Email Addresses
Use the “Add” button to enter the email address you wish to receive notifications on.
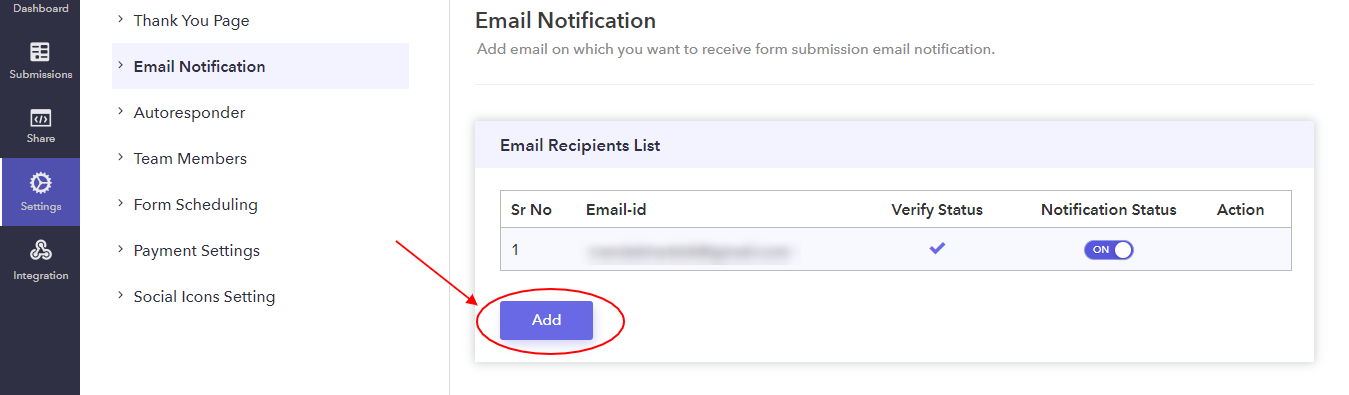
Moreover, you can add multiple emails in a single survey form using Pabbly Form Builder.
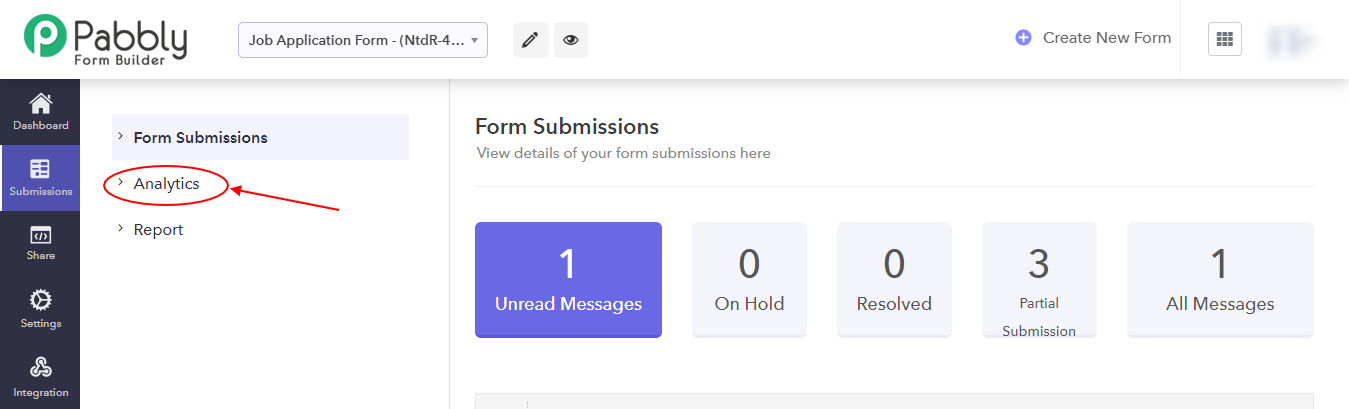
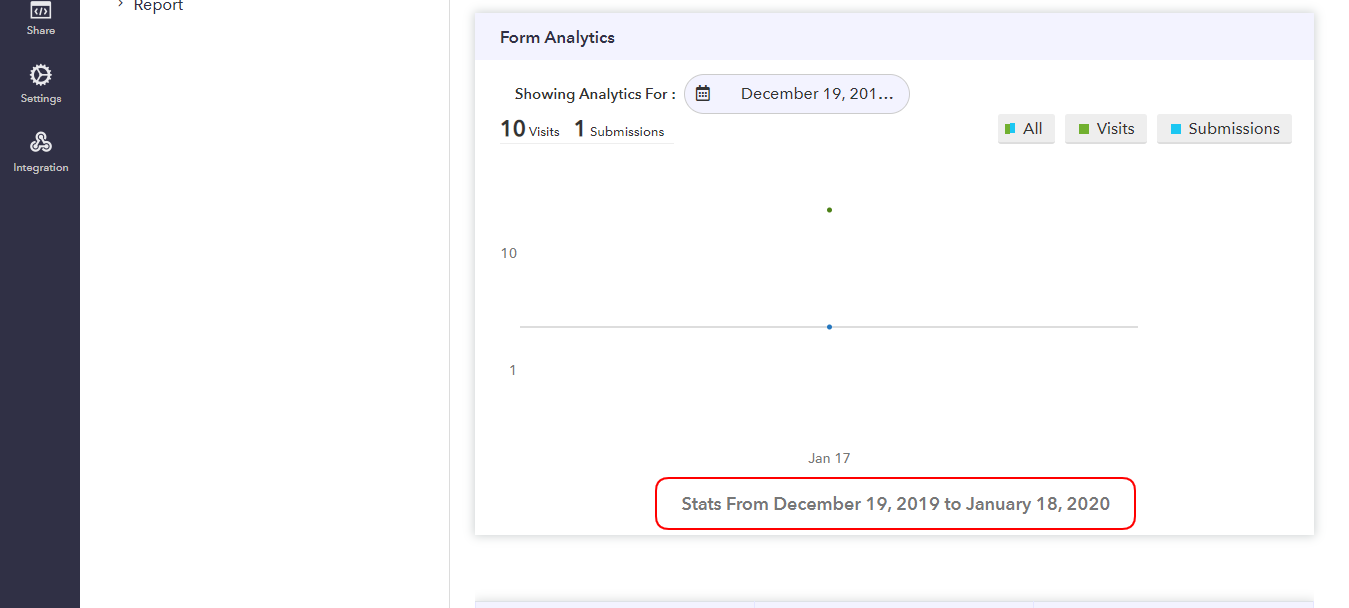
4. How To View Analytics:
Step 1: Analytics Option
In the Submissions tab, click on “Analytics”.
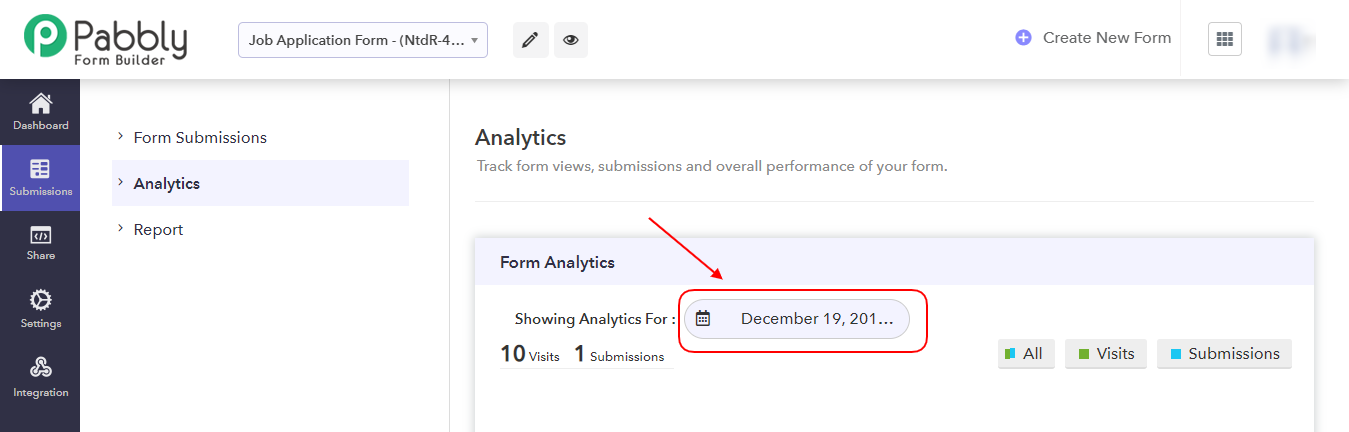
Step 2: Showing Analytics Option
Now, choose the period you need to view the analytics of. Use the drop-down menu beside “Showing Analytics For:” to set the period.
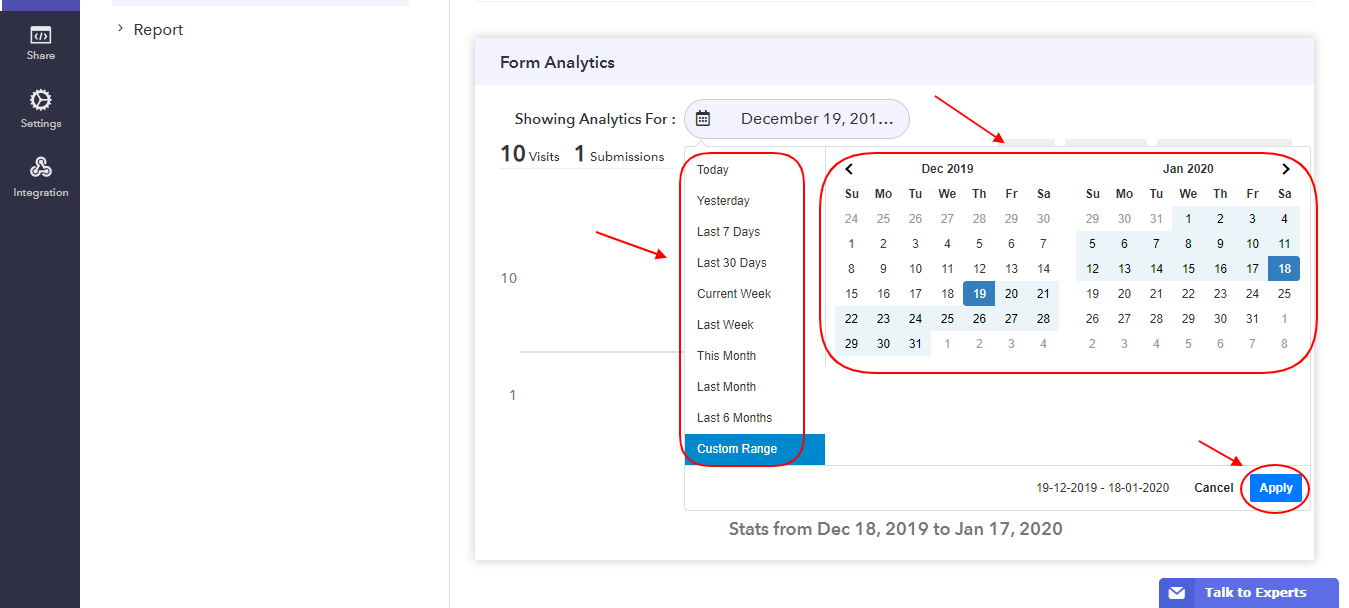
Step 3: Apply Option
You can select ranges like the last 7 days, this month and the last 6 months. Alternatively, you can also create your custom range.
After selecting the time period, click on “Apply”.
The page will then display the analytics for the selected period. These include form visits and submissions.
Here you have it, follow these steps and you can see and operate every needed thing related to your form.
Conclusion
Surveys are becoming increasingly common. Usually, Google Forms is the first online tool that comes into our mind when we wish to create surveys. This is partly because most of us have Google accounts. Nonetheless, it lacks in some areas, including response management which has been discussed above.
If you do not find the drawbacks as limiting, Google Forms should be your top choice as it is free of cost too.
You May Also Like To Read:
- How To Receive A Payment With My Google Forms?
- How To Remove Confirmation Page On Submission In Google Forms?
How To Receive A Payment With My Google Forms?

Are you head over heels to develop payment forms for your website?
Frankly, you must be left puzzling over how to accomplish this task between third-party solutions or developing your own in-house payment forms!
As online websites become interwoven into our lives through smartphones or IoT devices, the potential to gauge payment acceptance on any website is an untapped opportunity!
So, if you want to create online forms to collect payment which can do beyond the basics then you should think over the righteous payment forms.
Now, you must be thinking about Google Forms, Right!
No doubt, Google Forms are trendy. But they can only create simple & rough forms that restrict you to take order and payments in a snap.
Google Forms is unable to collect payment in this period as it is not PCI compliant. It does not follow the set of security standards for the payment credentials. Also, Google Forms is incapable of offering a secure environment for processing, accepting & storing credit card information.
Therefore, here comes the need for a form builder that can offer a quicker and easier payment experience to your customers like Pabbly Form Builder. It’s very quick on the uptake for receiving online payments through your website.
If you want to collect payment with Google Forms then this will only allow you to create a custom confirmation text, which you can easily use to insert a link of the third-party payment website. This will redirect the customers from Google Forms to the 3rd-party website for payment.
Let’s discuss how Google Forms can be used to develop a basic checkout page to receive payment!
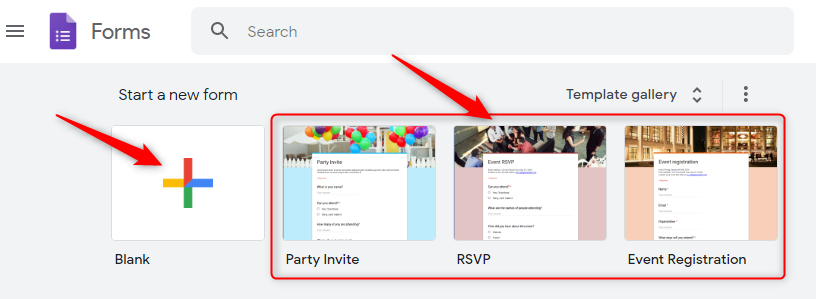
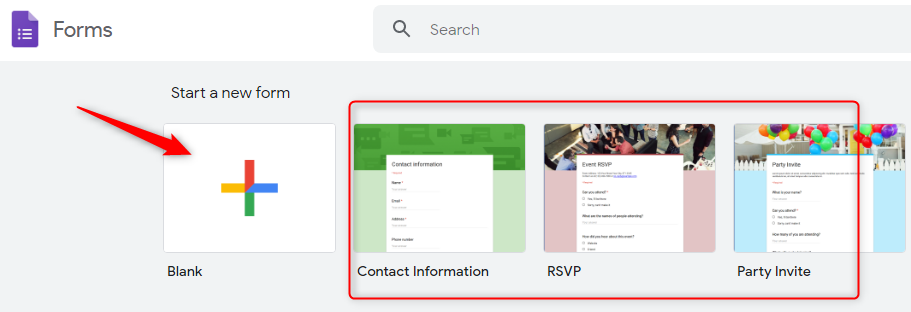
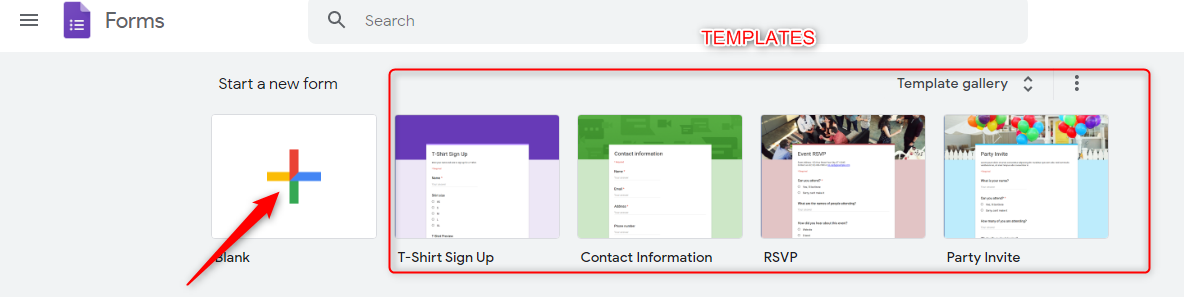
Step 1: Basic Checkout Form Creation by Google Forms
To frame out the payment collection form, you can use its pre-built templates. Also, you can draft your personal payment form by just tapping the “Blank” button from the Google Forms dashboard.

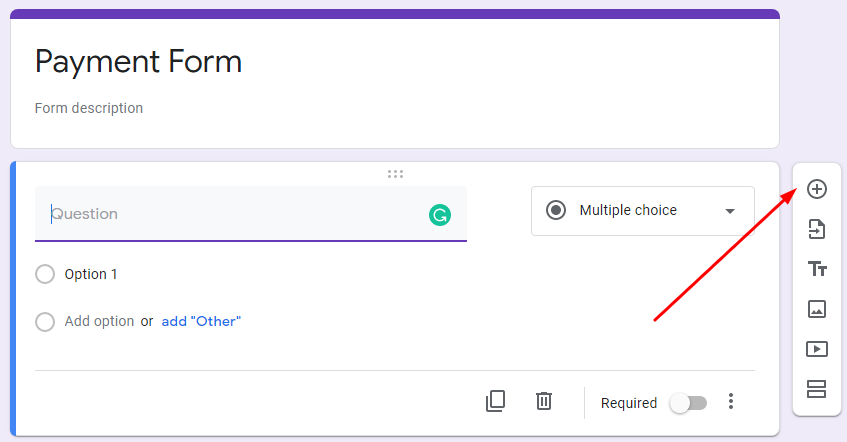
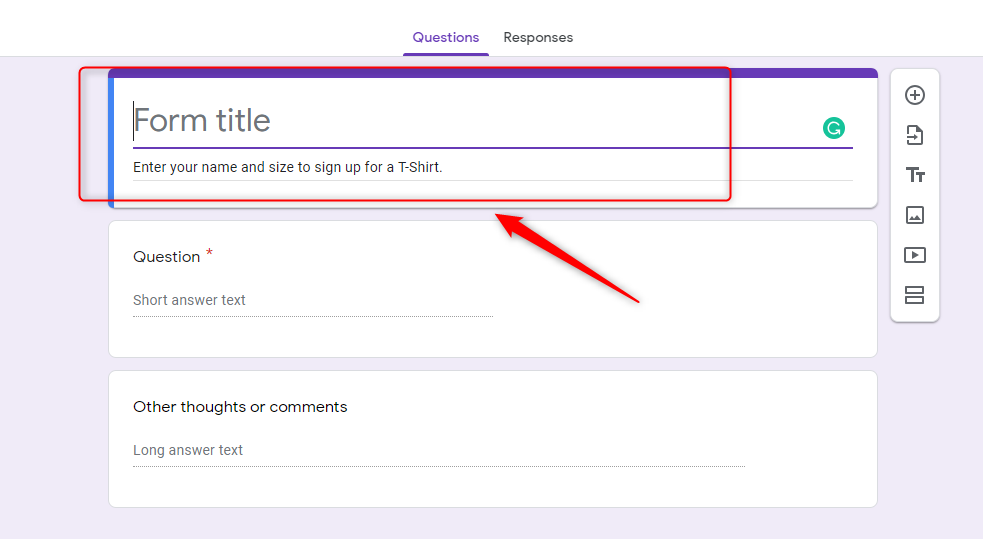
Step 2: Asking Payment Information
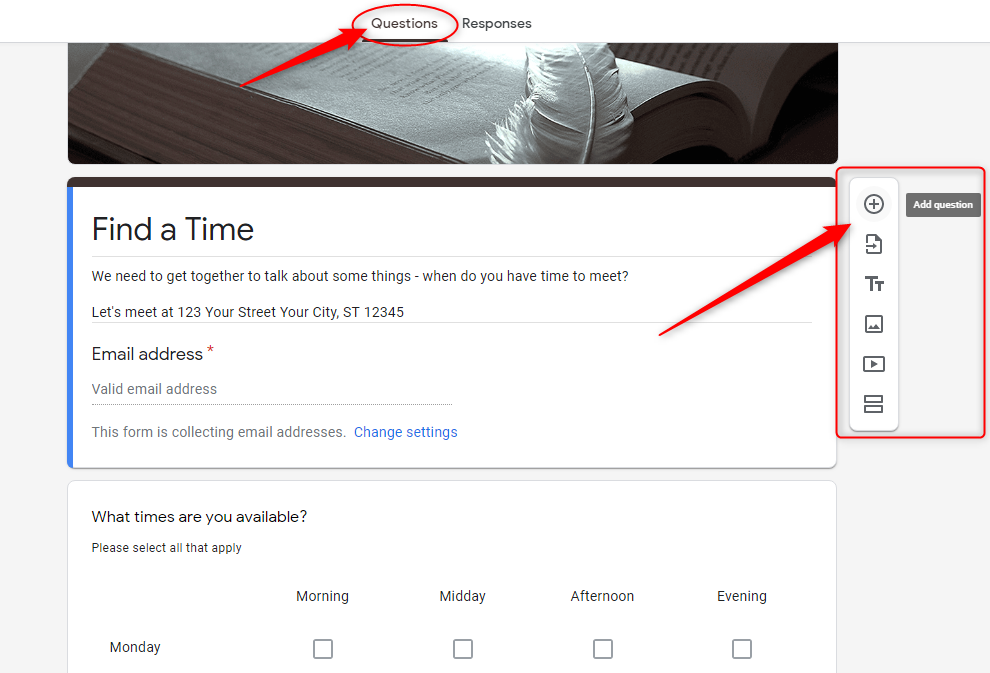
Now, you can add customized questions to your Google Forms for asking the essential information. For this, you need to click on the “Plus” icon.
This form builder comes up with multiple settings for adding multiple sections, images, videos, titles, etc.
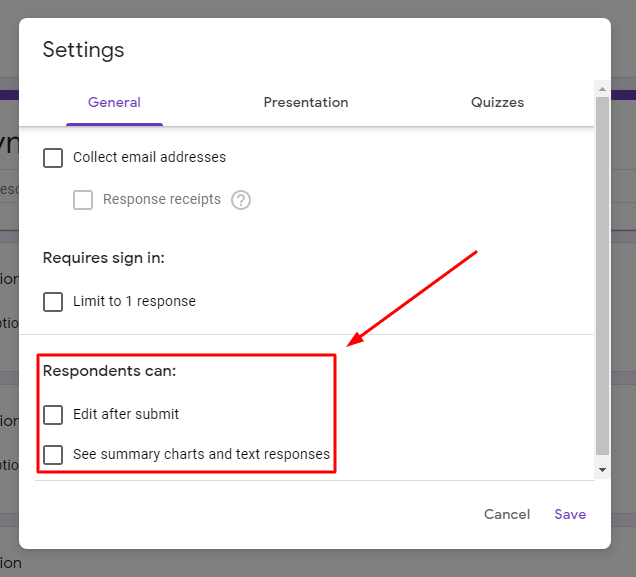
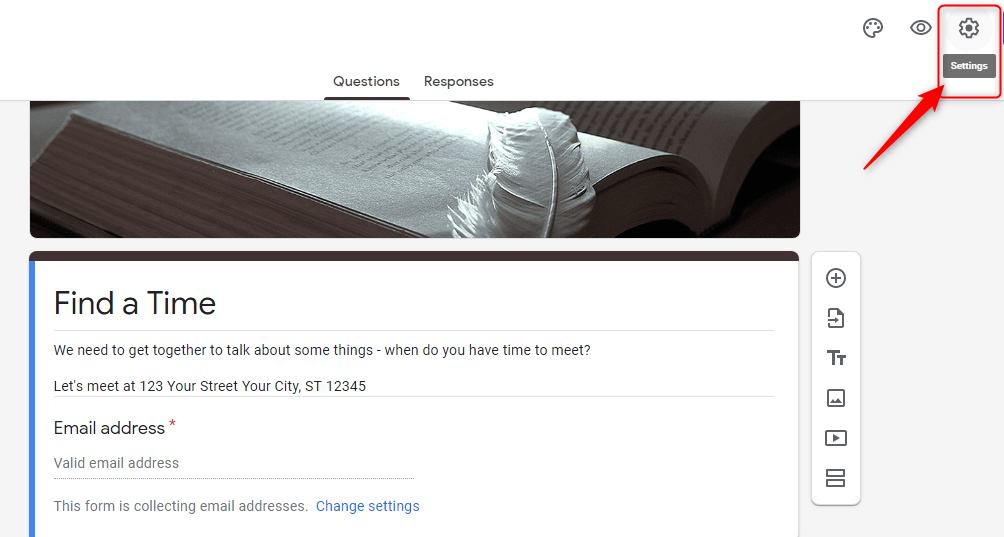
Step 3: General Settings
After creating the form, you can collect email addresses of the payer and be able to send them response receipts via “Settings” option in the dashboard. Also, the settings for the respondents can be done so that they can edit the details after submit or can see their purchasing summary.
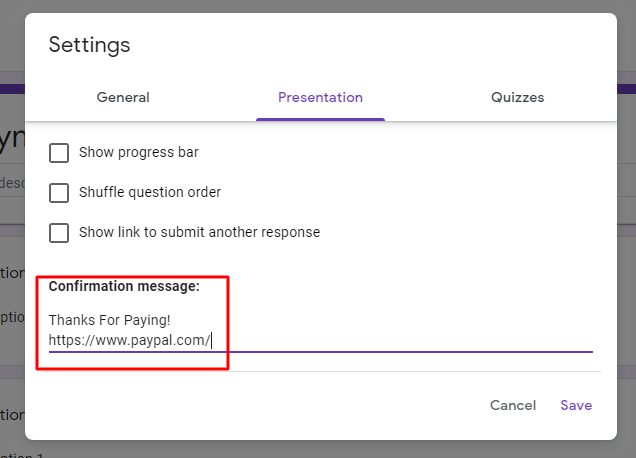
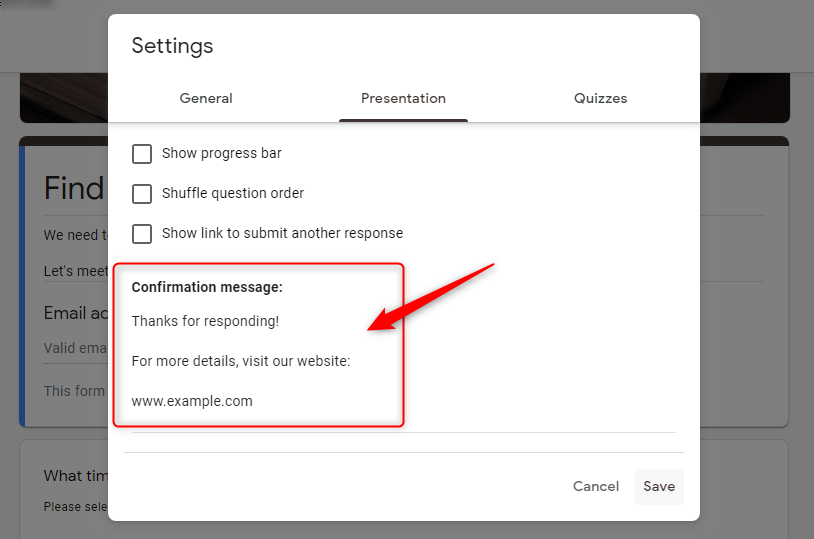
Step 4: Confirmation Message Setting
Now, go to the “Presentation” option where you can set a customized message and add the link of a third-party payment gateway for payment collection.
This is how you can frame up the basic payment form using Google Forms.
Why Is Google Payment Form The Stumbling Block?
As you know, for requesting payment we need to set a custom confirmation text in the Google Forms. But this link is visualized once the form gets submitted by the user. This means it will redirect the people away from your form to the third-party payment website. This will end up customers feeling as if they are paying to a business other than the one they are purchasing from.
Therefore, taking the turn for better business, there is requisite of the form builder that can keep their distractions to the minimum. Pabbly Form Builder is the must-have software for your business as it clears away all the payment issues that hinder your business. In addition, it allows you to collect payments through two different payment gateways such as PayPal and Stripe.
Let’s see how Pabbly Form Builder allows tailoring payment forms to fit your needs.
Step 1: Draft Customized Payment Form
Click on the “Create New Form” option to design a form that offers your customers a custom payment gateway.
Pabbly Form Builder also delivers the flexibility to choose predefined templates, keeping the customer payment experience intuitive and as easy as pie. Its ready-made templates are fully customizable giving you control over the look and feel of your payment form.
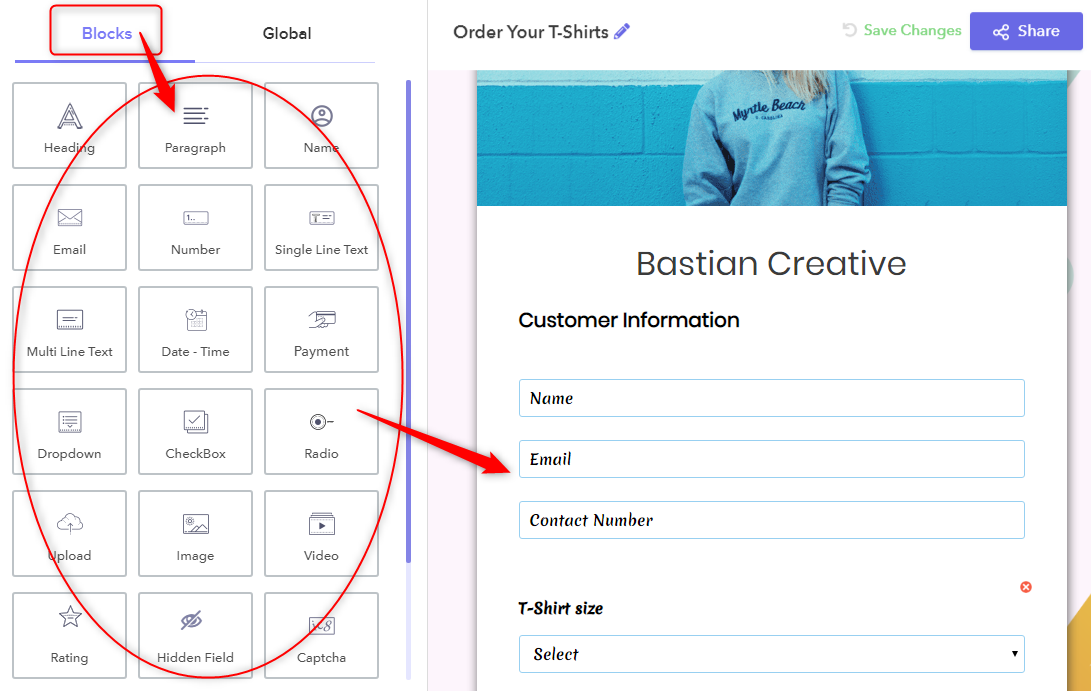
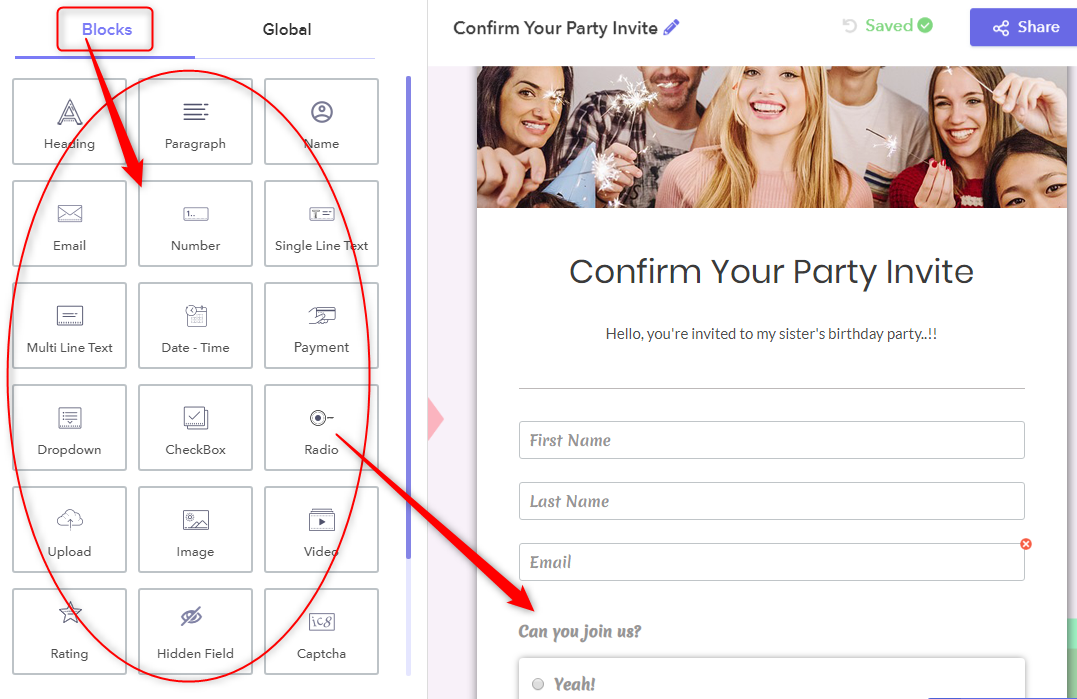
Step 2: Form Customization
It provides the collection of designing toolkit at its “Blocks” tab that will help you to plan out your own payment form for the website as you desire. You will be able to insert headings, image, captcha, payment, radio elements via its drag & drop feature.

Step 3: Infix The Payment Option
Now, by dragging the “Payment” tab from the blocks section, you can place it at any step in the form. This form builder will automatically showcase default options to add your products and their details as well as their total price.
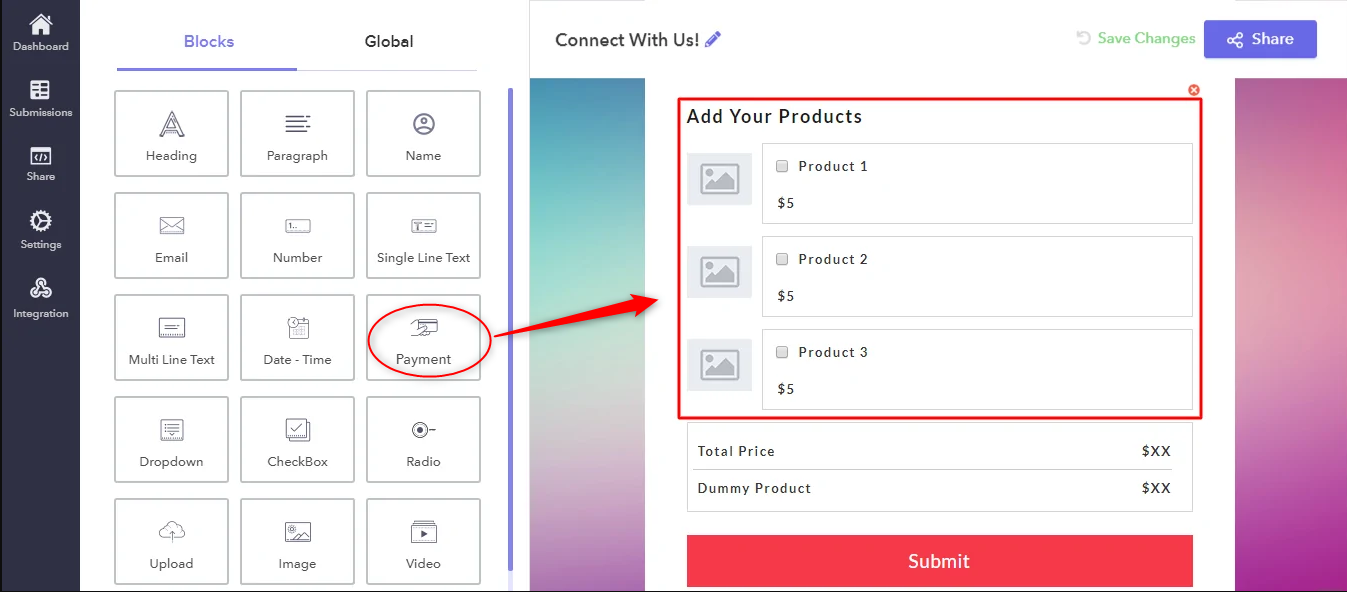
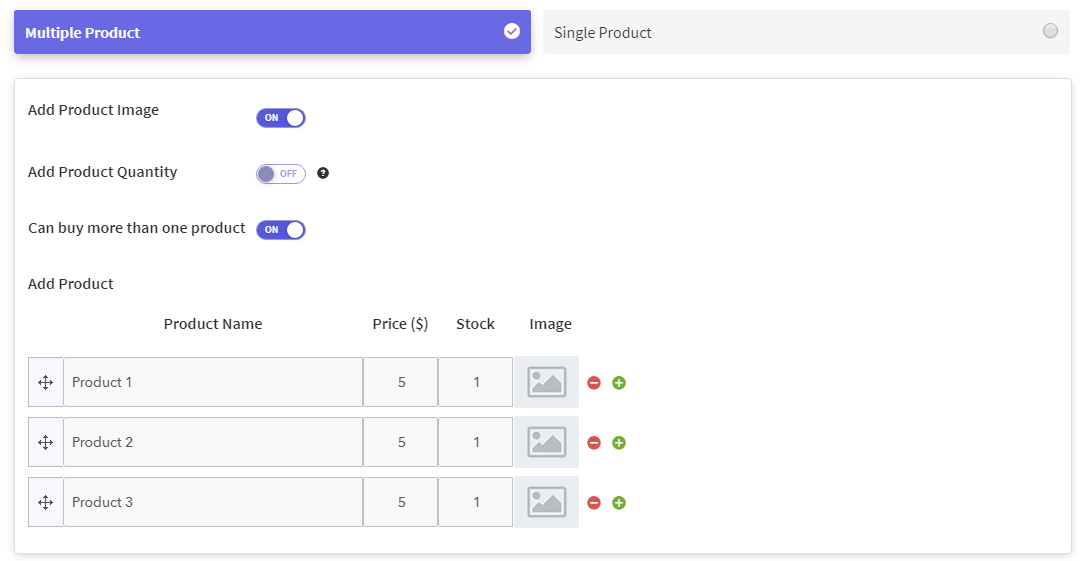
Step 4: Organize Product Specifics
The setup provides the flexibility to add an unlimited number of products. You can showcase the product image, name, stock availability, pricing keeping your online shopping website design consistent.
Step 5: Selection Of Payment Gateway Option
Do you know, 56% of the website users expect multiple payment options on their payment form? Pabbly Form Builder helps to offer two payment gateways i.e. Stripe, PayPal or both. You can choose to depend upon which payment method your target audience mostly prefer.

If you want to understand how to select these gateways, visit the Stripe integration guide and PayPal integration guide.
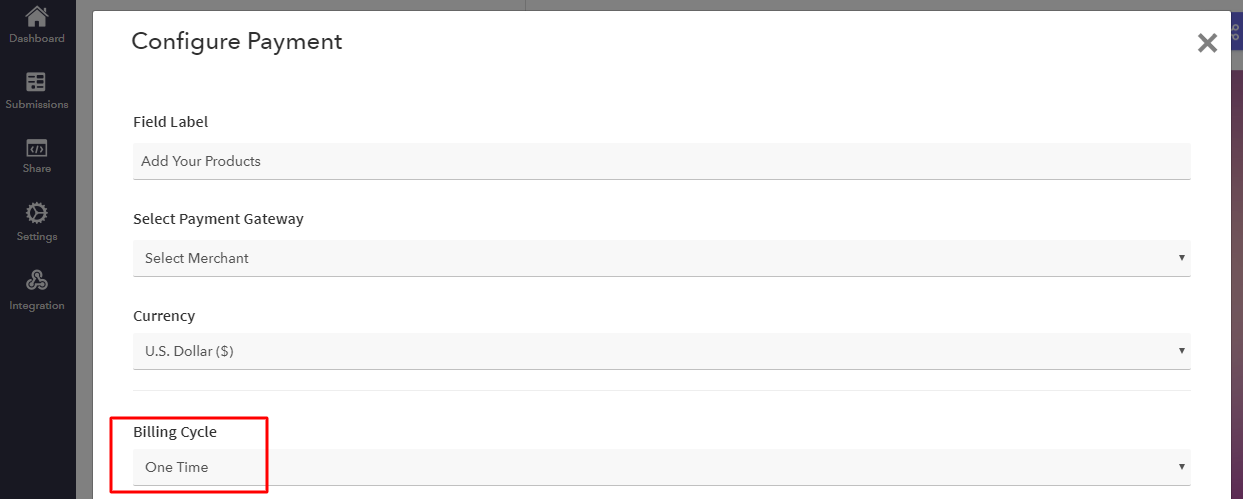
Step 6: Billing Cycle Structure
As you will see, the next step will be to select the billing cycle type. The form builder is designed to support both single as well as the recurring payment cycle.
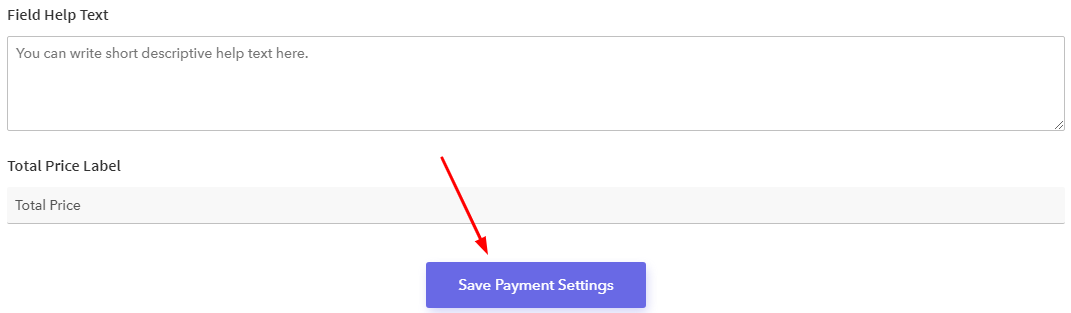
Step 7: Save Payment Settings
To raise the brand recognition of your business, the payment form is ready. Just, click on the “Save Payment Settings” button at the bottom and enjoy the seamless design of your payment page.
Congratulations! Your form is ready to go seamlessly with this form builder. Now, you can receive payment seamlessly from your online business website.
Wrapping Up!
Before making the decision!
Leading up to the judgment, you should consider a few facts.
First, whether you’re a small business or having technological resources, it will be wise to go with the best payment form builder. Because, it ensures flexibility in its modification and management. That way, you don’t have to worry about online payments as your processes or business evolve.
Second, examining the cost, upfront setup fees, and security, Pabbly Form Builder is supportive through thick and thin.
No matter what you implement, payment forms mean big step-up and growth for your online business website!
You May Also Like To Read:
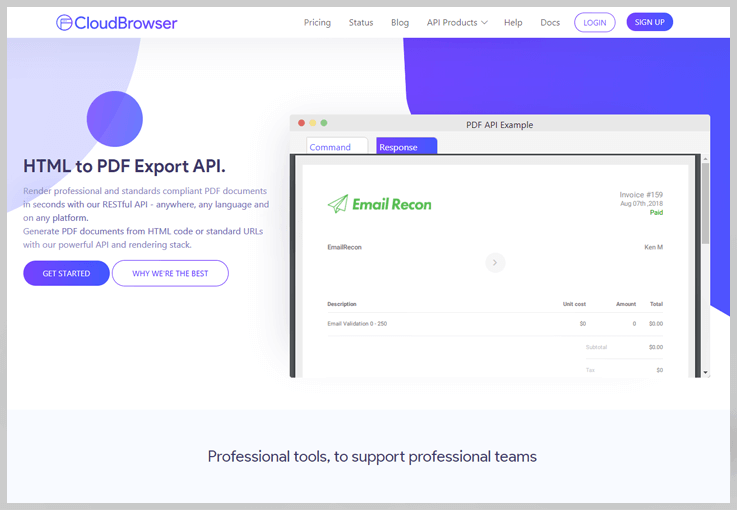
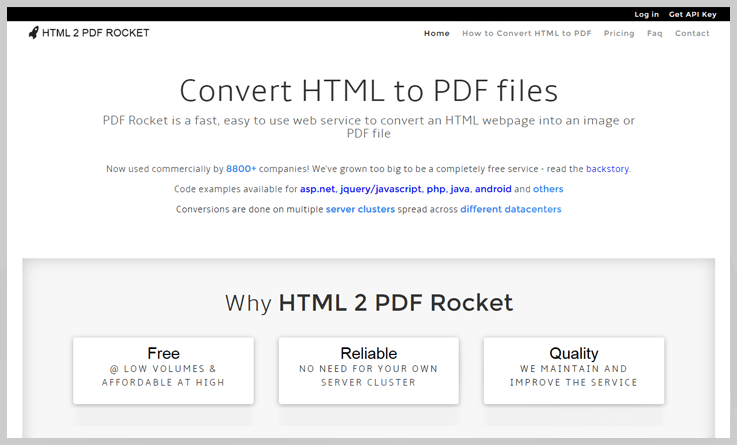
13 Best Webpage to PDF Export API Services2022

Are you exploring the HTML to PDF conversion APIs? Then, here your search ends, as we have listed the best and most comprehensive APIs to ease your work.
Having your HTML raw data in PDF format gave us an idea about website look and detail. Many times we need the source document in PDF format for future reference.
Hence in this particular piece of writing, we will introduce with Best Webpage to PDF Export API Services2022.
Export Web To Pdf

ByteScout Cloud API Server is a self-hosted on-premise REST Web API server for AI powered data extraction, PDF processing, spreadsheets, barcodes etc.
It has a dedicated web API customer success team which is robust as well as scalable. It is AI powered and provides manual data extraction. One can easily create, extract, modify, PDF, excel and barcodes.
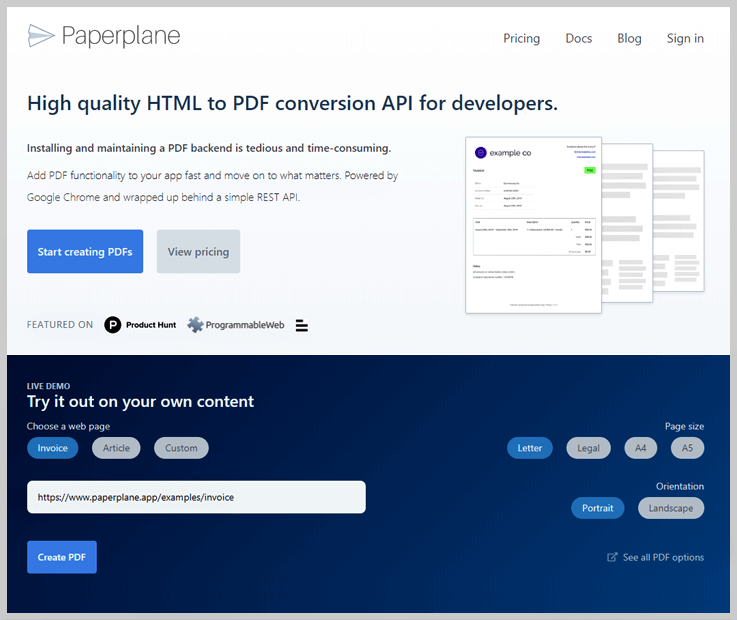
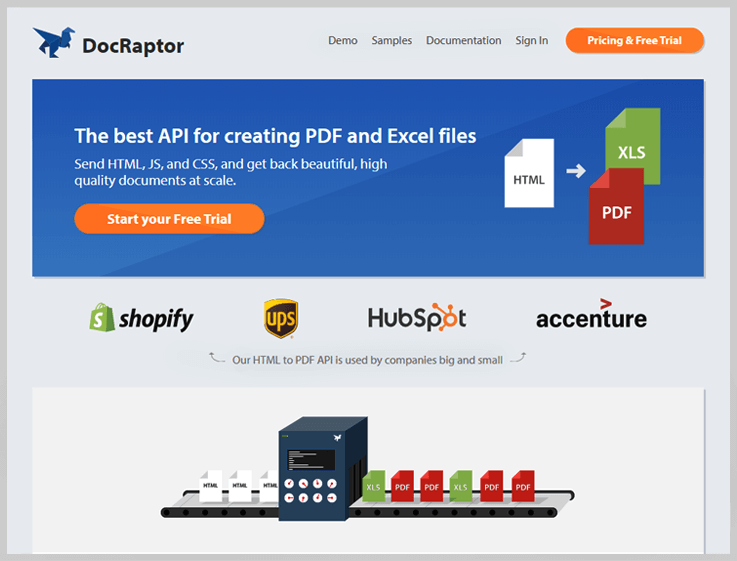
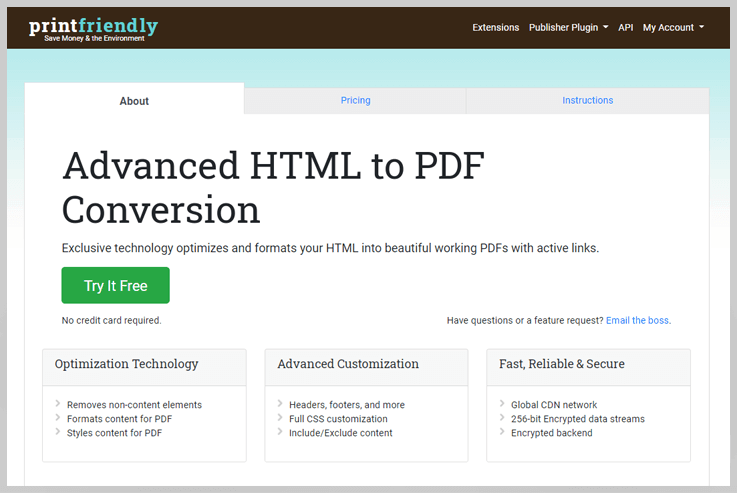
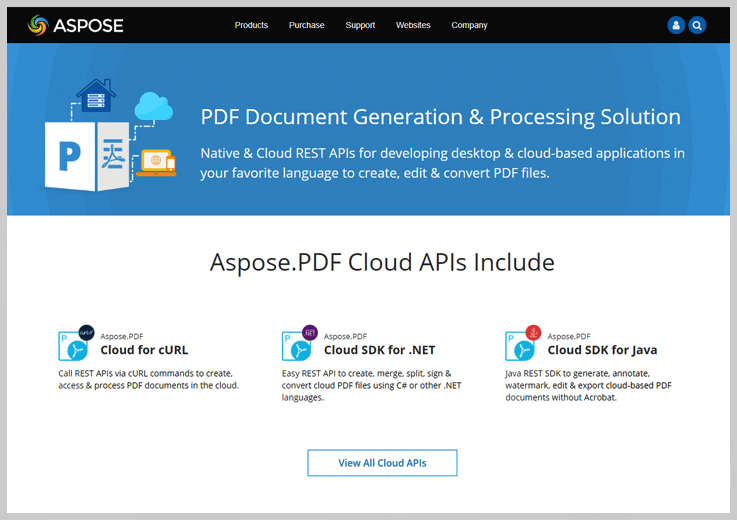
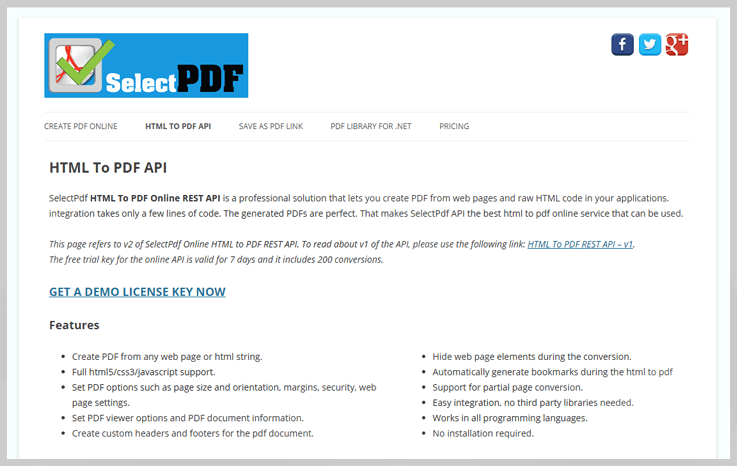
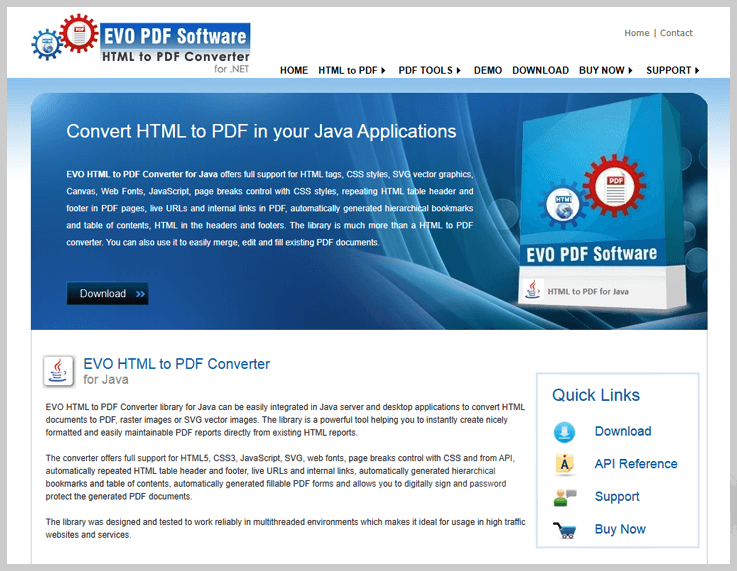
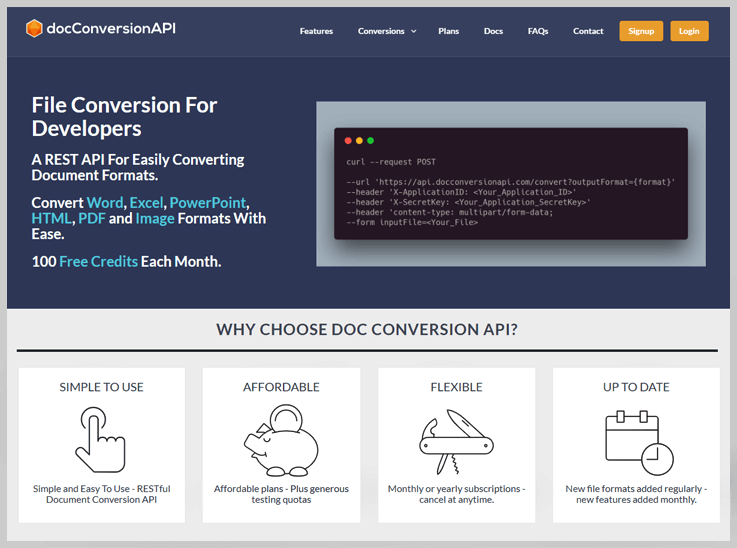
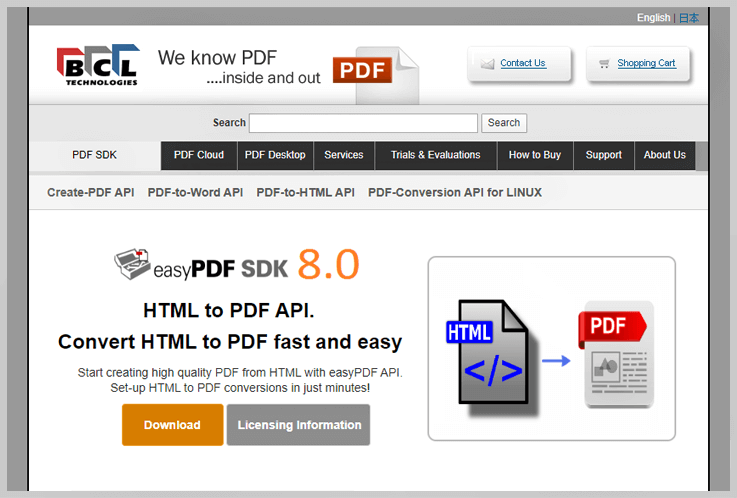
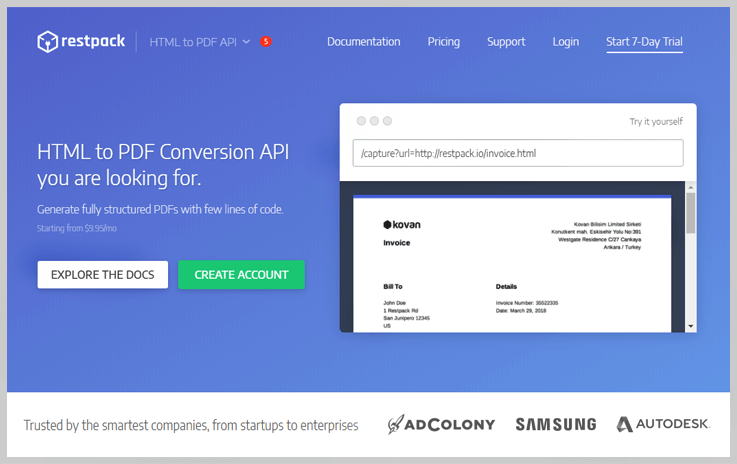
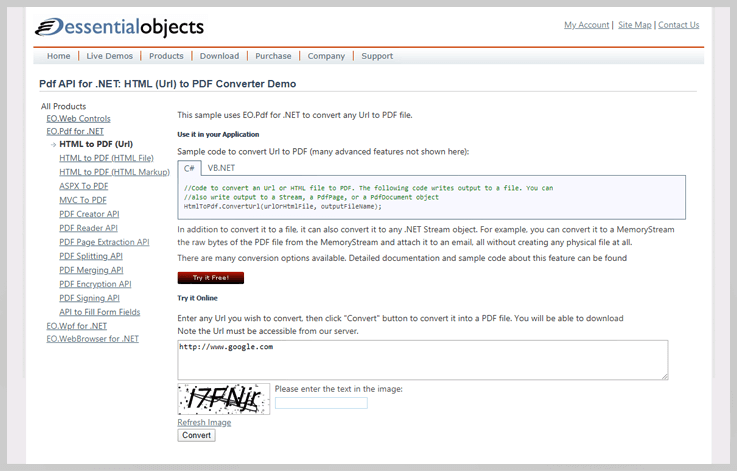
13 Best HTML To PDF Converter API Services 2022

Are you exploring the HTML to PDF conversion APIs? Then, here your search ends, as we have listed the best and most comprehensive APIs to ease your work.
Having your HTML raw data in PDF format gave us an idea about website look and detail. Many times we need the source document in PDF format for future reference.
Hence in this particular piece of writing, we will introduce with Best HTML To PDF Converter API Services.
Html To Pdf Converter API

12 Best Email to PDF Converter API Services 2022

Are you exploring the HTML to PDF conversion APIs? Then, here your search ends, as we have listed the best and most comprehensive APIs to ease your work.
Having your HTML raw data in PDF format gave us an idea about website look and detail. Many times we need the source document in PDF format for future reference.
Hence in this particular piece of writing, we will introduce with Best Email to PDF Converter API Services.
Email To Pdf Converter

How To Remove Confirmation Page On Submission In Google Forms?

Usually, when someone strikes a submit button after filling out any sort of form, they will see a confirmation “Thank You” page that appears right after it. This lets them know whether they have successfully submitted your form or subscribed to your marketing.
But, if you want to create your own custom Thank You pages or want to remove the Google Forms thank you page due to some reasons. So let me tell you, it does not provide any options.
Terrific but true!
Google Forms does not allow you to remove the confirmation page, that appears when the user clicks the submit button. Now what??
Don’t brood!
If Google Forms doesn’t provide such options then, you can try some other alternatives to it like Pabbly Form Builder. It comes with lots of options & settings, using which you can easily remove, redirect, and customize the confirmation page of any form.
Then, what are you waiting for? Try it right now & enjoy the freedom of customizing things according to your requirements.
Now, in that case, all you can do is set up Google Forms confirmation page redirect.
Definitely, this will not help you to remove the confirmation page but now your user will find a point that will deviate them to your site when the user will submit the form successfully.
Let’s See How To Remove Confirmation Page On Submission In Google Forms”
Step 1: Build A New Form
The very first thing you have to do is create a new form depending on your requirements. For this, you need to click on the “Blank” button from the dashboard.
Apart from this, you can also use any of its pre-built templates.
Step 2: Personalized Questions In Your Form
Next, you have to add desired questions to the form depending on your form needs. So, you can do this just by clicking on the “Plus” icon from the “Questions” tab of the dashboard. You can also add some more form elements like file upload section, images, videos, etc. into your forms from here.
Step 3: Hit The “Setting” Icon
Now, once you are done with adding required elements into your form. It’s time to set up the confirmation page. For this, you have to select the “Gear” icon from the top right corner of the dashboard.
Step 4: Go To The “Presentation” Tab
Later, in the “Settings” section, you will find a tab entitled “Presentation”. From here, you can customize the confirmation message as per your requirements.
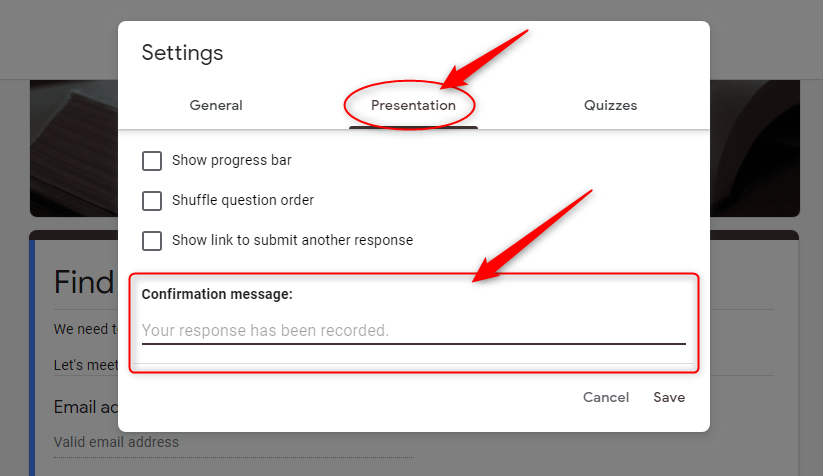
Step 5: Add Link In Confirmation Message
Now, as you wanted to add a link to the confirmation page for redirecting your customer to the desired page or website. From here, you can do so.
Step 6: Save Settings & Preview The Form
Momentarily, all you require to do is just “Save” these settings.
Also, you can “Preview” the confirmation message to get an idea about how it will look to the end-users. For this, you have to submit some dummy data into the form.
That’s it!
Now, you are all set to avail of the option “redirect on submission” in your Google Forms. Enjoy!
Restrictions Of Google Forms:
If you will stick to Google Forms even by applying a carrot-and-stick approach, still it will show a confirmation page to your visitors after the form submission. The reason behind this is that there is no way to remove it.
Now, if you think of using form redirection option of Google Forms to resolve this problem anyway, then again you will be left with very few possibilities to achieve the goal.
Again, the reason behind this is the same. It does not allow you to directly redirect your end-users at some different page. But, it will only show a link to that page on which you want your users to send.
Hence, it’s totally up to the users whether they want to jump on that page or not.
And, if they did not click on the link or take that message seriously, then there is no point in adding that link.
Apart from this, there are some more limitations of Google Forms in regards to the customization of the confirmation page that you realize only when you use other better form builders.
Are There Other Form Builders That Come With Better Options?
Yes, there is a huge number of form builders available online on the web that provide a variety of advanced features like customization or removal of the confirmation page.
But, if you ask me which tool is the best out of them then, I will recommend you use Pabbly Form Builder. Why?
There are several reasons behind this. But, the most important thing about it is it not only allows you to remove the confirmation page from the form but also allows you to add conditional redirections in your form.
Hence, the user doesn’t need to click on the link or button separately for redirecting on some other page after form submission. They will automatically redirect on dynamic pages depending on the inputs they submitted.
Now it’s time to see how one can do all this.
Set Up Pabbly Form Builder For Customizing Confirmation Page:
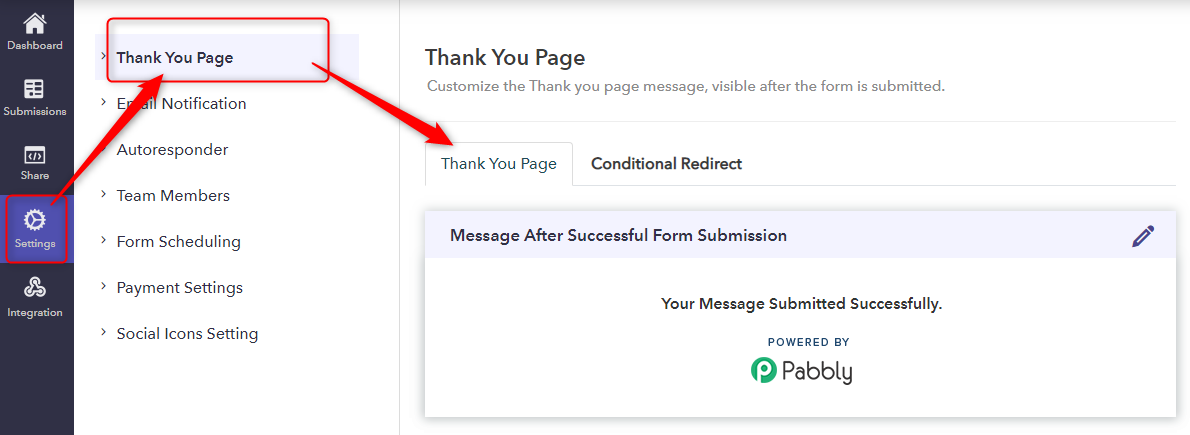
If you want to remove the confirmation page from your form on the basis of some conditions/logics. Then, it can easily be done using Pabbly Form Builder’s “Thank You Page” customization.
Please follow the below-mentioned steps to redirect your users.
Step 1: Create A New Form
First of all, you have to create a form in which you want to enable such options. For this, you have to either click on the “Create New Form” icon from the dashboard or you can also “Clone” one from its beautiful pre-built set of templates.
Step 2: Add Desired Fields Into The Form
Next, you can add different types of form fields like upload, rating, payment option, separator, captcha, etc, into your form. For this, you can choose various types of form elements from the “Block” tab of the Dashboard.
Besides, you can arrange the order of these fields the way you want.
Step 3: Go To Setting Button & Customize “Thank You Page”
Now, you have to go to the “Setting” option which is available on the left of the dashboard. Here, you will uncover many options for configuring advanced settings in the form.
Now, if you haven’t made any external settings for removing the confirmation page. Then, by default, the below-mentioned thank you message will get visible to the respondents after submission.
Step 4: Remove Confirmation Page By Setting Conditional Redirection
In order to remove the confirmation page from the form, you have to follow this crucial step. Go to the “Conditional Redirection” tab under the “Thank You Page” section.

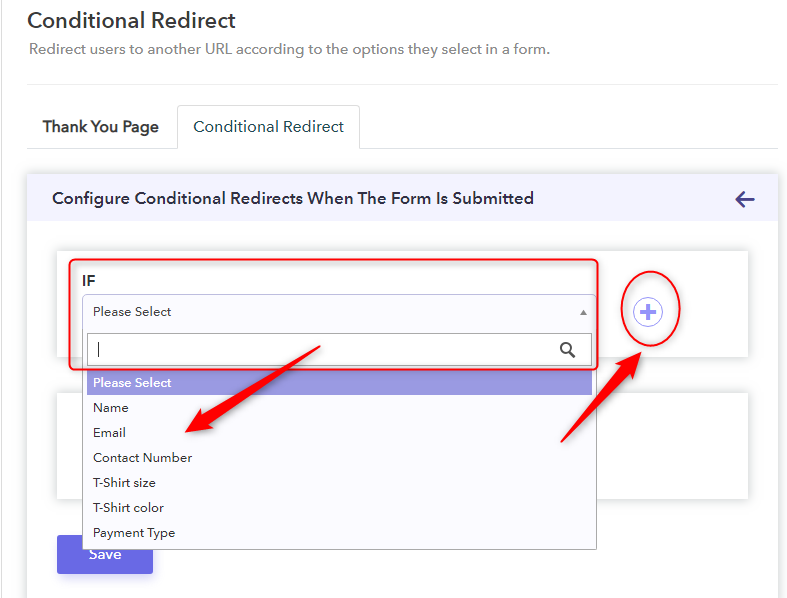
Step 5: Add Specified Conditions
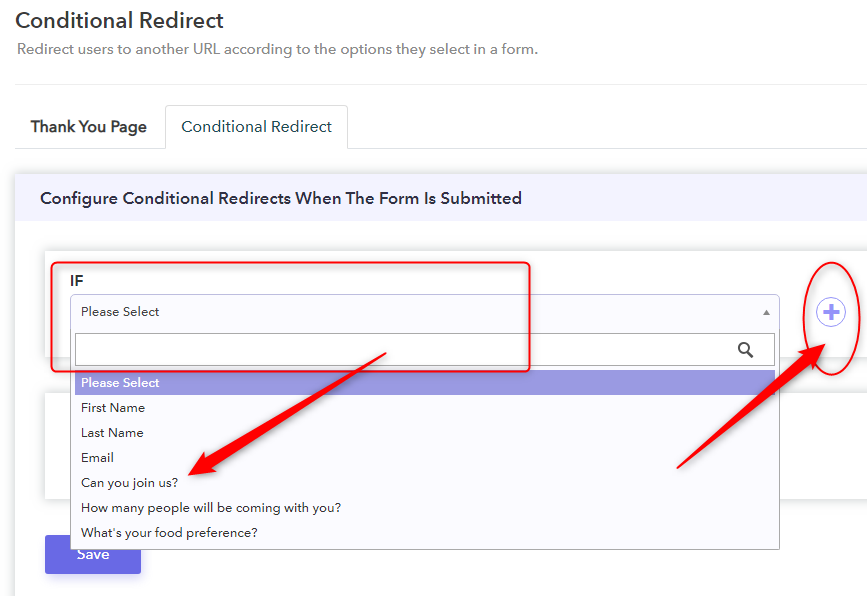
Later, you have to set up the desired “IF” condition from the drop-down list depending on your needs. Further, if you want to add more than one conditional logics into your form for redirections then, you can do that by clicking on the “Plus” icon which is available at the right side of the “IF” block.
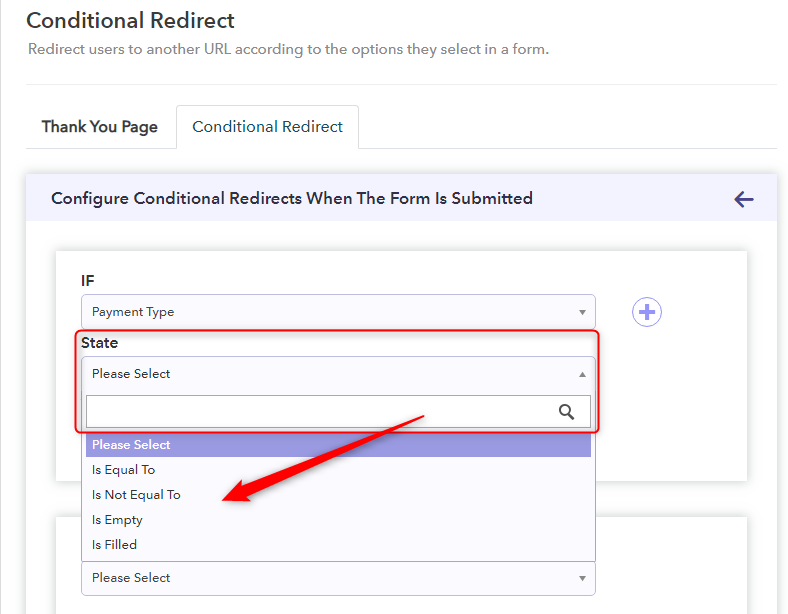
Step 6: Set The “State” Logic
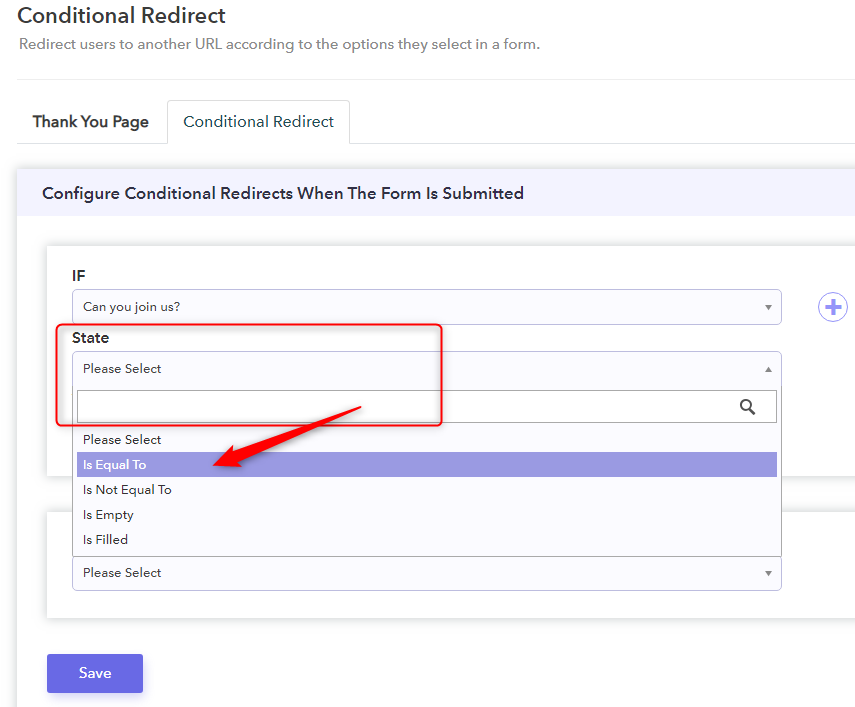
Momentarily, you have to choose the desired “State” from the drop-down list for the “IF” condition you have chosen.
Step 7: Select “Value” Logic
Further, for completing the conditional redirection, you have to set up the “Value” parameter from the drop-down list. 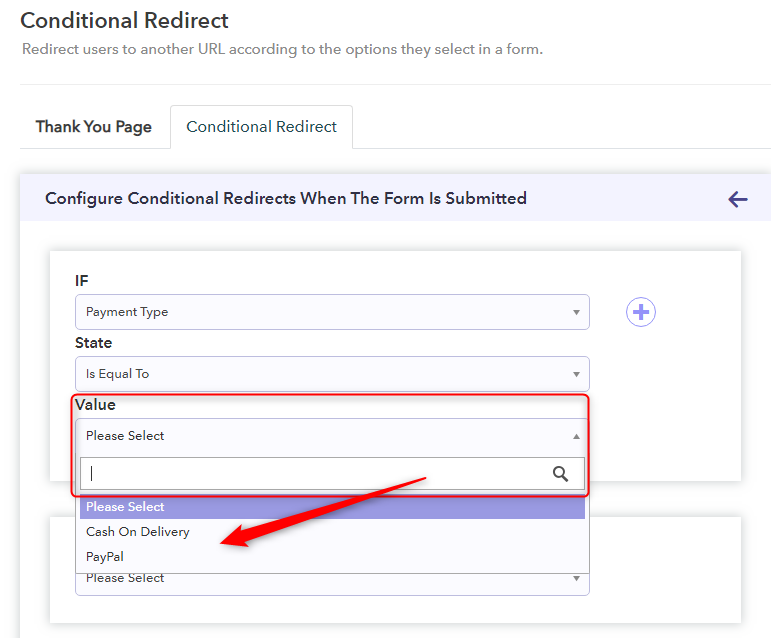
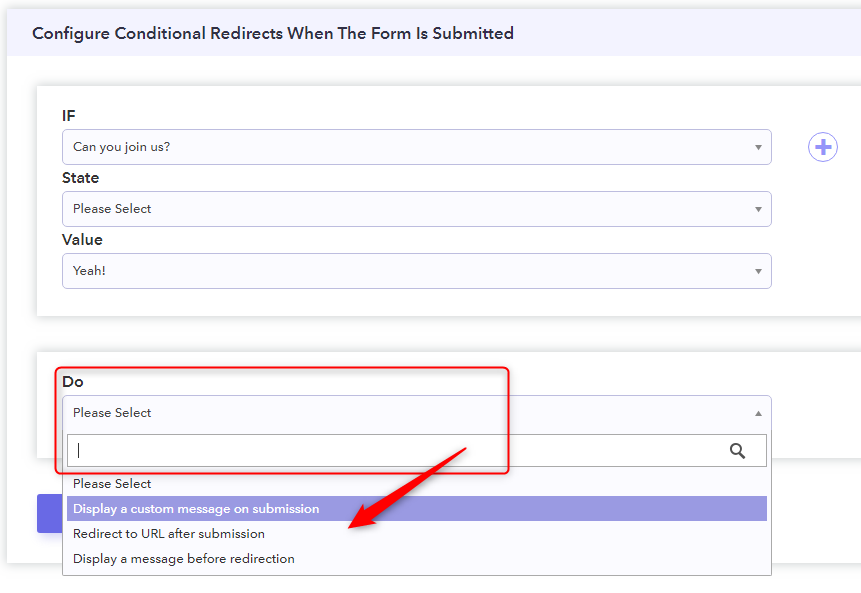
Step 8: Setup “Do” Logic
As you have completely set up the “IF” logics successfully. Now at this point, you have to set up the “Do” logics. For this, Pabbly Form Builder offers three variants of redirection after the submission of “Do” logic:
- Display a custom message on submission
- Redirect to URL after submission
- Display a message before submission
Step 9: Select “Redirect To URL After Submission” Do Logic
Now, as you want to remove the confirmation page from the form, you have to set up the “Redirect to URL after submission” option as “Do” logic. This will help you not to display any type of confirmation or thank you page after submission.
Step 10: Add URL
Later, you have to enter the URL of that page on which you want your respondents to send after submission.
Congratulations! You have successfully removed the confirmation page from your form by setting “Redirection After Completion” logics into Pabbly Form Builder.
Final Words!
When the users are on your website expressing interest, what better time is there to convert them as lead? True?
So, for maximizing conversions, it can be useful to send people to a page on your site or elsewhere on the web, rather than just show them a default “Thank You” page.
Hence, here in this post, we mentioned a few methods using which you can easily remove the confirmation page from it.
Now, taking everything into account, we are expecting that the above-mentioned information will surely be worked in your favor.
So, don’t waste any more time and try one out of them immediately to remove the confirmation page into your form.
You May Also Like To Read:
How To Duplicate A Google Forms?

Many times, you need to make edits to a form while having a copy of the original form. When you have a duplicate form as a backup, you can conveniently get back to your original form in case the edit goes wrong.
Now the question arises that which form builder is best for duplicating the form?
Nowadays, there are many form builders available in the market but you may have heard more about Google Forms as it is everyone’s first choice. It provides an easy way to create and send a basic business form in minutes. So, you can also use it for duplicating your form because it gives you the flexibility to make a copy of your original form without any extra efforts.
Google Forms can be useful for duplicating forms, but it does not provide much scope of editing to start with. Moreover, it does not copy the settings (like logics and email notifications) to the duplicate form. Instead, it only copies the structure of the form.
If you want to easily duplicate your entire form, including settings and logics then take a peek at our tutorial. Here, we’ll suggest you to try Google Forms alternative named Pabbly Form Builder. It provides better tools to duplicate forms that would also have the settings and logics of the original one.
There are two ways in which you can create a duplicate of your Google Forms:
Duplicating Forms Directly Through Google Forms:
You can also make a duplicate from the actual form. Here’s how to do it.
Step 1: Open Form and Form Functions
Open the form from the Google Forms dashboard which you want to duplicate.
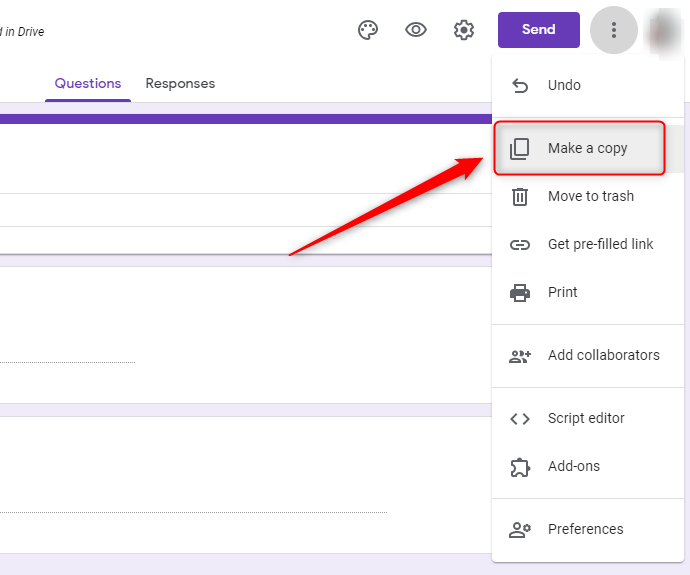
Step 2: Click On The More Icon
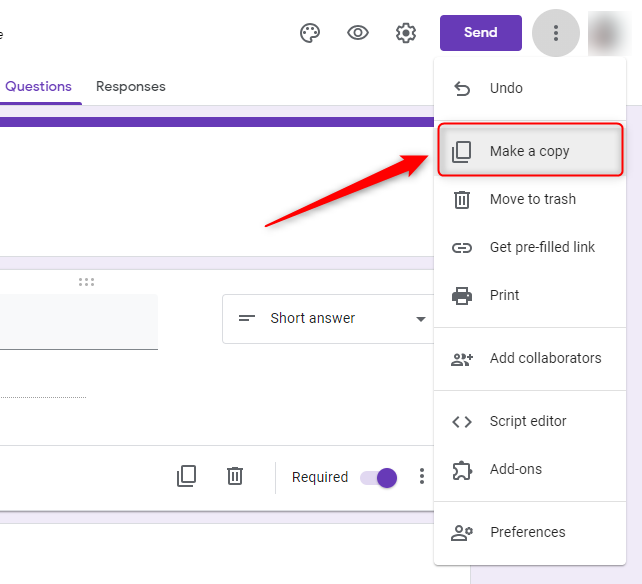
Now, click on the three vertical dots icon in the top right corner of the screen. This will open a drop-down menu.
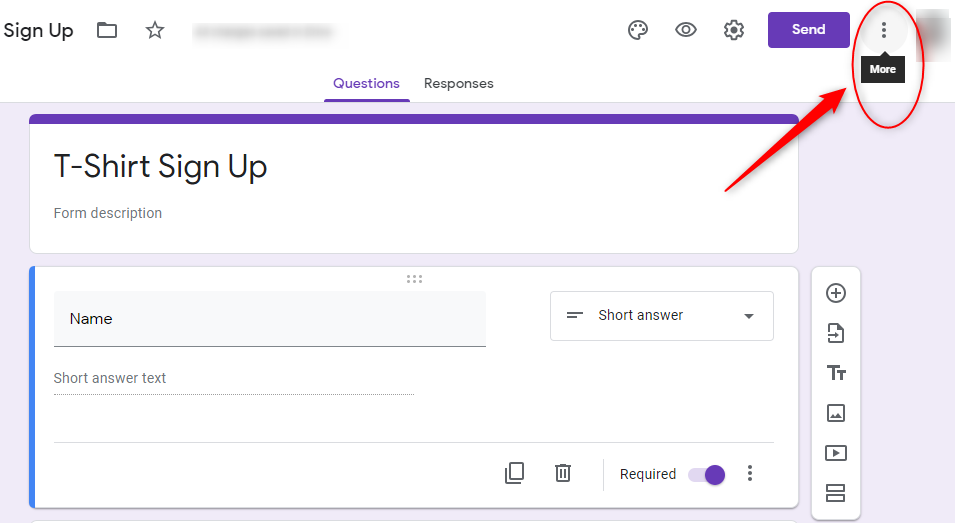
Step 3: Make a copy
Now, select the “Make a copy” option out of all the drop-down menu options.
Step 4: Make Settings For Duplicate Form
Lastly, set the name of the form copy. This method of duplicating a Google Form also allows you to decide where you want the copy to be pasted.
Set the document name & folder path where you want to store the form. Both things will appear in the dialog box on the screen.
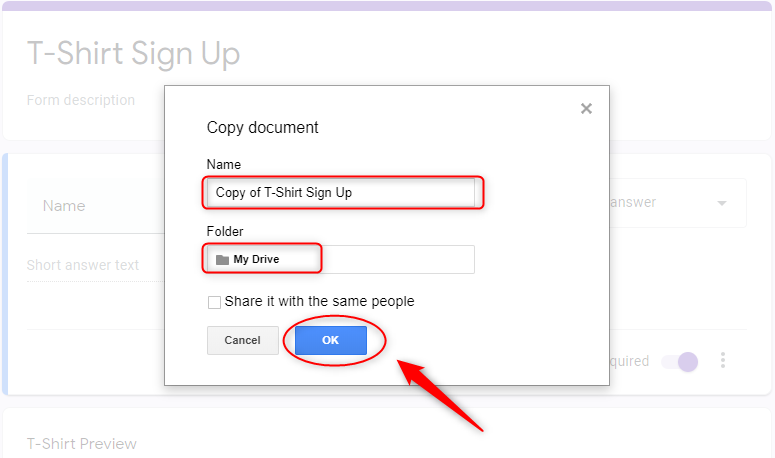
Now, click on the “OK” button to create a duplicate form on your selected location.
Duplicating Forms Through Google Drive:
Step 1: Choose A Form From The File
Open Google Drive in which your Google Forms are stored. After that, click once on your form to access a list of functions.
Step 2: Select Vertical 3-Dots
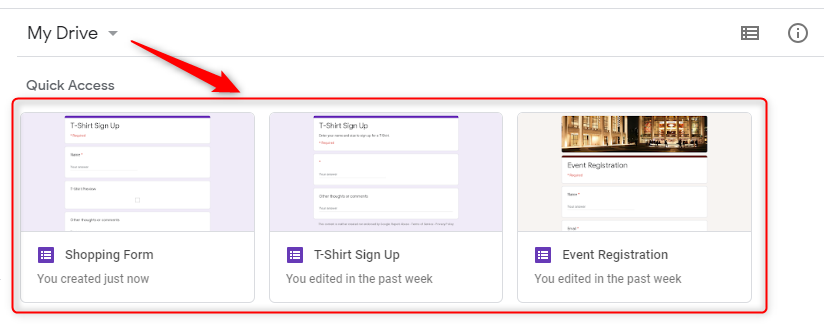
Click on the 3-vertical dots icon which is available in the upper-right part of the screen which will open a drop-down menu. Now, click on the “Make a copy” option from the given list. Thereafter, a copy of your form will be pasted in the same location as your original form in Google Drive.
Step 3: Edit The Duplicate Form
The copy of the form would be named as “Copy of (Name of your form)”. So, you can customize it as per your needs.

Why Should You Need To Try Pabbly Form Builder for Form Cloning?
In the context of duplication of forms, Google Forms is only able to copy the structure of the original form. This means, that you will need to re-set the features again like email notifications, follow-up pages, logics, etc. This can be inconvenient as well as a waste of time.
In essence, while Google Forms is a popular online resource because it is free to use, many organizations and individuals may prefer more customizability and efficiency with advanced features. This is why they may land on other products like Pabbly Form Builder.
With this, you can easily make a copy of your form in one click. This will save your time and energy of recreating a similar form with all its logic and settings. Moreover, it has various advanced features such as unlimited submission, collect one-time and recurring payments, conditional redirects, conditional logic and many more.
If you’re still in doubt then explore this platform using the free trial.
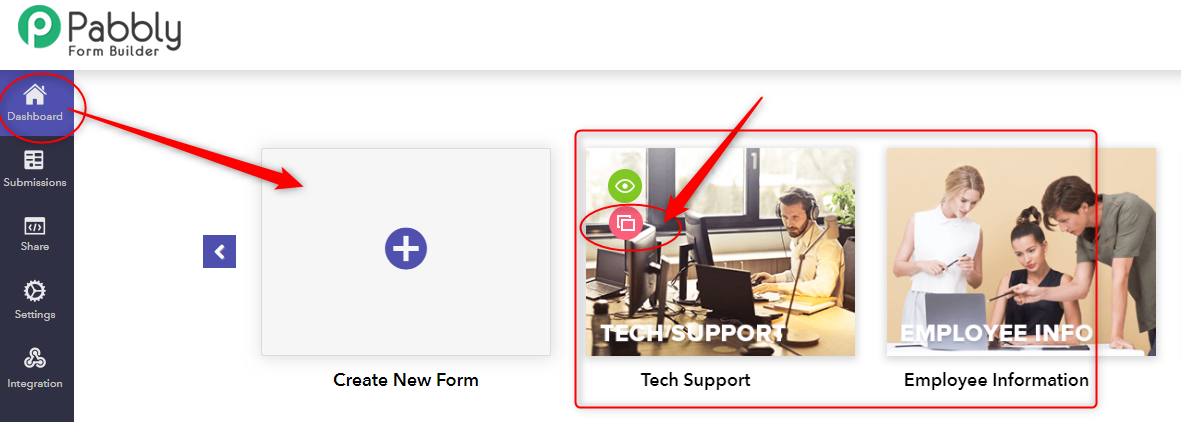
Duplicate Your Form Via Pabbly Form Builder
First of all, sign in to the Pabbly Form Builder and create your form using the form builder. After that, follow these steps to duplicate the form.
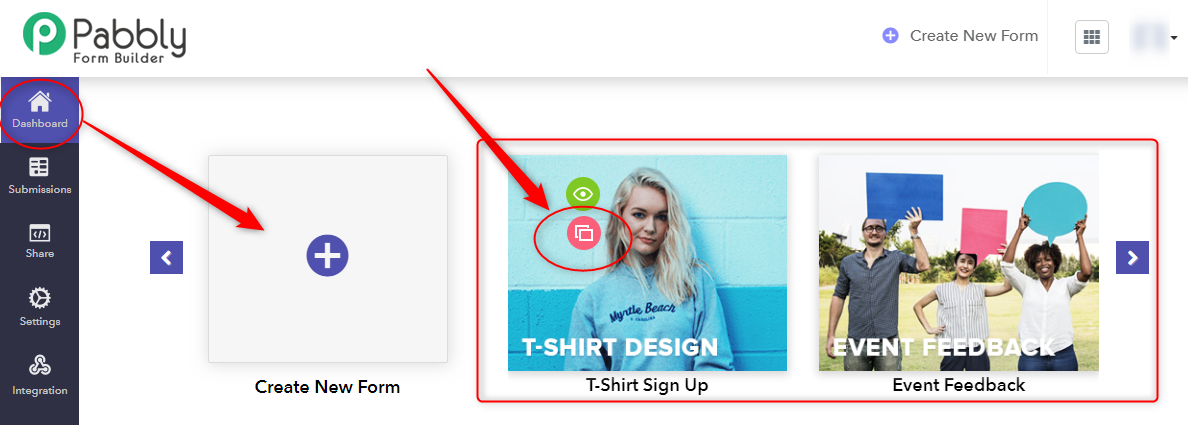
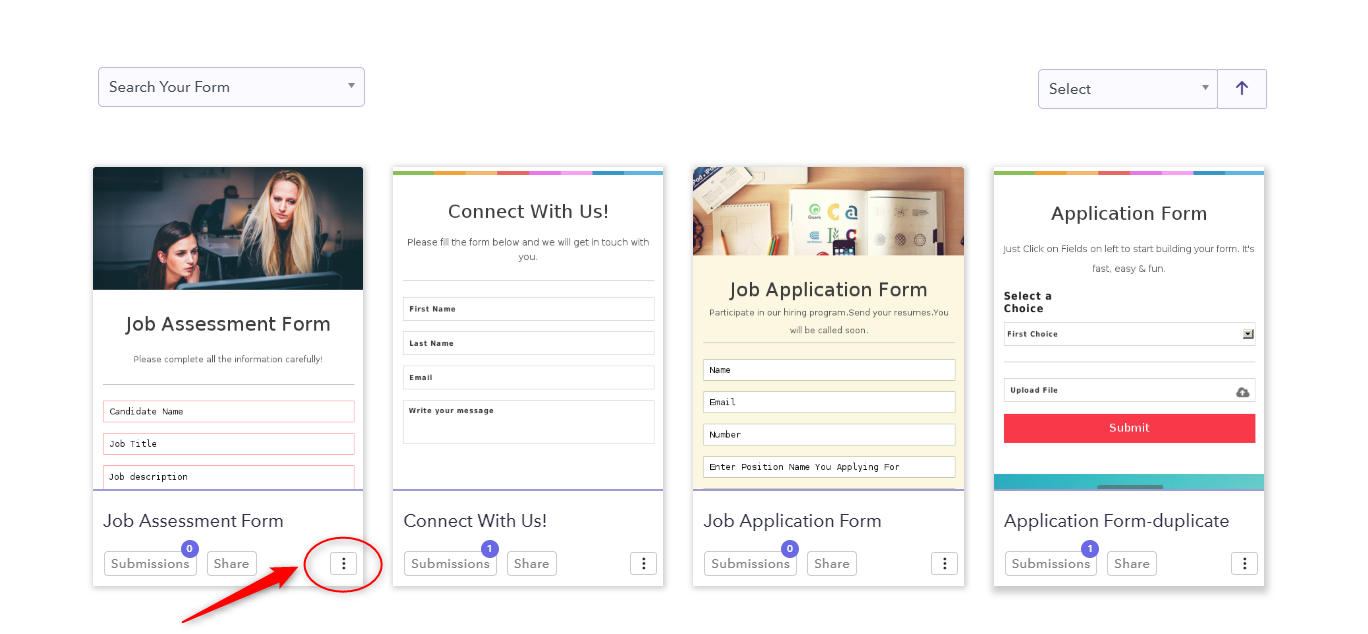
Step 1: Select A Form Options
Find the form you wish to duplicate on the form builder’s dashboard. Then, click on the three vertical dots icon on the form to open a drop-down menu.
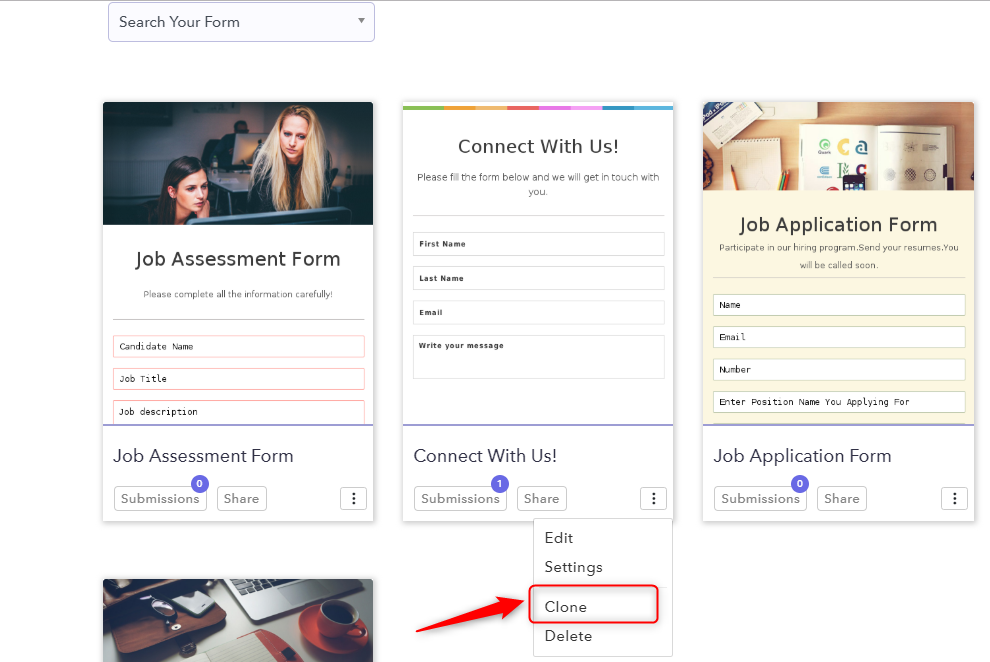
Step 2: Clone Form
From the drop-down menu, click on the “Clone” option to create a replica of the form you have selected.
Step 3: Confirm Cloning Action
Then, dialog box will appear on the screen in which Pabbly Form Builder will ask for a confirmation of your action. Now, click on the “Yes” option if you wish to proceed or want to copy the form.
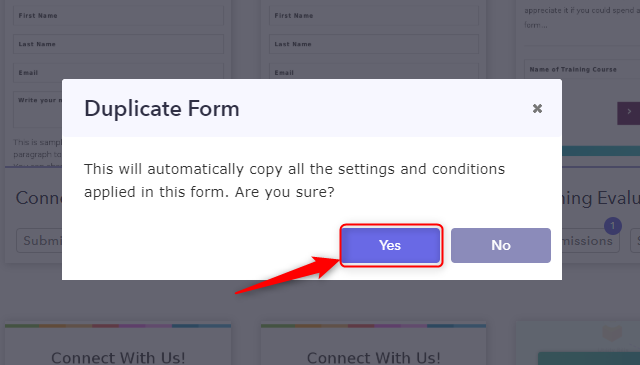
As you may have noticed, the dialogue box asks whether you wish to “Copy all the settings and conditions applied in this form”. This is because Pabbly Form Builder copies not only the structure of the form but also its logic conditions and settings like email notifications.
Step 4: Duplicate Copy Of Form
A copy of the form will then be pasted on the dashboard beside the original form.
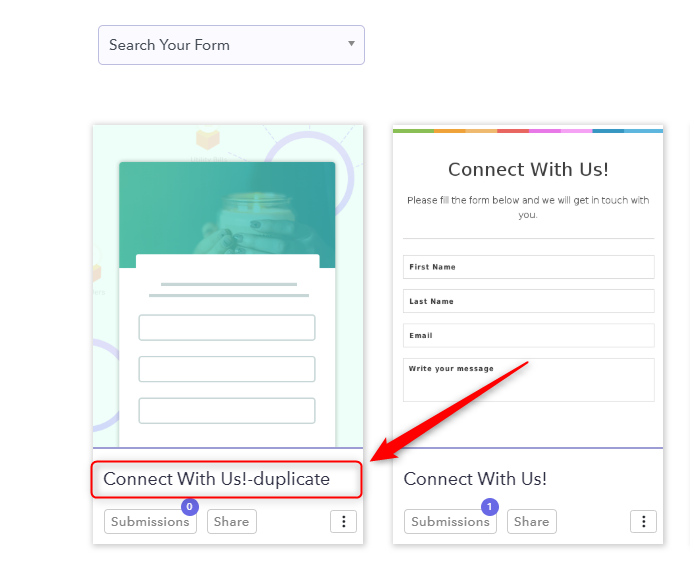
Finally, you can customize your form copy according to your needs and then save it.
Conclusion
Duplicating forms can be a useful way of keeping original forms safe while trying out different things with the copy. However, your form builder should have good customizing tools in order for you to enjoy such a benefit.
There are many form builders that are available online that provide varying degrees of customizability. While some are free of cost, others may provide a better user-interface and more features, for which they charge a price.
Therefore, you should consider what you prefer most: no cost or high-end features?
You May Also Like To Read:
- How To Redirect Custom URL After Google Forms Submission?
- How To Get The Geolocation Of A Place In Google Forms?
How To Get The Geolocation Of A Place In Google Forms?

If Google Forms is your first choice for creating any type of form and now you are looking for a way to capture & share your location with visitors via Google Forms, then I would like to tell you that:
Google Forms does not support the geolocation feature
It is definitely a free tool but it restricts you in features like it does’t have any inbuilt logic to identify locations. You can only add the link of the geolocation script in the description area as a part of the confirmation message.
So to overcome this you can try its alternatives.
Here, I’m highlighting one of them i.e. Pabbly Form builder that automatically detects the user’s location, IP address, etc without requiring any geolocation script. Apart from this, it has several advanced features like unlimited submission, conditional redirects, logic etc.
Try Pabbly Form Builder for Free
Forms work well for gathering a variety of data from any user. But if you want to record GPS coordinates on forms such as incident reports, order delivery forms, etc. then mistakes can happen while entering information that creates more work for you!
For example, while filling out shipping and billing address forms you filled the right address but it could not be located or confirmed for one reason or another.
Thus, you need to add the geolocation field to your forms. Adding this field to forms makes it easy to track where forms are filled out. The geolocation field can automatically get and store the current location of users.
For this, you would need to specifically ask the user in a question within the form for their country, postcode or zip, etc. Or else, you can handle the code/program in the script editor. This is a hectic task if you are not a pro at handling code and programs.
Google Forms does not identify visitor locations without scripting links. So, it will be mandatory for the respondent to click on the link before proceeding. Because it takes the location only when the user clicks on that link.
Let’s See How To Get The Geolocation Of A Place In Google Forms:
Step 1: Choose Your Template
First, you can simply choose the form design from its amazing pre-built templates or create your own by selecting the “Blank” option.
Step 2: Create Your Form
Next, create your form according to your requirements with the address field to capture a user’s location.
Step 3: Go To The Script Editor
Now, click on the “More” option that is available in the top right corner, here you will find the “Script Editor” option in the drop-down menu.
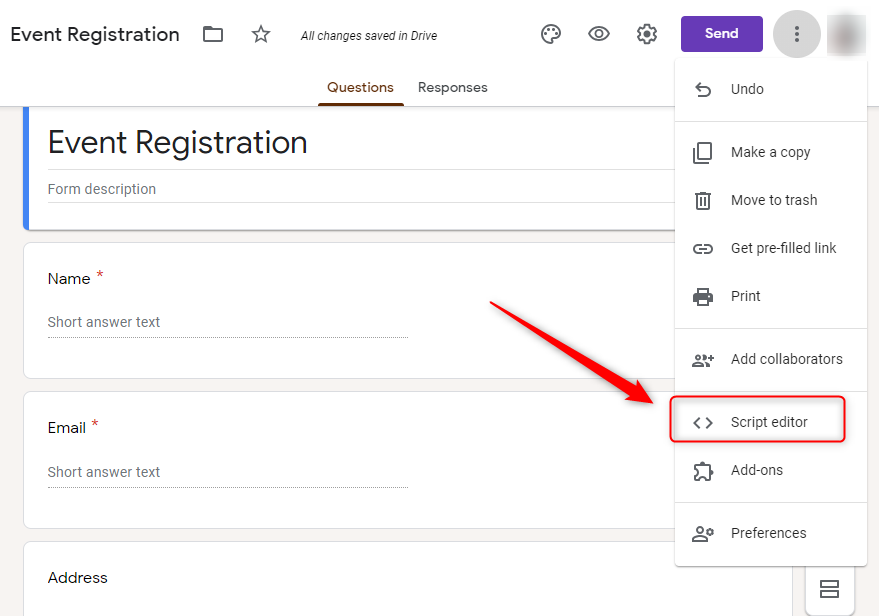
Step 4: Add Your Geolocation Script
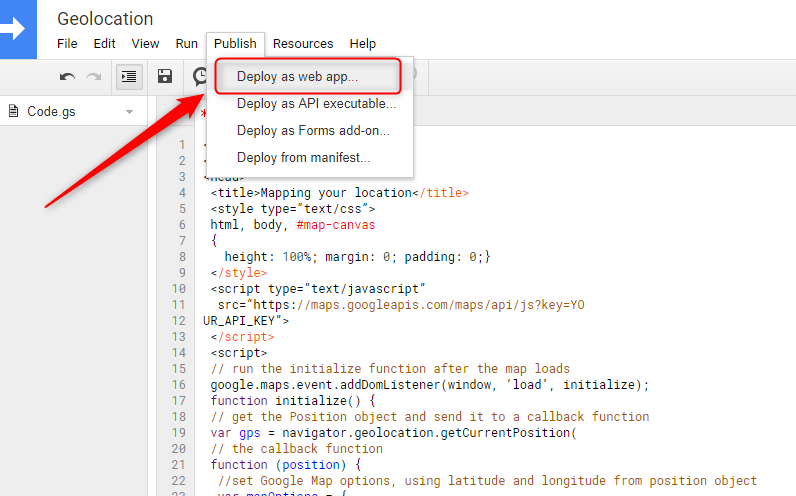
A clean slate opens in the new tab where you can enter your geolocation script to gather users’ address (street name, city, state, zip code, country). After adding the script you can publish it as “Deploy as web app” that will create a link.
Step 5: Paste A Link To The Confirmation Message
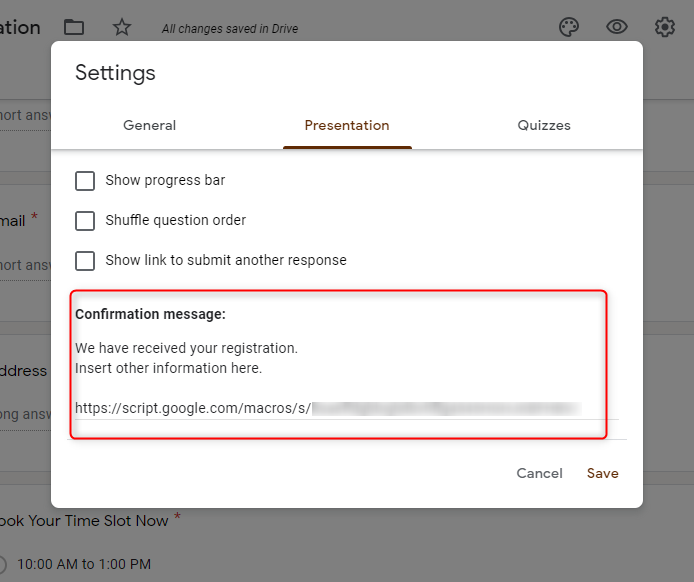
Now go to the settings of your form and paste the geolocation script link in under the confirmation message tab/section.
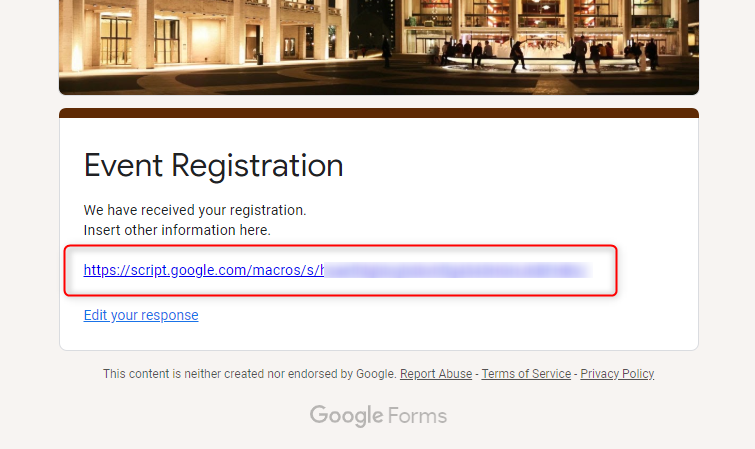
Step 6: Geolocation Script Link
After submitting the form, when users click on the scripted link, it will detect the respondent’s location.
Limitations of Google Forms
Google Forms has some limitations that you may not realize until you actually use it. We have seen one of its drawbacks in the above section i.e. it does not detect geolocation of place automatically. Therefore, you need to take the location from Google Maps using the link sharing option and paste it within your form description.
Besides that, it has some other limitations such as:
- It will not allow you to collect online payments directly from it.
- You cannot customize its rigid template to a great extent.
- Google Forms is not optimized for tablets or mobile devices.
- It doesn’t support complex branching & logical jumps.
- You can get email notifications only on one email address.
These are some pitfalls of using Google Forms, which may cause you to look for other form builders available online.
One of its best alternatives is Pabbly Form Builder, which does not restrict you on features. With this, you can easily share your current location with the respondent so that they can easily reach you using the map
Embed Google Maps Into Your Form via Pabbly Form Builder
Pabbly Form Builder is the best alternative of Google Forms because this software incorporates all those features which you refused to use in Google Forms. With this, you can easily embed the map in your form and share your location with the respondent without any coding knowledge.
Further, it automatically captures the user’s location, country, state, IP, browser details without adding any scripting code.
The following guide will teach you how to add a Google Maps to your form for getting the location of a place.
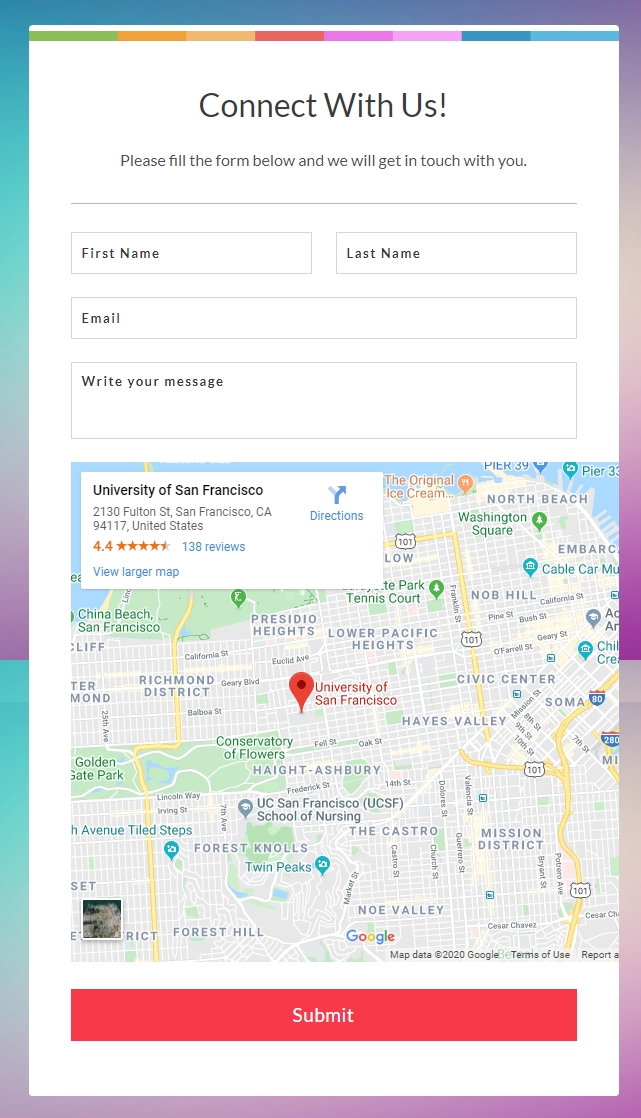
Step 1: Create Your Form
Firstly, you need to sign up for a free account & create a form by clicking on the “Create New Form” icon. Also, you can use its 250+ pre-built templates and customize it according to your requirements.
Step 2: Add Custom Fields
After this, add as many fields as you want in the form using its advanced options such as payment, captcha, hidden field, logic, rating, etc.
Step 3:Customize The Form
In addition, using this one can customize/edit your form individually or globally according to your needs. When you click on the “Global” option, many customization options will appear on the screen such as themes, layout, headers, etc.

Step 4: Embed The Map On Your Form
Now as you click on the “Heading” blocks the design options are open on your screen, here you can paste Google Maps code in “Heading Field” to embed the map in your form.
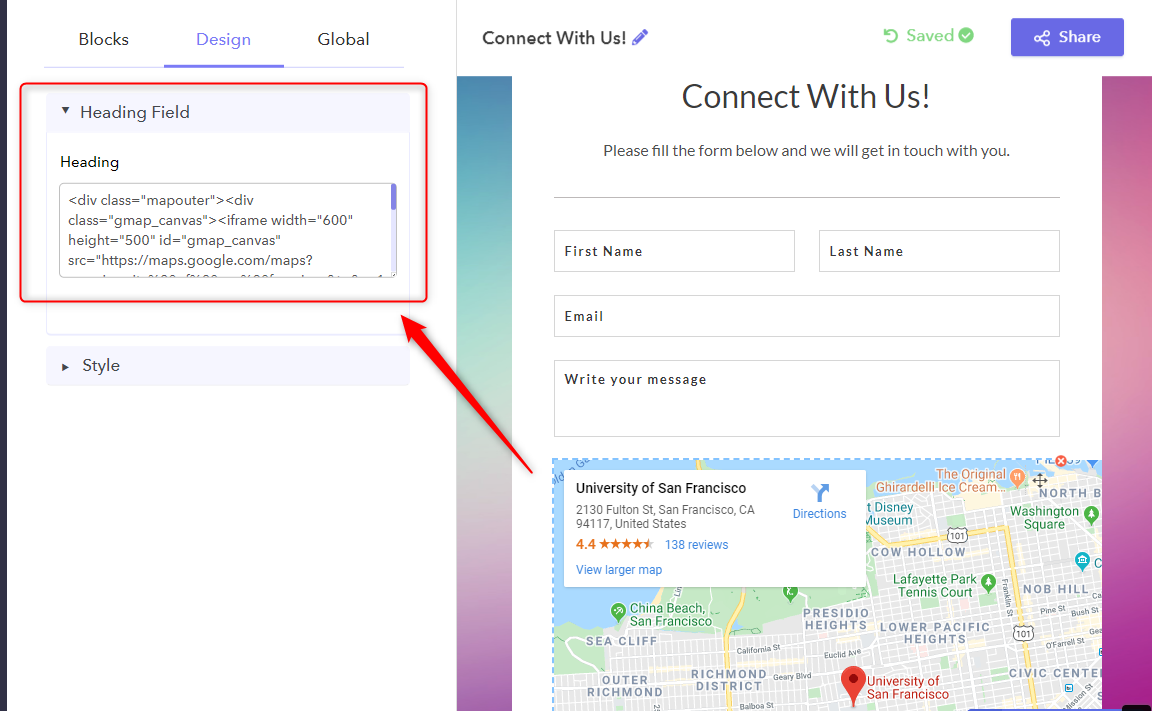
Step 5: Preview Your Form
To check the preview of your form with a map you can simply click on the eye icon.
Step 6: View Users Information
Now, go to the “Submission” option and then click on the user’s response details. A popup will appear on your screen where you can easily find all the details of your users.
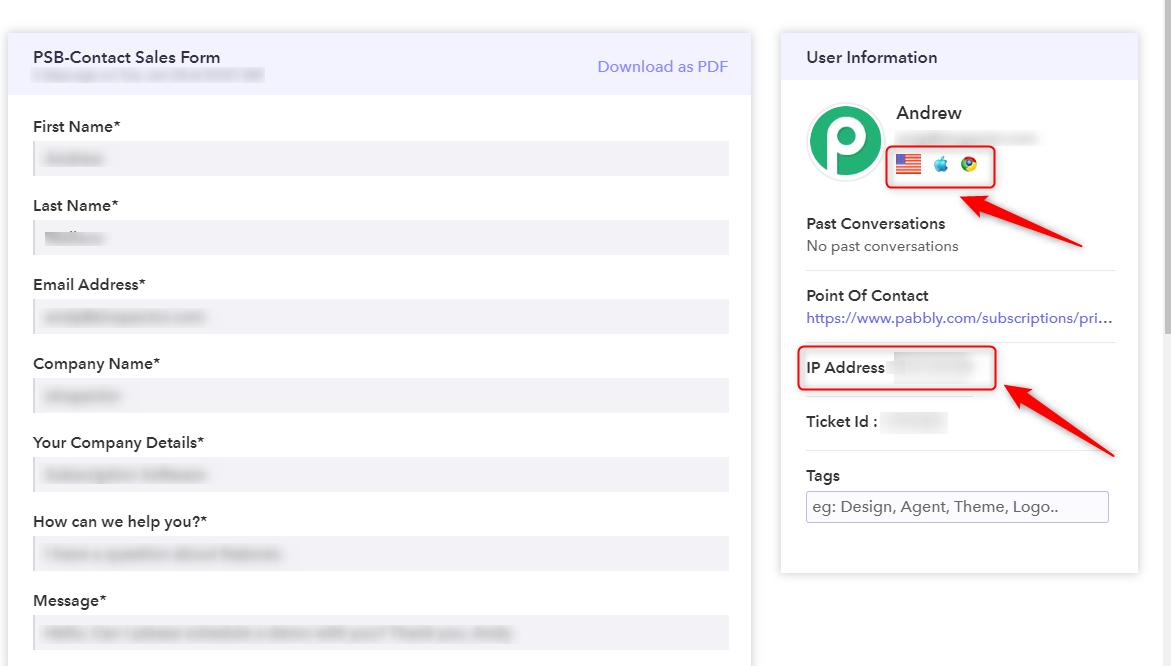
Now, you can view your user’s responses, IP address, country, browser details, etc in the admin panel.
Final Thoughts
Now, you can easily share your location with another person by embedding a map in your contact form. This will save you time and bring more business to your store. You’ll not only save your time but also get more leads through your contact form without having to embed the code every time.
We hope this article has helped you to add geolocation to a form!
You May Also Like To Read:
- How To Redirect Custom URL After Google Forms Submission?
- How to add Google Form to a Facebook Page?
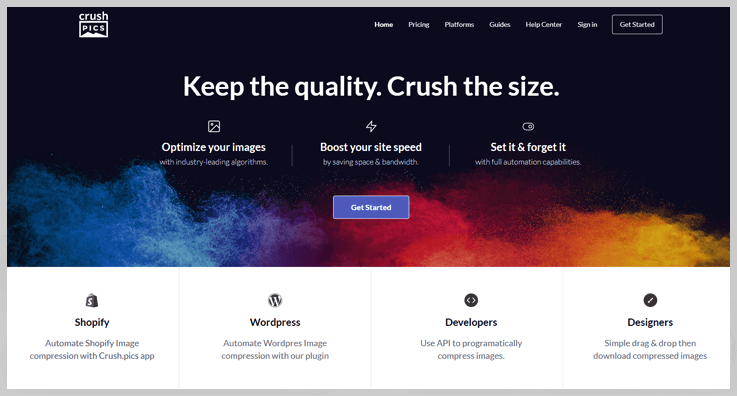
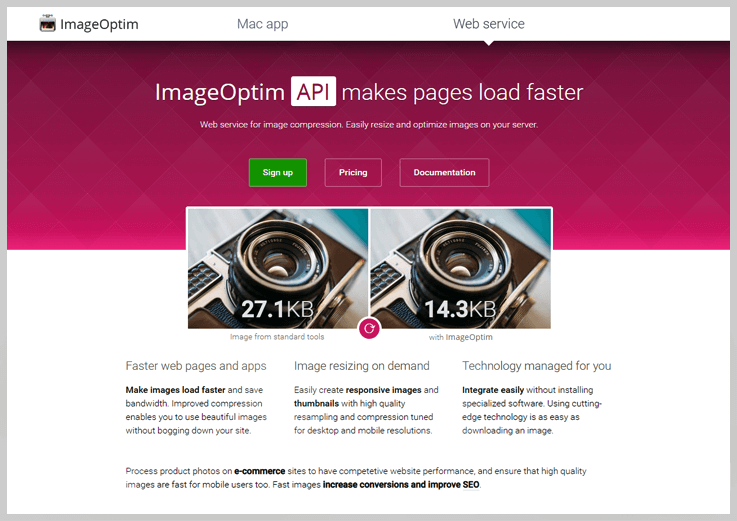
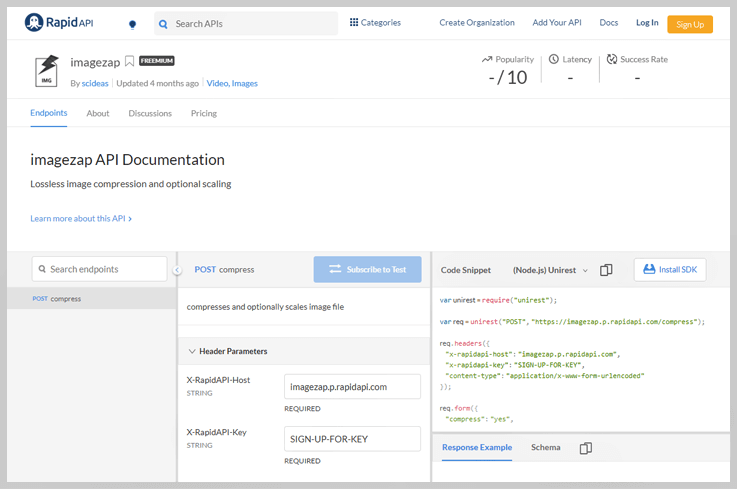
7 Best Image Resize API Services 2022

Do you want to compress or resize your images before uploading them online?
Optimizing your images for your website will help your site load faster. This means the website with faster loading speeds has better search engine rankings!
Hence, here, In this post, we have handpicked the Best Image Resize API Services for image optimization.
So, explore the list of these APIs & choose the best one that matches your expectations the most.
Image Resize API
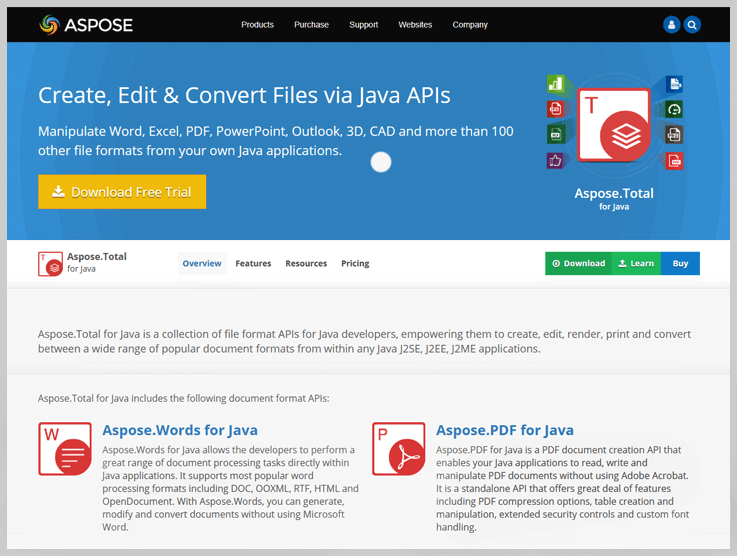


7 Best Image Processing API Services 2022

Do you want to compress or resize your images before uploading them online?
Optimizing your images for your website will help your site load faster. This means the website with faster loading speeds has better search engine rankings!
Hence, here, In this post, we have handpicked the Best Image Processing API Services for image optimization.
So, explore the list of these APIs & choose the best one that matches your expectations the most.
Image Processing API

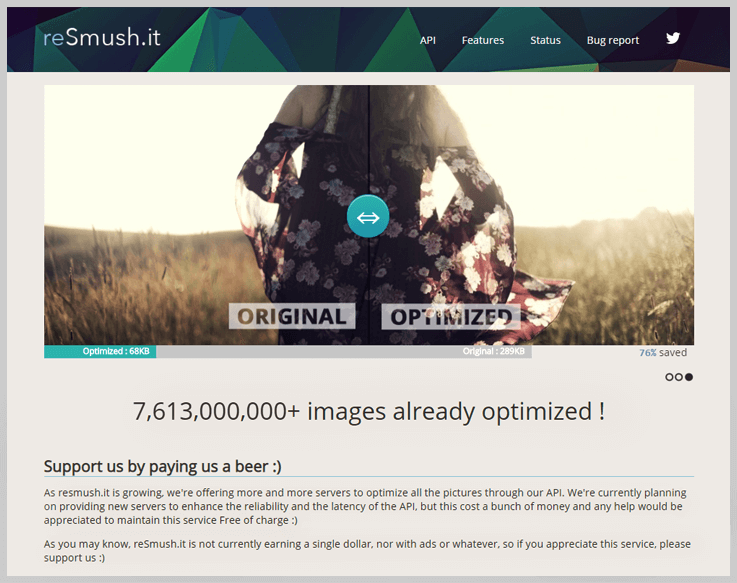


7 Best Bulk Image Compressor API Services 2022

Do you want to compress or resize your images before uploading them online?
Optimizing your images for your website will help your site load faster. This means the website with faster loading speeds has better search engine rankings!
Hence, here, In this post, we have handpicked the Best Bulk Image Compressor API Services for image optimization.
So, explore the list of these APIs & choose the best one that matches your expectations the most.
Bulk Image Compressor

7 Best Reduce Image Size API Services 2022

Do you want to compress or resize your images before uploading them online?
Optimizing your images for your website will help your site load faster. This means the website with faster loading speeds has better search engine rankings!
Hence, here, In this post, we have handpicked the Best Reduce Image Size API Services for image optimization.
So, explore the list of these APIs & choose the best one that matches your expectations the most.
Reduce Image Size API

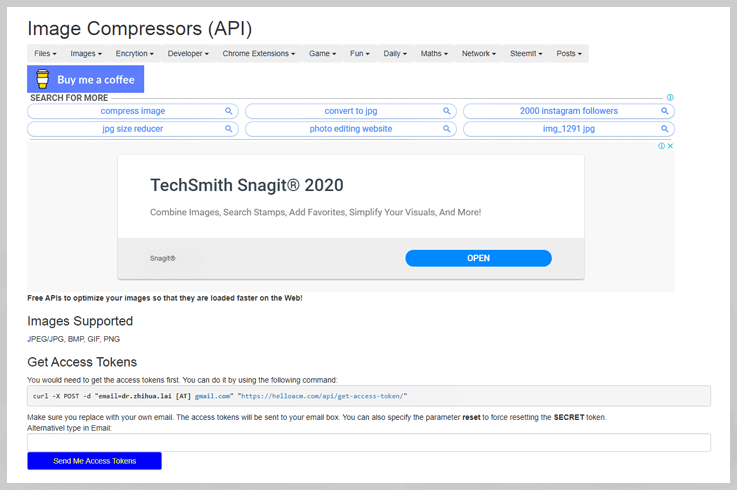
Image Compressors is a free API which is used to optimize your images so that they are loaded faster on the Web.
Moreover, it supports different image type such as JPEG/JPG, BMP, GIF, PNG. Besides, it empowers you to specify the URL instead of file as well.
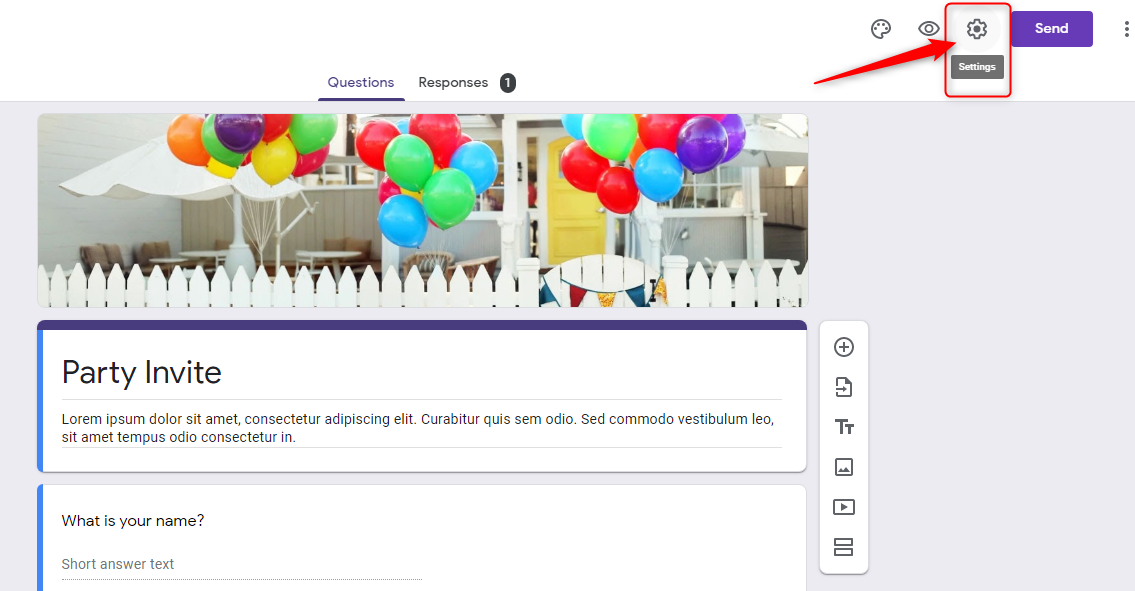
How To Redirect Custom URL After Google Forms Submission?
Undoubtedly, most people believe that Google Forms is the best form builder for creating wonderful forms that suit your business requirements.
But, the most tragic thing about Google Forms is that it does not even offer any feature that will allow you to instantly redirect your visitors at any other web page after each submission.
Now, you might be wondering what you can do for enabling such options. Right?
Then don’t panic! Here, in this post, we break down this problem for you by providing a few solutions that you can follow to resolve this problem.
Assuredly, Google Forms is the most trusted form builder that has a very simple interface. But, contrary to this, it is quite rigid with the option of redirecting the visitor to a custom URL after submission.
Now what?
Don’t worry, you can use some other form builders like Pabbly Form Builder for this. It offers advance features like custom URL after submission, logical redirections, dynamic redirection logics and much more for enabling this.
So, try it now!
Redirect To Custom URL After Submissions with Pabbly Form Builder
If you want to redirect the visitor to a custom URL via Google Form, then you need to add a link to the page on the confirmation section as this is the only way to land your visitor.
Setup Google Forms’ Confirmation Message To Add A Redirection Link:
By setting up Google Forms’ confirmation message, you can navigate the form respondents to the desired web page. But, this will not instantly redirect the visitors to that page. Why?
Because once the respondents submit the form, they will find a confirmation message page with the link of that page where you wanted to send them.
Now, by clicking on that link, they will get navigated towards that particular web page.
Let’s see how you can do this:
Step 1: Create A New Form
Firstly, you have to create a new form by clicking the “Blank” button into the dashboard. Also, you can use its beautiful pre-built templates too.
Step 2: Add Personalized Questions In The Form
Now, you can add customized questions into the form by just clicking the “Plus” icon. Besides that, you can also add a few more elements like file upload section, images, videos, etc into your forms from here.

Step 3: Hit The “Setting” Icon
Once you are done with adding required elements into your form, you have to select the “Setting” option which is available at the top right corner of the dashboard.
Step 4: Go To The “Presentation” Section
Now, in the “Settings” section, you will find a window entitled “Presentation”. From here, you can customize the confirmation message as per your requirements.
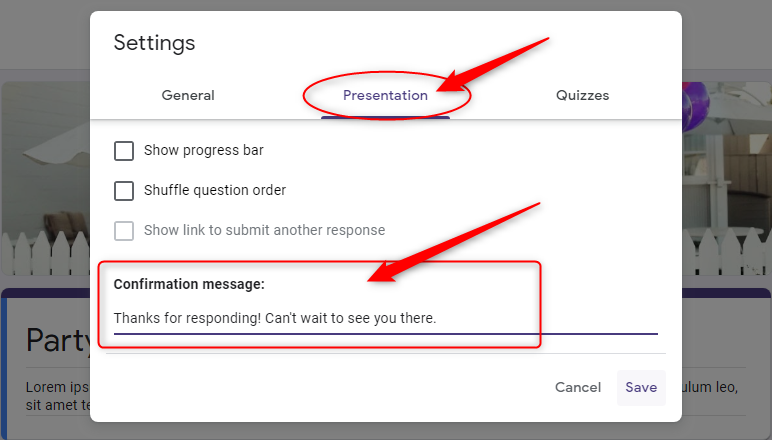
Step 5: Add Link In The Confirmation Message
Here, you can add the link of that page where you wanted to send your visitors after form submission.
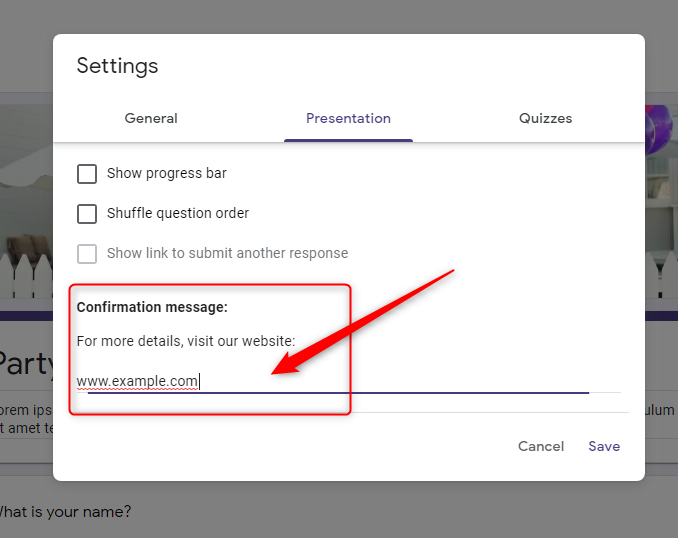
Step 6: Save Setting & Preview It
Now, all you need to do is just save these settings & preview your form.
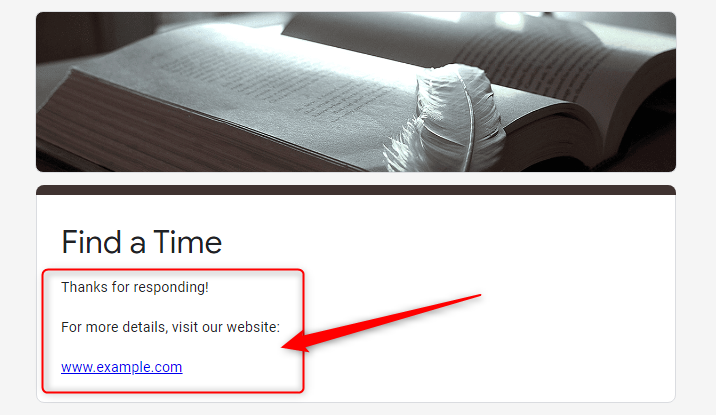
Below, I have mentioned how that link will look to the respondents. So, they can click that link & navigate to that page on which you wanted them to go.
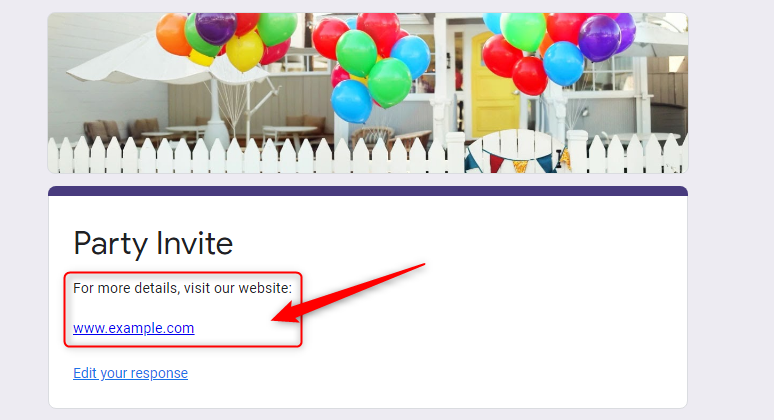
Now, you are all set to avail of the option “redirect on submission” into your Google Forms. Enjoy!
Limitations Of Google Forms:
As mentioned above that Google Forms does not support any direct feature of ‘Redirection On Submission”. This means, using the above method, you can only show a link of that page on which you want to send your respondents but it does not automatically redirect them on to that page.
Hence, it’s totally up to the users whether they want to jump on that page or not.
And, if they didn’t click the link then there is no point in adding that link.
Further, Google Forms does not offer any feature of “Conditional Redirection”. Nowadays, such types of redirection are highly demanded by the business as it helps them to customize things according to the data submitted by the users.
Now at this point, you must have realized that if you stick to Google Forms, then it will be a very loss deal for you.
Therefore, we will recommend you to use Pabbly Form Builder to overcomes all the stated shortcomings of Google Forms.
How “Redirect On Completion” Works In Pabbly Form Builder?
The main advantage of using Pabbly Form Builder is that it can navigate the respondents on to another webpage automatically after form submission. Here, the user doesn’t have to click on any link or button separately.
Apart from this, it allows you to configure different conditional redirections into form to see what happens after the form is submitted. With it, you can dynamically redirect a user to a specific URL based on their form input.
Let’s see how you can do all this.
Setting Up Pabbly Form Builder For Enabling “Dynamic Redirects After Form Submission” Option:
In Pabbly Form Builder, you can either show a default “Thank You” page to the user after submission or you can directly navigate them on to some special page depending on the input data submitted by them. We broke down this complex process in a few simple steps.
Step 1: Create A New Form
The very first thing you have to do is open the dashboard of Pabbly Form Builder & select the “Create New Form” icon for creating a fresh form from scratch.
Further, you can also “Clone” any of its pre-built templates & customize them according to your requirements.
Step 2: Add Required Fields In The Form
Next, you can add different types of form fields like upload, rating, payment option, separator, Captcha, etc, into your form by choosing all these from the “Block” section of the dashboard.
Besides, you can also arrange the order of these fields the way you want.
Step 3: Go To Setting Button & Customize “Thank You Page”
Once you are done with editing the form fields, then after that, go to the “Setting” option which is available at the left side column of the dashboard. Here, you will find many tabs for configuring advanced settings into the form. Click on the first tab called “Thank You Page”. If you didn’t make any external settings from here then by default the below-mentioned thankyou message will be visible to the respondents after submission.
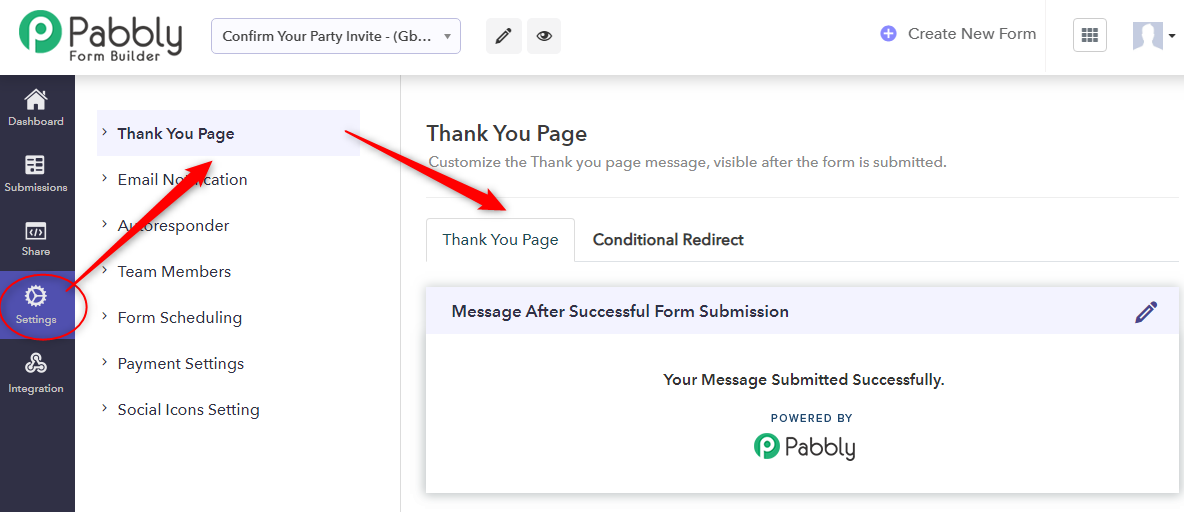
Step 4: Conditional Redirection
Now, this is a crucial stage from where you will be going to set up things for redirecting respondents on some other page after submission. For this, go to the “Conditional Redirect” tab in the “Thank You Page” option.
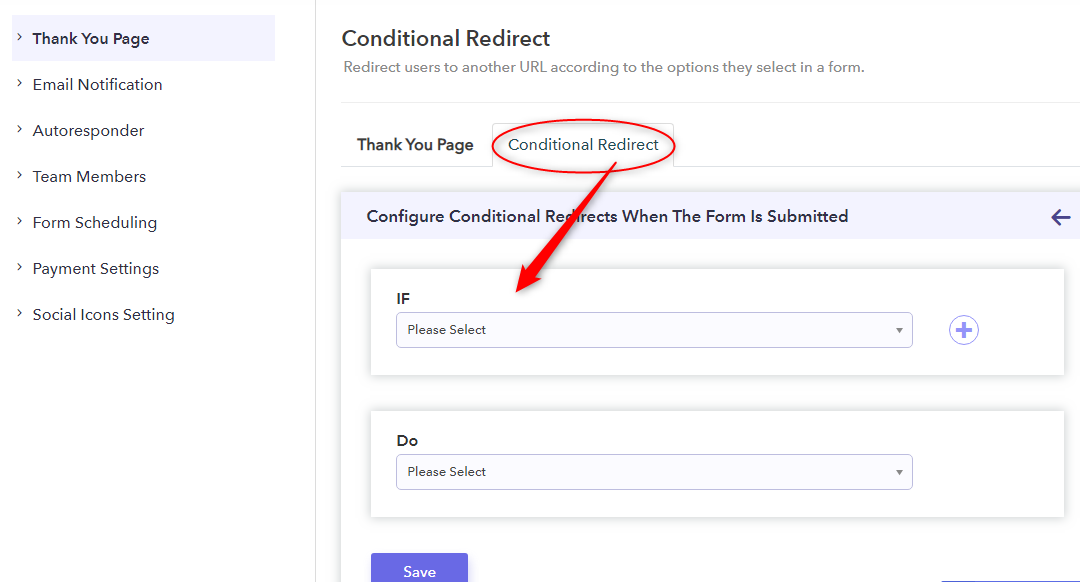
Step 5: Add Specified Conditions
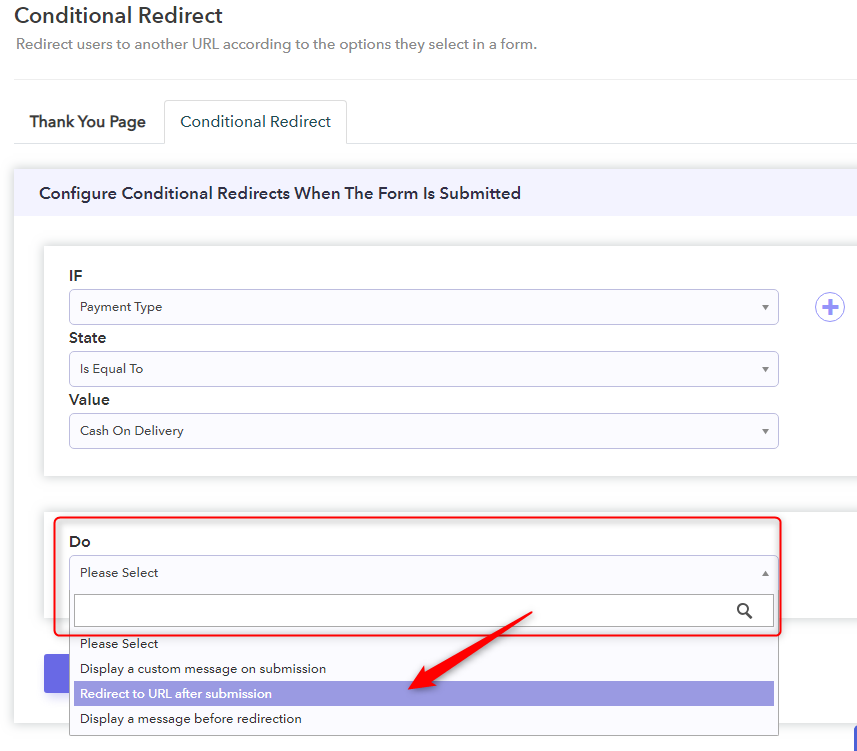
Later, you have to choose the desired “IF” condition for the drop-down list. If you want to add more than one conditional logics into your form for redirections then you can do that by clicking the “Plus” (+) icon available at the right side of the “If” block.
Step 6: Set The “State” Logics
Momentarily, you have to choose the desired “State” from the drop-down list for the “IF” condition you have chosen.
Step 7: Select the “Value” Logics
Further, for completing the condition on which you want to send your visitors to some other page, you have to lastly set up the “Value” parameter from the drop-down list.

Step 8: Setup “Do” Logic
As you have completely set up the “If” condition successfully. Now at this instance, you have to set up the “Do” logics. For this, Pabbly Form Builder offers three variants of redirection after submission. Below, we mentioned how you can set up any one step out of these three.
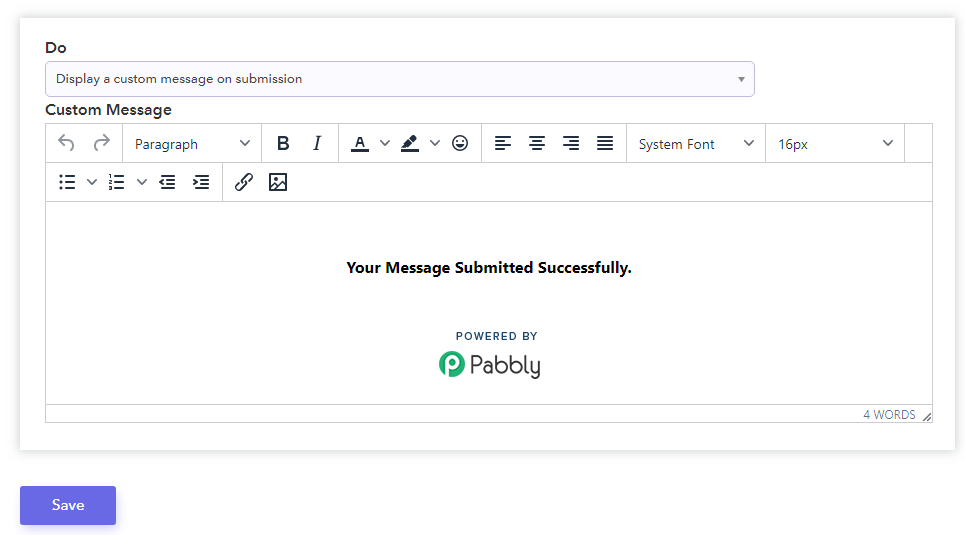
Step 8a) “Display A Custom Message On Submission” – Do Condition
The first method is “Display A Custom Message On Submission”. With this option, instead of redirecting visitors on any particular page, a customized message will be visible to them just like Google Forms.
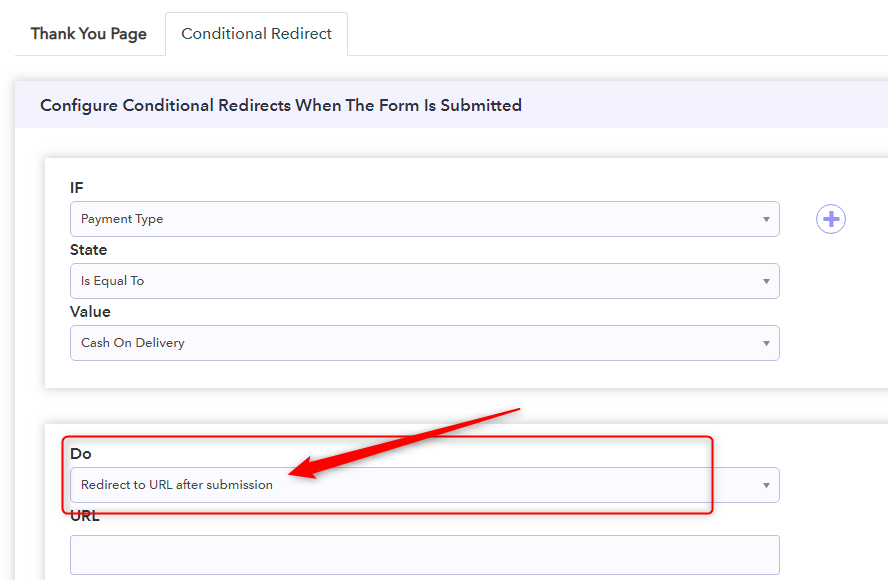
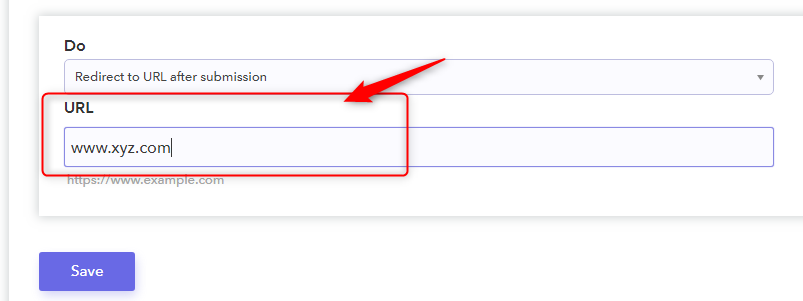
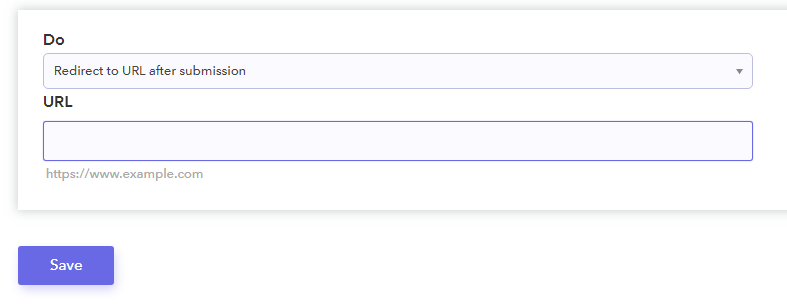
Step 8b) “Redirect To URL After Submission” – Do Logic
Now, if you want to avail of the “Redirection After Submission” option then you can do this from here. For this, you have to set the “Do” condition as “Redirect To URL After Submission” & then enter the URL of the page where you want them to send.
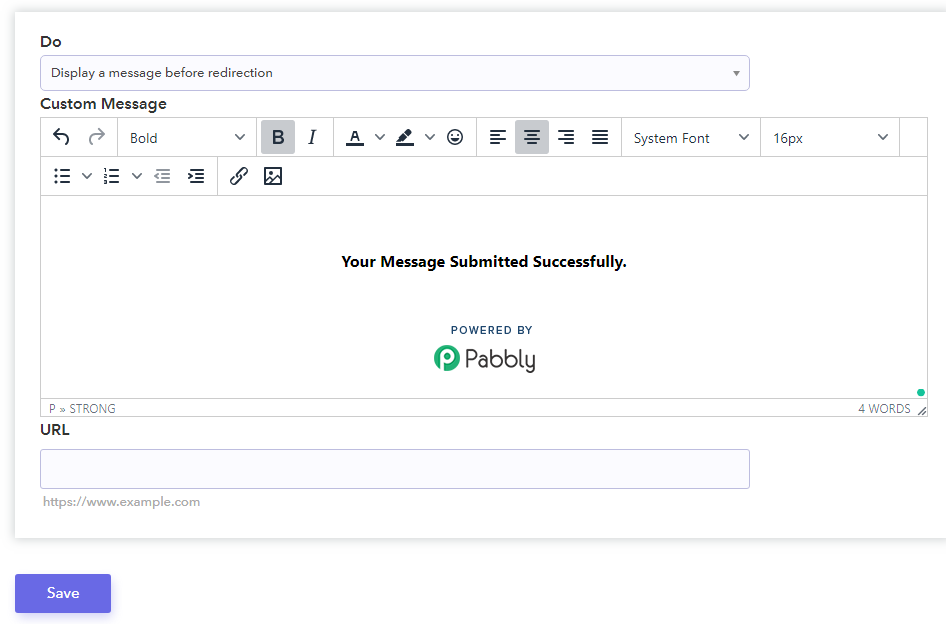
Step 8c) “Display A Message Before Redirection” – Do Logic
The most amazing thing about Pabbly Form Builder is it gives you the freedom of displaying a customized message before redirecting users on a different page after submissions. For this, you have to set the “Do” parameter as “Display A Message Before Redirection”. Then, set up a customized message which you want to display. Finally, you have to enter the URL of that page where you want to send your visitors.
Congratulations you have successfully configure the “Redirection After Completion” logics into Pabbly Form Builder.
Final Words!
Nowadays, in order to utilize your forms for marketing automation, many websites follow the “Redirection After Completion” logics in their forms. As you are using Google Forms and looking for ways of how you can do this. Hence, to help you out, we have discussed various methods using which you can avail of the same feature in your form.
Momentarily, taking everything into account, we are expecting that the above-mentioned information helped you to understand how one can redirect the respondents on a custom URL after form submission.
You May Also Like:
How To Add Google Forms To A Facebook Page?

If you have a Facebook Page for your business or company, you might want to convert your fans or followers into subscribers. Hence, for doing that, you need to add a form to your Facebook page. Basically, the major reason for adding forms on Facebook or other social media profile is to achieve a higher number of views and submissions.
Further, adding forms to Facebook will also help in conducting a survey, selling products on your page, collecting feedback and suggestions, offering cashback from your affiliate sales and a lot more.
Now, when we are talking about form, Google Forms comes first in everyone’s mind as it is a free tool available in the market. It is a simple to use tool which allows you to create a form for receiving responses from your audience but it has limited features.
As we have already mentioned above the Facebook page helps to boost the views and submissions of your forms. But, unfortunately, to track these parameters, Google Forms doesn’t provide any facility. Now what?
Well, if you want to try another form creator that offers the same functionality to analyze the status of the leads. Then, we’ll suggest you explore Pabbly Form Builder because it has a built-in analytics feature that gives you a complete insight of your form.
Besides, this amazing form builder offers a wide range of features that can fulfill everyone’s needs.
Google forms give you the option of capturing user inputs and storing it into a backend spreadsheet but you can not analyze the data of user conversion. Still, you want to use it for your business needs then in this article, we will show you how to add Google Forms to your Facebook page.
Step 1: Create Your Form
First, you need to create a Form by just selecting the ‘Blank’ option. You can also choose templates according to your requirements from its pre-designed template gallery.
Step 2: Entitle Your Form
After creating a form, entitle it using the customization options accordingly. All the changes will save automatically.
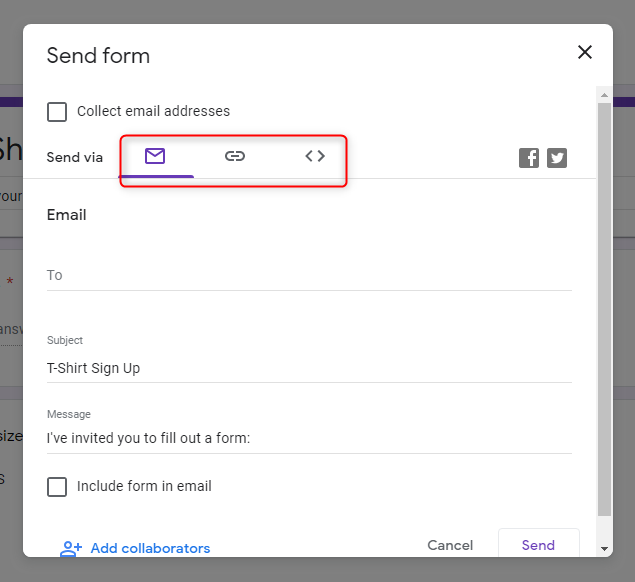
Step 3: Send Your Form
Once satisfied with your form, you can publish it by clicking on the “Send Form” button.
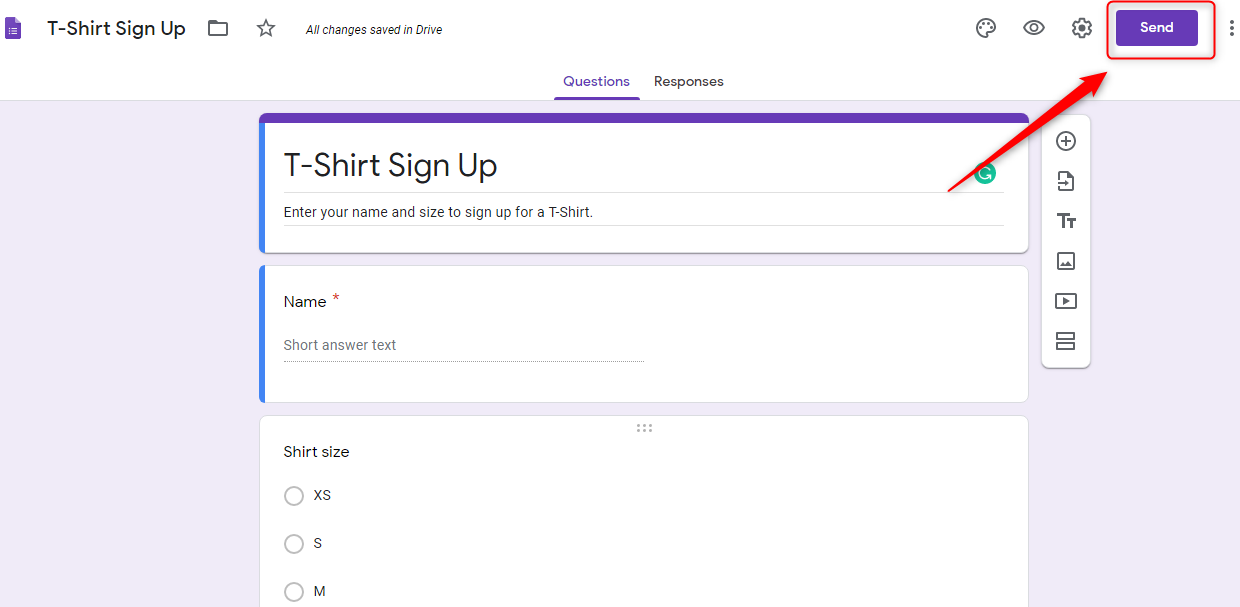
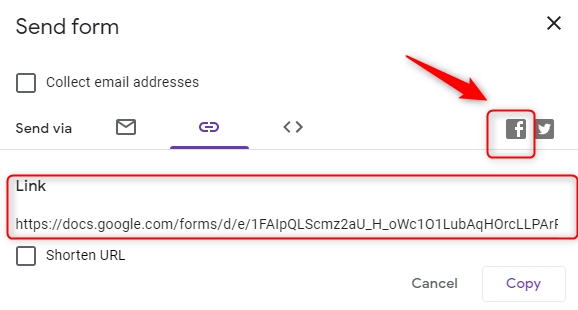
Step 4: Share The Form
In order to add the forms on Facebook page, you need to click on the “Send” button. Here, you will find a number of options for sharing your form including email, link sharing, HTML, etc. Using these options, you can share the form with people via email or social media, or embed it into a webpage.
Step 5: Add Form To A Facebook Page
Now, to post this form on Facebook page you can directly share it by clicking on the Facebook icon present on the right side.
Why there is a need to share a form on Facebook page or other social media platforms?
Obviously to achieve the higher conversion rates.
But do you guys really think that Google Forms can help you with this?
As we all know it creates a very basic form, that is not sufficient to attract more potential leads. Because there are very few customization options available in Google Forms. Apart from this, it doesn’t let you track the activity on your form as we have already mentioned above.
Hence, for designing a higher converting Facebook form and analyzing the performance of your form, you should have a professional tool that can do this work for you without requiring any expert knowledge. One such worth highlighting form generating tool is Pabbly Form Builder that offers you advanced customization features along with many other facilities such as reporting & analytics tools.
Thus, we’ll recommend you to try Pabbly Form Builder. Still in doubt then explore this platform for free using its free trial.
Let’s see how you can share the form on Facebook via Pabbly Form Builder
Step 1: Create a New Form
You just need to create a form for Facebook by clicking on the “Create New Form” button. You can also choose its pre-designed templates according to your needs.

Step 2: Customize Your Form
Pabbly Form Builder allows you to design the form of your desire by providing a wide range of customization options like themes, layout, header, colors, fonts and a lot more.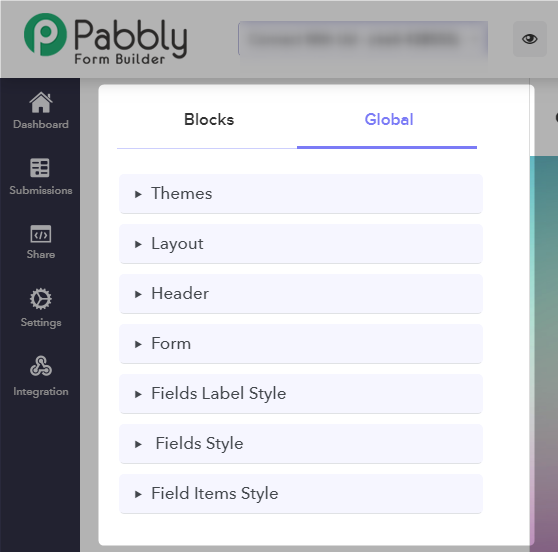
Step 3: Click On The Share Button
Once your Facebook form is ready for sharing then just hit the button “Share” present at the top right side of the screen.
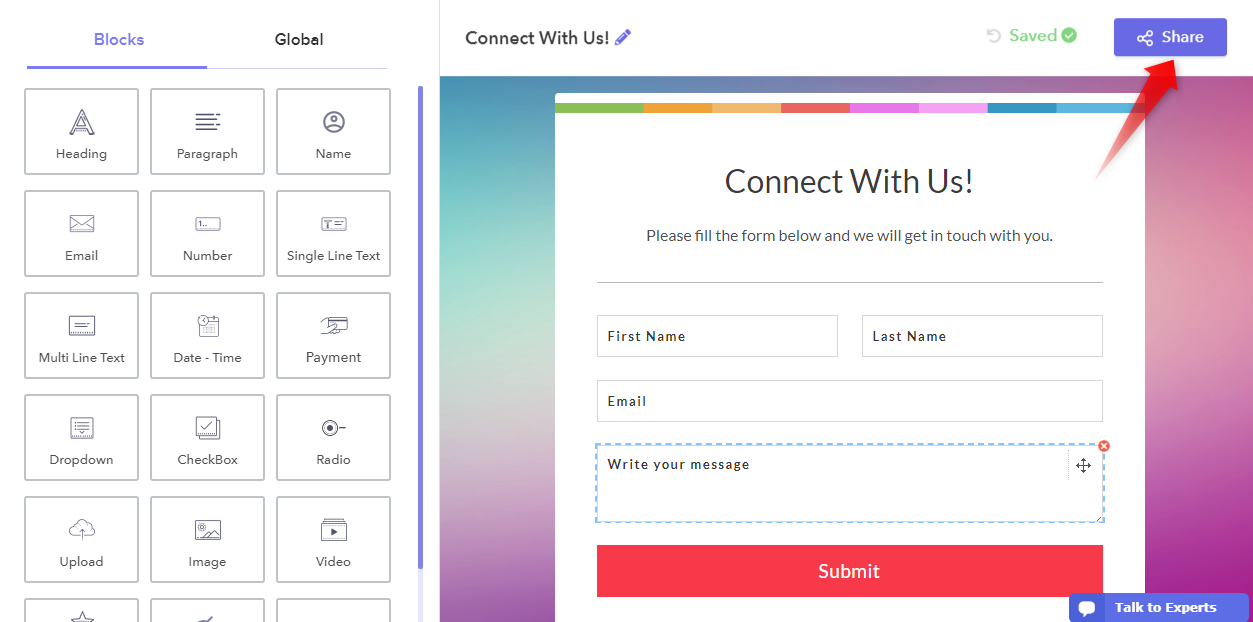
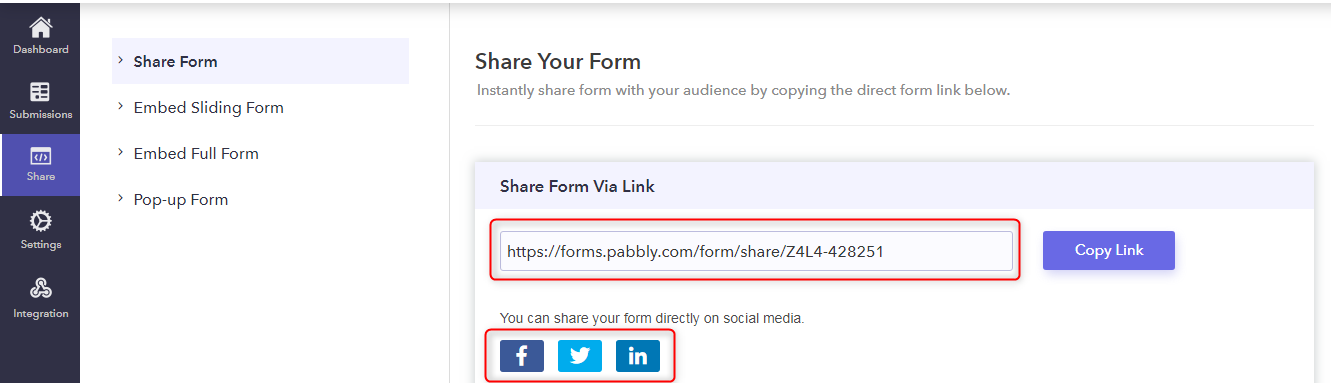
Step 4: Share Your Designed Form
Next, you can directly share your forms on Facebook, Twitter, LinkedIn, etc. by simply clicking on their icons appears at the bottom. Further, you can copy the link and share it on different mediums.
By sharing your form on different social media platforms you can get the maximum number of views in a very short span of time.
Step 5: Track Form Submissions
After that, click on the “Submission” button from the menu, where you can find the following options that are Forms submission, Analytics, and Report.
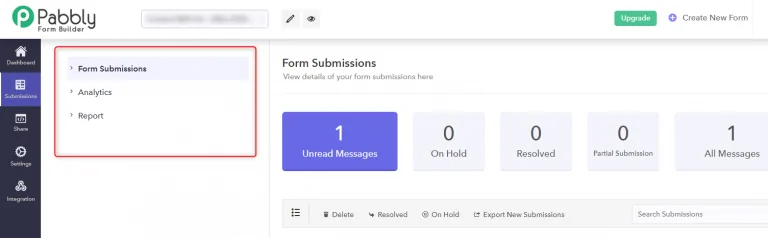
Here, you can view the details of all the forms in the “Form Submissions” section that are submitted by your users such as unread messages, partial submission, etc.
Conclusion:
Forms meant as lead generation tools that often appear linked on several social media sites. Social media sharing can help generate high amounts of traffic, so just follow these above steps to share your forms on Facebook as well as on other platforms and generate more & more leads for your business.
Hence, in this article, you will find how one can add forms to their different social media accounts. I hope this will you to achieve the desired results.
If you have any questions or suggestions regarding this guide, please feel free to leave a comment below.
You May Also Like To Read:
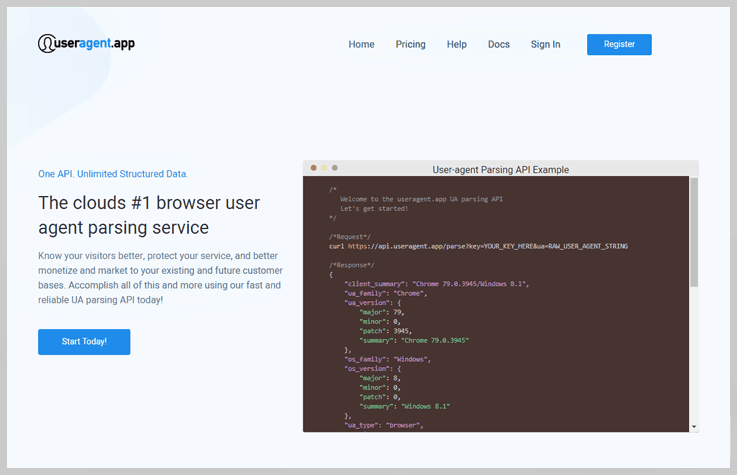
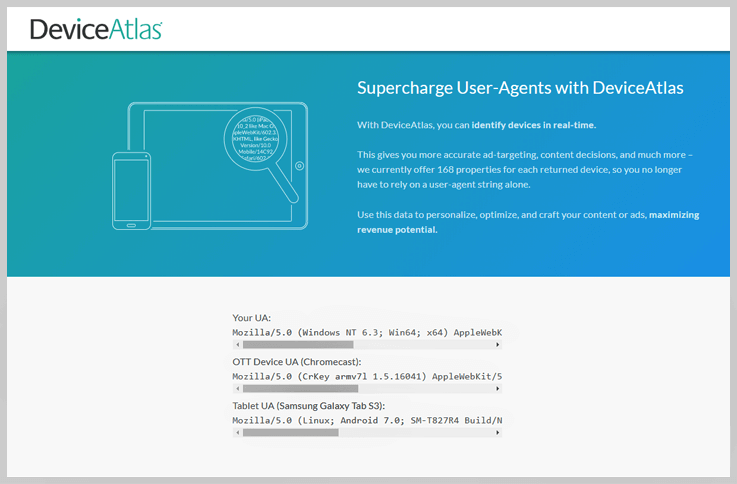
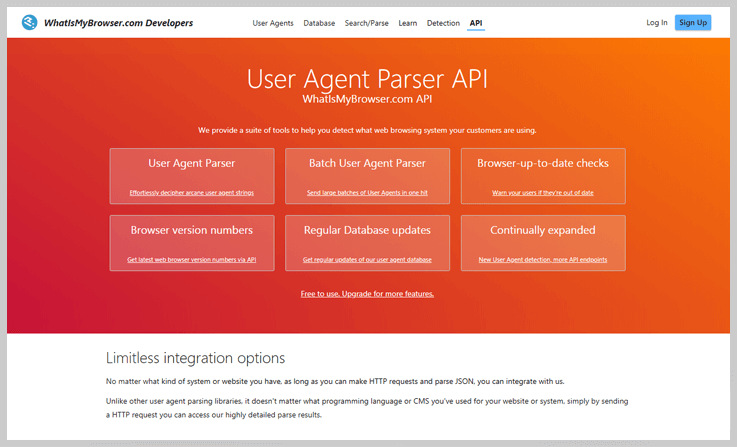
5 Best API Services To Find Chrome OS from User Agent 2022

Are you looking for Best API Services To Find Chrome OS from User Agent that can help you to identify different devices requesting online content or webpages?
Then you are in the right place. Here, in this post, we have come up with a set of some most advanced & comprehensive APIs. Using one out of this, you can easily detect all the different attributes related to browser & device. These attributes can be anything like OS, device name, browser details, etc.
Further, you know the web is meant to be accessible to everyone, regardless of which browser or the device they’re using. Hence, using this information you can find some ways to develop your site to progressively enhance itself based on the availability of features rather than by targeting specific browsers only. Right?
So, what are you waiting for? Explore the following APIs & choose the best one that fixes your business requirements.
Chrome Os User Agent

Heroku's User Agent Identifier is an add-on to simplify User Agent Identification with its continuously updated user agent parsing library.