Looking for Gmail Import Contacts CSV APIs to convert your CSV file into some other formats like XLS, PDF, etc? Then, your search ends here. Here, we have something to help you out.
Data importing and exporting is an essential part of all business and there is no denial in the fact that we all look for a convenient way to convert our data into the required format. One of the most required formats is CSV( Comma Separated Value) which is used to store the data into a tabular format such as a spreadsheet, and database.
Now, you might be thinking of using some software that can help you to convert your data to or from CSV format to various other formats like Microsoft Excel, Open document format, PDF, TSV, JPG, etc. But, at this point, we’ll suggest you try some CSV converter API for this instead of wasting a huge time & money on software. APIs are easy to handle which smooth the whole process, save lots of time and provides accuracy in the work.
Further, you can easily import, export, and convert files into the required format. Keeping the same in mind, here, in this post, we have listed the Best Gmail Import Contacts CSV APIs available in the market. Have a look at them & choose the best one according to your requirements.
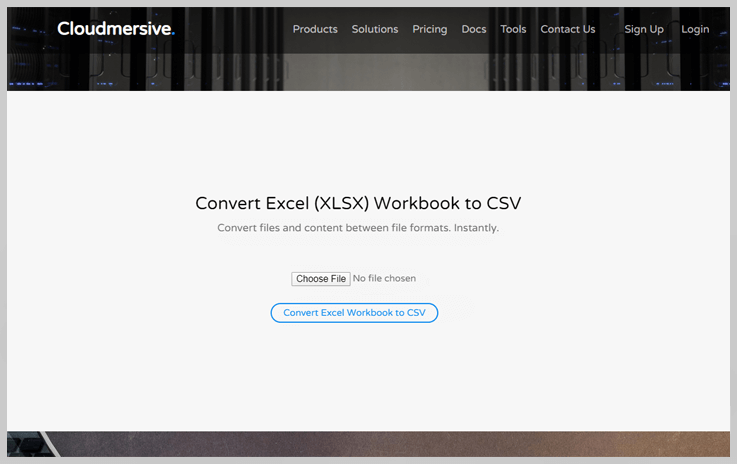
Gmail Import Contacts Csv API

Final Words On Gmail Import Contacts CSV APIs-
Here, we have listed 5 Best Gmail Import Contacts CSV APIs 2022. Using these conversion APIs, you can easily convert your data into the required format like XML, PDF, TXT, JPG, Excel, etc from CSV or vice versa. It will definitely smooth work at your end. So, just integrate it into your website or application in the desired programming language like PHP, Python, GO, etc, and you’re good to go.
For any more queries, get in touch with us. We’ll be happy to hear from you.
5 Best Import CSV Into MySQL APIs 2022

Looking for Import CSV Into MySQL APIs to convert your CSV file into some other formats like XLS, PDF, etc? Then, your search ends here. Here, we have something to help you out.
Data importing and exporting is an essential part of all business and there is no denial in the fact that we all look for a convenient way to convert our data into the required format. One of the most required formats is CSV( Comma Separated Value) which is used to store the data into a tabular format such as a spreadsheet, and database.
Now, you might be thinking of using some software that can help you to convert your data to or from CSV format to various other formats like Microsoft Excel, Open document format, PDF, TSV, JPG, etc. But, at this point, we’ll suggest you try some CSV converter API for this instead of wasting a huge time & money on software. APIs are easy to handle which smooth the whole process, save lots of time and provides accuracy in the work.
Further, you can easily import, export, and convert files into the required format. Keeping the same in mind, here, in this post, we have listed the Best Import CSV Into MySQL APIs available in the market. Have a look at them & choose the best one according to your requirements.
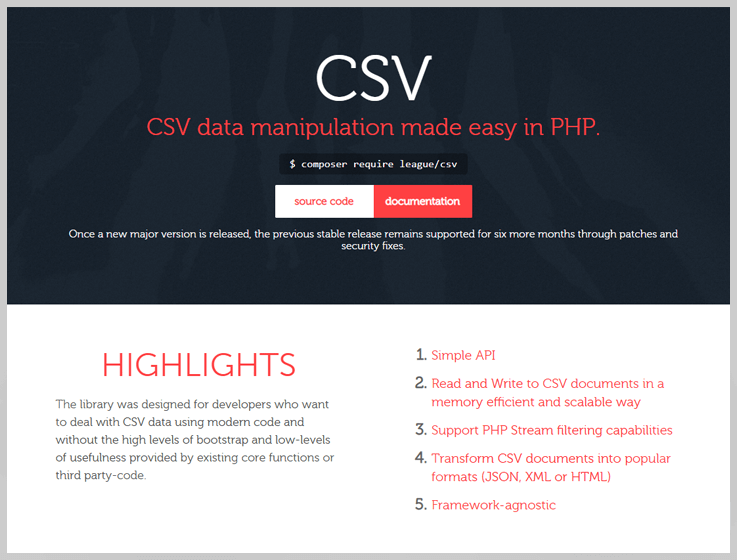
Import Csv Into Mysql API

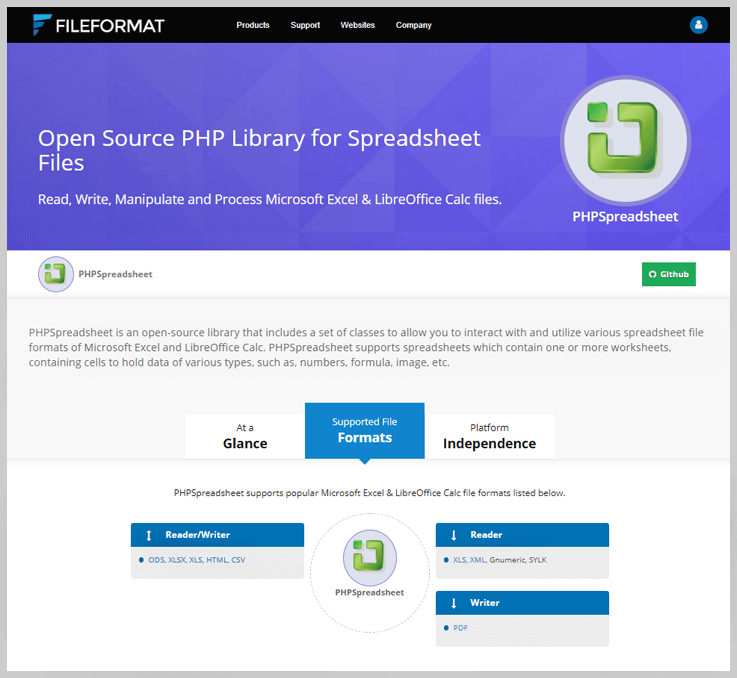
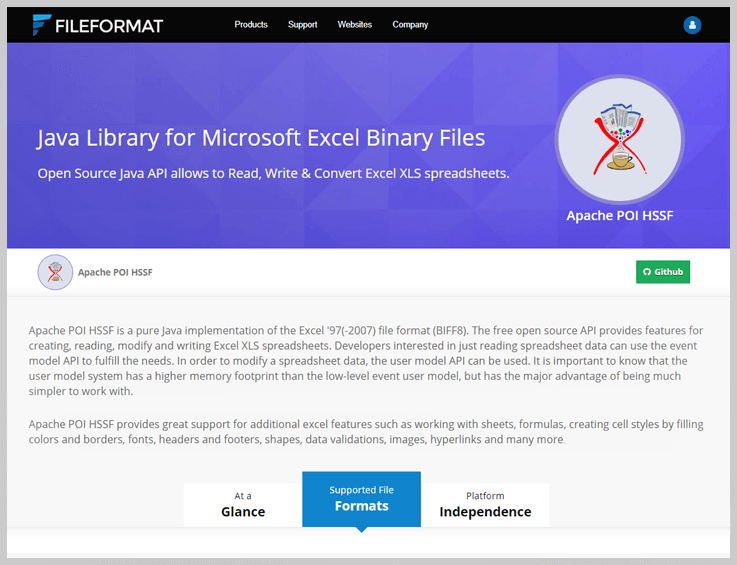
PHPSpreadsheet is an open-source library that contains a set of classes to enable you to interact with and utilize several spreadsheet file formats of Microsoft Excel and LibreOffice Calc.
Moreover, it supports spreadsheets that include one or more worksheets, containing cells to hold data of various types, such as, numbers, formula, image, etc.
Final Words On Import CSV Files Into MySQL API-
Here, we have listed 5 Best Import CSV Into MySQL APIs 2022. Using these conversion APIs, you can easily convert your data into the required format like XML, PDF, TXT, JPG, Excel, etc from CSV or vice versa. It will definitely smooth work at your end. So, just integrate it into your website or application in the desired programming language like PHP, Python, GO, etc, and you’re good to go.
For any more queries, get in touch with us. We’ll be happy to hear from you.
5 Best WordPress Import CSV To Database APIs 2022

Looking for WordPress Import CSV To Database APIs to convert your CSV file into some other formats like XLS, PDF, etc? Then, your search ends here. Here, we have something to help you out.
Data importing and exporting is an essential part of all business and there is no denial in the fact that we all look for a convenient way to convert our data into the required format. One of the most required formats is CSV( Comma Separated Value) which is used to store the data into a tabular format such as a spreadsheet, and database.
Now, you might be thinking of using some software that can help you to convert your data to or from CSV format to various other formats like Microsoft Excel, Open document format, PDF, TSV, JPG, etc. But, at this point, we’ll suggest you try some CSV converter API for this instead of wasting a huge time & money on software. APIs are easy to handle which smooth the whole process, save lots of time and provides accuracy in the work.
Further, you can easily import, export, and convert files into the required format. Keeping the same in mind, here, in this post, we have listed the Best WordPress Import CSV To Database APIs available in the market. Have a look at them & choose the best one according to your requirements.
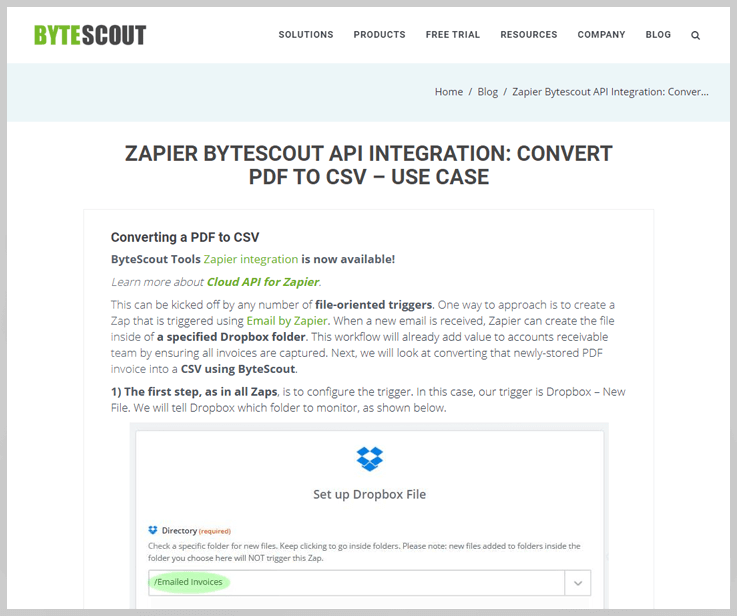
Wordpress Import Csv To Database API

Final Words On WordPress Import CSV To Database APIs-
Here, we have listed 5 Best WordPress Import CSV To Database APIs 2022. Using these conversion APIs, you can easily convert your data into the required format like XML, PDF, TXT, JPG, Excel, etc from CSV or vice versa. It will definitely smooth work at your end. So, just integrate it into your website or application in the desired programming language like PHP, Python, GO, etc, and you’re good to go.
For any more queries, get in touch with us. We’ll be happy to hear from you.
5 Best Export To CSV APIs 2022

Looking for Export To CSV APIs to convert your CSV file into some other formats like XLS, PDF, etc? Then, your search ends here. Here, we have something to help you out.
Data importing and exporting is an essential part of all business and there is no denial in the fact that we all look for a convenient way to convert our data into the required format. One of the most required formats is CSV( Comma Separated Value) which is used to store the data into a tabular format such as a spreadsheet, and database.
Now, you might be thinking of using some software that can help you to convert your data to or from CSV format to various other formats like Microsoft Excel, Open document format, PDF, TSV, JPG, etc. But, at this point, we’ll suggest you try some CSV converter API for this instead of wasting a huge time & money on software. APIs are easy to handle which smooth the whole process, save lots of time and provides accuracy in the work.
Further, you can easily import, export, and convert files into the required format. Keeping the same in mind, here, in this post, we have listed the Best Export To CSV APIs available in the market. Have a look at them & choose the best one according to your requirements.
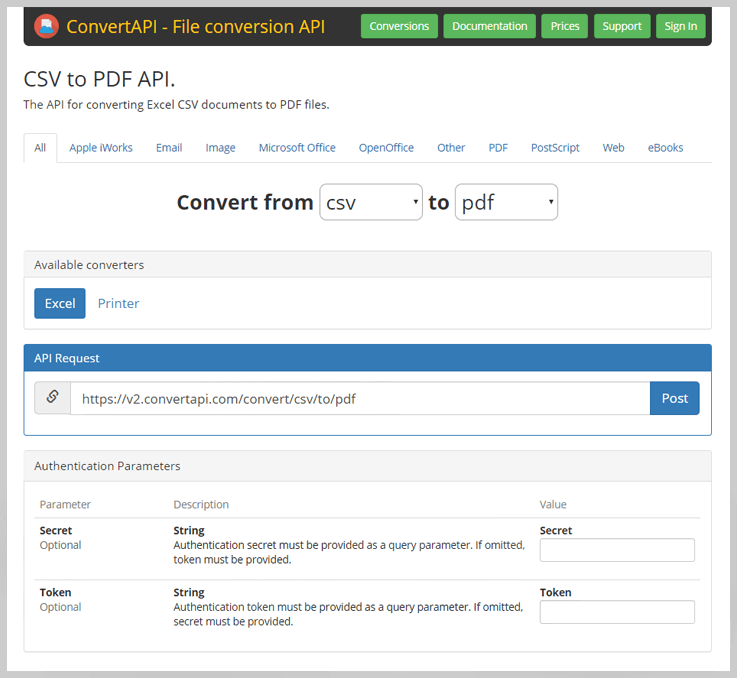
Export To Csv API
PHPSpreadsheet is an open-source library that contains a set of classes to enable you to interact with and utilize several spreadsheet file formats of Microsoft Excel and LibreOffice Calc.
Moreover, it supports spreadsheets that include one or more worksheets, containing cells to hold data of various types, such as, numbers, formula, image, etc.
Final Words On Export To CSV APIs-
Here, we have listed 5 Best Export To CSV APIs 2022. Using these conversion APIs, you can easily convert your data into the required format like XML, PDF, TXT, JPG, Excel, etc from CSV or vice versa. It will definitely smooth work at your end. So, just integrate it into your website or application in the desired programming language like PHP, Python, GO, etc, and you’re good to go.
For any more queries, get in touch with us. We’ll be happy to hear from you.
How To Embed Google Forms In Website?

Once you wind up the process of form creation in Google Forms, the next necessary step is to share it with a large audience. Hence, you might be roaming from here to there, in search of how you can embed Google Forms on a website page. Right?
It is very easy to embed Google Forms either on your WordPress website or in emails. So, in this article, we broke down the entire process of form embedding in a few simple steps.
Google Forms is an excellent free form builder that allows you to embed the form on your website. But, it can’t set up things like the position of form on the webpage, customization of header & footer and submission button of the form etc. Further, it only offers a default dull form embedding option i.e. Full form.
But, if you use another form builder like the Pabbly Form Builder, then you can have different types of form embedding options like full, pop-up, and sliding form. Moreover, it also offers several customization options for form embedding.
So, in this article, I have not only mentioned the steps of form embedding in Google Forms but also provided you with an alternative that allows you to do the same.
Let’s begin…
Steps To Embed Google Forms On A WordPress Website Page:
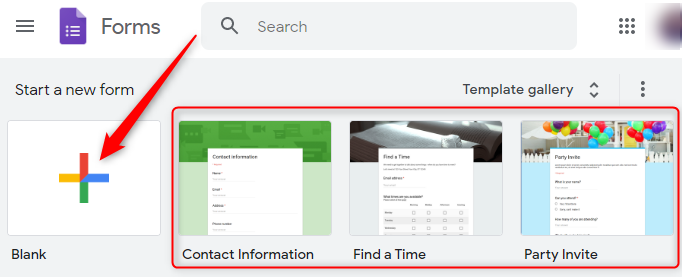
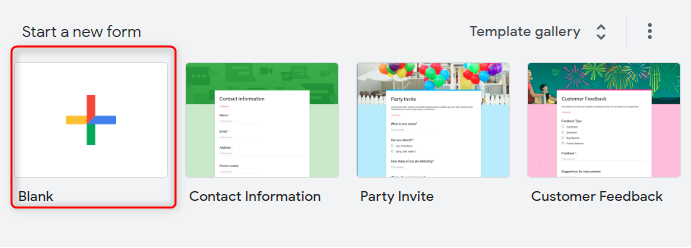
Step 1: Create A Form
Before we get started, you’ll need to create a form.
So, after login to Google Forms, go to the dashboard & click the “Blank” button. In case, if you don’t want to start everything from scratch then, you can also edit the existing templates to ease your task.
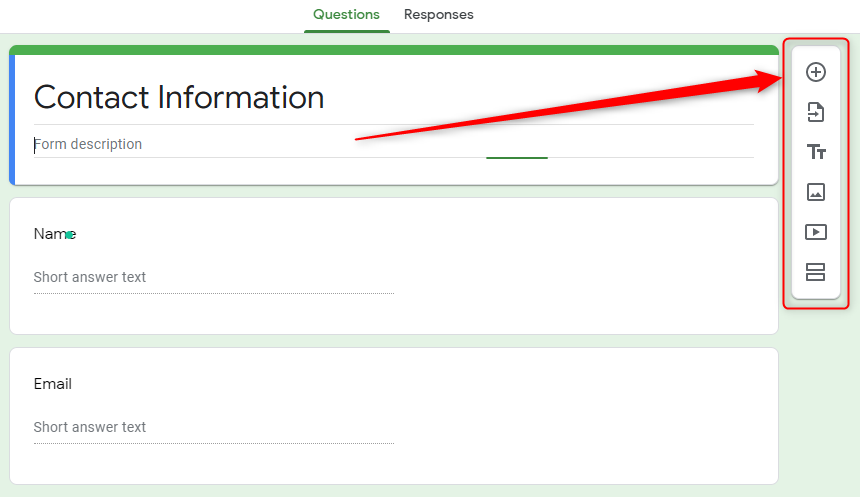
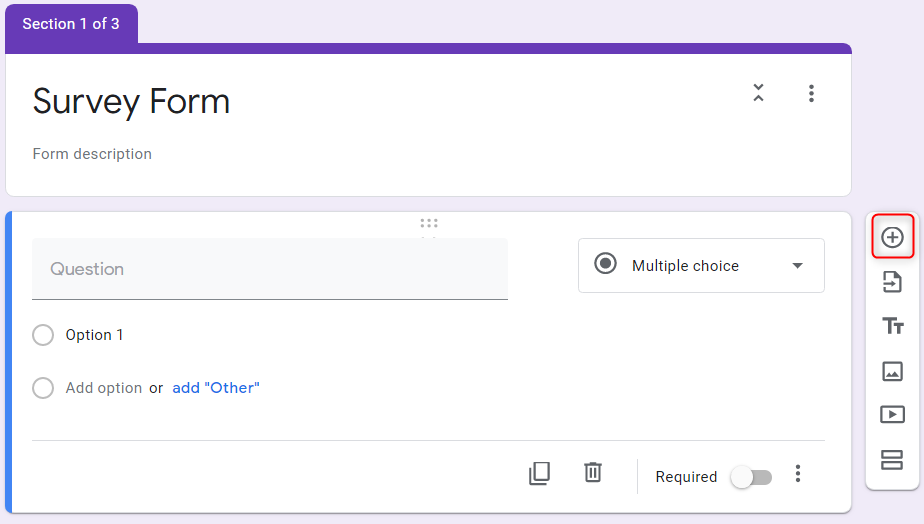
Step 2: Add Questions In Your From
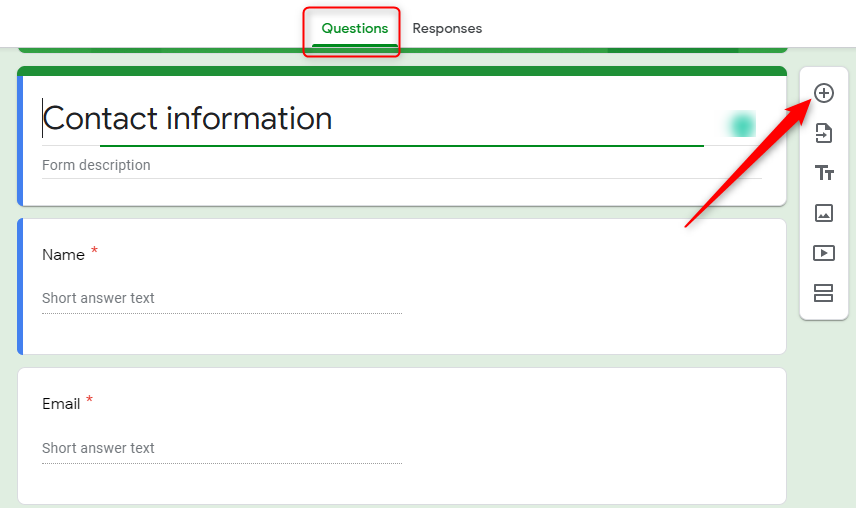
Next, is the round of adding questions into the form depending on your requirements. For this, go to the “Question” tab & click the “Plus” icon to add a new question.
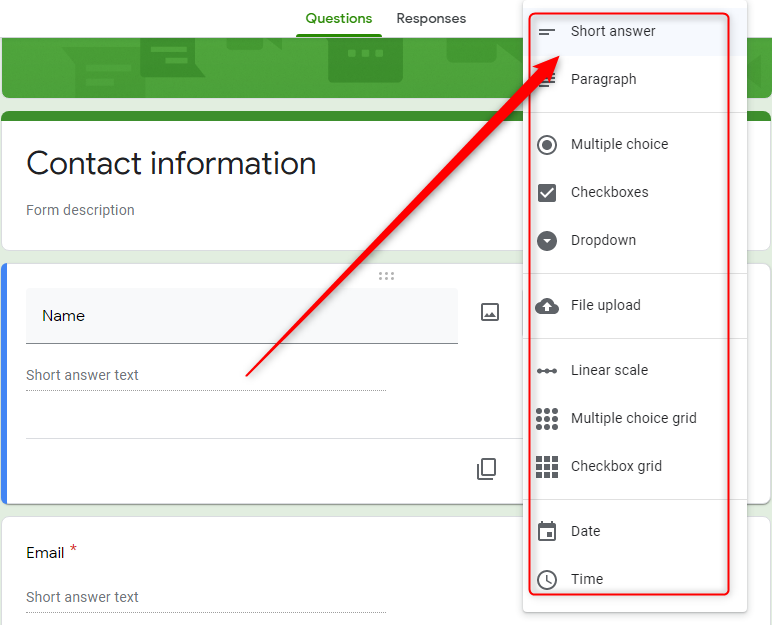
Step 3: Choose The Type Of Answer Field
Subsequently, you can choose different types of answer fields for the questions you made. For this, you have several options like short answers, file upload, multiple-choice and paragraphs, etc.
Step 4: Go To “Send” Option
Once you are done with editing the form, next you need to click on the “Send” button available at the top of the dashboard.
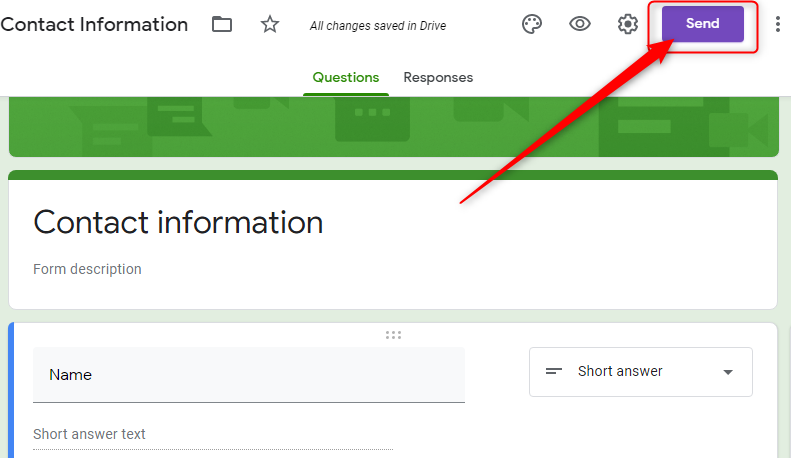
Step 5: Choose The Form Sharing Option
Now, once you open the “Send” tab, there, you will find various options of form embedding like email, HTML script, social media sharing, etc. At this point, what you need to do is select the “HTML script” option.
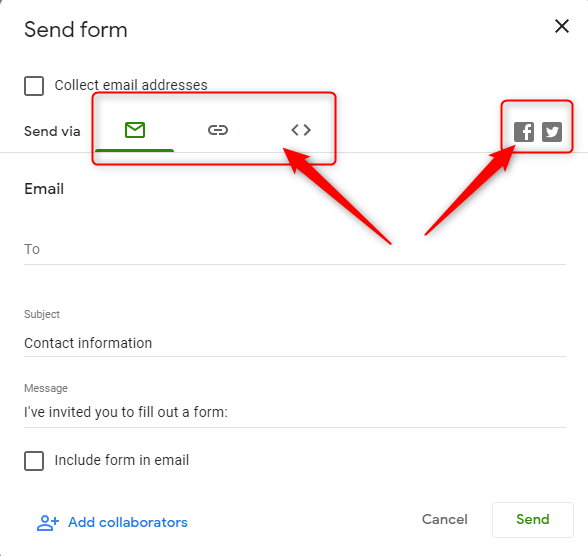
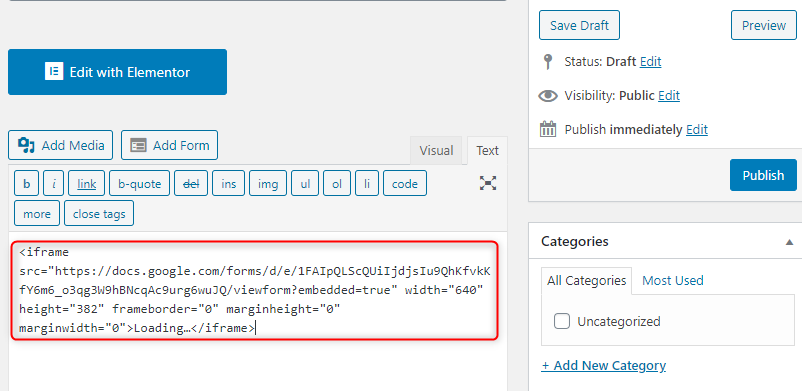
Step 6: Copy The iFrame Shortcode
Now, at this point, you can set up the dimensions of your form to specify how much portions you want to cover with it on the web page. Afterward, just copy the generated iFrame code from here.

Step 7: Paste The Code In Your Site’s Post
Then, all you need to do is paste the code in your WordPress website’s page/post.
Step 8: Save & Preview
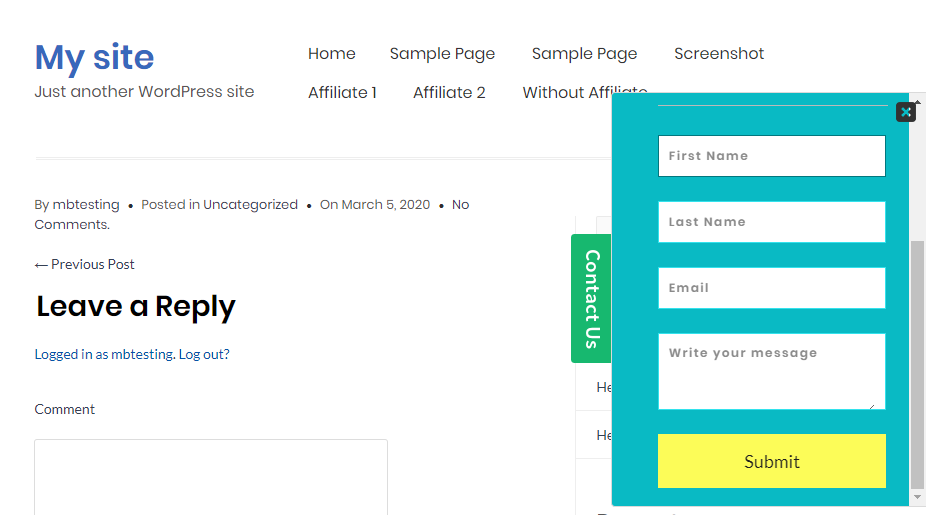
Eventually, you have successfully completed all the necessary steps for embedding the form on your website. Now, you can save all the changes you made on your website & preview it. Below, I mentioned how any form will look on your website page:
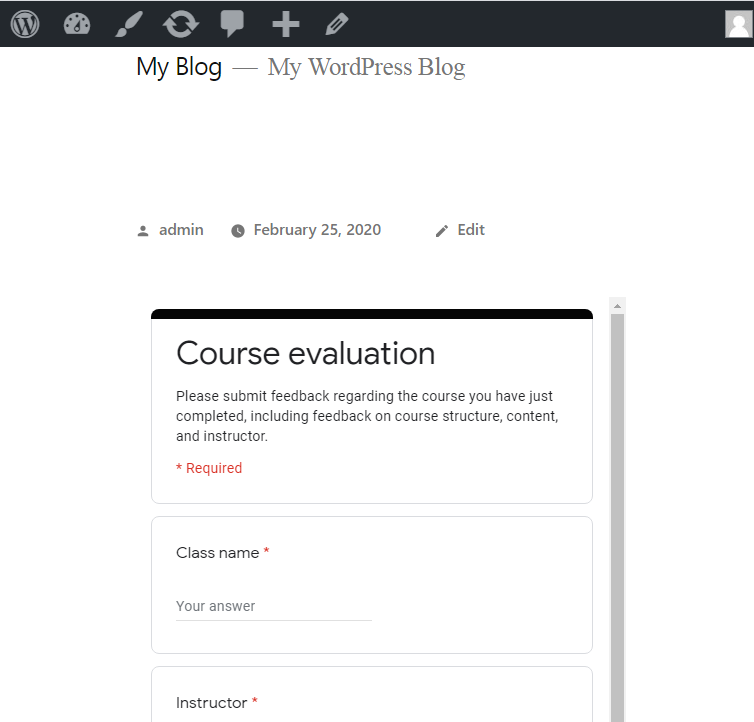
That’s it! you have successfully embedded your Google Forms on the website.
Why Google Forms Is Not The Best Tool For Embedding The Form On A Website Page:
Now, in the above mentioned image, you have seen that the form is covering too much space for your webpage. From this, you might realize that it’s not the efficient method of form embedding in every case. Let’s see why I called it a non-efficient method:
- Google Forms has a default type of form embedding option. It does not allow you to add the form on the website in different ways like sliding or pop-up form.
- Further, it does not allow you to add header & footer in the embedded form.
- It offers fewer options for social media sharing like with only Facebook & Twitter.
- Subsequently, it comes with very few customization options for form like you can’t change the color, style, header, footer & text of the form.
- Another major flaw is, it does not come with the integration of Google Analytics. Due to which you can’t track the details like how many respondents viewed & filled out your form.
- Further, you can not edit the text of the submission button in the form.
How To Overcome These Limitations Of Google Forms?
Here, I would like to suggest you try some other affordable form builder like Pabbly Form Builder for such needs. This tool not only offers multiple form embedding options but also comes with features like unlimited submission, file uploads, storage, and many more. Let’s see why I am recommending you to give a try to the Pabbly Form Builder:
- In contrast to Google Forms, it supports more options for form embedding like full, pop-up, and sliding form.
- Apart from this, it also offers more social media sharing options than Google Forms like Facebook, Twitter, LinkedIn, etc.
- This tool comes with the advanced customization option for the form you want to embed like its position, typography, color, header, footer & button option, etc.
- Besides this, it also comes with the direct integration of Google Analytics for tracking results. Additionally, it has its own built-in Analytics & Reporting feature for the same.
Embed Your Form Using Pabbly Form Builder:
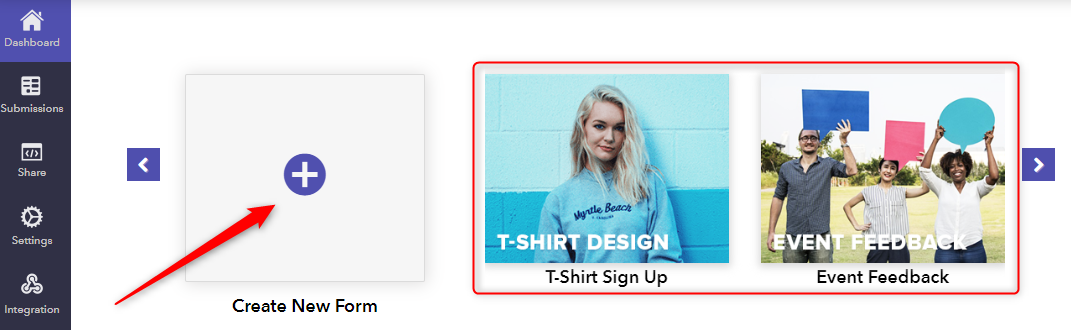
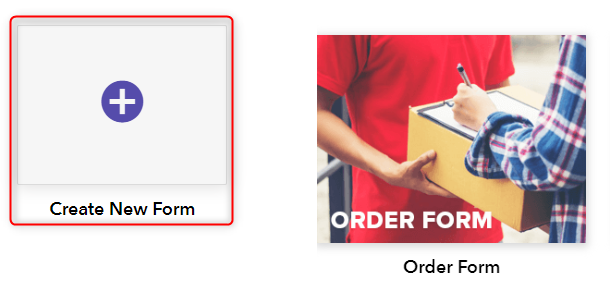
Step 1: Create A New Form
In the beginning, just go to the dashboard of it & select the “Create New Form” option for starting things from scratch. Besides this, you can also “Clone” any of its pre-built templates.

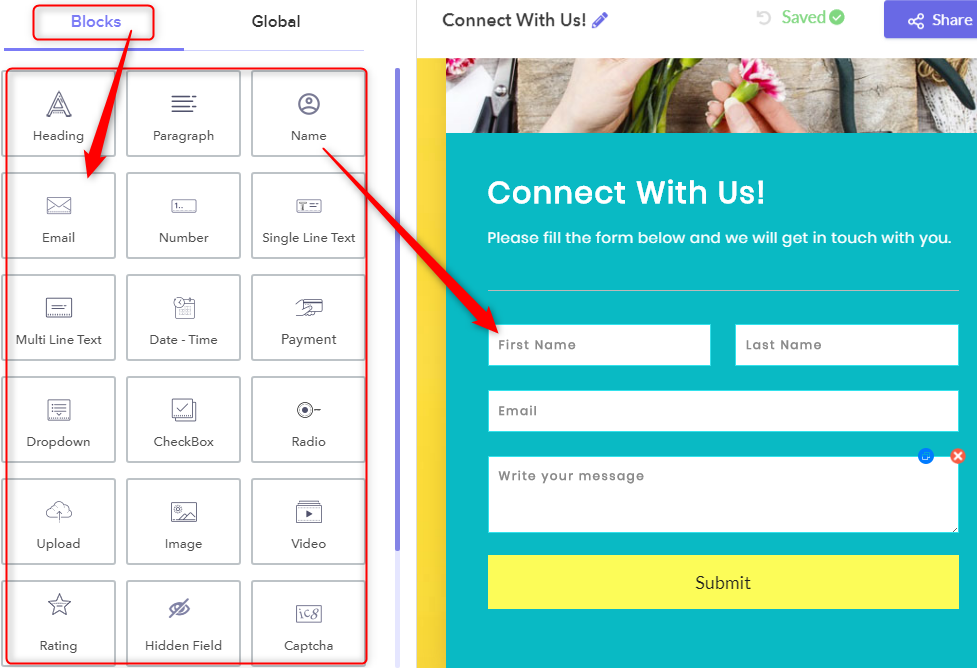
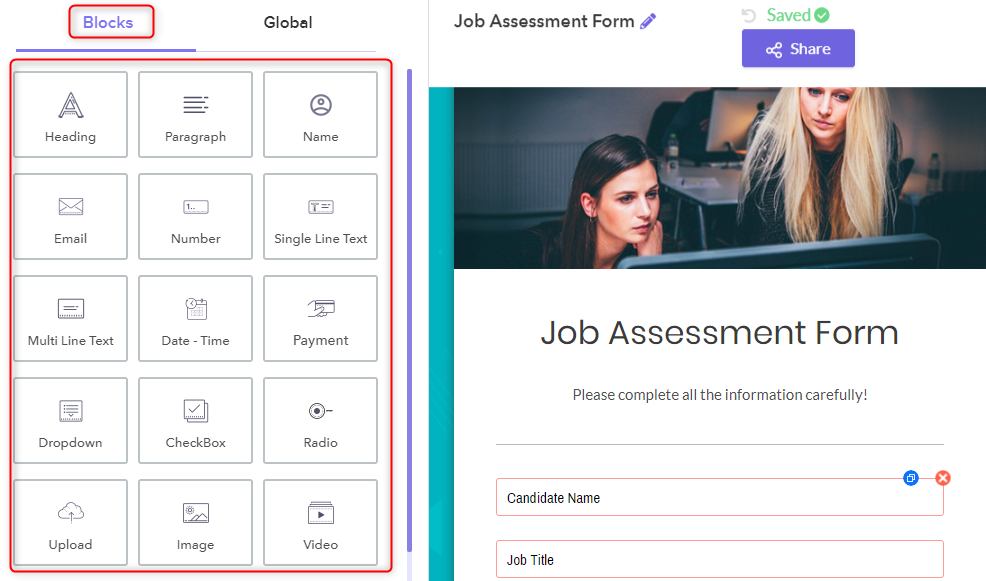
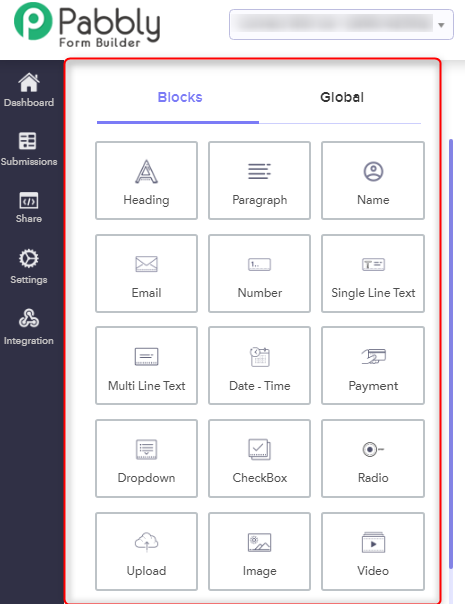
Step 2: Add Form Fields
The next step is about form customization, for this, go to the “Blocks” section of the dashboard. Now, select any desired field items from it & customized it as the way you want.
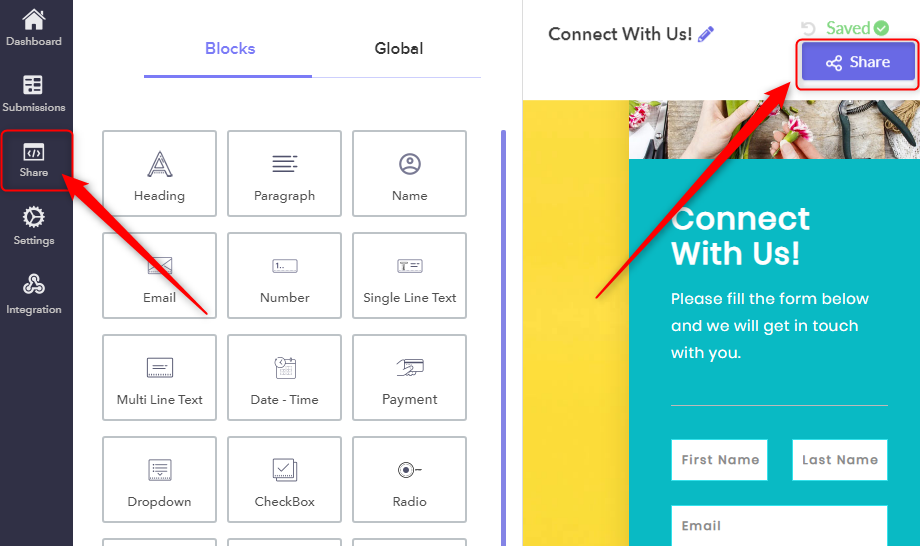
Step 3: Share The Form
Once you complete the process of form customization, next you have to share the form by clicking the “Share” button.
Step 4: Select The Form Embedding Type
Once you entered in the “Share” tab, you will find that you have 3 options of form embedding in:
- Sliding Form
- Full-Form
- Pop-up Form
Now, you can choose anyone out of these options for form embedding depending on the requirements of your website.

But, here in this help guide, I am explaining the steps of embedding form using all the 3 options one by one:
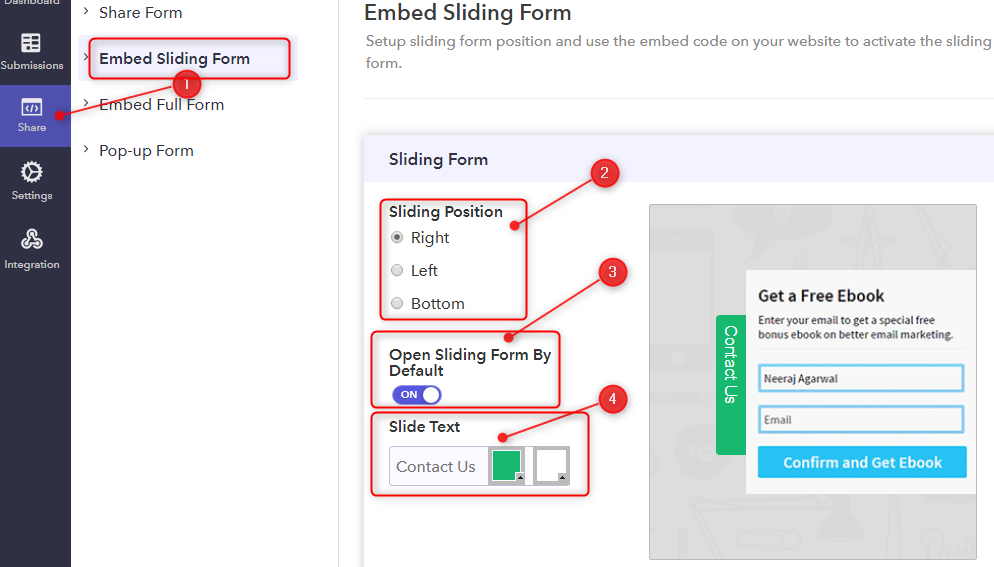
Step 4a: In Case Of Embedding A Sliding Form On Webpage
- Select the “Embed Sliding Form” option.
- Fix the position where you want your sliding form to display. Here, you have 3 options for this i.e. Right, Left, and Bottom.
- Subsequently, toggle the button if you want your form to slide on your website. If you make it “Off” then the form will be not visible to users till they click on “Sliding Text”.
- Further, customize the color of text and background of the “Slide Text”.
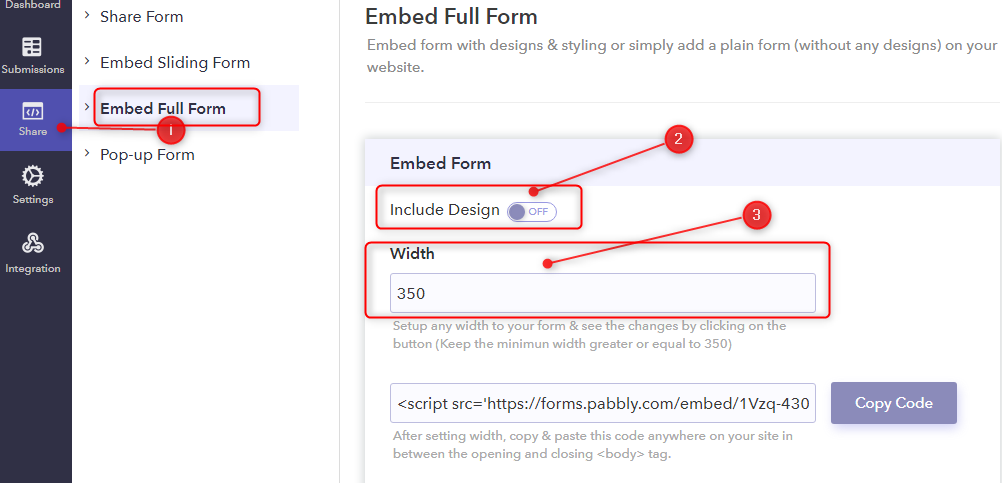
Step 4b: In Case Of Embedding A Full Form On Webpage
- Go to the “Embed Full Form” option.
- Toggle the button if you want to include the design & styling of your form or simply add a plain form on your WordPress website.
- Next, if you want then set the “Width” of form.
Step 4c: In Case Of Embedding A Pop-up Form On Webpage
- Go to the “Embed Pop up Form” option.
- Set up the header color of the “Pop-up Header Text” & its background.
- Further, customize the text of the “Pop-up Button” using which user’s will submit the form.

Step 5: Copy The Shortcode
After selecting & setting up the form embedding type, next you have to copy the Shortcode visible at the bottom of the page. In Pabbly Form Builder, you will find the following types of shortcodes for embedding form on the webpage:
- WordPress Shortcode
- HTML Code
You can use any type of code depending on the website type.
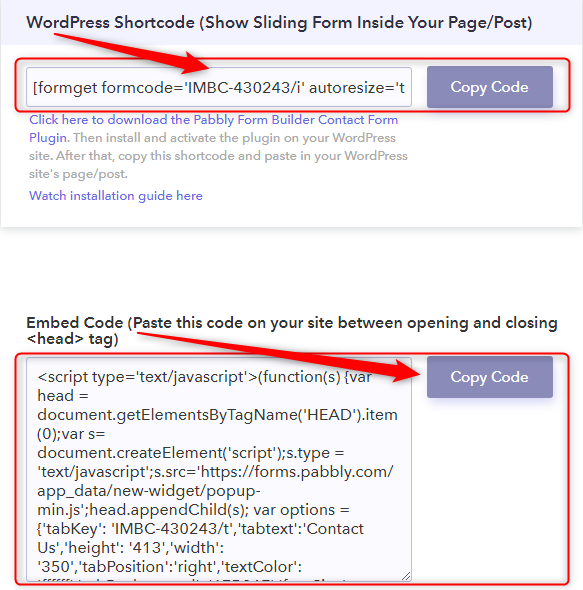
Step 6: Paste The Code In The Post Of Your Webpage
Lastly, simply paste this code in the page/post of your website page and click the “Save Draft” button. Now, you can see the changes just by previewing it & “Publish” the changes.

That’s it! This is how you can embed the form on a WordPress website page using the Pabbly Form Builder.
Step 7: Preview Your Form
As mentioned, with Pabbly Form Builder, you can embed three types of forms on your website. But due to the constraint of both space and time. I will be previewing only the “sliding-type form”
Conclusion
To embed Google Forms on a website is easy if you have gone through the recommended steps. But, due to the deficiencies of embedding features of Google Forms, you will lose potential customers in the long run. That is why I pitched its best alternative i.e. Pabbly Form Builder with its array of embedding options and unparalleled customization features. Come Have a look.
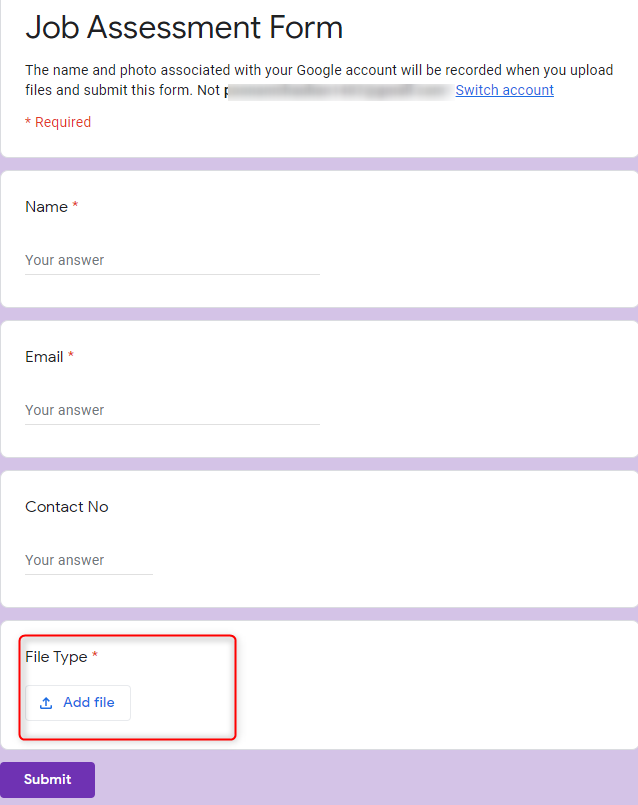
How To Upload Documents Through Google Forms Responses?

If you are dealing in a business where you need to collect client’s documents like resumes, cover letters, portfolios, videos, etc then adding the file uploading feature on your form is indispensable.
However, there is a wide range of file uploading form creators available in the market. And for sure, the first option that might come to your mind is Google Forms which allows a respondent to upload any kind of document in a form.
Undoubtedly, Google Forms has a lot to offer but it does limits users on storage. It only accepts the files from 1MB to 10GB. Also, once the storage gets full, it does not receive more files. That’s why we suggest Pabbly Form Builder as it permits unlimited file storage.
In this article, we will show you how to add an upload field in your form.
Let’s Discuss How Google Forms Can Be Used To Upload Documents On Your Forms
Step 1: Create Your Form
Open the dashboard of Google Forms and then to create a form, click on the “+” icon or you can also use its pre-designed templates too.
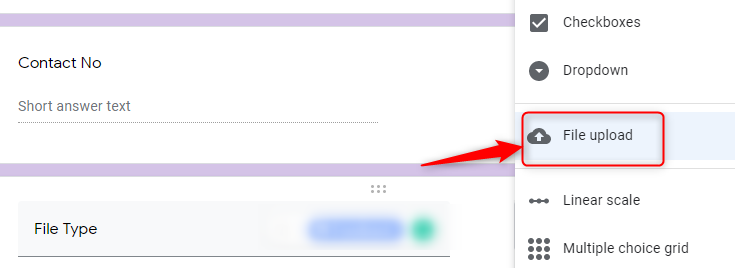
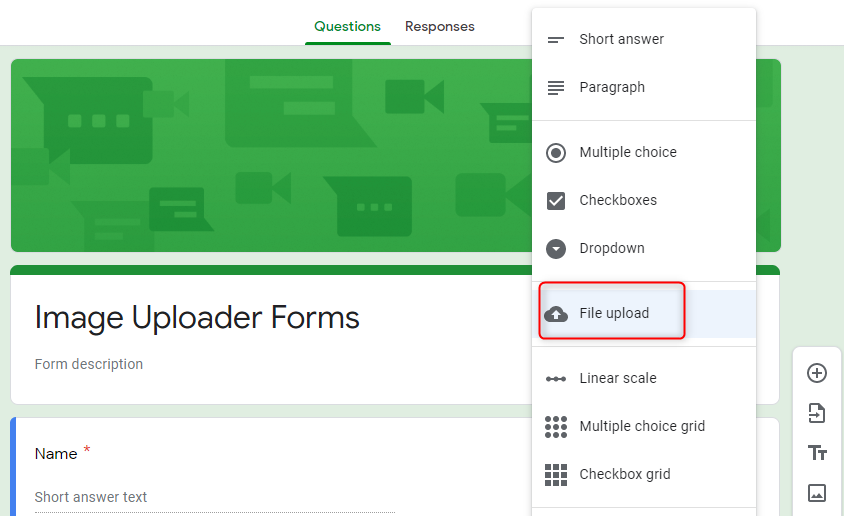
Step 2: Add “File Upload” Field
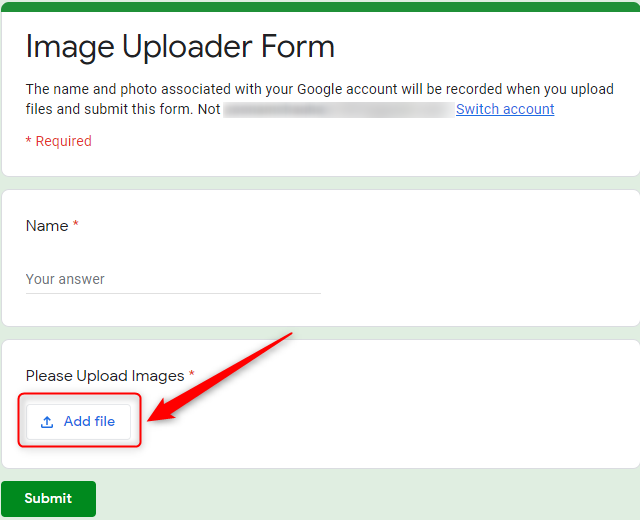
After assigning a name to your form add different fields such as checkboxes, dropdowns, etc according to your requirement. Then, to allow your respondent to attach a document into the form, click on the “File Upload” field.
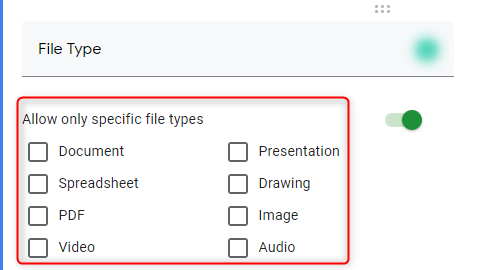
Step 3: Specify The File Types
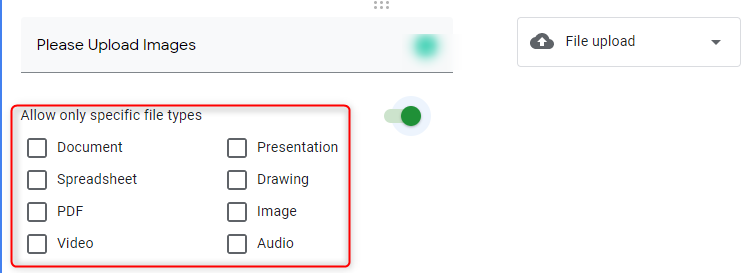
Further, there are a variety of options available in Google Forms such as document, presentation, image, etc. You can specify the file types which you want to accept from the user and it allows you to select multiple options.
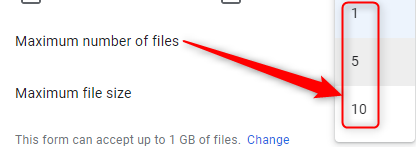
Step 4: Specify File Number
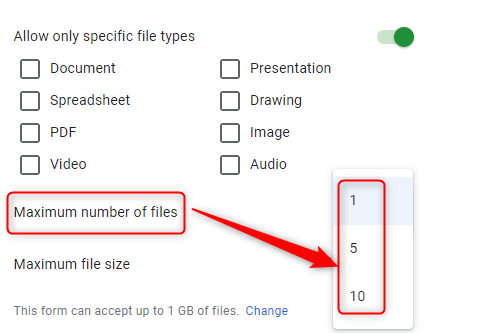
From here, you can specify the number of files, respondents can attach to your form which can be 1, 5 and 10.
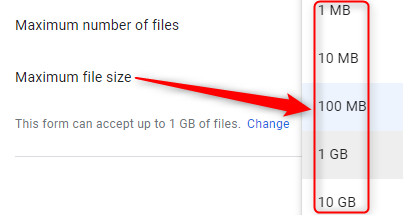
Step 5: Specify File Size
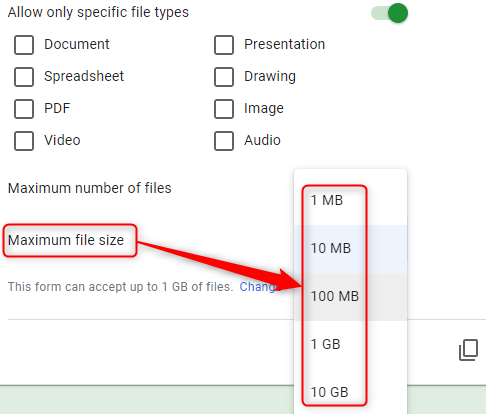
Further, you can specify the size of the file which can be from 1 MB to 10 GB. Also, it offers the limit of 1TB on overall responses which you have to set manually.
Step 6: Preview Form
To view the “Preview” of your form, click on the eye-shaped icon appearing on the top right corner.
This is how you can upload any kind of documents like pdf, docs, etc through Google Forms responses.
Limitations Of Google Forms For File Uploading
Certainly, Google Forms is a great tool but, it somehow fails when comes to storage. Some of its limitations involve:
- The form requires the creator’s Google Drive to store responses which can be an issue if it doesn’t have sufficient space.
- Google Forms restricts overall response when it reaches the demanded limit which is 1TB.
- Further, it does have restrictions on the maximum number of files which can be 10.
- Besides, it demands users to sign-in to fill the form.
Solutions For The Limitations Of Google Forms
As seen above, there are many limitations in Google Forms that can’t be denied. So, here I would like to suggest its alternative named Pabbly Form Builder that streamlines the process by offering unlimited submission, storage, forms and much more.
Let’s cast some lights on its features:
- The software gives you the flexibility to add multiple upload fields in a single form.
- It permits submissions of a file of any size.
- The robust tool is packed with unlimited storage. So, insufficient space is not going to be a problem for users.
- There is no limit on overall responses. However, it gives you an option to set one, if you want to.
- The form builder is integrated with Google Analytics which helps you to understand where you can improvise your form.
- Also, it lets you customize your form by setting a field label name, style, etc.
Now, Let’s See How Pabbly Form Builder Adds Value To Your Document Uploading Form?
Step 1: Create Form
Open the dashboard of Pabbly Form Builder. Then, start by clicking on the “Create New Form” option or simply using its pre-built templates.
Step 2: Add Upload Block
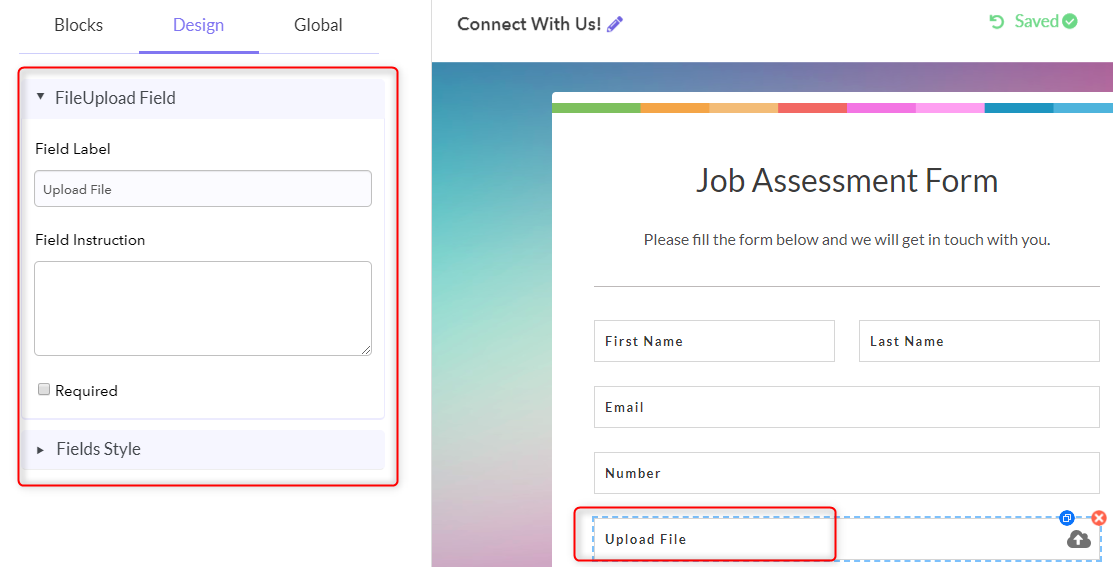
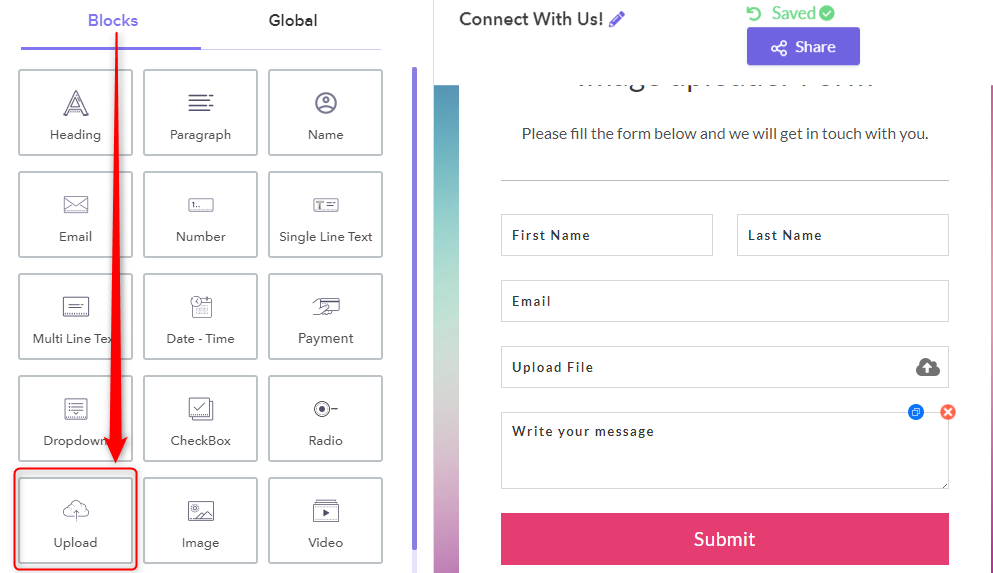
Further, you can add different fields according to your form needs like name, email, etc according to your form needs. Then, click on the “Upload” block to add the file upload field which will help users to attach a document into the form through responses.
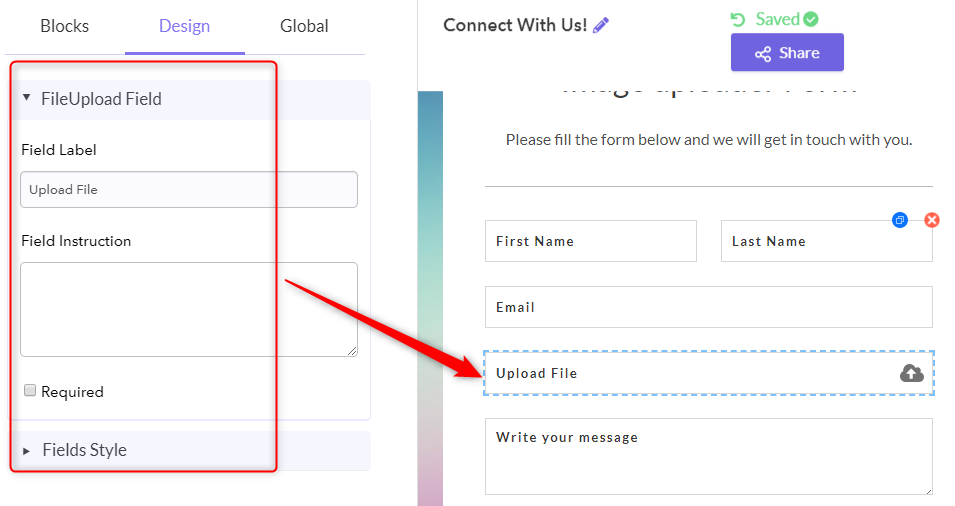
Step 3: Design Options
Jazz your form by doing unlimited customization such as setting field labels, instructions, style, etc of the “Upload” field.
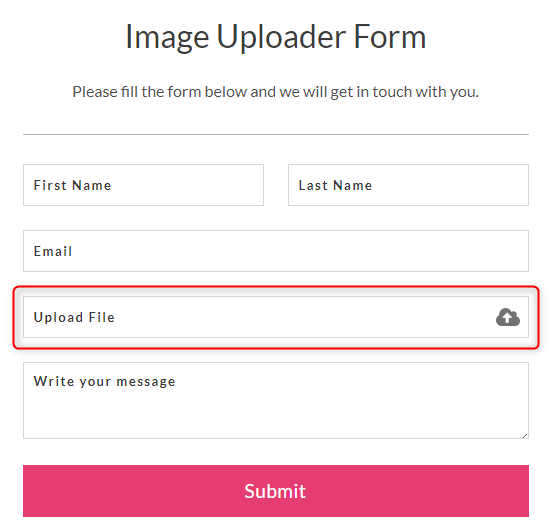
Step 4: Preview Your Form
Once you’re finished with your form, view its “Preview” by clicking on the eye-shaped icon.
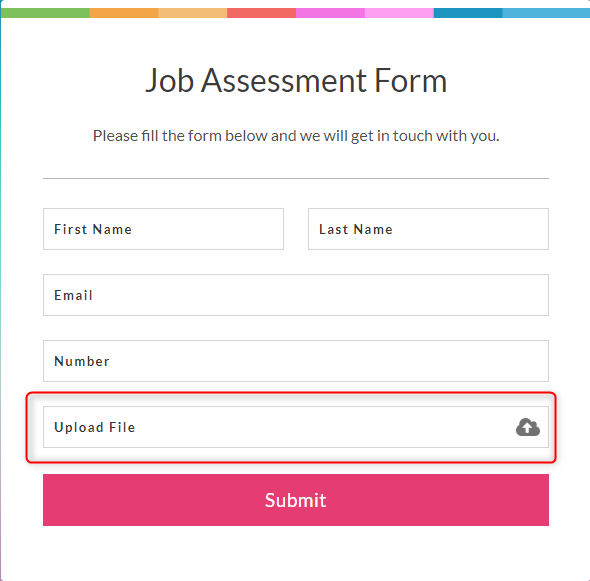
Voila! Your form is ready in no time. Using it, users can attach any kind of document through responses. Unlike Google Forms, here you don’t have to specify the file type manually.
Take Away!
Adding a File Upload field to your form lets you sift through piles of paperwork or track docs across countless email threads. It helps you to manage all your documents in one place securely. By taking the strategic steps as discussed above, you can create your form from scratch. And, yes! You will surely open the doors that will take you beyond the limitations of Google Forms.
How To Respond To Users Who Fill Out The Google Forms?

Responding to users who filled out the Google Forms is a great way to show that the data they submitted is very precious & you care about it.
But, if you are looking for some ways to respond to the user of your Google Forms. Then, in that case, I would like to tell you that it does not provide any dedicated features for doing the same. With it, you are only left with one option i.e. manually composing emails for each respondent.
Moreover, it can only collect, view, & store the data like email addresses of Google Forms responses in different sheets but not more than that.
Are There Any Other Form Makers That Help Us Out?
Yes! There are a plethora of form makers available in the market. But, I would recommend you to give a try to Pabbly Form Builder that comes at a very reasonable price. It has an “in-built helpdesk” feature that gives you the flexibility to view and manage responses at your fingertips.
Also, Pabbly Form Builder doesn’t restrict you on features by offering unlimited submissions, payments collection, uploads, & much more.
Further, it makes responding to users via software a cakewalk. Following are the features:
- The most amazing thing about Pabbly Form Builder is that, you can facilitate the real-time conversation with your prospects using an instant messaging live chat option.
- Further, instead of replying to all the customers individually, you can use its automated “Canned Responses” to give an instant reply to the customers in no time.
- Another important thing is, it gives you the freedom to define your own “Automated Replies”.
- Moreover, it offers flexibility to track down all the previous messages of the customer.
- It also lets you attach & send files to the users as a reply.
- Further, the system is fully automated which lets you send customized emails to each respondent.
- Additionally, you can filter all the incoming messages & entries and categorize them in 4 different ways: Unread Messages, On Hold, Resolved, Partial Submission.
Configuring Pabbly Form Builder To Respond To Users Who Fill Out The Form
Now, let us see how one can simply enable the functionality of responding to users who fill out the form created by Pabbly Form Builder:
Step 1: Create A New Form
To start, click on the option “Create New Form” or you can use its pre-designed templates too.
Step 2: Add Fields Into Form
Further, add fields like name, address, etc according to your form needs.
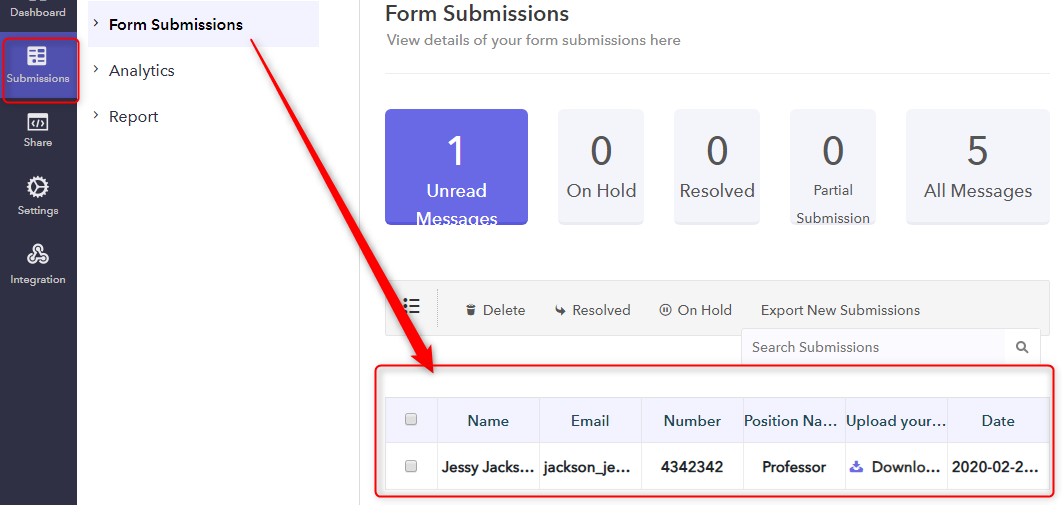
Step 3: Check Form Submissions
Now, go to the “Form Submissions” tab in the dashboard to check all the responses submitted by visitors.
Step 4: Open The Submission To Respond Any User
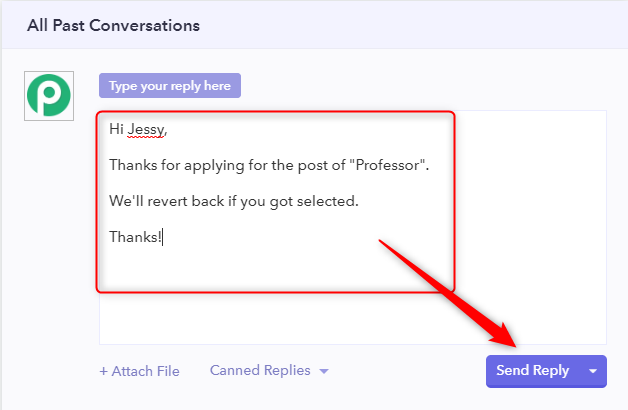
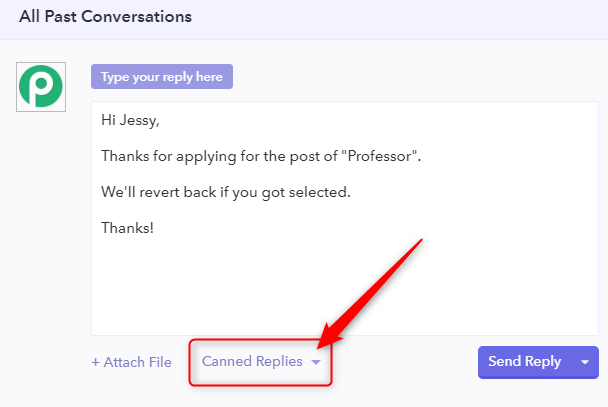
In order to respond to the user, open the submission report of that user. At the bottom of the report, it will display all the past conversations.

Step 5: Compose Personalized Message
To send a customized message, just type your message & hit the “Send Reply” button.
Apart from this, you can also attach & share any type of files/documents using the “+ Attach File” options available at the bottom.
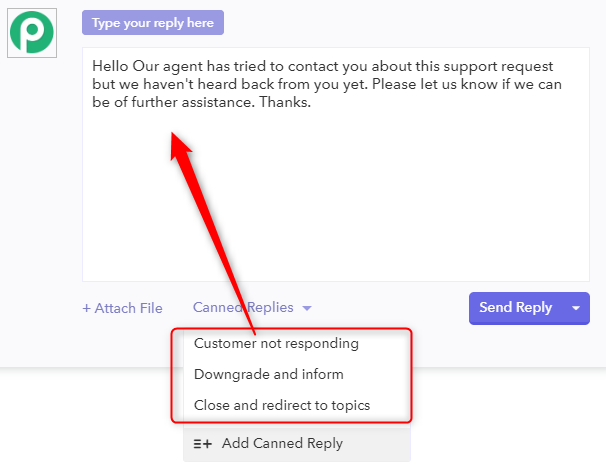
Step 6: Set Up Canned Replies For Automation
Besides this, you can also use the “Canned Replies” option to send an automated response to similar kinds of queries and form entries.
For this, you can either use the pre-built canned response or compose new one very easily.
Step 6.A: Select “Canned Replies” Option
Go to the “Canned Replies” option available at the bottom.
Step 6.B: Use Pre-built Canned Messages
Click on the triangular sign placed beside the “Canned Replies” options. Now, you will see a list of pre-built messages that you can use accordingly.
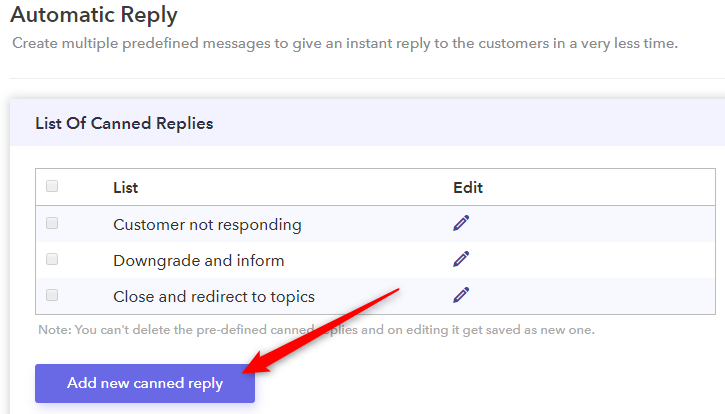
Step 6.C: Add New Canned Reply
Further, you can also compose a personalized canned message by clicking on the “Add New Canned Reply” button.
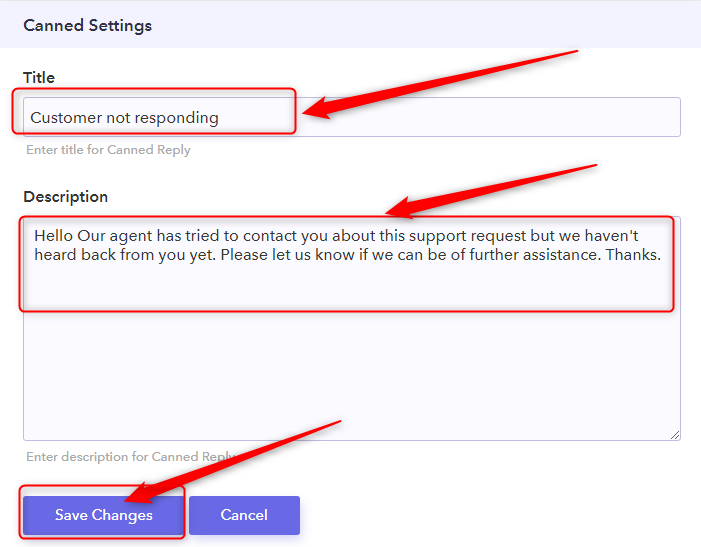
Step 6.D: Compose New Canned Reply
Now, you can type & save the message for future use which will definitely preserve time.
That’s it! Make all these changes and you’re good to go.
Wrapping Up!
Responding to users who fills out your Google Forms is a great way of converting visitors into client instantly.
But unfortunately, there is no such functionality in Google Forms. This free form builder does not support advanced features to view and manage responses.
Hence, I recommend you to give Pabbly Form Builder a try which provides a unique & advanced “helpdesk” feature.
We hope this article has helped you to find the best solution to your problem!
You May Also Like To Read:
How To Hide A Question In Google Forms?

One of the smartest ways for creating more dynamic Google Forms is by hiding the questions that are not relevant to the user.
As the choice of different respondents may vary, asking them a question not related to their choice may not seem a good idea. It might make them skip the question or at worse skip the complete form.
So, it’s better to show corresponding questions based on their previous answer only.
Hereafter, in this blog, I will let you know “How to hide a question in Google Forms”?
To your dismay Google Forms does not provide you with the option to add multiple logics to the same choice, as it allows a section jump to only any one of the other sections in your form.
If you want to add multiple logics to your form, you can do this with Pabbly Form Builder. With this form building application, you can add unlimited logics to your form by choosing from a variety of conditional statements that it offers.
Here’s How You Can Hide A Question In Google Forms
Step 1: Open Form
To get started, open the form in which you want to hide questions. You can also begin by creating a new form.
Step 2: Add A Question
Add the first question that you want to ask and choose the question type as ‘Multiple choice’ or ‘Dropdown’. To add a question, click on the ‘Plus’ button.
Note: The feature of hiding questions in Google Forms works only with ‘Multiple choice’ or ‘Dropdown’.
Step 3: Add Other Sections
To hide the question in Google Forms you must have at least two sections in your form. Add as many sections as required by clicking on the ‘Add section button’.
Step 4: Select Go To Section
Now move to the section where you want to apply the section jump. Click on the ‘More button’ (three verticle dots) and choose ‘Go to section based on answer’.
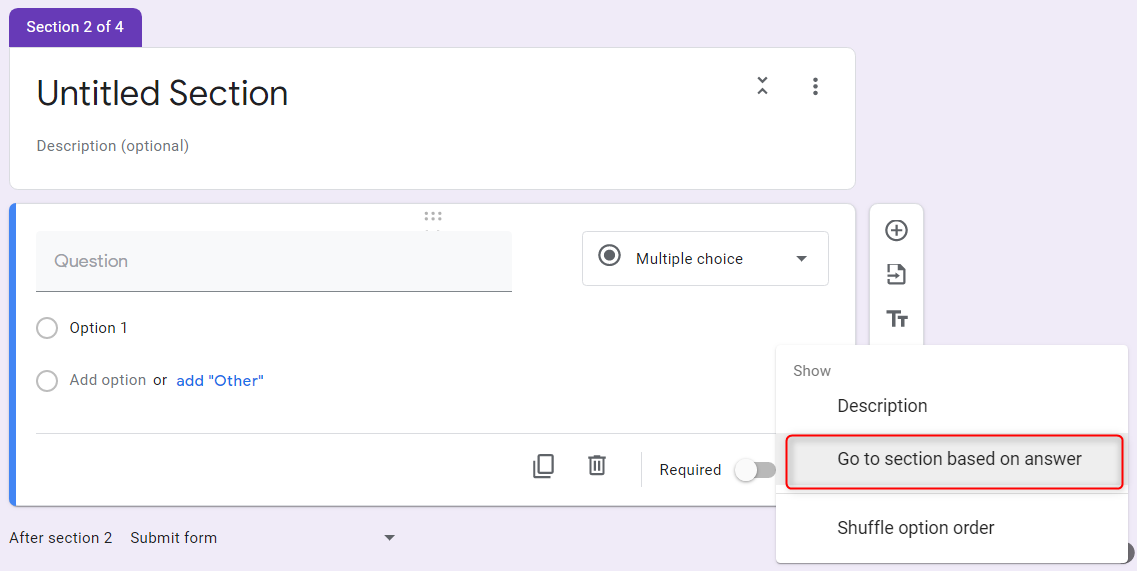
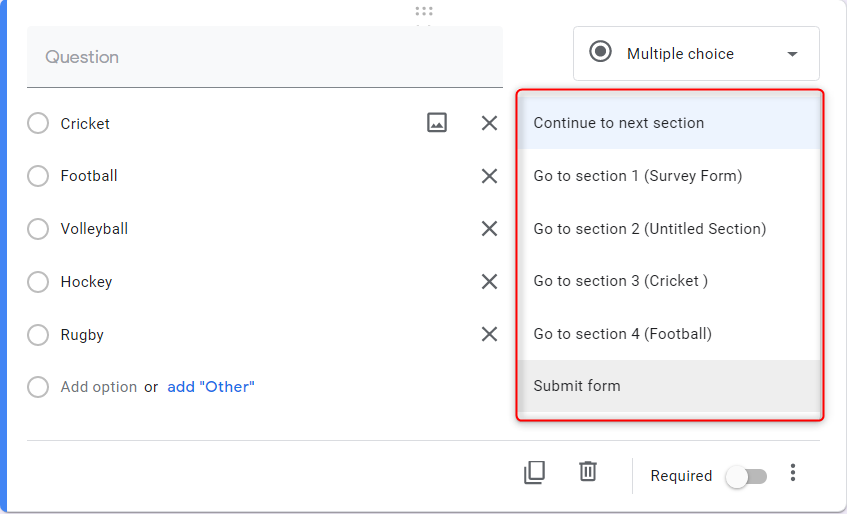
Step 5: Link The Answer To Their Respective Sections
On completing the previous step, a dropdown will appear in front of every option of your ‘Multiple choice’ questions. This dropdown contains all the sections of your form, choose a section to which you want to make the jump. You can also choose the ‘Submit form’ option whenever you want to end the survey.
Limitations Of Hiding Question In Google Forms
- If you want to add complex nested questions in Google Forms you can not do that.
- Conditional logic in Google Forms works only with ‘Multiple choice’ and ‘Dropdown’ options.
- Another drawback of Google Forms is that it offers very limited design and customization options.
Best Option To Hide Questions With Advanced Logic
There are a lot of other form builders available in the market which provide much more worthier features than Google Forms. One such form builder is Pabbly Form Builder.
It is a simple yet effective form building application that allows you to seamlessly add advanced logic to your forms.
Furthermore, this is the only Form Builder that comes with no restrictions on features which means you get unlimited features with a single plan.
With Pabbly Form Builder You Can:
- Add endless logics to create nested questions in your forms.
- Integrate multiple logics to create advanced logic.
- Add conditional logic not only to ‘Multiple choice’ and ‘Dropdown’ but also to ‘Radio’, ‘Paragraphs’, ‘Uploads’ and many other question types as well.
- You can create customized forms to reflect your brand by choosing from the drag and drop builder and pre-built designing templates.
Here’s How You Can Add Conditional Logic In Your Pabbly Form Builder
Step 1: Create A Form
To get started in Pabbly Form Builder, click on ‘Create New Form’ or choose from the prebuilt templates.
Step 2: Add Fields To Form
Now, add the required fields in your form. To add a field, choose from the ‘Blocks’ available on the left side of your Pabbly Form Builder dashboard. Further, specify your questions in these fields.
Step 3: Add Logic
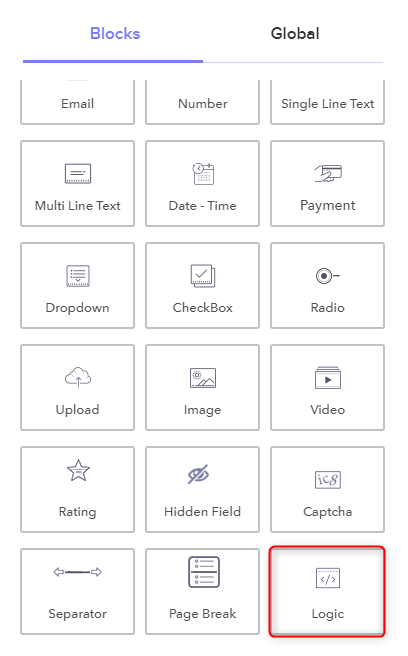
To add logic in your form, click on the ‘Logic’ option in the ‘Blocks’.
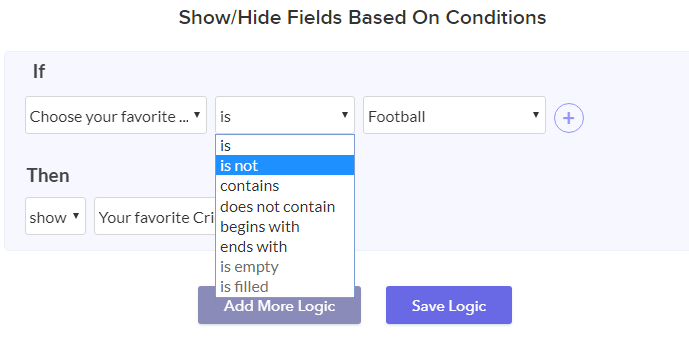
Step 4: Use of If/Then
A pop-up will now appear with the heading ‘Show/Hide Fields Based on Conditions’. The pop up includes two categories namely If and Then. When you click on these, a dropdown will appear showing you predefined conditions. Select the condition according to your need.
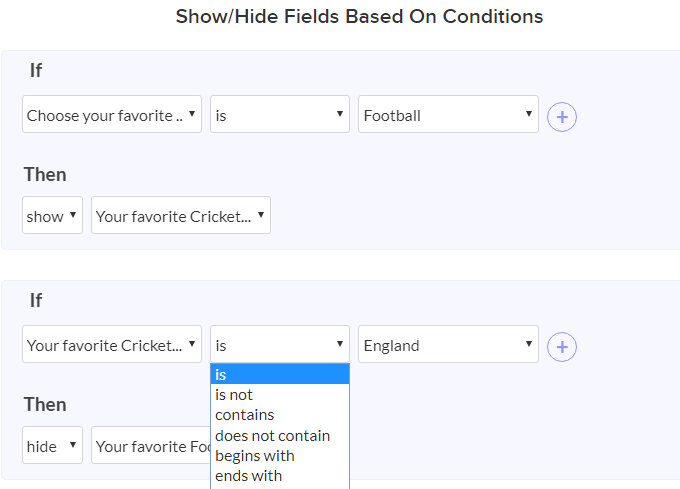
Step 5: Adding More Logic
Now, if you want to add multiple or advanced logic you can do so by clicking on the ‘Add More Logic’ button available at the bottom of the pop-up menu.

On clicking on ‘Add More Logic’ another If/Then section will be added.
Step 6: Save Logic
When you are done with adding logics, save them by clicking on the ‘Save Logic’ button present next to ‘Add More Logic’ button.

And that’s it, adding logic to your form will be completed.
Conclusion
I hope after reading this blog you got the answer to your question ‘How to hide a question in Google Forms’? Also, now creating dynamic Google Forms will be a lot easier for you.
If you are looking forward to creating more responsive forms and reduce the abandonment rate of your forms than hiding fields/questions in your form will be the best option.
You May Also Like To Read:
How To Allow Image Uploads In Google Forms?

Want to know more about image uploads in Google Forms?
Many times while conducting surveys or online competition, the form creator needs to gather images or documents from customers. For doing the same, they look for a tool that offers the file upload field in a form. Keeping our needs in mind, the very first software strikes is Google Forms that lets you build any type of form for free.
The software offers to upload documents, photographs, and videos into your form.
Without a doubt, Google Forms streamlines the procedure of form creation yet it somehow fails users on storage. All the files uploaded on Google Forms go directly in the form creator’s drive which can be an issue if he/she doesn’t have enough space in their drive.
Considering the limitation mentioned above, you can switch to Pabbly Form Builder which fulfills all your requirements by offering unlimited storage.
So, if you’re a newbie and want to know how to create an image upload form in Google Forms then, this article is for you.
Here’s A Step-By-Step Guide Of Adding Upload Field
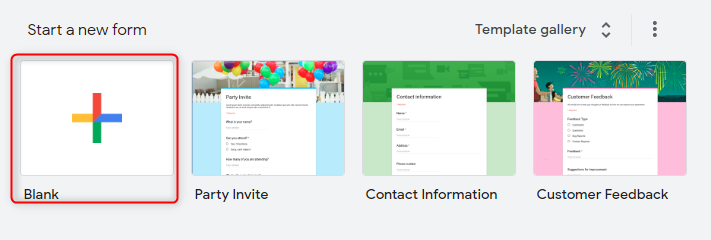
Step 1: Create Your Form
To create a form, click on the “Blank” options or you can use the available pre-built templates too.

Step 2: Add File Upload Option
After assigning a name and description to your form, all you need to do is add the “File Upload” option from the drop-down menu.
Step 3: Specific File Type Option
Toggle the ‘Allow only specific file types’ field on, which will offer a variety of options. Further, select the fields accordingly.
Step 4: Maximum Number Of Files Option
Here, you can specify the number of files, you want from users’ end. At the moment it can be 1, 5 or 10.
Step 5: Maximum File Size Option
Further, from here you can specify the file size which can be from 1 MB to 10 GB.
Step 6: Preview Your Form
To preview your form, click on the eye-formed symbol in the upper-right corner.
Limitations Of Google Forms
Apart from its “Free tool” title, it abandons users with vast needs. Some of image upload limitations of Google Forms are mentioned below:-
- The users are not allowed to upload unlimited images. Due to its limited storage, it only accepts the files from 1MB to 10GB.
- Further, the form creator must have enough space in their Google drive. As it automatically stops receiving responses due to insufficient space.
- Moreover, it has limits of 1TB on overall responses. After a required limit, it won’t accept further responses.
- Also, the form creator and respondent must have to sign in to their Google account.
Solutions For Google Forms Limitations
As already mentioned, the alternative to Google Forms named Pabbly Form Builder which offers unlimited submission, storage and much more. Some of its perks regarding file upload field are mentioned below:
- One of the benefits of the software is, it doesn’t restrict users on storage.
- Here, you don’t have to specify the file type manually. It gives the flexibility to upload any type of file.
- There is no restriction on the file upload field. You can add multiple upload fields in a form.
- Using the customization option, you can change the font, width, field label name, etc of the upload field.
- There is no need to sign-in to fill the form which makes it easy for both surveyor and respondent.
Let’s dig deep into all these features by creating an uploading form in Pabbly Form Builder.
How To Create Image Uploading Form Via Pabbly Form Builder
Step 1: Create Your Form
To create a form, click on the “+” icon or you can use pre-defined templates too.

Step 2: Add Upload Field
Further, drag the “Upload” block to add an image upload field to your form.
Step 3: Design Field
Using the “Design Field”, you can set field labels, instructions, style, etc.
Step 4: Preview A Form
Once your form is completed, preview your form by clicking on the eye-shaped icon on the left side.
That’s it! Your form is now ready to accept images from your audience.
Wrap Up!
At last, everything comes down to what you opt for.
Here is our consistently modern guide for comparing both the form builders in a fair-minded way. Google Forms bestows an unending list of features but it also has a few limitations that I mentioned earlier.
Consequently, to assist you with picking the best, I recommend its alternative to create amazing forms at a very reasonable cost.
We suggest you to try this tool once for the better.
You May Also Like To Read:
How To Add Non-YouTube Video To Google Forms?

Due to some reasons, there are many quality vloggers whose videos get banned by YouTube. Furthermore, there are organizations, regions and even countries that restrict access to YouTube videos. Hence, in such cases, you won’t be able to add YouTube videos to your Google Forms.
You may think ‘If not YouTube videos, maybe I can insert alternatives like Vimeo or Dailymotion videos to Google Forms?’
Unfortunately, you can’t add non-YouTube videos to Google Forms.
So, Can Any Google Forms Alternative Add Non-YouTube Videos In Their Forms?
Yes, there are some form builders that allow inserting non-YouTube videos to their forms.
Here, I am calling attention to one such incredible form creator i.e. Pabbly Form Builder that lets you add non-YouTube videos like Vimeo and Dailymotion to its form.
Try Pabbly Form Builder for Free
- Not only just Vimeo and Dailymotion. You can bring diversity to your form by adding videos from Liveleak, Dtube, Veoh, BitChute and even videos from gaming sites like Twitch.
- Adding the videos to Pabbly Form Builder is effortless. All you need to do is copy the video link and paste it on the form builder.
- Moreover, Pabbly Form Builder doesn’t believe in restrictions. You can add an unlimited number of videos to your form from YouTube and non-YouTube sources.
Hence, in this article, I am going to explain the procedure of adding non-YouTube videos to Pabbly Form Builder.
Steps To Integrate Non-YouTube Videos To Pabbly Form Builder:
Step 1: Create New Form
Sign in to your Pabbly Form Builder account. In its dashboard, you can choose from a plethora of beautiful inbuilt form templates. Just create a new form by clicking on the (+) sign.
Step 2: Select Video Field
In the left corner, you will find the “Blocks” section, it contains various fields. Click on the video field and the video field gets placed on the form.
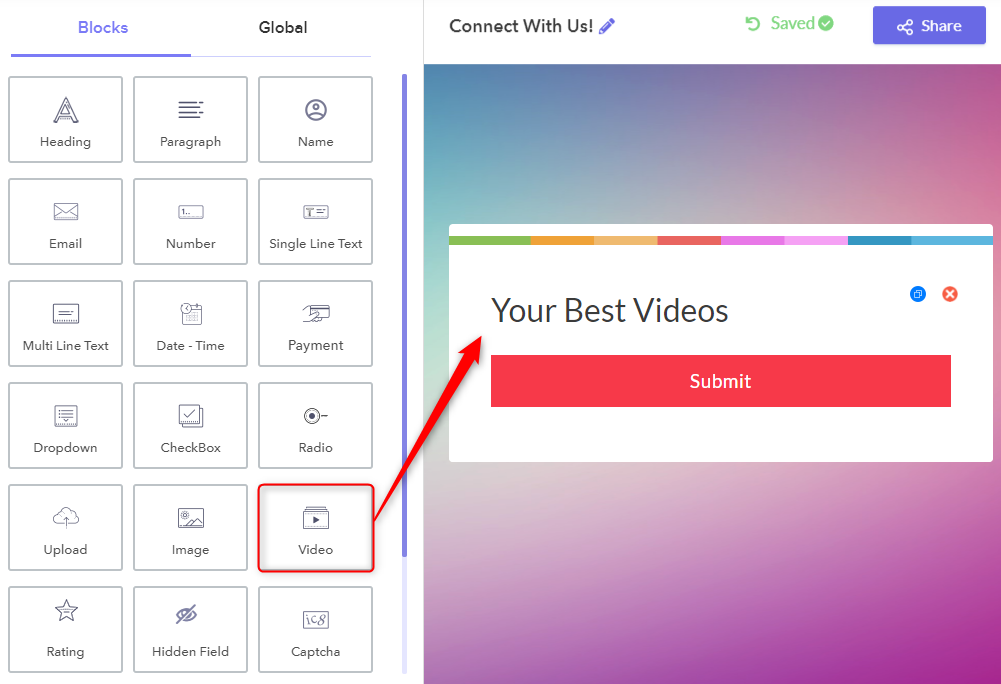
Step 3: Add Video Sharing Platform
When you click on the video field in the form, the design box opens in the left corner. Here, in the design box when you click on the ‘Source’, a drop-down box emerges which contains platforms like YouTube, Dailymotion, Vimeo, and custom.
You can select any video sharing platform according to your discretion. For example, I am selecting Dailymotion whose videos I am going to add on my form. By the same method, you can also add YouTube videos to Pabbly Form Builder.
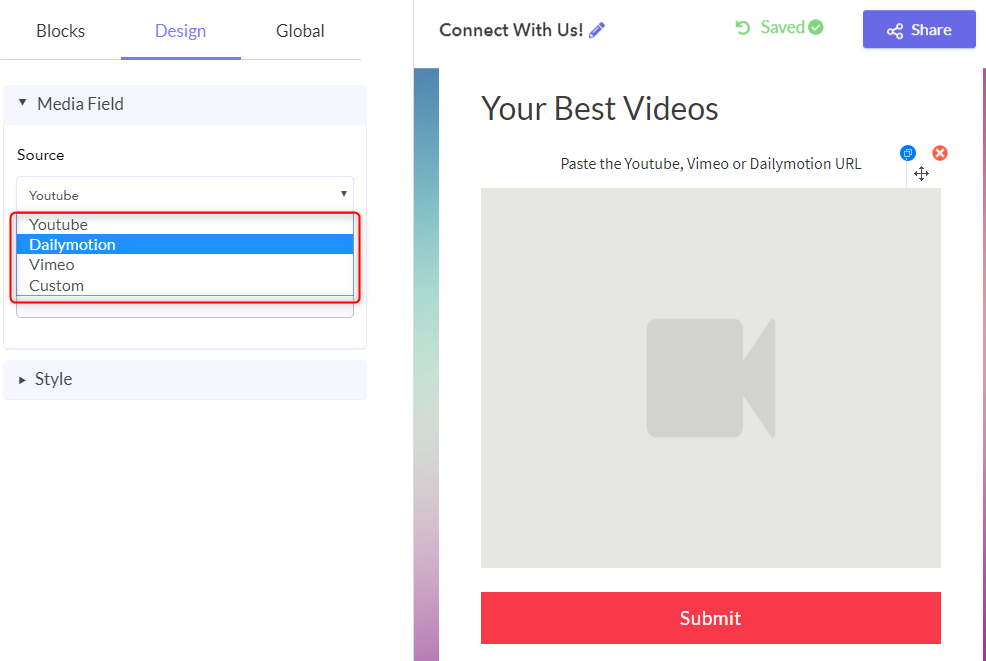
Step 4: Copy And Paste URL
Now, go to the video source, copy the URL and paste it into the URL section. See, for example, I have pasted the URL of the Dailymotion video which I want to add on my form. Once your URL is pasted into the section, Pabbly Form Builder immediately presents the video on the form.

Step 5: Add Custom Videos
The unique advantage with Pabbly Form Builder is that it doesn’t restrict you just with established video sharing sites like YouTube, Dailymotion, and Vimeo. You can add videos to your form, from non-mainstream websites too. This is done by selecting the “Custom” option from the source’s dropdown. Now, in the URL section, paste the source of your video.

Conclusion
At present, you can’t add non-YouTube videos to Google Forms. Meanwhile, there are many affordable form creators like Pabbly Form Builder that lets you insert unlimited videos from all video hosting sites in its forms. While your business is growing, you shouldn’t wait for Google to fix its limitations. So, take a leap of faith and give Pabbly Form Builder a try by signing up for a free account.
You May Also Like To Read:
How To View Submitted Google Forms Answers?

Many times form respondents want to view the submitted Google Forms. This is a necessity if users want to make sure whether they answered all fields correctly or not.
So, keeping the same in mind, it offers the feature where users get a copy of the submitted response via email notification.
Google Forms doesn’t let its users view the uploaded file which is one of the biggest drawbacks. As, it is an essential feature for respondents to verify whether they have uploaded the correct document/files or not.
Hence, we recommend you to try its alternative which is Pabbly Form Builder that lets you view uploaded file and you can also download it in PDF format. Further, you can easily get along with your respondendent using its advance response receipt features.
In this particular article, I am going to teach how one can view submitted responses in Google Forms.
So, let’s get started…..
Steps To View Submitted Response In Google Forms
Step 1: Build A Form
To create a form, click on the “Blank” button. Further, you can use its pre-designed templates too.
Step 2: Add The Fields
Next, to add fields click on the “Plus” icon. Further, you can add different form elements such as file upload section, images, videos, etc. according to your form needs.
Note: Your form must include an email field so, that user can put their email (where they will receive the replica of their submission).
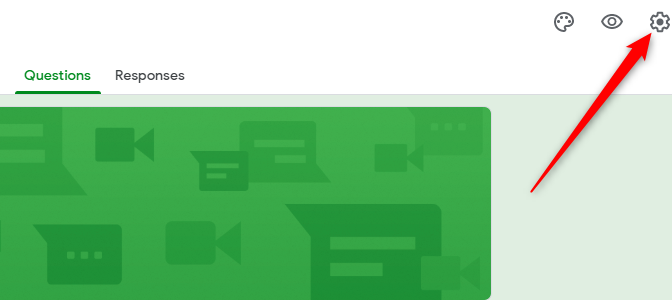
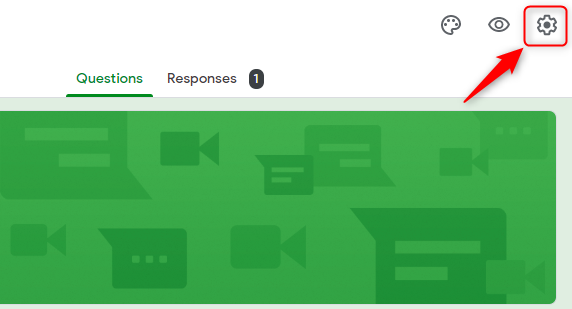
Step 3: Go To Gear Icon
Now, click on the “Gear” icon at the top right corner.
Step 4: Settings Option
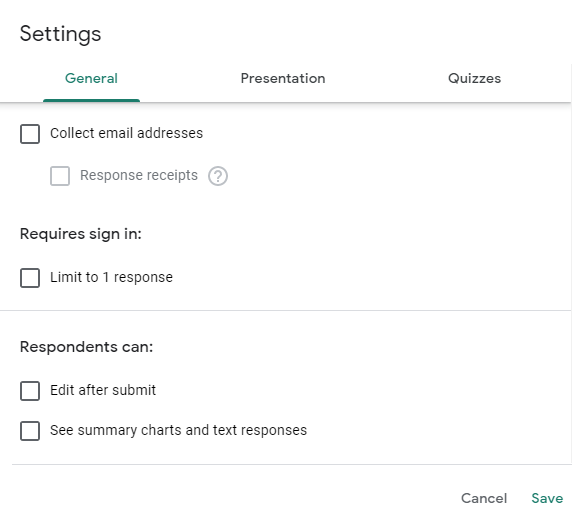
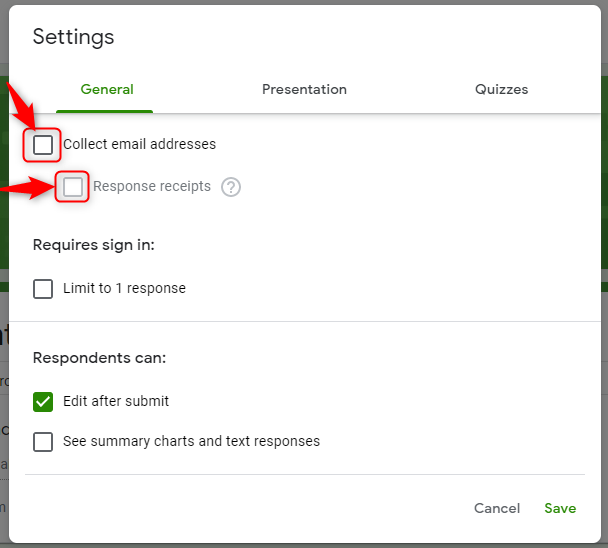
Further, it will open a pop-up window where you will find options like collect email addresses, response receipts, require sign in and a lot more.
Step 5: Enable The Response Receipts Box
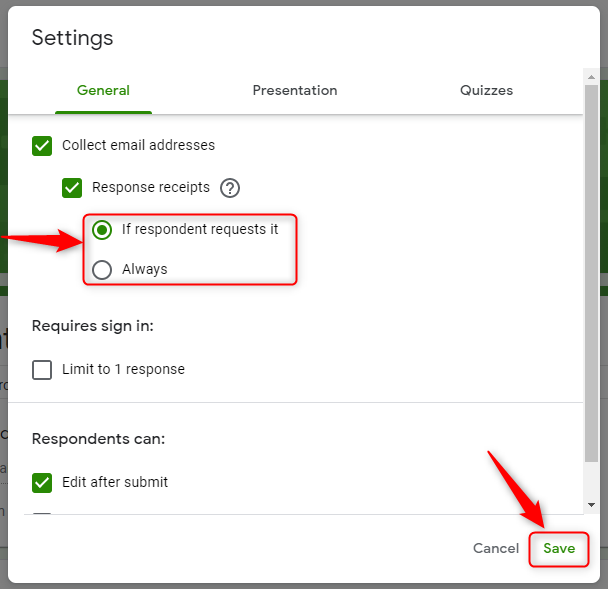
Next, click on the box “Collect Email Addresses”, it will enable the setting for “Response Receipts”. Simply, check the box beside “Response Receipts” which will offer two choices i.e “If the respondent requests it” and “Always”. Select the option accordingly and hit the “Save” button.

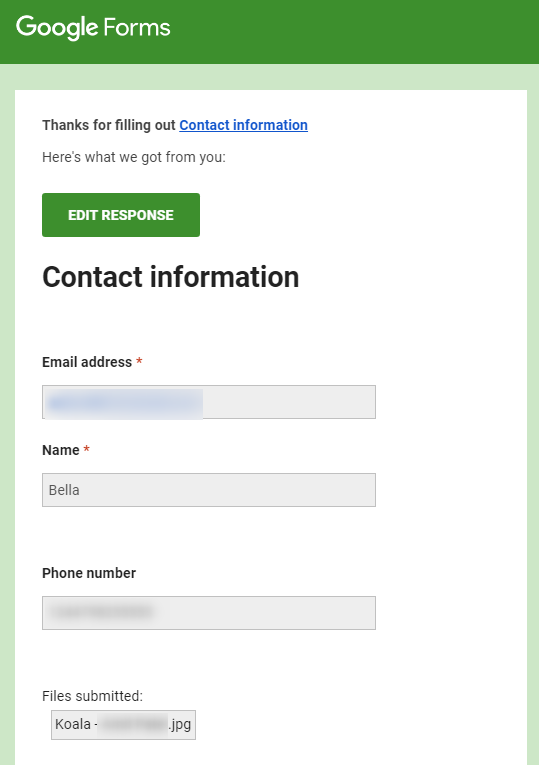
Step 6: Copy Of Submitted Response
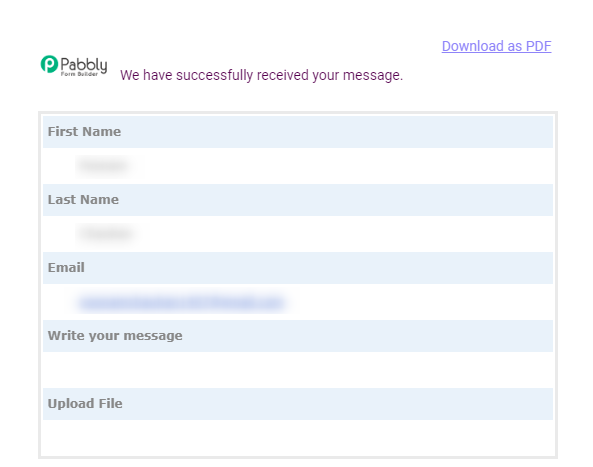
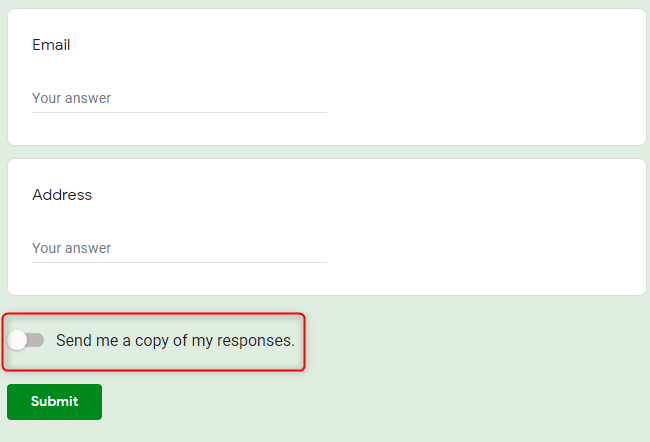
Finally, the form submitter will get an email like this, when they submit the form.
Limitation Of Google Forms
No doubt, Google Forms are free to use, but it fails users with vast needs. Some of its limitations are mentioned below:
- It does not provide the option to customize and personalize the email notification. As a result, you have to cooperate with its default email template.
- You can not send specific notification such as payment received/sent to the user.
- Further, it doesn’t let you include your brand logo on the response receipt.
- Advance features like tracking details of form activity are absent in Google Forms.
To Overcome These Limitations Try Its Best Alternative
As discussed above the powerful tool named Pabbly Form Builder which doesn’t restrict you on features by offering unlimited submission, storage and much more.
- It provides a wide range of options to customize the respondent receipt according to your needs.
- The software comes with Autoresponder feature which will ease work at your end.
- Pabbly Form Builder allows you to add your brand identity/logo in the respondent receipt.
- Using it, you can track details such as browser name, country, sessions, type of traffic, IP address of the form respondent.
- Further, it offers flexibility to download responses in PDF format.
Now, let’s see how you can simply enable the settings to send a replica of submitted forms to your respondents.
Steps To Enable Autoresponder in Pabbly Form Builder
Step 1: Create A New Form
To start, click on the “Create New Form” option and you can use pre-designed templates too.
Step 2: Add Fields To Form
In the “Blocks” section, it offers various elements for building a form. You just need to drag & drop those fields which you want to include in your form.
Step 3: Settings For Autoresponder
After creating the form, go to the “Setting” option, here you will find a feature “Autoresponder” along with other different options. Just select that button and it will offer a bunch of choices for email notification.
Step 4: Customize Your Email Notification
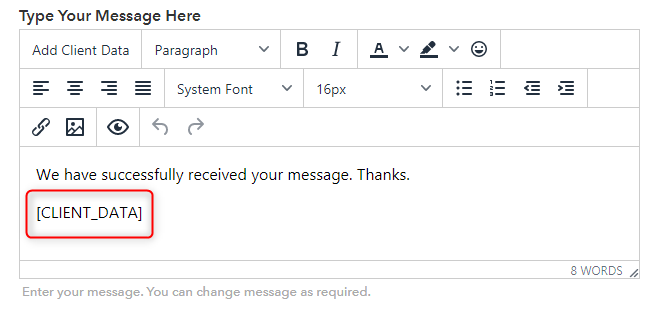
Next, here you find a variety of options such as system font, size and much more to customize the message content. Further, enable/disable it using the switch.
Note: Here, you’ll see the shortcode [CLIENT DATA] which sends the replica of the response to users into their mail account.
That’s how one can easily set up an autoresponder for sending a copy of submitted responses to the users.
Step 5: Copy Of Submitted Response
This is how your form respondent will get an email notification that contains a copy of the submitted response.
Conclusion:
We hope that this guide has helped you in configuring the setting for viewing the submitted response.
With the help of advanced features like autoresponders, users will get the exact copy of sent entries in their respective email account. This way they will rectify their mistakes if they have made any, during form submission.
Besides this, getting a positive response like “Your Message Received Successfully” from form creator always helps in maintaining a healthy relationship.
You May Also Like To Read:
- How To Add A Condition To Google Forms’ Checkbox?
- How To See All The Submitted Responses In Google Forms?
How To Add A Condition To Google Forms’ Checkbox?

After ticking checkboxes (loaded with conditions), visitors will be redirected to a new subset of questions based on their inputs. This exercise can trim down your scary lengthy forms which in turn will help you to reduce form abandonment rates. Unfortunately, at present, it is not possible to add a condition to Google Forms’ checkbox. It restricts this feature to just dropdown and multiple-choice options.
So, Can Any Google Forms Alternative Add Conditional Logic In Checkboxes?
Yes, this is 2020. There are some awesome form builders that allow you to build conditional logic in checkboxes. One of the affordable yet versatile ones is Pabbly Form Builder. Pabbly Form Builder offers you to effortlessly create conditional logic in its checkboxes.
- Not only in checkboxes, but you can also brew complex and unlimited conditional logic in fields like multiple-choice, uploads, radio, paragraphs, dropdown and more.
- One can also add AND/OR logic with conditions like is, is not, contains, does not contains and more.
- Furthermore, Pabbly Form Builder doesn’t restrict you any features like unlimited form submissions, unlimited storage, and multi integration through Webhooks.
Let’s see how easy it is to add conditional logic in checkboxes on Pabbly Form Builder.
Steps For Adding Conditional Logic In Checkboxes On Pabbly Form Builder:
Step 1: Create New Form
Once you enter into the dashboard, simply select the ‘Create New Form’ button. Furthermore, you can also select one of the beautiful pre-build templates according to your needs or organizational compliance.
Step 2: Click On Checkbox
A block consisting of many fields opens up in the left corner. Pressing the checkbox field located in the block summons multiple choices in your form.
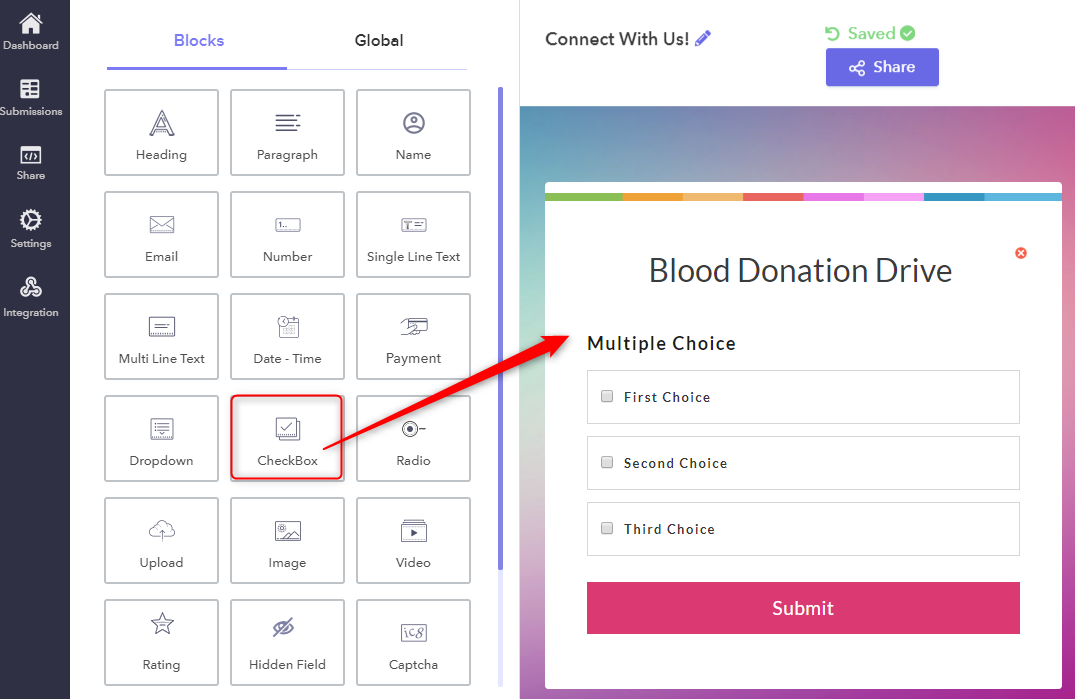
Step 3: Edit Choices In Checkbox
Merely, click on the multiple-choice in the form. The design field will open up in the left corner. Here, you can edit your question and multiple choices. Do remember that with Pabbly Form Builder, you can add unlimited choices by using (-) or (+).
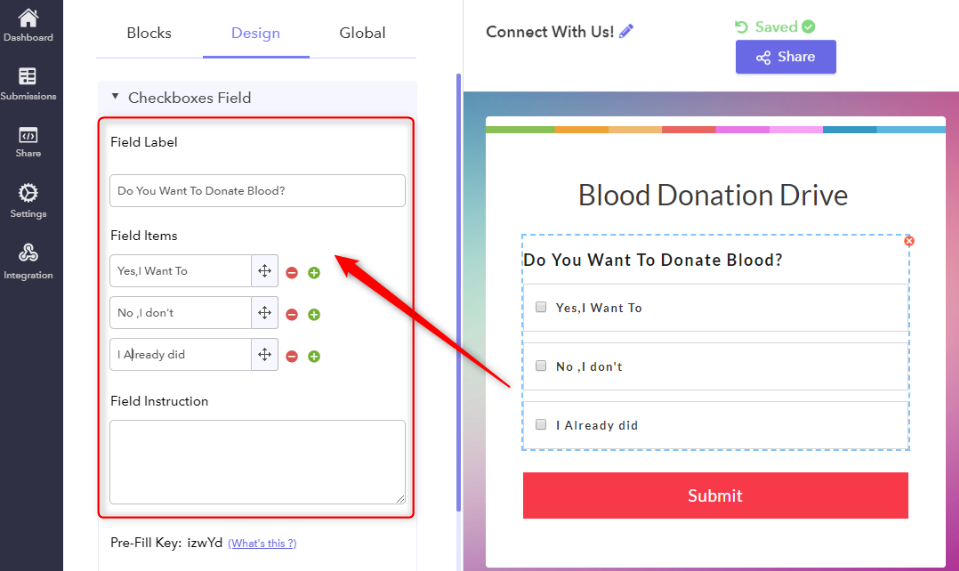
Step 4: Adding Extra Fields
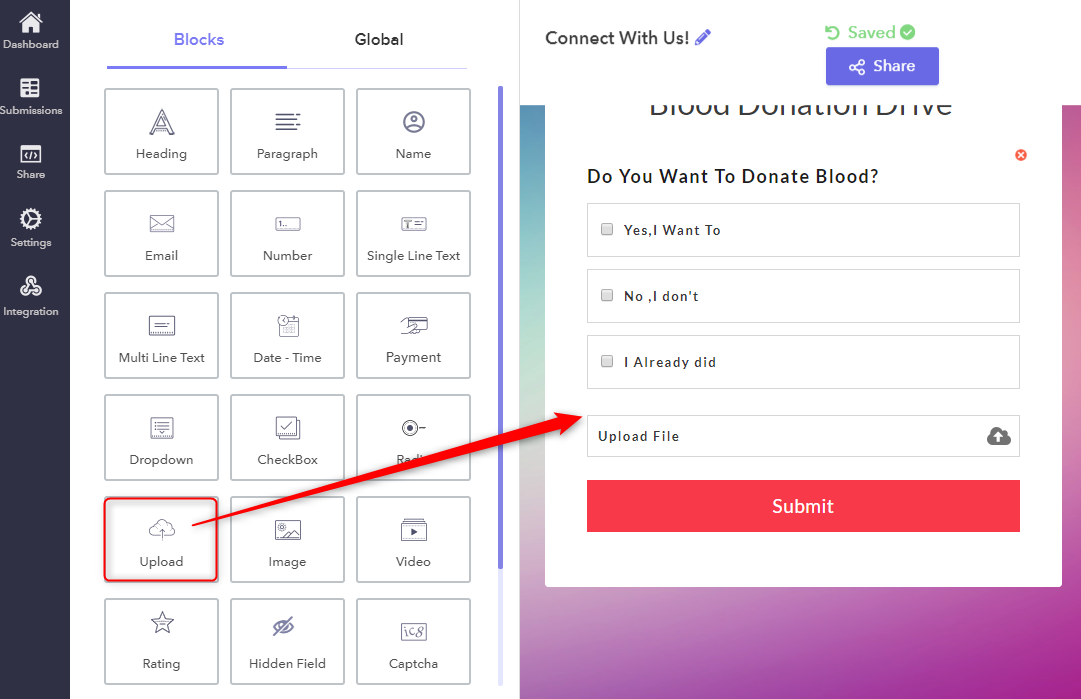
I am adding an extra field as ‘Upload File’. This will be used as a result when conditions are met. You can add one or multiple fields as results according to your discretions. For example, one can even set fields like payment, email, rating, names, date as results.
Step 5: Adding Logic
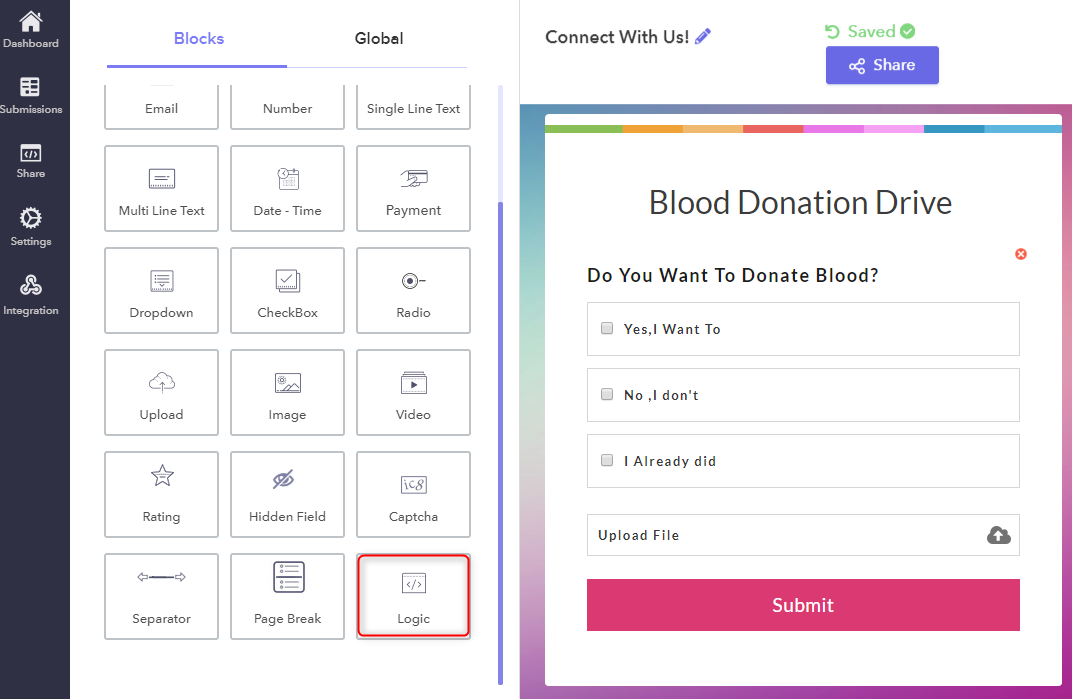
Now scroll down the block section and in the last row, you will find the logic field. Click on this field.
Step 6: Conditional Logic Pop-Up Box
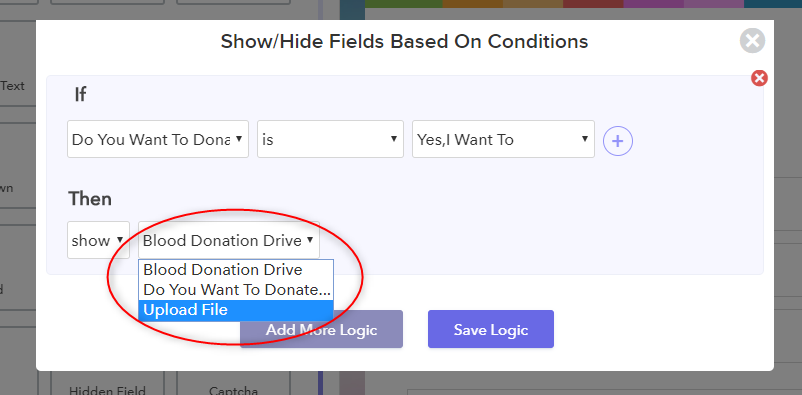
Clicking the logic field pops up a conditional logic box that displays ‘If’ logic, according to questions in your forms. In my case, I am placing ‘Do You Want To Donate Blood ?’ as the question.
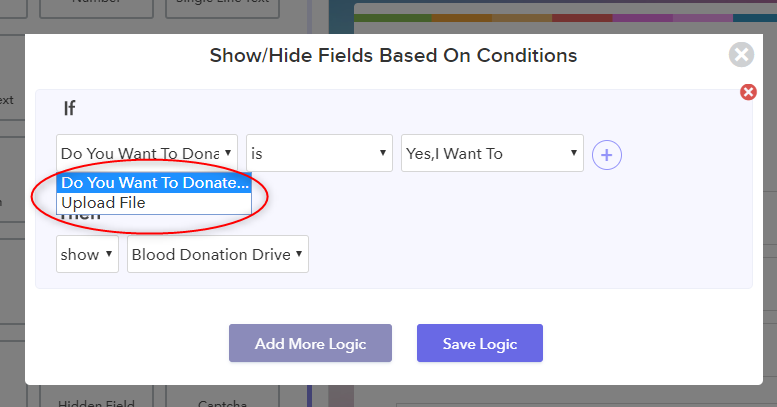
Step 7: Introducing Conditions
The unique advantage with Pabbly Form Builder is that it allows various conditions (is, is not, contains, is empty, ends with) by which you can build complex conditions with ease. Click, on one of the branches which resonates with your data in the form.
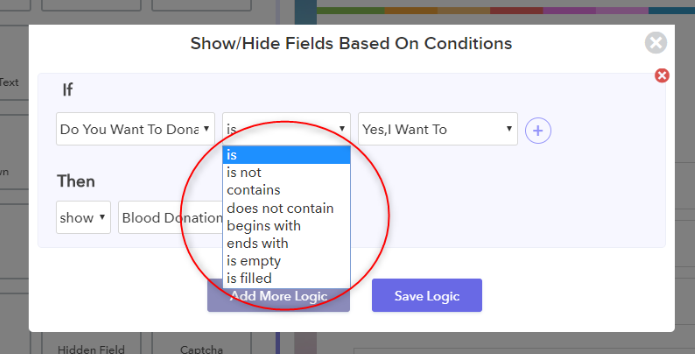
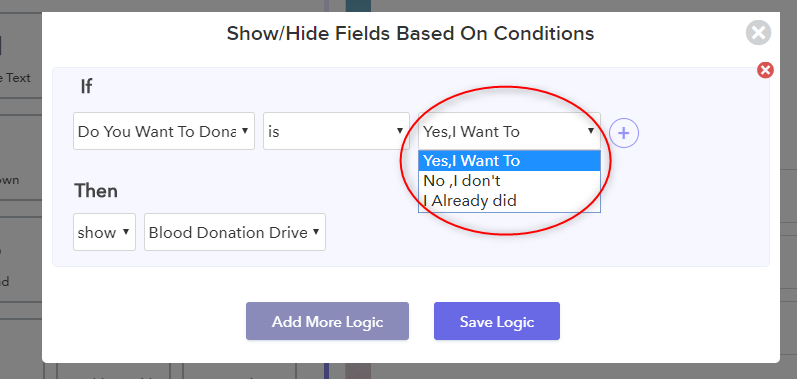
Step 8: Connecting With Choices
The choices of your checkbox are displayed here. Chose one of the choice to equate it with your logic gate.
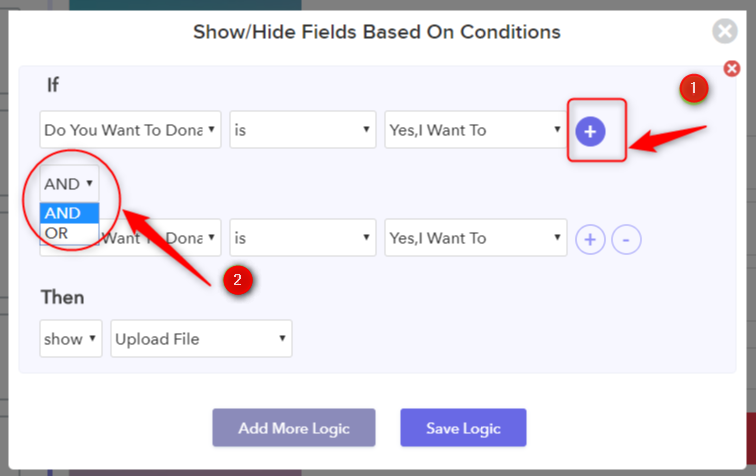
Step 9: Adding AND/OR
Now, to add AND/OR logic gates, click on the ‘+’ button and to remove them just click on the ‘-’button. These two additional logic gates are provided only by Pabbly Form Builder. Imagine all those complex fields you can create with all three gates(IF AND OR) in your forms.
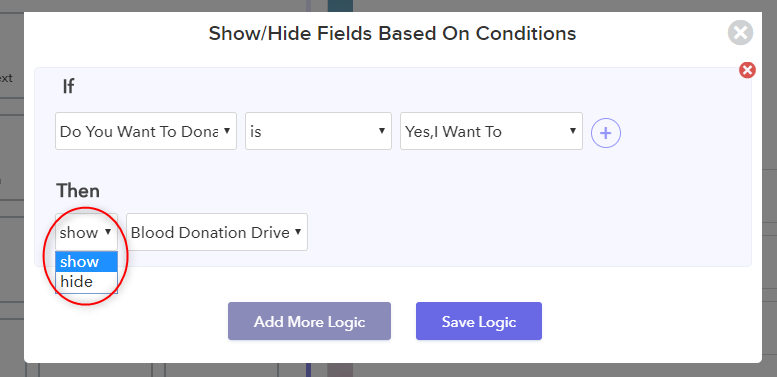
Step 10: Adding ‘Then’
After successfully placing the ‘Ifs’, chose either ‘show’ or ‘hide’ to govern the result.
Step 11: Placing Results
Pabbly Form Builder’s intuitive programming automatically positions all selections in the drop-down box. Just set the result from the selections. In my case, I am setting ‘Upload File’ as the result.
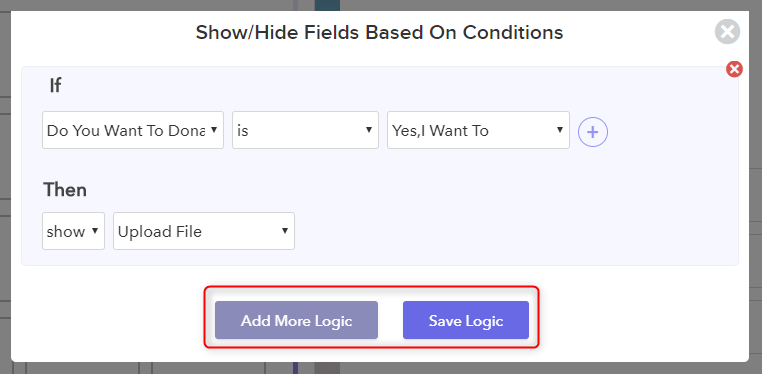
Step 12: Add More Logic And Save
Now, that you are adept with placing conditional logic, you may want to experiment and add more logic to make your checkbox extra dynamic. All you need to do is click on the ‘Add More Logic ‘ button. If you are satisfied with your conditional logic and checkbox then click on the ‘Save Logic Button’.
Conclusion
Like your business, you want your forms to be more dynamic for better lead capturing. However, you can’t add a condition to a Google Forms checkbox at present. Furthermore, many issues like lack of multi-payment options, design customization, and limited uploads may irk you. Do you really think when your business grows you still be using Goggle Forms? Why not switch now, to a better alternative like Pabbly Form Builder.
You May Also Like To Read:
- How To Add A Google Analytics Tracking Code In Google Forms?
- How To Add Multiple Questions In A Row Using Google Forms?
How To See All The Submitted Responses In Google Forms?

Seeing the submitted responses in Google Forms is an important task to ensure that you responded to all questions correctly.
However, there is no way to see submitted Google Forms as a user, unless the form creator has enabled “Response receipts”. In such a case, it will send a standard receipt, containing a copy of the responses, to your email as soon as you submit the form successfully.
On the other hand, if this setting isn’t enabled from the admin’s side, you won’t be able to see the forms that you have responded to, in the past.
“Response receipts” setting of Google Forms has certain limitations that you should be aware of. The very first is, it sends pre-designed message in receipts that you cannot edit in any way. Further, it limits your options when come to SMTP servers as it provides only single server.
Therefore, I would like to suggest a robust form creator i.e. Pabbly Form Builder, which allows you to send personalized receipts which you can edit. Moreover, you can even use your own email address to send the receipts as well as it supports multiple SMTP servers.
If you want to know more about the Response Receipt setting of Google Forms, then this article can help you.
How To Enable “Response Receipts” On Google Forms
Step 1: Open A Form
In order to configure “Response receipts”, open the form in which you wish to enable the setting.
Step 2: Open Settings Tab
After that, click on the “Gear” icon on the top-right part of the screen.
Step 3: Enable “Response Receipts”
Further, the settings tab will appear on the screen. Subsequently, check the “Collect email addresses” box and then the “Response receipts” box.
Step 4: “Response Receipts” Settings
The application would then offer you two options which are ‘If respondent requests it’ and ‘Always’. Select the option accordingly and then ‘Save’ the setting.
Step 5: The 2-Different “Response Receipts” Options
The ‘If respondent requests it’ option will result in a switch “Send me a copy of my responses” being added at the end of the form. The respondent can then click on the switch if he or she wishes to receive a receipt.
On the other hand, if you select the ‘Always’ option, a receipt will be sent to all the submissions.
The Rigid Nature Of “Response Receipts” In Google Forms
Some of the limitations of Google Forms in regards to “Response receipts” that you only realize when you use other better form maker.
- Google Forms has a standard Email template for the “Response receipts” which you cannot edit at your end.
- Moreover, the email address from which the receipts are sent is also fixed ([email protected]). So, there is no scope to send personalized messages to your respondents.
- Besides that, it does not allow your respondents to store their response data offline.
- Further, users can’t see their uploaded document in Google Forms response.
Are There Other Form Makers With Better Response Receipts?
There are many form makers available online which provide a variety of features for following up with your respondents. One such tool is Pabbly Form Builder which doesn’t restrict you on features by offering unlimited submissions, forms, receive payment and much more.
Below are the features that can vastly enhance the quality of your form response receipts.
- This online application allows you to send customized form response receipt messages to your respondents.
- The software allows you to add multiple email addresses to send the response receipts.
- It offers multiple SMTP servers in the software itself which makes it stand alone in-crowd.
- The best part is, the application sends the form response receipts automatically, even when you choose to send them through your email.
- The robust tool allows users to download their responses in PDF format.
Here Is How You Can Enable The Different Response Receipts On Pabbly Form Builder:
We further categorized it into three different categories for better understanding.
1. Enabling Email Notifications:
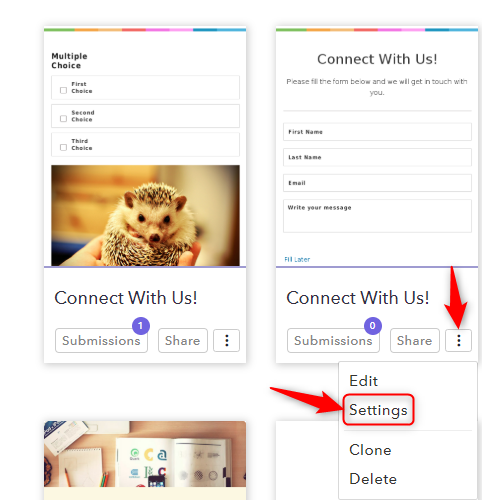
Step 1: Open Form Settings
On the Pabbly Form Builder dashboard, use the three vertical dots icon on your form to open a drop-down menu. Thereafter, select “Settings” from the menu to open form settings.
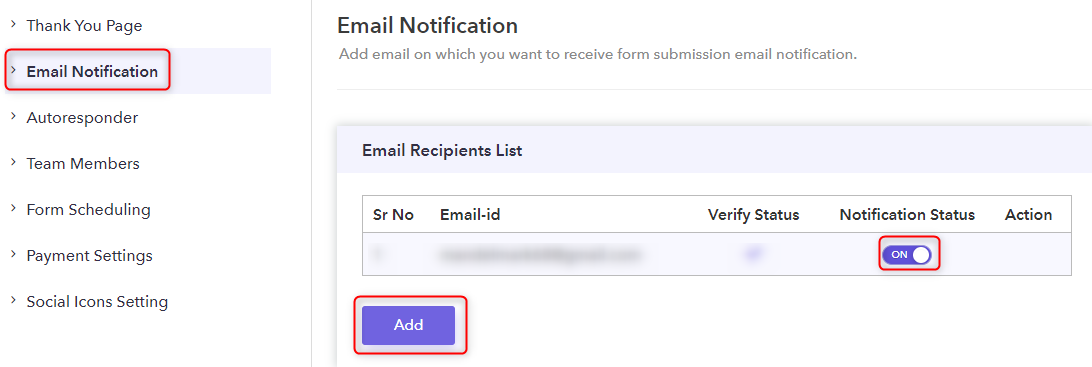
Step 2: Add Email & Enable Notifications
From the “Email Notification” tab, use the “Add” button to add the multiple email address on which you want to receive notifications. After that, switch “Notification Status” on.
2. Setting Email Address For Response Receipts
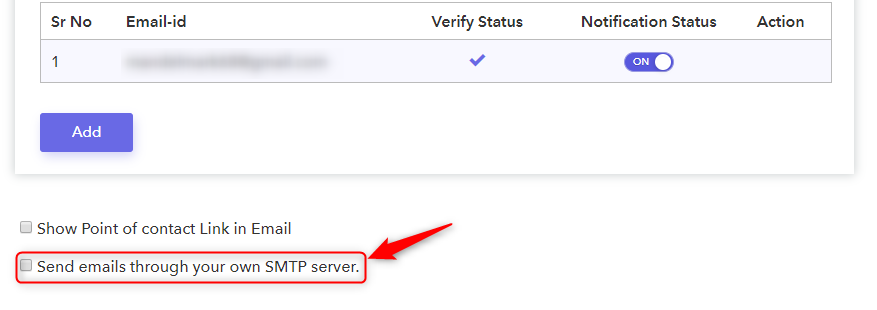
Step 1: Enable SMTP Server Option
In the Email Notification tab, scroll down to the last checkbox on the screen and click on it.
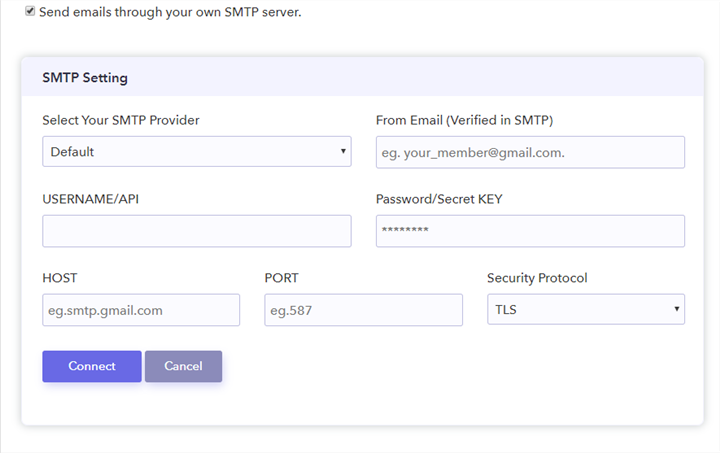
Step 2: Fill Details Of Your Email Address
As soon as you check the box, a form will appear which needs to be filled.
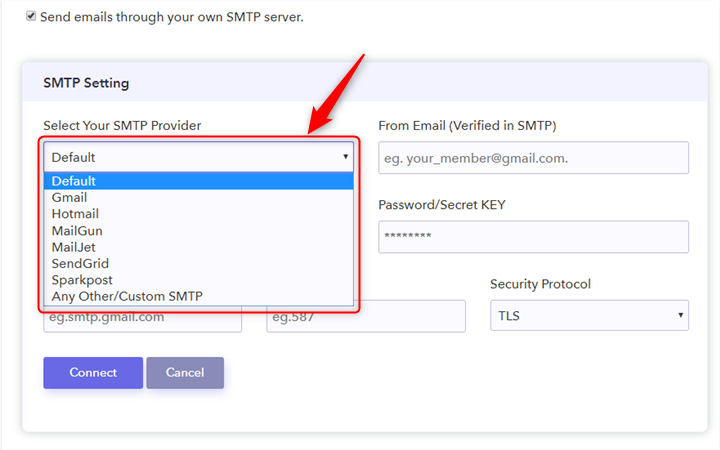
To select the domain of your email address, click on the drop-down menu under ‘Select Your SMTP Provider’.
Then, enter your complete details in the form to allow Pabbly Form Builder to access it.
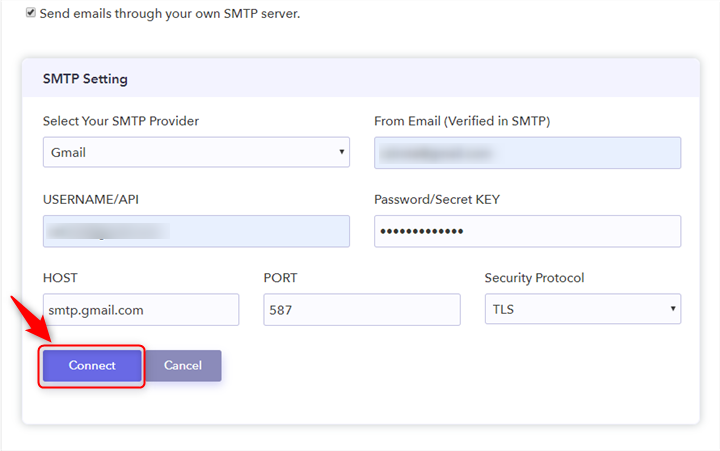
The HOST, PORT and Security Protocol would automatically be selected according to your email address. After entering all the details, click “Connect” to finish the process.
Now, all the form responses will be sent to your respondents through the email address you entered.
3. Customizing The Content Of Response Receipts And Email Notifications
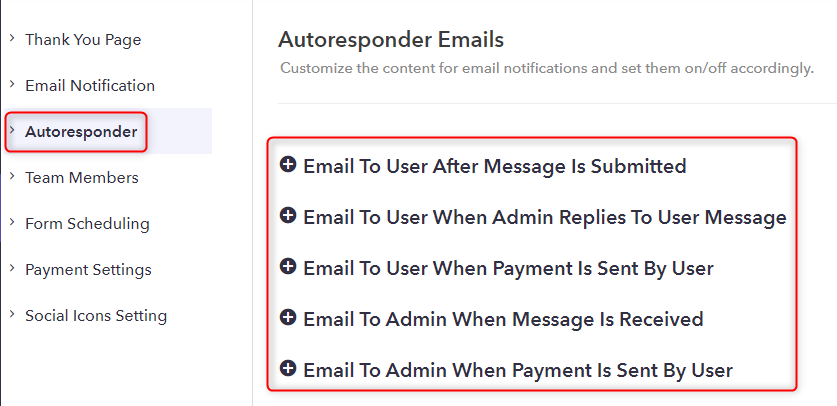
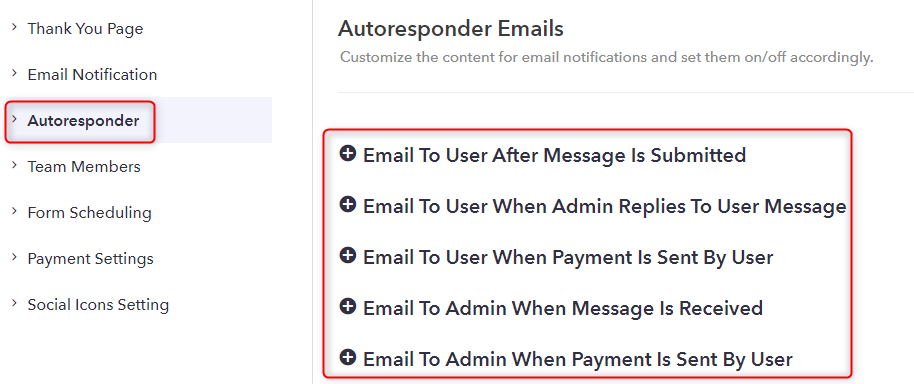
Step 1: Open Autoresponder Tab
In the Settings window, click on the “Autoresponder” option. Further, in the tab, you will find an array of response email options.
Step 2: Customizing Emails
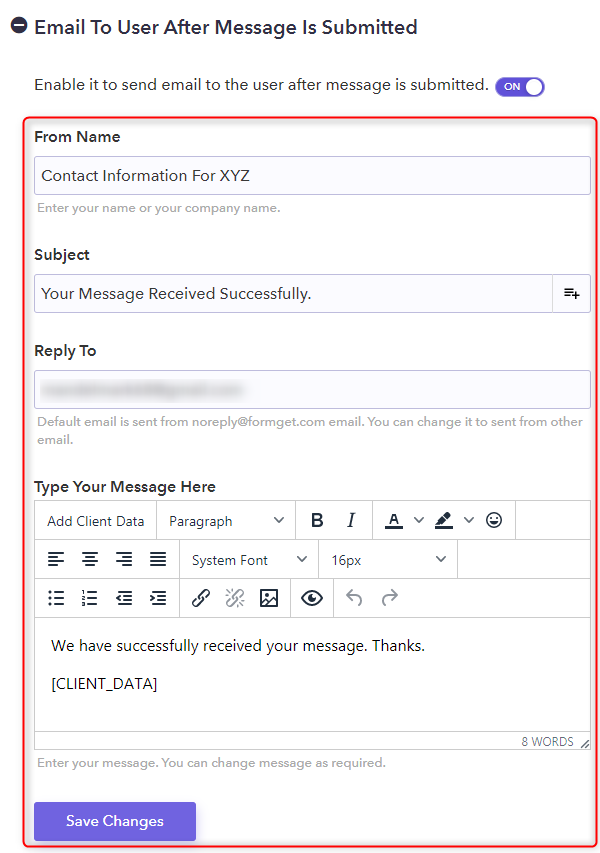
Further, you can click on any of the options to access its features. As an instance, we will click on the “Email To User After Message Is Submitted” feature which will open a drop-down menu with its settings.
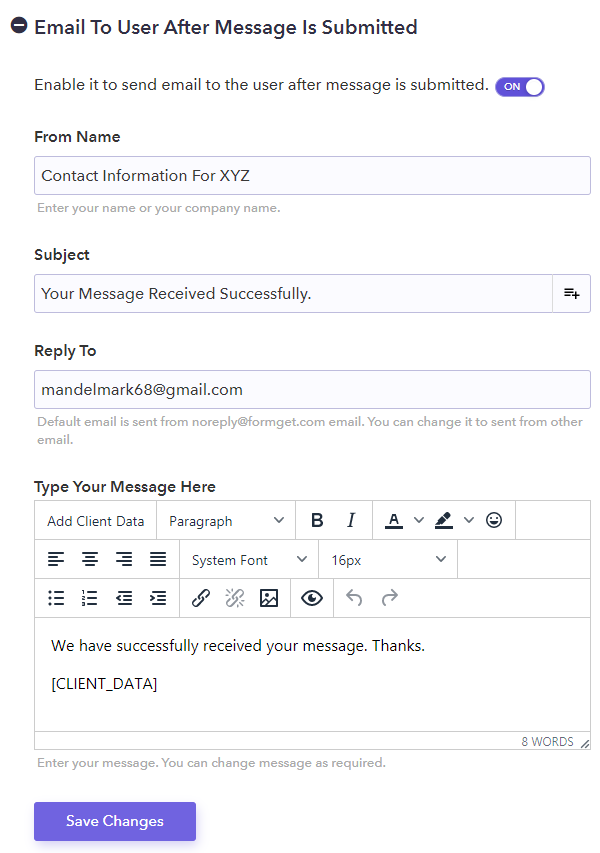
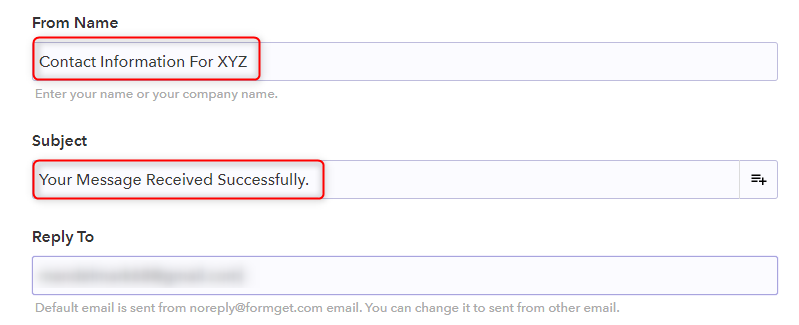
In the settings, you can set the name of the sender, subject line of the email and the email address from which the message needs to be sent.
Along with that, you can also create a personalized message with custom font and attachments. Use the “Add Client Data” button to insert the response data of your respondents in any part of the message you want. Pabbly Form Builder offers a huge palette of customizing tools that you can use to change font size and style, highlight text, attach photos and much more.
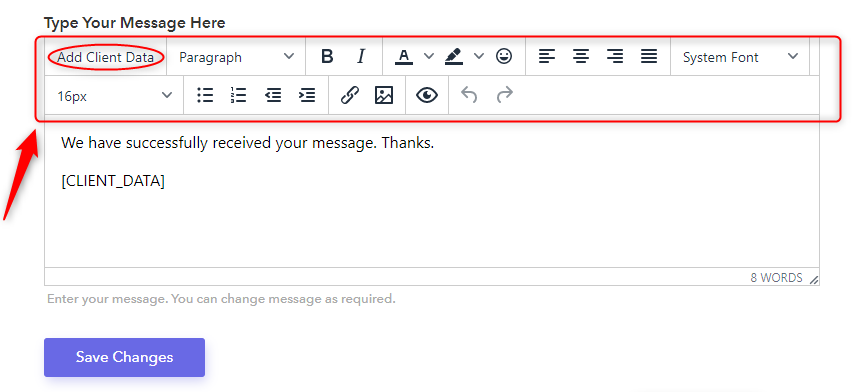
Lastly, after you have configured all the settings, click on the “Save Changes” button to finish the process.
The respondents will also be able to download their responses in a PDF form.
Winding-Up
Hopefully, you have now learned how to see submitted responses on your Google Forms. This way, your respondents would be able to know that their response has been received successfully. Also, they can check whether their responses were correct.
While there are plenty of form builders that offer different response receipt options, you can try your hands on Pabbly Form Builder as it is packed with a plethora of features for response receipts. Further, it also gives the flexibility to explore the platform for free.
You May Also Like To Read:
- Does Google Forms Have A Limit On The Number Of Responses?
- How Many Respondents Can You Have In A Google Forms Survey?
How To Add A Google Analytics Tracking Code In Google Forms?
Are you looking for a way to add Google Analytics code inside your Google Forms in order to track form submissions, goal conversions and keywords used by visitors? Well, unfortunately, that feature is currently not available in Google Forms.
But, wait before you leave this article, let me tell you that you can try some of its alternatives which offer this functionality to track the activity on your form. As a matter of fact, I am highlighting one such form creator i.e, Pabbly Form Builder that lets you add Google Analytics tracking code to monitor the performance of your form.
Reasons Why You Should Give Pabbly Form Builder A Try:
- It has a built-in form analytics feature that provides you complete stats like views, submissions, etc. about your form in the software itself.
- Also, this form creator offers a reporting feature through which you will get proper visual reports in the form of graphs and piechart.
- Pabbly Form Builder has a wide range of beautiful inbuilt form templates that can help you create an attention-grabbing form. Furthermore, it offers an intuitive drag-drop builder to build awesome forms.
- Moreover, it is the only software that doesn’t restrict you on features as it offers unlimited form submissions, upload, storage and a lot more.
Hence, in this article, I am going to explain the procedure of adding Google Analytics code in this amazing form creator.
Let’s begin…..
Steps To Integrate Google Analytics in Pabbly Form Builder:
Step 1: Pabbly Form Builder Dashboard
Sign in to your Pabbly Form Builder and open its dashboard. Now, create a form by just clicking on the “Create New Form” button or you can simply select any of its pre-built templates.

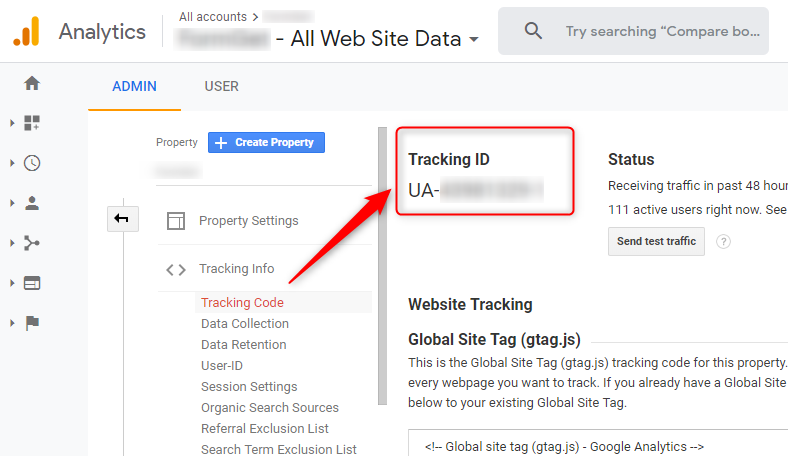
Step 2: Copy The Tracking ID From Google Analytics Account
After creating the form, go to your Google Analytics account. Here, click on the admin option of Google Analytics where you will get the “Tracking Info” tab. And, now go to the tracking code option where you will see the “Tracking ID” in the top- left corner. From here, you can copy the Tracking ID.
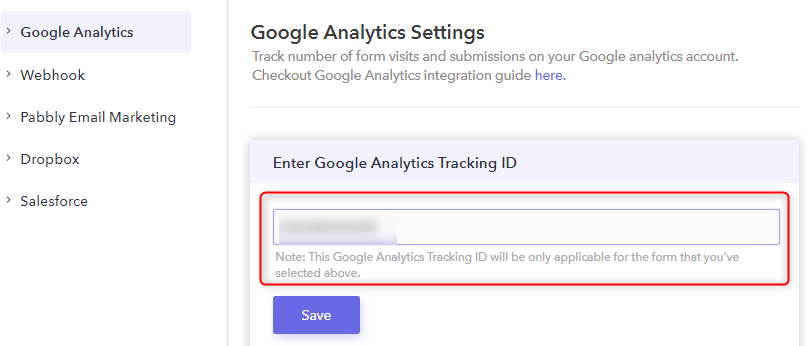
Step 3: Add Tracking Code
Next, paste the tracking ID which you have copied from the Google Analytics account into the Pabbly Form Builder’s “Google Analytics Settings” option.
This is how you can integrate your Google Analytics account with Pabbly Form Builder. And, now, you are all set to see real-time visitors on your form in the Google Analytics dashboard.
Steps To View Analytics & Reports in Pabbly Form Builder’s Dashboard
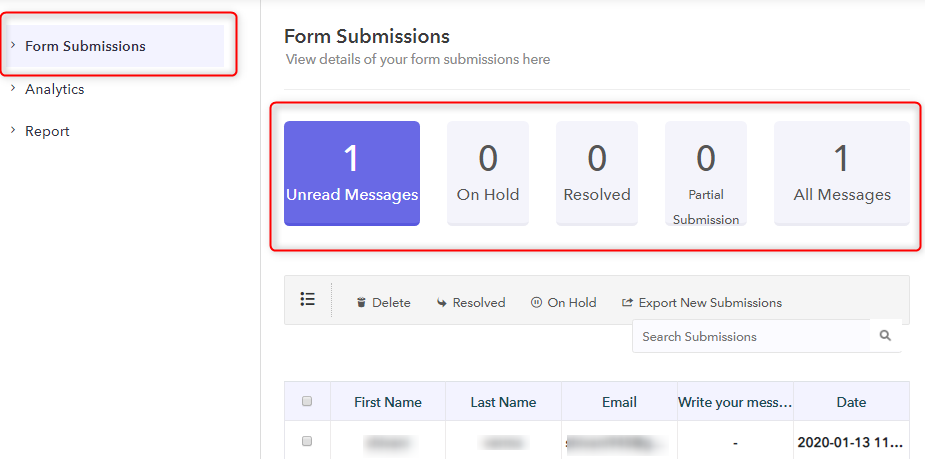
Step 1: View Form Submissions Details
Under the “Form Submissions” tab, you can see the details (unread messages, partial submission, resolved, etc) of all the forms that are submitted by your form respondents.
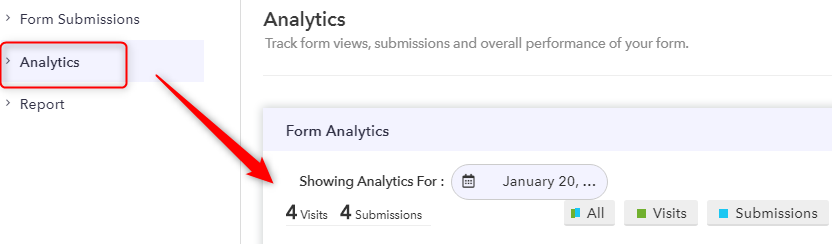
Step 2: Go To The Form Analytics Section
Further, in the “Analytics” section, you will get the complete insight about your form. Here, you can easily analyze the number of form views, submissions, and performance of your form. Moreover, you can also use the date filter to display specific records in the form.
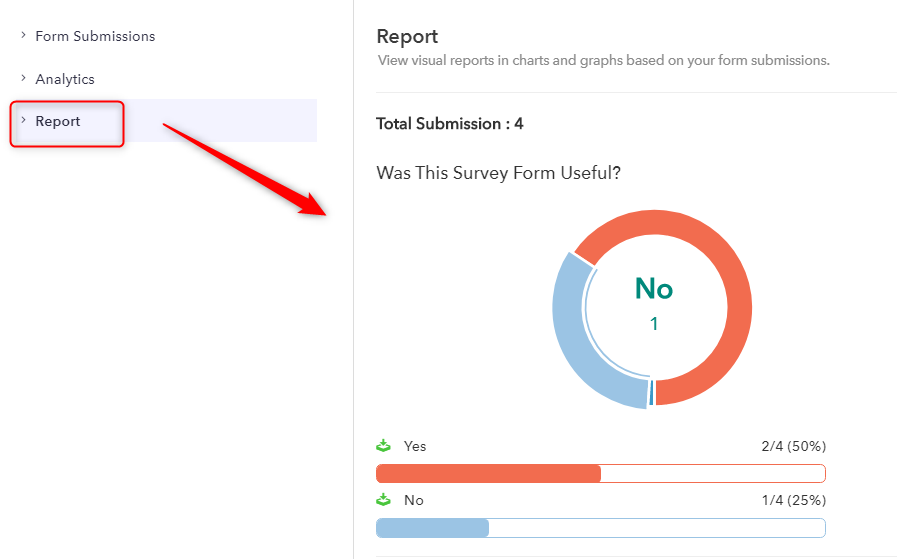
Step 3: View Your Form Submissions Report
Next, in the “Report” section, you can view visual reports in the form of graphs & charts depending on your form submission data.
By following the above-mentioned steps, you can easily analyze the activity of your form in the dashboard itself.
Final Thoughts
And that’s it! You now know how to add Google Analytics tracking code to Pabbly Form Builder in order to track form submissions and views.
Furthermore, if someone doesn’t have a Google Analytics account even then he/she will be able to track the performance of their forms with the help of its inbuilt analytics & reporting functionality that too without leaving the dashboard.
If you like this article, then do share your feedback in the comment section below.
You May Also Like To Read:
- Does Google Forms Have A Limit On The Number Of Responses?
- How To Add Multiple Questions In A Row Using Google Forms?
How To Add Multiple Questions In A Row Using Google Forms?

Let’s face it, your visitors don’t have time or patience to fill out a lengthy form. One of the best ways to make your forms concise is by presenting it in a single-line. And to build forms in a single-line format you need to place multiple fields in a single row. Unfortunately, Google Forms poses restrictions to place multiple questions adjacent to each other in a single row.
Therefore The Burning Question Is: If Not Google Forms, Then Which Form Builder?
There are actually many form creators that can create multiple questions in a single row. One of them is Pabbly Form Builder, which is an affordable form builder that can create single line forms, simply by reducing the width of the fields.
- Not only the width, but you can also customize the typography, box-shadow, background color and many other attributes related to fields.
- There is no limit to form submissions even in a single line format using Pabbly Form Builder.
- No matter what plan you chose, it doesn’t restrict you on any features like unlimited payment collection, unlimited storage, and multi integration through Webhooks.
Let me show you, how easy it is to create a form in a single line layout in this incredible form builder.
Steps To Create Multiple Questions In A Single Row In Pabbly Form Builder:
Step 1: Create A New Form
Once you sign in to your account you will be redirected to the dashboard. Here, you can choose from a plethora of pre-designed beautiful form templates or you can simply create a new form by clicking on plus (+) sign.
Step 2: Add Fields Into The Forms
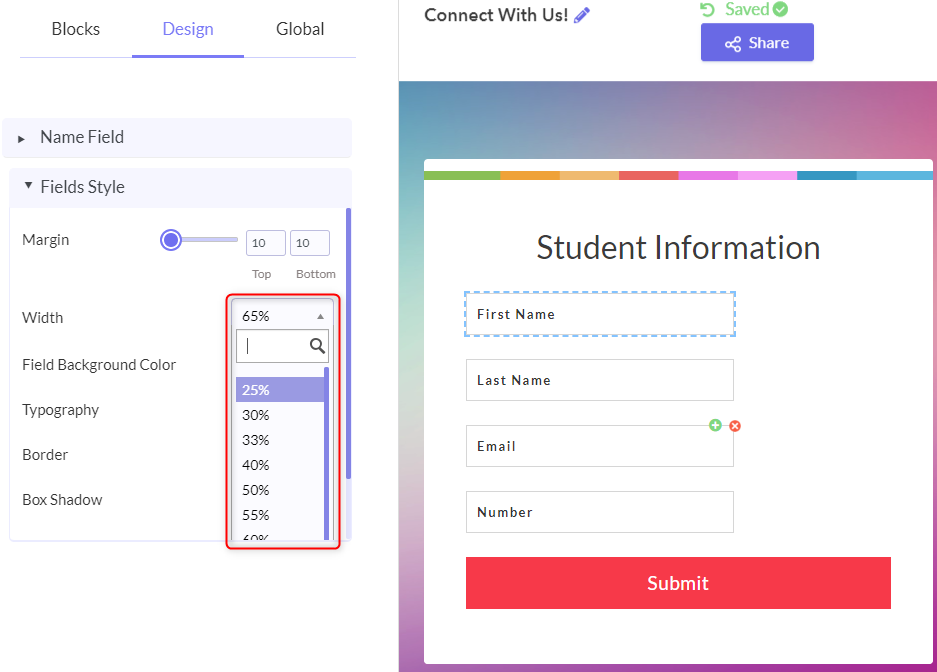
The form opens up and in the left corner, you will find multiple fields/questions to add. Insert some of these fields/questions to your form via the drag & drop feature. For example, I am inserting four fields/questions which are first name, last name, email, and number to the form.

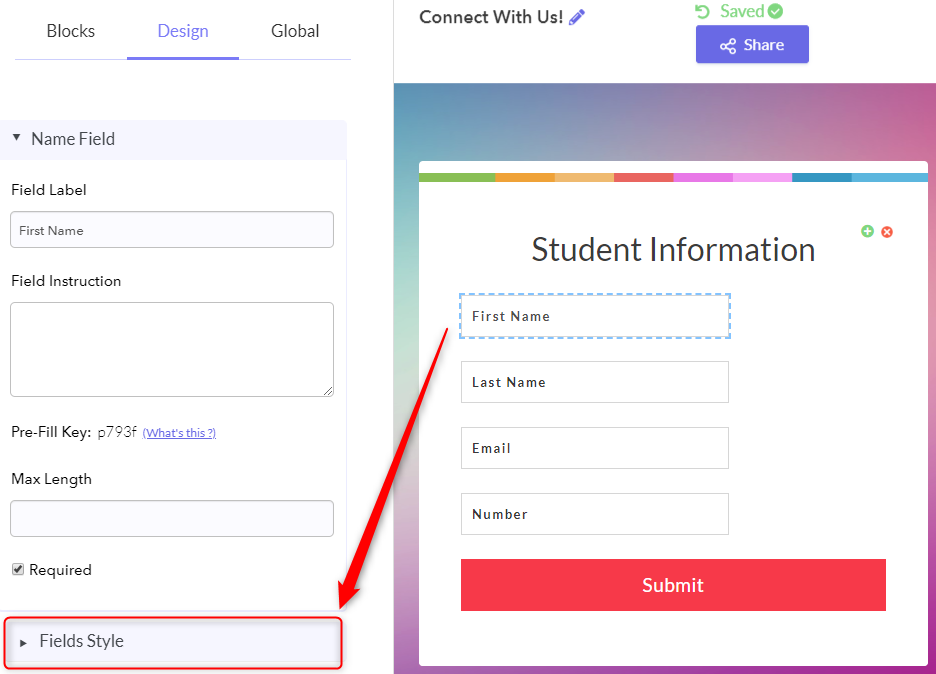
Step 3: Click On Fields Style
Clicking on a field opens the ‘design box’ at the left corner. Here at the bottom of the ‘design box,’ you will find the ‘Field Style’ button. Click on the ‘field style’ button to change the characteristics of the field like width, border, typography, and background color.
Step 4: Reducing The Width
Now, select the width option. A small scroll down box will appear, here select one of the shrink percentages. For example, I am shrinking the width of the ‘First Name’ field from the present 65% to 25%.
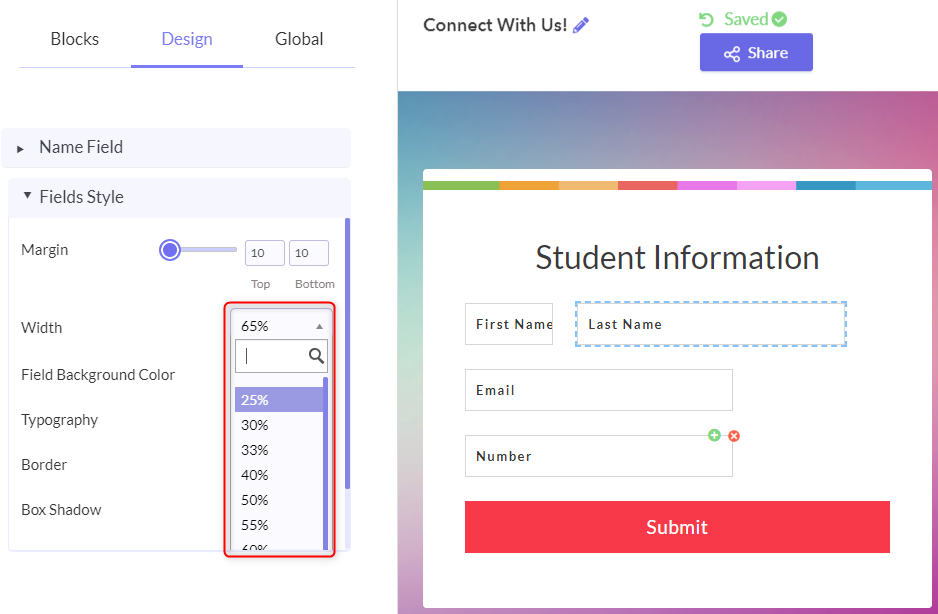
Step 5: Placing The Fields In A Line
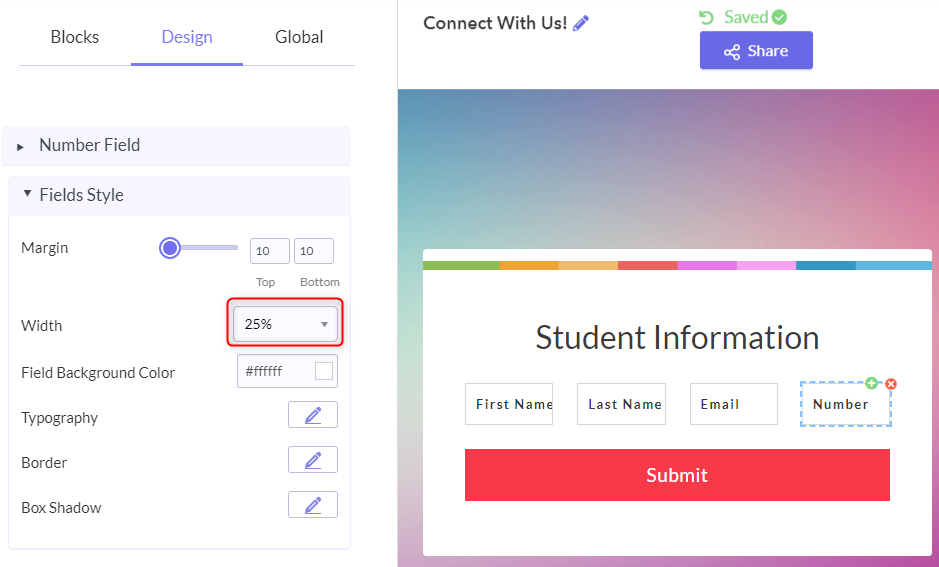
Now, click on the second field and while holding the mouse button down – drag it adjacent to the first field. Reduce the width of the second field from 65 % to 25%. Select the third field and again scale down its width. However, this time Pabbly Form Builder’s intuitive programming automatically places the third field adjacent to the second field so that a row can be created.
Step 6: Row Creation
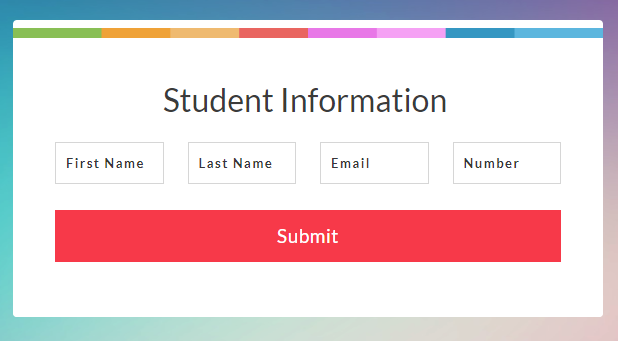
Continue the process, until all your fields are on the same row.
Step 7: Preview Your Form
Save the form and click on the “Eye Shaped” icon to preview. Add the information in the form according to your discretion and submit the form.
Conclusion
Google Forms, in its current design, don’t allow you to create multiple questions in a row. Moreover, other features like multi-payment options and brewing complex conditional logic are limited in Google Forms, which may hurt your growing business in the long run. Come have a look at Pabbly Form Builder as it offers unlimited form submissions, intuitive form builder, and multi-payment options at very nominal rates.
You May Also Like To Read:
- How Many Respondents Can You Have In A Google Forms Survey?
- How To Receive A Payment With My Google Forms?
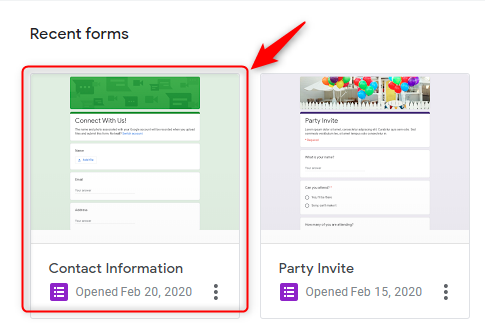
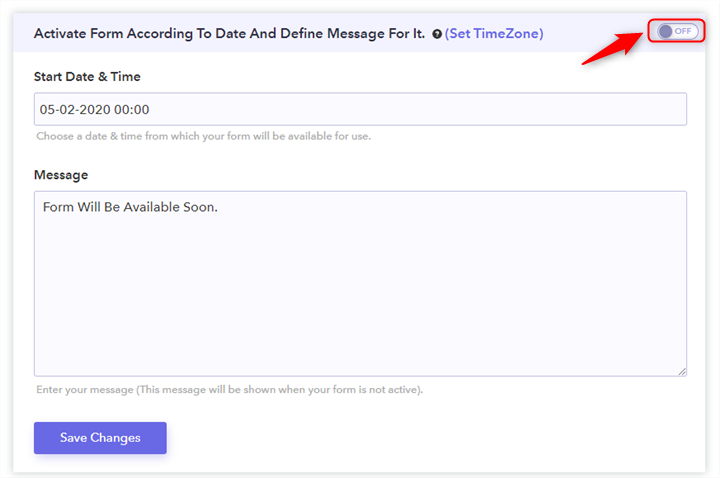
Does Google Forms Have A Limit On The Number Of Responses?
By default, Google Forms allow you to collect unlimited responses to your surveys. But what if, you want to limit your Google Forms responses?
The good news here is, you can limit Google Forms responses to a certain extent.
But, the very first question arises here is “why to limit responses?”
The obvious answer is by doing so, you can prevent spamming on your form. Besides that, halts on responses make the survey accurate and on point.
While Google Forms does allow you to limit responses to one per user, it doesn’t offer any feature to restrict an entire number of responses on a form.
Keeping the same in mind, we would like to suggest one of its best alternative i.e. Pabbly Form Builder which allows you to limit the total number of responses on a form. Along with that, you can also put an activation and expiration date on each of your forms.
So, if you want to know how to restrict responses on your Google Forms, then this help guide is for you.
Here Is How You Can Limit Responses On Google Forms To One Per User
Step 1: Open Your Form
In order to limit Google Forms responses, open the form in which you want to apply limitations.
Step 2: Open Form Settings
Further, to access settings of the form, click on the “gear” icon on the top right part of the screen.

Step 3: Switch On “Limit To 1 Response”
Lastly, click on the checkbox that says “Limit to 1 response” and hit “Save” thereafter.
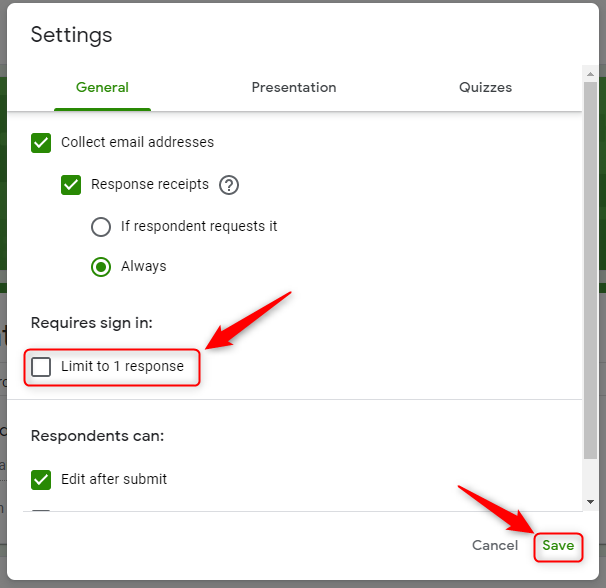
Now, your form will receive only one response from each user.
Does Restricting Responses Using Google Forms Help?
There are certain things that you should always keep in mind about the “Limit to 1 response” setting of Google Forms.
- It limits responses to one per user. Further, you can’t restrict the total number of responses to your survey.
- There is no such feature available to set activation and expiration date on the form.
- Moreover, you have to manually enable the limit to the response feature.
Are There Other Form Makers Available With Better ‘Limit response’ Settings?
There are plenty of alternatives to Google Forms available online. One such powerful alternative is the Pabbly Form Builder that doesn’t restrict you on features like unlimited uploads, unlimited storage and so on.
Moreover, it offers certain features on limiting responses that are listed below:
- Pabbly Form Builder allows you to collect unlimited responses from your users.
- It allows you to limit the total number of responses on each of your forms. If you enable this feature, the form will automatically expire as soon as the entered number of responses has been reached.
- Alternatively, you can also assign activation/expiration date and time for your forms.
- Moreover, all these actions conducted automatically by the application.
These features for limiting responses can be highly useful and efficient. You will not have to manually launch or close down any of your forms if the above-mentioned features are utilized.
Here Is How You Can Configure The Different ‘Limit responses’ Settings In Pabbly Form Builder
Step 1: Open Form Settings
In the Pabbly Form Builder dashboard, click on the three vertical dots icon on your form to open a drop-down menu. Thereafter, select “Settings” from the menu to open form configurations.

Step 2: Open Form Scheduling Tab
From the column on the left part of the screen, click on “Form Scheduling” to view all ‘Limit response’ options in Pabbly Form Builder.
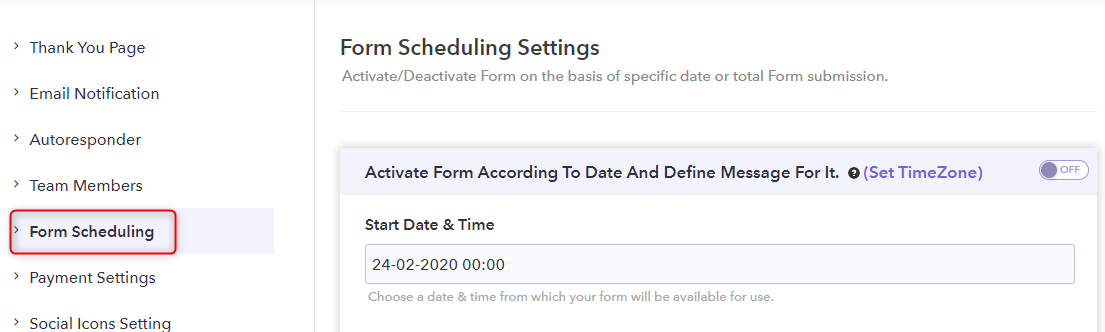
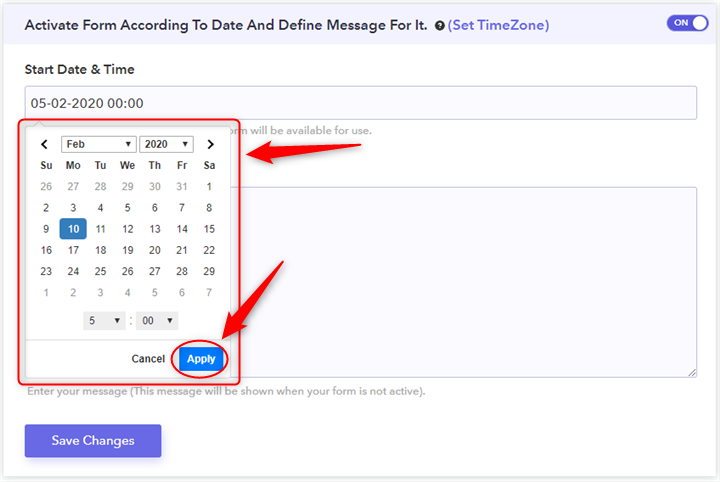
Step 3: Set Activation Date And Time On Form
The first dialogue box can be activated to enter the start date and time for your form. The form will be made active on the date and time you put into this box.
Step 3 a) Enable The Option
Enable the feature by clicking on the toggle at the top right corner of the box.
Step 3 b) Set Date and Time
After switching it on, select the date and time in the first field from the down-down menu and click “Apply”.
Step 3 c) Add Custom Message
After that, add a custom message that you want to be displayed, when the form is not active and then hit “Save Changes”.
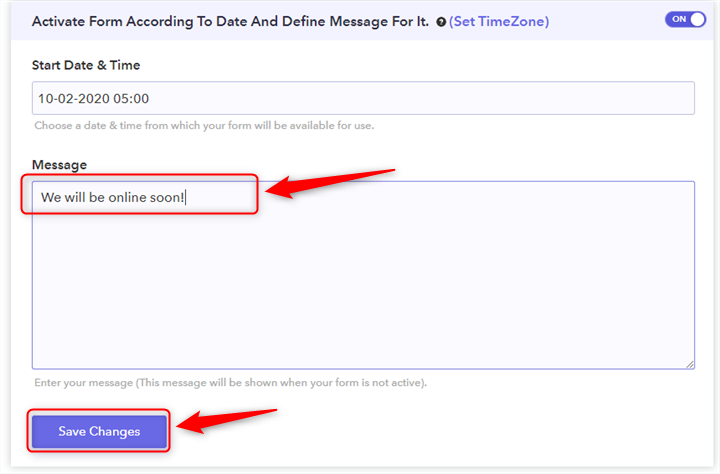
This would enable the “Activation Date and Time” feature for your form.
Step 4: Set Deactivation Date And Time On Form
Similarly, by enabling the “Deactivation Date and Time” feature you can set the end date and time of form. Further, you can also set the submission limit and custom message too.
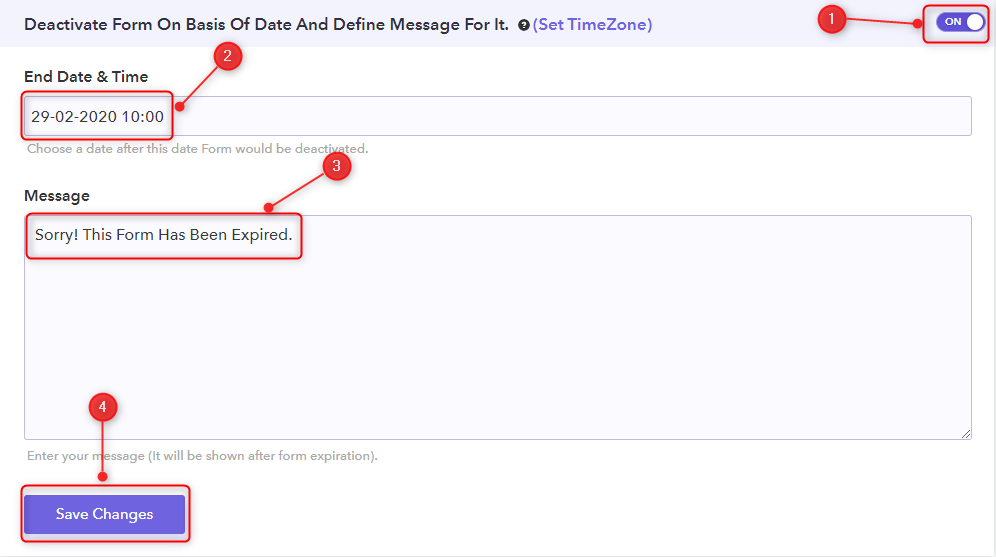
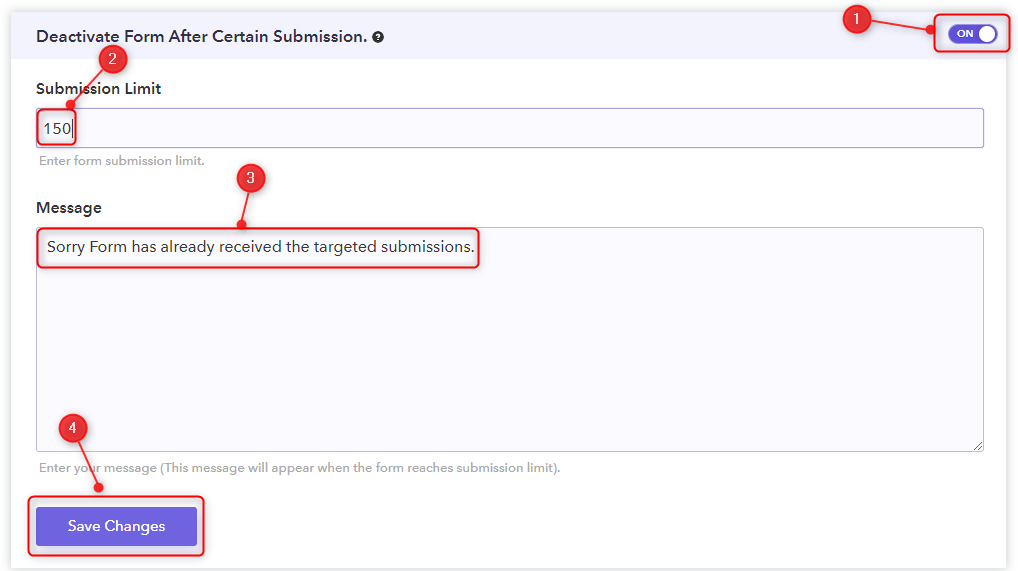
In this way, Pabbly Form Builder will handle your forms on your command.
To Sum Up…
Hopefully, this article has helped you learn how to put a limit on the number of responses on your Google Forms. Putting a restriction on submissions can be useful in a variety of ways. While form makers available online have distinct features that allow you to limit responses in different manners, you should choose the one that suits your requirements.
You May Also Like To Read:
5 Best Weather APIs to Access Weather Data Globally 2022

Weather APIs are Application Programming Interfaces. These are best for connecting to the large weather forecasts and historical data repositories
Why use Weather APIs?
Mostly the mobile phones or desktop showcase a seperate widget for displaying weather forecast. Similarly, if you want to add this section to your website, you can use forecast API & smoothen the task. Furthermore, once you integrate the weather API, the climatic data can then be posted on your website. Thus, you can effortlessly display the weather forecast on an hourly or daily basis.

Hence, in this weblog, you will find the list of best Weather APIs. So without any further ado, let’s get started and have a look at the APIs.
1. AccuWeather –
AccuWeather provides premium weather forecasting services around the globe. This weather API gives subscribers access to weather data based on location via a simple RESTful web interface.
Additionally, data can be found in more than 40 languages and dialects. Further, the responses to the data are returned in JSON and JSONP. SSL encryption is also available for secure communication purposes.
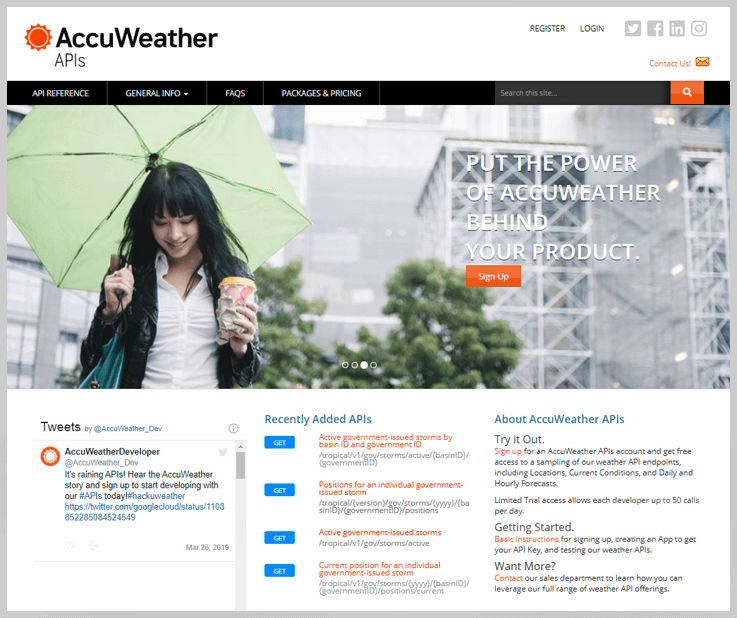
Highlights of AccuWeather Weather API-
- Showcase Current Conditions
- 24-Hour Historical Current Conditions
- Forecast 10-day
- Forecast 72-hour
- Indices 10-day
- Alarms 10-day
- Translations in diverse languages
- Tropical
- Alerts
- Imagery
- Location
Pricing:
The limited trial provides 50 calls per day. Calls for this best weather API can then be purchased with one of three plans, each giving access to long-range & more reliable forecasts.
2. Darksky
Next up on our list is Dark Sky, whose patented, consumer-oriented weather app has made a name for itself. Besides, the API offers worldwide current and historical weather data, as well as forecasts and warnings. This data is based on diverse weather conditions like atmospheric pressure, cloud cover, dew point, humidity, moon phase & more. It is generally highly regarded for its accuracy. Also, it is mostly selected by developers for its hyperlocal geographical precision.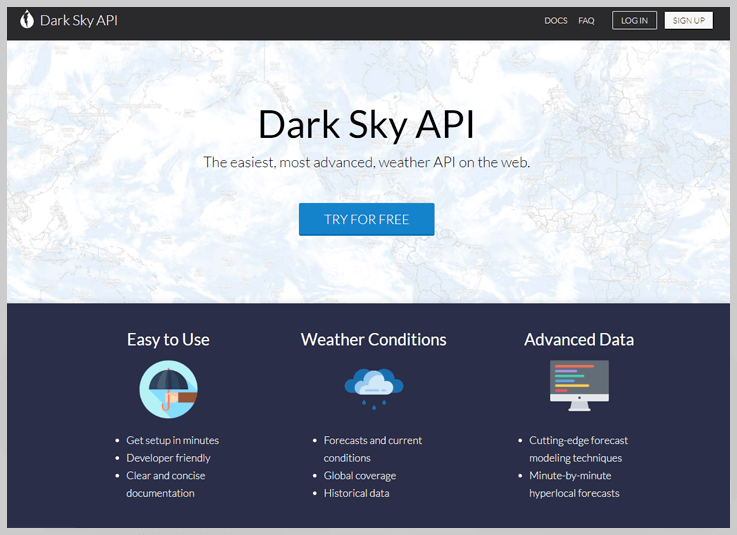
Highlights of Darksky Weather API-
- Observations dating back decades, hour by hour and day by day
- Severe weather warnings in the US, Canada, the member countries of the European Union and Israel
- Easy to use
- Developer-friendly
- Simple and succinct documentation
- Weather conditions Predictions and current conditions
- Local coverage
- Historical data
- Severe weather warnings
- Advanced data cutting-edge modeling methods
- Minute-by-minute hyperlocal forecasts
- Backed by a wide variety of data sources
Pricing:
This API for weather predictions is free of charge for up to 1,000 calls per day. Following this, you will have to pay $0.0001 per call on exceeding the call limits.
3. Weatherbit API
The Weatherbit API provides basic links to the Weatherbit.io Weather API. Moreso, from only latitude and longitude coordinates, you can get the weather forecast data back in JSON format.
While not completely free, the Weatherbit API provides a basic plan that allows developers to send 150 requests per day.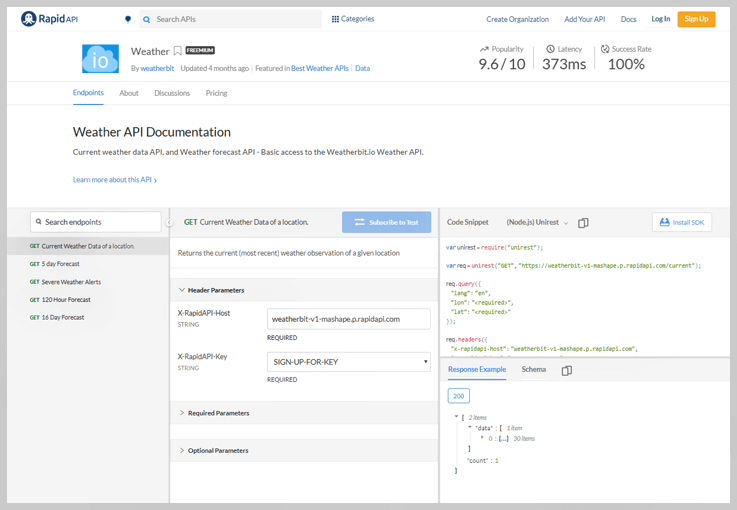
Highlights of Weatherbit Weather API-
- Current Weather Data of a location.
- Severe Weather Alerts
- 5-day Forecast
- 120 Hour Forecast
- 16 Day Forecast
Pricing:
Premium pricing commences at $35 a month. Free version limited to 500 API calls/day (not for use with commercial projects).
4. OpenWeather
OpenWeatherMap provides APIs for weather data for different timeline data types. In a solution inspired by crowdsourcing initiatives such as Wikipedia, weather data from worldwide weather services and more than 40,000 weather stations is collected. Nevertheless, this freemium solution also includes secure access to the 5-day/3-hour API, weather warnings and a weather map.
One thing to bear in mind is that besides limited data access, your OpenWeatherMap free account. It also limits your request to a maximum of 60 API calls per minute.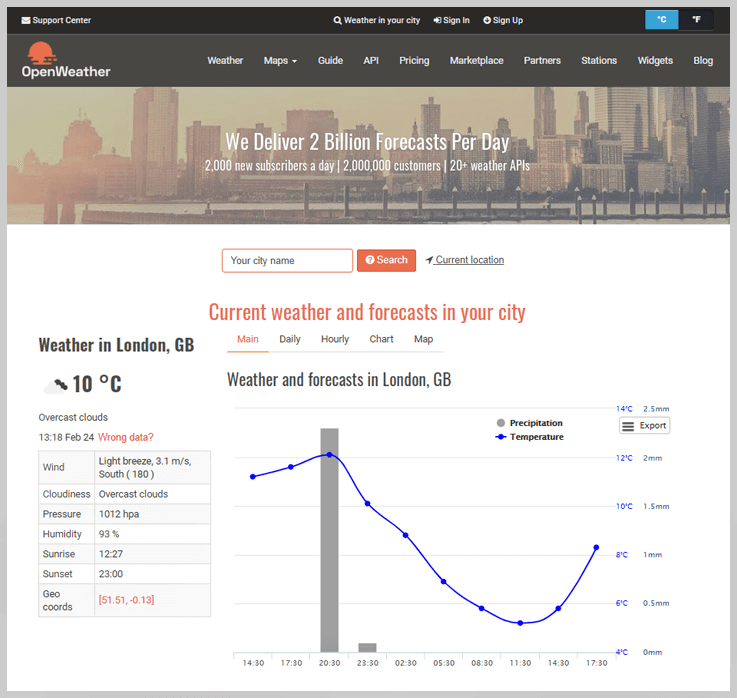
Highlights of OpenWeather Weather API-
- 4 days/hourly forecast reports
- 5 days/3 hour forecast reports
- 16 days/daily forecast reports
- Climate forecast for 30 days
- Weather maps consist of Current, Forecast, Historical layers
- Provides Relief maps
- Bulk downloading option
- UV index available
- Weather alerts
Pricing:
Free up-to-date weather and forecast data for up to 60 calls a minute. Further, developers have the option of purchasing additional calls from one of the four plans. This also allows access to wider weather predictions and advanced weather maps.
5. Weatherbit.io
The most comprehensive collection of weather historical observations. Above all this forecast API supports multiple data sources, including station info, satellite, radar & more. Apart from this, you get observed hyperlocal weather or weather forecasts for every point of the globe. Climate API response times an average of 200 ms or less.
Highlights of Weatherbit.io Weather API-
- Unparalleled Forecast Accuracy
- 99.9% uptime guaranteed
- Daily forecasts
- Current weather data
- Hourly forecasts
- Historical data
- Air Quality / Energy / Agweather API access
Pricing:
This best weather API offers a free plan that includes daily forecasts and weather data. Moreover, this Weather API Requests price starts from $35/month for daily forecasts. Further, this goes up to 470/month which includes current weather data, hourly forecasts and much more.
Final Thoughts On Weather APIs-
Finally, the list comes to an end. Above, we have mentioned all the Top Weather APIs. These APIs proffer distinct functionalities based on daily forecasts, reports, historical data & much more. So, you can select the one that fits in your box of requirements.
Further, for any more queries, you can get back to us. Share your views in the comments section below.
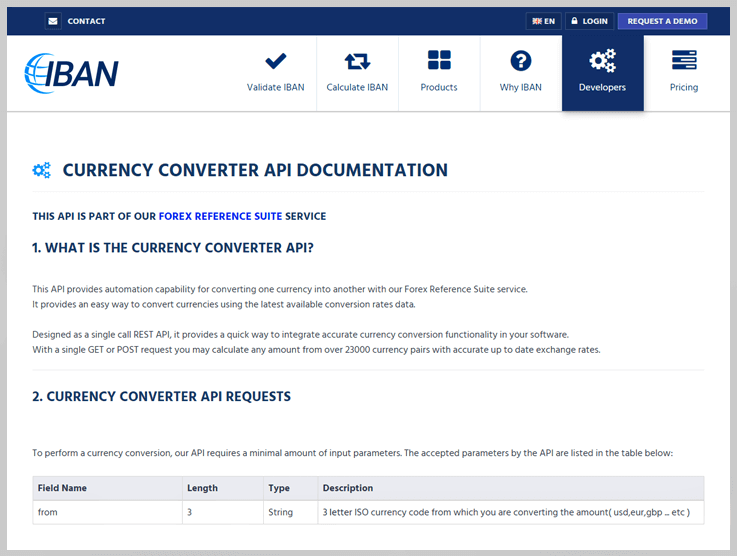
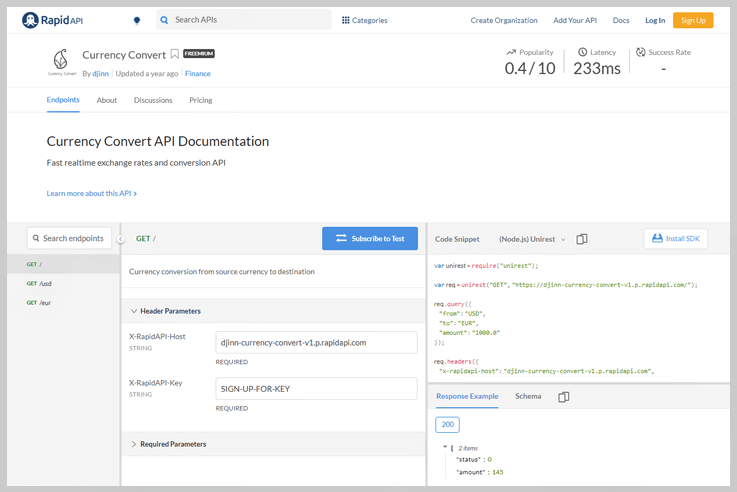
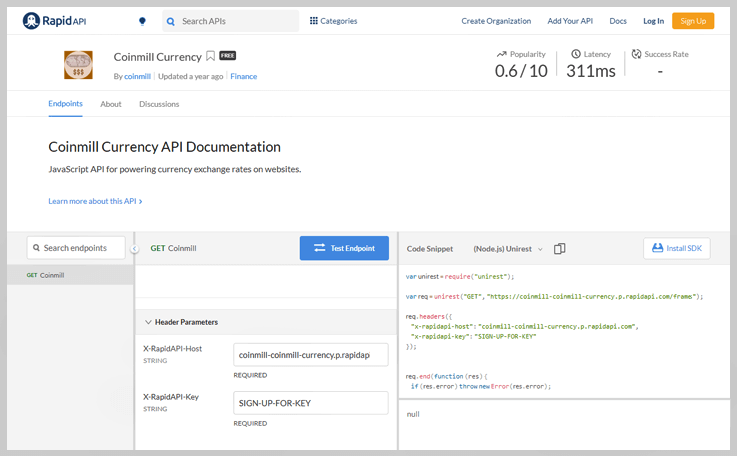
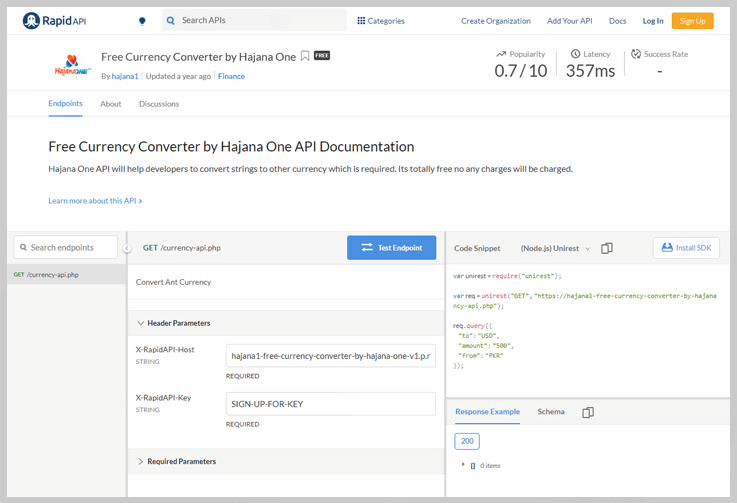
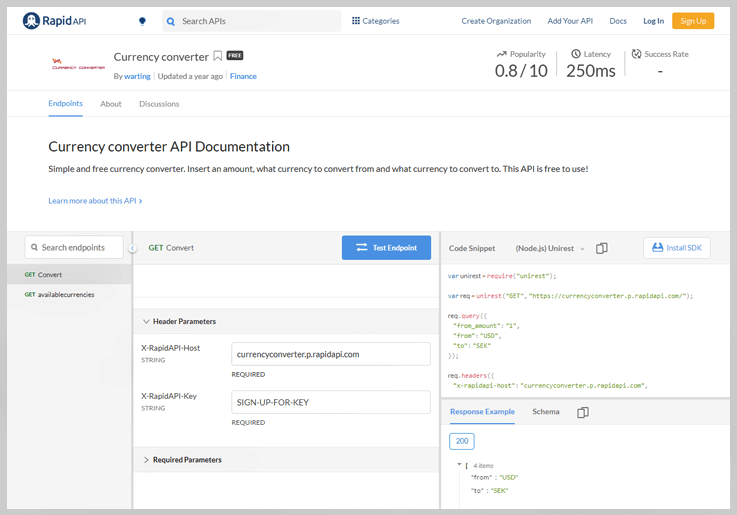
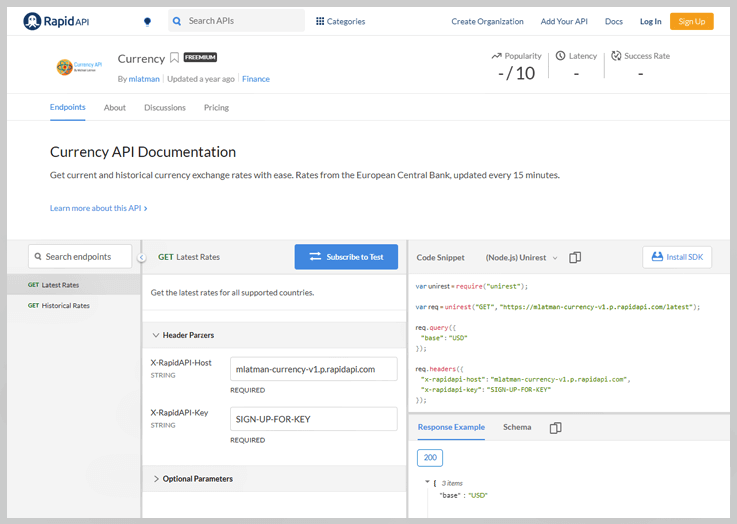
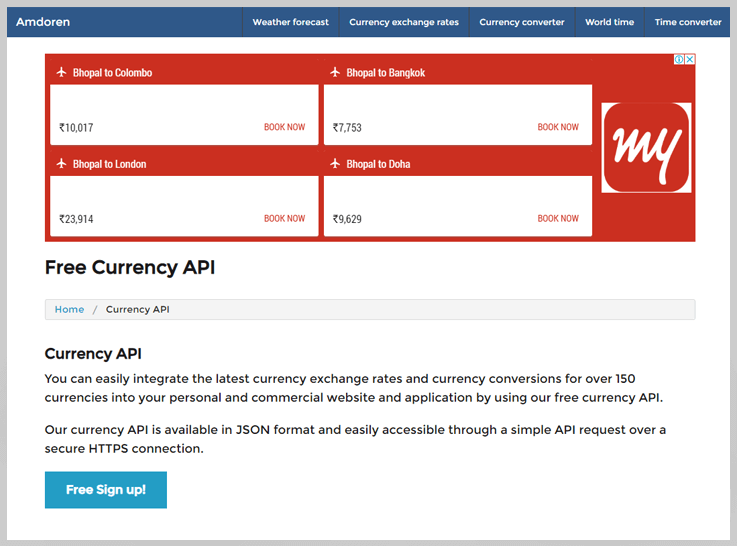
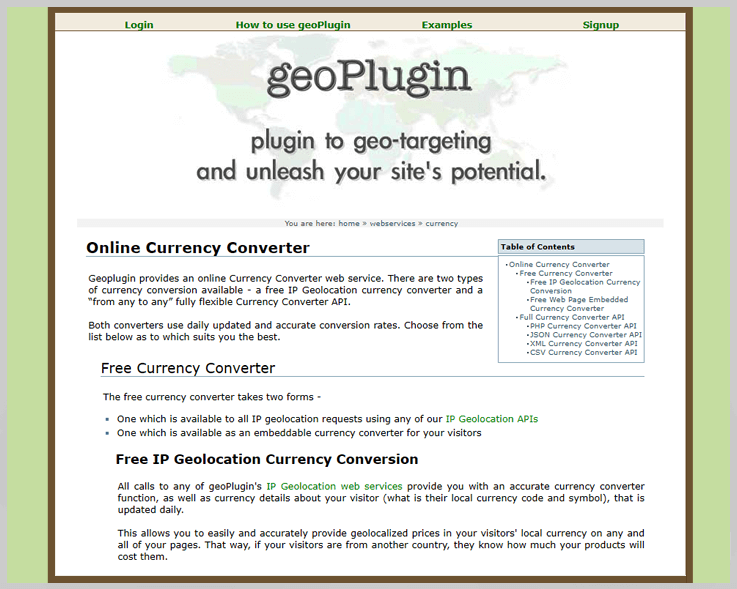
11 Best Foreign Exchange Rates API Services 2022

Most of the business owner who deals with financial markets on a daily basis must have been looked for a tool for currency conversion and exchange rates. Keeping the same in mind, many financial services released their APIs in the market. The reason for exposing APIs is, it eases the work, saves time and provides accuracy.
Here in this particular help guide, we’ll reveal some of the Best Foreign Exchange Rates API Services available in the market.
Choose accordingly and then integrate it with your website and you’re good to go.
Foreign Exchange Rates API