

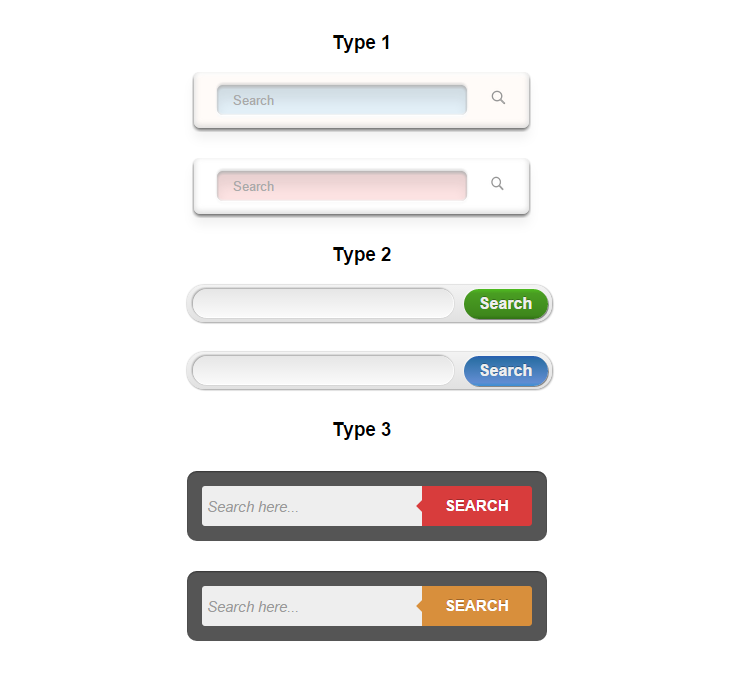
A search box frequently used by websites to make your website user friendly. By the search box user can search the content. Adding stylish search box on your website.This will help searching data content and also make a website appear professional.
In this tutorial we are going to explain how you can make stylish search box using only HTML and CSS. Here we are demonstrate three types of stylish search box with code and demo as well.
You can also refer our live demo or download the Script file. Extract the downloaded files, save it and run index.html on browser
If you want code for all button like above demo download the script and extract them. Here we are given the individual HTML code with CSS of above Type.
Search Box : Type 1

HTML Code:
Copy below code in your HTML file.
<!DOCTYPE html>
<html>
<head>
<title>Design search Button</title>
</head>
<body>
<!-- search form 1 -->
<form class="searchbox_1" action="">
<input type="search" class="search_1" placeholder="Search" />
<button type="submit" class="submit_1" value="search"> </button>
</form>
</body>
</html>CSS Code:
Copy below code in your CSS file, or inside style tag in HTML page.
/* search box*/
.searchbox_1{
background-color: #fffbf8;
padding:13px;
width:335px;
margin: 100px auto;
-webkit-box-sizing:border-box;
-moz-box-sizing:border-box;
box-sizing:border-box;
border-radius:6px;
-webkit-box-shadow:
0 2px 4px 0 rgba(72, 72, 72, 0.83),
0 10px 15px 0 rgba(126, 126, 126, 0.12),
0 -2px 6px 1px rgba(199, 199, 199, 0.55) inset,
0 2px 4px 2px rgba(255, 255, 255, 0.83) inset;
-moz-box-shadow:
0 2px 4px 0 rgba(72, 72, 72, 0.83),
0 10px 15px 0 rgba(126, 126, 126, 0.12),
0 -2px 6px 1px rgba(199, 199, 199, 0.55) inset,
0 2px 4px 2px rgba(255, 255, 255, 0.83) inset;
box-shadow:
0 2px 4px 0 rgba(72, 72, 72, 0.83),
0 10px 15px 0 rgba(126, 126, 126, 0.12),
0 -2px 6px 1px rgba(199, 199, 199, 0.55) inset,
0 2px 4px 2px rgba(255, 255, 255, 0.83) inset;
}
.search_1{
width:250px;
height:30px;
padding-left:15px;
border-radius:6px;
border:none;
color:#0F0D0D;;
font-weight:500;
background-color:#E2EFF7;;
-webkit-box-shadow:
0 -2px 2px 0 rgba(199, 199, 199, 0.55),
0 1px 1px 0 #fff,
0 2px 2px 1px #fafafa,
0 2px 4px 0 #b2b2b2 inset,
0 -1px 1px 0 #f2f2f2 inset,
0 15px 15px 0 rgba(41, 41, 41, 0.09) inset;
-moz-box-shadow:
0 -2px 2px 0 rgba(199, 199, 199, 0.55),
0 1px 1px 0 #fff,
0 2px 2px 1px #fafafa,
0 2px 4px 0 #b2b2b2 inset,
0 -1px 1px 0 #f2f2f2 inset,
0 15px 15px 0 rgba(41, 41, 41, 0.09) inset;
box-shadow:
0 -2px 2px 0 rgba(199, 199, 199, 0.55),
0 1px 1px 0 #fff,
0 2px 2px 1px #fafafa,
0 2px 4px 0 #b2b2b2 inset,
0 -1px 1px 0 #f2f2f2 inset,
0 15px 15px 0 rgba(41, 41, 41, 0.09) inset;
}
.submit_1{
width:35px;
height:30px;
background-image:url(img/search-btn.png);
background-repeat: no-repeat;
background-position: 17px 2px;
background-color:transparent;
-webkit-background-size:20px 20px;
background-size:20px 20px;
border:none;
cursor:pointer;
}
.search_1:focus{
outline:0;
}
Search Box : Type 2

HTML Code:
Copy below code in your HTML file.
<!DOCTYPE html>
<html>
<head>
<title>Design search Button</title>
</head>
<body>
<!-- search form 3 -->
<form id="search-form_3">
<input type="text" class="search_3"/>
<input type="submit" class="submit_3" value="Search" />
</form>
</body>
</html>
CSS Code:
Copy below code in your CSS file, or inside style tag in HTML page.
/* search box*/

#search-form_3 {
background: #e1e1e1; /* Fallback color for non-css3 browsers */
width: 365px;
margin: 100px auto;

/* Gradients */
background: -webkit-gradient( linear,left top, left bottom, color-stop(0, rgb(243,243,243)), color-stop(1, rgb(225,225,225)));
background: -moz-linear-gradient( center top, rgb(243,243,243) 0%, rgb(225,225,225) 100%);

/* Rounded Corners */
border-radius: 17px;
-webkit-border-radius: 17px;
-moz-border-radius: 17px;

/* Shadows */
box-shadow: 1px 1px 2px rgba(0,0,0,.3), 0 0 2px rgba(0,0,0,.3);
-webkit-box-shadow: 1px 1px 2px rgba(0,0,0,.3), 0 0 2px rgba(0,0,0,.3);
-moz-box-shadow: 1px 1px 2px rgba(0,0,0,.3), 0 0 2px rgba(0,0,0,.3);
}

/*** TEXT BOX ***/
.search_3{
background: #fafafa; /* Fallback color for non-css3 browsers */

/* Gradients */
background: -webkit-gradient( linear, left bottom, left top, color-stop(0, rgb(250,250,250)), color-stop(1, rgb(230,230,230)));
background: -moz-linear-gradient( center top, rgb(250,250,250) 0%, rgb(230,230,230) 100%);
border: 0;
border-bottom: 1px solid #fff;
border-right: 1px solid rgba(255,255,255,.8);
font-size: 16px;
margin: 4px;
padding: 5px;
width: 250px;

/* Rounded Corners */
border-radius: 17px;
-webkit-border-radius: 17px;
-moz-border-radius: 17px;

/* Shadows */
box-shadow: -1px -1px 2px rgba(0,0,0,.3), 0 0 1px rgba(0,0,0,.2);
-webkit-box-shadow: -1px -1px 2px rgba(0,0,0,.3), 0 0 1px rgba(0,0,0,.2);
-moz-box-shadow: -1px -1px 2px rgba(0,0,0,.3), 0 0 1px rgba(0,0,0,.2);
}

/*** USER IS FOCUSED ON TEXT BOX ***/
.search_3:focus{
outline: none;
background: #fff; /* Fallback color for non-css3 browsers */

/* Gradients */
background: -webkit-gradient( linear, left bottom, left top, color-stop(0, rgb(255,255,255)), color-stop(1, rgb(235,235,235)));
background: -moz-linear-gradient( center top, rgb(255,255,255) 0%, rgb(235,235,235) 100%);
}

/*** SEARCH BUTTON ***/
.submit_3{
background: #44921f;/* Fallback color for non-css3 browsers */
/* Gradients */
background: -webkit-gradient( linear, left top, left bottom, color-stop(0, rgb(79,188,32)), color-stop(0.15, rgb(73,157,34)), color-stop(0.88, rgb(62,135,28)), color-stop(1, rgb(49,114,21)));
background: -moz-linear-gradient( center top, rgb(79,188,32) 0%, rgb(73,157,34) 15%, rgb(62,135,28) 88%, rgb(49,114,21) 100%);
border: 0;
color: #eee;
cursor: pointer;
float: right;
font: 16px 'Raleway', sans-serif;
font-weight: bold;
height: 30px;
margin: 4px 4px 0;
text-shadow: 0 -1px 0 rgba(0,0,0,.3);
width: 84px;
outline: none;

/* Rounded Corners */
border-radius: 30px;
-webkit-border-radius: 30px;
-moz-border-radius: 30px;

/* Shadows */
box-shadow: -1px -1px 1px rgba(255,255,255,.5), 1px 1px 0 rgba(0,0,0,.4);
-moz-box-shadow: -1px -1px 1px rgba(255,255,255,.5), 1px 1px 0 rgba(0,0,0,.2);
-webkit-box-shadow: -1px -1px 1px rgba(255,255,255,.5), 1px 1px 0 rgba(0,0,0,.4);
}
/*** SEARCH BUTTON HOVER ***/
.submit_3:hover {
background: #4ea923; /* Fallback color for non-css3 browsers */

/* Gradients */
background: -webkit-gradient( linear, left top, left bottom, color-stop(0, rgb(89,222,27)), color-stop(0.15, rgb(83,179,38)), color-stop(0.8, rgb(66,143,27)), color-stop(1, rgb(54,120,22)));
background: -moz-linear-gradient( center top, rgb(89,222,27) 0%, rgb(83,179,38) 15%, rgb(66,143,27) 80%, rgb(54,120,22) 100%);
}
.submit_3:active {
background: #4ea923; /* Fallback color for non-css3 browsers */

/* Gradients */
background: -webkit-gradient( linear, left bottom, left top, color-stop(0, rgb(89,222,27)), color-stop(0.15, rgb(83,179,38)), color-stop(0.8, rgb(66,143,27)), color-stop(1, rgb(54,120,22)));
background: -moz-linear-gradient( center bottom, rgb(89,222,27) 0%, rgb(83,179,38) 15%, rgb(66,143,27) 80%, rgb(54,120,22) 100%);
}
Search Box : Type 3

HTML Code:
Copy below code in your HTML file.
<!DOCTYPE html>
<html>
<head>
<title>Design search Button</title>
</head>
<body>
<!-- search form 6 -->
<div class="button_box2">
<form class="form-wrapper-2 cf">
<input type="text" placeholder="Search here..." required>
<button type="submit">Search</button>
</form>
</div>
</body>
</html>
CSS Code:
Copy below code in your CSS file, or inside style tag in HTML page.
/* search box */

.button_box2 {
margin:100px auto;
}
/*-------------------------------------*/
.cf:before, .cf:after{
content:"";
display:table;
}
.cf:after{
clear:both;
}
.cf{
zoom:1;
}
/*-------------------------------------*/

.form-wrapper-2 {
width: 330px;
padding: 15px;
background: #555;
-moz-border-radius: 10px;
-webkit-border-radius: 10px;
border-radius: 10px;
-moz-box-shadow: 0 1px 1px rgba(0,0,0,.4) inset, 0 1px 0 rgba(255,255,255,.2);
-webkit-box-shadow: 0 1px 1px rgba(0,0,0,.4) inset, 0 1px 0 rgba(255,255,255,.2);
box-shadow: 0 1px 1px rgba(0,0,0,.4) inset, 0 1px 0 rgba(255,255,255,.2);
}
.form-wrapper-2 input {
width: 210px;
height: 20px;
padding: 10px 5px;
float: left;
font: bold 15px 'Raleway', sans-serif;
border: 0;
background: #eee;
-moz-border-radius: 3px 0 0 3px;
-webkit-border-radius: 3px 0 0 3px;
border-radius: 3px 0 0 3px;
}
.form-wrapper-2 input:focus {
outline: 0;
background: #fff;
-moz-box-shadow: 0 0 2px rgba(0,0,0,.8) inset;
-webkit-box-shadow: 0 0 2px rgba(0,0,0,.8) inset;
box-shadow: 0 0 2px rgba(0,0,0,.8) inset;
}
.form-wrapper-2 input::-webkit-input-placeholder {
color: #999;
font-weight: normal;
font-style: italic;
}
.form-wrapper-2 input:-moz-placeholder {
color: #999;
font-weight: normal;
font-style: italic;
}
.form-wrapper-2 input:-ms-input-placeholder {
color: #999;
font-weight: normal;
font-style: italic;
}
.form-wrapper-2 button {
overflow: visible;
position: relative;
float: right;
border: 0;
padding: 0;
cursor: pointer;
height: 40px;
width: 110px;
font: bold 15px/40px 'Raleway', sans-serif;
color: #fff;
text-transform: uppercase;
background: #D88F3C;
-moz-border-radius: 0 3px 3px 0;
-webkit-border-radius: 0 3px 3px 0;
border-radius: 0 3px 3px 0;
text-shadow: 0 -1px 0 rgba(0, 0 ,0, .3);
}
.form-wrapper-2 button:hover{
background: #FA8807;
}
.form-wrapper-2 button:active,
.form-wrapper-2 button:focus{
background: #c42f2f;
}
.form-wrapper-2 button:before {
content: '';
position: absolute;
border-width: 8px 8px 8px 0;
border-style: solid solid solid none;
border-color: transparent #D88F3C transparent;
top: 12px;
left: -6px;
}
.form-wrapper-2 button:hover:before{
border-right-color: #FA8807;
}
.form-wrapper-2 button:focus:before{
border-right-color: #c42f2f;
}
.form-wrapper-2 button::-moz-focus-inner {
border: 0;
padding: 0;
}
Conclusion :
In this tutorial we have learned about, how we can make different types of Search Box. Hope you have benefited from it. Keep visiting our websites for more information and coding tricks.
Recommended blogs –
jQuery CSS Progress Bar

ProgressBar is a graphical presentation which shows some progress. It shows a bar representing the completing of the task. Normally the ProgresBar do not display the amount of completion in numbers. If we want, we can display it in the Text or as graphical format.
In this tutorial we are going to explain how we can make a simple and stylish progress bar using jQuery and HTML/css. Here we are explaining five types of progress.
You can also refer our live demo or download the Script file. Extract the downloaded files, save it and run index.html on browser


HTML Code
Copy below code in your index.html page.
<div class="bar_container">
<div id="main_container">
<div id="pbar" class="progress-pie-chart" data-percent="0">
<div class="ppc-progress">
<div class="ppc-progress-fill"></div>
</div>
<div class="ppc-percents">
<div class="pcc-percents-wrapper">
<span>%</span>
</div>
</div>
</div>

<progress style="display: none" id="progress_bar" value="0" max="100"></progress>
</div>
</div>
CSS code
Copy below code in your style.css file or use internal, inside style tag.
/* Pie Chart */
.progress-pie-chart {
width:200px;
height: 200px;
border-radius: 50%;
background-color: #E5E5E5;
position: relative;
}
.progress-pie-chart.gt-50 {
background-color: #81CE97;
}

.ppc-progress {
content: "";
position: absolute;
border-radius: 50%;
left: calc(50% - 100px);
top: calc(50% - 100px);
width: 200px;
height: 200px;
clip: rect(0, 200px, 200px, 100px);
}
.ppc-progress .ppc-progress-fill {
content: "";
position: absolute;
border-radius: 50%;
left: calc(50% - 100px);
top: calc(50% - 100px);
width: 200px;
height: 200px;
clip: rect(0, 100px, 200px, 0);
background: #81CE97;
transform: rotate(60deg);
}
.gt-50 .ppc-progress {
clip: rect(0, 100px, 200px, 0);
}
.gt-50 .ppc-progress .ppc-progress-fill {
clip: rect(0, 200px, 200px, 100px);
background: #E5E5E5;
}

.ppc-percents {
content: "";
position: absolute;
border-radius: 50%;
left: calc(50% - 173.91304px/2);
top: calc(50% - 173.91304px/2);
width: 173.91304px;
height: 173.91304px;
background: #fff;
text-align: center;
display: table;
}
.ppc-percents span {
display: block;
font-size: 2.6em;
font-weight: bold;
color: #81CE97;
}

.pcc-percents-wrapper {
display: table-cell;
vertical-align: middle;
}

.progress-pie-chart {
margin: 50px auto 0;
}</style>
jQuery Code
Copy below script in your script.js file or use internal, inside script tag.
$(document).ready(function() {
var progressbar = $('#progress_bar');
max = progressbar.attr('max');
time = (1000 / max) * 5;
value = progressbar.val();

var loading = function() {
value += 1;
addValue = progressbar.val(value);

$('.progress-value').html(value + '%');
var $ppc = $('.progress-pie-chart'),
deg = 360 * value / 100;
if (value > 50) {
$ppc.addClass('gt-50');
}

$('.ppc-progress-fill').css('transform', 'rotate(' + deg + 'deg)');
$('.ppc-percents span').html(value + '%');

if (value == max) {
clearInterval(animate);
}
};

var animate = setInterval(function() {
loading();
}, time);
});
HTML Code
Copy below code in your index.html page.
 <div class="progress">
<div class="circle done">
<span class="label">1</span>
<span class="title">0%</span>
</div>
<span class="bar done"></span>
<div class="circle done">
<span class="label">2</span>
<span class="title">25%</span>
</div>
<span class="bar half"></span>
<div class="circle active">
<span class="label">3</span>
<span class="title">50%</span>
</div>
<span class="bar"></span>
<div class="circle">
<span class="label">4</span>
<span class="title">75%</span>
</div>
<span class="bar"></span>
<div class="circle">
<span class="label">5</span>
<span class="title">100%</span>
</div>
</div>
CSS Code
Copy below code in your style.css file or use internal, inside style tag.
.progress {
width: 1000px;
margin: 20px auto;
text-align: center;
}
.progress .circle,
.progress .bar {
display: inline-block;
background: #fff;
width: 40px; height: 40px;
border-radius: 40px;
border: 1px solid #d5d5da;
}
.progress .bar {
position: relative;
width: 80px;
height: 6px;
top: -33px;
margin-left: -5px;
margin-right: -5px;
border-left: none;
border-right: none;
border-radius: 0;
}
.progress .circle .label {
display: inline-block;
width: 32px;
height: 32px;
line-height: 32px;
border-radius: 32px;
margin-top: 3px;
color: #b5b5ba;
font-size: 17px;
}
.progress .circle .title {
color: #b5b5ba;
font-size: 13px;
line-height: 30px;
margin-left: -5px;
}

/* Done / Active */
.progress .bar.done,
.progress .circle.done {
background: #eee;
}
.progress .bar.active {
background: linear-gradient(to right, #EEE 40%, #FFF 60%);
}
.progress .circle.done .label {
color: #FFF;
background: #81CE97;
box-shadow: inset 0 0 2px rgba(0,0,0,.2);
}
.progress .circle.done .title {
color: #444;
}
.progress .circle.active .label {
color: #FFF;
background: #0c95be;
box-shadow: inset 0 0 2px rgba(0,0,0,.2);
}
.progress .circle.active .title {
color: #0c95be;
}
jQuery Code
Copy below script in your script.js file or use internal, inside script tag.
$(document).ready(function() {
var i = 1;
$('.progress .circle').removeClass().addClass('circle');
$('.progress .bar').removeClass().addClass('bar');
setInterval(function() {
$('.progress .circle:nth-of-type(' + i + ')').addClass('active');

$('.progress .circle:nth-of-type(' + (i - 1) + ')').removeClass('active').addClass('done');

$('.progress .circle:nth-of-type(' + (i - 1) + ') .label').html('✓');

$('.progress .bar:nth-of-type(' + (i - 1) + ')').addClass('active');

$('.progress .bar:nth-of-type(' + (i - 2) + ')').removeClass('active').addClass('done');

i++;

if (i == 0) {
$('.progress .bar').removeClass().addClass('bar');
$('.progress div.circle').removeClass().addClass('circle');
i = 1;
}
}, 1000);
});
HTML Code
Copy below code in your index.html page.
<div class="p_bar_body"><progress id="progress_bar" value="0" max="100"></progress><div class="progress-value"></div></div>
CSS Code
Copy below code in your style.css file or use internal, inside style tag.
progress {
width: 500px;
height: 25px;
border: 0px none;
background-color: #E5E5E5;
border-radius: 10px;
padding: 4px 5px 5px 5px;
}
progress::-webkit-progress-bar {
background-color: #E5E5E5;
border-radius: 50px;
padding: 2px;
box-shadow: 0 1px 0px 0 rgba(255, 255, 255, 0.2);
}
progress::-webkit-progress-value {
border-radius: 50px;
background:
-webkit-linear-gradient(135deg, transparent, transparent 20%, rgba(0, 0, 0, 0.1) 33%, #45B565 50%, transparent 10%),
-webkit-linear-gradient(top, #81CE97, #81CE97),
-webkit-linear-gradient(left, #ba7448, #c4672d);
background-size: 25px 14px, 100% 100%, 100% 100%;
-webkit-animation: move 5s linear 0 infinite;

}
@-webkit-keyframes move {
0% {background-position: 0px 0px, 0 0, 0 0}
100% {background-position:100px 0px, 0 0, 0 0}
}
.progress-value{
color: #444;
margin-left: 507px;
margin-top: -24px;
}

.progressDiv {
width: 84%;
background: #fcfcfc;
height: 325px;
border: 1px solid #ccc;
position: relative;
left: 7%;
top: 100px;
display: inline-block;
border-radius: 2px;
box-shadow: 0px 1px 1px 1px #ccc;
}
jQuery Code
Copy below script in your script.js file or use internal, inside script tag.
$(document).ready(function() {
var progressbar = $('#progress_bar');

max = progressbar.attr('max');

time = (1000 / max) * 5;

value = progressbar.val();

var loading = function() {
value += 1;

addValue = progressbar.val(value);

$('.progress-value').html(value + '%');

if (value == max) {
clearInterval(animate);
}
};

var animate = setInterval(function() {
loading();
}, time);
});
HTML Code
Copy below code in your index.html page.
<div class="container">
<ul id="progress">
<li><div id="layer1" class="ball"></div></li>
<li><div id="layer2" class="ball"></div></li>
<li><div id="layer3" class="ball"></div></li>
<li><div id="layer4" class="ball"></div></li>
<li><div id="layer5" class="ball"></div></li>
</ul>
</div>
CSS Code
Copy below code in your style.css file or use internal, inside style tag.
ul#progress {
list-style:none;
width:125px;
margin:0 auto;
padding-top:50px;
padding-bottom:50px;
padding-right: 46px;
}
ul#progress li {
float:left;
position:relative;
width:15px;
height:15px;
border:1px solid #fff;
border-radius:50px;
margin-left:10px;
border-left:1px solid #E5E5E5; border-top:1px solid #E5E5E5; border-right:1px solid #E5E5E5; border-bottom:1px solid #E5E5E5;
background:#E5E5E5;;
}

ul#progress li:first-child { margin-left:0; }

.running .ball {
background-color:#b5b5ba;
background-image: -moz-linear-gradient(90deg, #2187e7 25%, #a0eaff);
background-color:#81CE97;

width:15px;
height:15px;
border-radius:50px;
-moz-transform:scale(0);
-webkit-transform:scale(0);
-moz-animation:loading 1s linear forwards;
-webkit-animation:loading 1s linear forwards;
}

#layer1 { -moz-animation-delay:0.5s; -webkit-animation-delay:0.5s; }
#layer2 { -moz-animation-delay:1s; -webkit-animation-delay:1.5s; }
#layer3 { -moz-animation-delay:1.5s; -webkit-animation-delay:2.5s; }
#layer4 { -moz-animation-delay:2s; -webkit-animation-delay:3.5s; }
#layer5 { -moz-animation-delay:2.5s; -webkit-animation-delay:5s; }

@-moz-keyframes loading {
0%{-moz-transform:scale(0,0);}
100%{-moz-transform:scale(1,1);}
}

@-webkit-keyframes loading {
0%{-webkit-transform:scale(0,0);}
100%{-webkit-transform:scale(1,1);}
}
jQuery Code
Copy below script in your script.js file or use internal, inside script tag.
$(document).ready(function() {
$('#progress').removeClass('running');
$('#progress').removeClass('running').delay(10).queue(function(next) {
$(this).addClass('running');
next();
});
return false;

});
HTML Code
Copy below code in your index.html page.
<div class="container">
<ul id="loadbar">
<li><div id="layerFill1" class="bar"></div></li>
<li><div id="layerFill2" class="bar"></div></li>
<li><div id="layerFill3" class="bar"></div></li>
<li><div id="layerFill4" class="bar"></div></li>
<li><div id="layerFill5" class="bar"></div></li>
<li><div id="layerFill6" class="bar"></div></li>
<li><div id="layerFill7" class="bar"></div></li>
<li><div id="layerFill8" class="bar"></div></li>
<li><div id="layerFill9" class="bar"></div></li>
<li><div id="layerFill10" class="bar"></div></li>
</ul>
</div>
CSS Code
Copy below code in your style.css file or use internal, inside style tag.
ul#loadbar {
list-style:none;
width:140px;
margin:0 auto;
padding-top:50px;
padding-bottom:75px;
padding-right: 46px;
}
ul#loadbar li {
float:left;
position:relative;
width:11px;
height:26px;
margin-left:1px;
border-left:1px solid #E5E5E5; border-top:1px solid #E5E5E5; border-right:1px solid #E5E5E5; border-bottom:1px solid #E5E5E5;
background:#E5E5E5;
}

ul#loadbar li:first-child { margin-left:0; }

.ins .bar {
background-color:#81CE97;
width:11px;
height:26px;
opacity:0;
-webkit-animation:fill .5s linear forwards;
-moz-animation:fill .5s linear forwards;
}

#layerFill1 { -moz-animation-delay:0.5s; -webkit-animation-delay:0.5s; }
#layerFill2 { -moz-animation-delay:1s; -webkit-animation-delay:1s; }
#layerFill3 { -moz-animation-delay:1.5s; -webkit-animation-delay:1.5s; }
#layerFill4 { -moz-animation-delay:2s; -webkit-animation-delay:2s; }
#layerFill5 { -moz-animation-delay:2.5s; -webkit-animation-delay:2.5s; }
#layerFill6 { -moz-animation-delay:3s; -webkit-animation-delay:3s; }
#layerFill7 { -moz-animation-delay:3.5s; -webkit-animation-delay:3.5s; }
#layerFill8 { -moz-animation-delay:4s; -webkit-animation-delay:4s; }
#layerFill9 { -moz-animation-delay:4.5s; -webkit-animation-delay:4.5s; }
#layerFill10 { -moz-animation-delay:5s; -webkit-animation-delay:5s; }

@-moz-keyframes fill {
0%{ opacity:0; }
100%{ opacity:1; }
}

@-webkit-keyframes fill {
0%{ opacity:0; }
100%{ opacity:1; }
}
jQuer Code
Copy below script in your script.js file or use internal, inside script tag.
$(document).ready(function() {
$('#loadbar').removeClass('ins');
$('#loadbar').removeClass('ins').delay(10).queue(function(next) {
$(this).addClass('ins');
next();
});
return false;
});
Conclusion:
In this tutorial we have learned about, how we can make different types of progress bar. Hope you have benefited from it. Keep visiting our websites for more knowledge and information.
You may also like some related post –
- CSS list – Design stylish list
- CSS Radio Button And Checkbox
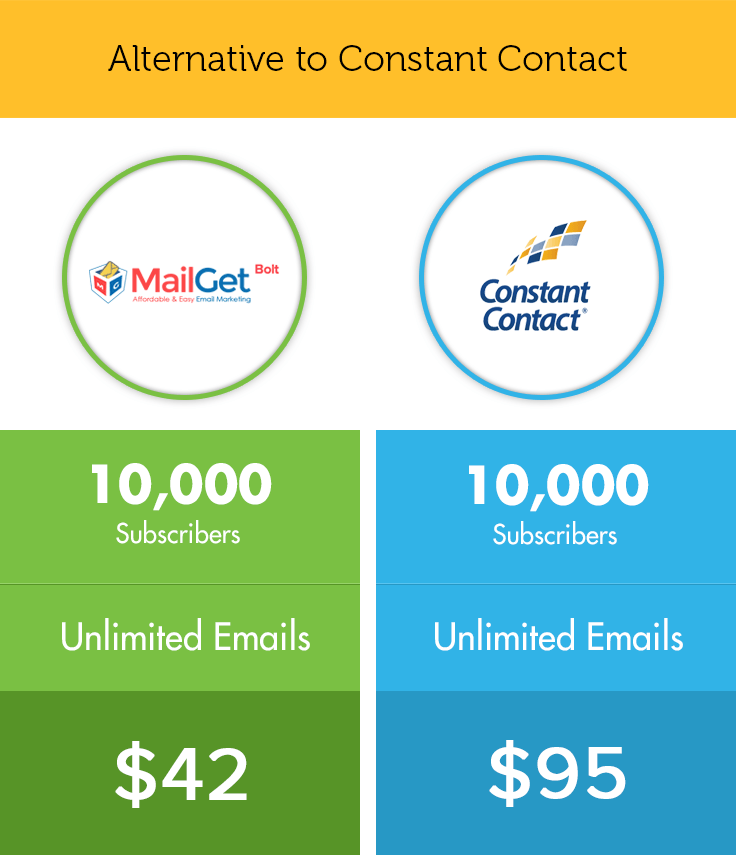
A Cheaper Constant Contact Alternative : MailGet Bolt

A good email marketing service can reduce half of your efforts of successfully delivering your product or service to your prospects. A service provider that matches your requirements like your budget, features, and so on.
Presently. there are many email marketing services that sound reliable but they are very expensive at the same time. Constant Contact is also one of them. Its cost gets higher with your growing subscribers list.
Now, if you are looking for an alternative to Constant Contact than MailGet Bolt can be the one that suits your requirements. Below are some consideration factors that explain, why to choose MailGet Bolt over Constant Contact :
MailGet Bolt vs Constant Contact : Consideration Factors
1. Pricing :
In Constant Contact the prices initially start with $20 per month for 0 – 500 contacts and then vary according to the pricing plan shown below:

Whereas in MailGet Bolt you have to pay monthly subscriber fees according to the number of subscribers you have, through your PayPal account. Table below explains pricing of MailGet Bolt.

2. Send Bulk Emails :
Start your amazing experience with the MailGet Bolt which allows you to send the bundles of emails in the large quantities.
Constant Contact is accepted by many email marketers today, but since MailGet Bolt has many smart features which make it stand apart from the crowd. Therefore one can send bulk emails at a very low cost compared to Constant Contact.
3. Email Personalization :
Nowadays B2B and B2C markets are switching into various new devices such as smartphones and tablets, so need of responsive email designing is also evolving rapidly day by day. Therefore your email campaigns and newsletters should be designed and personalized in such a way that it should fit or should adapt easily to diverse screen sizes.
Constant contact has a cluttered user interface. It can do personalization, but it is limited and fails to impress when we talk about advanced customization features. Flexibility to design an email template is also limited as WYSIWYG editor only works if you use templates that are provided by them.
Personalization of your email is easy with MailGet Bolt. It’s an Email builder that will help you design your email templates within a few clicks. It has a drag & drop interface that allows personalized text, images etc. One can easily create and personalize his own emails as per his requirements.
4. Deliverability :
High rate of email deliverability is necessary for a business to avoid its messages landing in spam folder. To achieve this a combination of email authentication and proper list management is required.
Though Constant Contact claims for high email deliverability but it somehow fails and still emails are flagged as spam.
But since MailGet is using Amazon SES services, it is equipped with content filtering technologies where it scans the outgoing email and ensures that the content meets ISP standards and then either queues it for sending or routes back to the sender for correction. Amazon SES also detects and blocks messages containing viruses or malware before they can be sent.
5. Storage Space :
A good email is simply a collection of images and text. So the storage space is a priority for uploading an image.
Since MailGet Bolt is self hosted, so from servers to hosting, everything is managed by it, and so there is no barrier for uploading. You can upload unlimited images with easy email template creator.
In contrast to it, through Constant Contact you can upload only upto five files or images for free and after that one need to upgrade to Library Plus to upload more and for that they charge $5/mo.
Conclusion :
Constant Contact though is acclaimed by most of the audience, but its a good idea to compare before randomly choosing any email marketing service. MailGet Bolt is definitely a good alternative to Constant Contact that can meet all your requirements at very affordable prices.
It totally depends upon your choice as to which email service you opt for better ROI from email marketing, but knowing the basic difference between MailGet Bolt and Constant Contact may help you a lot in making your decisions.
Still, if you are intersted in knowing more altenatives, below are posts which can help:-
- Email Marketing Comparison : Sendy Vs MailGet Bolt
- iContact Alternative : MailGet Best & Affordable Solution
- Alternative For MailChimp : Similar Features At Low Cost
CodeIgniter : Create Own Helper

The helper is used as a function library, by this we can just load a helper class in the controller or view as well. CodeIgniter provide different types of helper class, such as url_helper, captcha_helper ,email_helper etc. They all are located in system/helper.
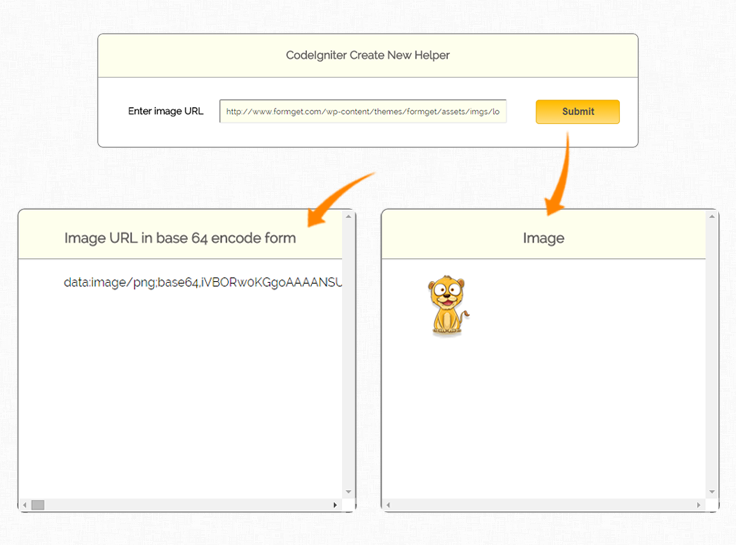
In this tutorial we are going to explain how you can create your own helper class. Here we have created helper called imagetodata. By using the function, we can convert image to data
Step to creating imagetodata helper
- Create a new file called imagetodata inside application/helper folder.
- Define function here.
- Load that helper in controller or even you can load in view as well.
- Now you call their functions.
You can also refer our live demo or download the Script file. Extract the downloaded files, save it in your local server and run it using given path
Controller File: image_controller.php
Copy the below code in your Controller File and save as image_controller.php. In controller first load helper in constructor and use their function.
<?php
class image_controller extends CI_Controller {

function __construct() {
parent::__construct();
$this->load->helper("form");
$this->load->library('form_validation');
$this->load->helper("imagetodata_helper");
}
function index(){
$this->load->view('image_view');
}

function image_to_data() {
$URL = $this->input->post('img_name');

// Validation for image url.
$this->form_validation->set_rules('img_name', '', 'callback_checkimgurl');
if ($this->form_validation->run() == FALSE) {
echo "<script type='text/javascript'>
alert('Please Enter Image URL');
</script>";
$this->load->view('image_view');
} else {
$data['data_image'] = convertToBase64($URL);
$this->load->view('image_view', $data);
}
}

// Check image format, if input image is valid return TRUE else returned FALSE.
function checkimgurl($img) {
if (preg_match_all('!http://.+\.(?:jpe?g|png|gif)!Ui', $img)) {
return true;
} else {
return false;
}
}
}
?>
View File : image_view.php
Copy the below code in your view and save as image_view.php. For encoding image to data by base64 just put image URL in given input box and press submit button.
<html>
<head>
<title>CodeIgniter Create New Helper</title>
<link rel="stylesheet" type="text/css" href="<?php echo base_url(); ?>css/style.css">
<link href='http://fonts.googleapis.com/css?family=Source+Sans+Pro|Open+Sans+Condensed:300|Raleway' rel='stylesheet' type='text/css'>
</head>
<body>
<div class="main">
<div id="content">
<h3 id="form_head">CodeIgniter Create New Helper</h3>
<div id="form_input">
<?php

//create form open tag
echo form_open('image_controller/image_to_data');

//create label
echo form_label('Enter image URL');

//create data input field
$data = array(
'name' => 'img_name',
'class' => 'input_box',
'placeholder' => "Please Enter Image URL",
'required' => 'required'
);
echo form_input($data);
?>
</div>
<div id="form_button">
<?php echo form_submit('submit', 'Submit', "class='submit'"); ?>
</div>
<?php
//Form close.
echo form_close(); ?>
</div>

<!-- Result div display -->
<?php if(isset($data_image)) { ?>
<div class="encode_img">
<div class="result_head"><h3>Image</h3></div>
<div class="data">
<img src="<?php echo $data_image; ?>">

</div>
</div>
<div class="real_image">
<div class="result_head"><h3>Image URL in base 64 encode form</h3></div>
<div class="data">
<?php echo $data_image; ?>
</div>
</div>
<?php } ?>
</div>
</body>
</html>
Helper File : imagetodata_helper.php
Helper function convertToBase64 it will take image URL and encode to base64 and return the data.
<?php if ( ! defined('BASEPATH')) exit('No direct script access allowed');

if (!function_exists('convertToBase64'))
{
function convertToBase64($path)
{
// $path = FCPATH.$path;
$type = pathinfo($path, PATHINFO_EXTENSION);
$data = file_get_contents($path);
$base64 = 'data:image/' . $type . ';base64,' . base64_encode($data);
return $base64;
}
}
CSS File : style.css
Styling HTML Elements.
body {
font-family: 'Raleway', sans-serif;
}
.main{
width: 1015px;
position: absolute;
top: 10%;
left: 20%;
}
#form_head{
text-align: center;
background-color: #FEFFED;
border-bottom: 1px solid #9A9A9A;
height: 35px;
margin: 0 0 -29px 0;
padding-top: 23px;
padding-bottom: 13px;
border-radius: 8px 8px 0 0;
color: rgb(97, 94, 94);
}
#content {
position: absolute;
width: 900px;
height: 187px;
border: 2px solid gray;
border-radius: 10px;
margin-left: -90px;
}
#form_input{
margin-left: 50px;
margin-top: 65px;
}
label{
margin-right: 6px;
font-weight: bold;
}
#form_button{
margin-left: 700px;
margin-top: -75px;
}
.input_box{
height:40px;
width:480px;
margin-left: 20px;
padding:10px;
border-radius:3px;
background-color: #FEFFED;
font-family: 'Raleway', sans-serif;
}
.result_head{
text-align: center;
background-color: #FEFFED;
border-bottom: 1px solid #9A9A9A;
height: 35px;
margin: 0 0 -29px 0;
padding-top: 8px;
padding-bottom: 22px;
border-radius: 8px 8px 0 0;
color: rgb(97, 94, 94);
}
.data{
margin-top: 50;
}
.encode_img{
position: absolute;
height: 400px;
width: 445px;
margin-left: 370px;
margin-top: 220px;
border: 2px solid gray;
border-radius: 10px;
overflow: scroll;
}
.real_image{
margin-top: 220px;
border: 2px solid gray;
border-radius: 10px;
position: absolute;
height: 400px;
width: 445px;
margin-left: -93px;
border: 2px solid gray;
border-radius: 10px;
overflow: scroll;
}
.submit{
font-size: 16px;
background: linear-gradient(#ffbc00 5%, #ffdd7f 100%);
border: 1px solid #e5a900;
color: #4E4D4B;
font-weight: bold;
cursor: pointer;
width: 140px;
border-radius: 5px;
padding: 10px 0;
outline: none;
margin-top: 20px;
margin-left: 15%;
}
.submit:hover{
background: linear-gradient(#ffdd7f 5%, #ffbc00 100%);
}
Conclusion:
In this way, we can create own helper class in CodeIgniter. Hope you might have understood it properly, keep reading our other blogs posts for more coding tricks.
CodeIgniter : Remember Me Login with Example

In this tutorial, we will learn to active remember me checkbox while login a page.
This concept is basically used when we want to remain login on a page and on sudden system failure or shut down and browser failure.
In such situation, we store remember me value submitted by users in session and use it in different pages of our application until users get logout.
You can also refer our live demo or download the Script file. Extract the downloaded files, save it in your local server and run it using given path
http://localhost/ci_remember_me/
To create a login form using remember me checkbox, it is required to have proper knowledge about CodeIgniter Session.
But if you don’t have proper knowledge on CodeIgniter Session, don’t be upset. Read our blog Session In CodeIgniter , CodeIgniter Simple Login Form With Sessions and easily got the concept of CodeIgniter Sessions.
To add the functionality of remember me checkbox in CodeIgniter, we need to download a library. We will use this library in our application.
Note : – You can download the library from the given link.
First of all, extract the file and copy Extend_Session.php to application/libraries folder.
Now, rename Extend_Session.php to MY_Session.php and also edit the name of class to MY_Session.
You can also use Extend_Session.php without making any changes in the file. But for this you have to make one changes in config file.
Open application/config/config.php and change $config[‘subclass_prefix’] = ‘MY_’; to the cofiguration given below.
$config['subclass_prefix'] = 'Extend_';Note : Extend_ and MY_ are the prefix which must be written before session.
Now, we are ready to use this library.
Simply load session library in your login controller and MY_session library will be autoloaded.
When “remember” flag is set by user, you can set the session as :-
$remember = $this->input->post('remember_me');
if($remember){
$this->session->set_userdata('remember_me", true);
}
Controllers : user_authentication.php
In controller we first check for session data. If it is set then it will redirect user to admin page.
If session is not set then it will follow the login procedure and set remember me value provided by the user in to session.
<?php

Class User_Authentication extends CI_Controller {

public function __construct() {
parent::__construct();

// Load form helper library
$this->load->helper('form');

// Load form validation library
$this->load->library('form_validation');

// Load session library
$this->load->library('session');
}

// Show login page
public function index() {
$this->load->view('login_form');
}

// Check for user login process
public function user_login_process() {

// Retrieve session data
$session_set_value = $this->session->all_userdata();

// Check for remember_me data in retrieved session data
if (isset($session_set_value['remember_me']) && $session_set_value['remember_me'] == "1") {
$this->load->view('admin_page');
} else {

// Check for validation
$this->form_validation->set_rules('username', 'Username', 'trim|required|xss_clean');
$this->form_validation->set_rules('password', 'Password', 'trim|required|xss_clean');

if ($this->form_validation->run() == FALSE) {
$this->load->view('login_form');
} else {
$username = $this->input->post('username');
$password = $this->input->post('password');
if ($username == "fugo" && $password == "formget") {
$remember = $this->input->post('remember_me');
if ($remember) {

// Set remember me value in session
$this->session->set_userdata('remember_me', TRUE);
}
$sess_data = array(
'username' => $username,
'password' => $password
);
$this->session->set_userdata('logged_in', $sess_data);
$this->load->view('admin_page');
} else {
$data = array(
'error_message' => 'Invalid Username or Password'
);
$this->load->view('login_form', $data);
}
}
}
}

// Logout from admin page
public function logout() {

// Destroy session data
$this->session->sess_destroy();
$data['message_display'] = 'Successfully Logout';
$this->load->view('login_form', $data);
}

}?>
Views : login_form.php
Copy the below code in your view and save as login_form.php
<html>
<head>
<title>CodeIgniter Remember Me Checkbox</title>
<link rel="stylesheet" type="text/css" href="<?php echo base_url(); ?>css/style.css">
<link href='http://fonts.googleapis.com/css?family=Source+Sans+Pro|Open+Sans+Condensed:300|Raleway' rel='stylesheet' type='text/css'>
</head>
<body>
<?php
if (isset($logout_message)) {
echo "<div class='message'>";
echo $logout_message;
echo "</div>";
}
?>
<?php
if (isset($message_display)) {
echo "<div class='message'>";
echo $message_display;
echo "</div>";
}
?>
<div id="main">
<div id="login">
<h2>CodeIgniter Remember Me Checkbox</h2>
<?php echo form_open('user_authentication/user_login_process'); ?>
<?php
echo "<div class='error_msg'>";
if (isset($error_message)) {
echo $error_message;
}
echo validation_errors();
echo "</div>";
?>
<label>UserName :</label>
<input type="text" name="username" id="name" placeholder="username"/>
<label>Password :</label>
<input type="password" name="password" id="password" placeholder="**********"/>
<input type="checkbox" name="remember_me"/> Remember Me
<input type="submit" value=" Login " name="submit"/>
<?php echo form_close(); ?>
</div>
<div id="note"><span><b>Note : </b></span> Please Use Following Username And Password for Login in this DEMO.
<b>username : </b>fugo<b>password : </b>formget
</div>
</div>
</body>
</html>
Views : admin_page.php
Copy the below code in your view and save as admin_page.php
<?php
$session_data = $this->session->userdata('logged_in');
?>
<html>
<head>
<title>Admin Page</title>
<link rel="stylesheet" type="text/css" href="<?php echo base_url(); ?>css/style.css">
<link href='http://fonts.googleapis.com/css?family=Source+Sans+Pro|Open+Sans+Condensed:300|Raleway' rel='stylesheet' type='text/css'>
</head>
<body>
<div id="profile">
<?php
echo "Hello <b id='welcome'><i>" . $session_data['username'] . "</i> !</b>";
echo "Welcome to Admin Page";
?>
</div>
<b id="logout"><a href="logout">Logout</a></b>
</body>
</html>
CSS : style.css
Styling HTML Elements.
#main{
width:960px;
margin:50px auto;
font-family:raleway;
}
span{
color:red;
}
h2{
background-color: #FEFFED;
text-align:center;
border-radius: 10px 10px 0 0;
margin: -10px -40px;
padding: 30px;
}
hr{
border:0;
border-bottom:1px solid #ccc;
margin: 10px -40px;
margin-bottom: 30px;
}
#login{
width:300px;
float: left;
border-radius: 10px;
font-family:raleway;
border: 2px solid #ccc;
padding: 10px 40px 25px;
margin-top: -8px;
}
input[type=text],input[type=password], input[type=email]{
width:99.5%;
padding: 10px;
margin-top: 8px;
border: 1px solid #ccc;
padding-left: 5px;
font-size: 16px;
font-family:raleway;
}
input[type=submit]{
width: 100%;
background-color:#FFBC00;
color: white;
border: 2px solid #FFCB00;
padding: 10px;
font-size:20px;
cursor:pointer;
border-radius: 5px;
margin-bottom: 15px;
}
#profile{
padding:50px;
border:1px dashed grey;
font-size:20px;
background-color:#DCE6F7;
}
#logout{
float: right;
padding: 5px;
border: dashed 1px gray;
margin-top: -126px;
margin-right: 36px;
font-size: 20px;
}
a{
text-decoration:none;
color: cornflowerblue;
}
i{
color: cornflowerblue;
}
.error_msg{
color:red;
font-size: 16px;
}
.message{
position: absolute;
font-weight: bold;
font-size: 28px;
color: #6495ED;
left: 262px;
width: 500px;
text-align: center;
margin-top: -46px;
}
#note{
clear: left;
padding-top: 20px;
margin-left: 20px;
}
Conclusion:
This was all about that how we can create remember me check box using codeigniter session. Hope you like it, keep reading our other blogs.
CodeIgniter : Resolve “MySQL Too Many Connection Errors”

In this tutorial we are going to see “How one can solve too many connection problem in mysql using CodeIgniter”. This error usually occurs if your scripts open persistent connections, which aren’t closed even if the script terminates, this means that all available connections are in use by other clients.
Now Exactly what are persistent connections..?? Persistent connections are links that do not close when the execution of your script ends. When a persistent connection is requested, PHP checks if there’s already an identical persistent connection (that remained open from earlier) – and if it exists, it uses it. If it does not exist, it creates the link.
Steps To Resolve The Error:-
Step 1: Use mysql_connect() instead of mysql_pconnect(). Here pconnect() states whether to use a persistent connection. To avoid using it in Codeigniter goto your project folder and navigate to application/config/database.php file and change the setting as:
// Set ' pconnect' From TRUE  to  FALSE

$db['default']['pconnect'] = FALSE;
Step 2: For Users who are using Server and wanted other sites to stop using persistent connection for PHP scripts, need to do the following change in their php.ini file:
; Allow or prevent persistent links.
mysql.allow_persistent=Off
Conclusion:
Hope this tutorial resolved your “MySql Too Many Connection Errors” problem.
Hope you like it, keep reading our other blogs. 🙂
For more related information just go through the following blogs –
Codeigniter URL Routing, Suffix & Enable Query String

In this tutorial, I’ve tried to give an overview with basic code examples on URL Routing, URL Suffix and URL Enabled Query String. Now the Question is Why it is Required..?? Through CodeIgniter URL Routing a user can present their web page in a more beneficial way, so as to make more sense to visitors and to search engines as well.
By default, URLs in CodeIgniter are designed to be search-engine and human friendly. Through this user actually knows what contents a page contains just by checking the URL in the browser’s address bar.
Hence, URL Routing is a technique which converts these SEO friendly urls to a format that server code can understand easily and drives a request to their corresponding request handler scripts.
Setting Rules For CodeIgniter URI Routing
In order to create your own routing rules, open routes.php located in application/config. Here you will find $routes array which permits you to specify your own routing criteria using any of the two methods given below:
Wildcards:
We can use two types of wildcards, namely:
- :num – Segment containing only numbers will be matched.
- :any – Segment containing only characters will be matched.
Using :num
$route['(blog/:num)'] = 'tutorial/java/$1';A URL with “blog” as the first segment, and a number in the second will be remapped to the “tutorial” class and the “java” method passing in the match as a variable to the function.
As when we invoke https://www.formget.com/blog/1 or https://www.formget.com/blog/2 it will redirect to https://www.formget.com/tutorial/java/$1.
Note : You can invoke URL only by using number.
Using :any
$route['(blog/:any)'] = 'tutorial/java';A URL with “blog” as the first segment, and anything in the second will be remapped to the “tutorial” class and the “java” method.
As when we invoke https://www.formget.com/blog/ or https://www.formget.com/blog/css it will redirect to https://www.formget.com/tutorial/java.
Note : tutorial is controller and java is controller’s function.
Note : Do not use leading/trailing slashes.
Regular Expression
You can also redirect your routes using regular expression.
$route['blog/([a-zA-Z0-9]+)'] = 'tutorial/java';By the above code you can invoke URL by your own regular expression. In this expression special characters are not allowed.
You can also catch a segment containing a forward slash (‘/’), which would usually represent the delimiter between multiple segments.
Note : You can also mix and match wildcards.
URL Suffix
To add a suffix, edit config.php which is located in application/config. For example,
$config['url_suffix'] = '.html';
URL Enabled Query String
In order to use Query String URL’s, edit config.php which is located in application/config. Set ‘enable_query_strings’ to TRUE and define controller and function trigger.
$config['enable_query_strings'] = TRUE;
$config['controller_trigger'] = 'c';
$config['function_trigger'] = 'm';
Conclusion:
This was all about how routes is working in CodeIgniter. Hope you like it, keep reading our other blogs. 🙂
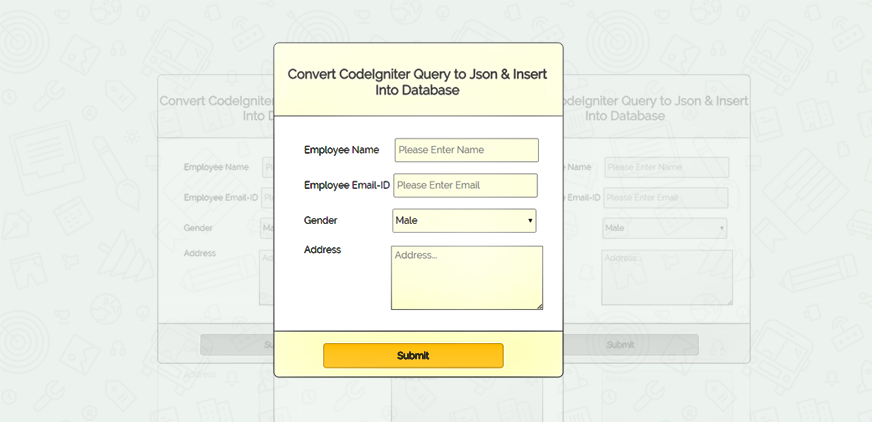
CodeIgniter Convert Query to Json & Insert Into Database

In this tutorial, we will learn to convert CodeIgniter query to json and also to insert them in our database.
It is difficult to store an array in database which contains a lots of user data. We will have to make a lots of indexes in array in order to store them in database.
In such situation, json is very helpful. Using json function we can convert array values into json string and store them easily in database.
Whenever we need the data, we can again convert json data back into array.
Syntax :
json_encode();     // Convert array into json string
json_decode();     // Convert json string back to array
You can also refer our live demo or download the Script file. Extract the downloaded files, save it in your local server and run it using given path
Logic Behind json encode and decode
Encode array to json using json_encode()
<?php
// This is a simple array
$var1 = array(
'key_name1' => 'value_name1',
'key_name2' => 'value_name2'
);

//We are converting array in encode $var1 array to json using json encode
$encode_data = json_encode($var1);
echo $encode_data;
?>
Result: Array Converted to JSON
{"key_name":"value_name","key_name1":"value_name1"} Decode json to array using json_decode()
<?php
// This is a simple array, We are converting array in
$var1 = array(
'key_name1' => 'value_name1',
'key_name2' => 'value_name2'
);

//encode $var1 array to json using json_encode()
$encode_data = json_encode($var1);
echo $encode_data;

//decode json data($encode_data) to array, using json_decode()
$decode_data = json_decode($encode_data);
print_r($decode_data);
?>
Result: JSON Converted to Array(stdClass Object)
stdClass Object ( [key_name1] => value_name1 [key_name2] => value_name2 )Extract data from stdClass Object
By forech
<?php
foreach ($decode_data as $value){
echo $value."<br>";
}?>
Output :
value_name1
value_name2
Fetch data from object
<?php

echo $decode_data->key_name1;
echo "<br>";
echo $decode_data->key_name2;

?>
Output :
value_name1
value_name2
Tutorial Scripts in detail
Below are the details of the code used in this tutorial with proper explanation.
First of all create a database name employee and table name employee_info as given below.
CREATE DATABASE employee;
CREATE TABLE employee_info(
 `emp_id` int(11) NOT NULL AUTO_INCREMENT,
`emp_data` varchar(255) NOT NULL,
PRIMARY KEY (`emp_id`)
)
Now, open application/config/database.php and make entry of database as given below.
$db['default']['hostname'] = 'localhost';
$db['default']['username'] = 'root';
$db['default']['password'] = '';
$db['default']['database'] = 'employee';
$db['default']['dbdriver'] = 'mysql';
Also, open application/config/autoload.php and load database library and helper library as given below.
$autoload['libraries'] = array('database');
$autoload['helper'] = array('url','file','form');
All required library and helpers are loaded. Now, create controllers, views and model as given below,
Controllers : form.php
Form controller fetch users submitted data, store them in an array and convert array into json string.
Created json string then send to database where it is stored.
<?php

class Form extends CI_Controller {

public function __construct() {
parent::__construct();
$this->load->model("json_model");
}

// Load view page
public function index() {
$this->load->view("view_form");
}

// Fetch user data and convert data into json
public function data_submitted() {

// Store user submitted data in array
$data = array(
'employee_name' => $this->input->post('emp_name'),
'employee_email' => $this->input->post('emp_email'),
'employee_gender' => $this->input->post('select'),
'employee_address' => $this->input->post('address'),
);

// Converting $data in json
$json_data['emp_data'] = json_encode($data);

// Send json encoded data to model
$return = $this->json_model->insert_json_in_db($json_data);
if ($return == true) {
$data['result_msg'] = 'Json data successfully inserted into database !';
} else {
$data['result_msg'] = 'Please configure your database correctly';
}

// Load view to show message
$this->load->view("view_form", $data);
}

}

?>
Views : view_form.php
It shows the form page where user can enter and submit employee data.
<html>
<head>
<title>Codeigniter Json</title>
<link rel="stylesheet" type="text/css" href="<?php echo base_url(); ?>css/style.css">
<link href='http://fonts.googleapis.com/css?family=Source+Sans+Pro|Open+Sans+Condensed:300|Raleway' rel='stylesheet' type='text/css'>
</head>
<body>
<div class="main">
<div id="content">
<h2 id="form_head">Convert CodeIgniter Query to Json & Insert Into Database</h2>
<div id="form_input">
<?php
echo form_open('form/data_submitted');
echo form_label('Employee Name' . ' ');
$data_name = array(
'name' => 'emp_name',
'id' => 'emp_name_id',
'class' => 'input_box',
'placeholder' => 'Please Enter Name',
'required' => 'required'
);
echo form_input($data_name);
echo form_label('Employee Email-ID');
$data_email = array(
'type' => 'email',
'name' => 'emp_email',
'id' => 'e_email_id',
'class' => 'input_box',
'placeholder' => 'Please Enter Email',
'required' => 'required'
);
echo form_input($data_email);
echo form_label('Gender');
$data_gender = array(
'Male' => 'Male',
'Female' => 'Female'
);
echo form_dropdown('select', $data_gender, 'Male', 'class="dropdown_box"');
echo form_label('Address');
echo "<div class='textarea_input'>";
$data_textarea = array(
'name' => 'address',
'rows' => 5,
'cols' => 28,
'placeholder' => 'Address...',
'required' => 'required'
);
echo form_textarea($data_textarea);
echo "</div>";
?>
</div>
<div id="form_button">
<?php echo form_submit('submit', 'Submit', "class='submit'"); ?>
</div>
<?php echo form_close(); ?>
</div>
</div>
<?php
if (isset($result_msg)) {
echo "<div id='res_msg'>";
echo $result_msg;
echo "</div>";
}
?>
</body>
</html>Models : json_model.php
Json_model interact with database and stored json string into database.
Note : if you want decode json data, just retrieve data from database and use json_decode(); to convert json string into array.
<?php

class Json_Model extends CI_Model {

// Insert json data into database
public function insert_json_in_db($json_data) {
$this->db->insert('employee_info', $json_data);
if ($this->db->affected_rows() > 0) {
return true;
} else {
return false;
}
}

}

?>
CSS : style.css
Styling HTML Elements.
body {
font-family: 'Raleway', sans-serif;
}
.main{
width: 1015px;
position: absolute;
top: 10%;
left: 20%;
}
#form_head{
text-align: center;
background-color: #FEFFED;
height: 66px;
margin: 0 0 -29px 0;
padding-top: 35px;
padding-bottom: 22px;
border-radius: 8px 8px 0 0;
color: rgb(97, 94, 94);
}
#content {
width: 481px;
height: auto;
border: 2px solid gray;
border-radius: 10px;
margin-top: -40px;
margin-left: -60px;
}
#form_input{
font-size: 16px;
font-family: 'Raleway', sans-serif;
margin-left: 50px;
margin-top: 36px;
}
label{
margin-right: 6px;
}
#form_button{
padding: 0 21px 15px 15px;
bottom: 0px;
width: 445px;
background-color: #FEFFED;
border-radius: 0px 0px 8px 8px;
border-top: 1px solid #9A9A9A;
}
.submit{
font-size: 16px;
font-family: 'Raleway', sans-serif;
background: linear-gradient(#ffbc00 5%, #ffdd7f 100%);
border: 1px solid #e5a900;
color: #4E4D4B;
font-weight: bold;
cursor: pointer;
width: 300px;
border-radius: 5px;
padding: 10px 0;
outline: none;
margin-top: 20px;
margin-left: 15%;
}
.submit:hover{
background: linear-gradient(#ffdd7f 5%, #ffbc00 100%);
}
.label_output{
color:#4A85AB;
margin-left: 10px;
}
.dropdown_box{
font-size: 16px;
font-family: 'Raleway', sans-serif;
height:40px;
width:240px;
border-radius:3px;
background-color:#FEFFED;
}
.input_box{
font-size: 16px;
font-family: 'Raleway', sans-serif;
height:40px;
width:240px;
padding:5px;
border-radius:3px;
border: 1px solid #A9A9A9;
background-color:#FEFFED;
}
.textarea_input{
margin-left: 145px;
margin-top: -16px;
}
textarea{
font-family: 'Raleway', sans-serif;
font-size: 16px;
padding:5px;
background-color:#FEFFED;
}
.address_div{
width: 50px;
height:auto;
}
#res_msg{
font-family: 'Raleway', sans-serif;
font-size: 16px;
position: absolute;
top: 610px;
left: 328px;
color: blue;
}
Conclusion:
In this way, we can Convert CodeIgniter Query to Json & Insert Into Database. Hope you might have understood it properly, keep reading our other blogs posts for more coding tricks.
Also read our popular post:-
- Codeigniter Database Connection
- Codeigniter Global Variable
- Codeigniter Third Party Libraries
- How To Create And Validate Select Option Field
Easy & Affordable AWeber Alternative : MailGet Bolt

AWeber is considered one of the best email marketing services.
But, due to its high price, and old user interface, people are looking for its alternative.
Since emails are never going to be pointless in terms of marketing and sales. It is required to cope up with new ideas and advanced features.
However, there are numerous software in the market, serving the same purpose as Aweber or even better.
That is why, we have come up with an AWeber alternative “MailGet Bolt“, which offers the lower price and great features.
It is a smart email building solution, due to its modern user interface and easy to use features.
In fact, it has an advanced drag & drop builder, 500+ templates, external SMTP (to save your time), email list cleaning & management service and much more.
There are days of research behind this amazing Aweber alternative.
While comparing both the services, there were many instances where MailGet Bolt was better than AWeber.
But, before we go further, let me introduce you to the alternative of these top-class services.
- Email Marketing Comparison: Sendy Vs MailGet Bolt
- iContact Alternative: MailGet Bolt Best Email Marketing Service For A Change
- Constant Contact Alternative: Same Features & Facilities With Low Pricing
1. On The Basis Of Pricing:
On the basis of pricing, MailGet Bolt is a perfect AWeber alternative. I say so, because of AWeber pricing plans.
As, it offers monthly, quarterly and annual plans of $19, $49 and $194 respectively.
Here is a table that explains the pricing plan of AWeber.
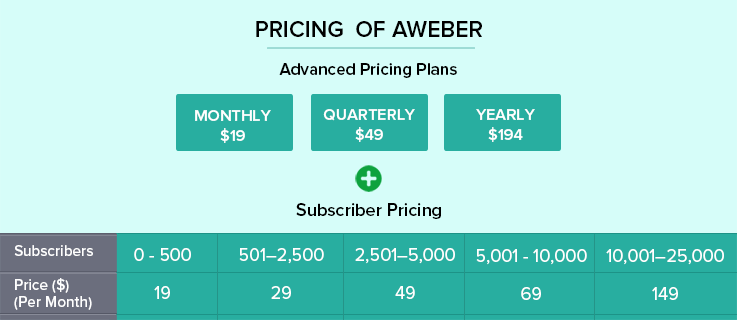
For example, if you have taken up a monthly plan and have 5000 subscribers, then you need to pay $19 for a monthly plan plus $49 as monthly subscriber fees i.e. $68 per month, to AWeber.
Whereas, MailGet Bolt has no such pricing plans. Its plans are simple, relevant and reasonable.
Note: “It gives 30-days free trial with the limit of up to 300 emails”.
The table below explains the pricing of MailGet Bolt.

2. On The Basis Of Number Of Unsubscribes:
You can’t expect everyone to like your product, because opinions vary from person to person.
What we mean to say is, some people will unsubscribe from your email list even if you send them the valuable emails.
And, MailGet Bolt doesn’t charge you for the unsubscribers. Here you pay for only what you use.
And this saves your cost to a considerable extent.
Now, if we talk about AWeber, it charges you for these unsubscribes.
Due to which there will be an unnecessary hike in your pricing plan, which you have to pay off. Moreover, you have to follow a complex procedure to remove them from your list.
3. On The Basis Of Number Of Duplicate Emails:
Segmenting and cleaning your email list is a necessity if you have a large subscriber list. And it is quite possible that some email addresses repeat themselves in more than one lists.
But, MailGet Bolt saves you from this by considering the same email addresses as one subscriber. And, doesn’t charge you for duplicate email addresses.
Whereas, AWeber counts an email address as two subscribers even if it exists in more than one email list. This directly means you have to pay twice or sometimes thrice for a single subscriber.
So be smart and pay reasonably only for the features used by you.
4. No Re-subscription Required while Importing Contacts:
With MailGet Bolt, you don’t have to subscribe again while importing the contact lists. You just need to import your list in .csv file format and you are ready to send your message.
If you want, you can even manually import your contacts.
“But, trust me that will become a headache soon”.
However, while using AWeber, you have to re-subscribe your list for importing contacts.
5. No Confirmation Required to Send Emails:
MailGet Bolt has single opt-in enabled and so you can freely share your piece of information to everyone who is there on your email list.
Note: “But be careful while entering the email addresses, as you will lose your subscriber”.
Whereas in AWeber, confirmed opt-in is enabled by default, which makes the subscriber confirm whether he wants your service or not.
And, as a marketer’s point of view, it is not profitable. Although you can disable this feature, yet, again it is a time taking process.
6. High Deliverability Guaranteed:
Deliverability is one of the most concerned issues in email marketing. But, with MailGet Bolt on your side, you can assure high deliverability rates.
In fact, it detects and blocks email containing viruses and malware.
Although AWeber claims high deliverability to its users but often land their emails into the spam folders of their subscribers.
Now if an email lands in the spam, what value can you get in return?
So it’s better to rely on MailGet Bolt’s deliverability rates.
Wrapping Up…
Just because a majority of people using a particular service we cannot use the same service. I am not saying, that you should use MailGet Bolt, but, the service you take up should meet, all of your requirements.
Before purchasing any random service you should test it first, compare it and only then you should invest in it.
MailGet Bolt is one such service that can meet all your requirements at very reasonable prices and prove itself as an AWeber alternative.
You should at least give it a try!
By using it you can easily enjoy simple, inexpensive, fast and reliable email marketing solution.
CodeIgniter: Language Class

In this tutorial, we will learn how to use CodeIgniter’s Language Class. Using this class we can create application in any languages of our choice. CodeIgniter Language class provides various functions which will help us to retrieve various language files and the line of text present in the file. This class is basically used for the purpose of multi-language internationalization.
If you want to know more about CodeIgniter Session, you can follow our blog posts Session In CodeIgniter and CodeIgniter Simple Login With Sessions.
We will use CodeIgniter Session and CodeIgniter Language class in building the contact form through which user can view form on his choice of language. In the example given below I’ve used English and French languages.
Watch the live demo or download code from the link given below
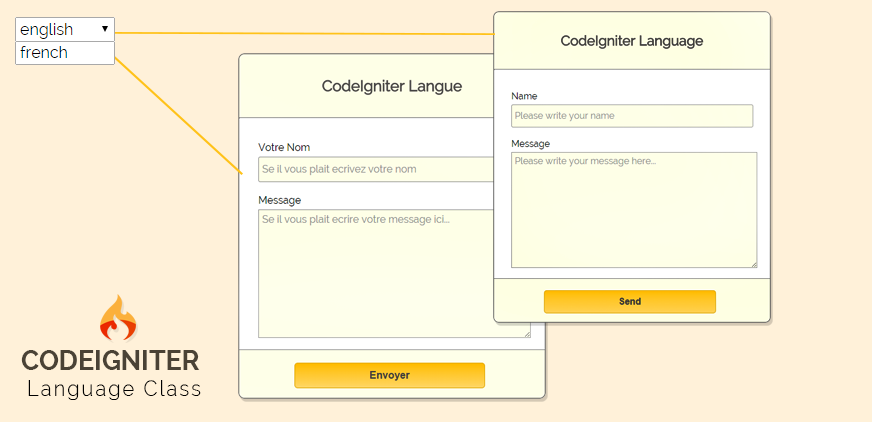
http://localhost/ci_language/Steps To Use CodeIgniter Language Class Example:
Step 1: In your CodeIgniter system folder open ‘applicationlanguage‘ folder and create two folder named as: ‘english‘ and ‘french‘. Here you can create more folders for multiple-languages.
Step 2: Now, inside english folder create a language file named as: contact_form_english_lang.php. Similarly inside french folder create a language file named as:contact_form_french_lang.php
As our language file is ready. We will load these files in controller and retrieve their text to use it in our contact form.
Step 3: Create a controller ci_language_tutorial.php which by default loads english language file and displays contact form in english language.
Step 4: Create a View contact_form.php which displays contact form in language selected by user.
Step 5: Create style.css file for styling html elements.
Note: Language file must contain _lang.php as file extension.
Language file: contact_form_english_lang.php
<?php
$lang['title'] = 'CodeIgniter Language';
$lang['select_lang'] = 'Select Language ';
$lang['name'] = 'Name';
$lang['message'] = 'Message';
$lang['name_placeholder_value'] = 'Please write your name';
$lang['message_placeholder_value'] = 'Please write your message here...';
$lang['message_sent'] = 'Thank you! Your message has been sent.';
$lang['send'] = 'Send';
?>
Language file: contact_form_french_lang.php
<?php
$lang['title'] = 'CodeIgniter Langue';
$lang['select_lang'] = 'Selectionnez la langue';
$lang['name'] = 'Votre Nom';
$lang['message'] = 'Message';
$lang['name_placeholder_value'] = 'Se il vous plait ecrivez votre nom';
$lang['message_placeholder_value'] = 'Se il vous plait ecrire votre message ici...';
$lang['message_sent'] = 'Merci! Votre message a ete envoye.';
$lang['send'] = 'Envoyer';
?>
Controller: ci_language_tutorial.php
When a user changes the language option from dropdown box, selected language file gets loaded in controller and their values get stored in session too. Then these stored values are passed to the view page where contact form is loaded based on selected language.
<?php

ob_start();
session_start();

class CI_Language_Tutorial extends CI_Controller {

public function __construct() {
parent::__construct();
}

// Create sessions for default view page
public function index() {

// Destroy session if already set
$this->session->sess_destroy();

// Load default language
$this->lang->load('contact_form_english', 'english');

// Create session array and store default language values in array
$sess_data = array();
$sess_data['default'] = 'english';
$sess_data['title'] = $this->lang->line('title');
$sess_data['select_lang'] = $this->lang->line('select_lang');
$sess_data['name'] = $this->lang->line('name');
$sess_data['message'] = $this->lang->line('message');
$sess_data['name_placeholder_value'] = $this->lang->line('name_placeholder_value');
$sess_data['message_placeholder_value'] = $this->lang->line('message_placeholder_value');
$sess_data['success_message'] = $this->lang->line('message_sent');
$sess_data['send'] = $this->lang->line('send');

// Set values in session
$this->session->set_userdata('session_data', $sess_data);

// Retrieve session values
$set_data = $this->session->all_userdata();

// Send retrieved data to view page
$this->load->view('contact_form', $set_data);
}

// Select language and manage view page
public function select_language() {

// Destroy session data
$this->session->sess_destroy();
$language = $this->input->post('language');
if ($language == 'english') {
$data['selected'] = 'english';
} else {
$data['selected'] = 'french';
}

// Load language according to language selected
$this->lang->load('contact_form_' . $language, $language);
$sess_data['select_lang'] = $this->lang->line('select_lang');
$sess_data['title'] = $this->lang->line('title');
$sess_data['default'] = $language;
$sess_data['name'] = $this->lang->line('name');
$sess_data['message'] = $this->lang->line('message');
$sess_data['name_placeholder_value'] = $this->lang->line('name_placeholder_value');
$sess_data['message_placeholder_value'] = $this->lang->line('message_placeholder_value');
$sess_data['send'] = $this->lang->line('send');
$sess_data['success_message'] = $this->lang->line('message_sent');

// Set session values according to selected language
$this->session->set_userdata('session_data', $sess_data);
$set_data = $this->session->all_userdata();
$this->load->view('contact_form', $set_data);
}

}

?>
Views: contact_form.php
Show contact form in the language selected by users.
</html>
<html>
<head>
<title>CodeIgniter Language Class</title>
<link rel="stylesheet" type="text/css" href="<?php echo base_url(); ?>css/style.css">
<link href='http://fonts.googleapis.com/css?family=Source+Sans+Pro|Open+Sans+Condensed:300|Raleway' rel='stylesheet' type='text/css'>
<script type="text/javascript">
function DoSubmit()
{
var x = "<?php echo $session_data['success_message']; ?>"
alert(x);
}

</script>
</head>
<body>
<?php
echo form_open('ci_language_tutorial/select_language');
$option = array(
'english' => 'english',
'french' => 'french '
);
$onchange = 'id="lang" onChange="this.form.submit()"';
echo form_dropdown('language', $option, $session_data['default'], $onchange);
echo form_close();
?>
<div class="main">
<div id="content">
<h2 id="form_head"><?php echo $session_data['title']; ?></h2><br/>
<hr>
<div id="form_input">
<?php
echo form_open('ci_language_tutorial/');
echo form_label($session_data['name']);
$data = array(
'name' => 'name',
'class' => 'input_box',
'placeholder' => $session_data['name_placeholder_value']
);
echo form_input($data);

echo "<div class='textarea_input'>";
echo form_label($session_data['message']);
$data = array(
'rows' => 10,
'cols' => 50,
'name' => 'message',
'placeholder' => $session_data['message_placeholder_value']
);
echo form_textarea($data);
echo "</div>";
echo '<div id="form_button">';
echo form_submit('submit', $session_data['send'], 'id="submit" onclick="DoSubmit()"');
echo '</div>';
echo form_close();
?>
</div>
</div>
</body>
</html>
CSS: style.css
For Styling HTML Elements.
body {
font-family: 'Raleway', sans-serif;
}
.main{
width: 1015px;
position: absolute;
top: 10%;
left: 20%;
}
#form_head{
text-align: center;
background-color: #FEFFED;
height: 66px;
margin: 0 0 -29px 0;
padding-top: 35px;
border-radius: 8px 8px 0 0;
color: rgb(97, 94, 94);
}
#content {
position: absolute;
width: 481px;
height: 540px;
border: 2px solid gray;
border-radius: 10px;
margin-top: -40px;
margin-left: -60px;
}
#form_input{
margin-left: 30px;
margin-top: 36px;
}
label{
margin-right: 6px;
padding-bottom: 10px;
}
#form_button{
padding: 0 0px 15px 0px;
position: absolute;
bottom: 0px;
width: 481px;
background-color: #FEFFED;
border-radius: 0px 0px 8px 8px;
border-top: 1px solid #9A9A9A;
left: 0px;
}
#submit{
font-size: 16px;
background: linear-gradient(#ffbc00 5%, #ffdd7f 100%);
border: 1px solid #e5a900;
color: #4E4D4B;
font-weight: bold;
cursor: pointer;
width: 300px;
border-radius: 5px;
padding: 10px 0;
outline: none;
margin-top: 20px;
margin-left: 18%;
}
.submit:hover{
background: linear-gradient(#ffdd7f 5%, #ffbc00 100%);
}
.dropdown_box{
font-family: 'Raleway', sans-serif;
font-size: 16px;
height:40px;
width:422px;
border-radius:3px;
background-color:#FEFFED;
}
.input_box{
font-family: 'Raleway', sans-serif;
font-size: 16px;
height:40px;
width:422px;
padding:5px;
border-radius:3px;
background-color:#FEFFED;
margin-top: 5px;
border:1px solid #A9A9A9;
}
textarea{
background-color:#FEFFED;
font-family: 'Raleway', sans-serif;
font-size: 16px;
margin-top: 5px;
padding:5px;
}
#lang{
font-family: 'Raleway', sans-serif;
font-size: 16px;
height:25px;
width:100px;
}
Conclusion:
Hope you got the concept of using CodeIgniter Language Class. Hope you liked it. Keep reading our blog posts. 🙂
CodeIgniter Template : Adding Header, Footer and Dynamic Content

CodeIgniter MVC work on a separate layer, applying MVC pattern, it is recommended that header, footer, side menu bar should be separate. Benefits of using these architectures are.
If your website contains multiple pages and all have a header, footer and menu bar and if you want to make some changes on header so you do not need to apply changes on every page.
Just go to your header page for changes.Now that changes will apply automatically on every page.
In this tutorial we are going to explain how we can create a header, footer and sidebar menu ,three different pages in CodeIgniter MVC and call them in different pages.
You can also refer our live demo or download the Script file. Extract the downloaded files, save it in your local server and run it using given path
http://localhost/ci_header_footer/index.php/first_page/phpIn this demo we are creating separate pages name page_header.php, page_footer.php and page_menu.php and call them in one page
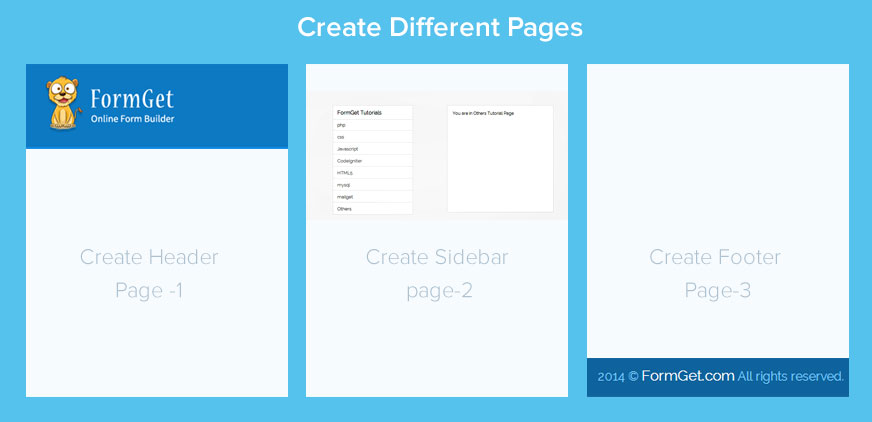
After combining header ,footer and menu in one page.
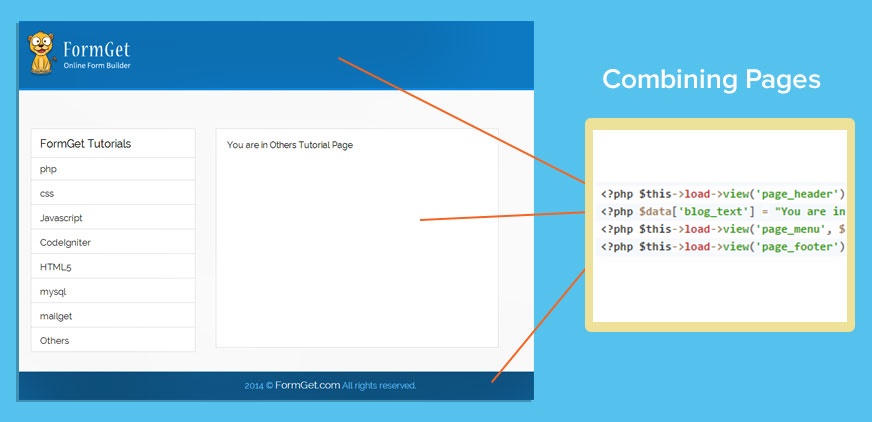
Below is our complete code with short explanation :
Controllers : first_page.php
In this controller defining all function which is loading different view.
<?php

class first_page extends CI_Controller {

function __construct() {
parent::__construct();
// path to simple_html_dom
}
function php() {
$this->load->view('page_php');
}
function css() {
$this->load->view('page_css');
}
function javascript() {
$this->load->view('page_javascript');
}

function codeigniter() {
$this->load->view('page_codeigniter');
}

function html5() {
$this->load->view('page_html5');
}

function mysql() {
$this->load->view('page_mysql');
}

function mailget() {
$this->load->view('page_mailget');
}
function others() {
$this->load->view('page_others');
}
}
?>
Views : page_header.php
In this view are creating header and also calling external css
<html>

<head>
<meta charset="UTF-8">
<meta name="viewport" content="width=device-width, initial-scale=1.0">
<link href='http://fonts.googleapis.com/css?family=Source+Sans+Pro|Open+Sans+Condensed:300|Raleway' rel='stylesheet' type='text/css'>
<link rel="stylesheet" type="text/css" media="all" href="<?php echo base_url(); ?>css/style.css" />
</head>
<body>

<div id="header">
<div class="logo">
<img src="<?php echo base_url(); ?>images/logo.png" alt="Formget logo">
</div>
</div>
Views : page_menu.php
In this view designing side menu bar.after clicking on menu it will call controller function by URL and that controller function load view.when you click on menu links it will generate dynamic Content.
<div class="blog">
<div id="blog_text">
<?php echo $blog_text;?>
</div>
</div>
<div id="sidebar" class="sidebar">
<!--Sidebar-->
<div class="sidebar-page">
<span class="sidebar-title">FormGet Tutorials</span>
<div class="feature-menu">
<ul><li><a href="php">php</a></li>
<li><a href="css">css</a></li>
<li><a href="javascript">Javascript</a></li>
<li><a href="codeigniter">CodeIgniter</a></li>
<li><a href="html5">HTML5</a></li>
<li><a href="mysql">mysql</a></li>
<li><a href="mailget">mailget</a></li>
<li><a href="others">Others</a></li>
</ul>
</div>
</div>
<!--/Sidebar-->
<!--Sidebar-->
<div class="sidebar-page">
<span class="sidebar-title"> About Us</span>
<div class="feature-menu">
<div class="textwidget"><p>Just get a FormGet account (It’s free), and you will be amazed with the ease you can create forms. It’s really easy and simple. You don’t have to spend too much time it? </p></div>
</div>
</div>
<!--/Sidebar-->
<div class="sidebar-banner">
<a href="#"><img src="<?php echo base_url(); ?>images/formget_add.jpg" alt=""> </a>
</div>
</div>
Views : page_footer.php
In this view designing footer.
<div id="footer_bottom" class="footer-bottom">
<div class="container">
<div class="row">
<div class="col-md-12">
<div class="copyright">2014 © <a href="#">FormGet.com</a> All rights reserved.</div>
</div>
</div>
</div>
</div>
</body>
</html>
Views : page_php.php
There are different pages like php,css,html5 etc. In every pages we are loading header footer and menu bar. and also sending Content to view
<?php $this->load->view('page_header'); ?>
<?php $data['blog_text'] = "You are in PHP Tutorial Page"; ?>
<?php $this->load->view('page_menu', $data); ?>
<?php $this->load->view('page_footer'); ?>
Views : page_css.php
<?php $this->load->view('page_header'); ?>
<?php $data['blog_text'] = "You are in css Tutorial Page"; ?>
<?php $this->load->view('page_menu', $data); ?>
<?php $this->load->view('page_footer'); ?>
CSS : style.css
Styling HTML Elements.
body {
background-color: #fafafa;
font-family: 'Raleway', sans-serif;
}
body{
margin:0;
}
#header {
background-color: #0c79c3;
padding:20px;
border-bottom: 4px solid #1089E2;
margin-bottom:70px;
}

#header .top-header {
padding-top: 20px;
border-bottom: 4px solid #0c6eb6;
padding-bottom: 20px;
}
.logo img {
margin-left: 8%;
}
.sidebar-page{
border: 1px solid #e2e2e2;
}
.sidebar-page{
border: 1px solid #e2e2e2;
background-color: #fff;
-webkit-border-radius: 3px;
-moz-border-radius: 3px;
border-radius: 3px;
margin-right: 5px;
margin-bottom: 40px;
margin-left:150px;
margin-top:10px;
width:300px;
}
.sidebar-page .sidebar-title {
display: block;
border-bottom: 1px solid #e2e2e2;
font-size: 20px;
padding: 15px 16px 13px 16px;
}
.sidebar-page ul{
padding: 0;
list-style-type: none;
height:343px;
margin-top:-4px;
}
.sidebar-page ul li a {
font-size: 17px;
color: #3D3D3D;
padding: 14px 16px 10px 16px;
border-bottom: 1px solid #e2e2e2;
display: block;
}
.sidebar-page ul li a:hover,.sidebar-page ul li a.current{
background-color: #0e7ac4;
color: #fff;
}
.sidebar-page ul li .glyphicon{
font-size: 16px;
color:#1473b3;
margin-right: 18px;
}
.sidebar-page ul li a:hover .glyphicon{
color:#fff;
}
a {
text-decoration: none !important;

}
.sidebar-page .textwidget{
font-size: 17px;
padding: 18px 19px 22px 19px;
line-height: 1.6em;
color: #0d0d0d;
}
#sidebar img {
max-width: 100%;
height: auto;
margin-left:150px;
}
#footer_bottom {
background-color: #0e639d;
padding-top: 13px;
padding-bottom: 17px;
margin-top:70px;
}
#footer_bottom .copyright {
text-align: center;
font-size: 16px;
color: #81ccff;
}
#footer_bottom .copyright a {
color: #fff;
font-size: 19px;
}
.blog{
width:700px;
height:400px;
border:1px solid #e2e2e2;
float:right;
margin-right:300px;
background-color:white;
}
#blog_text{
padding: 20px;
}
Conclusion:
This was all about how we can implement separate layers header, footer and side menu bar in CodeIgniter. Hope you like it, keep reading our other blogs
Email Marketing … 100X Cheaper

CodeIgniter URI Segment

Using CodeIgniter URL class’s function, we can retrieve information from URI string. In this tutorial we are going to explain how we can use the URI class in CodeIgniter to retrieve information from URI segment.
Note: This class is initialized automatically so we do need to do it manually.
$this->uri->segment(n)
Segment function allow you to retrieve a specific segment form URI string where n is a segment number.Segments are numbered from left to right.For example,if your URI like.
By the above example URI segment function give result by n parameter.
echo $this->uri->segment(1);//it will print blog
echo $this->uri->segment(2);//it will print language
echo $this->uri->segment(3);//it will print php
echo $this->uri->segment(4);//it will print function
$this->uri->slash_segment(n)
slash_segment function allow you to retrieve a specific segment form URI string with slash and second parameter add slash to trailing and/or leading point. If the parameter is not used, added slash on trailing point. For example
echo $this->uri->slash_segment(1);//it will print blog/
echo $this->uri->slash_segment(2,'leading');//it will print /language
echo $this->uri->slash_segment(3,'both');//it will print /php/
$this->uri->uri_to_assoc(n)
uri_to_assoc function allow you to make associative array of key/value pairs from URI string.For example
http://www.domainname.com/index.php/blog/language/php/function$temp= $this->uri->uri_to_assoc(2);
//it will print associative array of key/value pairs
//NOTE: change parameter 2 to n based on your URI length
/**
Array ( [blog] => language [php] => function)
*/$this->uri->assoc_to_uri()
assoc_to_uri function use for generating URI from associative array.For example
$url_data=array ( [blog] => language [php] => functions);
$str = $this->uri->assoc_to_uri($url_data);
/**
it will Produces
blog/language/php/functions

*/
$this->uri->uri_string()
uri_string function use for generating string from complete URI. For example
http://www.domainname.com/index.php/blog/language/php/functionecho $this->uri->uri_string();
//it will return
/**
blog/language/php/function
*/$this->uri->total_segments()
total_segments function return the total number of segments. For example
echo $this->uri->total_segments();//it will return 4$this->uri->segment_array()
segment_array function returns an array containing the URI segments. For example
print_r($this->uri->segment_array());

/**  it will Produces
Array ( [1] => blog [2] => php[3] =>language [4] =>function )
*/
//Or you can use  like

$uri_data= $this->uri->segment_array();
foreach ($uri_data as $segment)
{
echo $segment;
echo '<br />';
}
Conclusion:
This was all about URI class in CodeIgniter by using this we can perform different task by catching URI segment. Hope you like it, keep reading our other blogs
A Cheaper & Better MailChimp Alternative : MailGet Bolt

No matter what a person does throughout his day, but certainly checks his mailbox once in a day. Now,, what could be better for you if he finds your product or service right there saying hello to him..!!
Email marketing stands tall today, businesses need it and are benefited by it too. And for marketing successfully through emails, they need a service that is cheap & reliable, has high deliverability with minimum bounces and allows real-time tracking.
Now, there are numerous email marketing services claiming all the above-mentioned features, but it will be a no wise man’s idea to use them without comparing.
This particular blog pronounces a comparison between two such email marketing services namely MailChimp and MailGet Bolt – email marketing software, where the latter one is comparatively a newer but definitely cheaper and simpler mail client.
Explore more affordable, effetive and easy-to-use alternatives for you existing Email Marketing Service:-
- iContact Alternative : Service That Generates Best Results At Cheaper Price
- Alternative For MailChimp : MailGet Bolt Get Higher Open Rates
- Constant Contact Alternative : MailGet Bolt A Cost-Effective Emailing Service
Although many features are similar for both the services, still on a few but important features MailGet Bolt stands taller. Let’s understand them one by one…
Less Pricing: MailGet A MailChimp Alternative
MailChimp has a variable and very complicated pricing. The prices initially vary for every 500 subscribers, then for 200 and then maybe for 1,000 subscribers.
MailChimp offers two distinctive plans, one on the basis of a number of subscribers and the other on the basis of a number of emails sent.
Although there is a free plan for up to 2,000 subscribers and 12,000 emails, but to it has no add-ons features autoresponders, email client testing, delivery by time zone, and Social Pro, you have to pay $10 extra for them. So it’s a free yet paid subscription.
It is not possible to explain the pricing of MailChimp for every slot here, but for your understanding, here is the price list in a broader sense.
MailChimp Pricing
As far as pricing of MailGet Bolt is concerned, it is very simple, clear and comparatively very less than MailChimp. With MailGet you can send emails at Highly affordable, 99.02% deliverable & trackable, with drag and drop email creator.
And regarding the number of subscribers MailGet Bolt follows few simple slots. The table below describes the pricing of MailGet Bolt.

No Additional Half-Hidden Cost:
May you send world’s best emails, 5 out of hundred recipients will unsubscribe you. Now if you don’t remove them from your list, companies like MailChimp may charge you for such unsubscribers too.
Also, they charge you for duplicate email addresses too, that may get created while segmenting your email list.
MailGet Bolt as an alternative does not charge you either for the unsubscribers or for the duplicate email addresses. So you are saved from such unnecessary costs.
No Re-Subscription Required while Importing Contacts:
While importing contacts in MailChimp will ask you to re-subscribe your contacts while in MailGet Bolt you can directly import your contacts and start sending emails.
Single Opt-in:
MailChimp follows double opt-in i.e. if you add a person to your email list, he automatically receives an email for confirmation of subscription. If he approves it, then only you can send emails to him.
While in MailGet Bolt you have to opt-in once, i.e. you just have to add a person to your email list and he will start receiving your emails.
As a marketer’s point of view, double opt-in creates a negative edge in product marketing, because there are fair chances that a person may reject your subscription request without even checking out your product.
Whereas in the case of single opt-in, at least for once he comes in contact with your product and then he can make his choice, whether to response or unsubscribe.
To Conclude…
MailGet Bolt is the best solution for businesses that want a cheaper alternative to MailChimp.
It comes with a stunning email builder that creates beautiful emails by just drag and drop options. Also, it has great deliverability and allows complete tracking of your email. And you get all of this at highly affordable prices.
CodeIgniter xss_clean Example

XSS means Cross-site scripting, which is a type of security vulnerability found in web application. The XSS technique commonly used to trigger Javascript or other types of malicious code that attempt to hijack runnable code.
Usage of xss_clean(), we can stop the data and filter up, if any disallowed data is encountered it is rendered by xss_clean function and safe convert into the character entities.
Without the using of xss_clean(), encountered data via cookies and post, get method directly applied to the code, which is harmful.
Codeigniter provides “security” class which contains methods that help you create a secure application.
For sanitizing a particular data you have to pass that data into xss_clean().
Syntax:
Load “security” class in controller’s constructor.
$this->load->library("security");Executing xss_clean function using security class.
$data = $this->security->xss_clean($data);You can also refer our live demo or download the Script file. Extract the downloaded files, save it in your local server and run it using given path
http://localhost/codeigniter_xss_clean/index.php/form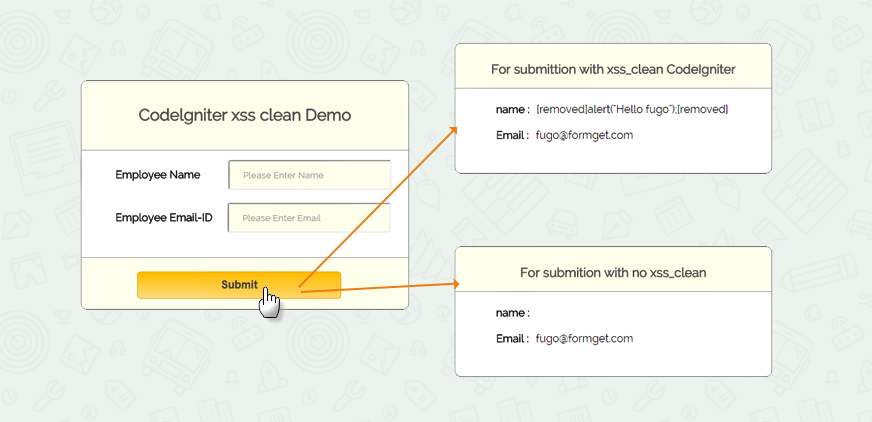
Note: For best example, to check how the malicious data attack our code, use a poor browser like FireFox or IE6. In that enter the values in form fields using <script> tag, you will get a alert message, which is encountered by post method. It will directly attack your code, when you do not use xss_clean(), you can also check the view source on the page.
Codeigniter File : form.php
<?php

class Form extends CI_Controller {
public function __construct() {

//Load helper and library.
parent::__construct();
$this->load->helper('url');
$this->load->helper('form');
$this->load->library("security");
}
public function index() {

// show view_form.php page.
$this->load->view("view_form");
}
public function data_submitted() {

//Storing values through POST method
$data['non_xss']= array(
'employee_name' => $this->input->post('emp_name'),
'employee_email' => $this->input->post('emp_email')
);

// Apply the xss_clean() of "security" library, which filtered data from passing through <script> tag.
$data['xss_data'] = $this->security->xss_clean($data['non_xss']);
// Send "non-xss" and "xss-clean" data in view.
$this->load->view("view_form", $data);
}
}
?>
View File : view_form.php
<html>
<head>
<title>Codeigniter xss clean</title>
<link rel="stylesheet" type="text/css" href="<?php echo base_url(); ?>css/style.css">
<link href='http://fonts.googleapis.com/css?family=Source+Sans+Pro|Open+Sans+Condensed:300|Raleway' rel='stylesheet' type='text/css'>
</head>
<body>
<div class="main">
<p class="main_note">Check xss_clean() and see the difference you have to enter data <br> between script tag. <b><script>alert('Hello')</script></b> </p>
<div id="content">
<h2 id="form_head">Codelgniter xss clean Demo</h2>
<div id="form_input">
<?php
//create form open tag
echo form_open('form/data_submitted');
//create label
echo form_label('Employee Name');
//create name input field
$data_name = array(
'name' => 'emp_name',
'id' => 'emp_name_id',
'class' => 'input_box',
'placeholder' => 'Please Enter Name',
'required' => 'required'
);
echo form_input($data_name);
echo "<br>";
echo "<br>";
echo form_label('Employee Email-ID');
//create email input field
$data_email = array(
'type' => 'email',
'name' => 'emp_email',
'id' => 'e_email_id',
'class' => 'input_box',
'placeholder' => 'Please Enter Email',
'required' => 'required'
);
echo form_input($data_email);
?>
</div>
<div id="form_button">
<?php echo form_submit('submit', 'Submit', "class=''submit"); ?>
</div>
<?php
//Form close.
echo form_close(); ?>
</div>
<?php //This div shown when values submitted. ?>
<?php if (isset($_POST['submit'])) { ?>
<p class="display_note">The data is shown without xss_clean(), when you enter data between script tag, it will be applied in the code.</p>
<div class="display">
<div class="result_head"><h3>For submission with no xss_clean</h3></div>
<div class="data">
<label>name :</label> <?php echo $non_xss['employee_name'] ?><br><br>
<label>Email :</label> <?php echo $non_xss['employee_email'] ?><br><br>
</div>
</div>
<p class="xss_note">This data is shown after xss_clean(), which filter the script tag.</p>
<div class="xss_clean_display">
<div class="result_head"><h3>For submission with xss_clean CodeIgniter</h3></div>
<div class="data">
<label>name :</label> <?php echo $xss_data['employee_name'] ?><br><br>
<label>Email :</label> <?php echo $xss_data['employee_email'] ?><br><br>
</div>
</div>
<p class="note"><b id='note_text'>Note:</b> For best explanation use <b>Firefox</b> or <b>IE Explorer</b></p>
<?php } ?>
</div>
</body>
</html>CSS File : style.css
body {
font-family: 'Raleway', sans-serif;
}
.main{
width: 1015px;
position: absolute;
top: 10%;
left: 20%;
}
#form_head{
text-align: center;
background-color: #FEFFED;
border-bottom: 1px solid #9A9A9A;
height: 66px;
margin: 0 0 -29px 0;
padding-top: 35px;
border-radius: 8px 8px 0 0;
color: rgb(97, 94, 94);;
}
#content {
position: absolute;
width: 481px;
height: 335px;
border: 2px solid gray;
border-radius: 10px;
margin-top: 70px;
margin-left: -90px;
}
#form_input{
margin-left: 50px;
margin-top: 43px;
}
label{
margin-right: 6px;
font-weight: bold;
}
#form_button{
padding: 0 21px 15px 15px;
position: absolute;
bottom: 0px;
width: 445px;
background-color: #FEFFED;
border-radius: 0px 0px 8px 8px;
border-top: 1px solid #9A9A9A;
}
.label_output{
color:#4A85AB;
margin-left: 10px;
}
.input_box{
height:40px;
width:240px;
padding:20px;
border-radius:3px;
background-color: #FEFFED;
font-family: 'Raleway', sans-serif;
}
input#e_email_id {
margin-left: 16px;
}
input#emp_name_id {
margin-left: 35px;
}
input#password_id {
margin-left: 87px;
}
.display{
position: absolute;
height: 190px;
width: 465px;
margin-left: 550px;
margin-top: 365px;
border: 2px solid gray;
border-radius: 10px;
}
.result_head{
text-align: center;
background-color: #FEFFED;
border-bottom: 1px solid #9A9A9A;
height: 35px;
margin: 0 0 -29px 0;
padding-top: 8px;
padding-bottom: 22px;
border-radius: 8px 8px 0 0;
color: rgb(97, 94, 94);;
}
.data{
margin-top: 50;
margin-left: 60px;
}
.xss_clean_display{
margin-top: 25px;
border: 2px solid gray;
border-radius: 10px;
position: absolute;
height: 190px;
width: 465px;
margin-left: 550px;
border: 2px solid gray;
border-radius: 10px;
}
.submit{
font-size: 16px;
background: linear-gradient(#ffbc00 5%, #ffdd7f 100%);
border: 1px solid #e5a900;
color: #4E4D4B;
font-weight: bold;
cursor: pointer;
width: 300px;
border-radius: 5px;
padding: 10px 0;
outline: none;
margin-top: 20px;
margin-left: 15%;
}
.submit:hover{
background: linear-gradient(#ffdd7f 5%, #ffbc00 100%);
}
p.main_note {
position: absolute;
margin-left: -90px;
margin-left: -87px;
margin-top: 9px;
}
p.note {
margin-top: 580px;
margin-left: 240px;
}
p.xss_note {
margin-left: 550px;
margin-top: 10px;
}
p.display_note{
position: absolute;
margin-top: 300px;
margin-left: 550px;
}
#note_text {
color: red;
}
Conclusion:
This was all about that how we can stop malicious data entered by post, get method using xss_clean() codeIgniter function to filter the data. Hope you like it, keep reading our other blogs.
CodeIgniter : Loading CSS and Javascript File

CodeIgniter use Model-View-Controller (MVC) architecture which work on three-tier architecture all the layers is separate. In CodeIgniter it is recommended that .css and .js file should be placed in CSS and JS folder.
In this tutorial we are going to explain how we can use external css and js in CodeIgniter.
To integrate external css and js file in CodeIgniter, do following steps :
- Download CodeIgniter from there website and extract them in your local server.
- Now create css and js folder in your project root directory.
- Copy your .css file in CSS folder and copy .js file in JS folder.
- For base_url() function you must load URL helper in your controller’s constructor
//Loading url helper
$this->load->helper('url');
Now you can use base_url() function in view
<link rel="stylesheet" type="text/css" href="<?php echo base_url(); ?>css/style.css">
<script type='text/javascript' src="<?php echo base_url(); ?>js/jquery.min.js"></script>
Note : base_url() function print your project base url .In view source it will make complete url.
http://www.aorank.com/tutorial/codeigniter_css_and_js/css/style.css
http://www.aorank.com/tutorial/codeigniter_css_and_js/js/jquery.min.js
You can also refer our live demo or download the Script file. Extract the downloaded files, save it in your local server and run it using given path
http://localhost/codeigniter_css_and_js/index.php/css_js_load
Tutorial Scripts in detail
Below are the details of the code used in this tutorial with proper explanation.
Controller File : css_js_load.php
In controller just load Url helper in constructor and index function load view where external css and js will use.
<?php if (!defined('BASEPATH')) exit('No direct script access allowed');

class Css_js_load extends CI_Controller {

function __construct() {
parent::__construct();

// Load url helper
$this->load->helper('url');
}

public function index() {

// View "css_js_view" Page.
$this->load->view('css_js_view');
}
}
?>
View File: css_js_view.php
In view, loading CSS and js using link and script tag
<html>
<head>
<title>Load css and javascript file in codeigniter</title>

<!--Load style.css file, which store in css folder.-->
<link rel="stylesheet" type="text/css" href="<?php echo base_url(); ?>css/style.css">
<link href='http://fonts.googleapis.com/css?family=Source+Sans+Pro|Open+Sans+Condensed:300|Raleway' rel='stylesheet' type='text/css'>

<!--Load jquery.min.js file, which store in js folder.-->
<script type='text/javascript' src="<?php echo base_url(); ?>js/jquery.min.js"></script>
</head>
<body>
<div class="main">
<div class="css">
<p>This div is shown by style.css file, which you will found in your project's root css folder.</p>
</div>
<div class ="js">
<p>This div is perform by script.js and jquery.min.js file, which you will found in your project's root js folder.</p></div>
<button type="button" class="fg-button teal" id="click">Click For Javascript</button>
</div>
<div id="formget_ad">
<a href="https://www.formget.com/app/"><img id="fugo" src="<?php echo base_url(); ?>images/formGetadv-1.jpg" /></a>
</div>

<!--Load script.js file, which store in js folder.-->
<script type='text/javascript' src="<?php echo base_url(); ?>js/script.js"></script>
</body>
</html>
CSS File : style.css
Styling HTML Elements.
body {
font-family: 'Raleway', sans-serif;
}
.main{
margin:0,auto;
}
.css {
position: absolute;
background-color: lightgrey;
width: 300px;
padding: 25px;
border: 25px solid black;
margin-top: 8%;
margin-left: 10%;
}
.js {
display:none;
position: absolute;
background-color: lightgrey;
width: 300px;
padding: 25px;
border: 25px solid black;
margin-left: 38%;
margin-top: 8%;
}
button#click {
margin-left: 45%;
margin-top: 22%;
}
.fg-button{
position: relative;
top: 0;
border-radius: 4;
font-size: 18px;
padding: 8px 28px;
text-decoration: none;
border: 0px solid;
cursor: pointer;
border-bottom-width: 3px;
outline: none;
-webkit-transition: 0.3s background;
-moz-transition: 0.3s background;
transition: 0.3s background;
}
.fg-button:active{
top: 2px;
}
.fg-button.teal{
color: #fff;
border-color: #04A5A1;
background-color: #08BBB7;
}
.fg-button.teal:hover{
background: #0ACFCB;
}
Javascript File : script.js
Javascript file where jQuery toggle function used in on click event.
$('#click').click(function()
{
$('div.js').toggle(1000);
});
Conclusion:
This was all about how we can use external CSS and js file in CodeIgniter. Hope you like it, keep reading our other blogs.
CodeIgniter Global Variable

In this tutorial, we will learn to create Global Variables in CodeIgniter. Now Why Exactly do we use it..?? Its all because Global Variables are available in every scope and holds static information. It makes the information very convenient and simple to update and can probably be modified from anywhere.
Now when it comes to define them in CodeIgniter, there are several ways do that. I’ve listed some of them below:
1. Create your own file in application/libraries in which class constructor contains an array as an argument. Now create a new file in /application/config with same name as given in application/libraries and declare your global variables in it. Now to use these variables, autoload the newly created library.
2. Create your own file in application/core and declare the global variables in it. Than in controller you need to extend your file name instead of CI_Controller.
3. If the Global Variables are true constants, just add them in application/config/constants.php file and name them in all uppercase like the others are defined.
4. If you want to set application constants create new config file and add the variables. Now load it as $this->config->load(‘filename’); And access those variables as
$this->config->item(‘variable_name’); .
Steps To Create Global Variables Using First Method:
Step 1: First of all, open application/libraries and create a custom class name globals.php. It contains a constructor function which contains an array as an argument.
<?php

class Globals {

//  Pass array as an argument to constructor function
public function __construct($config = array()) {

//  Create associative array from the passed array
foreach ($config as $key => $value) {
$data[$key] = $value;
}

// Make instance of CodeIgniter to use its resources
$CI = & get_instance();

// Load data into CodeIgniter
$CI->load->vars($data);
}

}

?>
Download The Script File
Save the project in your server directory and use the path given below to run the script.
http://localhost/ci_global_variable/Step 2: Now to make config file, open application/config and create file as globals.php and write the code given below. This file contains the config variable which will be passed as an array to constructor of Globals class where its keys and values are stored in $data.
<?php

// Create customized config variables
$config['web_Address']= 'https://www.formget.com/blog';
$config['title']= 'CodeIgniter Global Variable';

?>
When constructor function loads, it will take the config variables from the config file in order to use these variables anywhere.
Note: Name of the above file must be same as the class created in libraries folder otherwise the code will not work.
Step 3: But before using these variables we have to autoload the newly created library globals as given below.
$autoload['libraries'] = array('globals');Now, we are ready to use these global variables for our code.
Controllers : ci_global_variable_tutorial.php
Create controller which loads the view page.
<?php
class CI_Global_Variable_Tutorial extends CI_Controller{
public function __construct() {
parent::__construct();
}
// Load view page
public function index() {
$this->load->view('show_global_variables');
}
}
?>
Views : show_global_variables.php
In view page, we can use global variables according to our need.
<?php
echo "Title of the blog post : ".$title;
echo "<a href='$web_Address'>"."Click here to go to blog page"."</a>";
?>
Conclusion:
So now you know different ways to use Global variable in CodeIgniter. Hope you like the tutorial, keep reading our other blogs posts for more coding tricks. 🙂
Recommended blogs:-
- Codeigniter Database Connection
- Codeigniter Json
- Codeigniter Third Party Libraries
- How To Create And Validate Select Option Field
CodeIgniter: Access Third Party Libraries

In this tutorial I am going to show how you can access third party libraries in CodeIgniter in 4 simple steps. Now Why do we need it..?? While developing web applications, mostly developers have to deal with an integration segment i.e. they have to integrate applications with third party API’s. To segment these third party libraries with your own libraries, CodeIgniter has brought a new segmented folder i.e. third party folder.
So, if you are using CodeIgniter then you have to put that third party API libraries within the same library folder where you have kept or created your own application libraries. It is recommended to place third party packages in the application/third_party folder. In my case I’ll be using simple_html_dom.php as third party library.
Download The Script File To Use simple_html_dom Third Party Library
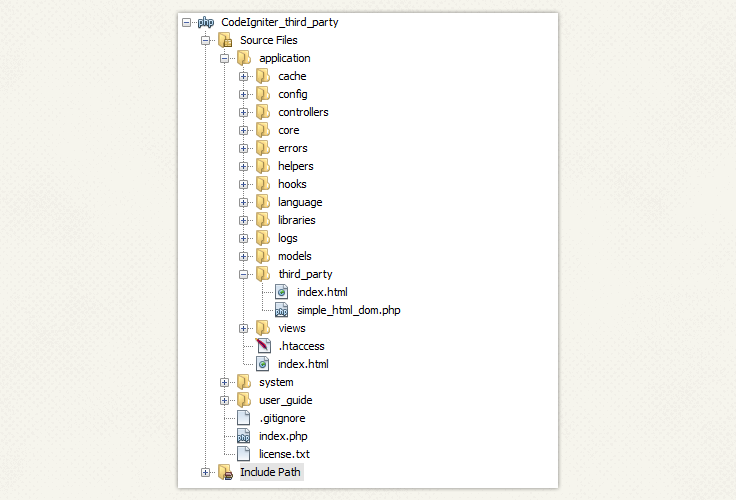
http://localhost/codeigniter_third_party/index.php/third_party_controllerSteps To Integrate third party library class in CodeIgniter:
Step 1: First download a third party library class. Here we are using simple_html_dom.php.
Step 2: Now copy it on CodeIgniter’s third party folder located at application\third_party.
Step 3: Write the code given below in your controller’s constructor to include the file in your project.
include APPPATH . 'third_party/simple_html_dom.php';Note : If your library class exists within sub folder directory then you can write full path as:
include APPPATH . 'third_party/folder_1/folder_2/simple_html_dom.php';
Step 4: Create controller file third_party_controller.php and include the third party library in the constructor.
Controller: third_party_controller.php
In this controller first add third party folder library by including APPPATH in constructor and then in index function create object ($html ) of that class then call its function for performing specific task.
<?php

class third_party_controller extends CI_Controller {

function __construct() {
parent::__construct();

//  Path to simple_html_dom
include APPPATH . 'third_party/simple_html_dom.php';
}

function index() {

//  Create object of Simple_html_dom class
$html = new Simple_html_dom();

//  Use Simple_html_dom class function load_file
$html->load_file('http://www.google.com');

//  Use Simple_html_dom class function
foreach ($html->find('img') as $element) {
echo $element->src . '<br>';
}
}

}
?>
Conclusion:
Now you can access Third Party Libraries easily. Hope you like this tutorial. Keep reading our other blogs posts for more coding tricks. 🙂
You may also like :
CodeIgniter – Getting Started With MVC
CodeIgniter Installation and Configuration
References:
Download the simple_html_dom.php library file from here to test it at your end.
You may also like:-