
How many times after sending an email you realize that – an embarrassing typo was left out, or you’ve missed inserting a link..?
If your emails are improper then, your customer might not read them or can even mark you as spam and unsubscribes you from receiving emails in future.
Stop Here & Check! No More Hassle..No Complex Setup..
Get A Fully Featured Email Marketing Package With In-Built SMTP
Sign Up For Free
So, do you want to take the fear out of sending emails?
All your efforts of creating the beautiful email campaign will be meaningless if it doesn’t reach to your customer’s inboxes the way you want it to be.
To avoid this, MailGet provides you an inbox preview feature to make sure that the email you are sending looks impressive and responsive in all devices.
Spot Problems Before Your Customers Do.!!
What Inbox Preview Is & What It Does.?
Inbox Preview is used to see how your email campaign will look like in different email client’s devices.
Preview your email campaigns in real-time before sending them and ensure that they look professional and easily readable by your customers.
By optimizing your message before sending it to customers,
- You can ensure that it will look accurate and beautiful on all devices used by the recipients.
- And that your emails won’t get blocked by spam filters and will appear exactly as you designed.
Check preview before sending the email and avoid sending illegible or missing text, images, and links to your customers.
With this, you will be able to increase response rates and reduce complaints.
What Is The Need Of Inbox Preview.?
Inbox Preview allows you to identify any issues quickly before you deploy your campaign drive by ensuring that your email will display correctly.
If not, done could lead you too –
The risk of spam and unsubscription increases if you send wrong and imperfect emails to your users.
People think that checking the inbox preview is time-consuming but by doing so, you can find out mistakes in your email, which saves you from sending faulty and improper looking emails.
As different users use different devices, so it is not compulsory that all of your messages will be perfectly get opened on all kind of devices.
So, before sending any email, you should preview it first.
Otherwise,
An incorrect email will be sent to your customers, which could lead to lower your reputation.
Even a small mistake in your message can ruin your campaign reputation.
Therefore,
It’s crucial to check your emails before sending them off to your customers.
When it comes to marketing campaigns, every big organization rely heavily on emails that sent to their target audience.
So if your email contains missing text and images, improperly formatted text-image ratio, and broken or invalid landing pages links then, it not only destroys your brand reputation and causes user frustration too.
As a result, you get blocked by users who could harm you badly. Isn’t it..??

Things That Could Be Done Using MailGet’s Email Inbox Preview
Things that can impact the success of your email campaign has to be reviewed.
This includes –
While previewing the content of your email, the very first and most important thing you should check is spellings.
Don’t trust the spell checker!
Get a habit of proofreading and do a final check and scan for misspelled words to make sure that your content is curated.
Make sure that all your images have uploaded properly and are hosted on your public web server, not on password protected site.
Verify that all your links are going to the right place?
Check every single link by clicking them and make sure that all of them are working properly.
Certify that the URLs you’re linking to are not blacklisted — something that could hurt your delivery rates.
A spelling mistake or even a missing word can take you to the danger zone.
Your Client thinks that you don’t offer high-quality content, and they will stop trusting on you which in result affect your reputation badly.
Check the spacing between elements, padding and margin changes, color and much more.
When you design any email, it may look great to you but, once that email lands into your subscriber list, it can look different.
So, before sending an email, make sure your emails looks great on every individual inbox.
Use proper header and preheader in your newsletter layout design.
Benefits Of Email Inbox Preview
Having a preview of your email before dropping it to the customers inbox will give you many advantages.
Have a look at it –
Preview your email campaigns in real-time ensures you that it will be easily readable by your customers which could lead to increase open rates as good content forces your clients to open your message.
Preview your email instantly before sending and save yourself from doing any mistake.
Inbox preview helps you to deliver a high-quality content to your subscribers which in result increases brand reputation and loyalty among customers.
Inbox preview gives you an accurate and exact representation of your content using which you can easily find out the mistakes if any and deliver a precise content to your clients.
Checking your emails one last time is a vital step for your email marketing campaign as it ensures that your newsletter will look perfect when reaching to client’s inbox.
So, take advantage of our Inbox Preview feature and preview your content before you hit SEND.
[Inbuilt Optin Form] Email Marketing Sign Up Forms: Grow Your Email List
Thinking of how to grow your audience and generate more leads and sales?
Well, adding an email signup form at high converting places results in building a mailing list quickly and easily.
Stop Here & Take A Glance! What If You Can Get An Inbuilt SMTP Along With Optin Form? Unbelievable Yet True!
Sign Up For Free
So, do you want to increase email list subscriptions with high-converting signup forms.?
Including subscription form could results in more visits to your website which ultimately can convert your visitors into the subscribers.
So,
Start capturing leads with MailGet by creating email marketing sign up forms..!!

What Is Email Marketing Sign Up Form?
Email Marketing Signup Form is a Web Form that can be added to a different website, blogs, social sites, etc. so that, a visitor can easily optin to your list and start receiving your newsletters or emails.
In other words,
Adding a signup form is a process where –
Customers Sign Up for your newsletters -> Get Added to your List -> Visit your website -> Get Converted -> Achieve Target.
Sign Up Form can also be referred as –
Web form, Email opt in forms, subscriber form, newsletter sign up form, custom forms or email web forms.
How To Add An Email Signup Form?
Click here… to add a signup email form.
Collect email subscribers with web forms and start growing your email list..!!
Building An Email List For MailGet Email Marketing
MailGet has been added up with an amazing feature known as Email Signup Forms.
Which helps you to –
- Collect your subscribers.
- Perform customer segmentation.
You can embed responsive newsletter signup form from –
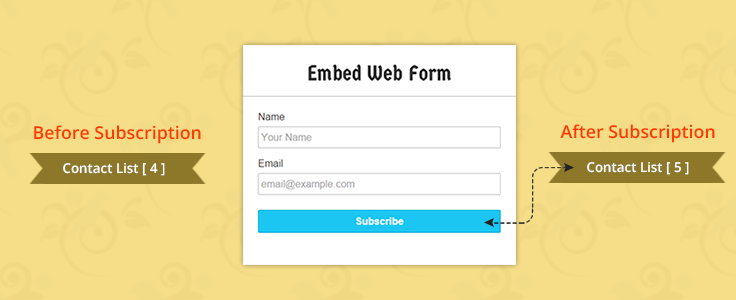
Setting -> Embed Form -> Embed Web FormUsing sign-up form template feature you can –
- Easily add opt in form in your web pages.
- Add the user to your contact list as soon as he fills out the form.
MailGet creates signup form code in HTML which you can embed in your website.
Add SignUp Form At High Converting Places
Add email opt in form at high converting places to build your email marketing list fast and better.
Make Your Lead Generation Forms Stand Out..!!
Make your forms noticed by people, place them where they get easily noticeable by users and attracts them to fill out.
So,
Here are some places where you could add a signup form to get more signups and subscriptions –
- The top sidebar of your website or blog
- In the top navigation bar
- The footer of your site
- A tab on your Facebook page
- At the end of every blog post
- On your About Us page
- All of your social sites
What Is The Benefit Of An Email Sign Up Forms?
Opt in email form capture more leads which help to grow your business in the following manner –
- As your customers sign up for your newsletters by itself, it means they are likely to read your emails, and so, they will never mark you as spam ultimately you get reduced spam rates.
- Include only relevant fields in the form to collect specific information, capture the exact information you want from them and control it.
- You just need to select an email list, where you want to collects all user’s data, now just copy the HTML code of form generated and add in your website.
Integrate your email marketing service with newsletter signup forms and grab the attention of potential subscribers and reach out to them.
Create Beautiful Sign Up Forms & Grow Your Audience!
Unsubscribe Email: Manage Email Opt-Out Link
If a person irritates you, again and again, you will try to get rid of him.
Same rule follows in email marketing world..!!
If you send an email to your customers frequently – you will be marked as spam.
How About Keeping Things Simple Via An Inbuilt SMTP That Comes Under This Bombing Email Marketing Package? Sounds Quite Exemplary! Why Not Try It On…
Sign Up For Free
Got scared !!
Don’t worry, using Unsubscribe email feature of MailGet – your customers can easily unsubscribe you with a single click instead of marking as spam.
Bam! Get reduced spam complaints.
What Is Unsubscribe Email Link?
A link that customers click on, to effortlessly remove themselves from your email marketing list.
In other words,
If any customer is not interested in receiving your emails,
Then, he/she can unsubscribe it by clicking on unsubscribe email link provided in an email, and hence customer will not receive any mail in future.
Unsubscription link is included at the bottom of the email, to give ease to the users if they would like to unsubscribe from your newsletters.
Why Should You Include Unsubscribe Email Link?
- Adding an unsubscribe link will make a big difference in how your recipients perceive the messages you sent.
- Most providers like Hotmail, Gmail, and Yahoo! support email list unsubscribe functionality.
- It works as an alternative to the report spam link and viewed positively by most ISPs and spam filters.
- You get reduced complaints -> improves email delivery rates.
How To Handle Unsubscription Email Link?
Here are some tips given to know how to handle Unsubscription Link –
Keep your email opt-out link simple and smart.
Don’t try to confuse your subscriber, use appropriate labels and proper text to make it easily understandable by your customers.
For example,
Instead of writing the text like “opt-out link for email”, use the relevant text on a link says “Unsubscribe here”.
If your subscribers don’t find the unsubscribe link in email, they can mark you as spam.
Ensure that the unsubscribe email link in your message is not hidden. This makes a big difference in your brand reputation.
When people want to unsubscribe, they expect the process to be easy and fast.
Avoid your user getting more frustrated by making it happen quickly and instantly.
Make it done with a single click.
Guess What! MailGet Does All This For You..
Benefits Of Including Email Unsubscribe Link
Unsubscribe management could benefit you in several ways –
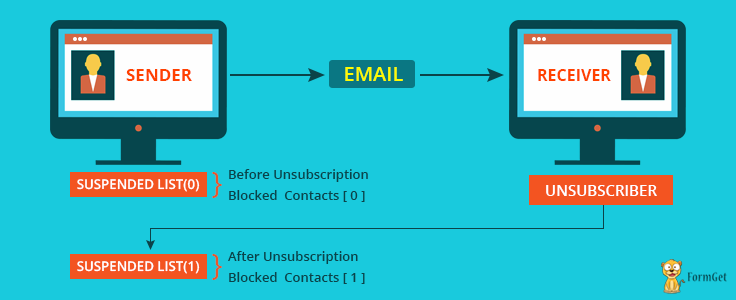
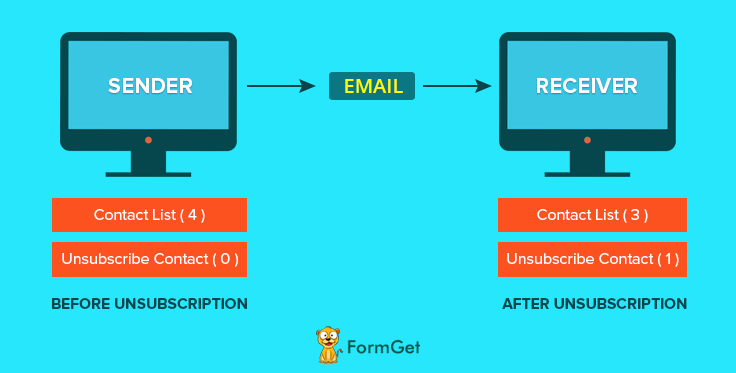
When your clients easily found an unsubscription link in your emails, then instead of marking you as spam they change their mind and unsubscribe you.
Providing a link of unsubscription in your campaign helps to build trust and brand reputation among customers.
Let your customers go if they wish to..
Give them a freedom and ease to unsubscribe from your list and do not force them to keep connected with you.
In this way, MailGet lets you manage email unsubscription process automatically.
Email Marketing : Sent Email Tracking – Open, Clicks, Country, Device, OS, Browser

![]()
Do you have any idea what happens after your email is sent. ?
- Did the recipient receive it?
- Did it get lost in their inbox?
- Did they click on the links?
- Opened attachments?
With An Email Tracking Feature, You Can Also Get An Inbuilt SMTP!
Yes, You Read It Right…No More Hassles Of External SMTP Integration.
Sign Up For Free
Want to know what happened with your emails once you send them. ?
As by tracking emails, you can build and maintain relationships in this highly packed, competing inbox environment.
So,
Start tracking all your sent emails using Email Tracking feature of MailGet and evaluate your campaign performance. !!
Why Email Tracking Is Important & What It Can Show You?
Email is the most powerful channel you use to talk with your customers.
Every time you send an email, you’re collecting data. But until you analyze it, data is just data. !!
So how do you find the time to delve into your stats and turn data into ROI.?
Using Email Tracking –
- You will have a clear picture of what works best for your customers and why.
- You can easily find out the weak points and tweak every message for better performance and better results.
The motive of tracking an email is not only to send emails to hundreds and thousands of people, but it also maintains customer segmentation.

How Does Email Tracking Work In MailGet.?
By tracking an email address in MailGet, you can monitor and analyze the success of each email in real time.
It keeps track of unsubscribe email, spam stats, opened emails and bounce rate.
MailGet follows the best email marketing tracking mechanism and generates the accurate result that includes –
1. Sent : Total number of emails sent for a particular campaign i.e. email delivery tracking.
2. Opened : How many sent emails were opened by the recipients i.e. tracking email opens.
3. Clicked : How many times the links have been clicked i.e. email link tracking.
4. Unsubscribed : How many recipients have unsubscribed for the mail.
Advanced Reporting
Want to track more data other than sent, opened, clicked and unsubscribed stats. ?
Here is an additional feature provided by MailGet known as Advanced Reporting for email campaign tracking.
How It Works. ?
When the subscriber clicks on links in your email template and he can easily tracks the following information –
- Type of Browser used by the subscriber.
- Type of Device used by the subscriber.
- Type of Operating System used by the subscriber.
- Tracks Country where the subscriber resides i.e. email location tracking.
A Glimpse How Advanced Report Looks In MailGet

For Example,
If the user sends an email campaign to its subscribers and if they clicks on any hyperlink or button.
Then, MailGet advanced reporting feature will collect all the information of subscriber which are mentioned above.
Moreover, the customer can also know that from which Country subscribers are clicking on the campaign links.
Hence, You just need to create a hyperlink or link button in the email campaign.
Note : – Advance Report Data will only get tracked if a user clicks on hyperlink or button present in your email campaign.
Benefits You Could Achieve From Email Tracking Data
Tracking an email provides a valuable email interaction with prospects. Gain unique insights such as –
Gain unique insights such as –
Track emails revenue and send campaigns that make you money.
Segment your email list based on open rates, purchases and more with email analytics and send targeted messages to your audience.
Analyze your data quickly and refine your email marketing strategy which ultimately increase your ROI.
By analyzing the stats and results of your campaigns, you can get to know the user’s interest and response which saves you from sending an irrelevant message to your recipient.
Tracking helps to know what time user is opening your email, so you can send your emails at the most convenient time when you are already on their minds.
Know exactly what your contacts want from you…
Better understand your customers by analyzing your emails and build more effective campaigns in the future.
Check out more related blogs here –
How To Track Email Via Google Analytics

We prepare mail and send it but do we have any idea what happens after that email is sent? Did the recipient receive it? Did it get lost in their inbox? Did they click on the links? Opened attachments?
We should be well aware of our send campaign’s Email Tracking Analytics. This helps you to track the behavior of email recipients whether they like our emails or not. This analysis surely helps us in drawing the different patterns for required improvements in our mailing strategy.
So Here Is The Solution-
Email Tracking is possible with the help of Google Analytics.
Google Analytics is used effectively for monitoring your emails. It is a service offered by Google. Strange to know Isn’t it..?? Obviously it is as many audiences still consider that GA is used only to track how many people visits their website and their average session time.
What Is Email Tracking?
It notifies when an email is sent whether it has been opened or clicked. Email tracking works in the background without interrupting our recipient.
How Does It Work?
We place an invisible image pixel in our emails that can detect the exact time and date an email has been opened. Email tracking can tell us when, how many times, where, and from what device a recipient opened our email.
And So-
Today in this tutorial, I’ll show you how to use GA to gain statistical insight into your outgoing emails.
Below You Can See Event Tracking Report For Outgoing Emails

Process To Track Email Using Google Analytics
For tracking the status of Email messages so as to know whether it is opened or not. You have need to follow these steps:-
Step 1 :- Create Google Analytics Account For Tracking Id.
This is a unique identifier that tells where tracking status has to be sent. If you don’t know how to find tracking id then follow these steps-
Signup for Google Analytics.
Click on Admin Tab.
Within Property column select Property Settings.
Under Basic Settings you can see Tracking Id.
Step 2 :- Create Campaign On Google Analytics.
This campaign contains all the parameter which are necessary to fill in creating email tracking URL such as Campaign Name, Campaign Medium and Campaign Source. Steps to create campaign on Google Analytics are given below-
Go to Reporting Tab of Google Analytics.
Click on Add Segment below Audience Overview.
Create New Segment on Clicking + NEW SEGMENT.
Write your Campaign Segment Name.
Fill parameter’s of Traffic Sources and click on Save button.

Step 3 :- Create A URL For Analytics.
This URL contains information about your Google Analytics tracking id, event category, event action, campaign name etc.
For building URL some required parameters need to be filled are:
Parameters Descriptions
v = 1 Google Analytics version number
tid Google Analytics Tracking ID (Ex. UA-12345678-2)
cid Customer ID (Ex. 12345678)
t Event hit type (Ex. event, pageview, social)
ec Event Category (Must not be empty.)
ea Event Action (Must not be empty.)
el Event Label (It’s an Optional parameter.)
cs Campaign Source (Ex. email, google)
cm Campaign Medium (Ex. cpc, email)
cn Campaign Name (It’s up to you)
Format Of URL
http://www.google-analytics.com/collect?v=1&tid= Tracking ID&cid=Customer ID&t=Event hit type&ec=Event Category&ea=Event Action&el=Event Label&cs=Campaign Source&cm=Campaign Medium&cn=Campaign Name
Now This An Example How URL Looks
http://www.google-analytics.com/collect?v=1&tid=UA-12345678-2&cid=12345678&t=event&ec=email&ea=open&el=open_email&cs=newsletter&cm=email&
cn=Buy_Product
Step 4 :- Append This URL In <img>’s SRC Attribute.
<html>
<body>
// write your content here.
<img src="http://www.google-analytics.com/collect?v=1&tid=UA-12345678-
2&cid=12345678&t=event&ec=email&ea=open&el=open_email&cs=newsletter&cm=email&cn=Buy_Product" />
</body>
</html>
Step 5 :- Now Just Send Email As A HTML.
This is the most important step as if you don’t send Email as a HTML, Gmail will consider this email message as a TEXT and you can not track whether an Email is opened or not using Google Analytics.
Note :- All the things given above will work only in case – “If the recipient has enabled Always display external images in General Setting of their Gmail Account.”
Step 6 :- See Your Campaign Result On Google Analytics.
- Go to Reporting Tab of Google Analytics.
- Click on Real-Time Menu Of Left Side Bar.
- And select Overview option to see how many users have opened your email at present.

And also you can see your campaign statistics that how many users have visited your campaign. If you want to know how many sessions generated then follow these steps-
Go to Reporting Tab of Google Analytics.
Click on Acquisition Menu Of Left Side Bar.
Select Campaigns option from Acquisition drop down menu.
And select All Campaigns option to see how many users have opened your email.
Conclusion:-
So, This was all about how to track Email Open Event with Google Analytics. Hope you liked it. Keep visiting our site for more interesting blog’s. 🙂
Get more related information here –
Email Personalization: Just Upload A CSV File And Send Email To Multiple Recipients

Ugh! Need to send the same Email for multiple contacts but don’t have enough time. OR Feel irritate in typing the same message and contacts each & every time.
It’s very easy to send an email for few person say 2-5 manually, but it becomes a tough job when it comes for sending to the bulk of contacts.
Though it is well said that ‘Time is Money’ so every person is trying to save his/her time.
In today’s busy human lives, it’s really has been a hectic job to write & send the same email message each time. Worrying about escape emails, misplace emails, fail emails.
Cheer up All……No need to worry now onwards.
We came up with a very optimized & simple solution named as Personalized Email.
Keep your all email contacts in CSV file with a specific format explained below in the blog. Upload this CSV file and write your message and just click the send button. It will be delivered to all the contacts which are listed in CSV file.
Today, we are going to explain you a simple way to send personalized messages to a large number client by just uploading a CSV file.The CSV file will only contain the name of the client and their email address. The format of information inside CSV file should be of the following pattern,
Client-name1, [email protected]
Client-name2, [email protected]
...
...
so on.
After uploading a valid CSV file, you will get a message box where you can write subject and messages.
Since, this is a personalized message so you will have to mention users name inside the subject and message.
For this, use keyword “{user}”, where you want to insert client name in the subject or message. The keyword {user} will be automatically replaced with the username during the process of sending messages.
For example: If, in the message you want to write
Hi, Client-name1Then you can write the message in the following way.
Hi, {user}Similarly, write {user} to all place in the message where you want client names.
Watch the live demo or download code from the link given below.
We have introduced an online service for personalized email marketing, name MailGet – Email Marketing Platform. It allow you to send personalized message to mulitple recipients at the same time. It also contains several userful features.
Follow the steps:
Step 1: Download latest version of PHPMailer library from here.
Step 2: Extract download library file and copy class.phpmailer.php, class.smtp.php and PHPMailerAutoload.php.
Step 3: Create a lib folder in your application folder and paste these library files in it.
Step 4: Now, create css and js folder. Download and paste bootstrap.css file in css folder. Similarly, download latest jQuery library file. Rename it to jquery.js and paste it into the js folder.
Step 5: Create uploads folder to store uploaded CSV file. The uploaded file will be deleted once the email is sent.
Step 6: Create index.php, Mail.php files in the root folder of your application and write the code provided below.
Step 7: Now, create style.css in css folder and paste the code as mentioned below.
Note: Be careful about the directory structure of your application. Follow the image given below for a clear understanding.

index.php
First, it shows a form containing CSV file uploading option. Once a valid CSV file is uploaded, it will again display a form which will allow users to write personalized subject and message.
When user will submit the form, all information will be passed to Mail.php file for further process.
<html>
<head>
<meta http-equiv="Content-Type" content="text/html; charset=windows-1252">
<title>Send Personalized Emails By Uploading CSV Using PHP</title>
<link rel="stylesheet" type="text/css" href="css/style.css"/>
<link rel="stylesheet" type="text/css" href="css/bootstrap.css"/>
<script src="js/jquery.js"></script>
</head>
<body>
<h1>Send Personalized Emails By Uploading CSV Using PHP</h1>
<div id="main" class="col-sm-12 col-md-6 col-lg-6">
<div id="csv_sec">
<form action="" method="POST" enctype="multipart/form-data">
<input type="file" name="csv_data" class="csv_upload"/>
<input type="submit" id="csv_upload" value="Upload CSV file" />
</form>
</div>

<?php
$ext_error = "";
$data = "";
$csv_data = array();
if (isset($_FILES) && (bool) $_FILES) {

// Define allowed extensions
$allowedExtentsoins = "csv";
$file_name = $_FILES['csv_data']['name'];
$temp_name = $_FILES['csv_data']['tmp_name'];
$path_part = pathinfo($file_name);
$ext = $path_part['extension'];

// Checking for extension of attached files
if ($ext != $allowedExtentsoins) {
echo "<script>alert('Sorry!!! ." . $ext . " file is not allowed!!! Try Again.')</script>";
$ext_error = TRUE;
} else {
$ext_error = FALSE;
}
if ($ext_error == FALSE) {
echo "<script>alert('File successfully uploaded!!! Continue...')</script>";

// Store attached files in uploads folder
$file_path = dirname(__FILE__) . "/uploads/" . $path_part['basename'];
move_uploaded_file($temp_name, $file_path);

// Retrieve data from the CSV file and storing in $csv_data
$file = new SplFileObject($file_path);
$file->setFlags(SplFileObject::READ_CSV);
foreach ($file as $row) {
// Remove empty row and empty values from the uploaded csv data
$csv_data[] = array_filter($row);
}
$csv_data = array_filter($csv_data);
$data = htmlspecialchars(json_encode($csv_data));
?>
<div id="login">
<h2>Message Box</h2>
<hr>
<form action="Mail.php" method="post">
<label>Subject : </label>
<input type="hidden" name="uploaded_file_path" value="<?php echo $file_path; ?>" />
<input type="hidden" name="user_list" value="<?php echo $data; ?>" />
<input type="text" name="email_sub" class="email_sub" />
<label>Message : </label>
<textarea name="box_msg" rows="10" cols="30" class="box_msg">Message...</textarea>
<input type="submit" value="Send" id="submit"/>
</form>
</div>
<?php
}
}
?>
</div>
<script>
jQuery("#csv_upload").click(function(e) {
var upload = jQuery('.csv_upload').val();
if (upload == "") {
alert('Please Upload a CSV file!!!');
e.preventDefault();
}
});
jQuery("#submit").click(function(e) {
var email_sub = jQuery('.email_sub').val();
var box_msg = jQuery('.box_msg').val();
if (email_sub == "") {
alert('Subject is required!!!');
e.preventDefault();
}
if (box_msg == "") {
alert('Message is required!!!');
e.preventDefault();
}
});
</script>
</body>
</html>
Mail.php
Retrieve and store all the data sent by index.php file. Then, it will pass all the information to the PHPMailerAutoload.php library file to send personalized email to each user( mentioned in the uploaded CSV file ) one by one.
Then, based upon the respose from the server, it will display status of each email and also will delete the uploaded CSV file form the uploads folder.
<html>
<head>
<meta http-equiv="Content-Type" content="text/html; charset=windows-1252">
<title>Send Personalized Email By Uploading CSV</title>
<link rel="stylesheet" type="text/css" href="css/style.css"/>
<link rel="stylesheet" type="text/css" href="css/bootstrap.css"/>
<script src="js/jquery.js"></script>
</head>
<body>
<?php
// Include PHPMailerAutoload.php library file
include("lib/PHPMailerAutoload.php");
$email_sub = "";
$msg = "";
$user_list = array();
$status = array();
$file_path = "";

// Retrieving & storing user's submitted information
if (isset($_POST['user_list'])) {
$user_list = json_decode($_POST['user_list']);
}
if (isset($_POST['email_sub'])) {
$email_sub = $_POST['email_sub'];
}
if (isset($_POST['box_msg'])) {
$msg = $_POST['box_msg'];
}
if (isset($_POST['uploaded_file_path'])) {
$file_path = $_POST['uploaded_file_path'];
}

// Sending personalized email
foreach ($user_list as $list) {
$receiver_name = "";
$receiver_add = "";
$per_msg = "";
$per_email_sub = "";
$receiver_name = $list[0];
$receiver_add = $list[1];

// Replacing {user} with client name from subject and message
$per_msg = str_replace("{user}", $receiver_name, $msg);
$per_email_sub = str_replace("{user}", $receiver_name, $email_sub);

$mail = new PHPMailer();
$mail->IsSMTP();
$mail->Mailer = "smtp";
$mail->Host = "smtp.gmail.com";
$mail->Port = 465;

// Enable SMTP authentication
$mail->SMTPAuth = true;

// SMTP username
$mail->Username = '<-- SMTP Username -->';

// SMTP password
$mail->Password = '<-- SMTP Password -->';

// Enable encryption, 'tls' also accepted
$mail->SMTPSecure = 'ssl';

// Sender Email address
$mail->From = '<-- Sender Email Address -->';

// Sender name
$mail->FromName = "<-- Sender Name -->";

// Receiver Email address
$mail->addAddress($receiver_add);

$mail->Subject = $per_email_sub;
$mail->Body = $per_msg;
$mail->WordWrap = 50;

// Sending message and storing status
if (!$mail->send()) {
$status[$receiver_add] = False;
} else {
$status[$receiver_add] = TRUE;
}
}
?>
<div id="main" class="col-sm-12 col-md-6 col-lg-6">
<h1>Message Status</h1>
<div id="status">
<ul>
<?php
foreach ($status as $user => $sent_status) {
if ($sent_status == True) {
$img = "img/errorFree.png";
} else {
$img = "img/error.png";
}
echo "<li> <img src='$img'/>" . $user;
}
// Deleting iuploaded CSV file from the uploads folder
unlink($file_path);
?>
</ul>
<a href="index.php" id="more">Send More Emails...</a>
</div>
</div>
</body>
</html>
style.css
Contain CSS coding used for this project. You can change it according to your requirement.
@import url(http://fonts.googleapis.com/css?family=Raleway);
body{
padding: 0;
}
#main{
float: none;
margin: 0 auto;
font-family:raleway;
}
h2{
background-color: #FEFFED;
text-align:center;
border-radius: 10px 10px 0 0;
margin: -10px -40px -20px !important;
padding: 15px;
}
hr{
border:0;
border-bottom:1px solid #ccc;
margin: 10px -40px;
margin-bottom: 30px;
}
#login, #csv_sec, #status{
width:50%;
min-width: 320px;
border-radius: 10px;
font-family:raleway;
border: 2px solid #ccc;
padding: 10px 40px 25px;
margin: 70px auto 0 auto;
}
#status{
padding: 10px 0 45px;
margin-top:30px;
background: #FEFFED;
}
input[type=text],input[type=email]{
width:100%;
padding: 10px;
margin-top: 8px;
border: 1px solid #ccc;
padding-left: 5px;
font-size: 16px;
font-family:raleway;
margin-bottom: 10px;
}
input[type=submit]{
width: 100%;
background-color:#FFBC00;
color: white;
border: 2px solid #FFCB00;
padding: 10px;
font-size:20px;
cursor:pointer;
border-radius: 5px;
}
textarea{
width: 100%;
margin-top: 10px !important;
margin-bottom: 15px !important;
}
input[type="file"] {
float: left;
width: 100%;
margin: 15px auto;
}
a#more {
float: right;
margin-right: 15px;
}
h1 {
text-align: center;
}
ul {
list-style: none;
}
div#status ul {
padding-left: 0;
}
div#status ul li {
width: 100%;
padding: 5px 10px;
font-weight: bold;
font-size: 16px;
}

div#status ul li img {
width: 50px;
margin: 5px 10px;
padding: 0 15px;
}
@media only screen and (max-width:480px){
div#login{
width: 300px;
}
}
Run the script & Enjoy!!!
Conclusion:
Hope this tutorial will be beneficial to you. Try the script and share your experience from the space given below. Keep reading our blogs for more easy tricks and concepts 🙂
Send Multiple Attachment In Email Using PHP

Now Why Email Attachments are Important..??? As business grows larger, its need to facilitate the flow of information between workers grows. Colleagues and Supervisors need to access documents and keep the data up-to-date in order to complete collaborative tasks. Email Attachments is one way to accomplish this sharing of data.
We know sending a simple text email using mail() function is not a big deal nowadays. But, it’s a little bit tricky and difficult task to send emails with multiple attachments rather than sending a plain text.
If you’re just a normal user or intermediate programmer and want to implement multiple attachment functionalities for your mail using native mail() function its a bit challenging.. Isn’t it..??
And So,
Today, in this article I am going to explain a simple and easy way to send emails with multiple attachments using famous mail library PHPMailer.
Watch the live demo or download code from the link given below.

Steps To Proceed:-
Step 1- First, Download the latest PHPMailer library file. You can download the latest library file from here.
Step 2- Extract the library folder and copy class.phpmailer.php, class.smtp.php and PHPMailerAutoload.php file available in the extracted folder.
Step 3- Now, Create a lib folder in your project folder and paste the above-mentioned library file in it.
Step 4- Similarly, create js and css folder. Download latest jQuery library file and after renaming it to jquery.js, paste it into the js folder. In the same way, download and paste bootstrap.css file in css folder.
Step 5- Create a uploads folder. I’ve stored all attached file in this folder and will delete these files once I send the emails.
Step 6- Create index.php file in the root folder of your project and paste the code given below in it.
Step 7- Create MulAttachMail.php file in the same folder where we created index.php file and paste the code given in it.
Step 8- Create style.css file in the css folder. Paste the following code in it.
Note: You must be very clear about the directory structure of your project. A simple mistake can ruin your coding part and cause frustration in your mind.
So, be careful and follow each step exactly in the same way as I explained. For better understanding of directory structure, you can also refer to the image given below:

index.php
This file lets you create a message box. Users can write their message in the message box and attach their files. User should also enter the sender’s and receiver’s email addresses. When the user will clicks on the send button, all the submitted data will be passed to MulAttachMail.php file.
<html>
<head>
<meta http-equiv="Content-Type" content="text/html; charset=windows-1252">
<title>Send Multiple Attachment Using PHP</title>
<link rel="stylesheet" type="text/css" href="css/style.css"/>
<link rel="stylesheet" type="text/css" href="css/bootstrap.css"/>
<script src="js/jquery.js"></script>
</head>
<body>
<h1>Send Multiple Attachment Using PHP</h1>
<div id="main" class="col-sm-12 col-md-6 col-lg-6">
<div id="login">
<h2>Message Box</h2>
<hr>
<form action="MulAttachMail.php" method="post" enctype="multipart/form-data">
<h3>From : </h3>
<label>Sender's Name (Optional) : </label> <input type="text" name="" class="" placeholder="Enter Sender's Name"/>
<label>Sender's Email Address : </label> <input type="email" name="sen_email" class="sen_email" placeholder="Enter Sender's Email Address"/>
<h3>To : </h3>
<label>Receiver's Email Address : </label> <input type="email" name="rec_email" class="rec_email" placeholder="Enter Reciever's Email Address"/>
<label>Subject : </label>
<input type="text" name="email_sub" class="" placeholder="Subject"/>
<label>Message : </label>
<textarea name="box_msg" rows="10" cols="30">Write your message here...</textarea>
<div class="input_fields_wrap">
<div><input type="file" name="attachment" value="Attach File" id="first_attach" ></div>
</div>
<a class="add_field_button">Attach More Files</a>
<input type="submit" value="Send" id="submit"/>
</form>
</div>
</div>
<script>
jQuery(document).ready(function() {
jQuery("#submit").click(function(e) {
var sen_email = jQuery('.sen_email').val();
var rec_email = jQuery('.rec_email').val();
if (sen_email == "") {
alert('Sender's Email Address cannot be empty.');
e.preventDefault();
}
if (rec_email == "") {
alert('Receiver's Email Address cannot be empty.');
e.preventDefault();
}
var attach = jQuery('#first_attach').val();
if (attach == "") {
alert('Atleast one attachment is required!!!');
e.preventDefault();
}

});
// Code for creating more attachment file
// Maximum attachment allowed
var max_fields = 10;
//Fields wrapper
var wrapper = $(".input_fields_wrap");
// Add button ID
var add_button = $(".add_field_button");
// Initlal attachment field count
var x = 1;
// Add attachment field on per click
$(add_button).click(function(e) {
e.preventDefault();
// Max attachment allowed
if (x < max_fields) {
// Attachment increment
x++;
$(wrapper).append('<div><input type="file" name="attachment' + x + '"/><a href="#" class="remove_field"><img src="img/del-attach.png"/></a></div>'); //add attachment
if (x == max_fields) {
// Hide add more attachment link
$(".add_field_button").hide();
}
}

});
// Remove attachment on per click
$(wrapper).on("click", ".remove_field", function(e) { //user click on to remove attachment
e.preventDefault();
$(this).parent('div').remove();
x--;

if (x < max_fields) {
// Show add more attachment link when field < max_fields
$(".add_field_button").show();
}
})
});
</script>
</body>
</html>
MulAttachMail.php
All submitted values from index.php will be processed here. This file checks for the supported file, upload attached files, send emails. It then deletes the uploaded files from the project folder finally.
<?php
// Include PHPMailerAutoload.php library file
include ("lib/PHPMailerAutoload.php");

$sen_name = "";
$sen_email = "";
$rec_email = "";
$email_sub = "";
$box_msg = "";
// Retrieving & storing user's submitted information
if (isset($_POST['sen_name'])) {
$sen_name = $_POST['sen_name'];
}
if (isset($_POST['sen_email'])) {
$sen_email = $_POST['sen_email'];
}
if (isset($_POST['rec_email'])) {
$rec_email = $_POST['rec_email'];
}
if (isset($_POST['email_sub'])) {
$email_sub = $_POST['email_sub'];
}
if (isset($_POST['box_msg'])) {
$box_msg = $_POST['box_msg'];
}

if (isset($_FILES) && (bool) $_FILES) {
$files = array();
$ext_error = "";
// Define allowed extensions
$allowedExtentsoins = array('pdf', 'doc', 'docx', 'gif', 'jpeg', 'jpg', 'png', 'rtf', 'txt','zip');
foreach ($_FILES as $name => $file) {
if (!$file['name'] == "") {
$file_name = $file['name'];
$temp_name = $file['tmp_name'];
$path_part = pathinfo($file_name);
$ext = $path_part['extension'];

// Checking for extension of attached files
if (!in_array($ext, $allowedExtentsoins)) {
echo "<script>alert('Sorry!!! ." . $ext ."Extension is not allowed!!! Try Again.')</script>";
$ext_error = FALSE;
}else{
$ext_error = True;
}

// Store attached files in uploads folder
$server_file = dirname(__FILE__) . "/uploads/" . $path_part['basename'];
move_uploaded_file($temp_name, $server_file);
array_push($files, $server_file);
}
}
if($ext_error != FALSE){
$mail = new PHPMailer();
$mail->IsSMTP();
$mail->Mailer = "smtp";
$mail->Host = "smtp.gmail.com";
$mail->Port = 465;

// Enable SMTP authentication
$mail->SMTPAuth = true;

// SMTP username (e.g [email protected])
$mail->Username = '<-- SMTP Username -->';

// SMTP password
$mail->Password = '<-- SMTP password -->';

// Enable encryption, 'tls' also accepted
$mail->SMTPSecure = 'ssl';

// Sender Email address
$mail->From = $sen_email;

// Sender name
$mail->FromName = $sen_name;

// Receiver Email address
$mail->addAddress($rec_email);

// Attaching files in the mail
foreach ($files as $file) {
$mail->addAttachment($file);
}
$mail->Subject = $email_sub;
$mail->Body = $box_msg;
$mail->WordWrap = 50;

// Sending message and checking status
if (!$mail->send()) {
echo "<script>alert('Sorry!!! Message was not sent. Mailer error: " . $mail->ErrorInfo . ")</script>";
exit;
} else {
echo "<script>alert('Congratulations!!! Your Email has been sent successfully!!!')</script>";
}
// Deleting files from the uploads folder
foreach ($files as $file) {
unlink($file);
}
echo "<script>window.location='index.php';</script>";
}else{
foreach ($files as $file) {
unlink($file);
}
echo "<script>window.location='index.php';</script>";
}
}
?>
<script src="js/jquery.js"></script>
style.css
Includes basic styling of HTML elements.
@import url(http://fonts.googleapis.com/css?family=Raleway);
body{
padding: 0;
}
#main{
float: none;
margin: 0 auto;
font-family:raleway;
}
h2{
background-color: #FEFFED;
text-align:center;
border-radius: 10px 10px 0 0;
margin: -10px -40px -20px !important;
padding: 15px;
}
hr{
border:0;
border-bottom:1px solid #ccc;
margin: 10px -40px;
margin-bottom: 30px;
}
#login{
width:50%;
min-width: 320px;
border-radius: 10px;
font-family:raleway;
border: 2px solid #ccc;
padding: 10px 40px 25px;
margin: 70px auto 0 auto;
}
input[type=text],input[type=email]{
width:100%;
padding: 10px;
margin-top: 8px;
border: 1px solid #ccc;
padding-left: 5px;
font-size: 16px;
font-family:raleway;
margin-bottom: 10px;
}
input[type=submit]{
width: 100%;
background-color:#FFBC00;
color: white;
border: 2px solid #FFCB00;
padding: 10px;
font-size:20px;
cursor:pointer;
border-radius: 5px;
margin-bottom: 15px;
}
textarea{
width: 100%;
margin-top: 10px !important;
margin-bottom: 15px !important;
}
input[type="file"] {
float: left;
width: 90%;
}
a.remove_field img{
width: 20px;
height: 20px;
float: right;
margin-top: 6px;
}
.input_fields_wrap div input {
margin-top: 5px;
margin-bottom: 10px;
}
a.add_field_button {
float: right;
margin-bottom: 15px;
}
h1 {
text-align: center;
}
@media only screen and (max-width:480px){
div#login{
width: 300px;
}
}
Conclusion:
Hope you liked the tutorial. Do give a try to the script and share your experience with us in the space given below. Keep reading our other blog posts. 🙂
For more related information check out following blogs –
Hard Bounce vs Soft Bounce : Why Email Bounce Back

“Sometimes our email bounces. We send a message, and a short time later we receive a reply saying that the email could not be delivered. The reasons are often cryptic and confusing.” Why does it happen? And How to fix it.?
In General,
We’ve all been there. It takes time while creating an email then sending it and at last when we check our email reports we see that it “bounced.” And So, if our account has a high number of bounces it can obviously have a negative impact on our delivery rate. So it makes sense to clean up those bounced email addresses when necessary.
In this tutorial, you’ll learn why an email gets bounced, how to interpret email bounce-back error messages and steps to resolve it.
MailGet Bolt – email marketing service Tracks all Hard and Soft Bounce Emails So you can use this for sending your emails.
What is Bounce Back?
When an email message is unable to get delivered to a particular email address. It is called a Bounce. When it happens, an email message come back to the sender from the recipient’s mail server.
There are two types of bounces:
Soft Bounce:-
A Soft bounce basically occurs when a recipient’s server is temporarily not available, for receiving the email.
Reasons for soft bounces are:
- If recipient’s mailbox is full.
- If a message size is too large.
- If a server is unavailable due to the network problem.
Hard Bounce:-
A hard bounce basically occur’s when an e-mail message returns to the sender inbox as the recipient’s email address was invalid or the recipient’s email address doesn’t exist.
Reasons Why Emails Get Bounced:
1 :- If Recipient’s Email Address Does Not Exist.
This error occurs when the recipient’s email address does not have any existence. It means your target email address no longer exists or their accounts are disabled or closed.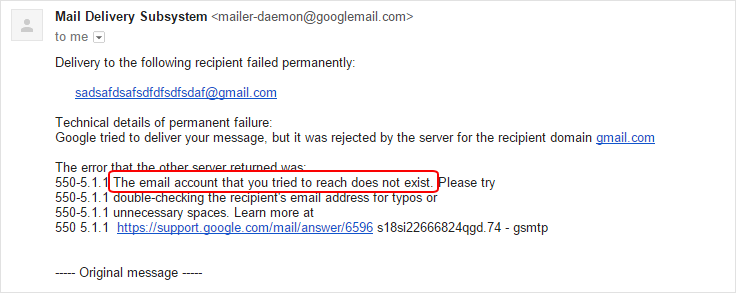
2 :- If Recipient’s Mailbox Is Full.
When the maximum size of inbox in mailbox exceeds its storage limit and if recipient’s Mailbox is full then an error occur which says:-
The recipient’s mailbox is full and can’t accept messages now. Please try resending this message later, or contact the recipient directly.
3 :- If Recipient’s Have Blocked Email.
If the email address of the sender is placed within the “Blocked” category by receiver then, receiving server restricts or block the incoming email messages.
Some of government institutions place their student’s email addresses in the “Blocked” category so that they can’t send any email message.
4 :- If Recipient’s Email Address Is Invalid.
If a recipient’s email address is not valid, or when sender forget to type a keyword or types an extra keyword in a valid email address then, an error occurs stating – recipient’s email address is invalid.
5 :- Message Size Is Too Large.
If the content of sending email message is greater than the maximum size limit of receiver mailbox including things like headers, images,
text, pdf file etc. then, an error will come to sender’s inbox stating that – “the message size is too large”.
6 :- Unknown Or Illegal Alias Of Email Address.
This error will occur when recipient’s alias email address is not valid or not exist. however, your server was not able to deliver the message to the server that hosts the account.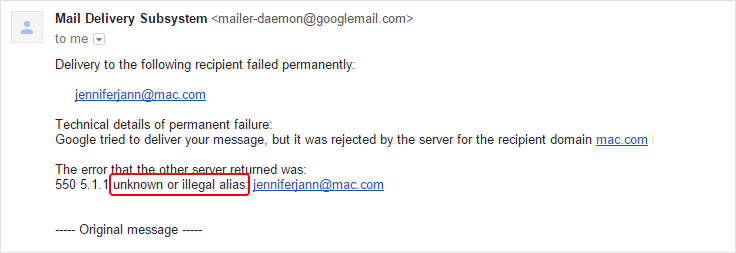
7 :- If Reputation Of Sending Server’s Is Poor.
If recipient recognizes that the email message he is receiving contains a malicious message or any kind of external links or virus. Recipient’s server will not accept the email.
In case if the sending server is email service provider’s and they have not attached their DKIM and SPF TXT record to a domain where his website hosted. So in this situation email message always goes in spam.
8 :- If IP Address Of Sending Or Receiving Server’s Had Blacklisted.
First of all, you have to check to see that either your IP address is blacklisted or that of the customer’s ISP. It’s more common that your customer’s IP address is blocked. In both the cases email message get bounce back.
9 :- If Recipient’s Server DNS Failure.
This error will occur in case if the recipient’s server DNS failure due to network failure or server down. It makes stuck to all the Smtp Service and stops all emails exchange from sender end to the receiver end. there is a condition if server unavailable In all this condition at the sender end an email message will come for notification that will explain why this happened.
10 :- If Mailbox Is Unavailable.
If PTIN ( Postini Threat Identification Network) identify that a particular Sending server’s trying to send an abusive or spam message. Then PTIN system blocks the recipient’s server from receiving a message from presents one hour. after one-hour PTIN system unblocks the recipient’s server from receiving messages from that particular sending IP. if sender tries again to send this message, then PTIN system again block the recipient’s server from receiving the message from presents one hour.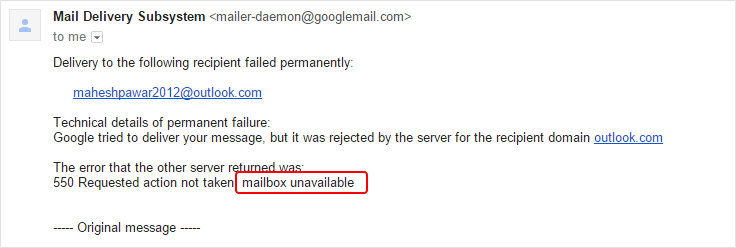
11 :- If Relay Denied.
If an email gets bounced back because of a temporary error either on the sending server or recipient’s server. Relay means “the transmission of sender email from a particular Smtp Service provider to the receiving server side, which has been denied because of sender’s error.”
This sort of bounce generally occurs due to a misconfiguration of the server on the recipient side or when the sender’s email is not verified.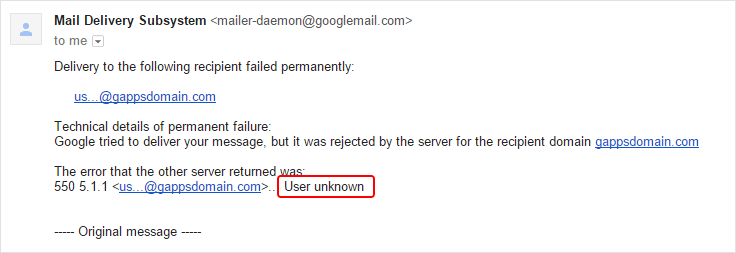
Conclusion:-
So monitor your bounces, keep track of the bounced email addresses for enhancing your Email Deliverability. If you do have other reasons why emails bounce? Share it with us in the space given below.. 🙂
Check Email MX Record Using PHP

MX-Record is also known as mail exchanger record (MX record). It is a type of record in the Domain Name System that points out to a mail server which is responsible for accepting email messages on behalf of a receiver domain.
An MX Record is a perfect(Route-Map) address of any domain(usually Email Receiver). So, when a user want to send an email to another user then user’s mail server must know the receiver IP address. Sender mail server sends a query to DNS. When DNS gets this request then DNS search for the request related Receiver records. This record is known as MX-Record.
In this blog post, we are going to clean email list on the basis of MX-Record.
If you want to learn the full concept about MX-Record, you must need to have basic knowledge about DNS(Domain Name Server/System).
If you don’t have any idea about DNS, then Please visit This link Domain Basics…
Watch the live demo or download code from the link given below

MailGet is an online Email Marketing sevice which allow you to send Bulk Emails with list cleaning features. You can easily connect and configure it with different SMTP service providers, e.g MailGun, Mandrill, Postmark etc, to send Emails.
The questions which come very first in user’s mind are listed below with proper explanation.
Why do we need MX records.?
When your domain is registered, it’s assigned several DNS records, which enable it to be located on the Internet. These include MX records, which direct the domain’s mail flow.
Each MX record points to an email server that’s configured to process mail for that domain. There’s typically one record that points to a primary server, then additional records that point to one or more backup servers. For users to send and receive an email, their domain’s MX records must point to a server that can process their mail.
How does it looks.?
This picture image will let you show the MX-Record Format.

- Name: Name of Email-Sender Domain.
- Class: This is always set to IN, which stands for the Internet.
- Type: For MX records, this is always set to MX.
- TTL: “Time to Live.” How long it will take to update the record. This is measured in seconds. A TTL of 3600 seconds means records will take an hour to update. A TTL of 86400 means records will take a day to update. A higher TTL value means less traffic load for the DNS server, but it also means that changing the MX records will take longer.
- Preference or Priority(PRI): The order of preference for mail delivery. Sending servers should try the lowest preference number first, then the next lowest, and so on.
- Data: Name of Receiver Domain or the hostname of the mail server that handles mail for that domain.
How can we update MX records.?
If your company has its own DNS servers, you can contact to your DNS administrator for update stuff. Otherwise, talk to your domain name provider.
Why should I update my MX records.?
We route your email to us for the better security of the message. When you update your MX records, we perform the certain operation listed below.
- Remove out the bad emails.
- Send the correct & good emails to your email server.
When should I update my MX records.?
As activation process occur, you’ll receive a message asking for update your MX records.
If you’re adding more domains later on, update your MX records after you’ve added the domain in the Administration Console. Until your domain is set up in the Administration Console, mail will bounce if you update your MX records.
Why do I need to have separate MX records.?
We use redundant MX records as a backup in case any problem occurs. They give our network more flexibility if any changes to architecture are necessary.
Should I update A records when routing mail to the message security service.?
Do not update your A records. Since your MX records point to psmtp.com, you do not need to change any A records.
Should I keep MX records pointed directly to my mail server as a backup.?
Yes. If you want to keep a direct MX record for your mail server as a backup, you can, but be sure to leave it at the lowest priority, after all four psmtp.com records. Leaving your own mail server in the MX records should be a temporary backup measure, because spammers sometimes try to bypass the service and connect directly to your mail server using your backup MX records. Once your mail is flowing through the message security service successfully, consider changing your MX records to remove this backup.
How long do MX record updates take.?
MX record updates are not immediate. After you’ve updated your MX records, it will take a while for every sender to use the new MX records. Your original TTL setting determines how long (in seconds) this will take. Changing the TTL setting won’t speed this up.
Will I lose mail after changing MX records.?
No. As long as you enter the MX records correctly, you won’t lose any mail. While your MX records are changing over, some mail will be delivered using your old MX information, and some mail will be delivered using your new MX information, but all of it will be delivered.
What happens if I type the wrong information into the MX record.?
If you type the incorrect delivery information in the MX record, some mail will bounce. The sender will receive a notice that the mail wasn’t delivered. If this happens, correct the MX records as soon as possible. Some mail may still bounce for a period of time (up to the length of the new TTL setting), but the sooner you update the MX records to the correct setting, the fewer messages will bounce.
What exactly happens when I update my MX records.?
Once you update your MX records, mail will start flowing through the message security service. After your old previous TTL (in seconds) has expired, all your mail flows through the message security service. When your mail flows through the service, mail is bounced from IP addresses known to be a major source of spam attacks or viruses. Also, if you have Non-Account Virus Blocking, mail to users will be filtered for viruses as well. You’ll get complete mail filtering after you’ve added your users.
How would I know that the MX update worked.?
If you want to check whether your MX update got successful or not, send a mail from an outside address then check in the full headers. It is a text which is about 20-30 lines long. If you find the word “psmtp.com” in the header then the mail has been routed through the message security service.
Important commands related to MX-Records:-
BLACKLIST: Check IP or host for reputation.
SMTP: Test mail server SMTP (port 25).
MX: DNS MX records for a domain.
A: DNS A record IP address for hostname.
SPF: Check SPF records on a domain.
TXT: Check TXT records on a domain.
PTR: DNS PTR record for the hostname.
CNAME: DNS canonical hostname to IP address.
SCAN: Perform a port scan on the host.
WHOIS: Get domain registration information.
ARIN: Get IP address block information.
SOA: Get Start of Authority record for a domain.
TCP: Verify an IP Address allows TCP connections.
HTTP: Verify a URL allows HTTP connections.
HTTPS: Verify a URL allows secure HTTP connections.
PING: Perform a standard ICMP ping.
TRACE: Perform a standard ICMP traceroute.
DNS: Check your DNS Servers for possible problems.
index.php :
This index.php file contains the major functionality of the script.While executing this code user see a form, see the image above.User has to enter email address and after clicking on submit button user gets the result as MX-Record.
<html>
<head>
<link href="css/style.css" rel="stylesheet" type="text/css"/>
<title>Check Email MX Record</title>
<meta http-equiv="Content-Type" content="text/html; charset=windows-1252">
</head>
<body>
<div class="container">
<div class="row">
<div class="col-sm-1 col-md-2 col-lg-12">
<div id="main" class="col-sm-1 col-md-2 col-lg-12">
<div class="col-sm-1 col-md-2 col-lg-12"><h1>Check Email MX Record</h1> </div>
<div id="login">
<h2>MX Record Checker</h2>
<hr>
<div id="right">
<form name="myForm" method="post" action="index.php">
Please Enter Email Address:<br /><br />
<input type="email" size=18 name="email" id="email"><br /><br />
<div class="col-sm-1 col-md-2 col-lg-12"> <input type="submit" value="Check" id="dsubmit" name ="submit"></div>
</form>
<div id ="result">
<?php
if (isset($_POST['submit'])) {
$email = $_POST['email'];
/*
* Getting Domain part from user input Email-Address
*/
$domain = substr(strrchr($email, "@"), 1);
/*
* This Function is used for fetching the MX data records to a corresponding
- Email domain
*/

function mxrecordValidate($email, $domain) {

$arr = dns_get_record($domain, DNS_MX);
if ($arr[0]['host'] == $domain && !empty($arr[0]['target'])) {
return $arr[0]['target'];
}
}

echo"<table id ='tid' >";
echo"<th>";
echo"Result";
echo"</th>";
echo"<tr>";
echo"<td>";
if (mxrecordValidate($email, $domain)) {
echo('This MX records exists.Valid Email Address.');
$data = dns_get_record($domain, DNS_MX);
foreach ($data as $key1) {
echo "Host:- " . $key1['host'] ;
echo "Class:- " . $key1['class'] ;
echo "TTL:- " . $key1['ttl'] ;
echo "Type:- " . $key1['type'] ;
echo "PRI:- " . $key1['pri'] ;
echo "Target:- " . $key1['target'] ;
echo "Target-IP:- " . gethostbyname($key1['target']) ;
}
echo"</td>";
echo"</tr>";
} else {
echo('No MX record exists.Invalid Email.');
}
echo"</td>";
echo"</tr>";
echo"</table>";
}
?>
</div>
</div>
</div>
</div>
</div>
</div>
</body>
</html>
style.css :
This file takes care about all designing working occuring in form, you can change it according to your requirement.
/*----------------------------------------------
css settings for HTML div exactCenter
------------------------------------------------*/
@import url(http://fonts.googleapis.com/css?family=Raleway);
body{
margin: 0 auto;
padding: 0 auto;
}
#main{
width: 100%;
margin: 1% auto;
font-family:raleway;
}
span{
color:red;
}
h1{
text-align:center;
font-family:raleway;
}
h2{
background-color: #FEFFED;
text-align:center;
border-radius: 10px 10px 0 0;
margin: -10px -40px;
padding: 15px;
font-family:raleway;
}
hr{
border:0;
border-bottom:1px solid #ccc;
margin: 10px -40px;
margin-bottom: 30px;
}
#login{
width: 289px;
border-radius: 10px;
font-family:raleway;
border: 2px solid #ccc;
padding: 10px 40px 33px;
margin-top: 23px;
margin: 0 auto;
}
input[type=text],input[type=password]{
width:99.5%;
padding: 10px;
margin-top: 8px;
border: 1px solid #ccc;
padding-left: 5px;
font-size: 16px;
font-family:raleway;
}
#email{
width:99.5%;
padding: 10px;
border: 1px solid #ccc;
padding-left: 5px;
font-size: 16px;
font-family:raleway;
}
input[type=submit]{
width: 98%;
background-color:#FFBC00;
color: white;
border: 2px solid #FFCB00;
padding: 10px;
font-size:20px;
cursor:pointer;
border-radius: 5px;
}
#profile{
padding:50px;
border:1px dashed grey;
font-size:20px;
background-color:#DCE6F7;
}
i{
color: black;
padding: 18px;
margin: 20px;
}
#right{
width: 96.1%;
border: 1px dashed rgb(215, 215, 215);
box-shadow: 0px 5px 17px 1px #99A3AD, 0px 0px 40px #EEEEEE;
padding: 10%;
margin-left: -24px;
word-wrap: break-word;
}
#right p{
padding: 20px;
}
#paypal_logo{
margin: 10px 315px;
float: right;
}
#dsubmit{
margin-top: 5px;
margin-bottom: 20px;
}
table {
font-family: 'Raleway', sans-serif;//
color:#666;
font-size:12px;
text-shadow: 1px 1px 0px #fff;
background:#eaebec;//
margin:20px;
border:#ccc 1px solid;
font-size: 16px;
-moz-border-radius:3px;
-webkit-border-radius:3px;
border-radius:3px;
-moz-box-shadow: 0 1px 2px #d1d1d1;
-webkit-box-shadow: 0 1px 2px #d1d1d1;
box-shadow: 0 1px 2px #d1d1d1;
margin: 0 auto;
}
table th {
text-align: center;
padding:21px 25px 22px 25px;
border-top:1px solid #fafafa;
border-bottom:1px solid #e0e0e0;
background: #ededed;
background: -webkit-gradient(linear, left top, left bottom, from(#ededed), to(#ebebeb));
background: -moz-linear-gradient(top, #ededed, #ebebeb);
}
table th:first-child {
text-indent: center;
padding-left:20px;
}
table tr:first-child th:first-child {
-moz-border-radius-topleft:3px;
-webkit-border-top-left-radius:3px;
border-top-left-radius:3px;
}
table tr:first-child th:last-child {
-moz-border-radius-topright:3px;
-webkit-border-top-right-radius:3px;
border-top-right-radius:3px;
}
table tr {
text-indent: center;
padding-left:20px;
}
table td:first-child {
text-align: center;
padding-left:20px;
border-left: 0;
}
table td {
padding:18px;
border-top: 1px solid #ffffff;
border-bottom:1px solid #e0e0e0;
border-left: 1px solid #e0e0e0;
background: #fafafa;
background: -webkit-gradient(linear, left top, left bottom, from(#fbfbfb), to(#fafafa));
background: -moz-linear-gradient(top, #fbfbfb, #fafafa);
word-break: break-word!important;
}
table tr.even td {
background: #f6f6f6;
background: -webkit-gradient(linear, left top, left bottom, from(#f8f8f8), to(#f6f6f6));
background: -moz-linear-gradient(top, #f8f8f8, #f6f6f6);
}
table tr:last-child td:first-child {
-moz-border-radius-bottomleft:3px;
-webkit-border-bottom-left-radius:3px;
border-bottom-left-radius:3px;
}
table tr:last-child td:last-child {
-moz-border-radius-bottomright:3px;
-webkit-border-bottom-right-radius:3px;
border-bottom-right-radius:3px;
}
table tr:hover td {
background: #f2f2f2;
background: -webkit-gradient(linear, left top, left bottom, from(#f2f2f2), to(#f0f0f0));
background: -moz-linear-gradient(top, #f2f2f2, #f0f0f0);
}
@media only screen and (max-width:480px){
#main {
width: 100%;
}
#login {
width: 75%;
margin: 0 auto;
}
input[type=submit] {
width: 98%;
}
table td {
word-break: break-word!important;
}
}
Conclusion :
Hope, you would have been understood a full concept of MX-Records from this blog post. I am sure you will give a try to the script provided and implement it in your own projects as well. Feel free to visit our website again in the future to get in touch with new coding tricks. You can let us know about your feedback in the space provided below.
You may also like –
11 Email Subject Ideas That Can Increase Your Open Rates

Are you unable to make your customers open your emails?
Are you struggling with your email subject?
Are you losing users?
If you are facing such issues then you are at the right place. Today, we will provide you a solution that will give you a better idea to choose a better subject for your emails which will certainly interest your clients.
The email subject is just like a decorative & interactive part of a cake which sudden obligate a user to certainly buy the cake.
People usually don’t have much time to spend in making such decision, so they instantly don’t care about the taste of the cake. They buy it because of only one reason — it attracts them.
The same law applies in the case of emails. Believe me, people suddenly don’t care about your content is how much beneficial for him. The first thing that they care is the email subject. So, your subject line should be so attractive and attentive that the user can’t ignore it.
Keeping in mind such concept, let’s have a look at some important points while writing email subjects for your clients.
We will try to explain each point through some situation along with proper example and solution.
1. Personalized email subject: Nowadays, people are very busy in their life and working. Sometimes they seem to lose their identity in the world.
Make feeling special and giving importance to the user by mentioning his name in the subject increase the possibility of opening your emails.
![]()
Suppose, John is a salesman. You can imagine how busy will be his day.
Now, after his hard work he got some time to ease himself and opened the inbox. Now, what do you think which email he would like to open?
What???
Yes, Exactly!!! He is trying to make himself comfortable. So, this time if he saw his name in the email subject, he will certainly think who have emailed this to him and will open it at least once.
2. Short, precise & clear: People want to understand everything quickly. They always preferred those emails which look clear to them at their first sight. Short words are more effective in such situation.
In an investigation, it is found that long word have very fewer clicks as compared short words because they are hard to understand quickly. So, always try to use short and brief subjects with a clear overview of the message inside the emails.
![]()
Suppose, Mr. McMohan is an old man. He has opened his inbox and now he got 500 messages in his mailbox. Now he saw the above-mentioned email.
What would be his response?
He will definitely open this email and will check the status of his order because the subject line clears him that the email belongs to his booked order.
3. Mystery/Surprize/Curiosity: People always like surprise & mystery. Use words and sentences in Email subjects that produce a curiosity in users mind about what surprise the email brought for them.
![]()
Liza is a housewife and usually do shopping online. Now, if she will saw this discount offers in her inbox, she will instantly open the email and try to check what is the best-discounted offer she may get.
4. Senders Name: Sometimes senders name/information itself creates a great impact on users. If a user sees the name of any prestigious company or person in the email subject, he just can’t ignore it and will surely open the email.
![]()
Suppose, Mike has recently completed his graduation and now searching for a job. He has opened his inbox and suddenly saw an email with subject line “Facebook Hiring Analysts“.
“Ohh my god! Wow!!!”.
He will quickly open the email and sincerely read the message.
5. Threatening/Terrifying: Fear words created a great impact on the users and pay their attention easily. Explain the risk and users couldn’t ignore it. They will definitely watch out the messages.
![]()
Everybody, especially children, is crazy about noodles. It is easy to cook and is very tasty also. Now, suddenly you got an email with a subject line like this.
What will you do?
Hey, I catch you. You have certainly read the message. You will try to find out why Maggie is so injurious to health?
The same action will be performed by other users.
6. Numbers: Numbers has its own effect on the users mind. They love to read the messages containing numbers because numbers give a clear idea about the message without reading the content.
![]()
Katie is seeking a job and now preparing herself of the job interview. Now, she needs to create a resume for the interview.
Suppose, she has opened his email and got an email with subject line “5 Ways To Improve Your Resume“.
Uh-oh!! now you know what will she do? She will immediately open the email and will read whole content.
7. Symbols, Questions & Other Punctuation: Using some special symbols & punctuation in the subject line sometimes creates some interest in the users mind to open the email. It is sometimes very effective so, you can use it in your subject.
![]()
Let suppose, you are a football fan and the craziest fan of Wayne Rooney. You have opened your inbox and suddenly found this email.
I bet, you will certainly open the email and will eagerly read its content to know what the email contains about Wayne Rooney.
8. Caps: Simple text are sometimes bored users and they don’t take the interest in the message. So, instead of plain text you can include CAPS words inside your subjects to make it more readable and interesting.
![]()
Jackie is a beginner and learns programming languages and he finds this email in his inbox. Because this email interests him and clears to him( CAPS texts ), he will definitely check out this email.
9. Controversial/Shocking Email Subject Lines: Nowadays, people are more interested in others matters than their own. They like to read about controversial subjects.
So, you can take advantages of it and give a try to use the controversial/shocking subject in your emails.
![]()
Suppose you have interests in politics and suddenly you got an email like above-mentioned. Don’t will you open the email?
Yes, I know!!! You will certainly read this.
10. Single-Word Subject Lines: A single-word is more effective and attentive than longer words and sentences. It easily clicks users mind. But, keep in mind that the used word should have a clear meaning.
![]()
The above-mentioned subject line will promptly attract users attention towards the offers. He will check the offer mentioned in the email.
11. Funny subject lines: Using Funny words in email subject is also a way to attract users towards the email message. You can use such ideas in your subject.![]()
Haa…haa…haa!!! How can a moustache change the world? I mean how is this possible??? Let’s check…
Sometimes using funny subjects also attracts the users and make them open the email and read the content.
Conclusion:
Hope you have enjoyed the article and liked the way of explaining through a real situation and examples. Must send us your feedback from the space given below.
Check out some more blogs here –
15 Steps To Design HTML Email Templates

If you want to create email templates that are responsive, easy to customize and conduct email marketing campaigns using personalized emails. Then, you have landed on the right blog.
This is a detailed tutorial in which we have shared some ultimate HTML Email Designing Guidelines that will help you to design HTML Email Templates without any hassle.
But first let explore the question that
Why Exactly Do We Need To Follow It..???
We are all aware of the fact that nowadays, companies are busy promoting their products, services and business solutions to customers online through email marketing. This is because email marketing is cost-effective, efficient and most reliable medium to reach out customs at the global level.
For this, we are going to use MailGet Bolt – Email Marketing Software as it is the best tool to make people aware of your products. Hence, when HTML Email Design is done correctly, you can send them to your customers to promote your business.
So, Now lets get assured that our email template design created with an Email Template Builder will get displayed at receiver’s end the way we want it to be by following below steps..
Things To Keep In Mind While Designing HTML Email:
1 :- Starting Tag Inside Body Must Be Table Tag
Always put your <div> tag inside the <table> tag. Html email supports <table> tag, so inside <body> tag- starting tag must be <table> tag.
<body>
<table>
<tr>
<td>
<div>
//write your tag's here.
</div>
</td>
</tr>
</table>
</body>
Note:- Don’t put your <table> tag inside the <div> tag.
<body>
<div>
<table>
<tr>
<td>
<div>
//write your tag's here.
</div>
</td>
</tr>
</table>
</div>
</body>
2 :- How To Put Your Content Inside <tr> Tag
Always put single <tr> in a <table> tag.
<table>
<tr>
<td>
//write somthing here.
</td>
</tr>
</table>
Note:- Put multiple <tr>tags inside a single <table> tag like this.
<table>
<tr>
<td>
//write somthing here.
</td>
</tr>
<tr>
<td>
//write somthing else here.
</td>
</tr>
</table>
3 :- How To Use Image Tag In HTML Email Designing.
Always put your <img> tag inside <a> tag. Write absolute source path of image and never forget to write alt property. It’s a required field in html email design. You must style <img> tag with property display: block;
<a href="#"><img src="must write absolute source path"
alt="must write something" style="display:block;" /></a>
Note:- Don’t put your <img> tag without <a> tag. Because specially in Gmail Download link will apear when you mouse hover over image.
<img src="write absolute source path" alt="write
something" />
4 :- Keep The Width Of HTML Emails Under 650 Pixels.
5 :- Always Set Given Below Style On Every <table> Tag.
style="margin:0; padding:0; cellpadding:0; cellspacing:0;"6:- Always Style Every <td> Tag From Property Which Is Given Below.
style="margin:0 auto;"7:- Always Put Inline CSS Into Your HTML Email.
<div style="display:block;"></div>Note:- External CSS or Internal CSS not supported by Email Client.
<html>
<head>
<link href="css/style.css" rel="stylesheet" type="text/css" /> //External CSS
</head>
<body>
</body>
</html>
or
<html>
<head>
<style>  //Internal CSS
body{
background-color:#eee;
}
</style>
</head>
<body>
</body>
</html>
8 :- Put Your Style To <table> Tag Instead Of <body> Tag.
As most of Email Clients are not paying attention over <body> tag and just ignore its style. So, always add style in starting<table> tag present inside <body> tag to take its advantage.
<html>
<head></head>
<body>
<table style="width:100%;background-color:#eee;">
//write your content here.
</table>
</body>
</html>
9 :- CSS That Email Client Do Not Support.
Never try to give property given below to any element in email template designing as it is not supported by email clients.
float: none|left|right|initial|inherit;
position: static|absolute|fixed|relative|initial|inherit;
10 :- Don’t Use Background-Image Property.
In HTML Email Designing, avoid using background-image property instead of this use bgcolor or background-color on Tag.
11 :- Don’t Try To Add JavaScript In HTML Code Because It Will Be Stripped
12 :- Always Define CSS Property Individually.
style="border-width:1px;
border-style:solid;
border-color:grey;"
never try to define in shorthand method like this.
style="border:1 px solid grey;"13 :- Use <span> Tag Instead Of <p> Tag.
Use <span>’s for writing any Text instead of <p> tag. Because <p> tag generate extra space that will become problem for HTML Email Designer.
14 :- Must Align Your Text With Style Align.
15 :- Use HTML Entities Whether It Is Name Or Number.
Define HTML Entity like this ["] [’] [©] instead of symbol. Here [] used as html entity separator.
Conclusion:-
So this was all that we have got on how to design HTML email templates. I definitely hope that the guidelines defined in this blog will help you create customized email templates that are eye-catchy with ease.
We have tried to elaborate each & every detail along with the HTML codes still, if you have got any doubts or queries related to HTML email templates designing, you can ask them to us in the comment section below. Keep visiting our website for more interesting blogs.
Also, give a try to MailGet Bolt an effective and tested email marketing tool which will help your business grow through email promotions.
Want some Free or Read-Made Email Marketing Templates??
Go through these links ->
5 Free Christmas Email Templates – Totally Responsive
6 Free New Year Email Templates + 500 Newsletters
Disposable Email Address Checker Using PHP
In today’s scenario, Disposable Emails have arisen a bigger problem for all websites runner.
It seems very hard to identify the Temporary or Disposable email addresses because…
…they register with a valid id(valid for small time spam) in our website.
Disposable Emails:
Emails which are generated for small time duration with a valid domain address…
How does it happen.?
For clear understanding, we assume a scenario where a user creates a disposable email address…
…with the help of any free disposable email provider and then user register in our website.
With the same email-id and user get success because of it’s valid domain.
After some time spam, user email id becomes invalid but user already would have entered in our website.
Though the email id becomes inactive but user becomes a valid user in our website…
…as we store email id in our own database and user can access it without any probs.
As the time passes out we would have already been kept those email id’s in bulk…
…which actually do not have existence.
It seems like garbage collection for us.
Watch the live demo or download code from the link given below

MailGet is an online email service provider which allows automatic email cleaning and email list management facility. Using such valid email lists you can send send Bulk Emails to large number of clients without being worried.
You can easily connect and configure it with different SMTP service providers, e.g MailGun, Mandrill, Postmark etc, to send Emails.
How it harms.?
we are unnecessarily entertaining these email id in the various contest like sending mail, storage…etc
By removing these emails, we can save a lot of time, storage and can stop many other unusual impacts which occur because of disposable emails.
You can also make a better Email Campaign after removing these disposable emails which can increase your email inbox delivery rate.
Don’t worry.! we came up with a proper solution for this problem.
Here user will see a form, users have to enter an email address and clicks on the search button.
The result is displayed on same page identifying whether an email is disposable or not.
This is a 3-way check where we are checking emails in 3 steps.
- Email-id check:
In this case, we are storing all possible disposable email addresses in a text file.No user will be allowed to register in our website with these email addresses. - Domain check:
In this case, we are disallowing those users who are trying to register with an invalid domain itself. - Disposable-sites-domain check:
In this case, we are matching domains(without extension) and domain pattern of all possible disposable email provider sites.Any email address with this domain will not be allowed to register in our website.
Example:
In ‘[email protected]’ we can make a pattern like ‘XYZ‘, ‘X‘, ‘Y‘ and ‘Z‘.Any email coming with this pattern will not be allowed.
Note:
We can’t be 100% sure of removing disposable emails always because…
…in every short time spam new disposable email addresses are generating and new service providers are emerging.
So we have to keep updates with time, for monitoring these disposable service provider.
But no need to worry ! with this script post we can remove bulk of disposable email addresses.
index.php :
This index.php file contains the major functionality of the script.While executing this code user see a form, see the image above.User has to enter email address and after clicking on submit button user gets the result,whether email is disposable or not.
<html>
<head>
<link href="css/style.css" rel="stylesheet" type="text/css"/>
<title>Disposable Email Address checker using PHP</title>
<meta http-equiv="Content-Type" content="text/html; charset=windows-1252">
</head>
<body>
<div class="container">
<div class="row">
<div class="col-sm-1 col-md-2 col-lg-12">
<div id="main" class="col-sm-1 col-md-2 col-lg-12">
<div class="col-sm-1 col-md-2 col-lg-12"><h1>Disposable Email Address checker using PHP</h1> </div>
<div id="login">
<h2>Disposable Email checker</h2>
<hr>
<div id="right">
<form name="myForm" method="post" action="index.php">
Please Enter Email Address:<br /><br />
<input type="email" size=18 name="email" id="email"><br /><br />
<div class="col-sm-1 col-md-2 col-lg-12"> <input type="submit" value="Check" id="dsubmit" name ="submit"></div>
</form>
<label id ="lbmesg">
<?php
if (isset($_POST['submit'])) {
$email = $_POST['email'];
$domain = substr(strrchr($email, "@"), 1);
$dispose_domain = array();
/*
* fetching disposable emails from text file to array.
*/
$handle = fopen("dispose.txt", "r");
while (($data = fgetcsv($handle, 1000, ",")) !== FALSE) {
$dispose_domain[$data[0]] = $data[0];
}
fclose($handle);
/*
* checking disposable email addresses which are stored in text file dispos1.txt
*/
if (in_array($domain, $dispose_domain)) {
echo "Email is Disposable";
} /*
* checking , if domain exist or not in DNS.
*/ elseif (!in_array($domain, $dispose_domain) && !fopen("http://$domain", 'r')) {
echo "Email is Disposable";
}
/*
* Checking the domains of all possible disposable emails providers.
*/ elseif (preg_match("/(ThrowAwayMail|DeadAddress|10MinuteMail|20MinuteMail|AirMail|Dispostable|Email Sensei|EmailThe|FilzMail|Guerrillamail|IncognitoEmail|Koszmail|Mailcatch|Mailinator|Mailnesia|MintEmail|MyTrashMail|NoClickEmail|
SpamSpot|Spamavert|Spamfree24|TempEmail|Thrashmail.ws|Yopmail|EasyTrashMail|Jetable|MailExpire|MeltMail|Spambox|empomail|33Mail|
E4ward|GishPuppy|InboxAlias|MailNull|Spamex|Spamgourmet|BloodyVikings|SpamControl|MailCatch|Tempomail|EmailSensei|Yopmail|
Trasmail|Guerrillamail|Yopmail|boximail|ghacks|Maildrop|MintEmail|fixmail|gelitik.in|ag.us.to|mobi.web.id
|fansworldwide.de|privymail.de|gishpuppy|spamevader|uroid|tempmail|soodo|deadaddress|trbvm)/i", $domain)) {
echo 'Email is Disposable';
} else {
echo "Email is Not Disposable";
}
}
?>
</label>
</div>
</div>
</div>
</div>
</div>
</body>
</html>
style.css :
This file takes care about all designing working occuring in form, you can change it according to your requirement.
/*----------------------------------------------
css settings for HTML div exactCenter
------------------------------------------------*/
@import url(http://fonts.googleapis.com/css?family=Raleway);
body{
margin: 0 auto;
padding: 0 auto;
}
#main{
width: 100%;
margin:4% auto;
font-family:raleway;
}
span{
color:red;
}
h1{
text-align:center;
font-family:raleway;
}
h2{
background-color: #FEFFED;
text-align:center;
border-radius: 10px 10px 0 0;
margin: -10px -40px;
padding: 15px;
font-family:raleway;
}
hr{
border:0;
border-bottom:1px solid #ccc;
margin: 10px -40px;
margin-bottom: 30px;
}
#login{
width: 289px;
border-radius: 10px;
font-family:raleway;
border: 2px solid #ccc;
padding: 10px 40px 33px;
margin-top: 23px;
margin: 0 auto;
}
input[type=text],input[type=password]{
width:99.5%;
padding: 10px;
margin-top: 8px;
border: 1px solid #ccc;
padding-left: 5px;
font-size: 16px;
font-family:raleway;
}
#email{
width:99.5%;
padding: 10px;
border: 1px solid #ccc;
padding-left: 5px;
font-size: 16px;
font-family:raleway;
}
input[type=submit]{
width: 98%;
background-color:#FFBC00;
color: white;
border: 2px solid #FFCB00;
padding: 10px;
font-size:20px;
cursor:pointer;
border-radius: 5px;
}
#profile{
padding:50px;
border:1px dashed grey;
font-size:20px;
background-color:#DCE6F7;
}
i{
color: black;
padding: 18px;
margin: 20px;
}
#right{
width: 72.1%;
height: 220px;
border: 1px dashed rgb(215, 215, 215);
box-shadow: 0px 5px 17px 1px #99A3AD, 0px 0px 40px #EEEEEE;
padding: 10%;
margin-left: 10px;
}
#right p{
padding: 20px;
}
#paypal_logo{
margin: 10px 315px;
float: right;
}
#results {
width: 100%;
margin-top: 30px;
table-layout: auto;
margin-bottom: 30px;
}
#dsubmit{
margin-top: 5px;
margin-bottom: 20px;
}
#txtmsg
{
height: 100px;
width: 99.5%;
}
#lbmesg{
margin-top: 50px;
margin-left: 2px;font-family:raleway;
}
@media only screen and (max-width:480px){
#main {
width: 100%;
}
#login {
width: 75%;
margin: 0 auto;
}
input[type=submit] {
width: 98%;
}
}
dispose.txt :
We have very large collection of disposable emails in this file. We keep it updated with time.
0815.ru
0clickemail.com
0wnd.net
0wnd.org
10minutemail.com
20minutemail.com
2prong.com
30minutemail.com
3d-painting.com
4warding.com
4warding.net
4warding.org
60minutemail.com
675hosting.com
675hosting.net
675hosting.org
6url.com
75hosting.com
75hosting.net
75hosting.org
7tags.com
9ox.net
a-bc.net
afrobacon.com
ajaxapp.net
amilegit.com
amiri.net
amiriindustries.com
anonbox.net
anonymbox.com
antichef.com
antichef.net
antispam.de
baxomale.ht.cx
beefmilk.com
binkmail.com
bio-muesli.net
bobmail.info
bodhi.lawlita.com
bofthew.com
brefmail.com
broadbandninja.com
bsnow.net
bugmenot.com
bumpymail.com
casualdx.com
centermail.com
centermail.net
chogmail.com
choicemail1.com
cool.fr.nf
correo.blogos.net
cosmorph.com
courriel.fr.nf
courrieltemporaire.com
cubiclink.com
curryworld.de
cust.in
dacoolest.com
dandikmail.com
dayrep.com
deadaddress.com
deadspam.com
despam.it
despammed.com
devnullmail.com
dfgh.net
digitalsanctuary.com
discardmail.com
discardmail.de
Disposableemailaddresses:emailmiser.com
disposableaddress.com
disposeamail.com
disposemail.com
dispostable.com
dm.w3internet.co.ukexample.com
dodgeit.com
dodgit.com
dodgit.org
donemail.ru
dontreg.com
dontsendmespam.de
dump-email.info
dumpandjunk.com
dumpmail.de
dumpyemail.om
e4ward.com
email60.com
emaildienst.de
emailias.com
emailigo.de
emailinfive.com
emailmiser.com
emailsensei.com
emailtemporario.com.br
emailto.de
emailwarden.com
emailx.at.hm
emailxfer.com
emz.net
enterto.com
ephemail.net
etranquil.com
etranquil.net
etranquil.org
explodemail.com
fakeinbox.com
fakeinformation.com
fastacura.com
fastchevy.com
fastchrysler.com
fastkawasaki.com
fastmazda.com
fastmitsubishi.com
fastnissan.com
fastsubaru.com
fastsuzuki.com
fasttoyota.com
fastyamaha.com
filzmail.com
fizmail.com
fr33mail.info
frapmail.com
front14.org
fux0ringduh.com
garliclife.com
get1mail.com
get2mail.fr
getonemail.com
getonemail.net
ghosttexter.de
girlsundertheinfluence.com
gishpuppy.com
gowikibooks.com
gowikicampus.com
gowikicars.com
gowikifilms.com
gowikigames.com
owikimusic.com
gowikinetwork.com
gowikitravel.com
gowikitv.com
great-host.in
reensloth.com
gsrv.co.uk
guerillamail.biz
guerillamail.com
guerillamail.net
guerillamail.org
guerrillamail.biz
guerrillamail.com
guerrillamail.de
guerrillamail.net
guerrillamail.org
guerrillamailblock.com
h.mintemail.com
h8s.org
haltospam.com
hatespam.org
hidemail.de
hochsitze.com
hotpop.com
hulapla.de
ieatspam.eu
ieatspam.info
ihateyoualot.info
iheartspam.org
imails.info
inboxclean.com
inboxclean.org
incognitomail.com
incognitomail.net
incognitomail.org
insorg-mail.info
ipoo.org
irish2me.com
iwi.net
jetable.com
jetable.fr.nf
jetable.net
jetable.org
jnxjn.com
junk1e.com
kasmail.com
kaspop.com
keepmymail.com
killmail.com
killmail.net
kir.ch.tc
klassmaster.com
klassmaster.net
klzlk.com
kulturbetrieb.info
kurzepost.de
letthemeatspam.com
lhsdv.com
lifebyfood.com
link2mail.net
litedrop.com
lol.ovpn.to
lookugly.com
lopl.co.cc
lortemail.dk
lr78.com
m4ilweb.info
maboard.com
mail-temporaire.fr
mail.by
mail.mezimages.net
mail2rss.org
mail333.com
mail4trash.com
mailbidon.com
mailblocks.com
mailcatch.com
maileater.com
mailexpire.com
mailfreeonline.com
mailin8r.com
mailinater.com
mailinator.com
mailinator.net
mailinator2.com
mailincubator.com
mailme.ir
mailme.lv
mailmetrash.com
mailmoat.com
mailnator.com
mailnesia.com
mailnull.com
mailshell.com
mailsiphon.com
mailslite.com
mailzilla.com
mailzilla.org
mbx.cc
mega.zik.dj
meinspamschutz.de
meltmail.com
messagebeamer.de
mierdamail.com
mintemail.com
moburl.com
moncourrier.fr.nf
monemail.fr.nf
monmail.fr.nf
msa.minsmail.com
mt2009.com
mx0.wwwnew.eu
mycleaninbox.net
mypartyclip.de
myphantomemail.com
myspaceinc.com
myspaceinc.net
myspaceinc.org
myspacepimpedup.com
myspamless.com
mytrashmail.com
neomailbox.com
nepwk.com
nervmich.net
nervtmich.net
netmails.com
netmails.net
netzidiot.de
neverbox.com
no-spam.ws
nobulk.com
noclickemail.com
nogmailspam.info
nomail.xl.cx
nomail2me.com
nomorespamemails.com
nospam.ze.tc
nospam4.us
nospamfor.us
nospamthanks.info
notmailinator.com
nowmymail.com
nurfuerspam.de
nus.edu.sg
nwldx.com
objectmail.com
obobbo.com
oneoffemail.com
onewaymail.com
online.ms
oopi.org
ordinaryamerican.net
otherinbox.com
ourklips.com
outlawspam.com
ovpn.to
owlpic.com
pancakemail.com
pimpedupmyspace.com
pjjkp.com
politikerclub.de
poofy.org
pookmail.com
privacy.net
proxymail.eu
prtnx.com
punkass.com
PutThisInYourSpamDatabase.com
qq.com
quickinbox.com
rcpt.at
recode.me
recursor.net
regbypass.com
regbypass.comsafe-mail.net
rejectmail.com
rklips.com
rmqkr.net
rppkn.com
rtrtr.com
s0ny.net
safe-mail.net
safersignup.de
safetymail.info
safetypost.de
sandelf.de
saynotospams.com
selfdestructingmail.com
SendSpamHere.com
sharklasers.com
shiftmail.com
shitmail.me
shortmail.net
sibmail.com
skeefmail.com
slaskpost.se
slopsbox.com
smellfear.com
snakemail.com
sneakemail.com
sofimail.com
sofort-mail.de
sogetthis.com
soodonims.com
spam.la
spam.su
spamavert.com
spambob.com
spambob.net
spambob.org
spambog.com
spambog.de
spambog.ru
spambox.info
spambox.irishspringrealty.com
spambox.us
spamcannon.com
spamcannon.net
spamcero.com
spamcon.org
spamcorptastic.com
spamcowboy.com
spamcowboy.net
spamcowboy.org
spamday.com
spamex.com
spamfree24.com
spamfree24.de
spamfree24.eu
spamfree24.info
spamfree24.net
spamfree24.org
spamgourmet.com
spamgourmet.net
spamgourmet.org
SpamHereLots.com
SpamHerePlease.com
spamhole.com
spamify.com
spaminator.de
spamkill.info
spaml.com
spaml.de
spammotel.com
spamobox.com
spamoff.de
spamslicer.com
spamspot.com
spamthis.co.uk
spamthisplease.com
spamtrail.com
speed.1s.fr
supergreatmail.com
supermailer.jp
suremail.info
teewars.org
teleworm.com
tempalias.com
tempe-mail.com
tempemail.biz
tempemail.com
TempEMail.net
tempinbox.co.uk
tempinbox.com
tempmail.it
tempmail2.com
tempomail.fr
temporarily.de
temporarioemail.com.br
temporaryemail.net
temporaryforwarding.com
temporaryinbox.com
thanksnospam.info
thankyou2010.com
thisisnotmyrealemail.com
throwawayemailaddress.com
tilien.com
tmailinator.com
tradermail.info
trash-amil.com
trash-mail.at
trash-mail.com
trash-mail.de
trash2009.com
trashemail.de
trashmail.at
trashmail.com
trashmail.de
trashmail.me
trashmail.net
trashmail.org
trashmail.ws
trashmailer.com
trashymail.com
trashymail.net
trillianpro.com
turual.com
twinmail.de
tyldd.com
uggsrock.com
upliftnow.com
uplipht.com
venompen.com
veryrealemail.com
viditag.com
viewcastmedia.com
viewcastmedia.net
viewcastmedia.org
webm4il.info
wegwerfadresse.de
wegwerfemail.de
wegwerfmail.de
wegwerfmail.net
wegwerfmail.org
wetrainbayarea.com
wetrainbayarea.org
wh4f.org
whyspam.me
willselfdestruct.com
winemaven.info
wronghead.com
wuzup.net
wuzupmail.net
www.e4ward.com
www.gishpuppy.com
www.mailinator.com
wwwnew.eu
xagloo.com
xemaps.com
xents.com
xmaily.com
xoxy.net
yep.it
yogamaven.com
yopmail.com
yopmail.fr
yopmail.net
ypmail.webarnak.fr.eu.org
yuurok.com
zehnminutenmail.de
zippymail.info
zoaxe.com
zoemail.org
emeil.in
azmeil.tk
mailfa.tk
inbax.tk
emeil.ir
33mail.com
maildrop.cc
inboxalias.com
spam4.me
koszmail.pl
tagyourself.com
whatpaas.com
0815.ru0clickemail.com
0wnd.net
0wnd.org
10minutemail.com
20minutemail.com
2prong.com
3d-painting.com
4warding.com
4warding.net
4warding.org
9ox.net
a-bc.net
amilegit.com
anonbox.net
anonymbox.com
antichef.com
antichef.net
antispam.de
baxomale.ht.cx
beefmilk.com
binkmail.com
bio-muesli.net
bobmail.info
bodhi.lawlita.com
bofthew.com
brefmail.com
bsnow.net
bugmenot.com
bumpymail.com
casualdx.com
chogmail.com
cool.fr.nf
correo.blogos.net
cosmorph.com
courriel.fr.nf
courrieltemporaire.com
curryworld.de
cust.in
dacoolest.com
dandikmail.com
deadaddress.com
despam.it
devnullmail.com
dfgh.net
digitalsanctuary.com
discardmail.com
discardmail.de
disposableaddress.com
disposemail.com
dispostable.com
dm.w3internet.co.uk example.com
dodgeit.com
dodgit.com
dodgit.org
dontreg.com
dontsendmespam.de
dump-email.info
dumpyemail.com
e4ward.com
email60.com
emailias.com
emailinfive.com
emailmiser.com
emailtemporario.com.br
emailwarden.com
ephemail.net
explodemail.com
fakeinbox.com
fakeinformation.com
fastacura.com
filzmail.com
fizmail.com
frapmail.com
garliclife.com
get1mail.com
getonemail.com
getonemail.net
girlsundertheinfluence.com
gishpuppy.com
great-host.in
gsrv.co.uk
guerillamail.biz
guerillamail.com
guerillamail.net
guerillamail.org
guerrillamail.com
guerrillamailblock.com
haltospam.com
hotpop.com
ieatspam.eu
ieatspam.info
ihateyoualot.info
imails.info
inboxclean.com
inboxclean.org
incognitomail.com
incognitomail.net
ipoo.org
irish2me.com
jetable.com
jetable.fr.nf
jetable.net
jetable.org
junk1e.com
kaspop.com
kulturbetrieb.info
kurzepost.de
lifebyfood.com
link2mail.net
litedrop.com
lookugly.com
lopl.co.cc
lr78.com
maboard.com
mail.by
mail.mezimages.net
mail4trash.com
mailbidon.com
mailcatch.com
maileater.com
mailexpire.com
mailin8r.com
mailinator.com
mailinator.net
mailinator2.com
mailincubator.com
mailme.lv
mailnator.com
mailnull.com
mailzilla.org
mbx.cc
mega.zik.dj
meltmail.com
mierdamail.com
mintemail.com
moncourrier.fr.nf
monemail.fr.nf
monmail.fr.nf
mt2009.com
mx0.wwwnew.eu
mycleaninbox.net
mytrashmail.com
neverbox.com
nobulk.com
noclickemail.com
nogmailspam.info
nomail.xl.cx
nomail2me.com
no-spam.ws
nospam.ze.tc
nospam4.us
nospamfor.us
nowmymail.com
objectmail.com
obobbo.com
onewaymail.com
ordinaryamerican.net
owlpic.com
pookmail.com
proxymail.eu
punkass.com
putthisinyourspamdatabase.com
quickinbox.com
rcpt.at
recode.me
recursor.net
regbypass.comsafe-mail.net
safetymail.info
sandelf.de
saynotospams.com
selfdestructingmail.com
sendspamhere.com
shiftmail.com
mail.me
skeefmail.com
slopsbox.com
smellfear.com
snakemail.com
sneakemail.com
sofort-mail.de
sogetthis.com
soodonims.com
spam.la
spamavert.com
spambob.net
spambob.org
spambog.com
spambog.de
spambog.ru
spambox.info
spambox.us
spamcannon.com
spamcannon.net
spamcero.com
spamcorptastic.com
spamcowboy.com
spamcowboy.net
spamcowboy.org
spamday.com
spamex.com
spamfree24.com
spamfree24.de
spamfree24.eu
spamfree24.info
spamfree24.net
spamfree24.org
spamgourmet.com
spamgourmet.net
spamgourmet.org
spamherelots.com
spamhereplease.com
spamhole.com
spamify.com
spaminator.de
spamkill.info
spaml.com
spaml.de
spammotel.com
spamobox.com
spamspot.com
spamthis.co.uk
spamthisplease.com
speed.1s.fr
suremail.info
tempalias.com
tempemail.biz
tempemail.com
tempe-mail.com
tempemail.net
tempinbox.co.uk
tempinbox.com
tempomail.fr
temporaryemail.net
temporaryinbox.com
thankyou2010.com
thisisnotmyrealemail.com
throwawayemailaddress.com
tilien.com
tmailinator.com
tradermail.info
trash2009.com
trash-amil.com
trashmail.at
trash-mail.at
trashmail.com
trash-mail.com
trash-mail.de
trashmail.me
trashmail.net
trashymail.com
trashymail.net
tyldd.com
uggsrock.com
wegwerfmail.de
wegwerfmail.net
wegwerfmail.org
wh4f.org
whyspam.me
willselfdestruct.com
winemaven.info
wronghead.com
wuzupmail.net
xoxy.net
yogamaven.com
yopmail.com
yopmail.fr
yopmail.net
yuurok.com
zippymail.info
jnxjn.com
trashmailer.com
klzlk.com
3d-painting.com
4warding.com
4warding.org
9ox.net
a-bc.net
antichef.net
antispam.de
beefmilk.com
brefmail.com
bumpymail.com
correo.blogos.net
dm.w3internet.co.uk example.com
dumpyemail.com
e4ward.com
email60.com
fakeinformation.com
fizmail.com
frapmail.com
great-host.in
gsrv.co.uk
guerillamail.com
haltospam.com
inboxclean.com
litedrop.com
mailcatch.com
mailinator.com
mailinator2.com
mailzilla.org
meltmail.com
moncourrier.fr.nf
monmail.fr.nf
nobulk.com
noclickemail.com
nospam.ze.tc
nospamfor.us
objectmail.com
onewaymail.com
punkass.com
putthisinyourspamdatabase.com
sendspamhere.com
skeefmail.com
sneakemail.com
spam.la
spamavert.com
spambob.net
spambob.org
spambog.com
spambog.de
spamcorptastic.com
spamcowboy.com
spamex.com
spamfree24.com
spamfree24.eu
spamfree24.info
spamfree24.net
spamfree24.org
spamherelots.com
spamhereplease.com
spaml.de
spammotel.com
spamthis.co.uk
suremail.info
tempemail.biz
tempemail.com
tempe-mail.com
tempemail.net
tempinbox.co.uk
tempomail.fr
temporaryinbox.com
tilien.com
tmailinator.com
trashmail.at
trash-mail.at
trashmail.me
trashymail.net
whyspam.me
wuzupmail.net
yogamaven.com
yopmail.fr
yuurok.com
zippymail.info
trashmailer.com
nospamforus
kurzepost.de
jetable
link2mail
meltmail
anonymbox
courrieltemporaire
sofimail
0-mail.com
get2mail
yopmail
10minutemail
mailinator
dispostable
spambog
mail-temporaire
filzmail
guerrillamail.net
mailmetrash.com
trash2009.com
mt2009.com
trashymail.com
mytrashmail.com
junk.
joliekemulder
lifebeginsatconception
beerolympics
smaakt.naar.gravel
q00.
spamavert
mintemail
tempemail
spamfree24
spammotel
spam
mailnull
e4ward
spamgourmet
mytempemail
incognitomail
spamobox
MailEater.com
spambox.us
uggsrock.com
TempEMail.net
spamfree.eu
greensloth.com
mjukglass.nu
slushmail.com
mailnull.com
20minutemail.com
bsnow.net
deadaddress.com
emailias.com
enterto.com
gishpuppy.com
goemailgo.com
guerrillamailblock.com
hidzz.com
incognitomail.net
kasmail.com
lifebyfood.com
maileater.com
mailexpire.com
mailmoat.com
mintemail.com
myspamless.com
mytempemail.com
netmails.net
odaymail.com
pookmail.com
shieldedmail.com
soodonims.com
spamgourmet.com
spamherelots.com
spaml.com
spamobox.com
tempemail.net
tempymail.com
zoemail.com
deadaddress
soodo
tempmail
uroid
spamevader
gishpuppy
privymail.de
fansworldwide.de
mobi.web.id
ag.us.to
gelitik.in
fixmail.tk
trbvm.com
my10minutemail.com
Conclusion :
Hope you would have learned & enjoyed from this blog post and would have got a clear picture about disposable email. I am sure you will give a try to the script provided and implement it in your own projects as well. Feel free to visit our website again in the future to get in touch with new coding tricks. You can let us know about your feedback in the space provided below.
Recommended blogs –
Remove Download Icon Over The Images In Gmail
You might have noticed a “download” button pop up in the bottom right corner of images in your emails?
Well,
This is not a feature of Google. Basically, some size of images or images without anchor or link shows such a download and save to drive icons.
Reason Behind It –
Google treats larger images as an attachment and allow them to view as a Google Drive Image.
This is annoying, because as a user clicks on something he accidentally downloads an image. Nobody would like that to happen with their receivers.
Try MailGet Bolt Now –
An independent email marketing service – MailGet Bolt that assure high inboxing via its own SMTP service at much affordable price than other hosted solutions.

![]()
Use MailGet Bolt – Email Marketing Service for Sending Emails, It’s an online email template builder that provide facility to sends bulk email . Using MailGet you can design premium email template
So Check Out On How To Get Rid Of Download Icon From Images Using CSS –
Here are some easy tips to remove download icons from images of HTML in Gmail inbox. Just include these tricks in your CSS while designing your image html templates.
Trick 1 :- Append .a5q {display: none !important;} css class into <style> tag.
Trick 2 :- Append tabletabletable div {display: none !important;} style into <head> section within <style> tag.
Trick 3 :- Or just style inline to your large size image like this.
<a href=”” style=”cursor:default;”><img src=”your large image file”></a>
Process To Attach An Image Of HTML To Send In Gmail:-
When you attach an image to email, there are three possibilities in Gmail to do so:-
1 :- If you attach an image with attach files option, it always shows “Download” and “Save to Drive” button when you move cursor over it.
2 :- If you attach an image with insert photo option, and if image resolution is bigger than 299×524. It will show “Download” and “Save to Drive” button when you move cursor over it.
3 :- If you attach an image using drag and drop method then it will show “Download” and “Save to Drive” button when you move cursor over it in case if resolution is bigger than 299×524.
Resolution To Get Rid Of Download Icon From Images:-
The reason behind displaying attachment in images is the resolution of image. If Gmail recognizes that the resolution of image is huge then it will embed an attachment to image.
Here some statistics that proves that if your image resolution is less than or equal to 299×524, Gmail will not embed an attachment to image.
Resolution Size Description
295×165 110 kb accept as image
298×166 112 kb accept as image
299×168 113 kb accept as image
300×168 114 kb not accept as image
299×200 132 kb accept as image
299×300 185 kb accept as image
299×400 233 kb accept as image
299×500 275 kb accept as image
299×520 284 kb accept as image
299×524 285 kb accept as image
299×525 286 kb not accept as image
Gmail has introduced this feature, but many people are unaware of it, that’s the reason they face this problem.
Conclusion :-
Hope from this blog you might have known that how to remove download icon on images of HTML in Gmail. Please comment for any query. Keep visiting our blog. 🙂
Check out more latest blog here –
Drip Email in Mailgun Using PHP

If you want to send emails to a specified list of subscribers to a specific date or time, “Drip Emailing” is a solution.
MailGet is an automated email marketing tool in which you can integrate via Mailgun SMTP/ API and send Schedule Emails or Drip emails.
In this blog, we are explaining how to configure a drip email campaign through Mailgun API in our PHP program.
At Email composing time we decide, which time Email should reach to customer inbox. Email Drips are nothing but just a schedule email. Which will automatically be sent on the scheduled time.
Mailgun provides credentials which help you for easy API/SMTP configuration in your application to send drip emails.
If you don’t know how to configure Mailgun API in your PHP program then first see this link mailgun send email. Now, let’s dive into the ocean of Email Drip.
Watch the live demo or download code from the link given below

I hope you configure Mailgun API in your program by the link provided above .
To make Email Drip’s or Schedule Email, you need to follow the below steps:-
1. Include mailgun.php in your main PHP page.
require 'vendor/autoload.php';

use MailgunMailgun;
2. Create an object of Mailgun through API key.
$mgClient = new Mailgun('<-- API KEY -->');3. In the domain information page, you will get “default SMTP login”. Copy string after @ symbol and initialize your domain variable with this string.
4. Finally, send Email by calling sendMessage() method of Mailgun object with parameters such as domain, sender, receiver, subject, text, and o:deliverytime.
o:deliverytime: On this time the receiver gets the message in his inbox.
According to mailgun doc: ” Messages can be scheduled for a maximum of 3 days in the future “. so, Think twice before setting o:deliverytime.
Tutorial Scripts in detail
Full code, which is used for Email Drip’s is listed below with proper explanation :
index.php
It is the main program file . We have configured Mailgun API in this file and accessed its features, like creating object of Mailgun, to sent mail with the help of sendMessage()method . we also set o:deliverytime to drip email to receiver’s inbox at a specific time .
<?php
require 'vendor/autoload.php';
use MailgunMailgun;
?>
<html>
<head>
<title>
Drip Email In Mailgun Using PHP
</title>
<meta name="viewport" content="width=device-width, initial-scale=1.0">
<script src="js/jquery-1.11.3.min.js" type="text/javascript"></script>
<script src="js/moment.js" type="text/javascript"></script>
<script src="js/bootstrap.js" type="text/javascript"></script>
<script src="js/bootstrap-datetimepicker.min.js" type="text/javascript"></script>
<link href="http://netdna.bootstrapcdn.com/twitter-bootstrap/2.2.2/css/bootstrap-combined.min.css" rel="stylesheet">
<link href="css/bootstrap.css" rel="stylesheet" type="text/css"/>
<link href="css/bootstrap-datetimepicker.min.css" rel="stylesheet" type="text/css"/>
<link href="css/style.css" rel="stylesheet" type="text/css"/>
<script>
function checkdate() {
var values = $(".datetime").val();
if (values == "") {
$(".datetime").css("background-color", "rgba(229, 87, 87, 0.33)");
$(".datetime").val("select date and time");
return false;
}
var selected_date_time = values.split(" ");
var selected_date = selected_date_time[0];
var selected_time = selected_date_time[1];
var selected_date_split = selected_date.split("/");
var day = selected_date_split[0];
var month = selected_date_split[1];
var year = selected_date_split[2];
var selected_time_split = selected_time.split(":");
var hour = selected_time_split[0];
var minutes = selected_time_split[1];
var seconds = selected_time_split[2];
var today = new Date();
var h = today.getHours();
var m = today.getMinutes();
var s = today.getSeconds();
var mon = today.getUTCMonth() + 1;
var d = today.getUTCDate();
var y = today.getUTCFullYear();
var your_date = new Date(year, (month - 1), day, hour, minutes, seconds);
var your_date_milliseconds = your_date.getTime();
var today_date = new Date(y, (mon - 1), d, h, m, s);
var today_date_milliseconds = today_date.getTime();
if (your_date_milliseconds < today_date_milliseconds) {
$(".datetime").css("background-color", "rgba(229, 87, 87, 0.33)");
$(".datetime").val(" Date / Time should not be less than current date.");
return false;
}
Date.prototype.addDays = function(days)
{
var dat = new Date(this.valueOf());
dat.setDate(dat.getDate() + days);
return dat;
}
var after_3_days = today_date.addDays(3);
var after_3_days_milliseconds = after_3_days.getTime();
if (your_date_milliseconds > after_3_days_milliseconds) {
$(".datetime").css("background-color", "rgba(229, 87, 87, 0.33)");
$(".datetime").val("Date /Time should not be more than 3 days ");
return false;
}
$(".dr").val(values);
return true;
}
function normal() {
$(".datetime").css("background-color", " ");
$(".datetime").val(" ");
}
</script>
</head>
<body>
<div class="container">
<div class="row">
</div>
<div class="row">
<div class="col-md-12">
<div id="main">
<h1>Drip Email in Mailgun Using PHP</h1>
</div>
</div>
<div class="col-md-12">
<div class="matter">
<div id="login">
<h2>Send Email</h2>
<hr/>
<form action="index.php" onsubmit=" return checkdate()" method="post">
<label class="lab">Sender's Name :</label>
<input type="text" name="sname" id="to" placeholder="Senders Name" required />
<label class="lab">Receiver's Email Address :</label>
<input type="email" name="to" id="to" placeholder="Receiver's email address" required />
<label class="lab">Drip Time:</label><br><div class="clr"></div>
<div id="datetimepicker2" class="input-append">
<input class="datetime" style="width:90%;" data-format="dd/MM/yyyy hh:mm:ss" type="text" required disabled>
<span onclick="normal()" style="margin-top:8px; padding-bottom:16px;" class="add-on"><i onclick="normal()" class="glyphicon glyphicon-calendar"></i>
</span>
</div>
<input class="dr" name="mydrip" type="hidden" >
<script type="text/javascript">
$(function() {
$('#datetimepicker2').datetimepicker({
language: 'en',
pick12HourFormat: false,
defaultTime: 'value',
minuteStep: 1,
disableFocus: true,
template: 'dropdown',
showMeridian: false
});
});
</script>
<label class="lab">Email type:</label><div class="clr"></div>
<div class="lab">
<input style="vertical-align: middle;" type="radio" value="def" name="etype" checked>Default
<input type="radio" value="cc" name="etype" >cc
<input type="radio" value="bcc" name="etype" >bcc </div>
<div class="clr"></div>
<label class="lab">Subject :</label>
<input type="text" name="subject" id="subject" placeholder="subject" required />
<label class="lab">Message body :</label><div class="clr"></div>
<div class="lab">
<input type="radio" value="text" name="msgtype" checked>Text
<input type="radio" value="html" name="msgtype" >HTML</div>
<textarea type="text" name="msg" id="msg" placeholder="Enter your message here.." required ></textarea><br><br>
<input type="submit" value=" Send " name="submit"/>
<span></span>
</form>
</div>
</div>
</div>
</div>
</div>
</body>
</html>
<?php
if (isset($_POST['sname'])) {
$sname = $_POST['sname'];
$to = $_POST['to'];
$subject = $_POST['subject'];
$msg = $_POST['msg'];
$msgtype = $_POST['msgtype'];
$mydrip = $_POST['mydrip'];
$hello = explode(" ", $mydrip);
for ($x = 0; $x < count($hello); $x++) {
if ($x == 0) {
$spliting = explode("/", $hello[$x]);
$day = $spliting[0];
$month = $spliting[1];
$year = $spliting[2];
}
if ($x == 1) {
$time = $hello[$x];
}
}
$timestamp = strtotime("$year-$month-$day");
$daychars = date('D', $timestamp);
$monchars = date('F', $timestamp);
$dt = new DateTime("$monchars $day $year $time UTC");
$dripday = $dt->format(DATE_RFC822);
$date_rfc = explode(" ", $dripday);
if ($msgtype == 'text') {
$html = '';
} else {
$msg = htmlentities($msg);
$html = $msg;
$msg = '';
}
for ($x = 0; $x < 6; $x++) {
switch ($x) {
case 0:
$date_rfc_day = $date_rfc[$x];
break;
case 1:
$date_rfc_date = $date_rfc[$x];
break;
case 2:
$date_rfc_month = $date_rfc[$x];
break;
case 3:
$date_rfc_year = $year;
break;
case 4:
$date_rfc_time = $date_rfc[$x];
break;
case 5:
$date_rfc_zone = $date_rfc[$x];
break;
}
}
$mgClient = new Mailgun('<-- API KEY -->');
$domain = "<-- DEFAULT SMTP LOGIN DOMAIN -->";
$result = $mgClient->sendMessage($domain, array(
"from" => "$sname < <---YOU@YOUR_DOMAIN_NAME---> >",
"to" => "Baz <$to>",
"subject" => "$subject",
"text" => "$msg!",
'o:deliverytime' => "$date_rfc_day $date_rfc_date $date_rfc_month $date_rfc_year $date_rfc_time +0530"
));
echo "<script>alert('Email Sent Successfully!!');</script>";
}
?>Style.css
Includes all basic styling of HTML elements.
@import url(http://fonts.googleapis.com/css?family=Raleway);
#main{
margin:50px auto;
font-family:raleway;
}
span{
color:red;
}
h2{
font-weight: 600;
background-color: #FEFFED;
text-align:center;
border-radius: 10px 10px 0 0;
margin: -10px -40px;
padding: 15px;
}
hr{
border:0;
border-bottom:1px solid #ccc;
margin: 10px -40px;
margin-bottom: 30px;
}
#login{
width:40%;
margin:0 auto;
display:inline-block;
border-radius: 10px;
font-family:raleway;
border: 2px solid #ccc;
padding: 10px 40px 25px;
}
textarea{
margin-top: 8px;
font-size: 16px;
font-family:raleway;
}
input[type=text],[type=email],input[type=password]{
height:35px;
width:99.5%;
padding: 10px;
margin-top: 8px;
border: 1px solid #ccc;
padding-left: 5px;
font-size: 16px;
font-family:raleway;
}
input[type=submit]{
width: 100%;
background-color:#FFBC00;
color: white;
border: 2px solid #FFCB00;
padding: 10px;
font-size:20px;
cursor:pointer;
border-radius: 5px;
margin-bottom: 15px;
}
#profile{
padding:50px;
border:1px dashed grey;
font-size:20px;
background-color:#DCE6F7;
}
#logout{
float:right;
padding:5px;
border:dashed 1px gray;
}
a{
text-decoration:none;
color: cornflowerblue;
}
i{
color: cornflowerblue;
}
#note {
clear: left;
padding-top: 20px;
margin-left: 20px;
font-size: 18px;
}
#formget{
float:right;
}
h1{
font-weight: 600;
text-align: center;
display:inlne;
alignment-adjust: center;
margin:0 auto;
width:100%;
}
textarea[type=text]{
width:100%;
height:200px;
}
.matter{
alignment-adjust: central;
margin:0 auto;
text-align: center;
}
.clr{
clear:left;
}
.lab{
font-size: 110%;
float:left;
}
@media screen and (max-width: 800px) {
#login{
width:330px;
}
}
.input-append .add-on, .input-prepend .add-on {
height:35px;
}
#to{
height:35px;
}
input[type=radio]{
margin:0;
}
Conclusion :
That’s all about how to send Drip Emails in Mailgun Using PHP. I hope you like the article, and I am sure you will use this script in some of your programs as well.
Feel free to visit our blog. You can give the comment in the space provided below.
You may also like –
30 Best Free Premium Responsive WordPress Themes

Nowadays, websites are looking for more profitable ways rather than just giving a simple online presence to their website.
And, it has been found that the presence of opt-in forms on any business website brings more benefits like sales, sign-ups, bookings, etc.
So, having a form on a website has become a basic need for almost every business, as clients are more interested in making online registrations and bookings.
But for this, you need a WordPress theme that should be compatible with form integration so that, you can easily create an amazing business website -> interact with your attendees online -> and manage their information from your website itself.
So, here I’ve collected down 30 Best Free And Premium Responsive WordPress Themes With Form Plugin that will surely win your heart.
You may also like-
- Free Responsive WordPress Themes
- Premium WordPress Themes
- Beautiful WordPress Themes
- Best WordPress Themes
Let’s start with Free Themes –
1. Colorway – Responsive WordPress Theme
Colorway is the most lightweight and fastest Elementor based theme available in the market. This excellent theme comes with inbuilt templates using which you can make a variety of websites.
This WordPress theme is SEO friendly as a result your website can reach a large number of audience.
Further, the theme is responsive as well as cross-browser compatible. As a result, no matter what device you are using your website will adapt itself according to the device.
The theme comes with a variety of features for which you have to scroll more –
- Colorway comes with 35+ easy to use templates by which you can create your website.
- You get advanced addons for appointment booking and lead capturing.
- This theme provides users with various slider options by which they can add images, text, video to the slider.
- The theme offers an image comparer for image comparison on your website.
- It provides you with unlimited styling and color options for easy customization.
2. One-Page – Beautiful One-Page WordPress Theme
One page is a single page WordPress theme that are more popular than multiple page themes nowadays as clients can easily view all your website and its feature with a single scroll without visiting multiple pages with extra loading time.
It has a 4 column feature area where you can show all your services, a full width image slider to display the images, Google map to share your location, a colorful pricing table is also given to display all your pricing plans and much more.
The theme comes with an inbuilt contact form by which clients can easily contact you.
Impressive features of theme are given below –
- Introduce your team members on the homepage.
- Testimonial section where clients post their comments and reviews.
- Different hexagonal way of representing images.
- Video section by which you can provide online training to your customers.
- Customization is enabled that let you add or remove your favourite section.
3. Traffica – Multipurpose WordPress Theme
Traffica is yet another free theme for developing an incredible business website.
The theme comes with several customization options and other outstanding feature that lets you display all your professional work, photos, videos, stories in your newly created business website.
Things that make this theme stand out among others are –
- Responsive and adaptable nature.
- Call to action button.
- Contact section with Google map and a contact form.
- Six widgetized area.
- Customer review section.
- A full width image sliding area.
4. BlackBird – Unique Responsive WordPress Theme
The theme is developed keeping in mind the simplicity of design, and the best part is – it is totally free and you can download it with a single click.
Several outstanding features are available like adding your own logo, custom feature texts, great style for blog pages, etc. This make this theme multipurpose. Yes! You can use this theme for multiple niches.
Have a look over its attractive features –
- 10 multiple styling color options.
- Adapts all type of screen sizes.
- Used for multiple businesses.
- Inbuilt Contact form.
- Image sliding area.
- Search bar on home page.
5. Squirrel – Multipurpose WordPress Theme
Squirrel is yet another beautiful WordPress theme that has a simple interface and is free to download.
Several customization options are available in the theme by which you can develop a website as per your need.
The theme is completely responsive in nature i.e. it get adjust for all type of devices.
Interesting features of Squirrel theme –
- Style switcher to change color of your site.
- Beautiful image sliding area.
- Amazing gallery section.
- Blog page to share updates and new articles.
- Contact form by which clients can reach to you.
6. Compass WordPress Theme
Compass is a free and ideal solution for crafting a professional business website. The theme is bundled with powerful attractive features that make it stand out among others.
An amazing full width image slider area is given to display all you work, beautiful gallery section with thumbnail feature, video in the right sidebar that is sticked onto the all pages of theme and much more.
A contact form and goole map is also provided on the homepage for giving ease to your clients while contacting or finding you.
Impressive features of compass theme –
- Multiple social icons
- Client section to post comment and positive feedback
- Blog area to post latest topics and news
- 3 column feature area display all your services.
- Responsive layout fit on every device.
- Add logo to provide a unique identity to your website.
7. Skillate WordPress Theme
Skillate is a mobile-ready eLearning theme for WordPress LMS plugins. It focuses on user experience and effortless navigation using mega menus and advanced search bars as well.
Skillate is built with next-gen custom Gutenberg blocks from Qubely for a future-proof concept. This also boosts customizability and SEO as Qubely is well known for it. The custom and modern blog section takes your writing to the next level with its focus on readability and a soothing color palette.

Upgrade your LMS website using these robust features from Skillate –
- Showcase your trending courses and instructors
- 4 home page variations to cover every use case
- Customize using flexible Gutenberg blocks
- Highly responsive and mobile-ready
- Multi-instructor ready
- Display accomplished instructors using instructor profiles
- Mega-menu for effortless navigation
8. Poloray WordPress Theme
Poloray is yet another user friendly theme that is completely free with lots of customization option. The theme can be implemented for multiple purpose.
You can present all your services online, introduce your team members on home page, showcase images in the sliding area, etc.
It consist of a gallery section with moving effects, a contact form is also given by which user can contact you easily by filling out few details.
Some highlighted features of theme are –
- A call to action button is given.
- Search bar in footer area
- Gallery section with sliding and moving effects.
- Blog page to post new articles and blogs.
- Adaptable theme – get adjustin all devices.
9. WoodPecker – Professional WordPress Theme
Woodpecker is another top free theme that is perfect for all kind of professional and personal websites.
It is a multipurpose theme as several customization options are available. It helps to create a website that strengthened your business with its core elements and features.
Amazing features of theme –
- 2 video section on homepage.
- Call to action button.
- Widgetized footer area.
- Contact form by which cleints can connect with you.
- Multiple color button are available
10. InfoWay – Fastest Lead Capture WordPress Theme
Infoway is the free responsive multipurpose WordPress theme that comes with tons of incredible features. Here multipurpose means the theme can be used for developing multiple type of businesses website.
The theme support widgets which gives you an infinite ways to customize your site. It’s 3 column features area allows you to tell your clients about your services and products.
The theme is also consist of a contact form that give ease to your customers while contacting you.
Check out below the more features that will surely win your heart.
- Display image of your business.
- Testimonial section – consist of client’s reviews.
- Video section is to show your work experience.
- Gallery section with sliding effect when get opened.
11. Andrina Lite WordPress Theme
This theme has everything that can be needed for building a business website and the best part about this WordPress template is – it’s absolutely free.
With andrina theme, you can easily create a wonderful website within no time. It has all those appealing features that a business website must have. The theme comes with loads of features like stunning image slider with moving effects, a section to display recent activities, video and blog section and much more.
Features of Andrina Lite Theme –
- Completely responsive layout.
- Show your opening & closing hours.
- Various social sharing options.
- Incredible gallery section with beautiful images.
- Inbuilt contact form.
Let’s move onto Best Premium Themes –
12. Swimming Club – WordPress Theme For Swimming Pool Clubs
Swimming Club is a perfect one-page premium WordPress theme for swimming academies & swimming pool associations websites.
Now your visitors can easily enroll himself for your services as the theme has a special section for custom form at the homepage. All you need to do is just download the FormGet form plugin, create a custom registration form and embed it on your site.
This can help you in collecting leads, payments and get bookings for your swimming academy online.
Let’s have a quick overview of the theme features –
- A full-width slider with description.
- Service section and blog section.
- Hexagonal gallery section.
- A contact section.
- 8 eye soothing colors and much more.
The theme is highly optimizable and looks good in all the devices. Want to know more about this theme..?
13. CoolCamp WordPress Theme – For Organizers Of Summer Camps
CoolCamp is another best premium WordPress theme for summer camp schools, camping academies, trekking, hiking, and adventure clubs.
This elegant, one-page style theme loaded with lots of features which help you to set your website the way you want it to be. You can create a custom registration form for your summer camp to collect and manage all the required data of attendees as the theme is compatible with the Form plugin.
Let’s have a quick overview of the theme features –
- Image/video slider with description.
- Service section to display all your services.
- Stylish blog area to post latest news.
- Client testimonial section that shows review.
- Inbuilt contact form.
- Several unique template color skin and many more.
The theme is cross-browser compatible and 100% responsive which means it look good on all devices. What more do you need?
14. Evento WordPress Theme – For Event Organizers
The venue for your upcoming event has been booked. Your speakers are lined up, and your marketing campaign is kicking into high gear. Now you just need to sit back and watch the registrations roll in, right? Sure—but these days, most event participants expect to register online, which means you’ll need a website and registration form that display information about your event and accept attendee information.
Fortunately, this great looking WordPress theme will help you to promote your events amongst an audience. The theme is adaptable with FormGet Plugin, which let you create an awesome registration form for your events, and you can even sell tickets and accept payment instantly by connecting your PayPal or Stripe account.
 Features that make this theme stand out among others –
- Unique responsive slider that works accross all the devices.
- Offer 12-different color skins.
- Google map is integrated in the contact page.
- Show the latest blogs and also create a gallery section.
- Call to action button, client review section and much more..
Perfect theme to make your event sparkling, just click on the link below
15. Wedding Planner WordPress Theme – For Wedding Planners
Do you wish to launch your own wedding planning business and want your business to grow into a successful career, then this theme is perfect solution for you.
This beautiful premium theme will present you like a rock star in organizing wedding events for clients. You can show off your hands-on experience and impress your prospect to become your customer.
The theme lets you develop a company image that reflects the style you want to convey. It is also compatible with FormGet that help you to collect the leads by just inserting the registration form.
The theme is highly customizable and has tons of interesting features –
- A slider, photoblog feature to display portfolio.
- Beautifully styled gallery.
- Contact form.
- Thumbnail slider images.
- Various social icons.
16. Karate WordPress Theme – For Karate And Martial Art Academy
This premium theme is focused on creating a clean and strong representation of a Karate and Martial Art Academy.
It is also compatible with a FormGet plugin that allows you to take the full advantage of it’s features. You can allow your student to get themselves register online with the custom build registration form and manage all the required information easily with this amazing tool. 12 different color option will give the power to make the theme look you like.
The theme is a perfect blend of various features –
- A full-width slider with description.
- Service section and blog section to show the services and latest stories.
- Work gallery.
- 3- column feature area.
- Google map integrated with contact page.
17. ProDancer WordPress Theme – For A Dance Studio
ProDancer is a skilled and premium WordPress theme for a dance studio and dance classes. This elegant theme allows you to represent every detail of your dance studio and delivers great online experience even on the small screen to your targeted visitors.
Online registration is a fast and smooth experience for a participant linking to the form from your official dance website. The theme is integrated with an awesome online form builder tool FormGet- that allows you to collect online payment via PayPal or Stripe.
You can create a custom registration form with desired input fields then fix it on your site and start capturing the lead in no time.

The theme is a perfect blend of various features –
- A full-width slider with description
- Service section blog section
- Work gallery.
- 3- column feature area.
- Google map integrated with contact page
18. PartyPlanner WordPress Theme – For Event And Party Planner
PartyPlanner is a dynamic and high-impact WordPress Theme that allow you to show off your services, skills, package, blog post and other information for your party planning website.
The theme gives you all the tools to plan out and coordinate party. It is designed for both in
idual planners and party planning companies that plan, design and manage party or events for private and corporate clients.
It is completely compatible with FormGet and default form is integrated within the theme which can be easily replaced by your’s customs form. Placing the quotation form on the front page increase the visibility of your form that in return generate more leads.
Check out some interesting features of the theme –
- Multiple images can be added in the slider.
- Display all the images in the tabbed slider.
- Full width theme with elegand look and design.
- Inbuilt contact form.
- Add new blogs and news to your post.
Explore more features by tapping a left click of your mouse on the below button.
19. Bitcoin WordPress Theme
The Bitcoin WordPress theme is a multipurpose and responsive cryptocurrency WordPress theme. It is designed for individuals and businesses in the digital currency world. This is an exclusive market theme for cryptocurrency-related websites.
The theme is ideal for managing cryptocurrencies or digital like currencies. As a result, it’s suitable for business, individual, or developer.
Ideal for digital agencies that offer financial consulting services for crypto-trading consultancies, Blockchain, Initial Coin Offerings (ICO), as well as other crypto trading activities, the Bitcoin WordPress theme will be the best solution. The theme comes with a stunning homepage, a contact page, Guide page, How it Works Page, Services Page, and an About Us page.
Key Features of Bitcoin WordPress Theme
- Responsive and Retina Ready – Works well on smartphones, tablets, and desktop.
- Social integration – Well integrated with all social media platforms. It lets you share your work with the world.
- Created for SEO – Coded with SEO in mind, which makes your site stand out from your competition.
- WordPress Multilingual Plugin (WPML) & Translation ready
- Coded with CSS3 & HTML5 – Coded with the CSS3 and HTML5 your site is updated and secure.
- 11 custom cryptocurrency widgets
- Custom layout creator for unlimited Footer, MegaMenu & Header layout options.
- Geo-Target plugin allows you to target users based on their location.
- No programming skills or knowledge needed– Just drag & drop
- Packed with amazing plugins including contact form 7, WooCommerce, visual composer, revolution slider, buddy press, Google maps, review plugin, and Geotarget plugin.
20. Makeup Artist WordPress Theme – For Makeup Service Providers
This theme is specially designed for the makeup artist, beauty salon, spa salon, and bridal makeup service provider.
The most important interaction on any such kind of website is going to be the appointment register process. FormGet can work seamlessly and also adaptable to this theme. It provides a better user experience during the appointment registration process on your website and accepts payment as well.
Turn on your creativity and create exceptional websites with this attractive WordPress Theme.
 The theme is developed with unbeatable visual features that can be felt when your site is being surfed by a user –
- 8 color options.
- Showcase your portfolio.
- Beautiful image slider on home page.
- Custom logo and favicon option.
- Dislpay the key services.
21. TrackCamp WordPress Theme – For Camping Organizers
TrackCamp is a powerful, flexible one-page theme specially designed for organizations involved in a wide range of camping and recreation activities. It has a full-width slider along with a cool gallery that will help you to engage your visitor just by placing a high-quality image. This theme also offers quick registration features for your visitors as it is compatible with FormGet.
The theme is incorporated with lots of features like 3 column feature area, blog post, contact form, widgetized footer section, contact form, testimonial and much more. If you are a big fan of easy to use things, this theme will be perfect for creating campaign site.
Amazing features of TrackCamp WordPress Theme –
- Show multiple categories in gallery section.
- Contact section.
- Filter effect in gallery section.
- Multiple template colors – choose your favourite one.
- Parallax background image for the gallery.
22. DiscoTheque WordPress Theme – For Night Clubs
Create extraordinarily and stunning website for your disco night club with Discothèque WordPress theme. It’s modern and elegant design gives your website a professional look. The theme has the full-screen slider that allow you to display large view of the glamorous image and impress the dance clubbers. You can also showcase your upcoming and passed away events and sell your ticket by collaborating theme with a FormGet WordPress plugin.
The theme has inbuilt contact and portfolio template and comes with the many exclusive features like dynamic front page sidebar, full-screen slider, blog page template, service section, etc.
Interesting features of DiscoTheque –
- Beautiful portfolio to show all your events images.
- Mutiple color options – select one of your choice.
- The menu option gets display in the right sidebar that make the theme different from others.
- Blog section to share latest stories and news in 6 formats.
- Social icons.
23. Auto Towing WordPress Theme
A superb theme designed for towing and recovery services. Its responsive design gives better browsing experience to visitors. A custom-in-built section for your business requisites, clean coded WordPress template with SEO options and much more..
While you are looking to increase your client, the important thing you are missing is Forms.
Adding a form will definitely increase your conversion rate, and however, it will ease the way of interaction between you and your clients.
The theme gives you many latest features and limitless possibilities for customization. They are –
- Add full size image of your services on homepage.
- 3 – feature area to showcase all your offering.
- Service area with multiple section.
- Different news room section where you can add the latest news of your business.
- Social icons, gallery section, blog section, etc.
24. Career Crunch WordPress Theme
Career Crunch is a WordPress theme for Career oriented academies specially those which offer hospitality training courses.
Take online applications and registrations from participants for the various activities they conduct, advance bookings for the courses they offer and manage events, etc.
The theme comes with inbuilt system to take bookings and payments online. This system is facilitated by InkAppointment WordPress plugin which comes integrated in the theme. So you can generate various filtered options for courses, commencing dates, batches, fee structure and even collect online payments, donations, accept paid registration for events, and much more from your website itself.
Check out the amazing features of theme –
- Tabbed view of recent blog post.
- Full page image sidebar
- Collect payment vis PayPal.
- InkAppointment plugin for online booking conversions.
- Gallery section to display your institute images.
25. Tan Salon WordPress Theme
Now let’s have a look over this top WordPress theme for tanning salons, tan hotels, resorts, and spas. In most of the terms, it seems to be perfect for the purpose it has been crafted. The theme has got a magnificent design. Starting from the top header section to the footer, every section is designed according to the requisites of tanning salons.
It is completely responsive, easy to use, has inbuilt SEO options and comes with a newsletter sign up form. It has all featured sections required to present your tanning salon.
A service opt-in form on your website will result in more people are likely to grab your services. This is like, sometimes you don’t feel like hungry, but if some mesmerizing food comes before you, you don’t deny it.
Features that make this theme outstanding –
- Share your creative ideas and new in blog section.
- A contact page is given for conversation.
- Multiple color schemes – choose your favourite one.
- Completely responsive – easily adapt the size of every devce.
- Image slider, service section, etc.
26. Golfer WordPress Theme
Here is another best responsive premium WordPress theme that has a perfect design. It is distinctively designed keeping in mind to give a wonderful online presence to golf clubs and country clubs.
The theme has an easy customization option so you can manage and update your golf business website without any need of technical coding.
It has several predefined colors – green, blue, pink, black, brown, red and yellow, you can go to an extreme. Just swap your content and images. Useless to say, with forms on your website, it will become easy for you to sell membership of your country club.
Wonderful features of the theme –
- Add your golf club images in 2 type of image slider.
- Show your key services and recent blog post.
- Beautiful gallery section where you can upload all of your images.
- Contact form on homepage.
- Responsive layout.
27. Drive-a-Way WordPress Theme
Drive-a-Way is for driving schools devoted to build a productive and persuasive website for driving instructors. Using an appointment booking form with this theme so that learners can book appointments online will be a great breakthrough for your business.
It also has a comprehensive inbuilt booking system to get appointments from your clients. People can book the available slots based on date and time in the booking form. Clients can also select packages if you offer training on different standards of vehicles, or multiple standards of instructions.
Isn’t it far a better to show a booking form and get your clients booked instantly than just demonstrating your business.
Features, that will surely grab your customer’s attention –
- A booking form on the homepage that lets your customer book thier appointments.
- A Google map is given that shows your location.
- Display all your services on home page.
- Multiple social icons.
- Testimonial section to display customer’s review.
28. Logistics Booking WordPress Theme
A WordPress theme for logistic coordinators, supply chain management involved businesses like packers-movers and transporters. Its extraordinary stirring design presents your services in a very impressive manner.
Add a logistic service booking form to your website and start getting online booking for your transportation business.
It comes with a truckload of possibilities for customization and is fully responsive. You get lots of predefined fields specifically designed to showcase your portfolio, contact information, team members, news editorials, and much more.
Look at the amazing features of this theme –
- News and blog post section.
- Google map to show your location.
- Advanced Shipment Booking features.
- Display your service features on homepage.
- Clients can select the number of labors required.
29. LaundryCare WordPress Theme
LaundryCare is a premium WordPress theme for laundry and dry cleaning service providers.
It may be a bit surprising that even for laundry and dry cleaning, a big number of people search online. So if you run a laundry business in any specific area or on a broad level, don’t make the mistake of not using a service booking form on your website.
Use advance booking form, or contact forms and be just a step away from getting orders place by your customers. That’s so essential for a laundry care website to have forms to accept orders online.
Have a look at some amazing features of this theme –
- Display about your servicrs on home page.
- Testimonial section that increases trust among your clients.
- Share your latest stories and news in a blog section.
- Full width image on home page.
30. Beauty Salon WordPress Theme
For any business like parlor, salon, spa, or massage centers, booking system is of utmost importance. You will get appointments hand to hand right from your website.
The theme has an inbuilt online booking module that let you manage your appointments from anywhere, push promotions directly to customers, customers can self-book their appointments, provide efficient and positive experiences for your customers. 
Have a look at the key features of this theme –
- Appointment booking form on homepage.
- Blog and news section.
- A Google map on home page that display your location.
- Testimonial section that build trust among customers.
- Respnsive layout i.e. adapts all type of screen sizes.
31. Variant – Lead Gen Landing Page WordPress Theme
Variant is a multipurpose WordPress theme that can be used for multiple type of businesses. So, you are allowed to create websites for wedding planner, taxi booking, hotel bookings, fitness center, travel booking, etc.
As the name suggest the theme is especially used for collecting the leads. And this lead generation can be done by adding a booking form on your website.
So, all the customers can easily book their rides and appointments by filling out few details.
The theme consist of several interesting features –
- Video and feature section.
- Integrated with social icons.
- Integrated with lead capture plugin and Formget.
- Custom lead gen form to collect more leads.
- Testimonial section to build trust among the customers.
32. CreativeHub – Ad Agency WordPress Theme
CreativeHub theme is one of the best premium theme to tell your customers about advertising and promotional strategies.
It consist of an inbuilt lead gen form to take the important information of your potential customers.
It is a colourful theme that can be used by the film makers, ad script writers for creating a digital advising website.
Features of CreativeHub theme –
- Display all your ads in the gallery section.
- Full width image slider to showcase images.
- Inbuilt contact form to collect leads.
- 8 unique color styles.
- Blog section share latest news and stories.
Last words..
Get all the website functionalities at your fingertips using these mobile friendly themes and start accepting bookings, collect payments and get number of registrations online by adding a form on the home page of your website.
So, pick a best theme and create a website for your business.
You may also see the related posts ->
- Video WordPress Themes
- Bootstrap WordPress Themes
- Fashion Ecommerce WordPress Themes
- Premium WP Themes
If you are in the field of medical & hunting for a responsive WP theme that perfectly suits your health profession then Doctor WordPress Themes would be the perfect match for you.
Chrome Extension: Inject Javascript Into Web Page

When you will be able to insert some HTML code into a web page, then you can change or enhance the way a website behave. Also as a developer, you can provide your users those missing features, which they always look for in some website.
For this, one can write a Javascript code. But how this code will be injected into the target page source?
This post will guide you how to create a chrome extension that will handle the injection of our Javascript code into Gmail page. If you want to know the basics of creating extensions for chrome, you can read our post regarding Chrome Extension Tutorial to Display RSS Blog Feeds.
Download code from the link given below

For excellent service in Email marketing, Bulk mailing, Email list management and many more, you must take a look at MailGet – Email Service Provider.
Chrome extensions provide a way out to execute our own script into a web page via “content-script”. Take a look at the following code snippet from manifest file,
"content_scripts": [
{ "run_at" :"document_end",
"matches": ["https://mail.google.com/*"],
"js": ["jquery-1.11.3.min.js","script.js"],
"css":["css/mycss.css"] }
],
Here “jquery-1.11.3.min.js”, “script.js” , “mycss.css” are the files I have defined as my content script.
You might already know that chrome browser requires a “manifest.json” file in the extension’s directory. You define a single file or a bundle of more than one file, to inject as your content script in the extension’s manifest file.
We will proceed with the following steps to complete our task. In the extension’s root directory,
1.) Create a file with name “manifest.json” put inside the code given later.
2.) Create a Javascript file “script.js” which upon execution insert HTML into Gmail page.
3.) Place the applied styles to the injected HTML into a separate file “mystyle.css” and place it into CSS folder.
4.) Use of chrome.extension.getURL(“img/MailGet.png”) will give the absolute path of the file Mailget.png.
Prepare the manifest
The content of file are self-suggesting and comments are also provided to have you a clear idea about the usage.
In the content script section, there are some additional properties such as “run_at” tells extension when to execute our script with options of “document_start”, “document_end” and “document_idle” and if you intend the script to execute only for some specific page then “matches” specifies the pattern of the url to match in the address bar.
Note: Don’t forget to delete all the comments in menifest file before you use the code.
manifest.json
{
"manifest_version": 2,
//current manifest version by chrome

"name": "Gmail inject pop-up",
"description": "This extension will append an icon in the gmail homepage and a pop-up will appear on click over that icon.",
"version": "1.0",
//Name,Description & version of your extension

"content_scripts": [    <-------------------------------------------------------------Content Script details in manifest
{ "run_at" :"document_end",
"matches": ["https://mail.google.com/*"],
"js": ["jquery-1.11.3.min.js","script.js"],
"css":["css/mycss.css"]
} ],
//"run_at" tells when to load the javascript,
//"matches" tells the URL to match to inject the code which I'm using Gmail here,
//"js" tells all .js files to inject,
//"CSS" tells about all included CSS files for injection.

"web_accessible_resources":["img/*.png"]
}
//web_accessible_resources specify the path and format of files which the web page require to load from extension.
//But why? because webpage and extension executes in isolated environments.They can't access one another's resources directly.
//and in the following way we allow web page to access the required files from extension.
Content script files
script.js
Following script instructs the extension to inject a “clickable icon with HTML pop-up” code into gmail page.
$(document).ready(function() {   // Load the function after DOM ready.

var link1=chrome.extension.getURL("img/MailGet.png");     //Get absolute path of the file residing your extension.
var t1='<div id="pop"><a href=""><img id="mgt" src="'+link1+'"width="25" height="24"></a></div>'    //now set the src to absolute path.
$(".gb_Lb").prepend(t1);     //Insert MailGet icon into top-right corner of Gmail home.

var link2=chrome.extension.getURL("img/button_cancel.png");
var link3=chrome.extension.getURL("img/AoRankLogo.png");
var t2='<div id="pop_bg" style="height: 100%; width: 100%;"></div><div id="mgt_popup"><span class="popup_close"></span><div><img id="logo" src="'+link3+'"/></div><div id="pop_inner"><label id="user"></label><input type="button" id="mailgett" value="Go To MailGet"/></div></div>'
$("body").append(t2);

$("#pop").click(function() {//click on injected mailget icon.
event.preventDefault();//first stop default behaviour of anchor.
$("#pop_bg").css("display", "block");//Show pop-up background.
$("#mgt_popup").css("display", "block");//Show pop-up div.
//Inject dynamically generated html from here( However i've used a string only).
$("#user").html("MailGet is an online Email Management Service which allow you to Send Bulk and Drip Emails<br><br>");
});

$(".popup_close").click(function(){//click close symbol hides popup
$("#pop_bg").css("display", "none");
$("#mgt_popup").css("display", "none");
});

$("#mailgett").click(function() { // click on "Go To Mailget" button hides popup and opens provided url in new tab.
$("#pop_bg").css("display", "none");
$("#mgt_popup").css("display", "none");
window.open("https://www.formget.com/mailget/" , '_blank');
});
});
mycss.css
The extension itself injects the following CSS styles into the target page if the file is correctly specified in manifest.json
@import url(http://fonts.googleapis.com/css?family=Raleway);

img#mgt{
border-radius:10px;
}
div#pop_bg{
opacity:0.6;
background: #000;
left: 0;
position: absolute;
top: 0;
z-index: 500;
display:none;
height: 100%;
width: 100%;
}
div#mgt_popup{
background: #FFF;
height:330px;
width:500px;
z-index:550;
display:none;
left: 42%;
top: 52%;
margin-left:-110px;
margin-top:-228px;
position: absolute;
border: 5px solid rgba(58, 53, 40, 0.46);
}
.popup_close{
background:url("https://cdn0.iconfinder.com/data/icons/slim-square-icons-basics/100/basics-22-48.png") no-repeat;
height: 48px;
width: 48px;
position: absolute;
top: -9px;
left: 461px;
opacity: 0.5;
cursor:pointer;
}
input[type=button]{
margin: 27px 0px 0px -52px;
color: #fff;
background-color: #FFBC00;
border-color: #FFBC00;
padding: 12px 130px;
border:1px solid white;
font-family:raleway !important;
font-Weight:bold;
font-size:18px;
color:white;
}
div#pop{
width: auto;
height: auto;
padding-left: 17px;
padding-top: 2px;
}
#pop_mail_read{
margin: 75px 0 0 184px;
}
img#logo{
margin: 37px 8px 26px 33%;
}
div#pop_inner{
margin: 0 22%;
text-align: center;
}
Download Jquery file and place it in the application folder.Make sure the file-name is correct in manifest file.
Load the Extension
Follow these steps:
1.) Go to “Menu<<More Tools<<Extensions” OR type in the address bar “chrome://extension”.
2.) Check the “developer mode” option to enable loading the extension.
3.)Click “Load unpacked extension” then select the application folder(not zipped).
The extension is now loaded in chrome to execute.
Open Gmail in the browser and you will see the MailGet icon ![]() in the Top-Right corner of the page.This is the icon we injected right away through our content-script specifically script.js file.
in the Top-Right corner of the page.This is the icon we injected right away through our content-script specifically script.js file.
Now click on that icon and a popup will appear.This is the same popup we have injected as HTML.
Conclusion
- We created a chrome extension which executes our javascript(script.js) inside a web page.
- We specified the web page as “gmail.com” otherwise one can also make the script work in more than one or all pages and tabs.
- The CSS we have created for our HTML will automatically get applied if the path in the manifest is correct.
- Chrome runs our script when there is URL in the address bar matching to gmail’s.
Further, you can also extend the script to handle communication with external resources.
I hope that now the concept of injecting code in a web page would be clear to you. Play with the code and please let us know if you find any trouble. Keep visiting our site for many more useful blogs.Thanks for reading!!!
Recommended blogs –
Remove Duplicate Email Addresses From CSV In Bulk

We often get frustrated, when we see a duplicate email address in our file or sheet. We can manage this duplicate email until if we have a small set of emails.
But the conditions become worst when duplicate emails are stored in bulk. At this point, we can not remove duplicate emails manually.
In this blog post, I am going to explain that how to clean your email list by removing duplicate emails either it is uploaded via CSV file or manually entered.
Benefits of this code-script:-
- You will have two choice either enter email addresses manually or upload a CSV file.
- After removing the duplicate emails, you can download the results in a CSV file which doesn’t have any duplicate emails.
- If you don’t want to download the results then you can simply see & verify the results.
- Takes very less time in filtering the results.
Detailed explanation:-
We will create a form which will allow users to insert different email addresses (with a comma separation ) in a textbox.
OR
they can upload a CSV file containing a list of email addresses directly.
After clicking on submit button, results will display in a table.
OR
A user can also export the filtered results as a CSV file for both cases.
The user can easily download the exported CSV file from the Export CSV link given at the bottom of the result.
Note:- Format for CSV file to be upload, This CSV file should have one column name say Email(can be any name) and all emails to be filter must be kept under this coloumn.
Watch the live demo or download code from the link given below

MailGet is an online email sevice provider which allow you to send Bulk Emails.
You can easily connect and configure it with different SMTP service providers, e.g MailGun, Mandrill, Postmark etc, to send Emails.
Let’s have a look at the coding part.
1. Create a php file name index.php in the root folder of your application and paste the PHP code given below in it.
index.php
This index.php file contains the major functionality of the script. When you will execute this page you will get a form, image is shown above.
<?php
session_start();
?>
<html>
<head>
<meta http-equiv="Content-Type" content="text/html; charset=windows-1252">
<link href="css/style.css" rel="stylesheet" type="text/css"/>
<link href="bootstrap/css/bootstrap.css" rel="stylesheet" type="text/css"/>
<link href="bootstrap/css/bootstrap-theme.min.css" rel="stylesheet" type="text/css"/>
<title>Remove Duplicate Email Addresses Using PHP</title>
</head>
<body>
<div class="container">
<div class="row">
<h1 class="main_heading">Remove Duplicate Email Addresses Using PHP</h1>
<div id="main">
<div id="login">
<h2>Duplicate Email Remover</h2>
<hr>
<div id="right">
<div id ="form1" >
<form method="post" action ="" id="ctform">
<label><b>Enter Email :</b></label>
<input type="email" multiple rows="3" id ="text1" name ="email"/>

<input type="submit" id ="dsubmit" value ="submit" name ="dsubmit" />
</form>
<b id="or">OR</b>
<form action="<?php echo $_SERVER["PHP_SELF"]; ?>" method="post" enctype="multipart/form-data">
<label><b>Upload CSV :</b></label>
<label><input type="file" name="file" id="file" /></label>
<input type="submit" name="csubmit" id="csubmit" value="submit"/>
</form>
</div>
</div>
</div>
</div>
<div id="csvmailcontent">
<?php
try {
if (isset($_POST['dsubmit'])) {
$email = $_POST['email'];
$semail = "$email";
$arr = split(',', $semail);
/**This function remove the duplicte email in this case when input type is
is 'email' if you want to remove duplicate text or field just change the
input type in html form***/
$array = array_unique($arr);
$array2[] = $array;
$lists = json_encode($array2);
if (!empty($email)) {
echo"<table id ='tid' >";
echo"<th>";
echo"<b>";
echo"Result Emails";
echo"</b>";
echo"</th>";
foreach ($array2 as $key1) {
foreach ($key1 as $key2) {
echo"<tr>";
echo"<td>";
echo $key2 . "<br/>";
echo"</td>";
echo"</tr>";
}
} echo"</table>";
/**form having 'Export CSV' button' also takes the value to be downloaded**/
echo"<form action='emaildown.php' method='post' >
<input type='hidden' name='lists' value='$lists' id ='lists' />
<button type='submit' value='Export CSV' id ='mailsubmit'><u>Export CSV</u></button>
</form>";
} else {
echo "<script type='text/javascript'>alert('Please Enter the Emails')</script>";
}
}
} catch (MyException $e) {
echo "Some thing went wrong";
}
?>
<?php
try {
if (isset($_POST['csubmit'])) {
if (isset($_FILES["file"])) {
//if there was an error uploading the file
if ($_FILES["file"] ["error"] > 0) {
echo "<script type='text/javascript'>alert('Please choose File for upload')</script>";
} else {
$storagename = $_FILES["file"]["name"];
$_SESSION['file_name'] = $storagename;
$id = $_SESSION['file_name'];
$row = 1;
/***saving file to upload folder you can check whether your file has been upoaded or not. Clean
this folder if you find necessary after certain time when a bulk of file stored in this folder****/
move_uploaded_file($_FILES["file"]["tmp_name"], "upload/" . $storagename);
$file = new SplFileObject("upload/" . $storagename);
$file->setFlags(SplFileObject::READ_CSV);
$file->setCsvControl(',', '"', '\');
foreach ($file as $value) {
/**extracting value from file and printing on page**/
foreach ($value as $row) {
$arcsv[] = $row;
}
}
$arcsv = array_unique($arcsv);
$_SESSION['csv_value'] = $arcsv;
if (empty($arcsv)) {
$arcsv = $_SESSION['csv_value'];
}
echo"<table id ='tid'>";
echo"<th>";
echo"<b>";
echo"Result Emails";
echo"</b>";
echo"</th>";
foreach ($arcsv as $key) {
echo"<tr>";
echo"<td>";
echo $key . "<br/>";
echo"</td>";
echo"</tr>";
}
echo"</table>";
$arcsv1[] = $arcsv;
$lists1 = json_encode($arcsv1);
}
}
if (!empty($file)) {
/**form having 'Export CSV' button' also takes the value to be downloaded**/
echo"<form action='csvdown.php' method='post' >
<input type='hidden' name='lists1' value='$lists1' />
<button type='submit' value='Export CSV' id ='csvsubmit'><u>Export CSV<u></button>
</form>";
}
}
} catch (MyException $e) {
echo "Some thing went wrong";
}
?>
</div>
</div>
</div>
</body>
</html>
2. In the same root folder, create emaildown.php file and paste the following code in it.
emaildown.php
This file has the code for downloading the emails after removing the duplicate and store in a CSV file in the case when a user enters the emails manually.
<?php
try {
$array2 = json_decode($_POST['lists']);
header("Content-type: text/csv");
header("Content-Disposition: attachment; filename=file.csv");
header("Pragma: no-cache");
header("Expires: 0");
$data = $array2;
$file = fopen('php://output', 'w');
fputcsv($file, array('Emails '));
foreach ($data as $row) {
fputcsv($file, $row, ',');
}
exit();
} catch (MyException $e) {

echo "Some thing went wrong";
}
?>
3. Similarly, create a csvdown.php file in the root same root folder with following code.
csvdown.php
This file contains code for downloading the emails after removing the duplicate and store in a csv file in the case when user uploads a CSV file.
<?php
try {
$array2 = json_decode($_POST['lists']);
header("Content-type: text/csv");
header("Content-Disposition: attachment; filename=file.csv");
header("Pragma: no-cache");
header("Expires: 0");
$data = $array2;
$file = fopen('php://output', 'w');
fputcsv($file, array('Emails '));
foreach ($data as $row) {
fputcsv($file, $row, ',');
}
exit();
} catch (MyException $e) {

echo "Some thing went wrong";
}
?>
4. Finally, create a css folder in the root directory. Create style.css file in it and paste the css code given below in it.
style.css
This file is taking care of all designing work in the form. You can alter it and can make form of your choice.
@import url(http://fonts.googleapis.com/css?family=Raleway);
#main{
min-width: 350px;
margin: 44px auto;
font-family:raleway;
}
span{
color:red;
}
h1.main_heading {
text-align: center;
}
h2{
background-color: #FEFFED;
text-align:center;
border-radius: 10px 10px 0 0;
margin: -10px -40px;
padding: 15px;
}
hr{
border:0;
border-bottom:1px solid #ccc;
margin: 10px -40px;
margin-bottom: 30px;
}
#login{
border-radius: 10px;
font-family:raleway;
border: 2px solid #ccc;
padding: 10px 40px 33px;
margin-top: 23px;
}
input[type=text],input[type=email]{
width:99.5%;
padding: 10px;

border: 1px solid #ccc;
padding-left: 5px;
font-size: 16px;
font-family:raleway;
}
input[type=submit]{
width: 37%;
background-color:#FFBC00;
color: white;
border: 2px solid #FFCB00;
padding: 4px;
font-size:20px;
cursor:pointer;
border-radius: 5px;
}
#right{
overflow: hidden;
overflow-wrap: break-word;
width: 104%;
border: 1px dashed rgb(215, 215, 215);
box-shadow: 0px 5px 17px 1px #99A3AD, 0px 0px 40px #EEEEEE;
margin-left: -2%;
padding: 20px;
}
#right p{
padding: 20px;
}
form1 {
padding-top: 27px;
width: 248px;
margin: auto;
}
#right h3 {
margin-top: -8px;
text-align: center;
}
#csvmailcontent{
width:60%px;
font-family:raleway;
margin-top: -4%;
}
#mailsubmit{
background:none!important;
border:none;
padding:0!important;
font: inherit;
border-bottom:1px solid #444;
cursor: pointer;
font-size: 150%;
margin-left: 45%;
}
#csvsubmit{
background:none!important;
border:none;
padding:0!important;
font: inherit;
border-bottom:1px solid #444;
cursor: pointer;
font-size: 150%;
margin-left: 45%;
}
#uploadcsv
{
margin-bottom: 5%;
}
#text1{
margin-top: 1%;
margin-bottom: 11px;
}
input#text1 {}
#or{
margin-left: 45%;
font-size: 20px;
font-family:raleway;
margin-top: -50px;
}
#or:hover{
color: #204d74;
z-index: 8;
}
#file{
color:lightblue;
margin-top: 3px;
margin-bottom: 4px;
}
table {
font-family: 'Raleway', sans-serif;
color:#666;
font-size:12px;
text-shadow: 1px 1px 0px #fff;
background:#eaebec;
margin:20px;
border:#ccc 1px solid;
font-size: 16px;
-moz-border-radius:3px;
-webkit-border-radius:3px;
border-radius:3px;
-moz-box-shadow: 0 1px 2px #d1d1d1;
-webkit-box-shadow: 0 1px 2px #d1d1d1;
box-shadow: 0 1px 2px #d1d1d1;
margin: 0 auto;
}
table th {
text-align: center;
padding:21px 25px 22px 25px;
border-top:1px solid #fafafa;
border-bottom:1px solid #e0e0e0;

background: #ededed;
background: -webkit-gradient(linear, left top, left bottom, from(#ededed), to(#ebebeb));
background: -moz-linear-gradient(top, #ededed, #ebebeb);
}
table th:first-child {
text-indent: center;
padding-left:20px;
}
table tr:first-child th:first-child {
-moz-border-radius-topleft:3px;
-webkit-border-top-left-radius:3px;
border-top-left-radius:3px;
}
table tr:first-child th:last-child {
-moz-border-radius-topright:3px;
-webkit-border-top-right-radius:3px;
border-top-right-radius:3px;
}
table tr {
text-indent: center;
padding-left:20px;
}
table td:first-child {
text-align: center;
padding-left:20px;
border-left: 0;
}
table td {
padding:18px;
border-top: 1px solid #ffffff;
border-bottom:1px solid #e0e0e0;
border-left: 1px solid #e0e0e0;
background: #fafafa;
background: -webkit-gradient(linear, left top, left bottom, from(#fbfbfb), to(#fafafa));
background: -moz-linear-gradient(top, #fbfbfb, #fafafa);
}
table tr.even td {
background: #f6f6f6;
background: -webkit-gradient(linear, left top, left bottom, from(#f8f8f8), to(#f6f6f6));
background: -moz-linear-gradient(top, #f8f8f8, #f6f6f6);
}
table tr:last-child td:first-child {
-moz-border-radius-bottomleft:3px;
-webkit-border-bottom-left-radius:3px;
border-bottom-left-radius:3px;
}
table tr:last-child td:last-child {
-moz-border-radius-bottomright:3px;
-webkit-border-bottom-right-radius:3px;
border-bottom-right-radius:3px;
}
table tr:hover td {
background: #f2f2f2;
background: -webkit-gradient(linear, left top, left bottom, from(#f2f2f2), to(#f0f0f0));
background: -moz-linear-gradient(top, #f2f2f2, #f0f0f0);
}
@media only screen and (min-width:768px){
#main {
max-width: 370px;
}
}
You Should also have a look over increasing your email delivery rate for better inbox delivery using MailGet.
Conclusion:
Hope you would have learned & enjoyed from this blog post and would have got a clear picture about duplicate email remover. I am sure you will give a try to the script provided and implement it in your own projects as well. Feel free to visit our website again in the future to get in touch with new coding tricks. You can let us know about your feedback in the space provided below.
For more related information check out the following blogs –
Get Sender’s Statistics Using Mandrill API Key

Hi, everyone! Hope you all are good and enjoying learning our Tutorial Series on Mandrill API.
Today, we are here again with one more feature of Mandrill API.
In this tutorial, we are going to track complete email sending from your Mandrill account via Mandrill API key just like any Data Analytics Tools Where you can have a complete email analytics of your emails and can track your clients smartly.
This is useful to track Mandrill usage pattern from within your application.
We will track all the email sending activities done from a single email address [email protected]
The tracked data will include the following details:
1. Number of emails sent from your Mandrill account.
2. Number of emails opens (Total Opens and Unique Opens)
3. Number of link clicks in the email
4. Number of emails bounces
5. Complete monthly email sending activity (sorted day wise)
We will need two things for this:
- Mandrill API key: – Generated API key of any Mandrill account.
Note: – If you don’t have any Mandrill API Key, don’t worry. Just follow the tutorial link Steps to Generate Mandrill API Key. We have explained a very simple way to generate Mandrill API Key. - Emails address: – Any valid email address.
Note: – You can read our article Get Sender’s Email List Using Mandrill API Key. Try its demo and get the senders email addresses to use in the script.
We will pass these two data into the Mandrill Library using the code given below.
 // Pass user provided Mandrill API key to Mandrill library
$mandrill = new Mandrill($key);
// Get Mandrill API using sender's info
$result = $mandrill->senders->info($email);
The above-mentioned code will return us all the necessary details of the email address, which we will retrieve and display as output.
Watch the live demo or download code from the link given below

MailGet is an online email management service which allow multiple API/SMTP integration to send bulk and drip emails. It also provide you a dashboard to manage your records.
Let’s have a look at the scripting part.
1. Download the latest Mandrill library .zip folder.
2. Create lib folder in the root folder of your application. Now, extract the Mandrill library zip file, copy & paste all the files available in the src folder of extracted zip folder into lib folder.
3. Similarly, create js and css folder. Download and insert latest jQuery.js and Bootstrap.css file in it.
4. Create index.php file in the root folder and paste the following PHP code in it.
index.php
Display a form, get input from users and send it to the Mandrill library file. Retrieve return data and generate output to show as a result.
<html>
<head>
<meta http-equiv="Content-Type" content="text/html; charset=windows-1252">
<title>Get Sender's Statistics Using Mandrill API Key</title>
<link rel="stylesheet" type="text/css" href="css/style.css"/>
<link rel="stylesheet" type="text/css" href="css/bootstrap.css"/>
<script src="js/jquery.js"></script>
</head>
<body>
<?php
include ("lib/Mandrill.php");
$error_msg = "";
?>
<div class="container">
<div class="row">
<div id="main">
<h1>Get Sender's Statistics Using Mandrill API Key</h1>
<div id="login">
<h2>Mandrill User's Info Search Box</h2>
<hr>
<form action="" method="POST">
<label>Mandrill API-Key : </label> <input type="text" name="mandrill_api_key" class="mandrill-api-key" placeholder="Enter Mandrill API Key"/>
<label id="sen-email-lab">Sender's Email Address : </label> <input type="email" name="sender_email" class="sender-email" placeholder="Enter Sender's Email Address"/>
<input type="submit" value="Search" id="submit"/>
<span></span>
</form>
</div>
<?php
if (isset($_POST['mandrill_api_key']) && isset($_POST['sender_email'])) {
$key = $_POST['mandrill_api_key'];
$email = $_POST['sender_email'];

// Pass user provided Mandrill API key to Mandrill library
$mandrill = new Mandrill($key);
// Get Mandrill API using sender's info
$result = $mandrill->senders->info($email);
if (isset($result['message'])) {
$error_msg = $result['message'];
echo "<script>alert('" . $error_msg . "');</script>";
} else {
?>
<!-- Result div start -->
<div class="result">
<h1 class="res">Result</h1>
<div class="user_info">
<ul class="info">
<li class="index_info"> Email Address </li><li class='val'> : <?php echo $result['address'] ?></li>
<li class="index_info"> Created At </li><li class='val'> : <?php echo $result['created_at'] ?></li>
<li class="index_info"> Total Emails Sent </li><li class='val'> : <?php echo $result['sent'] ?></li>
<li class="index_info"> Reputation </li><li class='val'> : <?php echo $result['reputation'] ?></li>
<li class="index_info"> Total Emails opens </li><li class='val'> : <?php echo $result['opens'] ?></li>
<li class="index_info"> Total Emails Unique Opens </li><li class='val'> : <?php echo $result['unique_opens'] ?></li>
<li class="index_info"> Total Emails Clicks </li><li class='val'> : <?php echo $result['clicks'] ?></li>
<li class="index_info"> Total Emails Unique Clicks </li><li class='val'> : <?php echo $result['unique_clicks'] ?></li>
<li class="index_info"> Total Emails Hard Bounced </li><li class='val'> : <?php echo $result['hard_bounces'] ?></li>
<li class="index_info"> Total Emails Soft Bounced </li><li class='val'> : <?php echo $result['soft_bounces'] ?></li>
<li class="index_info"> Total Emails Rejected </li><li class='val'> : <?php echo $result['rejects'] ?></li>
<li class="index_info"> Total Emails Complaints as Spam </li><li class='val'> : <?php echo $result['complaints'] ?></li>
<li class="index_info"> Total Emails unsubscribes </li><li class='val'> : <?php echo $result['unsubs'] ?></li>
</ul>
<div id="tabs-container">
<h2 class="msg_history">Message History</h2>
<ul class="tabs-menu">
<li class="current"><a href="#tab-1">Today</a></li>
<li><a href="#tab-2">Last 7 day's</a></li>
<li><a href="#tab-3">Last 30 day's</a></li>
<li><a href="#tab-4">Last 60 day's</a></li>
<li><a href="#tab-5">Last 90 day's</a></li>
</ul>
<div class="tab">
<div id="tab-1" class="tab-content">
<ul class="tab-info">
<?php
foreach ($result['stats']['today'] as $key => $val) {
echo "<li class='index'>" . $key . "</li><li class='val'> : " . $val . "</li><br/>";
?>
<?php } ?>
</ul>
</div>
<div id="tab-2" class="tab-content">
<ul class="tab-info">
<?php
foreach ($result['stats']['last_7_days'] as $key => $val) {
echo "<li class='index'>" . $key . "</li><li class='val'> : " . $val . "</li><br/>";
?>
<?php } ?>
</ul>
</div>
<div id="tab-3" class="tab-content">
<ul class="tab-info">
<?php
foreach ($result['stats']['last_30_days'] as $key => $val) {
echo "<li class='index'>" . $key . "</li><li class='val'> : " . $val . "</li><br/>";
?>
<?php } ?>
</ul>
</div>
<div id="tab-4" class="tab-content">
<ul class="tab-info">
<?php
foreach ($result['stats']['last_60_days'] as $key => $val) {
echo "<li class='index'>" . $key . "</li><li class='val'> : " . $val . "</li><br/>";
?>
<?php } ?>
</ul>
</div>
<div id="tab-5" class="tab-content">
<ul class="tab-info">
<?php
foreach ($result['stats']['last_90_days'] as $key => $val) {
echo "<li class='index'>" . $key . "</li><li class='val'> : " . $val . "</li><br/>";
?>
<?php } ?>
</ul>
</div>
</div>
</div>
</div>
</div>
<!-- Result div End -->
<?php
}
}
?>
</div>
</div>
</div>
<script>
jQuery(document).ready(function() {
$("#submit").click(function(event) {
var Mandrillkey = jQuery('.mandrill-api-key').val();
var MandrillEmail = jQuery('.sender-email').val();
if (Mandrillkey == "") {
event.preventDefault();
alert('Please insert Mandrill API Key!!!');
}
if (MandrillEmail == "") {
event.preventDefault();
alert('Please Enter Sender's Email!!!');
}
});
$(".tabs-menu a").click(function(event) {
event.preventDefault();
$(this).parent().addClass("current");
$(this).parent().siblings().removeClass("current");
var tab = $(this).attr("href");
$(".tab-content").not(tab).css("display", "none");
$(tab).fadeIn();
});
});
</script>
</body>
</html>
5. Create style.css file in CSS folder and paste the following code in the file.
style.css
Includes basic styling of HTML elements.
@import url(http://fonts.googleapis.com/css?family=Raleway);

#main{
width:100%;
min-width: 320px;
margin:50px auto;
font-family:raleway;
}
h2{
background-color: #FEFFED;
text-align:center;
border-radius: 10px 10px 0 0;
margin: -10px -40px -20px !important;
padding: 15px;
}
hr{
border:0;
border-bottom:1px solid #ccc;
margin: 10px -40px;
margin-bottom: 30px;
}
ul{
text-decoration: none;
}
ul li{
display: inline-block;
}
#login{
width:320px;
border-radius: 10px;
font-family:raleway;
border: 2px solid #ccc;
padding: 10px 40px 25px;
margin: 70px auto 0 auto;
}
input[type=text],input[type=email]{
width:100%;
padding: 10px;
margin-top: 8px;
border: 1px solid #ccc;
padding-left: 5px;
font-size: 16px;
font-family:raleway;
margin-bottom: 15px;
}
input[type=submit]{
width: 100%;
background-color:#FFBC00;
color: white;
border: 2px solid #FFCB00;
padding: 10px;
font-size:20px;
cursor:pointer;
border-radius: 5px;
margin-bottom: 15px;
}
div#main h1 {
text-align: center;
}
h1.res {
margin-top: 51px;
}
div.user_info {
width: 650px;
position: relative;
background: #FEFFED;
border: 1px solid #d4d4d1;
border-radius: 10px 10px 5px 5px;
margin: 30px auto;
padding-bottom: 0;
text-align: center;
}
ul.info {
text-align: left;
margin: 20px auto;
}
ul.info li {
margin: 0 auto;
font-size: 18px;
}
li.index_info{
width: 50%;
text-align: left;
font-weight: bold;
}
ul.tab-info {
text-align: left;
}
ul.tab-info li.val {
float: right;
margin-right: 25%;
}
li.index {
font-weight: bold;
margin-left: 15%;
}
div#tabs-container {
margin: 0 5px;
border: 1px solid #d4d4d1;
background: #fff;
padding-top: 10px;
margin-bottom: 5px;
}
.user_info h3 {
background-color: #FEFFED;
text-align: center;
padding: 15px;
margin-top: 0;
border-bottom: 1px solid #d4d4d1;
border-radius: 10px 10px 0 0;
}
.tabs-menu {
height: 30px;
float: left;
clear: both;
margin-left: 20px;
}
.tabs-menu li {
height: 30px;
line-height: 30px;
float: left;
background-color: #FFBC00;
border: 1px solid #d4d4d1;
}
.tabs-menu li.current {
position: relative;
background-color: #fff;
z-index: 5;
}
ul.tab-info li {
padding: 5px;
font-size: 16px;
}
.tabs-menu li a {
padding: 10px;
text-transform: uppercase;
color: #fff;
text-decoration: none;
}
.tabs-menu .current a {
color: #2e7da3;
}
.tab {
background-color: #fff;
margin-bottom: 5px;
width: auto;
}
.tab-content {
text-align: center;
padding: 20px;
display: none;
}
ul.tabs-menu {
width: 100%;
margin-top: 20px;
}
#tab-1 {
display: block;
}
h2.msg_history{
text-align:center;
margin-top: -10px;
margin-bottom: 0;
padding: 15px;
margin-left: -120px;
background: none;
}
@media only screen and (max-width:767px){
.tabs-menu {
margin-left: 15%;
height:auto;
}
.tabs-menu li {
width: 150px;
clear: both;
}
div.user_info {
width: 350px;
}
.tab {
margin: 0 10px;
}
li.val {
float: right;
margin-right: 45px;
}
ul.tab-info {
text-align: left;
}
ul.info li{
margin-bottom: 10px;
}
ul.info li.val {
margin-right: 15%;
}
li.index {
margin-left:0;
}
}
Run the script and have fun!!!
Conclusion:
Using this script you can easily get all the information of sender using Mandrill API Key. Must try the script and post your feedback from the space given below.
Recommended blogs –