

Adding more to our features, We have now launched Zapier integration with MailGet.
Connect the apps you use, automate tasks, get more out of your data. When you integrate your Zapier account with MailGet you can use Zaps to connect any app with MailGet which is supported by Zapier. If any entry have email id in your app account will automatically be added to your MailGet email list to allow emailing from MailGet.
Here are the simple steps to follow for integrating Zapier with MailGet.
Step 1 : Login to your Zapier Account.
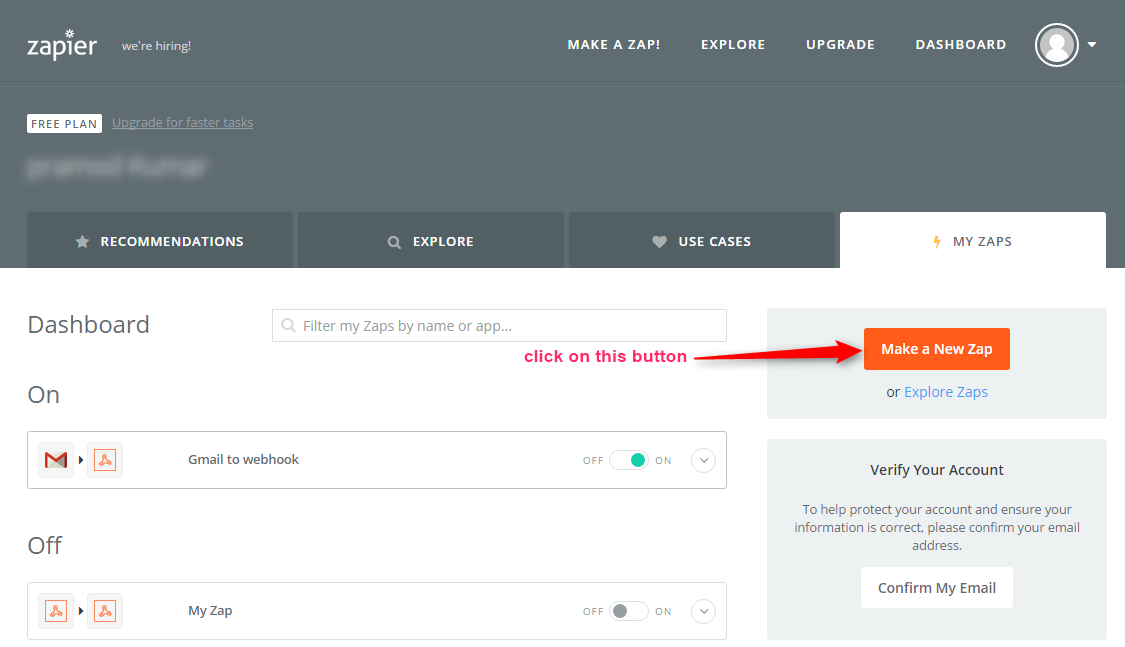
Step 2 : After login you have to click on “Make A New ZAP” button from Zapier dashboard.
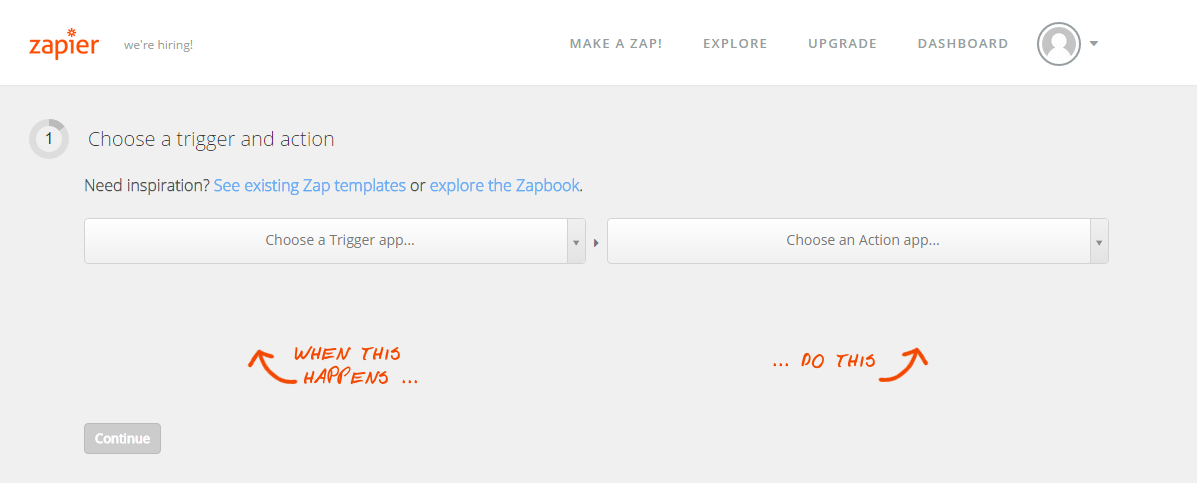
Step 3 : Now you have to choose trigger and action.
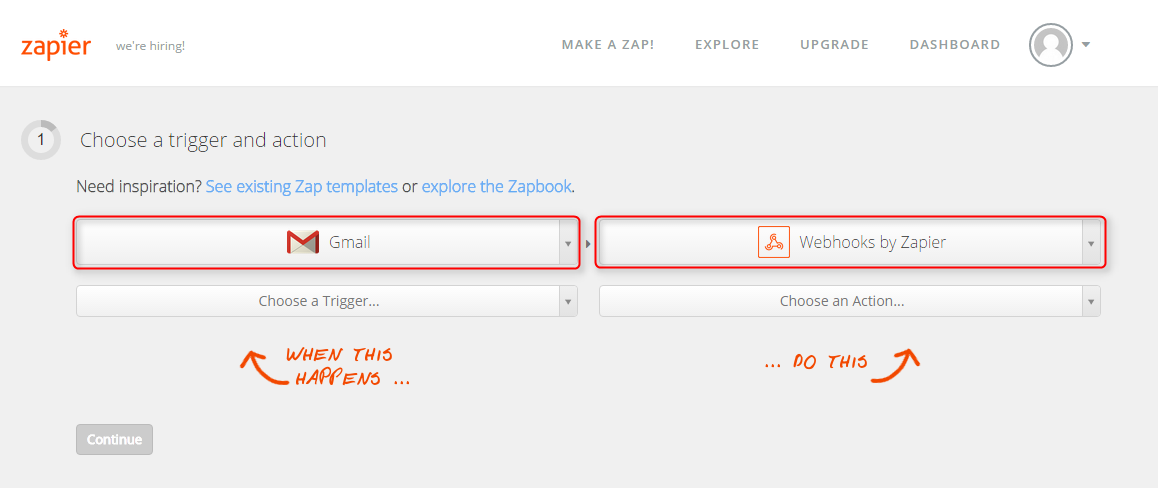
Step 4 : Select “Gmail” in Trigger option and “Webhooks by Zapier” in Action.
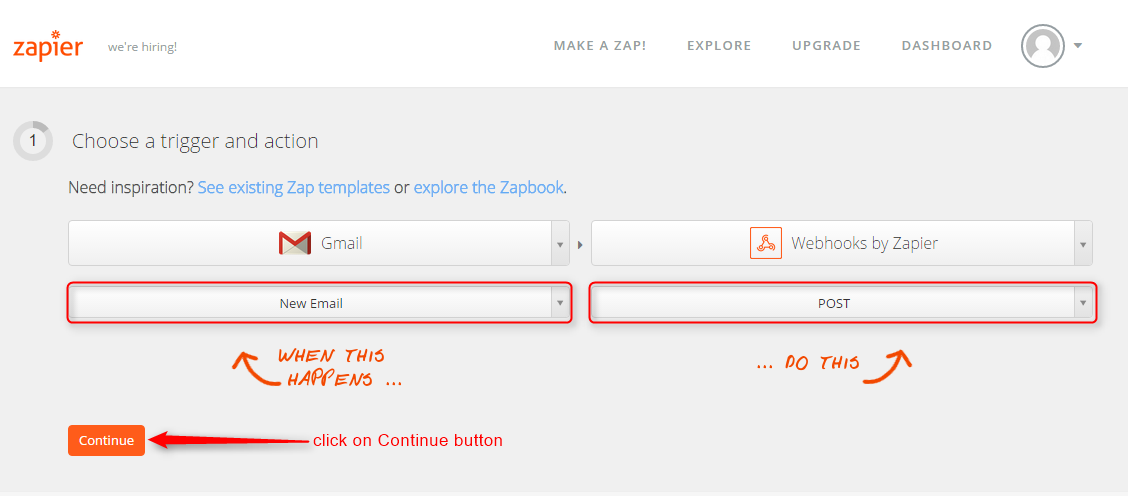
Step 5 : Select “New Email” in Trigger option and “POST” in Action then click on “Continue” button.
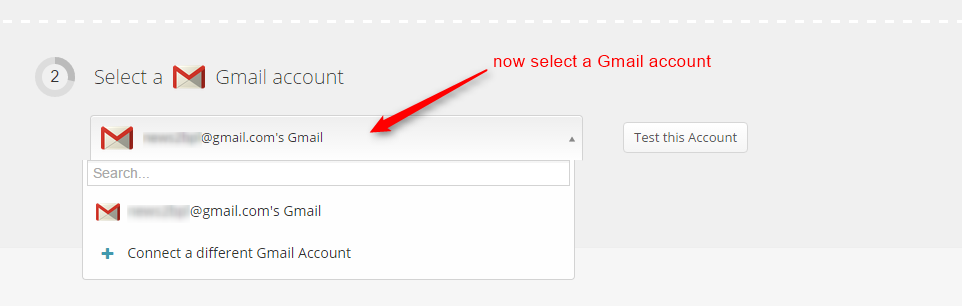
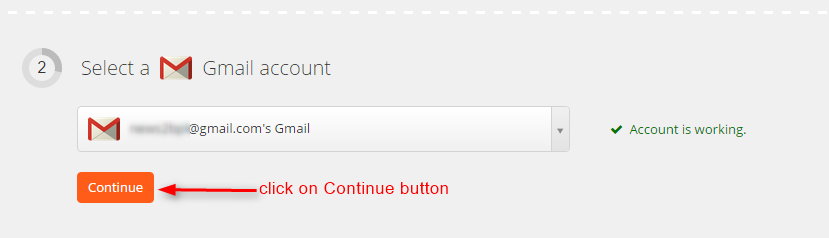
Step 6 : Now select a Gmail account then it will check for your Gmail account if it is working then “Account is working” message will shown. Now click on “Continue” button.
Step 7 : Now you have to select a Webhook by Zapier account for it click on “Continue” button.

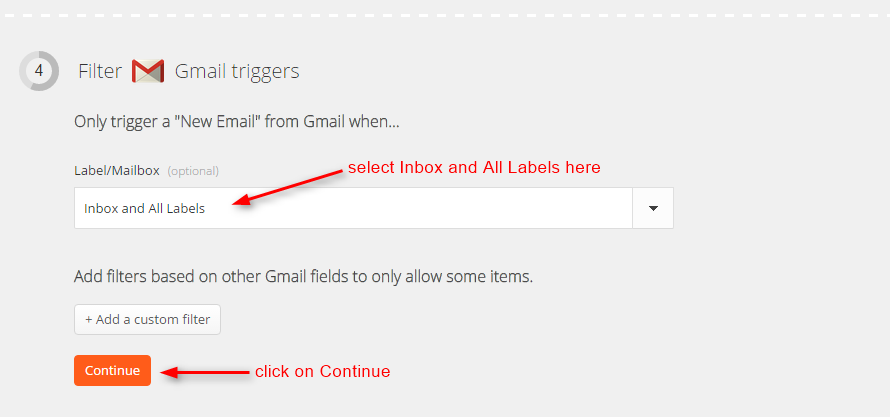
Step 8 : Now select “Inbox and All Labels” in Label/Mailbox, then click on “Continue” button.
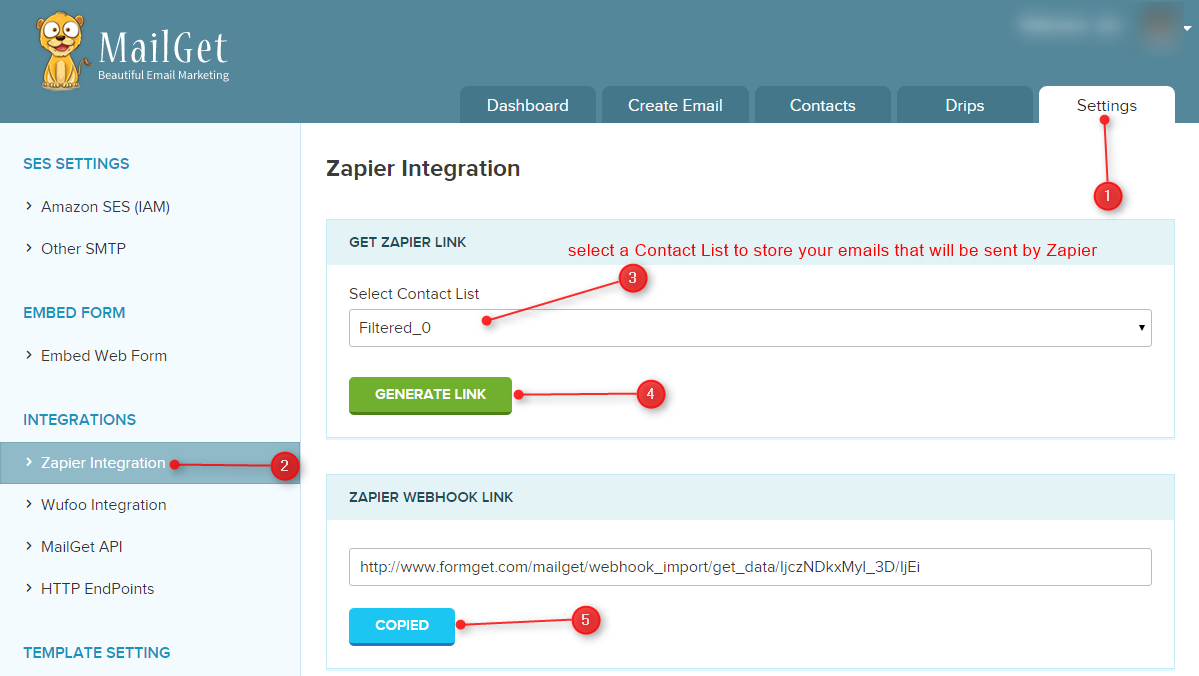
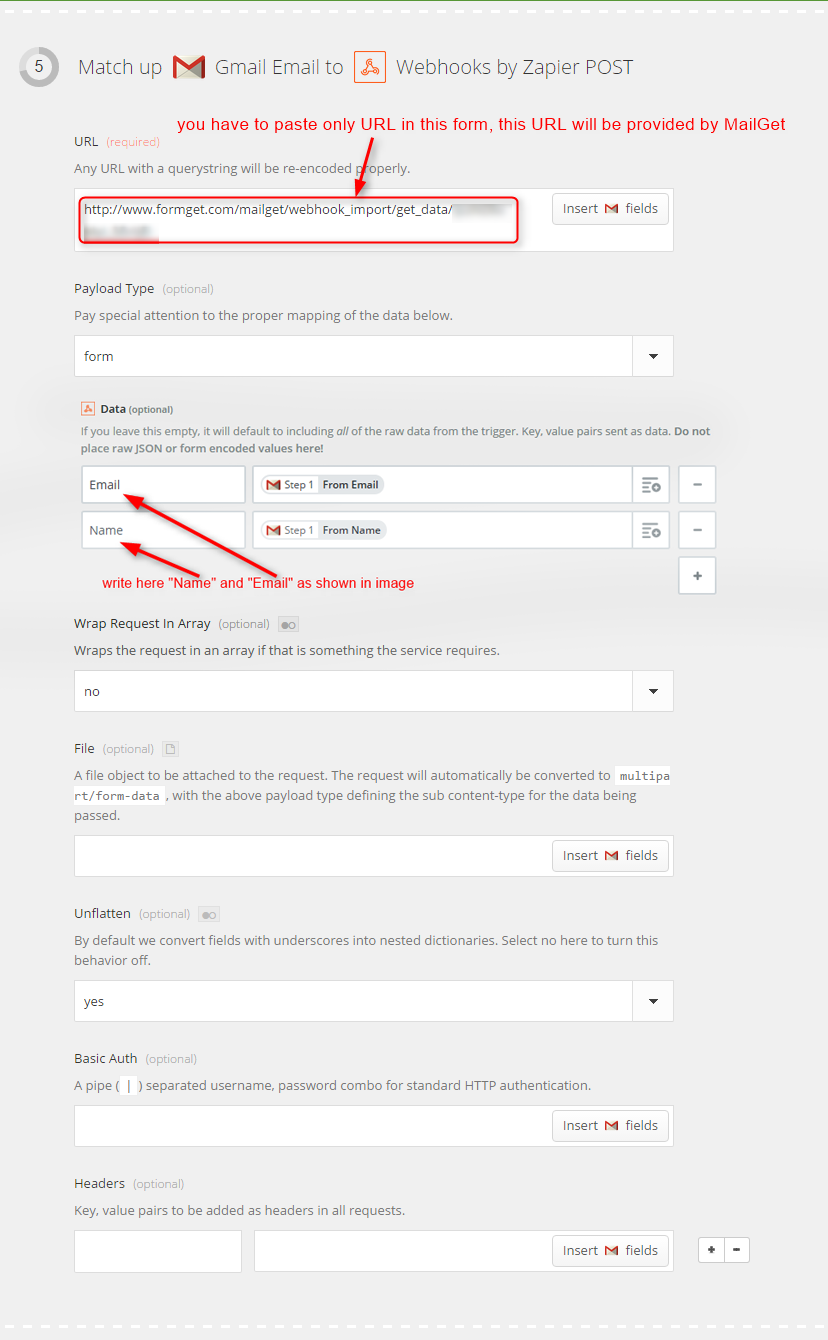
Step 9 : Now a form will open, you have to just paste the “URL” in URL field. That URL will be provided by MailGet. Click here to get the URL. In this documentation we have selected “Filtered_0” Contact list.
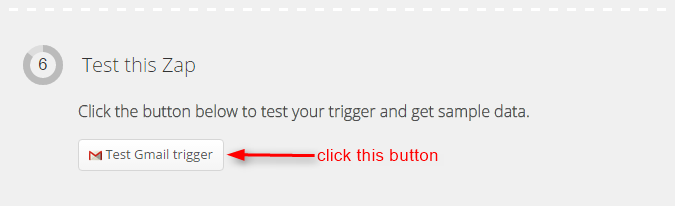
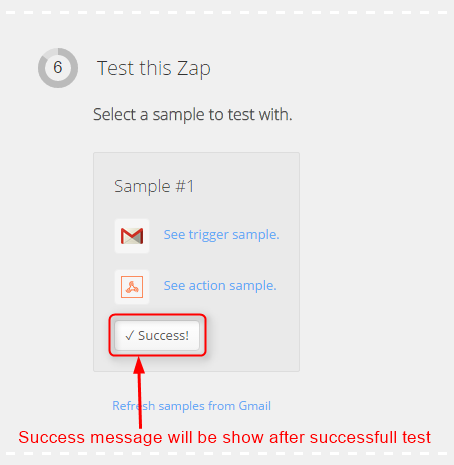
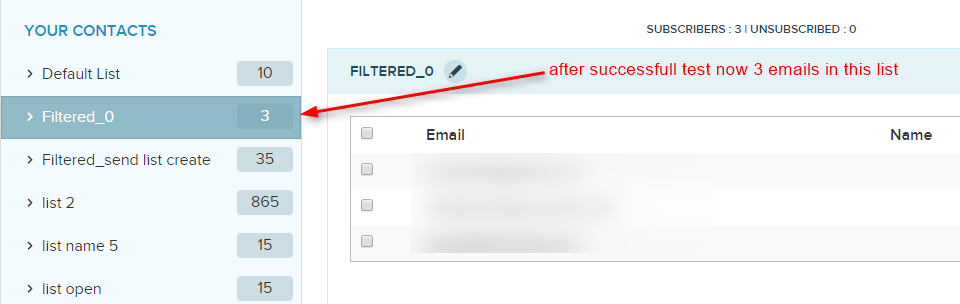
 Step 10 : Now you can test this Zap, just click on “Test Gmail trigger“. Before test “Filtered_0” Contact list have 0 contact.
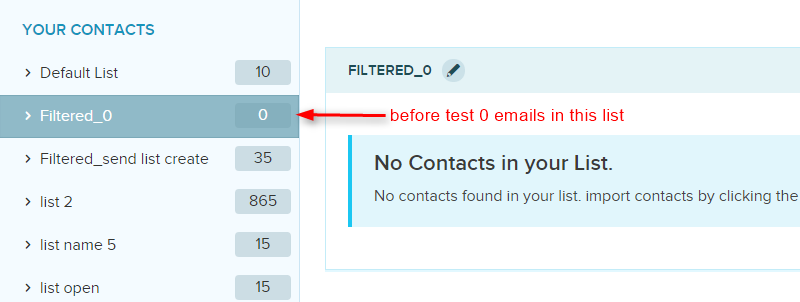
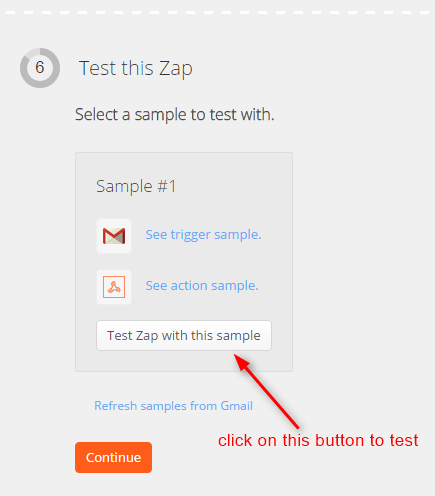
Step 11 : Click on “Test Zap with this sample” button to test it.
Step 12 : After successfully test a “Success” message will show and no. of contacts are increased in “Filtered_0” Contact list of MailGet Account.
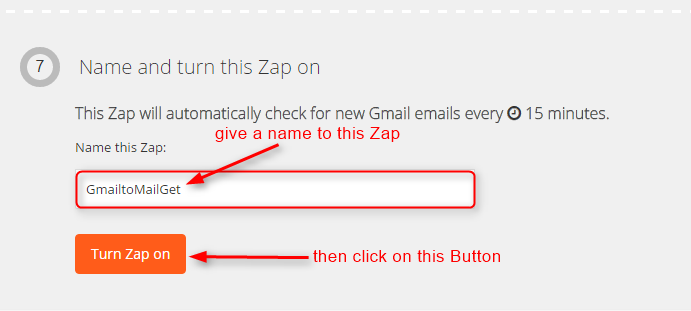
Step 13 : Give a name to this Zap and Turn on this Zap.
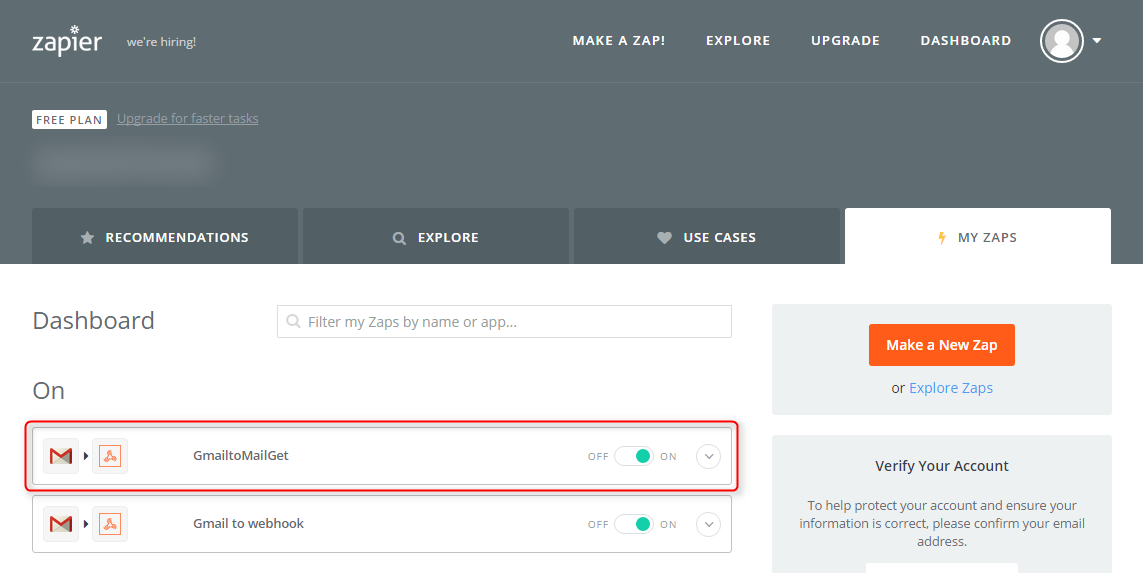
Now newly created Zap “GmailtoMailGet” will be “ON” in your Zapier dashboard.
Now your MailGet Contact list will always synchronized with Zapier account. Enjoy email marketing with MailGet 🙂
Send Email Via Mailgun API Using PHP

Stunning.! sending Emails in just a few steps.
Amazing to see.!
How to configure Mailgun API in your web application and send Email through it.
Mailgun: – Mailgun is an Email automation service. It has a very powerful sets of inbuilt functions for sending, tracking or receiving emails. Developers can process their email with the help of Mailgun API.
As sending Email is a very time-consuming process. So, using MailGun API, for sending Email, can save user’s time.
Watch the live demo or download code from the link given below

MailGet is an online Email Marketing Sevice which allow you integrate various API/SMTP servers to send emails in bulk.
To use Mailgun API, you need to embed it in your project. Follow the steps given below:
- Download Composer and install from this link –> click here.
- Open cmd prompt as administrator.
- Through cd command goto your project folder.
 C:> cd  C:xampphtdocsyour-project-folder

e.g C:xampphtdocsyour-project-folder>- Run the command below :
c:xampphtdocsyour-project-folder> composer require mailgun/mailgun-php:~1.7.2 Now, Your application is ready to use Mailgun API.
Steps to send email: –
- At the top of your script main file include mailgun.php, as shown below
 require 'vendor/autoload.php';
use MailgunMailgun; - Create an object of Mailgun through API key.
$mgClient = new Mailgun('<-- API KEY -->'); - In the domain information page, you will get “default SMTP login”. Copy string after @ symbol and initialize your domain variable with this string.
- Finally, send Email by calling sendMessage() method of Mailgun object with parameters such as, domain, sender, receiver, subject, text, HTML etc.
Tutorial Scripts in detail
The code used in the script with proper explanation are listed below .
index.php
This is the main program file. We have configured Mailgun API in this file and accessed its features, like creating object of Mailgun, to sent mail with the help of sendMessage() method.
<?php
//composer require mailgun/mailgun-php:~1.7.2
# Include the Autoloader (see "Libraries" for install instructions)
require 'vendor/autoload.php';
use MailgunMailgun;
?>
<html>
<head>
<title>
Send Email via Mailgun API Using PHP
</title>
<meta name="viewport" content="width=device-width, initial-scale=1.0">
<script src="js/jquery-1.11.3.min.js" type="text/javascript"></script>
<script src="js/bootstrap.js" type="text/javascript"></script>
<link href="css/bootstrap.css" rel="stylesheet" type="text/css"/>
<link href="css/style.css" rel="stylesheet" type="text/css"/>
</head>
<body>
<div class="container">
<div class="row">
<div class="col-md-12">
<div id="main">
<h1>Send Email via Mailgun API Using PHP</h1>
</div>
</div>
<div class="col-md-12">
<div class="matter">
<div id="login">
<h2>Send Email</h2>
<form action="index.php" method="post">
<label class="lab">Sender's Name :</label>
<input type="text" name="sname" id="to" placeholder="Senders Name"/>
<label class="lab">Receiver's Email Address :</label>
<input type="email" name="to" id="to" placeholder="Receiver's email address" />
<label class="lab">Email type:</label><div class="clr"></div>
<div class="lab">
<input type="radio" value="def" name="etype" checked>Default
<input type="radio" value="cc" name="etype" >cc
<input type="radio" value="bcc" name="etype" >bcc </div>
<div class="clr"></div>
<label class="lab">Subject :</label>
<input type="text" name="subject" id="subject" placeholder="subject" required />
<label class="lab">Message body :</label><div class="clr"></div>
<div class="lab">
<input type="radio" value="text" name="msgtype" checked>Text
<input type="radio" value="html" name="msgtype" >HTML</div>
<textarea type="text" name="msg" id="msg" placeholder="Enter your message here.." required ></textarea>
<input type="submit" value=" Send " name="submit"/>
</form>
</div>
</div>
</div>
</div>
<!-- Right side div -->
</div>
</body>
</html>
<?php
if (isset($_POST['sname'])) {
$sname=$_POST['sname'];
$to = $_POST['to'];
$subject = $_POST['subject'];
$msg = $_POST['msg'];
$msgtype = $_POST['msgtype'];
if($msgtype=='text'){
$html='';
}
else{
$msg = htmlentities($msg);
$html=$msg;
$msg='';
}
$mgClient = new Mailgun('<-- API KEY -->');
// Enter domain which you find in Default Password
$domain = "<-- DEFAULT SMTP LOGIN DOMAIN -->";

# Make the call to the client.
$result = $mgClient->sendMessage($domain, array(
"from" => "$sname <mailgun@<--DEFAULT SMTP LOGIN DOMAIN-->>",
"to" => "Baz <$to>",
"subject" => "$subject",
"text" => "$msg!",
'html' => "$html"
));
echo "<script>alert('Email Sent Successfully.. !!');</script>";
}
?>
Style.css
Includes all basic styling of HTML elements.
@import url(http://fonts.googleapis.com/css?family=Raleway);

#main{
margin:50px auto;
font-family:raleway;
}
h2{
font-weight: 600;
background-color: #FEFFED;
text-align:center;
border-radius: 10px 10px 0 0;
margin: -10px -40px;
padding: 15px;
}
#login{
width:40%;;
margin:0 auto;
display:inline-block;border-radius: 10px;
font-family:raleway;
border: 2px solid #ccc;
padding: 10px 40px 25px;
}
textarea{
margin-top: 8px;
font-size: 16px;
font-family:raleway;
}
input[type=radio]{
margin-top: 8px;
}
input[type=text],[type=email],input[type=password]{
width:99.5%;
padding: 10px;
margin-top: 8px;
border: 1px solid #ccc;
padding-left: 5px;
font-size: 16px;
font-family:raleway;
}
input[type=submit]{
width: 100%;
background-color:#FFBC00;
color: white;
border: 2px solid #FFCB00;
padding: 10px;
font-size:20px;
cursor:pointer;
border-radius: 5px;
margin-bottom: 15px;
}
a{
text-decoration:none;
color: cornflowerblue;
}
i{
color: cornflowerblue;
}
h1{
font-weight: 600;
text-align: center;
display:inlne;
alignment-adjust: center;
margin:0 auto;
width:100%;
}
textarea[type=text]{
width:100%;
height:200px;
}
.matter{
alignment-adjust: central;
margin:0 auto;
text-align: center;
}
.clr{
clear:left;
}
.lab{
font-size: 110%;
float:left;
}
@media screen and (max-width: 800px) {
#login{
width:330px;
}
}
Conclusion :
Hope this tutorial will help you to integrate MailGun API in your application and send email. Must try the script and send us your feedback from the space given below.
Get Sender’s Email List Using Mandrill API Key

In this tutorial, we will learn to find the email address of all users who sent emails using Mandrill API Key.
We will tell you about email list management by generating a list of email address of the senders who used a Mandrill Key to send the email to another user. The generated list can be download as exported CSV file.
For this, we will require a valid Mandrill API key.
Note: – If you don’t have any Mandrill API Key, don’t worry. Just follow the tutorial link Steps to Generate Mandrill API Key. We have explained all the steps in a very simple way so that anyone can generate Mandrill API Key easily.
The mandrill key will be passed to the Mandrill library file using the code given below, which will provide the detailed information about the sender.
//Pass user provided Mandrill API key to Mandrill library
$mandrill = new Mandrill($key);

//Get Mandrill API-Used Sender's Info
$result = $mandrill->senders->getList();
The email address of senders will then retrieved from the details and processed further to create an exported CSV file.
Watch the live demo or download code from the link given below

MailGet – email service provider is a service through which you can send bulk and drip emails. It also provide a dashboard for easy mailing list management.
Let’s have a detailed look at the whole process.
1> Download the latest Mandrill library .zip folder.
2> Create lib folder in the root folder of your project. Now, extract the Mandrill library folder, copy & paste all the files available in the src folder of extracted zip folder into lib folder.
3> Similarly, create js and css folder. Download and insert latest jQuery.js and Bootstrap.css file in it.
4> Create index.php file in the root folder and paste the PHP code given below in it.
index.php
Provide a form to enter a Mandrill API Key. Send the entered API key to Mandrill library file and generate the email list from the returned sender’s details.
Also, send the email lists to CSVDownload.php file to generate downloaded CSV file.
<html>
<head>
<meta http-equiv="Content-Type" content="text/html; charset=windows-1252">
<title>Get sender's Email List Using Mandrill API Key</title>
<link rel="stylesheet" type="text/css" href="css/style.css"/>
<link rel="stylesheet" type="text/css" href="css/bootstrap.css"/>
<script src="js/jquery.js"></script>
</head>
<body>
<?php
//include Mandrill library file
include ("lib/Mandrill.php");
$error_msg = "";
$lists = "";
?>
<div class="container">
<div class="row">
<div id="main">
<h1>Get sender's Email List Using Mandrill API Key</h1>
<div id="login">
<h2>Search Box</h2>
<hr>
<form action="" method="POST">
<label>Mandrill API-Key : </label> <input type="text" name="mandrill_api_key" class="mandrill-api-key" placeholder="Enter Mandrill API Key"/>
<input type="submit" value="Get Sender's Email" id="submit"/>
<span></span>
</form>
</div>
<?php
if (isset($_POST['mandrill_api_key'])) {
$key = $_POST['mandrill_api_key'];

//Pass user provided Mandrill API key to Mandrill library
$mandrill = new Mandrill($key);

//Get Mandrill API-Used Sender's Info
$result = $mandrill->senders->getList();

if (isset($result['message'])) {
$error_msg = $result['message'];
echo "<script>alert('" . $error_msg . "');</script>";
} else {
?>
<div class="result" class="col-xs-10 col-md-6">
<!-- Result div start -->
<h1 class="res">Result</h1>
<div class="user_info">
<h3>Sender's Email Addresses</h3>
<ul class="info">
<?php
// Retrieving Sender's Email Address
$senLists = array();
$i = 1;
foreach ($result as $value) {
echo "<li class='index'>" . $i . "> " . $value['address'] . "</li><br/>";
$senLists[] = $value['address'];
$i++;
}
echo $lists;
$lists = json_encode($senLists);
?>
<!-- Download CSV Section -->
<form action="CSVDownload.php" method="post" >
<input type="hidden" name="lists" value="<?php echo htmlspecialchars($lists); ?>" />
<input type="submit" value="Export CSV" class="csv_download" />
</form>
</ul>
</div>
</div>
<!-- Result div End -->
<?php
}
}
?>
</div>
</div>
</div>
<script>
jQuery(document).ready(function() {
$("#submit").click(function(event) {
var Mandrillkey = jQuery('.mandrill-api-key').val();
if (Mandrillkey == "") {
event.preventDefault();
alert('Please insert Mandrill API Key!!!');
}
});
});
</script>
</body>
</html>
5> Create CSVDownload.php file and paste the following code in it.
CSVDownload.php
Generate exported CSV file from the email list send by index.php file.
<?php
$sen_lists = array();
$sen_lists = json_decode($_POST['lists']);
foreach ($sen_lists as $sen_emails) {
$res[][] = $sen_emails;
}
header("Content-type: text/csv");
header("Content-Disposition: attachment; filename=Sender's Lists.csv");
header("Pragma: no-cache");
header("Expires: 0");
$file = fopen('php://output', 'w');
fputcsv($file, array('Sender's Email Lists'));
if(!empty($res)){
foreach ($res as $row) {
fputcsv($file, $row);
}
}
exit();
?>
6> Create style.css file in CSS folder and paste the code given below in the file.
style.css
Includes basic styling of HTML elements.
@import url(http://fonts.googleapis.com/css?family=Raleway);

#main{
width:100%;
min-width: 320px;
margin:50px auto;
font-family:raleway;
}
h2{
background-color: #FEFFED;
text-align:center;
border-radius: 10px 10px 0 0;
margin: -10px -40px -20px !important;
padding: 15px;
}
hr{
border:0;
border-bottom:1px solid #ccc;
margin: 10px -40px;
margin-bottom: 30px;
}
ul{
text-decoration: none;
}
ul li{
display: inline-block;
}
#login{
width:300px;
border-radius: 10px;
font-family:raleway;
border: 2px solid #ccc;
padding: 10px 40px 25px;
margin: 70px auto 0 auto;
}
input[type=text]{
width:100%;
padding: 10px;
margin-top: 8px;
border: 1px solid #ccc;
padding-left: 5px;
font-size: 16px;
font-family:raleway;
margin-bottom: 15px;
}
input[type=submit]{
width: 100%;
background-color:#FFBC00;
color: white;
border: 2px solid #FFCB00;
padding: 10px;
font-size:20px;
cursor:pointer;
border-radius: 5px;
margin-bottom: 15px;
}
div#main h1 {
text-align: center;
}
h1.res {
margin-top: 51px;
}
div.user_info {
max-width: 400px;
position: relative;
border: 1px solid #d4d4d1;
border-radius: 10px 10px 5px 5px;
margin: 30px auto;
padding-bottom: 0;
text-align: center;
}
ul.info {
text-align: left;
margin-bottom: 60px;
}
.info li {
padding: 5px;
font-size: 18px;
}
li.index_info{
width: 50%;
text-align: left;
font-weight: bold;
}
li.index {
font-weight: bold;
}
.user_info h3 {
background-color: #FEFFED;
text-align: center;
padding: 15px;
margin-top: 0;
border-bottom: 1px solid #d4d4d1;
border-radius: 10px 10px 0 0;
}
input.csv_download {
width: 125px;
background: none;
border: none;
outline:none;
color: blue;
text-decoration: underline;
position: absolute;
font-size: 16px;
bottom: 0;
right: 0;
}
Run the script and enjoy!!!
Conclusion:
Hope you have enjoyed the script and understand the concept. Please send us your feedback from the space given below. We will be back soon with a new trick.
Get Postmark API-Connected User’s Statistics

In this blog, we are going to tell you how to fetch user details and Message statistics via Postmark API. We will fetch user details through API token.
I hope you already know to configure Postmark API into your application and also send mail through it.
Note: – If you have no idea about the configuration and sending Email process, you can read our previous article, send email via Postmark API and learn it easily.
Watch the live demo or download code from the link given below

We have introduced an online Email management service name MailGet. It supports multiple smtp configuration and also allows to manage your contacts, records properly and can send bulk emails easily using this service. This Email Marketing Analytics helps you to grow faster and provides better service for managing your emails.
Now, let’s learn how to send messages with tag name and track them through Postmark API.
To fetch user’s info via Postmark API, you need API token. Using API token, you can easily fetch user info.
Let’s have a look at the section of code given below which we have used in this post to fetch user’s information.
First we have created an object PostmarkAdminClient through API token and then call listSenderSignatures() method. When this method executes, it returns an object which contain the sender’s signature id.
Now with the help of signature id, you can fetch details about the user. Calling getSenderSignature() method through PostmarkAdminClient, you can easily receive full information of user in the form of object, e.g. Domain ,Email Address , Reply to Email Address , Name .. etc.
$adminClient = new PostmarkAdminClient("$apitoken");
$signatures = $adminClient->listSenderSignatures();
$x=1;
foreach($signatures->senderSignatures as $key=>$signature){
foreach($signature as $sig){
if($x==6){
$signatureid=$sig;
}
$x++;
}
}

$signatureloaded=array();
$signaturedetails = $adminClient->getSenderSignature($signatureid);

$x=1;
foreach($signaturedetails as $detail){
switch($x){
case 1:
$signatureloaded[0]=array("Domain",$detail);
break;
case 2:
$signatureloaded[1]=array("Email Address",$detail);
break;
case 3:
$signatureloaded[2]=array("Reply to Email Address",$detail);
break;
case 4:
$signatureloaded[3]=array("Name",$detail);
break;
case 5:
$signatureloaded[4]=array("Confirmed",$detail);
break;
case 6:
$signatureloaded[5]=array("SPF Verified",$detail);
break;
case 7:
$signatureloaded[6]=array("SPF host",$detail);
break;
case 8:
$signatureloaded[7]=array("SPF text value",$detail);
break;
case 9:
$signatureloaded[8]=array("DKIM verified",$detail);
break;
case 10:
$signatureloaded[9]=array("Weak DKIM",$detail);
break;
case 11:
$signatureloaded[10]=array("DKIM HOST",$detail);
break;
case 12:
$signatureloaded[11]=array("DKIM Text Value",$detail);
break;
case 13:
$signatureloaded[12]=array("DKIM Pending HOST",$detail);
break;
case 14:
$signatureloaded[13]=array("DKIM Pending Text Value",$detail);
break;
case 15:
$signatureloaded[14]=array("DKIM Revoked HOST",$detail);
break;
case 16:
$signatureloaded[15]=array("DKIM Revoked Text Value",$detail);
break;
case 17:
$signatureloaded[16]=array("Safe to remove revoked key for DNS",$detail);
break;
case 18:
$signatureloaded[17]=array("dkim update status",$detail);
break;
case 19:
$signatureloaded[18]=array("return path status",$detail);
break;
case 20:
$signatureloaded[19]=array("return path domain",$detail);
break;
case 21:
$signatureloaded[20]=array("return path domain verified",$detail);
break;
case 22:
$signatureloaded[21]=array("return path domain cname value",$detail);
break;
}
$x++;
}
Now, we have $signatureloaded array that holds all the info about the user. You can easily get all the information by passing the array through foreach loop.
Let’s have a look at the next part of the code which will explain you to fetch message statistics via Postmark API. For this, you need to send messages with tag name which will help you to fetch message stats.
Here is the code to send messages with tag :
try{
$client = new PostmarkClient("<-- Server API Token -->");
$message = [
'To' => "<-- Receiver's Email Address -->",
'From' => "<-- Sender's Email Address -->",
'TrackOpens' => true,
'Subject' => "<-- Subject -->",
'TextBody' => "<-- This body is not plain someting is written inside this message -->",
'HtmlBody' => "<-- HTML Messages -->",
'Tag' => "<-- Tag -->",
'Headers' => [ "X-CUSTOM-HEADER" => "Header content"],

];
$sendResult = $client->sendEmailBatch([$message]);
}catch(PostmarkException $ex){
// If client is able to communicate with the API in a timely fashion,
// but the message data is invalid, or there's a server error,
// a PostmarkException can be thrown.
echo $ex->httpStatusCode;
echo $ex->message;
echo $ex->postmarkApiErrorCode;

}catch(Exception $generalException){
// A general exception is thown if the API
// was unreachable or times out.
}
After sending messages with tag name, now we will fetch sent message details.
Create an object of PostmarkClient and then call getOutboundOverviewStatics() menthod having following parameters:
- message tag – The tagname you gave in the message . we will track messages with this tag name .
- date from – date that you want stats of message from, use YYYY-MM-DD format, e.g – 2022-01-01.
- date upto – date that you want message stats upto, user YYYY-MM-DD format.
 $client = new PostmarkClient("$serverapitoken");
$statsall = $client->getOutboundOverviewStatistics("message tag", "date from ", "date upto ");
Tutorial Scripts in detail
Below are proper explanation of the code used in this tutorial.
index.php
Using this Php file, we connect to Postmark API and fetch user’s info and message statistics .
<?php
require_once('./vendor/autoload.php');
use PostmarkModelsPostmarkAttachment;
use PostmarkPostmarkAdminClient;
use PostmarkPostmarkClient;
use PostmarkModelsPostmarkException;
ini_set('max_execution_time', 1500);
?>
<html>
<head>
<meta name="viewport" content="width=device-width, initial-scale=1.0">
<script src="js/jquery-1.11.3.min.js" type="text/javascript"></script>
<script src="js/bootstrap.js" type="text/javascript"></script>
<link href="css/bootstrap.css" rel="stylesheet" type="text/css"/>
<link href="css/style.css" rel="stylesheet" type="text/css"/>
<title>Get User Statistics via Postmark API</title>
<script type="text/javascript">

$(document).ready(function() {
$("a#demo_key").click(function() {
var key = "xxxxxxxxxxx";
$("input.postmark-api-key").val(key);
});
});
</script>
</head>
<body>
<div class="container">
<div class="col-md-12">
<div id="main">
<h1>Get Postmark API-Connected User's Statistics </h1>
<div id="login">
<h2>Postmark User's Info Search Box</h2>
<form action="" method="POST">
<label>API Token : </label> <input type="text" name="postmark_api_token" class="postmark-api-key" placeholder="API TOKEN"/>
<label>Server API token : </label> <input type="text" name="postmark_server_api_token" class="postmark-api-key" placeholder="Server API token
"/><a id="demo_key" href="#">Use Demo Server Key</a>
<input type="submit" value="Search" id="submit"/>
</form>
</div>
<?php
if (isset($_POST['postmark_api_token'])) {
$apitoken = $_POST['postmark_api_token'];
if ($apitoken = "xxxxxxxxxxx") {
$apitoken = "<--INSERT API TOKEN HERE-->";
}
$serverapitoken = $_POST['postmark_server_api_token'];
if ($serverapitoken = "xxxxxxxxxxx") {
$serverapitoken = "<--INSERT SERVER API TOKEN HERE-->";
}
$adminClient = new PostmarkAdminClient("$apitoken");
$signatures = $adminClient->listSenderSignatures();
$x = 1;
foreach ($signatures->senderSignatures as $key => $signature) {
foreach ($signature as $sig) {
if ($x == 6) {
$signatureid = $sig;
}
$x++;
}
}
$signatureloaded = array();
$signaturedetails = $adminClient->getSenderSignature($signatureid);
$x = 1;
foreach ($signaturedetails as $detail) {
switch ($x) {
case 1:
$signatureloaded[0] = array("Domain", $detail);
break;
case 2:
$signatureloaded[1] = array("Email Address", $detail);
break;
case 3:
$signatureloaded[2] = array("Reply to Email Address", $detail);
break;
case 4:
$signatureloaded[3] = array("Name", $detail);
break;
case 5:
$signatureloaded[4] = array("Confirmed", $detail);
break;
case 6:
$signatureloaded[5] = array("SPF Verified", $detail);
break;
case 7:
$signatureloaded[6] = array("SPF host", $detail);
break;
case 8:
$signatureloaded[7] = array("SPF text value", $detail);
break;
case 9:
$signatureloaded[8] = array("DKIM verified", $detail);
break;
case 10:
$signatureloaded[9] = array("Weak DKIM", $detail);
break;
case 11:
$signatureloaded[10] = array("DKIM HOST", $detail);
break;
case 12:
$signatureloaded[11] = array("DKIM Text Value", $detail);
break;
case 13:
$signatureloaded[12] = array("DKIM Pending HOST", $detail);
break;
case 14:
$signatureloaded[13] = array("DKIM Pending Text Value", $detail);
break;
case 15:
$signatureloaded[14] = array("DKIM Revoked HOST", $detail);
break;
case 16:
$signatureloaded[15] = array("DKIM Revoked Text Value", $detail);
break;
case 17:
$signatureloaded[16] = array("Safe to remove revoked key for DNS", $detail);
break;
case 18:
$signatureloaded[17] = array("dkim update status", $detail);
break;
case 19:
$signatureloaded[18] = array("return path status", $detail);
break;
case 20:
$signatureloaded[19] = array("return path domain", $detail);
break;
case 21:
$signatureloaded[20] = array("return path domain verified", $detail);
break;
case 22:
$signatureloaded[21] = array("return path domain cname value", $detail);
break;
}
$x++;
}
?>

<!-- Result div start -->
<div class="result">
<h1 class="res">Result</h1>
<div class="user_info">
<ul class="info">
<?php
$x = 0;
foreach ($signatureloaded as $s) {
if ($x == 0 || $x < 5) {
echo "<div class='row'><li class='index_info'> $s[0] </li><li class='val'> : $s[1] </li></div>";
} else {
echo "<div class='row'><li class='index_info'> $s[0] </li><li class='val'> : XxXx----xxxxx----XxXx </li></div>";
}
$x++;
}
?>
</ul>
<div id="tabs-container">
<center><ul class="tabs-menu">
<h2 class="msg_history">Message History</h2>
<li class="current z"><a href="#tab-1">Today</a></li>
<li class="z" style="padding:0px;"><a href="#tab-2">Last 7 day's</a></li>
<li class="z" style="padding:0px;"><a href="#tab-3">Last 30 day's</a></li>
<li class="z" style="padding:0px;"><a href="#tab-4">Last 60 day's</a></li>
<li class="z" style="padding:0px;"><a href="#tab-5">Last 90 day's</a></li>
<li class="z" style="padding:0px;"><a href="#tab-6">All</a></li>
</ul></center>
<div class="tab">
<div id="tab-1" class="tab-content">
<ul class="tab-info">
<?php
$year = date('Y');
$month = date('m');
$day = date('d');
$today = "$year-$month-$day";
$client = new PostmarkClient("$serverapitoken");
$statsall = $client->getOutboundOverviewStatistics("tag1", "$year-$month-$day", "$today");
$stats = array();
$x = 1;
foreach ($statsall as $finalstatsall) {
switch ($x) {
case 1:
$stats[0] = array("sent", $finalstatsall);
break;
case 2:
$stats[1] = array("bounced", $finalstatsall);
break;
case 3:
$stats[2] = array("smtpapierrors", $finalstatsall);
break;
case 4:
$stats[3] = array("bouncerate", $finalstatsall);
break;
case 5:
$stats[4] = array("spamcomplaints", $finalstatsall);
break;
case 6:
$stats[5] = array("spamcomplaintsrate", $finalstatsall);
break;
case 7:
$stats[6] = array("tracked", $finalstatsall);
break;
case 8:
$stats[7] = array("opens", $finalstatsall);
break;
case 9:
$stats[8] = array("uniqueopens", $finalstatsall);
break;
case 10:
$stats[9] = array("withclientrecorded", $finalstatsall);
break;
case 11:
$stats[10] = array("withplatformrecorded", $finalstatsall);
break;
case 12:
$stats[11] = array("withreadtimerecorded", $finalstatsall);
break;
}
$x++;
}

foreach ($stats as $statistics) {
echo "<li class='index'>" . $statistics[0] . "</li><li class='val'> : " . $statistics[1] . "</li><br/>";
}
?>
</ul>
</div>
<div id="tab-2" class="tab-content">
<ul class="tab-info">
<?php
$year = date('Y');
$month = date('m');
$day = date('d');
$today = "$year-$month-$day";
$datetoday = date_create("$year-$month-$day");
date_sub($datetoday, date_interval_create_from_date_string("7 days"));
$d = date_format($datetoday, "Y-m-d");
$datt = explode("-", $d);
$year = $datt[0];
$month = $datt[1];
$day = $datt[2];
$client = new PostmarkClient("$serverapitoken");
$statsall = $client->getOutboundOverviewStatistics("tag1", "$year-$month-$day", "$today");
$stats = array();
$x = 1;
foreach ($statsall as $finalstatsall) {
switch ($x) {
case 1:
$stats[0] = array("sent", $finalstatsall);
break;
case 2:
$stats[1] = array("bounced", $finalstatsall);
break;
case 3:
$stats[2] = array("smtpapierrors", $finalstatsall);
break;
case 4:
$stats[3] = array("bouncerate", $finalstatsall);
break;
case 5:
$stats[4] = array("spamcomplaints", $finalstatsall);
break;
case 6:
$stats[5] = array("spamcomplaintsrate", $finalstatsall);
break;
case 7:
$stats[6] = array("tracked", $finalstatsall);
break;
case 8:
$stats[7] = array("opens", $finalstatsall);
break;
case 9:
$stats[8] = array("uniqueopens", $finalstatsall);
break;
case 10:
$stats[9] = array("withclientrecorded", $finalstatsall);
break;
case 11:
$stats[10] = array("withplatformrecorded", $finalstatsall);
break;
case 12:
$stats[11] = array("withreadtimerecorded", $finalstatsall);
break;
}
$x++;
}

foreach ($stats as $statistics) {
echo "<li class='index'>" . $statistics[0] . "</li><li class='val'> : " . $statistics[1] . "</li><br/>";
}
?>
</ul>
</div>
<div id="tab-3" class="tab-content">
<ul class="tab-info">
<?php
$year = date('Y');
$month = date('m');
$day = date('d');
$today = "$year-$month-$day";
$datetoday = date_create("$year-$month-$day");
date_sub($datetoday, date_interval_create_from_date_string("30 days"));
$d = date_format($datetoday, "Y-m-d");
$datt = explode("-", $d);
$year = $datt[0];
$month = $datt[1];
$day = $datt[2];
$client = new PostmarkClient("$serverapitoken");
$statsall = $client->getOutboundOverviewStatistics("tag1", "$year-$month-$day", "$today");
$stats = array();
$x = 1;
foreach ($statsall as $finalstatsall) {
switch ($x) {
case 1:
$stats[0] = array("sent", $finalstatsall);
break;
case 2:
$stats[1] = array("bounced", $finalstatsall);
break;
case 3:
$stats[2] = array("smtpapierrors", $finalstatsall);
break;
case 4:
$stats[3] = array("bouncerate", $finalstatsall);
break;
case 5:
$stats[4] = array("spamcomplaints", $finalstatsall);
break;
case 6:
$stats[5] = array("spamcomplaintsrate", $finalstatsall);
break;
case 7:
$stats[6] = array("tracked", $finalstatsall);
break;
case 8:
$stats[7] = array("opens", $finalstatsall);
break;
case 9:
$stats[8] = array("uniqueopens", $finalstatsall);
break;
case 10:
$stats[9] = array("withclientrecorded", $finalstatsall);
break;
case 11:
$stats[10] = array("withplatformrecorded", $finalstatsall);
break;
case 12:
$stats[11] = array("withreadtimerecorded", $finalstatsall);
break;
}
$x++;
}

foreach ($stats as $statistics) {
echo "<li class='index'>" . $statistics[0] . "</li><li class='val'> : " . $statistics[1] . "</li><br/>";
}
?>
</ul>
</div>
<div id="tab-4" class="tab-content">
<ul class="tab-info">
<?php
$year = date('Y');
$month = date('m');
$day = date('d');
$today = "$year-$month-$day";
$datetoday = date_create("$year-$month-$day");
date_sub($datetoday, date_interval_create_from_date_string("60 days"));
$d = date_format($datetoday, "Y-m-d");
$datt = explode("-", $d);
$year = $datt[0];
$month = $datt[1];
$day = $datt[2];
$client = new PostmarkClient("$serverapitoken");
$statsall = $client->getOutboundOverviewStatistics("tag1", "$year-$month-$day", "$today");
$stats = array();
$x = 1;
foreach ($statsall as $finalstatsall) {
switch ($x) {
case 1:
$stats[0] = array("sent", $finalstatsall);
break;
case 2:
$stats[1] = array("bounced", $finalstatsall);
break;
case 3:
$stats[2] = array("smtpapierrors", $finalstatsall);
break;
case 4:
$stats[3] = array("bouncerate", $finalstatsall);
break;
case 5:
$stats[4] = array("spamcomplaints", $finalstatsall);
break;
case 6:
$stats[5] = array("spamcomplaintsrate", $finalstatsall);
break;
case 7:
$stats[6] = array("tracked", $finalstatsall);
break;
case 8:
$stats[7] = array("opens", $finalstatsall);
break;
case 9:
$stats[8] = array("uniqueopens", $finalstatsall);
break;
case 10:
$stats[9] = array("withclientrecorded", $finalstatsall);
break;
case 11:
$stats[10] = array("withplatformrecorded", $finalstatsall);
break;
case 12:
$stats[11] = array("withreadtimerecorded", $finalstatsall);
break;
}
$x++;
}
foreach ($stats as $statistics) {
echo "<li class='index'>" . $statistics[0] . "</li><li class='val'> : " . $statistics[1] . "</li><br/>";
}
?>
</ul>
</div>
<div id="tab-5" class="tab-content">
<ul class="tab-info">
<?php
$year = date('Y');
$month = date('m');
$day = date('d');
$today = "$year-$month-$day";
$datetoday = date_create("$year-$month-$day");
date_sub($datetoday, date_interval_create_from_date_string("90 days"));
$d = date_format($datetoday, "Y-m-d");
$datt = explode("-", $d);
$year = $datt[0];
$month = $datt[1];
$day = $datt[2];
$client = new PostmarkClient("$serverapitoken");
$statsall = $client->getOutboundOverviewStatistics("tag1", "$year-$month-$day", "$today");
$stats = array();
$x = 1;
foreach ($statsall as $finalstatsall) {
switch ($x) {
case 1:
$stats[0] = array("sent", $finalstatsall);
break;
case 2:
$stats[1] = array("bounced", $finalstatsall);
break;
case 3:
$stats[2] = array("smtpapierrors", $finalstatsall);
break;
case 4:
$stats[3] = array("bouncerate", $finalstatsall);
break;
case 5:
$stats[4] = array("spamcomplaints", $finalstatsall);
break;
case 6:
$stats[5] = array("spamcomplaintsrate", $finalstatsall);
break;
case 7:
$stats[6] = array("tracked", $finalstatsall);
break;
case 8:
$stats[7] = array("opens", $finalstatsall);
break;
case 9:
$stats[8] = array("uniqueopens", $finalstatsall);
break;
case 10:
$stats[9] = array("withclientrecorded", $finalstatsall);
break;
case 11:
$stats[10] = array("withplatformrecorded", $finalstatsall);
break;
case 12:
$stats[11] = array("withreadtimerecorded", $finalstatsall);
break;
}
$x++;
}
foreach ($stats as $statistics) {
echo "<li class='index'>" . $statistics[0] . "</li><li class='val'> : " . $statistics[1] . "</li><br/>";
}
?>
</ul>
</div>
<div id="tab-6" class="tab-content">
<ul class="tab-info">
<?php
$year = date('Y');
$month = date('m');
$day = date('d');
$today = "$year-$month-$day";
$datetoday = date_create("$year-$month-$day");
date_sub($datetoday, date_interval_create_from_date_string("90 days"));
$d = date_format($datetoday, "Y-m-d");
$datt = explode("-", $d);
$year = $datt[0];
$month = $datt[1];
$day = $datt[2];
$client = new PostmarkClient("$serverapitoken");
$statsall = $client->getOutboundOverviewStatistics("tag1", "2006-01-01", "$today");
$stats = array();
$x = 1;
foreach ($statsall as $finalstatsall) {
switch ($x) {
case 1:
$stats[0] = array("sent", $finalstatsall);
break;
case 2:
$stats[1] = array("bounced", $finalstatsall);
break;
case 3:
$stats[2] = array("smtpapierrors", $finalstatsall);
break;
case 4:
$stats[3] = array("bouncerate", $finalstatsall);
break;
case 5:
$stats[4] = array("spamcomplaints", $finalstatsall);
break;
case 6:
$stats[5] = array("spamcomplaintsrate", $finalstatsall);
break;
case 7:
$stats[6] = array("tracked", $finalstatsall);
break;
case 8:
$stats[7] = array("opens", $finalstatsall);
break;
case 9:
$stats[8] = array("uniqueopens", $finalstatsall);
break;
case 10:
$stats[9] = array("withclientrecorded", $finalstatsall);
break;
case 11:
$stats[10] = array("withplatformrecorded", $finalstatsall);
break;
case 12:
$stats[11] = array("withreadtimerecorded", $finalstatsall);
break;
}
$x++;
}
foreach ($stats as $statistics) {
echo "<li class='index'>" . $statistics[0] . "</li><li class='val'> : " . $statistics[1] . "</li><br/>";
}
}
?>
</ul>
</div>
</div>
</div>
</div>
</div>
<!-- Result div End -->
</div>
</div>
</div>
<script>
jQuery(document).ready(function() {
$("#submit").click(function(event) {
var POSTMARKkey = jQuery('.postmark-api-key').val();
if (POSTMARKkey == "") {
event.preventDefault();
alert('Please insert POSTMARK API Key!!!');
}
});
$(".tabs-menu a").click(function(event) {
event.preventDefault();
$(this).parent().addClass("current");
$(this).parent().siblings().removeClass("current");
var tab = $(this).attr("href");
$(".tab-content").not(tab).css("display", "none");
$(tab).fadeIn();
});
});
</script>
</body>
</html>
?>
Style.css
Includes basic styling of HTML elements.
@import url(http://fonts.googleapis.com/css?family=Raleway);

#main{
width: 100%;
margin:50px auto;
font-family:raleway;
position: relative;
}
h2{
background-color: #FEFFED;
text-align:center;
border-radius: 10px 10px 0 0;
margin: -10px -40px;
padding: 15px;
}
hr{
border:0;
border-bottom:1px solid #ccc;
margin: 10px -40px;
margin-bottom: 30px;
}
ul{
text-decoration: none;
}
ul li{
display: inline-block;
}
div#login{
width:330px;
border-radius: 10px;
font-family:raleway;
border: 2px solid #ccc;
padding: 10px 40px 25px;
margin: 70px auto 0 auto;
}
input[type=text],input[type=email]{
width:100%;
padding: 10px;
margin-top: 10px;
margin-bottom: 10px;
border: 1px solid #ccc;
padding-left: 5px;
font-size: 16px;
font-family:raleway;
}
input[type=submit]{
width: 100%;
background-color:#FFBC00;
color: white;
border: 2px solid #FFCB00;
padding: 10px;
font-size:20px;
cursor:pointer;
border-radius: 5px;
margin-bottom: 15px;
margin-top: 5px;
}
a#demo_key {
float: right;
margin: 10px;
}
textarea{
width: 100%;
}
div#main h1 {
text-align: center;
}
h1.res {
margin-top: 51px;
}
div#login h2 {
border-bottom: 2px solid #ccc;
margin-bottom: 20px;
}
div.user_info {
width: 750px;
position: relative;
background-color: #FEFFED;
padding: 5px;
border:1px solid #D5D89B;
border-radius: 10px 10px 5px 5px;
margin: 30px auto;
}
.info li {
padding: 5px;
font-size: 18px;
}
.tabs-menu {
height: 30px;
float: left;
clear: both;
}
.tabs-menu li {
height: 30px;
line-height: 30px;
float: left;
background-color: #FFBC00;
border: 1px solid #d4d4d1;
}
.tabs-menu li.current {
position: relative;
background-color: #fff;
z-index: 5;
}
ul.tab-info {
margin-top: 90px;
}
li.index_info{
width: 50%;
text-align: left;
font-weight: bold;
}
li.index {
width: 30%;
text-align: left;
font-weight: bold;
}
ul.tab-info li {
padding: 5px;
font-size: 16px;
}

.tabs-menu li a {
padding: 0px;
text-transform: uppercase;
color: #fff;
text-decoration: none;
}
.tabs-menu .current a {
color: #2e7da3;
}
.tab {
border: 1px solid #d4d4d1;
background-color: #fff;
width: auto;
}
.tab-content {
text-align: center;
padding: 20px;
display: none;
}
ul.tabs-menu {
width: 100%;
}
#tab-1 {
display: block;
}
h2.msg_history{
text-align:center;
margin-top: -10px;
margin-bottom: 0;
padding: 15px;
margin-left: -120px;
background: none;
}
@media only screen and (max-width:480px){
div.user_info{
width: 100%;
min-width: 300px;
}
#main{
min-width: 300px;
}
.tabs-menu li {
clear: both;
float: none;
margin-left: -4px;
}
li.index {
width: 90%;
margin-left: -50px;
}
h2.msg_history {
margin-top: 0;
}
ul.tab-info {
margin-top: 170px;
}
}
.z{
width:110px;
}
Run the script and enjoy!!!
Conclusion :
Hope you have enjoyed this blog and will definitely try this script in your application. We will be back soon with some new coding tricks. Must send us your feedback in the space provided below.
You may also like –
How To Embed A Video In An Email

In today’s world, people use videos as preferable media to put their views in front of someone in an easy manner. Embedding a video in an email is used to enhance the user experience of email.
But due to spam and security reasons, there are number of email client that doesn’t support video in email, only Apple mail and Outlook.com with (chrome, firefox & internet explorer) supports video in email, they can play the video within the email.
Hence, this way, you can simply embed a video in a customized email template or an email template generated by an email builder.
Benefits of Embedding Video in Emails Based On Studies And Researches –
- The word “video” in the subject line of an email increases click through rates by 20%.
- Increases open rates and click-through rates.
- 44% users spent more time with the email having videos embedded.
- Sharing and forwarding increased by 41%.
- Conversion rates increased by 24% and ROI increased by 20%.
- Marketers generated 40% higher monthly revenue.
Watch the live demo or download code from the link given below

You can use MailGet -email service provider for the entire solution.
Embed A Video In Email –
We can use the <video> tag of HTML5 to send the video in an email. But there are some of email clients which doesn’t support <video> tag.
In this tutorial, you will learn to send video from your email which will be visible in your Apple and Outlook client’s email as both supports video used within the email.
But,
For other email clients, you have to include a fallback image which will be linked to a video. The fallback image is shown to the email client which doesn’t support the video tag in the email.
<video poster="path of the poster image" width="100%" height="50%" controls="controls">
<source src="path of the video" type="video/mp4" />
<a href=" path of the same video uploaded on youtube">
<img src="path of the video image" width="100%" height="50%" alt="image instead of video" />
</a>
</video>
Explanation:
(i) A poster image will get the display in the email client which supports <video> tag with the video controls.
(ii) <source> tag accepts the path of the video.
(iii) Here is the image with the link of the same video uploaded on the youtube. We can also use the video uploaded on the different server, but it will get opened in the different tab which will look awkward.
In the above code we have created a backup image for email clients which doesn’t support video tag. This image is linked with the video uploaded on the youtube.
Some Important Facts –
(i) The link for the youtube video must be the direct link of the video. it should not be the embed URL.
(ii) This youtube link works in the email client that doesn’t support <video > tag such as Gmail, Hotmail.
(iii) For the images we should use the screenshot of video.
(iv) There must be both of the images poster image and link image, poster image is shown to the client which support video in email and link image shown to the other email client which doesn’t support video in email.
HTML File –
<!DOCTYPE html PUBLIC "-//W3C//DTD XHTML 1.0 Transitional//EN" "http://www.w3.org/TR/xhtml1/DTD/xhtml1-transitional.dtd">
<html xmlns="http://www.w3.org/1999/xhtml">
<head>
<!-- If you delete this meta tag, Half Life 3 will never be released. -->
<meta name="viewport" content="width=device-width" />
<meta http-equiv="Content-Type" content="text/html; charset=UTF-8" />
<title>send video in emails</title>
<link rel="stylesheet" type="text/css" href="css/style.css" />
</head>
<body bgcolor="#">
<!-- BODY -->
<table class="body-wrap" bgcolor="#F8F8F8">
<tr>
<td class="container" bgcolor="#FFFFFF">
<div class="content">
<!-- HEADER -->
<table class="head-wrap" bgcolor="FFFFFF">
<tr>
<td class="header container" >
<div class="content">
<table bgcolor="#FFFFFF">
<tr>
<td><img src="https://www.formget.com/mailget/images/logo.png" width="50%" /></td>
<td align="right"><h2 class="collapse">Welcome To MailGet</h2></td>
</tr>
</table>
</div>
</td>
</tr>
</table><!-- /HEADER -->
<!-- code for the video starts from here-->
<table>
<div style="border:1px solid; text-align: center ; margin-left: auto ; margin-right: auto ;">
<video poster="https://www.formget.com/wp-content/uploads/2015/09/video-in-email-image.png" width="100%" height="50%" controls="controls">
<source src="https://www.formget.com/wp-content/uploads/2015/09/MailGet-Explainer-Video.mp4" type="video/mp4" />
<a href="https://www.youtube.com/watch?v=QpeQx8bE598"><img src="https://www.formget.com/wp-content/uploads/2015/09/video-in-email-image.png" width="100%" height="50%" alt="image instead of video" /></a>
</video>
</div>
</table>
<!-- code for the video end here-->
<table>
<tr>
<td>
<p class="lead">Hi...., Friends the above video will get played when we click on it
this video will open with different styles in different device
video will directly get played in apple mail and outlook , but in some other divices it will popup up a window in which video will play</p>
<!-- Callout Panel -->
<div id="rt" style=" margin-bottom: 110px"></div>
<hr>
<p class="callout">
For frequent solution over the problem related to mails
just check our service <a href="https://www.formget.com/mailget">MailGet</a>
</p><!-- /Callout Panel -->
<hr>
<!-- social & contact -->
<table class="social" width="100%">
<tr>
<td>
<a href="www.Formget.com/mailget.com">For MailGet click kere </a>
</td>
</tr>
</table><!-- /social & contact -->
</td>
</tr>
</table>
</div><!-- /content -->
</td>
</tr>
</table><!-- /BODY -->
</div>
</body>
</html>
CSS File: style.css
* {
margin:0;
padding:0;
}
img {
max-width: 100%;
}
.collapse {
margin:0;
padding:0;
}
body {
-webkit-font-smoothing:antialiased;
-webkit-text-size-adjust:none;
width: 100%!important;
height: 100%;
}
/* -------------------------------------
ELEMENTS
------------------------------------- */
a { color: #2BA6CB;}

p.callout {
padding:15px;
background-color:#ECF8FF;
margin-bottom: 15px;
}
.callout a {
font-weight:bold;
color: #2BA6CB;
}
/* -------------------------------------
HEADER
------------------------------------- */
table.head-wrap { width: 100%;
max-width: 700px;
margin:auto auto;}

.header.container table td.logo { padding: 15px; }
.header.container table td.label { padding: 15px; padding-left:0px;}
/* -------------------------------------
BODY
------------------------------------- */
table.body-wrap { width: 100%;
}
/* ---------------------------------------------------
RESPONSIVENESS
Nuke it from orbit. It's the only way to be sure.
------------------------------------------------------ */
.container {
display:block!important;
max-width:700px!important;
margin:0 auto!important; /* makes it centered */
clear:both!important;
}
.content {
padding:15px;
max-width:700px;
margin:0 auto;
display:block;
}
.content table { width: 100%; }
NOTE: We have also included a zip file of complete code just download it and use it.
Conclusion
I hope that you have enjoyed this article ,and you must be feeling yourself comfortable in sending a video within an email. Please comment for any query. Keep visiting our website.
For more related information check out the following blogs –
Insert Contacts In Outlook Using PHP

Hey, Folks!
In this blog post, we’re going to learn email list management in Outlook account by importing Microsoft live contacts.
Microsoft has a centralized system. They have a dedicated service for each feature. For example, PEOPLE service for Contacts, Mail for emailing etc. It doesn’t matter which kind of Microsoft account you are logged in, Hotmail, Outlook, Live. All services will get redirected to people when using contacts and redirected to mail when using mail.
You can also export contacts from outlook in a CSV file with the same procedure. Take a sneak peek at our blog Export Outlook Contacts. Let’s begin.
Watch the live demo or download code from the link given below

Take a sneak peek on our premium service MailGet – email marketing platform for the entire solution.
Process:
Let’s take a look at the process step by step.
- The user will get a contact form on the index page.
- The user will be asked to enter his First Name, Last Name, and Email Address.
- After submitting the above information, the user will be asked to log into Microsoft account in which he wants to add the contact.
- Then, Microsoft will ask the user for permission to read/write contacts from/to his account.
- And at last, contact will get added in his address book.
- After this, he can get back to the first page with the back button, or he can log out from logout button.
So, above is the complete process to add contacts in Microsoft.
To obtain Client ID & Client Secret, you can take a reference about registering and creating application in Microsoft from our previous blog Export Outlook Contacts.
PHP File: index.php
<html>
<head>
<title>Insert Contacts in Outlook Using PHP</title>
<link href="bootstrap/css/bootstrap.css" rel="stylesheet" type="text/css"/>
<link href="css/style.css" rel="stylesheet" type="text/css"/>
<script>
function call(){
var fn = document.getElementById("fn").value;
var ln = document.getElementById("ln").value;
var email = document.getElementById("email").value;
var url_values = '?fn='+fn+'%26ln='+ln+'%26email='+email;
var urls= 'https://login.live.com/oauth20_authorize.srf?client_id=000000004816A327&scope=wl.signin%20wl.basic%20wl.emails%20wl.contacts_emails%20wl.contacts_create&response_type=code&redirect_uri=https://www.formget.com/tutorial/insert-contacts-in-outlook-using-php/oauth-hotmail.php'+url_values;
window.location.replace(urls);
}
</script>
</head>
<body>
<div class="container-fluid">
<h1>Insert Contacts in Outlook Using PHP</h1>
<div id="login">
<div id="h2" class="h2 row">
<div class="col-md-12"><h2><span>Insert Contact in <img src="images/microsoft.png"/></span></h2></div>
</div>
<div class="row">
<div id="indexform" class="col-md-12">
<?php
$client_id = 'Insert client id';
$client_secret = 'Insert client secret';
$redirect_uri = 'https://www.formget.com/tutorial/insert-contacts-in-outlook-using-php/oauth-hotmail.php';
$urls_ = 'https://login.live.com/oauth20_authorize.srf?client_id='.$client_id.'&scope=wl.signin%20wl.basic%20wl.emails%20wl.contacts_emails%20wl.contacts_create&response_type=code&redirect_uri='.$redirect_uri."?";
?>
<input id="fn" type="text" placeholder="First Name" name="name"/>
<input id="ln" type="text" placeholder="Last Name" name="lname"/>
<input id="email" type="email" placeholder="Contact Email" name="email"/>
<button type="button" class="btn btn-primary btn-block" id="submit" onclick="call()">Add Contact</button>
</div>
</div>
</div>
</div>
</body>
</html>
PHP File: oauth_hotmail.php
//function for parsing the curl request
session_start();
$data = $_GET;
$data1 = "fn=".$_GET['fn']."&ln=".$_GET['ln']."&email=".$_GET['email'];
$client_id = 'ENTER CLIENT ID';
$client_secret = 'ENTER CLIENT SECRET';
$redirect_uri = 'https://www.formget.com/tutorial/insert-contacts-in-outlook-using-php/oauth-hotmail.php?'.$data1;
$urls_ = 'https://login.live.com/oauth20_authorize.srf?client_id='.$client_id.'&scope=wl.signin%20wl.basic%20wl.emails%20wl.contacts_emails%20wl.contacts_create&response_type=code&redirect_uri='.$redirect_uri;
$auth_code = $data["code"];
$fields=array(
'code'=> urlencode($auth_code),
'client_id'=> urlencode($client_id),
'client_secret'=> urlencode($client_secret),
'scope' => 'wl.signin%20wl.basic%20wl.emails%20wl.contacts_emails%20wl.contacts_create',
'redirect_uri'=> urlencode($redirect_uri),
'grant_type'=> urlencode('authorization_code'),
);
$post = '';
foreach($fields as $key=>$value) { $post .= $key.'='.$value.'&'; }
$post = rtrim($post,'&');
$curl = curl_init();
curl_setopt($curl,CURLOPT_URL,'https://login.live.com/oauth20_token.srf');
curl_setopt($curl,CURLOPT_POST,5);
curl_setopt($curl,CURLOPT_POSTFIELDS,$post);
curl_setopt($curl, CURLOPT_RETURNTRANSFER,TRUE);
curl_setopt($curl, CURLOPT_SSL_VERIFYPEER,0);
$result = curl_exec($curl);
curl_close($curl);

$response = json_decode($result);
if(isset($response->access_token)){
$_SESSION['access_token'] = $response->access_token;
$accesstoken = $_SESSION['access_token'];
}
if(isset($_GET['code']))
{
$accesstoken = $_SESSION['access_token'];
}
$api_url = "https://apis.live.net/v5.0/me/contacts?access_token='.$accesstoken.";
$curl = curl_init($api_url);
$curl_data = array(
'first_name' => $data['fn'],
'last_name' => $data['ln'],
'emails' => array(
'personal' => $data['email'],
'account' =>'personal'
)
);
$curl_data = json_encode($curl_data);
curl_setopt($curl, CURLOPT_HTTPHEADER, array("Content-Type: application/json"));
curl_setopt($curl, CURLOPT_POST, true);
curl_setopt($curl, CURLOPT_POSTFIELDS, $curl_data);
curl_setopt($curl, CURLOPT_RETURNTRANSFER, true);
curl_setopt($curl, CURLOPT_SSL_VERIFYPEER,0);
$curl_response = curl_exec($curl);
?>

<html>
<head>
<title>Insert Contacts in Outlook Using PHP</title>
<link href="bootstrap/css/bootstrap.css" rel="stylesheet" type="text/css"/>
<link href="css/style.css" rel="stylesheet" type="text/css"/>
<script src="js/logout.js" type="text/javascript"></script>
</head>
<body>
<div class="container-fluid">
<h1>Insert Contacts in Outlook Using PHP</h1>
<div id="login">
<div id="h2" class="h2 row">
<div class="col-md-2"><a href="http://formget.com/tutorial/insert-contacts-in-outlook-using-php/index.php"><img id="yprevious" src="images/previous.png"/></a></div>
<div class="col-md-8"><h2><span>Insert Contact in <a><img src="https://www.formget.com/tutorial/insert-contacts-in-outlook-using-php/images/microsoft.png"/></a></span></h2></div>
<div class="col-md-2"><a href="#" onclick="caller()"><img id="ylogout" src="images/logout.png"/></a></div>
</div>
<div class="row">
<div class="col-md-12">
<p>Contact Added</p>
</div>
</div>
</div>
<div class="row">
<div class="col-md-12">
<p id="note">Note : If you want to export your Hotmail/Live/Outlook contacts, then you can use <a href="https://www.formget.com/tutorial/export-hotmail-contacts/">Export Outlook Contacts</a></p>
</div>
</div>
</div>
</body>
</html>
CSS File: style.css
@import url(http://fonts.googleapis.com/css?family=Raleway);
body{
font-family:raleway !important;
}
#h2{
background-color: #FEFFED;
text-align:center;
border-radius: 10px 10px 0 0;
border-bottom: 1px solid #ccc;
color: black;
font-weight: bolder;
font-size: 2em;
margin: 0px -15px;
padding: 8% 0;
font-family:raleway !important;
}
.wrap{
width: 33%;
margin: 5% auto;
}
.container-fluid{
width: 45%;
margin: auto auto;
}
#login{
border: 2px solid #ccc;
border-radius: 10px;
font-family:raleway!important;
}
h1{
padding: 6% 0;
font-family:raleway!important;
text-align: center;
font-size: 35px !important;
}
.h2{
margin: 0 !important;
padding: 2% 0 !important;
}
img{
padding: 0% 0%;
width: 35%;
}
input[type=text],input[type=email]{
width:99.5%;
padding: 10px;
margin-top: 14px;
border: 1px solid #ccc;
padding-left: 5px;
font-size: 16px;
font-family:raleway !important;
}
input[type=submit]{
width: 100%;
background-color:#FFBC00;
color: white;
border: 2px solid #FFCB00;
padding: 10px;
font-size:20px;
cursor:pointer;
border-radius: 5px;
margin-top: 14px;
}
p{
text-align: center;
font-family:raleway !important;
font-size:25px;
padding: 15px;
}
#yprevious,#ylogout{
width: 50px;
margin-top: 25%;
}
#logo {
margin-bottom: -2%;
}
#note{
font-size: 20px;
}
#note a{
text-decoration: none;
}
#indexform a#submit{
width: 100% !important;
background-color:#FFBC00;
color: white;
border: 2px solid #FFCB00;
padding: 10px 39%;
font-size:20px;
cursor:pointer;
border-radius: 5px;
margin-top: 14px;
margin: 0 1.5%;
}
#indexform,#email{
margin-bottom:25px;
}
JavaScript File: Logout.js
function call()
{
popup = window.open('https://login.live.com/logout.srf?ct=1441367969&rver=6.4.6456.0&lc=1033&id=64855&ru=https:%2F%2Fbay172.mail.live.com%2Fhandlers%2FSignout.mvc%3Fservice%3DLive.Mail%26mkt%3Den-in&mkt=en-in');
setTimeout(wait, 4000);
}
function caller()
{
call();
}
function wait()
{
popup.close();
window.location.href = 'http://formget.com/tutorial/insert-contacts-in-outlook-using-php/index.php';
}
Explaination of the main file : oauth_hotmail.php
First step is to start the session
session_start();Then we need to get the data travelling in the query string with the global variable $_GET.
$data = $_GET;
$data1 = "fn=".$_GET['fn']."&ln=".$_GET['ln']."&email=".$_GET['email'];
Now we need to set the client credentials, redirect URL and Login URL. Login URL must be exactly same as you have defined in the index.php file.
$client_id = 'ENTER CLIENT ID';
$client_secret = 'ENTER CLIENT SECRET';
$redirect_uri = 'https://www.formget.com/tutorial/insert-contacts-in-outlook-using-php/oauth-hotmail.php?'.$data1;
$urls_ = 'https://login.live.com/oauth20_authorize.srf?client_id='.$client_id.'&scope=wl.signin%20wl.basic%20wl.emails%20wl.contacts_emails%20wl.contacts_create&response_type=code&redirect_uri='.$redirect_uri;
Below line is to set the authentication code.
$auth_code = $_GET["code"];Below code is to set and encode the parameters which are going to pass in URL.
$fields=array(
'code'=> urlencode($auth_code),
'client_id'=> urlencode($client_id),
'client_secret'=> urlencode($client_secret),
'scope' => 'wl.signin%20wl.basic%20wl.emails%20wl.contacts_emails%20wl.contacts_create',
'redirect_uri'=> urlencode($redirect_uri),
'grant_type'=> urlencode('authorization_code')
);
Below code is building url which is going to append on the login URL.
foreach($fields as $key=>$value) { $post .= $key.'='.$value.'&'; }
$post = rtrim($post,'&');
In below code, we’re using curl to reach the login URL.
$curl = curl_init();
curl_setopt($curl,CURLOPT_URL,'https://login.live.com/oauth20_token.srf');
curl_setopt($curl,CURLOPT_POST,5);
curl_setopt($curl,CURLOPT_POSTFIELDS,$post);
curl_setopt($curl, CURLOPT_RETURNTRANSFER,TRUE);
curl_setopt($curl, CURLOPT_SSL_VERIFYPEER,0);
$result = curl_exec($curl);
curl_close($curl);
Below line is collecting response of the curl call in the $response variable
$response = json_decode($result);Below code is to check whether access token is set or not. If it is set then it will be stored in a SESSION variable to reuse it for refresh token.
if(isset($response->access_token)){
$_SESSION['access_token'] = $response->access_token;
$accesstoken = $_SESSION['access_token'];
}
Below code is to set refresh token. It will check if the code is set in the URL, then the access token we stored in SESSION variable will get stored in access token.
if(isset($_GET['code']))
{
$accesstoken = $_SESSION['access_token'];
}
Below is the URL responsible for writing contact into microsoft account.
$api_url = "https://apis.live.net/v5.0/me/contacts?access_token='.$accesstoken.";
$curl = curl_init($api_url);
The code below is responsible for inserting contacts into microsoft.
$curl_data = array(
'first_name' => $data['fn'],
'last_name' => $data['ln'],
'emails' => array(
'personal' => $data['email'],
'account' =>'personal'
)
);
The line below is use to encode the contact information into json.
$curl_data = json_encode($curl_data);The code below is setting curl options and executing it.
curl_setopt($curl, CURLOPT_HTTPHEADER, array("Content-Type: application/json"));
curl_setopt($curl, CURLOPT_POST, true);
curl_setopt($curl, CURLOPT_POSTFIELDS, $curl_data);
curl_setopt($curl, CURLOPT_RETURNTRANSFER, true);
curl_setopt($curl, CURLOPT_SSL_VERIFYPEER,0);
$curl_response = curl_exec($curl);
Conclusion:
I hope that at this point you must be feeling comfortable with importing Outlook contacts in PHP. Please comment for any query. Keep visiting our website.
Recommended blogs –
Amazon SES: Request Production Access. Increase Email Sending Limit

In our previous blog posts, we have covered how to Setup Amazon SES Account and Generate Amazon SES IAM Credentials to connect SES with MailGet – Email Service Provider. But, when a new user setup Amazon SES account it does not immediately grant unlimited SES usage.
New users are initially placed in the Amazon SES sandbox and are not granted production access for sending emails to everyone.
The following restrictions are in effect when new users are placed in Amazon SES sandbox environment:
- They can only send mail to the Amazon SES mailbox simulator and to verified email addresses.
- They can only send mail from verified email addresses.
- They can send a maximum of 200 messages per 24-hour period.
- Amazon SES can accept a maximum of one message from their account per second.
In this documentation, we will explain how to remove the restriction on recipient addresses and increase your sending limits.
Steps to Request Amazon SES Production Access:
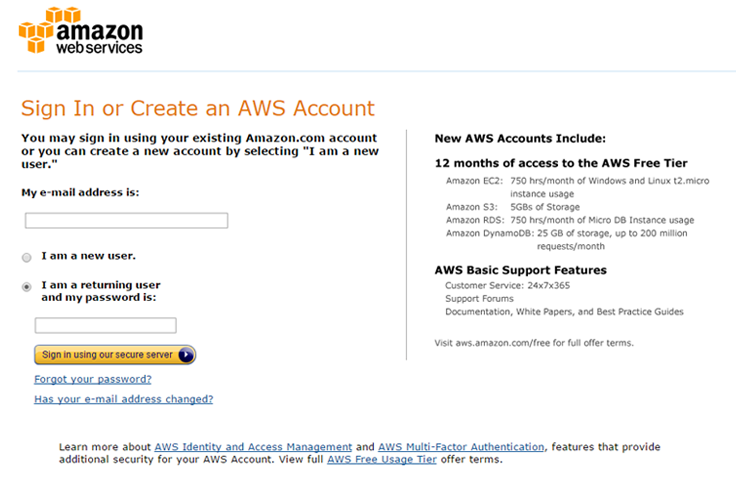
Step:1 Open aws.amazon.com/ses and click on “Sign in to the console” button.
Step:2 On the page appeared, simply enter your email ID, select”I am a returning user and my password is” option and enter password.
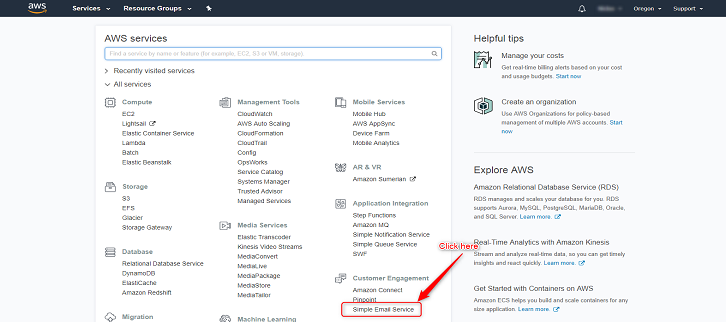
Step:3 In AWS Management Console Click on “SES email Sending Service”.
Step:4 Click on “Request a Sending Limits Increase” button. You can also directly visit the following link. http://aws.amazon.com/ses/extendedaccessrequest

Step 5. Select “Service Limit Increase” option under Regarding. ( As shown in screenshot below )
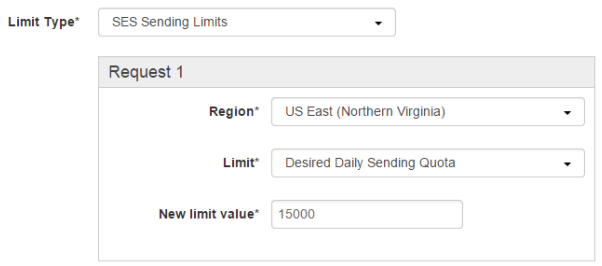
Step 6. Under Limit Type, select “SES Sending Limits” from drop down menu. ( As shown in screenshot below)

Step 7. Under Request 1, select your SES region, in which you verified your email earlier and have configured MailGet to use. For example, here select – “US East (Northern Virginia)”. ( As shown in screenshot below )
Step 8. Then select “Desired Daily Sending Quota”. ( As shown in screenshot below )
Step 9. Add number limit value, start with preferred sending value from 20,000 to 50,000 ( upon your choice ). ( As shown in screenshot below )
Tips – Starting with around 20,000, increases the chance of instant approval. After this approval, your limits will increase automatically with requirement.
Step 10. Click on “Add another request” button. And, start adding Request 2.
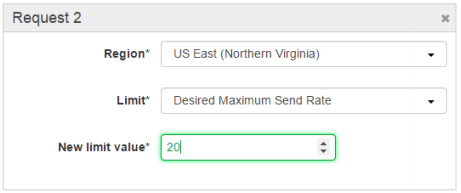
Step 11. Under Request 2, select your SES region, in most of the case for MailGet users, it is “US East (Northern Virginia)”. ( As shown in screenshot below )
Step 12. Then select “Desired Maximum Send Rate”. ( As shown in screenshot below )
11. Add number limit value, start with preferred sending rate from 20 mails/ sec ( upon your choice ). ( As shown in screenshot below )
Tips – Starting with around 20 mails/ second, increases the chance of instant approval. After this approval, your sending rate limits will increase automatically with requirement.
Step 13. Select Mail Type as “Subscription”.
Step 14. Under “Website URL”, put the link of your business website.
Step 15. Read the AWS Service Terms and AUP and Select “My email-sending complies with the AWS Service Terms and AUP”, as “Yes”. (Make sure to read the Terms and agree only if you comply with the policies.)
Step 16. Select “I only send to recipients who have specifically requested my mail”, as “Yes”. (Also make sure to send emails to your own audience. Sending illegitimate emails to third party audience or purchased email list is not allowed by MailGet or Amazon SES.)
Step 17. Select “I have a process to handle bounces and complaints”, as “Yes”. (MailGet does this for you. MailGet Team will set SNS topic for handing bounce and spam. Do send request for the same to us at [email protected], once the production access is granted.)
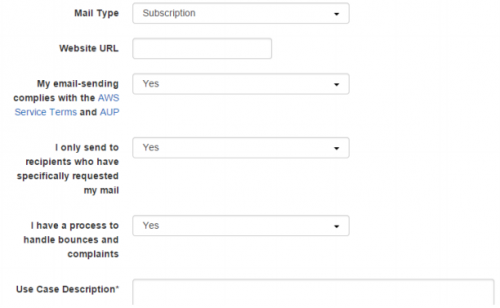
Step 18. Under “Use Case Description”; you can write your sample uses and how you are going to use Amazon SES. Your use case description may be different that the sample below.
One Sample Message can be:
Dear AWS team,
My official website is located here: [ Link of Business Website ] and overtime I have collected emails through opt-in subscriptions. My emails are clean and verified. I have been using other email service provider for long time and now we have planned to make a shift to Amazon SES.
I will be using online emailing application which is available here: https://www.formget.com/mailget-app/. This application can handle bounce, complaint and un-subscription effectively. And, these has been added to my verified email address in my Amazon SES account.
Kindly approve my request for Amazon SES production access in above mentioned region. Let me know if you have any question.Thanks and Regards!
Step 19. Select your Support Language.
Step 20. Select “Contact Method” as “Web”.
Step 21. Finally, click on “Submit” button to send the application form.
Once, the form has been submitted successfully, you will receive an email confirmation. And, most of the time approval can take upto 24 hours. You will receive email after approval.
After successful approval, you can start sending email campaigns from MailGet.
Send Email via PHPMailer and Mandrill’s SMTP

Mandrill allows users to send transactional emails at low cost along with enhanced inbox deliverability.
This makes Mandrill SMTP an ideal choice for developers for sending emails for their applications.
In this tutorial, we are going to cover, how you can use Mandrill in your PHP application along with PHPMailer for sending emails.
Before I start, let me briefly describe the basic concepts used for email sending application:
1. PHPMailer: PHPMailer is a code library which contains a PHP class that provides a package of different functions used to send emails.
2. Mandrill: Mandrill is an email infrastructure service designed to help users to send transactional emails like emails for password resets, order confirmations, welcome messages and any other emails required by the application.
To send emails directly through PHP, it requires you to have good knowledge about SMTP protocol and know how of how to inject emails for sending.
Using PHPMailer and Mandrill is one of the best solutions for sending spam-free emails along with better inbox deliverability using PHP.
Watch the live demo or download code from the link given below.

We have introduced an online email sevice name MailGet. You can send your emails easily by using Mandrill SMTP credentials. MailGet also supports multiple API/SMTP integrations for bulk email sending.
Let’s begin learning step by step: –
Step 1: – Download latest PHPMailer library’s .zip folder.
Step 2: – Create a lib folder in the root folder of your application.Now, extract the downloaded PHPMailer’s library zip folder. Copy & paste PHPMailerAutoload.php, class.phpmailer.php and class.smtp.php file in the lib folder.
Step 3: – Require a Mandrill username and Mandrill API Key.
Note: – If you don’t have any account in Mandrill, just follow the easy steps mentioned in the tutorial link Steps to Generate Mandrill API Key and get your username and API key.
Step 4: – Create index.php file in the root folder of the application and write the code given below in the file.
index.php
Display a message box containing sender’s email, receiver’s email, message etc. When a use enter all the value and click on Send button, the submitted value then passed through the library file and email is send to the sender’s address.
<html>
<head>
<meta http-equiv="Content-Type" content="text/html; charset=windows-1252">
<title>Send Email via PHPMailer and Mandrill's SMTP</title>
<link rel="stylesheet" type="text/css" href="css/style.css"/>
<link rel="stylesheet" type="text/css" href="css/bootstrap.css"/>
<script src="js/jquery.js"></script>
</head>
<body>
<?php
//include PHPMailerAutoload library file
include ("lib/PHPMailerAutoload.php");
$sen_name = "";
$sen_email = "";
$rec_email = "";
$email_sub = "";
$box_msg = "";

$mail = new PHPMailer();
// Telling the class to use SMTP
$mail->IsSMTP();
$mail->Mailer = "smtp";
$mail->Host = "smtp.mandrillapp.com";
$mail->Port = 587;
// Turn on SMTP authentication
$mail->SMTPAuth = true;
// SMTP Username
$mail->Username = "<-- Mandrill Username -->";
// SMTP Password ( i.e. Any valid Mandrill API key)
$mail->Password = "<-- Any valid Mandrill API Key -->";

// Retrieving & storing user's submitted information
if (isset($_POST['sen_name'])) {
$sen_name = $_POST['sen_name'];
}
if (isset($_POST['sen_email'])) {
$sen_email = $_POST['sen_email'];
}
if (isset($_POST['rec_email'])) {
$rec_email = $_POST['rec_email'];
}
if (isset($_POST['email_sub'])) {
$email_sub = $_POST['email_sub'];
}
if (isset($_POST['box_msg'])) {
$box_msg = $_POST['box_msg'];
}

$mail->From = $sen_email;
$mail->FromName = $sen_name;
$mail->AddAddress($rec_email);
$mail->Subject = $email_sub;
$mail->Body = $box_msg;
$mail->WordWrap = 50;

if (($sen_email != "") && ($rec_email != "" )) {
// Sending Email
$status = $mail->Send();
}
?>
<h1>Send Email via PHPMailer and Mandrill's SMTP</h1>
<div id="main" class="col-sm-12 col-md-6 col-lg-6">
<div id="login">
<h2>Message Box</h2>
<hr>
<form action="" method="POST">
<h3>From : </h3>
<label>Sender's Name (Optional) : </label> <input type="text" name="" class="" placeholder="Enter Sender's Name"/>
<label>Sender's Email Address : </label> <input type="email" name="sen_email" class="sen_email" placeholder="Enter Sender's Email Address"/>
<h3>To : </h3>
<label>Receiver's Email Address : </label> <input type="email" name="rec_email" class="rec_email" placeholder="Enter Reciever's Email Address"/>
<label>Subject : </label>
<input type="text" name="email_sub" class="" placeholder="Subject"/>
<label>Message : </label>
<textarea name="box_msg" rows="10" cols="30">Write your message here...</textarea>
<input type="submit" value="Send" id="submit"/>
</form>
</div>
<?php
if (isset($status)) {
if ($status == 1) {
echo "<script>alert('Congratulations!!! Your Email has been sent successfully!!!')</script>";
} else {
echo "<script>alert('Sorry!!! Message was not sent. Mailer error: " . $mail->ErrorInfo . ")</script>";
}
}
?>
</div>
<script>
jQuery(document).ready(function() {
jQuery("#submit").click(function() {
var sen_email = jQuery('.sen_email').val();
var rec_email = jQuery('.rec_email').val();
if (sen_email == "") {
alert('Sender's Email Address cannot be empty.');
}
if (rec_email == "") {
alert('Receiver's Email Address cannot be empty.');
}
});
});
</script>
</body>
</html>
Step 5: – Create a CSS folder in the root folder and create a style.css file containing the following CSS code.
style.css
Includes basic styling of HTML elements.
@import url(http://fonts.googleapis.com/css?family=Raleway);
body{
padding: 0;
}
#main{
float: none;
margin: 0 auto;
font-family:raleway;
}
h1 {
text-align: center;
}
h2{
background-color: #FEFFED;
text-align:center;
border-radius: 10px 10px 0 0;
margin: -10px -40px -20px !important;
padding: 15px;
}
#login{
width:50%;
min-width: 320px;
border-radius: 10px;
font-family:raleway;
border: 2px solid #ccc;
padding: 10px 40px 25px;
margin: 70px auto 0 auto;
}
input[type=text],input[type=email]{
width:100%;
padding: 10px;
margin-top: 8px;
border: 1px solid #ccc;
padding-left: 5px;
font-size: 16px;
font-family:raleway;
margin-bottom: 10px;
}
input[type=submit]{
width: 100%;
background-color:#FFBC00;
color: white;
border: 2px solid #FFCB00;
padding: 10px;
font-size:20px;
cursor:pointer;
border-radius: 5px;
margin-bottom: 15px;
}
textarea{
width: 100%;
margin-top: 10px !important;
margin-bottom: 15px !important;
}
@media only screen and (max-width:480px){
div#login{
width: 300px;
}
}
Now, insert the latest bootstrap.css file in the CSS folder. Also, create a js folder in root folder and insert the latest jQuery.js file in it.
Now, your application is ready to send email. Run the application and enjoy sending emails…
Conclusion:-
Hope you enjoyed the article. Must try it and send us your feedback from the space given below.
Recommended blogs –
Find Email Domain Exists Or Not

Domain names are those names which are provided by DNS server to each IP addresses querying for an HTTP request.
In this blog post, I am going to show whether an Email Domain exists or not. It will certainly help you in email list cleaning and perfect email list management.
Following are the benefits achieved by verifying the email domain –
- Restrict sending emails to all those emails whose domain doesn’t exist.
- No fake user can enter to your web portal or contact list.
Let’s have a look at the brief summary of domain name system/server(DNS) and domain name.
Domain name system came into existence with the invention of the internet. It is an authorized organization which provide a specific name to your IP address (127.0.0.1 as example.com) and let you communicate to anyone in the network.
Imagine for a while that you have to enter the IP address of Google every time, then you will get frustrated after some time-spam, though it is the matter of only one address, what will happen when you have to enter IP addresses of several sites.
It’s almost impossible to remember IP address of each host in the internet network, for this purpose DNS provide us a unique domain name for further communication with any IP addresses in the internet network.
Domain Name hierarchy
Let’s have a look at different types of domain name available:- 
This above image explains about the hierarchy of DNS. Root is at the top and then .com, .net, .org, .gov, .mil are considered as generic top-level domains(gTLD).
- .COM – For any Commercial purpose, like www.google.com.
- .ORG – For different Organization, like http://www.humanhealth.org.
- .NET – For Network Solution, like http://www.besthistory.net
And like this .gov for government and .mil for army(military) section so we have a broad classification of the domain name.

For sending emails and related functionality, you can take a look at our premium service MailGet – email marketing platform. It’s a user friendly online service in which you can also integrate different smtp.
Index.php
This page will display a form to enter different address. The submitted values will be retrived and checked whether the entered address contains a valid domain name or not. On the basis of result, it will display a message.
<html>
<head>
<link href="css/style.css" rel="stylesheet" type="text/css"/>
<title>Find Email Domain Exist or Not</title>
<meta http-equiv="Content-Type" content="text/html; charset=windows-1252">
</head>
<body>
<div class="container">
<div class="row">
<div class="col-sm-1 col-md-2 col-lg-12">
<div id="main" class="col-sm-1 col-md-2 col-lg-12">
<div class="col-sm-1 col-md-2 col-lg-12"><h1>Find Email Domain Exist or Not</h1> </div>
<div id="login">
<h2>Verify Email Domain</h2>
<div id="right">
<form name="myForm" method="post" action="index.php">
Please Enter Email Address:
<input type="email" size=18 name="email" id="email">
<div class="col-sm-1 col-md-2 col-lg-12"> <input type="submit" value="Check" id="dsubmit" name ="submit"></div>
</form>
<label id ="lbmesg">
<?php
if (isset($_POST['submit'])) {
$email = $_POST['email'];
$domain = substr(strrchr($email, "@"), 1);
/* This code verify a registered of valid domain name */
if ($result = fopen("http://$domain", 'r')) {
echo $domain . " Exist";
} else {
echo $domain . " Not Exist";
}
}
?>
</label>
</div>
</div>
</div>
</div>
</div>
</body>
</html>
style.css
Includes basic styling of HTML elements.
@import url(http://fonts.googleapis.com/css?family=Raleway);
body{
margin: 0 auto;
padding: 0 auto;
}
#main{
width: 100%;
margin:4% auto;
font-family:raleway;
}
span{
color:red;
}
h1{
text-align:center;
font-family:raleway;
}
h2{
background-color: #FEFFED;
text-align:center;
border-radius: 10px 10px 0 0;
margin: -10px -40px;
padding: 15px;
font-family:raleway;
}
hr{
border:0;
border-bottom:1px solid #ccc;
margin: 10px -40px;
margin-bottom: 30px;
}
#login{
width: 289px;
border-radius: 10px;
font-family:raleway;
border: 2px solid #ccc;
padding: 10px 40px 33px;
margin-top: 23px;
margin: 0 auto;
}
input[type=text],input[type=password]{
width:99.5%;
padding: 10px;
margin-top: 8px;
border: 1px solid #ccc;
padding-left: 5px;
font-size: 16px;
font-family:raleway;
}
#email{
width:99.5%;
padding: 10px;
border: 1px solid #ccc;
padding-left: 5px;
font-size: 16px;
font-family:raleway;
}
input[type=submit]{
width: 98%;
background-color:#FFBC00;
color: white;
border: 2px solid #FFCB00;
padding: 10px;
font-size:20px;
cursor:pointer;
border-radius: 5px;
}
#profile{
padding:50px;
border:1px dashed grey;
font-size:20px;
background-color:#DCE6F7;
}
i{
color: black;
padding: 18px;
margin: 20px;
}
#right{
width: 72.1%;
height: 220px;
border: 1px dashed rgb(215, 215, 215);
box-shadow: 0px 5px 17px 1px #99A3AD, 0px 0px 40px #EEEEEE;
padding: 10%;
margin-left: 10px;
}
#right p{
padding: 20px;
}
#paypal_logo{
margin: 10px 315px;
float: right;
}
#results {
width: 100%;
margin-top: 30px;
table-layout: auto;
margin-bottom: 30px;
}
#dsubmit{
margin-top: 5px;
}
#txtmsg
{
height: 100px;
width: 99.5%;
}
#lbmesg{
margin-top: 50px;
font-family:raleway;
}
@media only screen and (max-width:480px){
#main {
width: 100%;
}
#login {
width: 75%;
margin: 0 auto;
}
input[type=submit] {
width: 98%;
}
}
Conclusion :
Hope you would have learned & enjoyed this blog post and would have got a clear picture about DNS. I am sure you will give a try to the script provided and implement it in your own projects as well. Feel free to visit our website again in the future to get in touch with new coding tricks. You can let us know about your feedback in the space provided below.
Check out our other popular post too:
Email Verification Services & Softwares
Verify Gmail Address via SMTP
Email List Cleaning Software Services
Now, what are you going to do with a huge email list?
If your answer is email advertisements, online marketing, product & service promotions via emails.
In that case, Mailget Bolt is the right choice for your email marketing campaign.
Export Contacts From SendGrid’s Marketing Email API

Managing contacts is an integral part of your marketing campaigns life-cycle. There is a time when you feel like to switch email service providers and the question arises as – ” How to transfer your contacts safely into the new service and keep them intact? “
Well,
Today I’ll show you to export your SendGrid Contacts using SendGrid’s Marketing Email API.
Where,
SendGrid is a transactional email delivery and management service. The service manages various types of email including shipping notifications, friend requests, sign-up confirmations, and email newsletters.
SendGrid creates the lists for identification add recipients email addresses and name in it.
Now,
This tutorial demonstrate on – How to export your SendGrid contact lists. Here, after inserting your SendGrid credentials i.e. your user id and password, all the contacts from different recipient list will be displayed. You can then download this list in the form of excel sheet through the download link.
Watch the live demo or download code from the link given below
Use MailGet – Email Service Provider for Export SendGrid’s Emails List, just connect and send with SendGrid API or SMTP services.
Steps to Export Contacts From SendGrid: –
Step 1 :– Download the latest SendGrid Marketing Email API library.
Step 2 :- Extract the downloaded .zip folder.
Step 3 :- Create a CSS folder within root folder to place style.css and table.css files.
Step 4 :- Create index.php into your root folder and copy the code present under index.php section. Similarly create csvdownload.php and copy the code present under csvdownload.php section.
index.php
It provides an interface for user to fill the SendGrid account details like user name and password which will go to SendGrid’s Marketing Email API for further processing which will export all the contacts present in different recipient lists.
<html>
<head>
<meta charset="UTF-8">
<meta name="viewport" content="width=device-width, initial-scale=1.0">
<link href="css/bootstrap.css" rel="stylesheet" type="text/css"/>
<link href="css/style.css" rel="stylesheet" type="text/css"/>
<link href="css/table.css" rel="stylesheet" type="text/css"/>
<script src="js/jquery.min.js" type="text/javascript"></script>
<title>Export Contacts From SendGrid Via Marketing Email API</title>
<script type = "text/javascript" >
$(document).ready(function() {
$('#demo_keys').click(function() {
$('#dusername').val('ssssssssss');
$('#dpassword').val('xxxxxxxxxxx');
});
});
</script>

<script type="text/javascript">
function validate()
{

if (document.myForm.dusername.value == "")
{
alert("Please enter your User Name!");
document.myForm.dusername.focus();
return false;
}
if (document.myForm.dpassword.value == "")
{
alert("Please enter password!");
document.myForm.dpassword.focus();
return false;
}

return(true);
}
</script>

</head>
<body>
<div class="container">
<div class="row">

</div>
<div class="row">
<div class="col-md-12">
<div id="main">
<h1><b>Export Contacts From SendGrid's Marketing Email API</b></h1>
<a href="#" id="demo_keys" style="float:right; margin:39px 26% -13px 12px;font-weight: bold;font-size: 20px;">Use Demo API Key and Secret Key</a>
<br/><br/>
</div>
</div>
</div>
<div class="row">
<div class="col-md-12">
<div id="content">
<div id="login">
<h2>Enter Your SendGrid Credentials</h2><hr/>
<form name="myForm" action="" method="post" onsubmit="return validate();" >
<label><h3>User Name:</h3> </label> <br/>
<input type="text" name="dusername" id="dusername" placeholder="Enter User Name"/>
<label><h3>Password:</h3> </label> <br/>
<input type="password" name="dpassword" id="dpassword" placeholder="Enter Password"/><br/><br/>
<input type="submit" value="Submit" name="dsubmit" />
<span></span>
</form>
</div>
<br/>
<?php
if (isset($_POST['dsubmit'])) {
error_reporting(0);
require_once "sendgrid/newsletter.php";
if ($_POST['dusername'] == 'ssssssssss') {

$sg_user = "Enter Your SenGrid UserName";
} else {
$sg_user = $_POST['dusername'];
}
if ($_POST['dpassword'] == 'xxxxxxxxxxx') {

$sg_api_key = "Enter Your SenGrid Password";
} else {
$sg_api_key = $_POST['dpassword'];
}
$sendgrid = new sendgridNewsletter($sg_user, $sg_api_key);
$contact1['Tags'] = $sendgrid->newsletter_lists_get($list = '');
foreach ($contact1['Tags'] as $value) {
$contact2['Tags'] = $sendgrid->newsletter_lists_email_get($value['list'], '');
$data[$value['list']] = $contact2['Tags'];
}
echo "<div id="login">";
$data['contact1'] = $contact1['Tags'];
echo " <h2>Contact Lists</h2><hr/>";?>
<a href = "csvdownload.php?<?php echo http_build_query($data); ?>" ><img src = "image/csv.gif" alt = "" style = "float:right; margin: -86px 0px 0px 0px;" />
</a >
<?php echo "<table>";
foreach ($contact1['Tags'] as $value) {
echo "<tr><th>";
echo "Recipient Lists: " . $value['list'];
echo "</th></tr>";
echo "<tr><th>";
echo "Email Addresses";
echo "</th></tr>";

$contact2['Tags'] = $sendgrid->newsletter_lists_email_get($value['list'], '');
foreach ($contact2['Tags'] as $value) {
echo "<tr><td>";
$b = $value['email'];
echo $value['email'];
echo "</td></tr>";
}
}
echo "</table>";
echo "</div>";
}
?>
</div>
</div>
</div>
</body>
</html>
Step 5:- Create csvdownload.php into your root folder and copy the code present under the csvdownload.php section.
csvdownload.php
This code will download the SendGrid account contacts in excel sheet which we are getting in the form of array.
<?php
error_reporting(0);
if (isset($_GET)) {
$data =($_GET);
header("Content-type: text/csv");
header("Content-Disposition: attachment; filename=Contacts.csv");
header("Pragma: no-cache");
header("Expires: 0");
$file = fopen('php://output', 'w');
fputcsv($file, array('List','Email'));
foreach ($data as $value) {
if(key($data) != 'contact1'){
$list = key($data);
foreach ($value as $index){
foreach($index as $email){
$a = $index['email'];
}
fputcsv($file,array($list,$a));
}
next($data);
}
}
exit();
}
?>
Step 6:- Create style.css into your css folder created within the root folder. Once you finished this task just copy css code and paste it into style.css.
style.css
This make front page attractive and look good.
@import url(http://fonts.googleapis.com/css?family=Raleway);

.error{
color: #FF0000;
}

body{
//background-color:#D8C092;
//margin:100px,50px;
//padding:100px,50px;
}

#main{margin:50px auto;
font-family:raleway;
}

span{
color:red;
}

#main h1{
text-align:center;
align:center;
word-spacing:5px;
}

h2{
background-color: #FEFFED;
text-align:center;
border-radius: 10px 10px 0 0;
margin: -10px -40px;
padding: 15px;
}

hr{
border:0;
border-bottom:1px solid #ccc;
margin: 10px -40px;
margin-bottom: 30px;
}

#login{
width:50%;
margin:0 auto;
//display:inline-block;
border-radius: 10px;
font-family:raleway;
border: 2px solid #ccc;
padding: 10px 40px 25px;
}

input[type=text],input[type=password],input[type=email]{
width:99.5%;
padding: 10px;
margin-top: 8px;
border: 1px solid #ccc;
padding-left: 5px;
font-size: 16px;
font-family:raleway;
}

#textarea{
width:99.5%;
padding: 10px;
margin-top: 8px;
border: 1px solid #ccc;
padding-left: 5px;
font-size: 16px;
font-family:raleway;
}

input[type=submit]{
width: 100%;
background-color:#FFBC00;
color: white;
border: 2px solid #FFCB00;
padding: 10px;
font-size:20px;
cursor:pointer;
border-radius: 5px;
margin-bottom: 15px;
}

#profile{
padding:50px;
border:1px dashed grey;
font-size:20px;
background-color:#DCE6F7;
}

#logout{
float:right;
padding:5px;
border:dashed 1px gray;
}

a{
text-decoration:none;
color: cornflowerblue;
}

i{
color: cornflowerblue;
}

#note{
clear: left;
padding-top: 20px;
margin-left: 20px;
font-size: 18px;
text-align: center;
}

#sidebar{
float:left;
}

#content{
alignment-adjust: central;
margin:0 auto;
text-align: left;
}
Step 7:- Create table.css into your css folder created within the root folder. Once you finished this task just copy css code and paste it into table.css.
table.css
table a:link {
color: #666;
font-weight: bold;
text-decoration:none;
}
table a:visited {
color: #999999;
font-weight:bold;
text-decoration:none;
}
table a:active,
table a:hover {
color: #bd5a35;
text-decoration:underline;
}
table {
font-family: 'Raleway', sans-serif;
//color:#666;
font-size:12px;
text-shadow: 1px 1px 0px #fff;
background:#eaebec;
//margin:20px;
border:#ccc 1px solid;
font-size: 16px;
-moz-border-radius:3px;
-webkit-border-radius:3px;
border-radius:3px;

-moz-box-shadow: 0 1px 2px #d1d1d1;
-webkit-box-shadow: 0 1px 2px #d1d1d1;
box-shadow: 0 1px 2px #d1d1d1;
margin: 50px 50px;
width: 85%;

}
table th {
padding:21px 25px 22px 25px;
border-top:1px solid #fafafa;
border-bottom:1px solid #e0e0e0;

background: #ededed;
background: -webkit-gradient(linear, left top, left bottom, from(#ededed), to(#ebebeb));
background: -moz-linear-gradient(top, #ededed, #ebebeb);
}
table th:first-child {
text-indent: center;
padding-left:20px;
}
table tr:first-child th:first-child {
-moz-border-radius-topleft:3px;
-webkit-border-top-left-radius:3px;
border-top-left-radius:3px;
}
table tr:first-child th:last-child {
-moz-border-radius-topright:3px;
-webkit-border-top-right-radius:3px;
border-top-right-radius:3px;
}
table tr {
text-indent: center;
padding-left:20px;
}
table td:first-child {
text-align: center;
padding-left:20px;
border-left: 0;
}
table td {
padding:18px;
border-top: 1px solid #ffffff;
border-bottom:1px solid #e0e0e0;
border-left: 1px solid #e0e0e0;

background: #fafafa;
background: -webkit-gradient(linear, left top, left bottom, from(#fbfbfb), to(#fafafa));
background: -moz-linear-gradient(top, #fbfbfb, #fafafa);
}
table tr.even td {
background: #f6f6f6;
background: -webkit-gradient(linear, left top, left bottom, from(#f8f8f8), to(#f6f6f6));
background: -moz-linear-gradient(top, #f8f8f8, #f6f6f6);
}
table tr:last-child td {
//border-bottom:0;
}
table tr:last-child td:first-child {
-moz-border-radius-bottomleft:3px;
-webkit-border-bottom-left-radius:3px;
border-bottom-left-radius:3px;
}
table tr:last-child td:last-child {
-moz-border-radius-bottomright:3px;
-webkit-border-bottom-right-radius:3px;
border-bottom-right-radius:3px;
}
table tr:hover td {
background: #f2f2f2;
background: -webkit-gradient(linear, left top, left bottom, from(#f2f2f2), to(#f0f0f0));
background: -moz-linear-gradient(top, #f2f2f2, #f0f0f0);
}
thead {
border-top: 2px solid #E8E8E8;
}
Conclusion :
Thus using SendGrid’s Marketing Email API you can export the contacts and download it. Hope you like it, keep reading our other blogs and share your experience in the space given below 🙂
Get more related information here –
- Get Postmark API-Connected User’s Statistics
- Email Open Tracking Using PHP
Export Postmark Contacts Using PHP

This tutorial is all about how we can fetch email contacts from Postmark API. Let me tell you first that this tutorial is not for beginners. If you don’t know how to configure Postmark API in your PHP program, then follow this link Send Email via PostMark API using PHP.
I hope you learn well how to configure postmark API in your app and send mail’s through it.
Now, in this tutorial we first configure postmark API in our program. Then we fetch contacts from postmark. Also, you can download all postmark contact in .xls file by clicking on download button.
Watch the live demo or download code from the link given below

MailGet provides you a well managed email list and allow you to Export PostMark’s Email List. Just connect and send with PostMark API or Any SMTP services.
Steps to fetch Email Contacts from Postmark
- Configure your program with Postmark API. If you don’t know how to configure Postmark API then follow this post Send Email via PostMark API using PHP .
- The Postmark does not provide any contact management, when user send email through postmark it will save contacts in their DB.
- Here we are fetching those contacts.
Tutorial Scripts in detail
Below are the details of the code used in this tutorial with proper explanation.
we are creating object of postmark API :
$client = new PostmarkClient("$apitoken"); we call getOutboundMessages() method through postark API object . and receives an object which contains all contacts and messages :
$allmessages = $client->getOutboundMessages(); Through our logic we fetched unique contacts from that object :
$ar = $allmessages;
$final = array();
$m = 1;
$x = 1;
foreach ($ar as $total_mail_address) {
break;
}
foreach ($ar as $data) {
if ($x == 2) {
for ($i = 0; $i < $total_mail_address; $i++) {
$len_of_dup_emails = count($data[$i]['Recipients']);
for ($j = 0; $j < $len_of_dup_emails; $j++) {
$emailid = $data[$i]['Recipients'][$j];
$finalarrlength = count($final);
for ($outer = 0; $outer < $finalarrlength; $outer++) {
$var1 = $final[$outer];
$var2 = $emailid;
if (strtolower($var1) == strtolower($var2)) {
break;
}
}
if ($outer == $finalarrlength) {
$final[$finalarrlength] = $emailid;
}
$m++;
}
}
}
$x++;
}
saving contacts in session variable
$_SESSION['email_address']=$final; when user clicks on download button . request goes to download.php and it will then print session data in .xls file
index.php
Below file is the main program file in which , we are connecting our API in the program and accessing its features like – creating session , creating object of postmark Client , fetching email address from Postmark API , and save data to session and if download button click then send session data to download.php.
<?php
session_start();
$_SESSION['email_address']=0;
require_once('./vendor/autoload.php');
use PostmarkPostmarkClient;
use PostmarkModelsPostmarkException;
?>
<html>
<head>
<title>
Export Postmark Contacts Using PHP
</title>
<meta name="viewport" content="width=device-width, initial-scale=1.0">
<script src="js/jquery-1.11.3.min.js" type="text/javascript"></script>
<script src="js/bootstrap.js" type="text/javascript"></script>
<link href="css/bootstrap.css" rel="stylesheet" type="text/css"/>
<link href="css/style.css" rel="stylesheet" type="text/css"/>
<link href="css/table.css" rel="stylesheet" type="text/css"/>
<script type="text/javascript">
$(document).ready(function() {
$("a#demo_key").click(function() {
var key = "xxxxxxxxxxx";
$("input#demo_postmark_key").val(key);
});
});
</script>
</head>
<body>
<div class="container">
<div class="row">
<div class="col-md-12">
<div id="main">
<h1>Export Postmark Contacts Using PHP</h1>
</div>
</div>
<div class="col-md-12">
<div class="matter">
<div id="login">
<h2>Get Contacts</h2>
<hr/>
<form action="index.php" method="post">
<label class="lab">Enter POSTMARK Server API token</label>
<?php
if (isset($_POST['submit'])) {
$password = $_POST['password'];
echo "<input id='demo_postmark_key' type='text' name='password' value='$password' required/>";
} else {
echo " <input id='demo_postmark_key' type='text' name='password' required/>";
}
?>
<a id="demo_key" href="#">Use Demo Server Key</a>
<input type="submit" value="Submit" name="submit"/><br />
<span></span>
</form>
</div>
</div>
</div>
</div>
<!-- Right side div -->
<?php
if (isset($_POST['submit'])) {
$password = $_POST['password'];
if ($password == "xxxxxxxxxxx") {
$apitoken = "enter your  POSTMARK Server API token";
} else {
$apitoken = $_POST['password'];
}
try {
$client = new PostmarkClient("$apitoken");
$allmessages = $client->getOutboundMessages();
$ar = $allmessages;
$final = array();
$m = 1;
$x = 1;
foreach ($ar as $total_mail_address) {
break;
}
foreach ($ar as $data) {
if ($x == 2) {
for ($i = 0; $i < $total_mail_address; $i++) {
$len_of_dup_emails = count($data[$i]['Recipients']);
for ($j = 0; $j < $len_of_dup_emails; $j++) {
$emailid = $data[$i]['Recipients'][$j];
$finalarrlength = count($final);
for ($outer = 0; $outer < $finalarrlength; $outer++) {
$var1 = $final[$outer];
$var2 = $emailid;
if (strtolower($var1) == strtolower($var2)) {
break;
}
}
if ($outer == $finalarrlength) {
$final[$finalarrlength] = $emailid;
}
$m++;
}
}
}
$x++;
}
$_SESSION['email_address']=$final;
?>
<center> <h3> Email Address List</h3></center>
<?php
echo "<div style='width:40%; margin:0 auto; '>";
echo "<form action='download.php' method='post' >";
echo "<input type='password' name='password' value='$password' hidden>";
echo "<input type='text' name='download' value='' hidden>";
echo "<input type='submit' value='Download Excel' name='submit'>";
echo "</form>";
echo "</div>";
?>
<table class="bouncetable">
<thead>
<td id="name">S.No</td>
<td>Email</td>
</thead>
<?php
for($i=0;$i<count($final);$i++){
$sno=$i+1;
echo "<tr><td>$sno</td>";
echo "<td>$final[$i]</td></tr>";
}
?>
</table>
<?php
} catch (PostmarkException $ex) {
// If client is able to communicate with the API in a timely fashion,
// but the message data is invalid, or there's a server error,
// a PostmarkException can be thrown.
echo "<script>alert('invalid api token ');</script>";
} catch (Exception $generalException) {
echo "<script>alert('ERROR ');</script>";
}
}
?>
</div>
</body>
</html>
download.php
index.php file will store contacts in session variable now , when user clicks the download button . download.php gets call and fetch session data and save that data in .xls file to the user .
 <?php
session_start();
if(isset($_SESSION['email_address'])){
$final=$_SESSION['email_address'];
$x = 1;
foreach ($final as $email) {
$data[$x] = array('S.NO.' => "$x", 'Email-Address' => "$email");
$x++;
}
$filename = "EMAIL-ADDRESS" . ".xls";
header("Content-Type: application/vnd.ms-excel");
header("Content-Disposition: attachment; filename="$filename"");
$heading = false;
if (!empty($data))
foreach ($data as $row) {
if (!$heading) {
// display field/column names as a first row
echo implode("t", array_keys($row)) . "n";
$heading = true;
}
echo implode("t", array_values($row)) . "n";
}
exit;

}
?>
style.css
The below file contains all the basic styling of page .
 @import url(http://fonts.googleapis.com/css?family=Raleway);

#main{
margin:50px auto;
font-family:raleway;
}
span{
color:red;
}
h2{
font-weight: 600;
background-color: #FEFFED;
text-align:center;
border-radius: 10px 10px 0 0;
margin: -10px -40px;
padding: 15px;
}
hr{
border:0;
border-bottom:1px solid #ccc;
margin: 10px -40px;
margin-bottom: 30px;
}
#login{
width:40%;;
margin:0 auto;
display:inline-block;
border-radius: 10px;
font-family:raleway;
border: 2px solid #ccc;
padding: 10px 40px 25px;
}
textarea{
margin-top: 8px;
font-size: 16px;
font-family:raleway;
}
input[type=radio]{
margin-top: 8px;
}
input[type=text],[type=email],input[type=password]{
width:99.5%;
padding: 10px;
margin-top: 8px;
border: 1px solid #ccc;
padding-left: 5px;
font-size: 16px;
font-family:raleway;
}
input[type=submit]{
width: 100%;
background-color:#FFBC00;
color: white;
border: 2px solid #FFCB00;
padding: 10px;
font-size:20px;
cursor:pointer;
border-radius: 5px;
margin-bottom: 15px;
}
#profile{
padding:50px;
border:1px dashed grey;
font-size:20px;
background-color:#DCE6F7;
}
#logout{
float:right;
padding:5px;
border:dashed 1px gray;
}
a{
text-decoration:none;
color: cornflowerblue;
}
i{
color: cornflowerblue;
}#note {
clear: left;
padding-top: 20px;
margin-left: 20px;
font-size: 18px;
}
#formget{
float:right;
}
h1{
font-weight: 600;
text-align: center;
display:inlne;
alignment-adjust: center;
margin:0 auto;
width:100%;
}
textarea[type=text]{
width:100%;
height:200px;
}
.matter{
alignment-adjust: central;
margin:0 auto;
text-align: center;
}
.clr{
clear:left;
}
.lab{
font-size: 110%;
float:left;
}
thead {
border-top: 3px solid #DEDEDE;
}
h3 {
margin-top: 52px !important;
}
table.css
The below file contais all the styling of table present in the program .
table a:link {
color: #666;
font-weight: bold;
text-decoration:none;
}
table a:visited {
color: #999999;
font-weight:bold;
text-decoration:none;
}
table a:active,
table a:hover {
color: #bd5a35;
text-decoration:underline;
}
table {
font-family: 'Raleway', sans-serif;
font-size:12px;
text-shadow: 1px 1px 0px #fff;
background:#eaebec;
border:#ccc 1px solid;
font-size: 16px;
-moz-border-radius:3px;
-webkit-border-radius:3px;
border-radius:3px;
-moz-box-shadow: 0 1px 2px #d1d1d1;
-webkit-box-shadow: 0 1px 2px #d1d1d1;
box-shadow: 0 1px 2px #d1d1d1;
border-radius:80px;
margin: 20px auto;
width:40%;
}
table th {
padding:21px 25px 22px 25px;
border-top:1px solid #fafafa;
border-bottom:1px solid #e0e0e0;
background: #ededed;
background: -webkit-gradient(linear, left top, left bottom, from(#ededed), to(#ebebeb));
background: -moz-linear-gradient(top, #ededed, #ebebeb);
}
table th:first-child {
text-indent: center;
padding-left:20px;
}
table tr:first-child th:first-child {
-moz-border-radius-topleft:3px;
-webkit-border-top-left-radius:3px;
border-top-left-radius:3px;
}
table tr:first-child th:last-child {
-moz-border-radius-topright:3px;
-webkit-border-top-right-radius:3px;
border-top-right-radius:3px;
}
table tr {
text-indent: center;
padding-left:20px;
}
table td:first-child {
text-align: center;
padding-left:20px;
border-left: 0;
}
table td {
padding:18px;
border-top: 1px solid #ffffff;
border-bottom:1px solid #e0e0e0;
border-left: 1px solid #e0e0e0;
background: #fafafa;
background: -webkit-gradient(linear, left top, left bottom, from(#fbfbfb), to(#fafafa));
background: -moz-linear-gradient(top, #fbfbfb, #fafafa);
}
table tr.even td {
background: #f6f6f6;
background: -webkit-gradient(linear, left top, left bottom, from(#f8f8f8), to(#f6f6f6));
background: -moz-linear-gradient(top, #f8f8f8, #f6f6f6);
}
table tr:last-child td:first-child {
-moz-border-radius-bottomleft:3px;
-webkit-border-bottom-left-radius:3px;
border-bottom-left-radius:3px;
}
table tr:last-child td:last-child {
-moz-border-radius-bottomright:3px;
-webkit-border-bottom-right-radius:3px;
border-bottom-right-radius:3px;
}
table tr:hover td {
background: #f2f2f2;
background: -webkit-gradient(linear, left top, left bottom, from(#f2f2f2), to(#f0f0f0));
background: -moz-linear-gradient(top, #f2f2f2, #f0f0f0);
}
Conclusion :
That’s all about how to fetch email addresses of postmark API from your PHP web app. I am sure you will try this script and add it in your few programs too. Feel free to visit our site for more interesting tutorials . you can give your feedback in the space provided below.
Get more related information through following blogs –
- PHP Mailgun
- Unsubscribe PHP :Add an Unsubscribe Link to an Email
Chrome Extension Tutorial to Display RSS Blog Feeds

Hello! As you might already know that a person can receive blog feeds on email or on a website. But you need not surprise when I say that you can also create a Google Chrome Browser extension for this. So your user can see all latest feeds just by a click on an icon, that’ll display RSS feeds from the server.
Chrome is now one of the most popular web browsers and you can’t ignore its utilization in increasing your users.Creating a chrome extension of your service has become a necessity and it is also not too much tough. So let’s begin creating your first extension to display RSS feeds.
Watch the live demo or download code from the link given below

What is an extension
Google provides various APIs to create a program which runs inside the browser and extends the browser’s functionality.That is why such programs are called extensions.
There are many limitations while creating an extension since google is much strict towards the data security.So you must consider these following limitations in your mind before you proceed to code for an extension-
1.] The popup to display should be purely HTML and JavaScript and jQuery is the only thing to manage all content.
2.] To create dynamic content, prefer to use external Javascript in any page of the extension.
3.] Chrome blocks all links which don’t have a “target” property set to “_blank”.
4.] If you are linking some files from google servers it is better to download them into your extension. If it is still necessary then prefer “HTTPS” over “HTTP”.
How to create extension
The first file you need to create in order to create an extension is a JSON formatted “manifest” file, and it is compulsory that you name the file as “manifest.json”.The file manifest contains all metadata about your extension.Here you provide a name of your extension, some description about it, also the version, permission to the resources from your extension would require accessing data. You can choose either browser action or page action depending on your extensions requirements. Here I’ve chosen browser action and provided the details of my extension’s icon, popup page, and its default title.
manifest.json
{
"manifest_version": 2,
"name": "Formget Latest Blogs",
"description": "This extension displays the latest blog updates from FormGet.",
"version": "1.0",
"browser_action":
{
"default_icon": "formget_favicons.png",
"default_popup": "popup-page.html",
"default_title":"Formget Updates"
},
"permissions": [ tabs],
"content_security_policy": "script-src 'self' https://www.google.com;object-src 'self'"
}
Then create a HTML file with name “popup-page.html”. This file will be rendered inside the popup of your extension. Since we’ll be displaying feed at runtime, so there is an empty division<div> with id given”feed”, into which dynamically data will be populated.
popup-page.html
<!DOCTYPE html PUBLIC "-//W3C//DTD XHTML 1.0 Transitional//EN" "http://www.w3.org/TR/xhtml1/DTD/xhtml1-transitional.dtd">
<html xmlns="http://www.w3.org/1999/xhtml">
<head>
<title>Formget Latest Blogs</title>
<script type="text/javascript" src="jquery.min.js"></script>
<script type="text/javascript" src="jquery.parss.js"></script>
<script type="text/javascript" src="myjs.js"></script>
<link rel="stylesheet" href="mycss.css" type="text/css" media="all">
</head>
<body id="main-body">
<div id="box">
<div id="logo"><a href="https://www.formget.com" target="_blank"><img src="img/formget-logo.png" alt="Formget logo"></a></div>
<div id="blog-head">
<div id="blog_head_con">
<a href="https://www.formget.com/blog" target="_blank">
<img src="img/blog.png" alt="formbuilder">
<span class="logo-inner">Latest Blog listing</span>
</a>
</div>
</div>
<!--Below div used to place RSSfeed data fetched from server-->
<div id="feed"></div>
</div>
</body>
</html>
Now create the “heart” of our extension, a Javascript file. Every dynamic content on our popup page is delivered through javascript. Since chrome allows only external javascript, we need to create a file with name “myjs.js”. Here “jquery.parss.js” library is used, to fetch RSS feeds from your server. It directly puts the <title>, <date>, <description> etc. in <li> tags.
myjs.js
$(document).ready(function(){
$("#feed").PaRSS(
"https://www.formget.com/feed/", // (feed_url,item_count,date_format,show_descriptions)
10,
"M jS g:i a",
true
);
window.addEventListener('click',function(e){ // To open injected hyperlinks in new tabs, chrome block them otherwise.
if(e.target.href!==undefined){
chrome.tabs.create({url:e.target.href})
}
});
});
mycss.css
#main-body{
margin:0;
}
#box{
width:400px;
font-family:raleway,Arial, Helvetica, sans-serif;
}
#feed{
list-style:none;
background-color:#FFFFFF;
margin-top:134px;
}
li:before{
content:'';
display:inline-block;
height: 45px;
width: 45px;
background-image:url(img/author.png);
border-radius:30px;
background-size:contain;
background-repeat:no-repeat; }
li{
border:1px solid #CBCBCB;
padding:5px;
box-shadow: 0px 5px 17px 1px #99A3AD, 0px 0px 40px #EEEEEE;
margin-top: 20px;
margin: 10px;
}
li:hover{
transform: scale(1.02);
}
#logo{
margin-top:-10px;
background-color:#0c79c3;
padding: 14px;
z-index:99999;
position: fixed;
top: 0;
left: 0;
width: 400px;
}
#blog-head{
padding:5px 0 5px 5px;
background-color:#3C3C3C;
box-shadow: 0px 5px 17px 1px #505050, 0px 0px 40px #1ABBFF;
z-index:99999;
position: fixed;
top:58px;
left: 0;
width: 400px;
}
.logo-inner{
color:#fff;
font-size: 16px;
vertical-align: bottom;
display: inline-block;
margin-left: 5px;
padding: 14px;
}
.parss-date, .parss-image {
display: block;
float: right;
margin-top: -6px;
color: #888888;
}
.parss-title a {
font-size: 16px;
margin-top: 9px;
margin-left: 10px;
position: absolute;
color: #0C79C3;
text-decoration: none;
text-overflow: ellipsis;
display: inline-block;
width: 275px;
white-space: nowrap;
overflow: hidden;
vertical-align: top;
}
.parss-title a:hover{
color:#003399;
}
.parss-description{
font-size: 17px;
font-size: 14px;
color: #8A8A8A;
-webkit-margin-after: 0.5em;
-webkit-margin-start: 0px;
-webkit-margin-end: 0px;
text-overflow: ellipsis;
display: inline-block;
width: 275px;
white-space: nowrap;
overflow: hidden;
vertical-align: top;
margin-left: 55px;
margin-top: -12px;
}
.parss-description:after{
content:'...';
}
div#blog-head img {
margin: 0 -10px 7px 0;
}
div#logo img {
margin: 0 34%;
}
div#blog_head_con {
margin: 0 0 0 30%;
}
Load the extension locally
Now you have all required files ready so you need your extension to start working in a chrome. You can load your extension in following steps:
- Directly type “chrome://extensions” in the address bar. Alternatively you can click on menu icon
 then click “more tools->extensions”.
 - Now check the “Developer Mode” checkbox on the top of the page.
- Click on “Load Unpacked Extensions” button and give the path of your extension folder residing in your local system.
Your extension’s icon will start displaying in the extension bar of the browser. Click on it and see what we’ve done so far!
Conclusion
This was the easiest kind of extension you will build. But you can work more on it to increase the functionality. I hope that the post was helpful for you to create a simple RSS feed extension successfully. I tried to keep things simple and clear. Keep visiting our website, Thank you !!
For more information go thorugh following blogs –
- Javascript Login Form
- Form Submit Without Page Refreshing– jQuery/PHP
- How To Create Pop-up Contact Form Using JavaScript
Export Hotmail/Live/Outlook Contacts Using PHP

Hey, Folks!
In this blog post, we’re going to learn how to manage email list by exporting Microsoft live contacts in a CSV file.
Microsoft has created a synchronized system. All the contacts saved in any Microsoft service will get save in a single place, i.e., PEOPLE service offered by Microsoft.
It doesn’t matter which service or device you’re using, whether its outlook, Hotmail, windows mobile, desktop, tablet.
If your Microsoft account is associated with them, it will get saved on the cloud on the People’s service.
So, Microsoft has offered a single API to access these contacts.
We’re going to use the same API to export contacts from the Microsoft account.
Let’s begin.
Watch the live demo or download code from the link given below

You can take a look at our premium service MailGet – email service provider for a quick solution.
Registering Application:
First of all we need to register an application with a microsoft account. You can register your application here.
Let’s take a look at how to register.
After login to Microsoft, you’ll see the following window.

After entering application name. Click on I accept. Your application will get created and following window will get appear.

You can see your application’s name. My application’s name is ‘Export Contacts’. Then click on API Settings. You will get following window.

You need to mention the redirection URL which you’re going to use in your PHP program. Now Click on APP Settings.
You can get your Client ID & Client Secret from here. This Client ID & Secret will get use in our PHP Program.
So this is how we’re going to register and create application.
Process:
Let’s take a look at the process step by step.
- The user will be asked to log in to Microsoft account.
- The user will be redirected to the Microsoft login page.
- After entering the credentials, it will then redirect user to the page where contacts will get displayed.
- After this, the user can get download the contacts in the CSV format with the CSV image button, or he can log out from logout button.
So, above is the complete process to export contacts in microsoft.
PHP File: index.php
This is the first page in which user will be asked to sign in to microsoft account.
<?php
$client_id = 'ENTER CLIENT ID';
$client_secret = 'ENTER CLIENT SECRET';
$redirect_uri = 'http://formget.com/tutorial/export-hotmail-contacts/oauth-hotmail.php';
$urls_ = 'https://login.live.com/oauth20_authorize.srf?client_id='.$client_id.'&scope=wl.signin%20wl.basic%20wl.emails%20wl.contacts_emails&response_type=code&redirect_uri='.$redirect_uri;
?>
<html>
<head>
<title>Export Hotmail Contacts Using PHP</title>
<link href="bootstrap/css/bootstrap.css" rel="stylesheet" type="text/css"/>
<link href="css/style.css" rel="stylesheet" type="text/css"/>
</head>
<body>
<div class="container-fluid">
<h1>Export Hotmail Contacts Using PHP</h1>
<div id="login">
<div class="row">
<div class="col-md-12">
<h2 id="h2">Microsoft Sign-in</h2>
</div>
</div>
<div class="row">
<div class="col-md-12">
<a id="signin" href="<?php echo $urls_; ?>"><img id="signinwithms" class="img-responsive" src="http://formget.com/tutorial/export-hotmail-contacts/images/Microsoft.png"></a>
</div>
</div>
</div>
</div>
</body>
</html>
PHP File: oauth_hotmail.php
This is the main file in which contacts are getting fetched and displayed.
<?php
//function for parsing the curl request
session_start();
$client_id = 'ENTER CLIENT ID';
$client_secret = 'ENTER CLIENT SECRET';
$redirect_uri = 'http://formget.com/tutorial/export-hotmail-contacts/oauth-hotmail.php';
//$redirect_uri = 'http://locahost/export-hotmail-contacts/oauth-hotmail.php';
$auth_code = $_GET["code"];
$fields=array(
'code'=> urlencode($auth_code),
'client_id'=> urlencode($client_id),
'client_secret'=> urlencode($client_secret),
'redirect_uri'=> urlencode($redirect_uri),
'grant_type'=> urlencode('authorization_code')
);
$post = '';
foreach($fields as $key=>$value) { $post .= $key.'='.$value.'&'; }
$post = rtrim($post,'&');
$curl = curl_init();
curl_setopt($curl,CURLOPT_URL,'https://login.live.com/oauth20_token.srf');
curl_setopt($curl,CURLOPT_POST,5);
curl_setopt($curl,CURLOPT_POSTFIELDS,$post);
curl_setopt($curl, CURLOPT_RETURNTRANSFER,TRUE);
curl_setopt($curl, CURLOPT_SSL_VERIFYPEER,0);
$result = curl_exec($curl);
curl_close($curl);
$response = json_decode($result);
if(isset($response->access_token)){
$_SESSION['access_token'] = $response->access_token;
$accesstoken = $_SESSION['access_token'];
}
if(isset($_GET['code']))
{
$accesstoken = $_SESSION['access_token'];
}
$url = 'https://apis.live.net/v5.0/me/contacts?access_token='.$accesstoken;
$response = file_get_contents($url);
$response = json_decode($response, true);
$data = $response['data'];
?>

<html>
<head>
<title>Export Hotmail Contacts Using PHP</title>
<link href="bootstrap/css/bootstrap.css" rel="stylesheet" type="text/css"/>
<link href="css/style.css" rel="stylesheet" type="text/css"/>
<script src="js/logout.js" type="text/javascript"></script>
<meta name="robots" content="noindex, nofollow">
<script type="text/javascript">
var _gaq = _gaq || [];
_gaq.push(['_setAccount', 'UA-43981329-1']);
_gaq.push(['_trackPageview']);
(function () {
var ga = document.createElement('script');
ga.type = 'text/javascript';
ga.async = true;
ga.src = ('https:' == document.location.protocol ? 'https://ssl' : 'http://www') + '.google-analytics.com/ga.js';
var s = document.getElementsByTagName('script')[0];
s.parentNode.insertBefore(ga, s);
})();
</script>
</head>
<body>
<div class="container-fluid">
<h1>Export Hotmail Contacts Using PHP</h1>
<div id="login">
<div id="h2" class="h2 row">
<div class="csv col-md-3"><a href ="http://formget.com/tutorial/export-hotmail-contacts/download.php?<?php echo http_build_query($data); ?>" id="download"><img class="img-responsive" src="images/download-csv-icon.gif"></a></div>
<div class="col-md-6"><h2><span>Hotmail Contacts</span></h2></div>
<div class="col-md-3"><a href ="#" onclick="caller()" id="logout"><img class="img-responsive" src="images/button-power_green.png"></a></div>
</div>
<div class="row">
<div class="col-md-12">
<table cellspacing='0'>
<thead>
<td>Name</td>
<td>Email</td>
</thead>
<?php
foreach ($response['data'] as $emails) {?>
<tr>
<td><?php echo $emails['name']; ?></td>
<td><?php print_r($emails['emails']['preferred']); ?></td>
</tr>
<?php }
?>
</table>
</div>
</div>
</div>
</div>
</body>
</html>
CSS File: style.css
This is the CSS file for index.php and oauth_hotmail.php
@import url(http://fonts.googleapis.com/css?family=Raleway);

#h2{
background-color: #FEFFED;
text-align:center;
border-radius: 10px 10px 0 0;
border-bottom: 1px solid #ccc;
color: black;
font-weight: bolder;
font-size: 2em;
margin: 0px -15px;
padding: 8% 0;
font-family:raleway;
}
.wrap{
width: 33%;
margin: 5% auto;
}
.container-fluid{
width: 44%;
margin: auto auto;
}
#login{
border: 2px solid #ccc;
border-radius: 10px;
font-family:raleway;
}
#signinwithms{
margin: auto;
width: 50%;
padding: 1% 0;
}
h1{
padding: 6% 0;
font-family:raleway;
text-align: center;
}
.csv{
margin: auto;
}
.h2{
margin: 0 !important;
padding: 2% 0 !important;
}
img{
padding: 10% 25%;
}
table {
font-family: 'Raleway', sans-serif;
font-size:12px;
text-shadow: 1px 1px 0px #fff;
border:#ccc 1px solid;
font-size: 16px;
-moz-border-radius:3px;
-webkit-border-radius:3px;
border-radius:3px;
-moz-box-shadow: 0 1px 2px #d1d1d1;
-webkit-box-shadow: 0 1px 2px #d1d1d1;
box-shadow: 0 1px 2px #d1d1d1;
width: 90%;
margin: 7% auto;
}
table td{
padding: 18px;
text-align: center;
border-bottom: 1px solid #e0e0e0;
border-right: 1px solid #e0e0e0;
}
thead{
font-weight: bold;
}
table tr:hover td {
background: #f2f2f2;
background: -webkit-gradient(linear, left top, left bottom, from(#f2f2f2), to(#f0f0f0));
background: -moz-linear-gradient(top, #f2f2f2, #f0f0f0);
}
JavaScript File: Logout.js
This is the js file responsible for logout.
function call()
{
popup = window.open('https://login.live.com/logout.srf?ct=1441367969&rver=6.4.6456.0&lc=1033&id=64855&ru=https:%2F%2Fbay172.mail.live.com%2Fhandlers%2FSignout.mvc%3Fservice%3DLive.Mail%26mkt%3Den-in&mkt=en-in');
setTimeout(wait, 4000);
}
function caller()
{
call();
}

function wait()
{
popup.close();
window.location.href = 'http://formget.com/tutorial/index.php';
}
Explanation of the main file : oauth_hotmail.php
First step is to start the session
session_start();Now we need to set the client credentials.
$client_id = 'ENTER CLIENT ID';
$client_secret = 'ENTER CLIENT SECRET';
$redirect_uri = 'http://formget.com/tutorial/export-hotmail-contacts/oauth-hotmail.php';
Below line is to set the authentication code.
$auth_code = $_GET["code"];Below code is to set and encode the parameters which are going to pass in URL.
$fields=array(
'code'=> urlencode($auth_code),
'client_id'=> urlencode($client_id),
'client_secret'=> urlencode($client_secret),
'redirect_uri'=> urlencode($redirect_uri),
'grant_type'=> urlencode('authorization_code')
);
Below code is building url which is going to append on the login URL.
foreach($fields as $key=>$value) { $post .= $key.'='.$value.'&'; }
$post = rtrim($post,'&');
In below code, we’re using curl to reach the login URL.
$curl = curl_init();
curl_setopt($curl,CURLOPT_URL,'https://login.live.com/oauth20_token.srf');
curl_setopt($curl,CURLOPT_POST,5);
curl_setopt($curl,CURLOPT_POSTFIELDS,$post);
curl_setopt($curl, CURLOPT_RETURNTRANSFER,TRUE);
curl_setopt($curl, CURLOPT_SSL_VERIFYPEER,0);
$result = curl_exec($curl);
curl_close($curl);
Below line is collecting response of the curl call in the $response variable
$response = json_decode($result);Below code is to check whether access token is set or not. If it is set then it will be stored in a SESSION variable to reuse it for refresh token.
if(isset($response->access_token)){
$_SESSION['access_token'] = $response->access_token;
$accesstoken = $_SESSION['access_token'];
}
Below code is to set refresh token. It will check if the code is set in the URL, then the access token we stored in SESSION variable will get stored in access token.
if(isset($_GET['code']))
{
$accesstoken = $_SESSION['access_token'];
}
Following code is responsible for fetching the contacts once authorization process get completed.
$url = 'https://apis.live.net/v5.0/me/contacts?access_token='.$accesstoken;
$response = file_get_contents($url);
$response = json_decode($response, true);
$data = $response['data'];
Conclusion:
I hope that at this point you must be feeling comfortable with importing Microsoft contacts in PHP. Please comment for any query. Keep visiting our website.
Mandrill SMTP With MailGet : Complete Setup

Today, we are going to learn how to generate Mandrill API Key so that we can use it in our application.
But, before generating API-key, I am giving you a brief explanation of exactly what Mandrill is and why we need Mandrill API/SMTP integration into our application or websites.
Mandrill is basically an email infrastructure service developed by MailChimp. It was started as an idea in 2010 but, became the reality in 2022.
Mandrill is designed to help users who need to send a transactional email like password resets, order confirmations, and welcome messages. Technically, users can send any legal, non-spam emails through Mandrill.
Mandrill also offers advanced tracking, easy-to-understand reports & email templates.
Why Mandrill API Key is Needed?
Mandrill allows users to send emails through the Mandrill API or SMTP integration. Integration process requires a key to access Mandrill API and send emails, get information about the account, and view or parse reporting data in your own app or system.
MailGet is an online email management service which allows you to send bulk as well as grid email through Mandrill. You only need mandrill credentials to integrate SMTP service in MailGet to send emails.
It also provide a dashboard to store and manage your users and sent messages information in your account. This service very effective and have very low maintenance cost.
How to Generate Mandrill API Key?
Generating Mandrill API Key is an easy and simple process which I am going to explain step-by-step.
Step 1: – Click on the Mandrill SignUp link and create your username and password for Mandrill account.

Step 2: – After successful registration, you will get Mandrill dashboard where you will have fill some necessary details for your Mandrill account.

Step 3: – Now, you have your dashboard and you will get API configuration section. Just click on “Get API Keys” button.

Step 4: – You will get a pop-up, which required your account password for verification. Just enter your account password and click on “Verify Password” button.

Step 5: – Now, you will get a button in your dashboard to Add API Keys. Just click on it.

Step 6: – Under API Keys section, you will get your Mandrill API key. You can also generate more keys to use in different applications or websites.

Hurray!!! You got your Mandrill API Key. Use it in your application and enjoy…
Connect Mandrill SMTP with MailGet
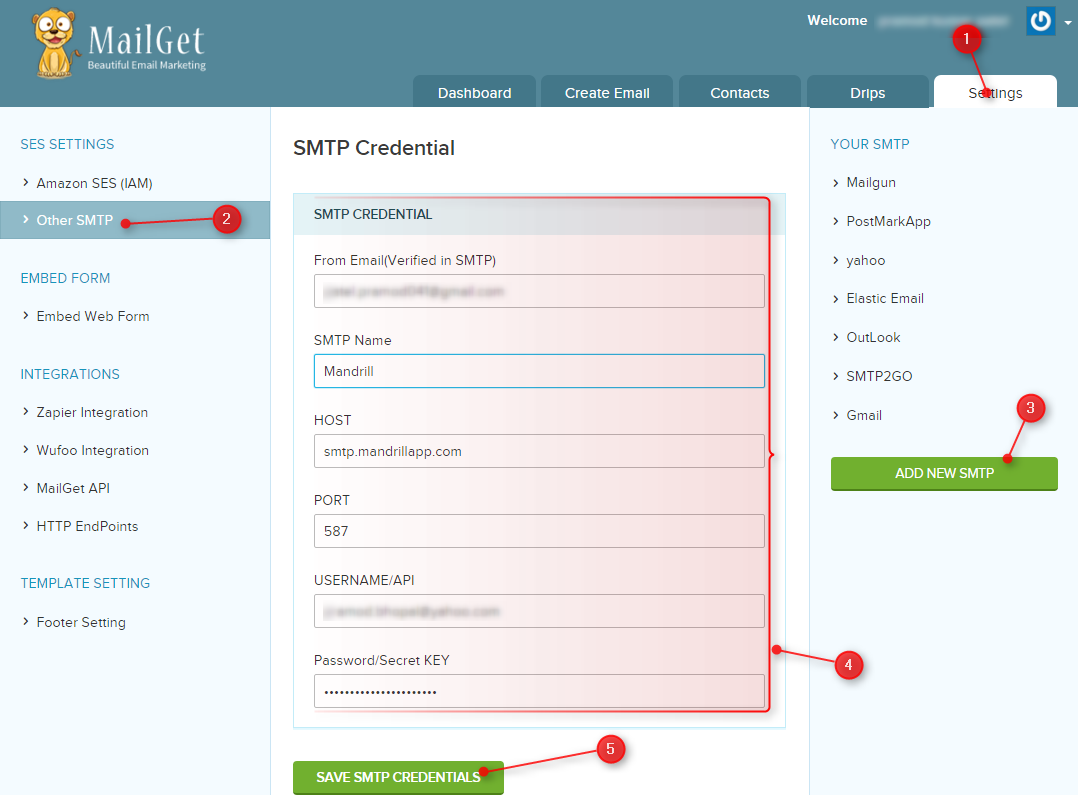
Step: 1 Go to your MailGet dashboard and click on “Settings” tab.
Step: 2 On setting page click on “Other SMTP” link in left sidebar to open SMTP setting section.
Step: 3 Now you will see a green button “ADD NEW SMTP” on the right side, click on that button to add Mandrill SMTP.
Step: 4 When you will click on “ADD NEW SMTP” button, a new form will open. You have to fill all the information in form as listed below to connect MailGet With Mandrill .
From Email: From Email address( which one you have used to create account in Mandrill ) for your Email Campaign.
SMTP Name: You can set any name to recognize Mandrill SMTP.
HOST: smtp.mandrillapp.com
PORT: 587
USERNAME/API: Mandrill Account Login Email address.
PASSWORD/Secret KEY: Mandrill API Key.
Step: 5 After filling form click on the green button “SAVE SMTP CREDENTIALS” to save details.
Now your Mandrill SMTP is connected with your MailGet Account to send emails.
Setup Mandrill Account for Handling Bounces & Spam Emails
If your mailing list has many invalid email addresses, it may result in a hard bounce rate. It can harm the reputation of your Mandrill account and your account may even get blocked as per the terms and conditions of Mandrill.
We suggest you to configure your Mandrill account with MailGet. It will enable Mandrill to report to Mailget regarding bounced as long as spammed emails.
With the help of that report, MailGet removes invalid (bounce) and spam emails from your recipients list.
So that next time when your emails will be sent, bounced & spam emails addresses will be auto filtered out.
Follow these steps:
Step : 1 click on “Setting after then click on Webhooks” option.

Step : 2 click on “Add a Webhook” Button.

Step : 3 check “Message is Bounced & Message is Marked As Spam” then Enter “Post To URl” which will be provide by Mailget then enter “Description” after then click on “Create Webhook” Button.
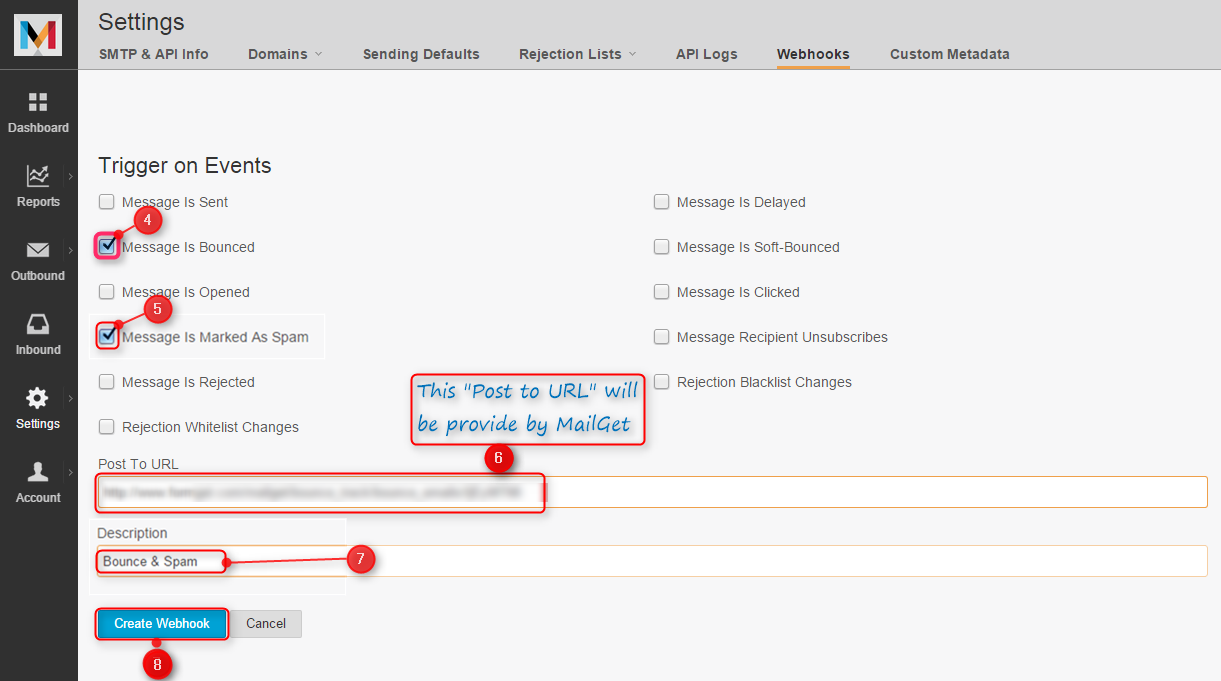
Step : 4 After then confirmation will be display “Webhook successfully saved“.
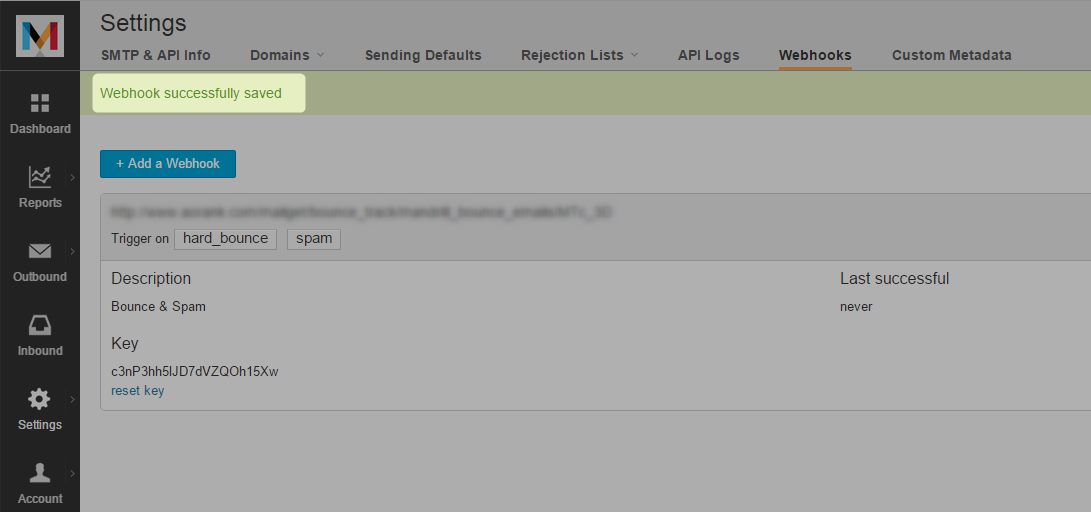
Conclusion: –
Hope this blog will explain you a clear and simple procedure to generate Mandrill API Key. Must create a Mandrill API Key and use it in your application for sending emails. You can share your views in the space given below.

Export Mailjet Contacts Using PHP

This tutorial demonstrate you how to do a proper email list management by exporting your Mailjet contacts.
After inserting your Mailjet API key and Secret key, all the contacts from different contact list will be displayed. Here we have used dummy Mailjet API key and Secret key for exporting contacts from Mailjet account.
If you want to export your contacts from Mailjet account then you must have your own API key and Secret key. You can then download this list in the form of excel sheet through the download link.
For this, we are going to use MailJet API.
Watch the live demo or download code from the link given below

MailGet – Email Service Provider povides a perfect and well managed list management services for Sending Emails. Just connect and send with MailJet API or SMTP services.
Steps to Export Contacts From MailJet : –
Step 1:– Download the latest MailJet API library .zip folder
Step 2:- Extract the downloaded .zip folder.
Step 3:- Create a lib folder in the root folder, copy & paste all the files available in the src folder of extracted zip folder.
Step 4:- Create index.php into your root folder and copy the code present under index.php section.
Tutorial Scripts in detail
Below are the details of the code used in this tutorial with proper explanation.
index.php
It provides an interface for user to fill the Mailjet account details like Mailjet API Key and Mailjet Secret Key which will go to Mailjet Api for further processing which will export all the contacts present in the all the contact list.
<html>
<head>
<title>Export Mailjet Contacts Using PHP</title>
<meta name="robots" content="noindex, nofollow">
<link href="css/style.css" rel="stylesheet" type="text/css"/>
<link href="css/table.css" rel="stylesheet" type="text/css"/>
<link href="css/bootstrap.css" rel="stylesheet" type="text/css"/>
<script src="js/bootstrap.js" type="text/javascript"></script>
<script src="js/jquery.min.js" type="text/javascript"></script>
<meta name="robots" content="noindex, nofollow">
<script type="text/javascript">
var _gaq = _gaq || [];
_gaq.push(['_setAccount', 'UA-43981329-1']);
_gaq.push(['_trackPageview']);
(function() {
var ga = document.createElement('script');
ga.type = 'text/javascript';
ga.async = true;
ga.src = ('https:' == document.location.protocol ? 'https://ssl' : 'http://www') + '.google-analytics.com/ga.js';
var s = document.getElementsByTagName('script')[0];
s.parentNode.insertBefore(ga, s);
})();
</script>
<script type = "text/javascript" >
$(document).ready(function() {
$('#demo_keys').click(function() {
$('#api_key').val('xxxxxxxxxxx');
$('#secret_key').val('ssssssssss');
});
});
</script>

</script>
</head>
<body>
<div class="container">
<div class='wrap'>
<div class='row'>
<div id="main" class="col-xs-12 col-sm-6 col-md-4 ">
<h1 id='h1'>Export Mailjet Contacts Using PHP</h1>
<a href="#" id="demo_keys" style="float:right; margin:35px 0px -14px 0px;font-weight: bold;font-size: 20px;">Use Demo API Key and Secret Key</a>
</div>
</div>

<div class='row' >
<div id="login" class="col-xs-12 col-sm-6 col-md-4 ">
<div style='margin-top:-30px;'>
<h2>Get Contacts</h2>
<div style="margin: 20px 10px;">
<form action="" method="post" name='myForm' onsubmit="return validate();">
<label>Insert Mailjet API Key : </label>
<input type='text' name='api_key' id='api_key' placeholder="Enter Mailjet API Key "/>
<label>Insert Mailjet API Sectret Key : </label>
<input type='text' name='secret_key' id='secret_key' placeholder='Enter Mailjet Sectret Key '/>
<br/><br/>
<input type='submit' name='submit' value='Export Contacts!' /><br/>
</form>
</div>
</div>

</div>
</div>

</div>
</div>
<?php
if (isset($_POST['submit'])) {
include("src/Mailjet/php-mailjet-v3-simple.class.php");

function listContacts() {
error_reporting(0);
if ($_POST['api_key'] == 'xxxxxxxxxxx') {
//Enter Your Mailjet API Key Here
$apiKey = "Enter Your Mailjet API Key Here";
} else {
$apiKey = $_POST['api_key'];
}
if ($_POST['secret_key'] == 'ssssssssss') {
//Enter Your Mailjet Secter Key Here
$secretKey = "Enter Your Mailjet Secter Key Here";
} else {
$secretKey = $_POST['secret_key'];
}

$mj = new Mailjet($apiKey, $secretKey);
$result = $mj->contact();
foreach ($result as $data) {

for ($i = 0; $i < count($data);) {
$index = $i + 1;
if ($data[$i]->Email) {
$contact[$i]['email'] = $data[$i]->Email;
} $i++;
}
}
if ($mj->_response_code == 200) {
print '<script type="text/javascript">';
print "alert('success - listed contacts!')";
print '</script>';
} else {
print '<script type="text/javascript">';
print "alert('Enter Valid API and Secret Key...')";
print '</script>';
}
if ($mj->_response_code == 200) {
echo "<div class='container'>
<div class='wrap'>
<div class='row' >
<div id='login' class='col-xs-12 col-sm-6 col-md-4 '>
<div style='margin-top:-30px;'>
<h2>Exported Contacts List</h2>";
?>
<a href="csvdownload.php?<?php
echo http_build_query($contact);
?>"><img src="image/excelimg1.gif" alt="" style="float:right; margin: -86px 0px 0px 0px;" /></a>
<?php
echo "<div style='margin: 20px 10px;'>
<form method='get' name='myForm' ><table cellspacing='0'>
<thead>
<td id='name'>S.No</td>
<td>Email Addresses</td>
</thead>";
$index = 1;
foreach ($contact as $data) {
echo "<tr><td>" . $index . "</td><td>" . $data['email'] . "</td></tr>";
$index++;
}
}
return $contact;
}

listContacts();
}
?>

</table>
</form>
</div>
</div>
</div>
</div>
</div>
</div>

</body>
</html>
Step 5:- Create csvdownload.php into your root folder and copy the code present under the csvdownload.php section.
csvdownload.php
This code will download the Mailjet account contacts in excel sheet which we are getting in the form of array.
<?php

if (isset($_GET)) {
$contact = $_GET;
header("Content-type: text/csv");
header("Content-Disposition: attachment; filename=Contacts.csv");
header("Pragma: no-cache");
header("Expires: 0");
$file = fopen('php://output', 'w');
fputcsv($file, array('Email'));
foreach ($contact as $email) {
fputcsv($file, $email);
}
exit();
}
?>
Step 6:- Create style.css into your css folder created within the root folder. Once you finished this task just copy css code and paste it into style.css.
style.css
This make front page attractive and look good.
/*----------------------------------------------
css settings for HTML div exactCenter
------------------------------------------------*/
@import url(http://fonts.googleapis.com/css?family=Raleway);
.wrap{
margin:0;
padding: 0;
}

#main{
width:60%;
margin:auto;
font-family:raleway;
//border:1px solid green;
margin-left: 20%;
}

span{
color:red;
}

#h1{
text-align:center;
font-size:35px !important;
margin-top: 60px;

}
#a{
font-size:15px !important;
}
h2{
background-color: #FEFFED;
text-align:center;
border-radius: 10px 10px 0 0;
padding:30px;
margin: 0px -40px -40px -40px ;
border-bottom: 1px solid #ccc;
}

#login{
width:60%;
//float: left;
border-radius: 10px;
font-family:raleway;
border: 2px solid #ccc;
padding: 10px 40px 25px;
margin-top: 30px;
margin-left: 20%;
}

input[type=text],input[type=textarea]{
width:99.5%;
padding: 10px;
margin-top: 8px;
border: 1px solid #ccc;
padding-left: 5px;
font-size: 16px;
font-family:raleway;

}
input[type=radio]{
vertical-align: middle;
margin: -4px 0 0 2px !important;

}
input[type=submit]{
width: 100%;
background-color:#FFBC00;
color: white;
border: 2px solid #FFCB00;
padding: 10px;
font-size:20px;
cursor:pointer;
border-radius: 5px;
margin-bottom: 15px;
}
#profile{
padding:50px;
border:1px dashed grey;
font-size:20px;
background-color:#DCE6F7;
}

#logout{
float:right;
padding:5px;
border:dashed 1px gray;
}

a{
text-decoration:none;
color: cornflowerblue;
}

i{
color: cornflowerblue;
}
#note {
word-wrap: break-word;
margin: 10px 24%;
width: 62%;
padding: 10px 50px;
font-size: 16px;
}

label {
display: inline-block;
max-width: 100%;
margin-bottom: 5px;
font-weight: bold;
margin-top: 18px;
}
/*-----------------------------------------------------------------
css settings for right side advertisement
------------------------------------------------------------------*/
#formget{
float:right;
}
Step 7:- Create table.css into your css folder created within the root folder. Once you finished this task just copy css code and paste it into table.css.
table.css
It will provide style to content of table awesome and in well format.
table a:link {
color: #666;
font-weight: bold;
text-decoration:none;
}
table a:visited {
color: #999999;
font-weight:bold;
text-decoration:none;
}
table a:active,
table a:hover {
color: #bd5a35;
text-decoration:underline;
}
table {
font-family: 'Raleway', sans-serif;
//color:#666;
font-size:12px;
text-shadow: 1px 1px 0px #fff;
background:#eaebec;
//margin:20px;
border:#ccc 1px solid;
font-size: 16px;
-moz-border-radius:3px;
-webkit-border-radius:3px;
border-radius:3px;

-moz-box-shadow: 0 1px 2px #d1d1d1;
-webkit-box-shadow: 0 1px 2px #d1d1d1;
box-shadow: 0 1px 2px #d1d1d1;
margin: 50px 50px;
width: 85%;

}
table th {
padding:21px 25px 22px 25px;
border-top:1px solid #fafafa;
border-bottom:1px solid #e0e0e0;

background: #ededed;
background: -webkit-gradient(linear, left top, left bottom, from(#ededed), to(#ebebeb));
background: -moz-linear-gradient(top, #ededed, #ebebeb);
}
table th:first-child {
text-indent: center;
padding-left:20px;
}
table tr:first-child th:first-child {
-moz-border-radius-topleft:3px;
-webkit-border-top-left-radius:3px;
border-top-left-radius:3px;
}
table tr:first-child th:last-child {
-moz-border-radius-topright:3px;
-webkit-border-top-right-radius:3px;
border-top-right-radius:3px;
}
table tr {
text-indent: center;
padding-left:20px;
}
table td:first-child {
text-align: center;
padding-left:20px;
border-left: 0;
}
table td {
padding:18px;
border-top: 1px solid #ffffff;
border-bottom:1px solid #e0e0e0;
border-left: 1px solid #e0e0e0;

background: #fafafa;
background: -webkit-gradient(linear, left top, left bottom, from(#fbfbfb), to(#fafafa));
background: -moz-linear-gradient(top, #fbfbfb, #fafafa);
}
table tr.even td {
background: #f6f6f6;
background: -webkit-gradient(linear, left top, left bottom, from(#f8f8f8), to(#f6f6f6));
background: -moz-linear-gradient(top, #f8f8f8, #f6f6f6);
}
table tr:last-child td {
//border-bottom:0;
}
table tr:last-child td:first-child {
-moz-border-radius-bottomleft:3px;
-webkit-border-bottom-left-radius:3px;
border-bottom-left-radius:3px;
}
table tr:last-child td:last-child {
-moz-border-radius-bottomright:3px;
-webkit-border-bottom-right-radius:3px;
border-bottom-right-radius:3px;
}
table tr:hover td {
background: #f2f2f2;
background: -webkit-gradient(linear, left top, left bottom, from(#f2f2f2), to(#f0f0f0));
background: -moz-linear-gradient(top, #f2f2f2, #f0f0f0);
}
thead {
border-top: 2px solid #E8E8E8;
}
Conclusion :
Thus using MailJet API you can export the contacts and download it. Hope you like it, keep reading our other blogs and share your experience in the space given below 🙂
Recommended blogs –
How to Design Responsive Email Template
Nowadays, approximate 50% of emails are opened on mobile devices. this means the designer must have to consider two major aspects first, emails should be displayed optimally on different mobile devices and second, it must be supported by different mobile clients like Gmail, Yahoo, Outlook.
We can also make use of media query, but they are not supported by various email clients. Here we are going to use fluid hybrid method to create responsive email .fluid part means we will use lots of percentage , and hybrid part is to restrict the size of some element on larger screen.
Check Out Some Awesome Email Templates Made By MailGet Email Builder –

You can create Responsive Email Templates by using Email Builder offered by MailGet – email marketing platform.
Basics of Responsive Email
<html xmlns="http://www.w3.org/1999/xhtml">
<head>
<meta http-equiv="Content-Type" content="text/html; charset=utf-8" />
<!--[if !mso]><!-->
<meta http-equiv="X-UA-Compatible" content="IE=edge" />
<!--<![endif]-->
<meta name="viewport" content="width=device-width, initial-scale=1.0">
<title></title>
<link rel="stylesheet" type="text/css" href="styles.css" />
<!--[if (gte mso 9)|(IE)]>
<style type="text/css">
table {border-collapse: collapse;}
</style>
<![endif]-->
</head>
<body>
<center class="wrapper">
<div class="webkit">
[content goes here]
</div>
</center>
</body>
</html>
The use of tags of above code is listed below:
<meta http-equiv="X-UA-Compatible" content="IE=edge" />This tag is used to make email compatible for windows mobile , it is hidden inside a conditional tag so this tag will be hidden for Microsoft outlook .if we will not do this, Windows Live Mail will not display images
<meta name="viewport" content="width=device-width, initial-scale=1.0">This tag controls the size of the viewport , according to the device in which it is opened.
<!--[if (gte mso 9)|(IE)]> and <![endif]-->These are the conditional statement, content written with in it only runs for Microsoft Outlook.
<div class="webkit">......Content......</div>This class is used for earlier versions of WebKit-powered mail clients. WebKit mail client only supports max-width in a block level element so we should write our content within it to set our layout display at the correct size.
body {
Margin: 0;
padding: 0;
min-width: 100%;
background-color: #ffffff;
}
table {
border-spacing: 0;
font-family: sans-serif;
color: #333333;
}
td {
padding: 0;
}
img {
border: 0;
}
.wrapper {
width: 100%;
table-layout: fixed;
-webkit-text-size-adjust: 100%;
-ms-text-size-adjust: 100%;
}
.webkit {
border:1px solid black;
max-width: 600px;
}
Here in the above style.css we set the margin and padding of the body and the border of a table, image to zero.
we set the width of wrapper to 100% ,making the table layout fixed , we also set the width of webkit to 600px to contain everything in Apple Mail 6 (and below) and Outlook 2022.
Creating Structure of Responsive Email

<table id="outer">
<tr>
<td>
<!--outer table's td start from here-->

<!--conditional statement start for outlook-->
<!-- below code will get enabled automatically when the outlook email client will get detected -->
<!--[if (gte mso 9)|(IE)]>
<table width="600" align="center">
<tr>
<td>
<![endif]-->
<!--conditional statement ends for outlook-->

<table id="inner">
<!-- .......content....... -->
</table>

<!-- conditional statement start for outlook -->
<!--[if (gte mso 9)|(IE)]>
</td>
</tr>
</table>
<![endif]-->
<!--conditional statement ends for outlook-->

<!-- end <td> of outer table-->
</td>
</tr>
</table>
Explanation:
(i) we wil set the width of outer table 100% for smaller device, but for large device we fix the maximum width of the outer table at 600px.
(ii) <!–[if (gte mso 9)|(IE)]>……code………..<![endif]–> the code within this conditional statement only execute when the outlook mail client is detected.The outlook mail client doesn’t support [max-width] , so we make use of another table within the conditional statement of fix height to make email responsive in outlook also.
(iii) inner table contains the content of the email. we fix the width to 100% and the max-width to a certain size according to our requirement.
Creating Two Column Structure of Email
Below code will create two column structure :
 <table class="outer" align="center">
<div id="header"><p class="h1" id="head">Responsive Email</p>
</div>
<tr>
<td class="two-column-layout">
<!--[if (gte mso 9)|(IE)]>
<table width="100%">
<tr>
<td width="50%" valign="top">
<![endif]-->
<div class="inner">
<table width="100%">
<tr>
write content here
</tr>
</table>
</div>
<!--[if (gte mso 9)|(IE)]>
</td>
<td width="50%" valign="top">
<![endif]-->
<div class="inner">
<table width="100%">
<tr>
write content here
</tr>
</table>
</div>
<!--[if (gte mso 9)|(IE)]>
</td>
<td width="50%" valign="top">
<![endif]-->
<div class="inner">
<table width="100%">
<tr>
write content here
</tr>
</table>
</div>
<!--[if (gte mso 9)|(IE)]>
</td>
<td width="50%" valign="top">
<![endif]-->
<div class="inner">
<table width="100%">
<tr>
write content here
</tr>
</table>
</div>
<!--[if (gte mso 9)|(IE)]>
</td>
</tr>
</table>
<![endif]-->
</td>
</tr>
</table>
In the above code replace the content with this:
 <td class="inner1">
<table class="contents">
<tr>
<td>
<div id="cont1"><img src="https://www.formget.com/mailget/upload_files/1431944509-1601297505-Formget_welcome_email_png" width="280" alt="Formget image" /></div>
</td>
</tr>
<tr>
<td class="text">
<p class="h1"> secand coloum Maecenas sed ante pellentesque, posuere leo id, eleifend dolor. Class aptent taciti sociosqu ad litora torquent per conubia nostra, per inceptos himenaeos. </p>
</td>
</tr>
</table>
</td>
Now we set the width of outer table to 100% , and the max-width to 600px so that in larger device the table extend upto width of 600px.
same as we set the width of inner table to 100%, and the max-width to 300px . this will create a structure in which 2 column lies on a single row.
For outlook mail client, we use the conditional statement in which we fix the width of <td> to 50% to get the required structure in outlook also.
Below is the stylesheet of above code:
.outer {
Margin: 0 auto;
width: 100%;
max-width: 600px;
}
.inner1 {
padding: 10px;
}
p {
Margin: 0;
}
.h1 {
font-size: 21px;
font-weight: bold;
Margin-bottom: 18px;
}
.h2 {
font-size: 18px;
font-weight: bold;
Margin-bottom: 12px;
}
#header{
width:100%;
max-width:600px;
background-color:black;
color:white;
}
.two-column-layout .inner {
width: 100%;
max-width: 300px;
display: inline-block;
vertical-align: top;
}
.two-column-layout {
text-align: center;
font-size: 0;
}
.contents {
width: 100%;
}
.two-column-layout .contents {
font-size: 14px;
text-align: left;
}
.two-column-layout img {
width: 100%;
max-width: 280px;
height: auto;
}
.two-column-layout .text {
padding-top: 10px;
}
p#head{
margin:0;
}
Creating Three Column Structure of Emails
We can also create a three column structure by following the same phenomena
 <table class="outer" align="center">
<div id="header"><p class="h1" id="head">Responsive Email</p>
</div>
<tr>
<td class="three-column-layout">
<!--[if (gte mso 9)|(IE)]>
<table width="100%">
<tr>
<td width="200" valign="top">
<![endif]-->
<table class="inner">
write your content here
</table>
<!--[if (gte mso 9)|(IE)]>
</td><td width="200" valign="top">
<![endif]-->
<table class="inner">
write your content here
</table>
<!--[if (gte mso 9)|(IE)]>
</td><td width="200" valign="top">
<![endif]-->
<table class="inner">
write your content here
</table>
<!--[if (gte mso 9)|(IE)]>
</td>
</tr>
<tr>
<td width="200" valign="top">
<![endif]-->
<table class="inner">
write your content here
</table> <!--[if (gte mso 9)|(IE)]>
</td><td width="200" valign="top">
<![endif]-->
<table class="inner">
write your content here
</table>
<!--[if (gte mso 9)|(IE)]>
</td>
<td width="200" valign="top">
<![endif]-->
<table class="inner">
write your content here
</table>
<!--[if (gte mso 9)|(IE)]>
</td>
</tr>
</table>
<![endif]-->
</td>
</tr>
</table>
In the above code replace the content with the below code:
<tr>
<td class="inner1 contents">
<img src="https://www.formget.com/mailget/upload_files/1431944509-1601297505-Formget_welcome_email_png" width="280" alt="Formget image" />
<p class="h2">Heading</p>
<p>This is the first column of first row reside within inner table</p>
<p><a href="#">Read more</a></p>
</td>
</tr>
</table>
In the above code we set the width of .outer table to 100% and the max-width to 600px. we also set the width of .inner table to 100% and the max-width to 200px.
For outlook, we also set the width of <td> to 200 within the conditional statement.
.three-column-layout {
text-align: center;
font-size: 0;
padding-top: 10px;
padding-bottom: 10px;
}
.three-column-layout .inner {
width: 100%;
max-width: 200px;
display: inline-block;
vertical-align: top;
}
.three-column-layout .contents {
font-size: 14px;
text-align: center;
}
.three-column-layout .text {
padding-top: 10px;
}
Now if we resize our window, we will see that the columns stack to fill the available space. Three columns will reduce to two-columns with three rows, until they collapse finally to a single column with six rows.
Inline your css
Email client didn’t support internal or external CSS they only support inline css , so we have to inline our css there are various tools available to inline our css such as zurb inliner and many more.
These tools accept the HTML code with internal or external CSS (must be complete URL) and convert it into inline CSS.
Note: you have to maintain the uniform margin at every level of structure. you can notice that I am using a uniform margin of 10px at the inner side table.
Conclusion :
I hope after reading the whole script you are feeling comfortable with responsive email design. Feel free to visit our website again in the future to get in touch with new coding tricks. You can let us know about your feedback in the space provided below.
Recommended blogs –
- Duplicate Email Remover
- Unsubscribe PHP : Add an Unsubscribe Link to an Email
Find Bounced Email List via PostMark API

Those email which fails to reach their destination is known as Bounced emails. The sender gets error messages for those bounce emails. The reason for those Bounced emails are as follows:
Get Complete Detail of Hard and Soft Bounce Emails
- Typing mistake: wrong address is given in the place for Recipient’s Address.
- Technical Error: may be the recipient mailbox is full or the size of your message is greater than the recipients max limit.
- Security Error: The sender email is blocked or not comes in the preferred list and hence it returned back by the receiver’s mail server.
In this blog, we are going to tell you that how can you get List of bounced email via Postmark API. before putting next step , If you are new to Postmark API then first follow this post –> Send Email via Postmark API Using PHP and in that post you will learn how to configure postmark API in PHP and send mail through it .
Watch the live demo or download code from the link given below

Use MailGet – Email Service Provider for Finding Bounced Email List, just connect and send with PostMark API or Any SMTP services.
Concept behind the script
So , from the previous post ( Send Email via Postmark API Using PHP ), you already know how to send mail . now lets understand that how can we achieve success in getting information about bounced emails.
To, get detail of bounced email , we have to send some email to wrong addressess and we fetch their details through our program . For send mail from postmark API through your PHP program follow the previous post –> Send Email via Postmark API Using PHP .
now, i hope you already send some email to false addressess and we are going to learn how to fetch details about those bounced emails .
steps for getting bounced emails are as follows :-
- configure your program with postmark api .( take help from —> Send Email via Postmark API Using PHP . )
- create postmarkClient through api token
$client = new PostmarkClient("<Server API token>"); - call getBounce() function through client . which return you an object and you can fetch bounced emails list with its help .
$bounces = $client->getBounces(); Tutorial Scripts in detail
Below are the details of the code used in this tutorial with proper explanation.
index.php
Below file is the main program file in which , we are connecting our API in the program and accessing its features like – creating object of postmark Client and fetchig details of bounced emails.
<?php
require_once('./vendor/autoload.php');

use PostmarkPostmarkClient;
use PostmarkModelsPostmarkException;
?>
<html>
<head>
<title>
Find Bounced Email List via PostMark API
</title>
<meta name="viewport" content="width=device-width, initial-scale=1.0">
<script src="js/jquery-1.11.3.min.js" type="text/javascript"></script>
<script src="js/bootstrap.js" type="text/javascript"></script>
<link href="css/bootstrap.css" rel="stylesheet" type="text/css"/>
<link href="css/style.css" rel="stylesheet" type="text/css"/>
<link href="css/table.css" rel="stylesheet" type="text/css"/>
<script type="text/javascript">

$(document).ready(function() {
$("a#demo_key").click(function() {
var key = "xxxxxxxxxxx";
$("input#demo_postmark_key").val(key);
});
});
</script>
</head>
<body>

<div class="container">
<div class="row">

</div>
<div class="row">
<div class="col-md-12">
<div id="main">
<h1>Find Bounced Email List via PostMark API</h1>
</div>
</div>
<div class="col-md-12">
<div class="matter">
<div id="login">
<h2>Get Bounced Email</h2>
<hr/>
<form action="index.php" method="post">
<label class="lab">Enter POSTMARK Server API token</label>
<?php
if (isset($_POST['submit'])) {
$password = $_POST['password'];
echo "<input id='demo_postmark_key' type='text' name='password' value='$password' required/>";
} else {
echo " <input id='demo_postmark_key' type='text' name='password' required/>";
}
?>
<a id="demo_key" href="#">Use Demo Server Key</a>
<input type="submit" value="submit" name="submit"/><br />
<span></span>
</form>
</div>

</div>
</div>
</div>
<!-- Right side div -->
<?php
if (isset($_POST['submit'])) {
$password = $_POST['password'];
if ($password == "xxxxxxxxxxx") {
$apitoken = "Insert Server API token here";
} else {
$apitoken = $_POST['password'];
}
try {
$client = new PostmarkClient("$apitoken");
$bounces = $client->getBounces();
$ar = $bounces;
?>
<center> <h3>Bounced Email List</h3></center>

<table class="bouncetable">
<thead>
<td id="name">S.No</td>
<td>Subject</td>
<td>Email</td>
<td>Bounced Time</td>
</thead>
<?php
$count = 1;
$x = 1;
foreach ($ar as $numofbounce) {
break;
}
foreach ($ar as $data) {
if ($x == 2) {
for ($i = 0; $i < $numofbounce; $i++) {
?>
<tr>
<td><?php
echo $count;
$count++;
?></td>
<link href="style.css" rel="stylesheet" type="text/css"/>
<td>
<?php echo $data[$i]['Subject']; ?>
</td>
<td> <?php echo $data[$i]['Email']; ?></td>
<td> <?php echo $data[$i]['BouncedAt']; ?></td>
</tr>
<?php
}
}
$x++;
}
?>

</table>

<?php
} catch (PostmarkException $ex) {
// If client is able to communicate with the API in a timely fashion,
// but the message data is invalid, or there's a server error,
// a PostmarkException can be thrown.
//echo $ex->httpStatusCode;
// echo $ex->message;
// echo $ex->postmarkApiErrorCode;
echo "<script>alert('invalid api token ');</script>";
} catch (Exception $generalException) {
// echo "welcome";
echo "<script>alert('ERROR ');</script>";
}
}
?>

</div>
</body>
</html>
Style.css
Includes basic styling of HTML elements.
@import url(http://fonts.googleapis.com/css?family=Raleway);

#main{

margin:50px auto;
font-family:raleway;
}

span{
color:red;
}

h2{
font-weight: 600;
background-color: #FEFFED;
text-align:center;
border-radius: 10px 10px 0 0;
margin: -10px -40px;
padding: 15px;
}

hr{
border:0;
border-bottom:1px solid #ccc;
margin: 10px -40px;
margin-bottom: 30px;
}

#login{
width:40%;;
margin:0 auto;
display:inline-block;

border-radius: 10px;
font-family:raleway;
border: 2px solid #ccc;
padding: 10px 40px 25px;
//margin-top: 70px;
}
textarea{
margin-top: 8px;
font-size: 16px;
font-family:raleway;

}
input[type=radio]{
margin-top: 8px;
}
input[type=text],[type=email],input[type=password]{
width:99.5%;
padding: 10px;
margin-top: 8px;
border: 1px solid #ccc;
padding-left: 5px;
font-size: 16px;
font-family:raleway;
}

input[type=submit]{
width: 100%;
background-color:#FFBC00;
color: white;
border: 2px solid #FFCB00;
padding: 10px;
font-size:20px;
cursor:pointer;
border-radius: 5px;
margin-bottom: 15px;
}
#profile{
padding:50px;
border:1px dashed grey;
font-size:20px;
background-color:#DCE6F7;
}

#logout{
float:right;
padding:5px;
border:dashed 1px gray;
}

a{
text-decoration:none;
color: cornflowerblue;
}

i{
color: cornflowerblue;
}#note {
clear: left;
padding-top: 20px;
margin-left: 20px;
font-size: 18px;
}
#formget{
float:right;
}
h1{
font-weight: 600;
text-align: center;
display:inlne;
alignment-adjust: center;
margin:0 auto;
width:100%;
}
textarea[type=text]{
width:100%;
height:200px;

}

.matter{
alignment-adjust: central;
margin:0 auto;
text-align: center;

}
.clr{
clear:left;
}
.lab{

font-size: 110%;
float:left;
}
thead {
border-top: 3px solid #DEDEDE;
}
h3 {
margin-top: 52px !important;
}
table.css
A separate css style sheet for table used in index.php to show bounced emails list.
table a:link {
color: #666;
font-weight: bold;
text-decoration:none;
}
table a:visited {
color: #999999;
font-weight:bold;
text-decoration:none;
}
table a:active,
table a:hover {
color: #bd5a35;
text-decoration:underline;
}
table {
font-family: 'Raleway', sans-serif;
//color:#666;
font-size:12px;
text-shadow: 1px 1px 0px #fff;
background:#eaebec;
//margin:20px;
border:#ccc 1px solid;
font-size: 16px;
-moz-border-radius:3px;
-webkit-border-radius:3px;
border-radius:3px;

-moz-box-shadow: 0 1px 2px #d1d1d1;
-webkit-box-shadow: 0 1px 2px #d1d1d1;
box-shadow: 0 1px 2px #d1d1d1;
margin: 50px 11%;
width: 85%;

}
table th {
padding:21px 25px 22px 25px;
border-top:1px solid #fafafa;
border-bottom:1px solid #e0e0e0;

background: #ededed;
background: -webkit-gradient(linear, left top, left bottom, from(#ededed), to(#ebebeb));
background: -moz-linear-gradient(top, #ededed, #ebebeb);
}
table th:first-child {
text-indent: center;
padding-left:20px;
}
table tr:first-child th:first-child {
-moz-border-radius-topleft:3px;
-webkit-border-top-left-radius:3px;
border-top-left-radius:3px;
}
table tr:first-child th:last-child {
-moz-border-radius-topright:3px;
-webkit-border-top-right-radius:3px;
border-top-right-radius:3px;
}
table tr {
text-indent: center;
padding-left:20px;
}
table td:first-child {
text-align: center;
padding-left:20px;
border-left: 0;
}
table td {
padding:18px;
border-top: 1px solid #ffffff;
border-bottom:1px solid #e0e0e0;
border-left: 1px solid #e0e0e0;

background: #fafafa;
background: -webkit-gradient(linear, left top, left bottom, from(#fbfbfb), to(#fafafa));
background: -moz-linear-gradient(top, #fbfbfb, #fafafa);
}
table tr.even td {
background: #f6f6f6;
background: -webkit-gradient(linear, left top, left bottom, from(#f8f8f8), to(#f6f6f6));
background: -moz-linear-gradient(top, #f8f8f8, #f6f6f6);
}
table tr:last-child td {
//border-bottom:0;
}
table tr:last-child td:first-child {
-moz-border-radius-bottomleft:3px;
-webkit-border-bottom-left-radius:3px;
border-bottom-left-radius:3px;
}
table tr:last-child td:last-child {
-moz-border-radius-bottomright:3px;
-webkit-border-bottom-right-radius:3px;
border-bottom-right-radius:3px;
}
table tr:hover td {
background: #f2f2f2;
background: -webkit-gradient(linear, left top, left bottom, from(#f2f2f2), to(#f0f0f0));
background: -moz-linear-gradient(top, #f2f2f2, #f0f0f0);
}
Conclusion :
I hope now you understand , how we can find bounced emails list through Postmark API, I am sure you will try this code is your program .keep in touch with us anytime for new coding tricks . you can give your feedback in the below space.
You may also like –
- Get Postmark API-Connected User’s Statistics
- Export Gmail Contacts in PHP
Get Mandrill API-Connected User’s Statistics

In the last blog post, we have learnt how to send emails via Mandrill API.
Today, we are going to learn about one of the important features of Mandrill API. We will find Mandrill API-connected user’s statistics via Mandrill API Key. We will also find all the message history sent by that particular user. Such information could be helpful for your Marketing Analytics strategy.
To get the user information, Mandrill API have provided a simple code. Just to use the following code in the PHP file.
 //Pass Mandrill API key to Mandrill library
$mandrill = new Mandrill($key);
//Get Mandrill API-connected user's info
$result = $mandrill->users->info();
Watch the live demo or download code from the link given below

Note: – We have introduced a very effective and powerful online email management service name MailGet. MailGet allows you a simple smtp configuration for sending bulk emails through Mandrill and manage your emails at very low cost.
The above-mentioned code will return an arrays containing all the information of the user having that particular API key.
- username: username of the user created for SMTP authentication.
- created_at: Mandrill Account creation date and time ( YYYY-MM-DD HH:MM:SS format ).
- public_id: a unique, permanent identifier for this user.
- reputation: the reputation of the user on a scale from 0 to 100, with 75 generally being a “good” reputation.
- hourly_quota: Maximum number of emails that Mandrill will send for this user.
- backlog: the number of emails that are queued for delivery due to exceeding your monthly or hourly quotas
- stats: summary of the account’s sending stats.
- today: stats for this user so far today
- sent: total number of emails sent for this user so far today.
- hard_bounces: total number of emails hard bounced for this user so far today.
- soft_bounces: total number of emails soft bounced for this user so far today.
- rejects: total number of emails rejected for this user so far today.
- complaints: total number of emails spam complaints for this user so far today.
- unsubs: the number of unsubscribes for this user so far today.
- opens: the number of times emails have been opened for this user so far today
- unique_opens: the number of unique opens for emails sent for this user so far today.
- clicks: the number of URLs that have been clicked for this user so far today.
- unique_clicks: the number of unique clicks for emails sent for this user so far today.
- last_7_days: Same information as available for today but, of last 7 days.
- last_30_days: Same information as available for today but, of last 30 days.
- last_60_days: Same information as available for today but, of last 60 days.
- last_90_days: Same information as available for today but, of last 90 days.
- all_time: Same information as available for today but, of the lifetime of the user’s account.
- today: stats for this user so far today
Let’s begin the scripting part.
First we need to create the directory structure in the same way as we made in our last blog post while sending Emails (i.e create separate folders for Mandrill API library, CSS, js and other files).
Note: – If you are reading our Mandrill API blogs first-time, then there is no need to worry. Read our previous published blog “Send Email via Mandrill API Using PHP” in which directory structure is well described.
Now, create index.php file in the root directory and paste the Php code given below in it.
index.php
Allow a user to insert Mandrill API Key and check whether the key is valid or Invalid. If the key found valid, then it retrieve and show all the accont information of the user having that particular API key otherwise show error messages.
<html>
<head>
<meta http-equiv="Content-Type" content="text/html; charset=windows-1252">
<title>Get User Statistics via Mandrill API</title>
<link rel="stylesheet" type="text/css" href="css/style.css"/>
<script src="js/jquery.js"></script>
</head>
<body>
<?php

//include Mandrill library file
include ("lib/Mandrill.php");
$error_msg = "";
?>
<div id="main">
<h1>Get Mandrill API-Connected User's Statistics </h1>
<div id="login">
<h2>Mandrill User's Info Search Box</h2>
<form action="" method="POST">
<label>Mandrill API-Key : </label> <input type="text" name="mandrill_api_key" class="mandrill-api-key" placeholder="Enter Mandrill API Key"/>
<input type="submit" value="Search" id="submit"/>
</form>
</div>
<?php
if (isset($_POST['mandrill_api_key'])) {
$key = $_POST['mandrill_api_key'];

//Pass user provided Mandrill API key to Mandrill library
$mandrill = new Mandrill($key);

//Get Mandrill API-connected user's info
$result = $mandrill->users->info();
if (isset($result['message'])) {
$error_msg = $result['message'];
echo "<script>alert('" . $error_msg . "');</script>";
} else {
?>

<!-- Result div start -->
<div class="result">
<h1 class="res">Result</h1>
<div class="user_info">
<ul class="info">
<li class="index_info"> Username </li><li class='val'> : <?php echo $result['username'] ?></li>
<li class="index_info"> Created At </li><li class='val'> : <?php echo $result['created_at'] ?></li>
<li class="index_info"> Public ID </li><li class='val'> : <?php echo $result['public_id'] ?></li>
<li class="index_info"> Reputation </li><li class='val'> : <?php echo $result['reputation'] ?></li>
<li class="index_info"> Email's allowed to send per hour </li><li class='val'> : <?php echo $result['hourly_quota'] ?></li>
</ul>
<div id="tabs-container">
<ul class="tabs-menu">
<h2 class="msg_history">Message History</h2>
<li class="current"><a href="#tab-1">Today</a></li>
<li><a href="#tab-2">Last 7 day's</a></li>
<li><a href="#tab-3">Last 30 day's</a></li>
<li><a href="#tab-4">Last 60 day's</a></li>
<li><a href="#tab-5">Last 90 day's</a></li>
<li><a href="#tab-6">All</a></li>
</ul>
<div class="tab">
<div id="tab-1" class="tab-content">
<ul class="tab-info">
<?php
foreach ($result['stats']['today'] as $key => $val) {
echo "<li class='index'>" . $key . "</li><li class='val'> : " . $val . "</li><br/>";
?>
<?php } ?>
</ul>
</div>
<div id="tab-2" class="tab-content">
<ul class="tab-info">
<?php
foreach ($result['stats']['last_7_days'] as $key => $val) {
echo "<li class='index'>" . $key . "</li><li class='val'> : " . $val . "</li>";
?>
<?php } ?>
</ul>
</div>
<div id="tab-3" class="tab-content">
<ul class="tab-info">
<?php
foreach ($result['stats']['last_30_days'] as $key => $val) {
echo "<li class='index'>" . $key . "</li><li class='val'> : " . $val . "</li>";
?>
<?php } ?>
</ul>
</div>
<div id="tab-4" class="tab-content">
<ul class="tab-info">
<?php
foreach ($result['stats']['last_60_days'] as $key => $val) {
echo "<li class='index'>" . $key . "</li><li class='val'> : " . $val . "</li>";
?>
<?php } ?>
</ul>
</div>
<div id="tab-5" class="tab-content">
<ul class="tab-info">
<?php
foreach ($result['stats']['last_90_days'] as $key => $val) {
echo "<li class='index'>" . $key . "</li><li class='val'> : " . $val . "</li>";
?>
<?php } ?>
</ul>
</div>
<div id="tab-6" class="tab-content">
<ul class="tab-info">
<?php
foreach ($result['stats']['all_time'] as $key => $val) {
echo "<li class='index'>" . $key . "</li><li class='val'> : " . $val . "</li>";
?>
<?php } ?>
</ul>
</div>
</div>
</div>
</div>
</div>

<!-- Result div End -->
<?php
}
}
?>
</div>
<script>
jQuery(document).ready(function() {
$("#submit").click(function(event) {
var Mandrillkey = jQuery('.mandrill-api-key').val();
if (Mandrillkey == "") {
event.preventDefault();
alert('Please insert Mandrill API Key!!!');
}
});
$(".tabs-menu a").click(function(event) {
event.preventDefault();
$(this).parent().addClass("current");
$(this).parent().siblings().removeClass("current");
var tab = $(this).attr("href");
$(".tab-content").not(tab).css("display", "none");
$(tab).fadeIn();
});
});
</script>
</body>
</html>
In style.css ( created inside CSS folder ), paste the css code given below.
style.css
Includes basic styling of HTML elements.
@import url(http://fonts.googleapis.com/css?family=Raleway);

#main{
width:960px;
margin:50px auto;
font-family:raleway;
}
h2{
background-color: #FEFFED;
text-align:center;
border-radius: 10px 10px 0 0;
margin: -10px -40px;
padding: 15px;
}
hr{
border:0;
border-bottom:1px solid #ccc;
margin: 10px -40px;
margin-bottom: 30px;
}
ul{
text-decoration: none;
}
ul li{
display: inline-block;
}
#login{
width:300px;
border-radius: 10px;
font-family:raleway;
border: 2px solid #ccc;
padding: 10px 40px 25px;
margin: 70px auto 0 auto;
}
input[type=text],input[type=email]{
width:100%;
padding: 10px;
margin-top: 8px;
border: 1px solid #ccc;
padding-left: 5px;
font-size: 16px;
font-family:raleway;
}
input[type=submit]{
width: 100%;
background-color:#FFBC00;
color: white;
border: 2px solid #FFCB00;
padding: 10px;
font-size:20px;
cursor:pointer;
border-radius: 5px;
margin-bottom: 15px;
}
a#demo_key {
float: right;
margin: 10px;
}
textarea{
width: 100%;
}
div#main h1 {
text-align: center;
}
h1.res {
margin-top: 51px;
}
div.user_info {
width: 750px;
height: 625px;
background-color: #FEFFED;
padding: 5px;
border:1px solid #D5D89B;
border-radius: 10px 10px 5px 5px;
margin: 30px auto;
}
.info li {
padding: 5px;
font-size: 18px;
}
.tabs-menu {
height: 30px;
float: left;
clear: both;
}
.tabs-menu li {
height: 30px;
line-height: 30px;
float: left;
background-color: #FFBC00;
border: 1px solid #d4d4d1;
}
.tabs-menu li.current {
position: relative;
background-color: #fff;
z-index: 5;
}
ul.tab-info {
margin-top: 90px;
}
li.index_info{
width: 50%;
text-align: left;
font-weight: bold;
}
li.index {
width: 30%;
text-align: left;
font-weight: bold;
}
ul.tab-info li {
padding: 5px;
font-size: 16px;
}

.tabs-menu li a {
padding: 10px;
text-transform: uppercase;
color: #fff;
text-decoration: none;
}
.tabs-menu .current a {
color: #2e7da3;
}
.tab {
border: 1px solid #d4d4d1;
background-color: #fff;
margin-bottom: 20px;
width: auto;
}
.tab-content {
text-align: center;
padding: 20px;
display: none;
}
ul.tabs-menu {
width: 100%;
}
#tab-1 {
display: block;
}
h2.msg_history{
text-align:center;
margin-top: -10px;
margin-bottom: 0;
padding: 15px;
margin-left: -120px;
background: none;
}
Now, run the script and have fun!!!
Conclusion :
Hope you have enjoyed learning Mandrill API’s feature. Keep in touch with us, we will be come back soon with another feature of Mandrill API. You can send us your feedback and share your experience about this blog in the space given below 🙂
Recommended blogs –