

Looking for a Best Online Form Builders ?? Then you are the right place!!
Whether you’re looking to capture leads, collect payments, get feedbacks, sign up free trials, or survey your audience, you’ll need an online form builder to build a form. Right?
But, there are myriad of form builder tools available in the market and it’s really difficult to choose the best one. While, some of the form creator software offers easy UI, drag & drop builder, etc and others provide reports, hassle-free payment collections and much more.
To help you out, we are going to discuss the Best Online Form Builder along with their pricing details and key features that will help you to insert & validate the desired fields and embed them on your websites, social networks and anywhere else.
Check this table out to find the best form builders compared at glance-
| Comparison Between Best Online Form Builders | |||||
| Services | Pricing | Submissions | File Upload | Payments | |
| Pabbly Form Builder | $15/mo | Unlimited | Unlimited | Unlimited | |
| WPForms | $31.60/mo | Unlimited | 128MB | Not available | |
| ProProfs Survey Maker | $20/mo | 200 Response | 200MB | Not available | |
| Gravity Forms | $59/mo | Unlimited | Unlimited | Unlimited | |
| 123FormBuilder | $24.99/mo | 5000 | 150MB | Not available | |
Now, without further ado, let’s explore these best online form builders one by one thoroughly and find out the one that perfectly meets your business requirement.
1. Pabbly Form Builder – Unlimited Submissions
“Pabbly Form Builder is the only form builder that does not restrict you on features like form submissions, file uploads, payments, etc.”
On comparing with others, Pabbly Form Builder is the cheapest and most effective form builder that comes with a handful of unbounded features which takes an innovative approach to the world of form building.
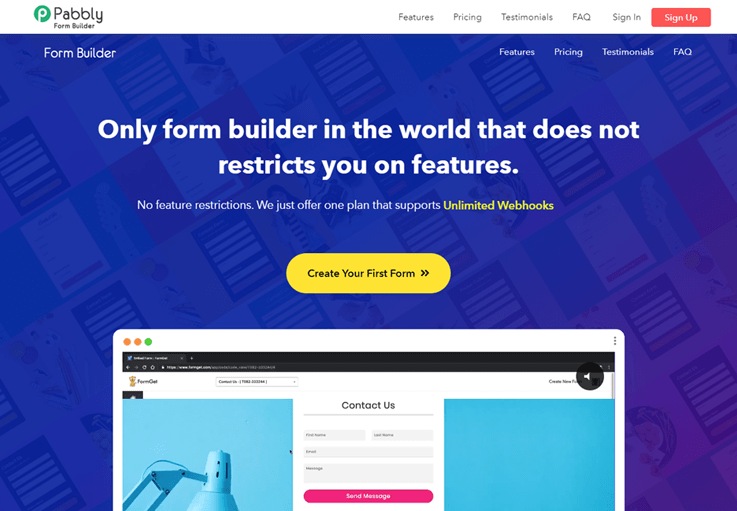
Using this online form builder, you can create any kind of forms in a blink of an eye using drag and drop builder. Also, you can further enhance your created form with the in-built conditional logic. Now, the forms you’ve created can also be integrated with various payment gateways like PayPal and Stripe. So, you can collect payments hassle-free.
With this, you get some really impressive features like submission reports through email, autoresponder, canned replies, and the list goes on.
Attributes:-
- With Pabbly Form Builder, you can follow-up your leads by sending automated emails on successful form submissions.
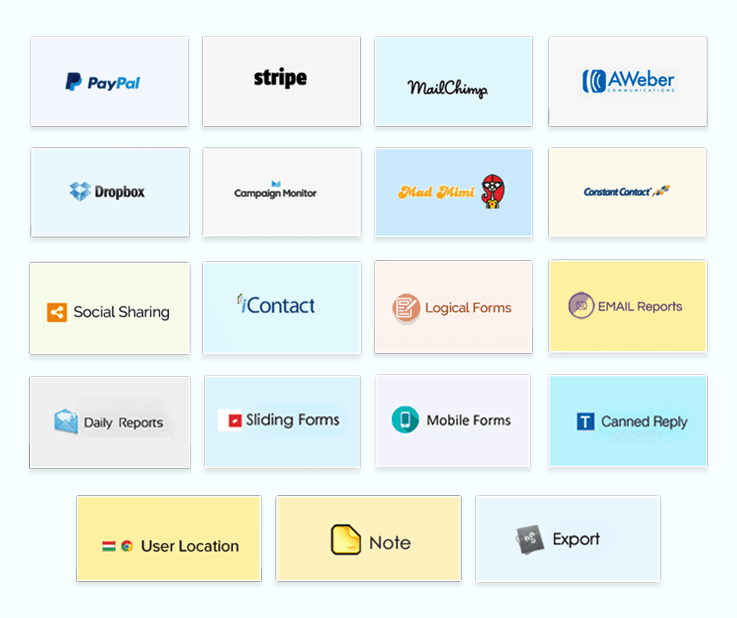
- It comes with limitless integrations like MailChimp, Mad Mini, AWeber, WordPress, etc.
- To offer security against spammers and bots, the form comes with the feature of ReCaptcha.
- Then, it provides data security using data encryptions and provides secure payments with SSL encryption.
- You can schedule when to take forms on-air and when to take them off air using form scheduling feature.
- There’s also an option to add media files like images, videos to your forms.
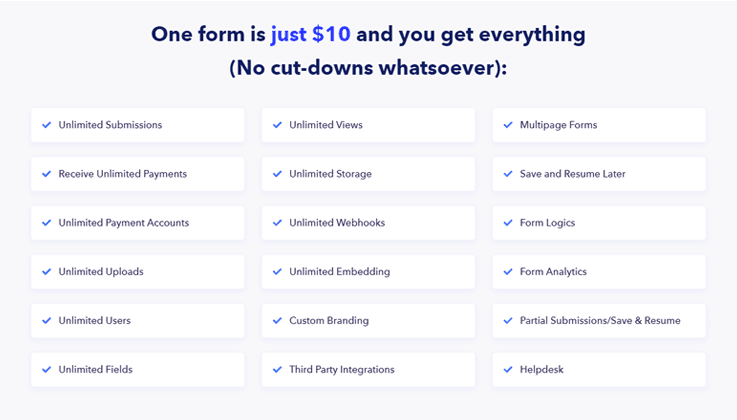
Best Feature – “Unlimited Submissions, File Uploads & Payments”
While other software restricts you on features like submission, upload, etc, Pabbly Form Builder doesn’t do so. It is the ultimate tool that gives you the freedom of limitless submission, embedding, file upload, payment, Webhook, & much more.
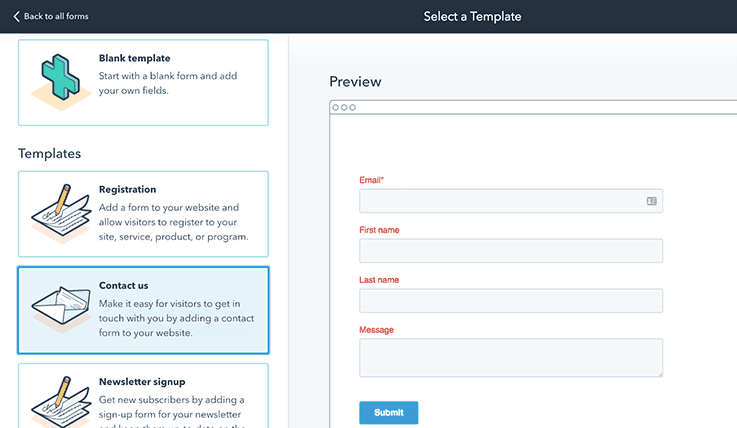
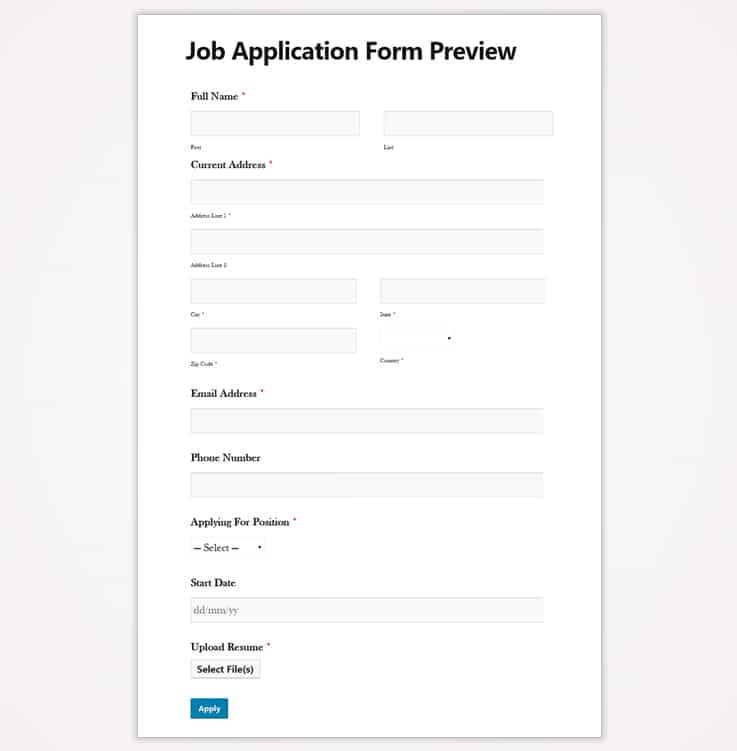
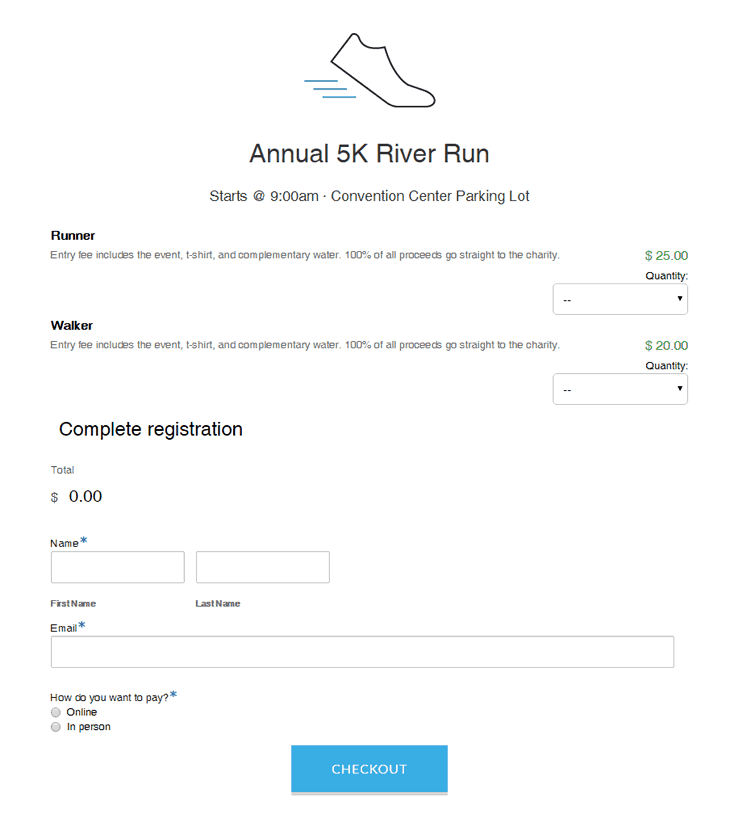
How the form will look like?

Pricing Details of Pabbly Form Builder:-
Pabbly Form Builder gives you the freedom of unlimited submissions, unlimited file uploads, unlimited views and many more just at the cost of $10 per month. This means, if you build a form using Pabbly Form Builder, then you can share that forms with unlimited peoples.
2. HubSpot Form Builder
HubSpot is an all-in-one CRM, Sales, Marketing, and Customer Service platform with 300+ product integrations. HubSpot’s free WordPress plugin brings powerful, easy-to-use contact management, email marketing, ads management, live chat & bots, pop-up forms, analytics and much more to WordPress. You can add popups to your website in minutes using the drag and drop form builder.
You can choose from four types of WordPress forms:
- Inline form: A form you can embed directly on your site pages.
- Overlay modals: Center screen popups that appear on top of page content.
- Top banners: Small banners at the top of the page.
- Slide-in boxes: Small boxes that slide in from the side or bottom of the page.
Attributes:-
- You can easily create online pop-up forms by using the drag-and-drop form builder.
- Everyone who fills out a form in a pop-up will automatically be stored into HubSpot CRM (100% free, forever). You can further manage the relationship with that person by setting reminder tasks or sending them a personalized email.
- Customize the information you collect with up to 1,000 form fields and a dozen different field types.
Pricing Details of HubSpot Form Builder:
HubSpot Form Builder is 100% free and comes integrated with HubSpot CRM (also free, forever).
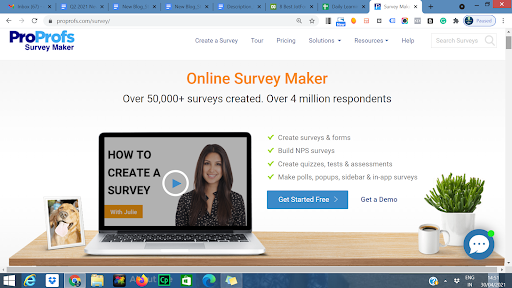
3. ProProfs Survey Maker
ProProfs Survey Maker is an advanced form builder that helps you create engaging forms in minutes. This tool offers 100+ ready-to-use form templates and 20+ question types to help you get started quickly. Be it powerful analytics, intelligent reporting, user-friendly interface, or third-party integrations, everything comes packed with this form builder.
You can organize all your online campaigns in one place with a rich dashboard that possesses powerful reporting capabilities.
Attributes:-
- Easy-to-use interface
- Diverse customization and branding options
- Advanced features such as conditional logic and survey redirects
- Powerful integration with popular tools
- Advanced reporting and analytics
- Real-time notifications
- Extensive and helpful product knowledge base
- Multiple sharing options, including email, social media, website embedding, and survey links.
Best Feature – “Detailed Reporting and Analytics”
Create custom reports and see form responses for every day, week, or month. See who filled your form, when they filled it, and share presentation-ready reports with key stakeholders. Also, for easier segmentation, you can assign emoticons or stars to the reports depending on user feedback.

Pricing:
ProProfs Survey Maker offers 3 pricing options:
- Forever free plan
- Essentials plan starting at $0.05/response/month
- Premium plan starting at $0.10/response/month.
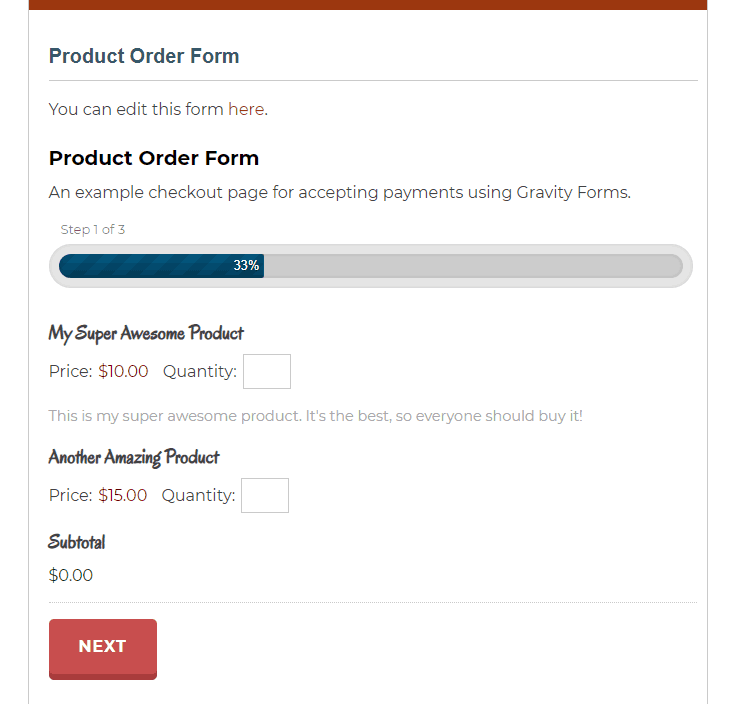
4. Gravity Forms
Gravity form is another plug-in for WordPress which helps in building the form within a WordPress website. The biggest advantage of using Gravity forms is that these are theme-optimized forms, i.e. the forms embed themselves with the theme of the website seamlessly without any special programming by the users.
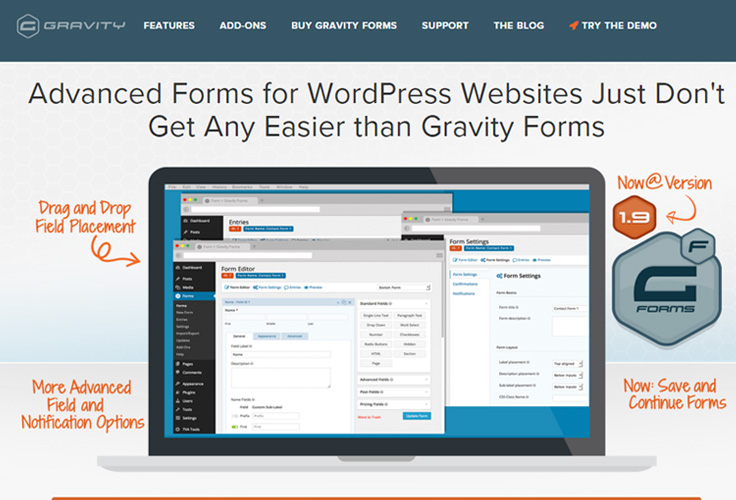
Attributes:-
- Gravity forms offer ease of form development from within the website itself.
- Integration with a large number of third-party websites like Google Docs, PayPal, Stripe, etc. with Gravity form
- Unlimited forms with no restriction on results can be generated using Gravity form.
- Gravity form offers attractive pricing with special re-sign discounts which makes them an attractive choice for the lower budget users.
Best Feature – Seamless Integration
Integration with a large number of third-party websites like Google Docs, PayPal, Stripe, etc. with Gravity form
How the form will look like?
| Gravity Forms Pricing | |||||
| Basic License | Elite License | Pro License | |||
| $59/Year | $259/Year | $159/ Year | |||
| 1 Site | Unlimited Sites | 3 Sites | |||
Gravity Forms Pricing:
From $39 per site, with 1 year of upgrades and support.
Limitations of Gravity Forms
The biggest limitation of these forms is that it charges quite a high price to integrate E-commerce.

5. WPForms
WPForms is a form builder that provides the look as well as the features in the form. It allows anything to be added in the form including the payment options as well as the file uploader. It has been there for a long time, and it is possible that you have already heard of it. This easy to use form builder with strong reporting skills is perfect for beginners as well as for seasoned users.
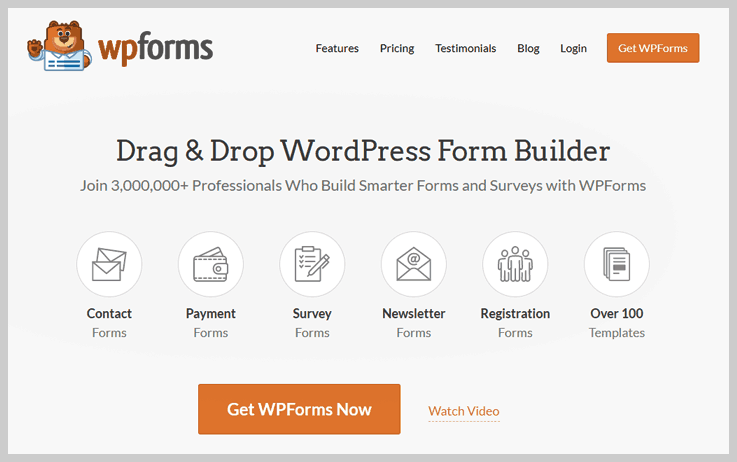
Attributes:-
- It comes with intuitive Drag and Drop features which allow the ease of form development.
- WPForms automatically prevents spam submission by smart captcha and honeypot.
- This software offers payment integration services to users through PayPal.
- With multi-page forms, you can split long forms into multiple pages.
Best Feature – Conditional Logic
Through its smart conditional logic, you can easily create high-performance forms.
How the form will look like?

| WPForms Pricing | |||||
| Basic | Plus | Pro | Elite | ||
| $31.60/Year | $79.60/Year | $159.60/Year | $239.60/ Year | ||
Limitations of WPForms
- This software doesn’t work on non-WordPress sites.
- It doesn’t provide any free trial to the customers.
6. weForms
weForms comes with all the advanced tools that would change your form building experience for life. Simply bring any form to life with its powerful features and easy drag & drop custom field options. Quickly create any contact forms, leads generating forms, the user or event registration forms or any customized form in the simplest way possible without any hitch with its pre-defined form templates.
Creating the forms of your dream has never been so easy as it comes with a number of high-end modules and extensions to boost the functionalities of your form building.
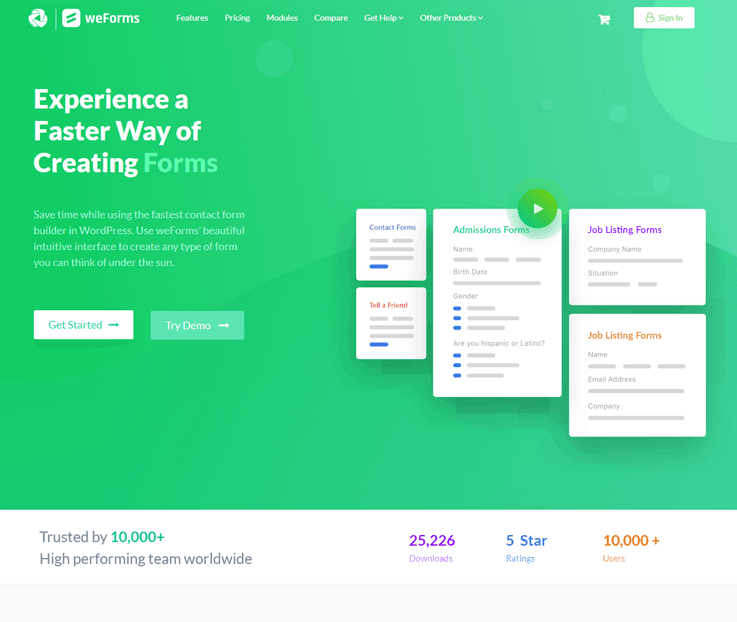
Attributes:-
- Fully Responsive Mobile-friendly Forms
- 20+ Custom Field with Pre-defined Form Templates
- Easy Extending & Customization of Forms
- Form Exporting & Importing Facility
- Form Entry Restrictions, Scheduling & Expiry Settings
- Email Notification Customization & Form Redirection to Custom Page/URL.
Best Feature – Easy Drag & Drop Form Editor
Build, super-fast, SEO friendly and mobile responsive forms hassle-free for your website within minutes.
How the form will look like?
weForms Price:
There are four plans for weForms to chose from
- Personal: $39 yearly plan of basic level usage for a single site.
- Professional: $79 yearly plan of pro-level usage for up to 3 sites.
- Business: $149 yearly plan of advanced level usage for up to 10 sites.
- Developer: $399 yearly plan of advanced level usage for up to 50 sites.
7. FormGet
FormGet has got every basic to the advanced features which a form builder of 2019 should have with the most user-friendly approach! It’s isn’t any plain drag and drop builder but it surprises you with smart block editors, numerous beautiful themes, a lot of pre-built form templates and more. So, with this form builder, you can possibly create anything right from registration forms, payment forms, polls, quizzes, questionnaires and a lot more!
Undoubtedly, it lets you create an ultimate responsive and sorted form along with smart features like unlimited fields, conditional logic, conditional redirects and more which adds the real worth.
Pros of FormGet-
Attributes:-
- Collect Payments Using Both PayPal and Stripe –
You can collect payment using both PayPal and Stripe with ease. Also, it empowers you to collect recurring payments as well. So, payments collection get smarter than ever with FormGet.
- Sell Multiple Products-
With this online form builder, you can highlight the product quantities, product images, and can collect payments for more than one products at the same time.
- Fill Your Form With Multimedia-
Then, it lets you used all the multimedia stuff in the form. So, right from videos to images, you can use it all. Also, it’s upload feature lets you collect the files of almost every format by the user be it a PDF, JPEG or even docx.
- Embed and Share-
With FormGet, you can seamlessly share the form by freely embedding it to any website or can share it on the social media networks too!
- Custom Submission Page and Redirects-
You can create a custom submission page for the users after the successful submission of forms. However, FormGet provides a default “thank you” message and page which you can customize.
Best Feature – Use Hidden Fields
Hidden fields are one of the most interesting features of FormGet which allows you to create the fields which only you can see. So, this way, you can easily sort different forms by using the hidden fields.
How the form will look like?
| FormGet Pricing | |||||
| Starters | Standard | Rookie | Pro Plan | Advance | |
| $7/ Month | $19/ Month | $35/ Month | $79/ Month | $99/ Month | |
| 1200 Submissions | 10K Submissions | 25K Submissions | 60K Submissions | Unlimited Submissions | |
| 6 Months Upload Storage | 9 Months Upload Storage | 12 Months Upload Storage | 18 Months Upload Storage | Lifetime Upload Storage | |
8. Formstack
If you’re looking for creating a professional form or want a form for the business purpose, there is no better form generator like Formstack. With its feature of denying submission, advanced payment processing, digital signature, encryption, etc. this form generator is preferred by all those who are looking for extra features in the form.
While the other entire form app plays in the basic form generation, Formstack takes the process a notch higher with its interesting and non-beatable features.
Attributes:-
- Formstack has an intuitive interface that makes it easy to develop the forms.
- This form builder tool offers the ability to archive the form without the loss of data. This is a definite advantage over the Wufoo and other form builders.
- Conditional logic available to develop the branched out form with Formstack
- Formstack allows the forms empowers you to send attachments.
- Comes in integration with the third parties like Twitter, Google Docs, etc. possible while using Formstack.
- Live Chat for Customer Support is provided to solve all the users’ concerns.
- A tips and trick blog is available to the Formstack users which help the users stay ahead in the game. This tips and tricks blog helps the users in making their form more user-friendly.
Best Feature – Analytics Dashboard
Formstack provides an intuitive analytics dashboard for various site matrix such as revenue, cash balance, net income, profit margin, etc.
How the form will look like?
| Formstack Pricing | |||||
| Bronze | Silver | Gold | Platinum | ||
| $19/Month | $59/Month | $99/Month | $249/Month | ||
| 1 user/5 forms | 1 user/20 forms | 5 users/100 forms | 10 users/1,000 forms | ||
Formstack Pricing:
Free usage for 3 forms; $14 for 5 form plan; 20 forms for $29 plan, $59/month for up to 100 forms and 2,000 entries; $99+/month after that.
Limitations of Formstack
- The biggest limitation is its comparatively higher price. The Formstack is priced higher than its counterparts.
- Limitations on all levels of membership are there, thus making the process a bit difficult for the users.
Note – No video tutorials or phone support is available in Formstack.
9. NinjaForms
NinjaForms is a WordPress plug-in used for generation of forms on the WordPress blogs. This plug-in is available for free for a lifetime with a basic version for unlimited forms with unlimited responses. Further features are available with the paid version. For the users using WordPress, the tool of NinjaForm is a real boon.
Attributes:-
- Customizable Notifications for the response to the forms are available with Ninja forms.
- Ninja Forms provide an option of sorting, searching and downloading the entries through .CSV format.
- Customization of CSS and layout available with the paid version of NinjaForms.
- Ninja forms come with built-in Akismet Protection to protect from the spam.
Best Feature – Customize & Import Entries
NinjaForms provide an option of sorting, searching and downloading the entries through .CSV format.
How the form will look like?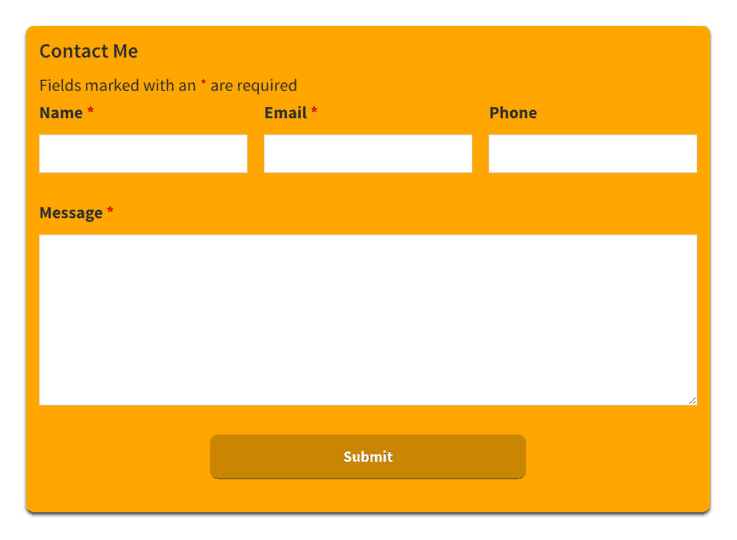
| NinjaForms Pricing | |||||
| Personal | Professional | Agency | |||
| $99/ Year | $199/ Year | $499/ Year | |||
| 1 Site | 20 Sites | Unlimited Sites | |||
NinjaForms Pricing:
Free for unlimited basic forms; add-on extensions from $19 and more each.
Limitations of NinjaForms
- NinjaForms require a self-hosted WordPress site as this is practically a WordPress extension.
- Each extension of NinjaForms is priced at the variable price with price ranging from $19 to $49. This can make the form far more expensive than its counterparts.
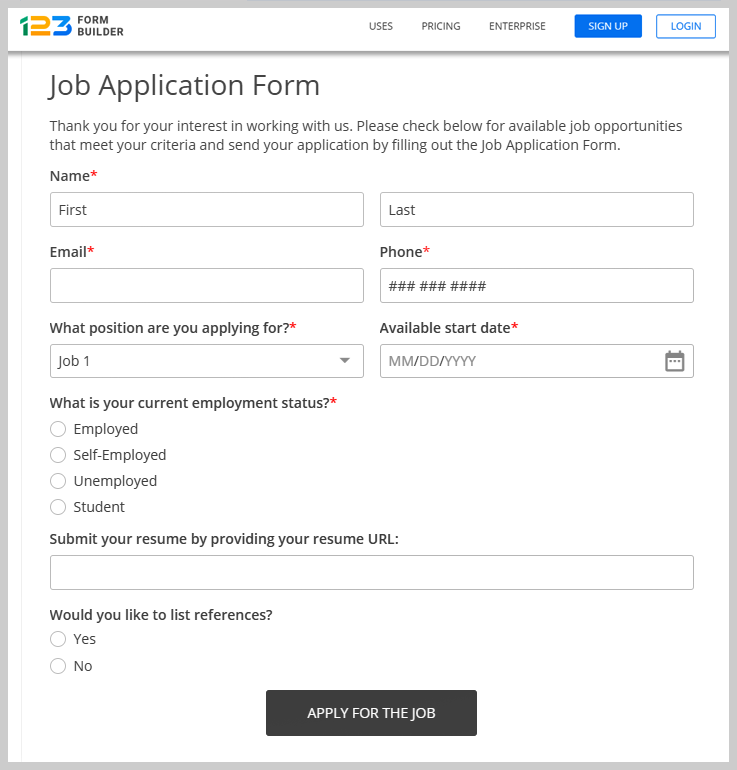
10. 123FormBuilder
123FormBuilder is one of the latest modern WordPress form builders. This software offers a lot of advanced features for its users. This software provides you maximum customizability with a pre-built template facility.

Attributes:-
- Fully responsive form builder with a pre-built template facility.
- It allows you to address users of different languages with the multilingual form feature.
- You can organize your data in real-time reports with graphs and charts.
- Integration with various platforms like Google Drive, Dropbox, etc.
- Social sharing Facility like Facebook.
Best Feature – Drag & Drop with Dynamic Conditional Logic
This is a drag & drop form builder that will allow you to use the smart conditional logic feature to make your form more dynamic & interactive.
How the form will look like?
123FormBuilder Price:
123FormBuilder offers 3 different pricing plans:
- Basic- It cost you $35.00 per month for 5 forms and collecting submissions.
- Gold- This plan will cost you $24.99 per month for 20 forms with accessing different features.
- Platinum- It charges $44.99 monthly for unlimited forms with all the features.
Limitation of 123FormBuilder
- It provides very few numbers of forms in its basic and gold plan that makes it a little bit costly
11. Cognito Forms
Cognito is a simple form builder tool that helps in creating unlimited forms using drag and drop feature. It allows collecting much data as your customer can give without any clutter. You can also create a PDF and Word document from your entry data for future use. This form builder provides a free plan for a single user with 500 monthly entries and unlimited forms.
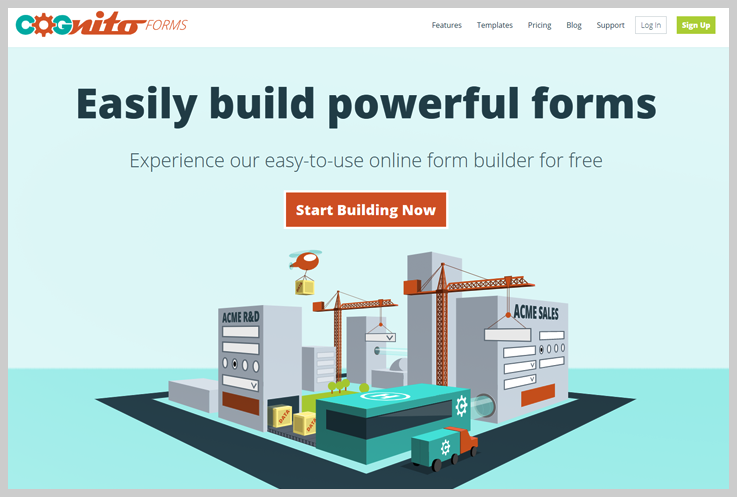
Attributes:-
- Cognito Forms allows users to save and resume from the field where they left.
- In this form builder, you can capture multiple file uploads.
- You can keep your data safe and secure with data encryption.
- It allows collecting payments through forms easily as it is integrated with PayPal, Stripe, etc.
- Cognito offers an unlimited number of forms and fields to users.
- It offers a guarantee against spam with smart captcha feature.
Best Feature – Electronic signature
Through electronic signature, you can easily collect a signature on any form and device.
How the form will look like?

| Cognito Pricing | |||||
| Pro | Team | Enterprise | |||
| $10/ Month | $24/ Month | $99/ Month | |||
| 2 User | 5 User | 50 Users | |||
Limitations of Cognito Forms
- It doesn’t provide charts and reports to analyze performance.
- There are very few templates available to users.
12. Leadformly
Leadformly is a different kind of online form builder. It is one of the best choices for lead generation. With this software, you can create high converting lead capture forms. This visually delightful form builder allows the user to create unlimited forms.
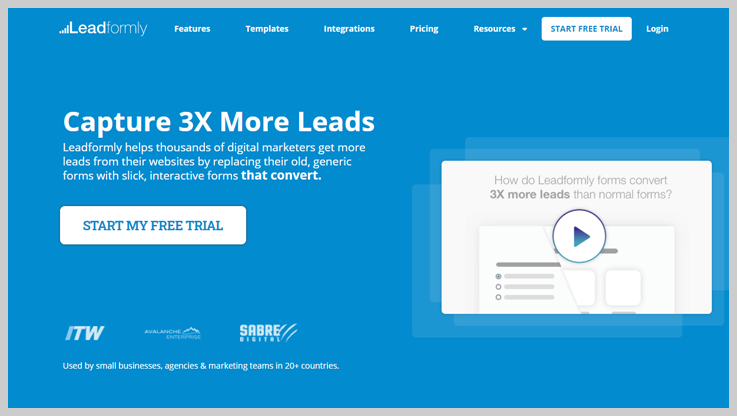
Attributes:-
- With Leadformly, interesting and creative form creation is possible using drag and drop feature.
- Leadformly allows for multi-user management.
- A huge number of templates are available which can be further modified to suit the requirement of the users.
- You can easily analyze reports with the help of form analytics.
- More than 1000 integrations are possible with Leadformly.
- It supports advanced conditional logic.
Best Feature – Huge Template Library
A huge number of templates are available which are highly responsive.
| Leadformly Pricing | |||||
| Essential | Growth | Team | |||
| $37/Month | $74/Month | $149/Month | |||
| Up to 250 leads per month | Up to 1000 leads per month | Up to 25000 leads per month | |||
| Unlimited number of forms | Unlimited number of forms | Unlimited number of forms | |||
Limitations of Leadformly
- One of the limitations of Leadformly is that it doesn’t provide social login and file uploads.
- You can not collect online payment with Leadformly.
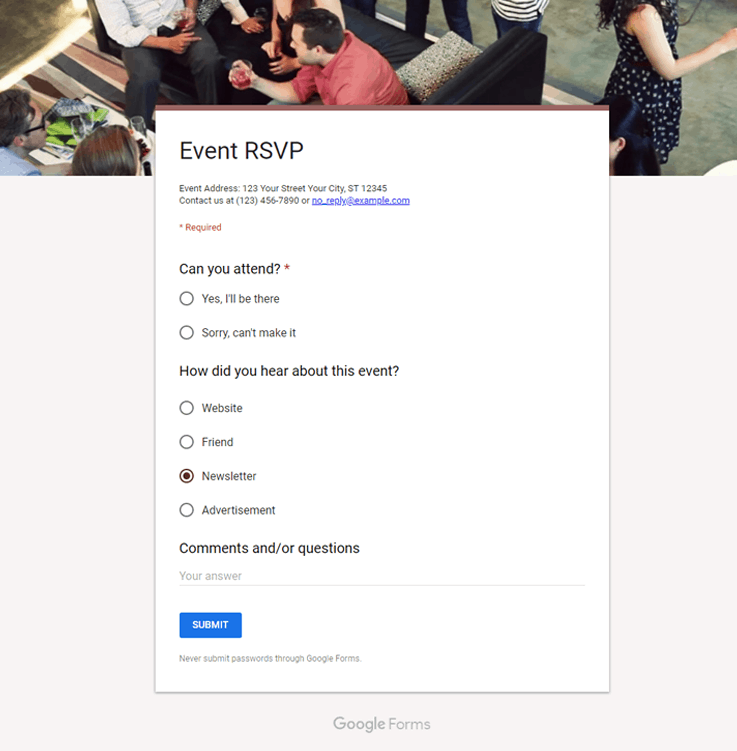
13. Google Forms
Google has almost taken over all our works and functions. With Google Docs, it provides an excellent alternative to the Microsoft Word. It also serves as a tool for form development with its inbuilt feature of Google Forms. The biggest advantage of using the Google Docs is its familiarity for the users as well as the storage space it allows on the system.
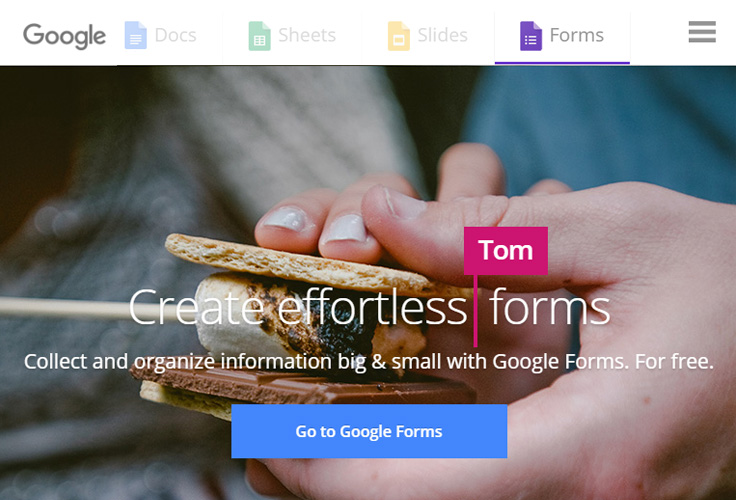
Attributes:-
- The Google Forms are free. No charges are applied for the use of these forms.
- The form creating procedure is faster as compared to the other apps with Google Forms.
- Further processing of data is possible using the excel files of the Google Docs. Google actually can provide quick graphs and analytics for the forms instantly.
- These forms can be edited by the team just like Google Docs.
Best Feature – Analytics
Google Forms stands out when it comes to tracking and analysis. It provides you with real-time reports about the forms in the graphical format.
How the form will look like?
Google Forms Pricing:
Free of cost.
Limitations of Google Docs
- The biggest limitation of Google Docs is that there are no customization options. The Google Forms comes with a standard format, and the same can only be used.
- With the Google Docs, only basic form fields available. No frills like payment option, customization of the output can be added to Google Docs.
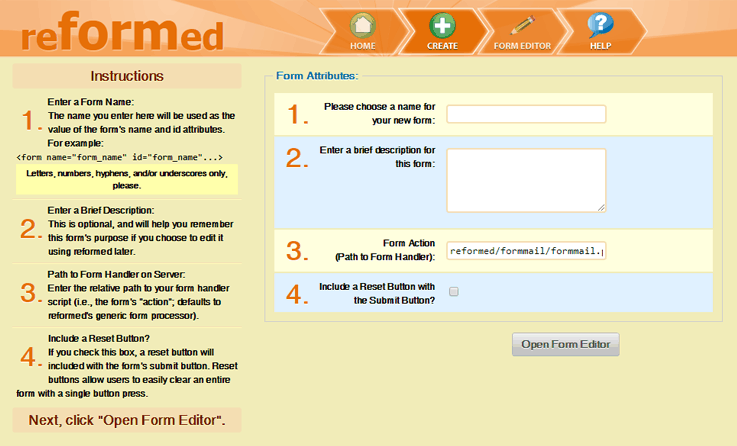
14. Reformed
This HTML5 based form builder tool is the best available tool to develop a form which looks like the part of the website itself. The biggest advantage of this form generator is that it is comparatively cheaper as compared to the rest of the form generators.
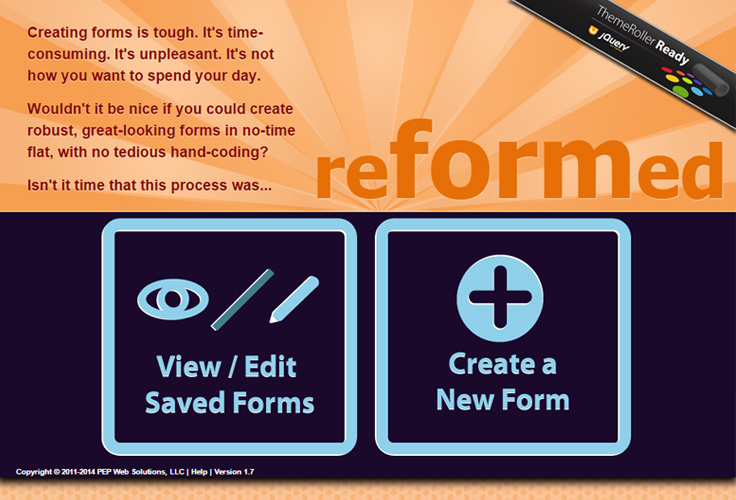
Attributes:-
- Reformed offers ease to develop the form as per the choice of the user and theme requirement with the help of the HTML coding.
- It comes with instruction that suggests different features.
- This saves the list of forms created in the past.
- Also, it supports via the help of support documentation.
- Reformed allows the saving of form directly in the web browser.
Best Feature – Customization Options
Reformed offers ease to develop the form as per the choice of the user and theme requirement with the help of the HTML coding.
How the form will look like?
Reformed Pricing: Free of Cost.
Limitations of Reformed
- The biggest limitation of this form generator is that it requires the knowledge of programming and hence is not suitable for the beginners.
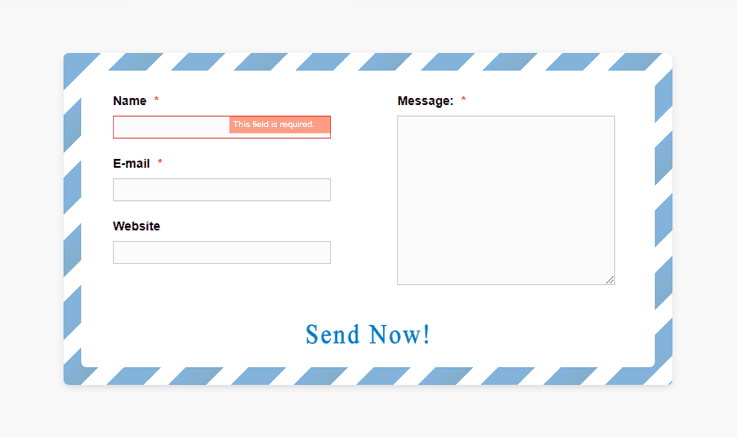
15. JotForm
JotForm is one of the easiest, fastest full-featured online form builders. It is possible to immediately start building up of forms on Jotform.com. The site does not ask for any sign-ups for the free user and the responses can be received by adding the email id in the end. The code generated while preparing the form then needs to be added to the website. This form maker is buzzing with multiple features and is one of the most famous form-builder preferred by the users.
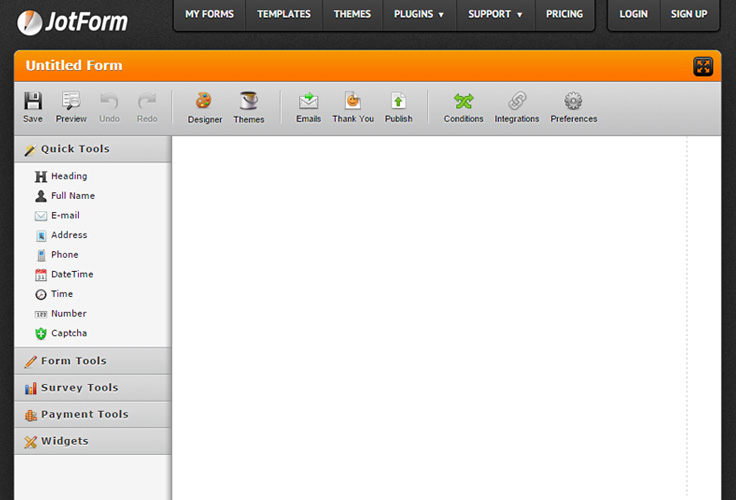
Attributes:-
- This online form builder offers a fully customizable form with more than 2500 templates and 40 themes.
- Customization of the form is quite easy with UI interface of JotForm.
- Conditional logic and development of branched-out form is possible with the use of JotForm
- No registration needed for development of free forms.
- Payment option of JotForm supports eight gateways of the payment including the major gateway of PayPal, Stripe, etc.
- 24*7 Customer Support Available is available with JotForm
- Visual Report Building allowed using the responses of the form. This helps in analyzing the responses of the JotForm.
Best Feature – Multiple Payment Options
With Jotform, you can collect payment effortlessly via renowned payment modes like PayPal, Stripe, Square, etc.
How the form will look like?
| JotForm Pricing | |||||
| Bronze | Silver | Gold | |||
| $19/Month | $39/Month | $99/Month | |||
| 1000 Submissions | 10,000 Submissions | 1,00,000 Submissions | |||
JotForm Price: Free for unlimited forms and up to 100 entries; $9.95/month for unlimited forms and up to 1,000 entries, $19.95+/month after that.
Limitations of JotForm
- Subscription limitation prevents the future entry of forms, and the same can be changed only at the end of the calendar month.
- The website of JotForm is slightly outdated website.
Conclusion:
As seen clearly, each of the online form builders has their own features and pros and cons. Some of the builders are available only as of the WordPress plug-in, while others are available as tools for all the users.
Moreover, there are certain online form builders that need server space for storing the user’s response while others host their own server.
The prices of each of the form builder also vary. I’ve listed all the form builder tools and their features in this blog.
Now, it’s on you to choose the one that best suits your business needs and fits in your budget.
10 Free Best Business Email Templates


Emails have risen as the backbone of businesses and play a prominent role in the growth of any organization.
Business groups are broadly using email for communicating with their suppliers, business partners, and clients.
Moreover, a majority of business organization are now employing Top Email Marketing Services for –
- Sending business email newsletter
- Promoting new products
- Marketing
and much more…
The foremost reason that business corporations prefer to use emails as their communication channel rather than the traditional telephonic and mail communication is because of the lower price, lower overhead expenses and faster conversion rate.
Also Read Our Blog – 10 Cheapest Email Marketing Services
Well, sending emails for business communication is a very effective plan, but when it comes to creating business emails, it becomes a tedious and time-consuming task to accomplish out.
So,
To assist you in creating business emails, I’ve listed below some of the finest and best business email templates that are all free to download.
1. Marketize your business with this type of ready to use email template.

Try It NowTemplate PreviewClone This Email Template
2. Present your marketing emails look eye-catching with this template.

Try It NowTemplate PreviewClone This Email Template
3. Update about the new partnerships and business partners with this business email template.

Try It NowTemplate PreviewClone This Email Template
4. Attractive email template for sending the business email newsletters.
Try It NowTemplate PreviewClone This Email Template
5. Keep your clients and partners updated about your company with this business email template.

Try It NowTemplate PreviewClone This Email Template
6. Make your weekly business email newsletter more amazing with this business email template.
Try It NowTemplate PreviewClone This Email Template
7. Build your organsiation bulletin’s email a more engaging one with below business email template.

Try It NowTemplate PreviewClone This Email Template
8.

Try It NowTemplate PreviewClone This Email Template
9. Use this business email template especially for notifying about your organisation performance and growth.
Try It NowTemplate PreviewClone This Email Template
10. Create your business invitation emails more amazing and stunning .
Try It NowTemplate PreviewClone This Email Template
Conclusion –
Well, I think after viewing these business email templates, you surely would like to use them for your organisation also.
Want To Build Your Own Email Templates. ?
Try MailGet Bolt sign-up for free – Whose Drag & Drop Email Builder lets you create professional looking business emails easily and quickly.
Got Some Queries. ? Comment below in the space provided –
Also Read Our Blog –
10 Best Free Holiday Email Templates


Sign-Up Here To Avail The Offer
When the holiday season comes, you will surely check out for the different ideas through which you can grow your business.
So, if you are planning to go with email marketing as your holiday marketing strategy like other business organizations and firms.
Then,
You won’t be regretting on your decision to work with email marketing.
The best thing about email marketing is –
- It provides the best way to connect with the people by sending them emails.
- You get to target on a larger crowd, which you cannot afford with other marketing strategies and that too in a personalized manner.
Also Read Our Blog –
Now, you might be thinking that –
How to design great holiday emails that drive user engagement..??
Well, I’ve collected some of the best holiday email templates which you will love to use for your holiday email marketing.

1. Email Template for Black Friday
Have a look at this holiday email template given below – You can use it to promote your products on occasions like Black Friday.

Try It Now Template PreviewClone This Email Template
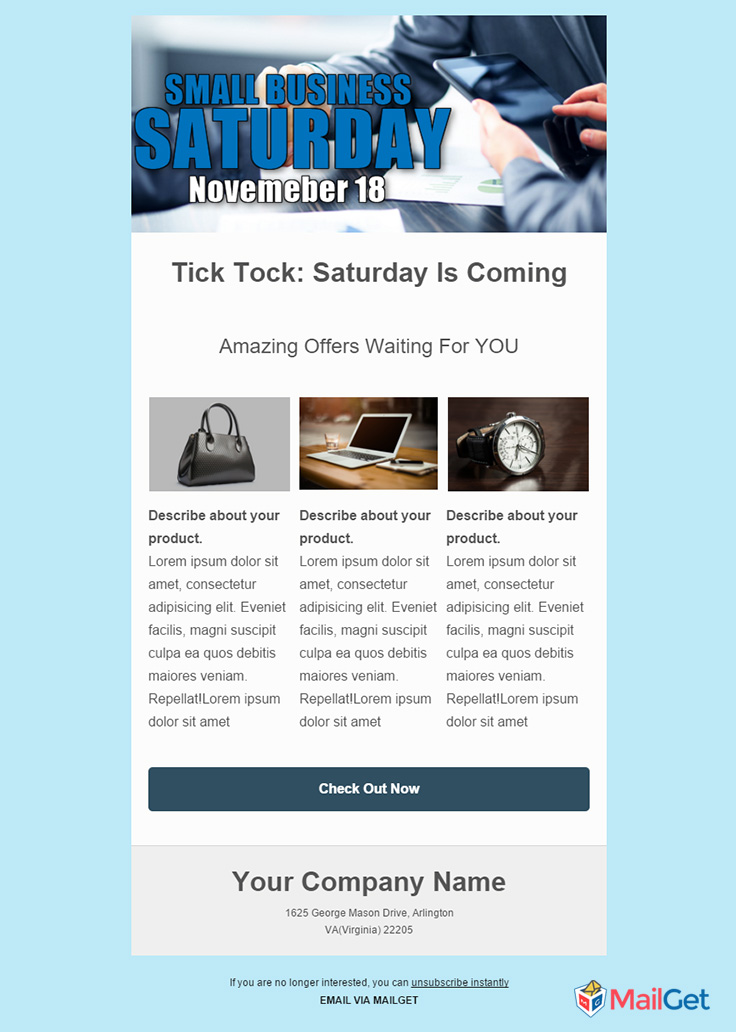
2. Email Template for Small Business Saturday
Reach out to your audience with these form of holiday email templates on Small Business Saturday.
Try It NowTemplate PreviewClone This Email Template
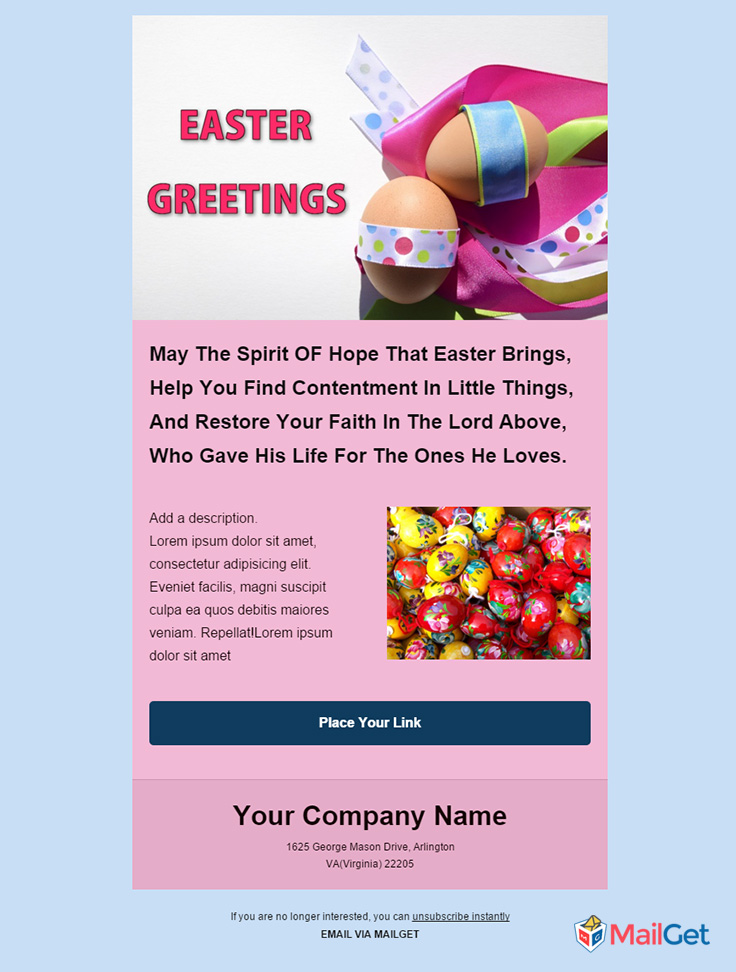
3. Email Template for Easter Season
Send beautiful Easter Greeting Email Newsletters to your subscribers to promote your business during holiday season.
Try It NowTemplate PreviewClone This Email Template
4. Email Template for Cyber Monday
Use these sort of holiday email templates to entice your customers and leads on Cyber Monday .

Try It NowTemplate PreviewClone This Email Template
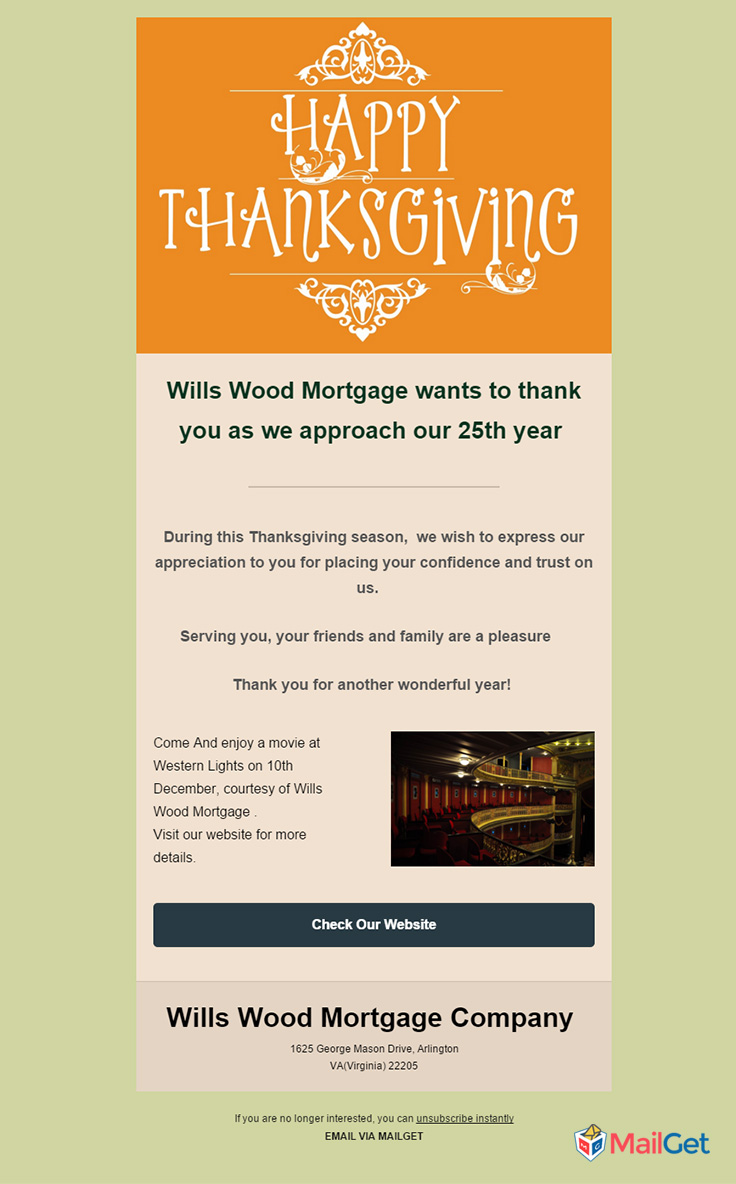
5. Email Template for ThanksGiving
Highlight your organization’s giving back efforts using following ThanksGiving email template.
Try It NowTemplate PreviewClone This Email Template
6. Email Template for New Year
Make your New Year Greeting Emails look amazing using these kind of email templates.

Try It NowTemplate PreviewClone This Email Template
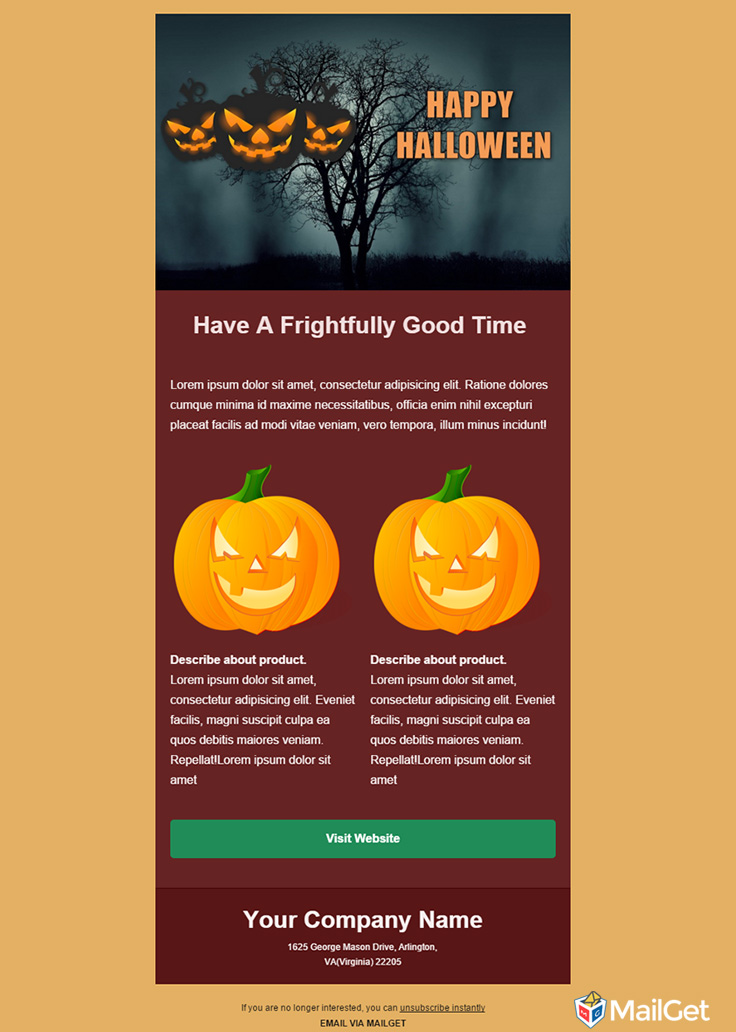
7. Email Template for Halloween Day
Stunning holiday email templates specially designed for Halloween Day.
Try It NowTemplate PreviewClone This Email Template
8. Email Template for Diwali
Incredible Diwali email templates to fire up the inboxes of your clients and subscribers.

Try It NowTemplate PreviewClone This Email Template
9. Email Template for Christmas
Send greeting and promotional emails on Christmas using such an awesome email template.

Try It NowTemplate PreviewClone This Email Template
10. Email Template for Winter Season
A simple but effective holiday email template for Winter Season.
Try It NowTemplate PreviewClone This Email Template
Conclusion –
Well, I think you would be amazed to look these sort of email templates which are specially designed to be used during holiday seasons.
Want To Build Your Own Email Templates..???
Try MailGet Email Service Provider which includes an excellent Drag & Drop Email Builder.
Do you have suggestions of your own? Share in the comments section below!
Visit Our Blog – 10 Best Free Responsive Email Template Builders
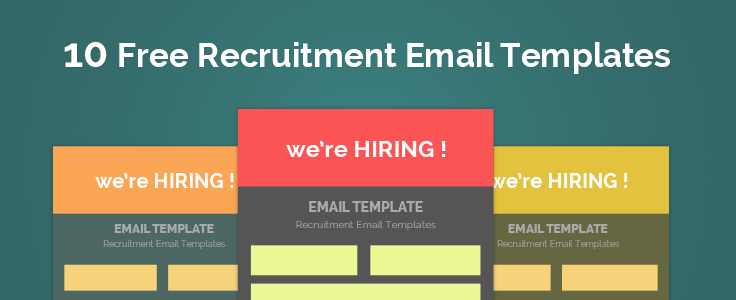
10 Free Job Recruitment Email Templates
When it comes to recruitment and hiring process, you can easily get the crowd of passive candidates on the sites like Linkedin.
But to find out the right candidate, you need to communicate with all of them.
Email marketing is one of the best and effective approach through which you can easily and quickly connect with the candidates by sending them emails.
Why Email Marketing Only?
Email marketing is the only channel which makes it possible to reach every candidate individually, and you can make sure that not a single candidate is missed out.
Moreover, various email marketing services have grown up. Here I would like to describe of MailGet, an email marketing service which I also personally use for my business.
It has some great feature such as –
- Drag & Drop Email Builder – Allows you to create and design great emails that too responsive in nature i.e. can be viewed on any device.
- Email Tracking System – You can monitor your email sent. Like you can know how many emails get delivered, how many emails get opened and much more stats.
- Email Scheduling – You can schedule your email delivery by specifying the email sending date and time.
Try MailGet Bolt Now –
An independent and hassle free email marketing service – MailGet Bolt that lets you send trackable emails via its own SMTP service with high inbox deliverability assurance.

Next up is that while performing email marketing for recruitment purpose, you should make sure that your emails are eye-catching as then only you can grab the prospective candidate’s engagement and urge them to make a response.
Also Read Our Blog –
Check out here some of the best email templates that you can use for hiring and job recruitment purposes.
1. These type of recruitment email templates are preferable for job consultancy agencies and organisations.

2. These form of recruitment templates can be used by big corporation for recruitment and hiring process.

3. Big companies and businesses can use these sort of recruiting email templates for their hiring process.

4. A modern type of recruiter email template.

5. Email templates for recruiters, who organizes job fairs and expos.

6. Hiring email templates specially designed for manufacturing and industrial organisations.

7. Simple but striking form of recruiting email template.

8. Recruiting email templates, especially designed for hiring organisations and agencies.

9. A good and impressive type of email template, that can be used for recruitement and hiring purpose.

10. An truly engaging form of email template, that can be used for recruitment process.

Conclusion
I think that these sort of recruitment email templates will definitely help you in making your hiring and recruitment process a lot effective one.
Want To Design Your Own Email Template..??
Try MailGet – email marketing platform which lets you to design stunning emails through their Drag & Drop Email Builder.
Still Got Some Queries..??? Comment below in the space provided.
Read Our Blogs on – Free Email Marketing and Job Board WordPress Themes.
Copywriting : Creating Good Quality Content

Writing content is easy but, writing good content that attracts readers can be hard. !!
As many writers produce content before even identifying –
- Why they are writing it. ?
- What reader will get through it. ?
Isn’t this fact. Right. ?
Then, What’s The bottom line. ?
Good Quality Content can ridiculously increase traffic and sales for you. !!
As it has the power to –
- Attract readers
- Admire your article
- Share your content on the web
- Make them stay on your website
High-quality content is important for SEOs and Internet Marketing Strategy.
How. ?
As it is not merely the content that is going to be posted on your website but, it’s the content you submit to search engines for their readers.
Now,
I am going to tell you some actionable steps to create killer content – that will undoubtedly boost users engagement to your site. !!
Step #1 – Use Attractive Heading : Make Readers to Click on Your Article.
Good content or graphical user presentation are not enough to attract reader’s attention.
A good headline is equally important. !!
How. ?
Say – You published a killer article and waited for a response.
But, What if you didn’t get a good response. ?
Well here’s the deal:
- Heading Start with A Target Keyword –
It’s important that you place the targeted keyword at the starting point of the heading.
By doing so, It increase more clicks on your article.
Note –
- You could write an excellent and accurate article only if you know your targeted keyword prehend.
- Choose a keyword with high search volume.
- Add a Caption Text –
Let’s Say,
Your target keyword is Email-Delivery.
Will this be clear, if you make your article heading as ” Email Delivery ” only. ?
No.. Right. ?
So, why not then make it more relevant. !!
Add a short description by letting your user know what exactly they will get in the post.
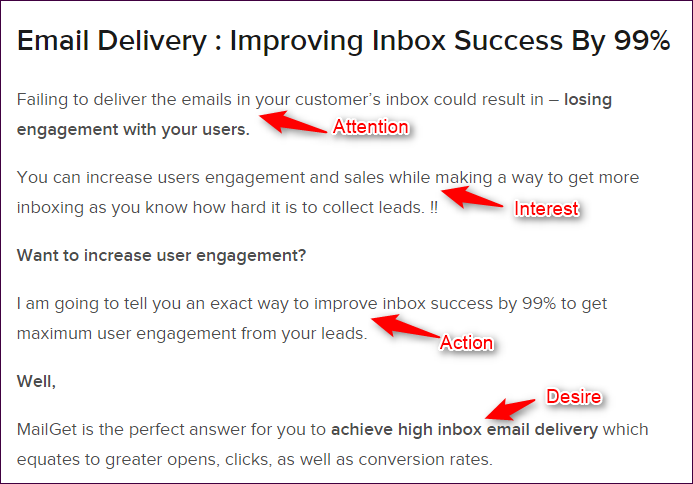
Example –
Email Delivery : Improving Inbox Success By 99%
Making Sense. Isn’t it. ?
Tip – You can add long tail keywords that have searches but, carefully choose specific ones according to your content.
A Catchy, Relevant and Compelling headline can effectively increase your clicks, reads, and shares.
Step #2 – AIDA Method : A Good Introduction Part Increase Your Reader’s Stay ?
Now that you’ve got a click. It’s time to make your user stay long. !!
You know how hard it is to get a user to your site after so many hurdles but, what if he leave out instantly. ??
It hurts.. right. ? The reason could be probably your introduction part that might have not connected him, with the content you introduced.
So, let’s make user agree that he came to the right place for what he was looking for. !!
Question is – How..?
Well, I am going to explain an effective AIDA method which makes your user stick on your page like superglue.
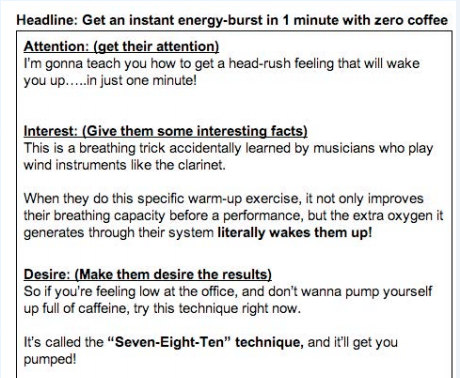
AIDA stands for : Attention, Interest, Desire and Action. (we use AIDA principle in introduction part only)
- Attention : Get their attention that will perk their ears up, using any of the target sentences given below
- Talk about some profit or benefit they could achieve.
- Tell them what they are losing or create a fear.
- Offer something by telling what extra they could achieve. (It could be free pdf, discount for any item etc. )
- Interest : Keep them interested by providing interesting facts, stories, case studies, uses, etc.
It’s a supporting statement for attention.
For example, You can include –
- Facts –
- Story –
- Case studies –
- Desire : Show them what their life can be like with this, or the results.
So, give them a proof of whatever you said above is true and justify yourself. !!
If not done,
Your readers will lose interest and surely jump off.
- Action : Lead them through the process of taking action
Take action by telling what exactly they are going to get after reading your article.
One more example..
One more example..
Step #3 – Sub-Heading : Make Easy For Readers to Scan Article
Sub-heading are equally important as your article heading.
Why So. ?
People have a habit to scan articles rather than reading them completely. While scanning, If they feel article is useful then they start going thoroughly.
Now, what makes scanning easier. ?
Subheadings, Right. !!
Divide your sub-heading into two parts as –
First part : Second part
- First Part –
Include keyword rather than just writing long sentences. You can also include LSI (Latent Semantic Index) keywords in targeted niche i.e. keywords that Google shows related to your searched keyword.
- Second Part –
Describe briefly what user is going to get in the upcoming content so that, he can have a clear picture of what is inside for him.
Step #4 – Paragraphs
Most people write for experts. But in my experience, write for a beginner readers (think reader as 4th grader student)
It becomes easy for every reader to understand what you want to convey.
You might be wondering How. ?
For that, make sure you follow these points –
A. Write Short Paragraph
- Use short paragraphs instead, long paragraph.
- Cover every new concept in new paragraph.
- Don’t merge multiple concept in one paragraph. As it’s hard for reader to understand.
B. Skip Unnecessary Words –
Eliminate the fluff as it confuses the reader.
C. Avoid Jargon –
Use simple words as they get easily clicked.
- Use Active Tense (Rather than passive tense)
- Avoid needless repetition –
As repetition frustrate user which increases the chances for him to opt out of the page.
D. Add lists –
As they are easier to scan. Turn text into lists as much as possible.
- Ordered list is good when you have a particular sequence for the process.
- Unordered list is good when you don’t have any particular sequence.
E. Add Attention Seekers –
Whenever you have a section where someone may get bored and leave, add a Sentence Connectors.
For example, Sentence Connectors that I’ve used in this post –
- You might be wondering:
- Now, what makes scanning easier. ?
- Question is..How.?
- Let’s Say,
- Well here’s the deal:
- Making Sense. Isn’t it. ?
Step #5 – Content Formatting
To look like a professional, your formatting pattern has to be fixed for all articles.
These are the things you need to take care of –
- Image size for blog – ( For InkThemes.com and FormGet.com Websites)
Width – 736 , Height – may vary
- Subheadings –
Should be H2 – >H3 – > H4 etc.
- Links – Provide proper internal link for article.
Bold and should be redirected to a relevant page rather than redirecting your user to a sales page.
- Speak Directly To your Reader –
Great content is always focused on the reader.
Rather than using “We”..
Start using “You” and “I” and make your user feel connected to you.
- Be Accurate in Your Reporting and Sourcing of Information –
Keep in mind – your Article is a reflection of your company. Consider who you are linking to.
Step #6 – Provide Complete Information : No One Like Incomplete Information
No one like incomplete or fluff information in the article.
Incomplete means you are just giving concept but you are not telling about the complete process of doing that concept.
Step #7 – Image & Video : Add Relevant Images To Support Text
Always maintain the text-image ratio. There are various studies done which states images, videos, infographics, etc. has always been constructive.
It gives a user a short break while reading the article continuously and images and videos remain in users mind for quite long.
Step #8 – Conclusion
Sum up your article by describing what user has achieved and you can also include some other relevant posts in support of your article.
Bonus – Great for getting traffic to your other posts. But, be sure to include very specific post link.
You’re all set now to make Google readers stay on your site. !!
Get more useful information through following blogs –
- Lead Generation: through content upgrade
PhoneGap : How Push Notifications Work?

Push Notification are –
- Simple messages that one receives from the apps installed in the device.
- Very popular among mobile devices, iPads and what not..!!
For example,
Whatsapp and Facebook message notifications in the notification bar of the home screen or lock screen.
It is a way to –
- notify user,
- update user about new updates,
- send offers,
- notifications related to the app.
Components we’re going to use to implement PhoneGap Push Notification:
- PhoneGap Plugin Push (A 3rd Party Plugin)
– A 3rd Party Plugin to implement push notification in a PhoneGap app.
- Google Cloud Messaging (GCM) Service
– Google Cloud Messaging to send push notifications.
- Web Server for running PHP Files
– Web Server to run PHP Files which are storing registration ID in the database returned by GCM.
Push Notification Providers
Every platform has their own Push Notification provider. Let’s take a look at each of them.
- Android – Google Cloud Messaging Services (GCM)
https://developers.google.com/cloud-messaging/
- iOS Devices – Apple Push Notification Service (APNS)
https://developer.apple.com/notifications/
- Microsoft – Microsoft Push Notification Services (MPNS)
https://msdn.microsoft.com/en-us/library/windows/apps/ff402558(v=vs.105).aspx
There are several other 3rd party providers available such as Parse, Push Bots and more. But I’ll recommend you to use standard providers.
How PhoneGap Push Notification Works?
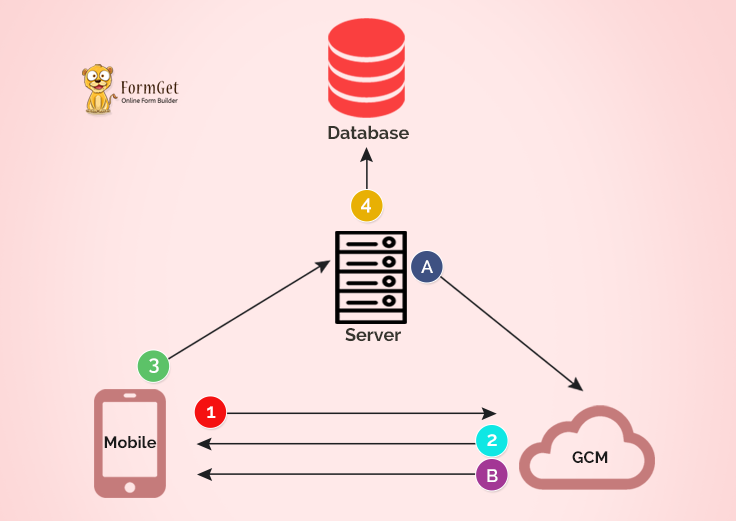
Working of push notification is divided into two steps:
- Registration
- Sending Push Notification
Registration Process
-
-
Step 1Register the mobile device with GCM / APNS / MPNS.
-
-
-
Step 2On successful registration, GCM / APNS / MPNS will return a 256 char encrypted registration ID. This registration ID is unique for every device and every application.
Registration ID - e2I1DO3qcgg:APA91bEqBYx_B_uaVDz_neKna1j2vePk-fAg01JKObli6sC3H1b4ZtR4BCBGyT2a5CUPHL0RNQ66wsQtiwN7jxugxeFqoxB3B3siF6UYgIO53Cg1X0Hnkav1bEeUBLo7TSgO4XtlNeVP
-
-
-
Step 3After obtaining RegistrationID, We will send this ID to our own server.
-
-
-
Step 4Now, we’ll Store this registrationID in our database along with user’s name and email ID
-
Sending Push Notification
-
-
Step ASend Push Message along with registration ID to GCM / APNS / MPNS.
-
-
-
Step BPush message will be automatically sent by GCM / APNS / MPNS when the user comes online.
-
Creating A Project On Google Developer Console
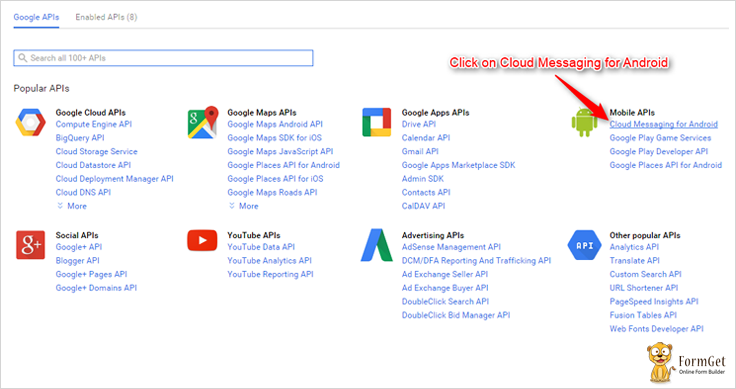
As we’re building the app for android, we will use Google Cloud Messaging (GCM).
For that, we need to create a project on Google’s developer console.
Step – 1
- You need to login to Google Developer Console with your google account.
https://console.developers.google.com/

Step – 2
- Create a new project on the dashboard.
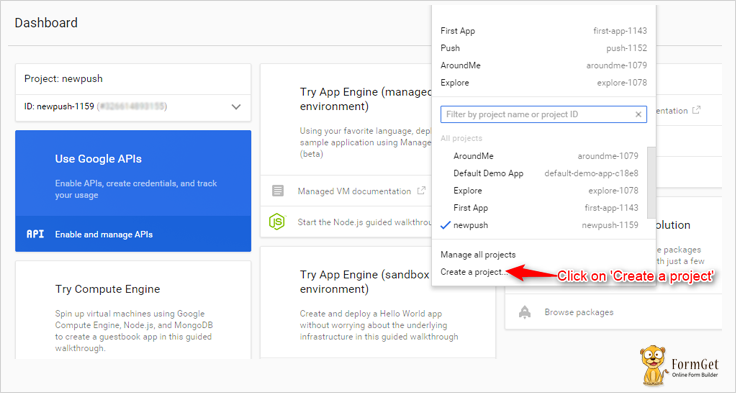
Step – 3
- Name your project.

Step – 4
- Copy the Project number which is also known as Sender’s ID.
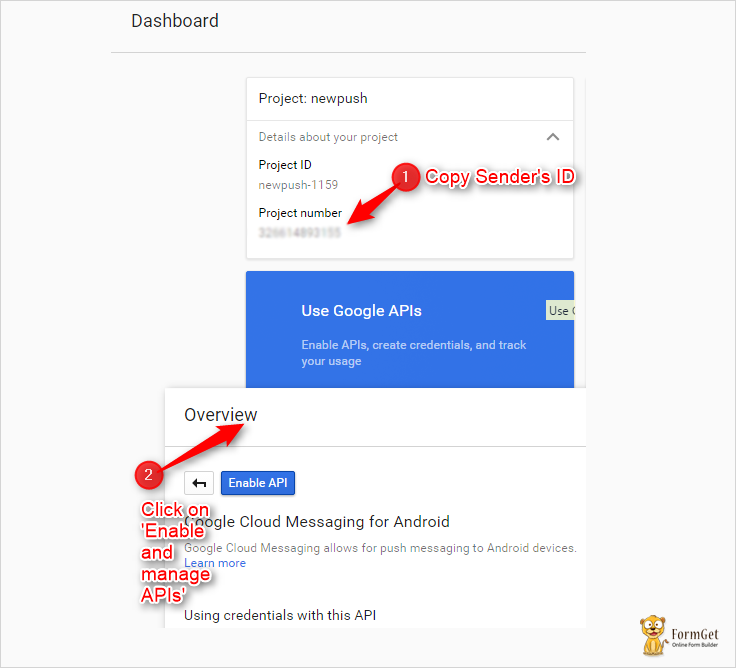
Step – 5
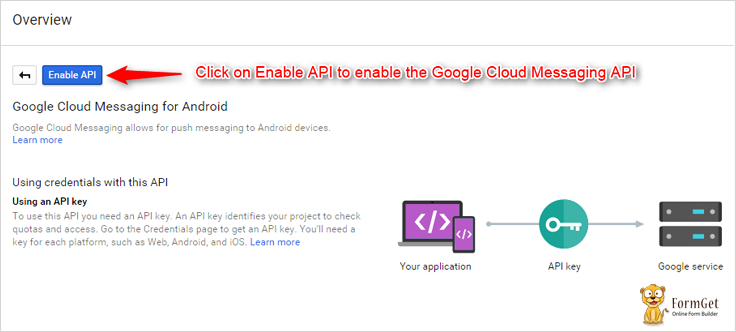
- Now you need to enable the Google Cloud Messaging API.
Step – 6
- Enable The API by clicking ‘Enable API’ button.
Step – 7
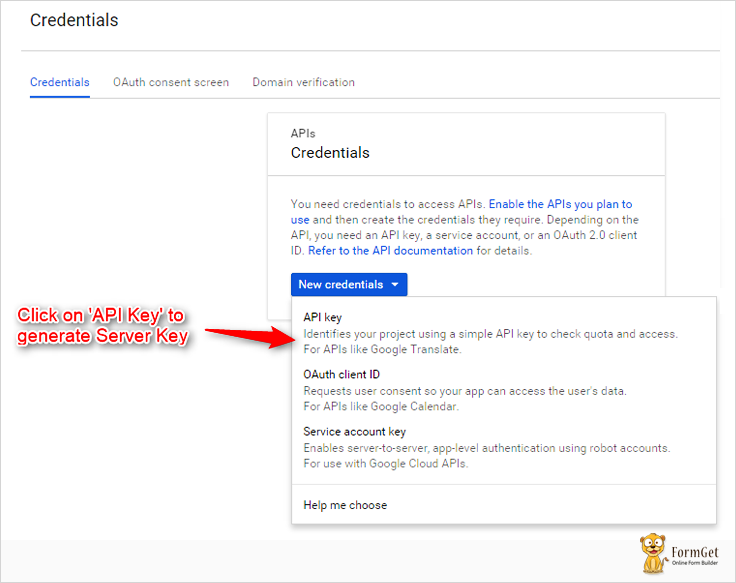
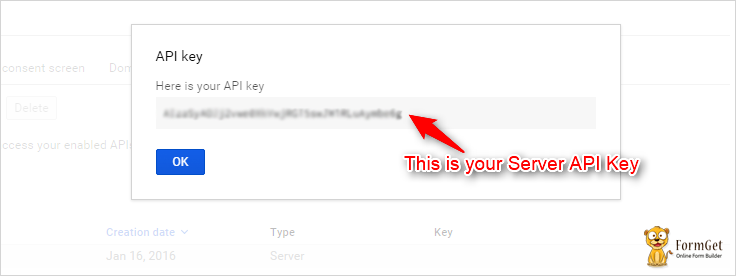
- Now you need to generate a Server Key.
You need to click on ‘Go to credentials‘

Now you need to click on ‘API Key‘ to generate Key.
Now Click on ‘Server Key‘
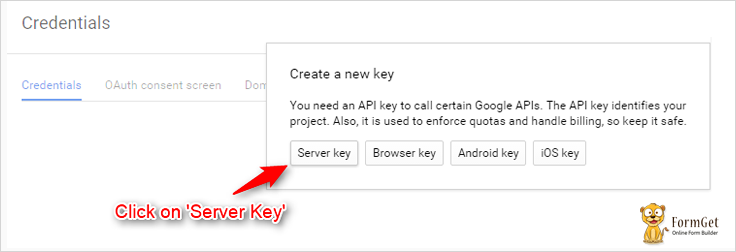
Click on ‘Create‘
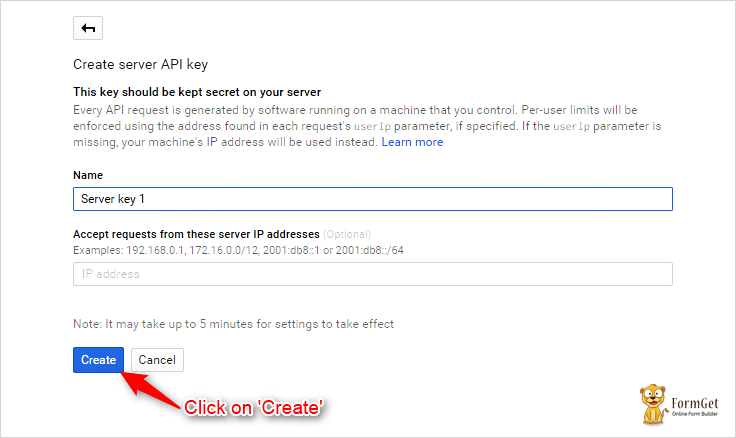
Now, this is your Server Key
Important Points Before Creating A Project
Now, before creating a PhoneGap project, you need to double check the following points:
- Make sure you’ve Android SDK Installed and configured.
- Make sure you have installed the following packages. These packages are different for every platform and every platform has its own API Level.
- Android Support Repository
- Android Support Library
- Google Play Services
- Google Repository
- Intel x86 Emulator Accelerator (HAXM installer)
- Make sure you have a virtual device (x86 System Image with Google API) with the API Level 22 in the emulator.
Creating A PhoneGap Project
-
-
Create a new ProjectCreating a project “PushExample” with id=”org.push.sample”
phonegap create PushExample --id "org.push.sample" --name "PushExample"
-
-
-
Add Android PlatformWe want to create the app for android
phonegap platform add android
-
-
-
Add Push Notification PluginWe need to add the push plugin
phonegap plugin add phonegap-plugin-push
-
-
-
Add Cordova.js and Push.jsAdd cordova.js and push.js in the head section of index.html
<script type="text/javascript" src="cordova.js"></script> <script type="text/javascript" charset="utf-8" src="push.js"></script>
-
-
-
Copy Cordova.jsCopy cordova.js from
Project/platforms/android/assets/wwwto
Project/www
-
-
-
Copy Push.jsCopy push.js from
Project/plugins/phonegap-plugin-push/wwwto
Project/www
-
Changes That Needs To Be Done In The Files
Changes in My.js File:
You need to change “senderID”: “123456789876” with your sender ID in the following code which is a part of my.js file.
var push = PushNotification.init({ "android": {"senderID": "123456789876"},
"ios": {"alert": "true", "badge": "true", "sound": "true"}, "windows": {} } );
push.on('registration', function(data) {
// data.registrationId
});
push.on('notification', function(data) {
});
push.on('error', function(e) {
// e.message
});
Changes in AndroidManifest.xml:
In the last 2 lines of AndroidManifest.xml file, you need to replace application id with your application id which you’ve entered while creating the project.
In my case, it is “org.push.sample”
Location of AndroidManifest.xml : Project-Folder/platforms/android/
<permission android:name="${applicationId}.permission.C2D_MESSAGE" android:protectionLevel="signature" />
<uses-permission android:name="${applicationId}.permission.C2D_MESSAGE"/>
Changes in sendnotification.php:
- You need to enter your own API Key you’ve generated in the Google Developer Console.
define( 'API_ACCESS_KEY', 'ENTER YOUR OWN API KEY' ); - You need to enter your own registration ID here.
I’m fetching it through the database, but you can directly paste it here.
$to="YOUR OWN REGISTRATION ID";Building The Project
- You need to open your Node.js command prompt and follow the following steps:
-
-
Prepare
cordova prepare android
-
-
-
Compile
cordova compile android
-
-
-
Build
cordova build android
-
-
-
Emulate
cordova emulate android
-
Files:
Application Files
HTML File : Index.html
This is the main file of the application.
<!DOCTYPE html>
<html>
<head>
<meta name="format-detection" content="telephone=no">
<meta name="msapplication-tap-highlight" content="no">
<meta name="viewport" content="user-scalable=no, initial-scale=1, maximum-scale=1, minimum-scale=1, width=device-width">
<title>Hello World</title>

<!--Stylesheet Files : jQuery Mobile CSS File, Customized CSS File-->
<link rel="stylesheet" href="css/jquery.mobile-1.4.5.css">
<link rel="stylesheet" href="css/my.css">

<!--AJAX Library, jQuery File : Library, Mobile Library,Cordova JS, Push Notification JS and Customized JS File -->
<script src="https://ajax.googleapis.com/ajax/libs/jquery/1.11.3/jquery.min.js"></script>
<script type="text/javascript" src="js/jquery-1.11.3.min.js"></script>
<script type="text/javascript" src="js/jquery.mobile-1.4.5.js"></script>
<script type="text/javascript" src="cordova.js"></script>
<script type="text/javascript" src="push.js"></script>
<script type="text/javascript" src="js/my.js"></script>
</head>

<!--Beginning of the Body-->
<body>
<div data-role="page">
<div data-role="header" data-position="fixed" class="ui-header ui-bar-a ui-header-fixed slidedown" role="banner">
<h1>Push Me</h1>
</div>
<div data-role="main" class="ui-content" id="main">

<!--Form containing fields registration ID, name, email ID and a submit button -->
<form>
<ul data-role="listview" data-inset="true">
<li class="ui-field-contain">
<label for="name2">Your Registration ID is:</label>
<input type="text" id="regid" value="" data-clear-btn="true" disabled>
</li>
<li class="ui-field-contain">
<label for="name2">Enter Your Name:</label>
<input type="text" id="name" value="" data-clear-btn="true">
</li>
<li class="ui-field-contain">
<label for="name2">Enter Your Email ID:</label>
<input type="text" id="email" value="" data-clear-btn="true">
</li>
<li class="ui-body ui-body-b">
<center><a href="#" id="submit" class="ui-shadow ui-btn ui-corner-all">Submit</a></center>
</li>
</ul>
</form>
</div>
</div>
</body>
<!--End of the body-->
</html>
JavaScript File : My.js
This file is registering the user on GCM and sending the registration ID to our own server, i.e, Insertregid.php.
document.addEventListener("deviceready",onDeviceReady,false);

<!--Device Ready Function-->
function onDeviceReady(){
alert("Device Ready");

<!--Initializing Push Notification-->
var push = PushNotification.init({

<!--Setting attributes for Android, IOS and Windows-->
android: {
senderID: "123456789876"
},
ios: {
alert: "true",
badge: "true",
sound: "true"
},
windows: {}
});

<!--This will alert registration ID which is returned by the GCM-->
push.on('registration', function(data) {
alert(data.registrationId);
$("#regid").val(data.registrationId);
});
push.on('notification', function(data) {
});
push.on('error', function(e) {
});
}

<!--Fetching the values of registration ID, name and email from the input boxes-->
$(document).ready(function() {
$("#submit").click(function() {
var regid = $("#regid").val();
var name = $("#name").val();
var email = $("#email").val();
alert(regid);
alert(name);
alert(email);

<!--Passing those values to the insertregid.php file-->
$.ajax({
url: "http://www.aorank.com/tutorial/push/insertregid.php",
type: "POST",
dataType:'text',
data: {regid: regid,name: name,email:email},
success: function(data){
alert(data);
}
});
});
});
CSS File : My.css
.ui-bar-a, .ui-page-theme-a .ui-bar-inherit, html .ui-bar-a .ui-bar-inherit, html .ui-body-a .ui-bar-inherit, html body .ui-group-theme-a .ui-bar-inherit {
border: 1px solid #005994 !important;
background: #0093EA !important;
color: #fff !important;
font-weight: bold !important;
text-shadow: 0 0 #eee !important;
background-image: -webkit-gradient(linear, left top, left bottom, from( #0093EA), to( #007dcd ));
background-image: -webkit-linear-gradient( #0093EA , #007dcd );
background-image: -moz-linear-gradient( #0093EA, #007dcd );
background-image: -ms-linear-gradient( #0093EA , #007dcd );
background-image: -o-linear-gradient( #0093EA , #007dcd );
background-image: linear-gradient( #0093EA , #007dcd );
}
.ui-page-theme-a .ui-btn:hover, html .ui-bar-a .ui-btn:hover, html .ui-body-a .ui-btn:hover, html body .ui-group-theme-a .ui-btn:hover, html head + body .ui-btn.ui-btn-a:hover{
border: 1px solid #007dcd;
background: #333 ;
font-weight: bold;
text-shadow: 0 0 #eee !important;
color: #fff !important;
background-image: -webkit-gradient(linear, left top, left bottom, from( #0093EA ), to( #0093EA ));
background-image: -webkit-linear-gradient( #0093EA , #0093EA );
background-image: -moz-linear-gradient( #0093EA , #0093EA );
background-image: -ms-linear-gradient( #0093EA , #0093EA );
background-image: -o-linear-gradient( #0093EA , #0093EA );
background-image: linear-gradient( #0093EA , #0093EA );
}
.ui-page-theme-a .ui-btn.ui-btn-active, html .ui-bar-a .ui-btn.ui-btn-active, html .ui-body-a .ui-btn.ui-btn-active, html body .ui-group-theme-a .ui-btn.ui-btn-active, html head + body .ui-btn.ui-btn-a.ui-btn-active, .ui-page-theme-a .ui-checkbox-on:after, html .ui-bar-a .ui-checkbox-on:after, html .ui-body-a .ui-checkbox-on:after, html body .ui-group-theme-a .ui-checkbox-on:after, .ui-btn.ui-checkbox-on.ui-btn-a:after, .ui-page-theme-a .ui-flipswitch-active, html .ui-bar-a .ui-flipswitch-active, html .ui-body-a .ui-flipswitch-active, html body .ui-group-theme-a .ui-flipswitch-active, html body .ui-flipswitch.ui-bar-a.ui-flipswitch-active, .ui-page-theme-a .ui-slider-track .ui-btn-active, html .ui-bar-a .ui-slider-track .ui-btn-active, html .ui-body-a .ui-slider-track .ui-btn-active, html body .ui-group-theme-a .ui-slider-track .ui-btn-active, html body div.ui-slider-track.ui-body-a .ui-btn-active {
background-color: #0093EA !important ;
border-color:#0093EA !important;
color: #fff ;
text-shadow: 0 1px 0 #005599 ;
}
img{
padding: 25px;
}
button.ui-btn, .ui-controlgroup-controls button.ui-btn-icon-notext {
border-radius: 5px !important;
}
#main{
margin-top: 12% !important ;
}
.ui-collapsible-inset.ui-collapsible-themed-content .ui-collapsible-content
{
background-color: #ddd;
color: #111;
}
.ui-collapsible-content {
-webkit-transition: all 0.5s;
-moz-transition: all 0.5s;
-ms-transition: all 0.5s;
-o-transition: all 0.5s;
transition: all 0.5s;
overflow: hidden;
}
.ui-collapsible-content-collapsed {
display: block;
height: 0;
padding: 0 16px;
}
Server Files
Database : Tutorial.db
Create Database with the name ‘tutorial’ in Phpmyadmin:
CREATE DATABASE tutorial;Create a table with the name ‘gcm’ in the tutorial Database in Phpmyadmin:
CREATE TABLE `gcm` ( `id` INT(11) NOT NULL AUTO_INCREMENT , `regid`VARCHAR(255) NOT NULL , `name` VARCHAR(255) NOT NULL , `email` VARCHAR(255)NOT NULL , PRIMARY KEY (`id`) ) ENGINE = InnoDB;PHP File : Insertregid.php
This file is inserting the Registration ID, name and email into the database sent by the user from the index file or the main file of the application.
<?php

<!--Setting values for the database-->
$servername = "localhost";
$username = "root";
$password = "";
$dbname = "tutorial";

<!--Connecting the database-->
$conn = mysqli_connect($servername, $username, $password,$dbname);

<!--Recieving the values of registration ID,name and email ID sent by index.html-->
$regid = $_POST['regid'];
$name = $_POST['name'];
$email =$_POST['email'];
echo "Submitted";

<!--Inserting registration ID,name and email ID in the database-->
$sql = "INSERT INTO gcm (regid, name, email) VALUES ("."'".$regid."'".","."'".$name."'".","."'".$email."'".")";

<!--Executing the query and closing the database connection-->
mysqli_query($conn, $sql);
mysqli_close($conn);
?>
PHP File : Sendnotification.php
This file is retrieving the registration ID from the database and sending message as the push notification on the fetched registration ID/IDs.
<?php

<!--Setting values for the database-->
$servername = "localhost";
$username = "root";
$password = "";
$dbname = "tutorial";

<!--Connecting the database-->
$conn = mysqli_connect($servername, $username, $password,$dbname);
$email = $_POST['email'];
$msg = $_POST['msg'];
$noti =$_POST['noti'];
echo "Submitted";

<!--Retrievin Registration ID from the database with the help of email-->
$sql = "SELECT regid FROM gcm where email='\"'.$email.'\"'";

<!--Executing the query-->
$result = mysqli_query($conn, $sql);
if (mysqli_num_rows($result) > 0) {
$regid = mysqli_fetch_assoc($result);
} else {
echo "0 results";
}

<!--closing the database connection-->
mysqli_close($conn);

<!--Setting Server API Key that we generated in the Google Developer Console-->
define( 'API_ACCESS_KEY', 'ENTER YOUR OWN API KEY' );

<!--Storing Fetched Registration ID to the vaiable 'to'. 'to' is an array of registration IDs whom we want to send push notification-->
$to=$regid;

<!--This 'to' is assigned to registrationIds-->
$registrationIds = array($to);

<!--Message Array-->
$msg = array
(

<!--Message that we want to send in the push notification-->
'message' => $msg,

<!--Title that we want to set for the push notification-->
'title' => $noti,

<!--Subtitle, ticker text-->
'subtitle' => 'This is a subtitle. subtitle',
'tickerText' => 'Ticker text here...Ticker text here...Ticker text here',

<!--Sets to true or '1' if we want device to vibrate and make sound when user recieves push notification-->
'vibrate' => 1,
'sound' => 1,
'largeIcon' => 'large_icon',
'smallIcon' => 'small_icon'
);

<!--RegistrationIds and message are assigned to fields-->
$fields = array
(
'registration_ids' => $registrationIds,
'data' => $msg
);
$headers = array
(

<!--Setting headers for API acceess key and content type-->
'Authorization: key=' . API_ACCESS_KEY,
'Content-Type: application/json'
);

<!--Initializing Curl-->
$ch = curl_init();

<!--Posting data to the following URL-->
curl_setopt( $ch,CURLOPT_URL, 'https://android.googleapis.com/gcm/send' );

<!--Post Data = True, Defining Headers and SSL Verifier = false-->
curl_setopt( $ch,CURLOPT_POST, true );
curl_setopt( $ch,CURLOPT_HTTPHEADER, $headers );
curl_setopt( $ch,CURLOPT_RETURNTRANSFER, true );
curl_setopt( $ch,CURLOPT_SSL_VERIFYPEER, false );

<!--Posting fields array in json format-->
curl_setopt( $ch,CURLOPT_POSTFIELDS, json_encode( $fields ) );

<!--Executing Curl-->
$result = curl_exec($ch );

<!--Closing Curl-->
curl_close( $ch );
echo $result;
?>
<!DOCTYPE html>
<html>
<head>
<meta name="format-detection" content="telephone=no">
<meta name="msapplication-tap-highlight" content="no">
<meta name="viewport" content="user-scalable=no, initial-scale=1, maximum-scale=1, minimum-scale=1, width=device-width">
<title>Send Me </title>

<!--Stylesheet Files : jQuery Mobile CSS File, Customized CSS File-->
<link rel="stylesheet" href="css/jquery.mobile-1.4.5.css">
<link rel="stylesheet" href="css/my.css">

<!--AJAX Library, jQuery File : Library,and Mobile Library -->
<script src="https://ajax.googleapis.com/ajax/libs/jquery/1.11.3/jquery.min.js"></script>
<script type="text/javascript" src="js/jquery-1.11.3.min.js"></script>
<script type="text/javascript" src="js/jquery.mobile-1.4.5.js"></script>
</head>

<!--Beginning of the Body-->
<body>
<div data-role="page">
<div data-role="header" data-position="fixed" class="ui-header ui-bar-a ui-header-fixed slidedown" role="banner">
<h1>Send Me</h1>
</div>
<div data-role="main" class="ui-content" id="main">

<!--Form containing fields registered email, message user wants to send, title of the push notification and submit button-->
<form action="http://www.aorank.com/tutorial/push/sendnotification.php" method="post">
<ul data-role="listview" data-inset="true">
<li class="ui-field-contain">
<label for="name2">Enter Your Registered Email:</label>
<input type="text" name="email" id="email" value="" data-clear-btn="true">
</li>
<li class="ui-field-contain">
<label for="name2">Enter Your Message:</label>
<input type="text" name="msg" id="message" value="" data-clear-btn="true">
</li>
<li class="ui-field-contain">
<label for="name2">Enter Notification Title:</label>
<input type="text" name="noti" id="notification" value="" data-clear-btn="true">
</li>
<li class="ui-body ui-body-b">
<center><input type="submit" id="submit" value="Send Notification" class="ui-shadow ui-btn ui-corner-all"/></center>
</li>
</ul>
</form>
<!--End of the form-->

/div>
</div>
</body>
<!--End of the body-->
</html>
Conclusion:
As you can see, PhoneGap Push Notification is one of the key feature of any application.
With this, it is possible to let subscribers/users of the app know about the application updates, offers and other information.
Hope this will help you with implementing PhoneGap Push Notification.
For more related updates check out below-mentioned blogs –
- Phonegap Contacts Plugin : Contact Management App
- PhoneGap Bluetooth
10 Best MailChimp Alternatives: 2X Cheaper Services [Avail $5 Offer Below]

When email marketing services are discussed, it’s quite obvious that no one will forget to talk about MailChimp.
Moreover, MailChimp is now slightly been phrased as an analog to email marketing service.
What’s The Bottom Line, Then?
Though, MailChimp is one of the most popular email marketing service…
..but there are multiple other options available in the market which offer unlimited emails, great deliverability, advanced features, higher open rates, huge subscribers and many other facilities at extremely low cost.
You might be wondering now which are they –
So, for your convenience, we came up with a list 10 MailChimp Alternative which provides 2X Cheaper & Better Services.
| Comparison Between Best MailChimp Alternatives | |||||
| Services | Starter Plan | No. Of Contact | Sign-Up Forms | Auto-Responder | Drip Emails |
| MailGet | $5/m | 5000 | ✔ | ✔ | ✔ |
| Pabbly Email Marketing | $29/m | 5000 | ✔ | ✔ | ✔ |
| MooSend | $10/m | 1000 | ✔ | ✔ | ✔ |
| SendinBlue | $25/m | Unlimited | ✔ | ✔ | ✔ |
| Constant Contact | $20/m | Unlimited | ✔ | ✔ | ✔ |
| EngageBay | $7.79/m | 1000 | ✔ | ✔ | ✔ |
| Pinpointe | $49/m | 5000 | ✔ | ✔ | ✔ |
Let’s Start Exploring Them…
1. Pabbly Email Marketing – Email Marketing Service
Pabbly Email Marketing is a striking option currently available in the market that can be used for effective email marketing.
- It’s a fully web-based email marketing application which is easy to implement even for beginners and user-friendly, plus it offers higher email delivery rate.
- Features like email builder, form creator, autoresponder, responsiveness, pre-designed templates and more are preloaded in this service.
- With the features listed above, you can run email marketing campaigns that are more effective and generate more profits for your business.
Now talking about the pricing of Pabbly Email Marketing –
Free trial plan let you explore Pabbly Email Marketing.
The Rookie plan costs around $29/m and allows unlimited email delivery to 5,000 contacts.
The Pro plan costs you $49 and allows you to add 15,000 subscribers
Then there are Advance plans which range from $99/m for 50,000 users to $1599/m for 10,00,000 users.
To know further details about price plans.
What Makes Pabbly Email Marketing Special –
- Explore Pabbly Email Marketing free of cost.
- Drip emailing & campaign scheduler
- Drag and Drop email creator
- 500+ free email templates
- Social media integration
- Autoresponder feature
- Landing page creator
- In-built SMTP service
What Makes Pabbly Email Marketing Down –
- No emails can be sent in a free trial plan.
- They are strictly against high bounce & complaints rate
I and my team have examined the working of Pabbly Email Marketing and found it the best one among all. This is the reason why Pabbly Email Marketing holds the top spot on the blog.
Following are the results we personally got after implementing this software in our email campaigns –
- 43.64% promotional email open rate.
- 99% more inbox deliverability.
2. MailGet – Unlimited Emails At $5
MailGet is one of the cheapest and modernized alternative to MailChimp email marketing service. Because it provides higher open rates, delivers responsive emails and is extremely easy to use.
This marketing service requires the least convention to start bulk emailing.
- Just sign up for the account, connect SMTP service, create emails, add contact list and start sending.
- Run email marketing campaigns that are productive with tools like drag & drop email builder, email scheduler, autoresponder and much more.
- You can also attach subscription forms, track emails, send auto follow-up emails, etc.
Now talking about MailGet pricing –
Just by paying $5 a month you can start sending limitless emails to 5,000 subscribers.
This mailing service has designed multiple price plans that can satisfy the needs of any size of business.
Click to have a look at the vast list of price plans offer by MailGet.
As far as I know about email marketing services,
I think MailGet is the only email marketing service available worldwide, that permits you to send unlimited emails for just $29.
What Makes MailGet Special –
- No requirement of hosting and other configurations
- Smart email monitoring system
- Easy contact import alternatives
- Campaign tracking with Google Analytics
- Marketing automation
- Supports multiple SMTP integrations
- List hygiene features
- SMTP Routing
What Makes MailGet Down –
- Initially, SMTP configuration is mandatory to start email delivery.
MailGet allows connecting multiple SMTP servers at a single time which is one of the best things about it.
In a situation when any of the server stops working, the remaining connected servers will help you deliver emails without any delay.
This is the reason why people are receiving 43% open rate on promotional campaigns and 75% higher email deliverability.
Also have a look at some amazing blogs here –
3. Moosend – Send Automated Emails
Moosend is a matchless tool for creating & sending bulk e-mail campaigns. It helps in projecting transactional as well as marketing emails. Also, it permits you to send emails in automation via creating a drip.
- Drag & drop campaign editor enables you to design beautiful & responsive newsletters.
- Optimize each email & also measures its success in real time. like, CTR, subscriber stats, campaign activities & more.
- Custom sign up forms through this service lets you easily capture the visitor’s data. You can edit the form fields and then copy/paste it to your site, blog or any third party sign up.
- SMTP allows you to send transactional emails extremely fast and also increases the delivery rate by utilizing the world-class infrastructure.
- Through its API, you can easily create & manage email campaigns, and mailing list according to your campaign requirement.
Talking about Moosend pricing –
Offers a free trial of unlimited emails up to 1000 subscribers for every plan.
Moreover, it consists of multiple pricing plans which starts from $10 for up to 2000 subscribers to $3650 for 10,00,000 subscribers.
If your business does not need often email sendings, you can opt its “pay as you go” plan. Here, you will have to pay only when you send emails.
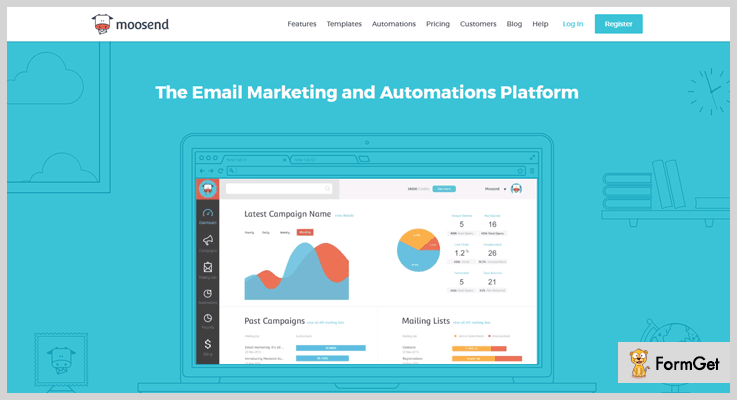
What Makes Moosend Special –
- Easy automation for scheduling campaign on specific date & time.
- Integrated SMTP for sending emails with high inbox deliverability.
- Offers a free trial for up to 1000 subscribers.
- Drag-n-drop editor for creating newsletters for your campaign.
- List segmentation for better communications to specific people.
What Makes Moosend Down –
- Pricing is pretty high.
- Service cancellation is not easy.
More About Alternative Emailing Service
4. SendinBlue Email Marketing Platform
Sendinblue provides a single stage for online mail marketing, delivers transactional emails, plus you can also conduct SMS campaigns.
- It’s a simple, reliable and cost-effective email marketing platform for running mass mail campaigns.
- Sendinblue has got template gallery, deliver mobile-friendly emails, allows inbox preview, contact management, variety of integrations, delivery reports, transactional mails, etc.
Coming To The Pricing Of Sendinblue –
Lite plan is perfect for initial marketers as it costs around $8/m. You can send 40,000 emails with this plan.
To know more about their pricing plans and services, visit their website.
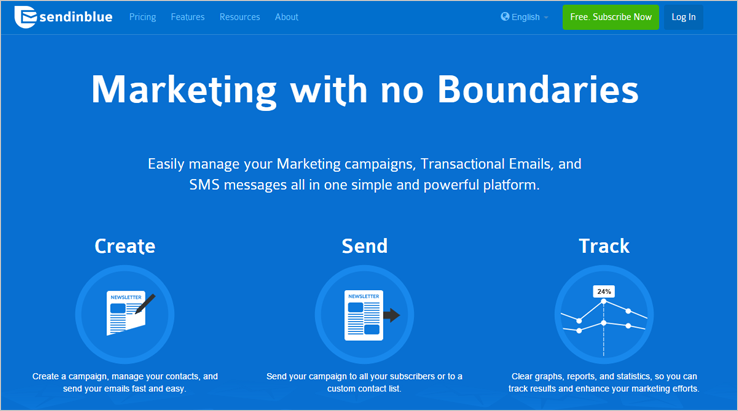
What Makes SendinBlue Special –
- Excellent deliverability results
- Deliver responsive emails
- Robust contact management
- Real-time reporting system
- Subscription forms creation tool
What Makes SendinBlue Down –
- Long validation process
- Pricing is pretty high
- Tracking not there in most plans.
More About Alternative Emailing Service
5. Constant Contact Mail Marketing Service
With Constant Contact mail marketing service, you can engage more customers easily by sending emails that look great on various devices.
- You will find facilities like customizable email templates, mail editing tools, effortless contact management and much more in this service.
Coming To The Pricing Of Constant Contact –
Price plans for this service vary by the number of contacts you have. $20 is charged for the starting plans. It permits email delivery to 500 users every month.
Visit their website to get more details of pricing plans and services.
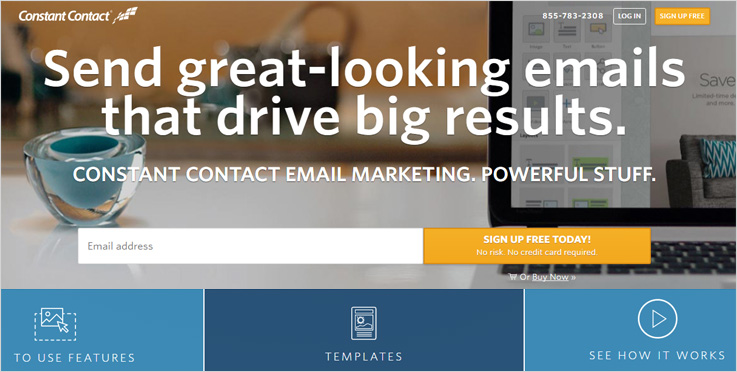
What Makes Constant Contact Special –
- Automatic contact list management
- Upload contacts from various sources
- Get free trial on all plans
- Real-time email tracking
- Advanced autoresponder
- Enhanced reporting features
- Multimedia Center
What Makes ConstantContact Down –
- Overpriced
- Service cancellation is not easy
- No inbox preview option
- Very limited customization available
More About Alternative Emailing Service
6. EngageBay – Complete Marketing Automation & CRM
EngageBay is one of the most affordable and comprehensive alternatives to MailChimp. This full-fledged platform offers a complete solution to all your email marketing needs. Trusted by over 30,000 loyal customers and counting, EngageBay’s Marketing Bay offers powerful features:
- Its drag-and-drop email form builder lets you design beautiful email forms and make them responsive with just a tap of a button. You can also choose from various pre-made templates.
- With autoresponders, you can automatically send out ‘Thank you’ and other regular messages.
- EngageBay’s segmentation lets you segregate your contacts based on various criteria. With email broadcasts, you can then launch personalized emails using segmentation to enhance your outreach. Likewise, you can A/B test your email broadcasts for maximum conversions.
- Moreover, tools like email sequences let you send out a series of emails based on timings and various triggers.
- EngageBay also integrates with a small but growing number of third-party business applications like Zapier and Mandrill.
Coming To EngageBay’s Pricing –
There’s a free plan with lifetime validity for up to 15 users. This plan offers 500 contacts, 1,000 branded emails, autoresponders, email broadcasts, and pre-built email templates.
The Basic plan costs $7.79 per user per month if subscribed biennially. You can send 2,500 branded emails and store 1,000 contacts. Even in the basic plan, you’ll get access to predictive scoring, email sequences, and task management.
For up to 20,000 branded emails per month and 20,000 contacts, you’ll spend $14.99 per user per month on the Growth plan. This plan adds email broadcast A/B testing or split testing, timezone-based email delivery, marketing automation, and your own custom domain.
The Pro plan starts at $29.99 per month when subscribed biennially and offers advanced email marketing tools, premium phone support, custom reporting, and a dedicated account manager. You also get 30,000 contacts and 30,000 branded emails.
Visit EngageBay to know more about their customizable paid plans.
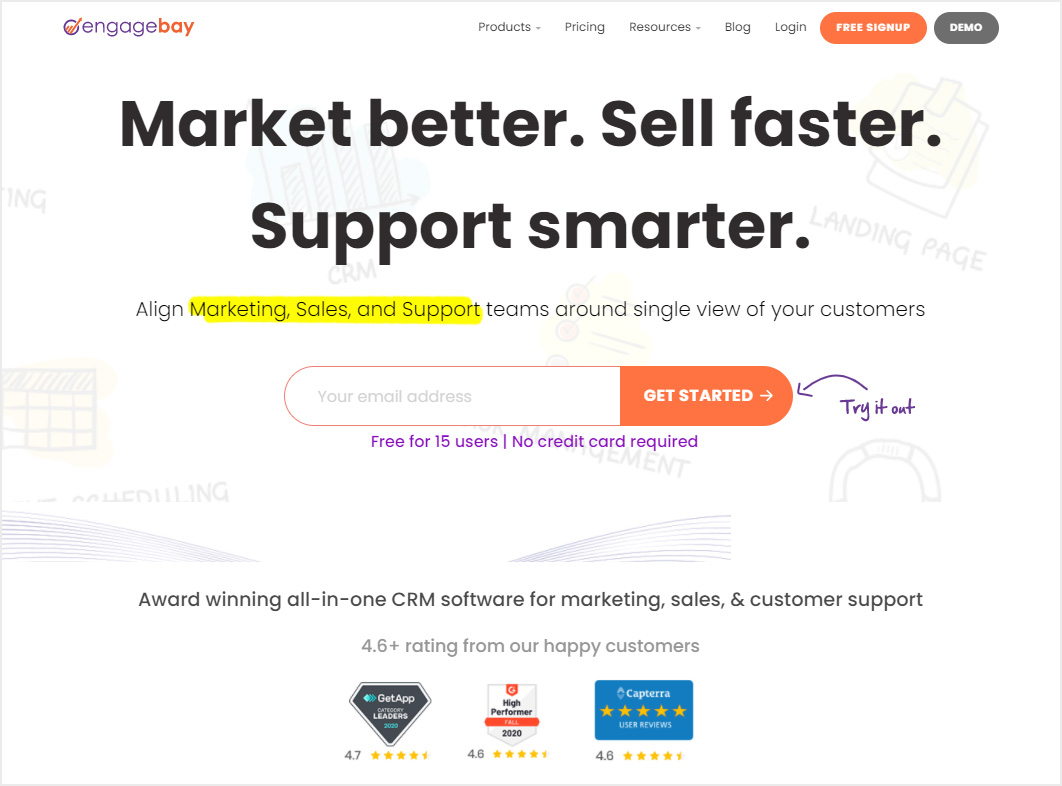
What Makes EngageBay Special –
- Rich feature set
- Free forever plan
- 360-degree contact view
- Automated segmentation of contacts
- Web forms
- A/B testing for email broadcasts
- Drag-and-drop email form builder and advanced workflow automation
- Superb user support, 24/7 service
What Makes EngageBay Down –
- Supports a small number of third-party applications
- B2B templates are not wide in variety
More About Alternative Emailing Service
7. AWeber Email Marketing Platform
AWeber is another email marketing platform which will assist you in finding the new audience, build relationship and sell more products via mail marketing.
- A reliable and versatile emailing solution whose delivery rates are well adored by clients all over the world.
- A platform for marketers who want to spend less time in managing campaigns and need an automated solution to run campaigns.
- Design & deliver responsive emails using mail editors, HTML templates, also integrate online tools, sign-up forms, email API’s to make them more advanced.
Coming To AWeber Pricing –
All new users are not charges for the first month. Later the base plan is charged $19 a month which allows unlimited emails delivery to 500 subscribers.
Click here to know more about their pricing plans and services.
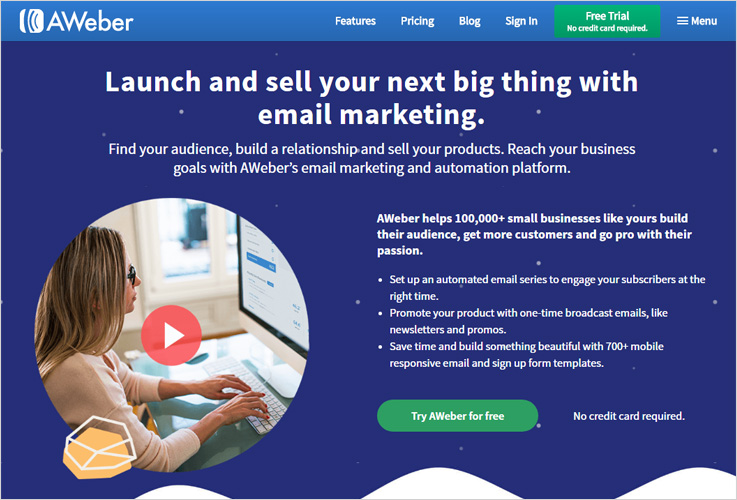
What Makes AWeber Special –
- Unlimited email delivery on all plans
- List segmentation for targeted emailing
- Excellent customer support via call, chat & email
- Wide variety of responsive templates
- Allows multiple integrations
- Image hosting & sign-up form
What Makes AWeber Down –
- Some templates are outdated
- Plans offered are expensive
More About Alternative Emailing Service
8. Pinpointe Email Marketing For Businesses
- Optional sub-accounts allows agencies and companies to manage up to 250 separate partner/customer accounts.
- Widget-based campaign builder makes it easy (and fun) to quickly and easily create great-looking mobile friendly campaigns
- Advanced real-time analytics and heat map so you can optimize campaign send times.
- Sending plans designed for customers who send more frequently
Coming To Pinpointe Pricing –
Click here to know more pricing plans and services of Pinpointe.
What Makes Pinpointe Special –
- Create great campaigns quickly with the builder and 100’s of mobile-ready templates.
- Behavioral segmenting.
- High email delivery and inbox rates.
- Optional sub-accounts – agencies can manage each customer separately.
- Advanced real-time reporting and analytics.
- Excellent customer support via call, chat & email.
- Over 400,000 FREE image library and unlimited image hosting.
What Makes Pinpointe Down –
- Free Trial is 15 days. Others offer longer trials.
- Limited social features.
More About Alternative Emailing Service
9. iContact Online Marketing Application
iContact is the right email marketing product for people who are willing to actively market their business online.
- iContact delivers emails that are highly responsive and messages that don’t fall into spam traps.
- Add social media buttons on facebook, twitter, and LinkedIn to amplify your emails.
- You get multiple, easy to use options for creating emails, managing contacts with great customer support system, social media integration and more.
Coming To iContact Pricing –
Start your mass mailing campaigns at a price of $14/m and send responsive emails 500 contacts monthly.
Visit their website to know more about iContact.

What Makes iContact Special –
- Drag and Drop email editor
- Robust tracking and reporting facility
- Unlimited technical and query support
- Multiple HTML templates to choose from
- Diverse integration option
- Spam check to enhance deliverability
What Makes iContact Down –
- iContact interface is somewhat clunky
- No Google Analytics integration option
- Contact import from third-party apps not allowed
- Service cancellation is complicated
More About Alternative Emailing Service
10. Mad Mimi Advanced Emailing Tool
If you are looking for an email marketing tool which can help you design professional, mobile-friendly emails then Mad Mimi will be the right option.
- It provides email building tools and offers various features through which you can create eye-catchy emails.
- This service is loaded with features like email scheduler, drip emailer, multi-list segmentation to effectively run email marketing campaign.
Coming To Mad Mimi Pricing –
Pricing of the plans designed by Mad Mimi may change by the variations in number of contacts.
Still, you have to pay $42 every month to send unlimited emails to 10,000 contacts.
What Makes Mad Mimi Special –
- Integration of social media buttons
- Free trial for testing is available
- Simple and user-friendly interface
- Integration with Google Analytics
- Cheapest among the list
- Customizable type email templates
What Makes Mad Mimi Down –
- A/B split testing is not present
- Autoresponder is not that good
- Limited email templates
- Spam checker is absent
More About Alternative Emailing Service
11. ActiveCampaign Mail Automation Software
The benefits of having ActiveCampaign marketing software is that you can deliver messages that are most effective and convert more leads into regular customers.
- This software helps you to automate customer engagements but delivering emails like welcome, birthday greets, follow-ups and more automatically according to user replies.
- Proper segmentation of user info is done. It stores behaviors, location, history, nature of contact and much more which can be bifurcated by different logics.
- Also allows social analysis and contact import from multiple third-party platforms.
Coming To ActiveCampaigns Pricing –
Basic plan comes with a price tag of $9 per month. This plan permits you to send unlimited mails to 500 contacts.
Visit ActiveCampaigns to know more about their pricing plans and services.
What Makes ActiveCampaign Special –
- User-friendly interface
- Free image hosting
- Full access to contact history
- Segment contacts with ease
- Include subscription forms
- Split testing & dynamic content
- Intuitive email builder
What Makes ActiveCampaign Down –
- Supports over 300 third-party apps but at an additional cost.
- Customer support is not that good.
More About Alternative Emailing Service
12 . Campaign Monitor Emailing Solution
Campaign Monitor is a reputed web-based email marketing solution that guarantees professional grade marketing services.
- Campaign monitor includes simplified mail building tools like drag & drop editor, you can also choose from hundreds of professionally designed responsive templates and give personal touch to your mails.
- Attach eye-catchy sign-up forms to grab the attention of new as well as dormant customers.
- Campaign Monitor permits easy connection hundreds of e-commerce platform, CRM, or website.
Coming To Campaign Monitor Pricing –
This email marketing service has designed 4 different packages, the price which may vary on the number of users you need for sending emails.
The most basic plan has got 2,500 email delivery to 500 users and is priced around $9 a month.

What Makes Campaign Monitor Special –
- Email templates are responsive & robust
- Excellent & simple user interface
- Bounce tracking & CAN-Spam
- Send transactional emails.
- Multiple business integration options
What Makes Campaign Monitor Down –
- Plans are much expensive
- No free trial are available
- Very limited email templates
- No advanced reporting facility
- Yearly plans are not available
More About Alternative Emailing Service
Conclusion
After going through this blog one thing is sure that you will agree to the fact that MailChimp’s is not the only choice left for quality emailing service.
And I am pretty certain that the list of 10 MailChimp Competitors would have helped you find the best mailing solution for your business.
Still, interest to know more about email marketing and other aspects related to it. Read the blogs and articles mentioned below:-
AngularJS CRUD: Example Using MySQLi Database

AngularJS is commonly used for creating a single page application. So, it becomes challenging for users to interact their application with the database and perform CRUD operation in it.
In this tutorial, we are going to create an AngularJS CRUD Example and will also explain each CRUD operation in detail.
For storing of data, we are going to use MySQLi database.
We will learn:
- Read data from the database.
- Insert data into the database.
- Update existing data in the database.
- Delete data from the database.
In order to understand easily and effectively, we are going to create an application which will perform all the above-mentioned operation.
We will also explain each process while the process of creating the application.
Speciality of the Application:
- Users can Add new entries of employees in the database.
- Users can Read, Update and Delete the existing employee details.
- Application will also contains a search bar to search the list of employee according to the query given.
Watch AngularJS CRUD Application Demo or download code from the link given below.
Application Development Process:
Step 1: Create file structure of the application.
Follow the image given below and create your application structure in the same way as given in the image.
Otherwise, you may face some problem regarding the working of the application.

Step 2: Setting up the database.
Create a database name “employee“.
Now, inside employee database, create a table name “emp_details” with different fields using the query given below:
CREATE TABLE emp_details (
emp_id int(255) NOT NULL AUTO_INCREMENT,
emp_name varchar(255) NOT NULL,
emp_email varchar(255) NOT NULL,
emp_gender varchar(255) NOT NULL,
emp_address varchar(255) NOT NULL,
PRIMARY KEY (emp_id)
);
OR
Download the database .sql file from this link and import it directly into your database. It will automatically create a table “emp_details” with different columns/fields to store employee details in it.
Step 3: Connecting to MySQLi database.
In database_connections.php, write MySQLi query to connect to the database.
<?php
// Connecting to database as mysqli_connect("hostname", "username", "password", "database name");
$con = mysqli_connect("localhost", "root", "", "employee");
?>
Note: We will include this connection file in each CRUD opearation performing file.
Step 4: Create index.html file for the application.
index.html
This file contains the layout of the application. It includes two seperate form template to insert and update employee details.
Some AngularJS built-in directives have also used in it such as ng-repeat, ng-show, ng-hide, ng-click etc. These directives add some special behaviour into the application to make it more interactive.
Note: – To know about the functionality of different built-in directives, read our blog AngularJS Directives.
Also, for search bar and other filtering functionality, read blog AngularJS Filters.
<html ng-app="crudApp">
<head>
<title>AngularJS Directive Demo</title>
<meta name="viewport" content="width=device-width, initial-scale=1">
<!-- Include Bootstrap CSS -->
<link rel="stylesheet" type="text/css" href="css/bootstrap.min.css">
<!-- Include main CSS -->
<link rel="stylesheet" type="text/css" href="css/style.css">
<!-- Include jQuery library -->
<script src="js/jQuery/jquery.min.js"></script>
<!-- Include AngularJS library -->
<script src="lib/angular/angular.min.js"></script>
<!-- Include Bootstrap Javascript -->
<script src="js/bootstrap.min.js"></script>
</head>
<body>
<div class="container wrapper" ng-controller="DbController">
<h1 class="text-center">AngularJS CRUD Operations Demo</h1>
<nav class="navbar navbar-default">
<div class="navbar-header">
<div class="alert alert-default navbar-brand search-box">
<button class="btn btn-primary" ng-show="show_form" ng-click="formToggle()">Add Employee <span class="glyphicon glyphicon-plus" aria-hidden="true"></span></button>
</div>
<div class="alert alert-default input-group search-box">
<span class="input-group-btn">
<input type="text" class="form-control" placeholder="Search Employee Details Into Database..." ng-model="search_query">
</span>
</div>
</div>
</nav>
<div class="col-md-6 col-md-offset-3">

<!-- Include form template which is used to insert data into database -->
<div ng-include src="'templates/form.html'"></div>

<!-- Include form template which is used to edit and update data into database -->
<div ng-include src="'templates/editForm.html'"></div>
</div>
<div class="clearfix"></div>

<!-- Table to show employee detalis -->
<div class="table-responsive">
<table class="table table-hover">
<tr>
<th>Emp ID</th>
<th>Employee Name</th>
<th>Email Address</th>
<th>Gender</th>
<th>Address</th>
<th></th>
<th></th>
</tr>
<tr ng-repeat="detail in details| filter:search_query">
<td>
<span>{{detail.emp_id}}</span></td>
<td>{{detail.emp_name}}</td>
<td>{{detail.emp_email}}</td>
<td>{{detail.emp_gender}}</td>
<td>{{detail.emp_address}}</td>
<td>
<button class="btn btn-warning" ng-click="editInfo(detail)" title="Edit"><span class="glyphicon glyphicon-edit"></span></button>
</td>
<td>
<button class="btn btn-danger" ng-click="deleteInfo(detail)" title="Delete"><span class="glyphicon glyphicon-trash"></span></button>
</td>
</tr>
</table>
</div>
</div>
</div>
<!-- Include controller -->
<script src="js/angular-script.js"></script>
</body>
</html>Now, we have all the basic settings for the application.
So, let’s focus on the CRUD operation and start from reading the database.
1. Read From Database : Get Employee Detail
The downloaded database .sql files that you have imported in the employee database contains some dummy data. So, now we are going to retrieve and read these data from the database and display it in the application’s main page.
For this, create a module name crudApp and a controller name DbController in the angular-script.js.
Also, inside controller create a function getInfo() which send request to empDetails.php.
angular-script.js
// Application module
var crudApp = angular.module('crudApp',[]);
crudApp.controller("DbController",['$scope','$http', function($scope,$http){

// Function to get employee details from the database
getInfo();
function getInfo(){
// Sending request to EmpDetails.php files
$http.post('databaseFiles/empDetails.php').success(function(data){
// Stored the returned data into scope
$scope.details = data;
});
}
Here, getInfo() function sends request to empDetails.php page via $http.post method.
Note:- $http is one of the most important service of AngularJS which is used to transfer data. For more info, read our blog AngularJS – http.
Now, empDetails.php contains select query and retrives all the employee details stored in the employee database. These details are returned in the JSON format.
empDetails.php
<?php
// Including database connections
require_once 'database_connections.php';
// mysqli query to fetch all data from database
$query = "SELECT * from emp_details ORDER BY emp_id ASC";
$result = mysqli_query($con, $query);
$arr = array();
if(mysqli_num_rows($result) != 0) {
while($row = mysqli_fetch_assoc($result)) {
$arr[] = $row;
}
}
// Return json array containing data from the databasecon
echo $json_info = json_encode($arr);
?>
The returned json data has stored in $scope.details.
Now, the details property has all the employees details which can be displayed in the application index.html page using ng-repeat directive.
<html ng-app="crudApp">
...
<body>
<div class="container wrapper" ng-controller="DbController">
...
<!-- Table to show employee detalis -->
<div class="table-responsive">
<table class="table table-hover">
<tr>
<th>Emp ID</th>
<th>Employee Name</th>
<th>Email Address</th>
<th>Gender</th>
<th>Address</th>
<th></th>
<th></th>
</tr>
<tr ng-repeat="detail in details| filter:search_query">
<td>
<span>{{detail.emp_id}}</span></td>
<td>{{detail.emp_name}}</td>
<td>{{detail.emp_email}}</td>
<td>{{detail.emp_gender}}</td>
<td>{{detail.emp_address}}</td>
<td>
<button class="btn btn-warning" ng-click="editInfo(detail)" title="Edit"><span class="glyphicon glyphicon-edit"></span></button>
</td>
<td>
<button class="btn btn-danger" ng-click="deleteInfo(detail)" title="Delete"><span class="glyphicon glyphicon-trash"></span></button>
</td>
</tr>
</table>
</div>
...
</body>
</html>
Process output
Here, the employee details table contains two buttons – one for edit and another for delete. We will read about the functionality of these buttons further in this tutorial.
That’s ends with the reading part. Next part is about inserting employee information into the database.
2. Insert Into Database : Employee Detail
To insert employee details, we need a form with different input fields.
So, let’s create a form.html page which contain a form to insert employee details.
form.html
<!-- Form used to add new entries of employee in database -->
<form class="form-horizontal alert alert-warning" name="empList" id="empForm" ng-submit="insertInfo(empInfo);" hidden>
<h3 class="text-center">Insert Employee Details Into Database</h3>
<div class="form-group">
<label for="Name">Employee Name:</label>
<input type="text" name="emp_name" class="form-control" placeholder="Enter Employee Name" ng-model="empInfo.name" autofocus required />
</div>
<div class="form-group">
<p class="text-danger" ng-show="empList.emp_name.$invalid && empList.emp_name.$dirty">Name field is Empty!</p>
</div>
<div class="form-group">
<label for="Email">Email Address:</label>
<input type="email" name="emp_email" class="form-control" placeholder="Enter Employee Email Address" ng-model="empInfo.email" autofocus required />
</div>
<div class="form-group">
<p class="text-danger" ng-show="empList.emp_email.$invalid && empList.emp_email.$dirty">Invalid Email!</p>
</div>
<div class="form-group">
<label for="Gender">Gender:</label>
<label for="" class="radio-inline gender">
<input type="radio" name="emp_gender" value="male" ng-model="empInfo.gender">Male
</label>
<label for="" class="radio-inline gender">
<input type="radio" name="emp_gender" value="female" ng-model="empInfo.gender">Female
</label>
</div>
<div class="form-group">
<label for="Address">Address:</label>
<input type="text" name="emp_address" class="form-control" placeholder="Enter Employee Address" ng-model="empInfo.address" autofocus required />
</div>
<div class="form-group">
<p class="text-danger" ng-show="empList.emp_address.$invalid && empList.emp_address.$dirty">Address field is Empty!</p>
</div>
<div class="form-group">
<button class="btn btn-warning" ng-disabled="empList.$invalid">Add Into Database</button>
</div>
</form>
Every input field has ng-model directive associated with them which will bind and store users input values in the empInfo. When the user will click on the submit button ( Here, Add Into Database button), empInfo will be passed, as an argument, to the insertInfo() function.
angular-script.js
$scope.insertInfo = function(info){
$http.post('databaseFiles/insertDetails.php',{"name":info.name,"email":info.email,"address":info.address,"gender":info.gender}).success(function(data){
if (data == true) {
getInfo();
// Hide details insertion form
$('#empForm').css('display', 'none');
}
});
}
insertInfo() function communicates with insertDetails.php file and send the submitted data to it.
insertDetails.php
<?php
// Including database connections
require_once 'database_connections.php';
// Fetching and decoding the inserted data
$data = json_decode(file_get_contents("php://input"));
// Escaping special characters from submitting data & storing in new variables.
$name = mysqli_real_escape_string($con, $data->name);
$email = mysqli_real_escape_string($con, $data->email);
$gender = mysqli_real_escape_string($con, $data->gender);
$address = mysqli_real_escape_string($con, $data->address);

// mysqli insert query
$query = "INSERT into emp_details (emp_name,emp_email,emp_gender,emp_address) VALUES ('$name','$email','$gender','$address')";
// Inserting data into database
mysqli_query($con, $query);
echo true;
?>
In insertDetails.php, the sent values are first decoded into JSON format. Then, they are filtered and stored into different variable.
These variables are then used to store data into the database. When the data has submitted successfully, it returns true in response to insertInfo() function.
At the same time getInfo() function get called by the insertInfo() function which displays the newly inserted details in the employee detail table.
Process output
Now, let’s understand the update process.
3. Update Database: Existing Employee Details
If you remember, we have added an edit button in the index.html page while displaying the employee details in the table. Now, it time to understand its functionality.
This edit button contains ng-click directive which on click calls editInfo(detail) function and pass the details of the clicked row’s data as an argument.
The passed argument then stored into a new scope property, $scope.currentUser, and this propert is used by the editForm.php to display the current employee details in the edit form.
angular-script.js
$scope.currentUser = {};
$scope.editInfo = function(info){
$scope.currentUser = info;
$('#empForm').slideUp();
$('#editForm').slideToggle();
}
Now, we are going to create an edit form which will use the above mentioned scope’s property for the updation process.
editForm.html
<!-- Form used for updation of data into database -->
<form class="form-horizontal alert alert-warning" id="editForm" ng-submit="UpdateInfo(currentUser)" hidden>
<h3 class="text-center">Update Employee Details</h3>
<div class="form-group">
<label for="Name">Employee Name:</label>
<input type="text" class="form-control" ng-model="currentUser.emp_name" value="{{currentUser.name}}">
</div>
<div class="form-group">
<label for="Email">Email Address:</label>
<input type="email" class="form-control" ng-model="currentUser.emp_email" value="{{currentUser.emp_email}}">
</div>
<div class="form-group">
<label for="Gender">Gender:</label>
<label for="" class="radio-inline gender">
<input type="radio" ng-model="currentUser.emp_gender" value="male" >Male
</label>
<label for="" class="radio-inline gender">
<input type="radio" name="gender" ng-model="currentUser.emp_gender" value="female">Female
</label>
</div>
<div class="form-group">
<label for="Address">Address:</label>
<input type="text" class="form-control" ng-model="currentUser.emp_address" value="{{currentUser.emp_address}}">
</div>
<div class="form-group">
<button class="btn btn-warning" ng-disabled="empList.$invalid" ng-click="updateMsg(currentUser.emp_id)">Update</button>
</div>
</form>
Now, when a user will change the current values of input field and click on submit button, here update button, another function UpdateInfo() get called containing currentUser as an argument( which contains the updated values of the input fields ).
angular-script.js
$scope.UpdateInfo = function(info){
$http.post('databaseFiles/updateDetails.php',{"id":info.emp_id,"name":info.emp_name,"email":info.emp_email,"address":info.emp_address,"gender":info.emp_gender}).success(function(data){
$scope.show_form = true;
if (data == true) {
getInfo();
}
});
}
Now, updateInfo() function communicates with the updateDetails.php and send all the updated data, also contain the id of employee, through $http.post method.
updateDetails.php
<?php
// Including database connections
require_once 'database_connections.php';
// Fetching the updated data & storin in new variables
$data = json_decode(file_get_contents("php://input"));
// Escaping special characters from updated data
$id = mysqli_real_escape_string($con, $data->id);
$name = mysqli_real_escape_string($con, $data->name);
$email = mysqli_real_escape_string($con, $data->email);
$gender = mysqli_real_escape_string($con, $data->gender);
$address = mysqli_real_escape_string($con, $data->address);
// mysqli query to insert the updated data
$query = "UPDATE emp_details SET emp_name='$name',emp_email='$email',emp_gender='$gender',emp_address='$address' WHERE emp_id=$id";
mysqli_query($con, $query);
echo true;
?>
In updateDetails.php, the sent data get decoded and that particular row get updated with the new values. After succuessfully updation, it return true status as a reply.
When the UpdateInfo() method receives the true value, it calls getInfo() to show details of the updated table.
Process output
Update process ends here. Now, it’s time to have a look at the delete process.
4. Delete From Database: Existing Employee Details
Now, it time to understand the functionality of the delete button that we have added in the index.html page while displaying the employee details in the table.
Delete button contains ng-click directive as an attribute which on click calls deleteInfo(detail) function and pass the details of the clicked row’s data as an argument to it.
angular-script.js
$scope.deleteInfo = function(info){
$http.post('databaseFiles/deleteDetails.php',{"del_id":info.emp_id}).success(function(data){
if (data == true) {
getInfo();
}
});
}
Now, deleteInfo() function communicates with the deleteDetails.php and send employee ID of the clicked row through $http.post method.
deleteDetails.php
<?php
require_once 'database_connections.php';
$data = json_decode(file_get_contents("php://input"));
$query = "DELETE FROM emp_details WHERE emp_id=$data->del_id";
mysqli_query($con, $query);
echo true;
?>
In deleteDetails.php, the sent data get decoded and the row containing that particular ID get deleted. After succuessfully deletion, it return true status as a reply.
When the deleteInfo() method receives the true value, it calls getInfo() to show details of the updated table.
Process output
That ends the complete CRUD operation.
Application’s Styling Part
For responsiveness and icons, we have used bootstrap in the application.
Also, used some external CSS to improve designing part.
style.css
Contain CSS of the application.
@import url(http://fonts.googleapis.com/css?family=Raleway);
.wrapper{
min-height: 960px;
}
form#empForm, form#editForm {
padding: 0 35px 15px;
}
label.gender {
padding-top: 0 !important;
}
table tr th{
background: #f8f8f8;
}
.search-box {
padding-bottom: 0;
}
@media screen and (max-width: 368px){
.wrapper{
min-width: 340px;
}
}
Conclusion:
Hope you guys enjoyed this blog and learned the concepts of CRUD in AngularJS. Please write your comments from the space given below and keep in touch with us for more interesting blogs 🙂
AngularJS $animate : Tutorial With Animation Example

We have already learned that how to apply animation using specified directives of AngularJS. AngularJS also provide the facility to apply animation to custom directives.
Now, we are going to learned that how to apply animation in our own directives. We will do this by using the methods of $animate service of AngularJS.

$animate Service
$animate service belongs to the ngAnimate module of AngularJS. And to use ngAnimate you have to include angular-animate.js file in your page.
To use $animate service, we need to inject $animate services in our own directive after injecting this, we can use its method to apply animation in our directives on a particular event.
Syntax Of Using $animate Service
// Creating a module also injecting ngAnimate module in it
var myApp1 = angular.module("MyApp", ["ngAnimate"]);
// Using module creating directive also injecting $animate service
myApp1.directive('dirName', function ($animate) {
return{
// Methods of $animate used here
};
});
Explanation: First, we create a module with injecting ngAnimate module in it. Then we create directive using the module which implements $animate service in it.
Methods of $animate
There are various methods of $animate to apply animation on the custom directive in different events some of them are:
- enter(element, parent, callback): This method appends the element object with the parent element and then run the animation on the element.
- leave(element, callback): This method applies the animation on the element and removes the element.
- move(element, parent, [after], callback): This method moves the element after the after node or just before the parent node and runs the animation.
- addClass(element, className, callback): This method applies animation according to the class name and then add the class to the element.
- removeClass(element, className, callback): This method applies the animation and then remove the class from the element.
Note: In the above function callback contains the stylesheet that can be applied to the element. This is an optional parameter, we can also use an external stylesheet in which we have defined all CSS classes which we are using here.
Creating An Application
Here we are going to create an application in which we will create our own directives and we will also apply animation on it. We will do this by using methods of $animate service.
Creating module and directive
JavaScript File : app.js
// This will create a module name MyApp injecting ngAnimate module
var myApp1 = angular.module("MyApp", ["ngAnimate"]);
Explanation : Here we are creating a module name MyApp after injecting ngAnimate in it.
JavaScript File : directive.js
// Here creating directive also injecting $animate service in it
myApp1.directive('dirName', function ($animate) {
return{
// This is used to restrict directive use as an attribute
restrict: "A",
scope: {},
link: function (scope, element) {
var currentStep = 0;
var maxStep = 3;
var x = 1;
// This function will get called after clicking on a element
element.on('click', function () {
if (x % 2 == 0) // THis code is used to call different function on every click
{
var add = 'step-1';
$animate.addClass(element[0].children[0].children, add);
$animate.removeClass(element[0].children[0].children, 'step-0');
} else {
var add = 'step-0';
$animate.addClass(element[0].children[0].children, add);
$animate.removeClass(element[0].children[0].children, 'step-1');
}
x = x + 1;
});
}
};
});
Explanation : Here we are creating a directive named dirName in which we have injected $animate service.
Creating HTML File:
HTML File: index.html
<html ng-app="MyApp">
<head>
<title>Animation $animate Animation</title>
<script type="text/javascript" src="http://code.angularjs.org/1.2.16/angular.js"></script>
<script type="text/javascript" src="http://code.angularjs.org/1.2.16/angular-animate.js"></script>
<script type="text/javascript" src="js/app.js"></script>
<link rel="stylesheet" type="text/css" href="css/transitions.css" />
<script type="text/javascript" src="js/directive.js"></script>
</head>
<body>
<table>
<!--<tr> which will create first animation on the demo-->
<tr dir-name><td align="center">
<div class="my-slide-animation">
<b>Welcome</b>
</div></td>
<td><button type="button" >Animate It</button></td>
</tr>
</table>
</body>
</html>
Explanation: In above mentioned code we have included a module named MyApp. We have also used dir-name directive to create animation.
Creating CSS File:
CSS File: transitions.css
/* Css for first animation appied on first <tr> */
.my-slide-animation {
width: 100px;
height:100px;
background:#eee;
// -webkit-transition:0.5s linear all;
transition:0.5s linear all;
}.my-slide-animation.step-0 {
-webkit-transform:scale(1,1);
transform:scale(1,1);
background:#FEFFED;
}.my-slide-animation.step-1 {
-webkit-transform:scale(2,1);
transform:scale(2,1);
background:#ECC689;
}
Explanation: This css file is used to apply animation effect on the html page.
Note: Here in above code we have implemented some method of $animate. And there are various other method which can also be used to get animation on different different events.
Tips: We have include a zip file of complete code with this blog.To be more clear about Animation using $animate service in AngularJS. Just dowload it and use it.
Conclusion
At this point, I am pretty sure that you know how to apply animation in custom directive using $animate service in angular. For any query, let us know. Stay in touch with us for more technical tricks :).
PhoneGap RSS Reader : Send RSS News Feeds On Mobile

RSS stands for Rich Site Summary.
An RSS web feed includes summarized or full text of a blog.
It also includes metadata like URL, Title, Published date, and time etc.
To build the PhoneGap RSS Reader..
..we’re going to integrate PhoneGap components with Google Feed API.
Google Feed API will fetch the feeds of the website and these feeds will get displayed in the PhoneGap App.
PhoneGap RSS Reader allows you to reach your subscribers and send them news feeds of your latest blog posts through a mobile app..!!
Benefits of PhoneGap RSS Reader
Let’s take a look at the benefits a user/subscriber is going to have by using PhoneGap RSS Reader:
- Receive Timely Updates: Users/Subscribers will receive timely updates of their favourite websites and blogs on their mobile.
- No need to check website manually: By subscribing to a website’s RSS feed, the user/subscriber does not need to check the website manually for new content.
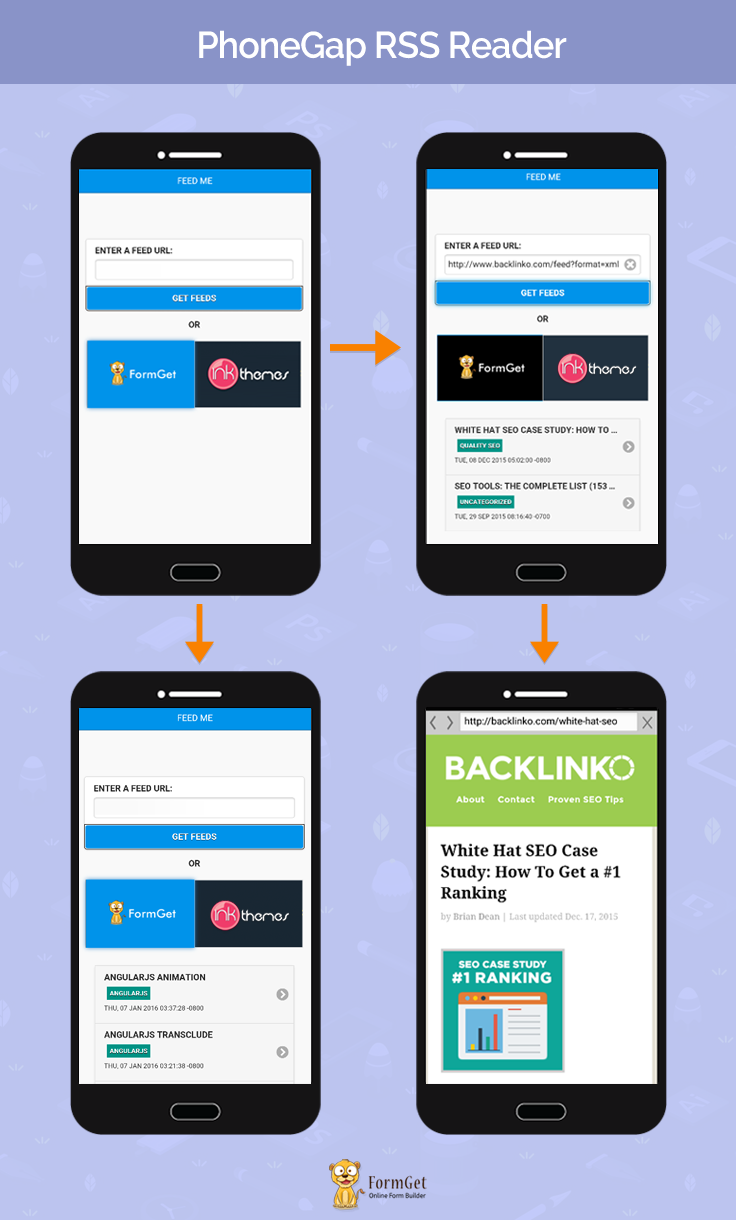
Idea Of The App
Features
- Fetch blog feeds of FormGet and Inkthemes.
- Fetch feeds of any website that user entered in the text input box.
- Opens blog posts in the inappbrowser.
Technologies Used
jQuery Mobile : For Interface / UI Designing
- We’re going to use jQuery Mobile for designing interface.
Google Feed API
- We’re going to fetch feeds by using Google Feed API.
Files :
HTML File : Index.html
<!DOCTYPE html>
<html>
<head>
<meta charset="utf-8" />
<meta name="viewport" content="user-scalable=no, initial-scale=1, maximum-scale=1, minimum-scale=1, width=device-width, height=device-height, target-densitydpi=device-dpi" />

<!--Stylesheet Files : jQuery Mobile CSS File, Customized CSS File and Font Awesome for icons -->
<link rel="stylesheet" href="css/jquery.mobile-1.4.5.css">
<link rel="stylesheet" href="css/my.css">
<link rel="stylesheet" href="font-awesome/css/font-awesome.min.css">

<!--jQuery File : Library, Mobile Library,Google Feed API JS Cordova JS and Customized JS File -->
<script src="js/jquery-1.11.3.min.js"></script>
<script src="js/jquery.mobile-1.4.5.js"></script>
<script type="text/javascript" src="https://www.google.com/jsapi"></script>
<script type="text/javascript" charset="utf-8" src="cordova.js"></script>
<script type="text/javascript" charset="utf-8" src="js/my.js"></script>
<title>Feeds</title>
</head>

<!--Beginning of the Body-->
<body>
<div data-role="page">
<div data-role="header" data-position="fixed" class="ui-header ui-bar-a ui-header-fixed slidedown" role="banner">
<h1>Feed Me</h1>
</div>
<div data-role="main" class="ui-content" id="main">

<!--Feed URL Text Box-->
<form>
<ul data-role="listview" data-inset="true">
<li class="ui-field-contain">
<label for="name2">Enter a feed URL:</label>
<input type="text" id="feedurl" value="" data-clear-btn="true">
</li>
<li class="ui-body ui-body-b">
<a href="#" id="getfeed" class="ui-shadow ui-btn ui-corner-all">Get Feeds</a>
</li>
</ul>
</form>
<!--End of Feed URL Text Box-->

<center><p><strong>OR</strong></p></center>
<div data-role="tabs">

<!--Navbar containing FormGet and InkThemes Logo Buttons-->
<div data-role="navbar">
<ul>
<li><a id="formget" href="#fg" data-theme="a" data-ajax="false"><img src="img/formget-logo.png"/></a></li>
<li><a id="inkthemes" href="#it" data-theme="a" data-ajax="false"><img width="237" height="49" src="img/inkthemes-logo.png"/></a></li>
</ul>
</div>
<div id="fg" class="ui-content">
<ul data-role="listview" data-inset="true" id="myTable">
</ul>
</div>
<div id="it" class="ui-content">
<ul data-role="listview" data-inset="true" id="myTable1">
</ul>
</div>
<div id="it" class="ui-content">
<ul data-role="listview" data-inset="true" id="myTable2">
</ul>
</div>
<!--End of the navbar-->

</div>
</div>
</div>
</body>
<!--End of the body-->
</html>
JavaScript File : Map.js
document.addEventListener("deviceready", onDeviceReady, false);

<!--Device Ready Function-->
function onDeviceReady() {

<!--Opening the link in the inappbrowser-->
$(document).on('click', '#link', function(){
var website = $("#link").attr("data-link");
alert(website);
window.open = cordova.InAppBrowser.open;
var ref = window.open(website, '_blank', 'location=yes');
ref.addEventListener('loadstart', function(event) { alert('start: ' + event.url); });
ref.addEventListener('loadstop', function(event) { alert('stop: ' + event.url); });
ref.addEventListener('loaderror', function(event) { alert('error: ' + event.message); });
ref.addEventListener('exit', function(event) { alert(event.type); });
});
}

<!--Loading Javascript API-->
google.load("feeds", "1");

<!--Defining initialize method fetching feeds and displaying them-->
function initialize(url) {
if (url == "https://www.formget.com/feed") {
var tab = "myTable";
}
else if(url == "https://www.inkthemes.com/feed"){
var tab = "myTable1";
}
else{
var tab ="myTable2";
}

<!--Calling google's feed method-->
var feed = new google.feeds.Feed(url);

<!--Setting the result format = Json Format-->
feed.setResultFormat(google.feeds.Feed.JSON_FORMAT);

<!--Setting the number of results = 10 -->
feed.setNumEntries(10);

<!--Loading the feeds-->
feed.load(function(result) {
var div1 = "";
var pubdate;
if (!result.error) {
for (var i = 0; i < result.feed.entries.length; i++) {
var entry = result.feed.entries[i];

<!--Grabbing Blog URL, Blog title, Blog Category and Publish Date and displaying them-->
div1 += "<li><a class='ui-btn ui-btn-icon-right ui-icon-carat-r' id=\"link\" data-link=\"" + entry.link + "\">" + entry.title + "<p id=\"catp\"><strong id=\"cat\">" + entry.categories + "</strong></p><p>" + entry.publishedDate + "</p>" + "</a></li>";
document.getElementById("myTable").innerHTML = div1;
document.getElementById("myTable1").innerHTML = div1;
}
}
});
}

<!--Grabbing Feed URL entered by the user-->
$(document).ready(function() {
$("#getfeed").click(function() {
var url = $("#feedurl").val();
alert(url);
initialize(url);
});
});

<!--Grabbing FormGet's blog feeds-->
$(document).ready(function() {
$("#formget").click(function() {
var url = $("#formget").attr("id");
url = "http://www." + url + ".com/feed";
initialize(url);
});

<!--Grabbing InkTheme's blog feeds-->
$("#inkthemes").click(function() {
var url = $("#inkthemes").attr("id");
url = "http://www." + url + ".com/feed";
initialize(url);
});
});
CSS File : My.css
.ui-bar-a, .ui-page-theme-a .ui-bar-inherit, html .ui-bar-a .ui-bar-inherit, html .ui-body-a .ui-bar-inherit, html body .ui-group-theme-a .ui-bar-inherit {
border: 1px solid #005994 !important;
background: #0093EA !important;
color: #fff !important;
font-weight: bold !important;
text-shadow: 0 0 #eee !important;
background-image: -webkit-gradient(linear, left top, left bottom, from( #0093EA), to( #007dcd ));
background-image: -webkit-linear-gradient( #0093EA , #007dcd );
background-image: -moz-linear-gradient( #0093EA, #007dcd );
background-image: -ms-linear-gradient( #0093EA , #007dcd );
background-image: -o-linear-gradient( #0093EA , #007dcd );
background-image: linear-gradient( #0093EA , #007dcd );
}
.ui-page-theme-a .ui-btn:hover, html .ui-bar-a .ui-btn:hover, html .ui-body-a .ui-btn:hover, html body .ui-group-theme-a .ui-btn:hover, html head + body .ui-btn.ui-btn-a:hover{
border: 1px solid #007dcd;
background: #333 ;
font-weight: bold;
text-shadow: 0 0 #eee !important;
color: #fff !important;
background-image: -webkit-gradient(linear, left top, left bottom, from( #0093EA ), to( #0093EA ));
background-image: -webkit-linear-gradient( #0093EA , #0093EA );
background-image: -moz-linear-gradient( #0093EA , #0093EA );
background-image: -ms-linear-gradient( #0093EA , #0093EA );
background-image: -o-linear-gradient( #0093EA , #0093EA );
background-image: linear-gradient( #0093EA , #0093EA );
}
.ui-page-theme-a .ui-btn.ui-btn-active, html .ui-bar-a .ui-btn.ui-btn-active, html .ui-body-a .ui-btn.ui-btn-active, html body .ui-group-theme-a .ui-btn.ui-btn-active, html head + body .ui-btn.ui-btn-a.ui-btn-active, .ui-page-theme-a .ui-checkbox-on:after, html .ui-bar-a .ui-checkbox-on:after, html .ui-body-a .ui-checkbox-on:after, html body .ui-group-theme-a .ui-checkbox-on:after, .ui-btn.ui-checkbox-on.ui-btn-a:after, .ui-page-theme-a .ui-flipswitch-active, html .ui-bar-a .ui-flipswitch-active, html .ui-body-a .ui-flipswitch-active, html body .ui-group-theme-a .ui-flipswitch-active, html body .ui-flipswitch.ui-bar-a.ui-flipswitch-active, .ui-page-theme-a .ui-slider-track .ui-btn-active, html .ui-bar-a .ui-slider-track .ui-btn-active, html .ui-body-a .ui-slider-track .ui-btn-active, html body .ui-group-theme-a .ui-slider-track .ui-btn-active, html body div.ui-slider-track.ui-body-a .ui-btn-active {
background-color: #0093EA !important ;
border-color:#0093EA !important;
color: #fff ;
text-shadow: 0 1px 0 #005599 ;
}
img{
padding: 25px;
}
#whatsearch{
padding-bottom: 25px;
}
button.ui-btn, .ui-controlgroup-controls button.ui-btn-icon-notext {
border-radius: 5px !important;
}
#searchbutton{
margin-bottom: 25px;
}
#main{
margin-top: 12% !important ;
}
.ui-collapsible-inset.ui-collapsible-themed-content .ui-collapsible-content
{
background-color: #ddd;
color: #111;
}
th {
border-bottom: 1px solid #d6d6d6 !important;
}
tr:nth-child(even) {
background: #e9e9e9 !important;
}
.ui-table {
margin-top: 5% !important;
border: 1px solid grey !important;
border-radius: 5px !important;
border-collapse: initial !important;
}
label{
font-weight: bold !important;
}
#label{
border: 1px solid #0093EA !important;
background: #fff !important;
color: #005994 !important;
font-weight: bold !important;
text-shadow: 0 0 #eee !important;
background-image: -webkit-gradient(linear, left top, left bottom, from( #0093EA), to( #007dcd ));
background-image: -webkit-linear-gradient( #0093EA , #007dcd );
background-image: -moz-linear-gradient( #0093EA, #007dcd );
background-image: -ms-linear-gradient( #0093EA , #007dcd );
background-image: -o-linear-gradient( #0093EA , #007dcd );
background-image: linear-gradient( #0093EA , #007dcd );
}
strong#cat{
background-color: #009688;
border-color: #1d1d1d;
color: #fff;
text-shadow: 0 1px 0 #111;
padding: 5px !important;
}
p#catp{
padding: 5px !important;
}
.ui-listview > li.ui-last-child > a.ui-btn {
border-bottom-width: 1px;
text-align: center !important;
background-color: #0093EA !important;
border-color: white !important;
}
.ui-body-b{
background-color: white !important;
}
#formget{
background-color: black !important;
}
#inkthemes{
background-color: #21313f !important;
}
Conclusion:
RSS Feed Reader in a mobile app is an addition of extra jam to the bread. It will let you reach to your users on mobiles, ipads and what not. I hope it will help you grow your blog subscribers with PhoneGap RSS Reader. Keep reading our blog posts.
Recommended blogs –
- PhoneGap Accelerometer, Device Info, & Compass Plugin
- PhoneGap Bluetooth
AngularJS Animation

Along with various important features, AngularJS also provides the functionality of animation.
AngularJS provides some inbuilt directives especially created for animation which you can directly use in your application. Or you can use $animate service with the custom directive for animation purpose.
In this tutorial, we are covering animation via inbuilt directives. Animation using $animate service will be cover in our next blog.
To achieve the animation, angular uses some classes with some defined directives or custom directive, which are automatically added by angular, when that particular event occurs.
Some of these directives are ngRepeat, ngSwitch, ngView, ngClass.
watch the live demo or download code from the link given below.
Installation Of Module
You have to download the angular-animate.js file and attach it with your main page.
Also, add a ngAnimate module as a dependency in your module.
angular.module('myApp', ['ngAnimate'])Note: This ngAnimate module provides support for CSS-based animation as well as javascript-based animation.
Animation using Inbuilt Directives Of AngularJS:
Animation based on ngHide and ngShow
We are going to create an example in which if we uncheck the checkbox, the text will disappear with animation.
First, we have to create a module attached with the ngAnimate module.
angular.module('myApp', ['ngAnimate']);Main HTML page, where we will apply animation.
 <!-- Initializing the value of checked -->
<div ng-init="checked=true">
<label>
<input type="checkbox" ng-model="checked"> click over the checkbox to see animation
</label>
<!-- The value of checked will changed after clicking on the button -->
<h4 class="check-element sampleanimate" ng-show="checked" >This text will fade in and fadeout on click of checkbox</h4>
</div>
Explaination: We have intialized the value of checked as true. When we will uncheck the checkbox, the value of ng-show will get changed to false and the following css code would applied on it.
.sampleanimate {
padding:10px;
background:white;
}
.sampleanimate {
-webkit-transition:all linear 0.5s;
transition:all linear 0.5s;
}
.sampleanimate.ng-hide {
opacity:0;
}
Note: In this given example, ng-hide class is added and remove by angular ngAnimate module while clicking on the checkbox.
Animation Using ng-class
Now, we will apply animation on a written text using ng-class. We will change the value of the ng-class on a button click.
Same as the last created animation, we have to inject ngAnimate module within our module as,
angular.module('myApp', ['ngAnimate'])Now, in HTML code, we are changing the value of ng-class.
 <input class="btn btn-warning form-control" type="button" value="Apply Class" ng-click="cssvariable='csschange'" >
<input class="btn btn-warning form-control" type="button" value="Remove Class" ng-click="cssvariable'">
<span ng-class="cssvariable">CSS-Animated Text</span>
Explanation: We are changing the value of cssvariable after clicking on the apply class button.
Stylesheet which is used for the animation is:
.csschange-add, .csschange-remove {
-webkit-transition:all cubic-bezier(0.250, 0.460, 0.450, 0.940) 0.5s;
-moz-transition:all cubic-bezier(0.250, 0.460, 0.450, 0.940) 0.5s;
-o-transition:all cubic-bezier(0.250, 0.460, 0.450, 0.940) 0.5s;
transition:all cubic-bezier(0.250, 0.460, 0.450, 0.940) 0.5s;
}
.csschange,
.csschange-add.csschange-add-active {
color: red;
font-size:3em;
}
.csschange-remove.csschange-remove-active {
font-size:1.0em;
color:black;
}
Note: In above mentioned example, the value of ng-class will get change on the button click. After clicking the button, a class csschange will get added and removed from the element.
Animation using ng-repeat
In this animation example, we are going to make use of ng-repeat directive. We will apply animation when a user will add or delete any employee name from the list.
First, we will create a module and injected ngAnimate module within it.
angular.module('myApp', ['ngAnimate'])Now, create a controller having the functionality of modifying the employee list.
.controller('empCtrl', function($scope) {
$scope.employees = [
{name: "Smith"},
{name: "Anderson"},
{name: "Robert"},
{name: "Michael"},
{name: "Clark"}
];
/* This function is used to add employees*/
$scope.addemp = function() {
$scope.employees.push($scope.emp);
$scope.emp = {};
};

/* This function is used to remove employees*/
$scope.removeemp = function(index) {
$scope.employees.splice(index, 1);
};
});
Explanation: Above controller belongs to myApp module, which will gives the functionality of adding and removing employees from the employee list.
Now, we will create a HTML page in which we will fetch the data of the employee, and perform addition and deletion of employee nam over the employee list.
 <div ng-controller="empCtrl">
<h4><p class="text-center">Employees Table</p></h4>
<ul class="list-unstyled">
<!-- In below code we are fetching the list of employee -->
<li ng-repeat="emp in employees" class="fade1" >
{{emp.name}}
<span class="text-danger" ng-click="removeemp($index)">X</span>
</li>
</ul>
<input class="form-control" type="text" ng-model="emp.name" placeholder="Enter a employee name" />
<button class="btn btn-warning btn-block" ng-click="addemp()">Add Employee Name</button>
</div>
CSS code used for this animation is :
.fade1 {
transition: 1s linear all;
-webkit-transition: 1s linear all;
}.fade1.ng-enter {
opacity: 0;
}.fade1.ng-enter.ng-enter-active {
opacity: 1;
}.fade1.ng-leave {
opacity: 1;
}.fade1.ng-leave.ng-leave-active {
opacity: 0;
}
Note: ng-repeat will add the class ng-enter and ng-leave while adding or deleting the employee name.
Directives Supports Animation
There are some of the directives in AngularJS which supports animation. They trigger the animation when the certain event occurs.
- ngRepeat: These directive triggers enter, leave and move animation in the occurrence of the corresponding event.
- ngView: This directives supports enter and leave animation events.
- ngInclude: This directive supports enter and leave animation events.
- ngSwitch: This directives supports enter and leave animation events.
- ngIf: This directive supports enter and leave animation events.
- ngClass: This directives supports add and remove animation events.
- ngShow & ngHide: This directive supports add and remove animation events. In these both of the directives, the ng-hide class name will get add and remove according to the occurrence of events.
How Classes Added For Different Animation Events
- enter, leave, move: For these type of animation events, the class will get added to the element by following the structure ng-<Eventnamme> and ng-<Eventname>-active
- add, remove: For these type of animation events, structure followed by added class is <classname>-add, <classname>-add-active, <classname>-remove, <classname>-remove-active. The same structure is followed by ngShow and ngHide directives, but both directives uses ng-hide class which are added or removed according to requirement.
Note: These classes are automatically added by angular in the occurrence of animation events, according to the format as mentioned above
Animation With Custom Directives
We can also apply animation in custom directive using AngularJS.
For this, we will make use of $animate service. We will inject this service in our custom directive function and make use of its method to get animation effect.
We will talk about $animate service and it’s all method in our next blog. It will make you more free to apply animation anywhere or in any directive.
Tips: This blog contains a free downloadable zip file of complete code. Just download it and use it. I am pretty sure that it will make you more clear about the working of animation in AngularJS
Conclusion
So you have seen that how we can apply animation in AngularJS application. Please comment for any query. Stay connected with us for more interesting technical stuff 🙂
AngularJS Transclude

AngularJS provides the lots of important features with their easy uses. But, when we talk about transclusion, which is one of the important features of angular, it creates some confusion among users regarding its proper uses.
So, in this blog, we are going to explain transclusion from the very basic level so that you can easily catch up the concepts and uses of transclusion.
Transclusion
Transclusion is a process of including the content of one template into another. It provides us the flexibility to use a custom directive in more efficient manner.
Need of Transclusion:
Let’s understand the need of transclusion through a simple example.
Suppose, we have a custom directive, demoText which purpose is to display a message “Custom Directive Data!!!“.
controller.js
// Application module
angular.module('myApp',[])
// Register custom directive
.directive('demoText',function(){
return{
// Isolated scopes
scope:{},
// Template for this custom directive
template:'<div><p>Custom Directive Data!!!</p></div>'
};
});
Now, we have used the above-mentioned custom directive in the index.html page of the application as:
index.html
<html ng-app="myApp">
<head>
// Include AngularJS and other library files here
</head>
<body>
<!-- Using custom directive as an element -->
<demo-text>
<p class="text-success">Successfully Transcluded!!!</p>
</demo-text>
</body>
</html>
Here, the custom directive is used as a element like, <demo-text>…</demo-text>.
But, there is one thing to notice that between the custom directive tags, there is a paragraph tag contain a message “Successfully Transcluded!!!“.
Now, when compiler will compile the directive and will link it with the DOM by AngularJS, the paragraph with “Successfully Transcluded!!!” message will get replaced with the template of the custom directive, i.e Custom Directive Data!!!.
The output will be displayed as:
Note:- In all the codes dispalyed in the blog, we have removed the CSS and class from elements so that the code looks clear and concept could be understand easily.
But, you will get the code with complete CSS and design in download script.
It means that whenever the custom directive will be used in the application, it will replace all the content between its tag with the template of the directive.
But, when we need to display the content between the tags along with the template then what?
In such case, transclusion is the solution. It will include the content between tags in the template of the custom directive.
To achieve transclusion, first we will have to enable the transclude option of the directive by setting it to true. By doing this, we tell the directive to allow the transcluded content to use within the directive.
controller.js
// Register custom directive
.directive('demoText',function(){
return{
...
// Enable transclusion property for this custom directive
transclude:true,
...
};
});
Now, to display the content, there is two way.
1. ngTransclude:
AngularJS provide ngTransclude directive which clone the content (between directive tag) and add it to the DOM as a child element where ngTransclude directive is applied.
For example,
controller.js
// Register custom directive
.directive('demoText',function(){
return{
...
// Enable transclusion property for this custom directive
transclude:true,
// Template for this custom directive
template:'<div><p>Custom Directive Data!!!</p><div ng-transclude></div></div>'
};
});
Here, ng-transclude is applied on the div of custom directives’s template as an attribute. So, the content will be displayed along with the directive’s template wherever the custom directive will be used in the application.
In above case, the output will be displayed as:
Download complete code from the link given below.
2. Transclude function:
Another way to show the content is to pass the fifth argument in the link function of the custom directive. It will act as a callback function and used to manipulate the cloned element or data.
For example,
controller.js
// Register custom directive
.directive('demoText',function(){
return{
...
// Enable transclusion property for this custom directive
transclude:true,
// Template for this custom directive
template:'<div class="alert alert-warning"><p class="text-info">Custom Directive Data!!!</p></div>',
// Passed transcludeFn callback function as fifth argument
link: function(scope, element, attrs, controller, transcludeFn){
transcludeFn(function(clone_data){

// Append this directive's template with the cloned content
element.append(clone_data);
});
}
};
});
Here, transcludeFn has passed as a fifth argument to directive’s link function, which will act a callback function. This function takes cloned element as an argument and append the directive’s element with the cloned element.
The output will be displayed something like this:
Download complete code from the link given below.
Note:- The output of transcludeFn function method will be different from the ngTransclude directive method because in transcludeFn method we are appending the element, directive’s template, with the cloned data.
However, in ngTransclude directive method, we are using ng-transclude as an attribute inside the div element of the directive’s template.
Application of transcludeFn:
Multiple clones of the content
One of the most important advantages of transcludeFn it that it allows you to use the cloned conted multiple time within your directive.
Fore example,
controller.js
// Register custom directive
.directive('demoText',function(){
return{
...
// Enable transclusion property for this custom directive
transclude:true,
// Template for this custom directive
template:'<div class="alert alert-warning"><p class="text-info">Custom Directive Data!!!</p></div>',
// Passed transcludeFn callback function as fifth argument
link: function(scope, element, attrs, controller, transcludeFn){
transcludeFn(function(clone_data){
// Append this directive's template with the cloned content
element.append(clone_data);
});
transcludeFn(function(clone_data){
// Append this directive's template with the cloned content
element.append(clone_data);
});
transcludeFn(function(clone_data){
// Append this directive's template with the cloned content
element.append(clone_data);
});
transcludeFn(function(clone_data){
// Append this directive's template with the cloned content
element.append(clone_data);
});
}
};
});
Here, you can see that transcludeFn(function(clone_data){ … }); is repeated multiple times inside the link function of the directive.
On each repetition, the cloned content will be appended with the new element of the directive, i.e each time in the directives template, a new clone element will be added. Such as,
Download complete code from the link given below.
You might be thinking that why we have used transcludedFn multiple times inspite of only appending the element multiple times in a single transcludeFn like,
controller.js
// Register custom directive
.directive('demoText',function(){
return{
...
// Enable transclusion property for this custom directive
transclude:true,
// Template for this custom directive
template:'<div class="alert alert-warning"><p class="text-info">Custom Directive Data!!!</p></div>',
// Passed transcludeFn callback function as fifth argument
link: function(scope, element, attrs, controller, transcludeFn){
transcludeFn(function(clone_data){
// Append this directive's template with the cloned content
element.append(clone_data);
element.append(clone_data);
element.append(clone_data);
element.append(clone_data);
element.append(clone_data);
});
}
};
});
Let me tell you that multiple element.append(clone_data); inside a single transcludeFn will append the template with the clone content only first time
Next time, it will overwrite the same cloned content again and again which will results in displaying the cloned content only once inspite of multiple times.
Using this method for cloning the content multiple times is totally useless. So, for multiple cloning use the first one.
Transclusion Scope:
One of the important advantages of transclusion is that it allow you to use the outer scope inside a custom directive, rather than the isolated scope( directive’s own internal scope ).
It is more useful when we want to add some dynamic content as a transcluded content in the custom directive’s template.
Let’s generate the same output but using the outer scope. For this we will have to make some changes in the earlier codes.
controller.js
// Application module
angular.module('myApp',[])
// Main controller of the application
.controller('demoController',['$scope',function($scope){
$scope.success_msg = "Successfully Transcluded!!!";
}])
// Register custom directive
.directive('demoText',function(){
return{
// Isolated scopes
scope:{},
// Template for this custom directive
template:'<div><p>Custom Directive Data!!!</p></div>'
};
});
In the controller.js file, we have added a controller which store “Successfully Transcluded!!!” message in the main scope($scope) of the application.
Now, in index.html, just use scope property and evaluate the message using expression.
<html ng-app="myApp">
<head>
// Include AngularJS and other library files here
</head>
<body>
<div ng-controller="demoController">
<!-- Using custom directive as an element -->
<demo-text>
<p class="text-success">{{success_msg}}</p>
</demo-text>
</div>
</body>
</html>
Here, in the html page, instead of a static element we are using success_msg object, which contain the message.
Note:- success_msg is a property added to the parent scope($scope). It act as an outer scope for the custom directive.
So, from the above-mentioned example, it might be clear that how you can use and outer scope inside a custom directive.
$destroy
Whenever we call a transcludeFn callback function inside a link function, a scope is created for the transcluded content.
In such case, if we need to remove the transcluded content, then there is a possibility of memory/scope leaking. This is because angular know only about the removing action of the transcluded content and unaware of
This is because angular know only about the removing action of the transcluded content by tracking events but, unaware of the transcluded scopes i.e whether the scope is destroyed or not.
Thus, to remove the leaking probability of scope, angular provides $destroy event which destroy the transcluded scopes.
Have a look at the example given below.
In this example, following action will be performed.
- First, display custom directive’s content along with a button “Show transcluded message“.
- When this button will be clicked, a transcluded function will be called which will append and display the transcluded content along with the directive’s template and another button “Hide transcluded message”.
- When this button will be clicked, $destroy event will trigger which will destroy the transcluded scope. At the same time, the transcluded content will be removed and hide the transcluded message.
controller.js
// Application module
angular.module('myApp',[])
// Main controller of the application
.controller('demoController',['$scope',function($scope){
$scope.success_msg = "Successfully Transcluded!!!";
}])
// Register custom directive
.directive('demoText',function(){
return{
// Isolated scopes
scope:{},
// Enable transclusion property for this custom directive
transclude:true,
// Template for this custom directive
template:'<div class="alert alert-warning"><p class="text-info">Custom Directive Data!!!</p><button class="btn btn-success" ng-show="show_msg" ng-click="show_div()">Show Transcluded Message</button><p class="alert alert-success trans-msg"></p><button class="btn btn-danger" ng-hide="show_msg" ng-click="hide_div()">Hide Transcluded Message</button></div>',
// Passed transcludeFn callback function as fifth argument
link: function(scope, element, attrs, controller, transcludeFn){
scope.show_msg=true;
var tranContent = element.find('.trans-msg');
tranContent.css({"display":"none"});
// Function to show the transcluded message div
scope.show_div= function(){
scope.show_msg=false;
// Transclude callback function to add content in the directive template
transcludeFn(function(clone_data){
tranContent.html(clone_data).css({"display":"block","margin-bottom":"5px"});
});
}

// Function to remove and hide the transcluded message div
scope.hide_div= function(){
scope.show_msg=true;
// Transclude callback function to destroy transcluded scope
transcludeFn(function(clone_data, tranScope){
// Destroying transcluded content's scope & setting it to NULL
tranScope.$destroy();
tranScope=null;
});
// Remove transclude content from the directive
tranContent.empty().css({"display":"none"});
}
}
};
});
index.html
<html ng-app="myApp">
<head>
// Include AngularJS and other library files here
</head>
<body>
<div ng-controller="demoController">
<!-- Using custom directive as an element -->
<demo-text>
<p class="text-success">{{success_msg}}</p>
</demo-text>
</div>
</body>
</html>
Output for this example would be like this,
Download complete code from the link given below.
Element Transclusion
Element transclusion is another awesome feature available in the AngularJS.
It allows you to transclude the whole element rather than just some content. For this, you will have to replace transclude:true with transclude:”element” in the custom directive.
By doing so, you can get the whole element in spite some content. Now you can easily modify the clone element and add it to the DOM and so on.
One of the important advantages of element transclusion is that you can remove template option from custom directive and directly use the dynamic content in the custom directive.
Let’s see element transclusion through an example which will display the “Successfully Transcluded!!!” message without using any template in custom directive.
controller.js
// Application module
angular.module('myApp',[])
// Main controller of the application
.controller('demoController',['$scope',function($scope){
$scope.success_msg = "Successfully Transcluded!!!";
}])
// Register custom directive
.directive('demoText',function(){
return{
// Isolated scopes
scope:{},
// Setting transclusion as element
transclude:"element",
// Link function to display the transcluded element content
link: function(scope, element, attrs, controller, transcludeFn) {
transcludeFn(function(clone_element) {
element.after(clone_element);
});
},
};
});
index.html
<html ng-app="myApp">
<head>
// Include AngularJS and other library files here
</head>
<body>
<div ng-controller="demoController">
<!-- Using custom directive as an element -->
<demo-text>
<p class="text-success">{{success_msg}}</p>
</demo-text>
</div>
</body>
</html>
Output
Download complete code from the link given below.
Conclusion:
Hope this blog will help you in understanding the concepts and use of transclusion in AngularJS. Keep reading our blogs and comment us from the space given below 🙂
For more related infromation check out some other blogs here –
Phonegap Contacts Plugin : Contact Management App

PhoneGap Contacts Plugin lets the user to manage contacts stored in the device through a mobile app.
Things a user can do using this plugin are –
- Create a contact
- Delete a contact
- Update a contact
- Search/Find a contact
We’re going to build this Contact Management App by using PhoneGap & jQuery Mobile Interface.
Now,
Let’s take a look at the methods, arguments, and objects offered by PhoneGap Contacts Plugin.
Methods, Arguments and Objects of Contacts Plugin
Methods
- contacts.create : Creates contact.
var contact = navigator.contacts.create(properties); - contacts.find : Search all contacts.
navigator.contacts.find(contactFields, contactSuccess, contactError, contactFindOptions);
Arguments
- contactFields: It is mandatory for find() method, it specifies the fields find is going to return.
["name", "phoneNumbers", "emails"] - contactSuccess: Success callback function.
- contactError: Error callback function.
- contactFindOptions: Optional fields used to filter the return fields.
{ filter: "", multiple: true, };
Objects
- Contact: It contain all the properties which are necessary to describe a contact.
- ContactName: It contacts all the fields related to the contact’s name.
- ContactField: It contains generic fields like email address, phone numbers, and URLs.
- ContactAddress: It contacts all the fields related to the contact’s address.
- ContactOrganization: It contacts all the fields related to the contact’s organization.
- ContactFindOptions: These are the properties, with the help of which data returned by find() gets filtered.
- ContactError: ContactError Object which gets passed to ContactError callback function.
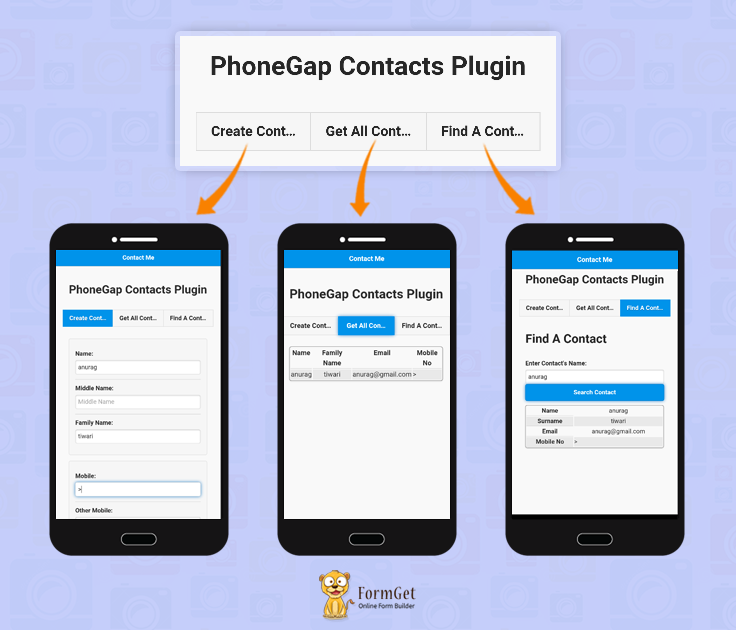
Idea Of The App
Features
- Creates a new contact in the device.
- Get all contacts stored in the device.
- Find/search a particular contact from stored contacts.
Technologies Used
jQuery Mobile : For Interface / UI Designing
- We’re going to use jQuery Mobile for designing interface.
Files:
HTML File : Index.html
<!DOCTYPE html>
<html lang="en">
<head>
<meta charset="UTF-8">
<title>Create Contact</title>

<!--Stylesheet Files : jQuery Mobile CSS File, Customized CSS File and Font Awesome for icons -->
<link rel="stylesheet" href="css/jquery.mobile-1.4.5.css">
<link rel="stylesheet" href="css/my.css">
<link rel="stylesheet" href="font-awesome/css/font-awesome.min.css">

<!--jQuery File : Library, Mobile Library, Cordova JS and Customized JS File -->
<script type="text/javascript" src="js/jquery-1.11.3.min.js"></script>
<script type="text/javascript" src="js/jquery.mobile-1.4.5.js"></script>
<script type="text/javascript" src="cordova.js"></script>
<script type="text/javascript" src="js/my.js"></script>
</head>

<!--Beginning of the Body-->
<body>
<div data-role="page">

<!--Header Bar-->
<div data-role="header" data-position="fixed" class="ui-header ui-bar-a ui-header-fixed slidedown" role="banner">
<h1>Contact Me</h1>
</div>
<div data-role="main" class="ui-content ui-corner-all" id="main">
<center><p id="heading">PhoneGap Contacts Plugin</p></center>
<div data-role="tabs">

<!--Beginning of the Navbar Tabs-->
<div data-role="navbar">
<ul>

<!--Tab Buttons : Create Contact, Get All Contacts & Find A Contact-->
<li><a href="#one" data-theme="a" data-ajax="false">Create Contact</a></li>
<li><a id="getContact" href="#two" data-theme="a" data-ajax="false">Get All Contacts</a></li>
<li><a href="#three" data-theme="a" data-ajax="false">Find A Contact</a></li>
</ul>
</div>

<!--First tab button functionality-->
<div id="one" class="ui-content">
<div id="namediv" class="ui-content">
<div class="ui-field-contain">
<label for="textinput-fc">Name:</label>
<input type="text" name="textinput-fc" id="dname" placeholder="Name" value="">
</div>
<div class="ui-field-contain">
<label for="textinput-fc">Middle Name:</label>
<input type="text" name="textinput-fc" id="dmname" placeholder="Middle Name" value="">
</div>
<div class="ui-field-contain">
<label for="textinput-fc">Family Name:</label>
<input type="text" name="textinput-fc" id="dfname" placeholder="Family Name" value="">
</div>
</div>
<div id="numberdiv" class="ui-content">
<div class="ui-field-contain">
<label for="textinput-fc">Mobile:</label>
<input type="text" name="textinput-fc" id="dmob" placeholder="Mobile" value="">
</div>
<div class="ui-field-contain">
<label for="textinput-fc">Other Mobile:</label>
<input type="text" name="textinput-fc" id="dothermob" placeholder="Other Mobile" value="">
</div>
</div>
<div id="emaildiv" class="ui-content">
<div class="ui-field-contain">
<label for="textinput-fc">Email:</label>
<input type="text" name="textinput-fc" id="demail" placeholder="Email" value="">
</div>
</div>
<div id="addressdiv" class="ui-content">
<div class="ui-field-contain">
<label for="textinput-fc">Street Address:</label>
<input type="text" name="textinput-fc" id="dadd" placeholder="Street Address" value="">
</div>
<div class="ui-field-contain">
<label for="textinput-fc">Region:</label>
<input type="text" name="textinput-fc" id="dregion" placeholder="Region" value="">
</div>
<div class="ui-field-contain">
<label for="textinput-fc">Country:</label>
<input type="text" name="textinput-fc" id="dcountry" placeholder="Country" value="">
</div>
</div>
<div id="addressdiv" class="ui-content">
<div class="ui-field-contain">
<label for="textinput-fc">Birthday:</label>
<input type="text" name="textinput-fc" id="dbday" placeholder="Birthday" value="">
</div>
<div class="ui-field-contain">
<label for="textinput-fc">Note:</label>
<input type="text" name="textinput-fc" id="dnote" placeholder="Note" value="">
</div>
<div class="ui-field-contain">
<label for="textinput-fc">URL:</label>
<input type="text" name="textinput-fc" id="durl" placeholder="URL" value="">
</div>
</div>
<a href="#" id="createContact" class="ui-shadow ui-btn ui-corner-all">Save Contact</a>
</div>
<!--End of First tab button-->

<!--Beginning of the second tab button-->
<div id="two" class="ui-content">
<table data-role="table" data-mode="reflow" class="ui-responsive ui-shadow" id="myTable"></table>
</div>
<!--End of second tab button-->

<!--Beginning of the third tab button-->
<div id="three" class="ui-content">
<h1>Find A Contact</h1>
<div class="ui-field-contain">
<label for="textinput-fc">Enter Contact's Name:</label>
<input type="text" name="textinput-fc" id="searchitin" placeholder="Find a contact you want to search" value="">
<a href="#" id="searchit" class="ui-shadow ui-btn ui-corner-all">Search Contact</a>
<table data-role="table" data-mode="reflow" class="ui-responsive ui-shadow" id="searchTable"></table>
</div>
</div>
<!--End of third tab button-->

</div>
</div>
</div>
</body>
<!--End of the Body-->
</html>
JavaScript File : My.js
<!--Call to document ready function-->
$(document).ready(function() {

<!--Definition of onlick function on the button with the id="searchit" -->
$(document).on('click', '#searchit', function() {
navigator.contacts.find(
[navigator.contacts.fieldType.name],
searchContacts,
errorHandler);
});

<!--Definition of searchContacts method -->
function searchContacts(c) {
var name = $("#searchitin").val();
console.log("searchContacts, number of results "+c.length);
var i=0;
for(var i=0, len=c.length; i<len; i++) {
if (c[i].name.givenName == name) {
var firstname = c[i].name.givenName;
var fname = c[i].name.familyName;
var email = c[i].emails[0].value;
var phone = c[i].phoneNumbers[1].value;
alert("f =" + firstname + "l =" + fname + "email =" + email + "phone =" + phone);
pair = "<tr><th data-priority=\"1\"><center>Name</center></th><td><center>"+c[i].name.givenName+"</center></td></tr><tr><th data-priority=\"1\"><center>Surname</center></th><td><center>"+c[i].name.familyName+"</center></td></tr><tr><th data-priority=\"1\"><center>Email</center></th><td><center>"+ c[i].emails[0].value +"</center></td></tr><tr><th data-priority=\"1\"><center>Mobile No</center></th><td>"+ c[i].phoneNumbers[1].value +"></td></tr>";
$("#searchTable").html(pair);
};
}
}

<!--Definition of onlick function on the button with the id="createContact" -->
$("#createContact").click(function(){

<!--Fetching values of all the fields-->
var name = $("#dname").val();
var mname = $("#dmname").val();
var fname = $("#dfname").val();
var mobile = $("#dmob").val();
var omobile = $("#dothermob").val();
var email = $("#demail").val();
var address = $("#dadd").val();
var region = $("#dregion").val();
var country = $("#dcountry").val();
var bday = $("#dbday").val();
var note = $("#dnote").val();
var durl = $("#durl").val();

<!--Calling the contacts.create method and passing the values to the respective fields-->
var myContact = navigator.contacts.create(
{
"displayName":null,
"name":{
"givenName":name,
"formatted":null,
"middleName":mname,
"familyName":fname,
"honorificPrefix":null,
"honorificSuffix":null
},
"nickname":null,
"phoneNumbers":[
{"type":"mobile","value":mobile,"id":0,"pref":false},
{"type":"other","value":omobile,"id":1,"pref":false}
],
"emails":[
{"type":"home","value":email,"id":0,"pref":false}
],
"addresses":[
{
"postalCode":null,
"type":"work",
"id":0,
"locality":null,
"pref":"false",
"streetAddress":" ",
"region":region,
"country":country
}],
"ims":null,
"organizations":[
{
"name":"",
"title":"",
"type":null,
"pref":"false",
"department":""
}],
"birthday":bday,
"note":note,
"categories":null,
"urls":[
{
"type":"other",
"value":durl,
"id":0,
"pref":false
}]
}
);
myContact.save();
alert("The contact, " + myContact.name.givenName + ", has been created");
});

<!--Definition of onlick function on the button with the id="getContact" -->
$(document).on('click', '#getContact', function() {

<!--Calling the contacts.find method to fetch all contacts-->
navigator.contacts.find(
[navigator.contacts.fieldType.name],
gotContacts,
errorHandler);
});
function errorHandler(e) {
console.log("errorHandler: "+e);
}

<!--Definition of gotContacts -->
function gotContacts(c) {
console.log("gotContacts, number of results "+c.length);
var pair="<tr><th data-priority=\"1\"><center>Name</center></th><th data-priority=\"1\"><center>Family Name</center></th><th data-priority=\"2\"><center>Email</center></th><th><center>Mobile No</center></th></tr>";
var i=0;
for(var i=0, len=c.length; i<len; i++) {
if(c[i].phoneNumbers && c[i].phoneNumbers.length > 0) {
pair += "<tr><td><center>"+c[i].name.givenName+"</center></td><td><center>"+c[i].name.familyName+"</center></td><td><center>"+ c[i].emails[0].value +"</center></td><td>"+ c[i].phoneNumbers[1].value +"></td></tr>";
}
}
alert(pair);
$("#myTable").html(pair);
}
});
CSS File : My.css
.ui-bar-a, .ui-page-theme-a .ui-bar-inherit, html .ui-bar-a .ui-bar-inherit, html .ui-body-a .ui-bar-inherit, html body .ui-group-theme-a .ui-bar-inherit {
border: 1px solid #005994 !important;
background: #0093EA !important;
color: #fff !important;
font-weight: bold !important;
text-shadow: 0 0 #eee !important;
background-image: -webkit-gradient(linear, left top, left bottom, from( #0093EA), to( #007dcd ));
background-image: -webkit-linear-gradient( #0093EA , #007dcd );
background-image: -moz-linear-gradient( #0093EA, #007dcd );
background-image: -ms-linear-gradient( #0093EA , #007dcd );
background-image: -o-linear-gradient( #0093EA , #007dcd );
background-image: linear-gradient( #0093EA , #007dcd );
}
.ui-page-theme-a .ui-btn:hover, html .ui-bar-a .ui-btn:hover, html .ui-body-a .ui-btn:hover, html body .ui-group-theme-a .ui-btn:hover, html head + body .ui-btn.ui-btn-a:hover{
border: 1px solid #007dcd;
background: #333 ;
font-weight: bold;
text-shadow: 0 0 #eee !important;
color: #fff !important;
background-image: -webkit-gradient(linear, left top, left bottom, from( #0093EA ), to( #0093EA ));
background-image: -webkit-linear-gradient( #0093EA , #0093EA );
background-image: -moz-linear-gradient( #0093EA , #0093EA );
background-image: -ms-linear-gradient( #0093EA , #0093EA );
background-image: -o-linear-gradient( #0093EA , #0093EA );
background-image: linear-gradient( #0093EA , #0093EA );
}
.ui-page-theme-a .ui-btn.ui-btn-active, html .ui-bar-a .ui-btn.ui-btn-active, html .ui-body-a .ui-btn.ui-btn-active, html body .ui-group-theme-a .ui-btn.ui-btn-active, html head + body .ui-btn.ui-btn-a.ui-btn-active, .ui-page-theme-a .ui-checkbox-on:after, html .ui-bar-a .ui-checkbox-on:after, html .ui-body-a .ui-checkbox-on:after, html body .ui-group-theme-a .ui-checkbox-on:after, .ui-btn.ui-checkbox-on.ui-btn-a:after, .ui-page-theme-a .ui-flipswitch-active, html .ui-bar-a .ui-flipswitch-active, html .ui-body-a .ui-flipswitch-active, html body .ui-group-theme-a .ui-flipswitch-active, html body .ui-flipswitch.ui-bar-a.ui-flipswitch-active, .ui-page-theme-a .ui-slider-track .ui-btn-active, html .ui-bar-a .ui-slider-track .ui-btn-active, html .ui-body-a .ui-slider-track .ui-btn-active, html body .ui-group-theme-a .ui-slider-track .ui-btn-active, html body div.ui-slider-track.ui-body-a .ui-btn-active {
background-color: #0093EA !important ;
border-color:#0093EA !important;
color: #fff ;
text-shadow: 0 1px 0 #005599 ;
}
img{
//padding: 25px;
padding-bottom: 25px;
//width: 20%;
}
button.ui-btn, .ui-controlgroup-controls button.ui-btn-icon-notext {
border-radius: 5px !important;
}
#searchbutton{
margin-bottom: 25px;
}
#main{
margin-top: -1% !important ;
}
.ui-collapsible-inset.ui-collapsible-themed-content .ui-collapsible-content
{
background-color: #ddd;
color: #111;
}
.ui-collapsible-content {
-webkit-transition: all 0.5s;
-moz-transition: all 0.5s;
-ms-transition: all 0.5s;
-o-transition: all 0.5s;
transition: all 0.5s;
//height: 2em;
overflow: hidden;
}
.ui-collapsible-content-collapsed {
display: block;
height: 0;
padding: 0 16px;
}
#bt i{
font-weight: bold;
}
th {
border-bottom: 1px solid #d6d6d6 !important;
}
tr:nth-child(even) {
background: #e9e9e9 !important;
}
.ui-table {
margin-top: 3% !important;
border: 1px solid grey !important;
border-radius: 5px !important;
border-collapse: initial !important;
}
label{
font-weight: bold !important;
}
#label{
border: 1px solid #0093EA !important;
background: #fff !important;
color: #005994 !important;
font-weight: bold !important;
text-shadow: 0 0 #eee !important;
background-image: -webkit-gradient(linear, left top, left bottom, from( #0093EA), to( #007dcd ));
background-image: -webkit-linear-gradient( #0093EA , #007dcd );
background-image: -moz-linear-gradient( #0093EA, #007dcd );
background-image: -ms-linear-gradient( #0093EA , #007dcd );
background-image: -o-linear-gradient( #0093EA , #007dcd );
background-image: linear-gradient( #0093EA , #007dcd );
}
#utable tr:nth-child(even){
background: inherit !important;
}
#heading{
font-weight: bold;
font-size: 30px;
}
#btndiv{
margin-top: 3%;
}
@media ( max-width: 35em ) {
.ui-table-reflow.ui-responsive td,
.ui-table-reflow.ui-responsive th {
width: auto;
float: none;
clear: none;
display: table-cell;
margin: 0;
padding:0;
}
}
#btndiv .ui-bar-a{
width: 50% !important;
margin: auto !important;
}
#namediv,#numberdiv,#emaildiv,#addressdiv{
border: 1px solid #ddd;
margin-top: 15px;
border-radius: 5px;
background-color: #f6f6f6;
}
.ui-navbar li .ui-btn {
font-size: 16px !important;
}
Conclusion:
So you see, with the help of contacts plugin, we can build a streak of useful apps and that too with so much of ease. I hope it will help you.
Check out the following blogs to get more related updates –
- PhoneGap : How Push Notifications Work?
- PhoneGap Inappbrowser
AngularJS Provider

Provider works in the same way as the service or factory works. It has an additional functionality that could be configured during the module configuration phase.
We can configure a provider according to our requirement. We applied this configuration when we want that our configuration must be set, before the application start.
The provider usually defined with the implementation of $get method and this $get is a factory function. In fact, when you create a factory function, an empty provider with $get function is set to your factory function automatically.
Watch the live demo or download code from the link given below.
Use Provider:
A provider can be used in the application as follows:
(i) First, we define a provider.
(ii) Then, we configure it.
Syntax for defining provider
angular.module('module_name').provider('date', function () {
return{
$get: function () {
return {
function_name: function ()
{

}

}
}
}
});
Syntax to configure application with provider
app.config(function (<providername>provider) {
// Code to configure application which will get run before the provider object instantiated.
});
Create an application
Now, we are going to configure provider in an application which will show a message like Good morning, Good afternoon, Good evening or Good night according to current time.
First, we have to create a module
var app = angular.module('mainApp', []);Defining a provider:
app.provider('date', function () {
return{
// This setgreet function can not be called by injector
setgreet: function (value) {
greet = value;
},
// Only value written within the $get function returned by injector
$get: function () {
return {
showDate: function ()
{
var format = 'M/d/yy h:mm:ss a';
var date = new Date();
return greet + '!! The Current Time is ' + date.getHours() + ':' + date.getMinutes() + 'hrs';
},
setDate: function ()
{
var date = new Date();
return date.getHours();
}
}
}
}
});
Note: In above-mentioned code, we have defined a function name setgreet that will not be called by injector. This function can be called from the config function by passing it’s provider name.
Configuring a provider:
Here, we are configuring our application by using provider that we have defined above:
app.config(function (dateProvider) {
// Setting the value of setgreet function of dateprovider
var t = dateProvider.$get().setDate();
if (t > 0 && t < 12) {
dateProvider.setgreet("Good morning");
}
else if (t > 11 && t < 17) {
dateProvider.setgreet("Good afternoon");
}
else if (t > 16 && t < 20) {
dateProvider.setgreet("Good evening");
}
else {
dateProvider.setgreet("Good night");
}
});
Note: The config function configure provider’s setgreet function by passing the value to the setgreet function to initialize it. dateProvider has passed as an argument to config function for the date provider.
Controllers:
app controller:
We also need a controller by which we will call the function of date provider:
app.controller('app', function ($scope, date) {
$scope.success = true;
$scope.call = function () {
// Calling show date function of date provider
$scope.greetmessage = date.showDate();
$scope.success = false;
}
});
Note: When the call function called on a button click, it will call the showDate function of date provider.
tm controller:
This controller will generate a dynamic clock in the main page.
app.controller('tm', function ($scope, $timeout) {
$scope.clock = "loading clock..."; // initialise the time variable
$scope.Interval = 100 //ms
Interval1 = 1 //ms
var tick = function () {
$scope.clock = Date.now() // get the current time
$timeout(tick, $scope.Interval); // reset the timer
}
// from here we are calling tick function after 100ms
$timeout(tick, $scope.Interval1);
});
HTML page:index.html
<html>
<head>
<title>AngularJS Provider</title>
<link rel="stylesheet" type="text/css" href="css/bootstrap.min.css" />
<link rel="stylesheet" type="text/css" href="http://fonts.googleapis.com/css?family=Raleway">
<script type="text/javascript" src="js/angular.min.js"></script>
<script type="text/javascript" src="js/app.js"></script>
</head>
<body ng-app="mainApp">
<h2 class="text-center page-header" style="border:none;">AngularJS Provider Demo</h2>
<div ng-controller="app">
<div ng-controller="tm">
<h1 class="text-center">{{ clock | date:'medium'}}</h1>
</div>
<button class="btn btn-large btn-block btn btn-warning" ng-click="call()">Click Here To Check Status And Message Of Current Time</button>
<div class="alert alert-success" ng-hide="success" style="margin-top:10px;"><b>{{greetmessage}}</b></div>
<div class="alert alert-warning" style="margin-top:10px;">
<b class="text-danger">Note:-</b>
<ul>
<li>
<p>If the time lies between <b>0</b> to <b>12 hours</b>, the message will be <b>Good morning.</b></p>
</li>
<li>
<p>If the time lies between <b>13</b> to <b>17 hours</b>, the message will be <b>Good afternoon.</b></p>
</li>
<li>
<p>If the time lies between <b>18</b> to <b>20 hours</b>, the message will be <b>Good evening.</b></p>
</li>
<li>
<p>If the time lies between <b>20</b> to <b>24 hours</b>, the message will be <b>Good night.</b></p>
</li>
</div>
</div>
</body>
</html>
Note: Here in above code app.js is a file which contains all javascript code of controller, provider and module.
Tips: This blog contains the zip file of complete code. Just download it and use it, it will makes you more clear about the working of providers in AngularJS.
Conclusion
I hope that at this point you must be feeling yourself comfortable with provider in AngularJS. Please comment for any query. Keep visiting our website for more intersting stuff 🙂
Read more related updates here –
PhoneGap Bluetooth

Bluetooth is a software(Based on wireless technology) which is generally used for making the communication or information exchange…
…between two electronic devices such as mobile phone computer tablet etc.
Though we have various fast data transfer technology today, which are capable to exchange data with a very fast speed rate, still we are carying and upgrading this bluetoth technology with time…
…because of its amazing merits such as low cost, low interference, automatic, low energy consumption, Instant PAN(Personal Area Network).
In This post we are going to explain how to turn on your device bluetooth with a phonegap application. You will also be able to see a bluetooth device list connected or paired with your device.
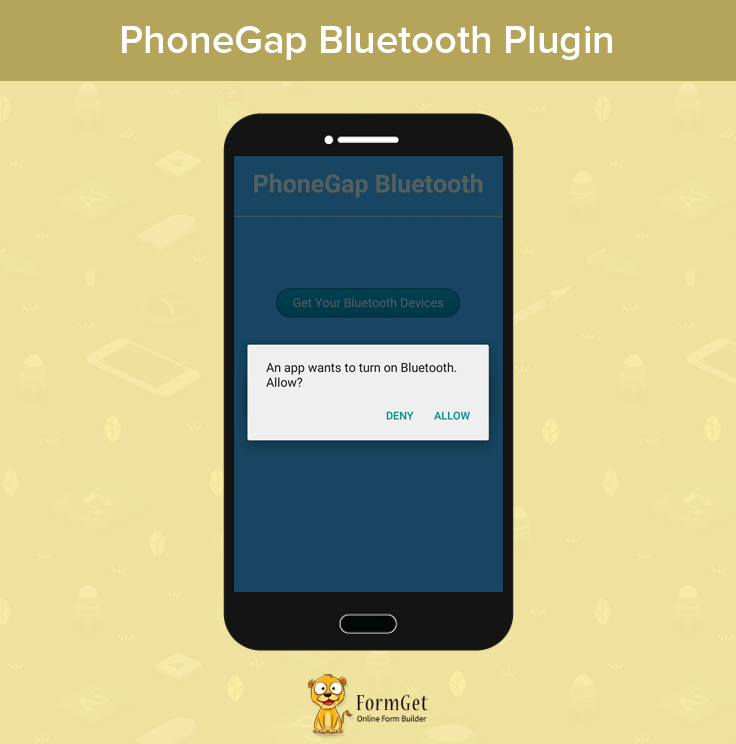
Start building your first PhoneGap Device Info application:
I am explaining this code project by keeping a focus on the android platform, but it will be a similar procedure to make it run across all platforms.
To develop a mobile application, you need to make some setup which is listed below:
- Install Node.js.
- Install Android Studio
- Install Apache ANT
- Install GIT Command Line
Note:- We are using Android Studio for launching the emulator and see the result of our application code. we are not doing any programming in android studio except the configuration like installation of all possible supporting features.
You have to choose only your android version which support your device and you will get all the required features to be downloaded with the automatic path set too.
Install PhoneGap/Cordova:
You can install it two ways either PhoneGap CLI(Command Line Interface) mode or PhoneGap desktop(GUI) mode.
I am using a desktop PhoneGap installation here but if you want to try it with PhoneGap CLI then follow command listed below.
C:\>npm install -g CordovaC:\>npm install -g PhoneGapCreate New PhoneGap Project & Add required Platforms such as android:
$ Cordova create PhoneGapBluetoothAdd Platforms:
$ Cordova platform add androidAdd Device Plugin:
$ cordova plugin add cordova-plugin-bluetooth-status$ cordova plugin add cordova-plugin-bluetooth-serialRun Project:
$ cordova build phonegapbluetooth$ cordova emulate phonegapbluetoothNote: If you are facing any problem regarding PhoneGap Installation or Plugin Installation then you can go through following blog post:
Learn how to install PhoneGap?
Learn how to create, run, build PhoneGap build?
Learn how to use PhoneGap Plugin API?
Complete Code:
You can try by just copy & paste the below code files.
index.html:
<!DOCTYPE html>
<html>
<head>
<meta charset="utf-8" />
<meta name="format-detection" content="telephone=no" />
<meta name="viewport" content="user-scalable=no, initial-scale=1, maximum-scale=1, minimum-scale=1, target-densitydpi=device-dpi" />
<link rel="stylesheet" type="text/css" href="css/index.css" />
<link href='https://fonts.googleapis.com/css?family=Fjalla+One' rel='stylesheet' type='text/css'>
<title>PhoneGap Bluetooth</title>
</head>
<body>
<div class="app">
<h1>PhoneGap Bluetooth</h1>
<div id="mainPage">
<ul id="deviceList">
</ul>
<button id="refreshButton" class ="styled-button-9">Get Your Bluetooth Devices</button>
</div>
<div id="detailPage">
<div id="resultDiv"></div>
</div>
<div id="statusDiv"></div>
</div>
<script type="text/javascript" src="cordova.js"></script>
<script type="text/javascript" src="js/index.js"></script>
<script type="text/javascript">
app.initialize();
</script>
</body>
</html>
index.css:
body {
font-family: 'Fjalla One', sans-serif;
font-weight: bold;
color: #2a2a2a;
background-color: #3eb0f7;
-webkit-appearance: none;
-webkit-touch-callout: none;
-webkit-tap-highlight-color: rgba(0,0,0,0);
-webkit-touch-callout: none; -webkit-user-select: none;
}

h1 {
text-align: center;
font-family: 'Fjalla One', sans-serif;
color:white;
}

#mainPage {
text-align:center;
}

#detailPage {
text-align:center;
font-size: 2em;
}

#detailPage div {
margin: 20px;
}

#detailPage button {
margin-top: 40px;
font-size: 0.6em; /* undo 2em from parent */
}

ul {
list-style: none;
border-bottom: 1px solid #d3d3d3;
text-align: center;
font-family: 'Fjalla One', sans-serif;
color:white;
}

li {
margin-left: -40px;
padding: 5px;
padding-top: 10px;
min-height: 50px;
border-top: 1px solid #d3d3d3;
font-size: 16px;
}

#resultDiv {
font: 16px "Source Sans", helvetica, arial, sans-serif;
font-weight: 200;
display: block;
-webkit-border-radius: 6px;
width: 100%;
height: 140px;
text-align: left;
overflow: auto;
}

#statusDiv {
text-align: center;
margin-top: 9px;
color:white;
}

.fadein {
opacity: 1;
-webkit-transition: opacity 1s ease-in;
}

.fadeout {
opacity: 0;
-webkit-transition: opacity 1s ease-out;
}
@media screen and (device-aspect-ratio: 40/71) {
h1 {
font-size: 1.6em;
padding-top: 15px;
}

input[type=text] {
font-size: 0.5em;
}
}
.styled-button-9 {
background: #00A0D1;
background: -moz-linear-gradient(top,#00A0D1 0%,#008DB8 100%);
background: -webkit-gradient(linear,left top,left bottom,color-stop(0%,#00A0D1),color-stop(100%,#008DB8));
background: -webkit-linear-gradient(top,#00A0D1 0%,#008DB8 100%);
background: -o-linear-gradient(top,#00A0D1 0%,#008DB8 100%);
background: -ms-linear-gradient(top,#00A0D1 0%,#008DB8 100%);
background: linear-gradient(top,#00A0D1 0%,#008DB8 100%);
filter: progid:DXImageTransform.Microsoft.gradient( startColorstr='#00A0D1',endColorstr='#008DB8',GradientType=0);
padding:8px 20px;
color:#cfebf3;
font-family: 'Fjalla One', sans-serif;
font-size:16px;
margin-top:22%;
border-radius:40px;
-moz-border-radius:40px;
-webkit-border-radius:40px;
border:1px solid #095B7E

}
index.js:
var app = {
initialize: function() {
this.bindEvents();
this.showMainPage();
},
bindEvents: function() {
var TOUCH_START = 'touchstart';
if (window.navigator.msPointerEnabled) { // windows phone
TOUCH_START = 'MSPointerDown';
}
document.addEventListener('deviceready', this.onDeviceReady, false);
refreshButton.addEventListener(TOUCH_START, this.refreshDeviceList, false);
sendButton.addEventListener(TOUCH_START, this.sendData, false);
disconnectButton.addEventListener(TOUCH_START, this.disconnect, false);
deviceList.addEventListener(TOUCH_START, this.connect, false);
},
onDeviceReady: function() {
//This function will be used for switching on the device bluetooth
cordova.plugins.BluetoothStatus.promptForBT();
window.bluetooth = cordova.require("cordova/plugin/bluetooth");
function yourCallbackFunction(){
window.bluetooth = cordova.require("cordova/plugin/bluetooth");
}
bluetoothSerial.isEnabled(success, failure);
alert('device is ready');
app.refreshDeviceList();
},
refreshDeviceList: function() {
alert('Get the Device List');
bluetoothSerial.list(app.onDeviceList, app.onError);
},
onDeviceList: function(devices) {
var option;
// remove existing devices
deviceList.innerHTML = "";
app.setStatus("");
devices.forEach(function(device) {
var listItem = document.createElement('li'),
html = '<b>' + device.name + '</b><br/>' + device.id;
listItem.innerHTML = html;
if (cordova.platformId === 'windowsphone') {
// This is a temporary hack until I get the list tap working
var button = document.createElement('button');
button.innerHTML = "Connect";
button.addEventListener('click', app.connect, false);
button.dataset = {};
button.dataset.deviceId = device.id;
listItem.appendChild(button);
} else {
listItem.dataset.deviceId = device.id;
}
deviceList.appendChild(listItem);
});
if (devices.length === 0) {
option = document.createElement('option');
option.innerHTML = "No Bluetooth Devices";
deviceList.appendChild(option);
if (cordova.platformId === "ios") { // BLE
app.setStatus("No Bluetooth Peripherals Discovered.");
} else { // Android or Windows Phone
app.setStatus("Please Pair a Bluetooth Device.");
cordova.plugins.BluetoothStatus.promptForBT();
}
} else {
app.setStatus("Found " + devices.length + " device" + (devices.length === 1 ? "." : "s."));
}
},
showMainPage: function() {
mainPage.style.display = "";
detailPage.style.display = "none";
},
showDetailPage: function() {
mainPage.style.display = "none";
detailPage.style.display = "";
},
setStatus: function(message) {
console.log(message);
window.clearTimeout(app.statusTimeout);
statusDiv.innerHTML = message;
statusDiv.className = 'fadein';
// automatically clear the status with a timer
app.statusTimeout = setTimeout(function () {
statusDiv.className = 'fadeout';
}, 5000);
},
onError: function(reason) {
alert("ERROR: " + reason); // real apps should use notification.alert
}
};
Conclusion:
Now, after reading this post you are able to turn on the device bluetooth using PhoneGap API. You can also get a device list which are ready to connect and pair with your bluetooth device. We will keep you updating on the same, so keep reading our blog post.
You may also have a look on some informative blogs below –
Angular Link Function

In the last two tutorial blogs, AngularJS Custom Directive and AngulaJS Isolate Scope, we have learnt about creating our own custom directives and isolate their scopes from their parent scopes.
In this tutorial, we are going to dive deep into the custom directive and will learn some of the important concepts and tricks of the AngularJS custom directive.
link function
link function is basically used to manipulate the DOM( Document Object Model ) element using custom directive. link option in custom directive registers DOM listener and also update the DOM.
Watch the live demo or download code from the link given below.
link function is used as an option in the custom directive as given below.
angular.module("myApp", [])
 // Registering custom directive
.directive('myProduct', function(){
return{
...
...

link: function(scope, element, attrs, controller, transcludeFn){
// Write your code here...
}

...
...

};
});
link function accepts some arguments. Let’s have a look at each of them.
- scope: – It is an Angular scope object.
- element: – It is the jqLite-wrapped element that is matched by this custom directive.
- attrs: – It is a hash object having key-value pairs of normalized attribute names with their corresponding attribute values.
- controller: – This is the directive’s required controller instance(s). If the directive has its own controller, then the controller’s name can be used as an argument.
- transcludeFn: – It is a transclude linking function pre-bound to the correct transclusion scope.
Note:- You can change the name of each argument according to you like, change scope to s or element to elem. But, the order of each argrument should be same as mentioned in the code.
Let’s understand the use of link function through an example.
Note: – In this example, we are going to use and modify the same code of custom directive that we create in the last blog of custom directive, i.e AngularJS Isolate Scope.
To read and download the earlier code, click here…
Hope you have downloaded the code from the above-mentioned link. So, let’s move ahead and modify the products by adding some behaviour to each product.
In this example, we are going to add a behaviour that when the user will put the mouse cursor over any of the product, the size of product will get zoom.
myController.js
// Application Module
angular.module("myApp", [])
// Single controller for all product
.controller("productController", ['$scope', function($scope) {
$scope.prod_alert = false;
// Adding inkthemes as a property to scope
$scope.products = [{
"product_name": 'InkThemes',
"product_img_link": 'inkthemes',
"product_link": 'https://www.inkthemes.com/market/'
}, {
"product_name": 'Aorank',
"product_img_link": 'aorank',
"product_link": 'https://www.formget.com/product/seo-php-script/'
}, {
"product_name": 'MailGet',
"product_img_link": 'mailget',
"product_link": 'https://www.formget.com/mailget/'
}, {
"product_name": 'Formget',
"product_img_link": 'formget',
"product_link": 'https://www.formget.com/'
}];
}])
// Registering custom directive
.directive('myProduct', function() {
return {
templateUrl: 'templates/product_page.html',
// Isolated scope for this directive
scope: {
productInfo: "=showProduct"
},
// Using link function add behaviour to each products
link: function(scope, element, attrs){
// Adding zooming property to each product on mouseenter
element.on('mouseenter', function(event){
angular.element(element[0].children[0]).css({'background':'#DEDDDD', "transform" : 'scale(1.2)',"margin-bottom" : "50px","margin-top" : "50px"});
});
// Resizing the product to its original size on mouseleave
element.on('mouseleave', function(event){
angular.element(element[0].children[0]).css({'background':'#F1F1F1', "transform" : 'scale(1)', "margin-bottom" : "0","margin-top" : "30px"});
});
}
};
});
Have a look at the link function code, i.e
// Using link function add behaviour to each products
link: function(scope, element, attrs){
// Adding zooming property to each product on mouseenter
element.on('mouseenter', function(event){
angular.element(element[0].children[0]).css({'background':'#DEDDDD', "transform" : 'scale(1.2)',"margin-bottom" : "50px","margin-top" : "50px"});
});
// Resizing the product to its original size on mouseleave
element.on('mouseleave', function(event){
angular.element(element[0].children[0]).css({'background':'#F1F1F1', "transform" : 'scale(1)', "margin-bottom" : "0","margin-top" : "30px"});
});
}
In this function, we are triggering an event when the user will enter the mouse over the product. It will applying some CSS to the outer div of the product, i.e element[0].children[0]. to zoom its size.
Similarly, when the use will remove the mouse cursor from the product, another event will trigger and it will resize the product to its original size.
Tips:- To inspect or find the position of any element, such as div, p, id or class, use console.log(element) inside link function and see the output in your browser’s console.
Similar things you can do for scope and attrs argument to see what object or data it actully contain.
index.html
It is the main view file of the application and display all the products.
<html ng-app="myApp">
<head>
<title>Angular Link Function</title>
<!-- Latest Bootstrap compiled and minified CSS -->
<link rel="stylesheet" href="https://maxcdn.bootstrapcdn.com/bootstrap/3.3.6/css/bootstrap.min.css" integrity="sha384-1q8mTJOASx8j1Au+a5WDVnPi2lkFfwwEAa8hDDdjZlpLegxhjVME1fgjWPGmkzs7" crossorigin="anonymous">
<!-- Include Application's CSS file -->
<link rel="stylesheet" href="css/style.css">
<!-- Include AngularJS library -->
<script src="https://ajax.googleapis.com/ajax/libs/angularjs/1.5.0-rc.0/angular.min.js"></script>
<!-- Include Application's JS file -->
<script src="js/myController.js"></script>
</head>
<body>
<div class="container main" ng-controller="productController">
<div class="row">
<h1 class="text-center">Angular Link Function Demo</h1>
<div class="col-xs-8 col-xs-offset-2 col-md-3 col-md-offset-0" ng-repeat="p in products">
<!-- Used custom directive as an element to show products -->
<my-product show-product="p"></my-product>
</div>
</div>
</div>
</body>
</html>
product_page.html
This template is used by the custom directive to show different products in the application’s view.
<!-- Template containing layout of each product -->
<div class='product-wrapper'>
<h3 class='text-center'><a href='{{productInfo.product_link}}'>{{productInfo.product_name}}</a></h3>
<div class='product'>
<img ng-src='img/{{productInfo.product_img_link}}.png' alt='{{productInfo.product_name}}'/>
<div class='clearfix'></div>
<div class='button text-center'>
<a href='{{productInfo.product_link}}' class='btn btn-danger'>Visit Site</a>
</div>
</div>
</div>
style.css
It contains all the CSS code used in the application.
@import url(http://fonts.googleapis.com/css?family=Raleway);
body{
min-height: 960px;
}
.main{
margin-top: 15px;
}
h1{
font-family:raleway;
margin-bottom: 20px;
}
h3 a{
color:#545151;
font-family:raleway;
}
.product-wrapper{
border:2px solid #E2E2E2;
padding: 0 10px 10px 10px;
background: #F1F1F1;
margin-top: 30px;
border-radius: 5px;
min-width: 200px;
font-family:raleway;
}
.product-wrapper img{
width: 98%;
border:1px solid #DEDEDE;
margin-bottom: 10px;
}
Conclusion:
Hope you got the concept of link function in AgularJS Custom Directive. Use it in your application and provide us your feedback from the commenting space given below. Keep in touch with us for more intersting code and tricks 🙂
PhoneGap Inappbrowser

PhoneGap InAppBrowser plugin works according to its name. It opens a new browser window within the application,i.e., no external browser needed to open links in the application.
Benefits:
- It gives you the ability to access web content within the application itself.
- You don’t need to open the documents, pdf’s or web pages in any external browser.
- Very easy to use and works exactly like any other browser.
You just need to call cordova.InAppBrowser.open() with the URL to open and “_blank” if you want the URL to open in the new window.
Idea Of The App:
Features
- It simply opens the link within the app’s browser rather than the system’s browser installed in the device.
Technologies Used
jQuery Mobile : For Interface / UI Designing
- We’re going to use jQuery Mobile for designing interface.
Let’s Take a look at the PhoneGap’s In-app browser.
PhoneGap’s Inappbrowser
Methods
- addEventListener : Adds a listener.
ref.addEventListener(eventname, callback); - removeEventListener : Removes a listener.
ref.removeEventListener(eventname, callback); - close : It closes the inappbrowser window.
ref.close(); - show : This is used to display the inappbrowser manually.
ref.show(); - executeScript : It is used to inject JS code into the inappbrowser window.
ref.executeScript(details, callback); - insertCSS : It is used to inject CSS code into the inappbrowser window.
ref.insertCSS(details, callback);
Object
- InAppBrowser
Properties
- type: It is used to specify the type of event -> loadstart, loadstop, loaderror, or exit.
- url: URL which is loaded.
- code: Error code (only for loaderror).
- message: Error message (only for loaderror).
We’re going to use only ‘cordova.InAppBrowser.open’ in our application.
cordova.InAppBrowser.open
var ref = cordova.InAppBrowser.open(url, target, options);- ref: It is the reference to the in-app browser window.
- url: It is the URL which user wants to load.
- target: It specifies that whether url is going to open in the same window, i.e, Cordova’s Web view.
- _self: url is going to get open in the same window.
- _blank: url is going to get open in the new window.
- _system: url is going to get open in the system’s browser.
- options: Inappbrowser’s options.
- location: It is used to turn on and off the in-app browser’s location bar.
Note: There’re several other options available for respective platforms (Android, IOS and Windows).
Files :
HTML File : Index.html
<!DOCTYPE html>
<html>
<head>
<title>InAppBrowser.addEventListener Example</title>

<!--Stylesheet Files : jQuery Mobile CSS File, Customized CSS File and Font Awesome for icons -->
<link rel="stylesheet" href="css/jquery.mobile-1.4.5.css">
<link rel="stylesheet" href="css/my.css">
<link rel="stylesheet" href="font-awesome/css/font-awesome.min.css">

<!--jQuery File : Library, Mobile Library, Cordova JS and Customized JS File -->
<script type="text/javascript" charset="utf-8" src="js/jquery-1.11.3.min.js"></script>
<script type="text/javascript" charset="utf-8" src="js/jquery.mobile-1.4.5.js"></script>
<script type="text/javascript" charset="utf-8" src="cordova.js"></script>
<script type="text/javascript" charset="utf-8" src="js/my.js"></script>
</head>

<!--Beginning of the Body-->
<body>
<div data-role="page">

<!--Header Bar-->
<div data-role="header" data-position="fixed" class="ui-header ui-bar-a ui-header-fixed slidedown" role="banner">
<center><h1>Open Me</h1></center>
</div>
<div data-role="main" class="ui-content" id="main">
<center><p id="heading">PhoneGap InappBrowser Plugin</p></center>

<!--Text box and go button div-->
<center><label for="text-basic">Enter Any Website without http://www:</label></center>
<input type="text" name="text-basic" id="text-basic" value="">
<button id="go" class="ui-btn">Go</button>
<!--End of the text box div-->

</div>
</div>
</body>
<!--End of the Body-->
</html>
JavaScript File : my.js
<!--Event listener to call device ready function-->
document.addEventListener("deviceready", onDeviceReady, false);

<!--Definition of device ready function-->
function onDeviceReady() {

<!--Onclick function on Go button-->
$(document).on('click', '#go', function(){

<!--Grabbing the website-->
var website = $("#text-basic").val();

<!--Opens the link in the in-app browser-->
window.open = cordova.InAppBrowser.open;
var ref = window.open("http://www."+website, '_blank', 'location=yes');
ref.addEventListener('loadstart', function(event) { alert('start: ' + event.url); });
ref.addEventListener('loadstop', function(event) { alert('stop: ' + event.url); });
ref.addEventListener('loaderror', function(event) { alert('error: ' + event.message); });
ref.addEventListener('exit', function(event) { alert(event.type); });
});
}
CSS File : My.css
.ui-bar-a, .ui-page-theme-a .ui-bar-inherit, html .ui-bar-a .ui-bar-inherit, html .ui-body-a .ui-bar-inherit, html body .ui-group-theme-a .ui-bar-inherit {
border: 1px solid #005994 !important;
background: #0093EA !important;
color: #fff !important;
font-weight: bold !important;
text-shadow: 0 0 #eee !important;
background-image: -webkit-gradient(linear, left top, left bottom, from( #0093EA), to( #007dcd ));
background-image: -webkit-linear-gradient( #0093EA , #007dcd );
background-image: -moz-linear-gradient( #0093EA, #007dcd );
background-image: -ms-linear-gradient( #0093EA , #007dcd );
background-image: -o-linear-gradient( #0093EA , #007dcd );
background-image: linear-gradient( #0093EA , #007dcd );
}
.ui-page-theme-a .ui-btn:hover, html .ui-bar-a .ui-btn:hover, html .ui-body-a .ui-btn:hover, html body .ui-group-theme-a .ui-btn:hover, html head + body .ui-btn.ui-btn-a:hover{
border: 1px solid #007dcd;
background: #333 ;
font-weight: bold;
text-shadow: 0 0 #eee !important;
color: #fff !important;
background-image: -webkit-gradient(linear, left top, left bottom, from( #0093EA ), to( #0093EA ));
background-image: -webkit-linear-gradient( #0093EA , #0093EA );
background-image: -moz-linear-gradient( #0093EA , #0093EA );
background-image: -ms-linear-gradient( #0093EA , #0093EA );
background-image: -o-linear-gradient( #0093EA , #0093EA );
background-image: linear-gradient( #0093EA , #0093EA );
}
.ui-page-theme-a .ui-btn.ui-btn-active, html .ui-bar-a .ui-btn.ui-btn-active, html .ui-body-a .ui-btn.ui-btn-active, html body .ui-group-theme-a .ui-btn.ui-btn-active, html head + body .ui-btn.ui-btn-a.ui-btn-active, .ui-page-theme-a .ui-checkbox-on:after, html .ui-bar-a .ui-checkbox-on:after, html .ui-body-a .ui-checkbox-on:after, html body .ui-group-theme-a .ui-checkbox-on:after, .ui-btn.ui-checkbox-on.ui-btn-a:after, .ui-page-theme-a .ui-flipswitch-active, html .ui-bar-a .ui-flipswitch-active, html .ui-body-a .ui-flipswitch-active, html body .ui-group-theme-a .ui-flipswitch-active, html body .ui-flipswitch.ui-bar-a.ui-flipswitch-active, .ui-page-theme-a .ui-slider-track .ui-btn-active, html .ui-bar-a .ui-slider-track .ui-btn-active, html .ui-body-a .ui-slider-track .ui-btn-active, html body .ui-group-theme-a .ui-slider-track .ui-btn-active, html body div.ui-slider-track.ui-body-a .ui-btn-active {
background-color: #0093EA !important ;
border-color:#0093EA !important;
color: #fff ;
text-shadow: 0 1px 0 #005599 ;
}
img{
padding-bottom: 25px;
}
button.ui-btn, .ui-controlgroup-controls button.ui-btn-icon-notext {
border-radius: 5px !important;
}
#searchbutton{
margin-bottom: 25px;
}
#main{
margin-top: -1% !important ;
}
.ui-collapsible-inset.ui-collapsible-themed-content .ui-collapsible-content
{
background-color: #ddd;
color: #111;
}
.ui-collapsible-content {
-webkit-transition: all 0.5s;
-moz-transition: all 0.5s;
-ms-transition: all 0.5s;
-o-transition: all 0.5s;
transition: all 0.5s;
overflow: hidden;
}
.ui-collapsible-content-collapsed {
display: block;
height: 0;
padding: 0 16px;
}
#bt i{
font-weight: bold;
}
th {
border-bottom: 1px solid #d6d6d6 !important;
}
tr:nth-child(even) {
background: #e9e9e9 !important;
}
.ui-table {
margin-top: 3% !important;
border: 1px solid grey !important;
border-radius: 5px !important;
border-collapse: initial !important;
}
label{
font-weight: bold !important;
}
#label{
border: 1px solid #0093EA !important;
background: #fff !important;
color: #005994 !important;
font-weight: bold !important;
text-shadow: 0 0 #eee !important;
background-image: -webkit-gradient(linear, left top, left bottom, from( #0093EA), to( #007dcd ));
background-image: -webkit-linear-gradient( #0093EA , #007dcd );
background-image: -moz-linear-gradient( #0093EA, #007dcd );
background-image: -ms-linear-gradient( #0093EA , #007dcd );
background-image: -o-linear-gradient( #0093EA , #007dcd );
background-image: linear-gradient( #0093EA , #007dcd );
}
#utable tr:nth-child(even){
background: inherit !important;
}
#heading{
font-weight: bold;
font-size: 30px;
}
#btndiv{
margin-top: 3%;
}
@media ( max-width: 35em ) {
.ui-table-reflow.ui-responsive td,
.ui-table-reflow.ui-responsive th {
width: auto;
float: none;
clear: none;
display: table-cell;
margin: 0;
padding:0;
}
}
#btndiv .ui-bar-a{
width: 50% !important;
margin: auto !important;
}
Conclusion:
Inappbrowser lets you avoid the pop ups popping up every time asking to choose one of the system browser in which one wants to open the link.
Instead it opens the link in the app’s browser. Isn’t that cool? Ofcourse it is. I hope it gave you a fine idea about inappbrowser. Keep reading our posts.
Get more related information here –
- PhoneGap RSS Reader : Send RSS News Feeds On Mobile
- PhoneGap Splash Screen
PhoneGap SQLite Plugin

What is SQLite?
SQLite is an embedded database software for local database / client-side storage.
Features
- Serverless: It doesn’t follow the client-server model.
- Zero-Configuration: No headache of configuration or administration because of residing on the client side.
- Transactional: It is transactional in nature.
- Self Contained: It is self-contained in nature, i.e, no external dependencies.
- Reads/Writes: Read/Write operation performed to an single disk file (ordinary file) as there is no server.
- Replacement for fopen() : It is no replacement for database like Oracle, but for fopen().
- High Performance: It has a high performance for low memory environments like embedded devices, PDA’s, Cell phones etc.
- Portable: Because of file format ‘db’, it is portable across cross platforms.
- Language Support : It supports multiple programming languages.
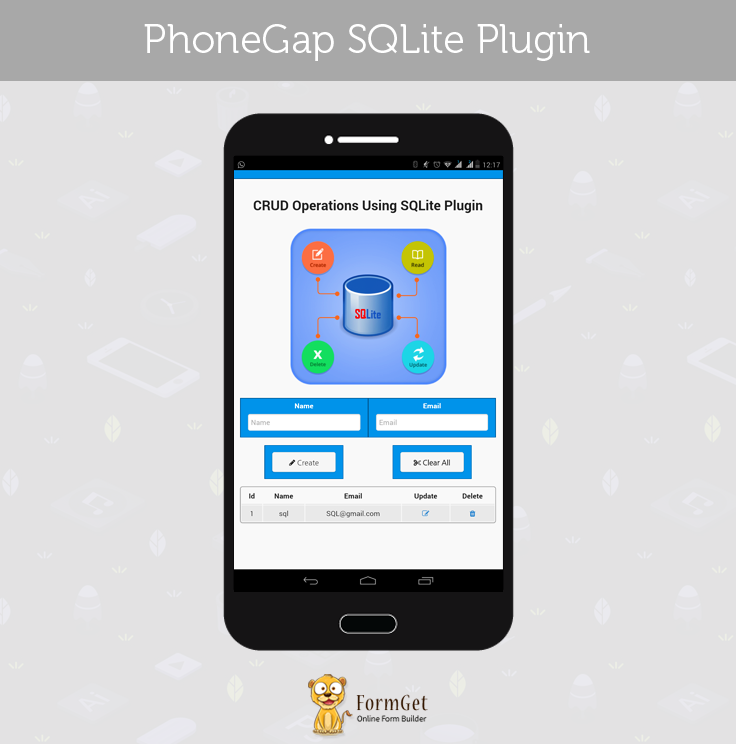
Idea Of The App:
Features
Performs CRUD Operations
- Create : Inserts a new row in the database.
- Read: View all data stored in the database and display it in the table.
- Update: Updates any value of any row stored in the database.
- Delete: Deletes a row from the database.
- Clear All: It empties all rows from the database.
Technologies Used
jQuery Mobile : For Interface / UI Designing
- We’re going to use jQuery Mobile for designing interface.
Database Details
-
- Database Name: my.db
- Table Name: mydata
- Table Columns / Fields
| Column : | Id | Name | |
|---|---|---|---|
| Type : | integer primary key | text | text |
Let’s Take a look at the SQLite Plugin.
SQLite Plugin
- SQLite Plugin provides the native interface to sqlite in a PhoneGap/Cordova plugin for all 3 platforms(Android, IOS and WP8).
- API’s are similar to that of HTML5’s Web SQL API.
Methods
- openDatabase() : It opens a database if already exists and creates a new database if don’t exists.
window.sqlitePlugin.openDatabase({name: "mydata.db"}); - transaction() : It runs a transaction.
db.transaction(function(transaction) {}); - executeSQL() : It executes a SQL statement.
transaction.executeSql('SELECT name,email FROM mydata where id=?', [id], function (tx, results) {});
Process To Follow While Adding SQLite Plugin(3rd Party Plugin):
You need to open your Node.js command prompt and do as mentioned below:
- Create a new phonegap project.
phonegap create SQLiteExample --id "org.sqliteexample.sample" --name "SQLiteExample" - Add the platform for which you want to create the application.
phonegap platform add android - Add the SQLite Plugin.
phonegap plugin add cordova-sqlite-storage - Now you need to add the following line in the config.xml file. There are three ways to define plugin
<gap:plugin name="SQLitePlugin" value="io.liteglue.SQLitePlugin"/> <gap:plugin name="SQLitePlugin" value="SQLitePlugin" /> <gap:plugin name="SQLitePlugin" value="org.sqliteexample.sample.sqlitePlugin.SQLitePlugin"/> - Open up your index.html file. Add cordova.js and SQLitePlugin.js to it.
<script type="text/javascript" src="js/cordova.js"></script> <script type="text/javascript" charset="utf-8" src="js/SQLitePlugin.js"></script> - Copy SQLitePlugin.js from
Project/plugins/cordova-sqlite-storage/wwwto
Project/www/js - Copy cordova.js from
Project/platforms/android/assets/wwwto
Project/www/js
Building Process:
Important Points Related To Compilation
- If you’re dealing with PhoneGap 3rd party plugins, I will strongly recommend you to install Android Studio.
- At least one virtual device must be present in the AVD (Android Virtual Devices). I will recommend you to have one with API Level 22 or below.
Open your Node.js command prompt and type following commands:
- Prepare your project
cordova prepare android - Compile your project
cordova compile androidIt will compile the project.
- Build your project
cordova build androidIt will generate APK in
Project/platforms/android/build/outputs/apk - Emulate your project
cordova emulate androidAs soon as the command runs, an android emulator will get opened, build the app, generate apk, install it in the emulator device and run it.
- Now you just need to emulate it every time, first 3 steps are just for the first time.
Files :
HTML File : Index.html
<!DOCTYPE html>
<html>
<head>

<!--Stylesheet Files : jQuery Mobile CSS File, Customized CSS File and Font Awesome for icons -->
<link rel="stylesheet" href="css/jquery.mobile-1.4.5.css">
<link rel="stylesheet" href="css/my.css">
<link rel="stylesheet" href="font-awesome/css/font-awesome.min.css">
</head>

<!--Beginning of the Body-->
<body>
<div data-role="page">

<!--Header Bar-->
<div data-role="header" data-position="fixed" class="ui-header ui-bar-a ui-header-fixed slidedown" role="banner">
<h1>Store Me</h1>
</div>

<!--Beginning of the Name and Email Field Div-->
<div data-role="main" class="ui-content" id="main">
<center><p id="heading">CRUD Operations Using SQLite Plugin</p></center>
<center><img src="img/phonegap-sqlite-plugin-img.png"/></center>
<div class="ui-grid-a">
<div class="ui-block-a"><div class="ui-bar ui-bar-a">
<center><label for="text-basic">Name</label></center>
<input type="text" name="text-basic" id="name" placeholder="Name">
</div></div>
<div class="ui-block-b"><div class="ui-bar ui-bar-a">
<center><label for="text-basic">Email</label></center>
<input type="text" name="text-basic" id="email" placeholder="Email">
</div></div>
</div>
<!--End of the Name and Email Field Div-->

<!--Beginning of the Create and Clear All Div-->
<fieldset class="ui-grid-a" id="btndiv">
<div class="ui-block-a"><div class="ui-bar ui-bar-a">
<a href="#" id ="creat" onclick="create()">
<center><i class="fa fa-pencil"> Create</i></center>
</a></div>
</div>
<!--End of the Create and Clear All Button Div-->

<!--Dialog Box when clicked on Clear All button-->
<div class="ui-block-b"><div class="ui-bar ui-bar-a">
<a id ="bt" href="#popupDialog" data-rel="popup" data-position-to="window" data-transition="pop" class="ui-btn ui-corner-all ui-shadow " >
<center><i class="fa fa-scissors"> Clear All</i></center>
</a></div>
</div>
</fieldset>
<div data-role="popup" id="popupDialog" data-dismissible="false" style="max-width:400px;">
<div data-role="header" data-theme="a">
<h1>Clear All?</h1>
</div>
<div role="main" class="ui-content">
<h3 class="ui-title">Are you sure you want to clear local storage?</h3>
<center><b><p>This action cannot be undone.</p></b></center>
<center> <a href="#" id ="clearall" class="ui-btn ui-corner-all ui-shadow ui-btn-inline ui-btn-b" data-rel="back" data-transition="flow">Yes! I'm Sure</a><a href="#" class="ui-btn ui-corner-all ui-shadow ui-btn-inline ui-btn-b" data-rel="back">Cancel</a></center>
</div>
</div>
<!-- End of the Clear All Dialog Box-->

<!--Table Displaying Database Rows-->
<table data-role="table" data-mode="reflow" class="ui-responsive ui-shadow" id="myTable">
</table>

<!--Dialog Box when clicked on update button-->
<div data-role="main" class="ui-content">
<div data-role="popup" id="myPopupDialog">
<div data-role="header">
<h1>Update</h1>
</div>
<div data-role="main" class="ui-content">
<form method="post">
<div class="ui-field-contain">
<table id="utable">
<tr>
<td><label for="id">Id:</label></td>
<td><input disabled="disabled" type="text" name="id" id="id" placeholder="Id" value=""></td>
</tr>
<tr>
<td><label for="name">Name:</label></td>
<td><input type="text" name="name" id="uname" placeholder="Name" value=""></td>
</tr>
<tr>
<td><label for="email">Email:</label></td>
<td><input type="email" name="email" id="uemail" placeholder="Enter Your New Email"></td>
</tr>
</table>
</div>
<center><a href="#" class="ui-btn ui-corner-all ui-shadow ui-btn-inline ui-btn-b" data-rel="back" id="upd" data-transition="flow">Update</a> <a href="#" class="ui-btn ui-corner-all ui-shadow ui-btn-inline ui-btn-b" data-rel="back">Cancel</a>
</center>
</form>
</div>
</div>
</div>
</div>
<!--End of the Update Dialog Box -->

<!--jQuery File : Library, Mobile Library, Cordova JS, SQLite Plugin JS and Customized JS File -->
<script type="text/javascript" charset="utf-8" src="js/jquery-1.11.3.min.js"></script>
<script type="text/javascript" charset="utf-8" src="js/jquery.mobile-1.4.5.js"></script>
<script type="text/javascript" src="cordova.js"></script>
<script type="text/javascript" charset="utf-8" src="SQLitePlugin.js"></script>
<script type="text/javascript" src="js/my.js"></script>

</body>
<!--End of the Body-->
</html>
JavaScript File : My.js
<!--Calling onDeviceReady method-->
document.addEventListener("deviceready", onDeviceReady, false);
function onDeviceReady() {

<!--window.sqlitePlugin.openDatabase creates/open a non existing/existing database-->
var db = window.sqlitePlugin.openDatabase({name: "my.db"});
show();
db.transaction(function(tx) {
tx.executeSql('CREATE TABLE IF NOT EXISTS mydata (id integer primary key, name text, email text)');
});

<!--Method to insert new row in the database-->
$(document).on('click', '#creat', function(){
var name = $("#name").val();
var email = $("#email").val();
db.transaction(function(transaction) {
var executeQuery = "INSERT INTO mydata (name, email) VALUES (?,?)";
transaction.executeSql(executeQuery, [name,email]
, function(tx, result) {
show();
},
function(error){
//filter(function(aSome) {alert('Error occurred');
});
});
});

<!--Display all rows stored in the database-->
function show(){
db.transaction(function(transaction) {
transaction.executeSql('SELECT * FROM mydata', [], function (tx, results) {
var key = "";

<!--Display the table head-->
var pair="<tr><th data-priority=\"1\"><center>Id</center></th><th data-priority=\"1\"><center>Name</center></th><th data-priority=\"2\"><center>Email</center></th><th><center>Update</center></th><th><center>Delete</center></th></tr>";
var i=0;

<!--results.rows.length to get the total number of rows stored in the database-->
var len = results.rows.length, i;
for (i=0; i<=len-1; i++) {

<!--Fetching the 'name' from the database-->
key = results.rows.item(i).name;

<!--Fetching the 'id' from the database-->
id = results.rows.item(i).id;

<!--Displaying all rows of the database in the table-->
pair += "<tr><td><center>"+id+"</center></td><td><center>"+key+"</center></td><td><center>"+results.rows.item(i).email+"</center></td><td><a class=\"update\" href=\"#myPopupDialog\" data-custom="+"'"+ id+ "'" +"data-rel=\"popup\" data-position-to=\"window\" data-transition=\"pop\"><center><i class='fa fa-pencil-square-o'></i></center></a></td><td><a id=\"delete\" data=\""+id+"\"><center><i class='fa fa-trash'></i></center></a></td></tr>";
}
if (pair == "<tr><th>Name</th><th>Email</th></tr>") {
pair += "<tr><td><i>empty</i></td><td><i>empty</i></td></tr>";
}
$("#myTable").html(pair);
}, null);
});
}

<!--Method to delete any row from the database-->
$(document).on('click', '#delete', function(){
var id = $(this).attr("data");
db.transaction(function(transaction) {
transaction.executeSql("DELETE FROM mydata where id=?", [id],
function(tx, result) {
show();
},
function(error){
// alert('Something went Wrong');
});
});
});

<!--Method to update the values of any row in the database-->
$(document).on('click', '#upd', function(){
var id = $("#id").val();
var name = $("#uname").val();
var email = $("#uemail").val();
db.transaction(function(transaction) {
var executeQuery = "";
transaction.executeSql("UPDATE mydata SET name=?, email=? WHERE id=?", [name,email,id],
function(tx, result) {alert('Updated successfully');
show();
},
function(error){alert('Something went Wrong');});
});
});
$(document).on('click', '.update', function(){
var id = $(this).attr('data-custom');
$("#id").val(id);
db.transaction(function(transaction) {
transaction.executeSql('SELECT name,email FROM mydata where id=?', [id], function (tx, results) {
var name = results.rows.item(0).name;
var email = results.rows.item(0).email;
$("#uname").val(name);
$("#uemail").val(email);
},
function(error){
alert('Something went Wrong');
});
});
});

<!--Method to clear all rows from the database-->
$(document).on('click', '#clearall', function(){
db.transaction(function(transaction) {
transaction.executeSql("DELETE FROM mydata", [],
function(tx, result) {alert('Delete successfully');
show();
},
function(error){alert('Something went Wrong');});
});
});
}
CSS File : My.css
.ui-bar-a, .ui-page-theme-a .ui-bar-inherit, html .ui-bar-a .ui-bar-inherit, html .ui-body-a .ui-bar-inherit, html body .ui-group-theme-a .ui-bar-inherit {
border: 1px solid #005994 !important;
background: #0093EA !important;
color: #fff !important;
font-weight: bold !important;
text-shadow: 0 0 #eee !important;
background-image: -webkit-gradient(linear, left top, left bottom, from( #0093EA), to( #007dcd ));
background-image: -webkit-linear-gradient( #0093EA , #007dcd );
background-image: -moz-linear-gradient( #0093EA, #007dcd );
background-image: -ms-linear-gradient( #0093EA , #007dcd );
background-image: -o-linear-gradient( #0093EA , #007dcd );
background-image: linear-gradient( #0093EA , #007dcd );
}
.ui-page-theme-a .ui-btn:hover, html .ui-bar-a .ui-btn:hover, html .ui-body-a .ui-btn:hover, html body .ui-group-theme-a .ui-btn:hover, html head + body .ui-btn.ui-btn-a:hover{
border: 1px solid #007dcd;
background: #333 ;
font-weight: bold;
text-shadow: 0 0 #eee !important;
color: #fff !important;
background-image: -webkit-gradient(linear, left top, left bottom, from( #0093EA ), to( #0093EA ));
background-image: -webkit-linear-gradient( #0093EA , #0093EA );
background-image: -moz-linear-gradient( #0093EA , #0093EA );
background-image: -ms-linear-gradient( #0093EA , #0093EA );
background-image: -o-linear-gradient( #0093EA , #0093EA );
background-image: linear-gradient( #0093EA , #0093EA );
}
.ui-page-theme-a .ui-btn.ui-btn-active, html .ui-bar-a .ui-btn.ui-btn-active, html .ui-body-a .ui-btn.ui-btn-active, html body .ui-group-theme-a .ui-btn.ui-btn-active, html head + body .ui-btn.ui-btn-a.ui-btn-active, .ui-page-theme-a .ui-checkbox-on:after, html .ui-bar-a .ui-checkbox-on:after, html .ui-body-a .ui-checkbox-on:after, html body .ui-group-theme-a .ui-checkbox-on:after, .ui-btn.ui-checkbox-on.ui-btn-a:after, .ui-page-theme-a .ui-flipswitch-active, html .ui-bar-a .ui-flipswitch-active, html .ui-body-a .ui-flipswitch-active, html body .ui-group-theme-a .ui-flipswitch-active, html body .ui-flipswitch.ui-bar-a.ui-flipswitch-active, .ui-page-theme-a .ui-slider-track .ui-btn-active, html .ui-bar-a .ui-slider-track .ui-btn-active, html .ui-body-a .ui-slider-track .ui-btn-active, html body .ui-group-theme-a .ui-slider-track .ui-btn-active, html body div.ui-slider-track.ui-body-a .ui-btn-active {
background-color: #0093EA !important ;
border-color:#0093EA !important;
color: #fff ;
text-shadow: 0 1px 0 #005599 ;
}
img{
padding: 25px;
}
button.ui-btn, .ui-controlgroup-controls button.ui-btn-icon-notext {
border-radius: 5px !important;
}
#searchbutton{
margin-bottom: 25px;
}
#main{
margin-top: 12% !important ;
}
.ui-collapsible-inset.ui-collapsible-themed-content .ui-collapsible-content
{
background-color: #ddd;
color: #111;
}
.ui-collapsible-content {
-webkit-transition: all 0.5s;
-moz-transition: all 0.5s;
-ms-transition: all 0.5s;
-o-transition: all 0.5s;
transition: all 0.5s;
//height: 2em;
overflow: hidden;
}
.ui-collapsible-content-collapsed {
display: block;
height: 0;
padding: 0 16px;
}
#bt i{
font-weight: bold;
}
th {
border-bottom: 1px solid #d6d6d6 !important;
}
tr:nth-child(even) {
background: #e9e9e9 !important;
}
.ui-table {
margin-top: 5% !important;
border: 1px solid grey !important;
border-radius: 5px !important;
border-collapse: initial !important;
}
label{
font-weight: bold !important;
}
#label{
border: 1px solid #0093EA !important;
background: #fff !important;
color: #005994 !important;
font-weight: bold !important;
text-shadow: 0 0 #eee !important;
background-image: -webkit-gradient(linear, left top, left bottom, from( #0093EA), to( #007dcd ));
background-image: -webkit-linear-gradient( #0093EA , #007dcd );
background-image: -moz-linear-gradient( #0093EA, #007dcd );
background-image: -ms-linear-gradient( #0093EA , #007dcd );
background-image: -o-linear-gradient( #0093EA , #007dcd );
background-image: linear-gradient( #0093EA , #007dcd );
}
#utable tr:nth-child(even){
background: inherit !important;
}
#heading{
font-weight: bold;
font-size: 40px;
}
#btndiv{
margin-top: 3%;
}
@media ( max-width: 35em ) {
.ui-table-reflow.ui-responsive td,
.ui-table-reflow.ui-responsive th {
width: auto;
float: none;
clear: none;
display: table-cell;
margin: 0;
padding:0;
}
}
#btndiv .ui-bar-a{
width: 50% !important;
margin: auto !important;
}
Conclusion:
With the help of SQLite plugin, you can enjoy the benefits of SQLite in mobile applications. As there is no server, accessing and writing the data is very fast which in result provides high performance. I hope this will help you.
Recommended blogs –
- PhoneGap Configuration File : Config.xml
- PhoneGap Camera Plugin