

Hello! This post is all about saving the google contacts in your google account, there is no library used in this script code. This script is totally based on curl function and also integrated with google application(Google OAuth). On running this script user will get a contact form asking for some field to be inserted, which are listed below: –
- Name
- Last Name
- Phone Number
After filling the form user will submit it and then user will be sent for google authentication. In google authentication user have to enter their Gmail ID and password, as soon as user complete this authentication user will be redirected to another page displaying message ‘contact added’. User’s are provided with two more option which is Logout and previous image sign. As per requirement, user can Logout or go to the previous page.
After completing all the procedure, user can check contacts details available in the account. The inserted contact details will get added in the account.
Watch the live demo or download code from the link given below
For Complete solution, you can take a look at our premium service MailGet – email service provider. It offers a well-managed email list and other advanced services to its users which helps them to manage their contact lists systematically.
Now come to the coding part, this script contains two Php file named ‘index.php‘ and ‘callback.php‘ along with separate images and CSS folder.
Index.php
This page will display a contact form. When a user will fill the contact form, all the values will be passed to callback.php page using GET method.
These passed value will be retrieve and stored in callback.php file.
<html>
<head>
<title>Insert Contacts in Google Using PHP</title>
<link href="bootstrap/css/bootstrap.css" rel="stylesheet" type="text/css"/>
<link href="css/style.css" rel="stylesheet" type="text/css"/>
<link href='http://fonts.googleapis.com/css?family=Source+Sans+Pro|Open+Sans+Condensed:300|Raleway' rel='stylesheet' type='text/css'>
</head>
<body>
<div class="container-fluid">
<h1>Insert Contacts in Google Using PHP</h1>
<div id="login">
<div id="h2" class="h2 row">
<div class="col-md-12"><h2><span>Insert Contacts in Google</span></h2></div>
</div>
<div class="row">
<div class="col-md-12">
<form action="http://formget.com/tutorial/Import-Google-Contacts-Using-PHP/callback.php?<?php echo http_build_query($data); ?>" method="get">
<input type="text" placeholder="First Name" name="name"/>
<input type="text" placeholder="Last Name" name="lname"/>
<input type="email" placeholder="Contact Email" name="email"/>
<input type="text" placeholder="Phone Number" name="phone"/>
<input type="submit" value="Add Contact" name="submit"/>
</form>
</div>
</div>
</div>
</div>
</body>
</html>
<?php
/**we are fetching the form data from browser using GET method**/
if (isset($_GET['submit'])) {
$data['name'] = $_GET['name'];
$data['lname'] = $_GET['lname'];
$data['email'] = $_GET['email'];
$data['email'] = $_GET['phone'];
}
?>
Callback.php
This page script has major functionality of code , this page is responsible for google authentication as well as adding the contacts of form visitor into the mail account of user.we are using curl function for doing all this there is no library at all.
<?php session_start(); ?>

<html>
<head><link href="css/style.css" rel="stylesheet" type="text/css"/>
<link href="bootstrap/css/bootstrap.css" rel="stylesheet" type="text/css"/>
<link href='http://fonts.googleapis.com/css?family=Source+Sans+Pro|Open+Sans+Condensed:300|Raleway' rel='stylesheet' type='text/css'>
<title>Import Google Contacts Using PHP</title>
</head>
<body>

<?php
/*****Form data is stored in session variabe because after google authentication the page will be redirected to this page and data will be persist******/
if (isset($_GET['name'])) {
$_SESSION['name'] = $_GET['name'];
$_SESSION['lname'] = $_GET['lname'];
$_SESSION['email'] = $_GET['email'];
$_SESSION['phone'] = $_GET['phone'];
/****this header part is responsible for google authentication ****/
/****After authentication we get authentication code in return****/
header('location:https://accounts.google.com/o/oauth2/auth?client_id=991481336354-m35dqmsq4ubc7gp8433dcb3ampip5tpi.apps.googleusercontent.com&redirect_uri=http://formget.com/tutorial/Import-Google-Contacts-Using-PHP/callback.php&scope=https://www.google.com/m8/feeds/&response_type=code');
}
/**session variable is stored in variable****/
$id1 = $_SESSION['name'];
$id2 = $_SESSION['email'];
$id3 = $_SESSION['lname'];
$id4 = $_SESSION['phone'];
?>
<div class="container-fluid">
<h1>Insert Contacts in Google Using PHP</h1>
<div id="login">
<div id="h2" class="h2 row">
<div class="col-md-12"><a href='http://formget.com/tutorial/Import-Google-Contacts-Using-PHP/index.php'> <img src="images/preimg1.jpg" alt="previous" id ="preimg"/></a><h2><span>Insert Contacts in Google</span></h2><a href='https://www.google.com/accounts/Logout?continue=https://appengine.google.com/_ah/logout?continue=http://formget.com/tutorial/Import-Google-Contacts-Using-PHP/index.php' ><img src='images/logoutimg1.png' alt='logout'id ='logoutimg'/></a></div>
</div>
<div class="row">
<div class="col-md-12">
<div class="row">
<div class="col-md-12">
<p>Contact Added</p>
</div>
</div>
</div>
</div>
</div>
</div>
</body>
</html>
<?php
$client_id = '<Enter your client id here>';
$client_secret = '<Enter your client secret here>';
$redirect_uri = 'http://formget.com/tutorial/Import-Google-Contacts-Using-PHP/callback.php' ;
$auth_code = $_GET['code'];
function curl_file_get_contents($url) {
$curl = curl_init();
$userAgent = 'Mozilla/4.0 (compatible; MSIE 6.0; Windows NT 5.1; .NET CLR 1.1.4322)';

curl_setopt($curl, CURLOPT_URL, $url); //The URL to fetch. This can also be set when initializing a session with curl_init().
curl_setopt($curl, CURLOPT_RETURNTRANSFER, TRUE); //TRUE to return the transfer as a string of the return value of curl_exec() instead of outputting it out directly.
curl_setopt($curl, CURLOPT_CONNECTTIMEOUT, 5); //The number of seconds to wait while trying to connect.
curl_setopt($curl, CURLOPT_USERAGENT, $userAgent); //The contents of the "User-Agent: " header to be used in a HTTP request.
curl_setopt($curl, CURLOPT_FOLLOWLOCATION, TRUE); //To follow any "Location: " header that the server sends as part of the HTTP header.
curl_setopt($curl, CURLOPT_AUTOREFERER, TRUE); //To automatically set the Referer: field in requests where it follows a Location: redirect.
curl_setopt($curl, CURLOPT_TIMEOUT, 10); //The maximum number of seconds to allow cURL functions to execute.
curl_setopt($curl, CURLOPT_SSL_VERIFYPEER, FALSE); //To stop cURL from verifying the peer's certificate.

$contents = curl_exec($curl);
curl_close($curl);
return $contents;
}

$fields = array(
'code' => urlencode($auth_code),
'client_id' => urlencode($client_id),
'client_secret' => urlencode($client_secret),
'redirect_uri' => urlencode($redirect_uri),
'grant_type' => urlencode('authorization_code')
);
$post = '';
foreach ($fields as $key => $value) {
$post .= $key . '=' . $value . '&';
}
$post = rtrim($post, '&');

$curl = curl_init();
curl_setopt($curl, CURLOPT_URL, 'https://accounts.google.com/o/oauth2/token');
curl_setopt($curl, CURLOPT_POST, 5);
curl_setopt($curl, CURLOPT_POSTFIELDS, $post);
curl_setopt($curl, CURLOPT_RETURNTRANSFER, TRUE);
curl_setopt($curl, CURLOPT_SSL_VERIFYPEER, FALSE);
$result = curl_exec($curl);
curl_close($curl);

$response = json_decode($result);
/***Accessing Access_Token and setting the session for access token so that after refreshing the page it will still persist in page***/

if (isset($response->access_token)) {
$accesstoken = $response->access_token;
$_SESSION['access_token'] = $response->access_token;
}

if (isset($_GET['code'])) {
/**access_token session is passed here for data persist after refreshing the page***/
$accesstoken = $_SESSION['access_token'];
}
if (isset($_REQUEST['logout'])) {
unset($_SESSION['access_token']);
}
$url = 'https://www.google.com/m8/feeds/contacts/default/full?max-results=' . $max_results . '&oauth_token=' . $accesstoken;
$xmlresponse = curl_file_get_contents($url);
if ((strlen(stristr($xmlresponse, 'Authorization required')) > 0) && (strlen(stristr($xmlresponse, 'Error ')) > 0)) { //At times you get Authorization error from Google.
echo "<h2>OOPS !! Something went wrong. Please try reloading the page.</h2>";
exit();
}
/**This is main script which is used for contact saving in account,variable declare before is passed here.***/
$access_token = $_SESSION['access_token'];
$contactXML = '<?xml version="1.0" encoding="utf-8"?> '
. '<atom:entry xmlns:atom="http://www.w3.org/2005/Atom" xmlns:gd="http://schemas.google.com/g/2005">'
. ' <atom:category scheme="http://schemas.google.com/g/2005#kind" term="http://schemas.google.com/contact/2008#contact"/> '
. '<gd:name> <gd:givenName>' . $id1 . '</gd:givenName> <gd:fullName></gd:fullName> <gd:familyName>' . $id3 . '</gd:familyName>'
. ' </gd:name> <gd:email rel="http://schemas.google.com/g/2005#home" address="' . $id2 . '"/> '
. '<gd:im address="[email protected]" protocol="http://schemas.google.com/g/2005#GOOGLE_TALK" primary="true" rel="http://schemas.google.com/g/2005#home"/>'
. ' <gd:phoneNumber rel="http://schemas.google.com/g/2005#home" primary="true">' . $id4 . '</gd:phoneNumber> </atom:entry>';
$headers = array('Host: www.google.com',
'Gdata-version: 3.0',
'Content-length: ' . strlen($contactXML),
'Content-type: application/atom+xml',
'Authorization: OAuth ' . $access_token);
$contactQuery = 'https://www.google.com/m8/feeds/contacts/default/full/';
$ch = curl_init();
curl_setopt($ch, CURLOPT_URL, $contactQuery);
curl_setopt($ch, CURLOPT_CUSTOMREQUEST, "POST");
curl_setopt($ch, CURLOPT_HTTPHEADER, $headers);
curl_setopt($ch, CURLOPT_RETURNTRANSFER, true);
curl_setopt($ch, CURLOPT_POSTFIELDS, $contactXML);
curl_setopt($ch, CURLOPT_SSL_VERIFYPEER, false);
curl_setopt($ch, CURLOPT_SSL_VERIFYHOST, false);
curl_setopt($ch, CURLOPT_CONNECTTIMEOUT, 10);
curl_setopt($ch, CURLOPT_TIMEOUT, 400);
curl_setopt($ch, CURLOPT_FAILONERROR, true);
$result = curl_exec($ch);
?>
Style.css
This style script is totally used for designing part of forms and pages and it has no concern with main functionality. You can make the form or design of your choice by editing this css file as per your requirements.
@import url(http://fonts.googleapis.com/css?family=Raleway);
body{
font-family:raleway !important;
}
#h2{
background-color: #FEFFED;
text-align:center;
border-radius: 10px 10px 0 0;
border-bottom: 1px solid #ccc;
color: black;
font-weight: bolder;
font-size: 2em;
margin: 0px -15px;
padding: 8% 0;
font-family:raleway !important;
position: relative;
}
.wrap{
width: 33%;
margin: 5% auto;
}
.container-fluid{
width: 45%;
margin: auto auto;
}
#login{
border: 2px solid #ccc;
border-radius: 10px;
font-family:raleway!important;
}
h1{
padding: 6% 0;
font-family:raleway!important;
text-align: center;
}
.h2{
margin: 0 !important;
padding: 2% 0 !important;
}
img{
padding: 0% 0%;
width: 110px;
margin-bottom: -5%;
}
input[type=text],input[type=email]{
width:99.5%;
padding: 10px;
margin-top: 14px;
border: 1px solid #ccc;
padding-left: 5px;
font-size: 16px;
font-family:raleway !important;
}
input[type=submit]{
width: 100%;
background-color:#FFBC00;
color: white;
border: 2px solid #FFCB00;
padding: 10px;
font-size:20px;
cursor:pointer;
border-radius: 5px;
margin-top: 14px;
}
p{
text-align: center;
font-family:raleway !important;
font-size:25px;
padding: 15px;
}
#logoutimg
{
width:9%;
position: absolute;
margin-left: 230px;
margin-top: -63px;
}
#preimg
{
width:7%;
position: absolute;
margin-left: -290px;
margin-top: 21px;
}
Conclusion :
Hope you would have enjoyed this script,I am sure you will give a try to the script provided and implement it in your own projects as well. Feel free to visit our website again in the future to get in touch with new coding tricks. You can let us know about your feedback in the space provided below.
You may also like –
- How to Design Responsive Email Template
- Export Gmail Contacts in PHP
Insert Contacts in Yahoo Using PHP

Hey, Folks!
In this blog, we’re going to learn a smarter way of managing email list. We will tell you how to import a contact in user’s yahoo address book from an external application.
We’re going to use Yahoo’s Contact API to achieve this goal. You can take a reference from our previous blog that how we can log in and gain access through Yahoo Contact API to read/write contacts.
You can also export contacts from yahoo in a CSV file with the same procedure. Take a sneak peek at our blog Export Yahoo Contacts.
Apart from Contact API, Yahoo’s YOS library will also get used.
So, let’s take a look at the process.

For Complete solution, you can take a look at our premium service MailGet – email marketing platform.
Files to be needed:
We’re going to use YOS Library which you can get from the github repository.
Process:
Let’s take a look at the process step by step.
- The user will get a contact form on the index page.
- The user will be asked to enter his First Name, Last Name, and Email Address.
- After submitting the above information, the user will be asked to log into yahoo account in which he wants to add the contact.
- Then, yahoo will ask the user for permission to read/write contacts from/to his account.
- And at last, contact will get added in his address book.
- After this, he can get back to the first page with the back button, or he can log out from logout button.
So, above is the complete process to add contacts in yahoo.
PHP File: index.php
<html>
<head>
<title>Insert Contacts in Yahoo Using PHP</title>
<!--Files to be included -->
<link href="bootstrap/css/bootstrap.css" rel="stylesheet" type="text/css"/>
<link href="css/style.css" rel="stylesheet" type="text/css"/>
<script src="js/logout.js" type="text/javascript"></script>
</head>
<body>
<div class="container-fluid">
<h1>Insert Contacts in Yahoo Using PHP</h1>
<div id="login">
<div id="h2" class="h2 row">
<div class="col-md-12"><h2><span>Insert Contact in <img id="logo" src="images/yahoo.png"/></span></h2></div>
</div>
<div class="row">
<div class="col-md-12">
<form action="http://formget.com/tutorial/insert-contacts-in-yahoo-using-php/contact-add.php?<?php echo http_build_query($data); ?>" method="get">
<input type="text" placeholder="First Name" name="name"/>
<input type="text" placeholder="Last Name" name="lname"/>
<input type="email" placeholder="Contact Email" name="email"/>
<input type="submit" value="Add Contact" name="submit"/>
</form>
</div>
</div>
</div>
</div>
</body>
</html>
<?php
if(isset($_GET['submit']))
{
$data['name'] = $_GET['name'];
$data['lname'] = $_GET['lname'];
$data['email'] = $_GET['email'];
}
?>
PHP File: contact-add.php
<html>
<head>
<title>Insert Contacts in Yahoo Using PHP</title>
<link href="bootstrap/css/bootstrap.css" rel="stylesheet" type="text/css"/>
<link href="css/style.css" rel="stylesheet" type="text/css"/>
<script src="js/logout.js" type="text/javascript"></script>
</head>
<body>
<div class="container-fluid">
<h1>Insert Contacts in Yahoo Using PHP</h1>
<div id="login">
<div id="h2" class="h2 row">
<div class="col-md-2"><a href="http://formget.com/tutorial/insert-contacts-in-yahoo-using-php/index.php"><img id="yprevious" src="images/previous.png"/></a></div>
<div class="col-md-8"><h2><span>Insert Contact in <a><img src="images/yahoo.png"/></a></span></h2></div>
<div class="col-md-2"><a href="#" onclick="caller()"><img id="ylogout" src="images/logout.png"/></a></div>
</div>
<div class="row">
<div class="col-md-12">
<p>Contact Added</p>
</div>
</div>
</div>
<div class="row">
<div class="col-md-12">
<p id="note">Note : If you want to export your yahoo contacts, then you can use <a href="https://www.formget.com/tutorial/export-yahoo-contacts-using-php/">Export Yahoo Contacts</a></p>
</div>
</div>
</div>
</body>
</html>

<?php
require("Yahoo.inc");
session_start();
// Your Consumer Key (API Key) goes here.
define('CONSUMER_KEY', "INSERT YOUR APPLICATION CONSUMER KEY");

// Your Consumer Secret goes here.
define('CONSUMER_SECRET', "INSERT YOUR APPLICATION CONSUMER SECRET");

// Your application ID goes here.
define('APPID', "INSERT YOUR APPLICATION ID");
$session = YahooSession::requireSession(CONSUMER_KEY,CONSUMER_SECRET,APPID);

// Fetch the logged-in (sessioned) user
$user = $session->getSessionedUser();
if(isset($_GET)){
$data = $_GET;
$name = $data['name'];
$lname = $data['lname'];
$email = $data['email'];
$contact_fields = array();
$contact_fields[] = array('type' => 'email', 'value' => $email);
$contact_fields[] = array('type' => 'name', 'value' => array('givenName'=> $name, 'familyName' => $lname));
$contact = array('fields' => $contact_fields);
print_r($user->addContact($contact)) ;
}
?>
CSS File: style.css
@import url(http://fonts.googleapis.com/css?family=Raleway);
body{
font-family:raleway !important;
}
#h2{
background-color: #FEFFED;
text-align:center;
border-radius: 10px 10px 0 0;
border-bottom: 1px solid #ccc;
color: black;
font-weight: bolder;
font-size: 2em;
margin: 0px -15px;
padding: 8% 0;
font-family:raleway !important;
}
.wrap{
width: 33%;
margin: 5% auto;
}
.container-fluid{
width: 45%;
margin: auto auto;
}
#login{
border: 2px solid #ccc;
border-radius: 10px;
font-family:raleway!important;
}
h1{
padding: 6% 0;
font-family:raleway!important;
text-align: center;
}
.h2{
margin: 0 !important;
padding: 2% 0 !important;
}
img{
padding: 0% 0%;
width: 110px;
margin-bottom: -5%;
}
input[type=text],input[type=email]{
width:99.5%;
padding: 10px;
margin-top: 14px;
border: 1px solid #ccc;
padding-left: 5px;
font-size: 16px;
font-family:raleway !important;
}
input[type=submit]{
width: 100%;
background-color:#FFBC00;
color: white;
border: 2px solid #FFCB00;
padding: 10px;
font-size:20px;
cursor:pointer;
border-radius: 5px;
margin-top: 14px;
}
p{
text-align: center;
font-family:raleway !important;
font-size:25px;
padding: 15px;
}
#yprevious,#ylogout{
width: 50px;
margin-top: 25%;
}
#logo {
margin-bottom: -2%;
}
#note{
font-size: 20px;
}
#note a{
text-decoration: none;
}
JavaScript File: Logout.js
function call()
{
popup = window.open('https://login.yahoo.com/config/login?logout=1&.direct=2&.src=fpctx&.intl=in&.lang=en-IN&.done=https://in.yahoo.com/');
setTimeout(wait, 4000);
}
function caller()
{
call();
}
function wait()
{
popup.close();
window.location.href = 'http://formget.com/tutorial/insert-contacts-in-yahoo-using-php/index.php';
}
Explaination of the main file : Contact-add.php
First of all we’ll include Yahoo.inc file
require("Yahoo.inc");Then we will start the session
session_start();We need to define the Consumer Key, we had generated while creating the application.
define('CONSUMER_KEY', "INSERT YOUR APPLICATION CONSUMER KEY");We need to define the Consumer Secret.
define('CONSUMER_SECRET', "INSERT YOUR APPLICATION CONSUMER SECRET");You may or may not insert application ID.
define('APPID', "INSERT YOUR APPLICATION ID");Now we’ll store the session created for the particular application.
$session = YahooSession::requireSession(CONSUMER_KEY,CONSUMER_SECRET,APPID);Below line will fetch the logged-in (sessioned) user
$user = $session->getSessionedUser();Below code is simply catching array thrown from index page.
if(isset($_GET)){
$data = $_GET;
 $name = $data['name'];
$lname = $data['lname'];
$email = $data['email'];
Below code is use to prepare contact in the proper format which is to be inserted.
$contact_fields = array();
$contact_fields[] = array('type' => 'email', 'value' => $email);
$contact_fields[] = array('type' => 'name', 'value' => array('givenName'=> $name, 'familyName' => $lname));
$contact = array('fields' => $contact_fields);
Below code will insert the contact in user’s address book of yahoo.
$user->addContact($contact);Conclusion:
I hope that at this point you must be feeling comfortable with importing yahoo contacts in PHP. Please comment for any query. Keep visiting our website.
Get more related blogs here –
Send Email Via SendGrid API Using PHP

SendGrid is a transactional email delivery and management service. It provides a cloud-based email delivery service and handle all the heavy lifting involved in sending messages and getting them delivered.
We are going to use SendGrid API for sending emails. SendGrid-PHP library helps you in a quick SMTP setting to send emails through SendGrid using PHP. SendGrid-PHP by SendGrid is the official PHP wrapper to send emails through the SendGrid API.
Watch the live demo or download code from the link given below

Use MailGet – email service provider for Sending Emails, just connect and send with SenGrid API or SMTP services.
Steps To Configure SendGrid API In An Application:-
1. Download Sendgrid-PHP Zip file.
2. Extract it.
3. Add SendGrid to your composer.json file. Composer is an excellent way to manage dependencies in your PHP application.
{
"require": {
"sendgrid/sendgrid": "~3.2"
}
}
4. Then at the top of your PHP script require the autoloader:
require 'vendor/autoload.php';
Alternative: Install from zip:-
1. If you are not using Composer, simply download and install the latest packaged release of the library as a zip.
2. Then require the library from package:
require("path/to/sendgrid-php/sendgrid-php.php");
Usage:-
1. To begin using this library, initialize the SendGrid object with your SendGrid credentials OR a SendGrid API Key.
API Key is the preferred method. API Keys are in beta. To configure API keys, visit https://sendgrid.com/beta/settings/api_key.
$sendgrid = new SendGrid('username', 'password');

// OR

$sendgrid = new SendGrid('sendgrid api key');
(In my example I’ve used SendGrid User Id and Password.)
2. Create a new SendGrid Email object and add your message details.
$email = new SendGrid\Email();
$email
->addTo('recepient_mail_id')
->addTo('recepient_mail_id')
->setFrom('sender_mail_id')
->setSubject('Subject goes here')
->setText('Hello World!');
3. Send it.
$sendgrid->send($email);
4. Index.php
The Complete code combining all the parameters is written in index.php file.
<?php

// require the autoloader
require 'vendor/autoload.php';

if (isset($_POST['dsubmit'])) {
$senderid = $_POST["dsender"];
$receiverid = $_POST["dreceiver"];
$subject = $_POST["dsubject"];
$message = $_POST["dmessage"];

//Set SendGrid Credentials

$sg_username = "Enter Your SendGrid User Name";
$sg_password = "Enter Your SendGrid Password";

// Initialize the SendGrid object with your SendGrid credentials

$sendgrid = new SendGrid($sg_username, $sg_password);

//Create a new SendGrid Email object

$mail = new SendGrid\Email();

// You Can Use Multiple Recipients Here. For This Tutorial We Have Used One.

$emails = array(
$receiverid
);
foreach ($emails as $recipient) {
$mail->addTo($recipient);
}

//Optional Fields.
$categories = array(
"SendGrid Category"
);
foreach ($categories as $category) {
$mail->addCategory($category);
}
$unique_args = array(
"Name" => "Enter Name Of Your Wish"
);
foreach ($unique_args as $key => $value) {
$mail->addUniqueArgument($key, $value);
}
try {

// Add your message details using SendGrid Email object. Here The Values Are Taken By HTML Form Filled By The User.
$mail->
setFrom($senderid)->
setSubject($subject)->
setText($message);

//Send Mail.
if ($sendgrid->send($mail)) {
echo "<script type='text/javascript'>alert('Sent mail successfully.')</script>";
}
} catch (Exception $e) {
echo "Unable to send mail: ", $e->getMessage();
}
}
?>
<html>
<head>
<meta charset="UTF-8">
<meta name="viewport" content="width=device-width, initial-scale=1.0">
<link href="css/bootstrap.css" rel="stylesheet" type="text/css"/>
<link href="style.css" rel="stylesheet" type="text/css">
<script type="text/javascript">
function validate()
{

if (document.myForm.dreceiver.value == "")
{
alert("Please enter your Email!");
document.myForm.dreceiver.focus();
return false;
}
else
{

/*validating email with strong regular expression(regex)*/
var str1 = document.myForm.dreceiver.value;
var filter = /^([\w-]+(?:\.[\w-]+)*)@((?:[\w-]+\.)*\w[\w-]{0,66})\.([com net org]{3}(?:\.[a-z]{6})?)$/i
if (!filter.test(str1))
{

alert("Please enter a valid email address!")
document.myForm.dreceiver.focus();
return false;
}
if (document.myForm.dsubject.value == "")
{
alert("Please enter a subject!");
document.myForm.dsubject.focus();
return false;
}
if (document.myForm.dmessage.value == "")
{
alert("Please enter message!");
document.myForm.dmessage.focus();
return false;
}
if (document.myForm.dsender.value == "")
{
alert("Please enter your Email!");
document.myForm.dsender.focus();
return false;
}
return(true);
}
}
</script>
</head>
<body>
<div class="container">
<div class="row">

</div>
<div class="row">
<div class="col-md-12">
<div id="main">
<h1><b>-Send Email Via SendGrid API Using PHP</b></h1>
</div>
</div>
<div class="col-md-12">
<div id="content">
<div id="login">
<h2>Message Box</h2><hr/>

<form name="myForm" action="" method="post" onsubmit="return validate();" >

<label><h3>From:</h3></label><br/>
<input type="email" placeholder="From: Email Id.." name="dsender" id="dsender" width="180"><br />

<label><h3>To:</h3></label>
<input type="email" placeholder="To: Email Id.." name="dreceiver" id="dreceiver" ><br/>

<label><h3>Subject:</h3></label>
<input type="text" placeholder="Enter Your Subject.." name="dsubject" id="dsubject" ><br/>

<label><h3>Message:</h3></label>
<textarea rows="4" cols="50" placeholder="Enter Your Message..." name="dmessage" id="textarea"></textarea><br/><br/>

<input type="submit" value="Send " name="dsubmit"/><br />

<span></span>
</form>
</div>
<p id="note"> <b>Note : </b> In demo, we have disabled the functionality of sending Emails.</p>
</div>
</div>
</div>
</div>
</body>
</html>
5. CSS File: style.css
Styling HTML elements.
@import url(http://fonts.googleapis.com/css?family=Raleway);

.error{
color: #FF0000;
}

body{
//background-color:#D8C092;
//margin:100px,50px;
//padding:100px,50px;
}

#main{margin:50px auto;
font-family:raleway;
}

span{
color:red;
}

#main h1{
text-align:center;
align:center;
word-spacing:5px;
}

h2{
background-color: #FEFFED;
text-align:center;
border-radius: 10px 10px 0 0;
margin: -10px -40px;
padding: 15px;
}

hr{
border:0;
border-bottom:1px solid #ccc;
margin: 10px -40px;
margin-bottom: 30px;
}

#login{
width:50%;
margin:0 auto;
//display:inline-block;
border-radius: 10px;
font-family:raleway;
border: 2px solid #ccc;
padding: 10px 40px 25px;
}

input[type=text],input[type=password],input[type=email]{
width:99.5%;
padding: 10px;
margin-top: 8px;
border: 1px solid #ccc;
padding-left: 5px;
font-size: 16px;
font-family:raleway;
}

#textarea{
width:99.5%;
padding: 10px;
margin-top: 8px;
border: 1px solid #ccc;
padding-left: 5px;
font-size: 16px;
font-family:raleway;
}

input[type=submit]{
width: 100%;
background-color:#FFBC00;
color: white;
border: 2px solid #FFCB00;
padding: 10px;
font-size:20px;
cursor:pointer;
border-radius: 5px;
margin-bottom: 15px;
}

#profile{
padding:50px;
border:1px dashed grey;
font-size:20px;
background-color:#DCE6F7;
}

#logout{
float:right;
padding:5px;
border:dashed 1px gray;
}

a{
text-decoration:none;
color: cornflowerblue;
}

i{
color: cornflowerblue;
}

#note{
clear: left;
padding-top: 20px;
margin-left: 20px;
font-size: 18px;
text-align: center;
}

#sidebar{
float:left;
}

#content{
alignment-adjust: central;
margin:0 auto;
text-align: left;
}
Conclusion :
Thus SendGrid is used for the purpose of avoiding relegation to the spam folder and rejection by mail servers. Hope you like it, keep reading our other blogs and share your experience in the space given below 🙂
For more related information go through following blogs –
- Embed Video In Email
- Get Mandrill API-Connected User’s Statistics
HTML Email Signature Generator

Email signature generator is one of the important parts for your email campaigns. A signature is something which represents your personality. It lets receiver feel a personal connection with the sender.
So,
A basic email signature contains your contact information and information of your business. It should represent who you are, what you do, and how you can be contacted.
Benefits Of Using Email Signatures –
- It shows your openness to communicate.
- Conveys professionalism via your emails.
- Used as a promotion tool for a business, a website/blog, a book, or a social cause.
- Helps representing your short biography.
- Also refers as a social networking tool, like a business card.
You can use this HTML Email Signature Generator to create an email signature for your customized Email Template or with HTML Template generated by an email builder.

For a quick and complete solution to create amazing and stunning email templates, take a sneak peek on our service MailGet – email service provider.
Create Your Signature From Email Signature Generator –
(i) Fill up the fields of the email signature generator form.
(ii) Copy the signature from the signature demo or you can copy the HTML of signature by clicking on create signature button.
(iii) Now you can use this signature with any of mail service provider such as Gmail, Yahoo, Hotmail, etc.
Adding Signature To Your Mail Service Provider –
In your email service provider, open the email signature settings and copy the signature from the signature preview and paste it into your email service provider’s signature box.
Code Files To Generate Email Signature Generator –
(i) index.php: This file generates the front view of Email generator.
(ii) ajax_php_file.php: This file uploads the pics of the user.
(iii) script.js: This file contains javascript code.
(iv) style.css: This file is used to make some styling.
PHP File: index.php
<html>
<head>
<title> Email-Signature-Creator</title>
<link rel="stylesheet" href="style.css" />
<meta charset="UTF-8">
<meta name="viewport" content="width=device-width, initial-scale=1.0">
<link href="css/bootstrap.min.css" rel="stylesheet" type="text/css"/>
<link href='http://fonts.googleapis.com/css?family=Roboto+Condensed|Open+Sans+Condensed:300' rel='stylesheet' type='text/css'>
<script type="text/javascript" src="http://code.jquery.com/jquery-1.8.2.js"></script>
<script src="http://ajax.googleapis.com/ajax/libs/jquery/1.11.1/jquery.min.js"></script>
<script src="js/bootstrap.min.js" type="text/javascript"></script>
<link href="css/style.css" rel="stylesheet" type="text/css"/>
<script type="text/javascript">
$("#copy").click(function() {
$("#div2").html($("#div1").html());
});
</script>
<script src="http://ajax.googleapis.com/ajax/libs/jquery/1.11.1/jquery.min.js"></script>
<script src="js/script.js"></script>
<script type="text/javascript">
$(document).ready(function (){
$("#copy1").click(function() {
var data = $("#div2").html();
$("#abc_data1").text(data);
});
$("#uploadimg").click(function() {
$('#message1').html('upload image');
});
});
</script>
<style>
.msg{
margin-top: 0;
}
#image_preview1{
margin-bottom:5px;
}
.uinfo{
width:410px;
}
#image_preview1{
display:none;
}
</style>
</head>
<body>
<div class="container">
<div class="row">
<!-- popup box modal starts here for upload image -->
<div class="modal fade demo-popup" tabindex="-1" role="dialog" aria-labelledby="myLargeModalLabel-1" aria-hidden="true">
<div class="modal-dialog">
<div class="modal-content">
<div class="modal-header">
<button type="button" class="close" data-dismiss="modal" aria-hidden="true">×</button> <h3 class="modal-title">upload your image</h3>
</div>
<div class="modal-body">
<P>
<div class="main">
<h1 id="message1">upload image</h1><br/>
<div id="message" align="center"></div>
<form id="uploadimage" action="" method="post" enctype="multipart/form-data">
<div id="selectImage">
<div></div>
<label>Select Your Image</label><br/>
<input type="file" name="file" id="file"/>
</div>
</form>
</div>
</P>
</div>
</div>
</div><!-- /.modal-content -->
</div><!-- /.modal-dialog -->
<!-- /.modal-->
<!-- popup box modal ends -->
<!-- popup box modal starts here to show html code -->
<div class="modal fade demo-popup1" tabindex="-1" role="dialog" aria-labelledby="myLargeModalLabel-1" aria-hidden="true">
<div class="modal-dialog">
<div class="modal-content">
<div class="modal-header">
<button type="button" class="close" data-dismiss="modal" aria-hidden="true">×</button> <h3 class="modal-title">Copy HTML Signature</h3>
</div>
<div class="modal-body">
<P>
<div id="abc1">
<pre id="abc_data1"></pre>
</div>
</P>
</div>
</div><!-- /.modal-content -->
</div><!-- /.modal-dialog -->
</div><!-- /.modal-->
<!-- popup box modal ends -->
</div> <!-- /.row -->
</div> <!-- /.container -->
<div id="wholecont">
<div id="main">
<h1><b>Create Easy Email Signatures</b></h1>
<div class="container">
<div class="row">
<div id="div1" align="center" class="col-md-5">
<h2>Your Information</h2>
<hr/>
<div class="row">
<form action="" style="border:none;">
<table class="uinfo">
<div class="row">
<tr>
<div class="col-md-6">
<td><div><b>Name</b></div><input type="text" name="username" onkeyUp="document.getElementById('Uname').innerHTML = this.value" />
</td>
</div>
<div class="col-md-6">
<td>
<div><b>Job Title</b></div><input id="jobtitle" type="text" name="jobtitle" onKeyup="addjobtitle()">
</td>
</div>
</tr>
</div>
<div class="row">
<tr>
<div class="col-md-6"><td>
<div><b>Email</b></div><input id="emailid" type="text" name="emailid" onKeyup="addemailid()"></td></div>
<div class="col-md-6"><td><div><b>Mobile No</b></div><input id="mobileno" type="text" name="mobileno" onKeyup="addmobileno()"></td></div>
</tr>
</div>
<div class="row">
<tr>
<div class="col-md-6">
<td><div><b>Company Name</b></div><input type="text" name="cname" onkeyUp="document.getElementById('companyname').innerHTML = this.value"></td></div>
<div class="col-md-6"><td><div><b>Website</b></div><input id="website" type="text" placeholder="http://www.example.com" name="website" onKeyup="addwebsite()"></td></div>
</tr>
</div>
<div class="row">
<tr>
<div class="col-md-12">
<td colspan="2">
<input type="button" id="uploadimg" class="" data-toggle="modal" data-target=".demo-popup" value="upload image">
</td>
</div>
</tr>
</div>
</table>
<table class="uinfo">
<div class="row">
<tr>
<td><div><b>Address</b></div>
<input type="text" class="inline" name="address" onkeyUp="document.getElementById('address1').innerHTML = this.value">
</td>
</tr>
</div>
<div class="row">
<tr>
<td><div><b>Address Line 2</b></div>
<input type="text" class="inline" name="addressline2" onkeyUp="document.getElementById('addressline2').innerHTML = this.value">
</td>
</tr>
</div>
<div class="row">
<tr>
<td>
<div><b>Facebook Profile Url</b></div>
<input class="inline" id="facebook" type="text" name="facebook" placeholder="https://www.facebook.com/profile.php?id=1000" onKeyup="addfacebook()">
</td>
</tr>
</div>
<div class="row">
<tr>
<td>
<div><b>Twitter Profile Url</b></div>
<input class="inline" id="twitter" type="text" name="twitter" placeholder="https://www.twitter.com/profile" onKeyup="addtwitter()">
</td>
</tr>
</div>
</table>
</form>
</div>
<input type="button" id="copy1" class="" data-toggle="modal" data-target=".demo-popup1" value="Create Signature">
</div>
<div id="div2" class="col-md-7">
<h2>Signature Demo</h2>
<hr/>
<div id="image_preview1">
<img id="previewing1" src="noimage.png" />
</div>
<p class="msg">
<span id="Uname">
</span><span id="jobtitle1"></span>
</p>
<p class="msg">
<a href="" id="emailid1"></a>
<span id="mobileno1"></span>
</p>
<br>
<p class="msg" id="companyname"></p>
<p class="msg" id="address1"></p>
<p class="msg" id="addressline2"></p>
<p class="msg">
<a class="msg" href="" id="website1">
</a>
</p>
<p class="msg">
<a id="fb" href="">
<img id="fbimg" width="16px" style="margin-bottom:2px; border:none; display:none;" height="16px" src="images/facebook.png" alt="Facebook">
</a>
<a id="tw" href="">
<img id="twimg" width="16px" style="margin-bottom:2px; border:none; display:none;" height="16px" src="images/twitter.png" alt="twitter">
</a>
</p>
</div>
</div>
</div>
</div>
</div>
</body>
</html>PHP File: ajax_php_file.php
<?php
if(isset($_FILES["file"]["type"]))
{
$validextensions = array("jpeg", "jpg", "png","JPG","JPEG","PNG");
$temporary = explode(".", $_FILES["file"]["name"]);
$file_extension = end($temporary);
if ((($_FILES["file"]["type"] == "image/png") || ($_FILES["file"]["type"] == "image/jpg") || ($_FILES["file"]["type"] == "image/jpeg") || ($_FILES["file"]["type"] == "image/JPEG") || ($_FILES["file"]["type"] == "image/JPG") || ($_FILES["file"]["type"] == "image/PNG")
)&& in_array($file_extension, $validextensions)) {
if ($_FILES["file"]["error"] > 0)
{
echo "Return Code: " . $_FILES["file"]["error"] . "<br/><br/>";
}
else
{
if (file_exists("upload/" . $_FILES["file"]["name"])) {
echo $_FILES["file"]["name"] . " <span id='invalid'><b>already exists.</b></span> ";
}
else
{
$nme=$_FILES["file"]["name"];
$photo = "newfile_".time().rand(5, 15).".".$nme;
$sourcePath = $_FILES['file']['tmp_name']; // Storing source path of the file in a variable
$targetPath = "upload/".$photo; // Target path where file is to be stored
move_uploaded_file($sourcePath,$targetPath) ; // Moving Uploaded file
echo $targetPath;
}
}
}
else
{
echo "Invalid file Size or Type";
}
}
?>
Javascript File: script.js
 function addjobtitle()
{
var jobtitle = document.getElementById("jobtitle");
var s = " / "+jobtitle.value;
document.getElementById('jobtitle1').innerHTML = s
}
function addemailid()
{
var emailid = document.getElementById("emailid");
var s = emailid.value;
document.getElementById('emailid1').innerHTML= s;
document.getElementById('emailid1').href="mailto:"+s;
}

function addmobileno()
{
var mobileno = document.getElementById("mobileno");
var s = " / "+mobileno.value;
document.getElementById('mobileno1').innerHTML = s
}
function addwebsite()
{
var website = document.getElementById("website");
var s = website.value;
document.getElementById('website1').innerHTML= s;
document.getElementById('website1').href="http://"+s;
}
function addoffice()
{
var office = document.getElementById("office");
var s =office.value;
document.getElementById('office1').innerHTML = s
}
function addfax()
{
var fax = document.getElementById("fax");
if(fax.value)
{
var s = " / "+fax.value;
document.getElementById('fax1').innerHTML = s
}
}
function addfacebook()
{
var facebook = document.getElementById("facebook");
var s =facebook.value;

document.getElementById("fbimg").style.display= "inline";
document.getElementById("fb").href= s;
}
function addtwitter()
{
var twitter = document.getElementById("twitter");
var s =twitter.value;

document.getElementById("twimg").style.display= "inline";
document.getElementById("tw").href=s;
}
$(document).ready(function (e) {
$("#uploadimage").on('submit',(function(e) {
e.preventDefault();
$("#message").empty();
$('#loading').show();
$.ajax({
url: "ajax_php_file.php", // Url to which the request is send
type: "POST", // Type of request to be send, called as method
data: new FormData(this), // Data sent to server, a set of key/value pairs (i.e. form fields and values)
contentType: false, // The content type used when sending data to the server.
cache: false, // To unable request pages to be cached
processData:false, // To send DOMDocument or non processed data file it is set to false
success: function(data) // A function to be called if request succeeds
{
if(data=="Invalid file Size or Type")
{
$('#message1').html(data);
$("#message").css("color","red");
$("#message").html("(size should be less then 2 mb)");
}
else{
$('#previewing1').attr('src',data);
$('#message1').html('image uploaded successfully');
$('#image_preview1').css('display', 'inline-block');
/*$('#previewing').attr('src',data);
$('#previewing').attr('src',"upload/DSC_0126.jpg");
$('#previewing').attr('src',"http://localhost/Create-Email-Signature/upload/DSC_0126.jpg");*/
}
}
});
}));
// Function to preview image after validation
$(function() {
$("#file").change(function() {
$("#message").empty(); // To remove the previous error message
var file = this.files[0];
var imagefile = file.type;
var match= ["image/jpeg","image/png","image/jpg"];
if(!((imagefile==match[0]) || (imagefile==match[1]) || (imagefile==match[2])))
{
$('#previewing').attr('src','noimage.png');
$("#message").html("<p id='error'>Please Select A valid Image File</p>"+"<h4>Note</h4>"+"<span id='error_message'>Only jpeg, jpg and png Images type allowed</span>");
return false;
}
else
{
var reader = new FileReader();
reader.onload = imageIsLoaded;
reader.readAsDataURL(this.files[0]);
$( "#uploadimage" ).submit();
}
});
});
function imageIsLoaded(e) {
$("#file").css("color","green");
$('#image_preview').css("display", "block");
/*$('#previewing').attr('src', e.target.result);*/
$('#previewing').attr('width', '250px');
$('#previewing').attr('height', '230px');
$('#previewing1').attr('width', '81');
$('#previewing1').attr('height', '80');
};
});
CSS File: style.css
@import url(http://fonts.googleapis.com/css?family=Raleway);
h1{
text-align:center;
//color: black;
font-size: 2em;
//margin-left: 15%;
}
#main{
margin: 25px 13%;
font-family: 'Raleway', sans-serif;
}
h2{
background-color: #FEFFED;
text-align:center;
border-radius: 10px 10px 0 0;
margin: 0 -40px;
padding: 30px 40px;
color: black;
font-weight: bolder;
font-size: 1.5em;
margin-top: -1px !important;
margin-bottom: -10px !important;
}
hr{
border:0;
margin-left: -40px;
margin-right: -40px;
margin-top: 10px;
margin-bottom: 14px;
border-bottom:1px solid #ccc;
margin-bottom: 30px;*/
}
#div1{
float: left;
border-radius: 10px;
font-family:raleway;
border: 2px solid #ccc;
padding: 0px 40px 0px;
margin-top: 70px;
margin: 50px;
//margin-left: 27%;
background-color: F6F7F6;
}
#div2{
width:450px;
float: left;
border-radius: 10px;
font-family:raleway;
border: 2px solid #ccc;
padding: 0px 40px 0px;
margin-top: 70px;
margin: 50px;
//margin-left: 27%;
}
input[type=text],input[type=email],input[type=button]{
width:99.5%;
padding: 5px;
margin-top: 0;
margin-bottom: 10px;
border: 1px solid #ccc;
padding-left: 5px;
font-size: 16px;
font-family:raleway;
}
input[type=button]#uploadimg{
width:99.5%;
padding: 5px;
margin-top: 10px;
margin-bottom: 10px;
border: 1px solid #ccc;
padding-left: 5px;
font-size: 16px;
font-family:raleway;
}
input[type=submit]{
width: 450px;
background-color:#FFBC00;
color: white;
border: 2px solid #FFCB00;
padding: 10px;
font-size:20px;
cursor:pointer;
border-radius: 5px;
margin-bottom: 12px;
}
#login{
width:550px;
float: left;
border-radius: 10px;
font-family:raleway;
border: 2px solid #ccc;
padding: 0px 40px 0px;
margin-top: 70px;
margin: 50px;
margin-left: 27%;
}
input[type=text].inline{
width:99.5%;
}
table{
border-spacing: 80% 0;
}
td{
padding-right:6px;
padding-left:6px;
}
#image_preview1{
margin-bottom:5px;
}
input[type=button]#copy1{
width:97%;
padding: 5px;
margin-top: 0;
margin-bottom: 27px;
border: 1px solid #ccc;
padding-left: 5px;
font-size: 16px;
font-family:raleway;
background-color: #FFBC00;
color: white;
border: 2px solid #FFCB00;
}
tips: Here is the source code of email generator with this blog just download it and use it.
Note: In above code you must also have to include some bootstrap file such as bootstrap.min.css, bootstrap.min.js.
Conclusion –
I hope that at this point you must be feeling comfortable with generating email signature. Please comment for any query. Keep visiting our website.
Get more information here –
- Import Contacts To Outlook
- Find Bounced Email Via Postmark
Send Email via Postmark API Using PHP

Use MailGet – email service provider for Sending Emails, just connect and send emails with Postmark API or SMTP services.
Postmark API/SMTP integration in your web application can help you to send and track your emails. It replaces SMTP (or Sendmail) with a far more reliable, elastic and care-free environment. In fact, we can get details about our emails in such a manner, that they were tracked or processed, bounces , opens and spam complaints.
Before going further always keep in mind that:
1. Send emails to only those persons who have provided you explicit permission to contact them.
2. If you are planning to send bulk emails, then postmark service is not made for that purpose.
Watch the live demo or download code from the link given below

Steps to configure Postmark API in an application: –
We need Server API token and Sender Signature for sending email through Postmark api . Follow the bellow steps to get them :
- Sign up in postmarkapp.com
- Login and create server by any name , for example “demo”.
- Now , a screen will appear with options statics , activity , templates , settings permissions, credentials . everytime you see this screen , whenever you click on your server name . click on credentials . and copy your Server API token .
- Now , click on sender signature and fill full name, and in from email give email address of your own domain . for example [email protected] . now go to your domain a confirmation link is sent from postmarkapp.com . when you confirm your domain email id . Then you can use it in your program as Sender Signature.
now, we have Server API token and Sender Signature . lets make a program for sending mail through Postmark API
To install api in your project : open command promt and through cd command go to the project location upto index.php and enter the below command .
composer require wildbit/postmark-php After applying the above command . vendor named folder gets include in your project
Now , at the very top of your code , you need to include PostmarkClient.php and PostmarkException.php in the following manner :
 require_once('./vendor/autoload.php');

use PostmarkPostmarkClient;

use PostmarkModelsPostmarkException;
Now,create PostmarkClient by using server API token and then use this client to call sendEmail() function by passing Sender Signature , receivers email address , subject of mail , and full message.
  $client = new PostmarkClient("Insert Server API token");
$sendResult = $client->sendEmail("Insert Sender Signatures", "$receiversaddress", "$subject", "$msg");
Tutorial Scripts in detail
Below are the details of the code used in this tutorial with proper explanation.
index.php
Below file is the main program file in which , we are connecting our API in the program and accessing its features like – creating object of postmark Client and sending mail with the help of sendEmail() method.
<?php
require_once('./vendor/autoload.php');

use PostmarkPostmarkClient;
use PostmarkModelsPostmarkException;
?>
<html>
<head>
<title>
Send Email via Postmark API Using PHP
</title>
<meta name="viewport" content="width=device-width, initial-scale=1.0">
<script src="js/jquery-1.11.3.min.js" type="text/javascript"></script>
<script src="js/bootstrap.js" type="text/javascript"></script>
<link href="css/bootstrap.css" rel="stylesheet" type="text/css"/>
<link href="css/style.css" rel="stylesheet" type="text/css"/>

</head>
<body>
<div class="container">
<div class="row">

</div>
<div class="row">
<div class="col-md-12">
<div id="main">
<h1>Send Email via Postmark API Using PHP</h1>
</div>
</div>
<div class="col-md-12">
<div class="matter">
<div id="login">
<h2>Send Email</h2>
<hr/>
<form action="index.php" method="post">
<label class="lab">Receiver's Email Address :</label>
<input type="email" name="to" id="to" placeholder="Receiver's email address" /><br /><br />
<label class="lab">Email type:</label><div class="clr"></div>
<div class="lab">
<input type="radio" value="def" name="etype" checked>Default
<input type="radio" value="cc" name="etype" >cc
<input type="radio" value="bcc" name="etype" >bcc </div>
<div class="clr"></div><br>
<label class="lab">Subject :</label>
<input type="text" name="subject" id="subject" placeholder="subject" required /><br /><br />
<label class="lab">Message body :</label><div class="clr"></div>
<div class="lab">
<input type="radio" value="text" name="msgtype" checked>Text
<input type="radio" value="html" name="msgtype" >HTML</div>
<textarea type="text" name="msg" id="msg" placeholder="Enter your message here.." required ></textarea><br><br>
<input type="submit" value=" Send " name="submit"/><br />
<span></span>
</form>
</div>
<p id="note"> <b>Note : </b> In demo, we have disabled the functionality of sending Emails.</p>
</div>
</div>
</div>
<!-- Right side div -->

</div>
</body>
</html>

<?php
if (isset($_POST['submit'])) {
$to = $_POST['to'];
$subject = $_POST['subject'];
$msg = $_POST['msg'];
$msgtype=$_POST['msgtype'];
if($msgtype=='text'){
echo $msg;
}else{
$msg=htmlentities($msg);
echo $msg;
}

try {
$client = new PostmarkClient("Insert Server API token");
$sendResult = $client->sendEmail("Insert Sender Signatures", "$to", "$subject", "$msg");
echo "<script>alert('Email Sent Successfully.. !!');</script>";
} catch (PostmarkException $ex) {
// If client is able to communicate with the API in a timely fashion,
// but the message data is invalid, or there's a server error,
// a PostmarkException can be thrown.
//echo $ex->httpStatusCode;
// echo $ex->message;
// echo $ex->postmarkApiErrorCode;
echo "<script>alert('Illegal email address');</script>";
} catch (Exception $generalException) {
// echo "welcome";
echo "<script>alert('ERROR ');</script>";
}

}
?>
Style.css
Includes basic styling of HTML elements.
@import url(http://fonts.googleapis.com/css?family=Raleway);

#main{

margin:50px auto;
font-family:raleway;
}

span{
color:red;
}

h2{
font-weight: 600;
background-color: #FEFFED;
text-align:center;
border-radius: 10px 10px 0 0;
margin: -10px -40px;
padding: 15px;
}

hr{
border:0;
border-bottom:1px solid #ccc;
margin: 10px -40px;
margin-bottom: 30px;
}

#login{
width:40%;;
margin:0 auto;
display:inline-block;

border-radius: 10px;
font-family:raleway;
border: 2px solid #ccc;
padding: 10px 40px 25px;
//margin-top: 70px;
}
textarea{
margin-top: 8px;
font-size: 16px;
font-family:raleway;

}
input[type=radio]{
margin-top: 8px;
}
input[type=text],[type=email],input[type=password]{
width:99.5%;
padding: 10px;
margin-top: 8px;
border: 1px solid #ccc;
padding-left: 5px;
font-size: 16px;
font-family:raleway;
}

input[type=submit]{
width: 100%;
background-color:#FFBC00;
color: white;
border: 2px solid #FFCB00;
padding: 10px;
font-size:20px;
cursor:pointer;
border-radius: 5px;
margin-bottom: 15px;
}
#profile{
padding:50px;
border:1px dashed grey;
font-size:20px;
background-color:#DCE6F7;
}

#logout{
float:right;
padding:5px;
border:dashed 1px gray;
}

a{
text-decoration:none;
color: cornflowerblue;
}

i{
color: cornflowerblue;
}#note {
clear: left;
padding-top: 20px;
margin-left: 20px;
font-size: 18px;
}
#formget{
float:right;
}
h1{
font-weight: 600;
text-align: center;
display:inlne;
alignment-adjust: center;
margin:0 auto;
width:100%;
}
textarea[type=text]{
width:100%;
height:200px;

}

.matter{
alignment-adjust: central;
margin:0 auto;
text-align: center;

}
.clr{
clear:left;
}
.lab{

font-size: 110%;
float:left;
}
Conclusion :
That’s all about how we can configure Postmark API to send mail through your own web app , I am sure you will try this script and implement it in some projects as well . Feel free to come anytime to this amazing website for new coding tricks . you can give your feedback in the below section .
Send Email via Mailjet API Using PHP

Use MailGet – email service provider for Sending Emails, just connect and send with MailJet API or SMTP services.
In this blog, I am going to explain an easy way of API/SMTP configuration to send an email using Mailjet. Emailing has become a powerful medium for companies to communicate with their clients. The most difficult task for companies is that how to send a large number of email to their customers.
We have made a blog for those who have suffered from this problem and so we are going to use Mailjet API for sending emails.
This tutorial will demonstrate how to configure MailJet API to send emails.
Watch the live demo or download code from the link given below

Steps to configure MailJet API in an application: –
Step 1:- Download the latest MailJet API library .zip folder
Step 2:- Extract the downloaded .zip folder.
Step 3:- Create a lib folder in the root folder, copy & paste all the files available in the src folder of extracted zip folder.
Step 4:- Create index.php into your root folder. And now just copy php code and paste it in index.php.
Tutorial Scripts in detail
Below are the details of the code used in this tutorial with proper explanation.
index.php
index.php provide an interface for user to fill the receiver’s information like receiver email id, subject and text which will be store in an array that will go further to Mailjet Api for processing which will send email to receiver’s email id.
<html>
<head>
<title>How To Send Email Using Mailjet API</title>
<meta name="robots" content="noindex, nofollow">
<link href="css/style.css" rel="stylesheet" type="text/css"/>
<link href="css/bootstrap.css" rel="stylesheet" type="text/css"/>
<script src="js/bootstrap.js" type="text/javascript"></script>
</head>
<body>
<div class="container">
<div class='wrap'>
<div class='row'>
<div id="main" class="col-xs-12 col-sm-6 col-md-4 ">
<h1 id='h1'>Send Email via Mailjet API Using PHP</h1>
</div>
</div>
<div class='row' >
<div id="login" class="col-xs-12 col-sm-6 col-md-4 ">
<div style='margin-top:-30px;'>
<h2>Email Form</h2>
<div style="margin: 20px 10px;">
<form action="" method="post" name='myForm' onsubmit="return validate();">
<label>To : </label>
<input type='text' name='to' placeholder="Enter Reciever's Email Address"/>
<label>Subject : </label>
<input type='text' name='subject' placeholder='Subject'/>
</br><label> </label>
<label>Message : </label><?php echo " "; ?><input type="radio" name='msg' value='txt' checked><?php echo " "; ?>Text <?php echo " "; ?><input type="radio" name='msg' value='html'><?php echo " "; ?> Html
</br><label></label>
<textarea name='text' style="height: 134px; resize: none; width: 100%;" placeholder='Write your message here...'/></textarea><br/>
<br/>
<input type='submit' name='submit' value='send' /><br/>
</form>
</div>
</div>
</div>
</div>
<div class='row'>
<div id="note" class="col-xs-12 col-sm-6 col-md-4 ">
<b>Note : </b>In demo, we have disabled the functionality of sending Emails.
</div>
</div>
</div>
</div>
<script type="text/javascript">
function validate()
{
if (document.myForm.to.value == "")
{
alert("Please enter your Email!");
document.myForm.to.focus();
return false;
}
else
{
/*validating email with strong regular expression(regex)*/
var str1 = document.myForm.to.value
/* This is the regular expression string to validate the email address
Email address example : [email protected] , [email protected] , [email protected] ,
[email protected] , [email protected]
*/
var filter = /^([w-]+(?:.[w-]+)*)@((?:[w-]+.)*w[w-]{0,66}).([com net org]{3}(?:.[a-z]{6})?)$/i
if (!filter.test(str1))
{
alert("Please enter a valid email address!")
document.myForm.to.focus();
return false;
}
if (document.myForm.subject.value == "")
{
alert("Please enter a subject!");
document.myForm.subject.focus();
return false;
}
if (document.myForm.text.value == "")
{
alert("Please enter a text!");
document.myForm.text.focus();
return false;
}
return(true);
}
}
</script>
</body>
</html>
<?php
include("src/Mailjet/php-mailjet-v3-simple.class.php");
//include('php-mailjet.class-mailjet-0.1.php');
$apiKey = 'Insert API Key';
$secretKey = 'Insert API Secret Key';
$mj = new Mailjet($apiKey, $secretKey);
if (isset($_POST['submit'])) {
function sendEmail() {
// Create a new Object
$mj = new Mailjet();
$params = array(
"method" => "POST",
"from" => "Insert sender Email Id",
"to" => "{$_POST['to']}",
"subject" => "{$_POST['subject']}",
"text" => "{$_POST['text']}"
);
$result = $mj->sendEmail($params);
if ($mj->_response_code == 200) {
//echo "success - email sent";
print '<script type="text/javascript">';
print 'alert("email successfully sent!")';
print '</script>';
} elseif ($mj->_response_code == 400) {
//echo "error - " . $mj->_response_code;
print '<script type="text/javascript">';
print 'alert("Email Successfully Sent..!")';
print '</script>';
} elseif ($mj->_response_code == 401) {
//echo "error - " . $mj->_response_code;
print '<script type="text/javascript">';
print 'alert("Unauthorized! You have specified an incorrect ApiKey or username/password couple.")';
print '</script>';
} elseif ($mj->_response_code == 404) {
//echo "error - " . $mj->_response_code;
print '<script type="text/javascript">';
print 'alert("Not Found! The method your are trying to reach don't exists.")';
print '</script>';
} elseif ($mj->_response_code == 405) {
//echo "error - " . $mj->_response_code;
print '<script type="text/javascript">';
print 'alert("Method Not Allowed! You made a POST request instead of GET, or the reverse.")';
print '</script>';
} else {
print '<script type="text/javascript">';
print 'alert(" Internal Server Error! Status returned when an unknow error occurs")';
print '</script>';
}
return $result;
}
sendEmail();
}
?>Step 5:- Create style.css into your css folder created within the root folder. Once you finished this task just copy css code and paste it into style.css.
style.css
Designing HTML elements.
@import url(http://fonts.googleapis.com/css?family=Raleway);
.wrap{
margin:0;
padding: 0;
}

#main{
width:60%;
margin:auto;
font-family:raleway;
//border:1px solid green;
margin-left: 20%;
}

span{
color:red;
}

#h1{
text-align:center;
font-size:35px !important;

}

h2{
background-color: #FEFFED;
text-align:center;
border-radius: 10px 10px 0 0;
padding:30px;
margin: 0px -40px -40px -40px ;
border-bottom: 1px solid #ccc;
}

#login{
width:60%;
//float: left;
border-radius: 10px;
font-family:raleway;
border: 2px solid #ccc;
padding: 10px 40px 25px;
margin-top: 30px;
margin-left: 20%;
}

input[type=text],input[type=textarea]{
width:99.5%;
padding: 10px;
margin-top: 8px;
border: 1px solid #ccc;
padding-left: 5px;
font-size: 16px;
font-family:raleway;

}
input[type=radio]{
vertical-align: middle;
margin: -4px 0 0 2px !important;

}
input[type=submit]{
width: 100%;
background-color:#FFBC00;
color: white;
border: 2px solid #FFCB00;
padding: 10px;
font-size:20px;
cursor:pointer;
border-radius: 5px;
margin-bottom: 15px;
}
#profile{
padding:50px;
border:1px dashed grey;
font-size:20px;
background-color:#DCE6F7;
}

#logout{
float:right;
padding:5px;
border:dashed 1px gray;
}

a{
text-decoration:none;
color: cornflowerblue;
}

i{
color: cornflowerblue;
}
#note {
word-wrap: break-word;
margin: 10px 24%;
width: 62%;
padding: 10px 50px;
font-size: 16px;
}

label {
display: inline-block;
max-width: 100%;
margin-bottom: 5px;
font-weight: bold;
margin-top: 18px;
}
#formget{
float:right;
}
Conclusions:-
This is all about, how to send emails via Mailjet API. Hope you will be benefited by this post. Please share your feedback in the space provided below. Keep reading our other blog post. 🙂
For more information check out the blog given below –
- How to Design Responsive Email Template
- Find Bounced Email Via Postmark
Case Study #1: How my friend “Adi” could have reached more Email Inbox ?

My friend Adi is “not” an “Email Marketing Pro”.
Infact, the last email broadcast he sent to his subscribers was almost 5 months back.
That’s Bad, Isn’t It..??
Since email marketing is the highest revenue generators for businesses, he left tons of money on the table.
- The “only good thing” he did all this time was that..
..he continued to collect email addresses from his website.
- Even when he hasn’t sent any emails all this long..
..and now, he wants to make a comeback to the world of email marketing. !!
So One Day –
- He sits on his comfy sofa and creates a nice looking email.
..he then sends that email to every single person in his email contact list.
Bad for him, roughly 15% of his emails bounces. !!
Well,
- He just made the biggest mistake..
..you as an email marketer can make. !!
What’s The Mistake Man. ?
- 15% emails bounce is often regarded as too high to send your emails..
..6% bounce is the maximum that is tolerated by almost all the best email service providers.
The email marketing company he uses secretly moves him to one of their email servers with bad reputations.
All email marketing companies do that. Even if they say, they don’t.
Now this is really bad for Adi. !!
From Now On,
- All the emails that he sents would be sent through the server with a bad reputation..
..almost always shared by people just like him.
- Since emails are coming from servers with bad reputation..
..they instantly get caught in the spam filters build by Gmail, Yahoo or Hotmail which means less Inbox’ing …
Now,
- He will almost always get less clicks and opens for the emails that he sends..
..he is getting punished for the fault he didn’t commit.
It wasn’t his fault .. Or was it?
How Could You Save Yourself If You Are In Situation Like This. ?
Well, the best way to save yourself from situations like this is by cleaning your email list before sending your first email campaign.
- The cleaning should be as much detailed as possible a great list cleaning service will actually remove as many bad emails as possible..
..which could bounce after you send the emails and a great help to us in optimizing our Email Campaign which provides us better inbox delivery.
However,
List cleaning service is usually expensive since it requires lots of server resources to check and validate the emails.
Recently,
- We launched email list cleaning in Pabbly which means..
..you can now say reduce your email bounces considerably.. Almost up to 10% in most cases..!!
- It does all the email validations and filtering..
..to make sure that you send great emails to valid email addresses.
- Pabbly connects with Amazon SES, MailGun, SendGrid, Mandrill and any SMTP service for sending emails..
..means you already had the power to experiment to achieve better inbox deliverability.
Email List Cleaning is the icing on a cake..!!
It helps you to reduce your email bounces while maintaining a great reputation as an email sender.
- Checkout the PabblyEmail Verification tutorial below –
https://www.pabbly.com/email-list-cleaning/
-
- Want to give Pabbly Email Marketing a try for better deliverability. ? Check it out below –
Have a look atMonthly Reports some more informative blogs here –
- Drip Email Marketing
- MailGet Monthly Reports
Email Open Tracking Using PHP

Why Do You Need To Track Email?
After sending an email, there is always a requirement to know whether the recipient opened it and if opened then when. You can ask for email read receipt to the user while sending mail, with many email SMTPs like Gmail, Outlook, Yahoo and many more. But that will only be a request.
If recipient ignores or denies the receipt request then you won’t get any information. It can impart a major impact on your email business.
Smart Meter Analytics can be a simple & logical way to let you come out from this situation. It is bundled with all kind of smart analytic facilities.
For tracking email open, we send a tracking code using PHPMailer library into the body of the email. Then tracking code itself notify us on the opening of that email.Isn’t it cool?also extremely useful.
Let’s begin learning how to track email opening using PHP.
Watch the live demo or download code from the link given below

For a quick and complete solution, you can use our email service provider MailGet.
At first, let me tell you the path we’ll move on.
Step 1. Create a PHP web page with name “index.php”. This will serve as our front-end.We’ll send an email and track it from here only.
Step 2. Create a PHP file with name “tracker.php”. There will be our PHP script for two purpose:
a. Send mail using PHP mailer library.
b. Read the log file(email.txt) to track if the email opened.
Step 3. Create a PHP file with name “trackonline.php”. This will be the PHP script to log an entry in a text file also check for the duplicity.
Step 4. Create a JavaScript file with name “myjs.js”. It will make ajax calls to tracker script and handle the responses.
How Things Work –
For the ease of understanding, I’ve broken the whole working of our program in three parts.
First one right below, takes user input, sends an email with a unique numerical id attached to it. Then read a log file to find a record with the same id send along with the email. If found then fetch the details and display it on index.php page else the mail is not opened yet. Go through the block diagram to understand what I just told you. ![]() Second is the tracking code and the logic is pretty simple.This is the soul which enable us to know about the mail open.When the email is sent, an HTML <img> tag is inserted in the email body which contains the path to our PHP script trackmailonline.php in “src”.
Second is the tracking code and the logic is pretty simple.This is the soul which enable us to know about the mail open.When the email is sent, an HTML <img> tag is inserted in the email body which contains the path to our PHP script trackmailonline.php in “src”.
In the third part, Now when the recipient opens the email, the browser sends an HTTP request to our script asking for image file.There we catch the values arrived within the request and log it into an email.txt file. Also, we shouldn’t fraud with the browser so the request is responded with a transparent image of size 1 pixel.
Tutorial Scripts In Detail –
Below are the details of the code used in this tutorial with proper explanation.
index.php
<!DOCTYPE html>
<html>
<head>
<meta charset="UTF-8">
<title>Email Open Tracking Using PHP</title>
<script src="js/jquery.min.js" type="text/javascript"></script>
<script src="js/myjs.js" type="text/javascript"></script>
<link href="css/style.css" rel="stylesheet" type="text/css"/>

</head>
<body>
<div id="main">
<h1>Email Open Tracking Using PHP</h1>
<div id="login">
<h2>Send Email</h2>
<hr/>
<form id="form1" method="post">
<div id="box">
<input type="email" placeholder="To : Email Id " name="mailto" required/>
<input type="text" placeholder="Subject : " name="subject" required/>
<textarea rows="2" cols="50" placeholder="Meassage : This is the fixed message of test email to get notify when it is read...." name="message" readonly ></textarea>
<input type="submit" value="Send" name="send" />
</div>
</form>

<div id="loading-image"><img src="http://www.arabianbusiness.com/skins/ab.main/gfx/loading_spinner.gif" alt="Sending....."/></div>

<form id="form2" method="post">
<div id="view"></div><br><br>
<div id="readstatus"></div>
<input type="submit" value="Track Status" id="track_mail" name="track"/>
</form>
</div>
</div>
</body>
</html>
tracker.php
<?php

require ('phpmailer/PHPMailerAutoload.php');
$from = "[email protected]"; //sender's username
$pwd = "formgetmb"; //sender's password
//---------------------------SEND eMail------------------------------------------------
if (isset($_POST['mailto'])) {
try {
$mail = new PHPMailer(true); //New instance,exceptions enabled with true
$to = $_POST['mailto'];
$subject = $_POST['subject'];
$id = rand(111, 999);
$id.=rand(111, 999);
$body = "This is the fixed message of test email to get notify when it is read.....";
//Below is the image tag with src to our tracknoline.php script page.........
$body .= "<img border='0' src='https://www.formget.com/tutorial/php-email-tracker/trackonline.php?email=$to&id=$id&subject=$subject' width='1' height='1' alt='image for email' >";
$mail->IsSMTP(); // tell the class to use SMTP
$mail->SMTPAuth = true; // enable SMTP authentication
$mail->Port = 25; // set the SMTP server port
$mail->Host = "smtp.gmail.com"; // SMTP server
$mail->Username = $from; // SMTP server username
$mail->Password = $pwd; // SMTP server password
$mail->From = $from;
$mail->FromName = "TESTUSER";
$mail->AddAddress($to);
$mail->Subject = $subject;
$mail->AltBody = "Please return read receipt to me."; // optional, comment out and test
$mail->WordWrap = 80; // set word wrap
$mail->MsgHTML($body);
$mail->IsHTML(true); // send as HTML
$mail->Send();

//return foll
echo '<input id="id1" name="id" type="hidden" value="' . $id . '">'
. '<input id="email1" name="email" type="hidden" value="' . $to . '">'
. '<label id="label1">Mail sent to <b>' . $to . '<b></label>';
} catch (phpmailerException $e) {
echo $e->errorMessage();
}
}
////--------------------------READ email.txt------------------------------------------

if (!empty($_POST['id'])) {

$id = $_POST['id'];
$to = $_POST['email'];
$checkid = "Id:" . $id;
$fh = fopen("https://www.formget.com/tutorial/php-email-tracker/email.txt", "r");
$read = false; // init as false
while (($buffer = fgets($fh)) !== false) {
if (strpos($buffer, $checkid) !== false) {
$a = explode("%",$buffer);
$read = true;
break; // Once you find the string, you should break out the loop.
}
}
fclose($fh);

if ($read == true) {
//$string = $email . " seen the mail on subject: '" . $sub . "' from ip: " . $ipAddress . " on " . $date . " and Id:" . $id . "n";
echo "<img id="closed-image" src="img/envelope-open.png" alt="email not opened"/><br><p id="closed-para">"
. "Mail sent from <b>" . $from . "</b><br> To <b>" . $to
. "</b><br>has been<div id="color-read"> opened on <b>".$a[1]."</b></div></p>"
. "<input id="id1" name="id" type="hidden" value="" . $id . "">"; //appended hidden input to keep previous data on the page.

} else {
echo "<img id="closed-image" src="img/envelope-closed.png" alt="email not opened"/><br><p id="closed-para">"
. "Mail sent from <b>" . $from . "</b><br> To <b>" . $to
. "</b><br><div id="color-not-read"> Not yet opened......</div></p>"
. "<input id="id1" name="id" type="hidden" value="" . $id . "">"; //appended hidden input to keep previous data on the page.
}
}
trackonline.php
<?php

if (!empty($_GET['email'])) {
$id = $_GET['id'];
$checkid = "Id:" . $id;
$email = $_GET['email'];
$sub = $_GET['subject'];
date_default_timezone_set('Asia/Kolkata');
$date = date('d/m/Y h:i:s a');
$fh = fopen("email.txt", "a+"); //file handler
$a = fgets($fh);
$found = false; // init as false
while (($buffer = fgets($fh)) !== false) {
if (strpos($buffer, $checkid) !== false) {
$found = true;
break; // Once you find the string, you should break out the loop.
}
}
if ($found == false) {
$string = $email."opened the mail with subject:".$sub."on%".$date."% with mailId:".$id."n";
fwrite($fh, $string);
}
fclose($fh);

//Get the http URI to the image
$graphic_http = 'https://www.formget.com/tutorial/php-email-tracker/blank.gif';

//Get the filesize of the image for headers
$filesize = filesize('blank.gif');

//Now actually output the image requested, while disregarding if the database was affected
header('Pragma: public');
header('Expires: 0');
header('Cache-Control: must-revalidate, post-check=0, pre-check=0');
header('Cache-Control: private', false);
header('Content-Disposition: attachment; filename="blank.gif"');
header('Content-Transfer-Encoding: binary');
header('Content-Length: ' . $filesize);
readfile($graphic_http);

//All done, get out!
exit;
}
myjs.js
$(document).ready(function()
{
$('#loading-image').hide();
//-------------------------------------------first ajax call to submit form1 and send email then receieve response HTML-----//
$("form#form1").submit(function()
{
$('#box').slideUp('fast');
$('#loading-image').show();
var d = $("#form1").serialize();
$.ajax({type: 'POST',
url: "tracker.php",
data: d,
dataType: 'html',
success: function(data)
{ $('form#form2').css("display","block");
$('#view').html(data);
$('#loading-image').hide();
$('#track_mail').css("visibility", "visible");
},
error: function() {
alert("oops! something went wrong....");
}
});
return false;
});
//-------------------------------------------first ajax call to submit form1 and send email then receieve response HTML-----//
$("form#form2").submit(function()
{
var d = $("#form2").serialize();
$.ajax({type: 'POST',
url: "tracker.php",
data: d,
dataType: 'html',
success: function(data)
{
$('#readstatus').html(data);
},
error: function() {
alert("oops");
}
});
return false;
});
});
style.css
Includes basic styling of HTML elements.
@import url(http://fonts.googleapis.com/css?family=Raleway);

h1{
text-align:center;
color: black;
font-size: 2em;
margin-top: 40px;
margin-bottom: 40px;
}

#main{
margin: 25px 100px;
font-family: 'Raleway', sans-serif;
}

h2{
background-color: #FEFFED;
text-align:center;
border-radius: 10px 10px 0 0;
margin: -10px -40px;
padding: 30px 40px;
color: black;
font-weight: bolder;
font-size: 1.5em;
margin-top: -1px !important;
// margin-bottom: -19px !important;
}

hr{
border:0;
border-bottom:1px solid #ccc;
margin: 10px -40px;
margin-bottom: 30px;
}

#login{
width:580px;
float: left;
border-radius: 10px;
font-family:raleway;
border: 2px solid #ccc;
padding: 0px 40px 0px;
margin-top: 70px;
margin: 50px;
margin: 0% 25%;
}

input[type=text],input[type=email],input[type=password]{
width:99.5%;
padding: 10px;
margin-top: 8px;
border: 1px solid #ccc;
padding-left: 5px;
font-size: 16px;
font-family:raleway;
}

textarea{
width:99.5%;
padding: 10px;
margin-top: 8px;
border: 1px solid #ccc;
padding-left: 5px;
margin-bottom: 40px;
font-size: 16px;
font-family:raleway;
}

input[type=submit],input[type=button]{
width: 49%;
background-color:#FFBC00;
color: white;
border: 2px solid #FFCB00;
padding: 10px;
font-size:20px;
cursor:pointer;
border-radius: 5px;
margin-bottom: 40px;
margin-left:25%
}

#track_mail{visibility: hidden;}
#track-div{margin-left:25%;}
#loading-image{margin-left:32%;}
#label{margin:0 20%;}
#para{
clear: both;
margin: 0 35%;
}
#view{padding-left:25%;}

form#form2 {
display: none;
}
img#closed-image, img#open-image {
margin: -6px 40% -40px 38%;
}
p#closed-para,div#color-read,div#color-not-read {
margin: 46px;
text-align: center;
line-height: 1.6em;
}
div#color-read{color:green;}
div#color-not-read{color:red;}
Conclusion
After reading the above post, I am sure you will give a try to the script provided and implement it in your own projects as well. Feel free to visit our website again in the future to get in touch with new coding tricks. You can let us know about your feedback in the space provided below ![]()
You may also like –
Send Email via Mandrill API Using PHP

Nowadays, Email marketing is increasing rapidly and become one of the most demanding services in the internet business. In email marketing, emails are one of the most powerful communication media which create a strong bond between companies and their clients.
Sending emails to a large number of clients are one of the most difficult and challenging tasks for the users. They need a powerful medium to send emails to their clients.
Keeping in mind such requirement of users for sending emails, we are creating a blog to Send Email via Mandrill API Using PHP.
We are going to integrate Mandrill API/SMTP services for sending personalized and one-to-one e-commerce emails.
It can also be used to send automated transactional emails like password resets, order confirmations, and welcome messages.
Watch the live demo or download code from the link given below

We have introduced a very effective and powerful online email management sevice name MailGet. Using MailGet you can easily send bulk emails through Mandrill and manage your emails at very low cost.
Steps to configure Mandrill API in an application: –
Step 1: – Download the latest Mandrill API library .zip folder.
Step 2: – Extract the downloaded .zip folder.
Step 3: – Create a lib folder in the root folder, copy & paste all the files available in the src folder of extracted zip folder.
Step 4: – Create index.php and paste the PHP code given below in it.
index.php
Provide an interactive user interface to insert important information like sender’s email, reciever’s email, message etc. These information will be stored in an array which will further passed to the Mandrill API library and send emails.
<html>
<head>
<meta http-equiv="Content-Type" content="text/html; charset=windows-1252">
<title>Send Email via Mandrill API Using PHP</title>
<link rel="stylesheet" type="text/css" href="css/style.css"/>
<script src="js/jquery.js"></script>
</head>
<body>
<?php

// include Mandrill library file
include ("lib/Mandrill.php");

// Passing Mandrill API key in the library
$mandrill = new Mandrill('<-- Mandrill API-Key -->');
$sen_name = "";
$sen_email = "";
$rec_name = "";
$rec_email = "";
$email_type = "";
$email_sub = "";
$msg_type = "";
$box_msg = "";
$message = array();
$to = array();
if (isset($_POST['sen_name'])) {
$sen_name = $_POST['sen_name'];
}
if (isset($_POST['sen_email'])) {
$sen_email = $_POST['sen_email'];
}
if (isset($_POST['rec_name'])) {
$rec_name = $_POST['rec_name'];
}
if (isset($_POST['rec_email'])) {
$rec_email = $_POST['rec_email'];
}
if (isset($_POST['email_type'])) {
$email_type = $_POST['email_type'];
}
if (isset($_POST['email_sub'])) {
$email_sub = $_POST['email_sub'];
}
if (isset($_POST['msg_type'])) {
$msg_type = $_POST['msg_type'];
}
if (isset($_POST['box_msg'])) {
$box_msg = $_POST['box_msg'];
}
$to[] = array(
'email' => $rec_email,
'name' => $rec_name,
'type' => $email_type
);
$message['subject'] = $email_sub;
$message[$msg_type] = $box_msg;
$message['from_email'] = $sen_email;
$message['from_name'] = $sen_name;
$message['to'] = $to;
if(isset($to[0]['email']) && $to[0]['email'] !== ""){
$result = $mandrill->messages->send($message);
$status = $result[0]['status'];
}
?>

<div id="main">
<h1>Send Email via Mandrill API Using PHP</h1>
<div id="login">
<h2>Message Box</h2>
<hr>
<form action="" method="POST">
<h3>From : </h3>
<label>Sender's Name (Optional) : </label> <input type="text" name="" class="" placeholder="Enter Sender's Name"/>
<label>Sender's Email Address : </label> <input type="email" name="sen_email" class="sen_email" placeholder="Enter Sender's Email Address"/>
<h3>To : </h3>
<label>Receiver's Name (Optional) : </label> <input type="text" name="rec_name" class="" placeholder="Enter Receiver's Name"/>
<label>Receiver's Email Address : </label> <input type="email" name="rec_email" class="rec_email" placeholder="Enter Reciever's Email Address"/>
<label>Email Type : </label>
<input type="radio" name="email_type" value="to" checked="checked" /><label> Default </label>
<input type="radio" name="email_type" value="cc"/><label> cc </label>
<input type="radio" name="email_type" value="bcc"/><label> bcc </label>
<label>Subject : </label>
<input type="text" name="email_sub" class="" placeholder="Subject"/>
<label>Message : </label>
<input type="radio" name="msg_type" value="text" checked="checked"/><label>text</label>
<input type="radio" name="msg_type" value="html"/><label>html</label>
<textarea name="box_msg" rows="10" cols="30">Write your message here...</textarea>
<input type="submit" value="Check" id="submit"/>
</form>
</div>

<div id="note">
<?php
if (isset($status)){
if($status == "sent") {
echo "<script>alert('Congratulations!!! Your Email has been sent successfully!!!')</script>";
} elseif($status == "rejected") {
echo "<script>alert('Sorry!!! Some error occurs, Please try again.')</script>";
}
}
?>
</div>
</div>
<script>
jQuery(document).ready(function() {
jQuery("#submit").click(function() {
var sen_email = jQuery('.sen_email').val();
var rec_email = jQuery('.rec_email').val();
if (sen_email == "") {
alert('Sender's Email Address cannot be empty.');
}
if (rec_email == "") {
alert('Receiver's Email Address cannot be empty.');
}
});
});
</script>
</body>
</html>
Step 5: – Create style.css file and paste the css code given below in it.
style.css
Includes basic styling of HTML elements.
@import url(http://fonts.googleapis.com/css?family=Raleway);

#main{
width:960px;
margin:50px auto;
font-family:raleway;
}
h2{
background-color: #FEFFED;
text-align:center;
border-radius: 10px 10px 0 0;
margin: -10px -40px;
padding: 15px;
}
hr{
border:0;
border-bottom:1px solid #ccc;
margin: 10px -40px;
margin-bottom: 30px;
}
#login{
width:300px;
float: left;
border-radius: 10px;
font-family:raleway;
border: 2px solid #ccc;
padding: 10px 40px 25px;
margin-top: 70px;
}
input[type=text],input[type=email]{
width:100%;
padding: 10px;
margin-top: 8px;
border: 1px solid #ccc;
padding-left: 5px;
font-size: 16px;
font-family:raleway;
}
input[type=submit]{
width: 100%;
background-color:#FFBC00;
color: white;
border: 2px solid #FFCB00;
padding: 10px;
font-size:20px;
cursor:pointer;
border-radius: 5px;
margin-bottom: 15px;
}
textarea{
width: 100%;
}
div#main h1 {
margin-left: -80px;
}
Conclusion :
Hope you have enjoyed reading the above post and will definitely integrate and use Mandrill API for sending emails. Always keep in touch with us for more interesting blogs. You can send us your feedback and share your experience about the blog in the space given below 🙂
Email List Cleaning: Email Verification And Validation

MailGet has an inbuilt email list cleaning feature that allows you to clean up your email list automatically. Cleaning of bad emails from your contacts list will maximize the efficiency of your email marketing campaigns and protect your email sender reputation.
MailGet cleans email list by providing four options to you namely, –
- Clean List: This option will check all emails from MX records and filter those emails whose domain doesn’t exist. Apply rules of popular ISP’s for filtering bad emails.
- Spam Clean: Deletes all emails that match with your Spam list.
- Suspended Clean: Deletes all emails that match with your Suspended list.
- Bounce Clean: Deletes all emails that match with your Bounced list emails.
Buy MailGet List Cleaning - NOW!
MailGet’s List Cleaning Demo Video
Follow These Steps To Clean Your Email List –
Note – Email list cleaner process will take time according to the size of the list.Once you start the process of list cleaning you have to wait till its completion and then perform another.
Step: 1 Click on the Contacts tab in your MailGet dashboard then click Clean Contact List section.

Step: 2 Click on CLEAN LIST buttons to clean your list.
Step: 3 After clicking on CLEAN LIST button a popup will appear then, click on CONFIRM button to delete invalid emails.

Step 4: Once done a message popup will appear displaying the success message then click OK.

Spam Clean
If your previously sent emails are marked as spam by some recipients, then the recipient email address will automatically get stored in Spam/Complaint List.

Step: 1 Click on the Contacts tab in your MailGet dashboard then click Clean Contact List. After then click on SPAM buttons to clean your list.
 Step: 2 After clicking on SPAM, one popup will appear, Now click on Confirm button to delete spam emails.

Step 3: After then Message popup will appear that shows Spam Emails Removed successfully after then click OK button.

Suspended Clean
If any recipient unsubscribes your previously sent email then their email addresses will automatically get stored in Suspended List.

Step 1: Click on the Contacts tab in your MailGet dashboard then click on Clean Contact List. After then click on SUSPENDED buttons to clean your list.

Step 2: After clicking on SUSPENDED, one popup will appear, Now click on Confirm button to delete Suspended emails.

Step 3: After then Message popup will appear that shows Suspended Emails Removed successfully after then click on OK button.

Bounce Clean
Delete emails present in your Bounce Emails List.

Step:1 Click on the Contacts tab in your MailGet dashboard then under Clean Contact List section click BOUNCE buttons to clean your list.
 Step: 2 After clicking on BOUNCE, one popup will appear, Now click on Confirm button to clean bounce emails.

Step 3: After then Message popup will appear that shows bounce Emails Removed successfully after then click on OK button.

Restore Your List –
You can also restore your deleted list. MailGet maintains a restore point for all four options of lists cleaning.
Each restore point will automatically delete after one week. So, if you want to back up your previous removed list you can restore it by clicking on RESTORE button.
- When you click on RESTORE button, a confirmation popup will opt out simply click on CONFIRM button.

- When your list will successfully restore, you will get a success message. Click Ok button to close this window.

Have a look over Email Delivery feature to know how to get success rate increased by delivering email campaign into subscriber’s inbox using MailGet.
Export Gmail Contacts in PHP

Hello! This post will show you how to import google contacts just after entering the gmail id using google oauth2. It will display all google contacts of that particular Email ID and will give you option to download those contact in excel sheet.
OAuth is a strong protocol for accessing the third party data on behalf of owner .
This whole google OAuth cycle is basically focused on accessing the third party data, after passing through a strong authorization we get some access permission with client id and password and that data is used for getting the code and access token and that key is further used for accessing the complete details by accessing the google API.
Watch the live demo or download code from the link given below

MailGet – Email Service Provider has got many smarter and effective features & facilities which can help in email list management.
Before going to complex coding part just have a look over these basic terminology listed below.
Google OAuth:
OAuth stands for “open standard for authorization” and provide a strong authorization scheme on behalf of owner, OAuth was started with oauth1.0
but it has been deprecated and replaced with oauth2.0, make sure you are using oauth2.0
OAuth Code: We only get this code while we are successfully authorized, after getting this code we can request for the access token.
Access Token: This token is key to get the content from the website server, while we request for the access token with authorized code then we get the access token. With this token, we can access most of the API and can collect the data according to our requirements.
Refresh Token: Often! we are confused with refresh the token. Refresh token is not a separate token even though it is same access token, but its value got refreshed after leaving one complete flow or logout from your session.
So Simply get the access token and make its session and maintain it till you get logout and at the time of re-login you will get a new access token or you can call it refresh token .
Steps for getting the google contacts : here we are explaining step-by-step process for accessing the google contacts.
Step :1
In this step you have to make one google oauth registration in google developer console for accessing the google api, for doing that please visit ‘https://console.developers.google.com/project’ and follow these steps.
- Go to the Google Developers Console.
- Select a project, or create a new one by clicking Create Project.
- In the Project name field, type in a name for your project.
- In the Project ID field, optionally type in a project ID for your project or use the one that the console has created for you. This ID must be unique world-wide.
- Click the Create button and wait for the project to be created.
- Click on the new project name in the list to start editing the project.
- In the sidebar under “APIs & auth”, select Consent screen.
- Choose an Email Address and specify a Product Name.
- In the sidebar under “APIs & auth”, select Credentials.
- Click Create a new Client ID — a dialog box appears.
- Register the origins from which your app is allowed to access the Google APIs, as follows. An origin is a unique combination of protocol, hostname, and port.
- In the Application type section of the dialog, select Web application.
- In the Authorized JavaScript origins field, enter the origin for your app. You can enter multiple origins to allow for your app to run on different protocols, domains, or subdomains.
- Wildcards are not allowed. In the example below, the second URL could be a production URL.
http://localhost:8080
https://myproductionurl.example.com - In the Authorized redirect URI field, delete the default value. Redirect URIs are not used with JavaScript APIs.
- Click the Create Client ID button.
- In the resulting Client ID for web application section, copy the Client ID that your app will need to use to access the APIs.
just after completion you will get a client id and client secret id.
Step :2
we have already gotten the client id and secret and now we will use these credential for login window or our login page ‘index.php’ while we execute this page we get window asking for ‘sign in with google ‘ when we click on button we are sent to gmail login window and after entering the gmail credential it directly redirected to our google api. here user is asked for giving and deny the access if he click on access button he is redirected to the callback page here we can see our google contacts and can import them in excel sheet.
index.php
<html>
<head>
<link href="css/style.css" rel="stylesheet" type="text/css"/>
<link href='http://fonts.googleapis.com/css?family=Source+Sans+Pro|Open+Sans+Condensed:300|Raleway' rel='stylesheet' type='text/css'>
<title>Export Google Contacts Using PHP</title>

</head>
<body>

<div id="main" class="col-sm-6 col-md-4 col-lg-2">
<div id="envelope" class="col-sm-6 col-md-4 col-lg-2">

<header id="sign_in" class="col-sm-6 col-md-4 col-lg-2">
<center>
<h2>Export Gmail Contacts With Google Oauth PHP</h2>
</center>
</header>
<hr>
<div id="content" class="col-sm-6 col-md-4 col-lg-2">
<center>
<h3 id ="sign">Sign In with Google for retrieving Contacts</h3>
<div class="col-sm-6 col-md-4 col-lg-2">
<a href="https://accounts.google.com/o/oauth2/auth?client_id=470483912778-4sa6ef2lhjfabp2no8nb5f0ht3sel123.apps.googleusercontent.com&redirect_uri=http://127.0.0.1/export-gmail-contacts-in-php/callback.php&scope=https://www.google.com/m8/feeds/&response_type=code"><img src="images/sign1.png" alt="" id="signimg"/></a>
</div>
</center>
</div>
</div>
</div>

</body>
</html>
Step :3
Here you will display all the google content , we are using access token for accessing the google contacts.
callback.php
<?php
session_start();
?>
<?php
$accesstoken = '';
$client_id = '470483912778-4sa6ef2lhjfabp2no8nb5f0ht3sel123.apps.googleusercontent.com';
$client_secret = 'lu7N1ukpl2nezboZI2orYRj2';
$redirect_uri = 'http://127.0.0.1/export-gmail-contacts-in-php/callback.php';
$simple_api_key = 'AIzaSyB_IOM7pfIAc3OEFZZBC5LpoACPPgwJ_hg';
$max_results = 500;
$auth_code = $_GET["code"];

function curl_file_get_contents($url) {
$curl = curl_init();
$userAgent = 'Mozilla/4.0 (compatible; MSIE 6.0; Windows NT 5.1; .NET CLR 1.1.4322)';

curl_setopt($curl, CURLOPT_URL, $url); //The URL to fetch. This can also be set when initializing a session with curl_init().
curl_setopt($curl, CURLOPT_RETURNTRANSFER, TRUE); //TRUE to return the transfer as a string of the return value of curl_exec() instead of outputting it out directly.
curl_setopt($curl, CURLOPT_CONNECTTIMEOUT, 5); //The number of seconds to wait while trying to connect.

curl_setopt($curl, CURLOPT_USERAGENT, $userAgent); //The contents of the "User-Agent: " header to be used in a HTTP request.
curl_setopt($curl, CURLOPT_FOLLOWLOCATION, TRUE); //To follow any "Location: " header that the server sends as part of the HTTP header.
curl_setopt($curl, CURLOPT_AUTOREFERER, TRUE); //To automatically set the Referer: field in requests where it follows a Location: redirect.
curl_setopt($curl, CURLOPT_TIMEOUT, 10); //The maximum number of seconds to allow cURL functions to execute.
curl_setopt($curl, CURLOPT_SSL_VERIFYPEER, 0); //To stop cURL from verifying the peer's certificate.
curl_setopt($curl, CURLOPT_SSL_VERIFYHOST, 0);

$contents = curl_exec($curl);
curl_close($curl);
return $contents;
}

$fields = array(
'code' => urlencode($auth_code),
'client_id' => urlencode($client_id),
'client_secret' => urlencode($client_secret),
'redirect_uri' => urlencode($redirect_uri),
'grant_type' => urlencode('authorization_code')
);
$post = '';
foreach ($fields as $key => $value) {
$post .= $key . '=' . $value . '&';
}
$post = rtrim($post, '&');

$curl = curl_init();
curl_setopt($curl, CURLOPT_URL, 'https://accounts.google.com/o/oauth2/token');
curl_setopt($curl, CURLOPT_POST, 5);
curl_setopt($curl, CURLOPT_POSTFIELDS, $post);
curl_setopt($curl, CURLOPT_RETURNTRANSFER, TRUE);
curl_setopt($curl, CURLOPT_SSL_VERIFYPEER, 0);
curl_setopt($curl, CURLOPT_SSL_VERIFYHOST, 0);
$result = curl_exec($curl);

curl_close($curl);

$response = json_decode($result);
if (isset($response->access_token)) {
$accesstoken = $response->access_token;
$_SESSION['access_token'] = $response->access_token;
}
if (isset($_GET['code'])) {
$accesstoken = $_SESSION['access_token'];
}

if (isset($_REQUEST['logout'])) {
unset($_SESSION['access_token']);
}
$url = 'https://www.google.com/m8/feeds/contacts/default/full?max-results=' . $max_results . '&oauth_token=' . $accesstoken;
$xmlresponse = curl_file_get_contents($url);

if ((strlen(stristr($xmlresponse, 'Authorization required')) > 0) && (strlen(stristr($xmlresponse, 'Error ')) > 0)) {
echo "<h2>OOPS !! Something went wrong. Please try reloading the page.</h2>";
exit();
}

//echo " <a href ='http://127.0.0.1/gmail_contact/callback.php?downloadcsv=1&code=4/eK2ugUwI_qiV1kE3fDa_92geg7s1DusDsN9BHzGrrTE# '><img src='images/excelimg.jpg' alt=''id ='downcsv'/></a>";
// echo "<h3>Email Addresses:</h3>";
$xml = new SimpleXMLElement($xmlresponse);
$xml->registerXPathNamespace('gd', 'http://schemas.google.com/g/2005/Atom');

$result = $xml->xpath('//gd:email');

foreach ($result as $title) {
$arr[] = $title->attributes()->address;
echo $title->attributes()->displayName;
}
//print_r($arr);
foreach ($arr as $key) {
//echo $key."<br>";
}

$response_array = json_decode(json_encode($arr), true);

// echo "<pre>";
// print_r($response_array);
//echo "</pre>";

$email_list = '';
foreach ($response_array as $value2) {

$email_list = ($value2[0] . ",") . $email_list;
}
//echo $abc;
// $final_array[] = $abc;
// $farr =$final_array;
//echo "<pre>";
//print_r($final_array);
// echo "</pre>";
//<input type="text" value="<?php echo ($abc);?" name="email">
?>
<html>
<head>
<link href="css/style.css" rel="stylesheet" type="text/css"/>
<link href="css/table.css" rel="stylesheet" type="text/css"/>
<link href='http://fonts.googleapis.com/css?family=Source+Sans+Pro|Open+Sans+Condensed:300|Raleway' rel='stylesheet' type='text/css'>
<meta http-equiv="Content-Type" content="text/html; charset=windows-1252">
<title>Export Google Contacts Using PHP</title>

</head>
<body>

<div id="main" >

<div class="col-sm-6 col-md-4 col-lg-2">
<div id="envelope" class="col-sm-6 col-md-4 col-lg-2">

<header id="sign_in">
<h2> <form action='csvdownload.php' method='post'>
<input type='text' value= '<?php echo $email_list; ?>' name='email' style='display: none'>

<input type='image' width='100' value='submit' src='images/excelimg1.gif' alt='submit Button' id ='btnimg'>
</form>Export Gmail Contacts<a href='https://www.google.com/accounts/Logout?continue=https://appengine.google.com/_ah/logout?continue=http://127.0.0.1/export-gmail-contacts-in-php/index.php' ><img src='images/logoutimg1.png' alt=''id ='logoutimg'/></a></h2>
</header>
<hr>
<div id="content" class="col-sm-6 col-md-4 col-lg-2">
<div class="col-sm-6 col-md-4 col-lg-2">

<div class="col-sm-6 col-md-4 col-lg-2">

<table cellspacing='0'>
<thead>
<td id="name">S.No</td>
<td>Email Addresses</td>
</thead>
<?php
$count = 0;
foreach ($result as $title) {
?>
<tr>
<td><?php echo $count;
$count++ ?></td>
<link href="style.css" rel="stylesheet" type="text/css"/>
<td><?php echo $title->attributes()->address; ?></td>
</tr>
<?php
}
?></table>

</div>

</div>
</div>
</div>
</div>
</div>

</body></html>
csvdownload.php
This script will show you how to download the google contacts in excel sheet , we are getting the data in form of string and here we are using scripts for printing them for spread sheet format.
<?php

$data = $_POST['email'];

$arry[] = explode(',', $data);

foreach ($arry as $row) {
$arlength = count($row);
for ($i = 0; $i < $arlength; $i++) {
$farry[] = explode(',', $row[$i]);
}
}

header("Content-type: text/csv");
header("Content-Disposition: attachment; filename=file.csv");
header("Pragma: no-cache");
header("Expires: 0");

$file = fopen('php://output', 'w');
fputcsv($file, array('Description'));
foreach ($farry as $row) {
fputcsv($file, $row);
}
exit();
Conclusion :
After reading the above post, I am sure you will give a try to the script provided and implement it in your own projects as well. Feel free to visit our website again in the future to get in touch with new coding tricks. You can let us know about your feedback in the space provided below
Get more related information here –
Verify Gmail Address via SMTP

Nowadays, Email list management became one of the most challenging issues faces by the users. Users usually unable to clean email list in a proper and effective manner. Due to which email management get frustrating segment and also takes a large part of our valuable time.
So, our today’s blog is based on a very common but a very important topic i.e Verify Gmail Address via SMTP.
Why Email verification is needed?
Most of the users faces a problem of fake and unnecessary email’s registration when they provide any registration or contact us features in their websites. The visitors generally use some fake emails with some unnecessary username and send us their data, which is very common but very frustrating for the website owner to manage.
Watch the live demo or download code from the link given below

MailGet – Email Service Provider has introduced a very smart and effective online application to clean and maintain your emails at very low cost.
What users usually do to stop this ?
To get rid of such issues, they usually use some regular expression(regex) validation in their website, but this is not a good solution of this problem because regex only checks the format of input provided by the user and on the basis of their expression they check whether the email is valid or not.
Now, the question arises, What the user will do to manage the emails? Is there any way to validate the email correctly?
The answer is yes, it is possible.
We have brought a simple and very effective solution of this issue.We will validate the Gmail Addresses via SMTP on the basis of responses of various SMTP servers.
These SMTP servers will belong to the domain which we will get from the provided gmail address for registration/contact us segment. Their response will decide whether the provided email is a valid email address or invalid.
So, let’s have a look that how we are going validate the emails.
- Take email from the users and will separate them in user and hosts portion. Hosts portion will tell us about the domain.
- Run MX DNS query to find out the lists of SMTP servers available for the domain.
- Send SMTP request to domain’s each SMTP server to connect.
- Once connect, we will send HELO followed by the sender and then the recipient. The recipient will the users email we want to test.
- The SMTP server will respond with the following code: –
- 250: – Emails is valid.
- 450/451: – Email is greylisted or some minor error occur i.e Email should be valid.
- 550 or other code: – Email is invalid.
Now, on the basis of above-mentioned response code we will decide whether the email is a valid email or invalid.
Tutorial Scripts in detail
Below are the details of the code used in this tutorial with proper explanation.
Step1: – Download SMTP Email validation library file from here.
Step2: – Create a “lib” folder in the root directory and paste “smtp_validateEmail.class.php“, from the downloaded library folder, in it.
Step3: – Download latest jQuery library and save it in “js“folder ,created at root directory, with the name “jquery.js”;
Step4: – Create a PHP file name “index.php” in the root folder and write the following code in it.
Index.php
Index.php get gmail id and find it alive or dead.
<html>
<head>
<title>Verify Gmail Address via SMTP</title>
<link rel="stylesheet" type="text/css" href="css/style.css"/>
<script src="js/jquery.js"></script>
</head>
<body>
<?php

//included the smtp validate email class
include_once ('lib/smtp_validateEmail.class.php');
$SMTP_Validator = new SMTP_validateEmail();
?>

<div id="main">
<h1>Verify Gmail Address via SMTP</h1>
<div id="login">
<h2>Validate Your Gmail Address</h2>
<form action="" method="POST">
<input type="text" name="val_check_email" class="email_box" placeholder="Username"/><label><b>@gmail.com</b></label>
<input type="submit" value="Check" id="submit"/>
</form>
</div>
<div id="note">
<?php
if (isset($_POST['val_check_email'])) {
$email = $_POST['val_check_email'];

if ($email != "") {
$email.="@gmail.com";
$results = $SMTP_Validator->validate(array($email));
echo "<p class='result'><b>RESULT : </b></p>";
if ($results[$email]) {
echo "<p><b>Congratulations!!!</b> The email address " . "<span class='success'><strong>" . $email . "</strong></span>" . " exists!</p>";
} else {
echo "<p><b>Sorry!!!</b> The email address " . "<span class='fail'><strong>" . $email . "</strong></span>" . " <strong>doesn't</strong> exists!<br>";
}
}
}
?>
</div>
</div>
<script>
jQuery(document).ready(function() {
jQuery("#submit").click(function() {
var val = jQuery('.email_box').val();
if (val == "") {
alert('Please enter an email.');
}
});
});
</script>
</body>
</html>
Step5: – Create a “CSS” folder with “style.css” file in the root directory and paste the following code in it.
style.css
Includes basic styling of HTML elements.
@import url(http://fonts.googleapis.com/css?family=Raleway);

#main{
width:960px;
margin:50px auto;
font-family:raleway;
}
div#main h1 {
margin-left: -30px;
}
h2{
background-color: #FEFFED;
text-align:center;
border-radius: 10px 10px 0 0;
margin: -10px -40px;
padding: 15px;
}
hr{
border:0;
border-bottom:1px solid #ccc;
margin: 10px -40px;
margin-bottom: 30px;
}
#login{
width:300px;
float: left;
border-radius: 10px;
font-family:raleway;
border: 2px solid #ccc;
padding: 10px 40px 25px;
margin-top: 70px;
}
input[type=text]{
width:69%;
padding: 10px;
margin-top: 8px;
border: 1px solid #ccc;
padding-left: 5px;
font-size: 16px;
font-family:raleway;
}
input[type=submit]{
width: 100%;
background-color:#FFBC00;
color: white;
border: 2px solid #FFCB00;
padding: 10px;
font-size:20px;
cursor:pointer;
border-radius: 5px;
margin-bottom: 15px;
}
#note{
clear: left;
padding-top: 20px;
}
span.success{
color:green;
}
span.fail{
color:red;
}
Now, run the script and enjoy…
Conclusion :
After reading the above post, I am sure you will give a try to the script provided and implement it in your own projects as well. Feel free to visit our website again in the future to get in touch with new coding tricks. You can let us know about your feedback in the space provided below ![]()
Are you all done with the email verification part via SMTP?
And wondering how to promote your service to those cleaned & active addresses which you’ve verified with lots of efforts.
If you are thinking the same then we have something great to offer.
MailGet Bolt – email marketing service which will help you send emails in bulk and target clients around the globe.
Export Yahoo Email Contacts Using PHP

In this blog post, We’ll learn that how we can export yahoo contacts with the help of a PHP Program. We’re going to create an application which will export contacts in a CSV file, i.e, excel sheet.
Yahoo uses OAuth authentication protocol to grant access to user data.So we’ll use the same library to achieve this purpose for our application.
User will get prompt to sign in followed by redirection to the Yahoo login page followed by the Yahoo Contacts display page.
So we’ll see the complete process step-by-step.

For a quick and complete solution, you can use our email marketing service MailGet.
Files to be needed:
First of all you need to download Yahoo Oauth Library. You can download it from github. It contains an example along with the library files.
Process:
Step 1:
In the first step, you need to sign-up to get a Consumer Key for the application. This key is application specific, not user specific. If you want to register your application and wish to obtain a Consumer key, Click here. Login with your yahoo credentials when asked. Click on Create an App and follow the process explained in the following image.

Yahoo will provide you a Consumer Key and a Consumer Secret.
Step 2:
In this step, we’ll use get_request_token() method to get a Request Token from our application. Yahoo will response with a request token (OAuth token) along with request token secret (OAuth Token Secret).
First of all you need to make changes in the library file globals.php. You need to paste OAUTH_CONSUMER_KEY & OAUTH_CONSUMER_SECRET, you just generated in the previous step.
define('OAUTH_CONSUMER_KEY', 'YOUR CONSUMER KEY');
define('OAUTH_CONSUMER_SECRET', 'YOUR CONSUMER SECRET');
So, create a PHP file named index.php.
In this file, we’re going to define callback URL and obtain request token along with the request token secret.
Given below is the callback URL.
$callback = "https://www.formget.com/tutorial/export-yahoo-contacts-using-php/yahoo_callback.php";Now, get_request_token()
get_request_token(OAUTH_CONSUMER_KEY, OAUTH_CONSUMER_SECRET, $callback, false, true, true);There will be other code including headers used for the parsing body to extract the request token and secret from the result returned by get_request_token. The user will be redirected to the callback domain.
Step 3:
After the 2nd step, the user will be directed to yahoo for authorization using request_auth. Yahoo then asks user to enter his/her credentials and then the user will able to access private data if he/she is authorized to. After this, authorized user will be directed back to the application.
Step 4:
In this step, request token and OAuth verifier will be exchanged for Access Token with the help of get_access_token_yahoo() method. Yahoo then grants an access token and along with an access token secret.
So, you need to create another PHP file with a name yahoo_callback.php.
In this file, access token will get exchanged.
This function calling is responsible for token exchanging.
get_access_token_yahoo(OAUTH_CONSUMER_KEY, OAUTH_CONSUMER_SECRET, $request_token, $request_token_secret, $oauth_verifier, false, true, true);Now with the help of callcontact_yahoo() method, we’ll access Yahoo Contacts.
callcontact_yahoo(OAUTH_CONSUMER_KEY, OAUTH_CONSUMER_SECRET, $guid, $access_token, $access_token_secret, false, true);There will be other code including headers used for parsing body to extract the access token and secret from the result returned by get_access_token_yahoo.
So these are the main steps you need to follow. Now take a look at the code given below.
PHP File : index.php
This is the main application file where user will be asked to sign-in.
<?php
require_once('globals.php');
require_once('oauth_helper.php');
// Callback URL
$callback = "https://www.formget.com/tutorial/export-yahoo-contacts-using-php/yahoo_callback.php";
// Get the request token using HTTP GET and HMAC-SHA1 signature
$retarr = get_request_token(OAUTH_CONSUMER_KEY, OAUTH_CONSUMER_SECRET, $callback, false, true, true);
if (! empty($retarr)){
list($info, $headers, $body, $body_parsed) = $retarr;
if ($info['http_code'] == 200 && !empty($body)) {
$_SESSION['request_token'] = $body_parsed['oauth_token'];
$_SESSION['request_token_secret'] = $body_parsed['oauth_token_secret'];
$_SESSION['oauth_verifier'] = $body_parsed['oauth_token'];
$url = urldecode($body_parsed['xoauth_request_auth_url']);
}
}
?>

<!--HTML Code (Interface) -->
<html>
<head>
<title>Export Yahoo Contacts Using PHP</title>
<link href="bootstrap/css/bootstrap.css" rel="stylesheet" type="text/css"/>
<link href="css/style.css" rel="stylesheet" type="text/css"/>
</head>
<body>
<div class="container-fluid">
<h1>Export Yahoo Contacts Using PHP</h1>
<div id="login">
<div class="row">
<div class="col-md-12">
<h2 id="h2">Yahoo Sign-in</h2>
</div>
</div>
<div class="row">
<div class="col-md-12">
<a id="signin" href="<?php echo $url; ?>"><img id="signinwithyahoo" class="img-responsive" src="images/sign-in-with-yahoo.png"></a>
</div>
</div>
</div>
</div>
</body>
</html>
PHP File : yahoo_callback.php
This is the file where user will be redirected after the authorization and where contacts will be displayed.
<?php
require_once('globals.php');
require_once('oauth_helper.php');
// Fill in the next 3 variables.
$request_token = $_SESSION['request_token'];
$request_token_secret = $_SESSION['request_token_secret'];
$oauth_verifier = $_GET['oauth_verifier'];
// Get the access token using HTTP GET and HMAC-SHA1 signature
$retarr = get_access_token_yahoo(OAUTH_CONSUMER_KEY, OAUTH_CONSUMER_SECRET, $request_token, $request_token_secret, $oauth_verifier, false, true, true);
if (! empty($retarr)) {
list($info, $headers, $body, $body_parsed) = $retarr;
if ($info['http_code'] == 200 && !empty($body)) {
$guid = $body_parsed['xoauth_yahoo_guid'];
$access_token = rfc3986_decode($body_parsed['oauth_token']) ;
$access_token_secret = $body_parsed['oauth_token_secret'];
// Call Contact API
$retarrs = callcontact_yahoo(OAUTH_CONSUMER_KEY, OAUTH_CONSUMER_SECRET, $guid, $access_token, $access_token_secret, false, true);
echo "<pre/>";
}}
?>

<!--HTML Code (Interface) -->
<html>
<head>
<title>Export Yahoo Contacts Using PHP</title>
<link href="bootstrap/css/bootstrap.css" rel="stylesheet" type="text/css"/>
<link href="css/style.css" rel="stylesheet" type="text/css"/>
<script src="js/logout.js" type="text/javascript"></script>
</head>
<body>
<div class="container-fluid">
<h1>Export Yahoo Contacts Using PHP</h1>
<div id="login">
<div id="h2" class="h2 row">
<div class="csv col-md-3"><a href ="https://www.formget.com/tutorial/export-yahoo-contacts-using-php/download.php?<?php echo http_build_query($retarrs); ?>" id="download"><img class="img-responsive" src="images/download-csv-icon.gif"></a></div>
<div class="col-md-6"><h2><span>Yahoo Contacts</span></h2></div>
<div class="col-md-3"><a href ="#" onclick="caller()" id="logout"><img class="img-responsive" src="images/button-power_green.png"></a></div>
</div>
<div class="row">
<div class="col-md-12">
<table cellspacing='0'>
<thead>
<td>Name</td>
<td>Email</td>
</thead>
<?php
foreach ($retarrs as $key => $value) {?>
<tr>
<td><?php echo $value['name']; ?></td>
<td><?php echo $value['email']; ?></td>
</tr>
<?php }
?>
</table>
</div>
</div>
</div>
</div>
</body>
</html>
PHP File : download.php
This file is responsible for the download of CSV file.
<?php

if(isset($_GET))
{
$retarrs = $_GET;
header("Content-type: text/csv");
header("Content-Disposition: attachment; filename=Contacts.csv");
header("Pragma: no-cache");
header("Expires: 0");
$file = fopen('php://output', 'w');
fputcsv($file, array('Name', 'Email'));
foreach($retarrs as $key => $value) {
$data['name'] = $value['name'];
$data['email'] = $value['email'];
fputcsv($file, $data);
}
exit();
}
?>
JS File : logout.js
function call()
{
popup = window.open('https://login.yahoo.com/config/login?logout=1&.direct=2&.src=fpctx&.intl=in&.lang=en-IN&.done=https://in.yahoo.com/');
setTimeout(wait, 4000);
}
function caller()
{
call();
}

function wait()
{
popup.close();
window.location.href = 'https://www.formget.com/tutorial/export-yahoo-contacts-using-php/index.php';
}
CSS File : style.css
This is the css styling code for the index.php file, i.e, our main application Page.
@import url(http://fonts.googleapis.com/css?family=Raleway);
#h2{
background-color: #FEFFED;
text-align:center;
border-radius: 10px 10px 0 0;
border-bottom: 1px solid #ccc;
color: black;
font-weight: bolder;
font-size: 2em;
margin: 0px -15px;
padding: 8% 0;
font-family:raleway;
}
.wrap{
width: 33%;
margin: 5% auto;
}
.container-fluid{
width: 44%;
margin: auto auto;
}
#login{
border: 2px solid #ccc;
border-radius: 10px;
font-family:raleway;
}#signinwithyahoo{
margin: auto;
width: 50%;
padding: 6% 0;
}
h1{
padding: 6% 0;
font-family:raleway;
text-align: center;
}
.csv{
margin: auto;
}
.h2{
margin: 0 !important;
padding: 2% 0 !important;
}
img{
padding: 10% 25%;
}
table {
font-family: 'Raleway', sans-serif;
font-size:12px;
text-shadow: 1px 1px 0px #fff;
border:#ccc 1px solid;
font-size: 16px;
-moz-border-radius:3px;
-webkit-border-radius:3px;
border-radius:3px;
-moz-box-shadow: 0 1px 2px #d1d1d1;
-webkit-box-shadow: 0 1px 2px #d1d1d1;
box-shadow: 0 1px 2px #d1d1d1;
width: 90%;
margin: 7% auto;
}
table td{
padding: 18px;
text-align: center;
border-bottom: 1px solid #e0e0e0;
border-right: 1px solid #e0e0e0;
}thead{
font-weight: bold;
}
table tr:hover td {
background: #f2f2f2;
background: -webkit-gradient(linear, left top, left bottom, from(#f2f2f2), to(#f0f0f0));
background: -moz-linear-gradient(top, #f2f2f2, #f0f0f0);
}
Conclusion:
I hope that at this point you must be feeling yourself comfortable with exporting yahoo contacts in PHP. Please comment for any query. Keep visiting our website.
Configure Multiple SMTPs With MailGet
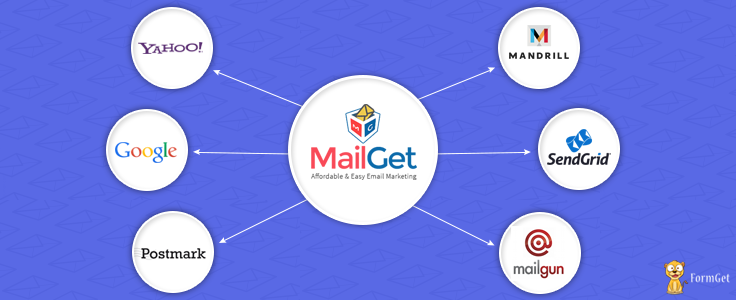
MailGet gives you the freedom to connect with multiple SMTP services in your account and send emails using different providers based on your requirements. It connects with all SMTP’s like Sparkpost, SendGrid, Mailgun, Postmark, Google, Yahoo, etc.
Advantages Of Using Multiple SMTPs –
- Get high open rates and inbox deliverability – You can test multiple SMTP to see which brings you the desired results.
- Switch Between SMTPs – In case if any SMTP service blocks you for high bounce rates or if you have issues regarding any particular SMTP then you can easily shift to other SMTP without affecting your campaigns records.
- As the previous bounces, spams, unsubscribes data remains within MailGet. So when you switch with another SMTP, your emails will not be sent to bounce contacts.
Configure multiple SMTP with MailGet to send emails and update or delete previous SMTP configuration by following these steps –
Add/Configure New SMTP –
Step: 1 Click on the Settings tab in your MailGet dashboard then click on Other SMTP.
Step: 2 Click on ADD NEW SMTP to add new SMTP.

Step: 3 A form opens to fill SMTP details like –
- From Email (Verified In SMTP) – one used for your SMTP service account.
- SMTP Name – desired SMTP name like Gmail, Yahoo, Mailgun, etc.
- Credential Provided By SMTP Service Provider – Host, Port, Username, Password.
Step: 4 In the last step, click on SAVE SMTP CREDENTIALS button to save details.
Note –
- If there is any issue with your SMTP credential, you will see the message displayed below –
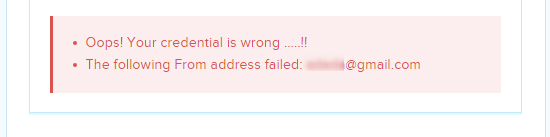
- If the details are correct, you will see the below message. Hence, your are now ready to send emails.
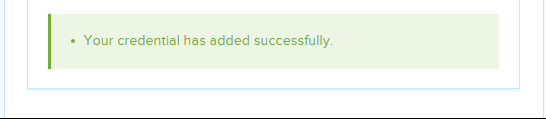
Update Or Delete Previous Configured SMTP –
Follow these steps to update or delete your previous saved SMTP details –
Step: 1 To update or delete your previous configured SMTP click on any SMTP shown in the right sidebar.
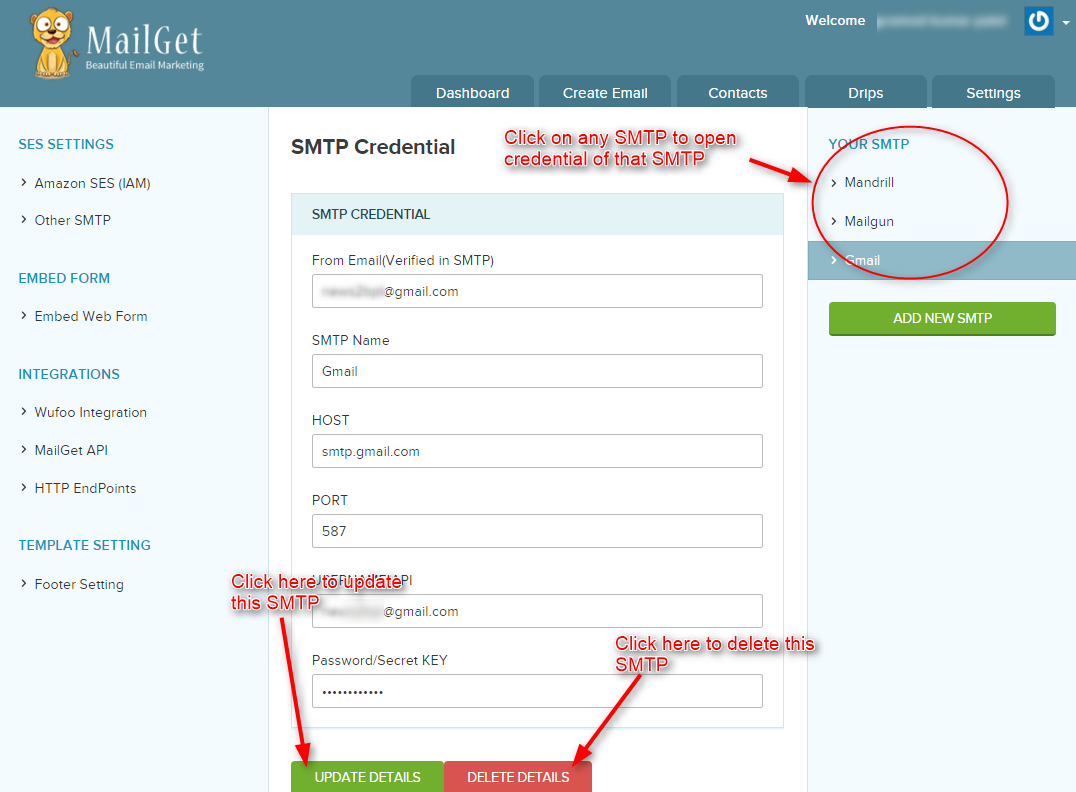
Step: 2 Click on UPDATE DETAILS button to update your details. You will see a message in the image given below after successful update.
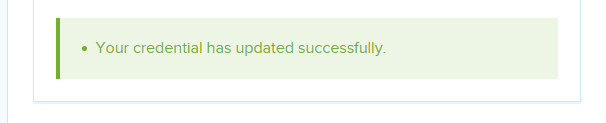
Step: 3 Similarly, when you click on DELETE DETAILS button, you will see the message in the image given below after successful delete of your SMTP.
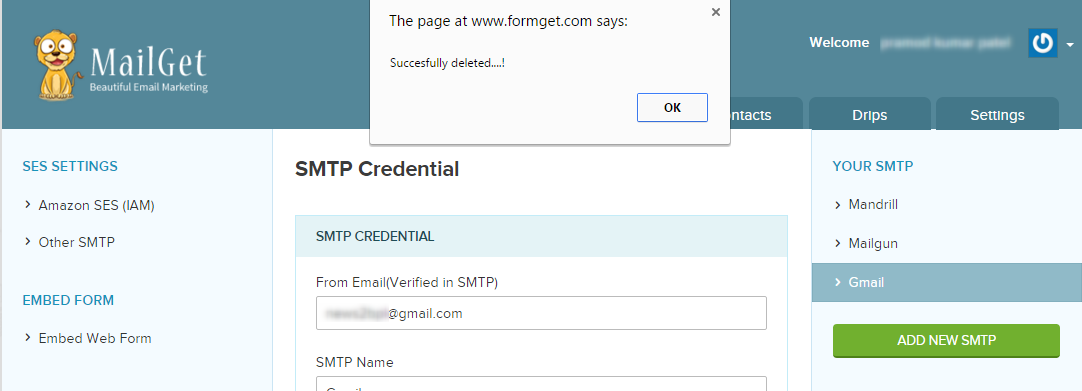
Now, your SMTP has deleted successfully from MailGet, Just click the OK button of an alert message to remove the message.
MailGet API – Email Newsletter Subscribe SignUp Form
MailGet provides API to integrate your website’s signup form with your MailGet account. You can download the MailGet API here.
Once you integrate MailGet API with your application, whenever any visitor signups at your website their contact information will automatically sync with your desired MailGet account contact list.
Integrate MailGet API with your Signup form by following these steps –
Step: 1 Click on the Settings tab in your MailGet dashboard. Now click on MailGet API button present under Integrations section.
Step: 2 In this page, you will find your Unique MailGet API Key. This MailGet API key is to be used on the signup page. Now click on Download MailGet API button to download MailGet API files.
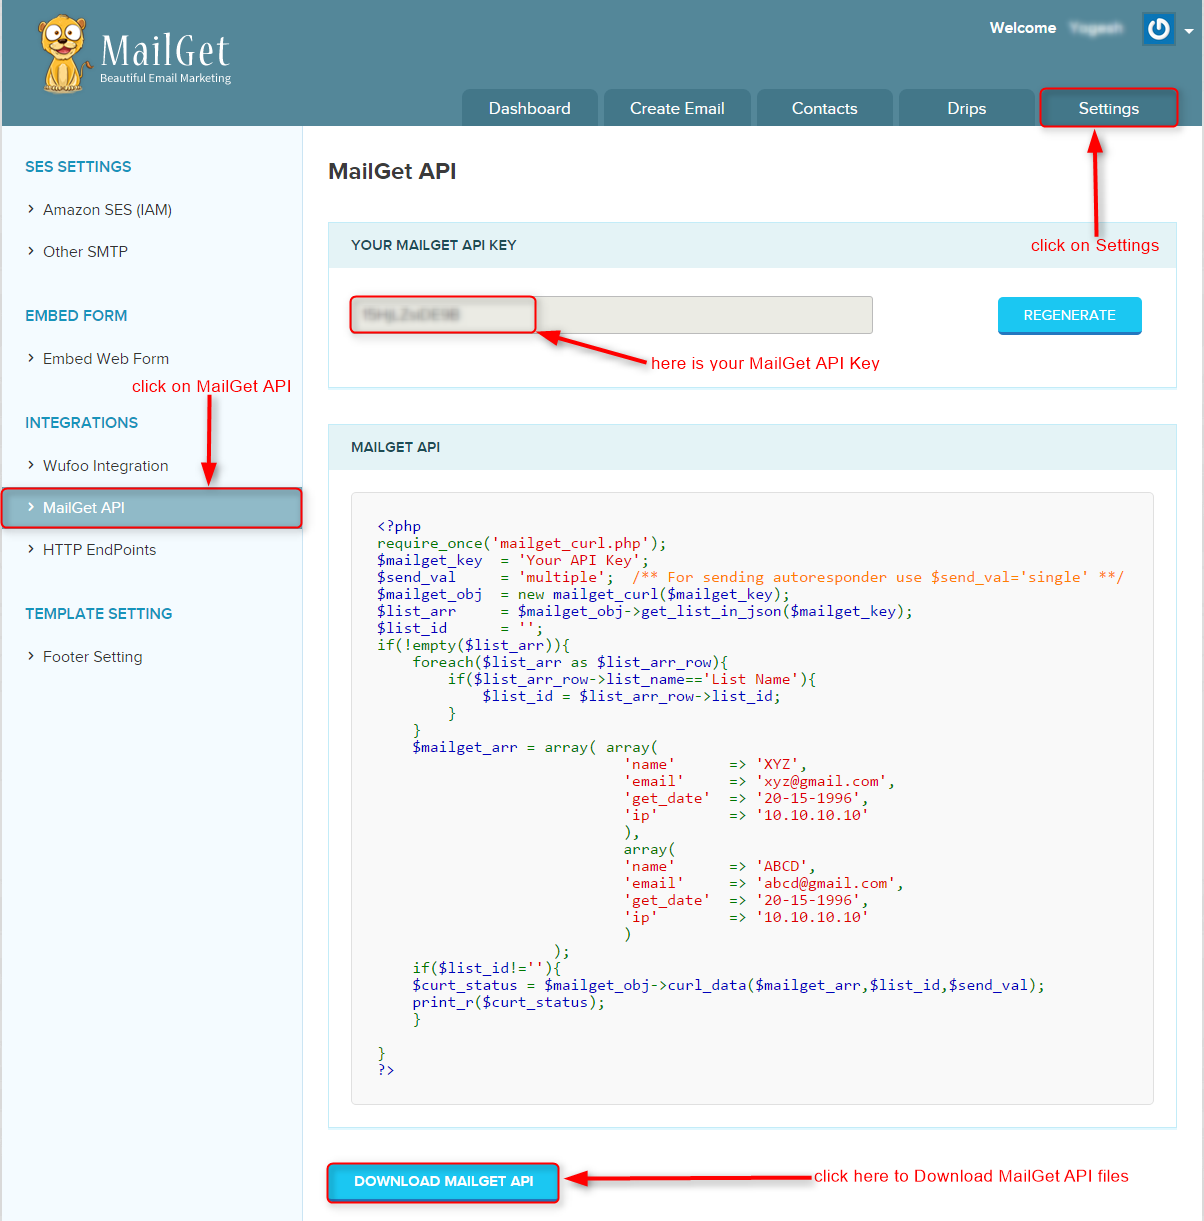
Step: 3 Now include or require mailget_curl.php file on your signup page code and write your MailGet API KEY as shown in the image given below.
If you want to set autoresponder for this list, then you can pass single in $send_val variable.
This $send_val variable is used to identify the process of adding contacts to a list.
If $send_val = ‘single‘ this means to add one contact at a time even array contains multiple emails, and if $send_val = ‘multiple‘ this means can add multiple emails to contact list at once.
Step: 4 Write your desired list name in which contact information of user collected from the form will be saved.
Pass the Name, Email, Custom, Custom1, Custom2, Custom3, Date and IP address of the user in the array as shown in the image given below.
Note – Custom, Custom1, Custom2, Custom3, Date and IP address is optional, you can just leave it blank.
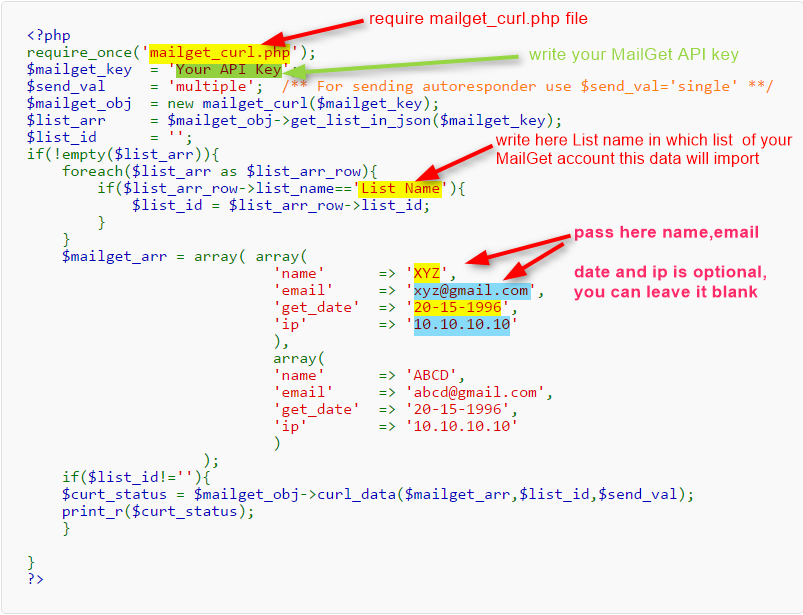
MailGet API Usage –
Here is also a short example that shows how you can use MailGet API on sign up page –
<?php

require_once('mailget_curl.php');

if (isset($_POST['submit'])) {
$name = isset($_POST['name']) ? $_POST['name'] : '';
$email = isset($_POST['email']) ? $_POST['email'] : '';
$custom = isset($_POST['custom']) ? $_POST['custom'] : '';
$custom1 = isset($_POST['custom1']) ? $_POST['custom1'] : '';
$custom2 = isset($_POST['custom2']) ? $_POST['custom2'] : '';
$custom3 = isset($_POST['custom3']) ? $_POST['custom3'] : '';

$mailget_key = 'Your API Key';
$send_val = 'single';/** For sending autoresponder use $send_val='single' * */
$mailget_obj = new mailget_curl($mailget_key);
$list_arr = $mailget_obj->get_list_in_json($mailget_key);
$list_id = '';
if (!empty($list_arr)) {
foreach ($list_arr as $list_arr_row) {
if ($list_arr_row->list_name == 'List Name') {
$list_id = $list_arr_row->list_id;
}
}
$mailget_arr = array(array(
'name' => $name,
'email' => $email,
'custom' => $custom,
'custom1' => $custom1,
'custom2' => $custom2,
'custom3' => $custom3,
'get_date' => date("Y-m-d"),
'ip' => ''
)
);
if ($list_id != '') {
$curt_status = $mailget_obj->curl_data($mailget_arr, $list_id, $send_val);
print_r($curt_status);
}
}
}
?>
MailGet API to delete contacts –
You can also use MailGet API to delete a particular contact from your MailGet list.
For this, You have to pass Email Address to delete and the List Name where the email exists as mentioned in below image.
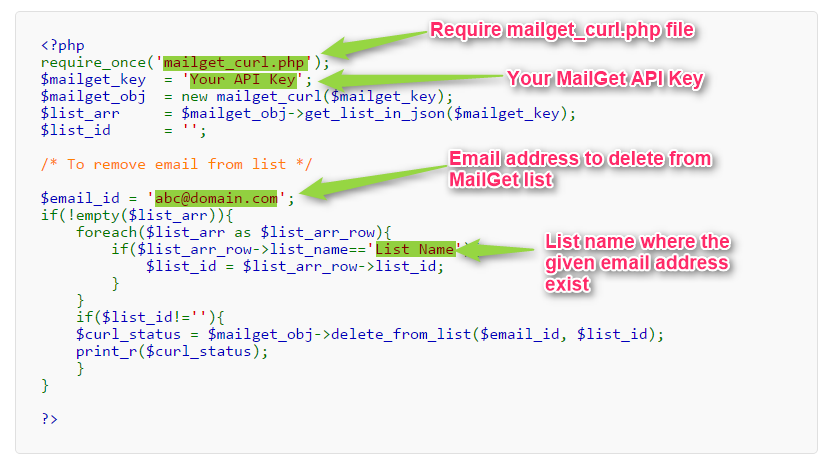
Here is a short example that shows how you can use MailGet API on your website page for deleting contact from your MailGet list –
<?php
require_once('mailget_curl.php');
$mailget_key  = 'Your API Key';
$mailget_obj  = new mailget_curl($mailget_key);
$list_arr     = $mailget_obj->get_list_in_json($mailget_key);
$list_id      = '';

/* To remove email from list */

$email_id = '[email protected]';
if(!empty($list_arr)){
foreach($list_arr as $list_arr_row){
if($list_arr_row->list_name=='List Name'){
$list_id = $list_arr_row->list_id;
}
}
if($list_id!=''){
$curl_status = $mailget_obj->delete_from_list($email_id, $list_id);
print_r($curl_status);
}
}
?>
Now everything is set.! You can also try MailGet subscription form where you just have to embed the html code of the form at your sign up page.
Import Email Contacts Lists To Send Bulk Email
How To Import Subscriber’s List –
For importing subscribers in your MailGet account, you can follow the steps given below. But before moving forward, there is some essential piece of information which you should know while importing your subscribers.
Points To Be Considered –
- Make sure that your email list is in comma-separated value (CSV) file format.
- We don’t compute the duplicate emails. Only the unique subscribers are counted.
- Same email addresses are not imported in a single email list which means that you could have the same addresses in the different list but not in one list.
- In continuation with the above point, duplicate emails are removed while sending emails. So, you don’t have to worry about sending an email twice to the same email address.
Step:1 – Log Into Your Account.
You will first have to log in to your account and move to “Subscribers” for uploading the email address or email list.
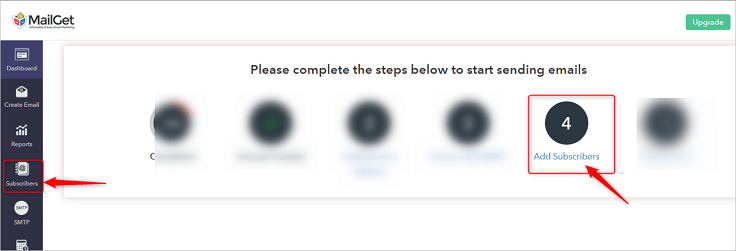
Step:2 – Create A New List.
Click on the “Create New List” option and give a suitable name to your list in which you want to import your subscribers.
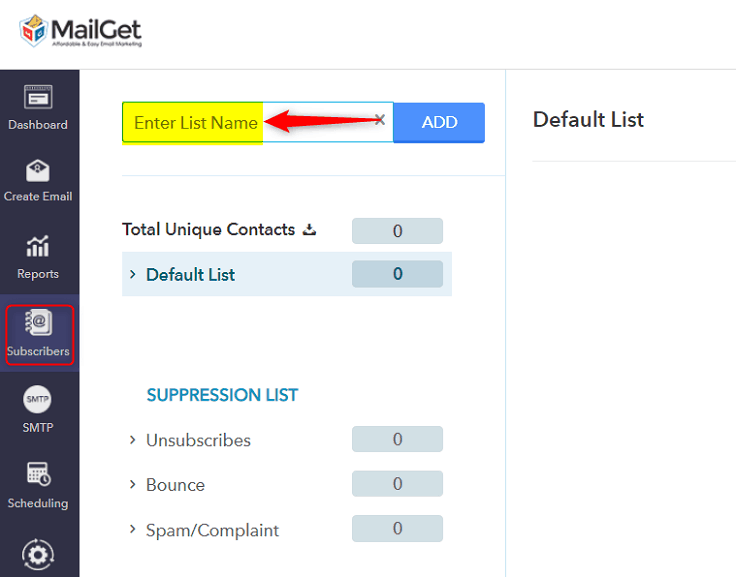
Step:3 – Click on “Add Subscribers”.
Once you have given any suitable name to your email list, then click on “Add Subscribers“ button.
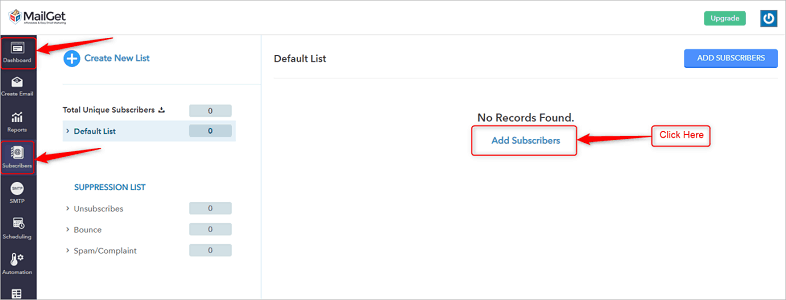
Step:4 – Select the list in which you want to import subscribers.
As you click on “Add Subscribers” button, you will get a display screen.
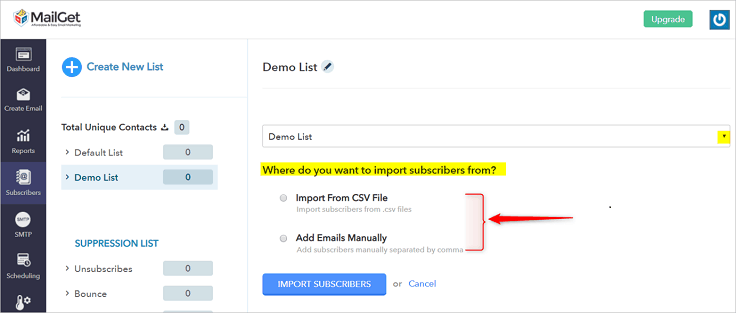
Now, importing subscribers in your created list can be accomplished using the following options-
4.1 Import subscribers in the list through CSV file.
4.2 Add the subscribers manually to your list.
Step:4.1 – Importing subscribers through CSV file.
To add subscribers through CSV file follow the given steps –
- Select “Import From CSV” option from the given checkbox.
- Click on the “Choose” button to upload the CSV file.
- Once you have uploaded the particular file, just click “IMPORT SUBSCRIBERS” button. For reference see the below image.
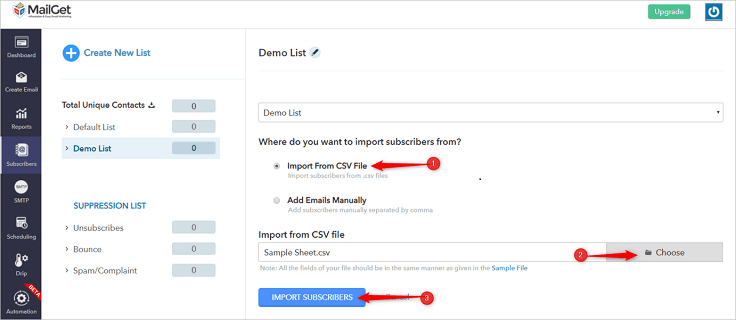
Step:4.2 – Add Emails Manually.
In case if you want to insert few subscribers in an existing email list or into the new list then you can manually add them as shown below-
a.) Select “Add Emails Manually” from the checkbox.
b.) Just below “Add Emails Manually” option, you will get a box in which you can enter the details of the email addresses.
c.) The format of manually adding any subscriber should be – name, email, custom fields.
d.) Details of each subscriber should be separated with a semicolon.
e.) Once you have entered all the email addresses then click “IMPORT SUBSCRIBERS” button.
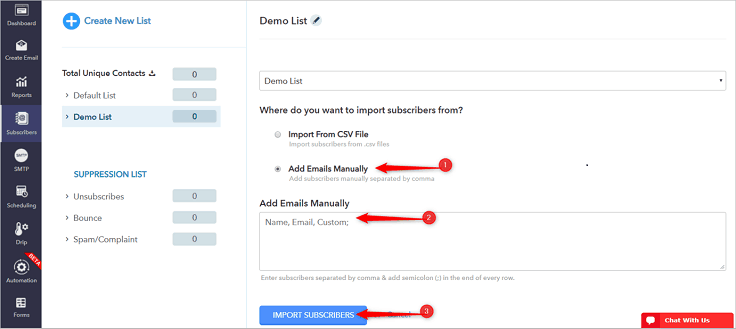
And, in order to avoid complication while importing your list. You can also download our “Sample CSV” and cross-check the format of your CSV file with that sample list.
Step:5 – Mapping the fields.
Once you have uploaded the list then, in this step you will have to map the columns of that uploaded file and match them to the fields given in the drop-down list.
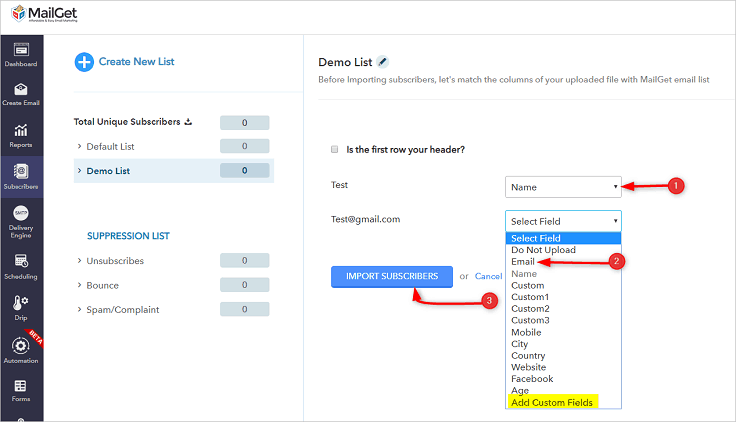
Note – If your file consists header column already, in that case, click on “Is the first row your header?” option then match the headers of your contact list with the drop-down list and hit “IMPORT CONTACTS” button.
Step: 6 – Click “OK” Button
After successfully importing your subscribers, you will see the following message box. Just click the “OK” button.
Now your contacts are successfully imported, and you can send emails to that list using MailGet.
Add an Unsubscribe Link to an Email Using PHP

In this post, we are going to learn how to allow your recipients to unsubscribe from your campaign with a single click. Allowing your recipients to unsubscribe from your mailing list with a single click is the best practice.
Send a unsubscribe link with email:
In one of our tutorial, we have already learned How to Create A Newsletter Subscription that will send an email with HTML to the subscriber.
We will send a unsubscribe link with the email to every user, that link referring to a page.
Unsubscribe link contains the email id of the user, which will get passed to the referring link.

MailGet – email marketing platform can be a great help for quick emailing solution.
The referring link of subscribe will be such as: <a href=”http://localhost/php-newsletter-with-unsubscribe-demo/unsubscribe.php?email=’[email protected]'”>
Note: We will send the email address of subscriber in the form of hash code to maintain the privacy.
Analyzing user experience:

PHP File: unsubscribe.php
<?php
//fetch the email id of the user
$emailid=$_GET['email'];
//decode the emailid
$emailid1=base64_decode($emailid);
?>
<html xmlns="http://www.w3.org/1999/xhtml" xml:lang="en" lang="en" class="gr__visuallightbox_com">
<head>
<title>Unsubscribe</title>
<meta http-equiv="content-type" content="text/html;charset=utf-8">
<link rel="stylesheet" href="unsubscribestyle.css" type="text/css">
</head>
<body>
<form autocomplete="off" action="unsubscribescript.php" method="post" id="formoid" class="formun">
<div><h2 class="title">Do you want to unsubscribe?</h2></div>
<div><label class="title">Email to unsubscribe:</label><input autocomplete="on" type="text" name="email" value="<?php echo $emailid1; ?>"></div>
<div><label class="title">Please let us know why you are unsubscribing:</label>
<div> <input type="radio" name="answer" value="Inappropriate emails"><span>Inappropriate emails</span><br>
<input type="radio" name="answer" value="Not interested anymore"><span>Not interested anymore</span><br>
<input type="radio" name="answer" value="Never signed up"><span>Never signed up</span><br>
<input type="radio" name="answer" value="Too often"><span>Too often</span><br>
<input type="radio" name="answer" value="Bad products"><span>Bad products</span><br>
<input type="radio" name="answer" value="Awful support"><span>Awful support</span><br>
<input type="radio" name="answer" value="Spam!"><span>Spam!</span><br>
</div>
</div>
<div><input type="submit" name="unsubscribe" value="Unsubscribe"></div>
<p class="link"><a href="https://www.formget.com/" target="_blank">For best themes :- Formget.com</a>
</p>
</form>
</body>
</html>
Note: we can use these fields according to our requirment.
Unsubscribe user:
PHP File: unsubscribescript.php
This file deletes the user’s email from the mailing list
<?php
//fetch the email id of the user
$emailid=$_POST['email'];
$pollids="data.txt";
$contents = file_get_contents($pollids);
// this will delets the email id of the user from txt file
$n= str_replace($emailid.",","","$contents");
//this rewrite the fresh emailid in the file
$file = fopen("data.txt",'w');
fwrite($file, $n);
fclose($file);
header('Location: https://www.inkthemes.com/');
?>
Note: Here, we are not handling the fields of user in unsubscribe.php file except email.
If you want to know more about how to send emails just follow our previous tutorial How to Create A Newsletter Subscription
To get the proper functioning code just download our zip file of code and use it.
Making Some Structural Changes:
CSS File: unsubscribestyle.css
@import "http://fonts.googleapis.com/css?family=Open+Sans:300&subset=latin,greek-ext,cyrillic-ext,greek,vietnamese,cyrillic,latin-ext";
#formoid{
font-size:14px;
font-size:14px;
width:;
margin:0 auto;
}
#formoid div.selector,
#formoid select,
#formoid input[type=button],
#formoid input[type=submit] {
font-family: "Open Sans","Helvetica Neue","Helvetica",Arial,Verdana,sans-serif;
color: #666;
padding: 5px;
}
#formoid h2 {
margin: 0.2em 0;
}
#formoid div.uploader:active span.action,#formoid div.uploader.active span.action{
background-color: #E6E6E6;
background-image: none;
outline: 0 none;
color: #333333;
}
#formoid div.uploader input {
opacity: 0;
filter: alpha(opacity:0);
position: absolute;
top: 0;
right: 0;
bottom: 0;
float: right;
height: 25px;
border: none;
cursor: default;
}
#formoid div.uploader.disabled span.action {
color: #aaa;
}
#formoid div.uploader.disabled span.filename {
border-color: #ddd;
color: #aaa;
}
#formoid div.selector:active,
#formoid select:active,
#formoid input[type=button]:active{
background-color: #cccccc;
}
#formoid div.selector:hover,
#formoid select:hover,
#formoid input[type=button]:hover {
color: #333333;
text-decoration: none;
background-position: 0 -15px;
}
#formoid div.selector:active,
#formoid select:active,
#formoid input[type=button]:active {
background-image: none;
outline: 0;
}
#formoid input[type=button][disabled] {
cursor: default;
background-image: none;
opacity: 0.65;
filter: alpha(opacity=65);
}
#formoid input[type=submit] {
background-color: #006dcc;
color: #ffffff;
text-shadow: 0 -1px 0 rgba(0, 0, 0, 0.25);
background-image: linear-gradient(top, #67c2ef, #2FABE9);
background-repeat: repeat-x;
filter: progid:DXImageTransform.Microsoft.gradient(startColorstr='#67c2ef', endColorstr='#2FABE9', GradientType=0);
border-color: #1598d9 #1598d9 #007bb8 #1598d9;
}
#formoid input[type=submit]:hover {
background-color: #2FABE9;
filter: progid:DXImageTransform.Microsoft.gradient(startColorstr='#47b4eb', endColorstr='#2FABE9', GradientType=0);
color: #ffffff;
text-decoration: none;
background-position: 0 -15px;
}
#formoid input[type=submit]:active,
#formoid input[type=submit][disabled] {
background-color: #2FABE9;
*background-color: #2FABE9;
background-image: none;
box-shadow: 0 2px 4px rgba(0, 0, 0, 0.15) inset, 0 1px 2px rgba(0, 0, 0, 0.05);
outline: 0 none;
}
#formoid input[type=text],
#formoid input[type=password],
#formoid textarea {
width: 96%;
padding: 6px 2%;
margin-left:-1px;
font-size: 1em;
font-weight: normal;
padding: 6px;
color: #777;
border-top: solid 1px #aaa;
border-left: solid 1px #aaa;
border-bottom: solid 1px #ccc;
border-right: solid 1px #ccc;
border-radius: 3px;
outline: 0;
}
body {
padding-top: 40px;
padding-bottom: 40px;
background-color: #f5f5f5;
}
.alert {
padding: 8px 35px 8px 14px;
margin-bottom: 20px;
text-shadow: 0 1px 0 rgba(255, 255, 255, 0.5);
background-color: #fcf8e3;
border: 1px solid #fbeed5;
}
.formun {
color: #333;
max-width: 500px;
padding: 19px 29px 29px;
margin: 0 auto 20px;
background-color: #fff;
border: 1px solid #e5e5e5;
}
Conclusion:
In this tutorial we have learned about, how to add the functionality of unsubscription in emails, Hope you have had a great experience. Keep visiting our website in future for more knowledge and information.
Recommended blogs –
Create A Survey Form Via FormGet

1. Can the survey results be sent to a particular (or various) email address based on user input?
2. Does your company advertise on the survey more than a footer at the bottom of the page? If so, is there any way to remove the advertisement?
3. Can an individual attach documents and/or photos to the survey?
Ans: Yes, Or system allow upload file, so Individual can attach document any document in the form of Zip Files.