
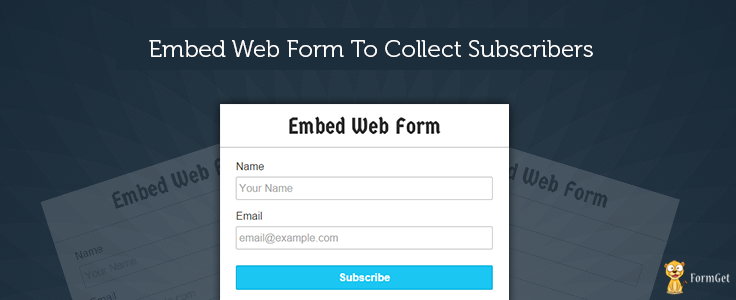
Embed a sign-up email form in your website to gather subscribers for your MailGet email campaigns.
MailGet signup form collects names and email addresses of users and automatically add them up to your selected mailing list on MailGet Contacts. After collecting names and emails of your subscribers, you can send them emails on a regular basis and make them aware about your services and products.

You just need to embed HTML code for subscription form in the backend of your website or blog.
Here are the steps you need to follow to generate web form code in MailGet –
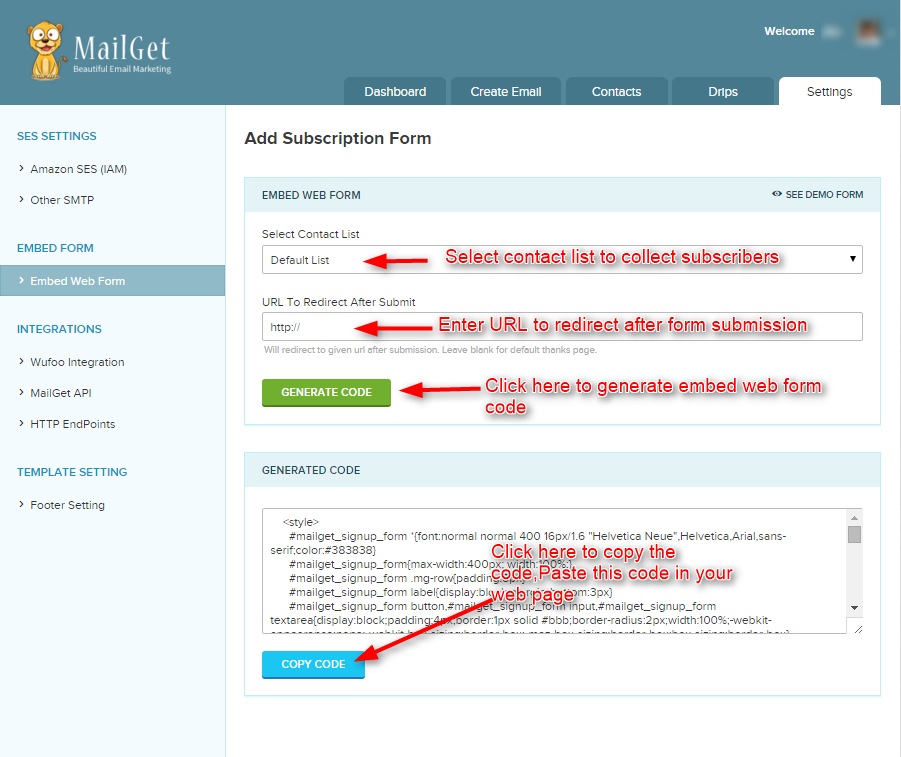
Step-1: Go to the Settings tab in MailGet dashboard and select Embed Web Form under EMBED FORM section.
Now, fill out the required fields as shown in the image given below –
Step-2: Copy the generated code and paste it in your website or blog. The basic form will look like this –
 When subscribers fill out this form and submits it, automatically their name and email will store in your selected contact list.
NOTE: In case you want to create your own subscription forms, then kindly check out FormGet, which will help you in creating any type of subscription forms. For more information, please go through following link – FormGet Integration With MailGet
Drip Email Campaign: Automate Your Marketing

Checkout the Drip/Automated Email Campaigns Explainer Video here.
Drip campaign feature in MailGet provides you a scheduled communication strategy with your subscribers or customers to eliminate the communication gap.
MailGet drips are automated sets of emails that go out based on specific timelines or user actions.
The main advantage is, not only you can save time but can also increase the conversion rates of your marketing campaign by staying in touch with prospects frequently.
In MailGet, Drip emails will be sent to that subscribers only whose information is inserted in the list used for drip in the Drips tab. You can add emails on that list either by Embed Web Form, by List Importing or by Importing Contacts manually.
So,
Follow these steps to set up a Drip Campaign in MailGet –
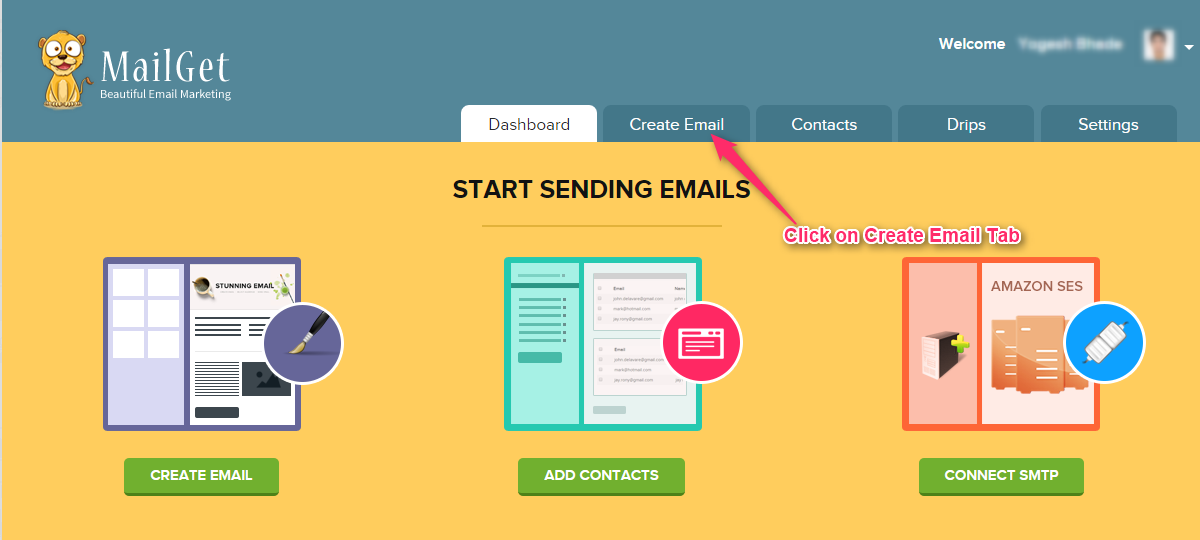
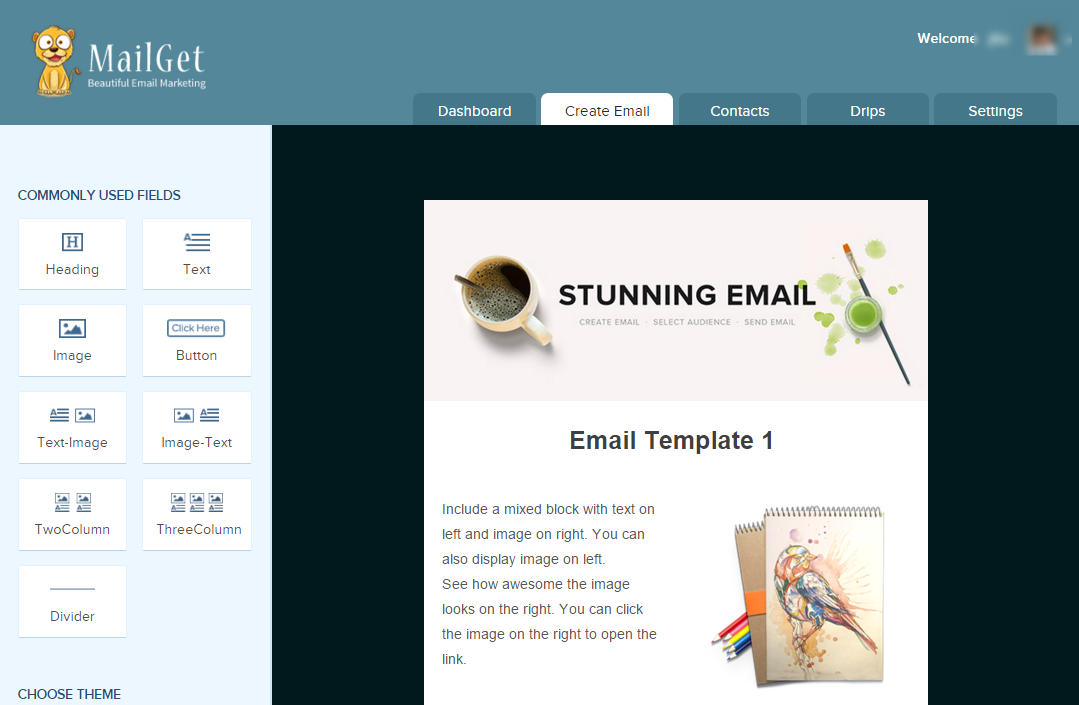
Step 1: Click on Create Email tab in your MailGet dashboard.
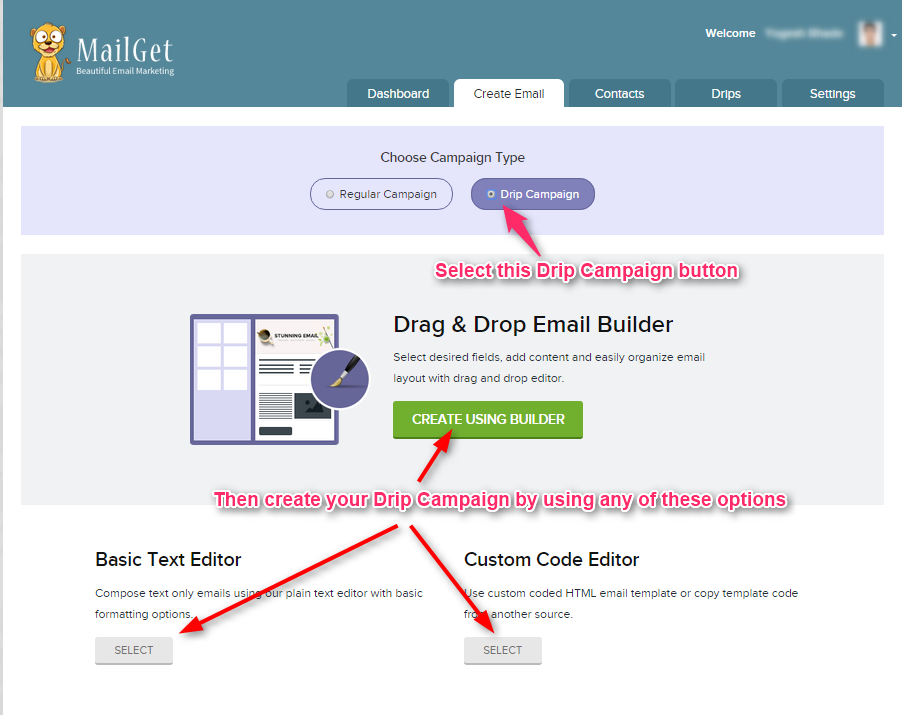
Step 2: Click on Drip Campaign button and build Email Template by using either option – Drag and Drop Email Builder, Basic Text Editor or Custom Code Editor.
For this documentation, I have used CREATE USING BUILDER to build Drip Email Template.
Step 3: Create three email templates for three drips.
Email Template 1 –
- Write the subject name for first Drip Email Template.
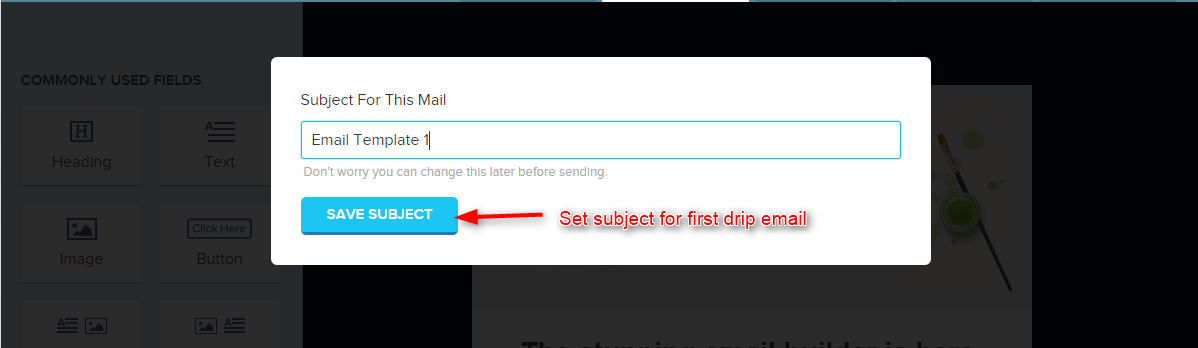
- Now build Drip Email template.
- After making Email Template click on SAVE & CONTINUE button.

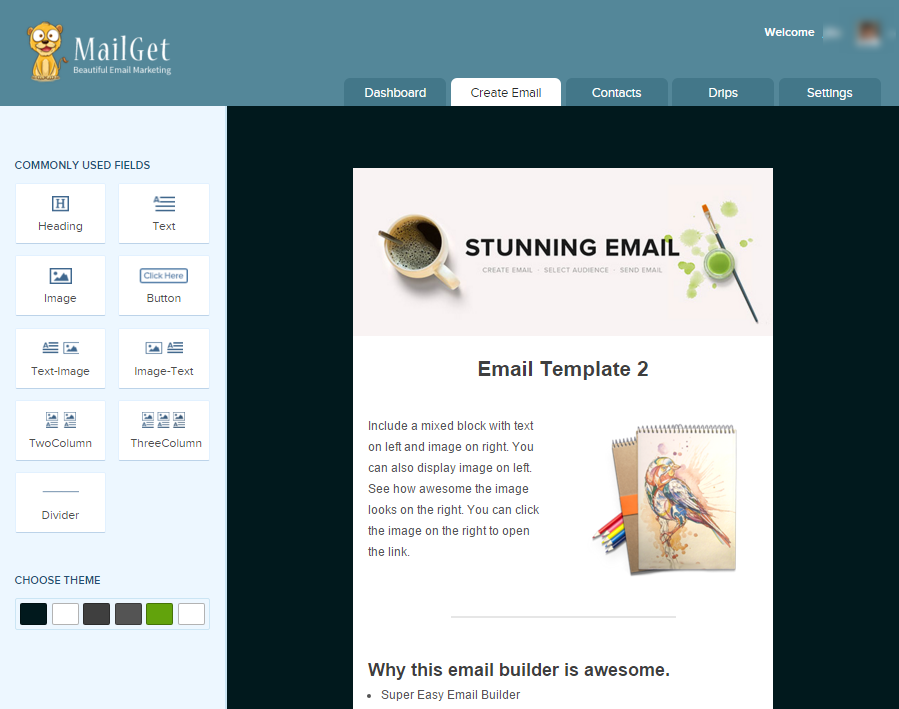
Email Template 2 –
- Write the subject name for this Drip Email Template.
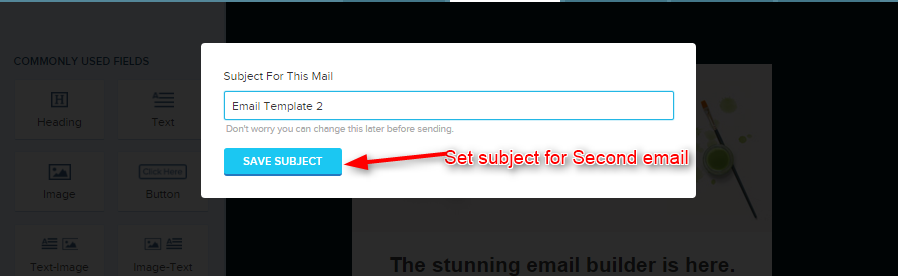
- Now make Drip Email template.
- After making Email Template click on SAVE & CONTINUE button.
Email Template 3 –
- Write the subject name for this Drip Email Template.
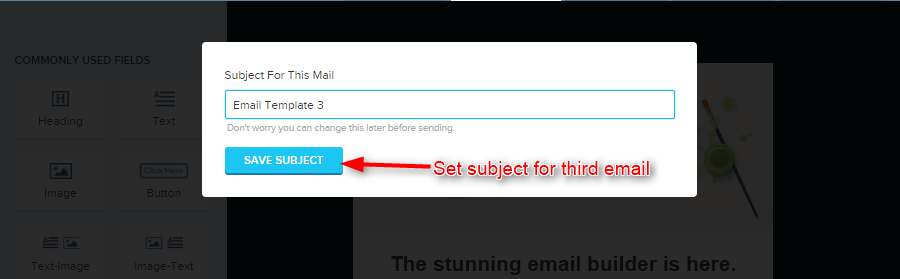
- Now make Drip Email template.
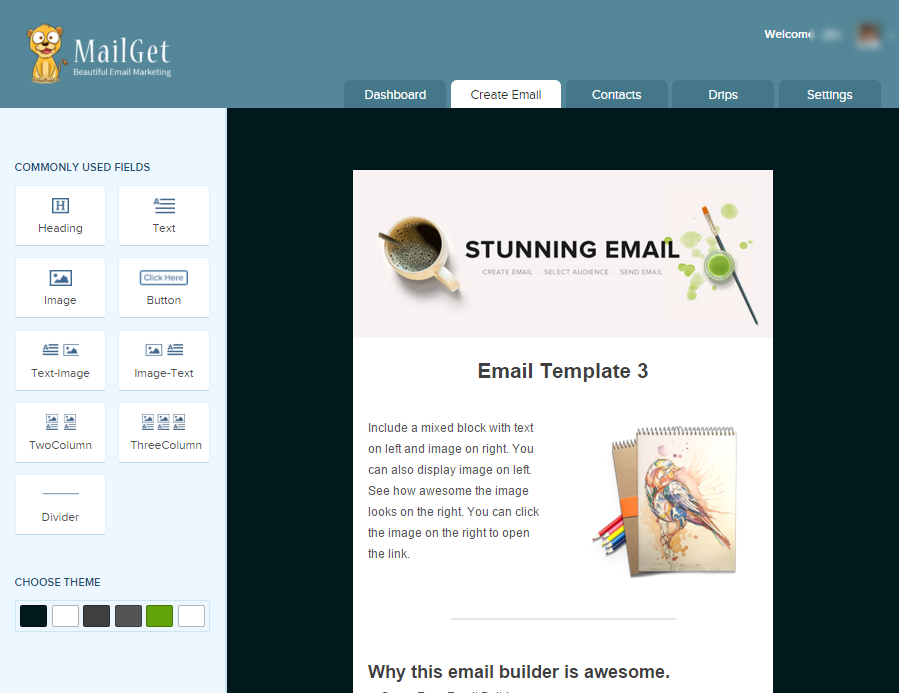
- After making Email Template click on SAVE & CONTINUE button.
Step 4: Now go to Drips tab in the header and click on Create New Drip tab. Fill all the details for your Drip as shown in the image below –
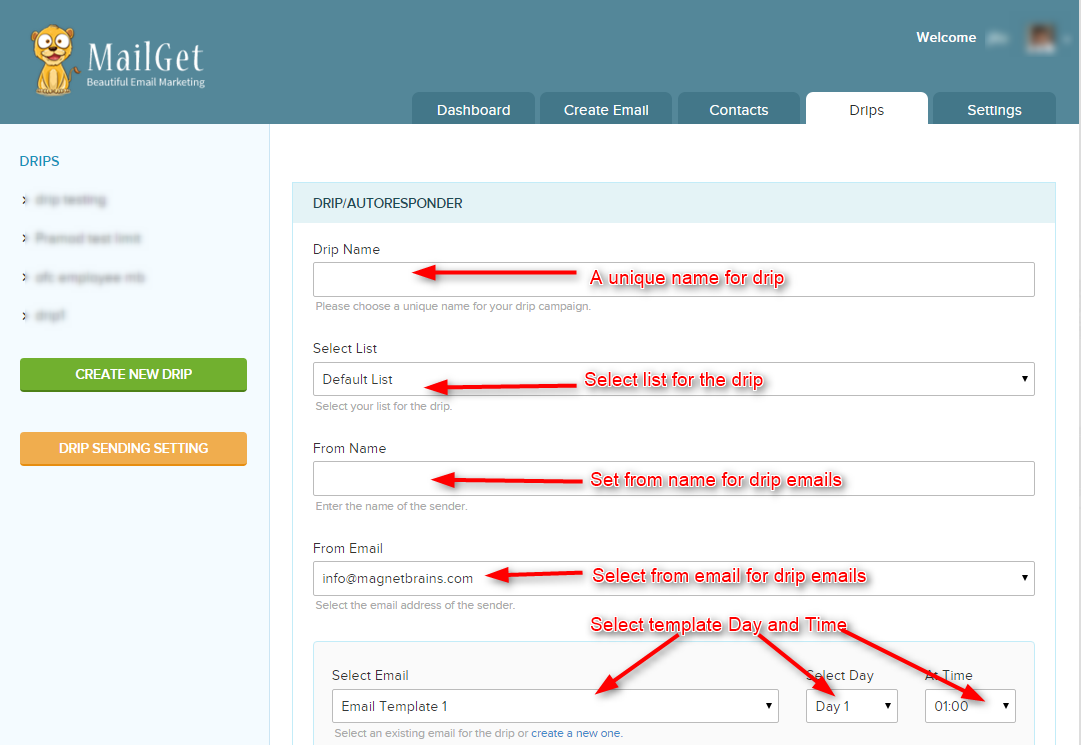
- Set Day and Time for all three drip template.
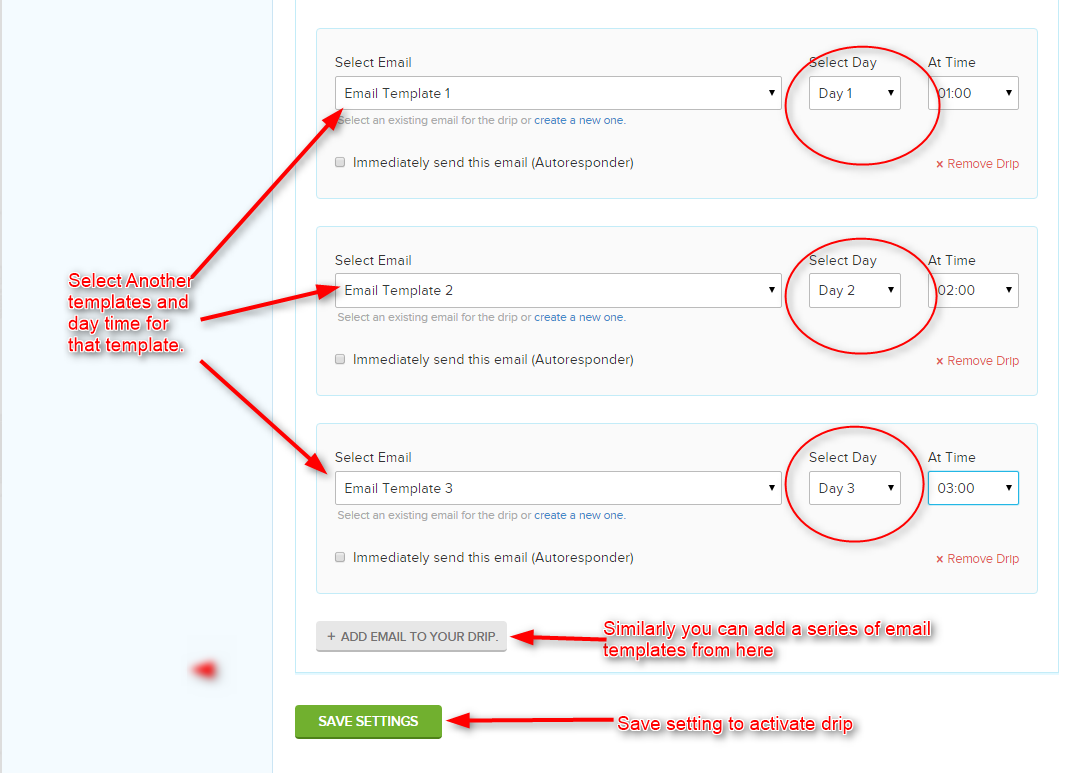
- Once completed with filling details click on Save Settings tab. Now, your Drip is all set to go.!
If any email get stored in your drip list then this drip will automatically send to that email.
Autoresponder Email: Create an Automation Workflow!

MailGet’s autoresponder email feature allows you to send automated sets of emails that go out immediately when a subscriber subscribe at your site and helps you to eliminate communication gap.
Reach more people in less time and turn loyal subscribers into paying customers with MailGet email autoresponder.
The main advantage is you don’t need to write each contact manually to send an email. MailGet automatically appends the subscriber email address in the contact list which you assign while setting up autoresponder campaign.
So, here are the steps you need to set up an autoresponder campaign in MailGet –
Step: 1 Create a web form to capture leads. You can follow the tutorial link below to embed web form on your website.
Embed Web Form
Step: 2 Click on Create Email tab in your MailGet dashboard.
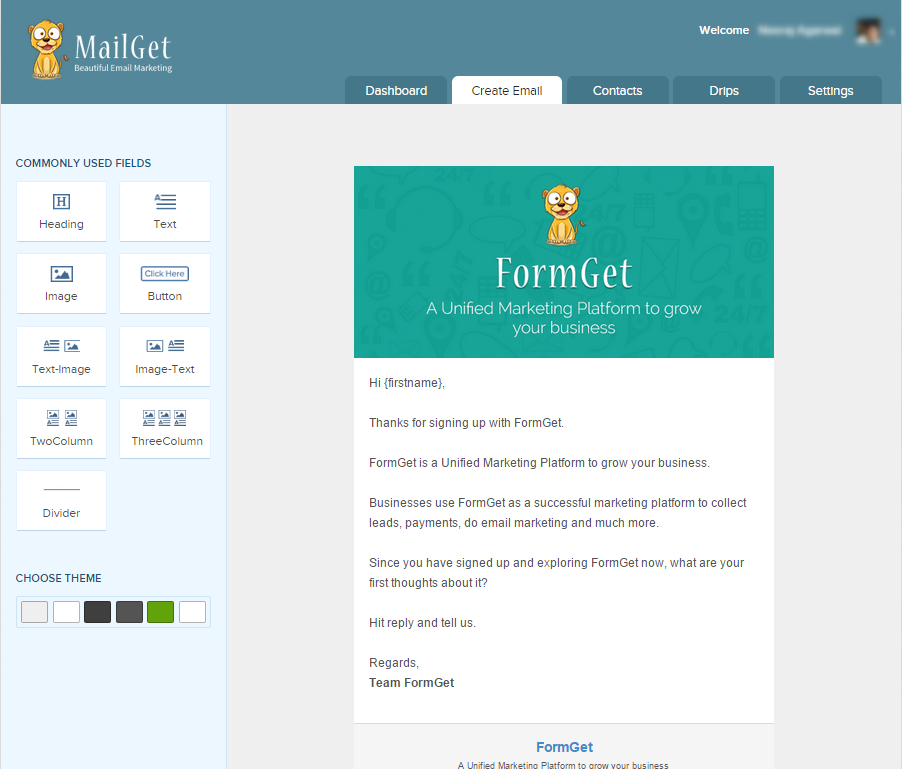
Step: 3 Click on Drip Campaign button and make Email Template by using any one option – Using Email Builder, Basic Text Editor or Custom Code Editor.
- In this documentation, we have used CREATE USING BUILDER to build Autoresponder Template.
- First write the subject name for this Autoresponder Template.
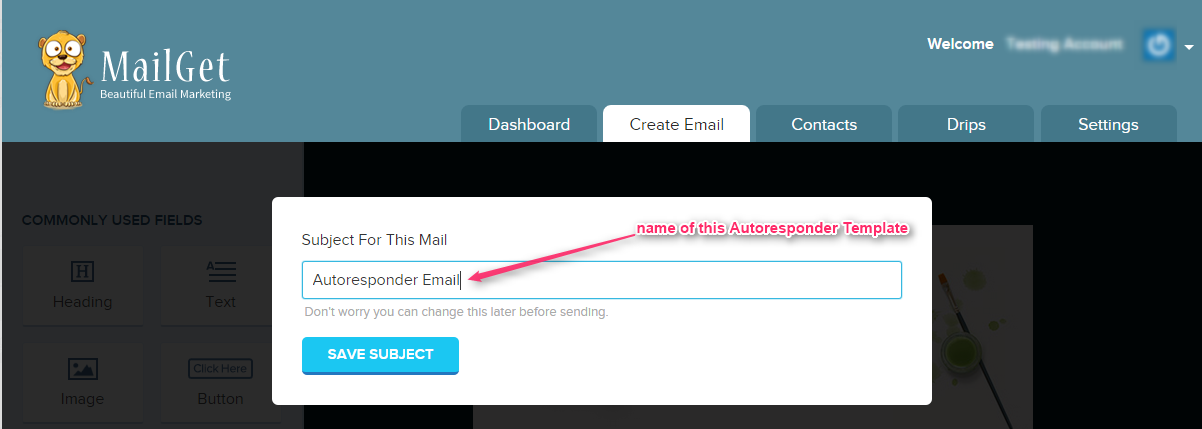
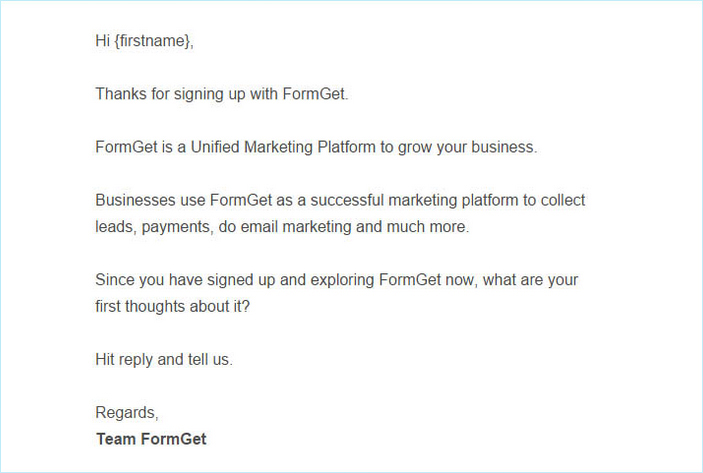
- Now make Autoresponder template.
Step: 4 After making Autoresponder Template click on SAVE & CONTINUE button.
Step: 5 Now click on Drips tab in MailGet dashboard and fill out the details as shown in the image below and don’t forget to check the Immediately send this email option. Your Autoresponder is all set now.!
Note –
Under section Select List – Select the list which you have selected while creating web form.

Note – While filling out the details in Drip/Autoresponder section the contact list selected will store all your subscribers collected through the form. So you can now set a different set of autoresponder series to separate contact lists.
How to Stop Sending Email Spam

In this tutorial, you will learn how to make your emails land directly to inbox.
Sending emails with PHP is easy. All you need is a function and three arguments.
mail($admin_email, “$subject”, $comment, “From:” . $email);
While this is all you need, it is not all enough to normal email messages. Any closer look than a mere glance will reveal that the basic use of the PHP email function does not set the “From:” header line.
The mail() function included with stock PHP does not support SMTP authentication, for example. If mail() does not work for you then for this or another reason, try the PHPMailer package, which is much more comprehensive while maintaining, to a large extent, the simplicity and ease of mail() for sending mail from PHP.
Mark the following points then proceed to code.
Use MailGet – Email Service Provider to send bulk email. MailGet has advance algorithm, necessary headers and spam protection technique to get you maximum Inbox delivery.
Mail Header
A ‘header’ is the technical information that is added to email messages such as sender, subject and time of sending.
This information is picked up by the receiving mail server and is processed in the delivery and display of the email. Senders can also add headers to emails themselves in order to give instructions to the receiving system (mail server). This information cannot be seen by the recipient (unless he starts digging into the HTML source code). For example, a DKIM header is added to prove to the receiving mail server that a sender is authentic.
To ensure delivery of your email directly to user’s inbox, you must insert required and proper header at the place.
Standard syntax for header is, {Header-name: header value}.
Following are the various headers:
$headers='From: [email protected] \r\n';
$headers.='Reply-To: [email protected]\r\n';
$headers.='X-Mailer: PHP/' . phpversion().'\r\n';
$headers.= 'MIME-Version: 1.0' . "\r\n";
$headers.= 'Content-type: text/html; charset=iso-8859-1 \r\n';
$headers.= "BCC: $emailList";
$headers.= "CC: $emailList";
From: The senders email address.
Reply-To: The email address where replies should be sent to.
Return-Path: Kind of the same thing as the Reply-To. Some email clients require this, others create a default.
X-Mailer: The message was sent using PHP, version 2.32.
MIME: Multipurpose Internet Mail Extensions () is an Internet standard that extends the format of email to support:
- Text in character sets other than ASCII.
- Non-text attachments: audio, video, images, application programs etc.
- Message bodies with multiple parts
- Header information in non-ASCII character sets.
Content-type: Tells the content type of message is plain text or HTML, also the character set used.
BCC: Blind Carbon Copy. A comma separated list of more recipients that will not be seen by any other recipients.
CC: Carbon Copy. A comma separated list of more recipients that will be seen by all other recipients.
Received-SPF: Pass (example.org: [email protected] designates 72.85.231.18 as permitted sender)
receiver=example.org;
client-ip=72.85.231.18;
envelope-from=<[email protected]>;
helo=host name, given in the HELO or EHLO command;
CRLF: Carriage Return/Line Feed is must to place each header in a new line.It is /r/n.
An example of a simple message with extra headers could look like this:
<?php $to = "[email protected]"; //argument 1
$subject = "Hi!"; //argument 2
$body = "Hi,\n\nHow are you?"; //argument 3
$headers = "From: [email protected]\r\n" . "X-Mailer: php"; //mail headers
if (mail($to, $subject, $body, $headers)){
echo("<p>Message sent!</p>");
}
else {
echo("<p>Message delivery failed...</p>");
} ?>
If you want to dig deeper, here are the definitions:
IP Address
If you are sending email from a new or cold” IP address, the various ISPs have no basis from which to assign you a sending reputation. Since this reputation will eventually determine whether or not your emails will get pass their SPAM filters, it’s obviously pretty much important. In the case that you are sending a very low volume (e.g., < 10,000 emails/month) of email, you will likely stay off the ISPs’ radars for the most part. However, if you are exceeding this approximate threshold, you should make the warmup process a priority in order to play it right.
Often times, the history of your IP is also an important determinant of an ISPs initial evaluation. Here are a few tools you can use to check the reputation of any IP: Return Path’s SenderScore.org and Cisco’s IronPort SenderBase.org
What does it actually mean to “warm up” an IP address?
IP warming is a gradual process that happens over time, with the goal of establishing a reputation as a legitimate email sender in the eyes of ISPs (Internet Service Providers). When an ISP observes email suddenly coming from a new or “cold” (ie, recently dormant) IP address, they will take notice of it and immediately begin evaluating the traffic coming from that IP. Since volume is perhaps the most telling factor in the eyes of ISP SPAM filters, it is best to begin sending low to moderate volume (e.g., up to 1 million emails/month), eventually working your way up to larger volumes (e.g., over 1 million emails/month). This gives the receiving email providers a chance to closely observe your email sending habits and the way your customers treat the emails they receive from you.
It should be noted that taking this gradual, ramping approach does not guarantee smooth sailing forever more. It remains important to follow best email practices – send acceptable content that your users want to get, maintain quality lists and send your email on a consistent basis.
Spam and Bounce
If your messages are skipping Inbox, the cause is a misconfigured filter or a setting on your Forwarding and POP/IMAP tab.Also,
- Update the SPF record on your DNS.
- As long as the from address is valid most email providers will allow them to be delivered, but security settings are an individual choice.
- If you’re on a shared host, consider buying a unique IP for yourself, because others using your IP may have gotten your IP blacklisted for spam.
- Ensure you do not send more than 250 emails to each provider per hour, as your reputation (of your IP) grows with the email providers you can up this number
Unsubscribe link
Modern email services like Gmail and Outlook.com have made great strides against spams, and it shouldn’t reach inbox very often.
Including an Unsubscribe button for senders with a good reputation will reduce “false-positive” spam complaints, reduce customer service requests, and improve the experience for your customers.
How To Add Unsubscribe Link?
Place an anchor tag in your email content with hyper-reference to a page, that will process the removal of a user from your mailing list.
<a href="">Unsubsribe</a>An Email Unsubscribe Link added by the sender can be mistrusted by recipients every now and then. Giving them the idea ‘they are only in it to sell, so they won’t process my request’. An unsubscribe link in the interface of the email client will seem more reliable.
Finally, spam filters will be positively affected when they see a list-unsubscribe header in your email. Your emails will pass through to the inbox more easily. The list-unsubscribe header is a kind of guarantee that you are a legitimate sender.
List-Unsubscribe: <mailto:[email protected]>, <http://domain.com/mail/unsubscribe.php?u=6546dfdg1ddkhpo9876>Unsubscribe user filter
Check for spam filters, if you have set If the mailbox is using spam filter set by the user, then there will be a strict criteria to pass through it. In your e-mail header, include something unique to the recipient that is, therefore, unlikely to be in a spam message.
Avoid the use of background colors, large or unusual fonts, or more than one font. In other words, don’t make your email look like an advertisement or a brochure.Spam filters are wary of link-laden messages because spammers tend to scatter links around their messages, hoping that the reader will click on at least one.
Subject
Spam filters use a lot of different criteria to judge incoming email.Because different spam filters can function slightly differently, it can be difficult to nail down the exact criteria for judging spam.
Subject lines that are irrelevant or contain a lot of capital letters and excessive punctuation tend to trigger spam filters. Avoid words like “free,” “act now,” “limited time,” or “click now.”
Context
You should aim for clean, minimally formatted emails that emphasize your content. Unfortunately, there is no complete list of spam trigger words. Further, it is not always the case that your email will end up in the spam filter simply by using a so-called trigger word.
This is a common, and easily preventable, cause for landing in the spam folder. Not only this is a good practice for avoiding a spam filter, but it also covers you in the case where the recipient cannot view HTML emails.
Conclusion
Make sure that you fulfill all aspect of not being a spammer, then there will be very minimal chances that your email won’t arrive into an inbox.Still nothing is always perfect at once.So try more and more and keep visiting our blogs for new and updated posts.Thank you!
You may also like –
- Import Contacts To Outlook
- Get Mandrill API-Connected User’s Statistics
MailGet Documentation

MailGet Complete Documentation for customer support. If still don’t find the answer to your query you can contact us at [email protected]
Support Link:
MailGet
- A fresh and affordable email marketing service : MailGet
- Email Builder – MailGet
- MailGet is different from other email marketing services
- Import contacts list on MailGet
- Personalize email marketing with MailGet
- Drip email campaigns – follow Up Emails
- Generate embed web form to collect subscribers
- Autoresponder email – auto-reply to every Lead
- API integrate – create website signup form
- Configure Multiple SMTP with MailGet
- Clean Email List
Amazon SES
- Setup Amazon SES Account
- Generate Amazon SES IAM Credentials
- Increase Amazon SES Email Sending Limit
- Setup Amazon SES Account for Spam Emails
- Setup Amazon SES Account for Handling Bounces
- Amazon SES Email Client: Send Emails 100x Cheaper with MailGet
- Amazing Features of Amazon SES Email Marketing
Mandrill
- Mandrill SMTP To Generate API Key
Sendy
Wufoo
FormGet
Postmark
Mailjet
Mailchimp
AWeber
Constant Contact
SendGrid
- SendGrid SMTP Connection with MailGet
iContact
MailGun
Zapier
Email Marketing
- Know Your Best Times to Send Emails to Get Maximum Open Rates
- How I Increased My Email Open Rate by over 300% with this simple trick
- Email Marketing Best Practices : Subject Lines
Email Marketing Personalization: Get 95% Increase In Open Rates!

MailGet email marketing comes with inbuilt personalized email feature that is powerful enough to get better customer engagement. Email marketing personalization in MailGet can be used in both email body and subject line allowing you to connect with your customers.
Personalization, when used in email marketing, improves open rates, as people are more likely to take action on a personalized email by either enabling images or proclaiming an open by clicking a link.
So, you can use following tags in email body and subject line –
- {firstname} – It’s used for adding the first name of the contact to the email.
- {lastname} – It’s used for inserting the last name of the body or subject line.
- {name} – For complete name tag use it.
- {unsubscribe} – For unsubscribes link in Email Template.
- {custom} – This text will replace by the customs value associated with the email address one you gave while import contacts. Similarly you can use {custom1}, {custom2} and {custom3}.
Note – The names here will be replaced by the one you gave while creating/importing contacts. You can download the sample CSV file here for reference.
Use Personalized Subject Line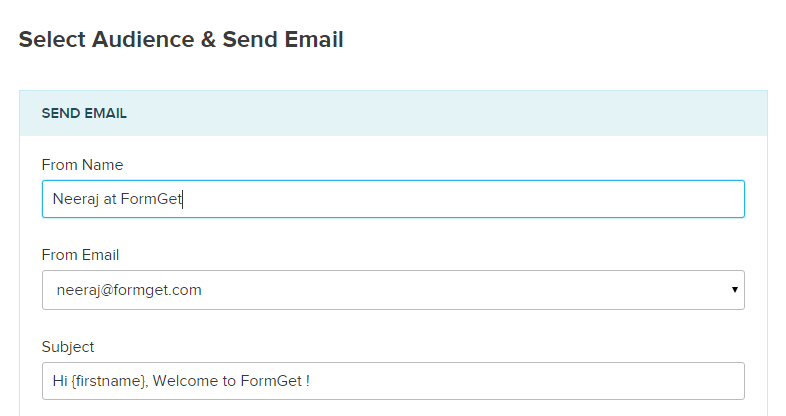
Use Personalization In Email Body
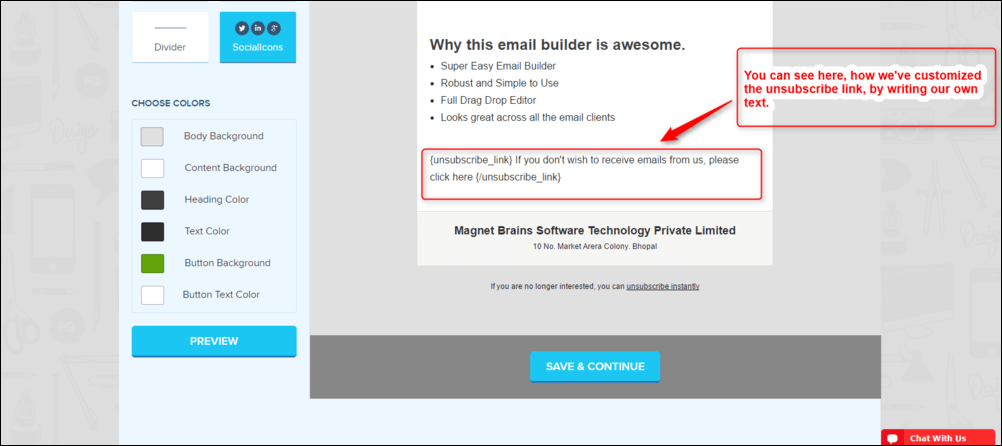
Customize Unsubscribe Text
For customizing the unsubscribe link, you can use the below link. Just in place if “Write here your text” you can put your text to be shown if in case any user wants to unsubscribe to receive emails.
{unsubscribe_link} Write here your text {/unsubscribe_link}
Try MailGet to get best email marketing results. Personalized email marketing can be used for effective drip emailing, email autoresponder or welcome emails.
Email Marketing Comparison – Sendy and MailGet Bolt

Few days back, I got an email from one of our customers who asked how MailGet Bolt – email marketing service is better than Sendy. I am writing this post to explain how MailGet Bolt is different and 10X better than Sendy. So, Email Marketing Comparison Sendy And MailGet Bolt are as follows.
One of the major difference between Sendy and MailGet Bolt lies in the way of setting up both the software.
Sendy is a self-hosted solution which means you have to set it up on your own server. This means you will have to separately handle server expenses and manage and configure the server infrastructure yourself.
Here are few more altenatives which can help you replace your existing emailing services:-
- Constant Contact Alternative : Top-Class Replacement At Cheaper Rates
- Alternative For MailChimp : Similar Features At Affordable Cost
- Aweber Alternative : MailGet Bolt Best Alternative To Choose
Below are few questions that we come across every once in a while. They are asked by different customers while joining MailGet Bolt.
1. Email Marketing Comparison Sendy And MailGet Bolt. Which is better?
MailGet Bolt is powerful email marketing application that includes amazing features like a great drag-drop email builder, contact management, email drips, autoresponders, embeddable web forms and much more.
We have developed great segmentation options in MailGet Bolt allowing you to send the email again to the subscribers who have not opened email for the first time. MailGet Bolt has bounce tracking, spam tracking and unsubscribes tracking built in it to make you achieve good account reputation.
Sendy doesn’t allow any segmentation options to allow sending to only the non-opens. This means you are not able to leverage the email campaigns success to extreme.
Sendy doesn’t come with a drag and drop email builder which makes the email newsletter creation harder.
With Sendy, to setup autoresponders and email drips you have to setup Cron jobs on your server which in itself is a little complex to setup. On the other hand, MailGet Bolt comes with drag drop email builder and you don’t have worry about any hassles for setting up or managing the server.
2. From your experience, how long does it take to send one email to a 50k list with MailGet Bolt?
Sending speed will vary for different users depending upon their account sending limits.
MailGet Bolt supports multi-threading to make sure you achieve the best possible sending rate. Unlike Sendy, there are no complex server settings required to be done for maximizing the sending rate. MailGet Bolt is built from the ground up to support dynamic multi-threading.
3. Do you have a feature to filter subscribers who have not opened my emails in the last 3 months? I would like to be able to filter out subscribers that are not active because having a clean list at any time helps with deliverability.
Ans: We can do the cleanup for you at our end based on your request, simply email us and ask for removing the non-opens and we will do it for you and filter your contact lists.
4. Can I segment the emails in such a way so that I can send emails just to non-opens again?
5. Would I be able to build my own template from scratch? (and choose custom background, font size, colors and email width).
6. Can I personalize my emails with a name of my contacts?
MailGet Bolt is not just a better alternative to Sendy, it’s infact 10x better. Try best email marketing software – MailGet Bolt today and we are 100% sure you will never go back to Sendy ever again.
PHP Newsletter Script

PHP Newsletter Script shows an one time per customer newsletter popup window with newsletter subscription form and suggestions to subscribe. After subscription, the user will get the latest blog updates in the website.
Here we are going to create an email newsletter from blog’s RSS feed.
We are going to follow 3 steps to send latest blogs to the subscriber:
(a): Here we generate a newsletter popup through which we are going to save email address of the user.
(b) : We extract the data (title, description, links) of the latest blog post from the website feed.
(c) : Prepare the message and send to all subscriber.
Step-1:
Here we are going to create a popup window and to save its data in a text file.
(i)-Create a popup window with a form:
Below code creates a popup window at the time of loading of the page.

For a complete solution, you can refer to our service Mailget or you can purchase our product Send Email With SMTP – PHP Script.
PHP File : Subscription-popup.php
<!--Subscription-popup.php-->

<html xmlns="http://www.w3.org/1999/xhtml">
<head>
<title>jQuery Show Popup on Page Load</title>
<script type="text/javascript" src="http://code.jquery.com/jquery-1.8.2.js"></script>
<link rel="stylesheet" type="text/css" href="https://www.formget.com/tutorial/createpopupform_livedemo/css/elements.css">
<script src="js/popup.js" type="text/javascript"></script>
<link href="css/style.css" rel="stylesheet" type="text/css"/>
<link href="css/style1.css" rel="stylesheet" type="text/css"/>
<meta name="robots" content="noindex, nofollow">
</head>
<body>
<div class='popup1'>
<div class='cnt223'>
<div style="height:30px;">
<a href=''><img class="close" src="close.png" style="width:24px; height:24px; float:right;"></a>
</div>
<!-- contact us form -->
<form action="processing-script.php" method="POST"style="border: 2px solid #ccc;" id="pop">
<h2>Subscribe Us!</h2><hr>
<p>Get Awesome updates delivered directly in your inbox .
<br/>Just Type Your Email Address Below And Click Subscribe!</p>
<input type="text" name="email" id="email" placeholder="Email" style="background-image:none;">
<div id="submitb">
<input id="submit" type="submit" name="submit" value="Subscribe">
</div>
</form>
</div>
</div>
<div id="main">
<h1>PHP Newsletter Script</h1>
<div id="login">
<h2>Get the Blogposts</h2>
<hr/>
<div>
<form action="index1.php" style="border:none;">

<input type="submit" name="submit" value="Click to Send Blogposts"/>
</form>
</div>
</div>
</div>
</body>
</html>
(ii)-Save its data in a text file:
Below code accepts the data from subscription-popup.php and save it in a text file.
Note: Before applying this code you first have to create a text file data.txt in your root directory, this file stores the name of subscribers separated by the comma.
PHP File : Processing-script.php
<!--save this code by the name of processing-script.php-->

<?php
if(isset($_POST['email'])) {
$data = $_POST['email'].',' ;
$ret = file_put_contents('data.txt', $data, FILE_APPEND | LOCK_EX);
if($ret === false) {
die('There was an error writing this file');
}
else {
echo "$ret bytes written to file";
header('Location: subscription-popup.php');
}
}
else {
die('no post data to process');
}
?>
Step-2:
Create a text file name savecont.txt.
And write the title of blogs currently available on the website separated by a comma.
So only latest uploaded blogs can be sent, if we don’t do this all blogs will get send, at the first time execution of code.
Step-3:
(i)-Get the list of the new uploaded blogs:
We do this by comparing current blogs title of the website to title stored in savecont.txt
<?php
require 'PHPMailerAutoload.php';
$url = "https://www.formget.com/feed/";
$xml = simplexml_load_file($url);
$pollids = "savecont.txt"; // txt file contain title of already uploaded blog
$contents = file_get_contents($pollids); //string contains list of titles seprated by commas
$data="";
$new="";
for($i=0;$i<10;$i++)
{
$a= $xml->channel->item[$i]->title.","; //this method works to fetch data from xml array
$data.=$a; // $data contains titles of current uploaded blogs
if (strpos($contents,$a) !== false) {
}
else{
$new.=$a; //contains titles newly uploaded blogs
}
}
$newblogs = explode(',', $new); // array contains title of new blogs uploaded
fopen('savecont.txt', 'w+');
$ret = file_put_contents('savecont.txt', $data, FILE_APPEND | LOCK_EX); //update the list of blog title in text file
?>
(ii) Fetch the content of blog:
We picks up the title, description, and link of the blog through xml.
<?php
$url = "https://www.formget.com/feed/";
$xml = simplexml_load_file($url);
$max = sizeof($newblogs); // contains number of new blogs
for($m=0;$m<$max;$m++)
{
$n=$newblogs[$m]; //contains title of new uploaded blog
$t=$xml->channel->item[$m]->title; // contains titles of blogs of website
if($n==$t)
{
echo "same string";
$a=$xml->channel->item[$m]->title; //set name of title
$b=$xml->channel->item[$m]->description; // set discription of blog in mail
$c=$xml->channel->item[$m]->link; // set name of the link of discription

?>
(iii) Now we fetch the name of the subscriber from data.txt and send the mails:
Prepare the mail for the blog using title, description, link.
Send mail to all email address stored in the data.txt file.
For sending mail, we are using PHPMailer library. You can refer to Send Email via Gmail SMTP Server in PHP to get an idea about PHPMailer library and Gmail settings & PHP Send HTML Email Template for preparing format of mail.
<?php
$mail = new PHPMailer;
$mail->isSMTP(); // Set mailer to use SMTP
$mail->Host = 'smtp.gmail.com;smtp.gmail.com'; // Specify main and backup SMTP servers
$mail->SMTPAuth = true; // Enable SMTP authentication
$mail->Username = 'Insert Gmail Email Id'; // SMTP username
$mail->Password = 'Insert Gmail Password'; // SMTP password
$mail->SMTPSecure = 'tls'; // Enable TLS encryption, `ssl` also accepted
$mail->Port = 587; // TCP port to connect to
$mail->From = '[email protected]';
$mail->FromName = 'abc';
$pollids = "data.txt";
$contents = file_get_contents($pollids);
$cont = explode(',', $contents); // contains number of emails
foreach ($cont as $item) {
$mail->addAddress($item); // Add a recipient
}
$mail->isHTML(true);
$mail->SingleTo = true;// if u want to send email to multiple users
$mail->Subject = 'Here is the subject';
$mail->Body = '<html>
<head>
<meta charset="utf-8">
<meta http-equiv="X-UA-Compatible" content="IE=edge">
<title>Single Extention </title>
</head>
<body style="font-size: 45px;font-family: proxima_nova_rgregular, sans-serif;font-size: 16px;line-height: 28px;">
<!-- Middle Section -->
<div align="center" style="border:1px,red,solid;">
<div align="center" id="padd" style="width:815px;border-style: solid;border-color: #D5D5D5;padding:30px;background-color:#F2F2F2;" >
<div style=""><img src="https://ci5.googleusercontent.com/proxy/uQRkR4RIRhQ7LPTHiI4BHEaGun2LR1WJRBOVFkRovNdPC55ysLASrCmwaf-aSXsv4M4B51-4IFjQmIvRCFPHxI4PLAvgL_oWkaeZJFZwEHrprw8P-UiZIfpFFy9u18SxCT0cLwFOJ4ffmjJScFPgClc=s0-d-e1-ft#https://www.formget.com/mailget/upload_files/1431944509-1601297505-Formget_welcome_email_png"/></div>
<div id="division1" style="width:585px;border-style: solid;border-color: #D5D5D5;background-color:#ffffff;" align="center">
<h2>'.$a.'</h2>
<div class="extension-desc" align="center">
<p style="margin:0 15px;">'.$b.'</p>
<p><b>for more details click here</b>'.$c.'</p>
</div>
</div>
</div>
</div>
</body>
</html>';
$mail->AltBody = 'This is the body in plain text for non-HTML mail clients';
if(!$mail->send()) {
echo 'Message could not be sent.';
echo 'Mailer Error: ' . $mail->ErrorInfo;
} else {
echo 'Message has been sent';
}
}
}
header('Location: subscription-popup.php');
?>
Note: We are using PHPMailer library to send the mail for more details about PHPMailer prefer our old blog post.
PHP File : index1.php (complete code for step 3)
Here is the complete code to send mail to the subscriber but it also requires the data.txt and savecont.txt file.
<?php
require 'PHPMailerAutoload.php';
$url = "https://www.formget.com/feed/";
$xml = simplexml_load_file($url);
$pollids = "savecont.txt"; // txt file contain title of already uploaded blog
$contents = file_get_contents($pollids); //string contains list of titles seprated by commas
$data="";
$new="";
for($i=0;$i<10;$i++)
{
$a= $xml->channel->item[$i]->title.","; //this method works to fetch data from xml array
$data.=$a; // $data contains titles of current uploaded blogs
if (strpos($contents,$a) !== false) {
}
else{
$new.=$a; //contains titles newly uploaded blogs
}
}
$newblogs = explode(',', $new); // array contains title of new blogs uploaded
fopen('savecont.txt', 'w+');
$ret = file_put_contents('savecont.txt', $data, FILE_APPEND | LOCK_EX); //update the list of blog title in text file
?>
<?php
$url = "https://www.formget.com/feed/";
$xml = simplexml_load_file($url);
$max = sizeof($newblogs); // contains number of new blogs
for($m=0;$m<$max;$m++)
{
$n=$newblogs[$m]; //contains title of new uploaded blog
$t=$xml->channel->item[$m]->title; // contains titles of blogs of website
if($n==$t)
{
echo "same string";
$a=$xml->channel->item[$m]->title; //set name of title
$b=$xml->channel->item[$m]->description; // set discription of blog in mail
$c=$xml->channel->item[$m]->link; // set name of the link of discription
?>
<?php
$mail = new PHPMailer;
$mail->isSMTP(); // Set mailer to use SMTP
$mail->Host = 'smtp.gmail.com;smtp.gmail.com'; // Specify main and backup SMTP servers
$mail->SMTPAuth = true; // Enable SMTP authentication
$mail->Username = '[email protected]'; // SMTP username
$mail->Password = 'formgetmb'; // SMTP password
$mail->SMTPSecure = 'tls'; // Enable TLS encryption, `ssl` also accepted
$mail->Port = 587; // TCP port to connect to
$mail->From = '[email protected]';
$mail->FromName = 'Formget';
$pollids = "data.txt";
$contents = file_get_contents($pollids);
$cont = explode(',', $contents); // contains number of emails
foreach ($cont as $item) {
$mail->addAddress($item); // Add a recipient
}
$mail->isHTML(true);
$mail->SingleTo = true;// if u want to send email to multiple users
$mail->Subject = 'Here is the subject';
$mail->Body = '<html>
<head>
<meta charset="utf-8">
<meta http-equiv="X-UA-Compatible" content="IE=edge">
<title>Single Extention </title>
</head>
<body style="font-size: 45px;font-family: proxima_nova_rgregular, sans-serif;font-size: 16px;line-height: 28px;">
<!-- Middle Section -->
<div align="center" style="border:1px,red,solid;">
<div align="center" id="padd" style="width:815px;border-style: solid;border-color: #D5D5D5;padding:30px;background-color:#F2F2F2;" >
<div style=""><img src="https://ci5.googleusercontent.com/proxy/uQRkR4RIRhQ7LPTHiI4BHEaGun2LR1WJRBOVFkRovNdPC55ysLASrCmwaf-aSXsv4M4B51-4IFjQmIvRCFPHxI4PLAvgL_oWkaeZJFZwEHrprw8P-UiZIfpFFy9u18SxCT0cLwFOJ4ffmjJScFPgClc=s0-d-e1-ft#https://www.formget.com/mailget/upload_files/1431944509-1601297505-Formget_welcome_email_png"/></div>
<div id="division1" style="width:585px;border-style: solid;border-color: #D5D5D5;background-color:#ffffff;" align="center">
<h2>'.$a.'</h2>
<div class="extension-desc" align="center">
<p style="margin:0 15px;">'.$b.'</p>
<p><b>for more details click here</b>'.$c.'</p>
</div>
</div>
</div>
</div>
</body>
</html>';
$mail->AltBody = 'This is the body in plain text for non-HTML mail clients';
if(!$mail->send()) {
echo 'Message could not be sent.';
echo 'Mailer Error: ' . $mail->ErrorInfo;
} else {
echo 'Message has been sent';
}
}
}
header('Location: subscription-popup.php');
?>
Making Some Structural Changes
1:- style.css :- Hold the css for custom style.
2:- style1.css :- This file hold the css for popup window.
3:- popup.js :- This build the functionality of popup window.
CSS : Style.css
@import url(http://fonts.googleapis.com/css?family=Raleway);
h1{
text-align:center;
//color: black;
font-size: 2em;
//margin-left: 15%;
}
#main{
margin: 25px 100px;
font-family: 'Raleway', sans-serif;
}
h2{
background-color: #FEFFED;
text-align:center;
border-radius: 10px 10px 0 0;
margin: -10px -40px;
padding: 30px 40px;
color: black;
font-weight: bolder;
font-size: 1.5em;
margin-top: -1px !important;
//margin-bottom: -19px !important;
}
hr{
border:0;
border-bottom:1px solid #ccc;
margin: 10px -40px;
margin-bottom: 30px;
}
#login{
width:550px;
float: left;
border-radius: 10px;
font-family:raleway;
border: 2px solid #ccc;
padding: 0px 40px 0px;
margin-top: 70px;
margin: 50px;
margin-left: 27%;
}
input[type=text],input[type=email]{
width:99.5%;
padding: 10px;
margin-top: 8px;
margin-bottom: 18px;
border: 1px solid #ccc;
padding-left: 5px;
font-size: 16px;
font-family:raleway;
}
input[type=submit]{
width: 100%;
background-color:#FFBC00;
color: white;
border: 2px solid #FFCB00;
padding: 10px;
font-size:20px;
cursor:pointer;
border-radius: 5px;
margin-bottom: 12px;
}
#formget{
float:right;
}
h1 {
//margin-left: -85px;
}
li{
display: inline;
}
#inputurl{
//display: none;
margin-top: 40px;
}
#submitread,#submitinsert,#submitupdate,#submitdelete{
width: 99.5%;
}
#book_form_insert,#book_form_update{
display: none;
}
#database #tab td{
border: 1px solid #ccc;
padding: 7px 3px;
}
#rinsert,#rupdate,#rdelete{
display: none;
}
#id1,#id2,#id3,#id4,#id5{
display: none;
}
#enterid,#enteridd{
display: none;
}
#dummy{
text-transform: uppercase;
text-align: center;
font-weight: bolder;
}
#tab{
width: 450px;
}
#pop h2{
margin: -10px -50px;
margin-top: 0;
padding-top:40px;
}
#pop hr{
margin: 10px -50px;
}
#pop{
padding-top: 0px;
}
CSS : Style1.css
#overlay {
position: fixed;
top: 0;
left: 0;
width: 100%;
height: 100%;
background-color: #000;
filter:alpha(opacity=70);
-moz-opacity:0.7;
-khtml-opacity: 0.7;
opacity: 0.7;
z-index: 100;
display: none;
}
.cnt223 a{
text-decoration: none;
}
.popup1{
width: 100%;
margin: 0 auto;
display: none;
position: fixed;
z-index: 101;
}
.cnt223{
width:600px;
min-height: 150px;
margin: 100px auto;
background: #f3f3f3;
position: relative;
z-index: 103;
padding: 10px;
border-radius: 5px;
box-shadow: 0 2px 5px #000;
}
.cnt223 p{
clear: both;
color: #555555;
text-align: justify;
}
.cnt223 p a{
color: #d91900;
font-weight: bold;
}
.cnt223 .x{
float: right;
height: 35px;
left: 22px;
position: relative;
top: -25px;
width: 34px;
}
.cnt223 .x:hover{
cursor: pointer;
}
#submit{
margin-top:30px;
}
#email{
float:left;
}
#submitb{
width:100px;
}
#div1{
border:1px solid red;
background-color:yellow;
}
form {
max-width: 1000px;
min-width: 250px;s
padding: 10px 50px;
border: 2px solid gray;
border-radius: 10px;
font-family: raleway;
background-color: white;
}
hr{
margin:none;}
Javascript : Popup.js
$(function(){
var overlay = $('<div id="overlay"></div>');
overlay.show();
overlay.appendTo(document.body);
$('.popup1').show();
$('.close').click(function(){
$('.popup1').hide();
overlay.appendTo(document.body).remove();
return false;
});

$('.x').click(function(){
$('.popup1').hide();
overlay.appendTo(document.body).remove();
return false;
});
});
Note: You must have to maintain data.txt and savecont.txt file while running this code.
Data.txt file contains email address separated by comma and savecont.txt file contains title of blogs available in the website feed
Tip: Check the data.txt and savecont.txt file after completion of code for debugging
To get the proper working code just download our zip file of code and use it.
Conclusion:
I hope that at this point you must be feeling yourself comfortable with Newsletter. Please comment for any query. Keep visiting our website.
Regular Expression to Validate an Email Address
Regualr expression is a sequence of character which define a specific pattern and also named as abbreviated regex or regexp and sometimes called a rational expression. we can make regular expression like ( “/ABC/” ,”Ab_123.Cd” ,”abc123.-@&”…)
They can be patterns or combination of alphabets(a,b..z) ,numbers(0,1…9), special character ( |, (),^, ), Quantifiers(*, +, ?), wildcards(.) character set[], character ranges[start ,end] .
In this tutorial, we are going to explain how we can use regular expressions to validate an email address.
Watch the live demo or download code from the link given below

You can buy our service for a quick solution Mailget and JQuery, CSS3 and PHP Form Validation Script.
Before we explore just have a look over this code below and read it carefully ,it will help us for better understanding the regular expression.
Expression Types
^ start of string
$ end of string
[a-z] letters a-z inclusive in lower case [A-Z] letters A-Z inclusive in upper case [0-9] numbers 0-9 inclusive [^0-9] no occurrences of numbers 0-9 inclusive? zero or one of the preceding character(s)
* zero or more of preceding character(s)
+ one or more of preceding character(s)
{2} 2 of preceding character(s)
{2,} 2 or more of preceding character(s)
{2,4} 2 — 4 of preceding character(s)
. any character
(a|b) a OR b
s empty space (known as whitespace)
Regular Expression in Detail
If you would have read the above code then you will find it easy to understand the below regular expression code.
example :- This example will show you that how a email address get validate through regular expression.
we have a regular expression like ,
/^w+[+.w-]*@([w-]+.)*w+[w-]*.([a-z]{2,4}|d+)$/i
Make it more simple ,divide this expression in three parts.
")
Each parts kept inside the parenthesis()
-
User name
( /^w+[+.w-]*@)

- / = Begin an expression
- ^ = The matched string must begin here, and only begin here
- w = any word (letters, digits, underscores)
- + = match previous expression at least once, unlimited number of times
- [] = match any character inside the brackets, but only match one
- +. = match a literal + or .
- w = another word
- – = match a literal –
- * = match the previous expression zero or infinite times
- @ = match a literal @ symbol(@ before domain name)
2. Domain name
(([w-]+.)*w+[w-]*.)
- () = make everything inside the parentheses a group (and make them referencable)
- [] = another character set
- w- = match any word or a literal –
- + = another 1 to infinity quantifier
- . = match another literal
- * = another 0 to infinity quantifier
- w+ = match a word at least once
- [w-]*. = match a word or a dash at least zero times, followed by a literal dot(.)before extension name
3.Extension
(([a-z]{2,4}|d+)$/i)")
- () = another group
- [a-z]{2,4} = match lowercase letters at least 2 times but no more than 4 times
- | = “or” (does not match pipe)
- d+ = match at least 1 digit
- $ = the end of the string
- / = end an expression
- i = test the string in a case insensitive manner
This script will show you , how to validate a email address through regular expression .
Index.php
This index page have both html code and java script code , when you will execute this page you will get a form on screen asking for entering the email id and message and then submit form by pressing submit button. and java script code will validate the user for the cases like “unfilled form field” or”filled incorrect text” , in this script email address field is validating by regular expression(regex) which is quite strong validation type.
<?php
if(isset($_POST['emailcheck']))
{
$email =$_POST['emailcheck'];
echo "<script type='text/javascript'>alert('your message has been sent to $email')</script>";
}
?>

<html>

<head>
<title>Regular expression to validate an email address</title>
<meta http-equiv="Content-Type" content="text/html; charset=windows-1252">
<link href="css/style.css" rel="stylesheet" type="text/css"/>

<script type="text/javascript">

function validate()
{
if (document.myForm.emailcheck.value == "")
{
alert("Please enter your Email!");
document.myForm.emailcheck.focus();
return false;
}
else
{

/*validating email with strong regular expression(regex)*/
var str=document.myForm.emailcheck.value
/* This is the regular expression string to validate the email address

Email address example : [email protected] ,  [email protected] , [email protected] ,

[email protected] ,  [email protected]

*/

var filter = /^([w-]+(?:.[w-]+)*)@((?:[w-]+.)*w[w-]{0,66}).([com net org]{3}(?:.[a-z]{6})?)$/i
if (!filter.test(str))
{

alert("Please enter a valid email address!")
document.myForm.emailcheck.focus();
return false;
}
if (document.myForm.msgbox.value == "")
{
alert("Please enter a message!");
document.myForm.msgbox.focus();
return false;
}
}

return(true);
}

</script>

</head>

<body>
<div id="main">
<center><h1>
Validate an Email Address by Regular Expression</h1></center>
<div id="login">

<h2>Contact Form</h2>
<hr>

<div id="right">
<form name="myForm" method="post" action="index.php" onsubmit="return(validate());">
Please input a valid email address:<br /><br />
<input type="text" size=18 name="emailcheck" id="emailcheck"><br /><br />
Message :<br /><br />

<textarea id="txtmsg" name ="msgbox"></textarea>

<input type="submit" value="Submit" id="dsubmit">
</form>
</div>
</div>
</div>

</body>
</html>
Style.css
This script will make your form look good and attractive ,you can go through this script and can play around this by changing the attribute value.with the change in attribute value you will see changes in the designing part of form ,and you can make it of your choice.
@import url(http://fonts.googleapis.com/css?family=Raleway);
#main{
width:960px;
margin:50px auto;
font-family:raleway;
}

span{
color:red;
}

h2{
background-color: #FEFFED;
text-align:center;
border-radius: 10px 10px 0 0;
margin: -10px -40px;
padding: 15px;
}

hr{
border:0;
border-bottom:1px solid #ccc;
margin: 10px -40px;
margin-bottom: 30px;
}

#login{
height: 500px;
width: 50%;
float: left;
border-radius: 10px;
font-family:raleway;
border: 2px solid #ccc;
padding: 10px 40px 33px;
margin-top: 23px;
margin-left: 200px;
}

input[type=text],input[type=password]{
width:99.5%;
padding: 10px;
margin-top: 8px;
border: 1px solid #ccc;
padding-left: 5px;
font-size: 16px;
font-family:raleway;
}

input[type=submit]{
width: 40%;
background-color:#FFBC00;
color: white;
border: 2px solid #FFCB00;
padding: 10px;
font-size:20px;
cursor:pointer;
border-radius: 5px;
}
#profile{
padding:50px;
border:1px dashed grey;
font-size:20px;
background-color:#DCE6F7;
}
i{
color: black;
padding: 18px;
margin: 20px;
}
#right{
width: 326px;

height: 321px;
/* border: 2px solid red; */
border: 1px dashed rgb(215, 215, 215);
box-shadow: 0px 5px 17px 1px #99A3AD, 0px 0px 40px #EEEEEE;
padding: 50px;
margin-left: 25px;

}
#right p{
padding: 20px;
}
#paypal_logo{
margin: 10px 315px;
float: right;
}

#results {
width: 100%;
margin-top: 30px;
//border: 1px solid #ccc;
table-layout: auto;
margin-bottom: 30px;
}
table {
border-collapse: collapse;
border-spacing: 0;
}
thead {
display: table-header-group;
vertical-align: middle;
border-color: inherit;
}
.head {
font-size: 15px;
font-family: "proxima_novasemibold", sans-serif;
background: #FEFFED;
color: #1d4c55;
border: 1px solid #ccc;
}
tr {
display: table-row;
vertical-align: inherit;
border-color: inherit;
}
.head th{
//border-right: 1px solid #ccc;
//border-bottom: 1px solid #ccc;
line-height: normal;
padding: 10px 0px;
text-align: left;
padding-left: 3%;
}
td {
//border-right: 1px solid #ccc;
border-bottom: 1px solid #ccc;
line-height: normal;
padding: 10px 0px;
text-align: left;
padding-left:3%;
vertical-align: top;
}

tbody {
display: table-row-group;
vertical-align: middle;
border-color: inherit;
}
tr {
display: table-row;
vertical-align: inherit;
border-color: inherit;
}

#return {
width: 492px;
height: auto;
float: left;
border-radius: 10px;
font-family: raleway;
border: 2px solid #ccc;
padding: 10px 40px 30px;
margin-bottom: 50px;
}
#return h3#success {
text-align: center;
font-size: 24px;
color: green;
margin-bottom: 10px;
}
#return P {
text-align: left;
}
#return .back_btn {
margin-top: 30px;
text-align: center;
}
#btn {
width: 100%;
background-color: #FFBC00;
color: white;
border: 2px solid #FFCB00;
padding: 10px 70px;
font-size: 20px;
cursor: pointer;
border-radius: 5px;
margin-bottom: 15px;
margin: 0 auto;
}
a{
text-decoration:none;
color: #33BADB;
}
.success_main_heading{
margin-left: -40%;

}
#return h3#fail{
text-align: center;
font-size: 24px;
margin-top: 50px;
color: red;
margin-bottom: 10px;
}
.red{
color:red;
font-weight: bold;
}
ul li{
margin-bottom: 15px;
text-align: justify;
margin-right: 20px;
}
hr.style-four {
margin-bottom: 10px;
width: 300px;
padding: 0;
border: none;
border-top: 1px solid rgba(0, 0, 0, 0.1);
color: #333;
text-align: center;
}
hr.style-four:after {
content: "Note";
display: inline-block;
position: relative;
top: -0.7em;
font-size: 1em;
padding: 0 0.25em;
background: white;
font-weight: 600;
}
#dsubmit{

margin-top: 50px;
}
#txtmsg
{
height: 100px;
width: 99.5%;
}
Conclusion :
Hope you would have enjoyed this post, I am sure you will give a try to the script provided and implement it in your own projects as well. Feel free to visit our website again in the future to get in touch with new coding tricks. You can let us know about your feedback in the space provided below ![]()
Recommended blogs –
- Create Multiple Form Fields Based On Selection Using jQuery
- How To Dynamically Add Form Fields And Increase Attribute Of The Field
PHP Send HTML Email Template

Hello! In this post, you will learn to send HTML content inside an e-mail body.
In PHP, you can achieve this in many ways. Below two are commonly used.
1. Using inbuilt ‘mail()’ function of PHP,or
2. Using ‘PHPMailer’ library.
In the first one, you need to have a properly configured SMTP server of your own, since using Gmail like service provider’s server you will be asked to handle various authentication stuff.
So here, I will show you how to use PHPMailer library to send mail using Gmail’s SMTP server. Let’s start.

Step 1. Change Settings in your Gmail account:
For this you can refer to our blog post Send email via Gmail SMTP server in PHP which will give you a clear idea about the settings you need to change in gmail and how you can use PHPMailer Library.
Step 2. Get the PHPMailer library:
The library is written in PHP and includes PHP class files.You can download from Github. Now extract PHPMailer’s .zip file, to your project folder.I had given the path as “/script/phpmailer/”.
Note:
If you are using wamp server and “php_smtp” PHP extension is not available in your WAMP Server installation (mostly unavailable in WAMP 2.0c and later versions) then you can download the php_smtp.dll and configure php.ini as following:
- Download php_smtp.dll file.
- Copy-paste the downloaded php_smtp.dll file in the “C:wampbinphpphp5.2.6ext” folder.
- Open php.ini (C:wampbinapacheapache2.2.8bin). Go to “Dynamic Extensions” section and copy-paste this line somewhere between extensions:
extension=php_smtp.dll
and save the file.4. Make sure to enable the extensions.
5. Restart WAMP server. Don’t forget this step

Step 3. Create a PHP file: Index.php
First create a php page (e.g. index.php) that will serve the purpose of user interface. In this file first place the html code as below:
<html>
<head>
<title>PHP Send HTML Email Template</title>
<script src="js/jquery.min.js" type="text/javascript"></script>
<script src="js/custom.js" type="text/javascript"></script>
<link rel="stylesheet" type="text/css" href="css/style.css">
</head>
<body>
<div id='main'><center><h1>PHP Send HTML Email Template</h1></center>
<div id='container' >
<h2>Send a Greeting to your closed ones....!!</h2>
<hr>
<form id="checkinput" action="index.php" method='POST'>
<div> <div id="book_container" class="card_container1" class>

<img id="img1" src='img/greet_1.jpg' style='border-radius:5px;width:190px;height:200px;' alt=''/>
<br/><br/>
<div><img class="right-icon1"id="right-icon"src="img/right.png"/><input id="rad1" type='radio' name='greet_radio' value="1"></div>
</div>

<div id="book_container" class="card_container2" >
<img id="img2" src='img/gree_2.jpg' style='border-radius:5px;width:190px;height:200px;' alt=''/>
<br/><br/>
<div><img class="right-icon2" id="right-icon"src="img/right.png"/><input id="rad2" type='radio' name='greet_radio' value="2"></div>
</div>
<div id="book_container" class="card_container3" >
<img id="img3" src='img/greet_3.jpg' style='border-radius:5px;width:190px;height:200px;' alt=''/>
<br/><br/>
<div><img class="right-icon3" id="right-icon"src="img/right.png"/><input id="rad3" type='radio' name='greet_radio' value="3"></div>
</div>
</div>
<div id="email_input">
<label><b>Enter Email:</b></label>
<input id="email" type='email' maxlength="50" name='mail_receiver'/></div>
<input type='submit' id='submit' name='send_greet' value='Send Greeting'/>
</form>
</div>
</div>
</body>
</html>
Now Append below code of PHPMailer, which handles the mailing part, to this file .
<?php

if (isset($_POST['send_greet']) && isset($_POST['greet_radio'])) {
require 'scripts/phpmailer/PHPMailerAutoload.php';

//Create a new PHPMailer instance
$mail = new PHPMailer;

//Tell PHPMailer to use SMTP
$mail->isSMTP();

//Ask for HTML-friendly debug output
$mail->Debugoutput = 'html';

//Set the hostname of the mail server
$mail->Host = 'smtp.gmail.com';
// use
// $mail->Host = gethostbyname('smtp.gmail.com');
// if your network does not support SMTP over IPv6

//Set the SMTP port number - 587 for authenticated TLS, a.k.a. RFC4409 SMTP submission
$mail->Port = 587;

//Set the encryption system to use - ssl (deprecated) or tls
$mail->SMTPSecure = 'tls';

//Whether to use SMTP authentication
$mail->SMTPAuth = true;

//Username to use for SMTP authentication - use full email address for gmail
$mail->Username = "your user name";

//Password to use for SMTP authentication
$mail->Password = "your password";

//Whether mail body contains HTML,false is plain text
$mail->IsHTML(true);

//Set who the message is to be sent from
$mail->setFrom('sender's email', 'sender's name');

//Set who the message is to be sent to
$mail_receiver = $_POST['mail_receiver'];

//email Address of reciever,
//here php variable has been used which stores and
//provides email-id entered through form
$mail->addAddress($mail_receiver, "");

//Set the subject line
$mail->Subject = "Hi !";

//Set Body of message
if ($_POST['greet_radio'] == '1') {

$mail->Body = "                                 // First HTML template

<div style='margin-left:150px;background-image:url(http://archive.customize.org/files/old/wallpaper/files/Surreal_Red_big.jpg); padding:50px;width:600px;'>
<h1 style='color:#FFFFFF;font-family: Arial, Helvetica, sans-serif;text-align:center;line-height:2.5em;'>Diwali Wishes!</h1>
<hr>
<table>
<tr><td style='text-align:center'>
<div>
<a href=''><img src='http://webneel.com/daily/sites/default/files/images/daily/09-2013/14-diwali-greeting-card.jpg' align='left' style='width:250px;height:250px;' alt=''/></a>
<p style='color:#FFFFDD; font-family: Allura,cursive,Arial, Helvetica, sans-serif; font-size:20px'>'Have a prosperous Diwali.Hope this festival of lights,brings you every joy and happiness.May the lamps of joy,illuminate your life and fill your days with the bright sparkles of peace,mirth and good will.'</p>
</div>
</td>
</tr>
<tr>
<td><div style='float:left;'><p style='color:#FFFFFF;font-family: Arial, Helvetica, sans-serif; font-size:20px'>'May the joy, cheer, Mirth and merriment Of this divine festival Surround you forever......'</p></div></td>
</tr>
</table>
</div>";   }

if ($_POST['greet_radio'] == '2') {
$mail->Body = "                                    //Second HTML template
<div style='margin-left:150px;background-image:url(http://archive.customize.org/files/old/wallpaper/files/Surreal_Red_big.jpg); padding:50px;width:600px;'>
<h1 style='color:#FFFFFF;font-family: Arial, Helvetica, sans-serif;text-align:center;line-height:2.5em;'>Diwali Wishes!</h1>
<hr>
<table>
<tr><td style='text-align:center'>
<div>
<a href=''><img src='http://webneel.com/daily/sites/default/files/images/daily/09-2013/14-diwali-greeting-card.jpg' align='left' style='width:250px;height:250px;' alt=''/></a>
<p style='color:#FFFFDD; font-family: Allura,cursive,Arial, Helvetica, sans-serif; font-size:20px'>'Have a prosperous Diwali.Hope this festival of lights,brings you every joy and happiness.May the lamps of joy,illuminate your life and fill your days with the bright sparkles of peace,mirth and good will.'</p>
</div>
</td>
</tr>
<tr>
<td><div style='float:left;'><p style='color:#FFFFFF;font-family: Arial, Helvetica, sans-serif; font-size:20px'>'May the joy, cheer, Mirth and merriment Of this divine festival Surround you forever......'</p></div></td>
</tr>
</table>
</div>";
}
if ($_POST['greet_radio'] == '3') {
$mail->Body = "                                     //Third HTML template
<div style='margin-left:150px;background-image:url(http://wallpaperology.com/zombie/93234-Happy-Raksha-Bandhan-Hd-Photo.jpg); padding:50px;width:600px;height:572px;'>
<h1 style='color:#FFAF09;font-family: Arial, Helvetica, sans-serif;text-align:center;line-height:2.5em;'>Greetings For You!</h1>
<hr>
<table>
<tr><td>
<div>
<img src='http://www.graphics18.com/wp-content/uploads/2009/08/rakhi-greetings-3.jpg' align='right' style='width:450px;height:250px;' alt=''/>
<p style='color:#FFDDBB; font-family: Allura,cursive,Arial, Helvetica, sans-serif; font-size:20px;'><i>The time is here again. The time where brothers and sisters all across the world reunite, to celebrate their bond of love and beauty. The most sacred bond between a man and a woman. The bond of brothers and sisters. The time for celebration,</i><br/><b><span style='color:#CCCC00;'>'Happy Raksha Bandhan'</span></b></p>
</div>
</td>
</tr>
<tr>
<td><div style='float:left;'><p style='color:#FFFFFF;font-family: Arial, Helvetica, sans-serif; font-size:20px'></p></div></td>
</tr>
</table>
</div>";
}

//send the message, check for errors
if (!$mail->send()) {
echo "Mailer Error: " . $mail->ErrorInfo;
} else {
echo '<script type="text/javascript">alert("Message has been sent");</script>';
}
}

 ?>
JQuery code : custom.js
$(document).ready(function () {

$("#checkinput" ).submit(function() {
var email = $("#email").val();
if(email==''){
alert( "Please provide an email address..... ");
return false;
}else{if($('#rad1').is(':checked') ||$('#rad2').is(':checked')||$('#rad3').is(':checked')) {/* DO NOTHING*/ }
else {alert("Please select a Greeting.....");
return false;}}
});

$("#img1").click(function () { //when click on image button
$('.card_container1').css('-webkit-transform','scale(1.08)');
$('.card_container2').css('-webkit-transform','scale(1)');
$('.card_container3').css('-webkit-transform','scale(1)');

$('.right-icon1').css('display','block');
$('.right-icon2').css('display','none');
$('.right-icon3').css('display','none');
$('input:radio[id=rad1]').prop('checked', true);
});
$("#img2").click(function () {
$('.card_container2').css('-webkit-transform','scale(1.08)');
$('.card_container1').css('-webkit-transform','scale(1)');
$('.card_container3').css('-webkit-transform','scale(1)');

$('.right-icon1').css('display','none');
$('.right-icon2').css('display','block');
$('.right-icon3').css('display','none');
$('input:radio[id=rad2]').prop('checked', true); //select radio button second
});

$("#img3").click(function () {
$('.card_container3').css('-webkit-transform','scale(1.08)');
$('.card_container1').css('-webkit-transform','scale(1)');
$('.card_container2').css('-webkit-transform','scale(1)');

$('.right-icon1').css('display','none');
$('.right-icon2').css('display','none');
$('.right-icon3').css('display','block');

$('input:radio[id=rad3]').prop('checked', true); //select radio button third

});
});
CSS code : style.css
@import url(http://fonts.googleapis.com/css?family=Raleway);

#main{
width:960px;
margin:50px auto;
font-family:raleway;
}
h2{
background-color: #FEFFED;
text-align:center;
border-radius: 10px 10px 0 0;
margin: -10px -40px;
padding: 15px;
}
hr{
border:0;
border-bottom:1px solid #ccc;
margin: 10px -40px;
margin-bottom: 30px;
}
#container{
width: 88%;
float: left;

border-radius: 10px;
font-family:raleway;
border: 2px solid #ccc;
padding: 10px 40px 25px;
margin: 20px 40px 40px 0;}

select{
width:99.5%;
padding: 10px;
margin-top: 8px;
border: 1px solid #ccc;
padding-left: 5px;
font-size: 16px;
font-family:raleway;
}

input[type=submit] {
width: 20%;
background-color: #FFBC00;
color: white;
border: 2px solid #FFCB00;
padding: 6px;
font-size: 20px;
cursor: pointer;
border-radius: 5px;
margin: 15px 1%;
float: left;
}
input[type=button] {
width: 48%;
background-color: #FFBC00;
color: white;
border: 2px solid #FFCB00;
padding: 10px;
font-size: 20px;
cursor: pointer;
border-radius: 5px;
margin: 15px 1%;
float: left;
}
input[type=button]:hover{
transform: scale(1.05);
}
input[type=submit]:hover{
transform: scale(1.05);
}
#profile{
padding:50px;
border:1px dashed grey;
font-size:20px;
background-color:#DCE6F7;
}

#logout{
float:right;
padding:5px;
border:dashed 1px gray;
}

a{
text-decoration:none;
color: cornflowerblue;
}

i{
color: rgb(155, 155, 155);
}

#formget{
float:right;
}
.card_container1{

-webkit-transition: 0.4s ease;
transition: 0.4s ease;
}

.card_container1:hover{

-webkit-transform: scale(1.08);
transform: scale(1.08);
cursor:pointer
}

.card_container2{

-webkit-transition: 0.4s ease;
transition: 0.4s ease;
}

.card_container2:hover{

-webkit-transform: scale(1.08);
transform: scale(1.08);
cursor:pointer
}

.card_container3{

-webkit-transition: 0.4s ease;
transition: 0.4s ease;
cursor:pointer
}

.card_container3:hover{

-webkit-transform: scale(1.08);
transform: scale(1.08);
}
#book_container{
width: 190px;
height: 260px;
border: 1px dashed rgb(195, 195, 195);
float: left;
margin: 9px 24px;
padding: 20px;
box-shadow: 0px 5px 17px 1px #99A3AD, 0px 0px 40px #EEEEEE;
}
hr.type_1 {
border: 0;
height: 55px;
background-image: url(../images/type_1.png);
background-repeat: no-repeat;
margin: 10px 67px;
}
#product_img{
width: 325px;
}
img#paypal_logo {
float: right;
margin-right: 27px;
margin-top: 1%;
padding-bottom: 15px;
}
.fgrow{
margin-bottom: 15px;
}

#return {
width: 492px;
height: 350px;
float: left;
border-radius: 10px;
font-family: raleway;
border: 2px solid #ccc;
padding: 10px 40px 11px;
margin: 16PX;
}
#return h3#success {
text-align: center;
font-size: 24px;
margin-top: 50px;
color: green;
}
#return P {
margin-left: 122px;
}
#return .back_btn {
margin-top: 51px;
text-align: center;
}
#btn {
width: 100%;
background-color: #FFBC00;
color: white;
border: 2px solid #FFCB00;
padding: 10px 70px;
font-size: 20px;
cursor: pointer;
border-radius: 5px;
margin-bottom: 15px;

}
a{
text-decoration:none;
color: cornflowerblue;
}
#formget{
float: right;
}
#return h3#fail{
text-align: center;
font-size: 24px;
margin-top: 50px;
color: red;
}

.mrtpbt{
margin-top: 5px;
margin-bottom: 15px;
line-height: 25px;
}
#return h3#Pending{
color: #FFBC00;
text-align: center;
font-size: 24px;
margin-top: 50px;

}
.description{

border: 1px dashed rgb(195, 195, 195);
height: 150px;
margin: 10px auto;
}
.description p{
color: black;
font-size: 20px;
font-weight: 600;
text-align: center;
}
.simplePopup {
display:none;
position:fixed;
border: 4px solid #FD703F;
background:#fff;
z-index:3;
width: 290px;
min-width: 290px;
padding: 12px;
text-align: center;
}

.simplePopupClose {
float:right;
cursor:pointer;
margin-left:10px;
margin-bottom:10px;
}
.simplePopup h3{
text-align: center;
font-family: raleway;
}
.simplePopup b{
font-size: 30px;
}
.simplePopup img{
position: relative;
background-color: #FFFFFF;
border-width: 7px;
border-style: solid;
border-color: rgb(253, 112, 63);
border-radius: 0px;
width: 100px;
}
.simplePopupBackground {
display:none;
background:#000;
position:fixed;
height:100%;
width:100%;
top:0;
left:0;
z-index:1;
}
#results {
width: 100%;
margin-top: 30px;
border: 1px solid #ccc;
table-layout: fixed;
margin-bottom: 15px;
font-family:raleway;
}

table {
border-collapse: collapse;
border-spacing: 0;
}
thead {
display: table-header-group;
vertical-align: middle;
border-color: inherit;
}
.head {
font-size: 15px;
font-family: "proxima_novasemibold", sans-serif;
background: #FEFFED;
color: #1d4c55;
}
tr {
display: table-row;
vertical-align: inherit;
border-color: inherit;
}
.head th, td {
border-right: 1px solid #ccc;
border-bottom: 1px solid #ccc;
line-height: normal;
padding: 10px 0 10px;
text-align: center;
}
tbody {
display: table-row-group;
vertical-align: middle;
border-color: inherit;
}
tr {
display: table-row;
vertical-align: inherit;
border-color: inherit;
}
#email_input{
margin:50px 0 0 145px;
float:left;
}
#submit{
margin:50px 20px;
}

input[type='email']{

height:40px;
width:280px;
}

input[type=radio] {
width: 100%;
height: 1.5em;
display:none;
}

.hli {

border:2px solid blue;

}
#right-icon{

width: 35px;
height: 35px;
margin-left: 76px;
}
.right-icon1,.right-icon2,.right-icon3{

display:none;
}
label b{
margin-right: 18px;
}
Step 4. Create HTML Template:
It is the html code you want to send inside an email. Remember to use inline CSS only,since many email service provider don’t support external/internal CSS.
Place this code in your PHP file, inside the mail’s body of PHPMailer code.It will look like $mail->Body = “your HTML template”;
Now save the file and execute.
You can create your own customized HTML template for email or you can use an Email Builder Tool to create responsive email templates.
Explanation of working:
When the program executes, an interface will be displayed which contains the HTML templates to select and a form which will ask for an email address to send the element.
To determine which template is selected by the user, the value of checked radio button is also supplied with the form data.
Now on submission of the form, email-id and value of radio button will be captured by mailer code and using ‘if ($_POST[‘greet_radio’] == ‘value’) ,the selected template will be sent to provided email id.
Conclusion:
I hope that at this point you must be feeling yourself comfortable with sending HTML inside email body. You can also try sending mail using other SMTP servers. Please comment for any query. Keep visiting our website.
Send Email via Gmail SMTP Server in PHP

Hello, Folks!
We’re going to learn how we can send an email using Gmail SMTP server from a PHP page/script.
SMTP is an abbreviation for Simple Mail Transfer Protocol.
SMTP is an Internet standard for electronic mail, i.e., email.
All mail servers and other mail transfer agents use SMTP to send and receive emails.
Firstly, we’ll take a look at the PHP mailer library we’re going to use.
You can take this library as an alternative of mail() function in PHP.
After that, we’ll discuss the process.
In case you want to send emails via Gmail, you can choose a simpler way that doesn’t require any technical coding – Connect with external SMTP Service Providers
Also you can learn, How to send mass emails in Gmail without getting blacklisted?

You can purchase our service Mailget – email marketing platform for the complete solution.
Change in Gmail settings :
First of all, you need to make some changes in your Gmail account settings.
You need to open your Gmail account settings. The following page will get open.

You need to click Signing in to Google. It will redirect you to the following page.

There are 2 steps :
1. You need to keep the 2-step verification off if you’re using it.
2. Then click on Connected apps & sites. It will redirect you to the following window.

Here, you need to keep Allow less secure apps : ON .
And it’s done. That’s all you need to do.
Files to be needed:
We’re going to use a PHPMailer library which you can find on the GitHub repository.
You can take it as an alternative to the mail() function of PHP.
Process:
Let’s take a look at the full code of the PHP file.
PHP file : index.php
<!DOCTYPE html>
<html>
<head>
<meta charset="UTF-8">
<title>Send email via Gmail SMTP server in PHP</title>
<link href="css/style.css" rel="stylesheet" type="text/css"/>
<meta name="robots" content="noindex, nofollow">
<script type="text/javascript">
var _gaq = _gaq || [];
_gaq.push(['_setAccount', 'UA-43981329-1']);
_gaq.push(['_trackPageview']);
(function() {
var ga = document.createElement('script');
ga.type = 'text/javascript';
ga.async = true;
ga.src = ('https:' == document.location.protocol ? 'https://ssl' : 'http://www') + '.google-analytics.com/ga.js';
var s = document.getElementsByTagName('script')[0];
s.parentNode.insertBefore(ga, s);
})();
</script>
</head>
<body>
<div id="main">
<h1>Send email via Gmail SMTP server in PHP</h1>
<div id="login">
<h2>Gmail SMTP</h2>
<hr/>
<form action="index.php" method="post">
<input type="text" placeholder="Enter your email ID" name="email"/>
<input type="password" placeholder="Password" name="password"/>
<input type="text" placeholder="To : Email Id " name="toid"/>
<input type="text" placeholder="Subject : " name="subject"/>
<textarea rows="4" cols="50" placeholder="Enter Your Message..." name="message"></textarea>
<input type="submit" value="Send" name="send"/>
</form>
</div>
</div>
<?php
require 'PHPMailerAutoload.php';
if(isset($_POST['send']))
{
$email = $_POST['email'];
$password = $_POST['password'];
$to_id = $_POST['toid'];
$message = $_POST['message'];
$subject = $_POST['subject'];
$mail = new PHPMailer;
$mail->isSMTP();
$mail->Host = 'smtp.gmail.com';
$mail->Port = 587;
$mail->SMTPSecure = 'tls';
$mail->SMTPAuth = true;
$mail->Username = $email;
$mail->Password = $password;
$mail->addAddress($to_id);
$mail->Subject = $subject;
$mail->msgHTML($message);
if (!$mail->send()) {
$error = "Mailer Error: " . $mail->ErrorInfo;
echo '<p id="para">'.$error.'</p>';
}
else {
echo '<p id="para">Message sent!</p>';
}
}
else{
echo '<p id="para">Please enter valid data</p>';
}
?>
</body>
</html>
Let’s take a look at our form code :
 //Form Code

<form action="index.php" method="post">
<input type="text" placeholder="Enter your email ID" name="email"/>
<input type="password" placeholder="Password" name="password"/>
<input type="text" placeholder="To : Email Id " name="toid"/>
<input type="text" placeholder="Subject : " name="subject"/>
<textarea rows="4" cols="50" placeholder="Enter Your Message..." name="message"></textarea>
<input type="submit" value="Send" name="send"/>
</form>
In this code, I’ve made 3 input fields for sender’s username and password and recipient’s email address. Along with this, I’ve also made a text area field for the message, sender wants to send.
 //PHP Script
<?php
require 'PHPMailerAutoload.php';
if(isset($_POST['send']))
{
// Fetching data that is entered by the user
$email = $_POST['email'];
$password = $_POST['password'];
$to_id = $_POST['toid'];
$message = $_POST['message'];
$subject = $_POST['subject'];

// Configuring SMTP server settings
$mail = new PHPMailer;
$mail->isSMTP();
$mail->Host = 'smtp.gmail.com';
$mail->Port = 587;
$mail->SMTPSecure = 'tls';
$mail->SMTPAuth = true;
$mail->Username = $email;
$mail->Password = $password;

// Email Sending Details
$mail->addAddress($to_id);
$mail->Subject = $subject;
$mail->msgHTML($message);

// Success or Failure
if (!$mail->send()) {
$error = "Mailer Error: " . $mail->ErrorInfo;
echo '<p id="para">'.$error.'</p>';
}
else {
echo '<p id="para">Message sent!</p>';
}
}
else{
echo '<p id="para">Please enter valid data</p>';
}
?>
The above code is responsible for the Gmail SMTP server settings, mail details and error messages on success and failure.
Now, lets understand this code line by line.
require 'PHPMailerAutoload.php';The above code is used to include PHPMailerAutoload file. PHPMailerAutoload is present in PHPMailer library.
$email = $_POST['email'];
$password = $_POST['password'];
$to_id = $_POST['toid'];
$message = $_POST['message'];
$subject = $_POST['subject'];
The above code is used to fetch data entered by the user in the form.
$mail = new PHPMailer;Here, we’re creating the object of PHPMailer class.
$mail->isSMTP();isSMTP() is used to tell that we want to send message using SMTP service particularly. There can be other ways to send mail like mail() function of php etc.
$mail->Host = 'smtp.gmail.com';The above code is use to set the hostname of the mail server.
$mail->Port = 587;The above code is used to set the SMTP port number for the authenticated TLS.
$mail->SMTPSecure = 'tls';The above code is used to set the encryption system. TLS is the successor of SSL (deprecated).
$mail->SMTPAuth = true;The above code is used to enable the SMTP authentication.
$mail->Username = $email;The above code is used to set the username of the sender.
$mail->Password = $password;The above code is used to set the password of the sender.
$mail->addAddress($to_id);
$mail->Subject = $subject;
$mail->msgHTML($message);
The above code is used to set the recipient’s email address.
if (!$mail->send())
{
$error = "Mailer Error: " . $mail->ErrorInfo;
echo '<p id="para">'.$error.'</p>';
}
else
{
echo '<p id="para">Message sent!</p>';
}
So this is the complete process of sending email via Gmail SMTP server in PHP.
CSS file : style.css
@import url(http://fonts.googleapis.com/css?family=Raleway);

h1{
text-align:center;
//color: black;
font-size: 2em;
margin-top: 40px;
margin-bottom: 40px;
}

#main{
margin: 25px 100px;
font-family: 'Raleway', sans-serif;
}

h2{
background-color: #FEFFED;
text-align:center;
border-radius: 10px 10px 0 0;
margin: -10px -40px;
padding: 30px 40px;
color: black;
font-weight: bolder;
font-size: 1.5em;
margin-top: -1px !important;
// margin-bottom: -19px !important;
}

hr{
border:0;
border-bottom:1px solid #ccc;
margin: 10px -40px;
margin-bottom: 30px;
}

#login{
width:580px;
float: left;
border-radius: 10px;
font-family:raleway;
border: 2px solid #ccc;
padding: 0px 40px 0px;
margin-top: 70px;
//margin: 50px;
margin: 0% 25%;
}

input[type=text],input[type=email],input[type=password]{
width:99.5%;
padding: 10px;
margin-top: 8px;
border: 1px solid #ccc;
padding-left: 5px;
font-size: 16px;
font-family:raleway;
}

textarea{
width:99.5%;
padding: 10px;
margin-top: 8px;
border: 1px solid #ccc;
padding-left: 5px;
margin-bottom: 5px;
font-size: 16px;
font-family:raleway;
}

input[type=submit]{
width: 100%;
background-color:#FFBC00;
color: white;
border: 2px solid #FFCB00;
padding: 10px;
font-size:20px;
cursor:pointer;
border-radius: 5px;
margin-bottom: 40px;
}
#para{
clear: both;
margin: 0 35%;
}
Conclusion:
I hope that at this point you must be feeling yourself comfortable with sending email via Gmail SMTP server in PHP. You can also try sending mail using other SMTP servers. Please comment for any query. Keep visiting our website.
For your information, there are several email marketing software out there in which you can connect your Gmail SMTP for sending bulk emails in automation. You can check them out:-
PHP Email Verification Script For Downloading E-Book

Email verification is a process to check the user authenticity, whether the person who is trying to access the services is right user or wrong user.
True register users are allowed to use all services provided by the provider and fake users are denied because they are not authorized users to use the specific services.
PHP Email Verification Script for Downloading e-book is all about to download the e-books after a successful email authentication.
If a user is successfully authenticated in email verification then they get the permission to download the e-book.
This script performs mainly three major task listed below.
- Get User Info(User name & email id)
- Mail_Verification(Verify user by Mail account)
- File_Download (File_download window)
Watch the live demo or download code from the link given below
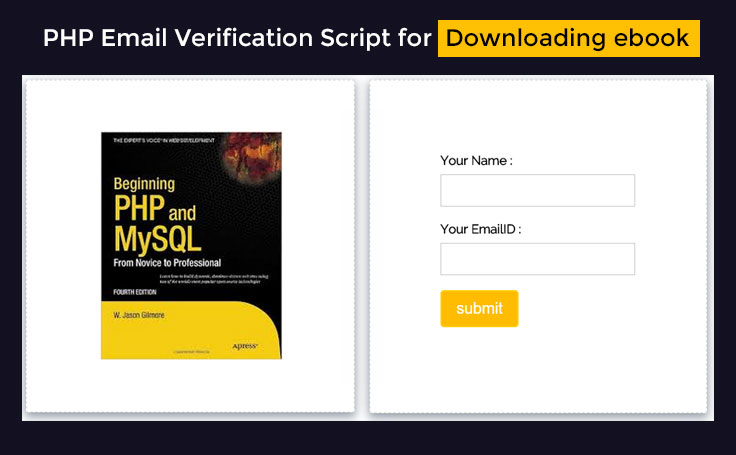
Our service Mailget – email marketing platform can provide you a complete solution
Change Settings in your Gmail account:
For this you can refer to our blog post Send email via Gmail SMTP server in PHP which will give you a clear idea about the settings you need to change in gmail and how you can use PHPMailer Library.
Concept Behind the Script
In Index page user enter his Name, email id and then click submit button.
the User gets an email in his inbox with a message,”Please click the below link(highlighted) for mail verification”, as soon as user click that link he is redirected to download page.
In download page user finds the download link where he can easily download the book by clicking on the download link.
Script Description:-
This script contain two page name ‘index.php’ and ‘download.php’ along with images folder,class(Mail library) and CSS folder.
Index.php
In this script we are going to make a email verification form where a user is asked to fill the info like user name & user emailid .
after filling this info he will submit the form and will receive a verification link(highlighted link) in email account , if user click that verification link he is redirected to the download page ,where he can download the book.pdf after clicking the download link.
<?php
include "classes/class.phpmailer.php"; // include the class name

//Generate random hash value
$hash = md5(rand(0, 1000));
if (isset($_POST['id'])) {
$id1 = $_POST['id'];
if ($id1 == $hash) {

header('location:download.php');
}
}


if (isset($_POST['dsubmit'])) {

$msg1 = "Download Link has been sent please check your Mail";
echo "<script type='text/javascript'>alert('$msg1')</script>";
}

if (isset($_POST['dsubmit'])) {
$emailid = $_POST['textmail'];
$mail = new PHPMailer(); // create a new object
$mail->IsSMTP(); // enable SMTP
$mail->SMTPDebug = 1; // debugging: 1 = errors and messages, 2 = messages only
$mail->SMTPAuth = true; // authentication enabled
$mail->SMTPSecure = 'ssl'; // secure transfer enabled REQUIRED for GMail
$mail->Host = "smtp.gmail.com";
$mail->Port = 465; // or 587
$mail->IsHTML(true);
$mail->Username = "Insert you gmail id";
$mail->Password = "Insert your gmail password here";
$mail->SetFrom("$emailid");
$mail->Subject = "Your Gmail SMTP Mail";
$mail->Body = "<b>Hi, your are welcome to Formget.com Please click the below link to verify your account <br/><br/>Link:-<a href='http://localhost/php-email-verification/download.php?id={$hash}'>$hash</a></b>";
$mail->AddAddress("$emailid");
if (!$mail->Send()) {
echo "Mailer Error: " . $mail->ErrorInfo;
} else {

}
}

?>

<html><head><meta http-equiv="Content-Type" content="text/html; charset=windows-1252">
<title>PHP Email Verification Script for Downloading ebook</title>
<link href="css/style.css" rel="stylesheet" type="text/css"/>
</head>
<body>
<div id="main">
<center><h1>PHP Email Verification Script for Downloading ebook</h1></center>
<div id="login">
<h2>Enter your Details Below to receive a Secure Download Link</h2>
<hr>
<div id="left">

<img src="images/book10.jpg" alt=""/>

</div>
<div id="right">
<div id ="form1">
<form method="post" action ="" id="ctform">
<label><b>Your Name :</b></label>
<input type="text" id ="text1" name ="textname" required/>
<br/>
<br/>
<label><b>Your EmailID :</b></label>
<input type="email" name ="textmail" id ="text1" required/>
<br/>
<br/>
<input type="submit" id ="dsubmit" value ="submit" name ="dsubmit" />
</form>
</div>
</div>
</div>
</div>
</body>
</html>
When user runs this page he gets a optin window asking for
- Enter your name
- Enter your email id
After entering the valid email id he need to click on submit button , as he click submit button he gets an alert message promoting that “verification link has been sent to your mail”.
Then user needs to login to his email account for verification, as he opens his mail inbox he gets a inbox message and after opening that message he is asked for click one of the “highlighted link” for verifying his mail.
Download.php
After successfull email verification the user is sent to this page where he will receive a thanks message ,user is allowed to download the book.pdf by clicking the download link provided in this page.
<?php
if(isset($_GET['id1']))
{
$filename="phpebook.pdf";
$file="ebook/phpebook.pdf";
$len = filesize($file); // Calculate File Size
ob_clean();
header("Pragma: public");
header("Expires: 0");
header("Cache-Control: must-revalidate, post-check=0, pre-check=0");
header("Cache-Control: public");
header("Content-Description: File Transfer");
header("Content-Type:application/pdf"); // Send type of file
$header="Content-Disposition: attachment; filename=$filename;"; // Send File Name
header($header );
header("Content-Transfer-Encoding: binary");
header("Content-Length: ".$len); // Send File Size
@readfile($file);
exit;
}
//echo"<h2>Thanks for download</h2>";
?>
<html><head><meta http-equiv="Content-Type" content="text/html; charset=windows-1252">
<title>PHP Email Verification Script for Downloading ebook</title>
<link href="css/style.css" rel="stylesheet" type="text/css"/>
</head>
<body>
<div id="main">
<center><h1>PHP Email Verification Script for Downloading ebook</h1></center>
<div id="ebook_download">
<h2>Thanks for verification</h2>
<hr>
<div id="right">
<h3 id="vermsg">Here you can download your file by clicking on <BR>Download link right below.</h3>
<a href="download.php?id1=downlaod"> <img src="images/downbtn.gif" alt="" id="downbtnimg"/></a>.
</div>
</div>
</div>
</body>
</html>
As user click that link he is directly sent to the download page with a message “Thanks for verification please click the below link for downloading the book” ,as he click that link the downloading process starts, and user gets the appropriate book pdf file.
Style.css
Includes basic styling of HTML elements.
@import url(http://fonts.googleapis.com/css?family=Raleway);
#main{
width:960px;
margin:50px auto;
font-family:raleway;
}
span{
color:red;
}

h2{
background-color: #FEFFED;
text-align:center;
border-radius: 10px 10px 0 0;
margin: -10px -40px;
padding: 15px;
}

hr{
border:0;
border-bottom:1px solid #ccc;
margin: 10px -40px;
margin-bottom: 30px;
}
#login{
height: 500px;
width: 90%;
float: left;
border-radius: 10px;
font-family:raleway;
border: 2px solid #ccc;
padding: 10px 40px 33px;
margin-top: 23px;
}
input[type=text],input[type=email]{
width:99.5%;
padding: 10px;
margin-top: 8px;
border: 1px solid #ccc;
padding-left: 5px;
font-size: 16px;
font-family:raleway;
}
input[type=submit]{
width: 40%;
background-color:#FFBC00;
color: white;
border: 2px solid #FFCB00;
padding: 10px;
font-size:20px;
cursor:pointer;
border-radius: 5px;
}
#profile{
padding:50px;
border:1px dashed grey;
font-size:20px;
background-color:#DCE6F7;
}
#left{
// background-color: rgb(254, 255, 237);
width: 415px;
height: 420px;
float: left;
border: 1px dashed rgb(215, 215, 215);
box-shadow: 0px 5px 17px 1px #99A3AD, 0px 0px 40px #EEEEEE;
}
#right{
width: 326px;
float: right;
height: 321px;
/* border: 2px solid red; */
border: 1px dashed rgb(215, 215, 215);
box-shadow: 0px 5px 17px 1px #99A3AD, 0px 0px 40px #EEEEEE;
padding: 50px;
}

#left img {
width: 230px;
height: 289px;
margin-left: -75px;
margin: 65px 15px 10px 94px;
background-repeat: round;
}
#left img:hover{
opacity:.80;
}
#left p{
font-size: 18px;
margin-left: 128px;
}
#right p{
padding: 20px;
}
#paypal_logo{
margin: 10px 315px;
float: right;
}
#results {
width: 100%;
margin-top: 30px;
//border: 1px solid #ccc;
table-layout: auto;
margin-bottom: 30px;
}
table {
border-collapse: collapse;
border-spacing: 0;
}
thead {
display: table-header-group;
vertical-align: middle;
border-color: inherit;
}
.head {
font-size: 15px;
font-family: "proxima_novasemibold", sans-serif;
background: #FEFFED;
color: #1d4c55;
border: 1px solid #ccc;
}
tr {
display: table-row;
vertical-align: inherit;
border-color: inherit;
}
.head th{
//border-right: 1px solid #ccc;
//border-bottom: 1px solid #ccc;
line-height: normal;
padding: 10px 0px;
text-align: left;
padding-left: 3%;
}
td {
//border-right: 1px solid #ccc;
border-bottom: 1px solid #ccc;
line-height: normal;
padding: 10px 0px;
text-align: left;
padding-left:3%;
vertical-align: top;
}
tbody {
display: table-row-group;
vertical-align: middle;
border-color: inherit;
}
tr {
display: table-row;
vertical-align: inherit;
border-color: inherit;
}
#return {
width: 492px;
height: auto;
float: left;
border-radius: 10px;
font-family: raleway;
border: 2px solid #ccc;
padding: 10px 40px 30px;
margin-bottom: 50px;
}
#return h3#success {
text-align: center;
font-size: 24px;
color: green;
margin-bottom: 10px;
}
#return P {
text-align: left;
}
#return .back_btn {
margin-top: 30px;
text-align: center;
}
#btn {
width: 100%;
background-color: #FFBC00;
color: white;
border: 2px solid #FFCB00;
padding: 10px 70px;
font-size: 20px;
cursor: pointer;
border-radius: 5px;
margin-bottom: 15px;
margin: 0 auto;
}
a{
text-decoration:none;
color: #33BADB;
}
.success_main_heading{
margin-left: -40%;

}
#return h3#fail{
text-align: center;
font-size: 24px;
margin-top: 50px;
color: red;
margin-bottom: 10px;
}
.red{
color:red;
font-weight: bold;
}
ul li{
margin-bottom: 15px;
text-align: justify;
margin-right: 20px;
}
hr.style-four {
margin-bottom: 10px;
width: 300px;
padding: 0;
border: none;
border-top: 1px solid rgba(0, 0, 0, 0.1);
color: #333;
text-align: center;
}
hr.style-four:after {
content: "Note";
display: inline-block;
position: relative;
top: -0.7em;
font-size: 1em;
padding: 0 0.25em;
background: white;
font-weight: 600;
}
#vermsg{
font-family: raleway;
color: #BFBFBF;
font-size: 22px;
}
#form1 {
padding-top: 27px;
width: 248px;
margin: 15px auto;
}
#downbtnimg {
margin: 63px 10%;
}
#right h3 {
margin-top: -8px;
text-align: center;
/* padding: 0; */
}
#ebook_download{
height: 500px;
width: 45%;
float: left;
border-radius: 10px;
font-family:raleway;
border: 2px solid #ccc;
padding: 10px 40px 33px;
margin-top: 23px;
margin-left: 22%;
}
Conclusion :
After reading the above post, I am sure you will give a try to the script provided and implement it in your own projects as well. Feel free to visit our website again in the future to get in touch with new coding tricks. You can let us know about your feedback in the space provided below ![]()
For more related updates check the following blogs –
Setup Amazon SES Account for Spam Emails
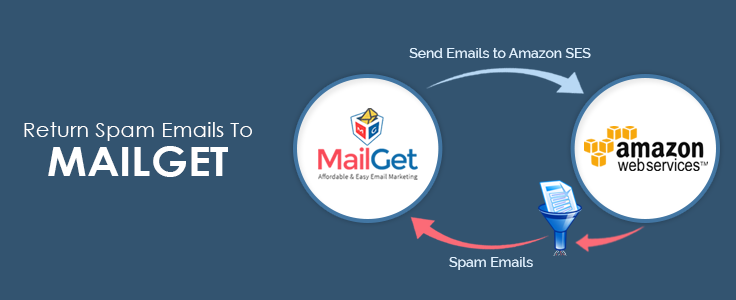
If your sent emails are marked as spam by a number of recipients, first of all, it’s a money wastage to keep sending emails to those uninterested people from your limited budget, and secondly, it can harm the reputation of your Amazon SES account.
So what you should do is, configure your Amazon SES account with your email sender (MailGet) after which Amazon SES can start sending complaint notifications (or spam reports) to MailGet.
Using that report, MailGet automatically removes the spam reported email addresses from your sending list.
So here are the steps you need for configuration.
Follow the below steps –
Step: 1 Go to the “Services” section and then click on “SNS – Simple Notification Service” option.
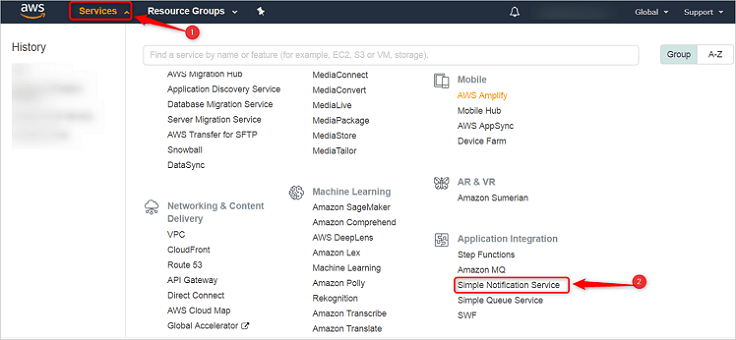
Step: 2 Move on to the “Topics” section and click “Create topic“ button.
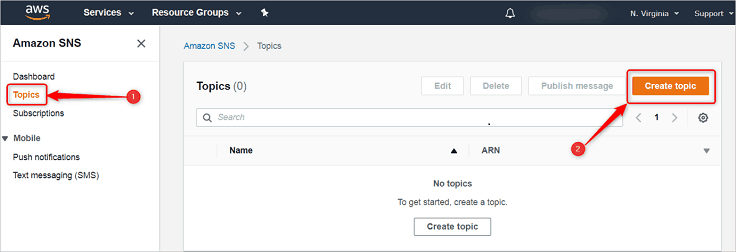
Step: 3 After clicking on a “Create Topic” a display screen will appear. Here, you will have to give a Topic Name as “Spam” and Display Name as “Spam_Complaints”.
Once you have added the desired names then, click the below given “Create Topic” button.
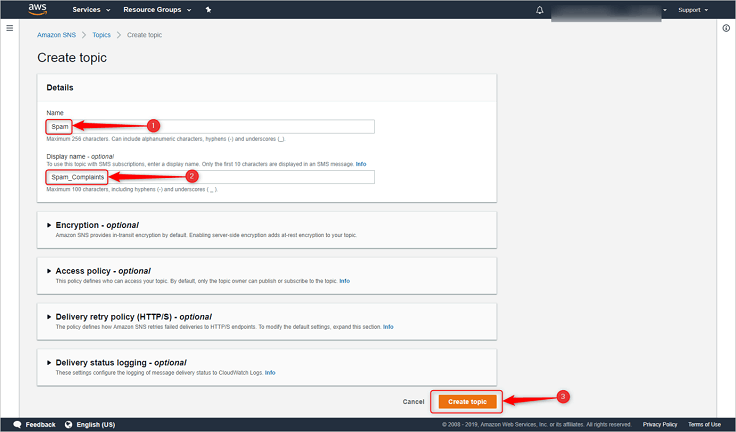
Step: 4 Now click on “Create subscription” button.
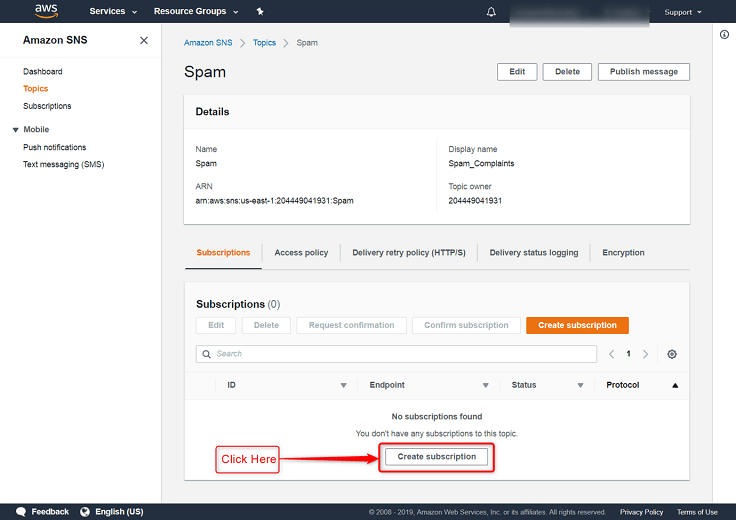
Step: 5 You will now have to add the endpoint. So, select Protocol as “HTTPS”.
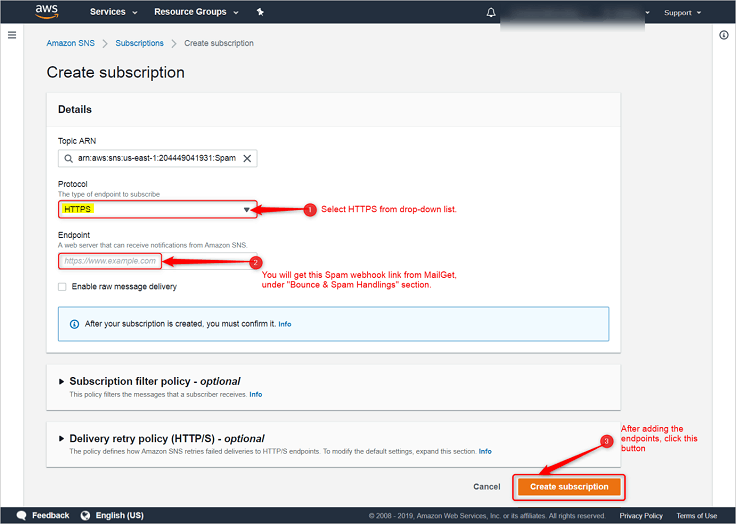
Next, just copy & paste the link for Endpoint viz., given in your MailGet account as “Spam Webhook”, under Bounce & Spam Handlings section (refer the below image).
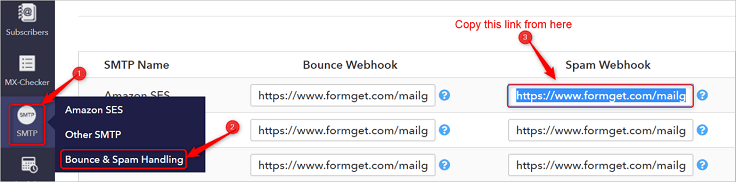
Step: 6 You will now get redirected to the page (as shown below) and then, just check the pending status and then click “Subscriptions” option.
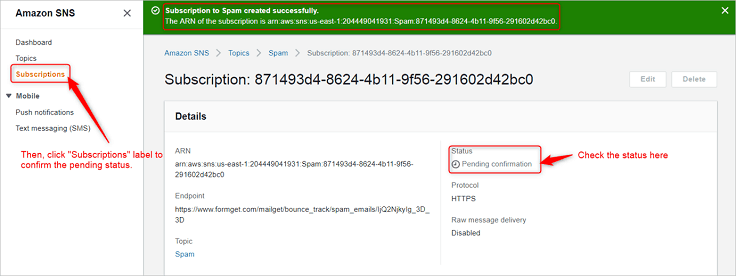
Step:7 Select “Pending Confirmation” from the check-box and then, click on “Request confirmation“.
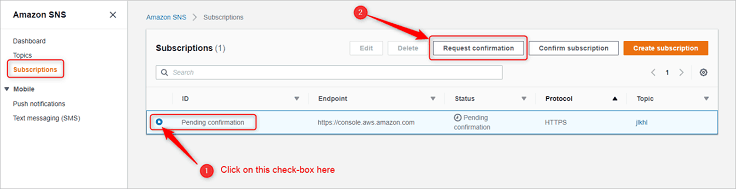
Step: 8 Now click on “Services” after then select “SES“.

Step: 9 Now click on the “Email Addresses” label.

Step: 10 Now click on your verified Sender: Email

Step: 11 Now click on “Notification” Option.
 ‘
‘
Step: 12 Now click on “Edit Configuration” Button.
 ‘
‘
Step: 13 Now click on “Complaints” after then select your topic name (In our case topic name is “spam_complaints”) after then click on “Save Config”

If you still experience problems, you can reach our support team anytime, or can talk to our support member over online chat.
Mailgun SMTP with MailGet : Complete Setup

MailGet allow you to connect any SMTP service in your MailGet account to send emails as per your requirement.
Below we are going to discuss about connecting Mailgun SMTP with MailGet to send bulk emails.
Collect API keys from Mailgun
Step 1: To use Mailgun SMTP, create an account in Mailgun website .

Step 2: After creating an account in Mailgun click on any domain( custom domain or sandbox domain) to get credentials of that domain for configuration.
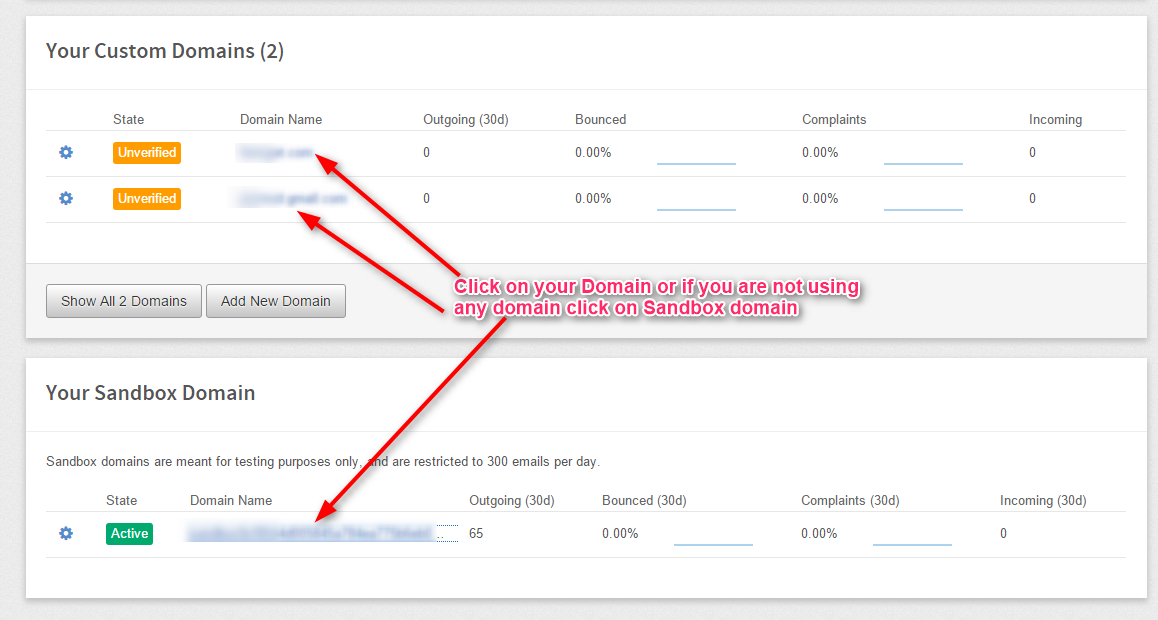
Step 3: Here we clicked on Sandbox domain and get the below page. From this page you will get all required credentials to configure it with MailGet.
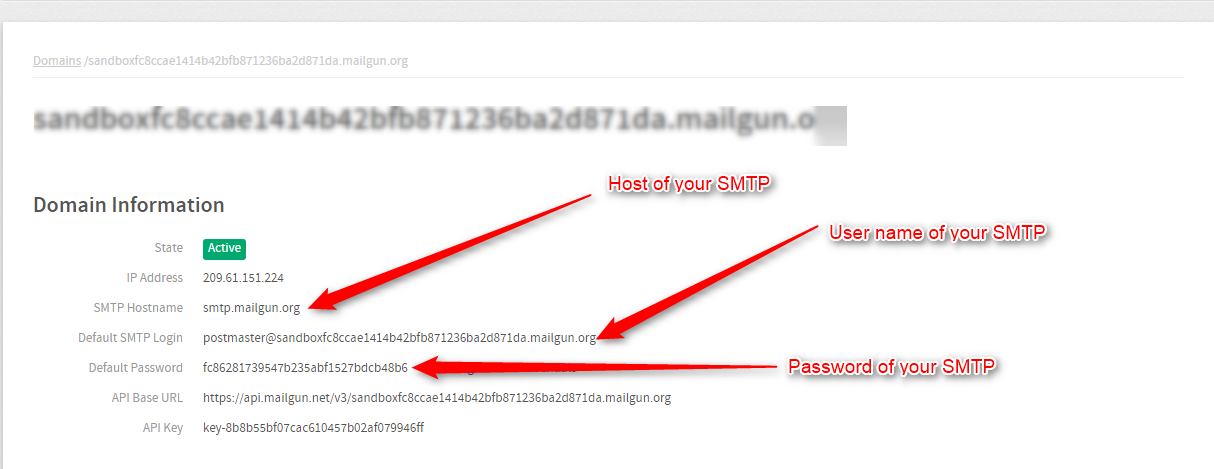
Collect all the details to use it while connecting Mailgun with MailGet.
Connect Mailgun SMTP with MailGet
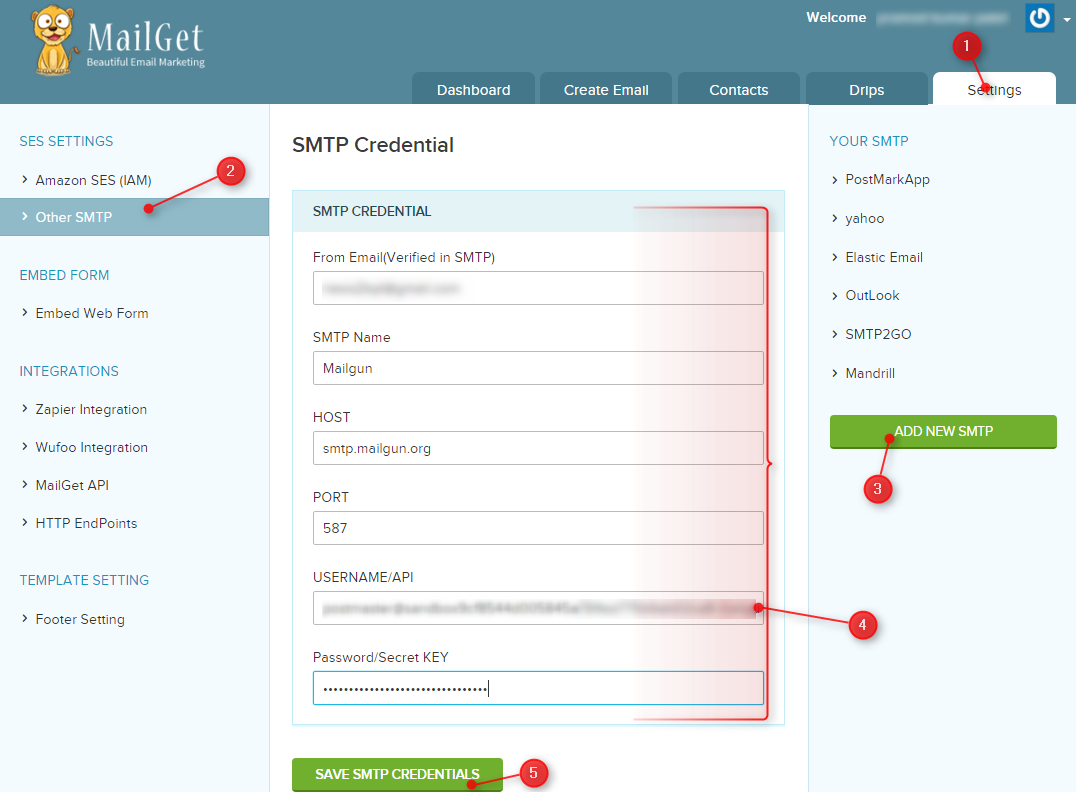
Step 1: Login in your MailGet account and click on the “Settings” tab.
Step 2: Then click on Other SMTP link on the left panel to get SMTP section visible for further process.
Step 3: Now click on “ADD NEW SMTP” button visible in the right panel to add Mailgun SMTP service.
Step 4: Fill all the compulsory details in SMTP configuration form.
From Email: Email address used in Mailgun account.
SMTP Name: You can set any name to recognize Mailgun SMTP.
HOST: smtp.mailgun.org
PORT: 587
USERNAME/API: Default SMTP Login.
PASSWORD/Secret KEY: SMTP Password.
Step 5: In the last click on the green button “SAVE SMTP CREDENTIALS” to save all details. Now your MailGet account is connected with Mailgun and ready to send email campaigns.
Setup Mailgun Account for Handling Spam & Bounce emails
MailGet automatically handles bounced & spam emails, but it requires to be configured with your SMTP service provider.
After configuration with Mailgun, MailGet will automatically add these emails to your bounce list & spam list. In other words, these no-use email addresses will be removed from your sending list and subsequent delivery attempts are ignored to protect your sending reputation.
Just follow these few steps required for configuration after which Mailgun will start sending notification of every bounced & spam email to your MailGet application.
Do follow steps
Step : 1 click on “Webhooks”
Step : 2 click on “setting icon” of Hard bounces after then click on “Edit URL” option.

Step : 3 Fill “URL” which will be provide by Mailget then click on “Set Webhook URL” Button.

Step : 4 click on “setting icon” of Spam complaints after then click on “Edit URL” option.

Step : 5 Again Fill “URL” for Spam complains, which will be provide by Mailget then click on “Set Webhook URL” Button.

Step : 6 After then this window will be display.


SendGrid SMTP With MailGet : Complete Setup
MailGet provide excellent feature for multiple SMTP integration in your single account to send emails. It connects with all SMTP services like Mandrill, SendGrid, Mailgun, Postmark, Google, Outlook, Yahoo,Mailjet etc.
In documentation, we are going to connect SendGrid with MailGet to send emails and see how to update that credentials.
Do follow steps-
Connect SendGrid SMTP
Step: 1 After login in your MailGet account click on the “Settings” tab in your dashboard.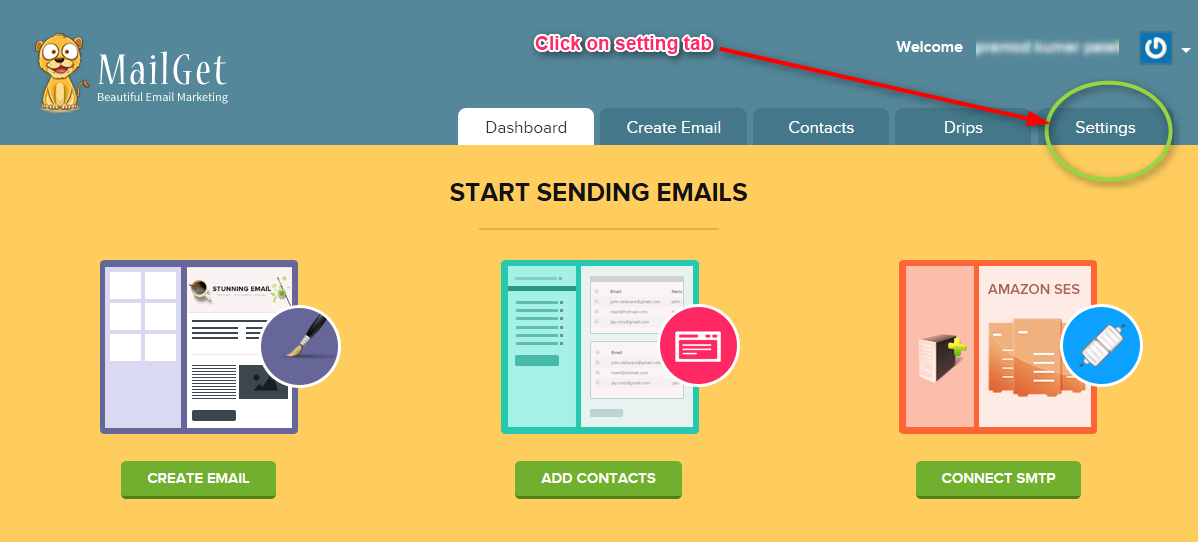
Step: 2 After then click on “Other SMTP” link in left sidebar. Now you will see a green button “ADD NEW SMTP” on the right side( shown below in image), click on that to add SendGrid SMTP.
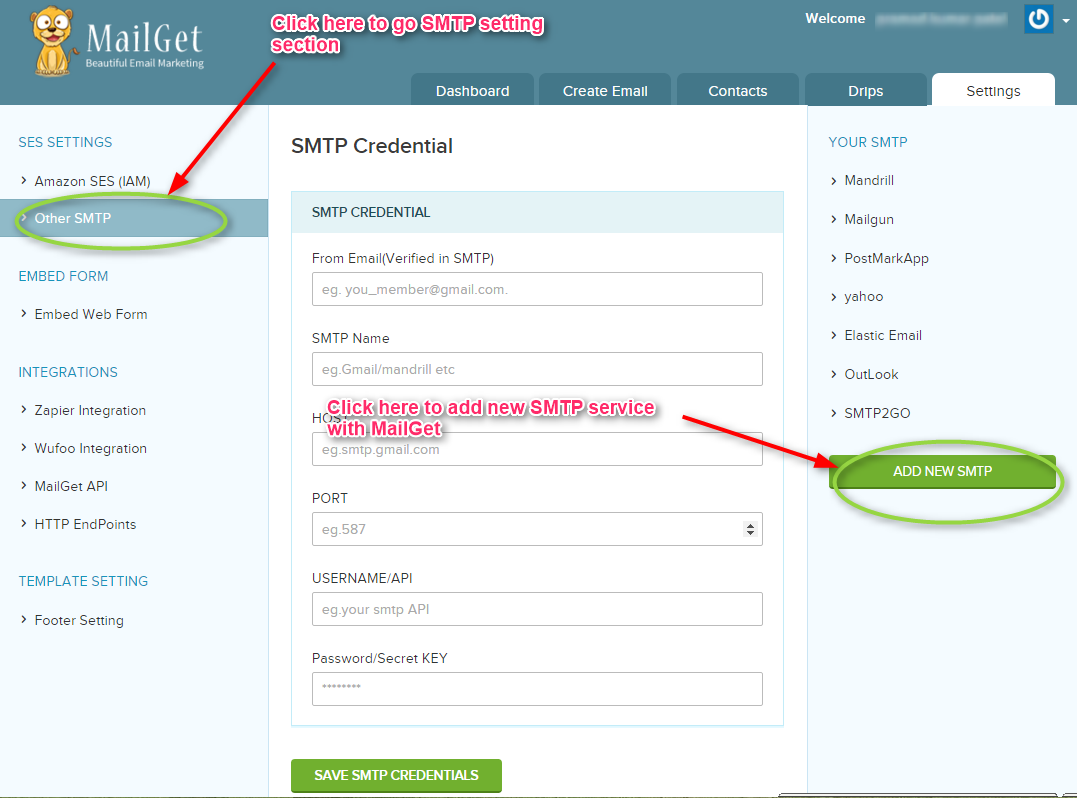
Step: 3 When you will click on “ADD NEW SMTP” button a new form will open. You have to fill all the information in form as listed below to connect MailGet With SendGrid.
From Email: From Email address( which one you have used to create account in SendGrid) for your Email Campaign.
SMTP Name: You can set any name to recognize SendGrid SMTP.
HOST: smtp.sendgrid.net
PORT: 587
USERNAME/API: SendGrid account Login Username.
PASSWORD/Secret KEY: SendGrid account login password.
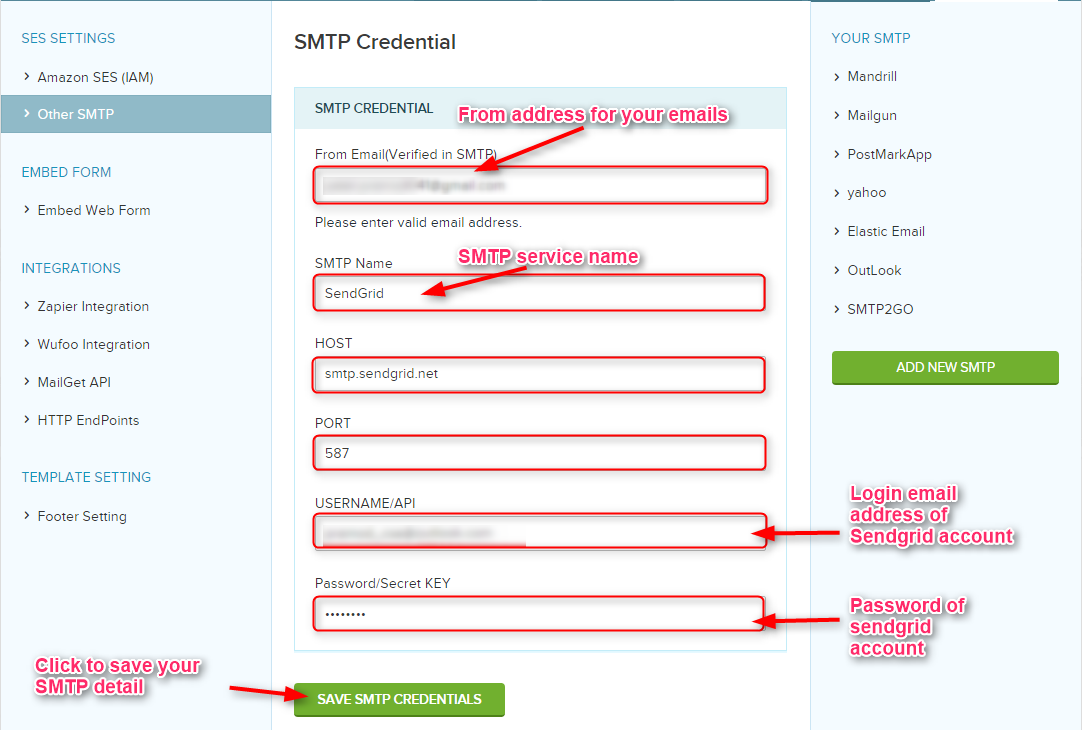
Step: 4 At last click on the green button “SAVE SMTP CREDENTIALS” to save details.
If there is any issue with your credential, you will get an error message.

With the correct details, you will get a success message which shows your SendGrid SMTP has configured successfully with Mailget.

Now you can send your email campaigns with this credential.
Update Previous connected SendGrid SMTP details
Step: 1 Click on SendGrid SMTP name shown in the right sidebar to update it.
Step: 2 After clicking on Sendgrid SMTP name, You will see your previous saved details. Now update your details and click on “UPDATE DETAILS ” button to save it. When you click on button to update SMTP, you will see a message “Your credential has updated successfully”.

Now your SendGrid SMTP details are successfully updated.
Setup SendGrid Account for Handling Bounces & Spam Emails
To maintain your sending reputation, you have to get rid off the bounced and spam emails containing in your mailing list.
For that, you need to configure MailGet with your SMTP service provider (SendGrid ) so that the bounced & spam email addresses can be filtered out from your sending list.
After configuration, SendGrid will start sending notification to MailGet about the bounced and spam email address when an email is sent to a list.
These notifications will help MailGet to filter your sending list.
Do follow steps
Step : 1 click on “SETTINGS” after then click on “Mail Settings” then click on “INACTIVE” option of Event Notification.

Step : 2 Switch “On” of Event Notification then Enter “HTTP POST URL” which will be provide by MailGet then check “Bounced & Mark as Spam” option then click on “Right” option.


Mailjet SMTP With MailGet : Complete Setup

MailGet allows you to connect multiple SMTP services in your account to send email campaigns.
In this documentation, we are going to discuss the configuration of Mailjet SMTP with MailGet to send bulk emails.
Collect API KEY’s from Mailjet
Step 1: Go to Mailjet website and create an account to use it.

Step 2: After creating an account in Mailjet you have to collect keys for configuration. For keys go to the SMTP settings in you Mailjet account and collect the required information.
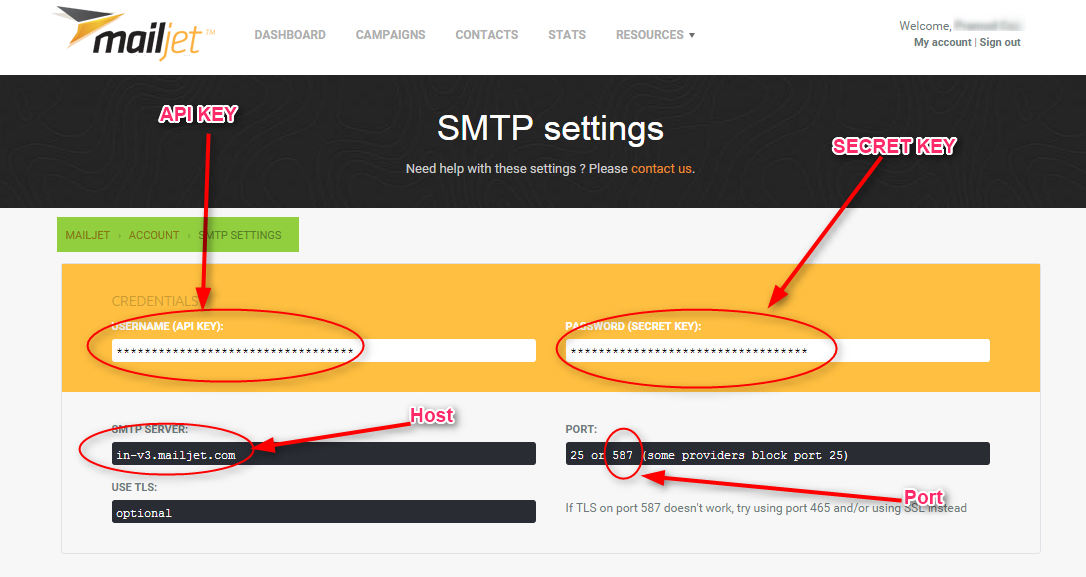
Connect Mailjet SMTP with MailGet
Step 1: Click on the “Settings” tab in your MailGet Dashboard.
Step 2: First you need to click on another SMTP link on the left side panel to get visible the SMTP setting section.
Step 3: Now click on “ADD NEW SMTP” button at the bottom of the right side panel to add your Mailjet SMTP service.
Step 4: After clicking on the “ADD NEW SMTP” a form will open. Fill all the required information in the form.
From Email: Add email address from which you want to send emails(Email address used in creating Mailjet account).
SMTP Name: You can set any name to recognize Mailjet SMTP.
HOST: Mailjet SMTP server.
PORT: 587
USERNAME/API: Mailjet API KEY.
PASSWORD/Secret KEY: Mailjet Secret KEY.
Step 5: Now at last click on the green button “SAVE SMTP CREDENTIALS” to save details.
Now you have successfully connected Mailjet SMTP with your MailGet account to send your campaigns.
Setup Mailjet Account for Handling Bounces & Spam Emails
To maintain the good reputation of your Mailjet account, you have to keep your email bounce & spam rates low and have to have authentic emails in your sending list.
So for that you need to configure your Mailjet SMTP server provider with your MailGet account. This helps you get rid of the invalid email addresses containing in your mailing list.
After configuration, Mailjet starts sending bounce & spam reports to MailGet, on the basis of which MailGet removes the bounced & spam emails from your sending list for the next time.
Here are the steps you need to follow:
Step: 1 click on “My account” after then click on “Event tracking (triggers)”.

Step: 2 Enter “ENDPOINT URL” which will be provided by MailGet then check “Bounce events & Spam events” option then click on “save” Button.

Postmark SMTP with MailGet : Complete Setup

MailGet allows any SMTP integration in your MailGet account easily to send emails as per your requirement.
Below we are going to discuss connecting Postmark SMTP with MailGet. Postmark can be used to send transactional emails only.
Collect API token from Postmark
Step 1: Go to Postmark website and create an account to use it.

Step 2: After creating an account in postmark click on credentials link. Then copy Server API token or you can generate a new token. This Server API token is the main key for configuring MailGet account with Postmark SMTP.
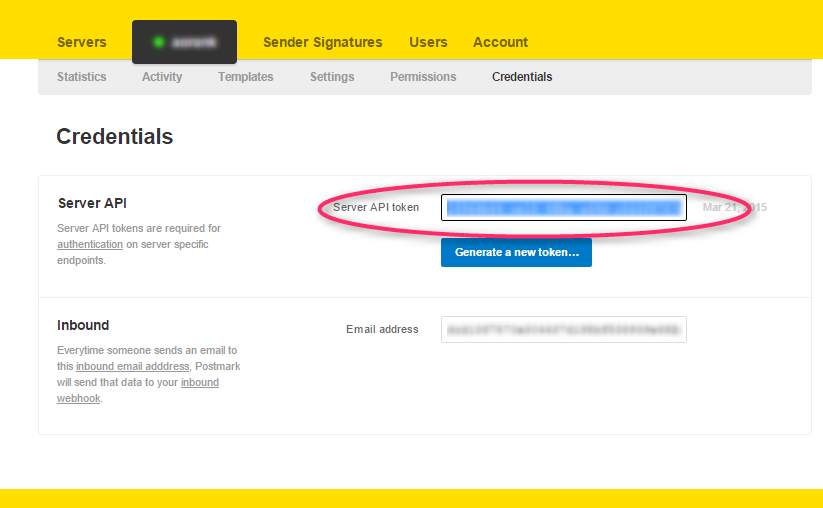
Connect Postmark SMTP with MailGet
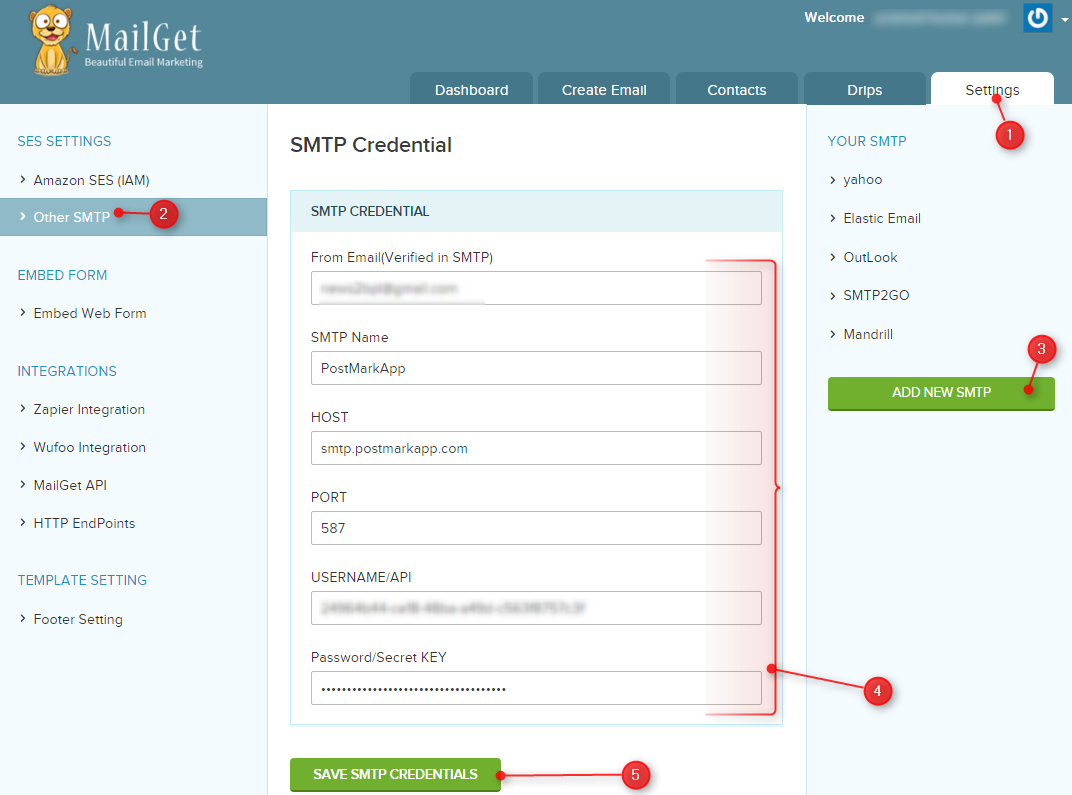
Step 1: After login in MailGet account click on the “Settings” tab.
Step 2: Then click on Other SMTP on the left panel to get SMTP section visible.
Step 3: Now click on “ADD NEW SMTP” button at the bottom of the right panel to add Postmark SMTP service.
Step 4: Fill all the necessary information in SMTP configuration form.
From Email: Email address used in postmark account.
SMTP Name: You can set any name to recognize Postmark SMTP.
HOST: smtp.postmarkapp.com
PORT: 587
USERNAME/API: Server API token.
PASSWORD/Secret KEY: Server API token.
Step 5: Now at last hit the green button “SAVE SMTP CREDENTIALS“, Your MailGet account is successfully connected with Postmark.
Setup Postmark Account for Handling Bounces & Spam Emails
In order to keep good reputation of your Postmark account, you should ensure that reports of bounce and spam emails as low as possible.
Hence for this, your Postmark account must be configured with your MailGet account. For this, you need to add Webhook to your Postmark account.
Once you’re done with the setup, you will start recieving sending bounce & spam reports in your MailGet account. Then accordingly to the report, MailGet will automatically filter bounce and spam emails.
These are the steps which you need to follow: –
Step #1 : Login to your Postmark Account.
Step #2: Go to Dashboard of Postmark and select the server.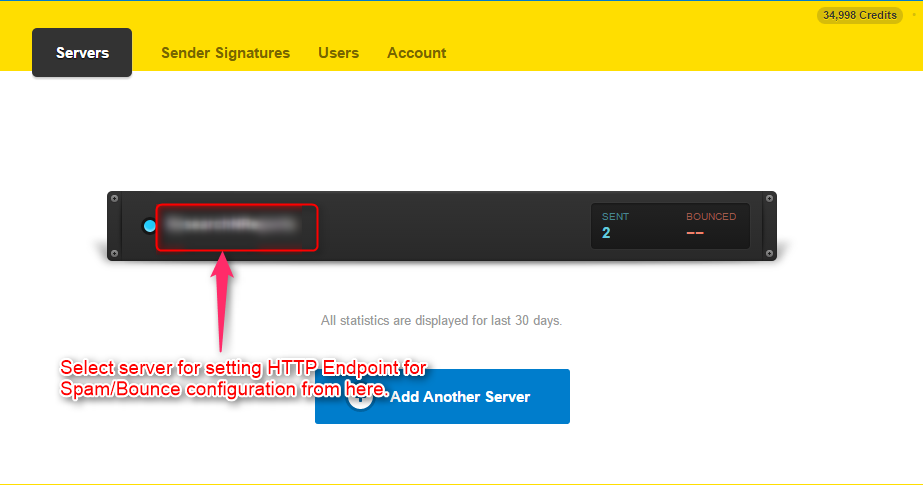
Step #3: Click on Settings tab to configure spam bounce.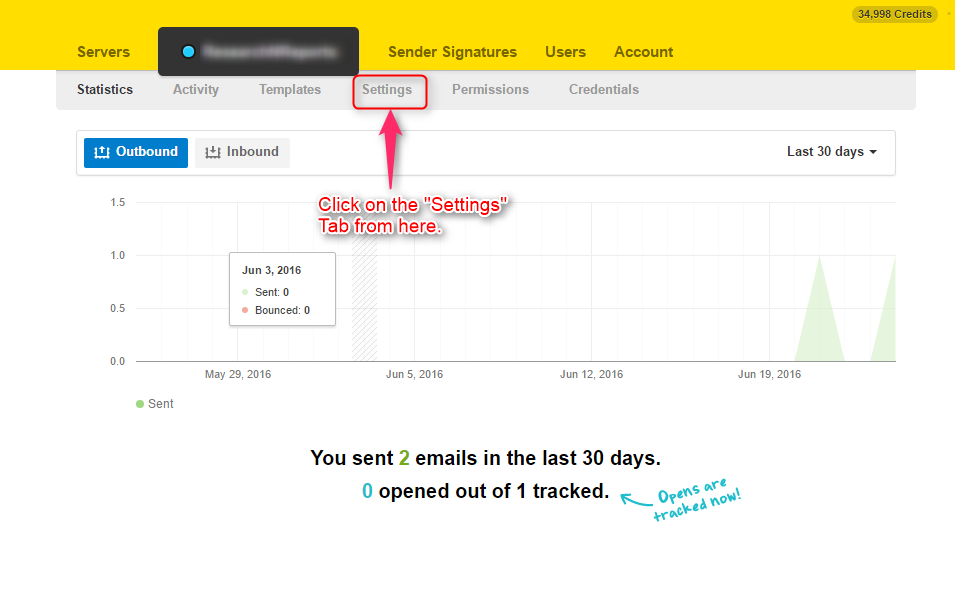
Step #4: Go to MailGet for your endpoint URL.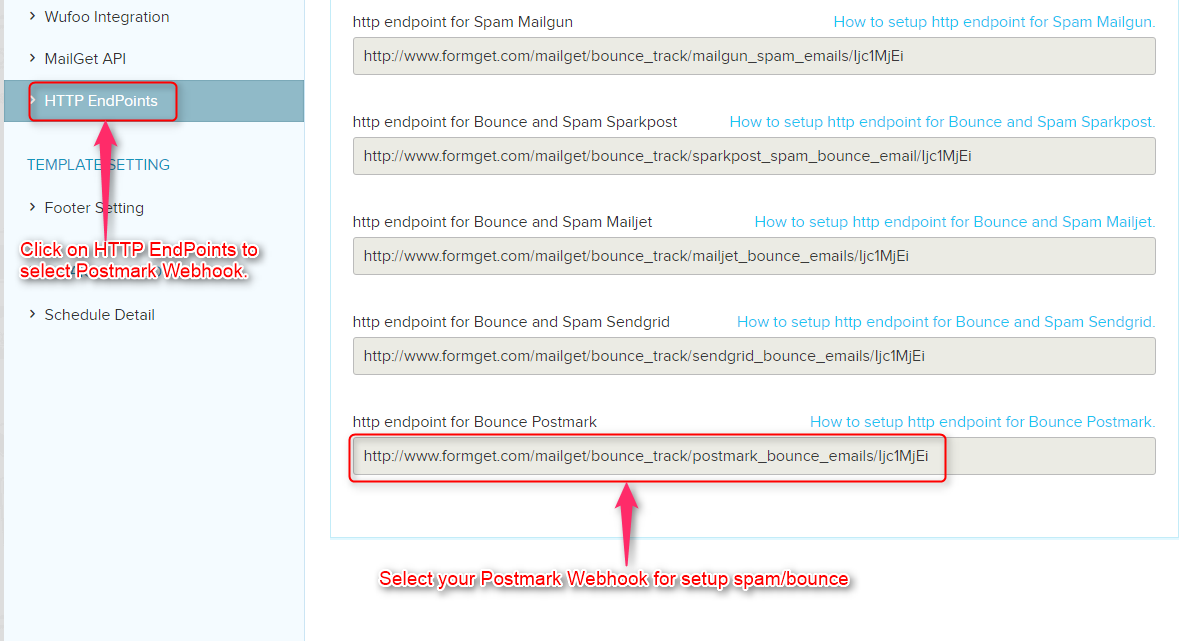
Step #5: Now, In the Setting panel you have to filled these fields. So that your webhook will be set for bounce and spam complaints.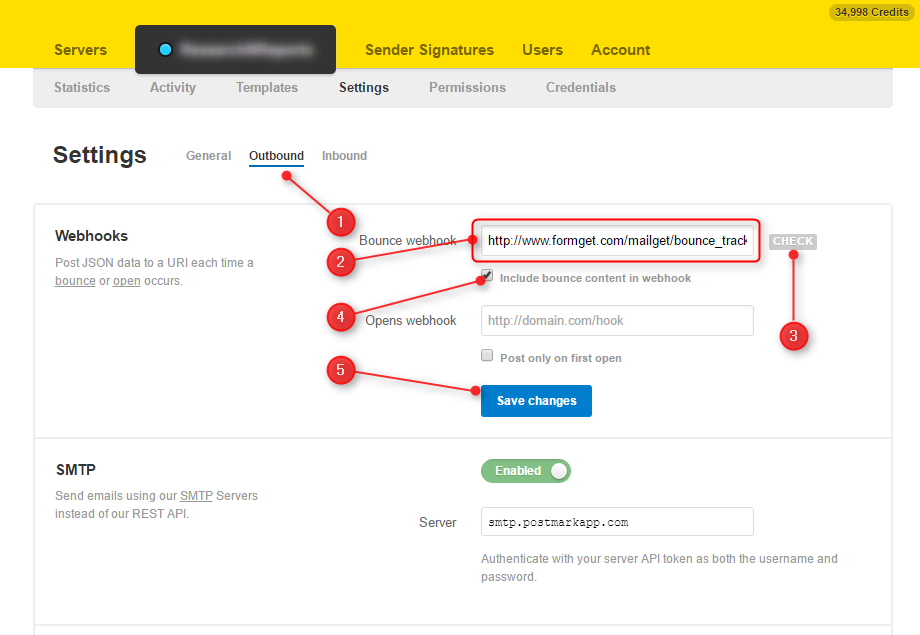
- Select Outbound option.
- Add Bounce Webhook of MailGet.
- Click on Check.
- Select checkbox to include bounce content in webhook.
- At last, Save your configuration by clicking on Save Changes.

Bootstrap Comment Box
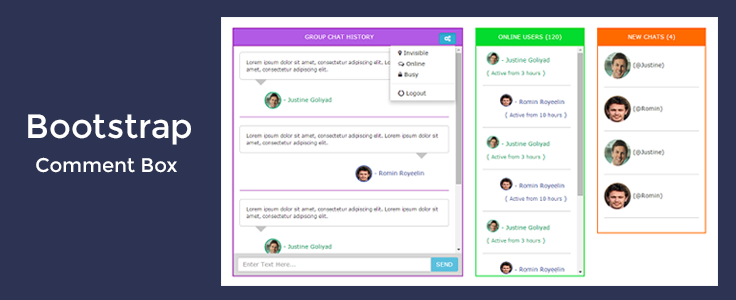
In this tutorial, I am going to create a simple comment box via ‘Bootstrap’.
There will be 4 fields (i.e. Name, email, website, and message) and a submit button in that comment box.
- When a user will submit that form then,
..his/her comment will get displayed in Leave A Reply section as indicated in the diagram given below.
In bootstrap,
We have to deal with ‘rows’ and ‘columns’ to make our web page responsive and mobile friendly.
For a quick solution, you can take a look at our bootstrap templates.
Here’s the layout of our comment box:-
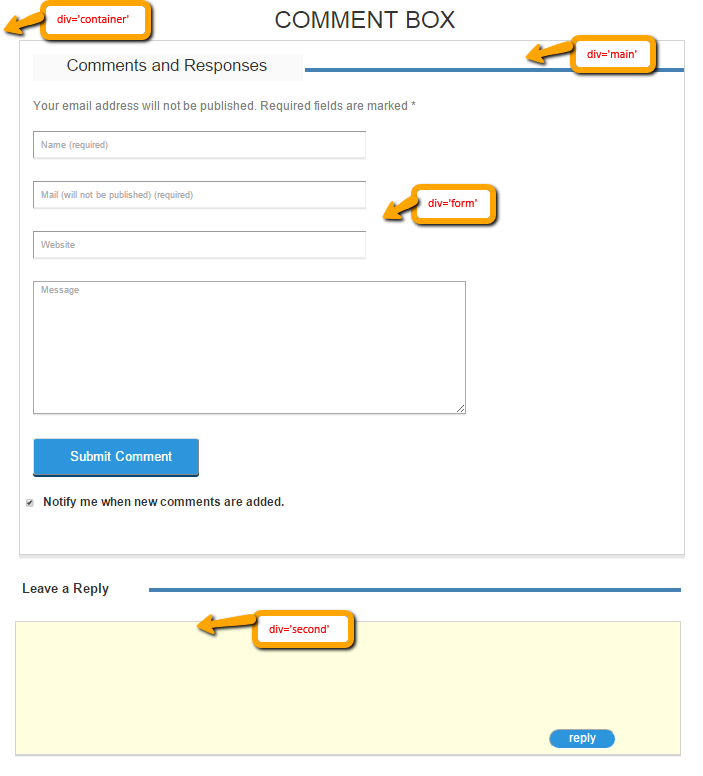
Steps to create comment box:
Let’s have a look on the coding given below :-
1. Firstly we have to download bootstrap library and add ‘bootstrap.css’ in our ‘head’ section.
Head section of HTML file will appear as:-
<head>
<meta charset = "utf-8">
<meta name = "viewport" content = "width=device-width, initial-scale=1">
<link href = "css/bootstrap.css" rel = "stylesheet" type = "text/css"/>
<link href="css.css" rel="stylesheet" type="text/css"/>
<link rel = "stylesheet" href = "http://maxcdn.bootstrapcdn.com/bootstrap/3.3.4/css/bootstrap.min.css">
<link href='http://fonts.googleapis.com/css?family=Roboto' rel='stylesheet' type='text/css'>
<title>Comment Box</title>
</head>
2. Start coding with the ‘HTML’ section
In this file, we will maintain our HTML part to give a basic layout of the form.
Create a html file i.e. ‘index.html’ :
<html>
<head>
<meta charset = "utf-8">
<meta name = "viewport" content = "width=device-width, initial-scale=1">
<link href = "css/bootstrap.css" rel = "stylesheet" type = "text/css"/>
<link href="css.css" rel="stylesheet" type="text/css"/>
<link rel = "stylesheet" href = "http://maxcdn.bootstrapcdn.com/bootstrap/3.3.4/css/bootstrap.min.css">
<link href='http://fonts.googleapis.com/css?family=Roboto' rel='stylesheet' type='text/css'>
<title>Comment Box</title>
</head>
<body>
<!------------container------->

<div class="container">

<h1>COMMENT BOX</h1>
<!-------Wrap------------>
<div id="wrap">
<div id="main">
<div class="row">
<div class="col-md-5">
<h3 class="heading">Comments and Responses</h3>
</div>
<div class="col-md-7">
<div id="upper_blank"></div>
</div>
</div>
</div>

<p>Your email address will not be published. Required fields are marked *</p>

<!------------Form Start---------->

<div id='form'>
<div class="row">
<div class="col-md-12">

<form action="" method="POST" id="commentform">

<div id="comment-name" class="form-row">
<input type = "text" placeholder = "Name (required)" name = "dname"  id = "name" >
</div>
<div id="comment-email" class="form-row">
<input type = "text" placeholder = "Mail (will not be published) (required)" name = "demail"  id = "email">
</div>
<div id="comment-url" class="form-row">
<input type = "text" placeholder = "Website" name = "url"  id = "url" >
</div>
<div id="comment-message" class="form-row">
<textarea name = "comment" placeholder = "Message" id = "comment" ></textarea>
</div>
<a href="#"><input type="submit" name="dsubmit" id="commentSubmit" value="Submit Comment"></a>
<input style="width: 30px" type="checkbox" value="1" name="subscribe" id="subscribe" checked="checked">
<p1><b>Notify me when new comments are added.</b></p1>
</form>

</div>
</div>
</div>
</div>

<!-------------------Reply Section------->
<div id="second">
<div class="row">
<div class="col-md-2">
<h3 class="second_heading"><b>Leave a Reply</b></h3>
</div>
<div class="col-md-10">
<div class="blank"></div>
</div>
</div>
</div>
<div id="middle">
<form>
<a href="#"><input type = "text" value = "reply" name = "dreply" id = "inner_reply"></a>
</form>
</div>

</div>
</body>
</html>
3. Coding for CSS
In this file, we will maintain the coding for the CSS part to give a good ‘look and feel’ to our layout and link this file to the head section of ‘HTML’.
create a ‘CSS’ file i.e. style.css
#wrap{
border: 1px solid lightgray;
alignment-adjust: central;
width: 1000px;
margin-left: 50px;
margin-top: 10px;
box-shadow: 0 5px 0 #e6e6e6;
padding-bottom: 50px;

}
h1{
color: blue-violet;
text-align: center;
}

h3.heading{
margin-left: 20px;
background-color: #fafafa;
font-size: 25px;
float: left;
padding-left: 40px;
position: relative;
width: 405px;
height: 40px;
padding-top: 5px;

}
#upper_blank{
border-bottom: 7px solid steelblue;
margin-top: 40px;
margin-right: 485px;
width: 570px;
padding-right: 480px;
}
p{
margin-left: 5px;
padding: 8px;
padding-left: 20px;
}
#name{
margin-left: 20px;
box-shadow: 0 2px 0 #e6e6e6;
height: 40px;
padding-left: 10px;
width: 500px;
}
#email{
margin-left: 20px;
box-shadow: 0 2px 0 #e6e6e6;
height: 40px;
padding-left: 10px;
width: 500px;
}
#url{
margin-left: 20px;
box-shadow: 0 2px 0 #e6e6e6;
height: 40px;
padding-left: 10px;
width: 500px;
}
#comment{
margin-left: 20px;
box-shadow: 0 2px 0 #e6e6e6;
height: 40px;
padding-left: 10px;
width: 650px;
height: 200px;
}
#commentSubmit{
margin-left: 20px;
width: 250px;
height: 55px;
color: white;
font-size: 20px;
background-color: #2c95dc;
box-shadow: 0 3px 0 #09466f;
margin-bottom: 30px;
padding-left: 20px;
border-radius: 5px;
}
#commentSubmit:hover {
background-color: #09466f;

}

p{
font-size: 18px;
color: gray;
padding-bottom: 15px;
padding-top: 15px;
}
p1{
font-size: 18px;
padding-top: 20px;
}

h3.second_heading{
margin-left: 0;
margin-top: 30px;
font-size: 20px;
width: 250px;
height: 50px;
padding-top: 10px;
padding-left: 55px;

}
#middle{
border: 1px solid lightgray;
width: 1000px;
height: 200px;
background-color: lightyellow;
margin-left: 45px;
text-align: left;
margin-top: 10px;
box-shadow: 0 2px 0 lightgray;
}
.blank{
border-bottom: 7px solid steelblue;
margin-top: 50px;
margin-left: 50px;
margin-right: 100px;
width: 800px;
}

#inner_reply{

margin-left: 800px;
margin-top: 160px;
width: 100px;
height: 30px;
background-color: #2c95dc;
text-align: center;
font-size: 18px;
color: white;
border-radius: 18px;
}
Conclusion: –
In this tutorial, we have learned about, how to create a comment box via bootstrap. Hope you will like this way to create a good comment box.