

In this blog, we are going to learn about creating popup modal using AngularJS and UI Bootstrap.
UI Bootstrap is a library written by Angular UI team. It contains bootstrap component written in pure AngularJS.
AngularJS allows data binding. It means, just set a variable and you can access it from all places where the variable is referred.
UI Bootstrap contains a repository of the angular directive for the different task performed over the bootstrap component.
Watch the live demo or download code from the link given below.
First, download and include UI Bootstrap and AngularJS file in the application’s main HTML page.
<!-- Include AngluarJS library -->
<script src="js/angular.min.js"></script>
<!-- Include UI Bootstrap library -->
<script src="js/ui-bootstrap-tpls-0.14.3.min.js"></script>
<!-- Include Bootstrap CSS CDN link -->
<link href="//netdna.bootstrapcdn.com/bootstrap/3.1.1/css/bootstrap.min.css" rel="stylesheet">
Example 1: Creating Simple Popup
Module
Create a module for the application.
Suppose, PopupDemo is the name of the module in which we passed ui.bootstrap module injected as a dependency. This will allow us to use ui.bootsrap component in this module.
angular.module('PopupDemo', ['ui.bootstrap']);Note:- To learn about modules and dependencies injection, read our blog articles AngularJS Module and AngularJS-Dependency Injection.
Controller
Now, we will create a controller named PopupDemoCont for PopupDemo module in which we will pass $modal service which is used to generate popup.
 angular.module('PopupDemo').controller('PopupDemoCont', ['$scope','$modal',function ($scope, $modal) {
$scope.open = function () {
console.log('opening pop up');
var modalInstance = $modal.open({
templateUrl: 'popup.html',
});
}
}]);
Here, we have used $modal service that belongs to ui.bootstrap module. The open() function is used to call the modal which returns an instance of the modal.
open() function accepts different parameter to create popup but, for now we are passing a single argument named templateUrl. This argument accept the path of the template which will shown as the view of the popup.
Note: open() function is defined in $scope so that it can be triggered by the view of this controller.
View
Now, we are creating a view from where we can call popup window on a button click.
Index.html
<body ng-app="PopupDemo">
<div ng-controller="PopupDemoCont">
<h2 class="text-center">Angularjs-Popup</h2>
<button ng-click="open()" class="btn btn-warning">Simple Popup</button>
</div>
</body>
Note:- After clicking on a button, open() function will get called because of ng-click directive.
Download complete code from the link given below.
Example 2: Popup with Close Button
Let’s add a close button in the popup.
In order to make close button work, we will have to add a controller with the popup template.
So, we have used another parameter in the open() function, named controller, which accept the name of the controller as a string.
Note:- In this example, we are modifying our previous made controller PopupDemoCont.
Controller
PopupDemoCont controller:
 angular.module('PopupDemo').controller('PopupDemoCont', ['$scope','$modal',function ($scope, $modal) {
$scope.open = function () {
console.log('opening pop up');
var modalInstance = $modal.open({
templateUrl: 'popup.html',
controller: 'PopupCont',
});
}
}]);
Here, controller parameter of open() function tells angular that when the popup is opened, associate the new controller with the popup.
PopupCont controller:
 angular.module('PopupDemo').controller('PopupCont', ['$scope','$modalInstance',function ($scope, $modalInstance) {
$scope.close = function () {
$modalInstance.dismiss('cancel');
};
}]);
In PopupCont controller, we have passed $modalInstance which is the instance of modal return by the open() function. We need to pass this instance because dismiss is the property of this instance object which is used to close the modal.
View
The index page from where we call open function will be same as it was in the example1. But, we have to add a button with ng-click, calling close function of PopupCont controller in the popup view.
Popup.html
<div class="modal-header">
<h3 class="modal-title">Header</h3>
</div>
<div class="modal-body">
This is Popup example with close button.
</div>
<div class="modal-footer">
<button class="btn btn-warning" type="button"
ng-click="close()">Cancel</button>
</div>
Download complete code from the link given below.
Example 3: Passing Parameter In Popup
To pass data in the popup window, we are going to use resolve parameter of $modal service which is an object. The property passed to this object will be accessible in the popup controller (PopupCont).
Controller
In this example, we are modifying both of the controller Popupdemocont and PopupCont of module PopupDemo.
Popupdemocont Controller
 angular.module('PopupDemo').controller('PopupDemoCont', ['$scope','$modal',function ($scope, $modal) {
$scope.open = function (titlename) {
var modalInstance = $modal.open({
templateUrl: 'Popup.html',
controller: 'PopupCont',
resolve: {
titlename2: function () {
return titlename;
}
}
});
}
}]);
PopupCont
 angular.module('PopupDemo').controller('PopupCont',function ($scope, $modalInstance, titlename2) {
$scope.title1 = titlename2;
$scope.close = function () {
$modalInstance.dismiss('cancel');
};
});
Note: Here, the name of property (titlename2) is passed as a parameter to PopupCont controller and assigned the value of titlename2 to $scope. This is because the popupCont controller is associated with the popup.html
View
We are also modifying our index.html.
Now, open() function will accept an argument which will be access by the controller and further used by the modals to generate the popup.
index.html
<body ng-app="PopupDemo">
<div ng-controller="PopupDemoCont">
<h2 class="text-center">Angularjs-Popup</h2>
<button ng-click="open('John')" class="btn btn-warning">Popup with parameter</button>
</div>
</body>
Popup.html
<div class="modal-header">
<h3 class="modal-title">Header</h3>
</div>
<div class="modal-body">
<span><b>Passed Parameter after click:</b></span>{{title1}}
In this Popup, we are passing the parameter "John" after clicking on a button.
</div>
<div class="modal-footer">
<button class="btn btn-warning" type="button"
ng-click="close()">Cancel</button>
</div>
Download complete code from the link given below.
Tips: For more clear concept over the angularjs popup, just download the source code and use it in your server or localhost.
Conclusion
Hope you got the clear concept of AngularJS Popup. Please comment at the space provided below for any query. Keep visiting our website for more technical tricks.
SMTP Routing In MailGet
We created MailGet with the sole purpose to help you to generate more revenue out of your email marketing while keeping your expenses low. We are continuously enhancing and innovating MailGet to make it awesome each passing day.
SMTP Routing is a new way to send your email campaigns.
SMTP Routing, not only enhances your email deliverability but gives you an amazing way to test and experiment between different email deliverability services.
As you might know, MailGet allows you to connect any SMTP service for sending emails.
NOTE: If you have connected more than one email sending server in your MailGet account then this feature will show at the time of Sending mail and you can use it.
For example :
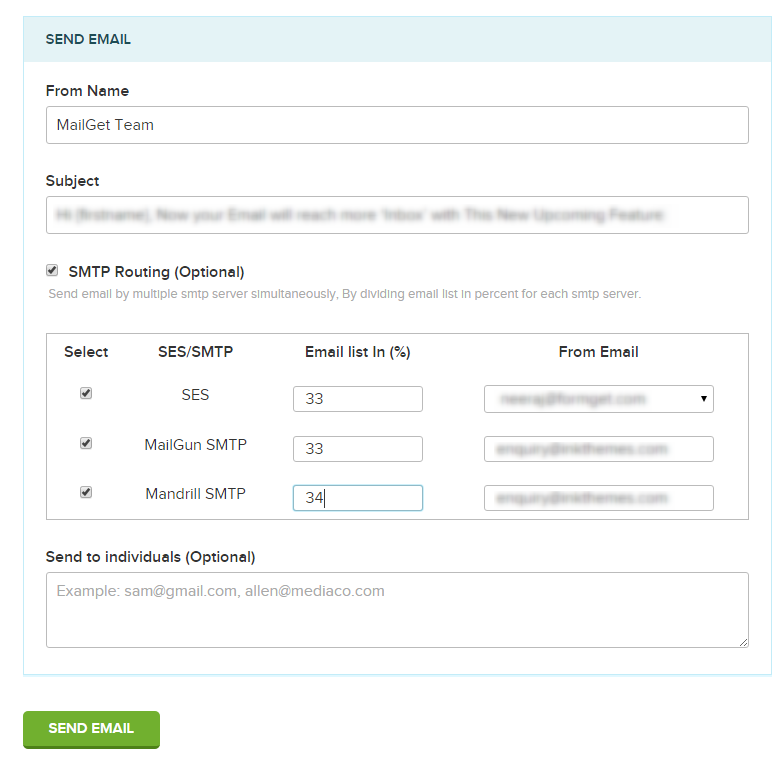
If you want to send a total of 10,000 emails and you have 3 email sending server ( Amazon SES, MailGun SMTP and Mandrill SMTP) connected within MailGet.
MailGet will distribute your emails and send them dynamically through multiple SMTP services.
Let us suppose, you choose 33% emails from Amazon SES, 33% from MailGun SMTP and 34% from Mandrill SMTP.
Now, 3300 emails will be sent using Amazon SES, 3300 emails will be sent using Mandrill SMTP and 3400 emails will be sent using Mandrill SMTP.
SES/SMTP : It is your email sending servers name.
Email list In (%) : Here you have to enter how many emails (in %) will send by particular email sending server.
Once the campaign is sent then you can track it on click of ADVANCE REPORT button and analyze the open, click and unsubscribe rate segmented by SMTP’s to allow you to track and enhance your email deliverability.
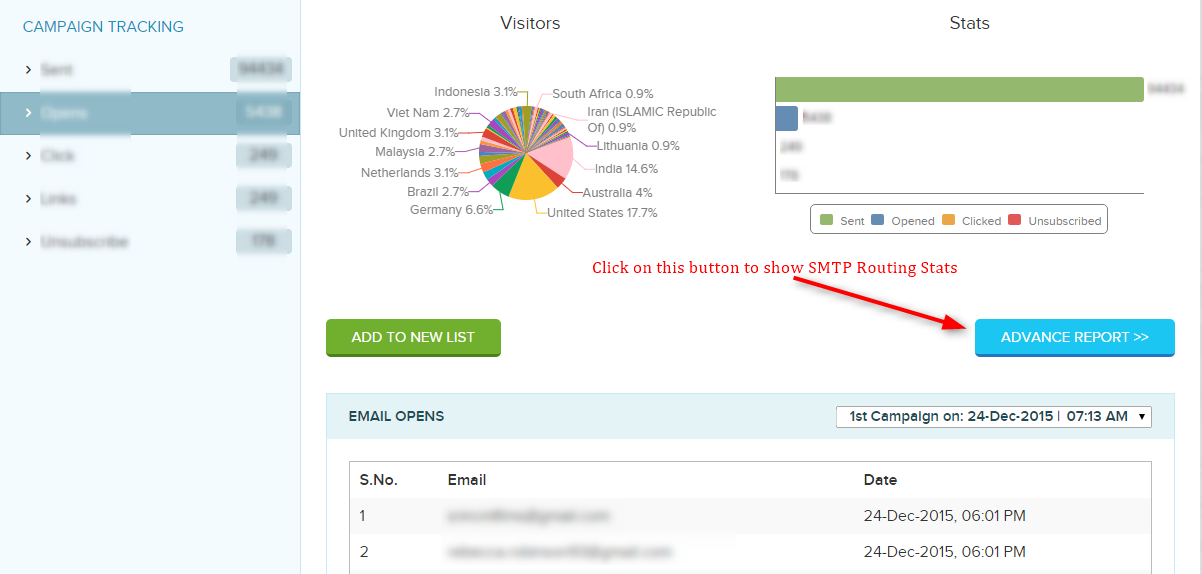
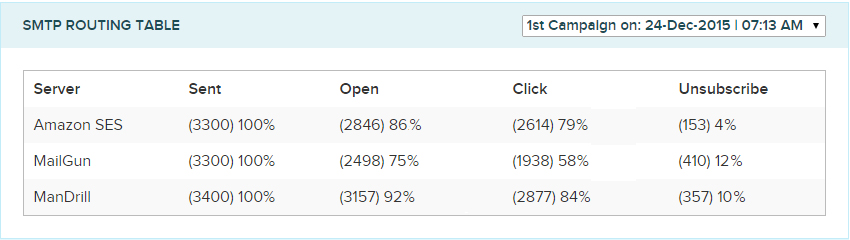
If you get low opens through one SMTP, you simply choose the best one and send the higher percentage of your emails in your next campaign through the best SMTP.
Your overall expenses for sending emails are also averaged. So this means if Amazon SES charges the lowest and MailGun charges the highest. With SMTP routing, your pricing is consolidated and you get the best pricing with the best deliverability.
AngularJS Isolate Scope
In this tutorial, we will have a look at the advanced concept of AnguarJS custom directive.
If you are new/starter to angular and want to know about the basics of custom directive, read our article AngularJS Custom Directive.
Isolate scope:
Isolated scopes are the scopes which are fully dedicated to a particular custom directive only. It means that the scope inside a directive gets separated from the scope outside.
Directive’s inner scope have been mapped with the outer scope in order to access and use their property.
By default, custom directives access the shared scope of their parents, i.e $scope in controller. In such conditions, we can use custom directive only once within a given scope.
Now, to re-use the directive, we will have to create a new controller.
Let’s understand it through an example.
Suppose, you want to create a directive, which shows different products of different categories. In such situation, we will have to create a separate controller and add properties for each product separately.
And in HTML page, we will have to access these controllers separately using ng-controller directive.
Watch the example code given below.
Note: – In this example, we are displaying and linking four products of our company. These are InkThemes, Aorank, FormGet and MailGet. And we are using controller based on their name. So, don’t be confused if your find these names in the codes.
Example1: Without isolating scope
myController.js
// Application Module
angular.module("myApp", [])
// Controller for inkThemes product
.controller("inkThemeController", ['$scope',function($scope){
$scope.product = {
"product_name" : 'InkThemes',
"product_img_link" : 'inkthemes',
"product_link" :'https://www.inkthemes.com/market/'
};
}])
// Controller for Aorank product
.controller("aorankController", ['$scope',function($scope){
$scope.product = {
"product_name" : 'Aorank',
"product_img_link" : 'aorank',
"product_link" :'https://www.formget.com/market/seo-php-script/'
};
}])
// Controller for MailGet product
.controller("mailgetController", ['$scope',function($scope){
$scope.product = {
"product_name" : 'MailGet',
"product_img_link" : 'mailget',
"product_link" :'https://www.formget.com/mailget/'
};
}])
// Controller for FormGet product
.controller("formgetController", ['$scope',function($scope){
$scope.product = {
"product_name" : 'Formget',
"product_img_link" : 'formget',
"product_link" :'https://www.formget.com/'
};
}])
// Registering custom directive
.directive('myProduct', function(){
return{
templateUrl: 'templates/product_page.html'
};
});
As you can see that we have created different controllers for different products. Reason behind using different controller is that we can access the scope only once for each controller.
index.html
<html ng-app="myApp">
<head>
<title>Custom Directive Example 2</title>
<script src="https://ajax.googleapis.com/ajax/libs/angularjs/1.5.0-rc.0/angular.min.js"></script>
<!-- Latest Bootstrap compiled and minified CSS -->
<link rel="stylesheet" href="https://maxcdn.bootstrapcdn.com/bootstrap/3.3.6/css/bootstrap.min.css" integrity="sha384-1q8mTJOASx8j1Au+a5WDVnPi2lkFfwwEAa8hDDdjZlpLegxhjVME1fgjWPGmkzs7" crossorigin="anonymous">
<script src="js/myController.js"></script>
<link rel="stylesheet" href="css/style.css">
</head>
<body>
<div class="container main">
<div class="row">
<h1 class="text-center">AngularJS Isolate Scope Example</h1>
<!-- Access inkThemeController's scope to show inkThemes product properties-->
<div ng-controller="inkThemeController">
<my-product></my-product>
</div>
<!-- Access aorankController's scope to show Aorank product properties-->
<div ng-controller="aorankController">
<my-product></my-product>
</div>
<!-- Access mailgetController's scope to show MailGet product properties-->
<div ng-controller="mailgetController">
<my-product></my-product>
</div>
<!-- Access formgetController's scope to show Formget product properties-->
<div ng-controller="formgetController">
<my-product></my-product>
</div>
</div>
</div>
</body>
</html>
In this file, we accessed all the controllers using ng-controller so that custom directive, myProduct, can use the scope properties only once for each controller to show different products.
product_page.html
This is custom directive’s template which used scope properties and display product in the application. It is included in the custom directive using templateUrl property.
<!-- Layout of each product -->
<div class='product-wrapper'>
<h3 class='text-center'><a href='{{product.product_link}}'>{{product.product_name}}</a></h3>
<div class='product'>
<img ng-src='img/{{product.product_img_link}}.png' alt='{{product_name}}'/>
<div class='clearfix'></div>
<div class='button text-center'>
<a href='{{product.product_link}}' class='btn btn-danger'>Visit Site</a>
</div>
</div>
</div>
Output: –
Watch output and Download complete code from the link given below.
Finally, we are able to show our products in the application.
But, there is a great risk in these codes. As you can see that currently we have four product and for each product, we have written separate controller which is very lengthy and time-consuming. It can fully mesh up the codes of your application too.
As a solution of these kinds of problems, angular allow you to isolate scopes of your custom directive.
Create Isolate Scopes:
To create an isolated scope in a custom directive, use scope option as given below:
angular.module("myApp", [])

// Registering custom directive
.directive('myProduct', function(){
return{
...
...
scope:{
productInfo : "=showProduct"
}

...
...
};
});
Here, scope option is an object which contains a property for each isolate scope binding. Such as, productInfo : “=showProduct”.
– productInfo : It is the custom directive’s isolate scope property name.
– =showProduct : It tells the compiler to bind showProduct as an attribute to the custom directive.
Here, showProduct is written in camelCase, so in HTML file, you will have to write it in dash-delimited form like show-product.
<my-product show-product></my-product>Note: – In case, if the attribute name is the same as the value you want to bind to inside the directive’s scope, you can use a shorthand syntax. Such as,
...
scope: {
// same as '=info'
info: '='
},
...
Now, in directives template, you need to access the internal scope of the directive rather than the external scope( as we did in Example1). Such as,
<h3>{{productInfo.product_name}}</h3>
<img ng-src='img/{{productInfo.product_img_link}}.png' alt='{{productInfo.product_name}}'/>
<a href='{{productInfo.product_link}}' class='btn btn-danger'>Visit Site</a>
As above, we have added property, productInfo, in the internal isolated scope of the directive. So, we will have to access prouctInfo in directive’s template rather the ourter scope property, such as productInfo.product_name, productInfo.product_img_link etc.
Note: – In case, if you access external scope, like product.product_name, then you will get an undefined values because this template belongs to custom directive and the directive have its own isolated scope.
So, let’s implement the above mentioned concept of isolated scope in an example.
Example2: With isolate scope
myController.js
// Application Module
angular.module("myApp", [])
// Single controller for all product
.controller("productController", ['$scope',function($scope){

// Adding inkthemes as a property to scope
$scope.inkthemes = {
"product_name" : 'InkThemes',
"product_img_link" : 'inkthemes',
"product_link" :'https://www.inkthemes.com/market/'
};

// Adding aorank as a property to scope
$scope.aorank = {
"product_name" : 'Aorank',
"product_img_link" : 'aorank',
"product_link" :'https://www.formget.com/market/seo-php-script/'
};

// Adding mailget as a property to scope
$scope.mailget = {
"product_name" : 'MailGet',
"product_img_link" : 'mailget',
"product_link" :'https://www.formget.com/mailget/'
};

// Adding formget as a property to scope
$scope.formget = {
"product_name" : 'Formget',
"product_img_link" : 'formget',
"product_link" :'https://www.formget.com/'
};
}])
// Registering custom directive
.directive('myProduct', function(){
return{
templateUrl: 'templates/product_page.html',

// Isolated scope for this directive
scope:{
productInfo : "=showProduct"
}
};
});
Here, productController is the only controller in the application which added the different product details in its scope. Whereas directive isolated scope has it’s own property, productInfo, which added showProduct as an attribute to the directive myProduct.
The outer scope’s properties can easily be mapped and accessed by this attribute in the application.
index.html
<html ng-app="myApp">
<head>
<title>Custom Directive Example 2</title>
<script src="https://ajax.googleapis.com/ajax/libs/angularjs/1.5.0-rc.0/angular.min.js"></script>
<!-- Latest Bootstrap compiled and minified CSS -->
<link rel="stylesheet" href="https://maxcdn.bootstrapcdn.com/bootstrap/3.3.6/css/bootstrap.min.css" integrity="sha384-1q8mTJOASx8j1Au+a5WDVnPi2lkFfwwEAa8hDDdjZlpLegxhjVME1fgjWPGmkzs7" crossorigin="anonymous">
<script src="js/myController.js"></script>
<link rel="stylesheet" href="css/style.css">
</head>
<body>
<div class="container main" ng-controller="productController">
<div class="row">
<h1 class="text-center">AngularJS Isolate Scope Example</h1>
<div class="col-md-3">

<!-- Directive with showProduct attribute and inkthmes as value -->
<my-product show-product="inkthemes"></my-product>
</div>
<div class="col-md-3">

<!-- Directive with showProduct attribute and aorank as value -->
<my-product show-product="aorank"></my-product>
</div>
<div class="col-md-3">

<!-- Directive with showProduct attribute and mailget as value -->
<my-product show-product="mailget"></my-product>
</div>
<div class="col-md-3">

<!-- Directive with showProduct attribute and formget as value -->
<my-product show-product="formget"></my-product>
</div>
</div>
</div>
</body>
</html>
Here, different properties of external scope (controller’s scope),containing product’s information, are accessed just by using attribute show-product in the directive.
For Example:
<my-product show-product="inkthemes"></my-product>Here, showProduct attributes accessed the scope properties of inkthemes product which is available in the external scope. It’s possible because isolated scope mapped with the outer scope and access their properties by passing outer scopes properties though the attribute.
product_page.html
This is directive’s template which accessed the isolated scopes properties of the directive and display different products in the application
<!-- Layout of each product -->
<div class='product-wrapper'>
<h3 class='text-center'><a href='{{productInfo.product_link}}'>{{productInfo.product_name}}</a></h3>
<div class='product'>
<img ng-src='img/{{productInfo.product_img_link}}.png' alt='{{productInfo.product_name}}'/>
<div class='clearfix'></div>
<div class='button text-center'>
<a href='{{productInfo.product_link}}' class='btn btn-danger'>Visit Site</a>
</div>
</div>
</div>
Output:
Watch output and Download complete code from the link given below.
On comparing Example1 and Example 2 , you can easily find that Example 2 is more organized and easy to implement. We only need to add different products information in the scope which can be easily used within the directive by isolated scope.
However, in Example 1 we need to create separate controllers for each product.
Conclusion:
Hope now you got the concept of isolated scope. Implement it in your custom directives and provides us your feedback from the space given below.
Keep reading our blogs for more interesting blogs on AngularJS.
AngularJS Form Validation

AngularJS provides an additional functionality to validate a form in a very simple way. So, in this tutorial, we will explain how you can validate your forms using AngularJS.
In the previous blog, we have already learnt about how to create a form using angular.
Now, we’ll talk about validating a form at the client side.
Note:- While performing client side validation, it’s also necessary to apply server side validation because of security reasons.
In AngularJS, there are some special properties of form by using which validation can be performed.
Watch the live demo or download code from the link given below.
In angular, the value of ng-model corresponding to input field, will not be set until it passes complete validation.
For example, if there is an input box like <input type=”email”>, then the value of ng-model will not be set until it follows the email format such as “[email protected]”.

AngularJS form Properties:
There are some properties of form in angular which is used to perform validation in form like $invalid, $valid, $dirty, $pristine, $touched.
These are of the boolean type means return true or false when called.
These properties will get called in different conditions.
– $invalid: This property tells that the input which is entered is invalid.
– $valid: This property tells that the input value is valid.
– $dirty: This property tells that the form element is accessed.
– $pristine: This property tells that the form element is not accessed yet.
Syntax of Properties:
To use property for validation, use the following syntax:
<formname>.<formelementname>.<propertyname>Example:
 <form name="frm" novalidate>
<input type="email" ng-model="user.email" name="email" placeholder="Enter Email Address" autocomplete="off" required>
<span ng-show="frm.email.$dirty && frm.email.$invalid">Email Address is not valid</span>
</form>
Explaination: In the above example, we have used $invalid and $dirty properties. It means, if the value is entered and it is invalid for the form-element, then the message within span tag will show.
Form Controls Parameters:
There are some form control parameters provided by angular to perform validation on form input controls.
<input
ng-model="string"
[name="string"]
[required="string"]
[ng-required="boolean"]
[ng-minlength="number"]
[ng-maxlength="number"]
[ng-pattern="string"]
[ng-change="string"]
[ng-trim="boolean"]
required>
</input>
To know more about these input directives click here…
Example:
 <input type="text"
name="username"
ng-model="user.firstname"
placeholder="Enter First Name"
autocomplete="off"
required/>
<span ng-show="frm.username.$dirty && frm.username.$error.minlength">username contains atlest 5 character</span>
<span ng-show="frm.username.$dirty && frm.username.$error.maxlength">maximum 10 charecters allowed</span>
Note:- max-length and min-length are the keys of $error ( object hash containning reference to form and controls).
CSS Styling
There are some classes which will be automatically added by angular in the form-element according to the status of the input element.
– ng-valid: Class added when the input is valid.
– ng-invalid: Class added when the input is invalid
– ng-dirty: Class added when the form element is accessed.
– ng-pristine: Class added when the form element is not accessed yet.
– ng-untouched: Class added when the form-element is not touched yet.
Explanation: if an input box is empty a class ng-pristine will be automatically added but if the user entered something the ng-pristine class will be replaced by ng-dirty.
Creating an Application:
Let’s create a form and validate it using angular.
Requirement of form:
- Name is required.
- Email is required and it should be in the email format.
- Password is required having minimum 5 and maximum 10 letters.
- Message is required.
- Gender must be selected.
- Country must be selected.
First, add novalidate with the form to disable the html5 validation.
Note:- To use angular form validation, must disable the traditional HTML validation. For this, use nonvalidate validatation property in the form.
Also, use ng-disabled with the submit button to disable submit till all the values within the form control are valid.
Now, create a HTML file for the application and add angular.min.js and bootstrap.min.css file in our code.
To learn about installation process of angular in an application, read our blog AngularJS – Introduction & Installation.
HTML File: index.html:
This file creates a form in which validation is applied.
<html>
<head>
<title>AngularJS Forms</title>
<link rel="stylesheet" href="css/bootstrap.min.css">
<link rel="stylesheet" href="css/style.css">
<script type="text/javascript" src="js/angular.min.js"></script>
<script type="text/javascript" src="js/app.js"></script>
</head>
<body class="container">
<div class="row" ng-app="myApp" ng-controller="maincntrl">
<h2 class="text-center"> AngularJS - Form </h2>
<div class="col-md-offset-1 col-md-6 col-sm-12" >
<div class="login">
<h2>Registration Form</h2>
<!--Code of form started-->
<form class="form-horizontal" name="frm" novalidate>
<!--Code to validate first name is written here-->
<div class="form-group" >
<label id="label" class="control-label">First Name:</label>
<input type="text" class="form-control" name="username" ng-model="user.firstname" placeholder="Enter First Name" autocomplete="off" required />
</div>
<!--Code to validate email address is written here-->
<div class="form-group">
<label id="label" class="control-label">Email:</label>
<input type="email" class="form-control" ng-model="user.email" name="email" placeholder="Enter Email Address" autocomplete="off" required>
<span class="msg" ng-show="frm.email.$dirty && frm.email.$invalid">Email Address is not valid</span>
</div>
<!--Code to validate password is written here-->
<div class="form-group">
<label id="label" class="control-label">Password:</label>
<input type="password" class="form-control" ng-model="user.pass" name="pass" placeholder="Enter Password" autocomplete="off" ng-minlength="5" ng-maxlength="12" required>
<span class="msg" ng-show="frm.pass.$dirty && frm.pass.$error.minlength">password must contain atleast 5 charecters</span>
<span class="msg" ng-show="frm.pass.$dirty && frm.pass.$error.maxlength">max-length of password reached</span>
</div>
<!--Code to validate message input box-->
<div class="form-group">
<label id="label" class="control-label">Message:</label>
<textarea type="textarea" rows="2" cols="50" name="message" class="form-control" ng-model="user.message" placeholder="Enter Your Message" autocomplete="off" required></textarea><br>
<span class="msg" ng-show="frm.message.$error.required">Enter a message</span>
</div>
<!--Code to validate gender field-->
<div class="form-group">
<label id="label" >Gender:</label>
Male <input type="radio" name="gender" ng-model="user.gender" value="male" required>
  Female <input type="radio" name="gender" ng-model="user.gender" value="female" required></br>
<span class="msg" ng-show="frm.gender.$error.required">select any gender</span>
</div>
<!--Code to validate country field-->
<div class="form-group">
<label id="label" class="control-label">Country:</label>
<select class="form-control" ng-model="user.country" name="cont" required>
<option value="india">India</option>
<option value="USA">USA</option>
<option value="switzerland">switzerland</option>
</select>
<span class="msg" ng-show="frm.cont.$error.required">Select a value</span>
</div>
<!--Code to disable submit button is written here-->
<div class="form-group">
<input ng-disabled="frm.$invalid" class="btn btn-warning" type="submit" ng-click="call()" value="Submit">
</div>
</form>
</div>
</div>
<!--code to show values after clicking pn submit button-->
<div class="col-md-offset-1 col-md-4 col-sm-12">
<div class="alert1" ng-show="submit_success" style="word-wrap:break-word;">
<div class="login" >
<h2>submitted values</h2>
<hr>
<h3 class="text-center">Submited Values:</h3>
<div class="row">
<div class="col-md-5 headname">
<b>FirstName:</b> </div> <div class="col-md-7"> {{server.firstname}}</div> </div>
<div class="row"><div class="col-md-5 headname"><b>Email: </b> </div> <div class="col-md-7"> {{server.email}}<br></div></div>
<div class="row"><div class="col-md-5 headname"><b>Password:</b></div><div class="col-md-7"> {{server.pass}}<br></div></div>
<div class="row"><div class="col-md-5 headname"><b>Message: </b></div><div class="col-md-7"> {{server.message}}<br></div></div>
<div class="row"><div class="col-md-5 headname"><b>Gender: </b></div> <div class="col-md-7">{{server.gender}}<br></div></div>
<div class="row"><div class="col-md-5 headname"><b>Country: </b></div><div class="col-md-7"> {{server.country}}<br></div></div>
<b>JSON Data: </b> {{server}}
</div>
</div>
</div>
</body>
</html>JavaScript File: app.js
This file works after we click on submit button. It will retrieve and shows the submited values at the right side of form.
 var myApp = angular.module("myApp", []);
myApp.controller("maincntrl", function ($scope) {
$scope.submit_success = false;
$scope.call = function () {
$scope.server = angular.copy($scope.user);
$scope.submit_success = true;
}
}
);
CSS File: style.css
It contains the styling CSS of the form.
@import url(http://fonts.googleapis.com/css?family=Raleway);
h2{
margin-top:20px;
margin-bottom:20px;
}
.login h2{
background-color: #FEFFED;
text-align:center;
border-radius: 10px 10px 0 0;
margin: -10px -40px;
padding: 15px;
}
.login hr{
border:0;
border-bottom:1px solid #ccc;
margin: 10px -40px;
margin-bottom: 10px;
}
.login{
width:100%;
border-radius: 10px;
font-family:raleway;
border: 2px solid #ccc;
padding: 10px 40px 10px;
word-wrap: break-word;
}
.login p{
margin-top:8px;
font-size:16px;
}
.login hr {
margin-bottom: 30px;
}
input[type=text]{
width:99.5%;
padding: 10px;
border: 1px solid #ccc;
padding-left: 5px;
font-size: 16px;
font-family:raleway;
}
label#label{
margin-bottom:10px;
font-size:18px;
font-weight:bold;
}
textarea.ng-invalid{
border:1px solid red;
border-left: 5px solid red;
}
textarea.ng-valid.ng-dirty{
border:1px solid green;
border-left: 5px solid green;
}
select.ng-invalid{
border:1px solid red;
border-left: 5px solid red;
}
select.ng-valid.ng-dirty{
border:1px solid green;
border-left: 5px solid green;
}
input.ng-invalid{
border:1px solid red;
border-left: 5px solid red;
}
input.ng-valid.ng-dirty{
border:1px solid green;
border-left: 5px solid green;
}
span.msg{
margin-top:15px;
color:red;
}
.headname{
font-size:15px;
}
Note:- ng-disabled button disables the submit button until the form is $invalid.
Conclusion:
I hope that now you got the concept of AngularJS form validation. Please share your feedback in the space given below. Keep visiting our website for further coding tricks.
You may also like –
PhoneGap Device Info, Accelerometer & Compass Plugin
PhoneGap device plugins are one of the important plugin sets which can provide the important information about your device.
These plugins have the capability to use the features of device hardware as well as software.
PhoneGap device plugin uses the device hardware to make a discovery about the device like device model, device version, device UUID(Unique ID for device identification) and etc…
The device sensors are used to get the motion(Accelerometer) and orientation(compass) of the device.
In a broad way, both the plugins are used to get the device direction, vibration, and orientation.
Device motion gives the coordinate values in three direction X, Y & Z. This value change related to gravity(9.8 m/s^2) with respect to earth frame.
Device orientation gives the value of a device head direction, it calculates the magnetic value matching to the device head pointer and gives us the value in a degree which further tell us a pointed direction of the device.
As magnetic field value are more accurate than Accelerometer value so in a case to get the accurate data we prefer the device compass value.
The Device Plugin is further classified into three types of plugin:
- Device info
- Device Motion(Accelerometer)
- Device orientation (Compass)
Device Info:
Device info plugin provides few important information related to device hardware and software.
The information provided by device info:
Device Model
Device Cordova
Device Platform
Device UUID
Device Version
Device Motion:
This device motion plugin is used to measure the position of your device on the coordinate axis. This coordinate value is measured relative to the gravity. This device accelerometer provides the value in three directions say X, Y and Z and one value for the timestamp.
Information provided by device motion:
Acceleration X
Acceleration Y
Acceleration Z
Timestamp
Device Orientation:
This plugin is used to get the device direction with a measure of the magnetic field with respect to the earth framework. It shows a value in degree and then with the help of this value you can calculate the direction where the device is pointing to.
Information provided by device orientation:
Compass-heading value
Start building your first PhoneGap Device Info application:
I am explaining this code project by keeping a focus on the android platform, but it will be a similar procedure to make it run across all platforms.
To develop a mobile application, you need to make some setup which is listed below:
- Install Node.js.
- Install PhoneGap Desktop App.
Install PhoneGap/Cordova:
You can install it two ways either PhoneGap CLI(Command Line Interface) mode or PhoneGap desktop(GUI) mode.
I am using a desktop PhoneGap installation here but if you want to try it with PhoneGap CLI then follow command listed below.
C:\>npm install -g Cordova
C:\>npm install -g PhoneGap
Create New PhoneGap Project & Add required Platforms such as android:
$ Cordova create PhoneGapDevice
Add Platforms:
$ Cordova platform add android
Add Device Plugin:
$ Cordova plugin add org.apache.cordova.device
$ Cordova plugin add org.apache.cordova.device-motion
$ Cordova plugin add org.apache.cordova.device-orientation
Note: If you are facing any problem regarding PhoneGap Installation or Plugin Installation then you can go through following blog post:
Learn how to install PhoneGap?
Learn how to create, run, build PhoneGap build?
Learn how to use PhoneGap Plugin API?
Complete Code:
Index.html:
<!DOCTYPE html>
<html>
<head>
<title>Compass Example</title>
<script type="text/javascript" charset="utf-8" src="cordova.js"></script>
<link rel="stylesheet" type="text/css" href="css/Style.css">
</head>
<body id ="indexbdy">
<marquee onmouseover ="stop();" onmouseout ="start();"><h1 id ="indexhead">Get Your Device Info Using PhoneGap Device Plugin</h1></marquee>
<center>
<div id ="deviceall">
<a href="deviceinfo.html" class="btn-info" role="button">PhoneGap Info</a><br/><br/>
<a href="devicemotion.html" class="btn-info" role="button">PhoneGap Device Motion</a><br/><br/>
<a href="deviceorientation.html" class="btn-info" role="button">PhoneGap Device Orientation</a>
</div></center>
</body>
</html>
Deviceinfo.html:
<!DOCTYPE  html>
<html>
<head>
<title>PhoneGap Device Info</title>
<script type="text/javascript" charset="utf-8" src="cordova.js"></script>
<link rel="stylesheet" type="text/css" href="css/Style.css">
<script type="text/javascript" charset="utf-8">
</script>
</head>
<body id ="deviceinfobdy">
<center><h2 id ="infohead">Your Device Information</h2><div id ="deviceinfo">
<p id="deviceProperties">Loading device properties...</p>
</div></center>
<center><div id ="goback"><a href="index.html" class="goback" role="button">Go Back</a><br/><br/></div></center>
<script src="js/deviceinfo.js" type="text/javascript"></script>
</body>
</html>
Devicemotion.html:
<!DOCTYPE html>
<html>
<head>
<title>Acceleration Example</title>
<script type="text/javascript" charset="utf-8" src="cordova.js"></script>
<link rel="stylesheet" type="text/css" href="css/Style.css">
</head>
<body id ="devicemotionbdy">
<center><h2 id ="infohead">Your Device Accelerometer</h2> <div id ="devicemotion">
<div id="accelerometer"><h3>Waiting for accelerometer...</h3></div>
<button onclick="stopWatch();" class="btn-info" >Stop Watching</button></div></center>
<center><div id ="goback"><a href="index.html" class="goback" role="button">Go Back</a><br/><br/></div></center>
<script src="js/devicemotion.js" type="text/javascript"></script>
</body>
</html>
Deviceorientation.html:
<!DOCTYPE html>
<html>
<head>
<title>Compass Example</title>
<script type="text/javascript" charset="utf-8" src="cordova.js"></script>
<link rel="stylesheet" type="text/css" href="css/Style.css">
</head>
<body id ="deviceorientationbdy">
<center><h2 id ="infohead">Your Device Compass</h2> <div id ="deviceorientation">
<div id="heading"><h3>Waiting for heading...</h3></div>
<button onclick="startWatch();" class="btn-info" >Start Watching</button>
<button onclick="stopWatch();" class="btn-info" >Stop Watching</button>
</div></center>
<center><div id ="goback"><a href="index.html" class="goback" role="button">Go Back</a><br/><br/></div></center>
<script src="js/deviceorientation.js" type="text/javascript"></script>
</body>
</html>
Deviceinfo.js
//  device API libraries are loading
document.addEventListener("deviceready", onDeviceReady, false);
// The device API are ready to use
function onDeviceReady() {
var element = document.getElementById('deviceProperties');
element.innerHTML = 'Device Model: ' + device.model + '<br />' +
'Device Cordova: ' + device.cordova + '<br />' +
'Device Platform: ' + device.platform + '<br />' +
'Device UUID: ' + device.uuid + '<br />' +
'Device Version: ' + device.version + '<br />';
}
Devicemotion.js
var watchID = null;
// Device API libraries are loading
document.addEventListener("deviceready", onDeviceReady, false);
// device API are ready to use
function onDeviceReady() {
startWatch();
}
// Trigger for start watching acceleration value
function startWatch() {
// acceleration updation after 3sec
var options = { frequency: 3000 };
watchID = navigator.accelerometer.watchAcceleration(onSuccess, onError, options);
}
// Trigger for stoping the acceleration watch
function stopWatch() {
if (watchID) {
navigator.accelerometer.clearWatch(watchID);
watchID = null;
}
}
// Display the current acceleration
function onSuccess(acceleration) {
var element = document.getElementById('accelerometer');
element.innerHTML = 'Acceleration X: ' + acceleration.x + '<br />' +
'Acceleration Y: ' + acceleration.y + '<br />' +
'Acceleration Z: ' + acceleration.z + '<br />' +
'Timestamp: ' + acceleration.timestamp + '<br />';
}
// Message display in case of failure
function onError() {
alert('onError!');
}
Deviceorientation.js
var watchID = null;

// API libraries are loading
document.addEventListener("deviceready", onDeviceReady, false);
// Device API are ready to use
function onDeviceReady() {
startWatch();
}
// Trigger for starting the watch
function startWatch() {
// After every 3 sec it update the compass value
var options = { frequency: 3000 };
watchID = navigator.compass.watchHeading(onSuccess, onError, options);
}
// Trigger for stoping the watch
function stopWatch() {
if (watchID) {
navigator.compass.clearWatch(watchID);
watchID = null;
}
}
// Get the current heading
function onSuccess(heading) {
var element = document.getElementById('heading');
element.innerHTML = 'Heading: ' + heading.magneticHeading;
var test =heading.magneticHeading;
s=String;s.prototype.a=s.prototype.replace;var a=test/11.25,a=a+0.5|0,b,k,c=a,d=c%8,c=c/8|0,e=["north","east","south","west"],f,g,h;f=e[c];g=e[(c+1)%4];h=f==e[0]|f==e[2]?f+g:g+f;b="1;1 by 2;1-C;C by 1;C;C by 2;2-C;2 by 1".split(";")[d].a(1,f).a(2,g).a("C",h);k=b.a(/north/g,"N").a(/east/g,"E").a(/south/g,"S").a(/west/g,"W").a(/by/g,"b").a(/[\s-]/g,"");b=b[0].toUpperCase()+b.slice(1);alert(b+" "+k)
}
// message display in case of failure
function onError(compassError) {
alert('Compass error: ' + compassError.code);
}
Style.css
.btn-info
{
-webkit-box-shadow:rgba(0,0,0,0.2) 0 1px 0 0;
-moz-box-shadow:rgba(0,0,0,0.2) 0 1px 0 0;
box-shadow:rgba(0,0,0,0.2) 0 1px 0 0;
color:#141414;
background-color:#00B2EE;
border-radius:5px;
-moz-border-radius:5px;
-webkit-border-radius:5px;
border:none;
text-decoration: none;
font-size:20px;
font-weight:700;
padding:4px 16px;
text-shadow:#FE6 0 1px 0;
}
#deviceall
{
margin-top:60%;
}
#indexbdy
{
background-color:#a8a8a8;
}
#indexhead{
color:blue;
}
#deviceinfo{
margin-top:60%;

}
#devicemotion
{
margin-top:60%;
}
#deviceinfobdy
{
background-color:#a8a8a8;
}
#deviceorientationbdy
{
background-color:#a8a8a8;
}
#devicemotionbdy
{
background-color:#a8a8a8;
}
.goback
{
font-size:25px;
color:blue;
}
#goback
{
margin-top:55%;
}
#accelerometer
{margin-bottom:20px;
font-size:18px;
color:#141414;
font-style:bold;
}
#heading
{
margin-bottom:20%;
font-size:18px;
color:black;
font-style:bold;
}
#deviceProperties
{
font-size:18px;
color:#141414;
font-style:bold;
}
#infohead
{
color:blue;
text-decoration:underline;
}
Conclusion:
Hope, you would have liked this post and would have learned about App building using PhoneGap. You would have also learned about PhoneGap plugins and platforms installation and few other necessary settings for running the application. We will be updating you regarding the same or something new, so keep reading our blog post.
You may also like –
- PhoneGap : How Push Notifications Work?
- PhoneGap SQLite Plugin
AngularJS Custom Directive
Directives are one of the core features of AngularJS. Angular provides a large number of built-in directives and makes it easier for the user to add and control various functionality in their application.
But, sometimes users have their own demands and they want to add a different functionality to their application.
In such condition, built-in directive can’t help them. But there is no need to worry because angular allow their users to create their own custom directives and use them in their application whenever and wherever they want.
To create a custom directive, angular provides a guideline for the user to follow. So, in this tutorial, we will guide you and explain how you can create and use a custom directive in your application.
First we will explain you the basic concepts to create a basic custom directive and will explain it deeply as we go further in this tutorial.
So, let’s start with creating a basic custom directive.
Note: – We will explain the main configuration and edited files in this tutorial. We are not including .css, images or other files in the examples. You can download the complete code for each example from the download button available just after each each example.
Create Custom Directive: –
Like a controller, first we need to register a custom directive on module in order to configure and use it.
For this use .directory() method and connect it to module by a dot(.) operator, i.e chain rule.
For Example: –
// Application module
angular.module("myApp", [])

// Registering custom directive and adding a template in the directive
.directive('myProduct', function(){
return{
...

...
};
});
Here, directive() method contains two argument in which first argument, i.e myProduct, is the name of the custom directive that you want to create and second argument is a factory function.
The factory function returns an object having different options which tell the behaviour of the directive, i.e how the directive should behave when matched. This function is invoked only once when the compiler finds and matches the directive for the first time.
Note: – You can use services into the factory function in the same way as we did for controllers. To know about angular services in details, read our blog AngularJS – Services.
Now, to use newly created custom directive you will have to write it in your HTML page between tags, i.e <my-product> </my-product>.
<html ng-app="myApp">
<head>
...
</head>
<body>
<div class="container">
...
...
<!-- Custom directive in lowecase and having dash-delimited format
<my-product></my-product>
...
...
</div>
</body>
</html>
myProduct tag will add all the functionality and bahaviour in that HTML page that you added during creating it.
Note: – Directive are case-sensitive and their name should written in CamelCase, e.g ngModel. However, HTML is case-insensitive so, should be written in lower case having dash-delimited attributes, e.g ng-model.
Custom Directive Example:
To create a custom directive, we will require minimum two files,
1. JS file: – To register and configure directive for the application.
2. HTML file: – Use custom directive to display its data.
myController.js
angular.module("myApp", [])
.controller("productController", ['$scope',function($scope){
$scope.product_name= 'BlackRiders Theme';
$scope.product_img_link='Black_Riders_theme';
$scope.product_price = '$59';
$scope.product_dwl_link = 'https://www.inkthemes.com/market/lead-generation-wordpress-theme/';
}])

// Registering custom directive and adding a template in the directive
.directive('myProduct', function(){
return{
template : "<div class='product-wrapper col-md-4 col-md-offset-4 col-xs-6 col-xs-offset-3'><h3 class='text-center'>{{product_name}}</h3><div class='product'><img ng-src='img/{{product_img_link}}.png' alt='{{product_name}}'/><div class='clearfix'></div><div class='button text-center'><button class='btn btn-success'>{{product_price}}</button><a href='{{product_dwl_link}}' class='btn btn-warning'>Download</a></div></div></div>",
controller:"productController"
};
});
index.html
<html ng-app="myApp">
<head>
<title>Custom Directive Example1</title>
<!-- Including AngularJS library file -->
<script src="https://ajax.googleapis.com/ajax/libs/angularjs/1.5.0-rc.0/angular.min.js"></script>
<script src="js/myController.js"></script>
</head>
<body>
<div class="container">
<div class="row">
<h1 class="text-center">Custom Directive Example1</h1>

<!-- Custom directive in lowecase and having dash-delimited format
<my-product></my-product>
</div>
</div>
</body>
</html>
Output:

Download complete code from the link given below.
Download Script
In the above example, you have noticed that controller and template properties were returned by custom created directive.
// Registering custom directive and adding a template in the directive
.directive('myProduct', function(){
return{
template : "<div>... ...</div>",
controller:"productController"
};
});
Controller property allows users to define the name the controller that they want to use in that particular directive. They are also allowed to write their own controller for the directive.
template property allows to add templates, such as div, paragraph, text etc, in the directive to show in the HTML page.
templateUrl:
template property is simply used to show a small amount of text or other data. But, when you have a large amount of HTML or text data, then it becomes messy and difficult to add these data in template property.
To resolve this problem, angular provide a solution, i.e templateUrl property.
Angular tells users to create a separate template, let say product_page.html, for their custom directive and write their HTML code or text data in it.
Now, write only the path of that created template in the templateUrl property.
product_page.html
<div class='product-wrapper col-md-4 col-md-offset-4 col-xs-6 col-xs-offset-3'>
<h3 class='text-center'>{{product_name}}</h3>
<div class='product'>
<img ng-src='img/{{product_img_link}}.png' alt='{{product_name}}'/>
<div class='clearfix'></div>
<div class='button text-center'>
<button class='btn btn-success'>Price: {{product_price}}</button>
<a href='{{product_dwl_link}}' class='btn btn-warning'>Download</a>
</div>
</div>
</div>
myController.js
// Registering custom directive and adding a template in the directive
.directive('myProduct', function(){
return{
templateURL : "templates/product_page.html",
};
});
Output:

Download complete code from the link given below.
Download Script
You will see that the directive will work in the same way as earlier did but, the main thing is that now the codes are properly managed and easy to use. Whenever you need to edit the template, you will have to only edit that template HTML file.
Custom directive types: –
Angular allow us to create custom directives based on
1> Element
2> Attribute
3> Class
- Element: – To create an element or tag based directive, use restict property with value “E” in the factory function.
// Registering custom directive and adding a template in the directive
.directive('myProduct', function(){
return{
restrict: "E",
...
...
};
});
Now, you can use the directive as an element in the HTML as
<my-product></my-product>
- Attribute: – To create an attribute based directive, use restict property with value “A” in the factory function.
// Registering custom directive and adding a template in the directive
.directive('myProduct', function(){
return{
restrict: "A",
...
...
};
});
Now, you can use the directive as an attribute in the HTML tag as
<div my-product></div>
- Class: – To create a class based directive, use restict property with value “C” in the factory function.
// Registering custom directive and adding a template in the directive
.directive('myProduct', function(){
return{
restrict: "C",
...
...
};
});
Now, you can use these class in the HTML tags as
<div class="my-product"></div>
Note: – To use your directive in the combined form of element, attribute and class, you can just write restict:”EAC” in the factory function.
Conclusion:
Hope we suceed in providing the basic concepts of AnglarJS Custom Directives. Use the concept and create your own directive. Don’t forget to share your feedback with us. Use the space given below to send your valuable feedback.
PhoneGap Local Storage

Data – Today, it is the most important and valuable entity on the web.
The most common way to store data is database, but what if you don’t have a lot of data to store?
Database proves to be an overhead in that case. So, what we should use then?
Well, the answer is HTML5’s Local Storage. It is also known as persistent storage because it lasts longer than sessions.
Local Storage was introduced by W3C. HTML5 uses browsers local storage to store data.
The major advantage of local storage is that data lasts even after the page is closed and re-opened.

Idea Of The App:
Features
Performs CRUD Operations
- Create : Creates a new key/value pair in the local storage.
- Read : Reads all data of the local storage and display it in the table.
- Update : Updates any value associated with any key.
- Delete : Deletes a key value pair from the local storage.
- Clear All : It empties local storage.
Technologies Used
jQuery Mobile : For Interface / UI Designing
- We’re going to use jQuery Mobile for designing interface.
Let’s Take a look at the Local Storage.
Local Storage
- Local Storage store data in key/value pairs.
- Storage limit is 2MB-10MB per domain/per website.
- CRUD operations are performed by using key.
- Data is actually stored as a string.
Methods
- key(n) : It returns the nth number of key in the local strorage.
localStorage.key(n) - getItem(Key) : It returns the value stored at the key ‘Key’. Returns null when key is not found.
localStorage.getItem(key) - setItem(key, value) : It sets a new key with the given value.
localStorage.setItem() - removeItem(key) : It removes the key/value pair with the key ‘Key’.
localStorage.removeItem(key) - clear() : It clears all key/value pairs from the local storage completely.
localstorage.clear()
Attribute
- length : It is used to determine the length of total number of keys stored in local storage.
localstorage.length
Quota On Different Browsers:
Mobile:
| Chrome | Android Browser | Firefox | Safari | iOS WebView | |
|---|---|---|---|---|---|
| Version | 40 | 4.3 | 34 | 8 | 8 |
| Local Storage | 10MB | 2MB | 10MB | 5MB | 5MB |
Desktop:
| Chrome | Firefox | Safari | IE | IE | |
|---|---|---|---|---|---|
| Version | 40 | 34 | 8 | 8 | 9,10 |
| Local Storage | 10MB | 10MB | 5MB | 10MB | 10MB |
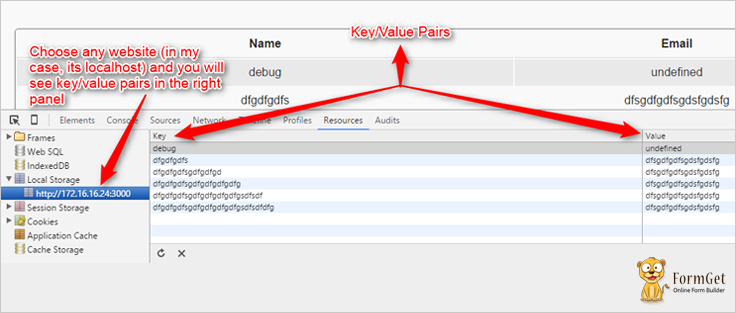
Where you can find local storage?
Suppose you want to see the local storage of any website. You need to follow the following steps:
- You need to press F12 key from your keyboard. Then click on resources
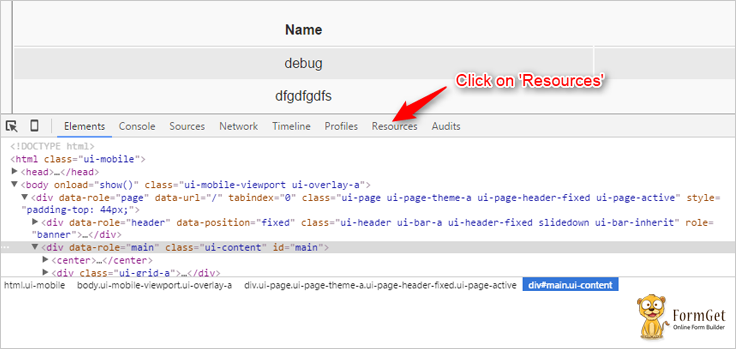
- After that you need to click on local storage on the left panel.
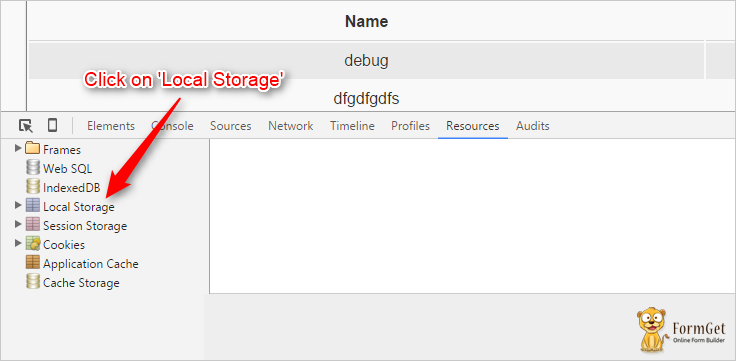
- Now you need to choose the website from the local storage and the key/value pairs associated with that website will be displayed.
Files :
HTML File : Index.html
<!DOCTYPE html>
<html>
<head>

<!--Stylesheet Files : jQuery Mobile CSS File, Customized CSS File and Font Awesome for icons -->
<link rel="stylesheet" href="css/jquery.mobile-1.4.5.css">
<link rel="stylesheet" href="css/my.css">
<link rel="stylesheet" href="font-awesome/css/font-awesome.min.css">

<!--jQuery File : Library, Mobile Library and Customized JS File -->
<script src="js/jquery-1.11.3.min.js"></script>
<script src="js/jquery.mobile-1.4.5.js"></script>
<script src="js/my.js"></script>
</head>

<!--Beginning of the Body-->
<body onload="show()">
<div data-role="page">

<!--Header Bar-->
<div data-role="header" data-position="fixed" class="ui-header ui-bar-a ui-header-fixed slidedown" role="banner">
<h1>Store Me</h1>
</div>

<!--Beginning of the Name and Email Field Div-->
<div data-role="main" class="ui-content" id="main">
<center><p id="heading">CRUD Operations Using Local Storage</p></center>
<div class="ui-grid-a">
<div class="ui-block-a"><div class="ui-bar ui-bar-a">
<center><label for="text-basic">Name</label></center>
<input type="text" name="text-basic" id="name" placeholder="Name">
</div></div>
<div class="ui-block-b"><div class="ui-bar ui-bar-a">
<center><label for="text-basic">Email</label></center>
<input type="text" name="text-basic" id="email" placeholder="Email">
</div></div>
</div>
<!--End of the Name and Email Field Div-->

<!--Beginning of the Create and Clear All Div-->
<fieldset class="ui-grid-a" id="btndiv">
<div class="ui-block-a"><div class="ui-bar ui-bar-a">
<a href="#" id ="bt" onclick="create()">
<center><i class="fa fa-pencil">Create</i></center>
</a></div>
</div>
<!--End of the Create and Clear All Button Div-->

<!--Dialog Box when clicked on Clear All button-->
<div class="ui-block-b"><div class="ui-bar ui-bar-a">
<a id ="bt" href="#popupDialog" data-rel="popup" data-position-to="window" data-transition="pop" class="ui-btn ui-corner-all ui-shadow " >
<center><i class="fa fa-scissors"> Clear All</i></center>
</a></div>
</div>
</fieldset>
<div data-role="popup" id="popupDialog" data-dismissible="false" style="max-width:400px;">
<div data-role="header" data-theme="a">
<h1>Clear All?</h1>
</div>
<div role="main" class="ui-content">
<h3 class="ui-title">Are you sure you want to clear local storage?</h3>
<center><b><p>This action cannot be undone.</p></b></center>
<center> <a href="#" class="ui-btn ui-corner-all ui-shadow ui-btn-inline ui-btn-b" data-rel="back" data-transition="flow" onclick="clearall()">Yes! I'm Sure</a><a href="#" class="ui-btn ui-corner-all ui-shadow ui-btn-inline ui-btn-b" data-rel="back">Cancel</a></center>
</div>
</div>
<!-- End of the Clear All Dialog Box-->

<!--Table Displaying Key/Value Pairs-->
<table data-role="table" data-mode="reflow" class="ui-responsive ui-shadow" id="myTable">
</table>

<!--Dialog Box when clicked on update button-->
<div data-role="main" class="ui-content">
<div data-role="popup" id="myPopupDialog">
<div data-role="header">
<h1>Update</h1>
</div>
<div data-role="main" class="ui-content">
<form method="post">
<div class="ui-field-contain">
<table id="utable">
<tr>
<td><label for="name">Name:</label></td>
<td><input disabled="disabled" type="text" name="name" id="uname" placeholder="Name" value=""></td>
</tr>
<tr>
<td><label for="email">New Email:</label></td>
<td><input type="email" name="email" id="uemail" placeholder="Enter Your New Email"></td>
</tr>
</table>
</div>
<center><a href="#" class="ui-btn ui-corner-all ui-shadow ui-btn-inline ui-btn-b" data-rel="back" onclick="update()" data-transition="flow">Update</a> <a href="#" class="ui-btn ui-corner-all ui-shadow ui-btn-inline ui-btn-b" data-rel="back">Cancel</a>
</center>
</form>
</div>
</div>
</div>
</div>
<!--End of the Update Dialog Box -->

</body>
<!--End of the Body-->
</html>
JavaScript File : My.js
$(document).on('click', '.update', function(){
var data = $(this).attr('data-custom');
$("#uname").val(data);
} );

<!--Method to create new key/value pair in the local storage-->
function create(){
var name = document.getElementById("name").value;
var email = document.getElementById("email").value;
if (typeof(Storage) !== "undefined") {

<!--Local Storage's SetItem Method-->
localStorage.setItem(name, email);
}
else {
document.getElementById("result").innerHTML = "Sorry, your browser does not support Web Storage...";
}
show();
}

<!--Display all key/value pairs in a table-->
function show(){
var key = "";

<!--Display the table head-->
var pair="<tr><th data-priority=\"1\"><center>Name</center></th><th data-priority=\"2\"><center>Email</center></th><th><center>Update</center></th><th><center>Delete</center></th></tr>";
var i=0;

<!--Localstorage.length to get the number of keys in the local storage-->
for (i=0; i<=localStorage.length-1; i++) {

<!--Localstorage.key() to determine the particular key-->
key = localStorage.key(i);

<!--Displaying local storage data in the table-->
pair += "<tr><td><center>"+key+"</center></td><td><center>"+localStorage.getItem(key)+"</center></td><td><a class=\"update\" href=\"#myPopupDialog\" data-custom="+"'"+ key+ "'" +"data-rel=\"popup\" data-position-to=\"window\" data-transition=\"pop\"><center><i class='fa fa-pencil-square-o'></i></center></a></td><td><a onclick=\"del("+"'"+ key+ "'" +")\"><center><i class='fa fa-trash'></i></center></a></td></tr>";
}
if (pair == "<tr><th>Name</th><th>Email</th></tr>") {
pair += "<tr><td><i>empty</i></td><td><i>empty</i></td></tr>";
}
document.getElementById('myTable').innerHTML = pair;
}

<!--Method to update the value for any key in the local storage-->
function update(){
var name = document.getElementById("uname").value;
var email = document.getElementById("uemail").value;
if (typeof(Storage) !== "undefined") {
localStorage.setItem(name, email);
}
show();
}

<!--Method to clear all data from the local storage-->
function clearall(){
localStorage.clear();
show();
}

<!--Method to delete a key/value pair from the local storage-->
function del(name){
localStorage.removeItem(name);
show();
}
CSS File : My.css
.ui-bar-a, .ui-page-theme-a .ui-bar-inherit, html .ui-bar-a .ui-bar-inherit, html .ui-body-a .ui-bar-inherit, html body .ui-group-theme-a .ui-bar-inherit {
border: 1px solid #005994 !important;
background: #0093EA !important;
color: #fff !important;
font-weight: bold !important;
text-shadow: 0 0 #eee !important;
background-image: -webkit-gradient(linear, left top, left bottom, from( #0093EA), to( #007dcd ));
background-image: -webkit-linear-gradient( #0093EA , #007dcd );
background-image: -moz-linear-gradient( #0093EA, #007dcd );
background-image: -ms-linear-gradient( #0093EA , #007dcd );
background-image: -o-linear-gradient( #0093EA , #007dcd );
background-image: linear-gradient( #0093EA , #007dcd );
}
.ui-page-theme-a .ui-btn:hover, html .ui-bar-a .ui-btn:hover, html .ui-body-a .ui-btn:hover, html body .ui-group-theme-a .ui-btn:hover, html head + body .ui-btn.ui-btn-a:hover{
border: 1px solid #007dcd;
background: #333 ;
font-weight: bold;
text-shadow: 0 0 #eee !important;
color: #fff !important;
background-image: -webkit-gradient(linear, left top, left bottom, from( #0093EA ), to( #0093EA ));
background-image: -webkit-linear-gradient( #0093EA , #0093EA );
background-image: -moz-linear-gradient( #0093EA , #0093EA );
background-image: -ms-linear-gradient( #0093EA , #0093EA );
background-image: -o-linear-gradient( #0093EA , #0093EA );
background-image: linear-gradient( #0093EA , #0093EA );
}
.ui-page-theme-a .ui-btn.ui-btn-active, html .ui-bar-a .ui-btn.ui-btn-active, html .ui-body-a .ui-btn.ui-btn-active, html body .ui-group-theme-a .ui-btn.ui-btn-active, html head + body .ui-btn.ui-btn-a.ui-btn-active, .ui-page-theme-a .ui-checkbox-on:after, html .ui-bar-a .ui-checkbox-on:after, html .ui-body-a .ui-checkbox-on:after, html body .ui-group-theme-a .ui-checkbox-on:after, .ui-btn.ui-checkbox-on.ui-btn-a:after, .ui-page-theme-a .ui-flipswitch-active, html .ui-bar-a .ui-flipswitch-active, html .ui-body-a .ui-flipswitch-active, html body .ui-group-theme-a .ui-flipswitch-active, html body .ui-flipswitch.ui-bar-a.ui-flipswitch-active, .ui-page-theme-a .ui-slider-track .ui-btn-active, html .ui-bar-a .ui-slider-track .ui-btn-active, html .ui-body-a .ui-slider-track .ui-btn-active, html body .ui-group-theme-a .ui-slider-track .ui-btn-active, html body div.ui-slider-track.ui-body-a .ui-btn-active {
background-color: #0093EA !important ;
border-color:#0093EA !important;
color: #fff ;
text-shadow: 0 1px 0 #005599 ;
}
img{
padding: 25px;
}
button.ui-btn, .ui-controlgroup-controls button.ui-btn-icon-notext {
border-radius: 5px !important;
}
#searchbutton{
margin-bottom: 25px;
}
#main{
margin-top: 12% !important ;
}
.ui-collapsible-inset.ui-collapsible-themed-content .ui-collapsible-content
{
background-color: #ddd;
color: #111;
}
.ui-collapsible-content {
-webkit-transition: all 0.5s;
-moz-transition: all 0.5s;
-ms-transition: all 0.5s;
-o-transition: all 0.5s;
transition: all 0.5s;
//height: 2em;
overflow: hidden;
}
.ui-collapsible-content-collapsed {
display: block;
height: 0;
padding: 0 16px;
}
#bt i{
font-weight: bold;
}
th {
border-bottom: 1px solid #d6d6d6 !important;
}
tr:nth-child(even) {
background: #e9e9e9 !important;
}
.ui-table {
margin-top: 5% !important;
border: 1px solid grey !important;
border-radius: 5px !important;
border-collapse: initial !important;
}
label{
font-weight: bold !important;
}
#label{
border: 1px solid #0093EA !important;
background: #fff !important;
color: #005994 !important;
font-weight: bold !important;
text-shadow: 0 0 #eee !important;
background-image: -webkit-gradient(linear, left top, left bottom, from( #0093EA), to( #007dcd ));
background-image: -webkit-linear-gradient( #0093EA , #007dcd );
background-image: -moz-linear-gradient( #0093EA, #007dcd );
background-image: -ms-linear-gradient( #0093EA , #007dcd );
background-image: -o-linear-gradient( #0093EA , #007dcd );
background-image: linear-gradient( #0093EA , #007dcd );
}
#utable tr:nth-child(even){
background: inherit !important;
}
#heading{
font-weight: bold;
font-size: 40px;
}
#btndiv{
margin-top: 3%;
}
@media ( max-width: 35em ) {
.ui-table-reflow.ui-responsive td,
.ui-table-reflow.ui-responsive th {
width: auto;
float: none;
clear: none;
display: table-cell;
margin: 0;
padding:0;
}
}
#btndiv .ui-bar-a{
width: 50% !important;
margin: auto !important;
}
Conclusion:
So, I hope you have a fine idea of how to use browser’s local storage and using it in your app. It is one of the useful feature one can use to avoid unnecessary server load. Hope it will help you and enhance your skill for good.
Recommended blogs –
- PhoneGap RSS Reader : Send RSS News Feeds On Mobile
- PhoneGap Inappbrowser
AngularJS – Form

In angular, a form is a collection of controls. Controls (such as, input, select, textarea, button) are the ways to interact with the form.
In AngularJS, we use ng-model to access user’s data. We bind input field to a model property using ng-model.
ng-model binds input fields of the form to the object of the model ($scope) synchronously, means the value in the scope object of the model and in the form of view will be same.
Watch the live demo or download code from the link given below.
Note: ng-model: ng-model provides two-way data binding. It binds the value of the form to the model object ($scope), then it’ll be accessible at the model and view synchronously, It means when the value at the form will change at the same time the value at the model object will get changed.
Creating an Application:
Here, we are going to create an application in which we will use the form-data at the model side after clicking the Submit button.
To fetch the data at the model, we will use ng-model and $scope object of the model.
HTML File: index.html
This file makes the form in front of user and binds it’s input fields from the model object($scope) using ng-model.
<html>
<head>
<title>AngularJS Forms</title>
<link rel="stylesheet" href="css/bootstrap.min.css">
<link rel="stylesheet" href="css/style.css">
<script type="text/javascript" src="js/angular.min.js"></script>
<script type="text/javascript" src="js/app.js"></script>
<style>
</style>
</head>
<body class="container">
<div class="row" ng-app="myApp" ng-controller="maincntrl">
<h2 class="col-md-offset-3 col-md-6 col-sm-12"> <center>AngularJS - Form <center></h2>
<div class="col-md-offset-3 col-md-6 col-sm-12" style="margin-top:10px;">
<div class="login">
<h2>Contact Form</h2>
<form class="form-horizontal">
<div class="form-group" >
<label id="label" class="control-label">First Name:</label>
<input type="text" class="form-control" ng-model="user.firstname" placeholder="Enter First Name">
</div>
<div class="form-group">
<label id="label" class="control-label">Email:</label>
<input type="email" class="form-control" ng-model="user.email" placeholder="Enter Email Address">
</div>
<div class="form-group">
<label id="label" class="control-label">Message:</label>
<textarea type="textarea" rows="2" cols="50" class="form-control" ng-model="user.message" placeholder="Enter Your Message"></textarea>
</div>
<div class="form-group">
<input class="btn btn-warning" type="submit" ng-click="call()" value="Submit">
</div>
<h3 class="text-center"> Entered Values:</h3>
<p><b>First Name :</b> {{user.firstname}}<br>
<b>Email: </b>{{user.email}}<br>
<b>Message: </b>{{user.message}}
</p>
</form>
</div>
<div class="alert" ng-show="submit_success">
<h3 class="text-center"> Submited Values:</h3>
<p><b>First Name :</b> {{server.firstname}}<br>
<b>Email: </b>{{server.email}}<br>
<b>Message: </b>{{server.message}}<br>
<b>JSON Data: </b>{{server}}
</p>
</div>
</div>
</div>
</body>
</html>
Note: Here in above code we can see that ng-model is attached with the form controls. By which the value of input field is get inserted as the property of user object
JavaScript File: app.js
 var myApp = angular.module("myApp", []);
myApp.controller("maincntrl", function ($scope) {
$scope.submit_success = false;
$scope.call = function () {
$scope.server = angular.copy($scope.user);
$scope.submit_success = true;
}
}
);
CSS File: style.css
/*----------------------------------------------
css settings for HTML div exactCenter
------------------------------------------------*/
@import url(http://fonts.googleapis.com/css?family=Raleway);
.h1 {
margin: 40px auto !important;
}
.login h2{
background-color: #FEFFED;
text-align:center;
border-radius: 10px 10px 0 0;
margin: -10px -40px;
padding: 15px;
}
.login hr{
border:0;
border-bottom:1px solid #ccc;
margin: 10px -40px;
margin-bottom: 10px;
}
.login{
width:100%;
border-radius: 10px;
font-family:raleway;
border: 2px solid #ccc;
padding: 10px 40px 40px;
word-wrap: break-word;
}
.login p{
margin-top:8px;
font-size:16px;
}
.login hr {
margin-bottom: 30px;
}
input[type=text]{
width:99.5%;
padding: 10px;
border: 1px solid #ccc;
padding-left: 5px;
font-size: 16px;
font-family:raleway;
}
label#label{
margin-bottom:10px;
font-size:18px;
font-weight:bold;
}
Events:
Here in this application, we have used a Event Listener Directives ng-click with a function means after clicking on it, it will call that function.
There are some of Angularjs event listener directives which are used with html dom as an event listener
- ng-click
- ng-dbl-click
- ng-mousedown
- ng-mouseup
- ng-mouseenter
- ng-mouseleave
- ng-mousemove
- ng-mouseover
- ng-keydown
- ng-keyup
- ng-keypress
- ng-change
Note: These event listeners directives are get attached with the HTML dom and will call the corresponding function when that event triggers.
Conclusion
I hope that now you are feeling yourself comfortable with AngularJS form and AngularJS event listener. Please share your feedback in the space given below. Keep visiting our website for further coding tricks.
PhoneGap Camera Plugin

PhoneGap is a very nice & useful framework which allows you to develop the mobile application using HTML5, CSS3 and JAVA SCRIPT.
The PhoneGap Apps are hybrid Apps and can run almost across all platforms such as android, ios, windows and etc.
It is very easy to code and simple to develop your mobile app which is compatible with all platforms.
In this tutorial, I am going to explain, how to make PhoneGap Camera App using PhoneGap Camera Plugin.
PhoneGap Camera Plugin is a code script which allows your mobile App to use the device camera and related hardware functionality.
Using your mobile App you can take picture from camera or gallery, edit picture, save picture to gallery.
Idea Of The App:
Features
- A single screen.
- Show Three Buttons.
- The First button is for taking pictures and show it on the same screen.
- The Second button is used to edit or crop a picture after capture.
- The Third Button is for selecting the image from gallery or album and then show it on the screen.
Technologies Used
jQuery Mobile : For Interface / UI Designing
- We’re going to use jQuery Mobile for designing interface.
Method:
navigator.camera.getPicture( cameraSuccess, cameraError, [ cameraOptions ] )
This function is used to capture an image from camera, you can also get a picture from photo album. After capturing the image, it is further passed to the success callback function as a string(base64-encoded). It can also be passed as a URI for the image file. You get a object in return(CameraPopoverHandle) which is used in reposition the image file.
Start building your first camera application:
I am explaining this code project by keeping a focus on the android platform, but it will be a similar procedure to make it run across all platforms.
To develop a mobile application, you need to make some setup which is listed below:
- Install Node.js.
- Install PhoneGap Desktop App.
Install PhoneGap/Cordova:
You can install it two ways either PhoneGap CLI(Command Line Interface) mode or PhoneGap desktop(GUI) mode.
I am using a desktop PhoneGap installation here but if you want to try it with PhoneGap CLI then follow command listed below.
C:\>npm install -g Cordova
C:\>npm install -g PhoneGap
Create New PhoneGap Project & Add required Platforms such as android:
$ Cordova creates PhoneGapCamera
Add Platforms:
$ Cordova platform add android
Add Camera Plugin:
$ Cordova plugin add org.apache.cordova.camera
Note: If you are facing any problem regarding PhoneGap Installation or Plugin Installation then you can go through following blog post:
Learn how to install PhoneGap?
Learn how to create, run, build PhoneGap build?
Learn how to use PhoneGap Plugin API?
Complete Code :
HTML File : Index.html
Copy and Paste the below code in your index.html.
<!DOCTYPE html>
<html>
<head>
<title>Capture Me</title>
<link rel="stylesheet" href="css/jquery.mobile-1.4.5.css">
<link rel="stylesheet" href="css/Style.css">
<link rel="stylesheet" href="font-awesome/css/font-awesome.min.css">
</head>
<body>
<div data-role="page">
<div data-role="header" data-position="fixed" class="ui-header ui-bar-a ui-header-fixed slidedown" role="banner">
<h1>Capture Me</h1>
</div>
<div data-role="main" class="ui-content" id="main">
<center>
<div class="grid">
<div class="block">
<div class="ui-bar ui-bar-a" style="height:100%">Camera</div>
</div>
<div class="block">
<div class="ui-bar ui-bar-a" style="height:100%">Crop
</div>
</div>
<div class="block">
<div class="ui-bar ui-bar-a" style="height:100%">Gallery
</div>
</div>
</div>
<div class="grid">
<div class="block">
<div class="ui-bar ui-bar-a" style="height:100%"><a id="img" href="" onclick="capturePhoto();"><center><i class="fa fa-camera fa-5x"></i></center></a></div>
</div>
<div class="block">
<div class="ui-bar ui-bar-a" style="height:100%">

<a href="" id="img" onclick="capturePhotoEdit();">
<center>
<i class="fa fa-crop fa-5x"></i>
</center>
</a>
</div>
</div>
<div class="block">
<div class="ui-bar ui-bar-a" style="height:100%">
<a id="img" href="" onclick="getPhoto(pictureSource.PHOTOLIBRARY);">
<center><i class="fa fa-picture-o fa-5x"></i></center>
</a>
</div>
</div>
</div>
</div>
</center>
<center><img style="display:none;width:50%;height:50%;" id="smallImage" src="" /></center>
<center><img style="display:none; width:50%;height:50%;" id="largeImage" src="" /></center>
</div>
</div>
<script type="text/javascript" src="js/Camera.js"></script>
<script src="js/jquery-1.11.3.min.js"></script>
<script src="js/jquery.mobile-1.4.5.js"></script>
<script type="text/javascript" charset="utf-8" src="cordova.js"></script>
</body>
</html>
Camera.js
Make a new Camera.js file inside the WWW/JS folder
//  Variable for picture source and return value format.
var pictureSource;
var destinationType;

// Loading device API libraries.
document.addEventListener("deviceready",onDeviceReady,false);

// device APIs are ready to use.
function onDeviceReady() {
pictureSource=navigator.camera.PictureSourceType;
destinationType=navigator.camera.DestinationType;
}

// The function is called on successful retrieval of photo.
function onPhotoDataSuccess(imageData) {
var smallImage = document.getElementById('smallImage');

// This function is used for unhide the image elements
smallImage.style.display = 'block';

// This function is used to display the captured image
smallImage.src = "data:image/jpeg;base64," + imageData;
}

// This function is called on the successful retrival of image.
function onPhotoURISuccess(imageURI) {
var largeImage = document.getElementById('largeImage');

// This function is used for unhiding the image elements
largeImage.style.display = 'block';

// This function is used to display the captured image.
largeImage.src = imageURI;
}

// This function will execute on button click.
function capturePhoto() {
// Take picture using device camera and retrieve image as base64-encoded string
navigator.camera.getPicture(onPhotoDataSuccess, onFail, { quality: 50,
destinationType: destinationType.DATA_URL });
}

// This function will execute on button click.
function capturePhotoEdit() {
// Take picture using device camera, allow edit, and retrieve image as base64-encoded string
navigator.camera.getPicture(onPhotoDataSuccess, onFail, { quality: 20, allowEdit: true,
destinationType: destinationType.DATA_URL });
}

// This function will execute on button click.
function getPhoto(source) {
// Retrieve image file location from specified source
navigator.camera.getPicture(onPhotoURISuccess, onFail, { quality: 50,
destinationType: destinationType.FILE_URI,
sourceType: source });
}

// This function will be called if some thing goes wrong.
function onFail(message) {
alert('Failed because: ' + message);
}
CSS File : Style.css
Make a new Style.Css file inside the WWW/CSS folder
.ui-bar-a, .ui-page-theme-a .ui-bar-inherit, html .ui-bar-a .ui-bar-inherit, html .ui-body-a .ui-bar-inherit, html body .ui-group-theme-a .ui-bar-inherit {
border: 1px solid #005994 !important;
background: #0093EA !important;
color: #fff !important;
font-weight: bold !important;
text-shadow: 0 0 #eee !important;
background-image: -webkit-gradient(linear, left top, left bottom, from( #0093EA), to( #007dcd ));
background-image: -webkit-linear-gradient( #0093EA , #007dcd );
background-image: -moz-linear-gradient( #0093EA, #007dcd );
background-image: -ms-linear-gradient( #0093EA , #007dcd );
background-image: -o-linear-gradient( #0093EA , #007dcd );
background-image: linear-gradient( #0093EA , #007dcd );
}
.ui-page-theme-a .ui-btn:hover, html .ui-bar-a .ui-btn:hover, html .ui-body-a .ui-btn:hover, html body .ui-group-theme-a .ui-btn:hover, html head + body .ui-btn.ui-btn-a:hover{
border: 1px solid #007dcd;
background: #333 ;
font-weight: bold;
text-shadow: 0 0 #eee !important;
color: #fff !important;
background-image: -webkit-gradient(linear, left top, left bottom, from( #0093EA ), to( #0093EA ));
background-image: -webkit-linear-gradient( #0093EA , #0093EA );
background-image: -moz-linear-gradient( #0093EA , #0093EA );
background-image: -ms-linear-gradient( #0093EA , #0093EA );
background-image: -o-linear-gradient( #0093EA , #0093EA );
background-image: linear-gradient( #0093EA , #0093EA );
}
.ui-page-theme-a .ui-btn.ui-btn-active, html .ui-bar-a .ui-btn.ui-btn-active, html .ui-body-a .ui-btn.ui-btn-active, html body .ui-group-theme-a .ui-btn.ui-btn-active, html head + body .ui-btn.ui-btn-a.ui-btn-active, .ui-page-theme-a .ui-checkbox-on:after, html .ui-bar-a .ui-checkbox-on:after, html .ui-body-a .ui-checkbox-on:after, html body .ui-group-theme-a .ui-checkbox-on:after, .ui-btn.ui-checkbox-on.ui-btn-a:after, .ui-page-theme-a .ui-flipswitch-active, html .ui-bar-a .ui-flipswitch-active, html .ui-body-a .ui-flipswitch-active, html body .ui-group-theme-a .ui-flipswitch-active, html body .ui-flipswitch.ui-bar-a.ui-flipswitch-active, .ui-page-theme-a .ui-slider-track .ui-btn-active, html .ui-bar-a .ui-slider-track .ui-btn-active, html .ui-body-a .ui-slider-track .ui-btn-active, html body .ui-group-theme-a .ui-slider-track .ui-btn-active, html body div.ui-slider-track.ui-body-a .ui-btn-active {
background-color: #0093EA !important ;
border-color:#0093EA !important;
color: #fff ;
text-shadow: 0 1px 0 #005599 ;
}
img{
padding: 25px;
}

#main{
margin-top: 12% !important ;
}
.block{
width: 33.33%;
float: left;
}
.grid{
width: 100%;
}
.fa{
font-size: 300% !important;
color: #0093EA !important;
}
#img{
padding: 15% !important;
}
.fa:hover{
color: #f9f9f9 !important;
}
Conclusion:
Hope, you would have liked this post and would have learned about App building using PhoneGap. You would have also learned about PhoneGap plugins and platforms installation and few other necessary settings for running the application. We will be updating you regarding the same or some thing new, so keep reading our blog post.
For more related information go through following blogs –
- PhoneGap Configuration File : Config.xml
- Introduction To PhoneGap
AngularJS – Dependency Injection

Dependency Injection is the pattern of designing software in which one or more services (known as dependencies) can be injected in the component (dependent object).
It makes our code more maintainable, testable and usable.
There are many components in which dependency can be applied like controllers, directives, filter, service, factory, provider, value, constant. But some of them are
But, some of them are non-injectable. It means you can’t inject them into a component such as controllers, directives, filter.
Rest of them are injectable and they are also called service creators.
Watch the live demo or download code from the link given below.
when any service is injected into a component. Injector called some method which creates the instance of that service then injector pass this instance of service to the component

Module Dependency:
Angular allows to inject a module within a module while creating it.
For Example:
angular.module('myApp',['othermodulename'])Here, we are creating a module name myApp and also telling the injector to inject an already available module named othermodulename.
Controller Dependency:
We can implement dependency over the controller by simply passing a service in a function, but a recommended way is to use the array notation method for controllers.
For Example:
Modulename.controller('contollername', ['$scope', 'dep1', function($scope, dep1) {
...
$scope.name = 'John';
...
}]);
Factory Dependency:
Here, we are defining factory, directives, filter with the dependency of factory function(services).
angular.module('myModule', []);
myModule.factory('serviceId', ['depService', function(depService) {
// Defining factory with a dependency of a service
}]);
myModule.directive('directiveName', ['depService', function(depService) {
// Defining directives with a dependency of a service
}]);
myModule.filter('filterName', ['depService', function(depService) {
// Defining filters with a dependency of a service
}]);
.config and .run method:
Using .config() method, we can configure a service before it will get instantiated.
config() method can only inject providers and constant because it gets called before the service object instantiated, and at that time, there are only providers and constant available.
After completion of config, the run will get called which inject the ‘services’, ‘value’, constant as the dependencies.
Note:- We cannot inject providers using the run method.
angular.module('myModule', []);
myModule.config(['depProvider', function(depProvider) {
// We can inject other provider and constant by config method
}]);
myModule.run(['depService', function(depService) {
// We can inject service value and constant by run method
}]);
Dependency Annotation:
Dependency annotation is referred as a method to define a service name with a function so that injector will get that which service is to be injected in the function.
There are three ways to annotate a function
1. Inline Array Annotation: This is the preferable way to annotate a function with a service.
Modulename.controller('contollername', ['$scope', 'dep1', function($scope, dep1) {
...............
}]);
2. $Inject Property Annotation: we can also use $inject method to annotate a function.
var MyController = function($scope, greeter) {
...............
}
MyController.$inject = ['$scope', 'greeter'];
someModule.controller('MyController', MyController);
3. Implicit Annotation: This is the simplest way of annotating a function with a service. In this method, you only have to pass the service name as an argument of the function.
Modulename.controller('contollername',  function($scope, dep1) {
...............
});
For Example:

Here, we are injecting service within the service and service within the controller.
Let’s create an application and implement dependencies in it.
Creating an Application:
This application will find out the square of a given number.
In this application, we will use dependency injection in service and dependency injection in the controller.
HTML File: index.html
This file shows the front view of application.
<html>
<head>
<title>Angular JS Dependency Injection</title>
<script src = "http://ajax.googleapis.com/ajax/libs/angularjs/1.3.14/angular.min.js"></script>
<link rel="stylesheet" type="text/css" href= "css/bootstrap.min.css">
<link rel="stylesheet" type="text/css" href= "css/style.css">
<script type="text/javascript" src="js/app.js"></script>
</head>
<body ng-app = "mainApp" >
<center> <h1 class="h1">AngularJS- independency injection Demo</h1> </center>
<div class="container">
<div class="demo-wrapper row">
<div class="col-md-4 col-md-offset-4 col-xs-12">
<div id="seen">
<div class="login">
<!--<h2>AngularJS Services Implementation</h2><hr><br><br>-->
<h2>Get Square Root For A Number</h2><hr/>
<div ng-controller = "CalcController">
<p>Enter a number: <input type = "number" ng-model = "number" /></p>
<button ng-click = "square()">X<sup>2</sup></button>
<p>Result: {{result}}</p>
</div>
</div>
</div>
</div>
</div>
</div>
</body>
</html>
JavaScript File: app.js
This is the javascript file which process the data enter by the user.
 var mainApp = angular.module("mainApp", []);
mainApp.factory('calculate', function() {
var factory = {};
factory.square = function(a, b) {
return a * b
}
return factory;
});
//============Here we are injecting a service within a service=============
mainApp.service('callcalculate', function(calculate){
this.square = function(a) {
return calculate.square(a,a);
}
});
//============here we are injecting a service within contoller=============
mainApp.controller('CalcController',function($scope, callcalculate) {
$scope.square = function() {
$scope.result = callcalculate.square($scope.number);
}
});
CSS File: style.css
/*----------------------------------------------
css settings for HTML div exactCenter
------------------------------------------------*/
@import url(http://fonts.googleapis.com/css?family=Raleway);
.demo-wrapper{
min-height: 900px;
min-width: 300px;
}
.h1 {
margin: 40px auto !important;
}
.login h2{
background-color: #FEFFED;
text-align:center;
border-radius: 10px 10px 0 0;
margin: -10px -40px;
padding: 15px;
}
.login hr{
border:0;
border-bottom:1px solid #ccc;
margin: 10px -40px;
margin-bottom: 10px;
}
.login{
width:100%;
border-radius: 10px;
font-family:raleway;
border: 2px solid #ccc;
padding: 10px 40px 40px;
word-wrap: break-word;
}
.login p{
margin-top:8px;
font-size:16px;
}
.login hr {
margin-bottom: 30px;
}
input[type=text],input[type=number]{
width:99.5%;
padding: 10px;
border: 1px solid #ccc;
padding-left: 5px;
font-size: 16px;
font-family:raleway;
}
Note: Here in above code, we are injecting service within a service and service within a controller in app.js file.
Conclusion
I hope this blog will clear your concept about dependency injection in AngularJS. Please share your feedback in the space given below. Keep visiting our website for further coding tricks 🙂
Remove Hashtag From The Routing URL – $locationProvider

You have noticed that whenever you write the URL of an Angular application, a hashtag, i.e /#/, always appear after the application root folder.
For Example: –
https://www.formget.com/tutorial/angularjs/#/emp_details/0It happens because AngularJS is a javascript framework which work at front-end rather than back-end. So, angular adds a hashtag, by default, after the application root folder name.
In this tutorial, we will explain you how to remove hashtag from the routing URL.
Watch the live demo or download code from the link given below.
To demonstrate this, we are using the same application that we had created in our last blog AngularJS Routing.
In earlier application code, you have noticed that whenever you run the application through some URL, a hashtag, i.e /#/, will appear in the URL just after the application folder name, which looks ugly.
So, let’s remove this hashtag from the URL and make you URL more beautiful and comfortable to read.
For this, you need to do two changes in the application.
1. Configure $locationProvider service in the application module.
2. Add a basetag in head section the application.
Configure $locationProvider
$locationProvider is used to to configure the application module and tell it how to store deep linking path of the application.
It uses html5Mode() method with true as parameter to remove hashtag, i.e /#/, from the URL of the application.
So, let’s apply it in the application and remove hashtag from the URL.
// Applicatio module
var myApp = angular.module('myApp', [
'ngRoute'
]);

// Configure routing for the application
myApp.config(['$routeProvider','$locationProvider', function($routeProvider, $locationProvider){

// Setting html5Mode as true to remove hashtag
$locationProvider.html5Mode(true);
$routeProvider.
when('/', {
templateUrl:'templates/emp_list.php',
controller : 'EmpListController'
}).
when('/emp_list',{
templateUrl : 'templates/emp_list.php',
controller : 'EmpListController'
}).
when('/emp_details/:itemId',{
templateUrl : 'templates/emp_details.php',
controller : 'EmpDetailsController'
}).
otherwise(
{redirectTo : "/"}
);
}]);
Add basetag:
Configuring $locationProvider will remove the hashtag from the application URL but, application will not load correctly. To resolve this, we will have to add a basetag in the head section of the index page.
<head>
<base href=" "/>
</head>
The basetag has one property, href. Href contains the URL path upto the application root folder.
For Example:-
Let suppose a URL,
https://www.formget.com/tutorial/angularjs/#/emp_details/0 Here, angularjs is the root folder of the application.
Then, we will write basetag as: –
<base href="https://www.formget.com/tutorial/angularjs/"/>After it, the application will load properly and the application URL will look something like
https://www.formget.com/tutorial/angularjs/emp_details/0 Conclusion:
Hope you got the concept for this little but very important trick. Apply it in your application and share your feedback with us from the space given below 🙂
Recommended blogs –
Email Autoresponder Email Marketing : Automate Your Replies

Are you facing trouble to reach your clients. ?
Then you are far away from establishing a powerful bond of communication with the subscribers and customers that could affect your user engagement towards your services.
So, Is there any solution regarding this matter. ?
Of course yes, Email Autoresponder helps you to connect with your clients at the same point when they contact you which in result increases clients engagement and enhances your lead nurturing program.
AutoResponding Is Yet Another Feature To Be Taken Care Of! What If It Comes With In-Built SMTP In A Fully-Featured Email Marketing Package?
Sign Up For Free
Well,
To help your efforts for strengthening the relationship with the clients, MailGet provides a best autoresponder email feature using which you can configure emails to triggered at a specific time.
By doing so, It helps you to boost your relationships with your client by –
- Nurture Lasting Relationships
- Increases User Engagement
- Nurture New Sign-ups
- Make A Powerful First Impression On The User
..which altogether lift your business.

What is Email Autoresponder?
An email autoresponder is an excellent innovation in email marketing tools with the help of which you can have automatic email reply when anyone contacts you.
With email autoresponder, you can create a pre-written email that automatically triggers out as an immediate response to any customer’s email or when any new subscriber gets added to your contact list.
For instance,
If you have recently got a new customer, then you can set emails for them to be delivered out on specific days or intervals, two days later and then three days later and so on.
Like when any user signups, you could send confirmation emails, user’s guide, newsletter, keep updating about new products and services, and much more.
Why Should I Use Email Autoresponder..??
One big thing that you could achieve using email autoresponder is that you can automate your email sending and use that free up time to focus on other tasks.
By combining email autoresponder with your email marketing strategy, you can make a loyal following of your customer as well as the subscriber.
More importantly, through email autoresponder, you will remain connected with your customer’s and subscriber without any bondage of time.
Features Of MailGet Email Autoresponder
- Welcome New Customers
Set emails to be triggered out automatically whenever a new user gets added to your subscriber’s list such as send them user guide, confirmation emails and welcome emails.
- Triggers Based On Subscriber Activity
Setup relevant emails to be send on the basis of specific subscriber activities such as those who clicks link on your welcome emails.
- No Limit
There is no limitation on the number of an autoresponder that you want to set up. You can configure any number of emails to be triggered as email autoresponder.
You can configure any number of emails to be triggered as email autoresponder.
- Unlimited Message Length
No issue related to the message length like 40KB per message or any other similar constraint. You can create emails of whatsoever size and schedule it using email autoresponders.
You can create emails of whatsoever size and schedule it using email autoresponders.
- Personalized Messages
Through autoresponders you also get to send personalized emails accordingly to the subscriber data you have collected.
Benefits Of Using Email Autoresponder
If you are unsure of the autoresponder benefits, keep on reading. I’ve broken it down for you –
The most useful part of using email autoresponder is that you can make it work continuously.
By having so, you can ensure that communication with your customer and subscriber never stop.
You can ensure that communication with your customer and subscriber never stop.
Using autoresponder email, you can regularly send them emails and provide them valuable information consistently.
By the time,
It becomes hard for customers not to like you and further helps you in building a long-term relationship with them.
Through email autoresponder, you can quickly convey them about new products and services being launched.
By doing so,
You can certainly increase your sale conversions and consequently helps to increase your business.
By using email autoresponder, you can save a lot of time.
For example,
You can set birthday emails for every subscriber and customer.
No need of manually sending welcome emails to a new subscriber.
By sending newsletter and advertisement regularly through email autoresponder, a point is reached where the subscribers start trusting your brand and ultimately get branded towards your service.
Through this feature, you will be able to design and send personalized email to your users. Sending personalized emails to the customers will increase their engagement with your emails.
Sending personalized emails to the customers will increase their engagement with your emails.
Email autoresponders not only provides an extremely useful way to communicate with the prospects but also keep you scheduled ahead of time.
Autoresponder is the tool that every organization wants to have to reach more subscribers while saving time. !!
AngularJS – $http | AngularJS ajax

$http service of AngularJS is used to fetch data from the remote server. It needs the data available at the server must be in JSON format or an javascript object. $http fetches the data from the server using browser.
We already know how to use services in Angularjs.By using the same method here, we are going to use $http services in angular.
Watch the live demo or download code from the link given below.
Syntax of $http:
modulename.controller('controllername',function($http) {

$http({
method: 'GET',
url: 'enter url here'
}).then(function successCallback(response) {
//this function will get run when data recieved
}, function errorCallback(response) {
// this function will run when any error occured
});
});
method: Here we difined the method of the method of trasfer data between client and server such as GET and POST.
method: 'GET', //Here we can use GET or POST method both to send data over the serverurl: Here we difined the url from where we are going to fetch the data
url: 'enter url here'successCallback: This finction will get called when our server returns response.
.then(function successCallback(response) {}errorCallback: This function will get called when server returns error.
function errorCallback(response) {}Shortcut methods for using $http:
Here are some shortcut method of using $http service with GET and POST method.
$http.get('/someUrl', config). then(function(response){.........}, function(){...............});
$http.post('/someUrl', data, config). then(function(){..............}, function(){...................});
Creating an application:
Now, we will create a application in which we fetch the json data in a table written on the text file.
We will do this by using $http service of angular.
First you have to include bootstrap.min.css and angular.min.js file in your html page
HTML File: index.html
This file is showing the result fetch from the $http services.
<html>
<head>
<link rel="stylesheet" type="text/css" href="css/style.css">
<link rel="stylesheet" type="text/css" href="css/bootstrap.min.css">
<script type="text/javascript" src="js/angular.min.js"></script>
<script type="text/javascript" src="js/app.js"></script>
</head>
<body>
<div ng-app="appl" ng-controller="fetchcontrol">
<table class="col-md-offset-4 col-md-3 col-xs-12" border="1" >
<thead><tr><td><strong>Person Id</strong></td><td>Name</td><td>Country</td></tr></thead>
<tbody>
<tr ng-repeat="n in nmt"><td>{{n.nameid}}</td><td>{{n.name}}</td><td>{{n.country}} </td></tr>
</tbody>
</table>
</div>
</body>
</html>
Javascript File: app.js This file fetches the data from details.txt using $http service.
This file fetches the data from details.txt using $http service.
Here the shortcut method of using $http service is implemented.
var appl = angular.module("appl", []);
appl.controller('fetchcontrol', function ($scope, $http) {
$http.get("details.txt")
.then(function (response) {
$scope.nmt = response.data;
}, function () {
alert('error occured');
});
})
CSS File: style.css:
/*----------------------------------------------
css settings for table and fonts
------------------------------------------------*/
@import url(http://fonts.googleapis.com/css?family=Raleway);
table{
width:300px;
margin-bottom: 15px;
border: 2px solid #ccc;
}
thead td{
background-color:#FFCB00;
text-align:center;
padding:15px;
}
tbody tr td {
text-align:center;
padding:15px;
}
tbody tr td:hover{
background-color:#FEFFED;
}
Note: This blog contains a zip file of complete application just download it and use it. i am sure that it will makes you more clear about the working of $http service.
Conclusion:
I hope that at this point you must be feeling yourself comfortable with $http service of angularjs. Please comment for any query. Keep visiting our website for the latest coding tricks.
AngularJS Routing : Connect Different Templates In Single Page Application

AngularJS Routing is one of the amazing feature provided by Angular. Routing helps in expanding the scope of view and allow us to use multiple templates within a single page application.
In this tutorial, we are going to demonstrate you how to configure and use routing in your single page application.
First we will explain how to configure and use routing in an application. Then we will give you information about some important services, such as $routeParams, $routeProvider etc. used for routing.
And finally, we will create an application using these services which will first show the list of members of a company.
When a user will select and click on See full bio link of a member’s list, the user will be redirected to another template which will contain the biography of that member.
In Biography template, the user will be able to switch to another members biography using the next and previous button. The user will also be able to go to members list page using Back to List link.
Watch the live demo or download code from the link given below.
ngRoute:
To use routing in the application, first we will have to include and configure ngRoute module in our application.
ngRoute requires an additional library angular-route.min.js which you can download from AngularJS official site.
When you will click on Download button, you will get Browse Additional Modules under Extra as shown in the image given below.

Click on the link and you will get a list of different modules.
Find the module with name angular-route.min.js. Download and include it in your application.
Now, we are ready to use ngRoute module.
Configure Application to use ngRoute:
Include ngRoute as a dependency in application module.
For example:
// Applicatio module
var myApp = angular.module('myApp', [
'ngRoute',
]);
Now, we will have to configure routes using $routeProvider in the application. For this, use .config() method of angular module.
myApp.config(['$routeProvider', function($routeProvider){
$routeProvider.
when('/', {
templateUrl:'templates/emp_list.php',
controller : 'EmpListController'
}).
when('/emp_list',{
templateUrl : 'templates/emp_list.php',
controller : 'EmpListController'
}).
when('/emp_details/:itemId',{
templateUrl : 'templates/emp_details.php',
controller : 'EmpDetailsController'
});
}]);
$routeProvider :
$routeProvider is a way of handling different templates and connect them with the view. It used .when() method to set controller and template for a particular route.
For example:
In the above-mentioned code, when a user will enter the URL for root document( e.g application) of the application, the user will be redirected to them another template page (e.g application/#/templates/emp_lists.php).
Note:- Whenever you will write the URL of application, /#/ will always appear after root document path. It reason behind is that, AngaularJS is a client side framework and applicable for single page application only. It works on front-end rather than backend so, will always contain a # symbol after root document URL.
when() method also allow you to use a controller in the template by just adding the name of the controller in controller property.
$routeParams :
$routeParams is a service which allow you to retrieve and use different parameters of routes.
To store route parameters in $routeParams use “ : “after the slash ” / ” followed by parameter name. The character or value up to next slash “/” will be stored in the name.
For example:
In the above-mentioned configuration code, we have written,
$routeProvider.
when('/emp_details/:itemId',{
templateUrl : 'templates/emp_details.php',
controller : 'EmpDetailsController'
});
Suppose an URL, /emp_details/5/.
Here, 5 will be stored in the $routeParams as { “itemId”:”5″} because we have added :itemId after /emp_details/.
Note: Mulitple parameter can be retieved by adding “:” along with parameter name. Each name will contain the string or value upto next slash “/”.
Same concept is used for the EmpDetailsController controller, which stores each employee ID in $routeParams and use it for linking to other employees.
myApp.controller('EmpDetailsController', ['$scope', '$http', '$routeParams', function($scope, $http , $routeParams) {
$http.get('js/data.json').success(function(data) {
$scope.emp = data;
$scope.whichItem = $routeParams.itemId;

if($routeParams.itemId > 0){
$scope.prevItem = Number($routeParams.itemId)-1;
}else{
$scope.prevItem = $scope.emp.length-1;
}

if($routeParams.itemId < $scope.emp.length-1){
$scope.nextItem = Number($routeParams.itemId)+1;
}else{
$scope.nextItem = 0;
}
});
}]);
Here, EmpDetailsController used $routeParams to store the id of employee in whichItem property of $scope service that is available in the emp_details template.
This id is further used by the controller to switch another employee’s details through next and previous buttons.
Now, let’s implement the above-mentioned services and create an application.
First, follow the directory structure image given below and create the directory for the application. Now, follow the steps given below.
Step 1: In index.php, write the following code.
index.php
It contains ng-view directive which will load different templates containing employee lists and employee biography.
<!DOCTYPE htm>
<html ng-app="myApp">
<head>
<title>AngularJs Route Demo</title>
<!-- Including Bootstrap CSS library -->
<link rel="stylesheet" href="css/bootstrap.min.css">
<!-- Including custom CSS file -->
<link rel="stylesheet" href="css/style.css">
<!-- Including AngularJS library file -->
<script src="lib/angular/angular.min.js"></script>
<!-- Including jQuery library -->
<script src="js/jQuery/jquery.min.js"></script>
<!-- Including Bootstrap JS file -->
<script src="js/bootstrap.min.js"></script>
<!-- Include Angular Route library -->
<script src="lib/angular/angular-route.min.js"></script>
</head>
<body>
<!-- Main div showing different templates loaded by ng-view directive -->
<div class="container main" ng-view>
</div>
<!-- Including Application main controller -->
<script type="text/javascript" src="js/AngularController.js"></script>
</body>
</html>
Step 2: Write the code given below in emp_list.php and emp_details.php.
emp_list.php
It contains the company members list which show a complete list of employees working in the company.
<div class="row">
<h1 class="text-center">Comapany Members List</h1>
<ul class="details col-lg-6 col-lg-offset-3 col-md-6 col-md-offset-3 col-xs-12" >
<li class="emp-details col-lg-12 col-md-12 col-xs-12" ng-repeat = "item in emp">
<img ng-src="img/{{item.img_link}}.jpg" alt="{{item.name}}"/>
<div class="emp-info">
<h3>{{item.name}}</h3>
<p class="designation">{{item.designation}}</p>
<h4>{{item.department}}</h4>
</div>
<a class="more" href="#/emp_details/{{emp.indexOf(item)}}"> See Full Bio...</a>
</li>
</ul>
</div>
emp_details.php
This template contains the biography of each employee.
<div class="row">
<h1 class="text-center">Member's Biography</h1>
<div class="emp-detail-wrapper col-lg-6 col-lg-offset-3 col-md-6 col-md-offset-3 col-xs-12" >
<div class="nav-info">
<a href="#/emp_details/{{prevItem}}" class="btn btn-left"><</a>
<a href="#/emp_details/{{nextItem}}" class="btn btn-right">></a>
</div>
<div class="clearfix"></div>
<div class="emp-bio-details col-lg-12 col-md-12 col-xs-12" ng-model="emp">
<div class="emp-info">
<h4>{{emp[whichItem].name}}</h4>
<p class="designation-info">{{emp[whichItem].designation}}, {{emp[whichItem].department}}</p>
</div>
<div class="clearfix"></div>
<img ng-src="img/{{emp[whichItem].img_link}}.jpg" alt="{{emp[whichItem].name}}"/>
<p class="bio">{{emp[whichItem].bio}}</p>
<a class="back" href="#/emp_list"> « Back to List</a>
</div>
</div>
</div>Step 3: Create a data.json file and write the following array in it.
data.json
It contains json array containing employee’s data and biography information.
[
{
"name":"Kris Skillman",
"img_link" : "Kris_Skillman",
"designation" : "Owner & Founder",
"department" : "Magnet Brains & InkThemes",
"bio": "Magnis scelerisque fermentum blandit. Sapien tempor montes elementum tempus litora torquent aliquam cursus cum ad adipiscing semper felis. Pede, eros convallis est, mi lorem conubia est habitant scelerisque. Enim morbi vestibulum venenatis nullam mauris suscipit."
},
{
"name":"Elisha Kirch",
"img_link" : "Elisha_Kirch",
"designation" : "Founder & CEO",
"department" : "Formget & MailGet",
"bio": "Magnis scelerisque fermentum blandit. Sapien tempor montes elementum tempus litora torquent aliquam cursus cum ad adipiscing semper felis. Pede, eros convallis est, mi lorem conubia est habitant scelerisque. Enim morbi vestibulum venenatis nullam mauris suscipit."
},
{
"name":"Wyatt Brandis",
"img_link" : "Wyatt_Brandis",
"designation" : "Web Developer",
"department" : "Aorank",
"bio": "Magnis scelerisque fermentum blandit. Sapien tempor montes elementum tempus litora torquent aliquam cursus cum ad adipiscing semper felis. Pede, eros convallis est, mi lorem conubia est habitant scelerisque. Enim morbi vestibulum venenatis nullam mauris suscipit."
},
{
"name":"Tenisha Preslar",
"img_link" : "Tenisha_Preslar",
"designation" : "Team Leader",
"department" : "Aorank",
"bio": "Magnis scelerisque fermentum blandit. Sapien tempor montes elementum tempus litora torquent aliquam cursus cum ad adipiscing semper felis. Pede, eros convallis est, mi lorem conubia est habitant scelerisque. Enim morbi vestibulum venenatis nullam mauris suscipit."
},
{
"name":"Josie Rylander",
"img_link" : "Josie_Rylander",
"designation" : "Tester",
"department" : "MailGet",
"bio": "Magnis scelerisque fermentum blandit. Sapien tempor montes elementum tempus litora torquent aliquam cursus cum ad adipiscing semper felis. Pede, eros convallis est, mi lorem conubia est habitant scelerisque. Enim morbi vestibulum venenatis nullam mauris suscipit."
},
{
"name":"Madelene Lucy",
"img_link" : "Madelene_Lucy",
"designation" : "Team Leader",
"department" : "Sales & Marketing, InkThemes",
"bio": "Magnis scelerisque fermentum blandit. Sapien tempor montes elementum tempus litora torquent aliquam cursus cum ad adipiscing semper felis. Pede, eros convallis est, mi lorem conubia est habitant scelerisque. Enim morbi vestibulum venenatis nullam mauris suscipit."
},
{
"name":"Jasper Sandrock",
"img_link" : "Jasper_Sandrock",
"designation" : "Plugin Developer",
"department" : "InkThemes",
"bio": "Magnis scelerisque fermentum blandit. Sapien tempor montes elementum tempus litora torquent aliquam cursus cum ad adipiscing semper felis. Pede, eros convallis est, mi lorem conubia est habitant scelerisque. Enim morbi vestibulum venenatis nullam mauris suscipit."
},
{
"name":"Russ Vandenberg",
"img_link" : "Russ_Vandenberg",
"designation" : "Software Developer",
"department" : "MailGet",
"bio": "Magnis scelerisque fermentum blandit. Sapien tempor montes elementum tempus litora torquent aliquam cursus cum ad adipiscing semper felis. Pede, eros convallis est, mi lorem conubia est habitant scelerisque. Enim morbi vestibulum venenatis nullam mauris suscipit."
},
{
"name":"Tory Negus",
"img_link" : "Tory_Negus",
"designation" : "Support Team Lead",
"department" : "InkThemes",
"bio": "Magnis scelerisque fermentum blandit. Sapien tempor montes elementum tempus litora torquent aliquam cursus cum ad adipiscing semper felis. Pede, eros convallis est, mi lorem conubia est habitant scelerisque. Enim morbi vestibulum venenatis nullam mauris suscipit."
},
{
"name":"Antione Pearlman",
"img_link" : "Antione_Pearlman",
"designation" : "Theme Developer",
"department" : "InkThemes",
"bio": "Magnis scelerisque fermentum blandit. Sapien tempor montes elementum tempus litora torquent aliquam cursus cum ad adipiscing semper felis. Pede, eros convallis est, mi lorem conubia est habitant scelerisque. Enim morbi vestibulum venenatis nullam mauris suscipit."
}
]
Step 4: In AngularContoller.js, write the following angular code.
AngularController.js
It is the main controller for the application containing different modules and controllers used in the application.
// Applicatio module
var myApp = angular.module('myApp', [
'ngRoute',
]);

myApp.config(['$routeProvider', function($routeProvider){
$routeProvider.
when('/', {
templateUrl:'templates/emp_list.php',
controller : 'EmpListController'
}).
when('/emp_list',{
templateUrl : 'templates/emp_list.php',
controller : 'EmpListController'
}).
when('/emp_details/:itemId',{
templateUrl : 'templates/emp_details.php',
controller : 'EmpDetailsController'
});
}]);

// Controller for employee lists template
myApp.controller('EmpListController', ['$scope', '$http', function($scope, $http) {
$http.get('js/data.json').success(function(data) {
$scope.emp = data;
});
}]);

// Controller for employee details template
myApp.controller('EmpDetailsController', ['$scope', '$http', '$routeParams', function($scope, $http , $routeParams) {
$http.get('js/data.json').success(function(data) {
$scope.emp = data;
$scope.whichItem = $routeParams.itemId;

if($routeParams.itemId > 0){
$scope.prevItem = Number($routeParams.itemId)-1;
}else{
$scope.prevItem = $scope.emp.length-1;
}

if($routeParams.itemId < $scope.emp.length-1){
$scope.nextItem = Number($routeParams.itemId)+1;
}else{
$scope.nextItem = 0;
}
});
}]);
Step 5: In style.css, write the following css code.
style.css
It contains all CSS code for the different templates used in the application.
@import url(http://fonts.googleapis.com/css?family=Raleway);
ul.details {
padding: 0;
margin-top: 15px;
min-width: 424px;
}
li.emp-details {
background: #90BF2F;
border-bottom: 2px solid;
border-radius: 10px;
padding: 15px;
font-family:raleway;
}
li.emp-details:hover {
background: #A2DC15;
}
.emp-details img {
width: 100px;
height: 100px;
float: left;
margin-right: 20px;
border: 1px solid #7D7D7D;
}
.emp-info {
font-family:raleway;
}
.emp-info h3 {
margin-top: -3px;
}
p.designation{
color: #FFF;
}
a.more {
position: absolute;
bottom: 12px;
right: 30px;
color:#FFF;
font-family:raleway;
}
.emp-detail-wrapper {
min-width: 424px;
background: #90BF2F;
padding: 10px;
border-radius: 5px;
margin-top: 20px;
}
.emp-info h4{
color:#000000;
font-weight: bold;
}
a.btn{
background: red;
color: white;
}
a.btn:hover{
background: white;
color: red;
}
p.bio{
color:#333029;
}
p.designation-info {
color: white;
margin-top: -10px;
font-size: 12px;
margin-bottom: 0;
}
.emp-bio-details img {
width: 100px;
height: 100px;
float: left;
margin: 7px 10px 0 0;
border: 1px solid #7D7D7D;
}
a.back{
color: white;
}
.nav-info {
margin: 0 15px;
}
Run the application and enjoy!!!
Conclusion:
Hope you will understand concept and importance of routing in angular. Run the script at your end and provide us your feedback from the space given below 🙂
10+ Best Real Estate Email Marketing Services 2022

The most fundamental and tiresome task of a real estate agent is to find out new clients and leads, together with staying in touch with previous customers. !!
Real estate agents have utilized various marketing strategies like social media, advertising platform, etc. to get new connections.
But yet they have dropped a very effective means of doing real estate marketing?
Guess what I am talking about.
It’s Email Marketing.
“A real estate agent who is not using email marketing is 100% losing to find new customers”
Email marketing provides a better, efficient and effortless way of doing marketing, where you get to target on much broader audiences by sending them emails.
Want To Know How Email Marketing Could Benefit?
Real estate agents and even real estate businesses can easily incorporate email marketing into their existing real estate marketing strategy by hiring email marketing service.
Here are the profits that can be earned by using email marketing services –
Stay In Touch With Clients & Leads: Produce More Real Estate Business
Email marketing services provide high email deliverability so that realtors can be assured that their emails are delivered right to their clients inbox and enhance the relationship with them.
Real estate agents can quickly update and inform their customers about upcoming projects and housing programs without facing any delay issues.
Track User Behaviour: Make Real Estate Marketing More Engaging
The possibility of business with anyone can be executed only when you know about their behavior, since then only you can convert them into leads and then sales.
Email service providers include email analytics and google analytics integration. Through this, a real estate agent can review about the website traffic generated through emails, simultaneously with keeping track on clients behavior.
Increase In Sales: Get Real Estate Leads Easily
Every realtor wants to grow sales to boost up their business.
Subscription forms embedding is one of the feature within email marketing campaign using which real estate agents can collect new prospects through their website and can nurture them to build strong brand loyalty long before a prospect is ready to buy.
Reach People On Any Device: Real Estate Business At Any Cost
Realtors always try that they should reach their prospects and clients through any possible means.
And so, email marketing services includes responsive email templates that allows creating emails that can accommodate to any size when viewed on devices like smartphones, tablets, etc.
Maintain Professionalism in Real Estate Business: Engage More Clients
It is important for realtors to maintain professionalism. Email marketing services provides personalization tags, using which a realtor can personalize the subject line and content of emails based on clients field data.
So, when an email is sent the tags dynamically changes and displays relevant information to each recipient.S
Effective Way Of Starting Conversation With Real Estate Prospects
As more clients get connected with your business, it gets difficult to address each client individually.
And so, with the help of drip email campaigns you can start the series of conversation with customers. You can set drips starting from welcome email template to sales template.
Saves Lot Of Time: Drive Real Estate Marketing Continuously
Realtors have a busy schedule. Therefore, it is hard for them to stay connected with their clients.
Autoresponder feature within email marketing comes here as a life saver through which email sending can automate that not only nurtures clients about your housing properties, projects, etc. but also feels connected with you.
Study the list which displays some best-in-class real estate email marketing services that are most suitable for real estate businesses and real estate agents.
Let’s Start..
1. MailGet
MailGet is one of the best and cheap email marketing platform. It provides a superb and affordable email marketing platform to real estate agents.
No technical knowledge required for using their services. It has an excellent support system where you get a follow-up mail after getting registered, they provide step by step procedure to get started, monitors your campaigns and guide you to get the maximum benefit.

MailGet Features
- Email Template Builder – An easy to use drop and drag email editor through which you can create responsive email templates in few seconds.
- MailGet comes with a 99% inbox email delivery rates by assuring that your sent emails will surely make it to the recipients inbox.
- List Management – Create and import contacts with efficient contact synchronization system.
- List Cleaner – Verify and validate all your clients email addresses.
- List Segmentation – Segment your customers on some common parameters.
- Drip Campaign – Schedule email campaigns to trigger at different timings.
- Autoresponder – Send automated emails to your customers.
- Email Inbox Preview – View your email before sending to your clients.
- SMTP Integration – Get high open rates and inbox deliverability by connecting with multiple SMTP services like Mandrill, SendGrid, MailGun, etc.
- Subscription Forms – Grow your customer list by embedding email sign up form in your website.
- Email Tracking – Track success and user response towards your email campaigns.
- Google Analytics – Track your user behavior.
MailGet Pricing Plan
MailGet comes up with three pricing plans –
- You need to pay $29 per month for sending emails to 10,000 contacts.
- $49 per month for 50,000 contacts.
- $79 per month for 1,00,000 contacts.
You can choose a yearly plan also with 2 months free subscription.
2. Constant Contact
Constant Contact, another big name in the category of email marketing service providers. It holds services through which you can efficiently work on driving email marketing for your business.
Constant Contact Features
- Email Template Editor for building beautiful looking emails
- Advanced personalization system for better email customization
- Contact segmentation option
- Robust email analytics system
- It drives more sales and business in less time
Constant Contact Pricing
Constant Contact charges around $1289 for sending emails to your clients and with further increase in clients you need to pay less.
3. RuleMailer
RuleMailer is a Swedish company that provides services for email marketing and SMS marketing. It provides a marketing floor where any organization and individual can set up email marketing for their business.

RuleMailer Features
- Send personalized emails to your clients
- Schedule email campaigns
- Powerful real-time statistics in the form of graphs and diagram
- Customer management system
RuleMailer Pricing
To know about the pricing, you need to signup.
4. SensorPro
SensorPro provides a marketing platform from where you can do email marketing, inbound marketing, do SMS and surveys simultaneously i.e. a kind of multi-marketing platform.
Thier email marketing service is among the best email deliverability services and suits best for real estate marketing.

SensorPro Features
- Beautiful and ready to use email templates
- Import multiple lists from various sources
- Design email campaigns
- Robust segmentation module
- Email tracking reports on various parameters
SensorPro Pricing
Sensor Pro provides you to send emails to 2500 contacts free while they charge accordingly to Pay As You Go. For instance, they charge approx $0.015 per email up to 2,50,000 contacts. With an increase in contacts, the prices go on decreasing.
5. Mail Marketer
Mail Marketer is a comprehensive and efficient email marketing service. It was started with the primary intention to provide entrepreneurs, marketers, real estate businesses and online retailers with an efficient email marketing platform.

Mail Marketer Features
- Pre-built email templates to create email
- Built in spam checker to identify whether the email will mark as spam or not.
- Real-time email delivery stats
- Campaign Management Options like unsubscribe options, sharing options, etc
Mail Marketer Pricing
Mail Marketer comes up with a Monthly plan and Pay-As-You-Go plan option. They charge around $42 per month to send emails to 50,000 contacts.
6. StrongView
Strong View presents an all in one marketing platform from where you can plan multiple marketing programs. With their world-class services, you can do email, social, mobile and web marketing on one centralized system. StrongView presents a superior email marketing service for real estate businesses and real estate agents.
StrongView Features
- Integrated open-time personalization functionality
- Use live content of website into email
- Real-time analysis of email campaigns
- Intuitive drag-and-drop interface
- Elimination system for duplication and synchronization issues
StrongView Pricing Plan
To know about pricing plans, you need to contact StrongView.
7. Hatchbuck
Hatchbuck provides software through which small and mid-sized businesses can do sales and marketing. It provides email newsletter service, marketing automation service, email marketing service, etc. with which business organizations and real estate business can boost their existing marketing strategy.

Hatchbuck Features
- Email Nurturing Engine for finding new prospects
- Import contacts through any sources
- Drag and drop form builder
- Contacts Segmentation
- Prebuild email template library
Hatchbuck Pricing
Hatchbuck offers various subscription plans like you have $79 per month plan, $159 per month plan and $239 per month plan.
8. Mailify
Mailify provides a robust and open email marketing software. It has incorporated several marketing features through which running email campaigns becomes a lot easier task. With all that, the support staff of Abilify is also tremendous and provides excellent guidance to any new user.

Mailify Features
- Free email templates
- High delivery infrastructure system
- Email analysis
- Create a responsive email newsletter
- Statistical report of email campaigns
Mailify Pricing Plan
Mailify has two types of plans namely- monthly and yearly plan. If you go for sending emails to 50,000 contacts, it will cost you around 169$ per month and $600, in case you opt for an annual plan.
9. CleverReach
CleverReach is a big name in the category of real estate agent email marketing companies. It includes some mind-blowing email marketing features that every realtor would like to implement with their existing real estate marketing strategy.

CleverReach Features
- Drag and drop system for creating emails
- Predesigned email templates
- Multi-lingual interface
- Integration options to connect with Salesforce, Microsoft Dynamics CRM, Shopware, Magento, Drupal, Eventbrite, and Google
CleverReach Charges
CleverReach charges according to the number of contacts. As for sending emails to 10,000 contacts, it cost you around $92.
10. Net Atlantic
A big name in the branch of email marketing service provider is Net Atlantic. It offers some great email marketing tools to design, send, manage and track email marketing campaigns. Real estate agents and real estate businesses can also use their email marketing service.

Net Atlantic Features
- Email list hygiene system
- Sophisticated email analytics and tracking functions
- Advanced email marketing servers
- Integration with other applications
Net Atlantic Pricing
Net Atlantic do charge you according to the number of contacts on your list. Just take, if you want to send emails to 50,000 contacts, then it will cost you $220.
Conclusion
Do you have suggestions of your own? Share in the comments section below! – I’d love to hear about it!
Try MailGet – email service provider which best suits for realtors.
Read Our Blog On –
AngularJS – Services

Services are singleton objects or just like a javascript function to perform a specific task. Angular allow us to use these services with controllers, service, filter or directive.
Whenever we want to use service with these components, we will have to specify the service name along with the component. By doing so, component ask angular to load that particular service in the application. This method of injecting service is called dependency injection.
Watch the live demo or download code from the link given below.
How to use a service with components
To use a service, you will have to add it as a dependency with a component such as controller, filter or service. To add a service with component, you have to pass it as an argument.
For example:

Here, we have to use $http service in the controller. So, we will have to add it within single quotes inside dependency section. Furthermore, if we use some function then, must use the service as an argument in the function.
Types of services
Services in angular are of two type:
- Built-in services
- Custom services
Built-in Service:
AngularJS provide us several built-in services. You can use these services to give your controller additional functionality.
For example, $http, $route, $filter and many more.
Built-in services always prefixed with $ sign.
As angular contains several built-in services. It is not possible to include all services in the blog. So, we are describing some of the important and commonly used services here. These are :
$http: This service is used to fetch data from the remote server by making XMLHttpRequest from the browser.
Syntax:
var app = angular.module('myApp', []);
app.controller('customersCtrl', function($scope, $http) {
// GET request to remote server
$http({
method: 'GET',
url: '/someUrl'
}).then(function successCallback(response) {
// when the response is available this call back is called
$scope.variablename = response.data.records;
}, function errorCallback(response) {
// called when server returns an error
});
});
$route: This service is used for linking url to controller and view. this service is used with ngView directives and $routeParams service. we also use $routeProvider ‘s API to define the route.
$filter: This service is used to filter the data according to user requirement.
Syntax:
var filter = angular.module('filterExample', [])
filter.controller('filterCntrl', function($scope, $filter) {
$scope.varname = $filter('filtername')($input);
});
For the functionality and uses of more sevices you can check out this link.
Custom Services
AngulaJS also allow you to create your own services, known as custom services.
There are many methods to create your own services, but commonly used method are :
1. Service method
To create a service using service method, follow the syntax given below:
modulename.service('servicename', function() {

this.maethodname1 = function() {
......
}
this.methodname2 = function() {
......
}
});
Note: We can also inject an already available service within the function.

2. Factory method
In the factory method of creating service, we first create the object of the factory then we assign method to it and at last, we return the factory object. Below syntax is used to create service using factory method.
modulename.factory('modulename', function() {
var factory = {};
factory.methodname1 = function() {
.............
}
factory.methodname2 = function() {
..............
}
return factory;
});
Creating a application
Let’s create an application using services which will perform the arithmetic operation.
First, you will need the angular.min.js and bootstrap.min.css file to connect your HTML code with angular and bootstrap.
This application is going to use both methods of creating custom services.
HTML File: index.html
<html>
<head>
<title>Angular JS Services</title>
<script src = "http://ajax.googleapis.com/ajax/libs/angularjs/1.3.14/angular.min.js"></script>
<link rel="stylesheet" type="text/css" href= "css/bootstrap.min.css">
<link rel="stylesheet" type="text/css" href= "css/style.css">
<script type="text/javascript" src="js/app.js"></script>
</head>
<body ng-app = "mainApp" >
<center> <h1 class="h1">AngularJS- Custom Services Demo</h1> </center>
<div class="container">
<div class="demo-wrapper row">
<div class="col-md-4 col-md-offset-2 col-xs-12" border="1" ng-controller = "CalcController">
<div id="seen">
<div class="login">
<h2>Perform Airthmetic Operation</h2>
<hr/>
<p>Enter first number : <input type = "number" ng-model = "firstnumber" />
<p>Enter secand number: <input type = "number" ng-model = "secandnumber" /></p>
<button ng-click = "addition()">+</button>
<button ng-click = "multiplyr()">X</button>
<button ng-click = "divid()">/</button>
<button ng-click = "subs()">-</button>
<p>Result: {{ans}}</p>
</div>
</div>
</div>
<div class="col-md-4 col-md-offset-0 col-xs-12">
<div id="seen">
<div class="login">
<!--<h2>AngularJS Services Implementation</h2><hr><br><br>-->
<h2>Get Square Root For A Number</h2><hr/>
<div ng-controller = "CalcController">
<p>Enter a number: <input type = "number" ng-model = "number" /></p>
<button ng-click = "square()">X<sup>2</sup></button>
<p>Result: {{result}}</p>
</div>
</div>
</div>
</div>
</div>
</div>
</body>
</html>
Javascript File: app.js
 var mainApp = angular.module("mainApp", []);

mainApp.factory('calculate', function() {
var factory = {};
factory.multiply = function(a, b) {
return a * b
}
factory.multiplyr = function(a, b) {
return a * b
}
factory.addition = function(a, b) {
return a + b
}
factory.subs = function(a, b) {
return a - b
}
factory.divid = function(a, b) {
return a / b
}
return factory;
});

mainApp.service('callcalculate', function(calculate){
this.square = function(a) {
return calculate.multiply(a,a);
}
this.multiplyr = function(a,b){
return calculate.multiplyr(a,b);
}
this.addition = function(a,b){
return calculate.addition(a,b);
}
this.subs = function(a,b){
return calculate.subs(a,b);
}
this.divid = function(a,b){
return calculate.divid(a,b);
}
});

mainApp.controller('CalcController',function($scope, callcalculate) {
$scope.square = function() {
$scope.result = callcalculate.square($scope.number);
}
$scope.multiplyr=function(){
$scope.ans= callcalculate.multiplyr($scope.firstnumber,$scope.secandnumber);
}
$scope.addition=function(){
$scope.ans= callcalculate.addition($scope.firstnumber,$scope.secandnumber);
}
$scope.subs=function(){
$scope.ans= callcalculate.subs($scope.firstnumber,$scope.secandnumber);
}
$scope.divid=function(){
$scope.ans = callcalculate.divid($scope.firstnumber,$scope.secandnumber);
}
});
CSS File: style.css
@import url(http://fonts.googleapis.com/css?family=Raleway);
.demo-wrapper{
min-height: 900px;
min-width: 300px;
}
.h1 {
margin: 40px auto !important;
}
.login h2{
background-color: #FEFFED;
text-align:center;
border-radius: 10px 10px 0 0;
margin: -10px -40px;
padding: 15px;
}
.login hr{
border:0;
border-bottom:1px solid #ccc;
margin: 10px -40px;
margin-bottom: 10px;
}
.login{
width:100%;
border-radius: 10px;
font-family:raleway;
border: 2px solid #ccc;
padding: 10px 40px 40px;
word-wrap: break-word;
}
.login p{
margin-top:8px;
font-size:16px;
}
.login hr {
margin-bottom: 30px;
}
input[type=text],input[type=number]{
width:99.5%;
padding: 10px;
border: 1px solid #ccc;
padding-left: 5px;
font-size: 16px;
font-family:raleway;
}
Conclusion
After reading above post, I am sure that you must be clear with the concept of angularjs services. Let us know about your feedback from the space provided below. Keep visiting our website and always be in touch with us for new coding tricks.
AngularJS Controller : Add Behaviour To Application

In this tutorial, we are going to learn about AngularJS Controller. For better understanding, we have divided this tutorial into two parts i.e, theoretical part as well as Implementation part.
Let’s have a look on what we are going to learn in this tutorial: –
Theoretical Part: –
– We will understand the concept of AngularJS Controller and will learn about how to define it in our application.
Implementation Part: –
– We will create a controller which will process a JSON array and will display its data in the view. The JSON array contains the name, designation and department details of each member of the company.
Watch the live demo or download code from the link given below.
AngularJS Controller:
AngularJS controller is a constructor function which is used for adding and controlling the behaviour of an angular data by defining different functions and values.
It plays an important role in the application and handles the interaction between data and the view.
A controller can be defined as:-
// Application module
var empController = angular.module('EmpController',[]);

// Controller of the application
empController.controller('EmpListController', ['$scope', function($scope) {
$scope.emp = [
{
"name":"Kris Skillman",
"img_link" : "Kris_Skillman",
"designation" : "Owner & Founder",
"department" : "Magnet Brains & InkThemes"
},
{
...
...
},
{
"name":"Tenisha Preslar",
"img_link" : "Tenisha_Preslar",
"designation" : "Team Leader",
"department" : "Aorank"
}
];
}]);
Here, EmpController is the name of application module in which controller constructor function is added by .controller() method.
Like Module, a controller also contains controller name and dependencies. In the above-mentioned controller, EmpListController is the name of the controller and this controller uses $scope as a dependency.
Note: To learn about Modules, read our article AngularJS Module.
In view, a controller is used by ng-controller directive.
<div class="row" ng-controller="EmpListController">

...
...

</div>
Here, EmpListController is the name of the controller.
Controller helps to make to code clean and easy to use.
Scope Inheritance/Child Scope:
We can define more than one controller for an application and use them in the view wherever needed.
An angular application can have only one root scope, but we can create many child scopes for it. This child can inherit the property of its parent scope and override the parents values with its own values.
For Example:
Here, we have three controllers with name controller1, controller3 and controller3.
– Controller1 contains the parent (root) scope and adding two property, company and name, to the scope.
– Controller2 and three contain the child scope and adding name property to it.
Controller:
// Application module
var myApp = angular.module('myApp', []);

// Controller 1
myApp.controller('Controller1', ['$scope', function($scope){
$scope.company ='Magnet Brains';
$scope.name = 'Jasper Sandrock';
}]);

// Controller 2
myApp.controller('Controller2', ['$scope', function($scope){
$scope.name = 'Madelene Lucy';
}]);

// Controller 3
myApp.controller('Controller3', ['$scope', function($scope){
$scope.name = 'Josie Rylander';
}]);
HTML:
In view, we called Controller1 using ng-controller directive. Inside Controller1 div, we used controller2 and inside Controller2, we used Controller3.
<div ng-controller="Controller1">
<ul>
<li>Company Name : {{company}}</li>
<li>Employee Name : {{name}}</li>
</ul>
<div ng-controller="Controller2">
<ul>
<li>Company Name : {{company}}</li>
<li>Employee Name : {{name}}</li>
</ul>
<div ng-controller="Controller3">
<ul>
<li>Company Name : {{company}}</li>
<li>Employee Name : {{name}}</li>
</ul>
</div>
</div>
</div>
Output:

Controller1 will access the value of root scope, i.e company and name, and will show the value available in the root scope. Controller2 will inherit the values of root scope and will access the same value for company but will override the value of name ( child scope override the parent scope ). Same thing happens in the case of Controller3.
Here ends the theoretical part.
Now it’s time to implement controller in the application.
Controller Implementation in the Application:
First follow the directory structure image given below and create the same structure for your application. Now, follow these steps:
Step1: Inside index.php, write the following code.
index.php
It act as the view part of the application. The controller is used in it using ng-directive. It accessed the function and values added to $scope by the controller and show the list of the company members.
<!DOCTYPE htm>
<html ng-app="EmpController">
<head>
<title>Angular Js Tutorial First Demo</title>
<!-- Include Bootstrap CSS library -->
<link rel="stylesheet" type="text/css" href="css/bootstrap.min.css">
<!-- Include CSS -->
<link rel="stylesheet" type="text/css" href="css/style.css">
<!-- Include AngularJS library -->
<script src="lib/angular/angular.min.js"></script>
<!-- Include jQuery library -->
<script src="js/jQuery/jquery.min.js"></script>
<!-- Include Bootstrap Javascript -->
<script src="js/bootstrap.min.js"></script>
<script type="text/javascript" src="js/myController.js"></script>
</head>
<body>
<div class="container main">
<div class="row" ng-controller="EmpListController">
<center>
<h1 class="h1">Company Members
List</h1></center>
<ul class="search-output col-lg-6 col-lg-offset-3 col-md-6 col-md-offset-3 col-xs-12" >
<li class="emp-details col-lg-12 col-md-12 col-xs-12" ng-repeat = "list in emp">
<img ng-src="img/{{list.img_link}}.jpg" alt="{{list.name}}"/>
<div class="emp-info">
<h3>{{list.name}}</h3>
<p>{{list.designation}}</p>
<h5>{{list.department}}</h5>
</div>
</li>
</ul>
</div>
</div>
</body>
</html>
Step2: In myController.php, write the following code.
myController.js
It is the main controller of the application. It added a JSON array to the $scope, which contains the information related to each members of the company.
// Application module
var empController = angular.module('EmpController',[]);

// Controller of the application
empController.controller('EmpListController', ['$scope', function($scope) {
// Adding JSON array in the emp variable
$scope.emp = [
{
"name":"Kris Skillman",
"img_link" : "Kris_Skillman",
"designation" : "Owner & Founder",
"department" : "Magnet Brains & InkThemes"
},
{
"name":"Elisha Kirch",
"img_link" : "Elisha_Kirch",
"designation" : "Founder & CEO",
"department" : "Formget & MailGet"
},
{
"name":"Wyatt Brandis",
"img_link" : "Wyatt_Brandis",
"designation" : "Web Developer",
"department" : "Aorank"
},
{
"name":"Tenisha Preslar",
"img_link" : "Tenisha_Preslar",
"designation" : "Team Leader",
"department" : "Aorank"
},
{
"name":"Josie Rylander",
"img_link" : "Josie_Rylander",
"designation" : "Tester",
"department" : "MailGet"
},
{
"name":"Madelene Lucy",
"img_link" : "Madelene_Lucy",
"designation" : "Team Leader",
"department" : "Sales & Marketing, InkThemes"
},
{
"name":"Jasper Sandrock",
"img_link" : "Jasper_Sandrock",
"designation" : "Plugin Developer",
"department" : "InkThemes"
},
{
"name":"Russ Vandenberg",
"img_link" : "Russ_Vandenberg",
"designation" : "Software Developer",
"department" : "MailGet"
},
{
"name":"Tory Negus",
"img_link" : "Tory_Negus",
"designation" : "Support Team Lead",
"department" : "InkThemes"
},
{
"name":"Antione Pearlman",
"img_link" : "Antione_Pearlman",
"designation" : "Theme Developer",
"department" : "InkThemes"
}
];
}]);
Step 3: Write the code given below in style.css.
style.css
It contains the styling CSS of the view.
@import url(http://fonts.googleapis.com/css?family=Raleway);

h1.h1 {
margin-top: 40px;
margin-bottom: 40px;
}
ul li{
direction: inline-block;
}
ul.search-output {
padding: 0;
min-width: 345px;
}
li.emp-details {
background: #90BF2F;
border-bottom: 2px solid;
border-radius: 10px;
padding: 15px;
font-family:raleway;
}
li.emp-details:hover {
background: #A2DC15;
}
.emp-details img {
width: 100px;
height: 100px;
float: left;
margin-right: 20px;
border: 1px solid #7D7D7D;
}
.emp-info {
font-family:raleway;
}
.emp-info h3 {
margin-top: -3px;
font-weight: bold;
color: #333131;
}
.emp-info p {
color: white;
font-weight: 500;
}
.emp-info h5 {
color: black;
font-weight: bold;
}
Conclusion:
Hope this blog will help you in understanding the concept and proper use of Controller in Angular application. Keep in touch with us and share your feedback regarding this blog with us from the space given below.
Email Analytics: View Advance Report

MailGet provides smart email analytics feature which is used to examine email behavior. It is utilized by the email marketers to analyze how recipients are interacting with their email message.
The Advance Report provides you stats regarding the type of devices and operating system used by the customers. You can also find customer’s location based on country.
Advance report feature works when the subscriber clicks on links or buttons present in your email template.
Note – See how to create and send email campaign by following this post – Email Builder: Design Responsive Email Templates

Follow These Steps To View Advance Report In MailGet –
Step 1: Select any email template from your MailGet dashboard then click any one of the links under Total Stats section.
Step 2: Click on Advance Report button to view advance stats.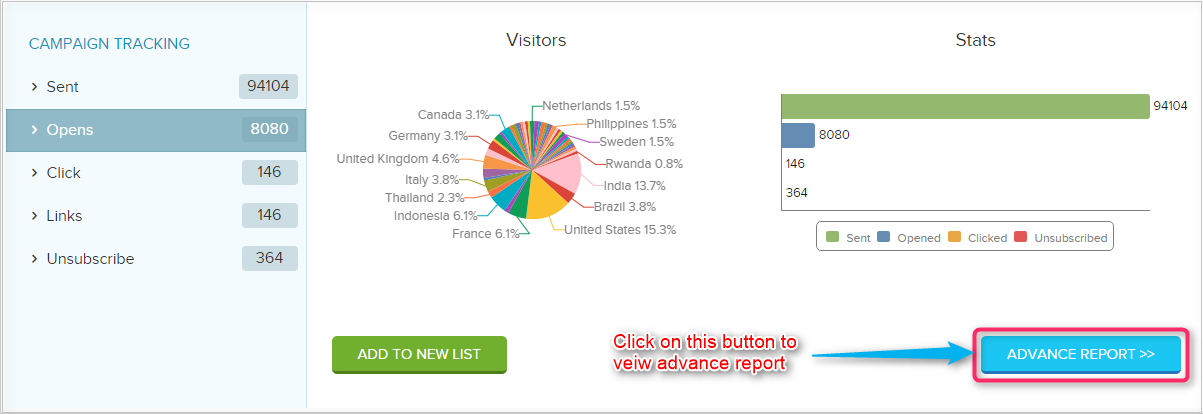
Step 3: You are all set now. Start tracking your customers behavior towards your email campaign..!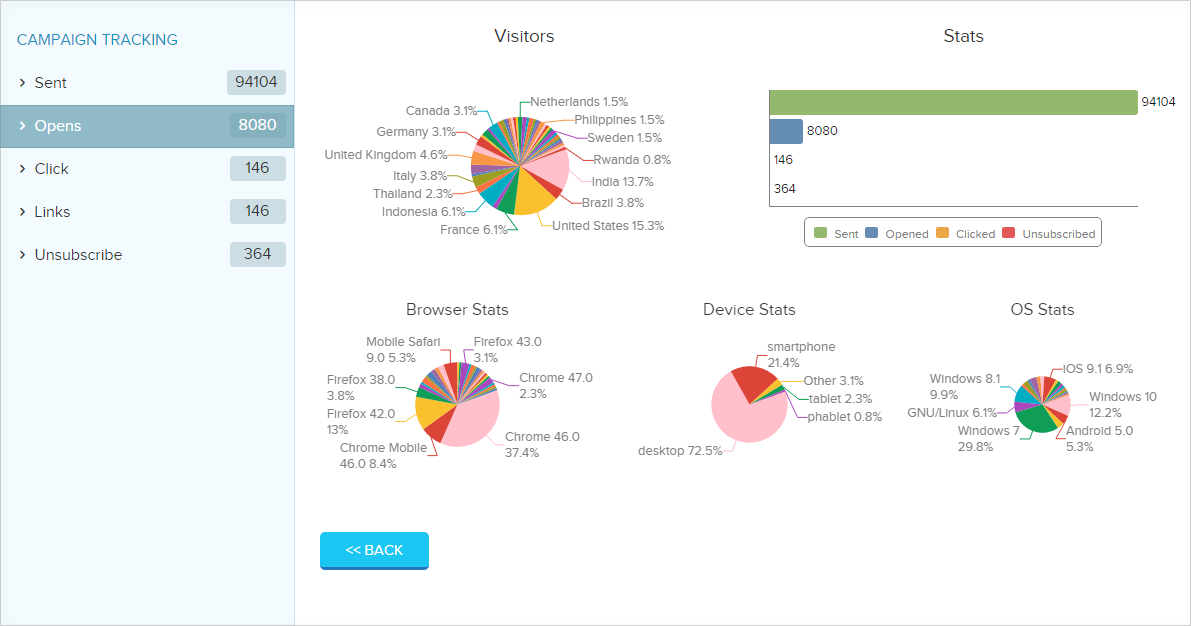
MailGet also provides you an option which helps Google Analytics integration for email campaign tracking.