

AngularJS Filters are used to modify the data according to user’s choice. These filters can be used with directives or expression using a pipe character.
Angular has a bunch of filters follows a defined syntax which is given below:
Basic syntax for filters:
{{data* | filter : option*}}Here we take some data and pipe that into a filter. sometimes we also specify the option for it.
Watch the live demo or download code from the link given below.
Filters available in AngulaJS :
1. Currency Filter:
Currency Filter converts a number into a proper currency format along with a currency symbol. By default, it show $ as a currency symbol but, we can change the currency symbol according to our requirement.
Syntax: {{ currency_expression | currency : symbol : fractionSize}}
Ex: {{12345 | currency}} = $12345
code:
 <p>
<b>Enter prices</b>
</p>
<input type="text" name="aname" ng-model="price" placeholder="Enter prices">
<p >
<!-- Here we pipe the numerical data into the currency filter-->
<b>Output: </b>
{{price|currency}}
</p>
Note : Symbol and fractionSize are two optional parameter in which symbol decided the currency symbol to be used and fractionSize is used to fix the number of fraction of decimal points.
2. Uppercase Filter:
Uppercase Filter converts a string into uppercase. This filter just accepts a string which is passed through a pipe symbol “|” and made available to uppercase filter where the whole string will get converted into uppercase.
Syntax: {{data_string | uppercase}}
Ex: {{‘John’ | uppercase}} = JOHN
Code:
<p>
<b>Enter a string</b>
</p>
<input type="text" name="aname" ng-model="uname" placeholder="Enter name in lowercase">
<p >
<b>Output: </b>
<!-- Here we accept a string and pipe that into the uppercase filter-->
{{uname | uppercase}}
</p>
3. Lowercase Filter:
Lowercase Filter converts an uppercase string into lowercase.
Syntax: {{data_string | lowercase}}
Ex: {{‘JOHN’ | lowercase}} = john
Code:
 <p>
<b>Enter a string</b>
</p>
<input type="text" name="aname" ng-model="lname" placeholder="Enter name in upercase">
<p>
<b>Output: </b>
<!-- Here we accept a string and pipe that into the lowercase filter-->
{{ lname | lowercase }}
</p>
4. Filter :
Filter selects a subset of the item from a JSON or Javascript Object’s array and return output in the form of an array. The condition for selecting subset is given by the user.
syntax: {{ filter_expression | filter : expression }}
Ex: {{ friends in friends | filter : ‘ jh’ }}
Above example returns all values of an array containing ‘jh’ word with in it.
Code:
<!-- Here we fetch a element from array and pipe that into the filter-->
<p ng-repeat="friend in friends|filter:{name:snme}" >
{{friend.name}}
{{friend.age}}
</p>
Note: There are various optional parameter for expression, it may be a string (‘jh’) or may be an object like {name:“M”} to filter a particular index of array having property [name] containing ‘M’.
5. OrderBy Filter:
orderBy filter is used to sort the list of data, string or numbers in a particular order,e.g Ascending or Descending. It orders alphabetically for the string and numerically for numbers.
syntax: {{ orderBy_expression | orederBy : expression : reverse }}
Ex: {{ friend in friends | orderBy : name : false }}
Above filter ordered the list of friends according to their name in alphabetical order.
Code:
<!-- Here we fetch a element from array and pipe that into the orderBy filter-->
<p ng-repeat="friend in friends|orderBy: selct : false">
{{friend.name}}
{{friend.age}}
</p>
Note: Expression can accept many possible values such the property of an object or it may be a string as an angular expression which’s solution is used for filtering purpose.
6. LimitTo Filter:
LimitTo filter used to create a new array of specified element or a string containing a specific number of element. The number or characters are taken from beginning of the element or from the end of the element. It depends on the sign (+,-) provided to limit.
syntax: {{ data_tolimit | limitTo : limit : begin }}
Ex: {{ ‘johncena’ | limitTo: 5 } =johnc
Code:
 <input type="text" name="aname" ng-model="lminput" placeholder="Enter a name">
<input type="number" step="1" ng-model="Limitto" value="2">
<p>
<b>Output: </b>
<!-- Here we accept a string from user and pipe that into the limitTo filter-->
{{lminput|limitTo:Limitto}}
</p>
Note: Limit accepts the length of returning array or string and the begin accept the number of the index from where the begin limitation starts. If the value of begin is negative, then it indicates the number of offset from the end of string or array from where to limitation applied.
7. Date Filter:
Date filter formats the date into the string according to given format.
syntax: {{ date_expression | date : format : timezone}}
Ex: {{‘1288323623006' | date:”MM/dd/yyyy ‘at’ h:mma”}} = 10/29/2010 at 9:10
Code:
<span>
{{'1288323623006' | date:"MM/dd/yyyy 'at' h:mma"}}
</span>
Note: Above filter accept the date and convert into the string by given format. There are various date formate available. Timezone accepts UTC/GMT and it is used to format the date.
Complete code for all filters:
HTML File: index.html
<html ng-app = "mainApp">
<head>
<title>Filters in AngularJS</title>
<link rel="stylesheet" type="text/css" href="css/style.css">
<link rel="stylesheet" type="text/css" href="css/bootstrap.min.css" />
<script src="https://ajax.googleapis.com/ajax/libs/jquery/1.11.3/jquery.min.js"></script>
<script type="text/javascript" src="js/angular.min.js"></script>
<script type="text/javascript" src="js/app.js"></script>
<script>
//Javascript code to switch between filters
function call(data) {
$('.non').css('display', 'none');
$('#' + data).css('display', 'block');
$('td.active').removeClass('active');
$('.' + data).addClass('active');
}
</script>
</head>
<body >
<center> <h1 class="h1">AngularJS-Filters Demo</h1> </center>
<div class="container">
<div class="demo-wrapper row">
<!--Code to genrate a table contains list of many filters-->
<table class="col-md-3 col-md-offset-3 col-xs-12" border="1" >
<thead><tr><td><strong>Filters</strong></td></tr></thead>
<tr><td class="currfilter active" id="activefilter" onclick="call('currfilter');">Currency filter</td></tr>
<tr><td class="upperfilter" onclick="call('upperfilter');">Uppercase Filter</td></tr>
<tr><td class="lowfilter" onclick="call('lowfilter');">Lowercase Filter</td></tr>
<tr><td class="filtfilter" onclick="call('filtfilter');">Filter</td></tr>
<tr><td class="orderfilter" onclick="call('orderfilter');">orderBy Filter</td></tr>
<tr><td class="limittofilter" onclick="call('limittofilter');">limitTo Filter</td></tr>
</table>
<div class="col-md-4 col-md-offset-0 col-xs-12">
<div id="seen">
<!--Code for currency filter starts-->
<div id="currfilter" class="non default">
<div class="login">
<h2>Currency Filter</h2>
<hr/>
<p><b>Enter prices : </b></p>
<input type="text" name="aname" ng-model="price" placeholder="Enter prices">
<p ><b>Output : </b>{{price|currency}}</p>
</div>
</div>
<!--Code for currency filter ends-->
<!--Code for uppercase filter starts-->
<div id="upperfilter" style="display:none" class="non">
<div class="login">
<h2>Uppercase Filter</h2>
<hr/>
<p><b>Enter a string : </b></p>
<input type="text" name="aname" ng-model="uname" placeholder="Enter name in lowercase">
<p ><b>Output : </b>{{uname|uppercase}}</p>
</div>
</div>
<!--Code for uppercase filter ends-->
<!--Code for lowercase filter starts-->
<div id="lowfilter" class="non" style="display:none">
<div class="login">
<h2>Lowercase Filter</h2>
<hr/>
<p><b>Enter a string : </b></p>
<input type="text" name="aname" ng-model="lname" placeholder="Enter name in upercase">
<p><b>Output: </b>{{lname|lowercase}}</p>
</div>
</div>
<!--Code for lowercase filter ends-->
<div ng-controller = "fetchdetails">
<!--Code for filter starts-->
<div id="filtfilter" class="non" style="display:none">
<div class="login">
<h2>Filter</h2>
<hr/>
<p ><b>Search by Name : </b></p><input type="text" name="aname" ng-model="snme" value="" placeholder="Enter a string">
<ul class="friend_info">
<li class="left info_heading">Name</li>
<li class="right info_heading">Age</li>
<li ng-repeat="friend in friends|filter:{name:snme}" >
<div class="left">{{friend.name}}</div>
<div class="right">{{friend.age}}</div>
</li>
</ul>
<br/>
<p><b>Search by Age : </b></p><input type="text" name="aname" ng-model="sage" value="" placeholder="Enter a number">
<ul class="friend_info">
<li class="left info_heading">Name</li>
<li class="right info_heading">Age</li>
<li ng-repeat="friend in friends|filter:{age:sage}">
<div class="left">{{friend.name}}</div>
<div class="right">{{friend.age}}</div>
</li>
</ul>
</div>
</div>
<!--Code for filter ends-->
<!--Code for orderBy filter starts-->
<div id="orderfilter" class="non" style="display:none">
<div class="login">
<h2>orderBy Filter</h2>
<hr/>
<p ><b>Select an option : </b></p>
<select ng-model="select">
<option value="" disabled selected>Select your option</option>
<option value="name">Name</option>
<option value="age">Age</option>
</select>
<ul class="friend_info">
<li class="left info_heading">Name</li>
<li class="right info_heading">Age</li>
<li ng-repeat="friend in friends|orderBy: select">
<div class="left">{{friend.name}}</div>
<div class="right">{{friend.age}}</div>
</li>
</div>
</div>
<!--Code for orderBy filter ends-->
<!--Code for limitTo filter starts-->
<div id="limittofilter" class="non" style="display:none">
<div class="login">
<h2>limitTo Filter</h2>
<hr/>
<p><b>Enter a name : </b></p>
<input type="text" name="aname" ng-model="lminput" placeholder="Enter a name"><br/>
<input type="number" step="1" ng-model="Limitto" value="2" class="limitTo">
<p><b>Output : </b> {{lminput|limitTo:Limitto}}
</p>
</div>
</div>
<!--Code for limitTo filter ends-->
</div>
</div>
</div>
</div>
</div>
</body>
</html>
Javascript: app.js
var mainApp = angular.module("mainApp", []);
mainApp.controller("fetchdetails", function($scope) {
$scope.Limitto = 3;
$scope.friends=[{name:'john',age:22},{name:'Aadam',age:25},{name:'Aadi',age:28},{name:'James',age:19}];
});
CSS: style.css
@import url(http://fonts.googleapis.com/css?family=Raleway);
.demo-wrapper{
min-height: 900px;
min-width: 300px;
}
ul{
list-style: none;
}
li {
height: 10px;
padding: 5px;
height: 20px;
}
li:last-child{
margin-bottom: 10px;
}
li.info_heading {
font-size: 16px;
font-weight: 600;
height: 30px;
margin-top: 5px;
}
.left{
float: left;
width: 50%;
}
.right{
float: right;
width: 50%;
}
.h1 {
margin: 40px auto !important;
}
.login h2{
background-color: #FEFFED;
text-align:center;
border-radius: 10px 10px 0 0;
margin: -10px -40px;
padding: 15px;
}
.login hr{
border:0;
border-bottom:1px solid #ccc;
margin: 10px -40px;
margin-bottom: 10px;
}
.login{
width:100%;
border-radius: 10px;
font-family:raleway;
border: 2px solid #ccc;
padding: 10px 40px 40px;
word-wrap: break-word;
}
.login p{
margin-top:8px;
font-size:16px;
}
.login hr {
margin-bottom: 30px;
}
input[type=text],input[type=number]{
width:99.5%;
padding: 10px;
border: 1px solid #ccc;
padding-left: 5px;
font-size: 16px;
font-family:raleway;
}
select{
width:99.5%;
padding: 10px;
margin-top: 8px;
border: 1px solid #ccc;
padding-left: 5px;
font-size: 16px;
font-family:raleway;
}
table{
width:300px;
margin-bottom: 15px;
border: 2px solid #ccc;
}
thead td{
background-color:#FFCB00;
text-align:center;
padding:15px;
}
tbody tr td {
text-align:center;
padding:15px;
}
tbody tr td:hover{
background-color:#FEFFED;
}
td.active {
background: #FEFFED;
}
.non{
display:none;
}
.default{
display:block;
}
.limitTo{
margin-top: 10px;
}
Conclusion:
I hope that at this point you must be feeling yourself comfortable with AngularJS filter. Please comment for any query. Keep visiting our website.
PhoneGap Splash Screen

Splash Screen:
It is the very first appearance or impression that you often see when you click on any application.
“First impression can be the last impression” so you have to very careful while deciding your splash screen.
It can be a text with an image or text without an image, depends on requirements.
You can use it to promote your brand icon and brand name.
You can use it for hiding some background operations like loading data from a database or any other network related processes.
It is also known as a welcome screen, you can use it to illustrate the features of your application.

Why should you have Splash Screen in your PhoneGap App?
Most of the time you do need splash screen in your application because of the following reasons:
It is always a front page that does not provide the actual content, it provides a brief
information to the visitors for what the application is about.
It is also used as a candyfloss for impressing the potential clients by the designers.
Companies prefer to make use of them to grab users’ attention to their latest products.
Disclaimers or warnings, it does not allow unauthorized content such as advertising, or gambling (as per law).
Grabbing the visitor attention for an important message, approaching deadline, critical update, latest release, news, slogan etc.
Select options facility to the visitor(country wise or city wise), it direct users to the appropriate version of the site.
Get the splash screen in your PhoneGap app:
In this section, I will cover up a complete technical stuff essential for making a splash screen in just a few simple steps.
Before you start making splash screen, you just need to make the following setup:
You should know how to install PhoneGap.
you should know how to create, run and build a PhoneGap application.
If you already know these stuff it is well & good.
if you don’t have any idea then…
…just check the following links listed below:
Now, you are ready for building you first mobile application as “PhoneGap Splash Screen”.

After successful installation of PhoneGap, you will see the similar folder-file hierarchy. it may vary a little as per PhoneGap version.
Make two new files style.css and myjs.js in their respective CSS and JS folder.
Simply copy this code index.html in the index.html file , myjs.js in the myjs.js file and style.css in the style.css file.
Now, run the project and copy the IP address on the browser you will get your splash screen ready.
Here, you will get the complete code for Splash Screen.
index.html
In this page we are having two main div one for splash and one for content.
<!DOCTYPE html>
<html>
<head>
<meta charset="utf-8" />
<meta name="format-detection" content="telephone=no" />
<meta name="msapplication-tap-highlight" content="no" />
<!-- WARNING: for iOS 7, remove the width=device-width and height=device-height attributes. See https://issues.apache.org/jira/browse/CB-4323 -->
<meta name="viewport" content="user-scalable=no, initial-scale=1, maximum-scale=1, minimum-scale=1, width=device-width, height=device-height, target-densitydpi=device-dpi" />
<link rel="stylesheet" type="text/css" href="css/style.css" />
<link href='https://fonts.googleapis.com/css?family=Nunito' rel='stylesheet' type='text/css'>
<title>PhoneGap Splash Screen</title>
</head>
<body>
<div id="splash"><h1 id ="hideme">splash screen<h1></div>
<section id="content"><p>Hello! Welcome to PhoneGap. Here you will learn how to build a mobile application.</p><section>
<script type="text/javascript" src="js/myjs.js"></script>
</body>
</html>
myjs.js
Here you will get reqired jquery code which will be used to generate the splash.
var content = $('#content');
function resetStyles() {
content.attr('style','').removeAttr('style');
}
function applyStyles() {
content.css({
opacity : 1,
transform: 'scale(1.0,1.0)',
WebkitTransform: 'scale(1.0,1.0)',
transition : 'transform 0.4s ease-in-out, opacity 0.4s ease-in-out',
WebkitTransition : '-webkit-transform 0.4s ease-in-out, opacity 0.4s ease-in-out'
});
}
applyStyles();
setInterval(function(){|
resetStyles();
setTimeout(function(){
applyStyles();
},1000)
},3000);
style.css
It will help you in changing the screen appearances. you can alter it according to your reqirements.
html,
body {
display: block;
font-family: Arial;
height: 100%;
margin: 0;
text-align: center;
text-transform: uppercase;
}
#splash,
#content {
display: table;
height: 100%;
width: 100%;
}
#content p {
display: table-cell;
vertical-align: middle;
font-size:50px !important;
font-family: 'Nunito', sans-serif;
margin-top:35% !important;
word-wrap: break-word;
}
/***This code is used for sowing the splash for 5 second over the content div****/
#splash {
background:#0080ff;
position : fixed;
-moz-animation: cssAnimation 0s ease-in 5s forwards;
/* Firefox */
-webkit-animation: cssAnimation 0s ease-in 5s forwards;
/* Safari and Chrome */
-o-animation: cssAnimation 0s ease-in 5s forwards;
/* Opera */
animation: cssAnimation 0s ease-in 5s forwards;
-webkit-animation-fill-mode: forwards;
animation-fill-mode: forwards;
}
#splash h1
{
font-size:50px !important;
font-family: 'Nunito', sans-serif;
text-align:center;
margin-top:25%;
color:white;
}
/****This code is used for hiding the h1 of splash div*****/
#hideme {
-moz-animation: cssAnimation 0s ease-in 5s forwards;
/* Firefox */
-webkit-animation: cssAnimation 0s ease-in 5s forwards;
/* Safari and Chrome */
-o-animation: cssAnimation 0s ease-in 5s forwards;
/* Opera */
animation: cssAnimation 0s ease-in 5s forwards;
-webkit-animation-fill-mode: forwards;
animation-fill-mode: forwards;
}
#content
{
font-size:50px;
width:100%;
height:100%;
background-color:gray;
}
html, body {
height:100%;
width:100%;
margin:0;
padding:0;
}
@keyframes cssAnimation {
to {
width:0;
height:0;
overflow:hidden;
}
}
@-webkit-keyframes cssAnimation {
to {
width:0;
height:0;
visibility:hidden;
}
}
Conclusion:
Now, you have learned to make a splash screen. you can design attractive and informational splash screen which will help you to increase the popularity of your application. I will be updating you regarding same so keep reading the blogs. Don’t forget to provide your valuable feedbacks.
Get more related information here –
- Phonegap Contacts Plugin : Contact Management App
- PhoneGap Local Storage
PhoneGap GPS / PhoneGap Geolocation Plugin

Geolocation can be defined as the real time geographic location of anything.
To build an app, we’re going to integrate PhoneGap’s Geolocation Plugin API with Google Maps Javascript API.
PhoneGap’s Geolocation Plugin API will grab user’s current location and Google Maps Javascript API will grab nearby addresses.

Idea Of The App:
Features
- A multi screen.
- Show nearby ATMs, Hospitals and Restaurants on the basis of user’s current location.
- First screen: User will be asked to choose any one out of the three (ATM, Hospital and Restaurant).
- Second screen: User’s location will be grabbed and results will be displayed.
Technologies Used
jQuery Mobile : For Interface / UI Designing
- We’re going to use jQuery Mobile for designing interface.
Google Maps Javascript API: For Fetching Nearby Places
- We’re going to fetch nearby ATMs, Hospitals and Restaurants by using Google Maps Javascript API.
Let’s Take a look at the PhoneGap’s Geolocation.
PhoneGap’s Geolocation
- PhoneGap has provided a plugin API to obtain the device’s location.
- It provides device location in terms of Longitude and Latitude.
- Either it uses GPS (Global Positioning System) or Inferred Network Signals.
- It is based on the standard W3C Geolocation API Specification.
Methods
- geolocation.getCurrentPosition : It returns the device’s current location
navigator.geolocation.getCurrentPosition(geolocationSuccess, [geolocationError], [geolocationOptions]); - geolocation.watchPosition : It continously watches the device’s location.
var watchId = navigator.geolocation.watchPosition(geolocationSuccess, [geolocationError], [geolocationOptions]); - geolocation.clearWatch : Stop watching the device’s location.
navigator.geolocation.clearWatch(watchID);
Objects
- Position
- PositionError
- Coordinates
We’re going to use only ‘getCurrentPosition’ in our application.
geolocation.getCurrentPosition
navigator.geolocation.getCurrentPosition(geolocationSuccess, [geolocationError], [geolocationOptions]);- geolocationSuccess : The ‘Position’ object is passed to this callback function on success.
- geolocationError : (Optional) The ‘PositionError’ object is passed to this callback function on error.
- geolocationOptions : (Optional) These are the geolocation options.
Files :
HTML File : Index.html
<!DOCTYPE HTML>
<html>
<head>
<title>FormGet PhoneGap</title>
<meta name="viewport" content="width=device-width, initial-scale=1">

<!--Stylesheet Files : jQuery Mobile CSS File, Customized CSS File -->
<link rel="stylesheet" href="css/jquery.mobile-1.4.5.css">
<link rel="stylesheet" href="css/my.css">

<!--jQuery Files : jQuery Library File, jQuery Mobile JS File, Customized JS File -->
<script src="js/jquery-1.11.3.min.js"></script>
<script src="js/jquery.mobile-1.4.5.js"></script>
<script src="js/my.js"></script>
</head>

<!--Beginning of the Body-->
<body>
<div data-role="page">

<!-- Header Bar-->
<div data-role="header" data-position="fixed" class="ui-header ui-bar-a ui-header-fixed slidedown" role="banner">
<h1>Around Me</h1>
</div>
<div data-role="main" class="ui-content" id="main">
<center><img style="text-align: center" src="img/logo.jpg"/></center>
<label id="whatsearch" for="search" style="text-align: center;">What Would You Like To Search?</label>

<!--Drop Down Select Option-->
<select name="search" id="choice" data-native-menu="false">
<option value="atm">ATM</option>
<option value="hospital">Hospital</option>
<option value="restaurant">Restaurant</option>
</select>

<!--Search Button-->
<button id="searchbutton" class="ui-btn" onclick="Myfunc()">Search</button>
</div>
</div>
</body>
<!--End of the Body-->
</html>
HTML File : Map.html
<!DOCTYPE html>
<html>
<head>
<title>Place searches</title>
<meta name="viewport" content="width=device-width, initial-scale=1,user-scalable=no">
<meta charset="utf-8">

<!--Stylesheet Files : jQuery Mobile CSS File, Customized CSS File -->
<link rel="stylesheet" href="css/jquery.mobile-1.4.5.css">
<link rel="stylesheet" href="css/my.css">
<style>
html, body {
height: 100%;
margin: 0;
padding: 0;
background-color: #EEE !important;
}
#map {
height: 100%;
}
</style>

<!--jQuery File : Customized JS File -->
<script src="js/map.js"></script>
</head>

<!--Beginning of the Body-->
<body onload="loader();">
<div data-role="page" id="pageone">

<!--Header Bar-->
<div data-role="header">
<a href="#pageone" data-role="button" class="ui-btn-left ui-link ui-btn ui-icon-back ui-btn-icon-left ui-shadow ui-corner-all" data-icon="back" data-rel="back" role="button" data-transition="pop" data-direction="reverse">Go Back</a>
<h1>Around Me</h1>
</div>

<!--Display div where nearby locations and their addresses will get displayed-->
<div data-role="main" class="ui-content" id="display">
</div>
</div>

<!--Loader Image Div-->
<div class="cssload-thecube">
<div class="cssload-cube cssload-c1"></div>
<div class="cssload-cube cssload-c2"></div>
<div class="cssload-cube cssload-c4"></div>
<div class="cssload-cube cssload-c3"></div>
</div>
<ul class="collapsible" data-collapsible="accordion">
</ul>
<div id="map"></div>

<!--jQuery Files : jQuery Library File, jQuery Mobile JS File-->
<script src="js/jquery-1.11.3.min.js"></script>
<script src="js/jquery.mobile-1.4.5.js"></script>

<!--Google Map Javascript API-->
<script src="https://maps.googleapis.com/maps/api/js?key=ENTER_YOUR_KEY&signed_in=true&libraries=places&callback=initMap" async defer></script>
</body>
<!--End of the Body-->
</html>
JavaScript File : Map.js
<!--PhoneGap Geolocation Plugin Method To Fetch Current Position-->
navigator.geolocation.getCurrentPosition(onSuccess, onError);

<!--Function executes only when location grabbed successfully-->
function onSuccess(position) {
var element = document.getElementById('map');
lati = position.coords.latitude;
long = position.coords.longitude;
initMap();
}

<!--Function executes in the case of error-->
function onError(error) {
alert('code: ' + error.code + 'n' +
'message: ' + error.message + 'n');
}
var map;
var infowindow;

<!--Initializing Google Maps-->
function initMap() {
var pyrmont = {lat: lati, lng: long};
map = new google.maps.Map(document.getElementById('map'), {
center: pyrmont,
zoom: 1
});
document.getElementById('map').style.visibility = 'hidden';
var keyword = location.hash.replace("#","");
document.getElementById("key").innerHTML = keyword.toUpperCase();

<!--Creating Google Maps Places object for nearby locations-->
var service = new google.maps.places.PlacesService(map);
service.nearbySearch({
location: pyrmont,
radius: 500,
types: [keyword]
}, callback);
}

<!--Callback function of Google Maps places service-->
function callback(results, status) {
if (status === google.maps.places.PlacesServiceStatus.OK) {
for (var i = 0; i < results.length; i++) {
var placeLoc = results[i].geometry.location;
var placeName = results[i].name;
var address = results[i].vicinity;
$( "div#display" ).append( $( "<div data-role='collapsible'><h1>" + placeName + "</h1><p>" + address + "</p></div>" ) );
$('[data-role=collapsible').collapsible();
}
$("#map").remove();
}
}

<!--Redirecting from screen 1 to 2-->
function Myfunc(){
var val = document.getElementById("choice").value;
window.location.href = "map.html#"+val;
}

<!--Loading Image-->
function loader(){
$('div.cssload-thecube').hide();
}
CSS File : My.css
.ui-bar-a, .ui-page-theme-a .ui-bar-inherit, html .ui-bar-a .ui-bar-inherit, html .ui-body-a .ui-bar-inherit, html body .ui-group-theme-a .ui-bar-inherit {
border: 1px solid #005994 !important;
background: #0093EA !important;
color: #fff !important;
font-weight: bold !important;
text-shadow: 0 0 #eee !important;
background-image: -webkit-gradient(linear, left top, left bottom, from( #0093EA), to( #007dcd ));
background-image: -webkit-linear-gradient( #0093EA , #007dcd );
background-image: -moz-linear-gradient( #0093EA, #007dcd );
background-image: -ms-linear-gradient( #0093EA , #007dcd );
background-image: -o-linear-gradient( #0093EA , #007dcd );
background-image: linear-gradient( #0093EA , #007dcd );
}
.ui-page-theme-a .ui-btn:hover, html .ui-bar-a .ui-btn:hover, html .ui-body-a .ui-btn:hover, html body .ui-group-theme-a .ui-btn:hover, html head + body .ui-btn.ui-btn-a:hover{
border: 1px solid #007dcd;
background: #333 ;
font-weight: bold;
text-shadow: 0 0 #eee !important;
color: #fff !important;
background-image: -webkit-gradient(linear, left top, left bottom, from( #0093EA ), to( #0093EA ));
background-image: -webkit-linear-gradient( #0093EA , #0093EA );
background-image: -moz-linear-gradient( #0093EA , #0093EA );
background-image: -ms-linear-gradient( #0093EA , #0093EA );
background-image: -o-linear-gradient( #0093EA , #0093EA );
background-image: linear-gradient( #0093EA , #0093EA );
}
.ui-page-theme-a .ui-btn.ui-btn-active, html .ui-bar-a .ui-btn.ui-btn-active, html .ui-body-a .ui-btn.ui-btn-active, html body .ui-group-theme-a .ui-btn.ui-btn-active, html head + body .ui-btn.ui-btn-a.ui-btn-active, .ui-page-theme-a .ui-checkbox-on:after, html .ui-bar-a .ui-checkbox-on:after, html .ui-body-a .ui-checkbox-on:after, html body .ui-group-theme-a .ui-checkbox-on:after, .ui-btn.ui-checkbox-on.ui-btn-a:after, .ui-page-theme-a .ui-flipswitch-active, html .ui-bar-a .ui-flipswitch-active, html .ui-body-a .ui-flipswitch-active, html body .ui-group-theme-a .ui-flipswitch-active, html body .ui-flipswitch.ui-bar-a.ui-flipswitch-active, .ui-page-theme-a .ui-slider-track .ui-btn-active, html .ui-bar-a .ui-slider-track .ui-btn-active, html .ui-body-a .ui-slider-track .ui-btn-active, html body .ui-group-theme-a .ui-slider-track .ui-btn-active, html body div.ui-slider-track.ui-body-a .ui-btn-active {
background-color: #0093EA !important ;
border-color:#0093EA !important;
color: #fff ;
text-shadow: 0 1px 0 #005599 ;
}
img{
padding: 25px;
}
#whatsearch{
padding-bottom: 25px;
}
button.ui-btn, .ui-controlgroup-controls button.ui-btn-icon-notext {
border-radius: 5px !important;
}
#searchbutton{
margin-bottom: 25px;
}
#main{
margin-top: 18% !important ;
}
.ui-collapsible-inset.ui-collapsible-themed-content .ui-collapsible-content
{
background-color: #ddd;
color: #111;
}
.cssload-thecube {
width: 131px;
height: 131px;
margin: 0 auto;
top: 25%;
margin-top: 88px;
position: relative;
transform: rotateZ(45deg);
-o-transform: rotateZ(45deg);
-ms-transform: rotateZ(45deg);
-webkit-transform: rotateZ(45deg);
-moz-transform: rotateZ(45deg);
}
.cssload-thecube .cssload-cube {
position: relative;
transform: rotateZ(45deg);
-o-transform: rotateZ(45deg);
-ms-transform: rotateZ(45deg);
-webkit-transform: rotateZ(45deg);
-moz-transform: rotateZ(45deg);
}
.cssload-thecube .cssload-cube {
float: left;
width: 50%;
height: 50%;
position: relative;
transform: scale(1.1);
-o-transform: scale(1.1);
-ms-transform: scale(1.1);
-webkit-transform: scale(1.1);
-moz-transform: scale(1.1);
}
.cssload-thecube .cssload-cube:before {
content: "";
position: absolute;
top: 0;
left: 0;
width: 100%;
height: 100%;
background-color: rgb(0,147,231);
animation: cssload-fold-thecube 2.76s infinite linear both;
-o-animation: cssload-fold-thecube 2.76s infinite linear both;
-ms-animation: cssload-fold-thecube 2.76s infinite linear both;
-webkit-animation: cssload-fold-thecube 2.76s infinite linear both;
-moz-animation: cssload-fold-thecube 2.76s infinite linear both;
transform-origin: 100% 100%;
-o-transform-origin: 100% 100%;
-ms-transform-origin: 100% 100%;
-webkit-transform-origin: 100% 100%;
-moz-transform-origin: 100% 100%;
}
.cssload-thecube .cssload-c2 {
transform: scale(1.1) rotateZ(90deg);
-o-transform: scale(1.1) rotateZ(90deg);
-ms-transform: scale(1.1) rotateZ(90deg);
-webkit-transform: scale(1.1) rotateZ(90deg);
-moz-transform: scale(1.1) rotateZ(90deg);
}
.cssload-thecube .cssload-c3 {
transform: scale(1.1) rotateZ(180deg);
-o-transform: scale(1.1) rotateZ(180deg);
-ms-transform: scale(1.1) rotateZ(180deg);
-webkit-transform: scale(1.1) rotateZ(180deg);
-moz-transform: scale(1.1) rotateZ(180deg);
}
.cssload-thecube .cssload-c4 {
transform: scale(1.1) rotateZ(270deg);
-o-transform: scale(1.1) rotateZ(270deg);
-ms-transform: scale(1.1) rotateZ(270deg);
-webkit-transform: scale(1.1) rotateZ(270deg);
-moz-transform: scale(1.1) rotateZ(270deg);
}
.cssload-thecube .cssload-c2:before {
animation-delay: 0.35s;
-o-animation-delay: 0.35s;
-ms-animation-delay: 0.35s;
-webkit-animation-delay: 0.35s;
-moz-animation-delay: 0.35s;
}
.cssload-thecube .cssload-c3:before {
animation-delay: 0.69s;
-o-animation-delay: 0.69s;
-ms-animation-delay: 0.69s;
-webkit-animation-delay: 0.69s;
-moz-animation-delay: 0.69s;
}
.cssload-thecube .cssload-c4:before {
animation-delay: 1.04s;
-o-animation-delay: 1.04s;
-ms-animation-delay: 1.04s;
-webkit-animation-delay: 1.04s;
-moz-animation-delay: 1.04s;
}
@keyframes cssload-fold-thecube {
0%, 10% {
transform: perspective(245px) rotateX(-180deg);
opacity: 0;
}
25%,
75% {
transform: perspective(245px) rotateX(0deg);
opacity: 1;
}
90%,
100% {
transform: perspective(245px) rotateY(180deg);
opacity: 0;
}
}
@-o-keyframes cssload-fold-thecube {
0%, 10% {
-o-transform: perspective(245px) rotateX(-180deg);
opacity: 0;
}
25%,
75% {
-o-transform: perspective(245px) rotateX(0deg);
opacity: 1;
}
90%,
100% {
-o-transform: perspective(245px) rotateY(180deg);
opacity: 0;
}
}
@-ms-keyframes cssload-fold-thecube {
0%, 10% {
-ms-transform: perspective(245px) rotateX(-180deg);
opacity: 0;
}
25%,
75% {
-ms-transform: perspective(245px) rotateX(0deg);
opacity: 1;
}
90%,
100% {
-ms-transform: perspective(245px) rotateY(180deg);
opacity: 0;
}
}
@-webkit-keyframes cssload-fold-thecube {
0%, 10% {
-webkit-transform: perspective(245px) rotateX(-180deg);
opacity: 0;
}
25%,
75% {
-webkit-transform: perspective(245px) rotateX(0deg);
opacity: 1;
}
90%,
100% {
-webkit-transform: perspective(245px) rotateY(180deg);
opacity: 0;
}
}
@-moz-keyframes cssload-fold-thecube {
0%, 10% {
-moz-transform: perspective(245px) rotateX(-180deg);
opacity: 0;
}
25%,
75% {
-moz-transform: perspective(245px) rotateX(0deg);
opacity: 1;
}
90%,
100% {
-moz-transform: perspective(245px) rotateY(180deg);
opacity: 0;
}
}
.ui-collapsible-content {
-webkit-transition: all 0.5s;
-moz-transition: all 0.5s;
-ms-transition: all 0.5s;
-o-transition: all 0.5s;
transition: all 0.5s;
overflow: hidden;
}
.ui-collapsible-content-collapsed {
display: block;
height: 0;
padding: 0 16px;
}
Conclusion:
So, I hope now you’re well aware with the GPS utility offered by PhoneGap. You can implement more useful apps using Geolocation Plugin API.
And if you have suggestions of your own? Share in the comments section below! I’d love to hear about it!
Recommended blogs –
- PhoneGap Plugin Apis And Events
- Install PhoneGap
AngularJS Module : Building Blocks To Angular

In this tutorial, we will give you conceptual and implementation information about AngularJS Module.
First we will explain the core concept of Modules and then we will create a simple application for the implementation understanding of the concept.
So, Let’s begin with the conceptual part.
AngularJS – Module
A module is a collection of the different block of codes which can be used in the angular application.
These codes contain information about directives, controllers, services, filters, different functions and values that can be used anywhere within the application.
Watch the live demo or download code from the link given below.
The basic syntax of a module is
angular.module('Module Name',[ 'Dependencies' ]);– Module Name: Name of the module to create. The same name will be used by the directive to retrieve module.
For example:-
// AngularJS module for the application
var myProduct = angular.module('myProduct', []);
// Controller for the application
myProduct.controller('productController', []);
Here, there are two modules created. First module is created for the application with name myProduct and another module is created for the controller with name productController.
In application, these modules can be used by directives as,
<html ng-app="myProduct">
<head>
...
...
</head>
<body>
<div class="product-wrapper row" ng-controller="productController">
....
....
</div>
</body>
</html>
– Dependencies: Sometimes a module depends upon another module, service or function. In such case, it is required to include it in the module as a dependency in order to use its functionality.
Dependencies should be written inside [] between quotes as,
// Controller for the application
myProduct.controller('productController', ['$scope', function($scope) {
// Product array containing values in JSON format
$scope.products = [
{
"prod_name": "Foogo-PRO Theme",
"prod_img": "Foogo_PRO_Theme",
"prod_price": "$59",
"download_link": "https://www.inkthemes.com/market/foogo-pro-wordpress-business-theme/",
},
{
"prod_name": "Video Member Theme",
"prod_img": "Video_Member_Theme",
"prod_price": "$119",
"download_link": "https://www.inkthemes.com/market/video-membership-wordpress-theme/",
}
]
}]);
Here, the controller module depends upon $scope to store products information. So, $scope is included as a dependency and between quotes.
Important:
$scope is a special javascript object which connects controller with the view. The values stored by controller in the $scope object has accessed in the view part.
If you are using any function as a dependency then other included modules or services should be passed as an argument to the function.
For example: –
In above-mentioned code, $scope is included as a dependency in the controller and it is passed as an argument to the function to store products information.
That’s it.
Now, it time for the coding part. So, get ready.
First we will create a directory structure for the application. Follow the directory structure given below and create the same structure for your application. Now, follow the steps given below:-
Step 1: – In index.php, write the code given below.
index.php
It is the core file of the single page application of angular. It will act as view and will display the content of the app.
<html ng-app="myProduct">
<head>
<title>AngularJS Directive Demo</title>
<meta name="viewport" content="width=device-width, initial-scale=1">
<!-- Include Bootstrap CSS -->
<link rel="stylesheet" type="text/css" href="css/bootstrap.min.css">
<link rel="stylesheet" type="text/css" href="css/style.css">
<!-- Include AngularJS library -->
<script src="lib/angular/angular.min.js"></script>
<!-- Include jQuery library -->
<script src="js/jQuery/jquery.min.js"></script>
<!-- Include Bootstrap Javascript -->
<script src="js/bootstrap.min.js"></script>
</head>
<body>
<div class="container">
<div class="product-wrapper row" ng-controller="productController">
<a href="https://www.inkthemes.com/market/"><h1 class="wrapper-heading"><span><img src="img/inkthemes_logo.png" class="inkthemes_logo"></span>InkThemes Themes</h1></a>
<!-- Retieving each product data from the products array -->
<div class="single-product col-md-3 col-sm-6 col-xs-8 col-xs-offset-2 col-sm-offset-0" ng-repeat="product in products">
<div class="product col-md-12">
<p class="prod_title">{{product.prod_name}}</p>
<!-- Retrieving and using each product src in image tag -->
<img class="prod_img" ng-src="img/{{product.prod_img}}.png"/>
<div class="button-group form-group">
<!-- Retrieving price of each product -->
<div class="btn btn-success details">Price {{product.prod_price}}</div>
<!-- Show Buy Theme button -->
<a href="{{product.download_link}}" class="btn btn-warning details">Buy Theme</a>
</div>
</div>
</div>
</div>
</div>
<!-- Include controller -->
<script src="js/myController.js"></script>
</body>
</html>
Step 2: – In myController.js, write the code given below.
myController.js
It is the main controller of the application. All modules and functions are defined in this file.
// AngularJS module for the application
var myProduct = angular.module('myProduct', []);
// Controller for the application
myProduct.controller('productController', ['$scope', function($scope) {
// Product array containing values in JSON format
$scope.products = [
{
"prod_name": "Foogo-PRO Theme",
"prod_img": "Foogo_PRO_Theme",
"prod_price": "$59",
"download_link": "https://www.inkthemes.com/market/foogo-pro-wordpress-business-theme/"
},
{
"prod_name": "Video Member Theme",
"prod_img": "Video_Member_Theme",
"prod_price": "$119",
"download_link": "https://www.inkthemes.com/market/video-membership-wordpress-theme/"
},
{
"prod_name": "Real Photography Theme",
"prod_img": "Real_Photography_Theme",
"prod_price": "$59",
"download_link": "https://www.inkthemes.com/market/real-photography-wordpress-theme/"
},
{
"prod_name": "Colorway Theme",
"prod_img": "Colorway_theme",
"prod_price": "$75",
"download_link": "https://www.inkthemes.com/market/colorway-wp-theme/"
},
{
"prod_name": "Geocraft Theme",
"prod_img": "geocraft_theme",
"prod_price": "$97",
"download_link": "https://www.inkthemes.com/market/geocraft-directory-listing-wordpress-theme/"
},
{
"prod_name": "BlackRiders Theme",
"prod_img": "Black_Riders_theme",
"prod_price": "$59",
"download_link": "https://www.inkthemes.com/market/lead-generation-wordpress-theme/"
},
{
"prod_name": "Videcraft Theme",
"prod_img": "Videcraft_theme",
"prod_price": "$97",
"download_link": "https://www.inkthemes.com/market/videocraft-wordpress-theme/"
},
{
"prod_name": "Variant Landing Page Theme",
"prod_img": "Variant_Landing_Page_Theme",
"prod_price": "$77",
"download_link": "https://www.inkthemes.com/market/landing-page-wordpress-theme/"
}
]
}]);
Step 3:- Write the follwing CSS code in style.css.
Contain CSS for the Application design.
@import url(http://fonts.googleapis.com/css?family=Raleway);

ul{
list-style: none;
}
li{
display: block;
font-family: 'Raleway', sans-serif;
}
.product-wrapper {
padding-left: 45px;
padding-top: 10px;
padding-bottom: 10px;
min-height:900px;
font-family: 'Raleway', sans-serif;
}
.wrapper-heading{
text-align: center;
font-family: 'Raleway', sans-serif;
}
img.inkthemes_logo{
width: 50px;
margin-top: -5px;
margin-right: 5px;
}
.single-product{
vertical-align: top;
float: none;
display: inline-block;
}
.prod_img{
width: 100%;
margin-bottom: 10px;
}
.product {
background: #F1F1F1;
padding: 10px 10px 0 10px;
margin-left: -20px;
margin-bottom: 10px;
border-radius: 5px;
}
p.prod_title {
font-size: 16px;
font-weight: bold;
font-family: 'Raleway', sans-serif;
color: #615F5F;
}
.button-group{
text-align: center;
margin-bottom: 0;
}
.glyphicon-ok{
color:green;
}
.btn{
font-family: 'Raleway', sans-serif;
margin-bottom: 10px;
}
@media only screen and (max-width:480px){
.product-wrapper {
padding-left: 0;
}
.product {
min-width: 200px;
}
}
@media only screen and (max-width:991px) and (min-width: 481px){
.product-wrapper {
padding-left: 20px;
}
}
Run the script and have fun!!!
Conclusion:
Keep reading our blog posts for more interesting concepts of AngularJS and provide us your feedback from the space given below.
10 ESP’s With Google Analytics Tracking Platform 2022

Are you able to trace the results generated by your emails marketing campaigns? If not Google Analytics Email Tracking will help you do so.
It will help you explore the performance of your email campaigns, then you can groom and intensify your campaigns to make them more appealing one’s which eventually head you towards acquiring more leads and customers.
How to track and monitor returns generated through the email campaigns?
Well, Google Analytics is the answer to this. With the assistance of Google Analytics, you can witness your campaign performance like check how many clicks your email got, how many people landed to your website, spot user behavior towards your email campaigns, number of clicks on links and much more.
Now, some email marketing services have come up with Google Analytics integration options under their services for campaign tracking and analysis.
So, I have listed the 10 Email Marketing Services that provides best in class Google Analytics Tracking Services to its customers –
Also, we have designed a table of comparison for your convenience below:-
| Comparison Between Google Analytics Email Tracking Services | |||||
| Services | Pricing | Number Of Emails | Free Trial | Multiple SMTP | Rating |
| Pabbly Email Marketing | $29/mo. | Unlimited | ✔ | ✖ | 4.9/5.0 |
| MailGet | $29/mo. | Unlimited | ✔ | ✔ | 4.8/5.0 |
| SendinBlue | $25/mo. | 40,000 | ✔ | ✖ | 4.1/5.0 |
| ActiveTrail | $7/mo. | Unlimited | ✔ | ✖ | 3.9/5.0 |
| Click Dimension | $455/mo. | 50,000 | ✖ | ✖ | 3.4/5.0 |
Want to enhance your knowledge on email markeitng service and its facilities read the blogs below once:-
1. Pabbly Email Marketing – Email Marketing Service
Pabbly Email Marketing service comes with a pre-equipped smart email campaign tracking facility using which you can analyze users actions through Google analytics. Additional, it also has effective marketing features and customer support staff, that allows you to run an effective email marketing campaigns for your business.

How Pabbly Email Marketing with Google Analytics:-
As per my view, the Pabbly Email Marketing will act as a complete solution set for your web complications as along with the google analytics it allows you to create emails and send them to a number of customers as well.
One more thing about the software which I was attracted to was that it offers great OPEN RATE i.e 25% in the beginning itself which other software lack. Plus, the pricing is also very reasonable i.e $29 per month for the basic plan for this service.
2. MailGet – Cheap Emailing Solution
MailGet is a fresh, cheap and affordable email marketing service through which you can send professional newsletters and can do powerful email marketing. You free trial through which 100 subscribers can be contacted in a month with an unlimited number of emails.
In addition, email builder, campaign tracking, Google analytics, and other advanced feature are available in this service as well.
Outstanding features of MailGet are:-
- Build great emails
- Maintain list hygiene
- Properly manage contacts
- Schedule emails to send later
- Automate your email marketing
- Email analytics system and much more..

MailGet includes Google Analytics Integration options through which you can study your client’s behavior and track website traffic due to email campaigns.
All you need is just to connect your email campaign with Google Analytics. You have to activate Enable button that is provided on the Settings tab. By doing so, all your URLs in the campaigns get embedded with the UTM tracking link.
Check out the advantage of integrating Google Analytics Campaign Tracking and Email Marketing with MailGet.
Past my research, I found that MailGet is the best google analytics email tracking tool because along with analytics it also gives you the facility of SMTP routing through you can send emails via multiple servers dynamically.
Not only that but you can connect to a number of SMTPs too, on the pricing part you will get the cheapest available software whose price plan starts at $29 per month, which is an incredible & lighting deal you will ever find for email marketing service.
3. SendinBlue
SendinBlue is a simple email marketing tool that offers business companies to market their product and grow their business. It includes a lot of features like drag & drop email builder, delivery optimization, built-in list management tools, real-time reporting, and analytics, etc.
SendinBlue provides user to go through a straightforward procedure for integrating with Google Analytics to track email campaigns. In the dashboard, you just need to select Google from Add Application button and then you will get combined with it.
4. Flexmail
Flexmail is yet another email marketing service provider that contains tools through which you can perform multi-channel communication, plan automated email campaigns, and problem-free system integration.

In Flexmail, for integrating with Google Analytics, you need to follow a few steps. In the account section, you need to activate the Google tracking codes and get your email campaign linked to it.
5. Sign-Up.to
Sign-Up to is an online marketing solution that contains email tracking services through which you can successfully run email marketing program for your business. It offers various marketing solutions like targeted email marketing, SMS marketing, permission-based list building and social marketing at one platform.

For tracking email campaigns through Google Analytics, it has email marketing analytics dashboard, from where you can connect to Google Analytics. You can connect to it either manually or do it while building up the email by just selecting the box present in the save dialogue box.
6. Webpower
Webpower is a web-based marketing solution that provides services like email marketing, event marketing, Lifecycle Marketing, Customer intelligence, etc. It owns various striking features such as responsive email templates, Multilingual Campaigns, control frequency of emails, list segmentation, reports, and analytics system, etc.

To have an in-depth analysis of email campaigns and website traffic, Webpower has provided the option for integration with the Google Analytics within their email marketing service. By doing so, you can find out the number of page visits that come through email campaigns.
7. ActiveTrail
The ActiveTrail gives user and business organization with an all in one email marketing platform. It includes a feature like landings page builder, marketing automation features, optimization tools, Google Analytics integration, advanced and mobile responsive email marketing, etc.

ActiveTrail offers you an option for integration with Google Analytics. In Active Trail, just tick the checkbox with “ Integration With Google Analytics” and then quickly track the performance reports of your email marketing campaigns.
8. Click Dimension
Click Dimension is easy to use email marketing solution, through which you can build email, surveys, web forms, nurture campaigns and also provides marketing automation solution.

Click Dimensions automatically handles authentication process for integrating with Google Analytics tracking platform. No procedure required for connecting with the Google analytics. All you need is just an account on Google Analytics. That’s It..!!
9. Doppler
A favorite name in the field of email marketing service providers is Doppler. A fully furnished email marketing service that provides features through which you can design and send email campaigns, track email campaigns, powerful integration options, and various customized plans.

For integration of Google Analytics with Doppler, you simply need to activate the Google Analytics button provided in Control Panel Division. Then you will successfully combine your Doppler’s account with Google Analytics account, and you can start tracking your email campaign through it.
10. SendBlaster
SendBlaster provides business organizations with a bulk email software for starting email marketing. It includes features through which stunning emails can be built, efficiently manage contact list, plan effective email campaigns, get email campaigns performance reports, and many other features you will find with their services.

SendBlaster, email marketing platform grants full integration with the Google Analytics to their user, so that they can easily track their marketing campaigns and see how email campaigns are performing.
Conclusion
Probably, you are now knowledgeable of the email marketing services that comes with Google Analytics integration for campaign tracking. Do you have suggestions of your own? Share in the comments section below! I’d love to hear about it!
Check our blog post too –
- 10 Top-Class Email List Cleaning Services
- Increase Open Rates With Follow-up
- Best Email Analytics Tools
- GetResponse Alternatives
- Opt In Form Email Marketing Services
Schedule Emails to Send Later At Specific Time : Email Marketing
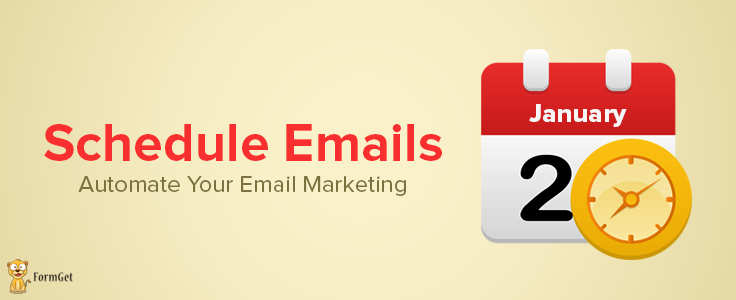
Want to reach out to your prospects at the most convenient time.?
Failing to do so, will affect your campaign’s reputation very badly.
Schedule emails are used by more than 450,000 users to increase their email productivity. !!
If your customers live in different world’s time zone, you need to send emails at the right time to get the maximum outcome from your email campaign.
Doing so will ultimately increase email opens, click through rate, etc.
Stop Here & Take a Deep Breath! We Offer You An Exclusive Email Marketing Package With Inbuilt SMTP…
Sign Up Free
Well, MailGet allows you to Schedule Email using which you can easily send emails later to the clients.

Is Email Scheduling Possible..?
Yes, Email Scheduling is possible..!!
Schedule your campaigns to:
- Communicate with your clients in different time zones.
- Send emails when users are most likely to be read.
How To Schedule Emails..?
Click Here.. to know how to schedule email to send later.
..start delivering information to your clients at the most convenient time when they are likely to open your emails.
Send Recurring Emails –
- Schedule the sequence of your messages on a recurring basis say – daily, weekly, monthly, or annually.
- If you are on vacation but still want your monthly release notes to get delivered.

Features Of Email Scheduler
MailGet provides an outstanding email scheduler feature through which you can schedule an email to sent later-
Scheduled Delivery
After creating the email, you will have two options to send your campaign. You can either select Immediate Delivery or choose a Send Later option.
For scheduling, MailGet gives you following options –
- Date: Set up an email to send at a specific date.
- Time: Set up an email to send at a specific time.
Handy Calendar Picker
Easily navigate and pick dates using handy calendar picker that tells MailGet when to send your message.
Schedule Email Campaign Without Pain
Just create a campaign as you normally do and click on the Send Later button.
Schedule your email campaign without pain in few minutes and makes your email sending task easier.
Date Based Scheduling
Choose to scheduled and send emails based on different dates –
- Based on special occasion and events dates –
Allows you to send emails based on an annual event like anniversary date, birthday date etc.
- Based on subscription date –
Allows you to send emails based on the date that a user get added to your list via sign up form.
Enjoy More Flexibility
Once an email is scheduled in MailGet, it appears in your dashboard with scheduling details right up until the scheduled time.
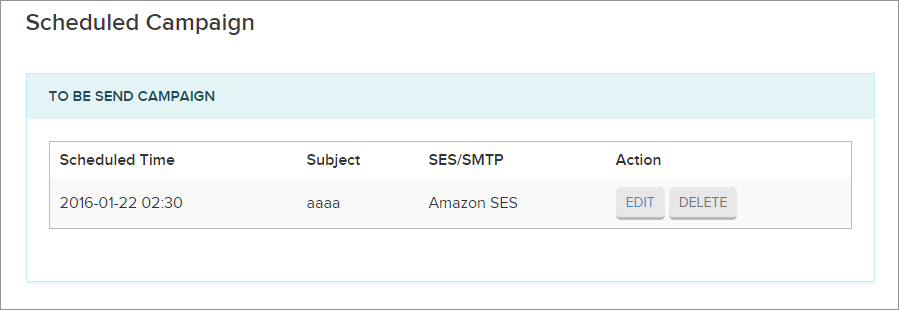
Make your entire email campaign more flexible by doings things until the scheduled time –
- Update your email content, subject, recipients and scheduled details.
- You can also send your scheduled email immediately with one click if you feel to do so.
How Schedule Email To Send Later Could Benefit You ?
Scheduling emails can improve morale.
Know How –
Keep Interest Of Users In Your Content
- When you send messages to your clients on scheduled basis then it brings interest in them, and they read your messages.
- If you send messages on a regular basis they get frustrated with you that can lead to less open and unsubscription rates.
Increases Trust And Loyalty
- While sending scheduled message to your customers, your primary aim is to deliver a precise and targeted message.
- And by delivering relevant information to your customers, you can increase trust and loyalty among them.
Builds Relationships
- Scheduling your email marketing campaigns helps you to stay in touch with your prospects.
As a result, your relationship gets strong with customers which ultimately increases chances of sales.
Run More Personalized Email Campaigns
- Enables to conduct more personalized email campaigns like if you know that some user opens emails at some particular time then accordingly to user behaviour you can send greeted emails.
Automated Scheduled Emails
- Run an automated scheduled emails according to your convenience by selecting the date and time as per your need.
Scheduling automates all kinds of tasks and saves time and efforts to send emails to an entire list of customers.
Scheduled Emails Are Timely And Personalized.
As a result, more frequently opens and clicks will arrive and it helps to drive more visits for your business. !!
AngularJS-Directive : Incharge To Give Commands

In this tutorial, we are going to create a simple application using angularjs-directives. This application will contain the following feature.
- Display all the available themes product.
- Each theme product contains a product image, show features button, price, features section, Hide Features and Buy Themes buttons.
- When a user clicks on a product’s Show Features button, the features section will be displayed and Show Features button would be hidden.
- And when user will click on Hide Features button available under features section, the feature section will be hide and Show features button will appear again.
- Features section also contains a Buy Theme buttons will redirect users to the related product page for purchasing.
So, let’s begin and have a look at the AngularJS Directives.
AngularJS Directive
AngularJS directives are the commands which communicate with angular library and tell angular to do a job on the HTML tags.
Since this task is performed on the HTML tags, hence directives have written in the HTML tags as an attribute containing ng- prefix.
e.g: – ng-app, ng-model, ng-repeat, ng-controller etc.
There are a number of inbuilt directives available in AngularJS with various functionalities. But in this blog, we will cover some of the important and commonly used directives.
For better and clear understanding, we have created a demo using these directives which are available downward.
Watch the live demo or download code from the link given below.
Let’s understand the functionality and uses of these directives one by one: –
ng-app:
ng-app directive tells angular to load the angular library in the application. It plays the key role in the application so should be used as an attribute to the root element of the application such as, HTML tag or body tag.
For example: –
<html ng-app="myProduct">Here myProduct is name of the application that we used in this blog. This name is defined in the module which is written inside the myController.js file of the js folder.
Modules helps to break the angularjs code into parts so that codes can be read, managed and used properly inside the application. Modules can be written in the following way:-
var myProduct = angular.module('myProduct', []);For more information about Modules, keep reading our blogs. We will include it in our next article.
But, if you don’t have any module, you can leave the application name empty.
<html ng-app="">ng-model:
ng-model directive is basically used to bind the users input. Hence, it is used with input, select, textarea and other tags which help users to provide input.
For example: –
<input type="text" ng-model="data"/>
<p>Entered Data: {{data}}</p>
Here, ng-model bind user’s input with data variable and will show the user’s entered data in the paragraph tag where {{data}} is written.
Note: – In angular, {{ expression }} is called as expression and is used to display the values.
ng-controller:
ng-Controller directive helps to use the controller in the HTML tags.
For example: –
<div class="product-wrapper row" ng-controller="productController">
...
...
</div>
Here, productController is the name of controller we have used in this blog. This name is defined in the module which is written inside the myController.js file of the js folder.
Controllers are used to add behaviour to the html tags using functions and values.
// AngularJS module for the application
var myProduct = angular.module('myProduct', []);
// Controller for the application
myProduct.controller('productController', ['$scope', function($scope) {

...
...
});
Note: – You can read about controllers in our upcoming blog.
ng-repeat:
ng-repeat directive is used to extract data from the javascript object array or JSON array.
Here, we have a json data name products which contains array containing different product values.
// AngularJS module for the application
var myProduct = angular.module('myProduct', []);
// Controller for the application
myProduct.controller('productController', ['$scope', function($scope) {

$scope.products = [
{ "prod_name": "Foogo-PRO Theme","prod_img": "Foogo-PRO_Theme","prod_price": "$59" ,"detail_status": false,"detail_hide_status": false },
...
...
{ "prod_name": "Colorway Theme", "prod_img": "Colorway_theme","prod_price": "$75", "detail_status": false,"detail_hide_status": false}
]
}]);
To access each product names from products array, you can use ng-repeat as:-
<div ng-repeat="product in products">
<p class="prod_title">{{product.prod_name}}</p>
</div>
ng-src:
ng-src directive used to add src in the image tags. These src should be generated or used in the angularjs application.
For example: –
<div class="single-product" ng-repeat="product in products">
<img class="prod_img" ng-src="img/{{product.prod_img}}.png"/>
</div>
Here, product.prod_img variable contains the name of the each product image which is available in img folder of the application. prod_img is defined in the json array just above under ng-repeat directive section.
Traditional src attribute cannot be used in angularjs application because angularjs loads after the DOM(Document Object Model). So, will generate a javascript error while loading the page.
ng-click:
ng-click directive triggers an event when a click action is performed on the HTML tags in which ng-click is used as an attribute.
For example: –
<div class="single-product" ng-repeat="product in products">
...
<button ng-click="showFeature($index)">Show Features</button>
...
</div>
Here, ng-click is used in button tag as an attribute. So, whenever this button will be clicked, showFeature() function will be called passing an argument $index.
Note: – $index is the index number of the product available in the products array.
showFeature() function is defined in the controller which is written inside the myController.js file of the js folder.
// AngularJS module for the application
var myProduct = angular.module('myProduct', []);
// Controller for the application
myProduct.controller('productController', ['$scope', function($scope) {

...
...
$scope.showFeature = function(index) {
for (var i = 0; i < $scope.products.length; i++) {
$scope.products[i].detail_status = false;
$scope.products[i].detail_hide_status = false;
$scope.products[index].detail_status = true;
$scope.products[index].detail_hide_status = true;
}
}
}]);
showFeature() basically updates the values of detail_status and detail_hide_status variable of each product. Their status are used inside ng-show and ng-hide directives to show/hide the details of the products.
ng-show:
ng-show directive controls the displaying behaviour of an HTML element. It shows or hide the element based on the values of the expression used in the ng-show directive.
For example: –
<div class="single-product" ng-repeat="product in products">
...
<button ng-show="product.detail_status">Hide Features</button>
...
</div>
Here, the button Hide Features will be displayed when the detail_status variable of the product will be true. detail_status variable is defined in the json array just above under ng-repeat directive section.
ng-hide:
Like ng-show directive, ng-hide directive also controls the displaying behaviour of an HTML element but, works in reverse i.e, when the expression contains true value, it will hide that HTML element and will show the element when the value is false.
For example: –
<div class="single-product" ng-repeat="product in products">
...
<div ng-hide="product.detail_hide_status">Price {{product.prod_price}}</div>
...
</div>
Here, the price of the product will be hidden when the detail_hide_status variable of the product will be true. detail_hide_status variable is defined in the json array just above under ng-repeat directive section.
Now, let’s have a look at the application coding part.
First, be careful about the directive structures of the application. Every file should be in their proper place so that we can build the application easily in proper and managed way.
Please follow the image given below and make your application directory accordingly. Now, follow the steps given below.
Step 1: – In index.php file, write the following code: –
index.php
It is the core file for this single page application. It contains all the used Angular directives along with related HTML tags.
<html ng-app="myProduct">
<head>
<title>AngularJS Directive Demo</title>
<meta name="viewport" content="width=device-width, initial-scale=1">
<!-- Include Bootstrap CSS -->
<link rel="stylesheet" type="text/css" href="css/bootstrap.min.css">
<link rel="stylesheet" type="text/css" href="css/style.css">
<!-- Include AngularJS library -->
<script src="lib/angular/angular.min.js"></script>
<!-- Include jQuery library -->
<script src="js/jQuery/jquery.min.js"></script>
<!-- Include Bootstrap Javascript -->
<script src="js/bootstrap.min.js"></script>
</head>
<body>
<div class="container">
<div class="product-wrapper row" ng-controller="productController">
<a href="https://www.inkthemes.com/market/"><h1 class="wrapper-heading"><span><img src="img/inkthemes_logo.png" class="inkthemes_logo"></span>InkThemes Themes</h1></a>
<!-- Retieving each product data from the products array -->
<div class="single-product col-md-3 col-sm-6 col-xs-8 col-xs-offset-2 col-sm-offset-0" ng-repeat="product in products">
<div class="product col-md-12">
<p class="prod_title">{{product.prod_name}}</p>
<!-- Retrieving and using each product src in image tag -->
<img class="prod_img" ng-src="img/{{product.prod_img}}.png"/>
<div class="button-group form-group">
<!-- Show Features button -->
<button class="btn btn-info details" ng-click="showFeature($index)" ng-hide="product.detail_hide_status">Show Features</button>
<!-- Retrieving price of each product -->
<div class="btn btn-success details" ng-hide="product.detail_hide_status">Price {{product.prod_price}}</div>
</div>
<ul class="prod_details col-md-12" ng-show="product.detail_status">
<!-- Retrieving features of each product -->
<li class="feature" ng-repeat="feature in product.prod_feature"><span class="glyphicon glyphicon-ok"></span>
{{feature}}
</li>
</ul>
<div class="button-group form-group">
<!-- Hide Features button -->
<button class="btn btn-danger details" ng-click="hideFeature($index)" ng-show="product.detail_status">Hide Features</button>
<!-- Buy Theme button -->
<a href="{{product.download_link}}" class="btn btn-warning details" ng-show="product.detail_status">Buy Theme</a>
<div class="clearfix"></div>
</div>
</div>
</div>
</div>
</div>
<!-- Include controller -->
<script src="js/myController.js"></script>
</body>
</html>
Step 2: – In myController.js file, write the following code: –
myController.js
It contains the main controller of the application and also have different modules in it. All the functions and variables accessed by directives have written in this file.
// AngularJS module for the application
var myProduct = angular.module('myProduct', []);
// Controller for the application
myProduct.controller('productController', ['$scope', function($scope) {
// Product array containing values in JSON format
$scope.products = [
{
"prod_name": "Foogo-PRO Theme",
"prod_img": "Foogo-PRO_Theme",
"prod_price": "$59",
"prod_feature": ["Awesome Slider",
"Completely Responsive",
"Full Documentation",
"Styling Option",
"Custom Templates",
"Custom Widgets",
"Social Icons",
"Compatibility"
],
"download_link": "https://www.inkthemes.com/market/foogo-pro-wordpress-business-theme/",
"detail_status": false,
"detail_hide_status": false
},
{
"prod_name": "Video Member Theme",
"prod_img": "Video_Member_Theme",
"prod_price": "$119",
"prod_feature": ["Awesome Slider",
"Completely Responsive",
"Full Documentation",
"Styling Option",
"Custom Templates",
"Custom Widgets",
"Social Icons",
"Compatibility"
],
"download_link": "https://www.inkthemes.com/market/video-membership-wordpress-theme/",
"detail_status": false,
"detail_hide_status": false
},
{
"prod_name": "Real Photography Theme",
"prod_img": "Real_Photography_Theme",
"prod_price": "$59",
"prod_feature": ["Awesome Slider",
"Completely Responsive",
"Full Documentation",
"Styling Option",
"Custom Templates",
"Custom Widgets",
"Social Icons",
"Compatibility"
],
"download_link": "https://www.inkthemes.com/market/real-photography-wordpress-theme/",
"detail_status": false,
"detail_hide_status": false
},
{
"prod_name": "Colorway Theme",
"prod_img": "Colorway_theme",
"prod_price": "$75",
"prod_feature": ["Awesome Slider",
"Completely Responsive",
"Full Documentation",
"Styling Option",
"Custom Templates",
"Custom Widgets",
"Social Icons",
"Compatibility"
],
"download_link": "https://www.inkthemes.com/market/colorway-wp-theme/",
"detail_status": false,
"detail_hide_status": false
},
{
"prod_name": "Geocraft Theme",
"prod_img": "geocraft_theme",
"prod_price": "$97",
"prod_feature": ["Awesome Slider",
"Completely Responsive",
"Full Documentation",
"Styling Option",
"Custom Templates",
"Custom Widgets",
"Social Icons",
"Compatibility"
],
"download_link": "https://www.inkthemes.com/market/geocraft-directory-listing-wordpress-theme/",
"detail_status": false,
"detail_hide_status": false
},
{
"prod_name": "BlackRiders Theme",
"prod_img": "Black_Riders_theme",
"prod_price": "$59",
"prod_feature": ["Awesome Slider",
"Completely Responsive",
"Full Documentation",
"Styling Option",
"Custom Templates",
"Custom Widgets",
"Social Icons",
"Compatibility"
],
"download_link": "https://www.inkthemes.com/market/lead-generation-wordpress-theme/",
"detail_status": false,
"detail_hide_status": false
},
{
"prod_name": "Videcraft Theme",
"prod_img": "Videcraft_theme",
"prod_price": "$97",
"prod_feature": ["Awesome Slider",
"Completely Responsive",
"Full Documentation",
"Styling Option",
"Custom Templates",
"Custom Widgets",
"Social Icons",
"Compatibility"
],
"download_link": "https://www.inkthemes.com/market/videocraft-wordpress-theme/",
"detail_status": false,
"detail_hide_status": false
},
{
"prod_name": "Variant Landing Page Theme",
"prod_img": "Variant_Landing_Page_Theme",
"prod_price": "$77",
"prod_feature": ["5 Layouts, 1 Dashboard",
"Create Desired Form",
"Powerful admin Panel",
"Instant Setup",
"Amazing features",
"Conversion Optimized"
],
"download_link": "https://www.inkthemes.com/market/landing-page-wordpress-theme/",
"detail_status": false,
"detail_hide_status": false
}
]

$scope.showFeature = function(index) {
for (var i = 0; i < $scope.products.length; i++) {
$scope.products[i].detail_status = false;
$scope.products[i].detail_hide_status = false;
$scope.products[index].detail_status = true;
$scope.products[index].detail_hide_status = true;
}
}

$scope.hideFeature = function(index) {
$scope.products[index].detail_status = false;
$scope.products[index].detail_hide_status = false;
}
}]);
Step 3: – In style.css file, write the following code: –
style.css
Includes basic styling of HTML elements.
@import url(http://fonts.googleapis.com/css?family=Raleway);

ul{
list-style: none;
}
li{
display: block;
font-family: 'Raleway', sans-serif;
}
.product-wrapper {
padding-left: 45px;
padding-top: 10px;
padding-bottom: 10px;
min-height:900px;
font-family: 'Raleway', sans-serif;
}
.wrapper-heading{
text-align: center;
font-family: 'Raleway', sans-serif;
}
img.inkthemes_logo{
width: 50px;
margin-top: -5px;
margin-right: 5px;
}
.single-product{
vertical-align: top;
float: none;
display: inline-block;
}
.prod_img{
width: 100%;
margin-bottom: 10px;
}
.product {
background: #F1F1F1;
padding: 10px 10px 0 10px;
margin-left: -20px;
margin-bottom: 10px;
border-radius: 5px;
}
p.prod_title {
font-size: 16px;
font-weight: bold;
font-family: 'Raleway', sans-serif;
color: #615F5F;
}
ul.prod_details {
background: #F3D8D8;
padding: 10px 10%;
font-family: 'Raleway', sans-serif;
}
li.feature{
width: 100%;
margin-bottom: 5px;
}
.button-group{
text-align: center;
margin-bottom: 0;
}
.glyphicon-ok{
color:green;
}
.btn{
font-family: 'Raleway', sans-serif;
margin-bottom: 10px;
}
@media only screen and (max-width:480px){
.product-wrapper {
padding-left: 0;
}
.product {
min-width: 200px;
}
}
@media only screen and (max-width:991px) and (min-width: 481px){
.product-wrapper {
padding-left: 20px;
}
}
Now, run the code and enjoy the application.
Conclusion: –
Hope this blog will give you a clear idea about the AngularJS Directives. Keep reading our blogs for more interesting topics on AngularJS. Let us know about your feedback from the space given below.
Google Analytics Email Marketing Tracking : Bulk Emails

Whether you are working in a small business or large, analytics is the most important task for every organization.
The same thing happens with email marketing campaigns.
For example –
When you do email marketing for your business, then you would like to know what results are generating on your websites.
And, several questions will come up in your mind like –
- How many visitors are arriving?
- For how long visitors are staying on your page?
- From what location they are reaching to your website?
- How many pages customers are viewing and much more.
Along With Analytical Tracking Enabled On Your Site, Won’t You Go Carefree If You Get Inbuilt SMTP In A Single Email Marketing Service Bundle?
Sign Up For Free
Thinking how to track all such data for your website?
You can optimize your marketing efforts by integrating with Google Analytics and understand your campaign results in real time.
Well,
MailGet provides you an option of Google Analytics Integration,
So that you can measure all the performance of your website and know what changes you should make – to take your campaigns to the peak.

What Is Google Analytics Campaign Tracking?
Google Analytics lets you analyze the quantitative data of your email program and to monitor the entire journey of your customers.
You can measure not only the performance of your site, but also take fresh insights into how customers use your website, from where they arrived, and how you can keep them engaging.
Why Should You Integrate Google Analytics With MailGet?
You need Google Analytics tracking feature to have access to all this data like –
- Get a detailed map/graph of your website traffic.
- Keep an eye on user behavior and traffic sources.
- Identify potential customers so that you can respond with information that pushes them closer towards buying a service or product.
- To track website statistics like – some visits, entrance and exit pages.
To obtain the information about the user’s actions – Google Analytics is the best option for it!
How To Integrate Google Analytics With MailGet
Analyzing the organic traffic is a key part of any email service provider and with Google Analytics, it is very easy to do.
Check out here, how Google Analytics Integrates with MailGet to track everything,
And know – what exactly your customers want from you.
Things You Could Do Using Google Analytics Email Tracking
You could know following google analytics reporting for any email campaign –
1. Sessions
- A session is the period of engagement of user on your website.
- One session is said to accomplish out when any visitor spent 30 seconds on the page.
The more sessions you have -> the more traffic you generate -> the more chances of sales..

2. Bounce Rate
- The number of visitors comes to your page and leave without interacting with another page of your website is bounce rate.
- Bounce rate of your website should always be low.

3. Page/Session
- The average number of pages that are viewed by any visitor during a session.
- The primary intention is to keep this metric as large as possible.

4. Average Session Duration
- The average time that any visitor spent on your page.
- This metric defines user engagement with your content, and it should always be high.

5. E-commerce Conversion Rate
- Percentage of visitors who converts and make a purchase through your site.

6. Transactions
- The total number of sales transaction performed on your website.

7. Goal Completions
- Set goals from subscription forms to sales landing pages and track its completion.
- You can set as many goals as you want.

8. Goal Conversion Rate
- Track total number of goals converted.

9. Browser
- Follow the type of Browser users are using Firefox, Safari, Google Chrome, Internet Explorer, etc.
- Know whether your website is responsive on various devices if not, track the number of bounce rate and improve your site design in that device.

10. Date & Hour
- View email campaign report by Date and Hour.

11. Operating System
- Get stats of different Operating System like Windows, Macintosh, Android, etc.

12. City, Country, and Continent
- Track your user’s City, Country, and Continent and know the region where traffic is more.


13. Device
- Track the Type Of Device user is using like whether he is using a desktop, a mobile or a tablet.

Benefits Of Email Tracking With Google Analytics
1. Analyze Results And Send Better Emails
Deliver impressive content to the right audience by analyzing the results of your campaign through which you can work more efficiently.
2. Optimize Your Email Marketing
Track visitors behavior on your website and optimize your email marketing accordingly.
3. Customizable Reports
Customize dashboard -> make reports according to your need as you wish to see -> check all stats anytime with updated reports.
4.Track Your Messages And Compare Them In Real Time
Understand the vital stats simply and compare reports with the previous duration(say – weekly, monthly, etc.)
-> Evaluate your marketing strategies to get the best outcomes for your business and optimize your campaigns in real-time by integrating MailGet with Google Analytics.
Email Scheduling: Schedule Emails To Send Later

Scheduling feature in MailGet allows you to set time and day to send emails automatically at the right time.
Create and schedule your emails to send later and reach out to your customers at the right time by using MailGet powerful scheduling feature.
How To Schedule Emails With MailGet?
Follow these simple steps to schedule your email –
Step 1: Click on the Create Email button in your MailGet Dashboard to start building your email.
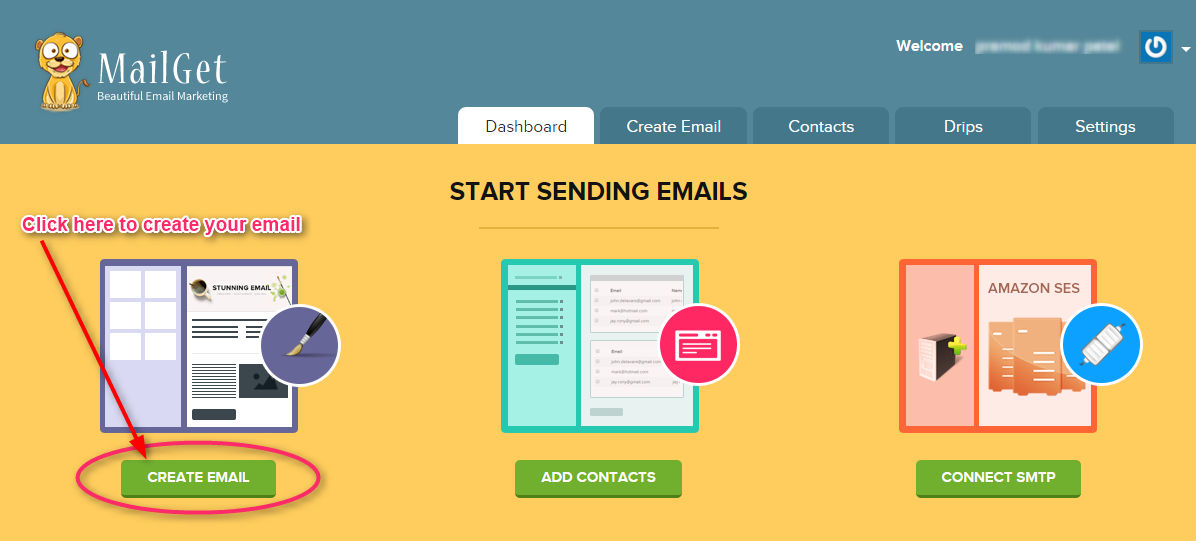
Step 2: Select the Regular Campaign and then select any email editor of your choice to create an email. Here I am using MailGet’s popular Email Template Builder.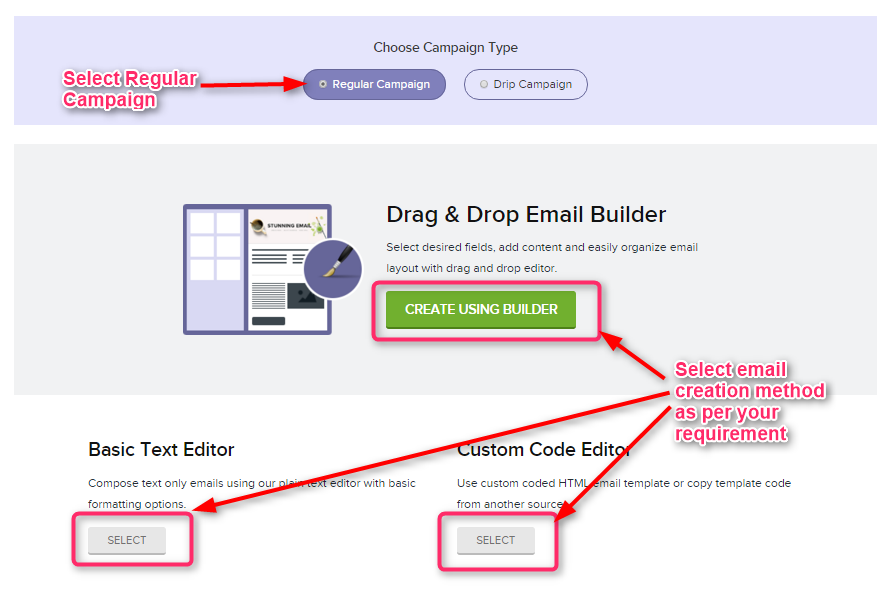
Step 3: Now write the subject for your email campaign and then click on the Save Subject button to save it.
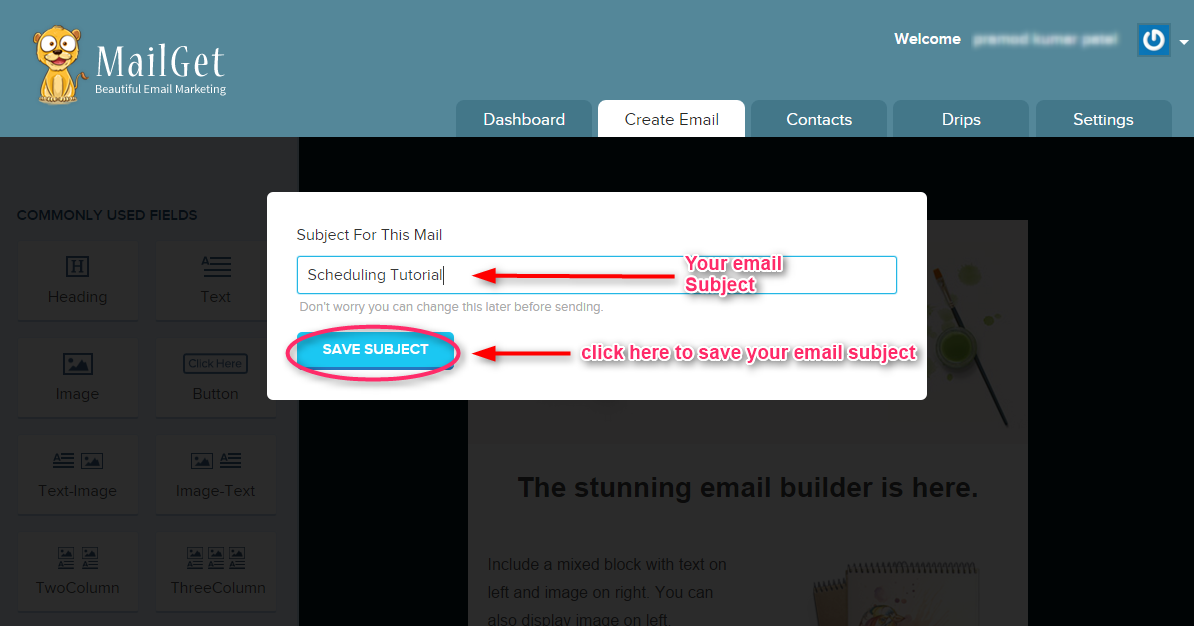
Step 4: Create attractive and beautiful email by using drag and drop email builder and then click on Save & Continue button.

Step 5: Set the required values for your campaign. After setting up all values click on the Send Later button.
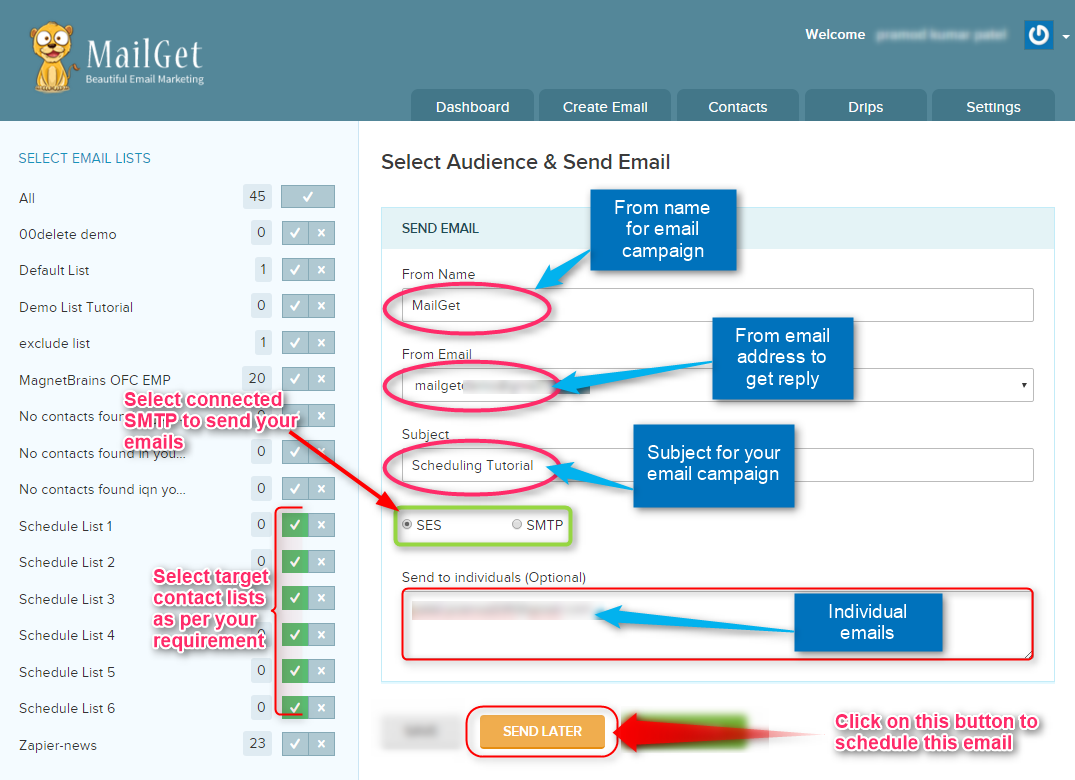
Step 6: When you click on Send Later button, you will see the preview of your email. If you feel that the preview is correct, then proceed and click Yes, Continue button.
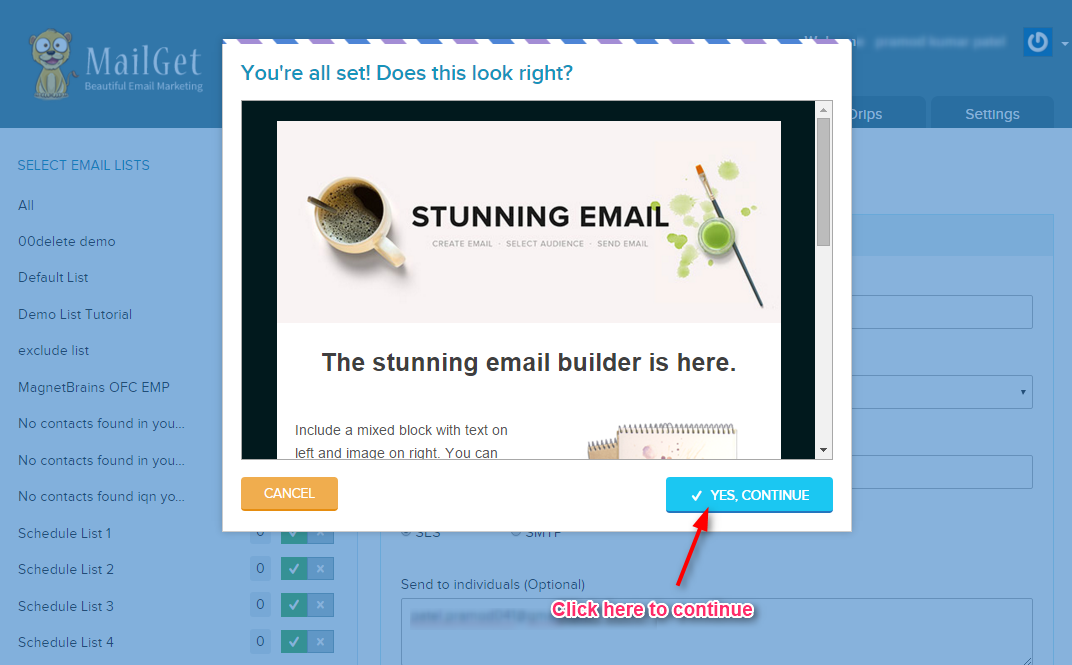
Step 7: Now you have to set date and time for your campaign.
- If you have set your time zone in the setting, then you will see the current date and time displayed in the text field.
Pick your date and time for the campaign to send it when you want to and click on SCHEDULE button to send the campaign later.
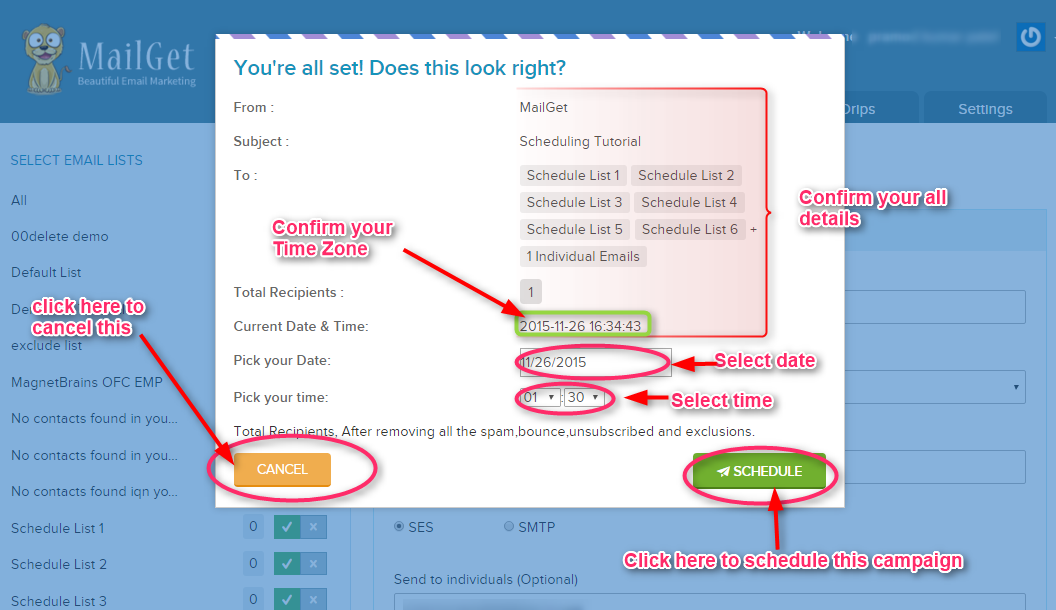
Step 8: After clicking on SCHEDULE button you will see a confirmation message on your screen. Click on TAKE ME TO SCHEDULING DETAIL button to close this message and to see the scheduled campaign details.
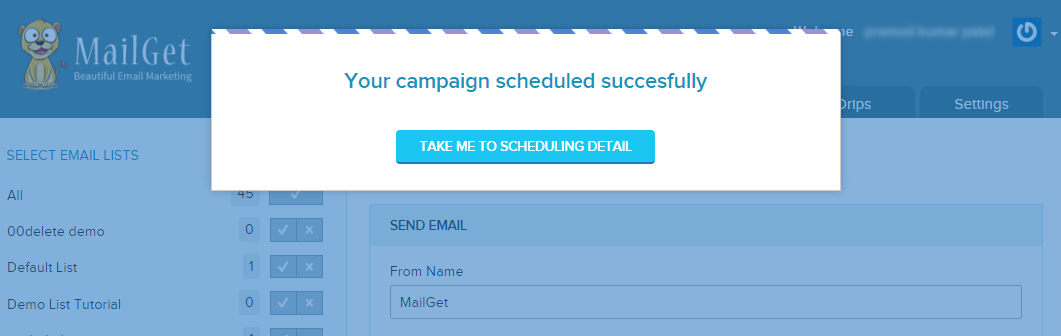
Now your campaign has been successfully scheduled.! You can also EDIT, DELETE and TRACK your each scheduled campaigns in the Settings tab under Campaign Scheduling Section.
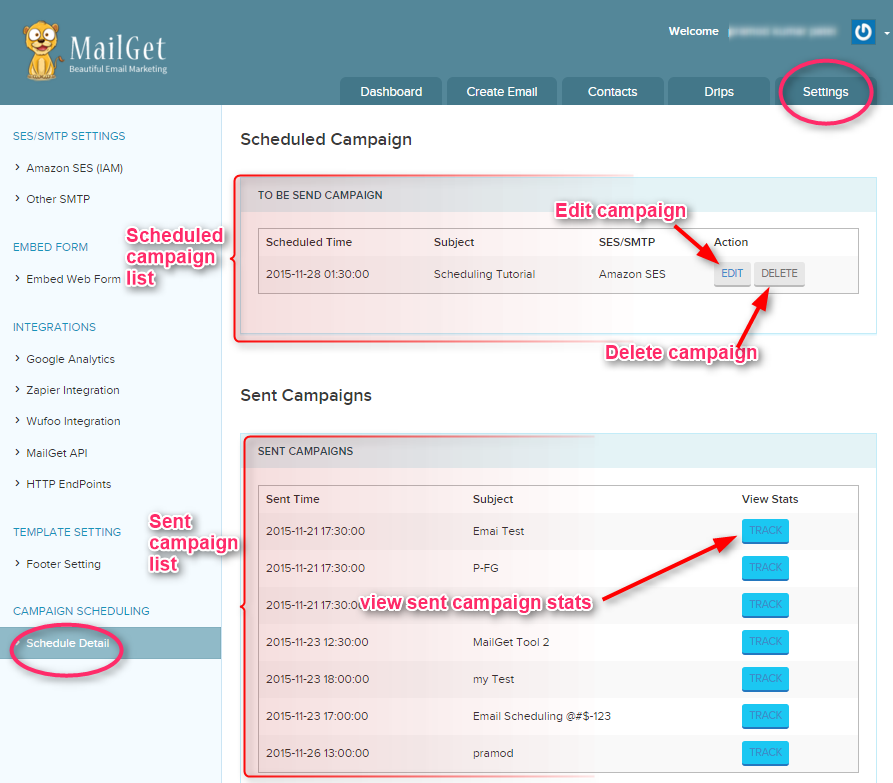
You can also see the Information for scheduled campaign on your MailGet dashboard.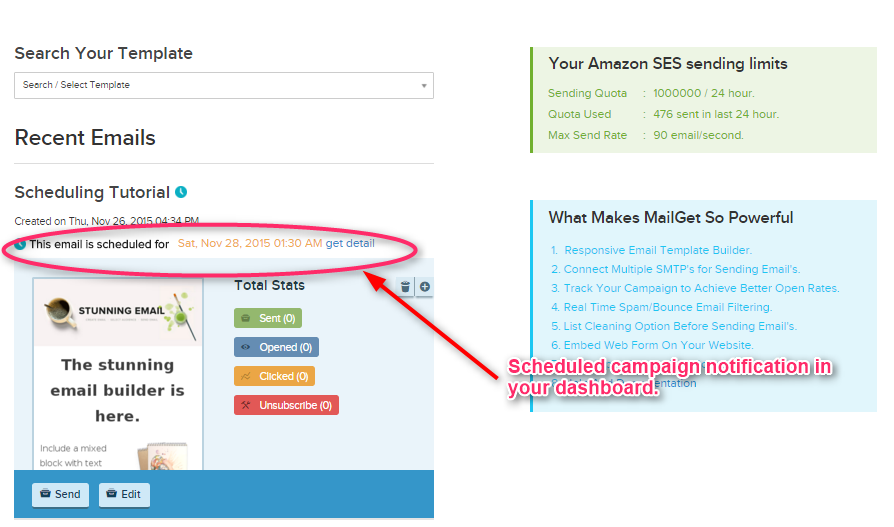
Now you know,
How easily you can schedule our email campaigns for a particular day and time.
There is no limitation on campaigns for scheduling them at same day or time.
11 Best Email Deliverability Software & Services 2022

| Comparison Between Best Email Deliverability Software & Services | |||||
| Services | Free Trial | Email Scheduling | Auto Responders | Drip Emails | Ratings |
| Pabbly Email Marketing | ✔ | ✔ | ✔ | ✔ | 5/5 |
| MailGet | ✔ | ✔ | ✔ | ✔ | 4.9/5 |
| Moosend | ✔ | ✔ | ✔ | ✖ | 3.3/5 |
| SendinBlue | ✔ | ✔ | ✔ | ✖ | 4.5/5 |
| StreamSend | ✔ | ✖ | ✖ | ✖ | 4.3/5 |
What’s the goal of every email marketing campaign?
To reach customers inbox in order to promote and advertise their business, products or services.
But what if your emails are not capable of reaching customers inbox?
If that’s your story, then you should immediately switch your mail marketing service.
There are a lot of factors that decide whether your mail will go to the mailbox or will get caught in junk folder or spam mail.
The only solution to overcome this issue is to use an email marketing service that has implanted arrangements to ensure that emails undoubtedly land in recipients inboxes.
Therefore, after performing intensive research, we have finalized 11 best email deliverability software & services that highlight to present maximum email deliverability.
All the services compiled in our list ensures a deliverability rate of 95.00-99.99%. In fact, the feature set also includes
1. Pabbly Email Marketing – Free 9k Emails With Delivery Assurance
Deliverability is the most important aspect of any mailing service and here Pabbly Email Marketing is designed keeping in mind all the important fact of email deliverability.
With Pabbly Email Marketing you receive enormous stunning characteristics that make your email marketing & promotion simpler and easier.
You can create emails using drag and drop builder that are responsive, use attractive business templates. Then, you can do bulk emailing to target millions of customers, track all sent emails, and much more.
It has out of the box inbuilt SMPT and you would not even require hosting for sending your emails in bulk.
After trying several emailing services we came to the conclusion that Pabbly Email Marketing is the best, as the deliverability rate it offers is 99%, which means the mails will directly fall in the inbox and will definitely not go into spam.
We also got an open rate of 42% in the beginning form this service which was quite surprising to me. One thing more, it is cheap as the base plan cost around $29 monthly and you can even run a test through its 7-days free trial.
Start Sending Free Emails With Pabbly Email Marketing!
Email Deliverability –
With Pabbly Email Marketing, you get the maximum e-mail deliverability as it focuses on all major aspects like DKIM, MTA, spams, etc that are required in handling campaign deliverability issues.
Pricing –
The pricing plan of Pabbly Email Marketing starts from $29 for 5000 subscribers list and ranges upto $99 for 50,000 subscribers. However, it has more higher plans with higher number of subscribers.
Features –
- Drag & Drop Mail Builder.
- Free E-mail Templates.
- Advanced Mail Tracking Facility.
- Contact List Management.
- Attach Subscription Forms.
Explore More Email Marketing Details
2. MailGet Email Marketing Platform
MailGet is the first name that comes to my mind regarding email marketing. It is one of the most affordable and advanced email marketing solution currently available in the market.
This service includes some fantastic features through which you can successfully run online marketing campaigns that hikes up your revenue and increases your profits. It also provides you with drip emails, canned replies which eases off your work and maintains automation to the maximum extent.

In my observation, MailGet is the finest email marketing service which allows multiple SMTP connections and uses various SMTP service providers. Unique features like SMTP routing are also available which other services do not offer.
Still, MailGet is the most economical service with which you can send unlimited emails to 7,500 users for a price as low as $5 a month and get deliverability rate which is quite high.
Email Deliverability –
MailGet assures 99% inbox email delivery to its users.
It has an inbuilt system that automatically solves issues related to ISPs, DKIMs, MTAs, handle bounces, spam and bulking.
These are the major factors that decide the deliverability of any email send.
Pricing –
- Send unlimited e-mails to 100 subscribers free of cost.
- Spend $5 to deliver unlimited emails to 5,000 clients.
The pricing plan ranges from $29 for 5000 subscribers to $99 to 50,000 subscribers.
Features –
- Connect Multiple SMTP Services.
- Import Email Contacts In Bulk.
- Auto-Followup Facility.
- Email Autoresponders.
Explore More Email Marketing Details
Check out the following blogs for more related updates –
3. SendinBlue Bulk Mailing Platform
SendinBlue is a targeted, professional and segmented email service provider which is best suitable for medium and large-scale organizations.
It has manipulated various features like using dynamic & exclusive content, personalization, advanced segmentation and mail tracking facility to assist a user in doing powerful email marketing.

Email Deliverability –
SendinBlue has put away various email deliverability tracking functions to ensure that they are best in providing email delivery services. SendinBlue holds DomainKeys, SenderID, SPF, DMARC security protocols, and DKIM authentication programs to make sure that the emails end up in the recipient’s inbox.
Moreover, you can have shared as well as dedicated IP’s along with IP pool management feature to send and manage mail delivery in large volume.
Pricing –
- SendinBlue allows sending 9,000 emails free with no contact limit.
- Micro plan is priced around $8 and offers 40,000 emails every month.
Features –
- Drag and drop email builder.
- Detailed analytics with open and click through reports.
- Social sharing enabled.
Explore More Email Marketing Details
4. MooSend Mailing Software
MooSend is a big email marketing solution that consists of excellent features for creating and sending beautiful as well as responsive emails. This solution gives you access to advanced mail editor, email automation, personalization features, and many others tools, through which e-mail marketing program can be operated effectively.

Email Deliverability –
Talking about MooSend’s email deliverability service, it continuously keeps viewing on the sender’s reputation, performs multiple testing for spam and email delivery. MooSend strictly checks the status of email campaigns concerning email deliverability rate.
Pricing –
- With free trial send unlimited emails to 5,000 users.
- Base plan also delivers unlimited emails to 5,000 users but you have to pay $10 monthly.
Features –
- Advanced list segmentation.
- Numerous 3rd party integrations.
Explore More Email Marketing Details
5. Drip Email Marketing Solution
Drip email marketing solution is a highly advanced mailing solution which helps you sell more online. Mails delivered using this service are more likely to land in customer’s inbox.
It has a pre-designed automation rule builder that holds 18 triggers and 16 actions which are used to apply different rules on campaigns and other application to improve deliverability. You can easily move subscribers from one campaign to another, apply tags, store conversations and more.

Email Deliverability –
This service supports various third-party integrations which can help to verify mail addresses and user contacts. This will definitely improve the deliverability, decrease bounce rate, reputation protection, and save time & money.
Besides this, domain monitoring, abuse management, bounce processing, etc. are also processed out simultaneously.
Pricing –
- Starter plan comes free of cost and allows sending unlimited emails to 100 subscribers.
- Basic plan is charged $49 a month for sending unlimited emails to 2,500 subscribers.
Features –
- Advance list segmentation.
- Real-time analytics.
- Email scheduling.
Explore More Email Marketing Details
6. MailerLite Email Marketing Software
With MailerLite email marketing software, you can create amazing emails and conduct campaigns that generate higher conversions. Tools like drag & drop builder, custom HTML editor, free newsletter templates and inbuilt photo editor will be a great help.
In addition, there are multiple other services which can help you automate your e-mail marketing.

Email Deliverability –
Email authentication methods is used by MailerLite to fight spamming and improve deliverability. This mailing service automatically sign your emails with popular authentication techniques, includes DomainKeys, DKIM, SenderID and SPF records.
All the above measures improve your e-mail deliverability, avoid spam filters and proves that your emails are from an authentic source.
Pricing –
- Send limitless mail to 1,000 users every month that too free of cost.
- Want to deliver more pay $10 a month and send unlimited emails to 2,500 users.
Features –
- Create landing pages.
- Create amazing pop-ups.
- Start RSS campaigns.
Explore More Email Marketing Details
7. VerticalResponse Emailing Service
VerticalResponse is a proven emailing service which allows you to build, send, track and conduct mail campaigns that look great on different device.
User-friendly tools like inbox preview, link checker, autoresponder help to enhance the open rates, boost your campaign performance and provides better results.
Additional amenities like multiple integrations, simplified contact management, e-mail scheduling and HTML editor are some of the add-ons that can help your business grow.

Email Deliverability –
VerticalResponse emailing service guarantees high delivery as the email addresses are initially validated and invalid contact are removed from the campaign list.
This reduces bounce rates and gives great deliverability in returns as the mails are land in the inbox of users.
Pricing –
- Send 4,000 mails monthly to 300 contacts free of charge.
- At a monthly cost of $22 start sending unlimited emails to 1,000 users.
Features –
- Create custom landing pages.
- Monitor email campaign via real time analytics.
Explore More Email Marketing Details
8. Pinpointe Email Marketing Software
Pinpointe has many advanced features & facilities that allow businesses and agencies to create manage and analyze high volume email campaigns. Quickly and easily create mobile-friendly emails with the modular drag n drop builder and hundreds of ready to use mobile-friendly templates. You get free access to over 1,000 email templates that are mobile-friendly and ready-to-use.
Features like advanced real-time reporting and sub-accounts let agencies organize their customers in separate accounts and maximize online marketing efficiency.

Email Deliverability –
While using Pinpointe mailing platform for promotion you will definitely encounter 96% to 99% inbox delivery rates. This is because it supports advanced bounce management and also filters unsubscribed users from the list which gradually raises the open rates.
It protects the overall deliverability as Pinpointe is a tier 1 ISP and manages it’s own IP addresses.
Pricing –
• Get 15-days free access to all features and 1,000 emails with Pinpointe.
• Just pay $49 a month and deliver 80,000 emails to 5,000 contacts.
• Plans designed for high-frequency senders and up to 5 million contacts
Features –
• Quickly build great looking responsive mobile emails with Pinpointe’s widgetized campaign builder
• Advanced email list segmentation with behavioral targeting
• Detailed reporting, analytics and real-time response heat maps so you can optimize sending times and results
Explore More Email Marketing Details
9. ActiveTrail Online Marketing Service
ActiveTrail permits you to automate all your email marketing processes. It has got some smarter way of doing email marketing by building customized & personalized emails, marketing automation tools, advanced segmentation system, campaign analytics program, etc.

Email Deliverability –
ActiveTrail online marketing service is a premium solution that offers nearly 100% deliverability rate and attracts more customers online. It is equipped with facilities like multiple IP addresses for delivery, automated spam address removal and more. This gradually increases open rates and deliverability of your campaigns.
Pricing –
- Enjoy 30-days free trial and send 2,000 emails to 500 users.
- At price of $9 a month, you can deliver unlimited emails to 500 contacts.
Features –
- Pre-built email templates.
- Custom landing page creator.
- Create online surverys.
Explore More Email Marketing Details
10. Infusionsoft Email Marketing Solution
Infusionsoft is a marketing service that permits you to engage more customers easily. With this marketing platform, you can run sophisticated and data-driven marketing campaigns and get high e-mail deliverability results.
You can manage all your contacts in one place and supports multiple third-party app integrations so that you deliver more organized, targeted and personalized mails.

Email Deliverability –
If you want to maximize the e-mail deliverability while using Infusionsoft you should configure SPF records on your domain this process increases your deliverability as the chance of getting spam flagged ends once you perform these steps.
Pricing –
- Build connections with your customers and start it for free with 14-days free trial.
- $50 is the cost of first plan which offers access to 500 contacts for email delivery.
Features –
- Secure RSS feeds.
- Login redirection.
Explore More Email Marketing Details
11. StreamSend Email Marketing Automation
StreamSend an online system for email marketing automation which helps you attract more customers and retarget most engaging clients. It also offers mobile-optimized mail templates that suit different campaigns.
You also get the ability to track marketing campaigns, social media engagement, video views and user locations as well.
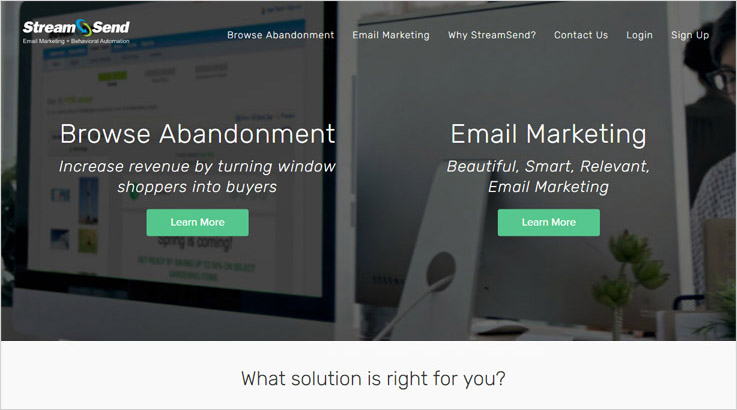
Email Deliverability –
To make sure that the mail reaches its destination, StreamSend has fixed up many issues from time to time for improving deliverability. They have listed many strategic and documented various sending recommendations, e-mail sender reputation, fostering ISP relationships, give whitelisting process recommendations, etc in order to increase the ever important ROI of your business.
Pricing –
- StreamSend offers a very limited free trial of 30-Days and allows only 200 mails delivery.
- At price point of around $20 send emails to 1000 contacts.
Features –
- Add videos in email.
- Create online surveys.
- RSS campaigns
Explore More Email Marketing Details
Final Conclusion
We have elaborated features, deliverability solution, and pricing of some email marketing services that are currently the best in the market.
I am sure that after going through Best Email Delivery Services blog you will find an awesome email marketing services that is best for the growth of your business and provides best email deliverability rates.
If you need to know more about email marketing services & software below you can find some relevant blogs:-
- Paid Email Service Providers
- Bulk Email Marketing Services
- Email Marketing India
- Email Monitoring Services
- GetResponse Competitors
And don’t forget to mention your comments on this blog.
PhoneGap Configuration File : Config.xml
Config.xml is a platform specific configuration file.
With the help of this configuration file, it is possible to modify the default values of PhoneGap application elements like –
- Widget
- Name
- Description
- Plugins
- API
- Icons
- Splash Screens etc.
Important Points About Config.xml
- Make sure it is at the top level of your application.
- You can take a look at the file structure of PhoneGap here.
- Its major purpose is to let developers specify the metadata about the application.
Now let’s take a look at the steps through which you can create a configuration file:
Step 1: Including XML Element
The very first step while creating a configuration file is to include XML element with the attributes version and encoding type.
<?xml version = "1.0" encoding = "UTF-8"?>Step 2: Including Widget, Name & Description Element
Following elements are the basic elements of the configuration file. Their inclusion is mandatory.
Necessary Elements
- <widget>: (required) It is the root of the configuration file. It indicates that whether configuration file is following W3C Standards or not.
<widget xmlns = "http://www.w3.org/ns/widgets"
xmlns:gap = "http://phonegap.com/ns/1.0"
id = "com.formget.sample"
versionCode = "1"
version = "1.0.0">
(a) id: It acts like the unique identifier for an application. It is written as reverse domain format. An application supports different platforms because of it.
id = "com.formget.sample"(b) version: Full version number of the application with the three number format : “Major.Minor.Patch”.
version = "1.0.0"(c) versionCode: (optional) Internal version number only set for android.
versionCode = "1"(d) cfBundleVersion: (optional) Internal version number only set for ios.
- <name>: (required) It is the name of the application which is going to be visible on home screen and app store.
<name>FormGet</name> - <description>: (optional) It is the description of the application that what this app is all about and what it does.
<description>An online form building application to create & design any type of HTML web form</description>
Step 3: Including Author Element
(optional) It defines the author of the application with the attributes email and href.
<author email="[email protected]" href="http://formget.com">FormGet Team</author>Step 4: Including Content Element
(optional) It sets the starting page of the application.
<content src="index.html"/>Step 5: Including Platform Element
By default PhoneGap Build builds an application for all platforms. If you want to build an app for a specific platform, you can do it with gap:platform element or platform element.
With ‘gap:platform’ Element:
<gap:platform name="android"/>
<gap:platform name="ios"/>
<gap:platform name="winphone"/>
With ‘platform’ Element:
<platform name="android" />
<platform name="ios" />
<platform name="winphone" />
Step 6: Including Feature (API) Element
Feature Element is used to include the features (API) which are going to used by the application.
Suppose you want to include the network feature.
<feature name="http://api.phonegap.com/1.0/network" />Similarly, you can add multiple features.
<feature name="http://api.phonegap.com/1.0/network" />
<feature name="http://api.phonegap.com/1.0/camera" />
<feature name="http://api.phonegap.com/1.0/notification" />
<feature name="http://api.phonegap.com/1.0/geolocation" />
<feature name="http://api.phonegap.com/1.0/media" />
<feature name="http://api.phonegap.com/1.0/contacts" />
<feature name="http://api.phonegap.com/1.0/file" />
<feature name="http://api.phonegap.com/1.0/battery" />
<feature name="http://api.phonegap.com/1.0/device" />
Step 7: Including Plugin Element
Plugin Element is used to include the plugins.
Plugin
<plugin name="com.phonegap.plugins..barcodescanner" spec="~1" source="npm" />- name: Plugin id with the reverse domain format.
name="com.phonegap.plugins..barcodescanner" - spec: (optional) Plugin version.
spec="~1" - source: (optional) It can be pgb or npm.
source="npm" - params: (optional) Parameters for configuration properties.
Suppose you want to include the barcodescanner plugin.
<plugin name="com.phonegap.plugins..barcodescanner" spec="~1" source="npm" />There are several plugins available for different purposes. You can see them here.
Step 8: Including Preference Element
There are 2 types of preferences you can set in the configuration file of PhoneGap.
- Common Preferences
- Platform Specific Preferences
Common Preferences:
Common Preferences
- Fullscreen Preference: It makes the application full screen. It is used to hide the status bar at the top of the screen.
<preference name="Fullscreen" value="true"/> - DisallowOverscroll Preference: If you don’t want the application to show anything when users scroll past the beginning or end of content, set this to true.
<preference name="DisallowOverscroll" value="true"/> - Orientation Preference: Orientation allows you to set and fix the orientation of the app to avoid automatic rotation.
There are three options for orientation: default, landscape and portrait.<preference name="Orientation" value="landscape"/> - HideKeyboardFromAccessoryBar Preference: Sets to true to hide additional toolbar above the keyboard.
<preference name="HideKeyboardFormAccessoryBar" value="false"/> - BackgroundColor Preference: Sets the background color of the application with a 4 byte format.
Byte 1 : Alpha Channel
Byte 2-4 : RGB(Red Green Blue Colors)<preference name="BackgroundColor" value="0xff0000ff"/>
Platform Specific Preferences:
Platform Specific Preferences:
IOS Specific Preferences
- Target-Device Preference: Targeting the specific device. Its options are : handset, tablet, or universal.
<preference name="target-device" value="universal" /> - Prerendered-icon Preference: Sets to ‘true’ to let ios know that icon is already rendered and don’t add anything to it.
<preference name="prerendered-icon" value="true" /> - Detect-data-types: Checks whether data types (For Example: dates and phone numbers) are automatically converted to links by the system.
<preference name="detect-data-types" value="true" /> - Exit-on-suspend: Application will be closed when suspended.
<preference name="exit-on-suspend" value="true" /> - Deployment-target: It sets the
IPHONEOS_DEPLOYMENT_TARGETin the build process, which is converted to theMinimumOSVersionin the ipa Propertly List.<preference name="deployment-target" value="7.0" />
Android Specific Preferences
- KeepRunning: App will continue to run in the background.
<preference name="KeepRunning" value="false"/> - LoadUrlTimeoutValue: It sets the amount of time to wait during a page load. After that, it will throw a timeout error. It is in milliseconds.
<preference name="LoadUrlTimeoutValue" value="5000"/> - SplashScreen: To set the names of the splash screen images. They must share a common name.
<preference name="SplashScreen" value="FormGetSplash"/> - SplashScreenDelay: The amount to time a splash screen appears. It is in milliseconds.
<preference name="SplashScreenDelay" value="5000"/> - InAppBrowserStorageEnabled: It makes sure that web pages opened in an InAppBrowser and web pages opened in the default browser share the same localStorage.
<preference name="InAppBrowserStorageEnabled" value="true"/> - LoadingDialog: It displays a dialog at the first page of the application with a title, message and a loading image.
<preference name="LoadingDialog" value="My Title,My Message"/> - LoadingPageDialog: It displays a dialog at every page of the application.
<preference name="LoadingPageDialog" value="My Title,My Message"/> - ErrorUrl: Intead of dialog, an error page will be displayed with a title,”Application Error”.
<preference name="ErrorUrl" value="myErrorPage.html"/> - ShowTitle: It displays the title at the top of the screen.
<preference name="ShowTitle" value="true"/> - LogLevel: Its sets the log level to minimum. By doing this, log messages of the app are filtered. Options are :
ERROR, DEBUG, INFO, VERBOSE, and WARN.<preference name="LogLevel" value="VERBOSE"/> - SetFullscreen: It is similar to the FullScreen of global config file.
<preference name="SetFullscreen" value="false"/>
Step 9: Including Icon and Spash Element
Icons and Splashes are also platform specific. Use ‘icon’ element to include ‘icons’ and use ‘splash’ element to include ‘splash screens’.
There are 2 ways to include icons and splashes:
- Use icon and splash element directly
<icon src="formget-icon.png" platform="ios" width="180" height="180"/><splash src="formget-icon.png" platform="ios" width="180" height="180"/> - Put icon element inside the platform element
<platform name="ios">
<icon src="formget-icon.png" width="180" height="180" />
<splash src="formget-icon.png" platform="ios" width="180" height="180"/>
</platform>
Icons:
Icon
<icon src="formget-icon.png" platform="ios" width="180" height="180"/>- src: (required) Source/Location of the icon image file specific to the www folder.
src= "formget-icon.png" - platform: (optional) Platform for which the icon belongs to.
platform="ios" - width: (optional) Width of the icon image.
width="180" - height: (optional) Height of the icon image.
height="180"
Similarly, icons of different sizes can be included for different platforms.
Splashes:
Splash
<splash src="formget-icon.png" platform="ios" width="180" height="180"/>- src: (required) Source/Location of the splash image file specific to the www folder.
src= "formget-icon.png" - platform: (optional) Platform for which the icon belongs to.
platform="ios" - width: (optional) Width of the icon image.
width="180" - height: (optional) Height of the icon image.
height="180"
Similarly, splash screens of different sizes can be included for different platforms.
Conclusion:
So you see, how easy it is to configure PhoneGap using the configuration file. It’s no rocket science to include icons, splash screens, plugins and other elements. I hope this will definitely help you.
You may also like –
- Create, Run And Build A PhoneGap App
- Introduction To PhoneGap
Google Analytics Integration With MailGet

Google Analytics is a great platform for carrying out basic analysis on your email campaigns. Things you can analyze with Google Analytics are explained briefly in Google Analytics Tracking feature.
Add Google Analytics tracking to your MailGet campaigns and start tracking your client’s behavior from clicks to purchases by setting up goals and conversion in Google Analytics.
Before Starting,
You must have Google Analytics account enabled for your website.
So,
You need to enable a connection between MailGet and Google Analytics account to track user behavior towards your campaigns. Connect MailGet with your Google account by following these steps –
Step 1: – In your MailGet dashboard, click on the Settings tab.
Step 2: – Under Integrations section click on Google Analytics tab.
Step 3: – Click Enable to start tracking your email template links. UTM tracking string gets added up in all the links of your campaigns once you select enable option.
By Default, it is Disable and removes the tracking string automatically from all the links of your campaigns.
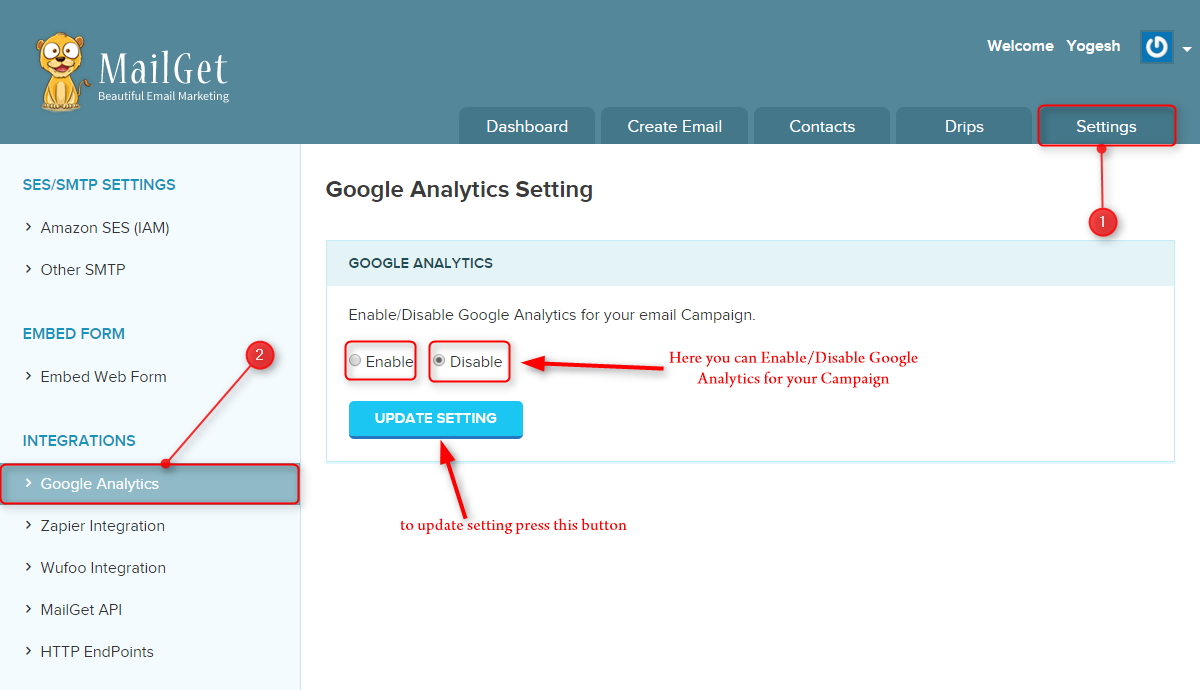
What is UTM Tracking?
A UTM code is a simple code that you can attach to a custom URL in order to track a source, medium, and campaign name. This enables Google Analytics to tell you where searchers came from as well as what campaign directed them to you.
Parameters In UTM Tracking String –
- utm_source – Identify a search engine, newsletter name, or other sources that send you traffic.
- utm_medium – The type of marketing medium that the link is featured in.
- utm_content – Used to track the different types of content that point to the same URL from the same campaign, source, and medium codes.
- utm_campaign – Identify a specific product promotion or strategic campaign.
For Example –
- If you have created a link on text or a link on button as –
<a href=”http://www.yourwebsite.com”>Login</a>
- And if, Google Analytics in enabled then, the URL of this link will be automatically changed to –
http://www.yourwebsite.com?utm_source=Pabbly&utm_medium=email&utm_content=CampaignSubject&utm_campaign=Button/LinkText
- Where,
utm_source = It will be Pabbly always
utm_medium = It will be email always
utm_content = It will be your Email Campaign Name also referred to as Email Subject Name which you give at the time of email creation.
utm_campaign = It will be Button’s Text or Link’s Text
Note – For image, no campaign name is displayed in the tracking link but to view it in Analytics Dashboard you can provide campaign name for the image by following these steps –
- From the MailGet dashboard, Select your campaign and click on Edit button.
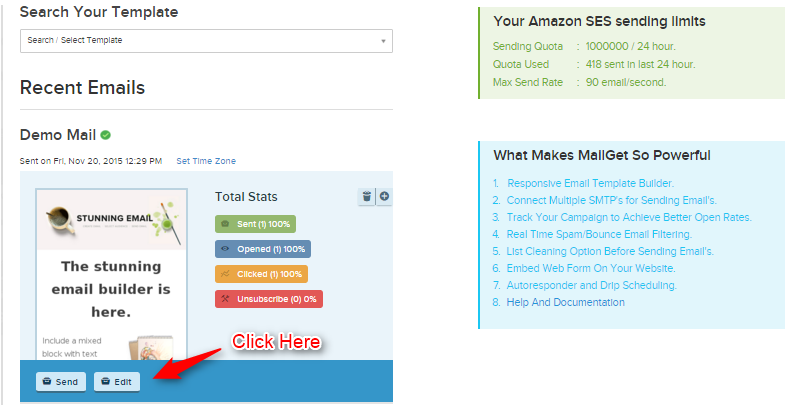
- Click on the link and provide a name to utm_campaign.
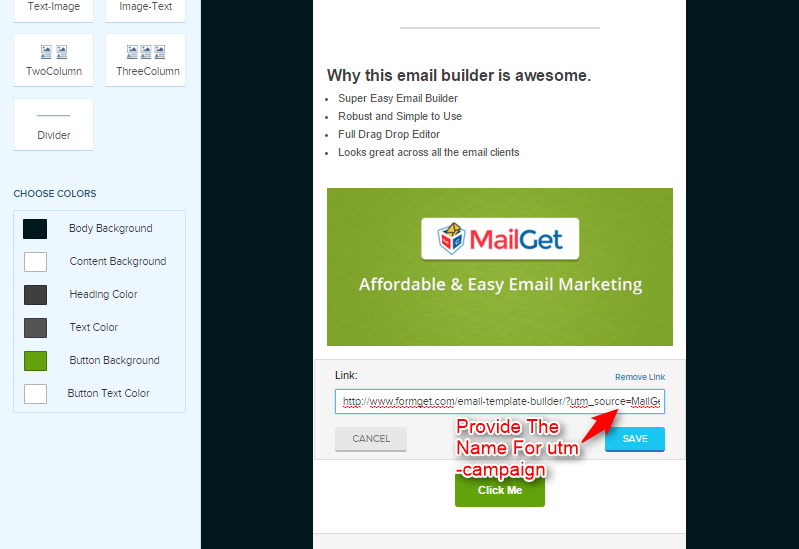
- Click Save and Continue.
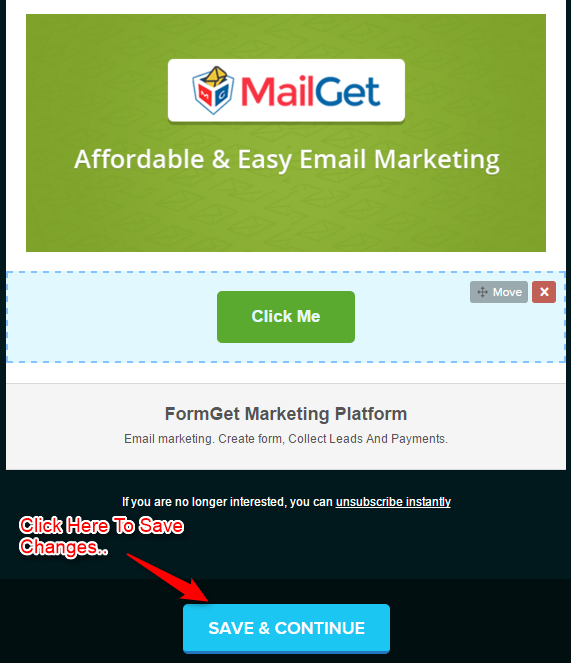
Now you can track the users behavior who clicks on link present in the image.
Now Track Your Campaign In Google Analytics –
It is always good to learn about your user and their interaction with your email campaign. The benefits of getting people-based analytics are that you can segment your emails by their behavior. And once you start understanding people you will start improving your business.
So, follow these steps to view your campaign in analytics –
- Login to your Google Analytics Dashboard.
- Click on the Acquisition tab present on the left-hand side of the analytics dashboard then click on Campaigns and select All Campaigns.
- In the center window, your campaign name will be displayed under the Campaign tab.
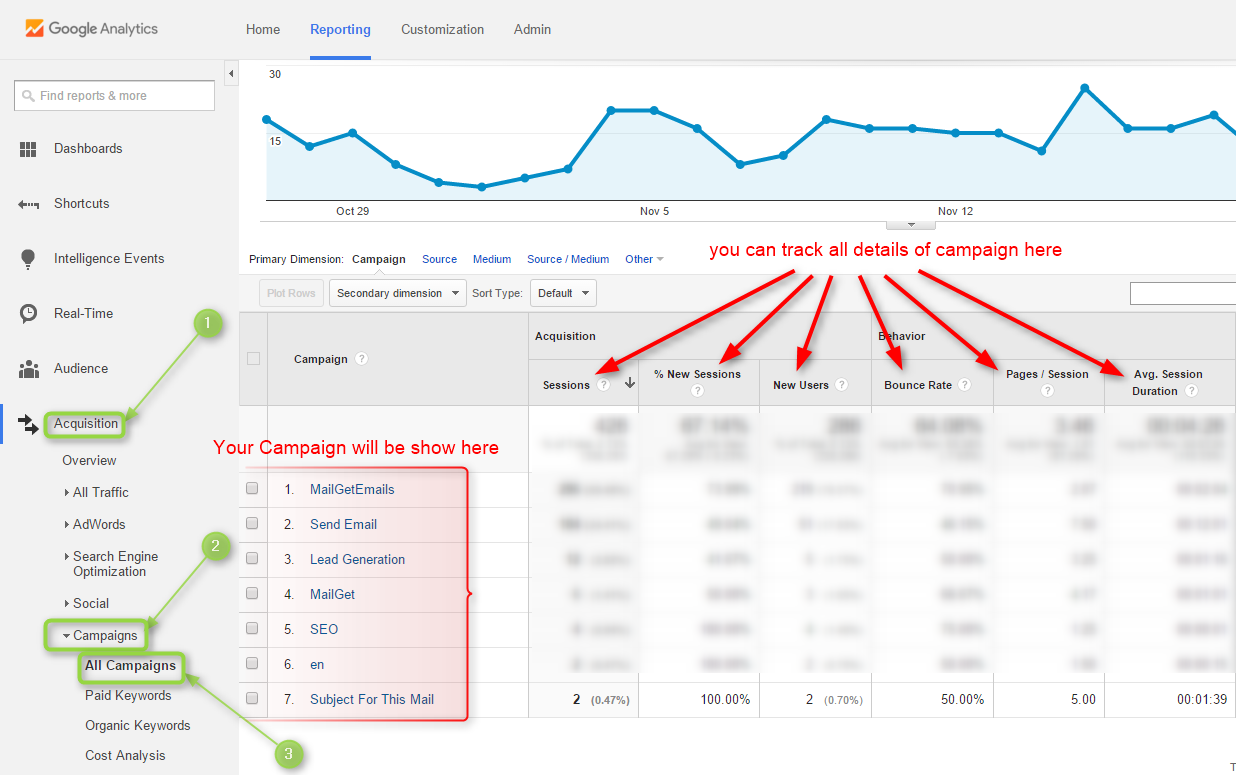
Google Analytics data is golden start making its use and understand what works and what doesn’t.
Get assured to invest your time optimizing the right activities, and dropping those that don’t work.

10+ Best Email List Management Services 2022
If you want to run successful email marketing campaigns, then it is very important that you get an email marketing software which is equipped with latest email list management service & feature.
So that, a properly managed and high-quality email list is produced which assures inbox delivery & rise in open rates for your business.
| Comparison Between Best Email List Management Services | |||||
| Services | Free Trial | Free Templates | SMTP | Import Contact | Scheduler |
| Pabbly Email Marketing | ✔ | 500+ | ✔ | ✔ | ✔ |
| MailGet | ✔ | 500+ | ✖ | ✔ | ✔ |
| SendinBlue | ✔ | 200+ | ✔ | ✖ | ✖ |
| MailChimp | ✔ | Limited | ✔ | ✔ | Complicated |
| Campaigner | ✖ | 900+ | ✔ | ✔ | ✔ |
Unorganised email contact list results in spamming, high bounce rate and causes other types of harms.
Therefore,
Email List Management features are being used for creating new email lists, custom data fields, contact grouping and importing contact etc.
But there are many marketing software who guarantee top-class email list management services. Which one to pick?
For your convenience, I have listed down 10+ best email list management services.
1. Pabbly Email Marketing– (100K+ Users Trust Us For a Reason)
Pabbly Email Marketing is a cost-effective & user-friendly email service provider which has got advanced email list management service.
Other than that it is composed of latest emailing tools like email editor, drip mailer, autoresponder etc which are essential for online promotions & advertisements.
Pabbly Email Marketing also offers 7-days free trial in which you can send emails to 100 contacts.
I believe that Pabbly Email Marketing is the best list management service as it will allow you to synchronize contacts and also upload them via CSV files.
The software is quite economic it starts at $29 per month in which unlimited mail sending to 5,000 subscribers is allowed. Also, the OPEN RATE is high which is 25% in the primary work phase itself.
So stop paying for something, when you can get the best for free!
List Management
Pabbly Email Marketing is very popular for its list management service. You can easily import contacts via CSV file or manually. It also helps you to handle bad addresses and unsubscribes so that your mail reached to the recipient’s inbox without being trapped in spam or junk folders.
| Pricing Of Pabbly Email Marketing Service | ||||||
| Subscribers | Upto 100 | Upto 5,000 | Upto 15,000 | Upto 50,000 | Upto 100,000 | Upto 200,000 |
| Pricing | $0/m | $29/m | $49/m | $99/m | $179/m | $349/m |
Note:-
- All the plans by Pabbly Email Marketing offer Unlimited email delivery to the listed subscribers.
- An additional 20% OFF on yearly subscription of any plan will be given.
2. MailGet – Email Marketing Software
MailGet is one such modern email marketing service that includes various speciality for designing emails and sending them in bulk.
Speaking about other features of MailGet, you can schedule drip campaigns, clean your email list, get accurate reports of email campaigns, subscriber segmentation and many more.
Plus, you can also attach multiple SMTP servers to it for effective email marketing.

In my opinion, MailGet gives you the best emailing services in the market.
The software can be purchased at a low price which starts at $29 per month for unlimited emailing.
It also offers SMTP routing feature which helps your emails delivered to the inbox of the user rather than spam, hence, giving a 99% deliverability rate.
List Management
MailGet highlights list management facility, with which you can easily manage email lists with bulk contacts. You can simply add contacts either manually or import a CSV file, maintain Unsubscribed contact lists, Bounced contact lists and Contact lists from collected leads.
| Pricing Of MailGet Email Marketing Service | ||||||
| Subscribers | Upto 100 | Upto 5,000 | Upto 15,000 | Upto 50,000 | Upto 100,000 | Upto 200,000 |
| Pricing | $0/m | $29/m | $49/m | $99/m | $179/m | $349/m |
To know pricing details of MailGet Bolt Click Here.
Note:-
- It’s mandatory to attach an SMTP server before starting email delivery.
- Similar 2 months straight discount is applicable to annual subscriptions.
You may also like:-
3. SendinBlue
Another email marketing solution that is becoming famous is SendinBlue. It is a self-hosted email marketing solution, which accommodates various options for creating and sending attractive emails.
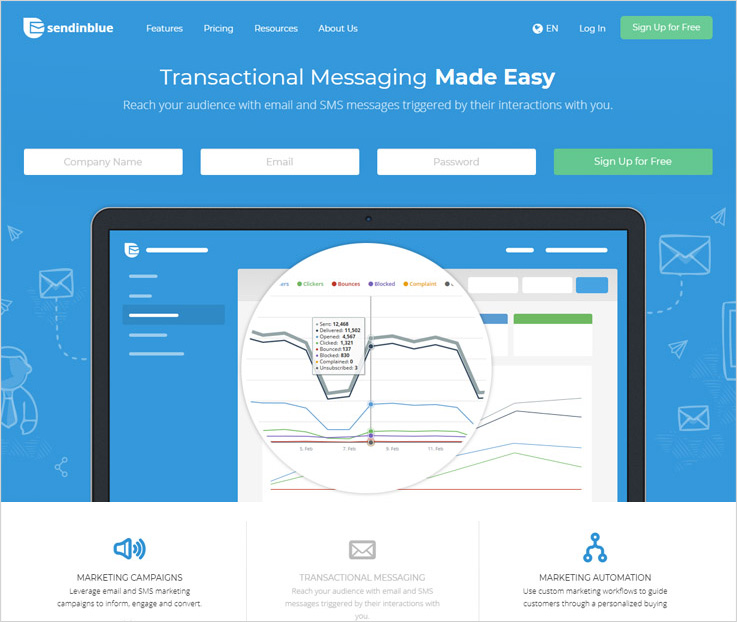
List Management
SendinBlue carries best email list management features with which you can put together different list into single email list, create suppression list, do custom list settings, do opt-outs management, etc. All these processing will increase your conversions and ROI.
| Pricing Of SendinBlue Email Marketing Service | ||||
| Number Of Emails | Upto 9,000 | Upto 40,000 | Upto 60,000 | Upto 120,000 |
| Pricing | $0/m | $25/m | $39/m | $66/m |
- SendinBlue also provides an Enterprise plan which can be customized to meet the requirements of any type of business.
4. Admail
Admail presents several organizations with a platform that has an email marketing solution as well as social media marketing solution.
With their email marketing features like email builder, responsive design, free images & templates you can deploy professional email marketing campaigns.
Subscriber Management
Admail has built a robust List Builder tool for handling and managing email lists. This tool is simply an email list management service that performs various works like automatic duplication handling, opt-in data capture, built signup forms, etc.
| Pricing Of Admail Email Marketing Service | |||||
| Number Of Emails | Upto 10,000 | Upto 20,000 | Upto 30,000 | Upto 50,000 | Upto 100,000 |
| Pricing | $65/m | $95/m | $110/m | $215/m | $350/m |
- Admail permits monthly payments via ACH Debit and Credit Card which are deduced automatically.
5. Elite Email
A cloud-based emailing platform with the aid of which small business organization can start their email marketing campaigns. With Elite Email, you can create great emails, send them in unlimited number and get a detailed analysis report.

Contact List Management
For management of contacts, Elite Email stores contact upgradations option, list segmentation, contact activity report, custom profile data, etc. through which you can maintain an excellent email list of contacts.
| Pricing Of Elite Email Marketing Service | |||||
| Number Of Emails | Upto 500 | Upto 1,000 | Upto 5,000 | Upto 15,000 | Upto 50,000 |
| Pricing | $0/m | $15/m | $45/m | $70/m | $240/m |
- Elite Email also provides Pay-As-You-Go plan in which email credits are provided which comes with 1-year expiry. 1 Credit = 1 Email.
- Pay-As-You-Go plan gives you full access to all features without any monthly charge.
6. DirectIQ
DirectIQ includes features like email template builder, campaign segmentation, social media integration, inbox preview options, social media tools, etc. Through which any business can perform email marketing and generate great benefits for their business out of it.
List Management
Other than giving powerful features linked to email marketing, DirectIQ has characteristics like email list creation, signup forms, individual contact history, list boost function and many other functionalities, by which you can organize & manage email lists efficiently.
| Pricing Of DirectIQ Email Marketing Service | |||||
| Number Of Emails | Upto 500 | Upto 1,000 | Upto 5,000 | Upto 10,000 | Upto 50,000 |
| Pricing | $0/m | $12/m | $45/m | $99/m | $250/m |
- Pay per email is also there in DirectIQ, which is best for marketers who don’t do email marketing on regular basis.
7. Mailify
Mailify assists small business to build, send, analyze and conduct multiple email marketing campaigns. It has a simple and user-friendly platform for email marketing and features such as drag-and-drop email editor, cloud synchronization real-time analytics, etc will help you a lot.
List Management
For list management needs, Mailify has placed an effective tool that is termed as Contact Management Tool. Through which you will be able to add, delete and upgrade your email list and contacts.
| Pricing Of Mailify Email Marketing Service | |||||
| Number Of Emails | Upto 1,000 | Upto 5,000 | Upto 10,000 | Upto 50,000 | Upto 100,000 |
| Pricing | $0/m | $19/m | $29/m | $99/m | $149/m |
8. MailChimp
MailChimp is a fully integrated email marketing software that helps in engaging new subscriber through targeted and intelligence-based opt-in email campaigns.
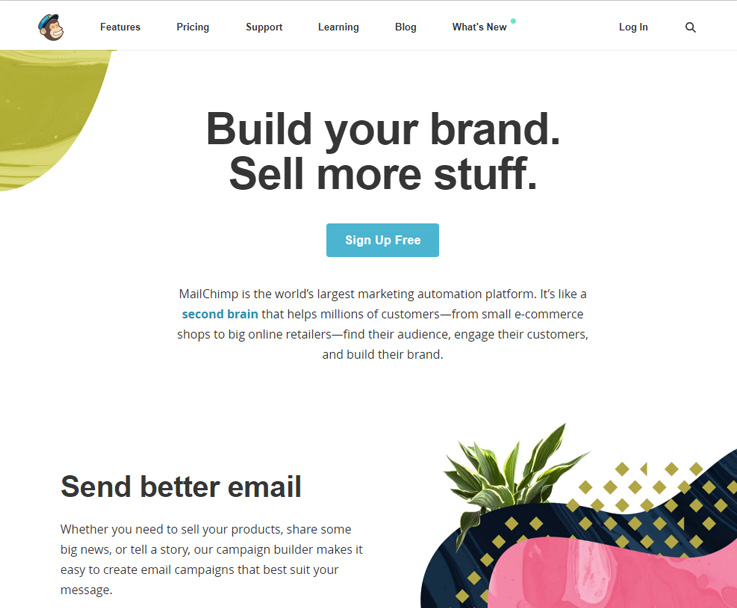
List Management
MailChimp hands over various options to create list based on different dimensions such as suppression list, bounce lists, etc. Pre-built segments are created which helps you send targeted emails to a specific crowd, you can also apply different conditions on segments.
| Pricing Of MailChimp Email Marketing Service | ||||
| Number Of Emails | Upto 2,000 | Upto 5,000 | Upto 10,000 | Upto 50,000 |
| Pricing | $0/m | $50/m | $75/m | $240/m |
- With MailChimp free plan you are allowed to send only 12,000 emails to 2,000 email contacts.
- The bill generated for Pro Marketer Plan includes monthly plan cost + price of the subscribers.
Then, Plan cost = $199
Subscribers Cost = $50
Total bill = $199 + $50 = $249.]
9. Campaigner
Campaigner is yet another fully integrated and reliable platform for online marketing & promotions. It includes some mind-blowing email marketing features like email creation, analytics, and optimization tools.

List Management
For managing complicated and bulk email lists, Campaigner is equipped with a premium List Management & Segmentation facility. Here you will get list supervising options for managing subscriber, subscriber signup center, automatic list deduping, etc.
| Pricing Of Campaigner Email Marketing Service | |||||
| Number Of Emails | Upto 1,000 | Upto 5,000 | Upto 10,000 | Upto 15,000 | Upto 50,000 |
| Pricing | $20/m | $50/m | $80/m | $100/m | $300/m |
- Each & every plan designed by Campaigner offer different amount of services & facilities at varied cost.
- The free trial does not come with full features, with it you can contact 1,000 users only for a limited time period.
- On all yearly subscriptions, you get a discount of 18%.
10. Zoho Campaigns
Zoho Campaigns is a simple to use comprehensive email marketing software that allows organizations to design, send and handle bulk email campaigns. It serves options within which you can create nice emails, get smart sending options, cloud synchronization and more.
Contact Management
Coming towards their solution for subscriber management, you can quickly add new contacts, create, edit, segment mailing lists, merge different contact lists according to your campaign needs.
| Pricing Of Zoho Campaigns Email Marketing Service | |||||
| Number Of Emails | Upto 1,000 | Upto 5,000 | Upto 10,000 | Upto 25,000 | Upto 50,000 |
| Pricing | $10/m | $45/m | $70/m | $125/m | $200/m |
- Zoho Campaigns has got Pay-As-You-Use plans which provide email credits for email delivery.
- Free plan is also available with which you can target 2,000 users.
11. Mailigen
Mailigen is the best software for email management that is fit for any size of business. It allows you to design and send beautiful emails & newsletters. Along with this, you can also unite your email marketing with mobile and social media as well.

List Management
Mailigen has combined management features in email marketing, so as to built a precise and active email list. Here you can quickly add new contacts, modify contact database, perform behavioral segmentation of contacts, etc.
| Pricing Of Mailigen Email Marketing Service | |||||
| Number Of Emails | Upto 1,000 | Upto 5,000 | Upto 10,000 | Upto 15,000 | Upto 50,000 |
| Pricing | $15/m | $40/m | $60/m | $84/m | $200/m |
- The 30-days free trial allows sending 100 emails without any charge.
- No contracts, credit card details are required, plus you can upgrade or downgrade the plan anytime.
Conclusion
I think you are now well acknowledged about email list management services. Take a look at our blog best email marketing services.
Find out others and do share with me in the comment box below.
- Google Analytics Email Tracking
- Cheap Email Services
- Email Marketing Small Business
- Best Email Marketing Companies
- Transactional Email Services
10+ Emailing Tools – Send, Track & Analyze| 99% Inbox Delivery Rates

We all are aware of the fact that email marketing services are the best means to attract more & more customers and promote products/services online in bulk.
A good mailing service helps you create, customize, edit, and send emails around the globe with just a few clicks.
But have you ever thought about knowing what action were taken by users on those emails?
Do you bother to analyze the results of your email marketing campaign. Its simply about email marketing analytics. Email marketing analytics starts when you check mark the following points
- How many emails land in the Inbox?
- What was the open rate of the Campaign?
- Total clicks received on the links in email?
- How many people unsubscribed?
- Bounce rate, user location?
And more.
These are few questions which are left unanswered by many email service providers.
Therefore, you need to have a service which will you overcome these backlogs which are causing harm to the success of your email campaign.
In this blog, we are going to unveil Best Tools for Email Marketing Analytics which provide advanced email tracking and analyzing facility at low cost.
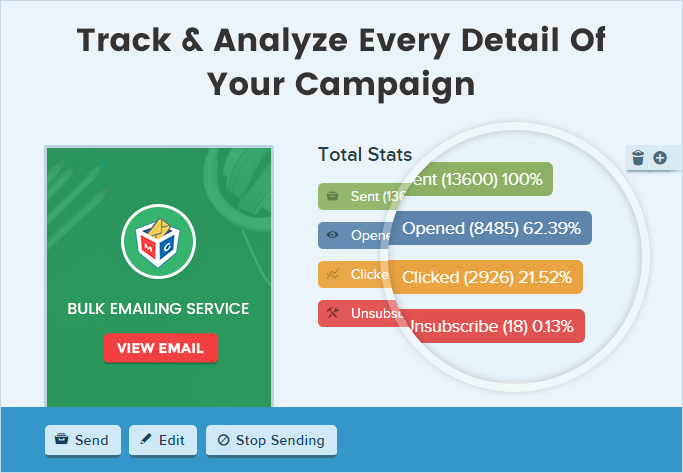
Dive Into The Comparison of Best Email Marketing Analytics Tools.
| Services | Price – 5k Subscribers | Free Trial | Drip Emails | Canned Replies |
| Pabbly Email Marketing | $29 | ✔ | ✔ | ✔ |
| MailGet Bolt | $29 | ✔ | ✔ | ✔ |
| SendinBlue | $39 | ✔ | ✖ | ✖ |
| Express Pigeon | $99 | ✔ | ✖ | ✖ |
1. Pabbly Email Marketing
It is the one-stop solution for best quality, customization, affordable, user-friendly, bulk emailing solution which will fulfill all your online marketing needs.
In addition to the above facilities, you can also analyze & track user activities on your emails and monitor the results of your email campaigns through different reports.
Pabbly Email Marketing also offers a free trial with which you are permitted to send emails to 300 users daily for 14 days.
Email Tracking & Analyzing ->
With Pabbly Email Marketing, you get –
- Drag & drop email builder.
- Advanced list cleaning facility.
- Notifies number of emails landing in spam.
- Know the number of unsubscriptions per campaign.
- Track the bounce rate and much more.
Pricing
Pabbly Email Marketing has designed multiple plans which can help you do effective email marketing at low price. The pricing plan starts from $29/m for 5000 subscribers and ranges up to $1599/m for 1,000,000 subscribers.
Here we will discuss specifically two popular plans with you.
- Rookie:- Send unlimited emails to 5000 users on monthly basis, just by paying $29/m.
- Pro:- With this plan you can target 15,000 users and send them unlimited emails at a price of $49 a month.
- Other than the above plans there are 10 more packages offered by Pabbly email marketing
Just sign-up and start send responsive emails to subscribers.
This emailing service guarantees 100% inbox which helped us get 23% and 43.64% open rates on different marketing campaigns respectively.
Plus the paid plans are also very cheap. The base plan will cost you only $29 a month and will allow you to deliver unlimited emails.
2. MailGet Bolt: Cheapest Emailing Service
MailGet Bolt is the cheapest in the list of 10 Best Email Marketing Analytics Tools and it provides best-in-class sending, tracking, analyzing facilities, plus you can test all its service through the free plan.
Another benefit of using MailGet Bolt email marketing service is that you can choose from a huge list of SMTP services and attach a number of SMTP services simultaneously. You can easily track and analyze the effects of emails delivered as it shows open rates, delivery rates, analytics and much more.
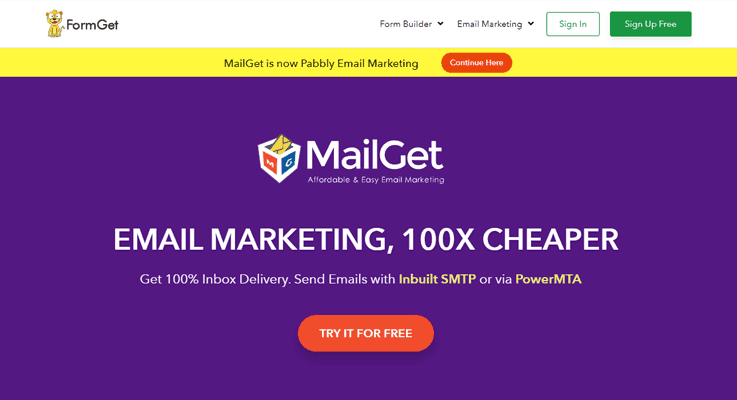
Email Analytics Features –
- User-friendly email editor.
- Email tracking and open rate analysis.
- Send emails that are 100% responsive.
- Autoresponder & drip campaigner.
- Customizable email templates.
- Multiple SMTP service choices available.
Pricing
- Can you imagine price as low as $29 a month for services like unlimited email delivery to 5000 users.
- The next plans cost around $49 a month and provide service like unlimited email deliver to 15,000 subscribers.
- There are 11 more plans which are offering different services at affordable prices.
SMTP! SMTP! Best way to enhance your deliverability rate!
With MailGet you get the option to choose any SMTP service of your choice and get it integrated in few clicks.
It also allows SMTP Routing which means you have to access to connect multiple SMTP relay parallelly for sending emails as per your needs.
And I am sure that you will get great open rates and deliverability results as we are using it for a year and we are completely satisfied with the services offered.
If you are eager to know more about Email Marketing Services here are some blogs which can help:-
3. SendinBlue: Responsive Email Marketing Solution
SendinBlue is another email marketing service provider that suits all size business organizations.
It includes features such as behavioral targeting, autoresponder, database management, email campaign reports and much more with which any business organization can enhance their marketing procedure.
Features
SendinBlue is equipped with enormous feature & facilities which are as follow:-
- Delivers the most accurate analytical results in the form of email client reports, list trend report, unsubscribe report, open/click tracking, etc.
- Email designed are fully responsive and looks attractive on various devices.
- Number of pre-designed email templates to choose from.
- Add customized media and content, also gives access to inbox preview.
Pricing
- Commence your email marketing campaigns by sending 9,000 emails for free.
- Light Plan is basically for beginners as it allows you to send 40,000 emails every month and charges around $8 for the service.
For More About Pricing & Tracking Details
4. SalesHandy
SalesHandy is one of the best email automation tools that allow you to send multiple email campaigns with behavioral trigger auto follow up. It provides an advanced analytics report of the performance of each email campaign.
Using powerful behavioral trigger feature of SalesHandy, you can schedule up to 9 stages of follow up emails with conditions such as Not Opened, Not replied or Been sent to target your audience.
The marketing email campaigns sent with SalesHandy lands in the primary tab of your prospects rather than the promotion tab. This increases the response rate and increases your conversion rate exponentially.
You can start using SalesHandy with 14 days Free Trial that allows you to send 200 emails and track unlimited emails.

Features:
- Send up to 5000 emails per day with an email campaign feature.
- Personalize your emails by using the Mail Merge tag.
- Advanced analytics and reporting provide detailed reports on all the campaigns with Email tracking, link tracking, Email Open rates, etc
- SMTP integration and custom domain tracking.
- Create, save and reuse powerful email templates
Pricing
- Regular Plan: $9/user/month (billed yearly)
- Plus Plan: $22/user/month (billed yearly)
- Enterprise Plan: $49/user/month (billed yearly)
For More About Pricing & Tracking Details
5. ExpressPigeon: Bulk Emailing Tool
ExpressPigeon is an innovative and robust email marketing platform, which is best fits for small to mid-sized organizations who want to keep an eye on their mail campaigns.
Services given by ExpressPigeon are top of the line and it comes loaded with various other features that helps you promote different types of products & services of your business online with ease.

Features Email Reporting-
- Reporting & tracking tool provides detailed reports on each campaign. These reports include results connected with spam, bounce, click rate, open rate, etc.
- Easy list segmentation of contacts improves user experience and helps to target the right customers.
- Supports multiple integrations and API’s
- Add personalized effects and give custom designs to every email.
Pricing
- Send 1,00 emails to 500 subscribers with the free plan.
- Get access to unlimited emails delivery to 10,000 users at a price of $50 a month.
Click the button below to explore more price plans.
For More About Pricing & Tracking Details
6. ActiveTrail: Mail Service Provider
ActiveTrail is a simple, fast and highly designated email delivery services. It offers an advanced analytics system through which you can track details of various bulk email marketing campaigns.
With this service, it becomes extremely simple to know a number of newsletters sent, open rates, clicks on links, unsubscribes rates, and more.
Email Analytic Features –
- The real-time analytics feature helps you track and watch activities at various email campaigns. It displays live reports on a delivery, opened, undelivered, spam and bounce emails.
- Pre-designed email templates which are highly responsive in design.
- Easy to use email builder and image editor for customizations.
- Conduct a variety of testing like AB split and see email inbox previews.
Pricing
- Sign-up for the free trial and you can test any of the listed plans 30-day for free.
- This is the most popular plan which has got a huge amount of features and gives you access to send unlimited emails to 10,000 contacts monthly.
Excluding the above plans, there is number of plans which ActiveTrail offers.
[Note:- Get a straight 15% discount on all plans for yearly subscription.]For More About Pricing & Tracking Details
7. Communicator: Mass Mailing Service
Communicator is a rewon mass mailing service which hands you the best way to increase your sales & reach out customers in every corner of the globe.
You can easily track different activities of the receivers on your delivered mails. It’s pre-equipped with features such as using dynamic content, triggered emails and marketing automation facilities as well.
Features Email Analytics –
- List Engagement Rate:- This feature will help you point out unique individuals from a huge list who have opened your emails over a period of time.
- Segment Contacts:- Its advanced contact segmentation allows you to have an auto maintained contact list which keeps separate mailing lists with different permissions.
- Open/Click Rates:- Tracking information of emails opened is further broken down by the location, device, number of clicks and more which is very beneficial is tracking activities.
- Mail Tracks:- With this service you can simply track read time duration, inbox placement, bounce rates, unsubscriptions and more,
Pricing
Essentials, Growth & Optimise are the three plans which cover the needs of all types of businesses offered by Communicator. To know the price details you have to ask for demo or sales team.
For More About Pricing & Tracking Details
8. SendLoop: Email Marketing Software
SendLoop offers email marketing as well as marketing automation services which are of great quality. Using this mailing solution you can deliver unlimited emails and enjoy the benefits of features like multi-user access, live chat, free image hosting, email templates, tracking & reporting, plus you can also integrate multiple other services with it.
But if you still not satisfied, then you can get your money back in 30-days and the best part is the full money is refunded.
Features Email Reporting –
- SendLoop also has email analytics which acknowledges you about email open rate, geolocation details, link click rates, bounces, etc.
- Real-Time email tracking & reporting facility is also available as with this you can track and analyze your readers instantly.
- Unlimited image hosting, plus multiple email templates which can be easily customizable are also there.
Pricing
- The forever free plan comes with 2000 subscriber access with which you can implement all the features & facilities of this service in your mail campaigns and deliver unlimited emails.
- If you are interested in sending unlimited emails to 5,000 users, in that case, you have to pay $14 for this premium service.
There are more than 15 price plans which may vary in cost & number of emails. This service can serve the needs of any size of organization for email marketing.
For More About Pricing & Tracking Details
9. Emailmanager: Emailing Solution
Emailmanager is a big name in the field of digital marketing & mailing services. Along with email marketing services, they also provide other services such as promotional marketing services and yield marketing tools for agencies.
In addition, you can also track things like opened emails, clicks, bounce rate, unsubscribed users, location and other important details.
Email Tracking Facilities –
- Emailmanager has various email tracking options such as real-time reports, Analytics360 and Google analytics. You can also track the location of people who interacted with your email.
- Multiple user integrations are permitted which allows different users with varied access restriction to perform actions on a single report.
- Simple contact segmentation to filter your contact list and manage it in different groups.
- Marketing automation is there to help you take customizable actions according to the reaction of the user, all this is done automatically.
Pricing
With EmailManager you get both options pay per contact plans & pay per campaign plans.
- Start by sending unlimited emails to 2,500 email contacts every month at a price of $26.
- The next plan cost around $43 with which you get unlimited email delivery to 5,000 contacts every month.
For more details on plans and pricing click button below.
For More About Pricing & Tracking Details
10. MPZmail: Email Marketing Tool
MPZmail is one such big competitor in the field of email marketing service provider. It provides an interface where creating and designing professional emails demands only a few minutes. Plus you can perform email tracking activity on all campaigns to track open, bounce, unsubscribe rate with ease.
Email Analytics Facilities –
- Create emails and templates which look amazing in design are responsive and eye-catchy all this without doing any type of coding with email builder.
- Send & track details like who is reading, clicking your emails, unsubscribers, bounces and more in real-time.
- Send your emails at times when your customers are most available and likely to read through email scheduler. You can specify the date & time of email delivery with this feature.
Pricing
- Send unlimited emails to 1,000 contacts free of cost with this plan.
- This paid plan will cost you $29 a month for unlimited email delivery to 6,000 subscribers.
For other plan, details click the button below.
For More About Pricing & Tracking Details
11. Vision6: Bulk Mailing Service
Vision6 was started keeping in mind to provide the best email marketing services through which people can simply enhance the reach of their business. It includes various features like creating customized web forms, automation in marketing and much more.
Email Analytics Features –
- Get 70+ professionally designed responsive email templates along with user-friendly email editor.
- See real-time analytics and tracking on various email campaigns and know who received, opened, clicked and shared the emails delivered in bulk.
- You can also follow-up the bounce rate as well as unsubscription rates of the campaigns.
Pricing
Vision6 has separated the packages into three categories Starter, Business & Pro Marketer:-
- The basic plan of Starter package comes at a cost of $29 a month with 12,500 email deliver to 2,500 users.
- The base plan of Business package is for $59 a month, with which you get access to unlimited emails for 2,500 subscribers.
There are multiple other plans which offer a variety of services at different price point.
For More About Pricing & Tracking Details
Final Conclusion To End
We have come to the end of this blog and I think now you would have made up your mind that which emailing service with tracking facility is best for your business.
This is a list of 10 Best Emailing Tools which can help you Track & Analyze user actions on your emails. Apart from the above services, there are numerous services available in the market.
So, if you have any suggestions? Share in the comments section below!
Finally, if you are interested in exploring more service related to email marketing, below are some more blog which will help you out.
PhoneGap Plugin Apis’ And Events

Plugin:
A plugin is an extension (also known as an add-in, add-on etc..) code which adds an extra feature to an existing code program irrespective of the core features of the program.
when a code program supports plug-in, it set-up a customization.
API(Application Programming Interface):
a set of functions and procedures that provide an interface between two application.
It allows you to get the features or data of any operating system, application or any other services.
What are the PhoneGap/Cordova plugins?
A plugin is a bit of add-in code that provides JavaScript interface to native components.
They allow your application to use native device capabilities beyond what is available to pure web apps.
Cordova ships with a minimal set of API’s and projects add what extra APIs they require through plugins.

You would be comfortable enough with the PhoneGap basics, you have read till now.
Now, how to use these Plugin Apis’?
To make you understand this, I will explain you the use of one of a plugin with an example, similarly you can proceed with others as well.
How to use Cordova Camera API…
…to grant the user, with the ability to take a picture of a person, and use that picture as…
…the person’s picture in the application. We do not pursue that picture in this sample application.git
Below listed code will only work, when you will run the application on your device as a Cordova app.
Ultimately, you can’t test it in a browser on the desktop.
Stpe by step explanation on use of Plugins Api as our Cordova project:
Add the camera plugin to your project:
cordova plugin add org.apache.cordova.cameraIn index.html, add the following list item to the user template:
<li class="table-view-cell media">
<a hre="#" class="push-right change-pic-btn">
<span class="media-object pull-left"></span>
<div class="media-body">
Change Picture
</div>
</a>
</li>
<li class="table-view-cell media">
<a hre="#" class="push-right change-pic-btn">
<span class="media-object pull-left"></span>
<div class="media-body">
Change Picture
</div>
</a>
</li>
In the initialize() function of user View, register an event listener for the click event of the Change Picture list item:
this.$el.on('click', '.change-pic-btn', this.changePicture);In user View, define the changePicture event handler as follows:
this.changePicture = function(event) {
event.preventDefault();
if (!navigator.camera) {
alert("Camera API not supported", "Error");
return;
}
var options = { quality: 50,
destinationType: Camera.DestinationType.DATA_URL,
sourceType: 1, // 0:Photo Library, 1=Camera, 2=Saved Album
encodingType: 0 // 0=JPG 1=PNG
};

navigator.camera.getPicture(
function(imgData) {
$('.media-object', this.$el).attr('src', "data:image/jpeg;base64,"+imgData);
},
function() {
alert('Error taking picture', 'Error');
},
options);

return false;
};
Events:
The movement or instance recognized by software that may be knobbed by a software.
Events can be triggered by the system, user, or in other ways.
What are the PhoneGap/Cordova events?
The Cordova events are the different-different processes which occur on performing the specific action.

Cordova events and related functions are listed below:
Device Ready: The event fires when Cordova is fully loaded.
document.addEventListener("deviceready", yourCallbackFunction, false);Pause: The event fires when an application is put into the background.
document.addEventListener("pause", yourCallbackFunction, false);
Resume: The event fires when an application is retrieved from the background.
document.addEventListener("resume", yourCallbackFunction, false);
Online: This event fires when an application goes online, and the device becomes connected to the Internet.
document.addEventListener("online", yourCallbackFunction, false);
Offline: The event fires when an application goes offline, and the device is not connected to the Internet.
document.addEventListener("offline", yourCallbackFunction, false);
Back Button: The event fires when the user presses the back button.
document.addEventListener("backbutton", yourCallbackFunction, false);
Battery Critical: The event fires when the battery has reached the critical level threshold.
window.addEventListener("batterycritical", yourCallbackFunction, false);
Battery Low: The event fires when the battery has reached the low-level threshold.
window.addEventListener("batterylow", yourCallbackFunction, false);
Battery Status: The event fires when there is a change in the battery status.
window.addEventListener("batterystatus", yourCallbackFunction, false);
Menu Button: The event fires when the user presses the menu button.
document.addEventListener("menubutton", yourCallbackFunction, false);
Search Button: The event fires when the user presses the search button on Android.
document.addEventListener("searchbutton", yourCallbackFunction, false);
Start Call Button: The event fires when the user presses the start call button.
document.addEventListener("startcallbutton", yourCallbackFunction, false);
End Call Button: This event fires when the user presses the end call button.
document.addEventListener("endcallbutton", yourCallbackFunction, false);Volume Down Button: The event fires when the user presses the volume down button.
document.addEventListener("volumedownbutton", yourCallbackFunction, false);Volume Up Button: The event fires when the user presses the volume up button.
document.addEventListener("volumeupbutton", yourCallbackFunction, false);Conclusion:
This post would be very helpful in understanding the basic idea about Plugin API’s & Events. This would be really a great help to you while you will be building your mobile application. We will be updating our blog post, so till then keep in touch & keep reading our blogs. Don’t forget to give your precious feedback from the space provided below.
For more related updates check the below mentioned blogs –
- PhoneGap GPS / PhoneGap Geolocation Plugin
- PhoneGap Camera Plugin
Create, Run And Build A PhoneGap App
Now that you’ve completed the Installation of PhoneGap, let’s understand the process of creating, running and building process of an app developed by PhoneGap.
Create An App
There are two ways to create an app:
- GUI
- CLI
Create An App With GUI:
You need to open the PhoneGap Desktop App.
- Click on ‘+’ symbol and then choose ‘Create new PhoneGap project‘.

- Fill the following details:
- Local Path
- Name
- ID (Optional)

- The app has been created. You need to click on the green button to run the app.
The server address at the bottom indicates that your app is running and it is the active project among all.
Only one project can be active at a time.
Create An App With CLI:
Open the command prompt if you’re using Windows or Terminal app if you’re using Mac OS X
- Create a folder named ‘sample‘ in the current location by the following command.
$ phonegap create sampleIt will create the project with the default name as Hello World and default id as ‘com.phonegap.helloworld’.
If you want to create a project with the custom name and custom id, type the following command.$ phonegap create myApp --id "org.myapp.sample" --name "appSample" - Make sure you’re getting the following output.
Creating a new cordova project. - Now when your project has been created in the current location, type cd command to enter into the project directory.
$ cd Sample/ - You need to type dir command in the Command prompt (Windows) and ls command in the Terminal app (Mac Os X).
Command Prompt (Windows)$ dirTerminal App (Mac OS X)
$ lsYou will see the following files and directories.
config.xml hooks platforms plugins www - As index.html stored in www, we’ll change our directory from sample to www.
$ cd www/
Run An App
Again there are 2 ways to run your app:
- GUI
- CLI
Run An App With GUI:
Important Points
- The desktop app of PhoneGap initiates a local web server which hosts the project.
- This local server returns a server address (A private IP Address).
- By entering this server address in PhoneGap’s Mobile app or in any browser installed on the desktop, you can run the app.
- If you’re running the project on the mobile app, make sure your Desktop and Mobile are connected to the same network.
- Run the project by clicking on the green button in the desktop app.
- Grab your device, open PhoneGap’s mobile app, enter the server address written on the bottom of the Desktop App and tap ‘Connect’

- You will see a connection occurred message followed by the success message
- When the app connects, it will load and preview of the app will be displayed.

Run An App With CLI:
- Open the command prompt and change into the project’s directory.
$ cd sample/ - Type ‘$ phonegap serve‘ in the command prompt or terminal app to run the project. This will return a server address.
$ phonegap serve - Now that you’ve server address, you just have to follow the 2nd, 3rd and 4th step mentioned in the above section ‘Running Your App With GUI‘.
Making Updates:
- The preview you saw in the above step was the default look of an app. Now let’s make some changes.
- Open the index.html (located in the project folder: ~/sample/www/index.html) file in any text editor. I am going to use Sublime Text.
- I am going to make following changes to the code:
- Save the changes and run the app by clicking on the green button of the desktop application.
- Now, open the mobile app and see the changes.

- You can make more changes as you like to the HTML, CSS and JavaScipt Code.
Build An App
Building/Compiling an app is an important phase of development. Now that we have created an app, we have to compile and generate an executable file for different platforms. Following are the ways which you can use to build an app.
- Build An App Using PhoneGap Build
- By uploading a zip file
- Using GIT
- Build An App Using CLI
Build An App Using PhoneGap Build:
PhoneGap Build is a cloud service used to build apps online. All you have to do is to upload the project to PhoneGap Build and it will create an executable file of apps for different platforms. It will generate:
- APK for Android
- IPA for IOS
- XAP for Windows
You need to follow the following process:
- Open ‘PhoneGap Build‘ and sign up.

- Log into the PhoneGap Build Account.
- Now you have 2 ways to upload a project:
-
By Using GIT
You can keep your app open source or private. PhoneGap Build has different plans for private apps.
You need to upload your project on GitHub and copy the link of that repository and paste it here.
Now click on ‘Pull from .git repository‘. Your project will be uploaded. -
By Uploading A ZIP File
Click on the ‘private’ tab.
Click on ‘Upload a .zip file’ to upload the project.
4. After uploading the project (Either by GIT or ZIP File), Click on ‘Ready to build‘. You will get the following screen.
5. Now click on ‘PG Build App’.

6. Click on the drop down menu ‘No Key Selected‘ next to android’s icon and select ‘add a key‘.(Optional)
7. Finally, you can download the app for the desired platform.
Build An App Using CLI:
- Open the node.js command prompt on windows or terminal app on Mac OS X.
- Create a new project with the following command.
$phonegap create sample com.phonegap.samplewhere, ‘sample‘ is an application name and ‘com.phonegap.sample‘ is an application ID.
- Make sure you’re getting the following output.
Creating a new cordova project. - Now when your project has been created in the current location, type cd command to enter into the project directory.
$ cd sample/ - Now log into the PhoneGap Build with the credentials you got after registration.
$ cd phonegap remote login -u [email protected] -p ********where, -u is for the username and -p is for the password.
- Make sure you’re getting the following output.
[phonegap]logged in as [email protected] - Now let’s build your project for android platform.
$ phonegap remote build android - Make sure you’re getting the following output.
[phonegap] compressing the app... [phonegap] uploading the app... [phonegap] building the app... [phonegap] Android build complete - Similarly, you can build your project for ios and windows platforms with the following commands.
IOS Platform$ phonegap remote build iosWindows Platform
$ phonegap remote build wp8
Conclusion:
Now you’re ready to create, run and build your own apps. You can do this process with GUI and CLI as you like. Create more useful apps and enjoy 🙂
You may also like –
10+ Best Email Marketing Automation Software 2022

Business organization are well known about the fact that how marketing directly relates to sales. Hence, business organization have used marketing services to boost their marketing strategy and therefore, invested an enormous amount in it.
Now, what next is to – “Reduce time spent administering marketing programs and completing tasks.”
And to do so, various email marketing automation services have begun up through which you can automate email marketing task and raise your efforts in building the relationship with customers and leads.
Which email marketing automation solution is best?
Well talking about the present scenario, there are several email marketing automation vendors available on the market that are serving email marketing automation software & platforms.
We have listed a small comparison among the famous services below, have a look at them for more details:-
| Comparison Between Best Email Marketing Automation Software | |||||
| Services | Free Trial | Pricing | No. Of Subscribers | API Integration | Rating |
| Pabbly Email Marketing | ✔ | $29/mo. | 5000 | ✔ | 4.9/5.0 |
| MailGet | ✔ | $5/mo. | 5000 | ✔ | 4.8/5.0 |
| SendinBlue | ✔ | $25/mo | Unlimited | ✔ | 4.1/5.0 |
| SharpSpring | X | $450/mo. | 1500 | ✔ | 4.0/5.0 |
|
SimplyCast |
✔ | $99/mo. | 3000 | ✔ | 4.9/5.0 |
Check out some more amazing blogs here –
So, here I have jotted down 10+ Best Email Marketing Automation Solutions that are best in providing email marketing automation tools.
1.Pabbly Email Marketing – Send Free Automated Emails
Sending automated email campaigns saves a lot of time and efforts of any organizations who send the bulk of emails to their customers.
Pabbly Email Marketing, a powerful email marketing automation software allows sending automatic and self-triggered emails which increase the communication opportunity with customers, enhance user engagement and you would be able to reach to your client’s inbox.
See the following features of Pabbly Email Marketing: email automation software –
- Send automatic and self-regulating welcome emails to your subscribers.
- You can also forward the triggered based campaigns based on the subscriber’s activity.
- It provides a special tracking functionality by which you will be able to analyze all your previously sent campaign reports.
- List management & cleaning are also the prominent features of Pabbly Email Marketing software.
- You can also send a series of emails by scheduling and drip emailing.
Pricing –
Explore Pabbly Email Marketing without paying any cost and also connect 3 SMTPs.
After that, you can go with any plan based on your requirement ranging from $29 which is charged for unlimited email delivery to 5000 contacts, $49 for 15000 Subscribers, $99 for 50,000 Subscribers and more.
Pabbly Email Marketing – The most productive email marketing automation software with 99% deliverability rate.
Surprising OPEN RATE, It was just 25% at the start but now we get more than 42% open rate in promotional campaigns.
The most popular plan of this service is available at a cost of $29/mo.
2. MailGet – Cheapest Email Marketing Automation Software
MailGet is an email marketing service provider that lets you create and send emails in bulk.
MailGet includes features such as email builder, API integration, list management, multiple SMTP connections, etc. with which effective email marketing can be executed. The prominent part with MailGet is that you will find the best automation features within their services.
MailGet step towards automation has introduced the following automation features –
- Email marketing with responsive email templates
- Lead Management
- Campaign Management
- Landing Pages and web forms
- Analytics to track emails
- Drip Campaigns
- Lead Nurturing to attract new customers
- Autoresponder for sending emails on a different schedule
Pricing –
MailGet offers some of the cheapest and most affordable marketing services. It provides multiple subscription plans which charge $29 email deliver to 5000 subscribers, $49 for 15,000 subscribers, $99 for 50,000 subscribers per month and many more.
It also has yearly versions on these plans with which you can avail an exclusive discount of 20% on all plans.
Among all the software MailGet has a unique feature to connect to multiple SMTP.
The software is very economical as it is available at a minimum price of $29/ month for UNLIMITED email with 99.99% email deliverability rate @INBOX of the customers.
So, I would recommend you the same service to go with.
3. SendinBlue
SendinBlue is another one amongst email marketing automation solutions, which has enabled some great automation features in their services. Their principal motto is to increase the revenue potential of their users by providing the good automation services.
SendinBlue is providing following automation features –
- Campaign Tracking
- Drip Campaigns
- Responsive Landing Pages
- Transactional Messaging
- API, Plugins & Integrations
- Email Marketing Automation System
Pricing – SendinBlue provides you with a free trial option where you can send 9,000 emails/month. Various monthly plans are also available in SendinBlue such as – INR443.65 per month plan, INR2,343 per month plan, INR3,960 per month plan and so on.
4. HubSpot Email Marketing
With HubSpot Email Marketing you can create professional marketing emails that engage and grow your audience. You can easily create personalized emails that scale beyond just 1:1 communications. With HubSpot’s drag-and-drop editor you don’t need a developer or designer to get started; simply drag-and-drop your way to a beautiful email that your audience will love.
HubSpot Email Marketing is automatically connected with HubSpot’s free-forever CRM so you can tailor emails based on any details you have – such as form submissions and website activity.
HubSpot is providing the following automation features –
- You can create better emails with a drag and drop editor and personalization tokens.
- In the free version, you get up to 5 smart lists and 25 static lists to segment your contacts database.
- You have a library of email templates to help you get started.
- Contacts management and integration with HubSpot’s free-forever CRM.
Pricing-
- Free: 2000 email sends per calendar month, with HubSpot branding.
Starter: 5X contact tier email send limit per calendar month. - Professional: 10X contact tier email send limit per calendar month. Includes smart content, design manager, blog/RSS email, A/B test emails, and time zone sending.
- Enterprise: 10X contact tier email send limit per calendar month. Includes everything in Professional, plus multiple CAN-SPAM footers and send frequency caps.
5. Omnisend
Omnisend is an omnichannel marketing automation platform that takes email marketing so much further. Offering advanced automation and precise targeting, it can replace different smaller plugins for your marketing campaigns.
Unlike many marketing automation tools, Omnisend allows you to add multiple channels within the same automated workflow. Using smart segmentation, you can target your messages so they’ll always be relevant, no matter who your customer is or what channel they’re using.
Omnisend offers advanced automation features:
- Omnichannel automation with email, SMS, web push notifications, Facebook Messenger and many more.
- Segmentation based on custom profile data, campaign engagement, and shopping behaviour.
- Custom fields for better customer data collection.
- Omnisend plays nice with other apps, offering API, Plugins & Integrations.
Pricing – Omnisend’s pricing depends on how many subscribers you have in your list, and they also have a free plan that allows you to send up to 15,000 emails each month. Their Standard plan starts from $16/month, but their plans are 22% cheaper when you pay annually.
6. SharpSpring
SharpSpring presents the best email marketing automation platforms through which any business can increase their functionality as well as performance.
Keeping in mind of automation, SharpSpring gives a formative stage for any business to use their automated services for enhancing marketing efforts.
Following automation features SharpSpring includes –
- Email and Text Alerts
- Multiple Device Tracking system to know which device contact uses
- Dynamic contents in emails
- Schedule emails trigger
- Dynamic list that automatically updates its contacts
- Lead Nurturing by sending automated emails
Pricing – You need to place a quote to know about pricing plans.
7. Platformly
Platformly is a powerful all-in-one marketing automation software that allows to capture and nurture leads, understand your customer’s entire journey, gain insights that lead to revenue, and build personal relationships at scale.
Platformly makes marketing attribution easy by precisely tracking interactions across different campaigns and channels throughout your entire marketing funnel.
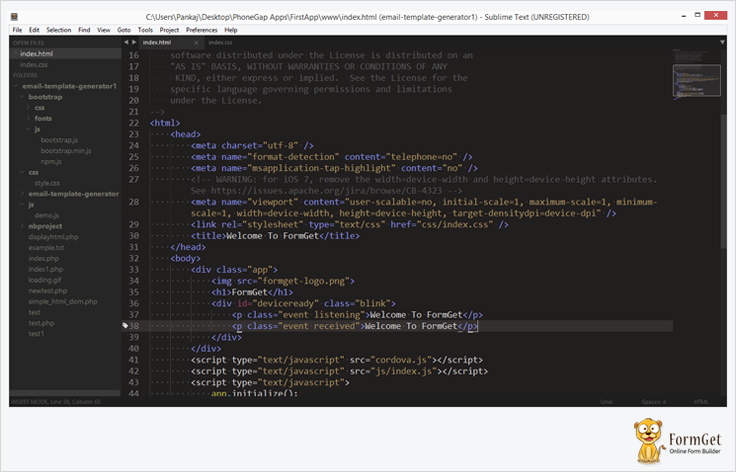
Platformly is providing the following automation features –
- Marketing Automation: Trigger personalized messages based on user actions
- Email Marketing: Design and send beautiful email marketing campaigns with ease
- CRM: Nurture your company’s relationships with clients and leads
- Business Dashboards: Monitor the health of your business in real-time
- Link Tracking: Track and optimize all of your online marketing
- Lead Capture: Convert visitors into customers with beautiful forms and pages
- Complete Reports: Make data-backed decisions with comprehensive reports
Pricing –
Use Platformly marketing automation for 15 days. During the free trial you will get access to all available features with no limitations.
After the free trial, you can choose one of the plans according to your contact list and business needs. Pricing for 1000 contacts start at $19/mo, 2500 contacts cost 29$/mo, 5000 contacts – $49, 10000 contacts – $69, etc. If you need more than 10000 emails/mo, more than 5 integrations, or want to upgrade other features you can jump to a Growth (+$49/mo) or Unlimited (+$99/mo) plan.
8. SAS Institute – Email Marketing Automation Software
SAS Institute is another best email marketing automation providers for small business and mid-sized business that provide business intelligence software for analytics purposes. Through their automation tools, any business can run marketing campaigns and maintain an intimate relationship with the customer.
SAS email marketing automation software has following automation features –
- Visual Data Exploration
- Powerful Analytics System
- Social Marketing
- Embedded Data Management system to manage customer’s data
- Multi-channel management
- Visitor tracking system
Pricing – You need to contact them to know their pricing plans.
9. SimplyCast
SimplyCast provides a customer-oriented platform and software for marketing and multi-channel communication to business organizations. Their primary goal is to help an organization to reach their customer at any cost and has integrated automation to develop out an active communication channel.
SimplyCast has cast many automation features in their services, some of which are as follows –
- Email marketing for sending emails in bulk
- Data Input Automation by which new data gets automatically added up
- Lead nurturing
- Customizable selection fields
- Automated invitations and reminders for users
- Time filters system uses the specific time for communications
- Third-party CRM integration
Pricing – Simply Cast gives various subscription offers to users. Their subscription plans vary from $99 per month to $499 per month. Yes, they provide a user with 14-day free trial option also.
10. SalesManago
SalesManago, a Poland-based solution is one of the best in class email marketing automation solution for digital marketers. Their user-friendly and easy to use services are majorly preferred by E-Commerce sites, B2B business, B2C business and retailers for their marketing strategies.
SalesManago email marketing automation features are as follows –
- Email marketing
- Real-time content personalization by analyzing the current behavior of the user
- Automated greeting and drip programs for lead nurturing
- Lead Management to easily manage your available contacts
- ROI tracking
- Predictive Marketing allows you to estimate future trends
Pricing – SalesManago has 2 plan for users- Basic and Elite. For using basic plan, they charge approx. $199 whereas in the Elite plan they take around $1499.
11. SalesFusion
SalesFusion is an email marketing automation tool that aids business organization that are trying to spread their business through marketing. SalesForce provides an affordable, fully functional and easy to manage marketing platform that promotes business to double their sales and revenues.
Some key automation features are –
- ROI reporting system
- Nurture Relationships to get new leads
- Synchronize all marketing activities
- Website Tracking system to keep a view of the visitors
- Multi-session events, an
- Automated initiation system for communicating with customers
Pricing – SalesFusion comes with two unique pricing options. For a database size of 10,000 contacts, they charge around $950 per month and extra cost with an increase in contact.
12. Act-On
Act-On is a comprehensive and fully furnished email marketing automation platform that was established to help modern business marketing. It is all in one marketing software platform that offers all the automation features through which successful marketing can be done.
Following email marketing automation features, ActOn holds –
- Email marketing to send email in large number
- Social Media Management
- Marketing machine for automated marketing programs and task
- Lead nurturing by systematically contacting prospects
Pricing -Act-On charges accordingly to the number of active connections. They have two pricing plan by which namely- Professional plan, which cost around $660 per month and an Enterprise that takes $2200 per month.
13. MindMatrix
MindMatrix claims to have the robust and best email marketing automation software. Their platform provides a complete integration or more precisely a perfect fusion of sales with marketing. Their platform focuses more on email marketing automation features and therefore embedded various automation features.
Automation features that MindMatrix offers are –
- Keeping view of marketing campaigns and efficiently handling it
- Smarter prospecting tools for new leads
- Multi-channel email marketing automation to have a presence on every marketing platform
- Accurate Lead scoring to focus on the marketing effort
- Efficiently tracking marketing effectiveness
Pricing – MindMatrix pricing starts around $300 per month for one company depending upon a number of contacts.
Conclusion
Hopefully, you are now aware of email marketing automation services and which service is best among these best top 10+ email marketing automation software. Choose the one that is suited to your business and enjoy their services.
Any services left out.? Comment out in space provided below. 🙂
Recommended blogs –
Introduction To PhoneGap

PhoneGap:
PhoneGap is a framework for quickly building a cross-platform mobile application.
It has been developed by Adobe System…
…and further taken care of by Apache group with a new name Apache Cordova.
It is completely free and open source for use.
PhoneGap Apps are written in HTML5 ,CSS3 and Javascript.
Apache Cordova is the core of the backend and erstwhile known as PhoneGap.
It has a bounded performance because of hybrid nature of Apps.

Nature of Apps?
While developing the mobile application, we generally see two kinds of application which are listed below:
Native App:-
These are the dedicated application for a specific operating system.
If you want to use any apps then you have to choose a specific app store.
For example, An App developed for Window can only be accessed by Windows users and is developed using Java, C#, C++ etc.
whereas iOS applications are developed using XCode/Objective-C etc.
This is a very expensive and very time consuming as complete development process happens for a specific app store at a time.
Hybrid App:-
These are the latest HTML5 apps.
The biggest advantage of developing a hybrid app is consistent, cross-platform UI that is compatible with most devices.
This is less expensive app development method but cannot be used for every type of app.
Difference between PhoneGap and Cordova:
Both Apache Cordova and PhoneGap are frameworks for mobile application development.
Apache Cordova is a platform for building native mobile applications using HTML, CSS, and JavaScript.
PhoneGap is an HTML5 app platform that allows you to author native applications with web technologies and get access to APIs and app stores.
Cordova makes sure that it works on all Android Smartphones. You need a Mac and Cordova to wrap it up for iOS.
PhoneGap makes sure that it works on all iOS and Android Smartphones. PhoneGap build services let you allow to do it.

Platform Guides:
PhoneGap is compatible with all possible platforms(OS) like:
- Android
- iOS
- Blackberry
- WebOS
- windows phone
- Symbian
- Bada.
It allows you to run your Apps on any of these operating system.
Note: It can be a probability that your Apps does not run on any of these listed OS because of version change, either of PhoneGap or OS(platform) or other compatible issues. so keep yourself updated with the latest version.
Supported Features:

File Structure:

Hooks:-
Hooks are nothing but an action in programs or scripts that executes various times in build process.
We have approx thirty-two different hook types, few of them are listed below.
- Before_Prepare
- After_Prepare
- Before_Build
- After_Build
Example: For removal of a temporary file from a project before build process.
Plugins:-
Cordova plugins provide an interface between a web view, empowering a Cordova…
…application and the native platform where this Cordova application is running.
Generally Plugins are poised of a single JavaScript interface used across all platforms, and…
…native implementations following platform-specific Plugin interfaces that the JavaScript calls into.
Example: Camera, Battery, Console, Contacts plugins etc.
Config.xml:-
This file contains the scripts which are used in building the hybrid application.
Icons & Splash Screens:
Icons are simply a logo image which helps us to identify a specific application
A splash screen is a graphical control element consisting of a window containing an image, a logo and the current version of the software.
A splash screen usually appears while a game or program is launching.
Icons Size for PhoneGap Android Application:-
- 192px (xxxhdpi)
- 144px (xxhdpi)
- 96px (xhdpi)
- 72px (hdpi)
- 48px (mdpi)
- 36px (ldpi)
- 512×512 pixel – only used in Android Market; resized to various sizes
Icons Size for PhoneGap iOS Application:-
- 57 px, iPhone
- 72 px, iPad
- 114 px, iPhone 4 Retina Display
- 144 px, iPad 3 Retina Display
- 1024 px, iTunes – Used in iTunes and in the App Store sized down to 175px
- 29 px, iPhone Settings/Spotlight, iPad Settings – used in these table views. Minor, but still important!
- 48 px, iPad Spotlight
- 58 px, iPhone 4 Settings/Spotlight
- 64 px document icon
- 320 px document icon
Icons Size for PhoneGap Windows Application:-
Home Screen:
- 62px, small application tile
- 173px, large application tile
- 48px, application bar icons
Windows Phone Marketplace:-
- 99px, small mobile app icon
- 173px, large mobile app icon
- 200px, PC app title icon
- 480x800px, details page screenshot
- 1000x800px, panorama background
- 480x800px, application splash screen
Splash Screen Sizes for phonegap android applications:-
- LDPI:
- Portrait: 200x320px
- Landscape: 320x200px
- MDPI:
- Portrait: 320x480px
- Landscape: 480x320px
- HDPI:
- Portrait: 480x800px
- Landscape: 800x480px
- XHDPI:
- Portrait: 720px1280px
- Landscape: 1280x720px
Splash Screen Sizes for phonegap ios applications:-
- Tablet (iPad)
- Non-Retina (1x)
- Portrait: 768x1024px
- Landscape: 1024x768px
- Retina (2x)
- Portrait: 1536x2048px
- Landscape: 2048x1536px
- Non-Retina (1x)
- Handheld (iPhone, iPod)
- Non-Retina (1x)
- Portrait: 320x480px
- Landscape: 480x320px
- Retina (2x)
- Portrait: 640x960px
- Landscape: 960x640px
- iPhone 5 Retina (2x)
- Portrait: 640x1136px
- Landscape: 1136x640px
- iPhone 6 (2x)
- Portrait: 750x1334px
- Landscape: 1334x750px
- iPhone 6 Plus (3x)
- Portrait: 1242x2208px
- Landscape: 2208x1242px
- Non-Retina (1x)
Splash Screen Sizes for phonegap Windows applications:-
- Portait: 480x800px
- Landscape: unsupported
Conclusion:
This post would definately have helped you in understading the basic concept about PhoneGap/Cordova. Here you would have learned about PhoneGap supported features, PhoneGap file structure, Icons, Splash screen etc.
We will keep you an update regarding the same, so keep in touch & keep reading our blogs. Don’t forget to share your valuable feedback with us from space provided below.
Recommended blogs –
- PhoneGap GPS / PhoneGap Geolocation Plugin
- PhoneGap Local Storage