

Express Checkout is a fast and very easy way for buyer to pay for the product they are buying.
In our previous blog post we have covered the PayPal Integration in PHP Using PDO using which you can sell products via PayPal securely without SDK.
But in this post we will be doing same task using PayPal PHP SDK with Express Checkout, which will help to collect more user information entered at the time of purchase.
According to PayPal adding the Express Checkout button to your website can increase your sales up to 18 percent.
Paypal Express Checkout for Single Product using PayPal PHP SDK

Note: Install.txt file is given in the download folder
Project Integartion
In our last post we have seen how to get Paypal App Id and App Secret, which is necessary to access PayPal PHP SDK.
Follow that post to learn how to get the credentials and put it in bootstrap.php file of this project to setup the required settings.
Then you will be ready to run the project. You can also refer the install.txt file given in download code folder.
PayPal Review Page Order Details
When a buyer logs in to PayPal to check out, you can present the buyer with detailed information about the item being purchased. PayPal order details are available with API version 53.0 or later.
The following diagram shows all of the details that you can include:

- Showing company/application logo
- Product name
- Showing Product prize
- Showing product quantity
- Total payable amount.
Tutorial Scripts in detail:
Below are the details of the code used in this tutorial with proper explanation.
MY-SQL Code
CREATE TABLE IF NOT EXISTS `tbl_product_detail` (
`product_id` int(11) NOT NULL AUTO_INCREMENT,
`item_number` varchar(255) NOT NULL,
`product_name` varchar(255) NOT NULL,
`product_img` varchar(255) NOT NULL,
`product_price` varchar(255) NOT NULL,
`product_currency` varchar(255) NOT NULL,
`product_dec` text NOT NULL,
PRIMARY KEY (`product_id`)
) ENGINE=InnoDB DEFAULT CHARSET=latin1 AUTO_INCREMENT=4 ;
Note : When you will create database tables then you have to store the product information.
Connection.php
This is the file used for database connectivity. It is used for making connection variable by PDO (PHP Data Objects).
<?php
function connection_open() {
// Database credential
$servername = "localhost";
$username = "root";
$password = "";
//Data base name
$dbname = "express_chekout";
try {
global $conn;
// Open the connection using PDO.
$conn = new PDO("mysql:host=$servername;dbname=$dbname", $username, $password);
// set the PDO error mode to exception
$conn->setAttribute(PDO::ATTR_ERRMODE, PDO::ERRMODE_EXCEPTION);
} catch (PDOException $e) {
// echo $sql . "<br>" . $e->getMessage();
die();
}
}
function connection_close() {
global $conn;
$conn = null;
}
?>
Function.php
This file contains all required function for database operation.
<?php
//This function is used for fetching all the records from the table
function Select_All_Records($table_name) {
global $conn;
$sql = "select * from $table_name";
try {
$stmt = $conn->query($sql);
return $stmt;
} catch (PDOException $e) {
print $e->getMessage();
}
}
//This function is used for fetching record with one Filter.
function Select_Record_By_One_Filter($data,$table_name){
global $conn;
$key = array_keys($data);
$value = array_values($data);
$sql = "select * from $table_name where $key[0] = '$value[0]'";
try {
$stmt = $conn->query($sql);
return $stmt;
} catch (PDOException $e) {
print $e->getMessage();
}
}
?>
Bootstrap.php
This file help to load and connect PayPal PHP SDK with your application.
<?php
// Include the composer Autoloader
// The location of your project's vendor autoloader.
$composerAutoload = 'PayPal-PHP-SDK/autoload.php';
if (!file_exists($composerAutoload)) {
//If the project is used as its own project, it would use rest-api-sdk-php composer autoloader.
$composerAutoload = 'PayPal-PHP-SDK/vendor/autoload.php';
if (!file_exists($composerAutoload)) {
echo "The 'vendor' folder is missing. You must run 'composer update' to resolve application dependencies.nPlease see the README for more information.n";
exit(1);
}
}
require $composerAutoload;
require __DIR__ . '/common.php';

use PayPalRestApiContext;
use PayPalAuthOAuthTokenCredential;

error_reporting(E_ALL);
ini_set('display_errors', '1');

// Replace these values by entering your own ClientId and Secret by visiting https://developer.paypal.com/webapps/developer/applications/myapps
$clientId = 'Your PayPal App Id';
$clientSecret = 'Your PayPal App Secret';
$mode = 'sandbox';

/** @var PaypalRestApiContext $apiContext */
$apiContext = getApiContext($clientId, $clientSecret);

return $apiContext;

function getApiContext($clientId, $clientSecret) {

// ### Api context
// Use an ApiContext object to authenticate
// API calls. The clientId and clientSecret for the
// OAuthTokenCredential class can be retrieved from
// developer.paypal.com

$apiContext = new ApiContext(
new OAuthTokenCredential(
$clientId, $clientSecret
)
);

// Comment this line out and uncomment the PP_CONFIG_PATH
// 'define' block if you want to use static file
// based configuration
global $mode;
$apiContext->setConfig(
array(
'mode' => $mode,
'log.LogEnabled' => true,
'log.FileName' => '../PayPal.log',
'log.LogLevel' => 'DEBUG', // PLEASE USE `FINE` LEVEL FOR LOGGING IN LIVE ENVIRONMENTS
'validation.level' => 'log',
'cache.enabled' => true,
// 'http.CURLOPT_CONNECTTIMEOUT' => 30
// 'http.headers.PayPal-Partner-Attribution-Id' => '123123123'
)
);

// Partner Attribution Id
// Use this header if you are a PayPal partner. Specify a unique BN Code to receive revenue attribution.
// To learn more or to request a BN Code, contact your Partner Manager or visit the PayPal Partner Portal
// $apiContext->addRequestHeader('PayPal-Partner-Attribution-Id', '123123123');
return $apiContext;
}
Index.php
This is the first file showing products details.
<?php
include('include/function.php');
include('include/connection.php');
echo connection_open();
?>
<html>
<head>
<title>Paypal Express Checkout for single product using PayPal PHP SDK</title>
<link rel="stylesheet" type="text/css" href="css/style.css">
<link rel="stylesheet" type="text/css" href="css/popup-style.css" />
<script src="js/jquery-latest.js" type="text/javascript"></script>
</head>
<body>
<div id = "main">
<h1>PayPal Express Checkout : Single Product</h1>
<?php
//Select_All_Records function is used for fetching all the records from the table
$query = Select_All_Records('tbl_product_detail');
$query->setFetchMode(PDO::FETCH_ASSOC);
while ($result = $query->fetch()) {
?>
<div id = "login">
<h2><?php echo $result['product_name']; ?></h2>
<hr/>
<form action = "process.php" method = "post">
<input type = "hidden" value = "<?php echo $result['item_number']; ?>" name = "product_id">
<img id = "product_img" src = "images/<?php echo $result['product_img']; ?>"/><br><br>
<div id = "product_content">
<h4 style="margin: 0px;">Description</h4>
<p><?php echo $result['product_dec']; ?></p>
</div>
<input type = "submit" value = " Buy Now $ <?php echo $result['product_price']; ?> " id="submit" name = "submit"/><br />
<span></span>
</form>
</div>
<?php } ?>
<img id="paypal_logo" style="margin-left: 722px;" src="images/secure-paypal-logo.jpg">
</div>
//This Pop-Up will called when we click on Buy Now Button
<div id="pop2" class="simplePopup">
<div id="loader"><img src="images/ajax-loader.gif"/><img id="processing_animation" src="images/processing_animation.gif"/></div>
</div>
<script src="js/jquery.simplePopup.js" type="text/javascript"></script>
<script type="text/javascript">
$(document).ready(function() {
$('input#submit').click(function() {
$('#pop2').simplePopup();
});
});
</script>
</body>
</html>
Process.php
This file contains code to process payment to PayPal.
<?php
require __DIR__ . '/bootstrap.php';

use PayPalApiAmount;
use PayPalApiDetails;
use PayPalApiItem;
use PayPalApiItemList;
use PayPalApiPayer;
use PayPalApiPayment;
use PayPalApiRedirectUrls;
use PayPalApiTransaction;

include('include/function.php');
include('include/connection.php');
if (isset($_POST['submit'])) {
echo connection_open();
if (isset($_POST['product_id'])) {
$product_id = base64_decode($_POST['product_id']);
$data = array(
'product_id' => $product_id
);
$query = Select_Record_By_One_Filter($data, 'tbl_product_detail');
$query->setFetchMode(PDO::FETCH_ASSOC);
$result = $query->fetch();
$product_name = $result['product_name'];
$product_price = $result['product_price'];
$product_currency = $result['product_currency'];
echo connection_close();
}
// ### Payer
// A resource representing a Payer that funds a payment
// For paypal account payments, set payment method
// to 'paypal'.
$payer = new Payer();
$payer->setPaymentMethod("paypal");

// ### Itemized information
// (Optional) Lets you specify item wise
// information
$item1 = new Item();
$item1->setName($product_name)
->setCurrency($product_currency)
->setQuantity(1)
->setPrice($product_price);

$itemList = new ItemList();
$itemList->setItems(array($item1));

// ### Additional payment details
// Use this optional field to set additional
// payment information such as tax, shipping
// charges etc.
$details = new Details();
$details->setShipping(0)
->setTax(0)
->setSubtotal($product_price);

// ### Amount
// Lets you specify a payment amount.
// You can also specify additional details
// such as shipping, tax.
$amount = new Amount();
$amount->setCurrency($product_currency)
->setTotal($product_price)
->setDetails($details);

// ### Transaction
// A transaction defines the contract of a
// payment - what is the payment for and who
// is fulfilling it.
$transaction = new Transaction();
$transaction->setAmount($amount)
->setItemList($itemList)
->setDescription("Payment description")
->setInvoiceNumber(uniqid());

// ### Redirect urls
// Set the urls that the buyer must be redirected to after
// payment approval/ cancellation.
$baseUrl = getBaseUrl();
$redirectUrls = new RedirectUrls();
$redirectUrls->setReturnUrl("http://localhost/express-checkout-single-product/success.php?success=true")
->setCancelUrl("http://localhost/express-checkout-single-product/index.php");

// ### Payment
// A Payment Resource; create one using
// the above types and intent set to 'sale'
$payment = new Payment();
$payment->setIntent("sale")
->setPayer($payer)
->setRedirectUrls($redirectUrls)
->setTransactions(array($transaction));
// For Sample Purposes Only.
$request = clone $payment;
// url to which the buyer must be redirected to
// for payment approval
try {
$payment->create($apiContext);
} catch (Exception $ex) {
//ResultPrinter::printError("Created Payment Using PayPal. Please visit the URL to Approve.", "Payment", null, $request, $ex);
exit(1);
}

// ### Get redirect url
// The API response provides the url that you must redirect
// the buyer to. Retrieve the url from the $payment->getApprovalLink()
// method
$approvalUrl = $payment->getApprovalLink();
header('Location: ' . $approvalUrl);
}
?>
Success.php
PayPal calls this file when payment gets successfully completed and provide detailed transaction information as response in json format.
<?php
require __DIR__ . '/bootstrap.php';

use PayPalApiExecutePayment;
use PayPalApiPayment;
use PayPalApiPaymentExecution;

// ### Approval Status
// Determine if the user approved the payment or not
if (isset($_GET['success']) && $_GET['success'] == 'true') {
// Get the payment Object by passing paymentId
// payment id was previously stored in session in
// CreatePaymentUsingPayPal.php
$paymentId = $_GET['paymentId'];
$payment = Payment::get($paymentId, $apiContext);

// ### Payment Execute
// PaymentExecution object includes information necessary
// to execute a PayPal account payment.
// The payer_id is added to the request query parameters
// when the user is redirected from paypal back to your site
$execution = new PaymentExecution();
$execution->setPayerId($_GET['PayerID']);
$result = $payment->execute($execution, $apiContext);
$obj = json_decode($payment);
?>
<html>
<head>
<title>Paypal Express Checkout for single product using PayPal PHP SDK</title>
<link rel = "stylesheet" type = "text/css" href = "css/style.css">
<script src="http://ajax.googleapis.com/ajax/libs/jquery/1.11.2/jquery.min.js"></script>
<script>
$(document).ready(function() {
$("a.Show").click(function() {
$("div#return").css({'overflow': 'scroll'});
$("a.Show").hide();
$("a.hide").show();

});
$("a.hide").click(function() {
$("div#return").css({'overflow': 'hidden'});
$("a.Show").show();
$("a.hide").hide();

});
});
</script>
</head>
<body>

<div id="main">
<h1>PayPal Express Checkout : Single Product</h1>
<div id="return">
<h2>Payment Detail</h2>
<hr/>
<a href="index.php"><img style="float: left;" title="Back To Product" src="images/back.png"></a><a class="show" ><img title="Show All Paypal's Returned Data" style="float: right;"src="images/down.png"></a><a class="hide" style="display: none;" ><img title="Hide Paypal's Returned Data" style="float: right;"src="images/up.png"></a>
<div class="clearfix"></div>
<br/>
<ul>
<li><?php echo "Id --> " . $obj->id ?></li>
<li><?php echo "create_time --> " . $obj->create_time ?></li>
<li><?php echo "update_time --> " . $obj->update_time ?></li>
<li><?php echo "state --> " . $obj->state ?></li>
<li><?php echo "intent --> " . $obj->intent ?></li>
<li>payer</li>
<ul>
<li><?php echo "payment_method --> " . $obj->payer->payment_method ?></li>
<li>payer_info</li>
<ul>
<li><?php echo "email --> " . $obj->payer->payer_info->email ?></li>
<li><?php echo "first_name --> " . $obj->payer->payer_info->first_name ?></li>
<li><?php echo "last_name --> " . $obj->payer->payer_info->last_name ?></li>
<li><?php echo "payer_id --> " . $obj->payer->payer_info->payer_id ?></li>
<li><?php echo "shipping_address" ?></li>
<ul>
<li><?php echo "line1 --> " . $obj->payer->payer_info->shipping_address->line1 ?></li>
<li><?php echo "city --> " . $obj->payer->payer_info->shipping_address->city ?></li>
<li><?php echo "state --> " . $obj->payer->payer_info->shipping_address->state ?></li>
<li><?php echo "postal_code --> " . $obj->payer->payer_info->shipping_address->postal_code ?></li>
<li><?php echo "country_code --> " . $obj->payer->payer_info->shipping_address->country_code ?></li>
<li><?php echo "recipient_name --> " . $obj->payer->payer_info->shipping_address->recipient_name ?></li>
</ul>
</ul>
</ul>
<li>transactions</li>
<ul>
<li>amount</li>
<ul>
<li><?php echo "total --> " . $obj->transactions[0]->amount->total ?></li>
<li><?php echo "currency --> " . $obj->transactions[0]->amount->currency ?></li>
<li>details</li>
<ul>
<li><?php echo "subtotal --> " . $obj->transactions[0]->amount->details->subtotal ?></li>
</ul>
</ul>
<li><?php echo "description --> " . $obj->transactions[0]->description ?></li>
<li>item_list</li>
<ul>
<li>items</li>
<ul>
<li><?php echo "name --> " . $obj->transactions[0]->item_list->items[0]->name ?></li>
<li><?php echo "price --> " . $obj->transactions[0]->item_list->items[0]->price ?></li>
<li><?php echo "currency --> " . $obj->transactions[0]->item_list->items[0]->currency ?></li>
<li><?php echo "quantity --> " . $obj->transactions[0]->item_list->items[0]->quantity ?></li>
</ul>
<li>shipping_address</li>
<ul>
<li><?php echo "recipient_name --> " . $obj->transactions[0]->item_list->shipping_address->recipient_name ?></li>
<li><?php echo "line1 --> " . $obj->transactions[0]->item_list->shipping_address->line1 ?></li>
<li><?php echo "city --> " . $obj->transactions[0]->item_list->shipping_address->city ?></li>
<li><?php echo "state --> " . $obj->transactions[0]->item_list->shipping_address->state ?></li>
<li><?php echo "postal_code --> " . $obj->transactions[0]->item_list->shipping_address->postal_code ?></li>
<li><?php echo "country_code --> " . $obj->transactions[0]->item_list->shipping_address->country_code ?></li>
</ul>
</ul>
<li>related_resources</li>
<ul>
<li>sale</li>
<ul>
<li><?php echo "id --> " . $obj->transactions[0]->related_resources[0]->sale->id ?></li>
<li><?php echo "create_time --> " . $obj->transactions[0]->related_resources[0]->sale->create_time ?></li>
<li><?php echo "update_time --> " . $obj->transactions[0]->related_resources[0]->sale->update_time ?></li>
<li>amount</li>
<ul>
<li><?php echo "total- -> " . $obj->transactions[0]->related_resources[0]->sale->amount->total ?></li>
<li><?php echo "currency- -> " . $obj->transactions[0]->related_resources[0]->sale->amount->currency ?></li>
</ul>
<li><?php echo "payment_mode- -> " . $obj->transactions[0]->related_resources[0]->sale->payment_mode ?></li>
<li><?php echo "state- -> " . $obj->transactions[0]->related_resources[0]->sale->state ?></li>
<li><?php echo "protection_eligibility- -> " . $obj->transactions[0]->related_resources[0]->sale->protection_eligibility ?></li>
<li><?php echo "protection_eligibility_type- -> " . $obj->transactions[0]->related_resources[0]->sale->protection_eligibility_type ?></li>
<li><?php echo "parent_payment- -> " . $obj->transactions[0]->related_resources[0]->sale->parent_payment ?></li>
<li>transaction_fee</li>
<ul>
<li><?php echo "value --> " . $obj->transactions[0]->related_resources[0]->sale->transaction_fee->value ?></li>
<li><?php echo "currency --> " . $obj->transactions[0]->related_resources[0]->sale->transaction_fee->currency ?></li>
</ul>
<li>links</li>
<ul>
<li><?php echo "href --> " . $obj->transactions[0]->related_resources[0]->sale->links[0]->href ?></li>
<li><?php echo "rel --> " . $obj->transactions[0]->related_resources[0]->sale->links[0]->rel ?></li>
<li><?php echo "method --> " . $obj->transactions[0]->related_resources[0]->sale->links[0]->method ?></li>
</ul>
<ul>
<li><?php echo "href --> " . $obj->transactions[0]->related_resources[0]->sale->links[1]->href ?></li>
<li><?php echo "rel --> " . $obj->transactions[0]->related_resources[0]->sale->links[1]->rel ?></li>
<li><?php echo "method --> " . $obj->transactions[0]->related_resources[0]->sale->links[1]->method ?></li>
</ul>
<ul>
<li><?php echo "href --> " . $obj->transactions[0]->related_resources[0]->sale->links[2]->href ?></li>
<li><?php echo "rel --> " . $obj->transactions[0]->related_resources[0]->sale->links[2]->rel ?></li>
<li><?php echo "method --> " . $obj->transactions[0]->related_resources[0]->sale->links[2]->method ?></li>
</ul>
</ul>
</ul>
</ul>

</ul>
</div>
<!-- Right side div -->
<div id="formget">
<a href=https://www.formget.com/app><img src="images/formget.jpg" alt="Online Form Builder"/></a>
</div>
</div>
</body>
</html>
<?php } ?>
Style.css
Includes basic styling of HTML elements.
@import url(http://fonts.googleapis.com/css?family=Raleway);

#main{
width: 950PX;
margin: 50PX auto;
font-family:raleway;
}
span{
color:red;
}
h1{
margin-left: 14%;
}
#return {
width: 492px;
height: 350px;
float: left;
border-radius: 10px;
font-family: raleway;
border: 2px solid #ccc;
padding: 10px 40px 11px;
margin: 16PX;
}
h2{
background-color: #FEFFED;
text-align:center;
border-radius: 10px 10px 0 0;
margin: -10px -40px;
padding: 15px;
}
hr{
border:0;
border-bottom:1px solid #ccc;
margin: 10px -40px;
margin-bottom: 30px;
}
#login{
width: 200px;
float: left;
border-radius: 10px;
font-family:raleway;
border: 2px solid #ccc;
padding: 10px 40px 11px;
margin: 16PX;
}
input[type=text],input[type=password]{
width:99.5%;
padding: 10px;
margin-top: 8px;
border: 1px solid #ccc;
padding-left: 5px;
font-size: 16px;
font-family:raleway;
}
input[type=submit]{
width: 100%;
background-color:#FFBC00;
color: white;
border: 2px solid #FFCB00;
padding: 10px;
font-size:20px;
cursor:pointer;
border-radius: 5px;
margin-bottom: 15px;
}
#profile{
padding:50px;
border:1px dashed grey;
font-size:20px;
background-color:#DCE6F7;
}
#logout{
float:right;
padding:5px;
border:dashed 1px gray;
}
a{
text-decoration:none;
color: cornflowerblue;
}
i{
color: cornflowerblue;
}
ul{
line-height: 22px;
}
#product_img{
width: 210px;

height: 230px;
}
#product_content{
width: 198px;
height: 116px;
padding: 10px;
margin-bottom: 23px;
font-size: 14px;
border: 1px solid rgba(128, 128, 128, 0.17);
}
#return{
width: 585px;
height: 507px;
float: left;
border-radius: 10px;
font-family: raleway;
border: 2px solid #ccc;
padding: 10px 40px 30px;
margin: 16PX;
overflow: hidden;
}
#return h3#success{
text-align: center;
font-size: 24px;
margin-top: 50px;
color: green;
}
#return h3#fail{
text-align: center;
font-size: 24px;
margin-top: 50px;
color: red;
}
#btn{
width: 100%;
background-color: #FFBC00;
color: white;
border: 2px solid #FFCB00;
padding: 10px 70px;
font-size: 20px;
cursor: pointer;
border-radius: 5px;
margin-bottom: 15px;
margin: 0 auto;
}
#return .back_btn{
margin-top: 51px;
margin-left: 19%;
}
#return P{
margin-left: 122px;
}
#formget{
float:right;
margin-top: 20px;
}
#loader
{
margin-left: 8%;
margin-bottom: 45px;
}
#loader #processing_animation {
width: 70%;
height: 12%;
}
ul li{
margin-left: 90px;
}
#return img:hover{
opacity: .4;
}
Conclusion :
After reading the above post, I am sure you will give a try to the script provided and implement it in your own projects as well. Feel free to visit our website again in the future to get in touch with new coding tricks. You can let us know about your feedback in the space provided below ![]()
Android View Classes

In this tutorial I’ve given brief explanation about Andriod View Class. View Class are the basic building block for user interface components. A View occupies a 2-dimensional area (say: rectangle) on the screen, which is responsible for framing and handling different type of events.
In our previous blog posts, we have learned Android installation steps and made first program called Hello world (built in XML code). The program was created to show text output in the AVD.
Views are used to create input and output fields in the an Android App. It can be input text field, radio field, image field etc. They are same as, input text field, image tag to show images, radio field in HTML.

Most Commonly Used Android View classes:
These views can be used to create a useful input and output fields.
- Text View
- EditText
- Button
- ImageView
- ImageButton
- CheckBox
- Radio button
- RadioGroup
- ListView
- Spinner
- AutoCompleteTextView
View Group Class
The View-Group is the base class for layouts, which holds other Views and define their properties. Actually an application comprises combination and nesting of Views-Group and Views Classes.

Text View:
This class is used to display text on the android application screen. It also allows user to optionally edit it. Although it contains text editing operations, the basic class does not allow editing, So Edit Text class is included to do so.

Syntax For Text View In XML Coding Is:
XML coding of text view:
<LinearLayout xmlns:android="http://schemas.android.com/apk/res/android"
android:layout_width="fill_parent"
android:layout_height="fill_parent"
android:orientation="vertical" >

<TextView
android:id="@+id/myTextview"
android:layout_width="fill_parent"
android:layout_height="wrap_content"
android:text="Mangnet Brains"
android:textSize="25dp"
android:textColor="@android:color/black"
android:typeface="serif"
android:gravity="center"
android:padding="10dp"
android:layout_margin="20dp" />
</LinearLayout>
Edit Text:
This class makes text to be editable in Android application. It helps in building the data interface taken from any user, also contains certain features through which we can hide the data which are confidential.

Syntax For Edit Text In XML Coding Is:
XML coding of edit text:
<LinearLayout xmlns:android="http://schemas.android.com/apk/res/android"
android:layout_width="fill_parent"
android:layout_height="fill_parent"
android:orientation="vertical" >

<EditText
android:id="@+id/myEdittext"
android:layout_width="fill_parent"
android:layout_height="wrap_content"
android:textSize="20dp"
android:textStyle="bold"
android:typeface="serif"
android:gravity="center"
android:padding="10dp"
android:layout_margin="20dp"
android:hint="Enter a Number"
android:singleLine="true"
android:inputType="textPassword" />

</LinearLayout>
Image view:
Image view helps to display images in an android application. Any image can be selected, we just have to paste our image in a drawable folder from where we can access it. For example: In below Code “@drawable/ic_laucher” has been taken.

Syntax For Image View In XML Coding Is:
XML coding of Image view:
<LinearLayout
xmlns:android="http://schemas.android.com/apk/res/android"
android:layout_width="fill_parent"
android:layout_height="fill_parent"
android:orientation="vertical"
android:gravity="center_horizontal" >

<ImageView
android:id="@+id/myimageview"
android:layout_width="100dp"
android:layout_height="100dp"
android:layout_margin="20dp"
android:gravity="center"
android:padding="10dp"
android:src="@drawable/ic_launcher" />
Check Box:
Checkbox is used in that applications where we have to select one option from multiple provided. Checkbox is mainly used when 2 or more options are present.

Syntax For CheckBox In XML Coding Is:
XML coding of checkbox:
<LinearLayout

xmlns:android="http://schemas.android.com/apk/res/android"
android:layout_width="fill_parent"
android:layout_height="fill_parent" >

<CheckBox
android:id="@+id/checkBox1"
android:layout_width="100dp"
android:layout_height="wrap_content"
android:layout_margin="20dp"
android:text="Formget."
android:checked="true" />
<CheckBox
android:id="@+id/checkBox2"
android:layout_width="100dp"
android:layout_height="wrap_content"
android:layout_margin="20dp"
android:text="Mailget." />

</LinearLayout>
Radio Button:
Radio button is like checkbox, but there is slight difference between them. Radio button is a two-states button that can be either checked or unchecked.

Syntax For Radio Button In XML Coding Is:
XML coding of Radio Button:
<LinearLayout xmlns:android="http://schemas.android.com/apk/res/android"
android:layout_width="fill_parent"
android:layout_height="fill_parent"
android:orientation="vertical"
android:gravity="center_horizontal" >

<RadioButton
android:id="@+id/radioButton1"
android:layout_width="100dp"
android:layout_height="wrap_content"
android:layout_margin="20dp"
android:text="Formget"
android:checked="true" />
<RadioButton
android:id="@+id/radioButton1"
android:layout_width="100dp"
android:layout_height="wrap_content"
android:layout_margin="20dp"
android:text="Mailget" />
</LinearLayout>
Button View:
This class is used to create a button on an application screen. Buttons are very helpful in getting into a content. Android button represents a clickable push-button widget.

Syntax For Button In XML Coding Is:
XML coding of button:
<LinearLayout xmlns:android="http://schemas.android.com/apk/res/android"
android:layout_width="fill_parent"
android:layout_height="fill_parent" >

<Button
android:id="@+id/button1"
android:layout_width="match_parent"
android:layout_height="wrap_content"
android:text="Click Here !" />

</LinearLayout>
Image Button View:
Image button is a button but it carries an image on it. We can put an image or a certain text on it and when we click it provides the operations assigned to it.

Syntax For Image Button In XML Coding Is:
XML coding of Image button:
<LinearLayout xmlns:android="http://schemas.android.com/apk/res/android"
android:layout_width="fill_parent"
android:layout_height="fill_parent"
android:orientation="vertical" >

<ImageButton
android:id="@+id/imageButton1"
android:layout_width="match_parent"
android:layout_height="wrap_content"
android:layout_gravity="center"
android:src="@drawable/ic_launcher" />

</LinearLayout>
Conclusion :
From this tutorial you know different types of view classes in Android and their functionality . They can be nested to do multiple functions at a higher level of coding, that we will be learning in our next blogs. Basically, these functions are used to create any applications. Hope you like it keep visiting for more posts from android. 🙂
PayPal OAuth Login using PHP

In our previous blog, we have seen, how to use facebook and google OAuth for logging into any particular website. In this blog post, we will do the same task using PayPal OAuth.
Which means that if you have already an account in PayPal, then you can login into that website directly which has this option in the login page without filling out the signup form.
Watch the live demo or download code from the below-given links

Note: Install.txt file is given in the download folder.
How to implement it
The download folder contains all the required files, like PayPal PHP SDK, Httpful library, composer.json and other required files too.
Put this folder in your local server and put App Id, App Secret and return URL in these two files, paypal_authentication.php & paypal_login.php.
Now run this page to live the script:
http://localhost/paypal_oauth/paypal_login.php
The detailed steps for tutorial are given below
First we will see few key steps that is necessary to be done. We are following this step to minimize PayPal PHP SDK dependency.
- Create a separate project folder where the files to be kept. (say: Project)
- Download PayPal PHP SDK from the link given and extract it in the project folder: https://github.com/paypal/PayPal-PHP-SDK/releases
- For SDK dependency we are using Httpful library. Here is the link from where you have to download it and then keep in the same folder: http://phphttpclient.com/#install
- Create composer.json and paste the code given below and save the file in the project folder.
composer.json
{
"require": {
"nategood/httpful": "*"
}
}
Note: Download code already contains these files.
Steps for Getting PayPal App ID and App secret key
In PayPal open authentication, App Id and the App secret key are required for authenticating a valid PayPal account. The steps to get App id and App Secret are:
Step 1: Login to PayPal account (https://developer.paypal.com/)

Step 2: Now click on Dashboard

Step 3: Click on Create App button which will appear at top-right corner of the window

Step 4: Now add App name and also select your business account and click on Create App button.

Step 5: This page will show your sandbox credential. For live PayPal App credentials just go to Live menu tab and click on Transactions tab.

Step 6: Then click on Create you first PayPal live app and then receive API Credentials link.

Step 7: Click on MyApp (App name given above)

Step 8: Click on Edit option to customize App Redirect URL link

Step 9: Put App redirect URL

Step 10: Click on Live Credentials to show App Id and App Secret

Step 11: App Id and App Secret will appear like this

Now copy them and put this App id and App Secret in the file naming paypal_authentication.php in place of put your App Id here and put your App Secret here.
Tutorial Scripts in detail:
The code used in the script with detailed description is given below.
Paypal_authentication.php
This file contains code for PayPal integration where first two line help to integrate PayPal-PHP-SDK via composer. In this file you need to add your PayPal App Id and App Secret key. At last it will send user data to their return page which we have put in PayPal account (In our case return page is result.php).
<?php
include('./httpful.phar');
// helper package autoload.
require __DIR__ . '/PayPal-PHP-SDK/autoload.php';

// setting some variables here.
$clientId = 'put your App Id here';
$clientSecret = 'put your App Secret here';
$requestData = '?grant_type=authorization_code&code='.$_GET['code'].'&return_url=http://paypal.hellofrancesco.com/paypal_test/return.php';

// here we exchange the authorization code with access and refresh tokens.
$response = HttpfulRequest::get('https://api.paypal.com/v1/identity/openidconnect/tokenservice' . $requestData)
->authenticateWith($clientId, $clientSecret)
->send();

$jsonResponse = json_decode($response->raw_body);

// checking out for errors.
if(isset($jsonResponse->error))
{
die('Error: just got some problems during operations. Try again.');
}

// getting user data, using the Identity APIs.
$response = HttpfulRequest::get('https://api.paypal.com/v1/identity/openidconnect/userinfo/?schema=openid')
->contentType("application/json")
->authorization($jsonResponse->access_token)
->authenticateWith($clientId, $clientSecret)
->send();

// user data is here!
$user = json_decode($response->raw_body);
Paypal_login.php
This php file show PayPal login button. Here you should add your PayPal App Id and return URL for your App.
<html>
<head>
<title>login with paypal</title>
<link rel="stylesheet" type="text/css" href="css/style.css">
</head>
<body>
<div id="main">
<h1>Log in With PayPal</h1>
<div id="login">
<h2>PayPal OAuth</h2>
<hr/>
<img id="paypal_img" src="images/new-paypal-logo.jpg"/>
<div id="paypal_button"><span id="myContainer"></span></div>
<script src="https://www.paypalobjects.com/js/external/api.js"></script>
<script>
paypal.use( ["login"], function(login) {
login.render ({
//Put your App Id
"appid": "put your App Id here",
"scopes": "profile email address phone https://uri.paypal.com/services/paypalattributes",
"containerid": "myContainer",
"locale": "en-us",
//Put return URL
"returnurl": "<?php echo('http://'.$_SERVER['HTTP_HOST'].preg_replace('/paypal_login.php/','result.php',$_SERVER['SCRIPT_NAME']))?>"
});
});
</script>
</div>
<div id="formget">
<a href=https://www.formget.com/app><img src="images/formget.jpg" alt="Online Form Builder"/></a>
</div>
</div>
</body>
</html>
Result.php
This file get user details via paypal_authentication.php file.
<?php session_start();

require('paypal_authentication.php') ;
$_SESSION["name"] = $user->name;
$_SESSION['user'] = array (
"email" => $user->email,
"given_name" => $user->given_name,
"family_name" => $user->family_name,
"language" => $user->language,
"phone_number" => $user->phone_number,
"street_address" => $user->address->street_address,
"locality" => $user->address->locality,
"region" => $user->address->region,
"postal_code" => $user->address->postal_code,
"country" => $user->address->country,
"account_type" => $user->account_type,
"verified_account" => $user->verified_account,
"account_creation_date" => $user->account_creation_date,
"age_range" => $user->age_range,
"birthday" => $user->birthday,
"zoneinfo" => $user->zoneinfo
);
?>
<!DOCTYPE html>
<html>
<head>
<title>Login with PayPal - Demo App</title>
</head>
<body>
</body>
<script>

window.opener.location.href ="loading_paypal_data.php";
window.close();
</script>
</html>
Loading_paypal_data.php
This file will call when PayPal iframe close and show simple message on popup.
<?php session_start();?>
<html>
<head>
<title>login with paypal</title>
<link rel="stylesheet" type="text/css" href="css/style.css">
<link rel="stylesheet" type="text/css" href="css/popup-style.css" />
<script src="js/jquery-latest.js" type="text/javascript"></script>
</head>
<body onload="loading();">
<div id="main">
<h1>Log in With PayPall</h1>
<div id="login">
<h2>PayPal OAuth</h2>
<hr/>
<img id="paypal_img" src="images/new-paypal-logo.jpg"/>
<div id="paypal_button"><span id="myContainer"></span></div>
<script src="https://www.paypalobjects.com/js/external/api.js"></script>
<script>
paypal.use( ["login"], function(login) {
login.render ({ "containerid": "myContainer", });
});
</script>
</div>
</div>
<div id="pop2" class="simplePopup">
<!-- <img src="images/formget_logo.png" class="formget_logo">-->
<img src="images/paypal_loader.gif" class="load">
<p class="load_text">Loading Your Information By...</p>
<img src="images/paypal_logo.jpg" class="logo">
</div>
</body>
<script src="js/jquery.simplePopup.js" type="text/javascript"></script>
<?php if(!empty($_SESSION)){?>
<script type="text/javascript">
function loading(){
$('#pop2').simplePopup();
}
setTimeout(function(){ window.location.replace("profile.php"); }, 3000);
</script>
<?php }?>
</html>
Profile.php
profile.php contain code for showing user information in table format with logout option.
<?php
session_start();
if (empty($_SESSION['user'])) {
header('Location: paypal_login.php');
}
?>
<html>
<head>
<title>login with paypal</title>
<link rel="stylesheet" type="text/css" href="css/style.css">
</head>
<body >
<div id="main">
<h1 id="title" >Log in With PayPal</h1>
<div id="paypal_info">
<h2>PayPal OAuth<a href="<?php echo "logout.php" ?>" ><img id="paylpal_logout" src="images/logout_menu.png"></a></h2>
<hr/>
<div id="user_info">
<table style="width:100%">
<tr>
<td><p>Name : </p></td>
<td><label> <?php echo $_SESSION['user']['given_name'] . " " . $_SESSION['user']['family_name']; ?></label></td>
</tr>
<tr>
<td><p>Email :</p> </td>
<td><label> <?php echo $_SESSION['user']['email']; ?></label></td>
</tr>
<tr>
<td><p>Mobile No. :</p></td>
<td><label> <?php echo $_SESSION['user']['phone_number']; ?></label></td>
</tr>
<tr>
<td><p>Account Creation Date :</p></td>
<td><label> <?php echo $_SESSION['user']['account_creation_date']; ?></label></td>
</tr>
<tr>
<td><p>Verified Account :</p></td>
<td><label> <?php echo $_SESSION['user']['verified_account']; ?></label></td>
</tr>
<tr>
<td><p>Street Address :</p></td>
<td><label> <?php echo $_SESSION['user']['street_address']; ?></label></td>
</tr>
<tr>
<td><p>Postal Code :</p></td>
<td><label> <?php echo $_SESSION['user']['postal_code']; ?></label></td>
</tr>
<tr>
<td><p>Locality : </p></td>
<td><label> <?php echo $_SESSION['user']['locality']; ?></label></td>
</tr>
<tr>
<td><p>Region :</p></td>
<td><label> <?php echo $_SESSION['user']['region']; ?></label></td>
</tr>
<tr>
<td><p>Zone Info :</p></td>
<td><label> <?php echo $_SESSION['user']['zoneinfo']; ?></label></td>
</tr>
</table>
</div>
</div>
<!-- Right side div -->
<div id="formget">
<a href=https://www.formget.com/app><img src="images/formget.jpg" alt="Online Form Builder"/></a>
</div>
</div>
</body>
</html>
Logout.php
This file helps to logout from app.
<?php session_start();
$_SESSION['user'] = null;
header('Location: paypal_login.php')
?>
Style.css
Styling html code.
@import url(http://fonts.googleapis.com/css?family=Raleway);

#main{
width: 960px;
margin:50px auto;
font-family:raleway;
}
span{
color:red;
}
h2{
background-color: #029DE0;
text-align:center;
border-radius: 10px 10px 0 0;
margin: -10px -40px;
padding: 15px;
color: white;
}
hr{
border:0;
border-bottom:1px solid #ccc;
margin: 10px -40px;
margin-bottom: 30px;
}
#login{
width:300px;
float: left;
border-radius: 10px;
font-family:raleway;
border: 2px solid #ccc;
padding: 10px 40px 25px;
margin-top: 70px;
}
input[type=text],input[type=password]{
width:99.5%;
padding: 10px;
margin-top: 8px;
border: 1px solid #ccc;
padding-left: 5px;
font-size: 16px;
font-family:raleway;
}
input[type=submit]{
width: 100%;
background-color:#FFBC00;
color: white;
border: 2px solid #FFCB00;
padding: 10px;
font-size:20px;
cursor:pointer;
border-radius: 5px;
margin-bottom: 15px;
}
#profile{
padding:50px;
border:1px dashed grey;
font-size:20px;
background-color:#DCE6F7;
}
#logout{
float:right;
padding:5px;
border:dashed 1px gray;
}
a{
text-decoration:none;
color: cornflowerblue;
}
i{
color: cornflowerblue;
}
#formget{
float:right;
}
#paypal_img{
width:100%;
}
#paypal_button{
margin: 20px 68px;
}
#main h1{
margin: -2px 58px;
}
#paypal_info{
width: 55%;
float: left;
border-radius: 10px;
font-family:raleway;
border: 2px solid #ccc;
padding: 10px 40px 25px;
margin-top: 70px;
}
h1#title{
margin-left: 19%;
margin-bottom: -27px;
}
img#paylpal_logout{
width: 45px;
height: 43px;
float: right;
margin-top: -7px;
margin-right: -7px;
}
Conclusion :
After reading the above post, I am sure you will give a try to the script provided and implement it in your own projects as well. Feel free to visit our website again in the future to get in touch with new coding tricks. You can let us know about your feedback in the space provided below ![]()
Paypal Coupon Code in PHP using PDO

We have already discussed in our previous blog, how to Integrate PayPal payment gateway using PHP and PDO (PHP Data Objects) to collect online payments.
Think, if you want to add a coupon feature also so that users get attracted to your offers and go for a payment instantly.
Here, in this tutorial we will be going to see, how we can add Coupon Code feature in our PayPal payment system.
Watch the live demo or download code from the below-given links

Note : The installation documentation is given in the download file.
Basic concept of generating coupon code:
Initially, we store coupon codes and discounted value in our database ( table: coupon_detail ). In run time, we fetch the coupon id randomly and based upon that we fetch coupon value of that particular id.
//This function is used for fetching one random record.
function Select_One_Random_Record($table_name) {
global $conn;
$sql = "SELECT * FROM $table_name ORDER BY RAND() LIMIT 1";
try {
$stmt = $conn->query($sql);
return $stmt;
} catch (PDOException $e) {
print $e->getMessage();
}
}
After this using, Ajax function will validate the coupon id and its value to prevent false implementation.
function check_promo_code() {
$.ajax({
url: "check_promocode.php",
type: "POST",
data: {code: $("input#promocode").val(), id:<?php echo $result['id']; ?>},
success: function(data) {
if (data == 'FALSE') {
$("span#wrong_code").html('Please enter a valid Voucher Code');
$("span#right_code").html('');
$("div#without_promo").show();
$("div#promo_offer").hide();
}
else {
$("span#right_code").html('PromoCode applied Successfully');
$("span#wrong_code").html('');
$("div#without_promo").hide();
$("div#promo_offer").show();
$("input#p_id").val('1');
$("input#promo_id").val(<?php echo $result['id']; ?>);}
}
}
});
}
Then both the product id and coupon id is sent to process.php page to validate if the coupon selected is right or not. It may happen that someone tries to change it using some coding tricks, but that too is not possible as we are validating it twice. Then further, the PayPal payment process takes place.
Tutorial Scripts in detail:
Below are the details of the code used in this tutorial with proper explanation.
MY-SQL Code
CREATE DATABASE `coupon`;
USE `coupon`;
CREATE TABLE IF NOT EXISTS `coupon_detail` (
`id` int(11) NOT NULL AUTO_INCREMENT,
`coupon_code` varchar(255) NOT NULL,
`coupon_value` int(11) NOT NULL,
PRIMARY KEY (`id`)
)
CREATE TABLE IF NOT EXISTS `product_detail` (
`p_id` int(10) NOT NULL AUTO_INCREMENT,
`p_name` varchar(255) NOT NULL,
`p_description` text NOT NULL,
`p_price` varchar(255) NOT NULL,
`product_currency` varchar(255) NOT NULL,
`p_img` varchar(255) NOT NULL,
PRIMARY KEY (`p_id`)
)Note : When you will create database tables then you have to store the coupon and product information.
Connection.php
This is the file used for database connectivity. It is used for making connection variable by PDO (PHP Data Objects).
<?php
function connection_open() {
// Database credential
$servername = "localhost";
$username = "root";
$password = "";
//Database name
$dbname = "coupon";
try {
global $conn;
// Open the connection using PDO.
$conn = new PDO("mysql:host=$servername;dbname=$dbname", $username, $password);
// set the PDO error mode to exception
$conn->setAttribute(PDO::ATTR_ERRMODE, PDO::ERRMODE_EXCEPTION);
} catch (PDOException $e) {
// echo $sql . "<br>" . $e->getMessage();
die();
}
}
function connection_close() {
global $conn;
$conn = null;
}
?>
Function.php
This file contains all required function for database operation.
<?php
//This function is used for fetching all the records from the table
function Select_All_Records($table_name) {
global $conn;
$sql = "select * from $table_name";
try {
$stmt = $conn->query($sql);
return $stmt;
} catch (PDOException $e) {
print $e->getMessage();
}
}

//This function is used for fetching record with one Filter.
function Select_Record_By_One_Filter($data, $table_name) {
global $conn;
$key = array_keys($data);
$value = array_values($data);
$sql = "select * from $table_name where $key[0] = '$value[0]'";
try {
$stmt = $conn->query($sql);
return $stmt;
} catch (PDOException $e) {
print $e->getMessage();
}
}

//This function is used for fetching record with two Filter.
function Select_Record_By_Two_Filter($data, $table_name) {
global $conn;
$key = array_keys($data);
$value = array_values($data);
$sql = "select * from $table_name where $key[0] = '$value[0]' AND $key[1] = '$value[1]'";
try {
$stmt = $conn->query($sql);
return $stmt;
} catch (PDOException $e) {
print $e->getMessage();
}
}

//This function is used for fetching one random record.
function Select_One_Random_Record($table_name) {
global $conn;
$sql = "SELECT * FROM $table_name ORDER BY RAND() LIMIT 1";
try {
$stmt = $conn->query($sql);
return $stmt;
} catch (PDOException $e) {
print $e->getMessage();
}
}
?>
Index.php
This is the main file in which the products details are being displayed with Promotional/Voucher Code button.
<?php
include('include/function.php');
include('include/connection.php');
connection_open();
$data = array(
'p_id' => 1
);
$p_query = Select_Record_By_One_Filter($data, 'product_detail');
$p_query->setFetchMode(PDO::FETCH_ASSOC);
$p_result = $p_query->fetch();
$p_price = $p_result['p_price'];
?>
<html>
<head>
<title>Paypal Coupon Codes</title>
<link rel="stylesheet" type="text/css" href="style.css">
<script src="jquery.min.js"></script>
</head>
<body>
<div id="main">
<h1 style="text-align: center;margin-left: 0px;">Paypal Coupon Codes in PHP</h1>
<?php
$query = Select_One_Random_Record('coupon_detail');
$query->setFetchMode(PDO::FETCH_ASSOC);
$result = $query->fetch()
?>
<div id="message-placeholder"><p class="msg" style="text-align:center;">Use Promotional/Voucher Code <b><?php echo $result['coupon_code']; ?></b> and get <b><?php echo $result['coupon_value']; ?>% </b>Discount. T&C's Apply.</p></div>
<div id="login">
<h2><?php echo $p_result['p_name']; ?></h2>
<hr/>
<div class="clear"></div>
<div id="product_img">
<img src="<?php echo $p_result['p_img']; ?>"/>
</div>
<div class="content_wrapper">
<div class="content">
<p id="description"><?php echo $p_result['p_description']; ?></p>
</div>
<div class="content" style="height:70px;">
<div id="get_promo_code">
<form action="" method="post" style="margin-bottom: 0px;">
<input type="text" id="promocode" placeholder="Enter Promotional/Voucher Code">
<input type='button' value="Apply" name="submit" onclick='check_promo_code()'>
</form>
<span id="wrong_code"></span>
<span id="right_code"></span>
</div>
</div>
<div class="content" style="height: 70px;">
<div id="amount">
<div id="without_promo" >
<p>
<b>Total Amount : $<?php echo $p_price; ?></b>
</p>
</div>
<div id="promo_offer">
<?php
$amount_after_offer = $p_price - ($p_price * $result['coupon_value'] / 100)
?>
<p><b>Total Amount : $<?php echo $amount_after_offer; ?></b></p>
<del><p>Total Amount : $<?php echo $p_price; ?></p></del>
</div>
</div>
<div id="buynow">
<form action="process.php" method="POST">
<input type="hidden" value="" id="promo_id" name="promo_id">
<input type="hidden" value="1" id="p_id" name="p_id">
<div><input type="submit" class="fr" value="Buy Now" name="submit"></div>
</form>
</div>
</div>
</div>
</div><img id="paypal_logo" src="secure-paypal-logo.jpg">
</div>
</body>
<script language="javascript" type="text/javascript">
function check_promo_code() {
$.ajax({
url: "check_promocode.php",
type: "POST",
data: {code: $("input#promocode").val(), id:<?php echo $result['id']; ?>},
success: function(data) {
if (data == 'FALSE') {
$("span#wrong_code").html('Please enter a valid Voucher Code');
$("span#right_code").html('');
$("div#without_promo").show();
$("div#promo_offer").hide();
}
else {
$("span#right_code").html('PromoCode applied Successfully');
$("span#wrong_code").html('');
$("div#without_promo").hide();
$("div#promo_offer").show();
$("input#p_id").val('1');
$("input#promo_id").val(<?php echo $result['id']; ?>);
}
}
});
}
</script>
</html>
<?php connection_close(); ?>
Process.php
This file contains code to process payment to PayPal. For the PayPal process, you have to paste merchant_email in line no. 38.
<?php

include('include/function.php');
include('include/connection.php');
if (isset($_POST['submit'])) {
connection_open();
if (isset($_POST['p_id'])) {
if (isset($_POST['promo_id'])) {
$data = array(
'p_id' => $_POST['p_id']
);
$p_query = Select_Record_By_One_Filter($data, 'product_detail');
$p_query->setFetchMode(PDO::FETCH_ASSOC);
$p_result = $p_query->fetch();
$p_price = $p_result['p_price'];

$data = array(
'id' => $_POST['promo_id']
);
$promo_query = Select_Record_By_One_Filter($data, 'coupon_detail');
$promo_query->setFetchMode(PDO::FETCH_ASSOC);
$promo_result = $promo_query->fetch();
$product_price = $p_price - ($p_price * $promo_result['coupon_value'] / 100);
} else {
$data = array(
'p_id' => $_POST['p_id']
);
$p_query = Select_Record_By_One_Filter($data, 'product_detail');
$p_query->setFetchMode(PDO::FETCH_ASSOC);
$p_result = $p_query->fetch();
$product_price = $p_result['p_price'];
}
$product_name = $p_result['p_name'];
$product_currency = $p_result['product_currency'];
$product_id = $_POST['p_id'] . '#' . $_POST['promo_id'];
//Here we have to use PayPal URL or sanbox URL.
$paypal_url = 'https://www.sandbox.paypal.com/cgi-bin/webscr';
//Here we have to use seller email id.
$merchant_email = '[email protected]';
//here we have to put cancel URL when payment is not completed.
$cancel_return = "http://localhost/paypal-coupon-codes/index.php";
//here we have to put cancel URL when payment is Successful.
$success_return = "http://localhost/paypal-coupon-codes/success.php";

echo connection_close();
?>
<div style="margin-left: 38%"><img src="ajax-loader.gif"/><img src="processing_animation.gif"/></div>
<form name="myform" action="<?php echo $paypal_url; ?>" method="post" target="_top">
<input type="hidden" name="cmd" value="_xclick">
<input type="hidden" name="cancel_return" value="<?php echo $cancel_return ?>">
<input type="hidden" name="return" value="<?php echo $success_return; ?>">
<input type="hidden" name="business" value="<?php echo $merchant_email; ?>">
<input type="hidden" name="lc" value="C2">
<input type="hidden" name="item_name" value="<?php echo $product_name; ?>">
<input type="hidden" name="item_number" value="<?php echo $product_id; ?>">
<input type="hidden" name="amount" value="<?php echo $product_price; ?>">
<input type="hidden" name="currency_code" value="<?php echo $product_currency; ?>">
<input type="hidden" name="button_subtype" value="services">
<input type="hidden" name="no_note" value="0">
</form>
<script type="text/javascript">
document.myform.submit();
</script><?php
}
}
?>
Success.php
PayPal calls this file when payment gets successfully completed and provide $_REQUEST array which contains product id, PayPal transaction ID, PayPal received amount value, PayPal received currency type and PayPal product status which is displayed in this page.
<?php
include('include/function.php');
include('include/connection.php');
echo connection_open();
?>
<html>
<head>
<title>Paypal Coupon Codes</title>
<link rel="stylesheet" type="text/css" href="style.css">
</head>
<body>
<?php
if (!empty($_REQUEST)) {
$product_no = $_REQUEST['item_number']; // Product ID
$product_transaction = $_REQUEST['tx']; // Paypal transaction ID
$product_price = $_REQUEST['amt']; // Paypal received amount value
$product_currency = $_REQUEST['cc']; // Paypal received currency type
$product_status = $_REQUEST['st']; // Paypal product status
$description = explode('#', $product_no);
if ($description[0] != '') {
if ($description[1] != '') {
$data = array(
'p_id' => $description[0]
);
$p_query = Select_Record_By_One_Filter($data, 'product_detail');
$p_query->setFetchMode(PDO::FETCH_ASSOC);
$p_result = $p_query->fetch();
$p_price = $p_result['p_price'];

$data = array(
'id' => $description[1]
);
$promo_query = Select_Record_By_One_Filter($data, 'coupon_detail');
$promo_query->setFetchMode(PDO::FETCH_ASSOC);
$promo_result = $promo_query->fetch();
$product_actual_price = $p_price - ($p_price * $promo_result['coupon_value'] / 100);
} else {
$data = array(
'p_id' => $description[0]
);
$p_query = Select_Record_By_One_Filter($data, 'product_detail');
$p_query->setFetchMode(PDO::FETCH_ASSOC);
$p_result = $p_query->fetch();
$product_actual_price = $p_result['p_price'];
}
}
echo connection_close();
}
?>
<div id="main">
<h1>Paypal Coupon Codes in PHP</h1>

<div id="return">
<h2>Payment Status </h2>
<hr/>

<?php
//Rechecking the product price and currency details
if ($product_price ==$product_actual_price && $product_currency == $p_result['product_currency']) {
echo "<h3 id='success'>Payment Successful</h3>";
echo "<P>Transaction Status - " . $product_status . "</P>";
echo "<P>Transaction Id - " . $product_transaction . "</P>";
echo "<div class='back_btn'><a href='index.php' id= 'btn'><< Back to Products</a></div>";
} else {
echo "<h3 id='fail'>Payment Failed</h3>";
echo "<P>Transaction Status - Unompleted</P>";
echo "<P>Transaction Id - " . $product_transaction . "</P>";
echo "<div class='back_btn'><a href='index.php' id= 'btn'><< Back to Products</a></div>";
}
?>
</div>

<!-- Right side div -->
<div class="fr"id="formget">
<a href=https://www.formget.com/app><img src="formget.jpg" alt="Online Form Builder"/></a>
</div>
</div>
</body>
</html>
Style.css
Includes basic styling of HTML elements.
@import url(http://fonts.googleapis.com/css?family=Raleway);
h1 {
margin-left: 14%;
}

#main{
width:960px;
margin:50px auto;
font-family:raleway;
}

#login {
width: 815px;
float: left;
border-radius: 10px;
font-family: raleway;
border: 1px solid #ccc;
padding: 10px 40px 25px;
margin: 17px 35px;
}
h2 {
background-color: #fcf8e3;;
text-align: center;
border-radius: 10px 10px 0 0;
margin: -10px -40px;
padding: 15px;
color:#8A6D3A;
font-size: 20px;
}
hr{
border:0;
border-bottom:1px solid #ccc;
margin: 10px -40px;
margin-bottom: 30px;
}
#product_img{
width: 50%;
float: left;
border: 1px dashed rgba(0, 0, 0, 0.15);
}
#product_img img{
padding: 10px;
width: 95%;
height: 340px;
}
.content_wrapper{
float: right;
width: 48%;
}
.content{
border: 1px dashed rgba(0, 0, 0, 0.15);
margin-bottom: 20px;
padding: 11px;
}
.content p#description{
text-align:justify;
padding:10px;
}
#get_promo_code input[type=button] {
width: 24%;
background-color: white;
float: right;
color: #FFBC00;
border: 2px solid #FFCB00;
padding: 10px;
font-size: 20px;
cursor: pointer;
border-radius: 5px;
}
input[type=text],input[type=password]{
width: 73%;
padding: 13px;
border: 1px solid #ccc;
padding-left: 5px;
font-size: 15px;
font-family:raleway;
border-radius: 5px;
}
#amount{
width: 50%;
float: left;
}

#promo_offer{
display: none;
}
#promo_offer del p{
color: rgba(128, 128, 128, .8);
}
#buynow{
width: 50%;
float: right;
}
input[type=submit]{
width: 100%;
background-color:#FFBC00;
color: white;
border: 2px solid #FFCB00;
padding: 10px;
font-size:20px;
cursor:pointer;
border-radius: 5px;
margin-bottom: 15px;
}
span#wrong_code{
color:red;
}
span#right_code{
color:green;
}
#return {
width: 492px;
height: 350px;
float: left;
border-radius: 10px;
font-family: raleway;
border: 2px solid #ccc;
padding: 10px 40px 11px;
margin: 16PX;
}
#message-placeholder {
margin: 10px auto auto;
background: #fcf8e3!important;
border: 1px solid #faebcc;
width: 875px;
color: #8a6d3b;
padding: 10px;
position: relative;
z-index: 1;
}
#message-placeholder b {
color: rgb(14, 207, 14);
}
#return h3#success {
text-align: center;
font-size: 24px;
margin-top: 50px;
color: green;
}
#return P {
margin-left: 122px;
}
#return .back_btn {
margin-top: 51px;
margin-left: 19%;
}
#btn {
width: 100%;
background-color: #FFBC00;
color: white;
border: 2px solid #FFCB00;
padding: 10px 70px;
font-size: 20px;
cursor: pointer;
border-radius: 5px;
margin-bottom: 15px;
margin: 0 auto;
}
a{
text-decoration:none;
color: cornflowerblue;
}

i{
color: cornflowerblue;
}
#product_content {
float: right;
width: 400px;
height: 250px;
margin-top: 20px;
margin-bottom: 23px;
font-size: 14px;
border: 1px solid rgba(128, 128, 128, 0.17);
}
#get_promo_code input[type=button]:hover{
background-color:#FFBC00;
color: white;
}
.clear{
clear: both;
}
.fr {
float: right;
}
img#paypal_logo{
float: right;
margin-right:25px;
padding-bottom:15px;
}
Conclusion :
After reading the above post, I am sure you will give a try to the script provided and implement it in your own projects as well. Feel free to visit our website again in the future to get in touch with new coding tricks. You can let us know about your feedback in the space provided below ![]()
Recommended blogs –
Android Hello World Program Example Using Eclipse

In our previous blog post we have seen what are the tools and software required to start creating a basic android program. Continuing with it, in this post we will be creating our first android program to see that how it actually works.
It will be a simple program in which we will see how to output a sample text, say, Hello World in an android virtual device.

We hope that you have followed our previous blog which was based on tools required for Android basic program, like SDK, JDK and Eclipse (IDE).
Also, we have illustrated how to launch Eclipse, set project folder and select SDK path.
After you successfully launch the eclipse, the steps that we have to follow are as under:
1. Select Android Application Project
- Go to File and then click on New.
- In New, Click on Android Application Project.

2. Creating new Android Application Project :
There is a series of steps for setting up an Android Application Project. A dialog box will appear, fill in all the details :

Where :
- Application name – Refers to the name of the application you want to give .
- Project name – Refers to the Project name you want to give to your application .
- Package name – Should be in a A.B format for ex: myapp.magnetbrains.co
- Min. req. SDK – From which version you want to have access with. ex: Android 2.2 or above
- Targeted SDK – Which particular version you are targeting. ex: Android 4.4 or above
- Compile with – From which SDK you want to compile with
- Theme – Any theme of your choice.
Then click on NEXT.
3. Configure Application launcher icon :
Choose your desired icon and configure as per your requirements. You can select the Image size and can give different colors as per your choice.
![]()
This icon will be representing your application later when we use it. Then click on NEXT.
4. Creating Activity:
Select any activity for ex : Blank activity. Blank activity refers to window that we will see when the application will be launched.

Then you need to specify about your blank activity and then click on Finish.

5. Project file structure :
After you have done all the required steps, android project will be created with some default files in it. It will be containing main activity Java codes and in layout XML codes, which will be containing all the required libraries which are used in any android application project.

Note : Above are the steps that you need to follow before writing any android program. Now we will be moving forward to the write our first program.
We can write the android program in XML, Java or can use drag and drop feature for it. But here we will be doing it with XML only.
6. “Hello World” using XML codes :
<LinearLayout xmlns:android="http://schemas.android.com/apk/res/android"
android:layout_width="fill_parent"
android:layout_height="fill_parent"
android:orientation="vertical" >

<TextView
android:id="@+id/textView1"
android:layout_width="wrap_content"
android:layout_height="wrap_content"
android:text="Hello World" />
</LinearLayout>
Below is the explanation for the above given XML code.
1. At first, any Layout is selected :
- An Android Layout is a class that handles arranging the way its child element appears on the screen. Any layout can be selected (We will be discussing about the layouts in our next tutorials).
2. Text view is used to display text on the screen.
- ‘@+id/textview’ is the id that is given to the text view, it can be changed and it is used for nesting purposes when you have to insert different layouts and views in your user interface.
- ‘Width’ and ‘Height’ instruction is to define how much a text would take the space on the application screen.
- ‘Text’ Syntax is used to enter the desired text and which will be displayed on the application screen.
7. Creating AVD(Android Virtual Device) :
Select Window from the title bar and then select ‘Android Virtual Device Manager ‘. Configure AVD according to you.

- AVD name – Name that you want to keep for your device
- Device name – Model number you want to work on
- Target – Which API version you are targeting for your app
- Memory options – Select Ram you are targeting
- Storage – Memory how much you want
- SD card – If you want SD card options
Then click on OK.
8. Launch Android Virtual Device

Select your device, click on start and then click on Launch. It will launch the AVD.

After the device is booted up virtual screen will appear. It will be containing all the Preloaded Applications. If you are launching for the first time it can take some time to launch the AVD.

9. Running of application:
Right click on the project and from the menu that appears, select Run as option and then choose as Android Application.

In the virtual device an application will be created that will be according to your application name.

Click on your application and then “Hello World” will be displayed on the application screen .

Conclusion
This is how the first Hello World program will work. Keep visiting us to learn more about Android and other coding concepts. Fill out the below given form to provide your feedback. We love to hear from you 🙂
Introduction To Android and Its Installation

Android is an operating system based on Linux, specifically developed for mobile devices such as cell-phones and tablets. It includes all the frameworks and that let you create and deploy your own custom applications.
The Operating system uses touch inputs that correspond to real-world input actions, Ex: swiping, tapping, pinching, and reverse pinching, and a Virtual keyboard, which is also being used in games, digital cameras, regular personal computers and other electronics .
Different versions of android
Android has different versions began with the release of the Android beta in November 2007. The first commercial version, Android 1.0, was released in Sep 2008. Android is under ongoing development combinedly by Google and the Open Handset Alliance, and has gone under a number of updates to the base operating system since its initial release.
Below is the table that is depicting the details of different versions of Android.

“Here in this tutorial we will just going to see, what are the tools and softwares required to built an Android Application. So now, we will be moving on to know what are the configurations and the installation steps required for building the initial Android Application“.
Required Android Configuration
Operating system
- For Windows – Windows XP or above
- For Mac – Version 10.4.8 or above
- For Linux – Any version
Development tools
- JDK – Java Development KIT version 5 or above
- SDK – Software Development KIT
- IDE – Integrated development environment (ex:-Eclipse, ADT, Android studio)
About Development Tools
JDK
Java is used to run Integrated Development Environment in android application programming. The JDK forms an extended subset of a software development kit (SDK). It includes “tools for developing, debugging, and monitoring Java applications”.
Any version of java can be used which is greater than version 5.
SDK
A software development kit enables developers to create applications for the Android platform. It includes sample projects with source code, development tools, an emulator, and required libraries to build Android applications.
Software Development kit contains all the:
- System Tools
- System Images
- Source Codes
- All Documentations
Eclipse (IDE)
Eclipse is an editor for android applications. It contains various features which are different from other editors , so it is used widely all over the world .
It can be used for developing in other programming languages like C, C++,java script, COBOL, FORTRAN and other languages too. Other editors can be used as well like ADT , Android studio etc.
Installation Steps
1. Download the JDK from the link given above. Then install it.
2. Download the SDK from the link given above. Create a separate folder (say : Android Development) and then save the downloaded files in that folder.
3. Download the Eclipse (IDE) from the link given above and save it in the same folder that have SDK in it.
4. Launch the Eclipse by double clicking the eclipse.exe file provided in the eclipse folder.
5. Now it will ask for a location where to save the projects, provide a suitable name according to you, say, Android Project.
Note : When you will first launch eclipse for android development then it will ask SDK location, which you have to do it manually.
The flowchart for the same is given :

The steps given above are the initial steps that a beginner need to follow to get start creating an Android Application.
You can follow our next blog to learn, how to create a hello world program.
Conclusion :
This was our first post regarding introduction to Android. Hope you have understood it properly. So, keep visiting us to learn more about it and you may also provide your feedback in the space provided below to get in touch with us 🙂
PayPal Integration in PHP Using PDO

In our previous blog, we have already discussed, how can we use PayPal button for collecting payments online. This time we came up with slight changes in that tutorial.
Here, we will be going to see how we can Integrate PayPal payment gateway using PHP and PDO (PHP Data Objects). Using PDO you can Integrate your script to any Database which supports PDO.
The complete motive of this tutorial is to showcase an online product selling website that we call as a ECommerce website, using which one can sell his product using a secure payment mode, i.e. PayPal.
Watch the live demo or download code from the below given links

Note : The installation documentation is given in the download file.
PayPal offers sandbox account for development and testing purpose. Here we are using Sandbox for demo. so if you would like to test our demo you can use your PayPal sandbox credentials.
If you want to run script to your live projects just change the $paypal_url on process.php page
//Paypal url for live
$paypal_url = 'https://www.paypal.com/cgi-bin/webscr';
//PayPal url for testing
$paypal_url = 'https://www.sandbox.paypal.com/cgi-bin/webscr';
Steps to follow :
Here in the download code provided above, there is file naming paypal.sql in which sql queries are written for creating database, table and different columns in it.
You just need to import it in your phpmyadmin it will create the required tables.
After doing it successfully, to run the script you need to call payments.php file.
Below are the details of the code used in the tutorial :
MY-SQL Code
CREATE TABLE IF NOT EXISTS `tbl_product_detail` (
`product_id` int(11) NOT NULL AUTO_INCREMENT,
`item_number` varchar(255) NOT NULL,
`product_name` varchar(255) NOT NULL,
`product_img` varchar(255) NOT NULL,
`product_price` int(11) NOT NULL,
`product_currency` varchar(255) NOT NULL,
`product_dec` text NOT NULL,
PRIMARY KEY (`product_id`)
)
Connection.php
This is file used for database connectivity. It is used for making connection variable by PDO(PHP Data Objects).
<?php
function connection_open() {
// Database credential
$servername = "localhost";
$username = "root";
$password = "";
//Data base name
$dbname = "paypal";
try {
global $conn;
// Open the connection using PDO.
$conn = new PDO("mysql:host=$servername;dbname=$dbname", $username, $password);
// set the PDO error mode to exception
$conn->setAttribute(PDO::ATTR_ERRMODE, PDO::ERRMODE_EXCEPTION);
} catch (PDOException $e) {
// echo $sql . "<br>" . $e->getMessage();
die();
}
}
function connection_close() {
global $conn;
$conn = null;
}
?>
Function.php
This file contain all required function for database operation.
<?php
//This function is used for fetching all the records from the table
function Select_All_Records($table_name) {
global $conn;
$sql = "select * from $table_name";
try {
$stmt = $conn->query($sql);
return $stmt;
} catch (PDOException $e) {
print $e->getMessage();
}
}
//This function is used for fetching record with one Filter.
function Select_Record_By_One_Filter($data,$table_name){
global $conn;
$key = array_keys($data);
$value = array_values($data);
$sql = "select * from $table_name where $key[0] = '$value[0]'";
try {
$stmt = $conn->query($sql);
return $stmt;
} catch (PDOException $e) {
print $e->getMessage();
}
}
?>
Payments.php
This is the main file in which the products details are being displayed with buy now button.
<?php
include('include/function.php');
include('include/connection.php');
echo connection_open();
?>
<html>
<head>
<title>paypal_simple_integration</title>
<link rel="stylesheet" type="text/css" href="style.css">
</head>
<body>
<div id = "main">
<h1>PayPal Payment Gateway Integration in PHP</h1>
<?php
//Select_All_Records function is used for fetching all the records from the table
$query = Select_All_Records('tbl_product_detail');
$query->setFetchMode(PDO::FETCH_ASSOC);
while ($result = $query->fetch()) {
?>
<div id = "login">
<h2><?php echo $result['product_name']; ?></h2>
<hr/>
<form action = "process.php" method = "post">
<input type = "hidden" value = "<?php echo $result['item_number']; ?>" name = "product_id">
<img id = "product_img" src = "<?php echo $result['product_img']; ?>"/><br><br>
<div id = "product_content">
<ul><?php $description = explode('#@#', $result['product_dec']);
foreach ($description as $value) { ?>
<li>
<?php echo $value; ?>
</li>
<?php } ?>
</ul>
</div>
<input type = "submit" value = " Buy Now $ <?php echo $result['product_price']; ?> " name = "submit"/><br />
<span></span>
</form>
</div>
<?php } ?>
</div>
</body>
</html>

<?php
//connection_close() is used for closing the connection .
connection_close();
?>
Process.php
This file contain code to process payment to paypal.
<?php
include('include/function.php');
include('include/connection.php');
if (isset($_POST['submit'])) {
echo connection_open();
if (isset($_POST['product_id'])) {
$product_id = base64_decode($_POST['product_id']);
$data = array(
'product_id' => $product_id
);
$query = Select_Record_By_One_Filter($data, 'tbl_product_detail');
$query->setFetchMode(PDO::FETCH_ASSOC);
$result = $query->fetch();
//Put sandbox url for testing.
//$paypal_url = 'https://www.sandbox.paypal.com/cgi-bin/webscr';
//Paypal url for live
$paypal_url = 'https://www.paypal.com/cgi-bin/webscr';
//Here we can used seller email id.
$merchant_email = 'your paypal seller email id';
//here we can put cancle url when payment is not completed.
$cancel_return = "http://localhost/paypal_simple_integration/payments.php";
//here we can put cancle url when payment is Successful.
$success_return = "http://localhost/paypal_simple_integration/success.php";

$product_name = $result['product_name'];
$product_price = $result['product_price'];
$product_currency = $result['product_currency'];
echo connection_close();
}
?>
<div style="margin-left: 38%"><img src="ajax-loader.gif"/><img src="processing_animation.gif"/></div>
<form name="myform" action="<?php echo $paypal_url; ?>" method="post" target="_top">
<input type="hidden" name="cmd" value="_xclick">
<input type="hidden" name="cancel_return" value="<?php echo $cancel_return ?>">
<input type="hidden" name="return" value="<?php echo $success_return; ?>">
<input type="hidden" name="business" value="<?php echo $merchant_email; ?>">
<input type="hidden" name="lc" value="C2">
<input type="hidden" name="item_name" value="<?php echo $product_name; ?>">
<input type="hidden" name="item_number" value="<?php echo $_POST['product_id']; ?>">
<input type="hidden" name="amount" value="<?php echo $product_price; ?>">
<input type="hidden" name="currency_code" value="<?php echo $product_currency; ?>">
<input type="hidden" name="button_subtype" value="services">
<input type="hidden" name="no_note" value="0">
</form>
<script type="text/javascript">
document.myform.submit();
</script>
<?php } ?>
Success.php
PayPal call this file when payment gets successfully completed and provide $_REQUEST array which contains product id, PayPal transaction ID, PayPal received amount value, PayPal received currency type and PayPal product status which is displayed in this page.
<?php
include('include/function.php');
include('include/connection.php');
echo connection_open();
?>
<html>
<head>
<title>paypal_simple_integration</title>
<link rel="stylesheet" type="text/css" href="style.css">
</head>
<body>
<?php
if (!empty($_REQUEST)) {
$product_no = $_REQUEST['item_number']; // Product ID
$product_transaction = $_REQUEST['tx']; // Paypal transaction ID
$product_price = $_REQUEST['amt']; // Paypal received amount value
$product_currency = $_REQUEST['cc']; // Paypal received currency type
$product_status = $_REQUEST['st']; // Paypal product status

$product_no = base64_decode($product_no);
$data = array(
'product_id' => $product_no
);
$query = Select_Record_By_One_Filter($data, 'tbl_product_detail');
$query->setFetchMode(PDO::FETCH_ASSOC);
$result = $query->fetch();
echo connection_close();
}
?>
<div id="main">
<h1>PayPal Payment Gateway Integration in PHP</h1>

<div id="return">
<h2>Payment Status </h2>
<hr/>

<?php
//Rechecking the product price and currency details
if ($product_price == $result['product_price'] && $product_currency == $result['product_currency']) {
echo "<h3 id='success'>Payment Successful</h3>";
echo "<P>Transaction Status - " . $product_status . "</P>";
echo "<P>Transaction Id - " . $product_transaction . "</P>";
echo "<div class='back_btn'><a href='payments.php' id= 'btn'><< Back to Products</a></div>";
} else {
echo "<h3 id='fail'>Payment Failed</h3>";
echo "<P>Transaction Status - Unompleted</P>";
echo "<P>Transaction Id - " . $product_transaction . "</P>";
echo "<div class='back_btn'><a href='payments.php' id= 'btn'><< Back to Products</a></div>";
}
?>
</div>

<div id="formget">
<a href=https://www.formget.com/app><img src="formget.jpg" alt="Online Form Builder"/></a>
</div>
</div>
</body>
</html>
Style.css
Includes basic styling of HTML elements.
@import url(http://fonts.googleapis.com/css?family=Raleway);

#main{
width: 950PX;
margin: 50PX auto;
font-family:raleway;
}

span{
color:red;
}
h1{
margin-left: 14%;
}
h2{
background-color: #FEFFED;
text-align:center;
border-radius: 10px 10px 0 0;
margin: -10px -40px;
padding: 15px;
}

hr{
border:0;
border-bottom:1px solid #ccc;
margin: 10px -40px;
margin-bottom: 30px;
}

#login{
width: 200px;
float: left;
border-radius: 10px;
font-family:raleway;
border: 2px solid #ccc;
padding: 10px 40px 11px;
margin: 16PX;
}

input[type=text],input[type=password]{
width:99.5%;
padding: 10px;
margin-top: 8px;
border: 1px solid #ccc;
padding-left: 5px;
font-size: 16px;
font-family:raleway;
}

input[type=submit]{
width: 100%;
background-color:#FFBC00;
color: white;
border: 2px solid #FFCB00;
padding: 10px;
font-size:20px;
cursor:pointer;
border-radius: 5px;
margin-bottom: 15px;
}
#profile{
padding:50px;
border:1px dashed grey;
font-size:20px;
background-color:#DCE6F7;
}

#logout{
float:right;
padding:5px;
border:dashed 1px gray;
}

a{
text-decoration:none;
color: cornflowerblue;
}

i{
color: cornflowerblue;
}
ul{
line-height: 22px;
}
#product_img{
width: 210px;

height: 230px;
}
#product_content{
width: 198px;
height: 116px;
margin-bottom: 23px;
font-size: 14px;
border: 1px solid rgba(128, 128, 128, 0.17);
}

#return{
width: 492px;
height: 350px;
float: left;
border-radius: 10px;
font-family: raleway;
border: 2px solid #ccc;
padding: 10px 40px 11px;
margin: 16PX;
}
#return h3#success{
text-align: center;
font-size: 24px;
margin-top: 50px;
color: green;
}
#return h3#fail{
text-align: center;
font-size: 24px;
margin-top: 50px;
color: red;
}
#btn{
width: 100%;
background-color: #FFBC00;
color: white;
border: 2px solid #FFCB00;

padding: 10px 70px;

font-size: 20px;

cursor: pointer;

border-radius: 5px;

margin-bottom: 15px;
margin: 0 auto;
}
#return .back_btn{

margin-top: 51px;
margin-left: 19%;
}
#return P{
margin-left: 122px;

}
Conclusion :
After reading the above post, I am sure you will give a try to the script provided and implement it in your own projects as well. Feel free to visit our website again in the future to get in touch with new coding tricks. You can let us know about your feedback in the space provided below ![]()
POST data using fsockopen() Function

As we have previously learnt about sending data using GET and POST in php. Both methods are used for sending data from one page to another, but using POST that can be done in hidden manner and in GET the data is traveled in the url, that is quite insecure if we sends a important information.
Here, we will be going to learn about fsockopen function in php, which will make POST method a highly secure method to send the information from one page to another that can’t even hacked by using JavaScript too.
$socket = fsockopen($host, 80, $errno, $errstr, 15);
Watch the live demo or download code from the below given links

Note : The installation documentation is given in the download file.
About fsockopen() :
fsockopen() function opens a server on the exact port we specify, here it is port 80 and the host is www.formget.com, then waits for us to specify what to do with it.
It checks whether http is enabled in the server or not, if it is not enabled then sends an error message and we can ends up the script there itself.
if (!$socket) {
//If connection gets fail then it will display the error number & message and will stops the script from continue working
echo ' error: ' . $errno . ' ' . $errstr;
die;
}
But if it finds the connection properly, then we can move further. Here we are sending the header information with the form data to the second.php file using fwrite() function.
 //Sends header data to the web server
fwrite($socket, $http);
It then returns some information which is stored in an array format to be displayed in the front end.
while (!feof($socket)) {
$contents[] = fgets($socket, 4096);
}
The returned value will contain some header information and the data sent. This time the data which we will get, will be in the processed form (performed at the another page). That data will be in the 8th index of the returned array.
if (isset($contents[8])) {
echo $contents[8] == '' ? '' : $contents[8];
}
It will then be displayed in the front end.
Below are the files used in the tutorial with the explanation :
First.php :
Here in this page, when the value will be entered in the textbox will be initially posted to the first.php page, then using fsockopen() value will be posted to second.php where some operations will be performed.
<html>
<head>
<title>POST data using fsockopen() Function</title>
<meta content="noindex, nofollow" name="robots">
<link rel="stylesheet" type="text/css" href="style.css">
</head>
<body>
<?php
if (isset($_POST['submit'])) {
$data = $_POST['emp_name'];
$host = "www.formget.com";
$path = "/tutorial/fsockopen/second.php";
$post_data = 'name=' . $data;
$socket = fsockopen($host, 80, $errno, $errstr, 15);
//Checks if the connection was fine
if (!$socket) {
//If connection gets fail then it will display the error number & message and will stops the script from continue working
echo ' error: ' . $errno . ' ' . $errstr;
die;
}
else
{
//This tells the web server what version of HTTP protocol we are using and the file to which we are sending request
$http = "POST $path HTTP/1.1rn";

//This is the url or IP of which the request is coming from
$http .= "Host: $hostrn";

//The user agent being used to send the request
$http .= "User-Agent: " . $_SERVER['HTTP_USER_AGENT'] . "rn";

//The content type, this is important and much look like the following if sending POST data.
//If this is not provided the server may not process the POST data
$http .= "Content-Type: application/x-www-form-urlencodedrn";

//Lets the web server know the total length/size of are posted content
//It is not always required but some servers will refuse requests if not provided
$http .= "Content-length: " . strlen($post_data) . "rn";

//Tells the server whether header request is completed and the rest if content / POST data
$http .= "Connection: closernrn";

//Add data to be sent
$http .= $post_data . "rnrn";

//Sends header data to the web server
fwrite($socket, $http);

//Waits for the web server to send the full response. On every line returned we append it onto the $contents
//variable which will store the whole returned request once completed.
while (!feof($socket)) {
$contents[] = fgets($socket, 4096);
}
//Close are request or the connection will stay open until script has completed.
fclose($socket);
}
}
?>
<div id="main">
<h1>POST data using fsockopen() Function</h1>
<div id="login">
<h2> fsockopen() Function </h2>
<hr/>
<form action="first.php" method="POST">
<center><span style="color: green;"><?php
if (isset($contents[8])) {
echo $contents[8] == '' ? '' : $contents[8];
}
?></span></center>
<br/>
<br/>
<label>Enter Name :</label>
<input type="text" name="emp_name" required="required" placeholder="Please Enter Name"/><br /><br />
<input type="submit" value="Click Here" name="submit"/><br />
</form>
<br/>
</div>
</div>
</body>
</html>
Second.php :
Now second.php page will return a value to first.php which will be displayed there.
<?php
//$_POST['name'] is Post with the help of fsockopen().
if (isset($_POST['name'])) {
echo 'Welcome '.$_POST['name'];
}?>
Style.css
This is the CSS file used for giving proper look to the tutorial pages.
/*----------------------------------------------
css settings for HTML div exactCenter
------------------------------------------------*/
@import url(http://fonts.googleapis.com/css?family=Raleway);
#main{
width:960px;
margin:50px auto;
font-family: 'Raleway', sans-serif;
}
h2{
background-color: #FEFFED;
text-align:center;
border-radius: 10px 10px 0 0;
margin: -10px -40px;
padding: 15px;
}
hr{
border:0;
border-bottom:1px solid #ccc;
margin: 10px -40px;
margin-bottom: 30px;
}
#login{
width:300px;
float: left;
border-radius: 10px;
font-family:raleway;
border: 2px solid #ccc;
padding: 10px 40px 25px;
margin-top: 70px;
}
input[type=text],input[type=email]{
width:99.5%;
padding: 10px;
margin-top: 8px;
border: 1px solid #ccc;
padding-left: 5px;
font-size: 16px;
font-family:raleway;
}
input[type=submit]{
width: 100%;
background-color:#FFBC00;
color: white;
border: 2px solid #FFCB00;
padding: 10px;
font-size:20px;
cursor:pointer;
border-radius: 5px;
margin-bottom: -12px;
}
span {
color: red;
}
#note{
float: right;
margin-top: 28px;
width: 43%;
margin-right: 298px;
text-align: justify;
}
Conclusion :
After reading the above post, I am sure you will give a try to the script provided and implement it in your own projects as well. Feel free to visit our website again in the future to get in touch with new coding tricks. You can let us know about your feedback in the space provided below 🙂
You may also like –
- PayPal Adaptive Payments for Marketplace in PHP
- PHP Multi Page Form
Collect Payments Safely with FormGet Forms

Collecting payments through FormGet forms is a hassle free and easy task altogether.
May it be a form for collecting registration fee for a seminar or a form accepting recurring monthly subscription fee of an email marketing service, one can collect payments safely and securely using FormGet forms.

FormGet allows two modes of payments through its forms, PayPal and Stripe.
Both of these extensions help you to collect online payments through your forms. With these extensions you can :
- Instantly accept credit card payments through FormGet forms.
- Create all types of online forms that accept payments.
- Dynamically calculate total amount based on the form field amount.
- Sign up your users for recurring payments.

FormGet Payment Forms
A variety of payment processing forms can be created in FormGet online form builder. Some of the prominent ones may be :
PayPal :
A 17 year old payment processing channel, PayPal allows merchants to accept funds online. It is easy, fast and reliable at the same time and helps users make secure transactions.
Apart from payment processing, it has multiple features like, Payment Processing Options, Customer Checkout Experience, Reporting and Management, Postage and Tax, Fraud Protection, Back-end Integration and many more..
Stripe :
Established in 2022 in San Jose, California, Stripe is a tool for handing online payment processing. It allows users to safely receive payments through forms by natively incorporating payment processing in a website or a form. Its key features are Stripe checkout, Mobile payment documentation, Coupons and free trials, Platform-building tools, Subscription solutions, Advanced reporting and many more..
Integration With FormGet
Both of these channels are successfully integrated with FormGet and one can easily collect payments through FormGet forms.
Create a beautiful form with FormGet’s online form builder, take up any of the above tools’ (PayPal or Stripe) extension, embed form in your site and here you are ready to collect your payments.
FormGet offers these extensions at very affordable prices and provide lots of customizable features too.
PayPal Integration with FormGet
Integrating FormGet forms with PayPal is very simple. A beautiful form, some simple settings like placing merchant id, currency, product amount, etc and you are done.
How to Integrate PayPal with FormGet Forms
You can collect payments for both single as well as multiple products using these forms. Just add the products in the form and set their price in the settings page.
Live Demo

Stripe Integration with FormGet
You can integrate Stripe payment processing tool in FormGet forms very easily with doing settings similar to PayPal.
How to Integrate Stripe with FormGet Forms
Activate your Stripe Extension in FormGet, create a form, do the payment settings for the products and then embed your generated code into your website; your form will be live.
Live Demo

FormGet is the most secure and reliable online form builder. Forms designed here are robust and fetch data to the utmost perfection. Responsiveness and scalability are two more important features of FormGet.
And with PayPal and Stripe integrated FormGet forms, you payments one hundred percent safe and secure. So give it a try and enjoy awesome form building experience with FormGet.
CodeIgniter PayPal Checkout

Suppose you want to sell your product online with a secure payment mode then here is the solution that you can use. The thing we are talking about is a PayPal buy now button.
You can use it simply, only you have to generate the code for the button and place it in your website to collect the online payment form in a secure way.
Actually the button which is generated is not secure enough to collect the payment, since user can alter the amount if he/she have some coding skills.
So we bring up to you a revised code using which you can add your own product (to be sold) and its detail. After few settings you just have to generate the code and you will be all set to sell your products online and to run your online ecommerce website as well..
Watch the live demo or download code from the below given links

Below is the explanation of the files that are used in the project.
Controllers : Products.php
It is a controller file that contains all necessary php functions in it.
<?php
if (!defined('BASEPATH'))
exit('No direct script access allowed');
class Products extends CI_Controller {
function __construct() {
parent::__construct();
$this->load->model('product_model');
$this->load->helper(array('url', 'html', 'form'));
}
public function index() {
$this->load->view('add_products');
}
public function save_products() {
$img_fullpath = base_url()."uploads/default_product.png";
if (!empty($_FILES)) {
$filename = time() . ".png";
$target_dir = "uploads/";
$target_file = $target_dir . $filename;
$uploadOk = 1;
$imageFileType = pathinfo($target_file, PATHINFO_EXTENSION);
// Check if image file is a actual image or fake image
if(!empty($_FILES["up_file"]["name"])){
$check = getimagesize($_FILES["up_file"]["tmp_name"]);
}
else{
$check = 0;
}
if ($check !== false) {
// echo "File is an image - " . $check["mime"] . ".";
$uploadOk = 1;
} else {
echo "File is not an image.";
$uploadOk = 0;
}
// Check if file already exists
if (file_exists($target_file)) {
echo $target_file . "Sorry, file already exists.";
$uploadOk = 0;
}
// Check file size
if ($_FILES["up_file"]["size"] > 500000) {
echo "Sorry, your file is too large.";
$uploadOk = 0;
}
// Allow certain file formats
if ($imageFileType != "jpg" && $imageFileType != "png" && $imageFileType != "jpeg" && $imageFileType != "gif") {
echo "Sorry, only JPG, JPEG, PNG & GIF files are allowed.";
$uploadOk = 0;
}
// Check if $uploadOk is set to 0 by an error
if ($uploadOk == 0) {
echo "Sorry, your file was not uploaded.";
// if everything is ok, try to upload file
} else {
if (move_uploaded_file($_FILES["up_file"]["tmp_name"], $target_file)) {

$img_fullpath = base_url() . "uploads/" . $filename;
// echo "The file ". basename( $_FILES["up_file"]["name"]). " has been uploaded.";
// echo $img_fullpath;
} else {
// echo "Sorry, there was an error uploading your file.";
}
}
//Get post value and make product array
$products = array(
'product_name' => $this->input->post('product_name'),
'product_price' => $this->input->post('product_price'),
'product_currency' => $this->input->post('product_currency'),
'merchant_email' => $this->input->post('merchant_email'),
'product_description' => $this->input->post('product_description'),
'payment_mode' => $this->input->post('payment_mode'),
'product_image' => $img_fullpath
);
$result = $this->product_model->inser_product($products);
if ($result === TRUE) {
echo "TRUE";
} else {
echo "FALSE";
}
}
}
//show_all function get all product details and send to show_all_products view
public function show_all() {

$data['query'] = $this->product_model->get_all_products();
$this->load->view('show_all_products', $data);
}
//checkout function load checkout view
public function checkout() {
$data['product_id'] = base64_encode($this->input->post('product_id'));

$this->load->view('checkout', $data);
}
//save billing info insert billing details value on db
public function save_billing_info() {
$product_id = base64_decode($this->input->post('product_id'));
$full_name = $this->input->post('full_name');
$email_address = $this->input->post('email_address');
$billing_info =array(
'product_id'=>$product_id,
'full_name'=> $full_name,
'email_address'=>$email_address
);
$result_bill = $this->product_model->insert_billing_details($billing_info);
$result = $this->product_model->get_product_by_id($product_id);
echo json_encode($result);
}
//This function get value for update products
public function get_value_for_update() {
$product_id = $this->input->post('product_id');
$result = $this->product_model->get_product_by_id($product_id);
echo json_encode($result);
}
//Update product
public function update_product() {
$img_fullpath = '';
if (!empty($_FILES)) {
$filename = time() . ".png";
$target_dir = "uploads/";
$target_file = $target_dir . $filename;
$uploadOk = 1;
$imageFileType = pathinfo($target_file, PATHINFO_EXTENSION);
// Check if image file is a actual image or fake image
if(!empty($_FILES["up_file"]["name"])){
$check = getimagesize($_FILES["up_file"]["tmp_name"]);
}
else{
$check = 0;
}
if ($check !== false) {
// echo "File is an image - " . $check["mime"] . ".";
$uploadOk = 1;
} else {
echo "File is not an image.";
$uploadOk = 0;
}
// Check if file already exists
if (file_exists($target_file)) {
echo $target_file . "Sorry, file already exists.";
$uploadOk = 0;
}
// Check file size
if ($_FILES["up_file"]["size"] > 500000) {
echo "Sorry, your file is too large.";
$uploadOk = 0;
}
// Allow certain file formats
if ($imageFileType != "jpg" && $imageFileType != "png" && $imageFileType != "jpeg" && $imageFileType != "gif") {
echo "Sorry, only JPG, JPEG, PNG & GIF files are allowed.";
$uploadOk = 0;
}
// Check if $uploadOk is set to 0 by an error
if ($uploadOk == 0) {
// echo "Sorry, your file was not uploaded.";
// if everything is ok, try to upload file
} else {
if (move_uploaded_file($_FILES["up_file"]["tmp_name"], $target_file)) {

$img_fullpath = base_url() . "uploads/" . $filename;
// echo "The file ". basename( $_FILES["up_file"]["name"]). " has been uploaded.";
// echo $img_fullpath;
} else {
// echo "Sorry, there was an error uploading your file.";
}
}
$product_id = $this->input->post('product_id');
$products_n = array(
'product_name' => $this->input->post('product_name'),
'product_price' => $this->input->post('product_price'),
'product_currency' => $this->input->post('product_currency'),
'merchant_email' => $this->input->post('merchant_email'),
'product_description' => $this->input->post('product_description'),
'payment_mode' => $this->input->post('payment_mode'),
'product_image' => $img_fullpath
);

$products_o = array(
'product_name' => $this->input->post('product_name'),
'product_price' => $this->input->post('product_price'),
'product_currency' => $this->input->post('product_currency'),
'merchant_email' => $this->input->post('merchant_email'),
'product_description' => $this->input->post('product_description'),
'payment_mode' => $this->input->post('payment_mode'),
'product_image' => $this->input->post('import_file_text')
);

if (empty($img_fullpath)) {
$product_val = $products_o;
} else {
$product_val = $products_n;
}

$result = $this->product_model->update_product($product_id,$product_val);
if ($result === TRUE) {
echo "TRUE";
} else {
echo "FALSE";
}
}
}
public function delete_product(){
$product_id = $this->input->post('product_id');
$result = $this->product_model->delete_product($product_id);

echo $result;
}
//notification call when user checkout from paypal
public function notification(){
$this->load->view('notification');
}
}
?>
Models : Product_model.php
It is a model file that contains all database connectivity functions and operations.
<?php
class product_model extends CI_Model {
//This function use for insert product info
public function inser_product($products) {
$this->db->insert('product', $products);
return TRUE;
}
//insert billing details
public function insert_billing_details($billing_info){
$this->db->insert('customer_details', $billing_info);
return TRUE;
}
//This function use for getting all products details
public function get_all_products() {
$this->db->select('*');
$this->db->from('product');
$query = $this->db->get();

return $query->result();
}
//Get product data by id
public function get_product_by_id($id){
$this->db->select('*');
$where = "(id='$id')";
$this->db->where($where);
$query = $this->db->get('product');
$data = $query->result();
foreach ($data as $value){
$pro =array(
'id'=>$value->id,
'product_name'=>$value->product_name,
'product_price'=>$value->product_price,
'product_currency'=>$value->product_currency,
'product_description'=>$value->product_description,
'merchant_email'=>$value->merchant_email,
'product_image'=>$value->product_image,
'payment_mode'=>$value->payment_mode,
);
}
return $pro;
}
//update product data
public function update_product($product_id,$product_val){
$this->db->where('id', $product_id);
$result = $this->db->update('product', $product_val);
if ($result == 1) {
return TRUE;
} else {
return FALSE;
}
}
//Delete product data by id
public function delete_product($product_id){
$this->db->where('id', $product_id);
$this->db->delete('product');
return TRUE;
}
}
?>
Views : Add_products.php
It is a view file that contains the form code which is used for adding new products.
<!DOCTYPE html>
<!--
To change this license header, choose License Headers in Project Properties.
To change this template file, choose Tools | Templates
and open the template in the editor.
-->
<html>
<head>
<meta charset="utf-8">
<meta http-equiv="X-UA-Compatible" content="IE=edge">
<title>Add Product</title>
<meta name="viewport" content="width=device-width, initial-scale=1">
<link rel="stylesheet" type="text/css" href="<?php echo base_url(); ?>css/global.css">
<link rel="stylesheet" type="text/css" href="<?php echo base_url(); ?>css/fg-main-style.css">
<link rel="stylesheet" type="text/css" href="<?php echo base_url(); ?>css/popup_style.css" />
<link rel="stylesheet" type="text/css" href="<?php echo base_url(); ?>css/style_code.css" />
<link rel="stylesheet" type="text/css" href="<?php echo base_url(); ?>css/loader.css" />
<script type="text/javascript" src="<?php echo base_url(); ?>js/jquery-latest.js"></script>
<script type='text/javascript' src='<?php echo base_url(); ?>js/jquery-1.9.1.js'></script>
<script type="text/javascript" src="<?php echo base_url(); ?>js/validate_by_text.js"></script>
</head>
<body>
<div id="main-wrapper" class="container-fluid">
<!-- Header Section -->
<div class="row">
<div class="main-header">
<div class="col-xs-3 col-sm-3 col-md-3">
<a href="#" class="logo"><img src="<?php echo base_url(); ?>images/logo.png" alt="Formget Fugo"></a>
</div>
<div class="col-xs-9 col-sm-9 col-md-9">
</div>
<div class="fg-clear"></div>
<ul class="main-tab">
<li><a class="active" href="<?php echo base_url(); ?>index.php/products/">Add Products</a></li>
<li id="nomargin"><a href="<?php echo base_url(); ?>index.php/products/show_all">Show Products</a></li>
</ul>
<div class="fg-clear"></div>
</div>
</div>
<!-- Middle Section -->
<div class="row main-container blue-bg">
<div style="padding:0 100px;">
<div class="col-md-12 nopadding">
<div id="right-section-wrapper"style="border-right: 1px solid #CBE5F4;">
<div class="top-section-heading">
<h2>Add Product</h2>
<h4>Add Your Product Name,Price, Currency type and Merchant Email Id</h4>
</div>
<div class="clearfix"></div>
<div id="success_msg">
<h2>Product Added Successfully...!!</h2>
<div id="btn_con"><a href="<?php echo base_url() ?>index.php/products/show_all" class="fg-btn orange medium inline">See All Products</a></div><a id="msg_close" class="close icon-cross2" href="javascript:void(0)"></a>
</div>
<div class="fg-parent-box">
<div class="fg-box first">
<p class="fg-box-header relative rl-pad">Product Information</p>
<div class="fg-inner-box rl-pad">
<form id="form" class="myForm" method="POST" enctype="multipart/form-data">
<div class="fg-row">
<label class="block fg-label">Product Name</label>
<input id="product_name" type="text" class="fg-input text fg-fw" name="product_name" value="">
<p id= "product_name" class="fg-help red"></p>
</div>
<div class="fg-row">
<div class="col-md-8 nopadding">
<label class="block fg-label">Product Price</label>
<input id="product_price" type="number" step="0.01" min="0" class="fg-input text fg-fw" name="product_price" value="">
<p id ="product_price" class="fg-help red"></p>
</div>
<div class="col-md-4 ">
<label class="block fg-label">Currency</label>
<select id="product_currency" class="fg-select fg-fw" name="product_currency">
<option value="USD" title="$" >USD</option>
<option value="AUD" title="$" >AUD</option>
<option value="BRL" title="R$" >BRL</option>
<option value="GBP" title="£" >GBP</option>
<option value="CAD" title="$" >CAD</option>
<option value="CZK" title="">CZK</option>
<option value="DKK" title="">DKK</option>
<option value="EUR" title="€">EUR</option>
<option value="HKD" title="$">HKD</option>
<option value="HUF" title="">HUF</option>
<option value="ILS" title="₪">ILS</option>
<option value="JPY" title="¥">JPY</option>
<option value="MXN" title="$">MXN</option>
<option value="TWD" title="NT$">TWD</option>
<option value="NZD" title="$">NZD</option>
<option value="NOK" title="">NOK</option>
<option value="PHP" title="P">PHP</option>
<option value="PLN" title="">PLN</option>
<option value="RUB" title="">RUB</option>
<option value="SGD" title="$">SGD</option>
<option value="SEK" title="">SEK</option>
<option value="CHF" title="">CHF</option>
<option value="THB" title="฿">THB</option>
</select>
<p class="fg-help"></p>
</div>
<div class="clearfix"></div>
</div>
<div class="fg-row">
<label class="block fg-label">Product Image</label>
<div class="fg-upload-parent">
<input id="up_file" type="file" class="file1" name="up_file" style="visibility:hidden; height:0px !important;" onchange="document.getElementById('import_file_text').value = this.value;">
<input class="fg-input text inline_path" id="import_file_text" placeholder="" type="text" onclick="document.getElementById('up_file').click();" readonly>
<span class="fg-upload-btn" onclick="document.getElementById('up_file').click();"><i class="icon-folder"></i>Choose</span>
<div class="fg-clear"></div>
</div>
</div>
<div class="fg-row">
<label class="block fg-label">Product Description</label>
<textarea name="product_description" class="fg-textarea fg-fw last" rows="6"></textarea>
<p class="fg-help"></p>
</div>
<div class="fg-row">
<label class="block fg-label">Merchant Email Id</label>
<input id="merchant_email" type="text" class="fg-input text fg-fw" name="merchant_email" value="">
<p id="merchant_email" class="fg-help red"></p>
</div>
<div class="fg-row first">
<label class="block fg-label">Payments Mode</label>
<select name="payment_mode" id="payment_mode" class="fg-select fg-fw">
<option value=""> -- Select Payment Mode -- </option>
<option value="https://www.sandbox.paypal.com/us/cgi-bin/webscr">sandbox.paypal</option>
<option value="https://www.paypal.com/cgi-bin/webscr">paypal</option>
</select>
<p id="payment_mode" class="fg-help"></p>
</div>
<div class="fg-row last">
<input id ="submit" type="submit" class="fg-btn green medium inline" value="Save Product" name="submit">
</div>
</form>
</div>
</div><!-- fg-box End -->
</div><!-- fg-parent-box End-->
</div><!-- right-section-wrapper End -->
</div>
</div>
</div>
<!-- Footer Section -->
<div class="row">
<div class="main-footer">
<div class="copyright-footer">
<p>2015 © your-company.com All rights reserved.</p>
</div>
</div>
</div>
</div>
<div id="pop2" class="simplePopup">
<div class="bubblingG">
<span id="bubblingG_1">
</span>
<span id="bubblingG_2">
</span>
<span id="bubblingG_3">
</span>
</div>
</div>
<script src="<?php echo base_url(); ?>js/jquery.simplePopup.custom.js" type="text/javascript"></script>
<script type="text/javascript">
//This function call when submit data for adding new products
jQuery(document).ready(function() {
$('input#submit').click(function(e) {
$('div#success_msg').slideUp(1000);
e.preventDefault();
var validate_value = validate();
if(validate_value=='true'){
var formData = new FormData($('.myForm')[0]);
jQuery.ajax({
type: "POST",
data: formData,
mimeType: "multipart/form-data",
contentType: false,
cache: false,
processData: false,
url: "<?php echo base_url();?>" + "index.php/products/save_products",
success: function(res) {
if (res)
{
if (res =='TRUE') {
setTimeout(function() {
$('#pop2').css('display', 'none');
$('div.simplePopupBackground').css('display', 'none');
},
4000);
setTimeout(function() {
$('div#success_msg').slideDown(1000);
},
4500);
$('#pop2').simplePopup();
// $('div#success_msg').slideDown(1000);
}
}
}
});
}
});
$('a#msg_close').click(function() {
$('div#success_msg').slideUp(1000);
});
});
</script>
</body>
</html>
Views : Show_all_products.php
It is also a view file that contains code for the operations like show data, edit data, delete data and copy product code.
<!DOCTYPE html>
<!--
To change this license header, choose License Headers in Project Properties.
To change this template file, choose Tools | Templates
and open the template in the editor.
-->
<html>
<head>
<meta charset="utf-8">
<meta http-equiv="X-UA-Compatible" content="IE=edge">
<title>Show Product</title>
<meta name="viewport" content="width=device-width, initial-scale=1">
<link rel="stylesheet" type="text/css" href="<?php echo base_url(); ?>css/global.css">
<link rel="stylesheet" type="text/css" href="<?php echo base_url(); ?>css/fg-main-style.css">
<link rel="stylesheet" type="text/css" href="<?php echo base_url(); ?>css/style.css" />
<link rel="stylesheet" type="text/css" href="<?php echo base_url(); ?>css/style_code.css" />
<script type="text/javascript" src="<?php echo base_url(); ?>js/jquery-latest.js"></script>
<script type='text/javascript' src='<?php echo base_url(); ?>js/jquery-1.9.1.js'></script>
<script type="text/javascript" src="<?php echo base_url(); ?>js/validate_by_text.js"></script>
</head>
<body>
<div id="main-wrapper" class="container-fluid">
<!-- Header Section -->
<div class="row">
<div class="main-header">
<div class="col-xs-3 col-sm-3 col-md-3">
<a href="#" class="logo"><img src="<?php echo base_url(); ?>images/logo.png" alt="Formget Fugo"></a>
</div>
<div class="col-xs-9 col-sm-9 col-md-9">
</div>
<div class="fg-clear"></div>
<ul class="main-tab">
<li><a href="<?php echo base_url(); ?>index.php/products/">Add Products</a></li>
<li id="nomargin"><a id="active" class="active" href="<?php echo base_url(); ?>index.php/products/show_all">Show Products</a></li>
</ul>
<div class="fg-clear"></div>
</div>
</div>
<!-- Middle Section -->
<div class="row main-container blue-bg">
<div style="padding:0 100px;">
<div class="col-md-12 nopadding">
<div id="right-section-wrapper"style="border-right: 1px solid #CBE5F4;">
<div id="table_container" >
<div class="top-section-heading">
<h2>Products Dashboard</h2>
</div>
<div class="clearfix"></div>
<div class="fg-parent-box">
<div class="tab-pag-wrapper">
<table class="messages">
<thead>
<tr class="head">
<th class="first">ID</th>
<th>Prodcut Name</th>
<th>Merchant's Email</th>
<th>Price</th>
<th>Action</th>
</tr>
</thead>
<tbody>
<?php foreach ($query as $row) { ?>
<input id="id<?php echo $row->id; ?>" value="<?php echo $row->id; ?>" type="hidden">
<input id="name<?php echo $row->id; ?>" value="<?php echo $row->product_name; ?>" type="hidden">
<input id="price<?php echo $row->id; ?>" value="<?php echo $row->product_price; ?>" type="hidden" >
<input id="currency<?php echo $row->id; ?>" value="<?php echo $row->product_currency; ?>" type="hidden">
<input id="url<?php echo $row->id; ?>" value="<?php echo $row->product_image; ?>" type="hidden">
<input id="description<?php echo $row->id; ?>" value="<?php echo $row->product_description; ?>" type="hidden">
<tr class="row-data">
<td class="first"><?php echo $row->id; ?></td>
<td><?php echo $row->product_name; ?></td>
<td><?php echo $row->merchant_email; ?></td>
<td><?php echo $row->product_price; ?>/<?php echo $row->product_currency; ?></td>
<td>
<a href="javascript:void(0)" onclick="preview(<?php echo $row->id; ?>);" >
<div id="show"><i class="icon-eye"></i></div>
</a>
<a href="javascript:void(0)" onclick="edit(<?php echo $row->id; ?>);" >
<div id="edit"><i class="icon-pencil"></i></div>
</a>
<a href="javascript:void(0)" onclick="delete_product(<?php echo $row->id; ?>);" >
<div id="delete"><i class="icon-trash"></i></div>
</a>
<a href="javascript:void(0)" onclick="get_code(<?php echo $row->id; ?>);">
<div id="get_code">Code</div>
</a>
</td>
</tr>
<?php } ?>
</tbody>
</table>
<!-- <div class="ajax_count">
<ul>
<li><a>1</a></li>
<li class="current"><a>2</a></li>
<li><a>3</a></li>
<li><a>></a></li>
<li><a>>></a></li>
</ul>
</div>-->
</div>
</div><!-- fg-parent-box End-->
</div>
<div id="update_form">
<div class="top-section-heading">
<h2>Update Product</h2>
<h4></h4>
</div>
<div class="clearfix"></div>
<div id="success_msg">
<h2>Product Updated Successfully...!!</h2>
<div id="btn_con"><a href="<?php echo base_url() ?>index.php/products/show_all" class="fg-btn orange medium inline">See All Products</a></div><a id="msg_close" class="close icon-cross2" href="javascript:void(0)"></a>
</div>
<div class="fg-parent-box">
<div class="fg-box first">
<p class="fg-box-header relative rl-pad">Product Information<a onclick="update_close();" id="update_close" ><img src="<?php echo base_url();?>images/close.png"/></a></p>
<div class="fg-inner-box rl-pad">
<form class="myForm" method="POST" enctype="multipart/form-data">
<input type="hidden" id="product_id" name="product_id" value=""/>
<div class="fg-row">
<label class="block fg-label">Product Name</label>
<input id="product_name" type="text" class="fg-input text fg-fw" name="product_name" value="">
<p id="product_name" class="fg-help red"></p>
</div>
<div class="fg-row">
<div class="col-md-8 nopadding">
<label class="block fg-label">Product Price</label>
<input id="product_price" type="number" step="0.01" min="0" class="fg-input text fg-fw" name="product_price" value="">
<p id="product_price" class="fg-help red"></p>
</div>
<div class="col-md-4 ">
<label class="block fg-label">Currency</label>
<select id="product_currency" class="fg-select fg-fw" name="product_currency">
<option value="USD" title="$" >USD</option>
<option value="AUD" title="$" >AUD</option>
<option value="BRL" title="R$" >BRL</option>
<option value="GBP" title="£" >GBP</option>
<option value="CAD" title="$" >CAD</option>
<option value="CZK" title="">CZK</option>
<option value="DKK" title="">DKK</option>
<option value="EUR" title="€">EUR</option>
<option value="HKD" title="$">HKD</option>
<option value="HUF" title="">HUF</option>
<option value="ILS" title="₪">ILS</option>
<option value="JPY" title="¥">JPY</option>
<option value="MXN" title="$">MXN</option>
<option value="TWD" title="NT$">TWD</option>
<option value="NZD" title="$">NZD</option>
<option value="NOK" title="">NOK</option>
<option value="PHP" title="P">PHP</option>
<option value="PLN" title="">PLN</option>
<option value="RUB" title="">RUB</option>
<option value="SGD" title="$">SGD</option>
<option value="SEK" title="">SEK</option>
<option value="CHF" title="">CHF</option>
<option value="THB" title="฿">THB</option>
</select>
<p class="fg-help"></p>
</div>
<div class="clearfix"></div>
</div>
<div class="fg-row">
<label class="block fg-label">Product Image</label>
<div class="fg-upload-parent">
<input id="up_file" type="file" class="file1" name="up_file" style="visibility:hidden; height:0px !important;" onchange="document.getElementById('import_file_text').value = this.value;">
<input name="import_file_text" class="fg-input text inline_path" id="import_file_text" placeholder="" type="text" onclick="document.getElementById('up_file').click();" readonly>
<span class="fg-upload-btn" onclick="document.getElementById('up_file').click();"><i class="icon-folder"></i>Choose</span>
<div class="fg-clear"></div>
</div>
</div>
<div class="fg-row">
<label class="block fg-label">Product Description</label>
<textarea id="product_description" name="product_description" class="fg-textarea fg-fw last" rows="6"></textarea>
<p class="fg-help">Help Text goes here.</p>
</div>
<div class="fg-row">
<label class="block fg-label">Merchant Email Id</label>
<input id="merchant_email" type="text" class="fg-input text fg-fw" name="merchant_email" value="">
<p id="merchant_email" class="fg-help red"></p>
</div>
<div class="fg-row first">
<label class="block fg-label">Payments Mode</label>
<select name="payment_mode" id="payment_mode" class="fg-select fg-fw">
<option value=""> -- Select Payment Mode -- </option>
<option value="https://www.sandbox.paypal.com/us/cgi-bin/webscr">sandbox.paypal</option>
<option value="https://www.paypal.com/cgi-bin/webscr">paypal</option>
</select>
<p id="payment_mode" class="fg-help"></p>
</div>
<div class="fg-row last">
<input id ="submit" type="submit" class="fg-btn green medium inline" value="Update Product" name="submit">
</div>
</form>
</div>
</div><!-- fg-box End -->
</div><!-- fg-parent-box End-->
</div>
</div><!-- right-section-wrapper End -->
</div>
</div>
</div>
<!-- Footer Section -->
<div class="row">
<div class="main-footer">
<div class="copyright-footer">
<p>2015 © your-company.com All rights reserved.</p>
</div>
</div>
</div>
</div>
<div id="pop1" class="simplePopup">
<form method="post" action="<?php echo base_url(); ?>index.php/products/checkout">
<input id="product_id" name="product_id" type="hidden" value=""/>
<h2>PHP, jQuery, Ajax Based Advance Contact Form</h2><br>
<img style="width:30%; height: 180px" id="product_img" >
<div id="product_decription_pre"></div>
<br>
<input id="show_submit" type="submit" value="Buy Now 28.00" class="fg-btn inline medium blue" />
<br><br>
</form>
</div>
<div id="copy_code" class="simplePopup">
<link rel="stylesheet" type="text/css" href="<?php echo base_url(); ?>css/embed_css.css" />
<div id="form_container">
<form method="post" action="<?php echo base_url(); ?>index.php/products/checkout">
<input id="product_id" name="product_id" type="hidden" value=""/>
<h2>PHP, jQuery, Ajax Based Advance Contact Form</h2><br>
<img style="width:30%; height: 180px" id="product_img" src="" >
<div id="product_decription_pre"></div>
<br><br>
<input id="code_submit" type="submit" value="Buy Now 28.00" class="fg-btn inline medium blue" />
<br><br>
</form>
</div>
</div>
<div id="pop2" class="simplePopup">
<div class="fg-row">
<label class="block fg-label">Copy Code</label>
<div id="code_con"></div>
<p class="fg-help">Copy Code and put anywhere in any view</p>
</div>
</div>
<div id="delete_product_pop" class="simplePopup">
<div class="fg-box first">
<p class="fg-box-header relative rl-pad">Deleting Product</p>
<div class="fg-inner-box rl-pad">
<form method="post">
<div class="fg-row">
<center> <label class="block fg-label">Are you sure..? <br>
<br>You want to delete this Product</label>
<input type="hidden" name="product_id" id="del_product_id" value=""/>
<div><br><input id="del_submit" type="submit" value="Yes" class="fg-btn inline medium green" /> <a href="<?php echo base_url(); ?>index.php/products/show_all" id="cancel_delete" class="fg-btn orange medium inline">No</a></div>
</center>
</div>
</form>
</div>
</div>
</div>
<script src="<?php echo base_url(); ?>js/jquery.simplePopup.js" type="text/javascript"></script>
<script type="text/javascript">
//js function for deleting product
function delete_product(id) {
$('#del_product_id').val(id);
$('#delete_product_pop').simplePopup();
}
//js function for view product
function preview(id) {
var currency = '$';
product_name = $("input#name" + id).val();
product_image = $("input#url" + id).val();
product_price = $("input#price" + id).val();
product_currency = $("input#currency" + id).val();
product_description = $("input#description" + id).val();
if (product_currency == "BRL") {
currency = 'R$';
} else if (product_currency == "USD" || product_currency == "ASD") {
currency = '$';
} else if (product_currency == 'GBP') {
currency = '£';
}
$("div#product_decription_pre").html(product_description);
$("#pop1 h2").html(product_name);
$("#pop1 img").attr('src', product_image);
$("#pop1 input#show_submit").val("Buy Now " + currency + "" + product_price);
$("#pop1 input#product_id").val(id);
$('#pop1').simplePopup();
}
//js function for get code
function get_code(id) {
var currency = '$';
product_name = $("input#name" + id).val();
product_image = $("input#url" + id).val();
product_price = $("input#price" + id).val();
product_currency = $("input#currency" + id).val();
if (product_currency == "BRL") {
currency = 'R$';
} else if (product_currency == "USD" || product_currency == "ASD") {
currency = '$';
} else if (product_currency == 'GBP') {
currency = '£';
}
$("#copy_code h2").html(product_name);
$("#copy_code img").attr('src', product_image)
$("#copy_code input#submit").val("Buy Now " + currency + "" + product_price);
$("#copy_code input#product_id").val(id);
var data = $('#copy_code').html();
$('#pop2 #code_con').text(data);
$('#pop2').simplePopup();
}
//js function for update product
function edit(id) {
$.ajax({
url: "<?php echo base_url();?>" + "index.php/products/get_value_for_update",
type: "POST",
dataType: 'json',
data: {product_id: id},
success: function(data) {
$("input#product_id").val(id);
$("input#product_name").val(data['product_name']);
$("input#product_price").val(data['product_price']);
$("select#product_currency").val(data['product_currency']);
$("textarea#product_description").html(data['product_description']); $("select#payment_mode").val(data['payment_mode']);
$("input#import_file_text").val(data['product_image']);
$("input#merchant_email").val(data['merchant_email']);
}
});
$("a#active").removeClass('active');
$("div#table_container").slideUp(1000);
$("div#update_form").slideDown(2000);
}
//js function for close update form
function update_close(){
$("div#update_form").slideUp(1000);
$("div#table_container").slideDown(1000);
}
//js function for update product when form submit
jQuery(document).ready(function() {
$('input#submit').click(function(e) {
$('div#success_msg').slideUp(1000);
e.preventDefault();
var validate_value = validate();
if(validate_value=='true'){
var formData = new FormData($('.myForm')[0]);
jQuery.ajax({
type: "POST",
data: formData,
mimeType: "multipart/form-data",
contentType: false,
cache: false,
processData: false,
url: "<?php echo base_url(); ?>" + "index.php/products/update_product",
success: function(res) {
if (res)
{
if (res == 'TRUE') {
$('div#success_msg').slideDown(1000);
}
}
}
});
}
});
//js function for deleting product
$('input#del_submit').click(function() {
var id = $('input#del_product_id').val();
$.ajax({
url: "<?php echo base_url();?>" + "index.php/products/delete_product",
type: "POST",
data: {product_id: id},
success: function(data) {
location.reload();
}
});
});
$('a#msg_close').click(function() {
$('div#success_msg').slideUp(1000);
});
});
</script>
</body>
</html>
Views : Checkout.php
It is also a view file that contains code for the checkout form.
<?php if(empty($product_id)){
header("Location: show_all");
} ?>
<html>
<head>
<meta charset="utf-8">
<meta http-equiv="X-UA-Compatible" content="IE=edge">
<title>Billing Details</title>
<meta name="viewport" content="width=device-width, initial-scale=1">
<link rel="stylesheet" type="text/css" href="<?php echo base_url(); ?>css/global.css">
<link rel="stylesheet" type="text/css" href="<?php echo base_url(); ?>css/fg-main-style.css">
<script type='text/javascript' src='<?php echo base_url(); ?>js/jquery-1.9.1.js'></script>
<link rel="stylesheet" type="text/css" href="<?php echo base_url(); ?>css/popup_style.css" />
<link rel="stylesheet" type="text/css" href="<?php echo base_url(); ?>css/loader.css" />
<script src="<?php echo base_url(); ?>js/jquery-latest.js" type="text/javascript"></script>
<script type="text/javascript" src="<?php echo base_url(); ?>js/validate_by_text.js"></script>
<style type="text/css">
img#paypal{
width: 126px;
float: right;
}
</style>
</head>
<body>
<div id="main-wrapper" class="container-fluid">
<!-- Header Section -->
<div class="row">
<div class="main-header">
<div class="col-xs-3 col-sm-3 col-md-3">
<a href="#" class="logo"><img src="<?php echo base_url(); ?>images/logo.png" alt="Formget Fugo"></a>
</div>
<div class="col-xs-9 col-sm-9 col-md-9">
</div>
<div class="fg-clear"></div>
<ul class="main-tab">
<li><a href="<?php echo base_url(); ?>index.php/products/">Add Products</a></li>
<li id="nomargin"><a href="<?php echo base_url(); ?>index.php/products/show_all">Show Products</a></li>
</ul>
<div class="fg-clear"></div>
</div>
</div>
<!-- Middle Section -->
<div class="row main-container blue-bg">
<div style="padding:0 100px;">
<div class="col-md-12 nopadding">
<div id="right-section-wrapper"style="border-right: 1px solid #CBE5F4;">
<div class="top-section-heading">
<h2>Billing Details</h2>
<h4></h4>
</div>
<div class="clearfix"></div>
<div class="fg-parent-box">
<div class="fg-box first">
<p class="fg-box-header relative rl-pad">User Information</p>
<div class="fg-inner-box rl-pad">
<form class="myForm" method="POST" enctype="multipart/form-data">
<input type="hidden" name="product_id" id="product_id" value="<?php echo $product_id; ?>"/>
<div class="fg-row">
<label class="block fg-label">Full Name</label>
<input name="full_name" id="full_name" type="text" class="fg-input text fg-fw"/>
<p id="full_name" class="fg-help red"></p>
</div>
<div class="fg-row">
<label class="block fg-label">Email Address</label>
<input id="email_address" type="text" class="fg-input text fg-fw" name="email_address" value="">
<p id="email_address" class="fg-help red"></p>
</div>
<div class="fg-row last">
<input onClick="submit_data();" id ="submit" type="button" class="fg-btn blue medium inline" value="Proceed To Paypal" name="submit"><img id="paypal" src="<?php echo base_url(); ?>images/paypal.jpg"/>
</div>
</form>
</div>
</div><!-- fg-box End -->
</div><!-- fg-parent-box End-->
</div><!-- right-section-wrapper End -->
</div>
</div>
</div>
<!-- Footer Section -->
<div class="row">
<div class="main-footer">
<div class="copyright-footer">
<p>2015 © your-company.com All rights reserved.</p>
</div>
</div>
</div>
</div>
</div>
<div id="pop2" class="simplePopup">
<div class="bubblingG">
<span id="bubblingG_1">
</span>
<span id="bubblingG_2">
</span>
<span id="bubblingG_3">
</span>
</div>
</div>
<form id ="payment_mode_form" name="form" action="https://www.sandbox.paypal.com/us/cgi-bin/webscr" method="post" target="_top">
<input type="hidden" name="cancel_return" value="http://localhost/ci_paypal/index.php/products/show_all" />
<input type="hidden" name="return" value="http://www.aorank.com/live-tutorial/test.php" />
<input type="hidden" name="cmd" value="_xclick">
<input id="business" type="hidden" name="business" value="">
<input type="hidden" name="lc" value="C2">
<input id ="item_name" type="hidden" name="item_name" value="">
<input id="amount" type="hidden" name="amount" value="">
<input id="currency_code" type="hidden" name="currency_code" value="USD">
<input type="hidden" name="button_subtype" value="services">
<input type="hidden" name="no_note" value="0">
<input type="hidden" name="bn" value="PP-BuyNowBF:btn_buynowCC_LG.gif:NonHostedGuest">
</form>
<script src="<?php echo base_url(); ?>js/jquery.simplePopup.custom.js" type="text/javascript"></script>
<script type="text/javascript">
//js function for submit billing form data
function submit_data() {
var validate_value = validate_user();
if(validate_value=='true'){
var payment_mode = $("select#payment_mode").val();
$.ajax({
url: "<?php echo base_url(); ?>" + "index.php/products/save_billing_info",
type: "POST",
dataType: 'json',
data: {full_name: $("input#full_name").val(), email_address: $("input#email_address").val(), product_id: $("input#product_id").val()},
success: function(data) {
$("input#item_name").val(data['product_name']);
$("input#amount").val(data['product_price']);
$("input#business").val(data['merchant_email']);
$("input#currency_code").val(data['product_currency']);
$('form#payment_mode_form').attr('action',data['payment_mode']);
}
});
setTimeout(function() {
document.form.submit();
}, 3000);
$('#pop2').simplePopup();
}
}
</script>
</body>
</html>
We will now see the key features of the script :
You may agree with the fact that now a days online shopping is preferred more than offline, so using this script you can easily run your own online e-commerce website.
The setup is very easy you just have to add your product details, set payment method & details, then by generating the code you can place it in your live website and you will be all set to sell your products.
The key features are :
1. Add product details at a single place:
You can provide the product information that you need to sell in a detailed manner. The below image depicts all the feature that you can perform.

2. Product dashboard to perform distinct operations :
After adding your product details, here in this section you can preview the product before using it and can edit, delete the same. You are provided with the code that you can use it to embed the product in a new page or any other website. Once you will follow this step you will now be ready to receive online payment and to sell products.

To generate the code click on the option provided :
Copy the code and paste it in the section of your website where you wish to make the product live. Once you will do this the product will start showing in the website.

Click on preview option you will see the product like this :
As you can see from the above picture that how the product will be showcased in front end. In that you can see the product image, its description and buy now button. That will give all the required information to user who will see your products. As soon as the buy now button will be clicked the user will be redirected to the checkout page where they can provide the payment details to complete the payment.

I think you have a clear picture now, how the script will work.
Conclusion :
Using the script will help you to collect the online payment by just selling your product and manage all the things at a single dashboard. Hope you will be benefited with that. Please share your feedback in the space provided below.. 🙂
Creating and Embedding Form in Simple Way

Form views play a pivotal role while deciding a sign-up.
It is important where a form( Web Form ) is placed in the website and how does it appear in front of a user.
After creating a beautiful form, one has to embed its code in his website to make it visible.
There can be many ways of embedding a form, but three are predominant, namely
- Sliding Form ( bottom tabbed form, left tabbed form, right tabbed form ).
- Embed Full Form ( with full designing header and footer ).
- Embed Plain Form( without designing header and footer ).
To understand better, we’ll follow these Web Form Generator one by one. Stay tuned…
Sliding Form
A sliding form is a tabbed form which you can embed in your website that will be directly showcased in front of user and will make them to fill it eagerly.
This form can further be classified into the following:
Bottom sliding form
Below is the screenshot depicting how the form will look like in the bottom view.

Live Demo of a Bottom Sliding Form
Left sliding form
The form in the left view will look like as shown in the below image.

Live Demo of a Left Sliding Form
Right sliding form
The right side of the form view will look like as the below image depicts.

Live Demo of a Right Sliding form
Embed Plain form without header and footer
You can use this form view to embed a form in between the content or sidebars of your website.The form is responsive enough to be fixed in the webpage content in its full width and short too.
Below is the image showing how the form will look like.

Live Demo of a Plain Form without header & footer
Embed Complete Form with header & footer
This form view contains complete form with header and footer part. The header part is nothing but a banner image that showcases your brand and in the footer you can provide all your contact details, your website link, social links and some informative texts.
Refer the below image to see how it will look like. 
Live Demo of a Form with header & footer
Share form link directly
You can also use the unique form link to share it out, that will help you to collect leads.

Hope you have understood how can you embed Web-Based Forms and how they will look like. For further any queries, you can contact us directly.
Know Your Best Times to Send Emails to Get Maximum Open Rates

Imagine a case:
 You make a superb marketing email, following all the best practices of email marketing.
And then you send it to your email list on a Saturday night when everybody is busy partying.
What would be the probable result..???
For sure sending at such times will give you lowest open rates. And mark the failure of your email campaign.
Sending marketing or promotional emails at wrong times is like serving hot soups in summers. Would people like it, noooooo…!!!
Now an obvious question: What is the best day and time to send a marketing email?
Well, if you are searching for a generalized answer then I’m sorry there isn’t one. Every sector has a different audience and their days and times of activity and inactivity are different too. So generalizing them may not work for you.
Don’t we have a solution then..???
Yes, for sure there is a solution..!!
But before we reach there, we need to first understand what the majority of people believe about best days and times of sending emails. We’ll begin with the days first..
The Day Dilemma…
Mondays: The most common prohibition call for sending emails was once used to be on Mondays. But gone are the days, Mondays are trending now.
The Experian study tells that Mondays gave highest open rates of about 19% in the fourth quarter of 2022.
Weekdays: Weekdays are supposed to be the best days to send an email since open rates for these days are quite high and are constant since long. People still prefer to send emails on Tuesdays and Thursdays.
But the same could be a problem for you, as you will have to face a tough competition to stand out in the crowd of millions of emails.
Weekends: Earlier, weekends were avoided to send emails as people were believed to be out of offices and away from their desktops. But mobiles phones and iPad’s have changed this theory.
Now weekends too enjoy email open rates as high as 16% to 20%. This opens a path to explore new times for sending emails.
The Time Dilemma…
Till now the best times to send emails were supposed to be morning 8 a.m. to 10 a.m. or in the afternoon as mentioned by some reports of email marketing services like MailerMailer, GetResponse, and MailChimp. Also, the late evening rates too were considerable.
But the same Experian report gave surprising results on email sending times. According to it, highest open rates of 26% to 35% are in early morning 4 a.m. to afternoon 12 p.m.
I hope by now you’ve understood that you can’t have the same formula to be applicable for everyone. We have to think particularly about a business and derive its very own best day and time of sending emails.
Here is the Solution I was talking about…
To find the solution, we’ll have to twist the question a bit, the new one should be like – What is your best day and time of sending marketing emails?
When you personalize the question, a smart feature of A/B testing comes in the picture. It is a smart tool which has multiple applications and also works great for deciding best times to send emails.
For finding best send times in your case, you can pick three or four day and time combinations based on your previous open rate records. And then can send a group of people emails at those selected times.
Now based on the results you get, you can decide your own best day and time for sending emails.
I would suggest you one more thing, do tweak your send times every once in a while as we never know when our own trends get changed.
How I Found My Best Times…Best Times To Send Emails
I too had the same challenge in MailGet – Email Marketing Platform …How to get the maximum email open rates..???
To crack this challenge, I tried A/B testing and chose three days – Monday, Wednesday, and Sunday with appropriate timings based on my past experiences. I didn’t choose Friday as I knew it won’t help and left Saturday for obvious reasons.
Now I designed a fabulous promotional email and sent it to 1000 different subscribers on these days.
I checked my responses and inferred that Thursday between 10 a.m. to 12 p.m. was the most value returning slot for my product.
And when I tried sending emails at above mentioned times, my email open rates increased from 13.6% to 21.3%. And believe me, that is a huge rise.
Since then I’m following the same schedule with slight tweaks and getting fruitful results from it.
Knocking at the right time alone won’t help…
Getting good open rates doesn’t solely depends on when you’re sending emails. A lot more factors also contribute in communicating well with the subscriber.
Considering the below-mentioned practices could improve your open rates surprisingly to newer levels.
- By selecting the right email marketing services you could make half your work done. A service that gives you high inbox delivery, sends in time, suits your budget, is user-friendly and has least bounces and spam is supposed to be an ideal email marketing service. Make sure you have one.
- The emails should have eyeball-grabbing subject lines. A good subject line is the key to high email opens, therefore you should be on your toes for writing email subject line that works.
- Sending good welcome emails is an excellent practice. Welcome emails have maximum open rates so we can tell our subscribers everything we want to and can set their expectations right there.
- Subscribers should receive emails consistently and the schedule should be fixed in the welcome email itself.
- Last and the most important, you should sound useful to subscribers in your emails. Helping them would help you in return and you will enjoy a long lasting successful relationship with them.
What are your views regarding this?
Do express in the comment box, on anything we could add or delete. See yaa with more of email marketing soon…
Salesforce Integration in FormGet
This tutorial deals with integration of Salesforce with FormGet to collect and store leads and contacts data through forms. The first requirement here would be a salesforce account, which I’m sure you must be having already.
Now the next move is to generate your “Security Token“. For this follow these simple steps :
Step 1 : Go to Salesforce Home, click on your User Menu and then on “My Settings” tab.
Step 2 : Now click on “Personal” and then on “Reset My Security Token” button.
Step 3 : Here, on this page click on “Reset Security Token“. You will get your security token on your email account. Copy it from there and save it somewhere.
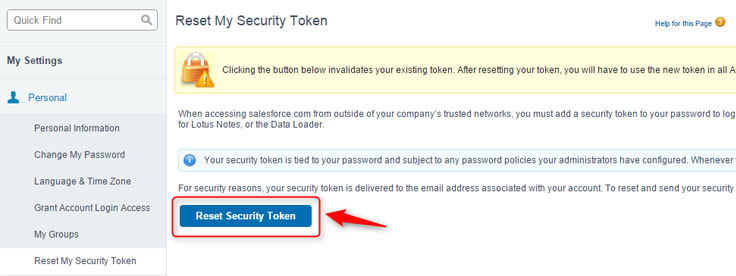
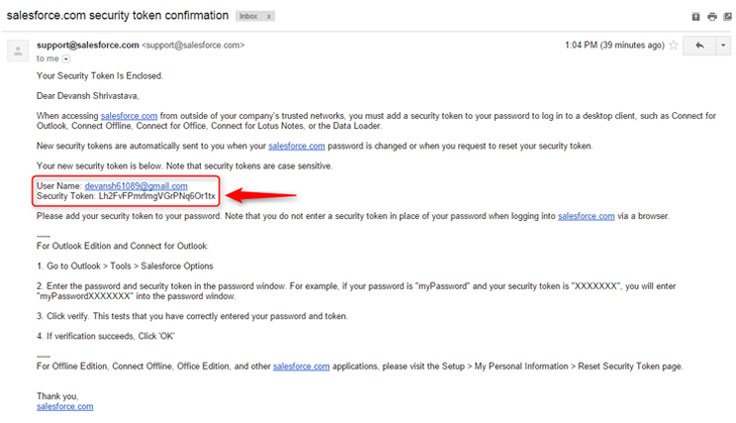
Now your part of work on Salesforce is over. Now you will have to do some settings in FormGet to integrate with it, after which your collected data through FormGet forms will directly be stored into Salesforce account.
Login to FormGet, Create your form and click on “Configure Extensions” button.

You will have to first purchase this extension from the Extensions window as it is a paid one. After you purchase it, you can now use to fetch data through forms, into Salesforce.
Step by step process of doing so is as follows :
Step 1 : After you click on Configure Extensions button, you will see the extensions page. Click on “Email Marketing/3rd Party” button, find Salesforce there and click on “Setup Now” button.
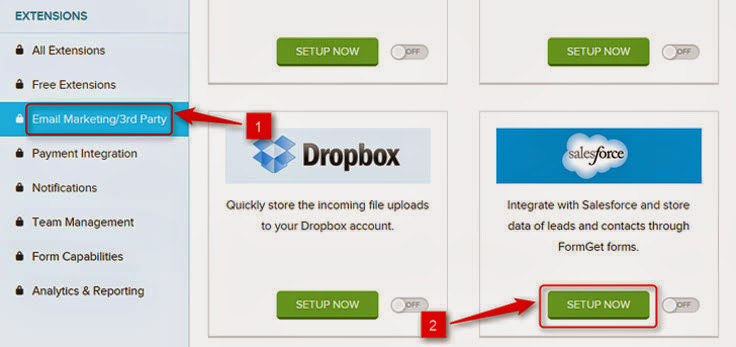
Step 2 : Enter your details; here you will have to enter your Salesforce account Username, Password and Security Token that you got through email. After entering, click on “Save Settings” button.
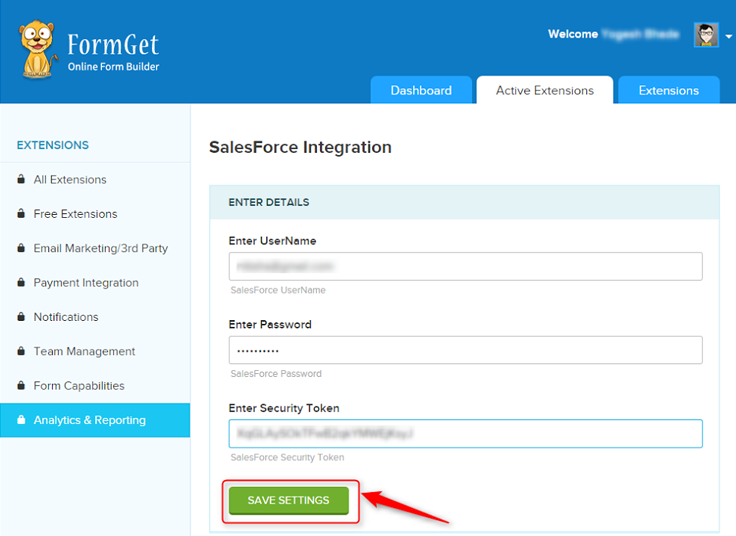
Step 3 : When you click on Save Settings button, you will see a “Form Mapping” button at the same place. When you click on it, your page will expand and you will see a page like this.
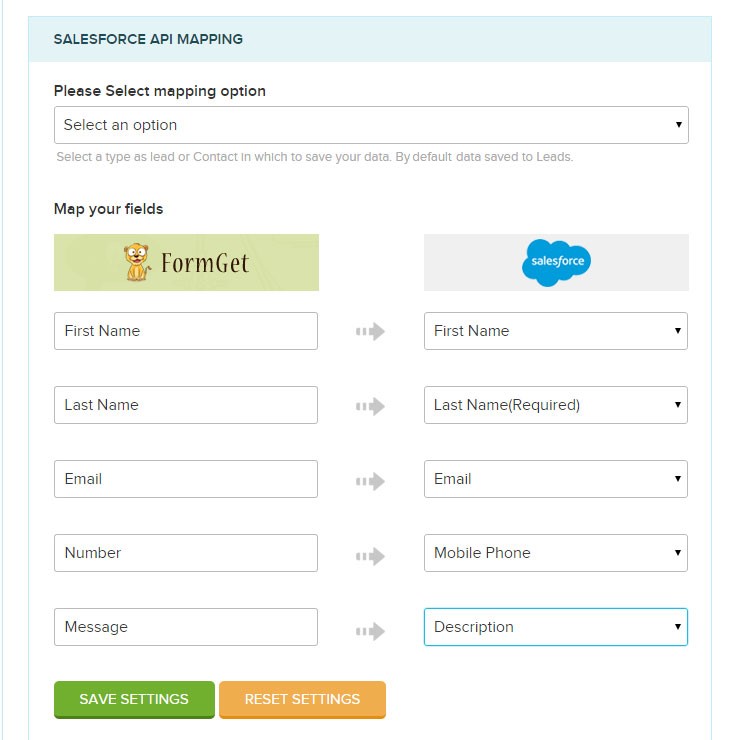
Step 4 : Now you can map so as to which form field data of your FormGet form you want to save in which field of your Salesforce list. But first you have to select the mapping option i.e. leads or contacts.
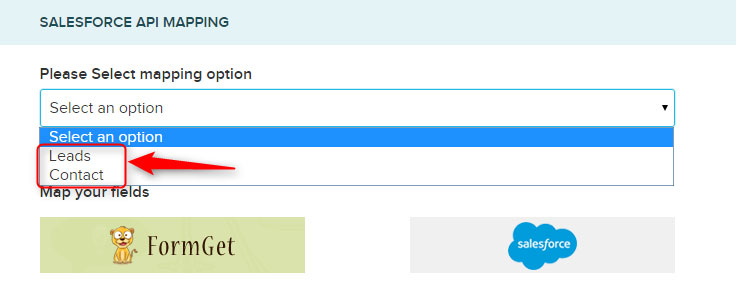
Step 5 : Now by clicking on fields of Salesforce, choose and map accordingly. After doing all click on “Save Settings” button.
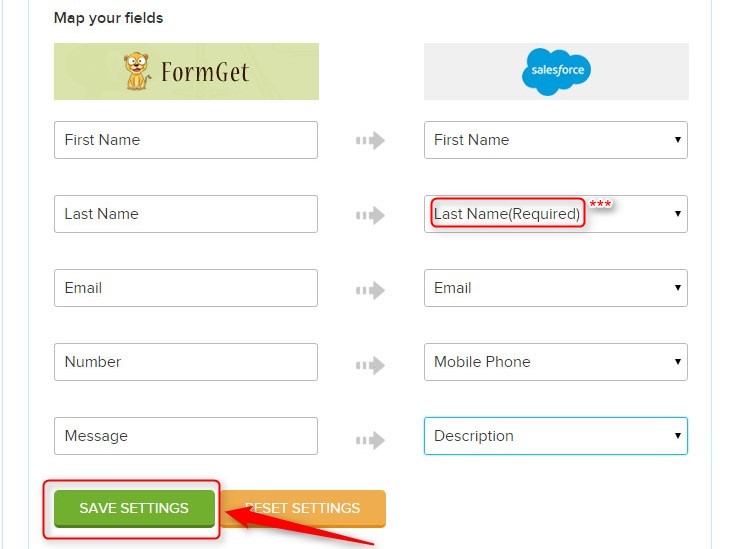
*** Side Note : It is necessary to select all the fields that are mentioned “required” in Salesforce fields, otherwise the forms would accept data but won’t be able to map and transfer to salesforce.
You are all set. Now whatever any data is collected through this particular form, will be automatically saved in your Saleforce list.
10 Types Of Welcome Emails to Increase Subscriber Engagement

When I started MailGet, I used to send welcome emails to everyone who signed up for it.
But to my disappointment, my welcome emails were failing to get the right response from my recipients.
And, I was getting very low CTR (Percentage of people opening to an email) nearly around 1.45%, which was quite below the industry standards.
Then, I decided to find out the reason behind all this.
So,
I examined 545 welcome emails of over 300 companies and determined what exactly a welcome email should hold.
Later on, when I applied my analysis on my welcome emails, I was shocked to see the results – My CTR raised to 2.55% i.e. by 175%.
Amazing. Isn’t it..!!
So, I have decided to share all my analysis with you.
For that, I have able to wrap up all my analysis work into 10 simple actionable steps.
Go through each of the steps and match how many of them you can follow too…
1. Send Welcome Emails Instantly:
Your subscriber should get your welcome email the moment he subscribes to your service.
And obviously, it is impossible to do that manually if a number of users subscribe you daily. A problem..???
Here is the solution – Email Autoresponders
Email Autoresponders are scheduled emails that are sent to a subscriber as soon as he joins your email list. Almost all email marketing services provide you the autoresponder feature nowadays. You can use them to make your work easier.
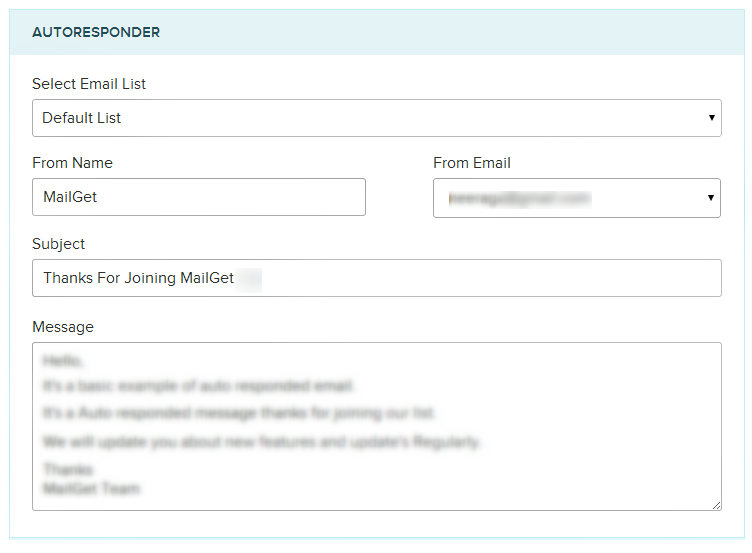
# Additional Input: You can inform your subscriber in the thanks page of your website to check his inbox for the welcome email and be sure that it reaches his inbox before he himself does.
2. Eye-Pleasing Subject Line Still Required:
A good subject line is always necessary to appeal a user. Just because he has subscribed you just now and is interested in you, you can’t ignore practices of writing a good subject line.
A simple “Welcome to ABC ” doesn’t work anymore, you need to be creative for sure.
In my case, instead of using a boring “Welcome to MailGet” I used this subject line: “Getting Started: Stay in touch..!!”
Try creating subject lines that pull subscribers and make them open your emails.
3. Give Users a Warm Welcome:
Subscribers should be delighted at your welcome and should feel that they are special for you. Check out these examples for how you could be different from others.
In the above email, the phrase “AND THIS IS CRAZY BUT” is rather a cooler way of saying that they are giving you a 20% off on their products.
See how StarBucks welcomes you. There’s a welcome written on the coffee cup, creatively mingling their product with your welcome.
4. Offer Them Some Starters:
Welcome emails have open rates as high as 54.7%, so why shouldn’t you utilize this. It could be a great idea to offer not all but a few of your best offers in the welcome email itself.

Offers in the very first email will overwhelm your subscribers and they will develop an inclination towards you.
After all who doesn’t want to be served well.
But while doing so, you should not forget the main purpose of a welcome email i.e. to make a bond with your subscriber.
5. Bring Them in Action:
Give a clear call to action to the subscriber in your welcome email..!!
This call to action could be a button simply saying “Shop Now” or something like “Click to Get Started“. Convey your message in short and then direct a subscriber to the click button saving both of yours time.
Put simple actionable steps in your welcome email to drive the subscriber in the right direction.
6. Tell Them the Time of Next Meeting:
Start setting expectations in your subscribers mind right from your welcome email. Set a day for meeting and arrive in his inbox regularly on the very same day (particularly for blog owners).
James Clear mentions in his welcome email that he will meet you on Mondays and Thursdays. The practice of meeting your subscribers at pre-scheduled times keeps their minds both prepared and waiting for your email.
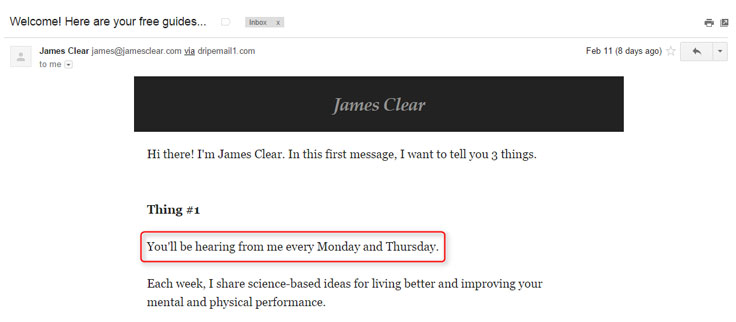
7. Adding Images Will Make it More Catchy:
Pictures are sometimes more explanatory than words. They save time and please your eyes too. Clear and detailed images work better for an email and may allow you more click-throughs.
You can use images as the background of your email on which you could write your message. But make sure your pictures are relevant and explain your intentions well.

And one technical thing, don’t upload heavy images that take much time to load as this may distract the audience.
8. Be Personal:
Personalization i.e. addressing a user by his name in the email is quite necessary for email marketing. Your Welcome email should address the person whom it is being sent. Also, it’s a good idea that the sender too is a person, not a team.
Now again this is something that needs use of an email marketing service. These services provide Email Personalization feature in which the system fetches the name of the subscriber from the contact details and put it in the email.
9. It’s a Mobile World:
The world is turning mobile these days, reports suggest more than 70% of people open emails in mobiles. So, your welcome emails should be responsive i.e. look equally good on all devices.
Mobile friendly emails have nowadays become more than a necessity and so you should be pretty sure about the responsiveness of your welcome email.
10. Get Social:
Don’t forget to put social buttons in your welcome email, to ensure that your subscribers are connected to you through multiple mediums.
Those who have subscribed you definitely want to know more about your product or service. Social mediums can help subscribers do that easily and at the same time increase their trust in you.
Wrapping Up…
The 10 practices I’ve mentioned above are tried and tested well. Use them to create a stunning welcome email and increase your subscriber engagement as I did.
And to design them the best what could be better than MailGet – Email Service Provider. It has amazing email builders to design a perfect welcome email. Also, setting autoresponders and email personalization too can be done very easily in MailGet.
Although these practices promise to improve your relationship with your customer, still the basic requirement for a customer to be with you is your usefulness to him. Always try to be useful to him and he won’t leave you ever.
Do you think we should do something more in our welcome emails?
Do express in the comment box below. See ya with more of email marketing soon…
10 Best Email Marketing Practices : Subject Lines
Thinking of what make subscribers open your marketing mails?
Well, all your answers would echo around many factors.
But, I know you all would agree with one point, that determines the opening of emails i.e. – Subject Lines.
The famous saying related to email subject lines states that –
If Your Email Subject Lines Are Of High Class, Then No One Can Stop You From Getting Success In Email Marketing.
So now you know how powerful subject lines are.!
Moreover,
A study on email subject line done by MarketingSherpas claims that – A right subject line can increase open rates up to 12.7%.
So, now let’s begin with discussing the “Dos and Don’ts” of making eye-catching email subject lines.
As said –
A list of recipes can’t make you a perfect chef, until you don’t know how to cook them.
But before beginning, have a look on the below infographics –
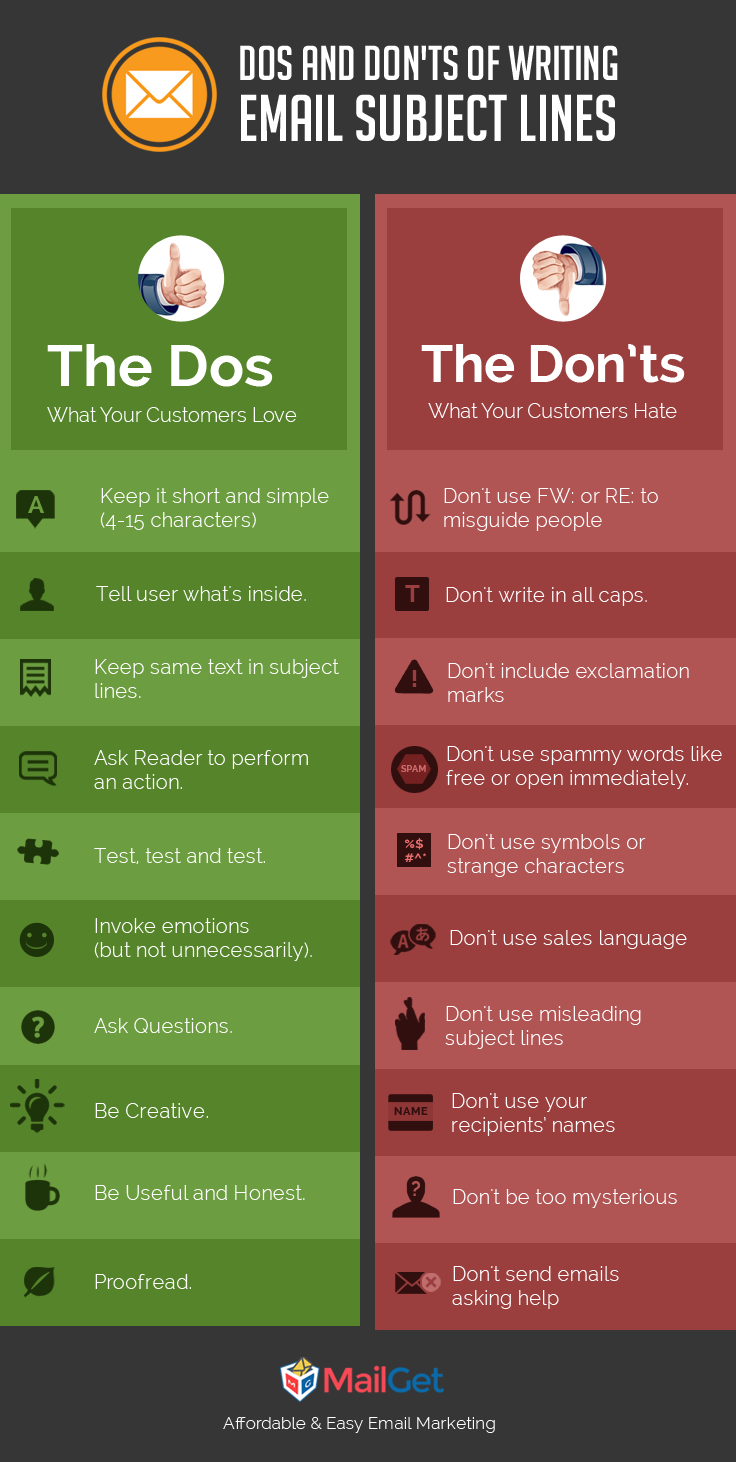
Got an idea of What To Do and What Not To Do.. ? we can
Let’s now move on to How To Do It part –
The Dos : What Your Customers Love
1. Do keep it short and simple :
Studies reveal that a subject line between 4-15 characters has the highest open rate (15.2%; MailerMailer report), whereas the maximum length of email subject lines should be not more than 60 characters.
A short subject line will be displayed fully on mobile phones too and guess what around 66% of the people use mobile phones to check emails (Marketing Land Report).
![]()
See what PayPal does, only 16 characters and I think you clearly understood what it wanted to deliver.
![]()
![]()
Now for keeping it short hyphens, colons and semicolons could be a great help. Twilio smartly uses a colon to reduce the length and at the same time delivers the message fully.
![]()
![]()
![]()
So give what it takes, but use short subject lines in your emails.
2. Do tell user what’s inside :
Tell your user what you’ve got for him straight forward. Don’t waste his time or you may find your email moved to spam or trash.
![]()
In the subject line above InkThemes is offering a huge 85% discount. Now as the reader is sure what he is getting inside, if he opens, he is ready to buy.
![]()
![]()
3. Do keep same text in subject lines :
Keeping similar subject lines in a particular series of mails makes reader used to those particular emails. And if a subscriber gets satisfied with a single email of the series, he’ll definitely see the rest too.

I’m not asking you to copy paste the same subject line every time,but atleast 3-4 words should be same so that it links properly to the previous one.
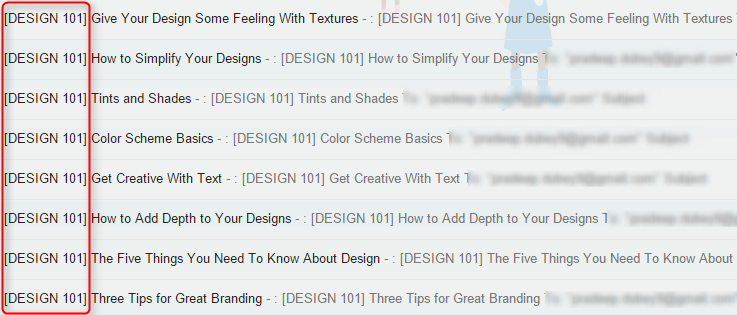
The above subject lines are of Canva which is a graphic design software. All of its emails start with subject [DESIGN 101] which brings consistency and continuity in marketing of their products through emails.
4. Do ask Reader to perform an action :
Motivation works. Give a call to action and people would respond. Below examples illustrate howto ask a reader to perform an action.
![]()
![]()
![]()
![]()
You need to smartly blend your information with a call to action, to get more opens while practicing effective email marketing.
5. Do invoke emotions (but not unnecessarily) :
An Emotional touch (joy, excitement, love, care) always works for a subject line. Check out the example below.
![]()
![]()
![]()
As soon as one reads the words “Happy Holidays”, the emotion drives him and he opens your email.
![]()
But hey, using emotions unnecessarily could be worst, be very careful with this. Give what you promise, or else no trust next time.
6. Do ask Questions :
You grow up answering everyone, to your teachers, your parents and everyone else around you. Its has become a habit and this might be the reason why asking questions in subject lines works.
Check out the examples below and see how differently questions can be asked.![]()
![]()
![]()
![]()
![]()
![]()
7. Do be creative :
For good email marketing, creativity counts, its something that’s always appreciated. Now, creativity doesn’t mean you beat around the bush, you can be creative and straightforward simultaneously.
![]()
A small phrase “A splash of red” has enhanced the subject at the same time hasn’t altered the meaning. Check some more examples.
![]()
Happy turns appy, attracts you and invokes your interest.
![]()
![]()
8. Do be Useful and Honest :
Your marketing email would only be opened, if the email subject line states it useful. People are very busy and only interested in emails that can actually help them.
![]()
![]()
![]()
Try to make your intentions clear in the subject line itself and maintain it till the “click here ” button of your email. This will help you in long run,I bet.
9. Do test, test and test :
I’m contradicting myself, but all the above practices may sometime fail, but what will definitely succeed, is testing. A/B testing is a tool used by numerous email marketing services today, where you make two subject lines and send to two different groups; the one with more opens is the winner.
US president Barack Obama raised a whopping $60 million additionally, using A/B testing (Source: Event360). What more you need to trust me on this now.
10.Do Proofread :
Even if you write a single word subject line, do cross check it a couple of times. A misspelled word is a red flag in your email’s reputation. Be alert of this.
The Don’ts : What Your Customers Hate
Don’ts don’t need explanations, you just need to avoid following the below mentioned practices. Study of much of researches and analyses on writing professional subject lines have led me to find out and produce to you these non-practices.
Still for your better understanding, we will discuss so as to why one should avoid doing them.
1. Don’t use FW: or RE: to misguide people :
Just to imply that the email has come from a trusted source, don’t use such words. The reader will find it eventually and then your email reputation is at stake.
![]()
![]()
![]()
Tell me who gives a reply of “Last Chance to Save 50% Off”. No one is gonna open such emails then or ever.
2. Don’t write in all caps :
It takes less than a fraction of a second for a recipient to decide whether to open the email or not. You need to leave no stone unturned to grab his attention.
But that doesn’t mean YOU CAN SHOUT ON HIM. Using all caps can turn him off and you may filtered to spam.
![]()
![]()
3. Don’t include exclamation marks :
Using exclamations have the same effect as the caps, it feels like you are forcing your email onto someone. Believe me, a reader doesn’t need any of it. Don’t make a subscriber feel you are desperate, be genuine.
![]()
![]()
4. Don’t use spammy words :
It’s 21st century, people are smart enough to judge your envelope from its cover. Including words like Free, Guarantee, Visit our website, etc may trigger spam filter and if not, the reader himself may spam filter it. These all are red flags, avoid using them.
![]()
5. Don’t use symbols or strange characters :
Don’t use symbols if you don’t want your emails look cheap and spammy, because a standard email from a reputed source always has its elegance and grace.
![]()
Symbols may also trigger spam detectors and booh your email is in the spam before a user may even look at it.
6. Don’t use sales language :
Cheesy sales pitches are a big turn off for subscribers. Their instincts don’t allow them to open emails, subject lines of which simply advertise products or services.
![]()
![]()
Tell but don’t sell.
7. Don’t use misleading subject lines :
Misleading email subject lines lead nowhere but to unsubscribe. And according to CAN-SPAM Act, writing such subject lines is illegal.
![]()
In the above example, who can tell what the email wants to convey, moreover the word Facebook misleads you. You need to be careful and shouldn’t follow such practices.
8. Don’t use your recipients’ names :
They know their names, why should we recall them. A name in your subject line not only increases its length unnecessarily but also negatively impacts the open rates (A MailerMailer study).
9. Don’t be too mysterious :
Too much mystery can kill the thrill. You should write effective email subject lines that generate curiosity but not mystery.
![]()
![]()
10. Don’t send emails asking help :
Emails asking help don’t open, as people fear of being scammed. Try not to always crying wolf, instead send emails that offer help to readers.
![]()
![]()
This was the first installment of the series, Email Marketing Best Practices which focused on writing subject lines.
I hope by now, you have got a good understanding of writing email subject lines that work, still if you are stuck at any point anywhere, feel free to ask at [email protected].
Do you think some more things need to be added in this post, do share in the comment box below. Will be back with something more interesting on email marketing soon…
MailGet Monthly Report – January 2022

We released MailGet – email service provider last year near Christmas. The idea of MailGet originated when we felt the need of reducing our personal email marketing expenses.
On the same notion, we designed MailGet for ourselves and for the other businesses dealing with the same issue. January was our first month of MailGet running successfully. 🙂
Here are the highlights of happenings in MailGet in January, 2022 :
- We added a total of 16 new customers to MailGet, who are now cutting down their email marketing expenses along with us.
- Around 1.5 million emails were sent via MailGet in January, 2022.
- We generated a sum of $464 from MailGet subscription sales in our first month of MailGet.
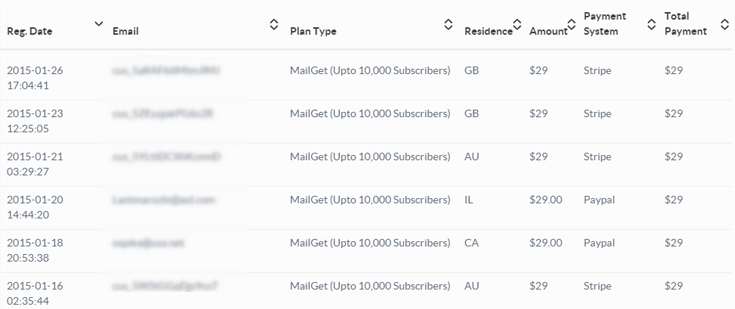
- Expenses : Biggest recurring monthly expense of $600 comes from our Amazon hosting servers. Our hosting costs increased ever since we started following best practices in server management (will write a post soon on that). We are pretty sure to break that even this month in February.
- We are working hard on the development end, we added Autoresponder to MailGet within a month of its inception.
- Wufoo integration was added to MailGet. All contacts in your Wufoo form can now automatically sync with MailGet (Wufoo integration was developed on request by one of our customers in Australia).
- We added a new Include/Exclude feature, to send emails again to only those subscribers who didn’t opened your email, the first time. (you’ll love this feature.)
- We released Optin forms to be added to your website/blog to add subscribers directly to your MailGet account from your website.
Challenges We Faced :
- Our biggest challenge in January was to manage and scale our database CPU resources. I didn’t want to say this but the very first test email that we triggered to our 50,000 subscribers crashed our database server. We didn’t anticipated the amount of load on our database. Ever since, we scaled our server in a way to allow sending thousands of emails per minute without any issues.
- People loved our idea of sending emails via Amazon SES and we got hundreds of emails from people who wanted to reduce their email marketing costs. However, setting up Amazon SES account was a bit of hurdle for people and most of our time on support went on explaining about the steps to configure Amazon SES account.
To resolve this, we wrote a blog post – Setup Amazon SES account and made a video to explain the step by step process to setup Amazon SES account. We are now planning to do this setup for our customers at our end itself. We are still planning it out, but we have decided that this is something we will be coming up with, soon.
Plans for February :
- We have planned to launch MailGet WordPress plugin in February.
- The most requested feature of automated sequential email drips too will be coming this February.
- We will be making few updates to our email builder to allow sending plain text emails and HTML emails.(This is again requested by one of our customers in Brazil.)
We think MailGet has got a lot of potential to improve your email marketing standards and reduce costs simultaneously. We are working continuously to enhance it and make it even more awesome day by day. With our efforts and customers’ feedback, MailGet is transforming into a more efficient email marketing solution and soon will rank among the top ones.
A big thanks to our users for their active participation.
If you haven’t checked MailGet yet, check it out via link below.
Try MailGet TodayAlso have a look at some more informative blogs –
- Remove Download Icon Over The Images In Gmail
10+ Cheapest Email Marketing Services 2022

“The company in which you will improve most will be the least expensive for you.”
– George Washington
Money matters !!!
Of course…You are in any business, you would want to spend the minimum and save maximum. The more you save, the more you earn. And the most interesting thing about cost saving is that it is a never-ending process.
Businesses today invest thousands of dollars in email marketing, by hiring costly services that display tons of features (many of which may be useless for you) and assure you highest ROIs.
But the same level of success can be derived from low-cost email marketing services too, as they also have all the necessary features required for a successful email campaign.
So for you to choose from, we’ve shortlisted 10+ cheap email marketing services of 2022 that are capable enough of generating higher returns on your investments.
| Comparison Between Cheap Email Marketing Services | |||||
| Services | Monthly Pricing | Number Of Emails | Free Trial | Rating | |
| Pabbly Email Marketing | $29 | Unlimited | Yes | 4.9/5.0 | |
| MailGet | $29 | Unlimited | Yes | 4.8/5.0 | |
| SendinBlue | $25 | 40,000 | Yes | 4.2/5.0 | |
| Moosend | $30 | Unlimited | Yes | 4.4/5.0 | |
| SendPulse | $6.40 | 500 | Yes | 4.2/5.0 | |
Side Note – Here, I am not going to discuss the free plans of email marketing services because, as I’ve told you in my earlier blog, they aren’t a good option. I’d mention them as they are a part of pricing plans but would never recommend them.
1. Pabbly Email Marketing
Pabbly Email Marketing is a great choice for business owners who want to send bulk emails to all their prospective users, in just one click. With this email marketing service, you can manage your contacts, email lists, and establish direct contact with your customers.
It removes the lengthy process of connecting SMTP that causes confusion. Since here in Pabbly Email Marketing, you don’t have to connect any SMTP which means you can simply verify your email and start sending emails to a mass audience quickly.

Thus, you don’t have to pay any extra amount for connecting other professional SMTP servers. Instead, you can subscribe to the plan based on your users and send emails to them within a price range that is comparatively cheaper than other email services.
It offers a user-friendly interface to easily manage contact list, schedule email along with drip campaign and to personalize your design email template.
Therefore; hit the below link to try all the above-stated features and remark your presence in this ever-growing technological world by making an impact in the minds of people through Pabbly Email Marketing.
I am using Pabbly Email Marketing for a year and tested all it’s working. It helps me increase my open rate by 23%.
So, if your focus is on open rate then I would recommend you to use Pabbly Email Marketing as it’s the cheapest & reliable service among all.
It charges only $49 per month for email marketing with which you can send unlimited emails to 15,000 subscribers.
Pricing:
Pabbly Email Marketing offers different pricing plans which are based on the number of subscribers such as-
Rookie – With this plan, you can send unlimited emails to 5,000 subscribers at the cost of $29 per month. Also, it provides you a facility to connect 3 SMTP servers, automatic follow-ups, and an email builder.
Pro – Buy now this plan and send emails to 15,000 subscribers at the price of $49 per month. Moreover, this plan includes all the basic features of the Rookie with MX Checker and live chat support.
Advance – As the name suggests, this plan includes all the advanced features of Pro at the cost of $99 with 50,000 subscribers. Also, you can upgrade your plan based on the number of subscribers on your mailing list from 50,000 to 1,000,000.
For instance, for sending unlimited emails to 100,000 subscribers, you need to pay $179 /month & so on.
2. MailGet
MailGet is by far the most reasonable and affordable email marketing service that comes up with many great features through which you can do powerful email marketing for your business.
It has many amazing features like – drag n drop email builder, list management, autoresponders, drip emails, schedule your email, signup forms, multiple SMTP integration, google analytics integration, and many more to offer at lowest possible prices.
MailGet is a fully hosted service so you need not worry about managing servers too.

It’s disruptive pricing plans give you the flexibility of paying for only the amount of emails you send along with a monthly subscription fee according to your contact list.
With MailGet you can effortlessly integrate multiple SMTP servers like Amazon SES, SendGrid, Mailjet, etc & send bulk emails at the same time.
The software is also cheapest among all services as it allows you to send Unlimited Emails to 7,500 subscribers at just $5 with a PROVEN DELIVERABILITY RATE.
MailGet connects with Amazon SES for sending emails, so high deliverability is quite assured. Amazon SES charges you $0.10 per thousand emails and MailGet charges you on the basis of a number of subscribers as per the table is shown below.
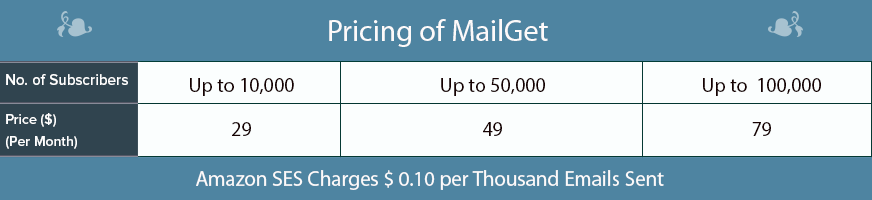
For instance, If you have 5,000 subscribers, and you send them unlimited, then you will have to pay only $29 ($49 for 15,000 subscribers) per month.
Not all services offer you so many features at such low prices. Moreover, its approach for email marketing is fresh and in accordance with today’s marketing scenario.
3. Moosend
Moosend is a less known, but the cheapest email marketing software that allows you to send email campaigns at affordable prices. It comes with both SMTP and API integration and has nearly all the required features.
Moosend has both Monthly as well as Pay as you go plans, where the former one charges according to the number of subscribers and the latter one according to the volume of emails. Tables below demonstrate the prices for both the plans separately.

It has plans up to a huge 800,000 subscribers where it costs $2320 per month.
As depicted in the table above, if you take up a plan based on a number of emails, for up to 100,000 emails you will have to pay $1 per 333 emails plus $0.003 per recipient. Similarly, you can assume for the higher plans also.
4. SendinBlue
SendinBlue is another low-cost email marketing service with multiple features like Signup Forms, RSS to Email, Email Analytics and QuickStats, Manage Subscribers List, Subscriber Segmenting, etc.
It charges you in two parts. The first one is the Advanced Pricing Plan, which you can pay monthly, quarterly or annually. Other than this there is an additional Subscriber pricing according to your list size. The prices of both are mentioned in the table below.
Like for example, you have 10,000 subscribers, take a monthly plan, and then your monthly bill would be $69 ($19 + $50).
If you have a subscriber base of more than 25,000 subscribers, you make contact them, and they will carve out a plan suitable for you.
5. SendPulse
SendPulse is yet another email marketing tool in the competition of cheap email marketing services that offers features like A/B Testing, RSS to Email, Analytics, drag and drop editor, etc.
It has different plans, pricing of which are based on a number of subscribers.
The free plan offers 15,000 emails for up to 500 contacts per month, whereas for further more paid plans, that starts from $6.4 to $25.6 only.
It also offers ‘Pay as you go’ plan when you can purchase email credits and use them according to your needs. Like purchasing 10,000 email credits will cost you $32 @ $0.0032 per email.
Pay as you go plan seems a bit costly but you can use your credits for any amount of time.
Further, it also has a VIP plan, in which you can target more than 1 million subscribers that provides custom pricing, custom email template, and personal management. You need to contact sales for this plan.
6. GetResponse
It is an online email marketing low-cost service with great features and great prices. Its list of features includes Autoresponders, Email Creator, A/B Split Testing, Landing Page Creator, List Management and much more.
The table below depicts the prices of GetResponse. It charges according to the number of subscribers in your contact list. Like for up to 25,000 subscribers, it costs $145.

It also has discounts for Nonprofits and annual buy. And again for High Volume, contact GetResponse team.
7. Constant Contact
Constant Contact is the cheapest email marketing solution with quite a good number of features and modest prices. It is good at analytics and support and serves you a handful of email templates and list building tools.
It displays plans up to 10,000 subscribers, above which you will have to contact the sales team of Constant Contact.

Constant Contact also provides Nonprofit and pre-pay discounts of 10-30 % and has a 100% money-back guarantee. But hey, terms and conditions apply.
8. Cakemail
Cakemail is an excellent choice for entrepreneurs and small business owners who want to expand their audience but don’t have a huge marketing budget. Cakemail offers all of the necessary tools to help you grow your audience and gain valuable insights along the way. One great detail about Cakemail is that you can use their free plan for as long as you want or until you’re ready for an upgrade.
Pricing:
Cakemail’s email marketing plans come in 3 sizes: Free, Growth, and Premium.
Free- $0 – No credit card needed, you can send 12K emails per month with the basic templates
Growth- Starting at $7, the send limit is 12x your contact limit plus 600 email templates
Premium- Starting at $199, starting at 100K contacts and the send limit is 15x your contact limit
All email marketing plans include email marketing campaigns, email designer, contact management, analytics, subscription forms, marketing API access, and unlimited users.
9. Mailjet
Mailjet is another low-cost email marketing software that helps businesses send successful newsletters in less time. It is a low priced email marketing solution that offers its users easy and simple email sending. Its features include inbuilt templates, easy contact list management, marketing automation, and support.
Pricing:
It has four pricing plans for the subscribers, you can choose any of them according to your need.
- Free: This is a free plan which allows you to send 200 emails per day.
- Basic: In basic plan, you will get all the core features of the service at the price of $8.69 only. You can send 30,000 emails in a month without any daily limit.
- Premium: With all the advanced features and 30,000 monthly emails, it costs you $18.86.
- Enterprise: It is a custom plan for high volume senders.
10. Zoho Campaigns
Campaigns is a Zoho vertical, integrated with Zoho CRM. It is intended for small and medium-sized businesses and is fully automated. It has pre-designed Email Templates, allows A/B Testing, integrates with Google Apps and does much more at reasonable prices.
Zoho Campaigns offers a monthly forever free plan for 2,000 subscribers and 12,000 emails. Along with it, paid plans based on both numbers of subscribers and volume of emails are also there. Prices up to 100,000 subscribers and the same number of emails are mentioned below.

Those who do not send emails frequently can take up ‘Pay as you go’ plan and purchase emails credits.

For a higher number of subscribers, you can use a customized High Volume plan. Email send limit of this plan is 10 x number of subscribers.
11. iContact
iContact is one of the affordable email marketing software which again is priced moderately and allows multiple features at the same time. It also comes with features like Autoresponder, A/B split testing, Email Builder, Third-Party Integration and Online Surveying.

It has a simple pricing plan that charges you according to the number of subscribers in your list. Like for a subscriber list of 10,000, your monthly bill would be $74. Also, it has a free trial and gives an annual discount of 15%.

For a contact list of more than 15,000, you can contact them, and they would provide you a customized plan. Moreover, it’s pricing for Salesforce is based on the number of emails sent.
16. Pepipost
Pepipost claims to convert emails into revenue. It is designed for all business sizes and is the cheapest email marketing provider that offers professional email campaign creation, advanced list segmentation & management tools, and targeted email autoresponders & workflows.
It has pricing plans based on a number of subscribers up to a list of 2000,000 contacts, but above 600,000 contacts the plans become a bit costlier as compared to other services.
Its High Volume pricing plans are customizable and can be availed by requesting a quote or by a call.
Conclusion
Among these cheap email marketing lists, many services also provide free trials for 15 to 60 days, but I’d suggest you take up a paid plan because paid plans allow you full access to all the features. Moreover, they don’t have any setup costs, and you can cancel these services anytime and move to a better one.
Selecting a good service is a complex task but is a single time one. Once you find the cheapest email marketing company that fits you the best, you can relax and sit happily seeing the conversions it produces for you. So choose well.
Give a try to Pabbly Email Marketing- one of the cheapest email marketing service offers various features for sending the emails and that too in a very lowest price i.e $29/ month up to 5,000 subscribers.
For more related stuff, you can also go through these blogs:-
- Best Email Marketing Services & Software
- Best Paid Email Service Providers
- Best Email Deliverability Software & Services
- Best Bulk Email Marketing Services & Softwares
- Best Email Marketing Service Providers
Do you have suggestions of your own? Share in the comments section below!
10 Best Drip Email Marketing Software | Send Emails To 300 Subscribers For FREE
Drip emailing is one of those must-have features in an email marketing service. However, not all email marketing service is going to offer you this. Hence, we have come up with 10 best drip email marketing software which won’t disappoint you at the time of your drip email campaigns.
Drip emailing is a smarter way to conduct successful email marketing campaigns. It’s a feature which makes you a better online marketer by automating mailing processes.
Before we begin,
A bit about Drip Emailing.
Drip emailing is a powerful feature which easily automates the process of email delivery. Once a contact is added to a drip campaign he automatically receives drip emails on regular basis.
Why do we need Drip Email Marketing?
There is a major difference between drip email campaigns and regular email campaigns.
The benefits of using Drip Campaign are that:-
- Automated email delivery, no manual intervention is required.
- Delivers welcome, greeting mails at times of sign-ups & at special occasions.
- Helps to conduct follow-ups and promotions on regular basis, etc.
The current market is flooded with hundreds of best drip campaign software which claim to be equipped with Drip email facility.
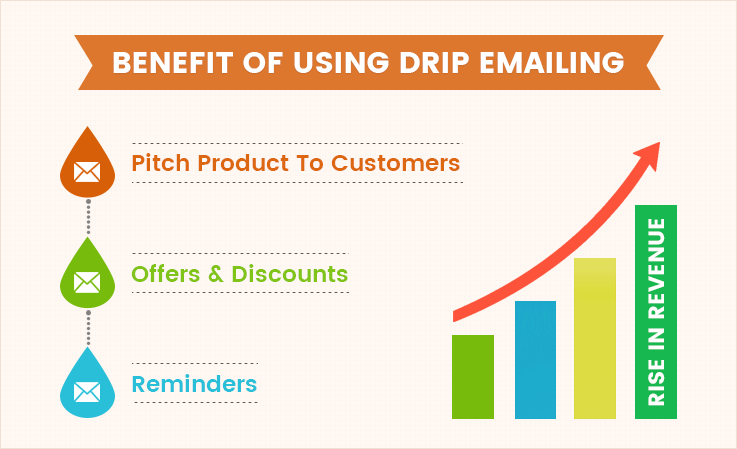
So, to help you choose the best in Best Drip Email Marketing Software & Tools blog we have defined some of the top class drip email services which will help you promote or advertise products online.
Comparison Of 5 Best Drip Email Marketing Software
| Services | Pricing for 50k Users | Free Demo | Auto Responders | Subscription Forms |
| Pabbly Email Marketing | $99/M | ✔ | ✔ | ✔ |
| MailGet | $49/M | ✔ | ✔ | ✔ |
| SendinBlue | $173/M | ✔ | ✖ | ✔ |
| Customer.io | $350/M | ✔ | ✖ | ✖ |
| Predictive Response | $825/M | ✔ | ✖ | ✔ |
1. Pabbly Email Marketing – Send Drip Emails Free & Easily
We all know that Pabbly Email Marketing is a leading email marketing brand in the market. This is because of its affordable price, quality services, and awesome features. Drip emailing is a facility which comes preloaded with this marketing software.
You can easily automate email delivery of different marketing campaigns using drip emailing features and reach out to customers at times when they are most available to interact.

Drip Emailing In Pabbly Email Marketing –
With Pabbly Email Marketing drip mailing service you just have to create series of emails, schedule campaign, add contacts and the emails will automatically get delivered at the specified date & time in customer’s inbox without any manual efforts.
You also get free access to 500+ email templates which accept all types of customizations. Still, if you want to design your own emails that process is also simplified by Drag-Drop email builder which is easy to use and helps you design eye-catchy emails.
Pricing –
- Pabbly Email Marketing offers a free trial for sending unlimited emails to 100 subscribers for 7 days.
- After that, you can choose from multiple paid plans which range from $29 for 5000 users to $1599 for 1 Million users a month.
There were times when we struggled getting 5% OPEN RATE on an email campaign.
But now we commonly score 43.69% and the reason behind this rise is Pabbly Email Marketing.
Trust me, the drip emails delivered through this email service provider lands directly in customer’s inbox, which increases the chances of conversions.
Try it once & you won’t regret
2. MailGet – Drip Emailing Service
MailGet is the cheapest email marketing software in this entire list and it has got various advanced features. In fact, it allows you to connect multiple SMTP services at a time.
You can create beautiful, eye-catchy emails without writing a single line of code using its drag and drop builder. It supports most of the popular SMTP services and requires no complicated hosting or set-up.
Drip Campaigns In MailGet –
Drip emailing is a complicated process to practice, but not with MailGet email marketing software. This software is equipped with the variety of tools which simplifies the process of email creation, designing, scheduling and more.
Drip email automation feature helps you send a series of emails automatically to customers at scheduled time intervals, the major benefit is that it removes any type of manual intervention in email delivery.
Pricing –
- Send unlimited drip emails to 5,000 users in a month at the cost of $29 only.
- The next plan will cost you $49 on monthly basis for unlimited email delivery to 15,000 subscribers.
- Other than the above price plans MailGet has designed 11 more plans which can satisfy the needs of any size of business.
If you already have an SMTP server, in that case, my personal recommendation is MailGet as it supports multiple SMTP integrations simultaneously and is extremely easy to set-up.
Plus the price of this online marketing service starts as low as $29 a month for the delivery of unlimited emails to 5000 users.
Any SMTP + MailGet = Great Drip Emailing Results.
Check out some latest blogs for more info –
3. SendinBlue – Mail Marketing Software
SendinBlue email marketing software doesn’t require any type of contracts or downloads. It is an easy-to-use emailing service which is loaded with features like mail editor, responsive design, email tracking, reporting and it also provides a free trial to test the service.
Transactional emails deliver via SendinBlue makes it easy for your business to inform, engage and convert new as well as old customers.

Drip Campaigns in SendinBlue –
SendinBlue helps you create and send emails that are capable of capturing leads, attract new customers, send emails in drips, track sent emails, monitor and analyze reports, and more. Drip emailing feature is an advanced facility which automatically triggers emails at a defined time or based on user behavior.
Pricing –
- Free version by SendinBlue credits your account with 300 emails per day which you can deliver to unlimited contacts in a month for no charge.
- If you want to target higher volume of clients. Then, SendinBlue has three paid versions which are Lite at $25/m for 40k emails. Then, there’s Essential at $39 for 60k emails & Premium has two subsets of $66 for 120k emails and $173 for 350k emails.
- Enterprise package is another version which is designed for organizations who want to deliver emails in large numbers like millions or billions. For more details on pricing and other version info, contact sales team.
Get More Drip Emailing Details
4. Customer.io – Email Marketing Platform
Email Marketing Platform by Customer.io provides premium mailing services which will fulfill all your marketing needs. You can simply target customers around the globe and deliver them emails at times when they are ready to read via drip email facility.
Additional features like timezone sending, segmentation, pre-designed templates, etc will help you save time, money and precious human efforts on email campaigns.
Drip Campaigns & Other Features –
Drip email campaigns conducted using Customer.io allows you to automate email deliver on the basis of user actions. These emails are perfectly timed and triggered at relevant conditions based on advanced rules-engine.
You can also segment users, manage user profiles, send easily customizable & personalized emails, etc.
Pricing –
- The first version is Small Business by Customer.io email marketing service in which you can send 100,000 to 50,000 users on monthly basis at a price of $350.
- Startup, Enterprise, and Broadcast are some other versions which offer a great deal of email marketing services.
Get More Drip Emailing Details
5. Predictive Response – Top Class Email Automation Service
Predictive Response is considered as a Top Email Automation service which improves your email marketing ROI through different automation techniques.
With this Email Automation Service, you don’t have to start from the scratch as it has got 500+ predesigned templates and also offers 1,000 free professional images, plus the templates are fully customizable.

Drip Campaigns & Other Features –
Using different features of Predictive Response you can conduct effective email marketing campaigns in just a few steps. You can schedule bulk email campaigns with drip campaign feature.
Deliver emails to customers which are perfectly designed and look attractive on different device screens.
Pricing –
- Predictive Response offers three different packages to fulfill your email marketing needs which are Standard, Professional, and Enterprise. These packages vary in price and services.
- For Standard package, if you want to send 5,000 emails or want to target 2,500 contacts in a month than, $300 a month will be charged.
Get More Drip Emailing Details
6. MailChimp – Marketing Automation Platform
We all are aware of the fact that MailChimp is the name which leads the way when it comes to effective & efficient email marketing.
It is equipped with drip emailing, autoresponders, A/B testing, email personalization, analytics, tracking and other helpful tools.
Transnational, as well as promotional emails, can be delivered with ease through MailChimp marketing automation platform.
Drip Campaigns & Other Features –
With MailChimp, you can simply integrate hundreds of third-party apps to store and fetch important details. MailChimp Mobile app is a facility which helps you create and send emails using a mobile phone or even tablets. You can also track the performance of different email campaigns.
Drip email feature can be used to deliver emails at different time intervals and also on the basis of user behavior.
Pricing –
- Conduct email marketing campaigns for free with MailChimp. You can deliver 12,000 emails to 2,000 subscribers on monthly basis
- Growing Business plan can send limitless emails to 2,000 subscribers in a month for $25 plus the plan cost which is $10. Total price = $25 + $10 = $35
- Pro Marketer is an advanced plan which comes loaded with latest features and allows sending unlimited emails to 2,000 users at the cost of $25 plus the monthly plan cost which is $199. Total price = $25 + $199 = $224.
Get More Drip Emailing Details
7. Mad Mimi – Email Service Provider
Mad Mimi is a web-based email marketing solution which has numerous tools for email creation, designing, and effective inbox delivery. This is an Email Service Provider which helps you do bulk email marketing, get higher deliverability, manage audience and more.
Drip campaigns feature automatically sends emails based on the defined time intervals. You can send welcome, follow-up, greeting and other promotional emails automatically.
Drip Campaigns & Other Features –
Drip email campaigns can easily be conducted with MadMimi as it just requires a few steps to start a drip email campaign. Create series of emails for delivery, give an appropriate name to drip campaign, select the list of contacts for delivery, specify the time intervals and leave the rest to MadMimi.
Pricing –
- Basic version is for Individuals who require less sending. With this, you can send unlimited emails to 500 contacts at the cost of $10 a month.
- Pro version will charge you $42 for a month and allow you to send unlimited emails to 10,000 email contacts.
- The Silver version is for bulk email marketers. It will cost you $199 and give access to send limitless emails to 50,000 users every month.
Get More Drip Emailing Details
8. SendLoop – Responsive Drip Email Campaigns
Sendloop can support the email marketing needs of different size of organizations. Email delivered via Sendloop are fully responsive and look great on different devices. This service is easy-to-use, you can create, send, manage and track different email campaigns simultaneously with this service.
Features like single or double opt-in confirmation, easy integration using webhooks, Google Analytics integration, email preview, social share will also be a help.
Drip Campaigns & Other Features –
Drip emailing feature helps you trigger emails automatically on user actions, like site viewing, sign-ups, welcome emails and auto-deliver a sequence of emails. This process will encourage them to buy or subscribe to your service.
You can add users through Facebook app, sign-up forms, code snippets, and use multiple plugins as well.
Pricing –
- Forever free version permits you to send unlimited emails to 2,000 users for free.
- $14 is charged for unlimited emails delivery to 5,000 users in a month with other features.
- Send unlimited emails to 10,000 users on monthly basis at a cost of $28.
Get More Drip Emailing Details
9. Vision6 – Email Marketing Tool
With Vision6 email marketing tool, you can do more than just online promotions. This is a great emailing and SMS messaging tool which is best for online marketers and agencies.
You can design, send, analyze and track various activities of email marketing campaigns and target customers around the globe.

Drip Campaigns & Other Features –
You get free access to over 70 professionally designed emails templates which are responsive. In addition to this, you also get drag & drop email editor which is extremely user-friendly.
Delivering emails to the right customers at right time is also possible, as you can schedule series of emails which automatically get triggered at a specified point of time. With this feature, you can conduct event campaigns, customer feedbacks and more.
Pricing –
Vision6 has designed three different packages for email marketing which are
- Starter Package:- Send 2,500 emails to 500 contacts in a month at a cost of $9.
- Business Package:- Deliver limitless emails to 500 users for $29 on monthly basis, comes with additional features.
- Pro Marketer Package:- $99 is the cost of this plan in which unlimited email delivery to 500 users can be done using advanced features.
As the number of emails or subscribers changes the cost may also vary.
Get More Drip Emailing Details
10. ZOHO Campaigns Mailing Solution
ZOHO Campaigns is a fully automated mailing solution, which keeps track of different campaigns, displays clicks, opens, unsubscribes, bounces, and shares of a particular campaign.
Features like A/B testing, social statistics, personalized greetings, Zoho CRM integration, etc are also added to this solution.
Drip Campaigns & Other Features –
Drip feature is slightly different in Zoho Campaign, still, it acts as a helping hand in saving time, efforts and money. As you don’t have to spend long hours for sending follow-up messages, you can deliver relevant content at the right time to the right customers.
Subscriber management is extremely easy, you can perform A/B testing, and send emails in bulk.
Pricing –
- Zoho campaign has a free version with which you can send 12,000 emails every month to 2,000 customers.
- Next is the Pay-As-You-Use version which charges $6 for 250 mails, $12 for 500 mails, $22 for 1,000 mails and so on.
- The monthly subscription version is different, in it, you can send unlimited emails to 500 users at a cost of $5, for $10 unlimited emails to 1,000 users and so on.
Get More Drip Emailing Details
Final Closure
We are at the end of this article of best drip email marketing software and I think you must have shortlisted the email marketing services which are best for your business.
This blog elaborates each & every listed service in detail and provides you with information about their pricing, features, and most importantly the drip email marketing facility. I can guarantee you that drip emailing will definitely raise revenue of your business.
All the services discussed here offer top class drip emailing facilities.
Still, if you are interested in knowing more about email marketing or marketing automation below are few blogs which you can have a look at:-
- Best Email Marketing Services
- Top Email Marketing Software | With Best Open Rates
- Cheap Email Marketing Services
- Autoresponder Email Marketing
- Best Email Marketing Companies
- AWeber Alternatives
Leave your precious comments below, we will be happy to hear from you.